-
Contents
-
Table of Contents
-
Bookmarks
Quick Links
ZXHN H108N
Home Gateway
Maintenance Management Manual
Version: V2.5
ZTE CORPORATION
NO. 55, Hi-tech Road South, ShenZhen, P.R.China
Postcode: 518057
Tel: +86-755-26770800
Fax: +86-755-26770801
URL: http://ensupport.zte.com.cn
E-mail: 800@zte.com.cn
Related Manuals for Zte ZXHN H108N
Summary of Contents for Zte ZXHN H108N
-
Page 1
ZXHN H108N Home Gateway Maintenance Management Manual Version: V2.5 ZTE CORPORATION NO. 55, Hi-tech Road South, ShenZhen, P.R.China Postcode: 518057 Tel: +86-755-26770800 Fax: +86-755-26770801 URL: http://ensupport.zte.com.cn E-mail: 800@zte.com.cn… -
Page 2: Legal Information
ZTE CORPORATION or its licensors may have current or pending intellectual property rights or applications covering the subject matter of this document. Except as expressly provided in any written license between ZTE CORPORATION and its licensee, the user of this document shall not acquire any license to the subject matter herein.
-
Page 3: About This Manual
About This Manual Purpose This manual describes how to configure and maintain the ZXHN H108N device. Intended Audience This document is intended for: Network planning engineers Installation debugging engineers On-site maintenance engineers System maintenance engineers …
-
Page 4
Chapter Summary 8, Application Describes the configuration of DDNS, DMZ, UPnP, port forwarding, DNS, QoS, SNTP, IGMP, MLD, USB storage, FTP application, port trigger, and application list. 9, Administration Describes the configuration of TR-069, user management, login timeout, system management, log management, mobile network management, system diagnosis, WAN type, and IPv6 switch. -
Page 5
ZTE CORPORATION in written form. This declaration is issued based on our current level of knowledge. Since conditions of use are outside our control, ZTE CORPORATION makes no warranties, express or implied, and assumes no liability in connection with the use of this information. -
Page 6: Safety Precautions
Safety Precautions Before using the device, read the following safety precautions. ZTE bears no liability to the consequences incurred by violation of the safety instructions. Read the user manuals before using the device. Pay attention to all the cautions in the user manuals and on the product.
-
Page 7: Product Introduction
The ZXHN H108N provides the broadband Internet service and enterprise network access service through the high-speed ADSL or 3G wireless access mode. The ZXHN H108N provides four 10/100Base-T Ethernet user interfaces and the wireless access function that complies with the IEEE 802.11b/g/n standard.
-
Page 8
Table 1 Technical Specifications Item Specification 105 mm (height) ×108 mm (width) × 52 mm Dimensions (depth) Rated current Home Gateway with USB port: 1 A Home Gateway without USB port: 500 mA Rated voltage 12 V 0 ℃ ~ 40 ℃ (32 °F~104 °F) Working temperature Working humidity 20% ~ 90%… -
Page 9
The settings may change with the network requirements. However, perform the steps above at the first time. 2. Check the TCP/IP settings. You can use the Ping command to check the connection between the computer and ZXHN H108N device. If pinging the device fails, verify the following: The Ethernet cable between the ZXHN H108N device and the computer is not correctly connected. -
Page 10
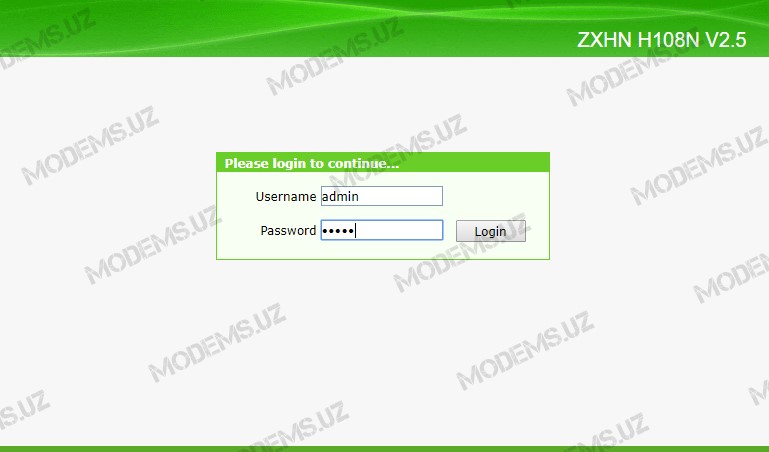
The TCP/IP settings on the computer are not correctly configured. 3.2 Logging In to the ZXHN H108N Device This procedure introduces how to log in to the ZXHN H108N device by using the web browser. Prerequisite Before logging in to the ZXHN H108N device, make sure that: … -
Page 11
Figure 1 Login 3. In the Username and Password text boxes, type the user name and password (by default, both admin ). Click Login. The default home window is displayed, see Figure 2. On the left navigation tree, click to perform the corresponding configurations. Figure 2 Home Page Note: The Web configuration pages may vary with the software versions. -
Page 12
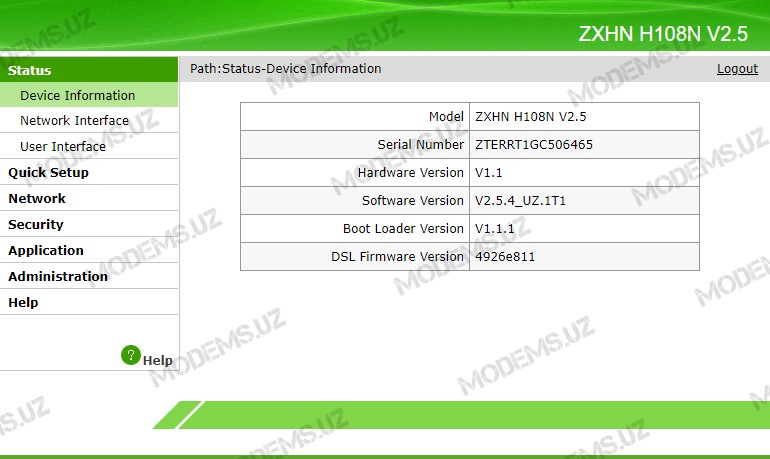
Interface Information, including WAN Connection, 3G Connection, 4in6 Tunnel Connection, 6in4 Tunnel Connection, Mobile Network and ADSL. On the main page of the ZXHN H108N, select [Status→User Interface] to view the User Interface Information, including WLAN, Etherent, and USB. -
Page 13: Quick Setup
Quick Setup Steps 1. On the navigation tree, click Quick Setup to open the Quick Setup page as show in Figure Figure 3 Quick Setup Table 3 describes the parameters for quick setup. Table 3 The parameters for quick setup Parameter Description New Connection Name…
-
Page 14
Parameter Description Type There are two connection type: Route Bridge Connection Link Type There are two link types: Username/Password PPP username/password provided by the ISP. IP Version The IP version includes: IPv4 IPv6 IPv4/v6 IP Type There are three IP types: Static DHCP IPoA… -
Page 15
Parameter Description GUA From The GUA From includes: DHCPv6 Static SLAAC GateWay From The GateWay From includes: SLAAC Static DNSv6 From The DNSv6 From includes: DHCPv6 Static SLAAC Prefix Delegation Enable the Prefix Delegation. Prefix Delegation for Allocation Enable the Prefix Delegation for Allocation Address. Address 2. -
Page 16
To setup a static connection, perform the following steps. IPv4 static connection is used as an example. a) Select Route from the Type drop-down list. b) Select IP from the Link Type drop-down list. c) Select Static from the IP Type drop-down list. d) Specify the IP address, subnet mask, gateway, and DNS server in the IPv4 area. -
Page 17
Parameter Description WPA/WPA2-PSK: It is a hybrid authentication mode. Passphrase WPA Range: 8 ~ 64 characters Encryption Algorithm WPA There are three options: TKIP:Temporal Key Integrity Protocol AES: Advanced Encryption Standard TKIP+AES: Adaptive encryption algorithm WEP Encryption Enable/Disable WEP Encryption. WEP Encryption Level The value can be 64bit or 128bit. -
Page 18
PPPoE PPPoA Static DHCP IPoA Bridge The ZXHN H108N supports eight WAN connections. Steps 1. On the navigation tree, click [Network→ WAN→ WAN Connection]. The WAN connection configuration page is displayed, see Figure… -
Page 19
Figure 6 WAN Connection Table 6 describes the parameters for creating a new WAN connection. Table 6 Parameters for Creating a New WAN Connection Parameter Description Connection Name The default is Create WAN Connection. Before creating a new connection, make sure the Create WAN Connection option is selected. -
Page 20
Parameter Description VPI/VCI Channel number of the cell Each ADSL port has eight PVCs, which can be configured with different VPIs and VCIs. This should be consistent with the port configuration on the NE. New VPI/VCI Create a VPI/VCI. Encapsulation Type Encapsulation type of the packets By default, it is LLC. -
Page 21
Parameter Description IP Version The IP version includes: IPv4 IPv6 IPv4/v6 PPP TransType PPPoE or PPPoA Enable When multiple computers in a share one address to access the Internet, NAT is used to transfer the private network address to the public network address of the WAN port. IP Address The IP address provided by the ISP Subnet Mask… -
Page 22
To setup a bridge WAN connection, perform the following steps. a) Select Bridge Connection from the Type drop-down list b) Specify other parameters as required, and then click Next. To setup a PPPoE connection, perform the following steps. a) Select Route from the Type drop-down list. b) Select PPP from the Link Type drop-down list. -
Page 23
6.1.2 Configuring 3G WAN Connection The ZXHN H108N device supports 3G WAN connection by using the 3G USB network card. This procedure introduces how to configure the 3G WAN connection Context The ZXHN H108N device supports 3G WAN connection by using the 3G USB network card. -
Page 24
3. After the configuration, click Create. 6.1.3 Configuring 4in6 Tunnel Connection ZXHN H108N supports supports Dual–stack lite technology. DS lite technology allows the device to encapsulate the IPv4 packets inside IPv6 packets and send the IPv6 packets to the ISP’s Carrier Grade NAT through its IPv6 WAN connection. -
Page 25
This procedure introduces how to configure the 4in6 tunnel connection of DS lite type. Prerequisite The IPv6 WAN connection has been created. Steps 1. On the navigation tree, [Network→ WAN→4in6 Tunnel Connection]. The 4in6 tunnel connection page is displayed, see Figure Figure 8 4in6 Tunnel Connection Table 8… -
Page 26
Prerequisite The IPv4 WAN connection has been created. Steps 1. On the navigation tree, click [Network→ WAN→6in4 Tunnel Connection]. The 6in4 tunnel connection is displayed, see Figure Figure 9 6in4 Tunnel Connection Table 9 lists the parameters for 6in4 tunnel connection. Table 9 6in4 Tunnel Connection Parameter Parameter Description… -
Page 27: Configuring Port Binding
Parameter Description 6rd Prefix Specify the 6rd Prefix. IPv4 Masklen Specify the IPv4 Masklen. BR Address Specify the BR Address. 2. Specify the parameters according to the request, and click Create. 6.1.5 Configuring Port Binding This procedure introduces how to configure port binding. The port binding function is used to bind the LAN-side port with the connection.
-
Page 28
Figure 11 ADSL Modulation 2. Select the ADSL modulation types and click Submit. 6.2 WLAN This section includes the following: Configuring Basic WLAN Parameters Configuring SSID Settings Configuring Security Configuring Access Control List Displaying Associated Devices … -
Page 29
Mixed(802.11g+802.11n) Mixed(802.11b+802.11g) Mixed(802.11b+802.11g+802.11n) Steps 1. On the navigation tree, click [Network→ WLAN→ Basic]. The basic WLAN parameter configuration page is displayed, see Figure Figure 12 Basic WLAN Parameter Configuration Table 10 lists the basic WLAN parameters. Table 10 Basic WLAN Parameter Parameter Description Wireless RF Mode… -
Page 30
Mode drop-down list, and specify the other parameters according the request. 3. After the configuration, click Submit. 6.2.2 Configuring SSID Settings The ZXHN H108N device supports four SSIDs and each SSID supports up to 32 subscribers. This procedure introduces how to configure the SSID settings. Steps 1. -
Page 31: Configuring Security
2. Select an SSID from the Choose SSID drop-down list, and specify other parameters. 3. Click Submit. 6.2.3 Configuring Security The ZXHN H108N device provides five WLAN authentication type, including open system, shared key, WPA PSK, WPA2-PSK, and WPA/WPA2-PSK. This procedure introduces how to configure WLAN security settings.
-
Page 32
Steps 1. On the navigation tree, click [Network→ WLAN→Security]. The security page is displayed, see Figure Figure 14 SSID Security Configuration Table 12 lists the SSID security parameters. Table 12 SSID Security Parameters Parameter Description Choose SSID Select the SSID to be configured. Authentication Type Select the authentication type. -
Page 33
6.2.4 Configuring Access Control List The ZXHN H108N device supports ACL function, which is used to permit or block the packets from the specified MAC address. This procedure introduces how to configure the ACL. By default, the function for the ZXHN H108N is enabled. -
Page 34
6.2.5 Displaying Associated Devices This procedure introduces how to display the wireless devices that are connected to the ZXHN H108N device. Steps 1. On the navigation tree, click [Network→ WLAN→ Associated Devices]. The associated device page is displayed. 2. Select an SSID (for example, SSID1) from the Choose SSID drop-down list. The system displays… -
Page 35
Figure 17 WiFi Restrictions Table 14 lists the parameters for WiFi restriction. Table 14 Parameter Description for WiFi Restriction Parameter Description Off Time Specify the time to disable the WiFi function. On Time Specify the time to enable the WiFi function. 2. -
Page 36: Configuring Dhcp Server
Configuring RA Service 6.3.1 Configuring DHCP Server ZXHN H108N supports the dynamic IP address allocation to the user-side computers or the wireless devices connected to the ZXHN H108N device. This procedure describes how to configure the DHCP server. Steps 1.
-
Page 37
Table 15 DHCP Server Parameters Parameter Description LAN IP Address IP address of the ZXHN H108N device The device IP address should be in the same network segment as the DHCP address pool. Subnet Mask Subnet mask of the device… -
Page 38
This procedure describes how to configure the IPv6 DHCP server to dynamically allocate IPv6 addresses to the user-side computers or wireless devices that are connected to the ZXHN H108N device. Steps 1. On the navigation tree, click [Network→ LAN→ DHCP Server(IPv6)]. The IPv6 DHCP server… -
Page 39
Figure Figure 21 DHCP Binding 3. Click Add. The DHCP binding table is configured. When the device whose MAC address is in the DHCP binding table is connected to ZXHN H108N, it will be automatically assigned the corresponding IP address. -
Page 40
6.3.4 Configuring DHCP Port Service This procedure introduces how to disable the DHCP service for the specified interface or SSID when the global DHCP function is enabled. Prerequisite Before configuring DHCP port service, make sure that the global DHCP service is enabled. Steps 1. -
Page 41
Figure 23 Static Prefix Table 17 describers the parameters for IPv6 static prefix. Table 17 IPv6 Static Prefix Parameters Parameter Description Prefix IPv6 address prefix Prefer LifeTime Preferred life time of the prefix The device on the side refreshes the IPv6 address in the preferred life time. -
Page 42
Steps 1. On the navigation tree, choose [Network→ LAN→Prefix Delegation]. The IPv6 prefix delegation configuration page is displayed, see Figure Figure 24 IPv6 Prefix Delegation Table 18 describers the parameters for IPv6 prefix delegation. Table 18 IPv6 Prefix Delegation Parameters Parameter Description Connection… -
Page 43
Figure 25 IPv6 Port Service 2. Select the interface or SSID whose DHCP function you want to disable. 3. Click Submit. The IPv6 DHCP function is disabled on the specified interface or SSID. The devices that are connected to the specified LAN interface or use the SSID will not be assigned the IPv6 addresses. -
Page 44
Figure 26 RA Service Table 19 describes the parameters for the RA service. Table 19 Parameters for the RA Service Parameter Description Minimum Wait Time Minimum delegation interval Maximum Wait Time Maximum delegation interval Managed flag Select this check box to enable the connected devices to obtain the IPv6 address through DHCPV6. -
Page 45
6.4.1 Configuring IPv4 Default Gateway This procedure introduces how to configure one WAN connection as the IPv4 default gateway. All the user-side devices will access the Internet by using this WAN connection by default. Steps 1. On the navigation tree, click [Network→Routing(IPv4)→Default Gateway]. The default gateway page is displayed, see Figure… -
Page 46
Context Policy routing is a routing rule. When it is configured, the packets are forwarded based on the routing policy. The ZXHN H108N supports packet forwarding based on the DSCP, source or destination address, protocol, source port number, or source address. -
Page 47
Figure 29 Policy Routing Table 21 lists the parameters for the policy routing configuration. Table 21 Parameters for Policy Routing Configuration Parameter Description Destination Interface Determined by the carrier DSCP DSCP value Source IP Source IP address Source Mask Source mask of the network segment Destination IP Destination IP address Destination Mask… -
Page 48
2. Select an interface from the Destination Interface drop-down list, and specify the routing policy as required. 3. Click Add. The policy routing rule is configured. The packets will be forwarded based on the policy routing. 6.4.4 Displaying IPv4 Routing Table This procedure introduces how to display the routing table. -
Page 49
Steps 1. On the navigation tree, click [Network→Routing(IPv6)→Default Gateway]. The default gateway page is displayed, see Figure Figure 31 Default Gateway 2. Select one WAN connection from the WAN Connection drop-down list as the default gateway. 3. Click Submit. 6.5.2 Configuring IPv6 Static Routing This procedure introduces how to configure IPv6 static routing. -
Page 50
Context Policy routing is a routing rule. When it is configured, the packets are forwarded based on the routing policy. The ZXHN H108N supports packet forwarding based on the DSCP, source or destination address, protocol, source port number, or source address. -
Page 51
Figure 33 IPv6 Policy Routing Table 23 lists the parameters for IPv6 policy routing configuration. Table 23 Parameters for Policy Routing Configuration Parameter Description Destination Interface Determined by the carrier Source IP Source IPv6 IP address Destination IP Destination IPv6 IP address Protocol The protocol includes the following: Source Port… -
Page 52
Prerequisite The IPv6 routing tables have been created. Steps 1. On the navigation tree, click [Network→ Routing(IPv6)→ Routing Table] to display the IPv6 routing table, which displays the IPv6 routing information, see Figure Figure 34 IPv6 Routing Table… -
Page 53: Configuring Firewall
Internet to send ping packets to the WAN interface of the ZXHN H108N. Middle: It allows the legal WAN to access the device and a device from the Internet to send ping packets to the WAN interface of the ZXHN H108N.
-
Page 54
7.2 Configuring IP Filter The ZXHN H108N device supports filtering the packets based on the IP range, port range, and protocol. This procedure introduces how to permit or deny the specified packets to go through the device. -
Page 55: Configuring Mac Filter
Table 25 IP Filter Parameters Parameter Description Enable Enable the IP filter function. Protocal Select the protocol that needs to filter packets. By default, it is TCP. Name Name of the IP filter rules Start/End Source IP Address Range of source IP address Start/End Destination IP Address Range of destination IP address Start/End Source Port…
-
Page 56
If you select Permit from the Mode drop-down list, please add the MAC address of your PC first, otherwise you cannot access the Web configuration page by using the PC that is connected to the ZXHN H108N device. 2. Configure the MAC filter parameters, and then click Add. -
Page 57
Steps 1. On the navigation tree, click [Security→ URL Filter]. The filter configuration page is displayed, see Figure 38. On this page, you can specify the URL rules to permit or deny the users to access the specified URL addresses. Figure 38 URL Filter Table 27 lists the parameters for… -
Page 58
Steps 1. On the navigation tree, click [Security→ Service Control]. The service control configuration page is displayed, see Figure 39. On this page, you can permit or discard the specified inbound access services by configuring the source IP address range and service types Figure 39 Service Control Table 28 lists the service control parameters. -
Page 59
ZXHN H108N device provides. 7.6 Configuring ALG The ZXHN H108N device supports the ALG function, which allows the system to convert the private addresses to the public addresses in the packets for the security purpose. This procedure introduces how to configure the ALG settings. -
Page 60
Figure 41 ALG 2. Select the ALG services by selecting the corresponding options, and then click Submit. -
Page 61
Application 8.1 Configuring DDNS ZXHN H108N supports the DDNS function. This procedure introduces how to configure DDNS to enable the host that has a dynamic IP address to provide the domain name service. Prerequisite Before configuring DDNS, make sure that: … -
Page 62
Table 29 DDNS Parameters Parameter Description Enable Select to enable the DDNS function. Service Type DDNS service types Server Server address If the GNUDIP HTTP is used, the server address is a URL. By default, it is http://www.dyndns.com. Username DDNS server user name Password DDNS server password Connection… -
Page 63: Configuring Upnp
Table 30 DMZ Host Parameters Parameter Description Enable Enable the DMZ host function. Connection The WAN connection that the computer at the LAN side uses to provide services to the devices at the Internet side. Enable MAC Mapping Enable the MAC mapping function. Enabled the MAC Mapping to configure DMZ Host MAC Address.
-
Page 64: Displaying Upnp Port Mapping
Table 31 UPnP Parameters Parameter Description Enable Select this option to enable the UPnP function. Connection WAN connection Advertisement Period (in Time period that the UPnP device sends an announcement minutes) packet If the UPnP device does not send any announcement packets during this period, it indicates that the device is invalid.
-
Page 65: Configuring Port Forwarding
8.5 Configuring Port Forwarding This procedure introduces how to configure port forwarding so that a computer from the external network can access the LAN-side server through the CPE WAN connection. Context If you have local servers for different services and you want to make them publicly accessible, you need to specify the port forwarding policy.
-
Page 66
Table 32 Port Forwarding Parameters Parameter Description Enable Enable port forwarding function. Name Name of the port forwarding rules Protocal Protocol name, including TCP, UDP, as well as TCP AND UDP protocols. The default protocol is TCP. WAN Host Start/End IP Address Start/End IP address of the WAN-side computer WAN Connection WAN connection that is used to access the virtual host… -
Page 67: Configuring Hosts
Figure 47 Domain Name 2. Type the domain name in the Domain Name text box. 3. Click Submit. 8.6.2 Configuring Hosts This procedure introduces how to configure the mapping relationship between the user-side host name and IP address. Steps 1. On the navigation tree, click [Application→ DNS Service→ Hosts]. The host configuration page is displayed, see Figure Figure 48 Hosts…
-
Page 68: Configuring Dns
3. Click Add. 8.6.3 Configuring DNS This procedure introduces how to configure the DNS server IP address. Steps 1. On the navigation tree, click [Application→ DNS Service→ DNS]. The DNS configuration page is displayed, see Figure Figure 49 DNS 2. Type the IP address of the server assigned by the ISP.
-
Page 69
Steps 1. On the navigation tree, click [Application→ QoS→ Basic]. The basic QoS parameter configuration page is displayed, see Figure Figure 50 Basic QoS Parameters 2. Select Enable QoS to enable the QoS function, and then specify other parameters. 3. Click Submit. 8.7.2 Configuring QoS Classification This procedure introduces how to configure the QoS classification rules, including layer-2 protocol, IP address range, and MAC address range. -
Page 70
Figure 51 QoS Classification Table 33 lists the QoS classification parameters. Table 33 QoS Classification Parameters Parameter Description Enable Enable the QoS classification DevIn Data flow ingress DevOut Data flow egress L2Protocol The layer 2 protocol includes IPv4, IPv6, ARP, and PPPoE. L3Protocol The layer 3 protocol includes TCP, UDP, and ICMP. -
Page 71
Parameter Description 802.1p Range: 0~7 Destination Port MIN/MAX Destination port range DSCP Range: 0~63 Source IP address MIN/MAX Source IP address range Destination IP address Destination IP address range MIN/MAX Range: 0~255 IP Precedence Range: 0~7 Source IPv6 Address MIN/MAX Source IPv6 address range Destination IPv6 Address Destination IPv6 address range… -
Page 72
Figure 52 Queue Management Table 34 lists the QoS Management parameters. Table 34 Queue Management Parameters Parameter Description Interface This option includes WAN or LAN. Enable Enable the queue management function. Priority Queue priority. Range: 1 ~ 8 Algorithm Queue algorithm. DWRR Weight The weight for the DWRR algorithm. -
Page 73
8.7.4 Configuring Committed Access Rate This procedure introduces how to configure the committed access rate for the specified LAN interface or SSID. Prerequisite Before configuring committed access rate, make sure that: The basic configuration is completed. The global committed access rate function is enabled. Steps 1. -
Page 74
Steps 1. On the navigation tree, click [Application→ SNTP]. The SNTP configuration page is displayed, Figure Figure 54 SNTP Table 35 lists the SNTP parameters. Table 35 SNTP Parameters Parameter Description Time Zone Time zone WAN Connection Select the WAN connection Primary Server Address address/realm name of the primary NTP server… -
Page 75
Configuring IGMP Basic Parameters 8.9.1 Configuring WAN Connection This procedure introduces how to configure the WAN connection for IGMP function. Prerequisite Before configuring WAN connection, make sure that the connection configuration is complete. Steps 1. On the navigation tree, click [Application→ IGMP→ WAN Connection]. The WAN connection configuration page is displayed, see Figure Figure 55 IGMP WAN Connection… -
Page 76
Figure 56 IGMP Basic Configuration 2. Enable the IGMP functions, and then click Submit. 8.10 MLD This section includes the following: Configuring MLD Snooping Configuring MLD Proxy 8.10.1 Configuring MLD Snooping This procedure introduces how to enable the MLD snooping function. Prerequisite Before configuring MLD snooping, make sure that: … -
Page 77
Figure 57 MLD Snooping 2. Enable the MLD snooping functions, and then click Submit. 8.10.2 Configuring MLD Proxy This procedure introduces how to enable the MLD proxy function for the specified IPv6 WAN connection. Prerequisite Before configuring MLD proxy, make sure that: … -
Page 78
This procedure introduces how to check the USB storage device information. Prerequisite Before displaying USB storage information, make sure that the USB storage device is connected to the ZXHN H108N device. Context The FTP protocol is used to manage the USB storage device. -
Page 79
DMP. If the DMS function in enabled on the ZXHN H108N device, any client that supports UPnP function can use the specified DMP (for example, windows media player) to watch the media files or photos stored in the storage device. -
Page 80
Steps 1. On the navigation tree, click [Application→ DMS ]. The DMS configuration page is displayed, Figure Figure 60 DMS 2. Enable the DMS function, and specify the place to store the media files. Note: By default, the media source is /mnt, that is the root directory of the USB device. You can change the root directory to other directory of the USB storage device. -
Page 81
2. Select the Enable FTP Server check box, and specify other parameters, and then click Submit. The FTP application is configured. You can upload or download the files to the specified FTP address of the ZXHN H108N device. 8.14 Configuring Port Trigger This procedure introduces how to configure the port triggering function. -
Page 82
Figure 62 Port Trigger Table 36 lists the port trigger parameters. Table 36 Port Trigger Parameter Parameter Description Enable Port Triggering Enable the port triggering function. Application Name of the port triggering item Triggering IP Address IP address of the computer in the LAN side The service type of the application including TCP, UDP, and Service Type TCP AND UDP… -
Page 83
Parameter Description WAN Start/End Port Specify the port range of the device protocol that the triggering port maps, that is, the layer-4 port number of the packets. Once the device accesses the triggering port, the service between the start port and end port will be enabled. The Start Port and End Port must be specified and meet the following conditions. -
Page 84
Figure 63 Port Forwarding (Application List) Table 37 lists the port trigger parameters. Table 37 Port Forwarding (Application List) Parameter Parameter Description WAN Connection WAN connection that is used to access the virtual host LAN Host IP Address IP address of the LAN-side host AppName Application name 2. -
Page 85
Figure 64 Application List 2. Click Click here to add an application. The application configuration page is displayed, see Figure… -
Page 86
Figure 65 Application List Table 38 lists the application list parameters. Table 38 Application List Parameter Parameter Description Application Name Application name Protocal Protocol of the permitted packet including TCP, UDP, and TCP AND UDP WAN Start/End Port Port number range of the WAN-side hosts Start/End Mapping Port Port number range of the mapping-side hosts 3. -
Page 87
Configuring TR-069 Basic Parameters Importing TR-069 Certificates 9.1.1 Configuring TR-069 Basic Parameters ZXHN H108N supports TR-069 protocol. This procedure introduces how to configure the TR-069 basic parameters. Prerequisite Before configuring TR-069 basic parameters, make sure that: connection is configured. -
Page 88
ACS URL The URL of the automatic configuration server that manages the device Username/Password User name and password for the ZXHN H108N device to log in to the automatic configuration server Connection Request URL Connection request URL, which is automatically generated… -
Page 89: Managing Users
Steps 1. On the navigation tree, click [Administration→ TR-069→ Certificate]. The certificate page is displayed, see Figure Figure 67 Certificate 2. Click Browse to select the CA certificate file. Note: The CA certificate is provided by the to the terminal user. It is imported from the local. 3.
-
Page 90
2. Configure the user management parameters, and then click Submit. 9.3 Configuring Login Timeout This procedure introduces how to manage the login timeout. After the user logs in to the ZXHN H108N device, if no operations are conducted during the specified time, the user will log off. -
Page 91: System Management
Steps 1. On the navigation tree, click [Administrator→ Login Timeout]. The login timeout configuration page is displayed, see Figure Figure 69 Login Timeout 2. Specify the time in the Timeout text box, and then click Submit. The login timeout is configured. If no action is taken during the specified time, the configuration page will be closed, and the user will be in logout status.
-
Page 92: Upgrading Software
Before upgrading software, make sure that the upgrade file is ready. Context Caution! Generally, the software is upgraded by the ZTE CORPORATION engineers. If the user wants to upgrade the software, contact the local office of ZTE CORPORATION to obtain the latest software version.
-
Page 93
Figure 71 Software Upgrade 2. Click Browse to select the upgrade version file. 3. Click Upgrade. Caution! The system prompts the upgrade progress. During the upgrade process, do not cut off the power supply. Otherwise the device may be damaged. After the software is upgraded, the system is automatically restarted and returns to the login page. -
Page 94
Figure 72 User Configuration Management 2. On this page, you can perform the following operations: Click Backup Configuration to export the user configuration file. Click Browse to select the user configuration file, and then click Restore Configuration to restore the device to the user configuration. Note: After the user configuration file is imported, the system is restarted. -
Page 95
Click Backup Configuration to export the default configuration file. Click Browse to select the default configuration file, and then click Restore Configuration to restore the ZXHN H108N device to the default configuration. Note: After the default configuration file is imported, the system is restarted. -
Page 96
Figure 74 Log Management Table 42 lists the log management parameters and buttons. Table 42 Log Management Parameters and Buttons Item Description Enable Save Log Select this option to save logs. There are eight levels, and they are Emergency, Alert, Critical, Log Level Error, Warning, Notice, Informational, and Debug. -
Page 97
Manufacturer:ZTE; ProductClass:ZXHN H108N V2.5; SerialNumber:; IP:192.168.1.1; HWVer:V1.0; SWVer:V2.5.0T2; 9.6 Mobile Network Management This section includes the following: Performing PIN Management Configuring Network Mode 9.6.1 Performing PIN Management This procedure introduces how to perform the PIN management. Prerequisite Before performing PIN management, make sure that: … -
Page 98
Figure 75 PIN Management Table 43 lists the PIN configuration parameters. Table 43 PIN configuration parameters Parameter Description Operation Mode Selecte the Operation Mode . Type the PIN number. Confirm PIN Confirm the PIN number. Remember PIN Enable the remember PIN number function. 2. -
Page 99
2. Select one network mode, and click Submit. Note: The ZXHN H108N device only supports WCDMA 3G card for the moment. If the network mode is changed, it is necessary to unplug the card and plug it again to make the change come into effect. -
Page 100
Figure 77 Uplink Backup Table 44 lists the uplink backup parameters. Table 44 Uplink Backup Parameter Parameter Description Primary Uplink Restore Time Specify the waiting time before switching to the primary connection and stop 3G connection after the primary connection works. -
Page 101
Diagnosing Ethernet Port Diagnosing PPPoE Diagnosing DNS Diagnosing IP Displaying MAC Table Displaying ARP Table 9.8.1 Diagnosing Network Connectivity This procedure introduces how to diagnose the network connectivity. Steps 1. On the menu bar, click [Administration→ Diagnosis→ Ping Diagnosis]. The ping diagnosis page is displayed, see Figure 78. -
Page 102
2. Type the IP address or host name in the IP Address or Host Name text box, select one WAN connection, specify the maximum hops, wait time, and protocol. 3. After the configuration, click Submit. The information of the routers between the specified IP address and the ZXHN H108N device is displayed. -
Page 103
traceroute to 90.1.1.9 (90.1.1.9) ,40 byte packets * * * Request timed out. 90.1.1.9 (90.1.1.9) 5 ms 4 ms 4 ms Traceroute complete. 9.8.3 Diagnosing Simulation Steps 1. On the navigation tree, click [Administration→Diagnosis→Simulation]. The Simulation page is displayed, see Figure Figure 80 Diagnosing Simulation Table 45… -
Page 104
Parameter Description Username/Password Username/Password provided by the ISP. The type includes Auto, PAP, and CHAP. By default, it is Authentication Type Auto. Retry Times Specify the retry times. 2. Configure the Diagnosing Simulation parameters, then click Start. The information is displayed, as show in Figure Figure 81 Simulation Result 9.8.4 Performing AT Diagnosis… -
Page 105
Figure 82 AT Diagnosis 2. Type in the At Command text box, and then click Submit. 3. The system starts to test whether the 3G USB card works normally. If the message appears, it indicates the 3G card works normally. 9.8.5 Performing Mirror Configuration This procedure introduces how to perform the mirror configuration. -
Page 106
Figure 83 Mirror Configuration Table 46 lists the mirror configuration parameters. Table 46 Mirror Configuration Parameters Parameter Description Source Network-side interface Destination User-side interface Enable Enable the port mirror function. 2. Configure the mirror parameters, and then click Add. 9.8.6 Diagnosing Line This procedure introduces how to verify that the Modem of ADSL WAN connection is properly connected to the network. -
Page 107
Figure 84 Line Diagnosis 2. Select the test type and VPI/VCI. 3. Click Submit to diagnose the connection. The network connectivity between the ZXHN H108N device and network is diagnosed. The diagnosis result is as follows: Number of repetitions is 1… -
Page 108
Figure 85 Ethernet Diagnosis 2. Select one Ethernet port and click Diagnose to check the Ethernet connectivity. The status of the specified Ethernet port is checked. The Check Ethernet connection shows the diagnosis result is “pass”, which means the specified LAN interface is connected. -
Page 109
Figure 86 PPPoE Diagnosis 2. Select one PPPoE connection and click Diagnose to check the PPPoE link. 9.8.9 Diagnosing DNS This procedure introduces how to verify that the existing DNS can translate the specified domain name. Steps 1. On the navigation tree, click [Administration→ Diagnosis→ DNS Diagnosis]. The diagnosis page is displayed, see Figure… -
Page 110
Figure 87 DNS Diagnosis 2. Type the domain name in the Domain Name text box and click Diagnose to perform the diagnosis. 9.8.10 Diagnosing IP This procedure introduces how to diagnose the connectivity status for IPoE WAN connection. Prerequisite IPoE WAN connections are created. -
Page 111
IP connectivity. 9.8.11 Displaying MAC Table This procedure introduces how to display the MAC table information of the ZXHN H108N device. Steps 1. On the navigation tree, click [Administration→Diagnosis→MAC Table]. The MAC table page… -
Page 112
Figure 89 MAC Table 9.8.12 Displaying ARP Table This procedure introduces how to display the ARP table information. Steps 1. On the navigation tree, click [Administration→Diagnosis→ARP Table]. The ARP table page displays the ARP table information, including network address, MAC address, and interface, see Figure Figure 90 ARP Table 9.9 Configuring WAN Type… -
Page 113
2. Select a WAN type from the WAN Type drop-down list. 3. After the configuration, click Submit. Note: If the WAN type is changed, the ZXHN H108N device will automatically recover to the corresponding WAN type factory configuration. 9.10 Configuring IPv6 Switch This procedure introduces how to switch on/off the IPv6 function. -
Page 114
Figure 92 IPv6 Switch 2. Select On or Off from the IPv6 Function drop-down list to enable or disable the IPv6 function. 3. Click Submit. -
Page 115
Glossary ACL — Access Control List ADSL — Asymmetric Digital Subscriber Line ARP — Address Resolution Protocol ATM — Asynchronous Transfer Mode CHAP — Challenge Handshake Authentication Protocol CPE — Customer Premises Equipment DC — Direct Current DDNS — Dynamic Domain Name Server DHCP — Dynamic Host Configuration Protocol DMP — Dedicated signaling MP DMS — Digital Media Server… -
Page 116
ISP — Internet Service Provider LAN — Local Area Network LLC — Logic Link Control MAC — Media Access Control MTU — Maximum Transfer Unit NAT — Network Address Translation NE — Network Element NMS — Network Management System NTP — Network Time Protocol OS — Operating System PAP — Password Authentication Protocol PPP — Point-to-Point Protocol… -
Page 117
WLAN — Wireless Local Area Network WPA — Wi-Fi Protected Access…
Всем привет! Сегодня поговорим про настройку модема-роутера ZTE H108N. Проблема в том, что у компании ZTE есть несколько аппаратных версий этого аппарата, а также прошивок. Из-за чего в интернете можно встретить абсолютно разные инструкции. Поэтому я описал два возможных варианта в этой статье. Если у вас возникнут какие-то трудности или вопросы, то пишите в комментариях. Также есть две версии: aDSL и обычное WAN подключение, но они отличаются только типом входного интерфейса.
Содержание
- Подключение
- Новая прошивка
- Быстрая настройка
- Ручная настройка
- Проброс портов
- Старая прошивка
- Характеристики
- Задать вопрос автору статьи
Подключение
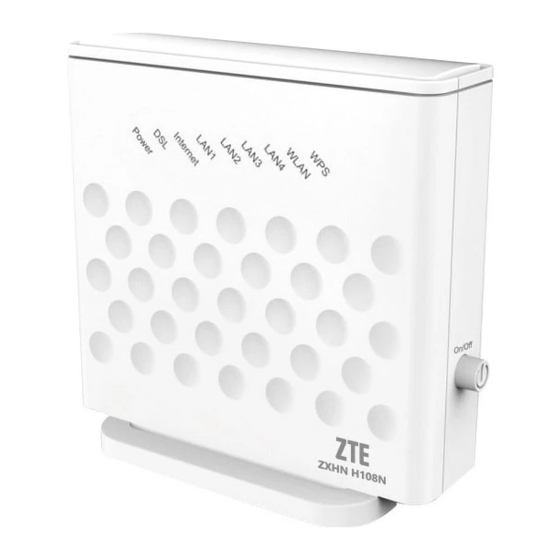
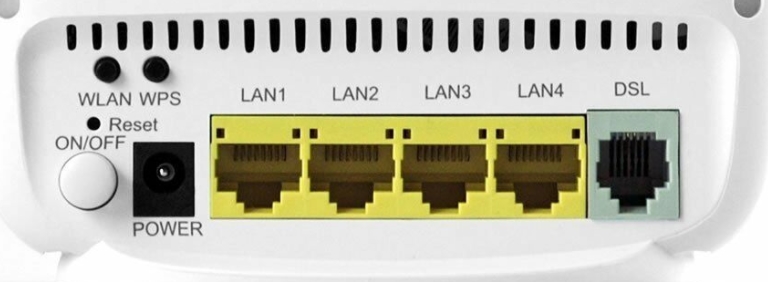
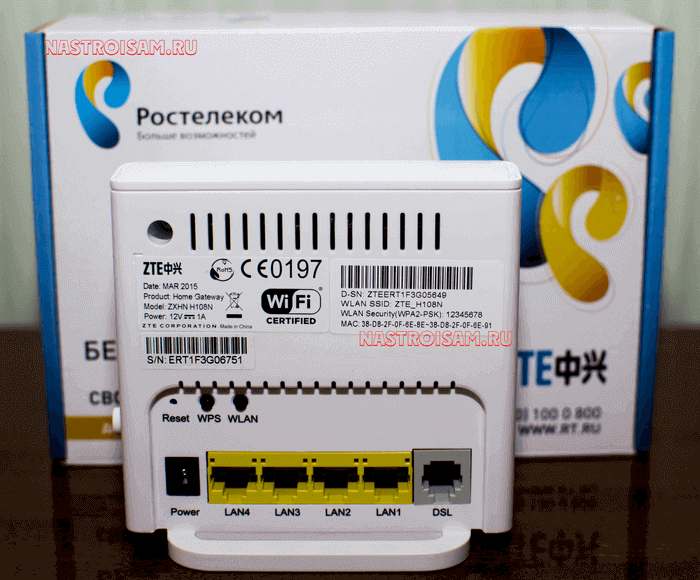
Для начала давайте ознакомимся с портами, кнопками и подключим его:
- ON/OFF – кнопка включения и выключения. Если он у вас зависнет, то просто два раза нажмите на неё.
- Reset – кнопка для сброса до заводских настроек. Если вы получили его не от работников компании, то зажмите её на 10 секунд, чтобы сбросить конфигурацию до заводской.
- WLAN – кнопка активации Wi-Fi. По умолчанию беспроводная сеть уже включена.
- WPS – быстрое подключение к WiFi.
- POWER – сюда подключаем блок питания.
- LAN1-4 – порты для подключения локальных устройств: компьютера, ноутбука, телевизора и т.д. Я сюда подключил свой ноут. Для первичной настройки лучше все делать по кабелю
- DSL или WAN – сюда подключаем кабель, который вам прокинул провайдер. Если у вас aDSL версия, то подключаем телефонный провод.
Как только вы подключите его к электросети и включите, вам нужно подключиться к его локальной сети. Это можно сделать с помощью кабеля, воткнув его в один из LAN входов. Или подключиться с помощью вай-фай – имя сети и пароль вы можете найти на этикетке аппарата.
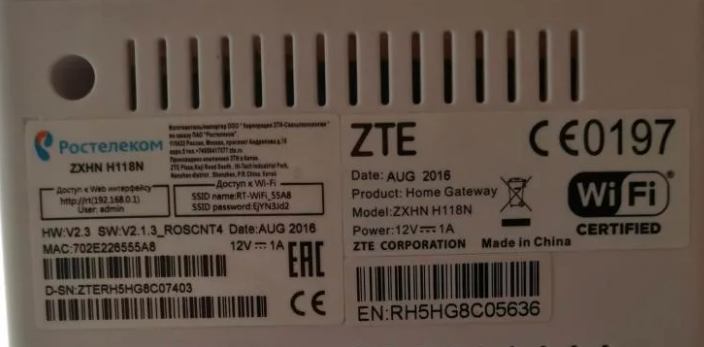
После того как вы подключитесь к сети вам нужно открыть любой браузер и ввести в адресную строку один из представленных адресов:
- 192.168.0.1
- 192.168.1.1
Ели вас попросят ввести логин и пароль, то пробуем комбинации:
- admin-admin
- admin-*Пустая строка*
Если ни одна из комбинаций не подходит, то смотрим на ту же самую бумажку. Если там ничего не указано, то значит в вашей спецификации нет пароля. Вам нужно сбросить маршрутизатор до заводских настроек, нажав на кнопку «Reset» ровно на 10 сек.
ВНИМАНИЕ! Теперь очень важный момент. Оказывается, у роутера ZTE ZXHN H108N есть две аппаратные спецификации и две разные прошивки. Поэтому смотрим свою главу, ориентируясь на скриншоты, которые и предоставил. Обязательно держите лист с настройками от провайдера под рукой.
Новая прошивка
Быстрая настройка
- Вас попросят ввести пароль от этого интерфейса. Обязательно запомните это значение, а также выберите часовой пояс.
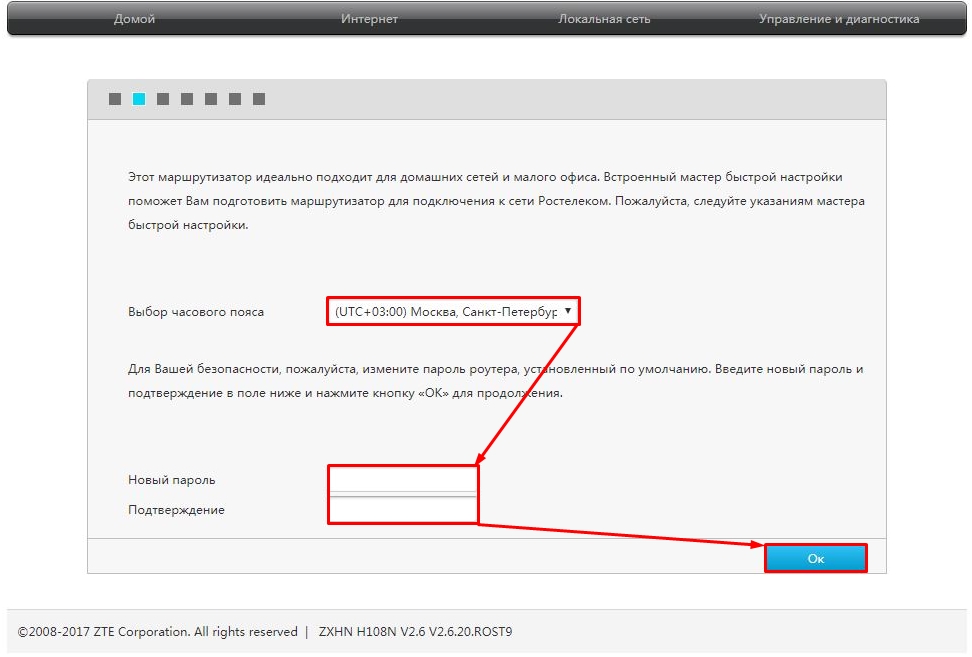
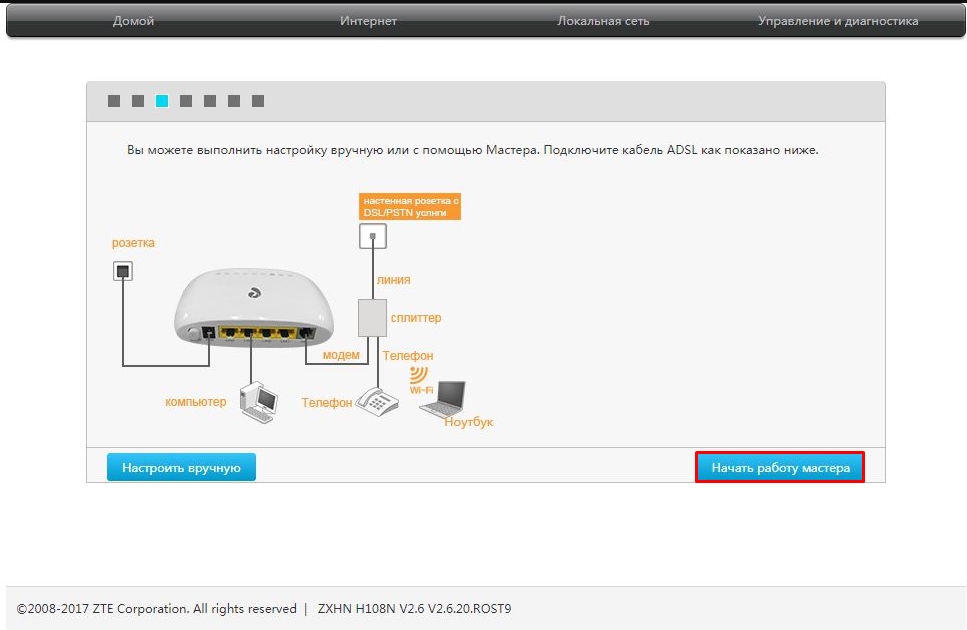
- Нажимаем на кнопку «Начать работу мастера». Также вы можете ознакомиться с примерной схемой подключения модема.
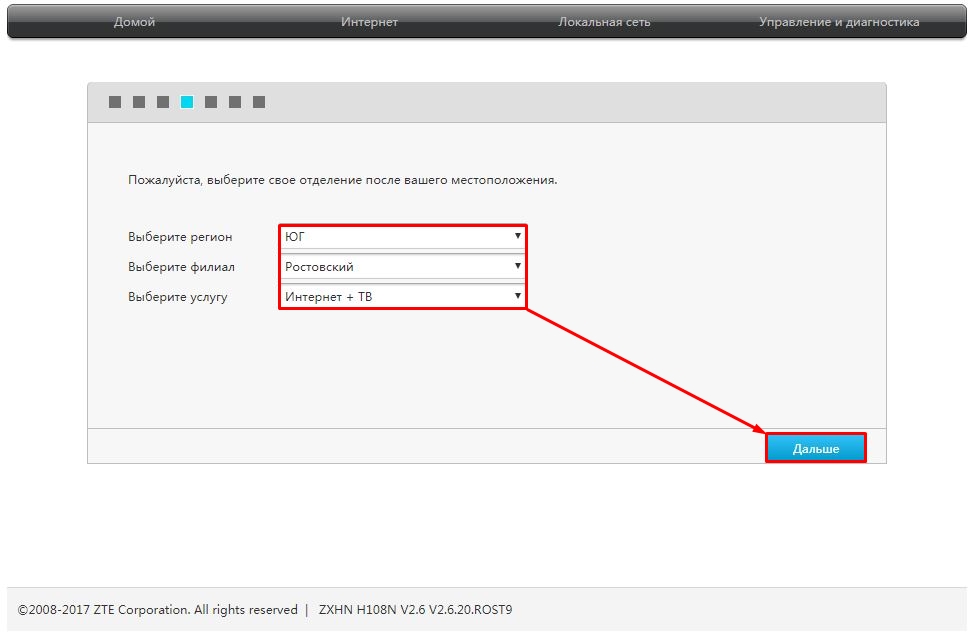
- Укажите регион, филиал, а также тип услуг. Нужно обязательно указать точные данные региона, так как от этого будут зависеть некоторые надстройки, которые автоматически пропишутся в вашем устройстве. Указывать «Интернет + ТВ» нужно только в том, случае, если вы еще используете приставку.
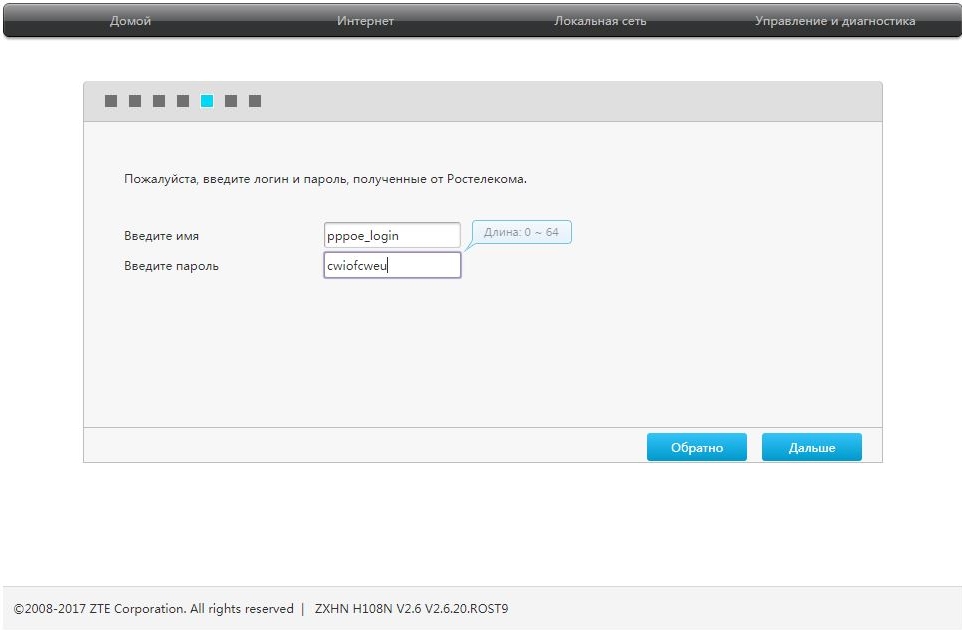
- Берем лист, который вам выдал провайдер и вписываем логин и пароль.
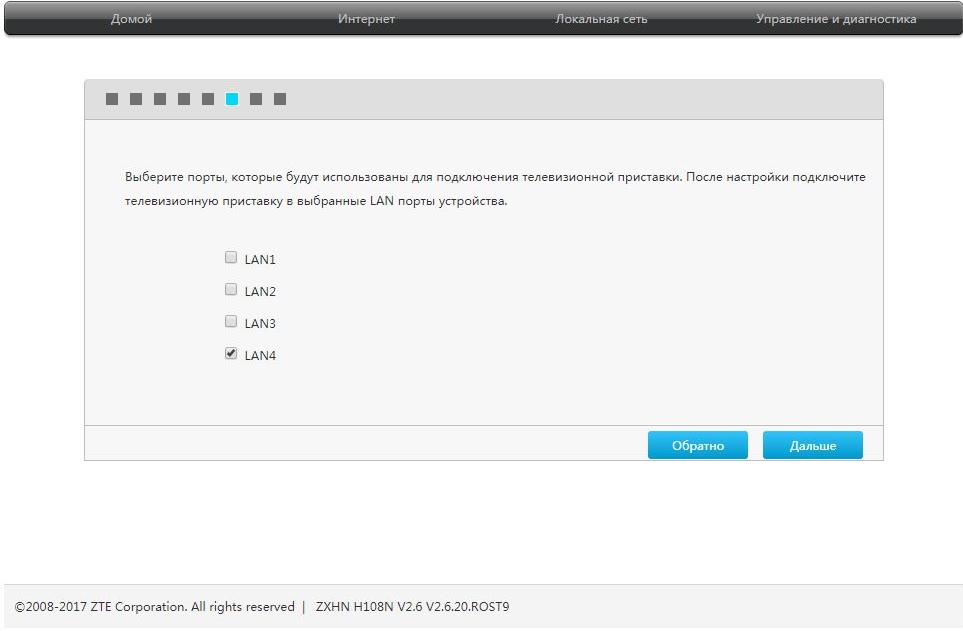
- Подключаем приставку в любой свободный порт и указываем этот номер в конфигурации.
- Вводим имя Wi-Fi сети (Идентификатор SSID) и пароль от нее.
- Далее ждем пока настройки примутся, а модем перезагрузится.
Ручная настройка
Вы можете производить ручную настройку, и менять некоторые значения напрямую, не запуская «Мастера».
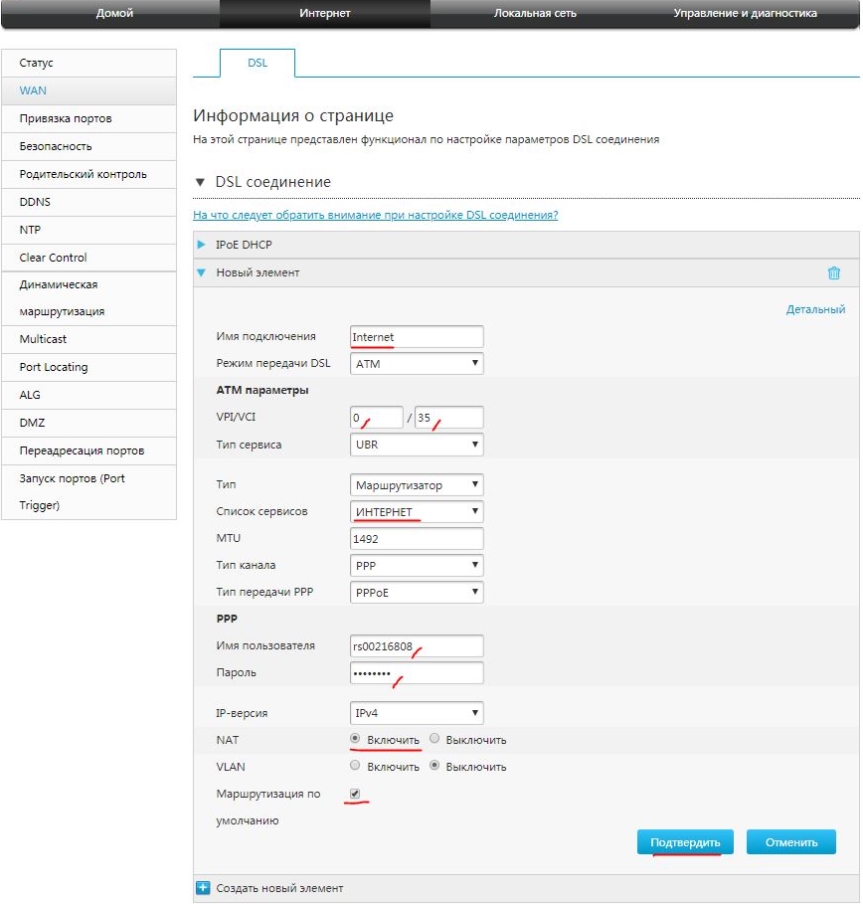
Интернет
Переходим во вкладку «Интернет», слева выбираем «WAN». В подразделе «Новый элемент» указываем нужные данные. Для разных регионов вам нужно будет менять значения «VPI/VCI».
IPTV
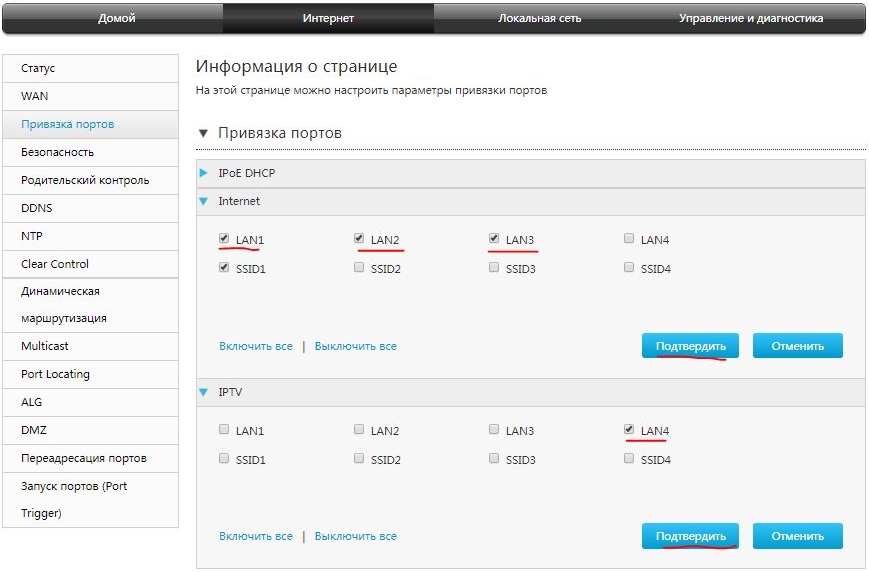
Для IP-TV нужно будет просто указать номер порта, в который вы подключили приставку.
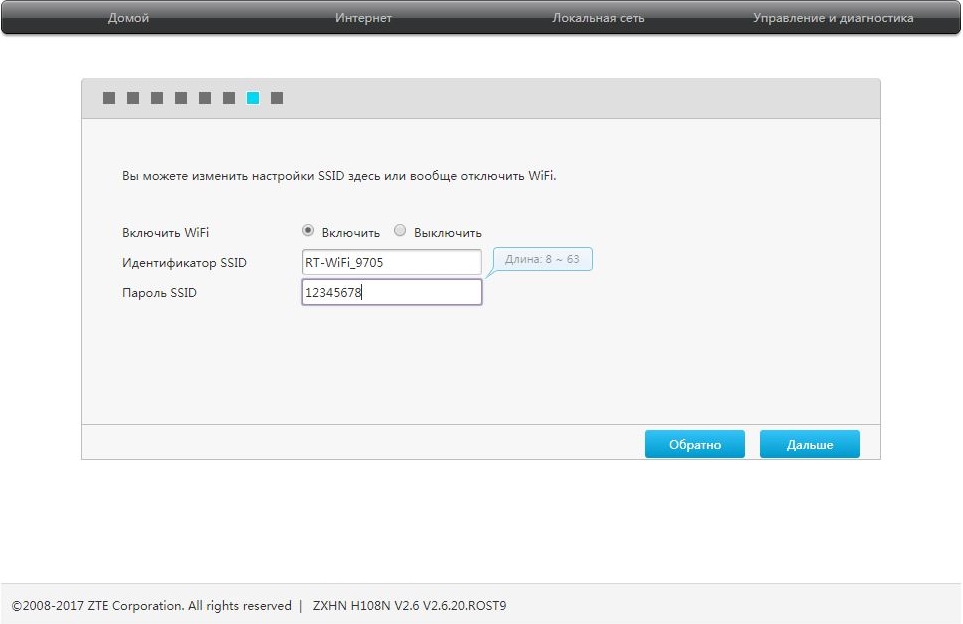
Wi-Fi
Для изменения ключа и имени сети, нужно зайти в «Локальную сеть» – «Беспроводное соединение». Также вы можете менять более детальные настройки.

Проброс портов
Переходим в раздел «Интернет» и далее кликаем по блоку «Переадресация портов». Далее нужно создать новый элемент.
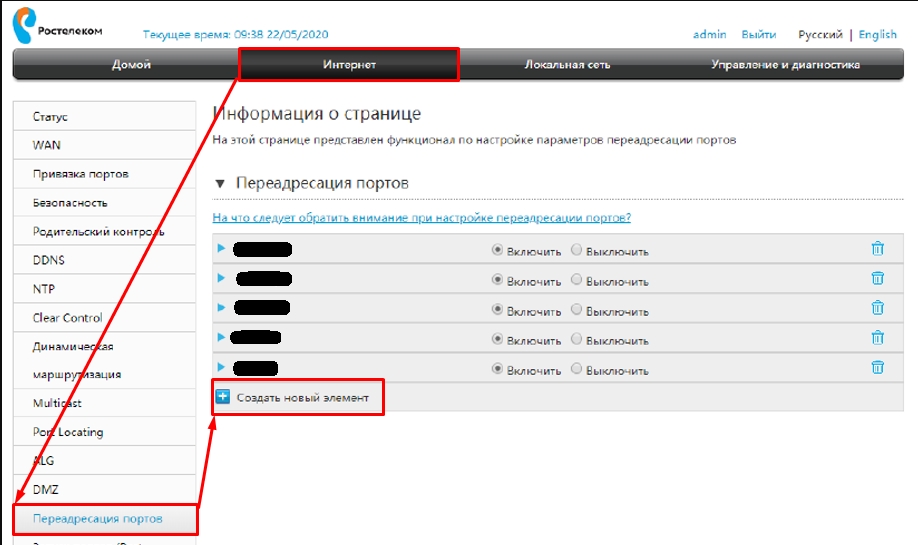
А теперь более подробно по каждому из пунктов:
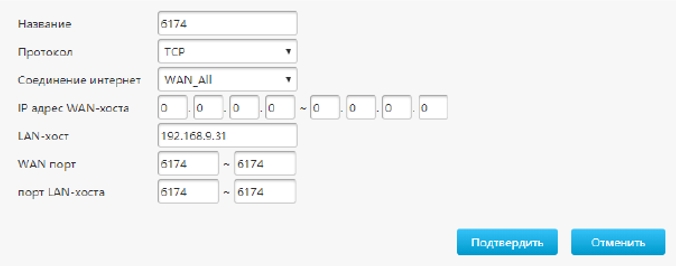
- Название – пишем любое понятное наименование.
- Протокол – указываем протокол. Если вам нужно открыть порт для двух протоколов, то нужно создавать два правила.
- Соединение интернет – указывает то подключение, которое вы создавали при первичной настройке.
- IP адрес WAN-хоста – можно указать тот IP, с которого вы сможете иметь доступ к вашему роутеру. Например, компьютер на работе. Если же вы будете обращаться с разных устройств, то указываем: 0.0.0.0 – 0.0.0.0. Обязательно нужно указать все нули, а не пустые строки.
- LAN-хост – локальный адрес устройства, на которое будет перекинут трафик по данным портам.
- WAN-порт – указываем интернет порт.
- Порт LAN-хоста – указываем локальный порт.
Обычно указываются одинаковые порты для WAN и LAN. В конце нажмите «Подтвердить».
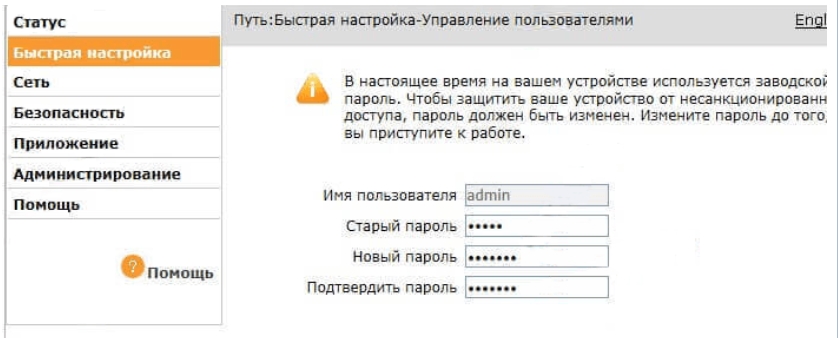
Старая прошивка
- Вводим старый пароль от этой админки и два раза новый.
- Если вылезло вот такое окошко, то указываем «Тип WAN» как «DSL».
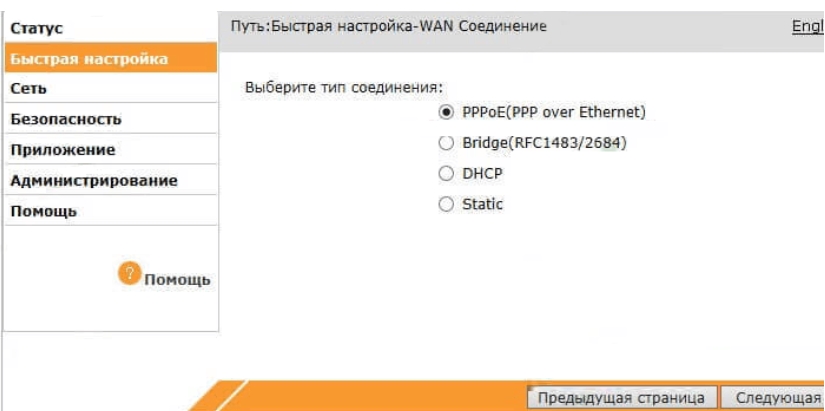
- Теперь самое главное, нужно указать тип соединения, который использует ваш провайдер. Это можно подсмотреть в договоре или позвонить по телефону технической поддержки. Если в договоре указаны логин и пароль, то это скорее всего «PPPoE». Если указаны IP, маска, то «Static». Если ничего не сказано, то «DHCP». У Ростелекома используется «PPPoE».
- С листа вводим данные «VPI» и «VCI». Теперь ниже указываем порты, которые будут использованы интернетом. Указываем все «LAN» кроме того, к которому будет подключена IPTV приставка. Если её нет, то указываем все порты. И ставим галочку напротив «SSID1».

- Если вы ранее указали тип подключения как «PPPoE», то вводим тут логин и пароль.
- Далее идет настройка вайфай. Указываем только имя сети и пароль.
- Если вам нужно настроить ещё IPTV, то указываем на очередном круге «Bridge».
- Тут указываем VPI и PCI с листа настроек IP-TV. Указываем только один порт, к которой подключена приставка.
Характеристики
| Порты | aDSL и LAN |
| Скорость локальных портов | 10-100 Мбит в секунду |
| Wi-Fi | 802.11b/g/n |
| Максимальная скорость по вай-фай | 300 Мбит в секунду |
| Частота | 2.4 Гц |
| Схема WiFi | 2х2 |
| USB | 2.0 только на новых моделях |
| Габариты | 108мм×52мм×105мм |
| Вес | 146г |
ZTE ZXHN H108N — модем, широко распространившийся среди крупных операторов нескольких стран, как Украина, Казахстан, Россия. Его рекомендуют, выдают в аренду. ZTE ZXHN H108N модем поддерживает технологию подключения ADSL, даёт возможность проводного и беспроводного выхода в интернет. По такому же принципу настраивается ZTE ZXV10 H108L модем. Настройка модема ZTE ZXHN H108N не сложная, по силам любому пользователю, внимательно изучившему инструкцию, приведённую ниже.

Узнайте, как провально сделать настройку модему ZTE ZXHN H108N
Настройка для работы
У ZTE ZXHN H108N отрегулирование модема осуществляется через браузер после подключения устройства к компьютеру. Вход в интерфейс настроек возможен через любой браузер, где в адресной строке введите 192.168.1.1, нажмите Enter.

В строке браузера Адрес наберите http://192.168.1.1
- В окне авторизации наберите в строках User name, Password одинаковое слово — admin. После нажатия ОК откроется окно с настройками.

В появившемся окне в качестве имени пользователя следует указать admin, в качестве пароля admin. Далее нажмите кнопку «Login»
Если раньше ваш роутер уже использовался, очистите его настройки, сбросив до заводских. Это выполняется нажатием кнопочки Reset, находящейся на задней панели. Давите на неё 10 секунд, подождите перезагрузки модема. После система предложит сменить пароль, введите прежнее имя пользователя, новый пароль.
- Проставьте далее тип подключения DSL, если с вас это потребуют.

Укажите тип подключения DSL
Следующие шаги ставятся по согласованию с провайдером, обычно их можно найти в договоре либо уточнить по телефону.
- Тип соединения чаще ставят PPPoE, если провайдер назначил динамический IP, ставится DHCP.
- Введите затем VPI/VCI опять же, взяв из договора. Внизу увидите «Связь с LAN портами», проставьте галочки на разъёмах, где запланировали раздачу интернета, последний порт желательно оставить свободным. Также проставьте галочку в SSID1, чтобы работал Wi-Fi.
Затем вас попросят авторизоваться, ввести логин с паролем учётки, оговорённые с провайдером. Если тип соединения установлен DHCP, эта страничка не появляется.
Затем у вас запросят подключение WAN — для телевидения, если услуга подключена, соглашаетесь и ставите там нужные данные.
Когда произойдёт перезагрузка, устройство будет готово функционировать с введёнными цифрами.
Настройка Wi-Fi
- Откройте браузер, зайдите в модемный веб-интерфейс, как описывалось в предыдущем разделе. Чтобы отрегулировать Wi-Fi, нужно выполнить несколько шагов:
- Пройдите в настройки беспроводной сети, отметив маркером пункт её включения.
- Режим поставьте Auto.
- В строке SSID впишите имя вашей сети Wi-Fi, отличное от других. Оно будет отображаться при поиске доступных подключений.
- Ключевая фраза WPA — это пароль для подключения к вашей сети. Поставьте сложный пароль, чтобы не допустить доступа к вашей сети посторонних.

- Сохраните параметры.

После перезагрузки ZTE ZXV10 H108L модем будет готов работать.
 Тип подключения Router: PPPoE
 Тип подключения Router: PPPoE
На примере показаны настройки провайдера Uzonline
1. Перед настройкой, подключаем кабели к роутеру:
- Телефонную линию в сплиттер в разъём LINE
- Далее подключаем телефонный кабель из комплекта одним концом в разъём MODEM на сплиттере, другим концом в разъём ADSL на модеме.
- ПК подключаем к модему через любой LAN-порт (4 желтых порта) с помощью кабеля который идет в комплекте с модемом.
Далее необходимо подключить провод питания в разъём POWER (гнезда блока питания на рис.) - Блок питания включить в розетку.
- После нажать кнопку питания для включения роутера.
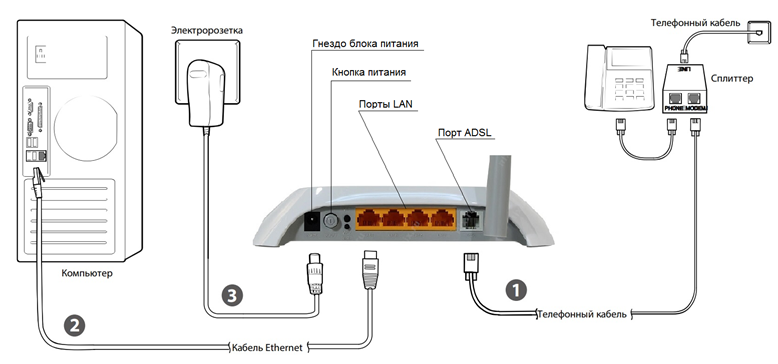
2. После того как вы подсоединили модем к сети и вашему компьютеру, включили модем в
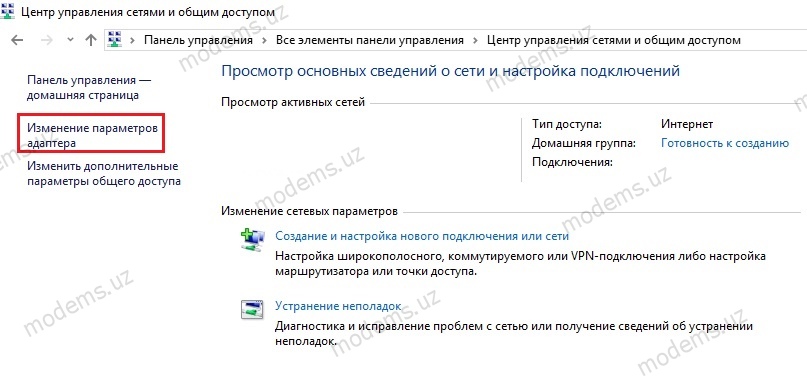
сеть, и вам необходимо настроить сетевой интерфейс. Перейдите в меню «Пуск» – «Панель управления», как это показано на рисунке(Windows xp, Windows7). Для Windows x можно открыть при помощи комбинации клавиш + и выбрав Панель управления.

3. В «Панели управления» выберите «Центр управления сетями и общим доступом». В
«Центре управления сетями» в левом фрейме выберите пункт «Управление сетевыми
подключениями» (или пункт «изменение параметров адаптера»), как это показано на рисунке.
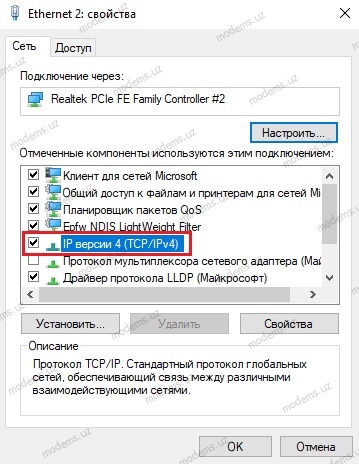
4. В открывшемся окне выберите значок Локального подключения и нажмите по нему правой кнопкой мышки и в контекстном меню выберите «Свойства»

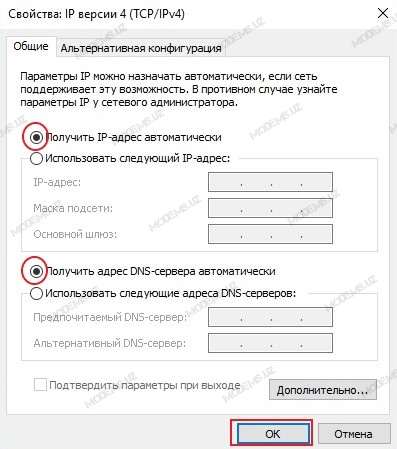
5. Вы увидите окно со свойствами подключения по локальной сети. Выберите компонент «Протокол Интернета версии 4» и нажмите «Свойства».
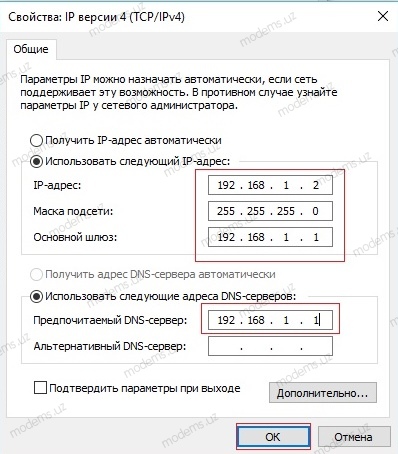
6. Далее откроется окно свойствами «протокола TCP/IPv4». Выполните настройку параметров TCP/IP, как показано на рисунке.
7. Далее открыть браузер (Google, Mozilla Firefox, Opera, Internet Explorer либо др.). В адресной строке браузера если что то написано, необходимо стереть, далее ввести стандартный ip адрес роутера 192.168.1.1 и нажать Enter на клавиатуре.

8. Далее появится окно, которое запрашивает имя пользователя и пароль (для входа в настройки роутера). По умолчанию на роутере имя пользователя — admin, пароль — admin
После ввода учётный данных на модем перед нами открывается интерфейс модема
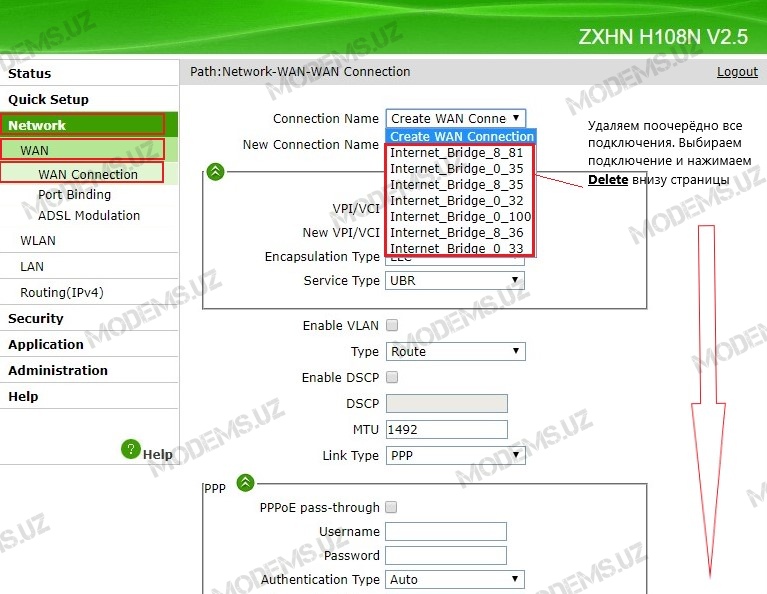
9. Далее заходим в Network>>>WAN>>>WAN Connection и удаляем поочерёдно все подключения в графе «Connection Name», путём выделения и нажатия на кнопку Delete.

10. После того как все дефолтные подключения удалены, Создаём новое для Интернета:
- В графе Connection Name выбираем значение Create Wan Connection
- В графе New Connection Name вписываем произвольное название подключения(пример Internet).
- Для графы VPI/VCI выбираем Create
- Устанавливаем параметры New VPI/VCI(на данном примере указаны параметры провайдера uzonline область) для Internet 0/33.
- Для параметра Type выбираем Route.
- Убираем галочку напротив параметра PPPoE pass-trough
- В поля Username/Password вводим учётные данные(Логин/Пароль) на услугу интернет(предоставляет ваш провайдер)
- Для IP Version выбираем IPv4
- Для PPP TransType выбираем значение PPPoE
- Ставим галочку напротив параметра Enable NAT
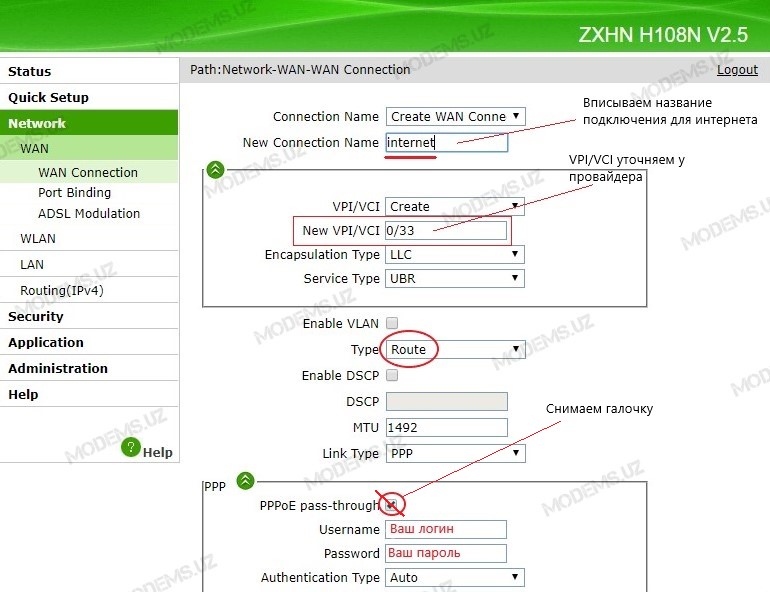
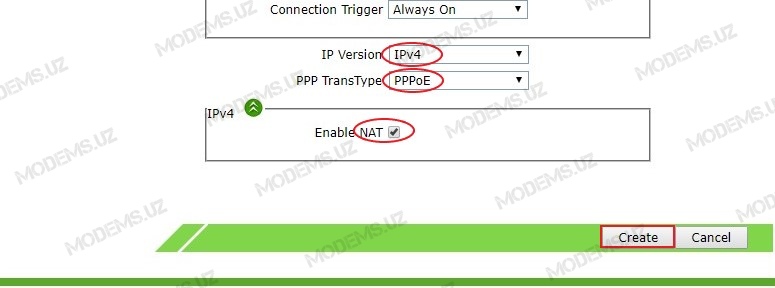
И нажимаем Create
11. Для тех у кого не предусмотрено использование IPTV, смело переходите на 14 пункт! Теперь необходимо создать новое подключение для IPTV. Для этого заполняем текущую страницу следующим образом:
- В графе Connection Name выбираем Create WAN Connection
- В графе New Connection Name вписываем произвольное название подключения(пример IPTV)
- Для графы VPI/VCI выбираем Create
- Устанавливаем параметры New VPI/VCI(на данном примере указаны параметры провайдера uzonline область) для IPTV 3/100
- Для показателя Type выбираем значение Bridge Connection

Нажимаем Create
12. Далее заходим в Network>>>WAN>>>Port Binding и в графе WAN Connection выбираем наше подключение для IPTV, далее ставим галочку напротив LAN1, тем самым забронировав 1й LAN порт для услуги IPTV.

Нажимаем Submit
13. Переходим в Network>>>LAN>>>DHCP Port Service и для отключения DHCP для LAN1 ставим галочку напротив LAN1
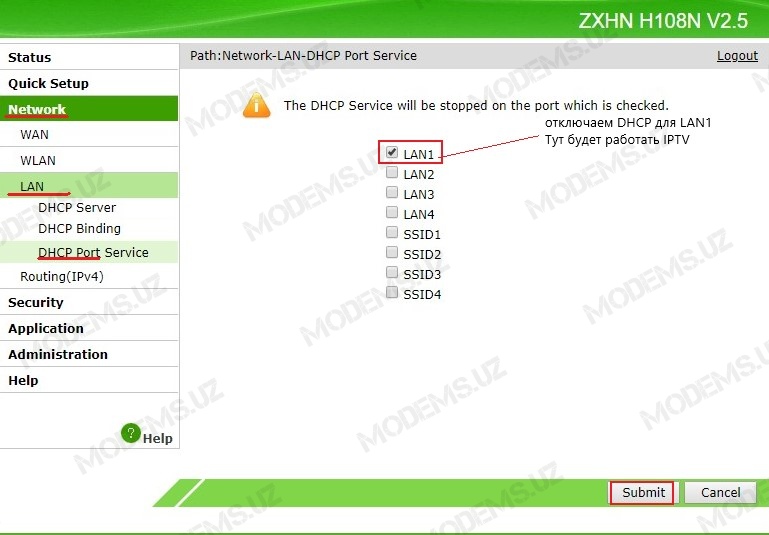
После чего модем будет пере подключен.
14. Теперь необходимо настроить wi-fi. Для этого переходим в Network>>>WLAN>>>Basic и настраиваем как на картинке
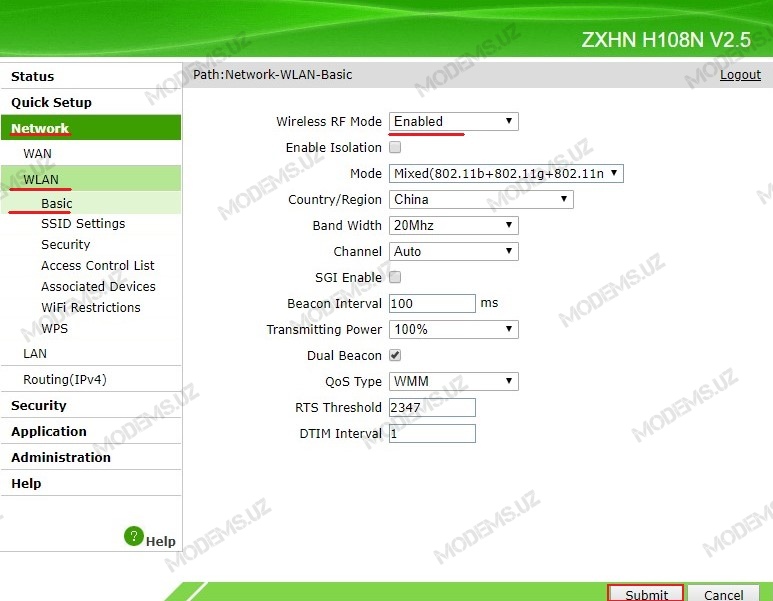
Нажимаем на Submit
Далее переходим в Network>>>WLAN>>>SSID Settings и вписываем название вашей Wi-fi сети. Также для отображения на wi-fi устройствах названия вашей wi-fi сети ставим галочку напротив Enable SSID
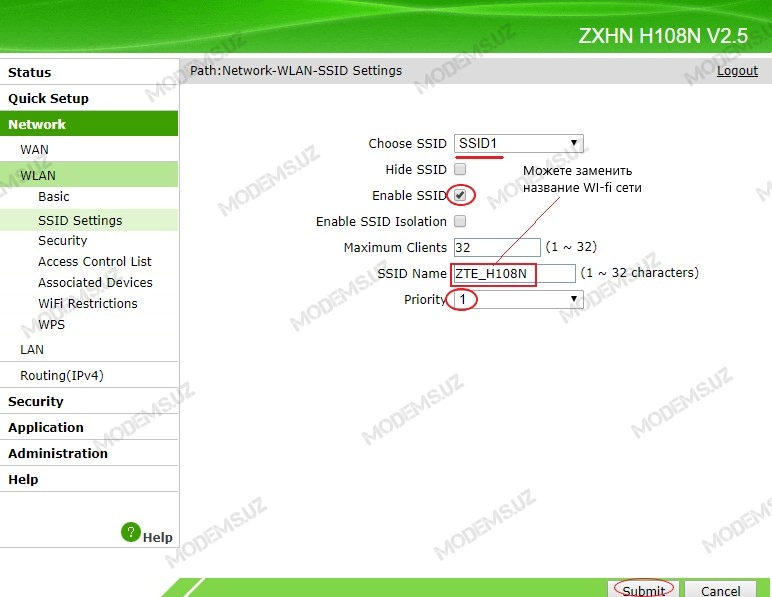
Нажимаем Submit
Далее заходим в Network>>>WLAN>>>Security и настраиваем следующим образом:
- Для параметра Authentication Type выбираем показатель WPA/WPA2-PSK
- В поле Passphrase устанавливаем пароль не менее 8 знаков
- Для параметра Encryption Algorithm выбираем показатель TKIP+AES
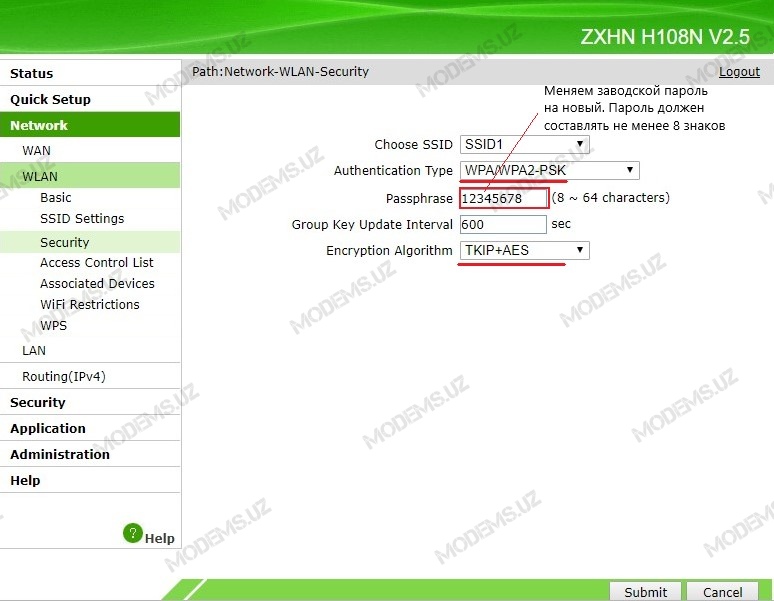
Нажимаем на Submit
Теперь заходим в Network>>>WLAN>>>WPS и отключаем данную функцию выбрав Disabled. Это необходимо для защиты вашей wi-fi сети от не санкционированного взлома. После чего модем будет пере подключен.

Пере заходим в интерфейс модема
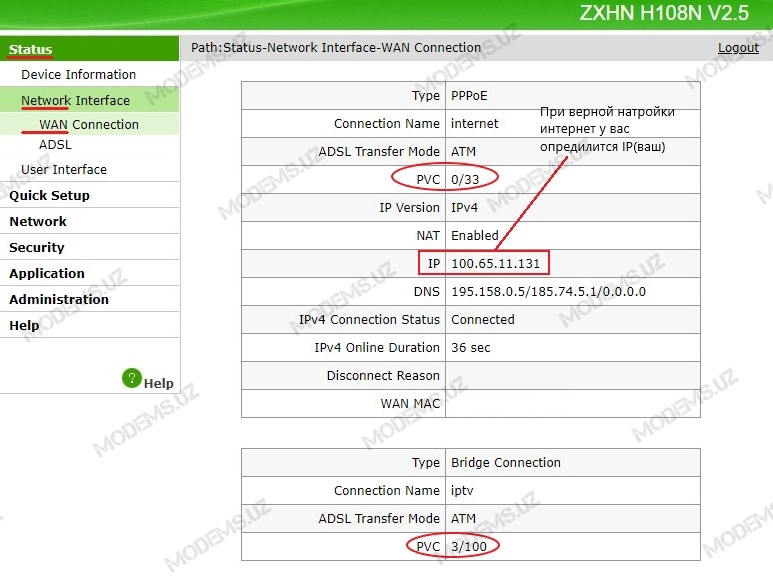
15. Для проверки настроек заходим в Status>>>Network interface>>>WAN Connection. При верной настройки интернет у вас определится ваш IP адрес. Также при наличии настроек IPTV у вас будет в данной таблице и информация о нём.
16. В окончании для корректной работы интернет на компьютерах и ноутбуках советую настроить получение IP адреса и DNS автоматически.
И на этом я Вас поздравляю, Вы настроили Ваш модем!
Поделитесь с друзьями
У нас очередное обновление — в филиал приехала партия универсальных WiFi-роутеров ZTE ZXHN H108N с эмблемой Ростелеком. Поискав по нему информацию в Интернете, я обнаружил, что эта модель поставляется многим провайдерам, но уже под другими брендами: Промсвязь, HOL, Movistar и TTNet. Хотя информация о них в сети весьма противоречивая и в большинстве источников указано, что это только ADSL-модем — это не совсем верно. Дело в том, что эта модель может ещё работать и на FTTB-линиях, и как 3G-роутер. Аппаратная возможность для этого есть. Но вот программно она реализована не везде. В итоге, получается в части железа эти устройства абсолютные близнецы, к примеру, как Промсвязь H108N для ByFly и его брат близнец с прошивкой под Ростелеком, а вот прошивкой эти возможности поддерживаются не у всех провайдеров. Только вот вопрос — совместимо ли программное обеспечение между собой?! Теоретически — скорее всего, да. А вот практически — надо пробовать.
Теперь давайте посмотрим на модем подробнее.
ZTE ZXHN H108N v 2.5 — представляет собой весьма компактный WiFi-роутер с внутренними антеннами и ADSL-модулем.
Он построен на базе чипа Broadcom BCM63281 KFBG, имеет 64MB оперативной памяти и 16MB Flash.
Исполнение корпуса — вертикальное и другого варианта его расположения не предусмотрено, подставка намертво прикручена к корпусе.
Физические порты расположены на задней панели:
Ethernet 10/100 mbps — 4 шт.
ADSL RJ11 — 1 шт.
USB 2.0 — 1 шт.
Там же находятся кнопки включения/выключения беспроводной сети WLAN, функции WPS и маленькая кнопочка сброса настроек к заводским — Reset.
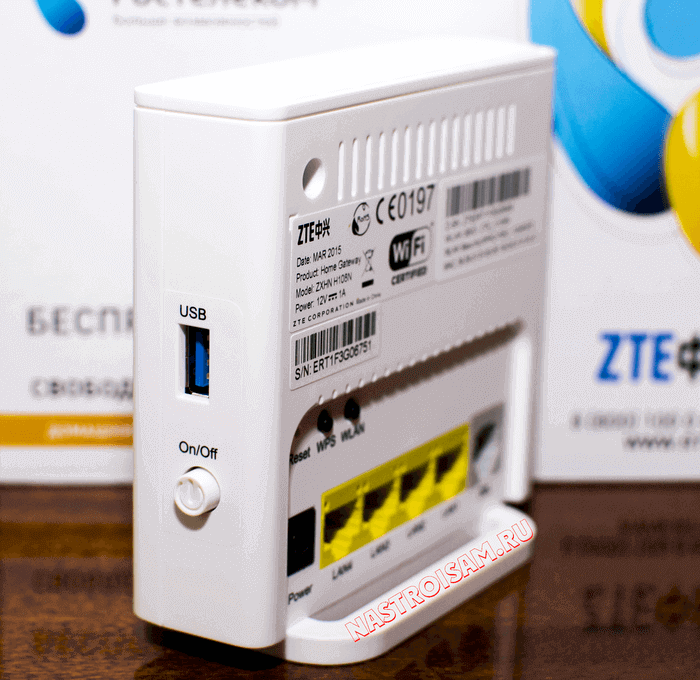
С левой стороны корпуса находится кнопка включения/выключения роутера и USB-разъём для подключения 3G модемов и флешек.
По качеству работы роутер очень понравился, он прост и очень функционален. Нет ничего лишнего. Причём, как показали тесты, аппарат отлично работает даже на пакете услуг «Интернет 100 мегабит +ТВ» — он отлично держит большую скорость и при этом изображение на телевизоре не сыпет артефактами.
Как настроить модем H108N для ADSL-линии?!
У роутера ZTE H108N V 2.5 для локальной сети используется IP-адрес 192.168.1.1, логин — admin, пароль — admin.

После первой авторизации автоматически запуститься «Быстрая настройка».
Первым шагом модем попросит сменить пароль для доступа:
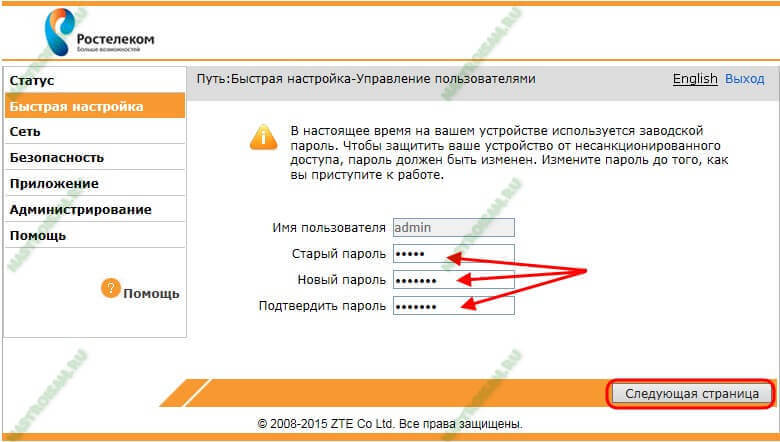
Прописываем новый пароль и нажимаем кнопку «Следующая страница».
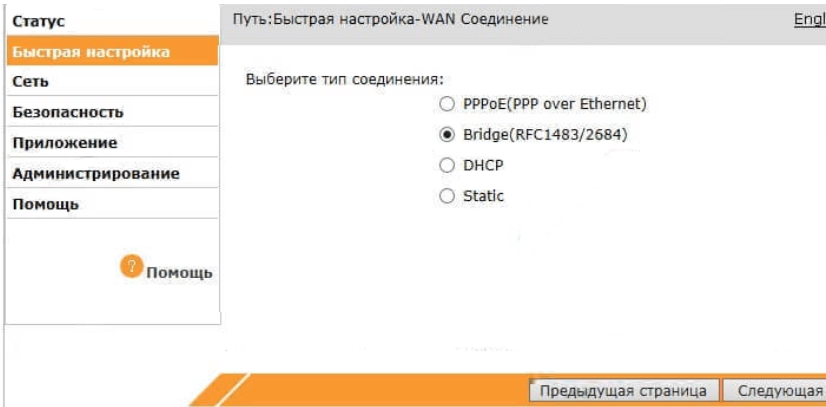
Теперь надо выбрать тип подключения. В нашем случае — DSL:
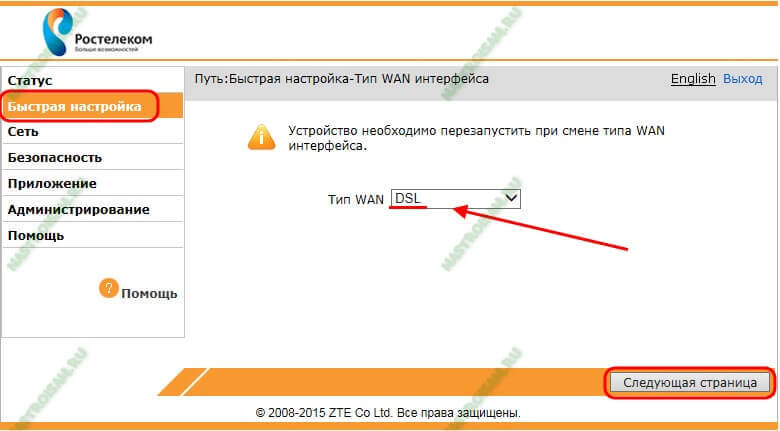
Идём дальше.
На этом этапе нужно указать тип соединения:

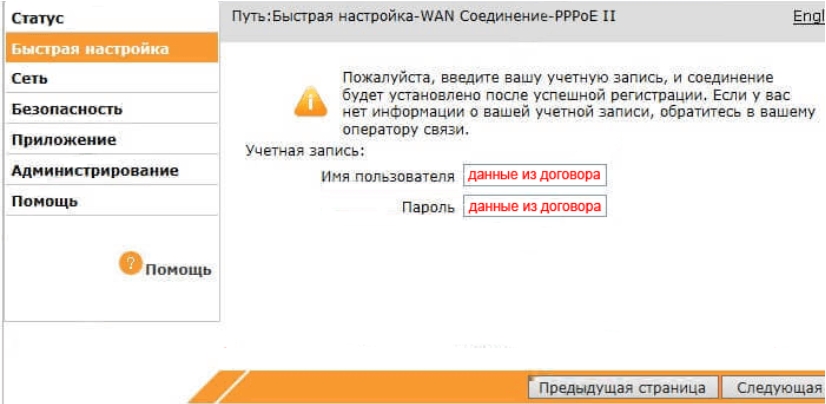
В большинстве филиалов ОАО Ростелеком используется PPPoE. (Если в Вашем филиале используется тип «Динамический IP», то выберите Вариант DHCP). Кликаем на «Следующая страница».
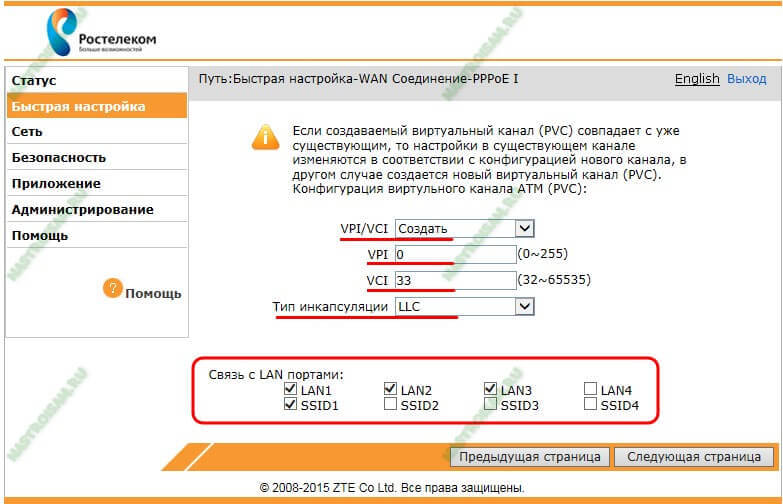
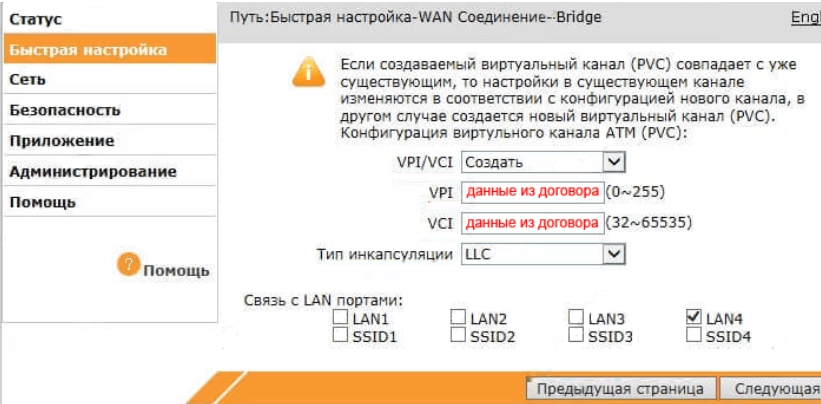
В списке «VPI/VCI» выбираем вариант «Создать». Ниже, в поля «VPI» и «VCI» надо ввести параметры Интернет канала. В нашем филиале используется 0/33. Если Вы не знаете какая пара используется у Вас — уточните этот момент в техподдержке.
Тип инкапсуляции — «LLC».
В разделе «Связь с портами» выберите галочками порты, на которых будет Интернет. Так же поставьте галку на «SSID1» — это WiFi-сеть.
Идём далее и попадаем на страницу ввода логина и пароль на подключение к провайдеру:
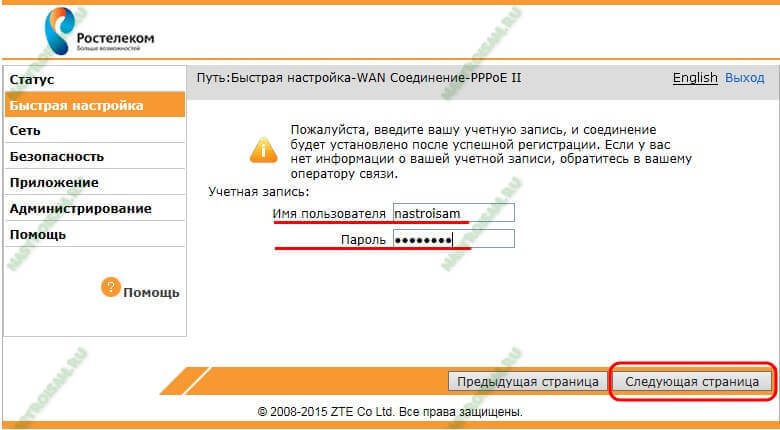
Примечание: если Вы выбирали тип соединения — DHCP, то шага с вводом логина и пароля на подключение у Вас не будет.
После ввода данных переходим на следующую страницу и получаем вот такое окно:
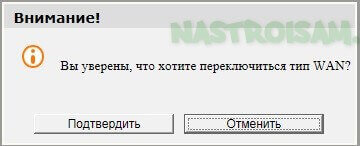
Если у Вас только услуга Интернет, то нажимайте на «Отменить».
Я же, для примера, рассмотрю ещё и создание второго соединения под интерактивное телевидение IPTV. Для этого надо нажать на кнопку «Подтвердить»:
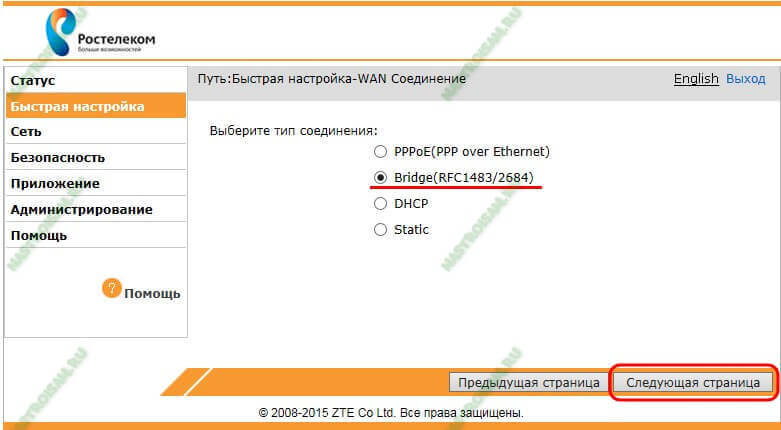
Выбираем тип соединения — Bridge (RFC1483/2684) и переходим на следующую страницу:
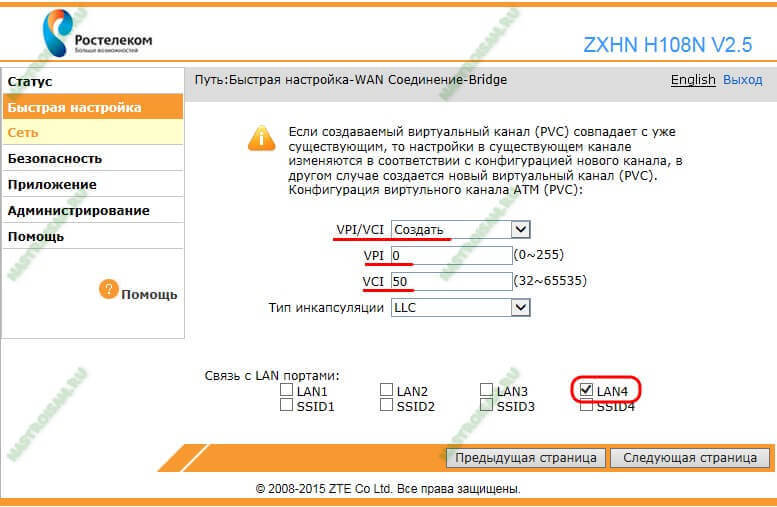
В списке «VPI/VCI» выбираем пункт «Создать» и указываем параметры канала для ТВ. У нас это — 0/50. Ниже надо поставить галочку на тот порт, в который будет включаться ТВ-приставка.
Переходим далее и снова видим вот такое окно:
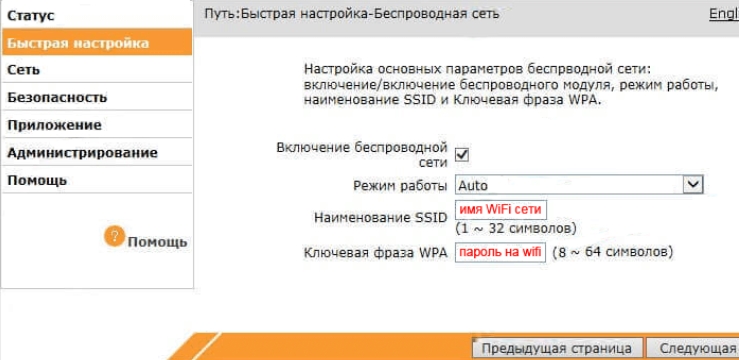
Нажимаем «Отменить» и попадаем в окно конфигурации беспроводной сети Вай-Фай:
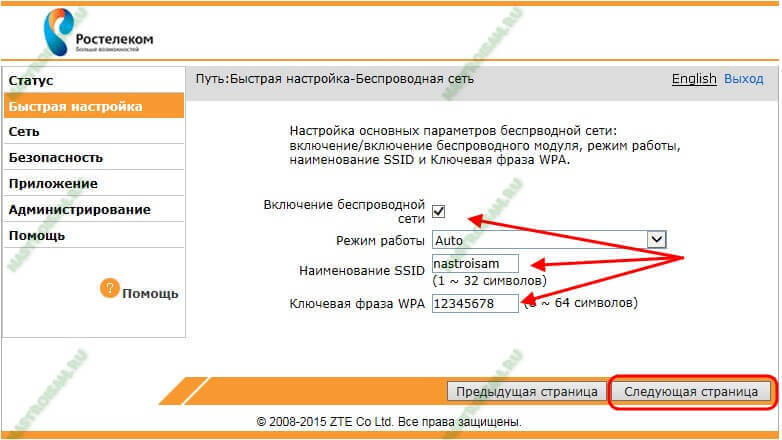
Проверьте, чтобы стояла галочка «Включение беспроводной сети».
Режим работы оставляем в автоматическом режиме.
В поле «Наименование SSID» надо указать имя сети WiFi — например, «nastroisam».
В поле «Ключевая фраза WPA» надо прописать пароль, который будет запрашиваться при попытках подключения к вашему домашнему Вай-Фаю. В этом качестве подойдёт любая буквенная, цифирная или смешанная последовательность не короче 8 символов.
Идём на следующую страницу.
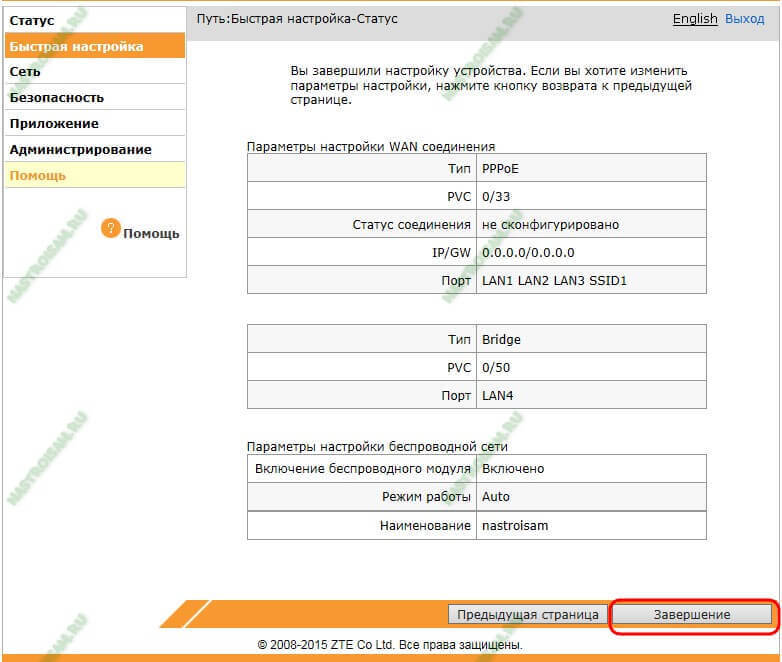
Остаётся только нажать на кнопку «Завершение».
На этом настройка ADSL модема ZTE H108N под Интернет и телевидение от Ростелеком завершена. Как настроить его под FTTB линию я расскажу позже. Следите за обновлениями на сайте.