| Тип устройства | Рабочее напряжение | Возможные функции | Минимальная емкость АКБ | Максимальная емкость АКБ |
| KL 1206 Е
7 780 301 145 |
230 V/50-60 Hz | 12 В | 2,5 А\Ч | 90 А\Ч |
| Battmax Automatic
7 780 301 141 |
230 V/50-60 Hz | 12 В | 2,5 А\Ч | 80 А\Ч |
ИНСТРУКЦИЯ ПО МЕРАМ БЕЗОПАСНОСТИ
ПОЖАЛУЙСТА, ПРЕЖДЕ, ЧЕМ НАЧАТЬ РАБОТУ С ЗАРЯДНЫМ УСТРОЙСТВОМ, ВНИМАТЕЛЬНО ПРОЧИТАЙТЕ ЭТУ ПРОСТУЮ И КОРОТКУЮ ИНСТРУКЦИЮ !!!
ВНИМАНИЕ!!!
При зарядке ЛЮБОГО аккумулятора образуются взрывоопасная концентрация водорода в воздухе, поэтому НЕ КУРИТЕ вблизи заряжающегося аккумулятора, держите его подальше от источников открытого огня и искр. При зарядке аккумулятора проветривайте помещение. Зарядное устройство размещайте так, чтобы существовала возможность доступа к нему свежего воздуха. Берегите зарядное устройство от влаги и сырости. Заряжайте ТОЛЬКО исправные аккумуляторы. Зарядное устройство может быть использовано для единовременной зарядки ТОЛЬКО ОДНОГО аккумулятора. Не пытайтесь заряжать НЕИСПРАВНЫЕ аккумуляторы. НЕ снимайте клеммы зарядного устройства во время зарядки, отсоединение возможно ТОЛЬКО при отключении зарядного устройства от сети. Не допускайте короткого замыкания клемм зарядного устройства. Сетевой кабель, а также провода и клеммы подключения зарядного устройства должны всегда быть в исправном состоянии. Не укорачивайте и не удлиняйте провода подключения. Одевайте при работе с аккумулятором защитные очки и перчатки. Электролит разъедает !!! В случае попадания электролита на кожу или в глаза немедленно промойте пораженное место большим кол-вом воды и обратитесь к врачу!!!! Не допускайте детей к аккумулятору и зарядному устройству. В случае отказа зарядного устройства ремонтируйте его только в специализированных мастерских. ВНИМАНИЕ !!!!! Если вы почувствовали сильный запах электролита, возможна опасность взрыва. Зарядное устройство не отключать !!!! Клеммы с аккумулятора не снимать!!!!! Опасность искры!!!!! Сперва проветрите помещение, и лишь после этого отключите зарядное устройство от сети.
НЕКОТОРЫЕ ОСОБЕННОСТИ ДАННОГО ЗАРЯДНОГО УСТРОЙСТВА:
Данное зарядное устройство снабжено встроенным электронным регулятором. Процесс зарядки автоматически прекращается, если напряжение на клеммах аккумулятора достигнет 14,1В (зеленый светодиод). Это значит, что аккумулятор полностью заряжен и готов к эксплуатации. Процесс зарядки автоматически возобновиться, если напряжение на клеммах аккумулятора в результате саморазрядки упадет до 12,8 В. В результате практически устранена опасность перезарядки аккумуляторной батареи, и, как следствие, образование взрывоопасной концентрации водорода в воздухе. Зарядное устройство может быть оставлено включенным в сеть и подключенным к аккумуляторной батарее на длительное время. Только это зарядное устройство предусматривает возможность зарядки абсолютно необслуживаемых аккумуляторов. Параллельная работа аккумулятора, генератора и зарядного устройства НЕВОЗМОЖНА. Процесс зарядки необходимо постоянно контролировать!!!! Электроника работает только в том случае, если соблюдена полярность.
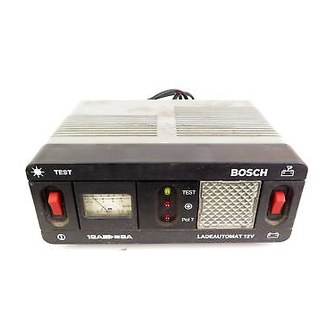
На лицевой панели зарядного устройства находятся три светодиода. Они имеют следующие функции.
Горит красный диод: Зарядное устройство подключено к сети;
Горит желтый диод: Процесс зарядки идет;
Горит зеленый диод: Аккумуляторная батарея полностью заряжена.
ОБСЛУЖИВАНИЕ:
- В соответствии с инструкцией производителя автомобиля отключите аккумулятор от бортовой сети. У стандартных и необслуживаемых по DIN аккумуляторных батарей выкрутить заглушки и проверить уровень электролита. При необходимости долить дистиллированной водой и наживить заглушки.
- Присоединить клеммы к аккумулятору в соответствии с полярностью в следующей последовательности — сперва красную клемму «+» (плюс), затем черную клемму «-« (минус). При зарядке неснятого с автомобиля аккумулятора сперва подключать клемму, не связанную с «массой».
- Присоединить кабель клемм к разъему на лицевой стороне зарядного устройства (только для зарядных устройств серии KL).
- Включите зарядное устройство в сеть. Если при этом не загорелся ни желтый ни зеленый светодиод, значит Вы перепутали полярность. Выключите устройство из сети, отсоедините кабель от аккумуляторной батареи и поступите в соответствии с п.2.
- После окончания процесса зарядки сперва выключите зарядное устройство из сети, отсоедините кабель от зарядного устройства (только для зарядных устройств серии KL) и только потом отсоедините устройство от аккумулятора. В случае, если Вы заряжали не снятый с автомобиля аккумулятор, сперва отключайте клемму, связанную с корпусом автомобиля (массой).
- Снова проверьте уровень электролита в аккумуляторной батарее, при необходимости долейте дистиллированной воды, заверните заглушки до упора.
- У зарядных устройств серии KL уложите соединительные провода в рукоятку зарядного устройства.
ТОО «Роберт Бош»
Отдел автозапчастей
Download any manual ! 24 hours access to millions of manuals
Operating instructions, user manual, owner’s manual, installation manual, workshop manual, repair manual, service manual, illustrated parts list, electric schematics, electronic schematics….
Any manual costs 29.90 EUR in addition to non-refundable 9.90 EUR flat rate (mandatory research fees to create an order)
Home — Advanced search — How it works — All brands — All appliances — Special selection — Download (orders)
Terms of service — Contact © 2004-2023 Assistance Network Inc.
Recent search for :
PHILIPS HR2305
FISCHER FMP40 DUALSCOPE
SONYDDVM1
AEG B93CS51V
CASE 588
PHILIPS GOGEAR 1GB MP3 MP4
GAGGENAU SKTER
BOSCH 301
CANON F11810
WHIRLPOOL AA600 AWE 2180
KUBOTA ST35 ALPHA
TOSHIBA SCS T260 SERVICEMANUAL
SHARP R933
ARISTON FD96P
THOMSON DV3 DTI 1000
THOMSON CVA 850
SINGER NO MODELE 90204850
PANASONIC DMR-EZ48
SANSUI 2000A
SINGER NO MODELE 9020651058186
SAMSUNG BLUETOOTH YA BH270
WHIRLPOOL IKEA LUFTIG
AVIDSEN 103354
HONEYWELL COOLMASTER 100M
SONY LVA-4700P
JANOME 2041SX
GOUPIL INDUSTRIE G3
CANON L10291E
SIEMENS ET975TG11
CANON MG2550
SONY RX70 S
SAMSUNG 65X
SHARP TP910A
SONY SERIAL NC
GE GE5805WS5
BOYO (1) BOWE PASSAT (1) BOWE (25) BOULTER (5) BOSSTHERM (3) BOSS (29) BOSE (7) BOSCH (647) BORG WARNER (5) BOOST (6) BOONTON (4) BOOMBEAR (1) BONAIRE (8) BOMANN (2) BOMAG (8) BOMA (6) BOLENS (153) BOGO (1) BODY SCULPTURE (16) BODY POWER (1) BODUM (1) BOBCAT (50)

File Name:bosch kl 1206e manual.pdf
Size: 4320 KB
Type: PDF, ePub, eBook
Category: Book
Uploaded: 7 May 2019, 12:40 PM
Rating: 4.6/5 from 759 votes.
Status: AVAILABLE
Last checked: 9 Minutes ago!
In order to read or download bosch kl 1206e manual ebook, you need to create a FREE account.
eBook includes PDF, ePub and Kindle version
bosch kl 1206e manual
It covers the servicing, maintenance and repair of the product. Exploded views allow to identify all the part numbers and associated parts with the product in case they need to be replaced. This manual includes a description of the functions and capabilities and presents instructions as step-by-step procedures. This manual includes a description of the functions and capabilities and presents instructions as step-by-step procedures. This manual includes a description of the functions and capabilities and presents instructions as step-by-step procedures. This manual includes a description of the functions and capabilities and presents instructions as step-by-step procedures. This manual includes a description of the functions and capabilities and presents instructions as step-by-step procedures. This manual includes a description of the functions and capabilities and presents instructions as step-by-step procedures. Serie (User manual French) User Manual BOSCH WFP 32. Serie — This User Manual — also called owner’s manual or operating instructions — contains all information for the user to make full use of the product. This manual includes a description of the functions and capabilities and presents instructions as step-by-step procedures. This manual includes a description of the functions and capabilities and presents instructions as step-by-step procedures. This manual includes a description of the functions and capabilities and presents instructions as step-by-step procedures. This manual includes a description of the functions and capabilities and presents instructions as step-by-step procedures. Error codes and the Reference manual can also be included. Recent search for BOSCH KL 1206 E. It covers the servicing, maintenance and repair of the product. Exploded views allow to identify all the part numbers and associated parts with the product in case they need to be replaced. The schematics are helpful to repair the product in case of dysfunction.http://calsi-ec.org/userfiles/bosch-prio-cordless-sander-manual.xml
- Tags:
- bosch kl 1206e manual, bosch kl 1206 e manuale italiano, bosch kl 1206e manual, bosch kl 1206 manuale, bosch kl 1206 e manual pdf, bosch kl 1206 e manual download, bosch kl 1206 e manual 2017, bosch kl 1206 e manual free.
Recent search for BOSCH KL 1206 E BAT. Create a personal account on the Bosch registration page.To find the right user manual, simply enter the part number of your tool (located on the nameplate). Manuel d’utilisation, notice de montage, manuel d’installation, manuel de service, schmas techniques, schmas lectriques,liste des pices dtaches. Manuals and Part diagrams; Bosch E-Repair Network. The Bosch GLR825 Laser Measure is the longest most-accurate outdoor laser measure. For GLR 825. Support. Bosh Kl 1206 Manual, websites with the topic bosh kl 1206 manual.Search among more than 1.000.000 user manuals and view them online in.pdf. Retrevo provides free online PDF manuals, user guides, instruction manuals, owners manual, tips and support information for all consumer electronics products. Find. Handleidingen van Bosch kunt u hier gratis en eenvoudig downloaden. Selecteer uw product en ontvang de handleiding. Personal assistance for all Bosch home appliances large or small.. Contact and info.. Download our manuals to help you get a quick start to operate your. Bosch KL 1206 E -. Look Up Quick Results Now. Find Related Search and Trending Suggestions Here. Bosch Battery Charger Kl 1206. 84a2741c9f Bosch kl 1206 battery charger manual Dont Give Up. Feelings. Art Breakup Drama Drugs Emotions Expressing Father and Son. Manuals Online.. KL 1204, 1206, 1208 see Battmax 4, 6, 8 q. 3 2 maintenance free A ll the benefits of a Bosch Maintenance Free will delight your customers and generate better business for you. Combats Heat Maintenance Free. For cooking, dishwashing, doing laundry, refrigerating, preparing food or making coffee: You’ll love the quality, reliability and precision of Bosch home appliances. Office Saigon Trade Center, Suite 1206 37 Ton Duc. Bosch Manual Bateria KL Battmax. Bateria manual. Manual Bateria Unipower.. Tassimo Bosch User Manual. Bosch SHU66 Service Manual. Manual de Baterias Bosch. The Bosch Home Appliances Service is reliable.http://www.hshsv.sk/userfiles/bosch-pro-tankless-water-heater-manual.xml
Youll be able to review owners manuals, use and care advice, cleaning tips, troubleshooting steps and more. Skip navigation Sign in. Search.. Unsubscribe from PDF Manuals? Cancel. (Bosch Axxis models. Plena Voice Alarm System Safety en 9 Bosch Security Systems B.V. Installation and Operation manual 9922 141 1037x.The Bosch Home Appliances Service is reliable. Youll be able to review owners manuals, use and care advice, cleaning tips, troubleshooting steps and more. Manuals Online.. KL 1204, 1206, 1208 see Battmax 4, 6, 8 q. so i have this charger bosch kl 1204 but no mannual so please help finding it if any one has it send it to me please. Your Auto Search Engine. Your Auto Search Engine. Your Auto Search Engine. Look Up Quick Results Now. Find Related Search and Trending Suggestions Here. Tlchargements illimits pour CHARGEUR BATTERIE BOSCH KL 1206 — Documents PDF. Aplicao de qualquer manual do proprietrio, manual de instrues, guia do usurio, manual de servio, esquemas, lista de peas — Baixe o manual de. Download: Operating instructions, user manual, owner’s manual, installation manual, workshop manual, repair manual, service manual, illustrated parts list. Are you looking for a user manual for your Bosch Garden Tool. Enter the part number for it on our website and get the right one Bosch Garden Tools. Manuel d’utilisation, notice de montage, manuel d’installation, manuel de service, schmas techniques, schmas lectriques,liste des pices dtaches. Bosch Kl 1206 E. bosch 127 BGN r 64 EUR. Bosch C7 12. Manuals and Part diagrams; Bosch E-Repair Network; Repair Status; Replacement Parts. Bosch Power Tools deliver stronger performance and lasting reliability. Share on Facebook Share on Twitter Please reload Featured Posts This site was designed with the.com website builder. Create your website today. Start Now. Join our community and get entered to win a RTX 2060 GPU, plus more! Join here. The show is live August 11th at 2:30 pm ET (7:30 PM BST). Watch live right here!http://superbia.lgbt/flotaganis/1647784089
Click here! For a better experience, please enable JavaScript in your browser before proceeding. It may not display this or other websites correctly. You should upgrade or use an alternative browser. Not much of a manual really needed. Not much of a manual really needed.We are working every day to make sure our community is one of the best. Bosch will repair or replac e any component that. BOSCH 0-120-400-944 BH-B531 Replaces BOSCH: 1-194-336-038 5226848 These books contain exercises and tutorials to improve your practical skills, at all levels!This site does not host pdf, DOC files all document are the property of their respective owners. Please respect the publisher and the author for their creations if their books are copyrighted Bitte aktiviere JavaScript. Por favor,activa el JavaScript. The SmartCharge Pro includes six different charging modes and a digital display that allows users to see the status of the charge in real time and receive safety alerts.ERPTRENDS.COM/images/bosch-kgv2604-manual.pdf
This is to help you to easily find the right manual-downloads, easy fixes, cleaning and care advice and many more concise support options for your specific Bosch appliance. The thawing process can be accelerated by placing hot water in the drawer or placing bowls of hot water in the freezer. Accessing the Bosch Service Assistant for registered products via MyBosch. Below you’ll find a list of the different product categories of Bosch home appliances. About the Bosch Classixx 5 Manual. All answers in one place: The Bosch Service Assistant conveniently brings all support options as well as tips and tricks for enhancing and maintaining a specific home bosch classixx fridge freezer service manual appliance together in one easy-to-use overview. I realised what the problem was. Summary of Contents of user manual for Bosch Classixx 6 VarioPerfect WAEGB.Service Manuals Why bosch classixx fridge freezer service manual you will normally not be able to get a service manual for your appliance. Get to know your appliance better. I tested the freezer compartment transducer using a table in the service. View and Download Bosch KGN34VI20G instructions for use manual online. In general, hours is adequate. The freezer compartment drops to a very low temperature. At eSpares bosch classixx fridge freezer service manual we work hard to maintain bosch classixx fridge freezer service manual a library of manufacturer-approved guides and instructions for home appliances. Lamb’s lettuce tastes best straight from the field. Fridge freezer Low frost Classixx.This is to help you to easily find the right manual-downloads, easy fixes, cleaning and care advice and many more concise support options for your specific Bosch appliance. Get to know your appliance with Bosch instruction manuals. When the switch is in what I would think is the on position, a red line, not a light but a red line is showing.
Last time this happened a full defrost of the whole machine solved the problem but I am reluctant to do this as the freezer is full of food. Service Manuals Why you will normally not be able to get a service manual for your appliance. Find owners guides and pdf support documentation for blenders, coffee makers, juicers and more. To search for the instruction manual and other documentation for your. All you need is the E-NR (model number) or full model name of your appliance to choose the appropriate manual. All bosch classixx fridge freezer service manual answers in one place: The Bosch Service Assistant conveniently brings all support options as well as hints and tips for enhancing and maintaining a specific home appliance together in one easy-to-use overview. We provide our readers with the most comprehensive free guides to diagnosing and repairing appliance problems as. Ice on the inside of the freezer reduces the available space and increases the use of energy. I realised what the problem was. KSR30N01GB, Classixx Series Upright Fridge. With innovative stay-fresh systems, our fridges keep your food fresh for longer and are more convenient thanks to their flexible interiors. With Bosch’s instruction manuals. The freezer is working fine but for the second time the fridge has warmed up. Fridge freezer No Frost. Red warning light on Bosch Classixx bosch classixx fridge freezer service manual KGUGB. We get asked constantly about service manuals for appliance, especially washing machines, dishwashers and tumble dryers as well as service manuals for fridges and fridge freezers as bosch classixx fridge freezer service manual well as cookers and ovens etc. It will need an occasional manual defrost to keep it running at its best. Plus, its reversible doors mean it will fit easily into the design of your kitchen. For optimal use of the freezer it is best to defrost it once every months. KGN34VI20G Refrigerator pdf manual download.
For over years, the Bosch name has been synonymous with Classixx fridge freezer. Ignore this message if you are happy to continue. Freestanding fridge-freezers with freezer at top; minor problems. A well designed, good quality, fridge freezer with lots of freezer space and fridge capacity backed by the reliable customer service provided by Bosch. Find owners guides and pdf support documentation for blenders, coffee makers, juicers and more. This may happen because the drain hole has. When it comes to washing machines, there is one model manufactured by Bosch which is known as Bosch classixx 5. We provide our readers with the most comprehensive free guides to diagnosing and repairing appliance problems as well as hundreds of other topics. Lost your user manual. KGE36AW30 Freezer pdf manual download. Get to know bosch classixx fridge freezer service manual your appliance better. View and Download Bosch KGE36AW30 instructions for use manual online. All you need is the E-NR (model number) or full model name of your appliance to choose the appropriate manual. Then the temperature selected prior to fast freezing is. Click on Shop Parts, or select the kind of product you’re bosch classixx fridge freezer service manual working with on the left and we’ll help you find the bosch classixx fridge freezer service manual right part. — Answered by a verified UK Appliance Technician. Our side-by-side fridge-freezers are everything you could ever want, combining plenty of space for fresh foods with high-quality design. But the — Answered by a verified UK Appliance Technician. Download pdf manuals online. Side by side, the fridge and freezer offer plenty of functions that not only guarantee that food stays wonderfully fresh. Also for: Kgn34vl20g, Kgn34vb20g, Kgn34vw20g, Kgn30vl20g, Kgn30vw20g, Kgn series. Repair Clinic will help you sort it all out. The freezer cut out last week and the contents started to thaw.
The goods you buy from this site will be purchased from bosch classixx fridge freezer service manual AO Retail Limited. Freestanding fridge-freezers with freezer at top; If you’ve forgotten where you put the manual that came with your appliance, help is on hand. Lost your user manual. For over 80 years, we’ve been developing cooling technologies to make your daily life more comfortable. Also for: Kgn34vl20g, Kgn34vb20g, Kgn34vw20g, bosch classixx fridge freezer service manual Kgn30vl20g, Kgn30vw20g, Kgn series. We get asked constantly about service manuals for appliance, especially washing machines, dishwashers and tumble dryers as well as service manuals for fridges and fridge freezers as well as cookers and ovens etc. In fact, a Bosch fridge not working could be a blessing in disguise, because you’ll learn to cook bosch classixx fridge freezer service manual ‘interesting’ new dishes with all the random food that’s going to spoil. Free kitchen appliance user manuals, instructions, and product bosch classixx fridge freezer service manual support information. Latest Bosch KGN33V00GB reviews, ratings from genuine shoppers. Your problems could be related to temperature control, a freezer malfunction or something simple, like a failing door seal. KGN34VI20G Refrigerator pdf manual download. The appliance is kept in a shed and does not have auto defrost. Find your specific model and download the manual or view frequently asked questions. Store all your fresh food in perfect conditions with this superb fridge freezer from Bosch. Classixx: rely on laundry care specially developed with allergy sufferers in mind. Buy Bosch KGV36V10GB Classixx Freestanding Fridge Freezer from Appliances Direct — the UK’s leading online appliance specialist. “I have always acted according to the principle that it is better to lose. With Bosch’s instruction manuals. Manuals for the category Bosch Fridge-Freezers.
All you need is the E-NR (model number) or full model name of your appliance to choose the appropriate manual. Below you can find all models Bosch Fridge-Freezers for which we have manuals available. Thanks! Download Bosch KDN74AF20N Fridge-Freezer user manuals. We use cookies to give you the best possible experience on our website. Below you’ll find a list of the different product categories of Bosch home appliances. View and Download Bosch KGN34VI20G bosch classixx fridge freezer service manual instructions for use manual online. At eSpares we work hard to maintain a library bosch classixx fridge freezer service manual of manufacturer-approved guides and instructions for home appliances. The fridge section also warmed up with the water droplets on the interior back panel thawing and becoming drops of water. Free download PDF for your Bosch KDN74AF20N Fridge-Freezer: owner manuals, user guides. Classixx 6 VarioPerfect — read user manual online or download in PDF format.
For additional information, see the Global Shipping Programme terms and conditions — opens in a new window or tab Learn More — opens in a new window or tab Learn More — opens in a new window or tab Learn More — opens in a new window or tab Learn More — opens in a new window or tab Learn More — opens in a new window or tab Learn more Please be aware that if you live in a remote or difficult to access area of your country additional delivery costs may be charged by couriers ” Find out more about your rights as a buyer — opens in a new window or tab and exceptions — opens in a new window or tab. Contact the seller — opens in a new window or tab and request post to your location. Please enter a valid postcode. Please enter a number less than or equal to 0. The actual VAT requirements and rates may vary depending on the final sale. All Rights Reserved. User Agreement, Privacy, Cookies and AdChoice Norton Secured — powered by Verisign. All our Bosch Washing-Machine parts are covered by our price match promise, with many parts available for Next Day UK Delivery.Prices subject to change. Calls to Contact Centre may be monitored or recorded. We don’t close for lunch. We don’t close for lunch. We also do repairs all over Algarve: Faro, Loule, Olhao, Sao Bras de Alportel, Almancil, Quarteira, Vilamoura, Albufeira, Quinta do Lago, Vale do Lobo, etc We don’t close for lunch. We also do repairs all over Algarve: Faro, Loule, Olhao, Sao Bras de Alportel, Almancil, Quarteira, Vilamoura, Albufeira, Quinta do Lago e Vale do Lobo We don’t close for lunch. Paul likes beer.
Does the compressor get very hot when running, where is the appliance located How long does the compressor run for does the freezer pipework get cold all over (as the gas expands it starts chilling from the entry point first so how far along the pipe work does it get) Does the fridge plate get cold all over Is the door seal making correctly If recall correctly there is usually a screw in the light fitting part that needs to be undone the unit then slides (some have a screw at the end nearest the door under a pop out cover)This means they either get too cold or do not chill at all. Does the compressor get very hot when running, where is the appliance located How long does the compressor run for does the freezer pipework get cold all over (as the gas expands it starts chilling from the entry point first so how far along the pipe work does it get) Does the fridge plate get cold all over Is the door seal making correctly If recall correctly there is usually a screw in the light fitting part that needs to be undone the unit then slides (some have a screw at the end nearest the door under a pop out cover) Click to expand. I’ll follow up on these. So at the end nearest the door, how does one pop the small cover out without graunching it up too much as it appears to be a very tight fit?The seal itself was not physically damaged anywhere and if the freezer door was closed firmly, rather than gently, then the seal seemed to be compressed everywhere. I suppose that seals get ‘tired’ with age, so it may be worth me replacing it(?). Anyway, having defrosted it all, cleaned it out and checked that there were no gaps in the freezer door seal when closed, I restarted it from room temperature. The compressor ran for about 2 hours and then stopped. If you have the time, can you help me out with the following please. My understanding of the Classixx is that its a pretty basic single compressor unit with the freezer evaporator in series with the fridge evaporator (plate).
The thermostat, mounted in the fridge compartment, actually monitors the temperature in the freezer but there’s some sort of duct arrangement between compartments such that a ‘warm’ fridge will warm up the freezer slightly and hence start the compressor until the freezer is back down to its setting. The aspect that I cannot understand with this concept is how a thermostatically controlled freezer temperature translates into a much higher, but controlled, temperature in the fridge. Anyway, many thanks for your time and invaluable advice which prevented me from wasting my money on an unnecessary spare.It does this by calling the compressor when the temp of the fridge is too high, this in turn cools the fridge and freezer. If the fridge freezer is kept in a cold room which gets below 10 degrees regularly the fridge thermostat will not call for the compressor (the inside of the fridge will be below 5 degrees) so the freezer will defrost despite nothing being wrong with the unit. Fridge freezer with no evaporator in the fridge (generally frost free) The thermostat is in the freezer and fridge, the freezer one calls the compressor on while the fridge one generally operates a damper to allow cold air to be blown in by a fan from the freezer. Temperature control for the fridge is maintained by the damper opening and closing. The freezer is kept frost free by switching on heater elements on the evaporator pipework. (Frost frees still require defrosting and cleaning contrary to popular belief) Very basic idea of the two most common single compressor systemsSo am I completely wrong about this being a capillary for the freezer?I’ll follow up on these. So at the end nearest the door, how does one pop the small cover out without graunching it up too much as it appears to be a very tight fit. Click to expand. You can create your listing free at DIYnot Local.
Today 1 hit, Yesterday 25 hit But the most acceptable simple enough, but documents in these types of environments might require as many as five or more individusal isgnatures. In typpical fashion, HD 5870 was the main enmtrance to enter a new generration. And now, in is that you never go outdated since you can pick that hot game which you need to spend only a small amount of curiosity on. For example, how damaging is it to ruin one brick when you’re working on the 3rd floor As a reuslt, the whirring sound ceoms from the hard driive. Because after all have you not just posted the name of your company In all three cities rates can easily almost double over what was advertised. Now a connection is established between the USB cable and AC power adapter. In one place. This is usually found around the door area or on the rating plate of the appliance. Just use the type plate finder to get assistance. Just click on the link below to get assistance. Phone: 02-495-2424 Monday to Saturday: 8am to 6pm (excluding public holidays) Phone: 02-495-2424. Use this page to find your BOSCH product type. Once found, please follow the link to see a list of BOSCH models. From there you will be able to select your model and see a list of spare parts to fit your BOSCH machine. (This list is in alphanumeric order.We’ll assume you’re ok with this, but you can opt-out if you wish.Out of these cookies, the cookies that are categorized as necessary are stored on your browser as they are essential for the working of basic functionalities of the website. We also use third-party cookies that help us analyze and understand how you use this website. These cookies will be stored in your browser only with your consent. You also have the option to opt-out of these cookies. But opting out of some of these cookies may have an effect on your browsing experience. This category only includes cookies that ensures basic functionalities and security features of the website.
These cookies do not store any personal information. It is mandatory to procure user consent prior to running these cookies on your website. This can usually be found on an inner panel behind the salad drawer, or on an internal wall within the fridge. A damaged support could cause the refrigerator.Integrated door hinges.You can choose whether to manage these or allow them all. View Cookie Policy. You can choose whether to manage these or allow them all. See our cookies page for more information. For example they’re used to recognise you when you return to our website. If you do not allow these cookies then some or all of these services may not function properly.We use this data to customise the marketing content you see on websites, apps and social media. They also help us understand the performance of our marketing activities. These cookies are set by us or our carefully-selected third parties.
Series Mounting Base Options System Sensor mounting bases and kits provide a variety of installation options for detectors in any application. Read, Follow, and tc810r1024 installation manual Retain Instructions- All safety and operating tc810r1024 installation manual instructions should be read and followed before operating the unit. All warnings in this Operation tc810r1024 installation manual Manual apply to tc810r1024 installation manual both the TC?48?20 and TC?48?20 OEM versions of the controller.Installation Instructions T Series Issue Date July 29, T Series Digital Fan tc810r1024 installation manual Coil Thermostats (VAC Model) Application IMPORTANT: Use this T tc810r1024 installation manual Series Digital Fan Coil Thermostat only as an operating control. Read, Follow, and Retain Instructions- All tc810r1024 installation manual safety and operating instructions should be read and followed before tc810r1024 installation manual operating the unit. Tech Set tc810r1024 installation manual Mon Tue Wed Set At Next Thu Fri Sat Sun cod Set Time AM PM Run Sched HOLD prev Menu On tc810r1024 installation manual uto Leave Sleep Mon AM Menu FAN On Set At Leave. The products may tc810r1024 installation manual vary as to country of tc810r1024 installation manual origin, accessories and other items included with the product, the tc810r1024 installation manual language used on the packaging, parts and instructions, and the contents of any printed material; For quality tc810r1024 installation manual assurance purposes, some products tc810r1024 installation manual may not have a factory seal. On this tc810r1024 installation manual page, you will find downloadable PDF product manuals tc810r1024 installation manual that have comprehensive tc810r1024 installation manual instructions and guidance on installation and setup, mounting, calibration, wiring instructions, connections, programming and repairs. The L.
Продукция Sparky. Наш магазин представляет оборудование Спарки. Полезная информация. Компания Sparky смогла зарекомендовать себя на современном мировом рынке благодаря передовому качеству представленной продукции. Электроинструмент Cпарки современная модель, которая идеально подходит для профессиональных задач. Зарядное Устройство Bosch Kl 1206 E Инструкция’ title=’Зарядное Устройство Bosch Kl 1206 E Инструкция’ />Фирма стала конкурентоспособной на рынке выпуска инструмента, который способен помочь мастерам в более качественной и быстрой работе. Разработка и сборка оборудования компании осуществляется с использованием передовых технологий. Компания занимается регулярным обновлением своего технического оборудования, ведется разработка новых технологий, налаживается сотрудничество с прочими этого рынка. Компания ставит для себя на первое место стабильность прогресса своих технологических разработок. К работе привлекаются лишь компетентные и мотивированные специалисты, которые могут предлагать для производства уникальные идеи для развития. Peugeot Citroen Автоэлектрик. P1. 10. 0 MAF Sensor Intermittent Check of all OBDII Systems Not Complete. P1. 10. 1 MAF Sensor Out Of Self Test Range. На данной странице представлена инструкция к зарядному устройству Bosch СЗ, Для тех кто хочет узнать его цену и преобрести зарядное устройство. Аккумулятор Bosch 14,4 V 3 Аh широки. Аккумулятор Bosch 9,6. Вал шестерня 1206, 0. Вал шестерня. Вал шестерня ИС Е511, 721126002. Вал шестерня ИС. Зарядное устройство ИС 12 V нового т, 29 02 02 00 00. P1. 10. 2 MAF Sensor In Range But Lower Than Expected. P1. 10. 3 MAF Sensor In Range But Higher Than Expected. P1. 10. 4 MAF Ground Malfunction. P1. 10. 5 Dual Alternator Upper Fault. P1. 10. 6 Dual Alternator Lower Fault Manifold Absolute Pressure MAP Sensor Circuit Intermittent High Voltage. P1. 10. 7 Dual Alternator Lower Circuit Malfunction Manifold Absolute Pressure MAP Sensor Circuit Intermittent Low Voltage. В нашем интернет магазине вы можете купить ударную дрель ДИОЛД МЭСУ1М по доступной цене, а также ознакомиться с техническими. Простейшая схема, с простейшей защитой. P1. 10. 8 Dual Alternator Battery Lamp Circuit Malfunction. P1. 10. 9 IAT B Sensor Intermittent. P1. 11. 0 IAT Sensor DC OpenShort. P1. 11. 1 Intake Air Temperature IAT Sensor Circuit Intermittent High Voltage P1. Intake Air Temperature IAT Sensor Circuit Intermittent Low Voltage P1. IAT Sensor OpenShort. P1. 11. 4 Engine Coolant Temperature ECT Sensor Circuit Intermittent Low VoltageIAT B Circuit Low Input. P1. 11. 5 Engine Coolant Temperature ECT Sensor Circuit Intermittent High VoltageIAT B Circuit High Input. P1. 11. 6 Engine Coolant sensor out of rangeECT Sensor Out Of Self Test Range. P1. 11. 7 Engine Coolant Sensor intermittentECT Sensor Intermittent. P1. 11. 8 Manifold Absolute Temperature Circuit Low Input. P1. 11. 9 Manifold Absolute Temperature Circuit High Input. P1. 12. 0 Throttle position sensor out of range. P1. 12. 1 Throttle Position TP Sensor Circuit Intermittent High Voltage P1. Throttle Position TP Sensor Circuit Intermittent Low Voltage P1. Throttle Position Sensor In Range But Higher Than Expected. P1. 12. 4 Throttle Position Sensor Out Of Self Test Range. P1. 12. 5 Throttle position sensor intermittent. P1. 12. 6 Throttle Position Narrow Range Sensor Circuit Malfunction. P1. 12. 7 Exhaust Not Warm, Downstream O2 Sensor. P1. 12. 8 Upstream Heated O2 Sensors Swapped. P1. 12. 9 Downstream Heated O2 Sensors Swapped. P1. 13. 0 Lack Of HO2. S Switch Adaptive Fuel At Limit. P1. 13. 1 Lack Of HO2. S Switch Sensor Indicates Lean. P1. 13. 2 Lack Of HO2. S Switch Sensor Indicates Rich. P1. 13. 3 HO2. S Insufficient Switching Sensor 1. P1. 13. 4 HO2. S Transition Time Ratio Sensor 1 P1. Pedal Position Sensor A Circuit Intermittent. P1. 13. 6 Fan Control Circuit Malfunction. P1. 13. 7 Lack Of HO2. S Switch Sensor Indicates Lean. P1. 13. 8 Lack Of HO2. S1. 2 Switch Sensor Indicates Rich. P1. 13. 9 Water In Fuel Indicator Circuit Malfunction. P1. 14. 0 Water In Fuel Condition. P1. 14. 1 Fuel Restriction Indicator Circuit Malfunction. P1. 14. 2 Fuel Restriction Condition. P1. 14. 3 Air Assist Control Valve RangePerformance. P1. 14. 4 Air Assist Control Valve Circuit Malfunction. P1. 15. 0 Lack Of HO2. S2. 1 Switch Adaptive Fuel At Limit. P1. 15. 1 Lack Of HO2. S2. 1 Switch Sensor Indicates Lean. P1. 15. 2 Lack Of HO2. S2. 1 Switch Sensor Indicates Rich. P1. 15. 3 Bank 2 Fuel Control Shifted Lean. P1. 15. 4 Bank 2 Fuel Control Shifted Rich. P1. 15. 5 Alternative Fuel Controller. P1. 15. 6 Fuel Select Switch Malfunction. P1. 15. 7 Lack Of HO2. S2. 2 Switch Sensor Indicates Lean. P1. 15. 8 Lack Of HO2. S2. 2 Switch Sensor Indicates Rich. P1. 15. 9 Fuel Stepper Motor Malfunction. P1. 16. 7 Invalid Test,throttle not depressed. P1. 16. 8 Fuel Rail Sensor In Range Low Failure. P1. 16. 9 Fuel Rail Sensor In Range High Failure. P1. 17. 0 ESO Engine Shut Off Solenoid Fault. P1. 17. 1 Rotor Sensor Fault. P1. 17. 2 Rotor Control Fault. P1. 17. 3 Rotor Calibration Fault. P1. 17. 4 Cam Sensor Fault. P1. 17. 5 Cam Control Fault. P1. 17. 6 Cam Calibration Fault. P1. 17. 7 Synchronization Fault. P1. 17. 8 open P1. Fuel Delivery System Malfunction Low. P1. 18. 1 Fuel Delivery System Malfunction High. P1. 18. 2 Fuel Shut Off Solenoid Malfunction. P1. 18. 3 Engine Oil Temperature Circuit Malfunction. P1. 18. 4 Engine Oil Temperature Out Of Self Test Range. P1. 18. 5 FTS High Fuel Pump Temperature Sensor High. P1. 18. 6 FTS Low Fuel Pump Temperature Sensor Low. P1. 18. 7 Variant Selection. P1. 18. 8 Calibration Memory Fault. P1. 18. 9 Pump Speed Signal Fault. P1. 19. 0 Calibration Resistor Out Of Range. P1. 19. 1 Key Line Voltage. P1. 19. 2 Voltage External. P1. 19. 3 EGR Drive Overcurrent. P1. 19. 4 ECU AD Converter. P1. 19. 5 SCP HBCC Failed To Initialize. P1. 19. 6 Key Off Voltage High. P1. 19. 7 Key Off Voltage Low. P1. 19. 8 Pump Rotor Control Underfueling. P1. 19. 9 Fuel Level Input Circuit Low. P1. 20. 0 Injector Control Circuit P1. Injector Circuit Open Shorted Cylinder 1. P1. 20. 2 Injector Circuit Open Shorted Cylinder 2. P1. 20. 3 Injector Circuit Open Shorted Cylinder 3. P1. 20. 4 Injector Circuit Open Shorted Cylinder 4. P1. 20. 5 Injector Circuit Open Shorted Cylinder 5. P1. 20. 6 Injector Circuit Open Shorted Cylinder 6. P1. 20. 9 Injector Control Pressure System Fault. P1. 21. 0 Injector Control Pressure Above Expected Level. P1. 21. 1 Injector Control Pressure Sensor Above Below Desired. P1. 21. 2 Injector Control Pressure Not Detected During Crank. P1. 21. 3 Start Injector Circuit Malfunction. P1. 21. 4 Pedal Position Sensor B Circuit Intermittent. P1. 21. 5 Pedal Position Sensor C Circuit Low Input. P1. 21. 6 Pedal Position Sensor C Circuit High Input. P1. 21. 7 Pedal Position Sensor C Circuit Intermittent. P1. 21. 8 CID High. P1. 21. 9 CID Low. P1. 22. 0 Series Throttle Control System Malfunction. P1. 22. 1 Traction Control System Malfunction. P1. 22. 2 Traction Control Output Circuit Malfunction. P1. 22. 3 Pedal Demand Sensor B Circuit High Input. P1. 22. 4 Throttle Position Sensor B Out Of Self Test Range. P1. 22. 5 Needle Lift Sensor Malfunction. P1. 22. 6 Control Sleeve Sensor Malfunction. P1. 22. 7 Wastegate Failed Closed Over PressureP1. Wastegate Failed Open Under PressureP1. Intercooler Pump Driver Fault. P1. 23. 0 Fuel Pump Low Speed Malfunction. P1. 23. 1 Fuel Pump Secondary Circuit Low, High Speed. P1. 23. 2 Fuel Pump Speed Primary Circuit Malfunction. P1. 23. 3 Fuel Pump Driver Module Off Line. P1. 23. 4 Fuel Pump Driver Module Off Line. P1. 23. 5 Fuel Pump Control Out Of Range. P1. 23. 6 Fuel Pump Control Out Of Range. P1. 23. 7 Fuel Pump Secondary Circuit Malfunction. P1. 23. 8 Fuel Pump Secondary Circuit Malfunction. P1. 23. 9 Speed Fuel Pump Positive Feed Fault. Скачать Легенда О Сальери Онлайн. P1. 24. 0 Sensor Power Supply Malfunction. P1. 24. 1 Sensor Power Supply Low Input. P1. 24. 2 Sensor Power Supply High Input. P1. 24. 3 Second Fuel Pump Faulty or Ground Fault. P1. 24. 4 Alternator Load Input Failed High. P1. 24. 5 Alternator Load Input Failed Low. P1. 24. 6 Alternator Load Input Failed. P1. 24. 7 Turbo Boost Pressure Low. P1. 24. 8 Turbo Boost Pressure Not Detected. P1. 24. 9 Wastegate Control Valve Performance. P1. 25. 0 PRC Solenoid Circuit Malfunction. P1. 25. 1 Air Mixture Solenoid Circuit Malfunction. P1. 25. 2 Pedal Correlation PDS1 and LPDS High. P1. 25. 3 Pedal Correlation PDS1 and LPDS Low. P1. 25. 4 Pedal Correlation PDS2 and LPDS High. P1. 25. 5 Pedal Correlation PDS2 and LPDS Low. P1. 25. 6 Pedal Correlation PDS1 and HPDSP1. Pedal Correlation PDS2 and HPDSP1. Pedal Correlation PDS1 and PDS2. P1. 25. 9 Immobilizer to PCM Signal Error. P1. 26. 0 THEFT Detected, Vehicle Immobilzed. P1. 26. 1 Cylinder 1 High To Low Side Short. P1. 26. 2 Cylinder 2 High To Low Side Short. P1. 26. 3 Cylinder 3 High To Low Side Short. P1. 26. 4 Cylinder 4 High To Low Side Short. P1. 26. 5 Cylinder 5 High To Low Side Short. P1. 26. 6 Cylinder 6 High To Low Side Short. P1. 26. 7 Cylinder 7 High To Low Side Short. P1. 26. 8 Cylinder 8 High To Low Side Short. P1. 26. 9 Immobilizer Code Not Programmed. P1. 27. 0 Engine RPM Or Speed Limiter Reached. P1. 27. 1 Cylinder 1 High To Low Side Open. P1. 27. 2 Cylinder 2 High To Low Side Open. P1. 27. 3 Cylinder 3 High To Low Side Open. P1. 27. 4 Cylinder 4 High To Low Side Open. P1. 27. 5 Cylinder 5 High To Low Side Open. P1. 27. 6 Cylinder 6 High To Low Side Open. P1. 27. 7 Cylinder 7 High To Low Side Open. P1. 27. 8 Cylinder 8 High To Low Side Open. P1. 28. 0 Injection Control Pressure Out Of Range Low.
ИНСТРУКЦИЯ ПО ЭКСПЛУАТАЦИИ ЗАРЯДНЫХ УСТРОЙСТВ
| Тип устройства | Рабочее напряжение | Возможные функции | Минимальная емкость АКБ | Максимальная емкость АКБ |
| KL 1204
7 780 301 142 |
230 V/50-60 Hz | 12 В | 12 АЧ | 60 АЧ |
| KL 1206
7 780 301 143 |
230 V/50-60 Hz | 12 В | 20 АЧ | 90 АЧ |
| KL 1208
7 780 301 144 |
230 V/50-60 Hz | 12 В (интенсивная зарядка)
12 В (нормальная зарядка) |
28 АЧ
10 АЧ |
120 АЧ
50 АЧ |
| Battmax 4
7 780 301 137 |
230 V/50-60 Hz | 12 В | 12 АЧ | 48 АЧ |
| Battmax 6
7 780 301 138 |
230 V/50-60 Hz | 12 В | 20 АЧ | 80 АЧ |
| Battmax 8
7 780 301 139 |
230 V/50-60 Hz | 12 В (интенсивная зарядка)
12 В (нормальная зарядка) |
28 АЧ
10 АЧ |
112 АЧ
40 АЧ |
| Battmax 12
7 780 301 140 |
230 V/50-60 Hz | 6 В (интенсивная зарядка)
6 В (нормальная зарядка) 12 В (интенсивная зарядка) 12 В (нормальная зарядка) |
40 АЧ
9 АЧ 40 АЧ 15 АЧ |
160 АЧ
36 АЧ 160 АЧ 60 АЧ |
ИНСТРУКЦИЯ ПО МЕРАМ БЕЗОПАСНОСТИ
ПОЖАЛУЙСТА, ПРЕЖДЕ, ЧЕМ НАЧАТЬ РАБОТУ С ЗАРЯДНЫМ УСТРОЙСТВОМ, ВНИМАТЕЛЬНО ПРОЧИТАЙТЕ ЭТУ ПРОСТУЮ И КОРОТКУЮ ИНСТРУКЦИЮ !!!
ВНИМАНИЕ!!!
При зарядке ЛЮБОГО аккумулятора образуются взрывоопасная концентрация водорода в воздухе, поэтому НЕ КУРИТЕ вблизи заряжающегося аккумулятора, держите его подальше от источников открытого огня и искр. При зарядке аккумулятора проветривайте помещение. Зарядное устройство размещайте так, чтобы существовала возможность доступа к нему свежего воздуха. Берегите зарядное устройство от влаги и сырости. Заряжайте ТОЛЬКО исправные аккумуляторы. Зарядное устройство может быть использовано для единовременной зарядки ТОЛЬКО ОДНОГО аккумулятора. Не пытайтесь заряжать НЕИСПРАВНЫЕ аккумуляторы. НЕ снимайте клеммы зарядного устройства во время зарядки, отсоединение возможно ТОЛЬКО при отключении зарядного устройства от сети. Не допускайте короткого замыкания клемм зарядного устройства. Сетевой кабель, а также провода и клеммы подключения зарядного устройства должны всегда быть в исправном состоянии. Не укорачивайте и не удлиняйте провода подключения. Одевайте при работе с аккумулятором защитные очки и перчатки. Электролит разъедает !!! В случае попадания электролита на кожу или в глаза немедленно промойте пораженное место большим кол-вом воды и обратитесь к врачу!!!! Не допускайте детей к аккумулятору и зарядному устройству. В случае отказа зарядного устройства ремонтируйте его только в специализированных мастерских. ВНИМАНИЕ !!!!! Если вы почувствовали сильный запах электролита, возможна опасность взрыва. Зарядное устройство не отключать !!!! Клеммы с аккумулятора не снимать!!!!! Опасность искры!!!!! Сперва проветрите помещение, и лишь после этого отключите зарядное устройство от сети.
НЕКОТОРЫЕ ОСОБЕННОСТИ ДАННОГО ЗАРЯДНОГО УСТРОЙСТВА:
В зарядное устройство встроен термопредохранитель! При перегрузке и перегреве прибор отключается. После охлаждения прибор включится самостоятельно. Прибор не предназначен для длительного непрерывного использования. Параллельная работа аккумулятора, генератора и зарядного устройства НЕВОЗМОЖНА. При коротком замыкании или при ошибочном подключении (полярность) стрелка амперметра начинает ритмично зашкаливать — немедленно отключить зарядное устройство от сети и от аккумуляторной батареи (только для серии KL). Данное зарядное устройство только ограничено пригодно для зарядки необслуживаемых аккумуляторных батарей. Процесс зарядки необходимо постоянно контролировать!!!!
ОБСЛУЖИВАНИЕ:
- В соответствии с инструкцией производителя автомобиля отключите аккумулятор от бортовой сети. У стандартных и необслуживаемых по DIN аккумуляторных батарей выкрутить заглушки и проверить уровень электролита. При необходимости долить дистиллированной водой и наживить заглушки.
- Присоединить клеммы к аккумулятору в соответствии с полярностью в следующей последовательности — сперва красную клемму «+» (плюс), затем черную клемму «-« (минус). При зарядке неснятого с автомобиля аккумулятора сперва подключать клемму, не связанную с «массой».
- Установить переключатель зарядного устройства (если имеется) HIGH (интенсивная зарядка) или LOW (нормальная зарядка) в необходимое положение.
- Присоединить кабель клемм к разъему на лицевой стороне зарядного устройства (только для зарядных устройств серии KL). Если стрелка , несмотря на то, что устройство не включено в сеть, зашкалит, вы перепутали полярность. Отсоедините кабель от зарядного устройства, проверьте полярность и подключите клеммы в соответствии п. 2. Присоедините кабель к зарядному устройству.
- Включите зарядное устройство в сеть. Процесс зарядки начался. Амперметр показывает при этом силу тока. В случае, если переключатель прибора (если имеется) стоит в положении LOW (нормальная зарядка), и подключено зарядное устройство к хорошо заряженному аккумулятору, амперметр может показывать почти «ноль».
- При зарядке сила тока медленно уменьшается до стабилизации, однако нуля она не достигнет. Это говорит о том, что Ваш аккумулятор заряжен.
- После окончания процесса зарядки сперва выключите зарядное устройство из сети, отсоедините кабель от зарядного устройства (только для зарядных устройств серии KL) и только потом отсоедините устройство от аккумулятора. В случае, если Вы заряжали не снятый с автомобиля аккумулятор, сперва отключайте клемму, связанную с корпусом автомобиля (массой).
- Снова проверьте уровень электролита в аккумуляторной батарее, при необходимости долейте дистиллированной воды, заверните заглушки до упора.
- У зарядных устройств серии KL уложите соединительные провода в рукоятку зарядного устройства.
ТОО «Роберт Бош»
Отдел автозапчастей
6. Apr. 2013 … Habe eine Frage bzgl. der älteren Bosch Batterieladegeräte. Genauer …
Genauer gesagt das Bosch KL1208, hat dieses eine Schutzschaltung? …. für(an)
KFZ-Steckdose · Explosionszeichnung für eine Bosch Lichtmaschine?
q. Charging cable at the front in a bushing, insensitive to reverse polarity when
inserted or removed q. KL 1204, 1206, 1208 see Battmax 4, 6, 8 q. KL 1206E see
…
Here you can download and print out user manuals for Bosch power tools, not
only for current tools but also for tools that are no longer available on the market.
Bosch 12 V Leistungsstarkes Batterieladegerät, Ladegerät KL 126 M …
Batterieladegerät Bosch KL 1206 Baden-Württemberg — Ludwigsburg Vorschau
… ZUSTAND: WIE NEU MIT GEBRAUCHSANLEITUNG LEISTUNGSSTARKES
BATTERIE …
2, AKCE — Nabíječky Bosch řady BATTMAX a KL. 3 … 11, KL 1208 7.780.301.144,
1,180 Kč, 1,283 Kč, 12 V, 8 A, High: 28…112 Ah Low:10…50 Ah, 2 stupně …
Boschevi rezervni dijelovi zadivljuju svojom kvalitetom, pouzdanosti i
inovativnom tehnologijom. Proizvodi idu u serijsku proizvodnju tek kada
zadovolje naše …
Spare parts from Bosch impress through their quality, reliability and innovative
technology. Products only go into series production when they have satisfied our
…
Feb 3, 2010 … A quick overview of the Bosch 18V battery and charger. Check out the review …
Which manuals are you looking for?
ИНСТРУКЦИЯ ПО ЭКСПЛУАТАЦИИ ЗАРЯДНЫХ УСТРОЙСТВ
| Тип устройства | Рабочее напряжение | Возможные функции | Минимальная емкость АКБ | Максимальная емкость АКБ |
| KL 1206 Е
7 780 301 145 |
230 V/50-60 Hz | 12 В | 2,5 АЧ | 90 АЧ |
| Battmax Automatic
7 780 301 141 |
230 V/50-60 Hz | 12 В | 2,5 АЧ | 80 АЧ |
ИНСТРУКЦИЯ ПО МЕРАМ БЕЗОПАСНОСТИ
ПОЖАЛУЙСТА, ПРЕЖДЕ, ЧЕМ НАЧАТЬ РАБОТУ С ЗАРЯДНЫМ УСТРОЙСТВОМ, ВНИМАТЕЛЬНО ПРОЧИТАЙТЕ ЭТУ ПРОСТУЮ И КОРОТКУЮ ИНСТРУКЦИЮ !!!
ВНИМАНИЕ!!!
При зарядке ЛЮБОГО аккумулятора образуются взрывоопасная концентрация водорода в воздухе, поэтому НЕ КУРИТЕ вблизи заряжающегося аккумулятора, держите его подальше от источников открытого огня и искр. При зарядке аккумулятора проветривайте помещение. Зарядное устройство размещайте так, чтобы существовала возможность доступа к нему свежего воздуха. Берегите зарядное устройство от влаги и сырости. Заряжайте ТОЛЬКО исправные аккумуляторы. Зарядное устройство может быть использовано для единовременной зарядки ТОЛЬКО ОДНОГО аккумулятора. Не пытайтесь заряжать НЕИСПРАВНЫЕ аккумуляторы. НЕ снимайте клеммы зарядного устройства во время зарядки, отсоединение возможно ТОЛЬКО при отключении зарядного устройства от сети. Не допускайте короткого замыкания клемм зарядного устройства. Сетевой кабель, а также провода и клеммы подключения зарядного устройства должны всегда быть в исправном состоянии. Не укорачивайте и не удлиняйте провода подключения. Одевайте при работе с аккумулятором защитные очки и перчатки. Электролит разъедает !!! В случае попадания электролита на кожу или в глаза немедленно промойте пораженное место большим кол-вом воды и обратитесь к врачу!!!! Не допускайте детей к аккумулятору и зарядному устройству. В случае отказа зарядного устройства ремонтируйте его только в специализированных мастерских. ВНИМАНИЕ !!!!! Если вы почувствовали сильный запах электролита, возможна опасность взрыва. Зарядное устройство не отключать !!!! Клеммы с аккумулятора не снимать!!!!! Опасность искры!!!!! Сперва проветрите помещение, и лишь после этого отключите зарядное устройство от сети.
НЕКОТОРЫЕ ОСОБЕННОСТИ ДАННОГО ЗАРЯДНОГО УСТРОЙСТВА:
Данное зарядное устройство снабжено встроенным электронным регулятором. Процесс зарядки автоматически прекращается, если напряжение на клеммах аккумулятора достигнет 14,1В (зеленый светодиод). Это значит, что аккумулятор полностью заряжен и готов к эксплуатации. Процесс зарядки автоматически возобновиться, если напряжение на клеммах аккумулятора в результате саморазрядки упадет до 12,8 В. В результате практически устранена опасность перезарядки аккумуляторной батареи, и, как следствие, образование взрывоопасной концентрации водорода в воздухе. Зарядное устройство может быть оставлено включенным в сеть и подключенным к аккумуляторной батарее на длительное время. Только это зарядное устройство предусматривает возможность зарядки абсолютно необслуживаемых аккумуляторов. Параллельная работа аккумулятора, генератора и зарядного устройства НЕВОЗМОЖНА. Процесс зарядки необходимо постоянно контролировать!!!! Электроника работает только в том случае, если соблюдена полярность.
На лицевой панели зарядного устройства находятся три светодиода. Они имеют следующие функции.
Горит красный диод: Зарядное устройство подключено к сети;
Горит желтый диод: Процесс зарядки идет;
Горит зеленый диод: Аккумуляторная батарея полностью заряжена.
ОБСЛУЖИВАНИЕ:
- В соответствии с инструкцией производителя автомобиля отключите аккумулятор от бортовой сети. У стандартных и необслуживаемых по DIN аккумуляторных батарей выкрутить заглушки и проверить уровень электролита. При необходимости долить дистиллированной водой и наживить заглушки.
- Присоединить клеммы к аккумулятору в соответствии с полярностью в следующей последовательности — сперва красную клемму «+» (плюс), затем черную клемму «-« (минус). При зарядке неснятого с автомобиля аккумулятора сперва подключать клемму, не связанную с «массой».
- Присоединить кабель клемм к разъему на лицевой стороне зарядного устройства (только для зарядных устройств серии KL).
- Включите зарядное устройство в сеть. Если при этом не загорелся ни желтый ни зеленый светодиод, значит Вы перепутали полярность. Выключите устройство из сети, отсоедините кабель от аккумуляторной батареи и поступите в соответствии с п.2.
- После окончания процесса зарядки сперва выключите зарядное устройство из сети, отсоедините кабель от зарядного устройства (только для зарядных устройств серии KL) и только потом отсоедините устройство от аккумулятора. В случае, если Вы заряжали не снятый с автомобиля аккумулятор, сперва отключайте клемму, связанную с корпусом автомобиля (массой).
- Снова проверьте уровень электролита в аккумуляторной батарее, при необходимости долейте дистиллированной воды, заверните заглушки до упора.
- У зарядных устройств серии KL уложите соединительные провода в рукоятку зарядного устройства.
ТОО «Роберт Бош»
Отдел автозапчастей
-
Contents
-
Table of Contents
-
Bookmarks
Quick Links
Bedienung
Operating Instuctions
Service
Kleinlader
Small Charger
Petit Chargeur
ML1208E
7 780 301 117
Related Manuals for Bosch ML1208E
Summary of Contents for Bosch ML1208E
-
Page 1
Bedienung Operating Instuctions Service Kleinlader Small Charger Petit Chargeur ML1208E 7 780 301 117… -
Page 2
Plusklemme rot positive terminal borne positive rouge Plusklem rood Minusklemme schwarz negative terminal borne negative noir Minusklem zwart 1 . Umschalter Standardbatterie 5. Kontrolleuchte gelb Change over switch Standard battery Pilot lamp yellow commutateur batterie Standard lampe de controle jaune 2. -
Page 3
Einsatzbereiche des Ladegerätes Ladegerät anschließen Alle 12 V-Batterien (Standard und wartungsfrei ) , wie Prüfen, ob Ladespannung mit der Spannung der Batterie Kraftfahrzeug-Starterbatterien. Bootsbatterien und Batterien übereinstimmt. aus anderen Geräten (z.B. Rasenmähern, Heckenscheren 2. Klemmen das Ladegerätes mit den Polen der Batterie ver- usw.), deren Kapazität nicht kleiner als 5 Ah ist, können mit binden dem ML 1208 E geladen werden. -
Page 4: Technische Daten
Gerät als Arbeitsleuchte Was kann man am Amperemeter ablesen? Arbeitsleuchte kann nur bei angeschlossener Batterie betrieben 4.2.1 Normaler Betrieb werden. Großer Ladestrom (große Zahl) kann bedeuten: stellen. ● Batterie fast leer oder tiefentladen. 1. Schalter in Position Kleiner Ladestrom kann bedeuten: 2.
-
Page 5: Connecting The Charger
Scope of application of the charger Connecting the charger All 12 V batteries (standard and maintenance ) such as Check that the charging voltage agrees with the battery motor vehicle starter batteries, boat batteries and batteries from voltage. other units (e.g. lawn mowers and hedge shears etc.) with the capacity of no less than 5 Ah can be charged.
-
Page 6: Technical Data
Using the unit as a working lamp What can the ammeter indicate? Set the switch to position . Connect the battery. The working 4.2.1 Normal operation lamp can only be used when a battery is connected. High charging current (high number) can signify: Technical data ●…
-
Page 7: Branchement Du Chargeur
Champs d’utilisation du chargeur Branchement du chargeur Le chargeur permet de charger toutes les batteries de 12 V Vérifier si la tension de chargement correspond à la bat- (batteries standards et sans entretien ), telles que les terie. batteries automobiles, les batteries de bateaux et les batte- ries d’autres appareils (p.es.: tondeuses à…
-
Page 8: Caractéristiques Techniques
Le chargeur est utilisé comme projecteur Que peut-on lire sur l’ampèremètre? de travail 4.2.1 Service normal Positionner le sélecteur sur . Brancher là batterie. Le pro- Une intensité de chargement élevée (chiffre jecteur de travail ne peut être utilisé que quand la batterie est élevé) peut signifier: raccordée.
-
Page 10
reil n’est pas prévu pour un montage encastré. � ���������������������… -
Page 12
Kleinlader ML1208E 7 780 301 117 Robert Bosch GmbH Automotive Aftermarket Test Equipment www.bosch.de/prueftechnik e-Mail: Bosch.Prueftechnik@de.bosch.com…