![]()
АВ ресивер
Инструкция по эксплуатации
Перед использованием аппарата прочтите прилагаемую “брошюру по безопасности”.
Русский

СОДЕРЖАНИЕ
Принадлежности . . . . . . . . . . . . . . . . . . . . . . . . . . . . . . . . . . . . . . . . . . . . . . . 4
|
ФУНКЦИИ |
5 |
|
Возможности аппарата . . . . . . . . . . . . . . . . . . . . . . . . . . . . . . . . . . . . . . . |
. . 5 |
|
Названия компонентов и их функции . . . . . . . . . . . . . . . . . . . . . . . . . |
. . 7 |
|
Передняя панель . . . . . . . . . . . . . . . . . . . . . . . . . . . . . . . . . . . . . . . . . . . . . . . . . . . . . . . . . . . . . . . . . . . . . . . . . . . . . . |
. . . . 7 |
|
Дисплей передней панели (индикаторы) . . . . . . . . . . . . . . . . . . . . . . . . . . . . . . . . . . . . . . . . . . . . . . . . . . . . . |
. . . . 8 |
|
Задняя панель . . . . . . . . . . . . . . . . . . . . . . . . . . . . . . . . . . . . . . . . . . . . . . . . . . . . . . . . . . . . . . . . . . . . . . . . . . . . . . . . |
. . . . 9 |
|
Пульт ДУ . . . . . . . . . . . . . . . . . . . . . . . . . . . . . . . . . . . . . . . . . . . . . . . . . . . . . . . . . . . . . . . . . . . . . . . . . . . . . . . . . . . . . . |
. . . 10 |
|
ПОДГОТОВКА |
11 |
Общая процедура настройки . . . . . . . . . . . . . . . . . . . . . . . . . . . . . . . . . . 11 1 Размещение колонок . . . . . . . . . . . . . . . . . . . . . . . . . . . . . . . . . . . . . . . . . 12
2 Подключение колонок . . . . . . . . . . . . . . . . . . . . . . . . . . . . . . . . . . . . . . . 16
5.1-канальная система . . . . . . . . . . . . . . . . . . . . . . . . . . . . . . . . . . . . . . . . . . . . . . . . . . . . . . . . . . . . . . . . . . . . . . . . . . . 16 7.1-канальная система . . . . . . . . . . . . . . . . . . . . . . . . . . . . . . . . . . . . . . . . . . . . . . . . . . . . . . . . . . . . . . . . . . . . . . . . . . . 16 Подключение колонок, поддерживающих соединение с раздельным усилением верхних и нижних частот . . . . . . . . . . . . . . . . . . . . . . . . . . . . . . . . . . . . . . . . . . . . . . . . . . . . . . . . . . . . . . . . . . . . . . . . . . . . . . . . . . . . . . . . . . . . 17 Подключение колонок Zone B . . . . . . . . . . . . . . . . . . . . . . . . . . . . . . . . . . . . . . . . . . . . . . . . . . . . . . . . . . . . . . . . . . . . 17
Входные и выходные гнезда и кабели . . . . . . . . . . . . . . . . . . . . . . . . . . 18 3 Подключение телевизора . . . . . . . . . . . . . . . . . . . . . . . . . . . . . . . . . . . . 19 4 Подключение воспроизводящих устройств . . . . . . . . . . . . . . . . . . . 21
Подключение видеоустройств (таких как BD/DVD-проигрыватели) . . . . . . . . . . . . . . . . . . . . . . . . . . . . . . 21 Подключение аудиоустройств (таких как CD-проигрыватели) . . . . . . . . . . . . . . . . . . . . . . . . . . . . . . . . . . . 23 Подключение к гнезду на передней панели . . . . . . . . . . . . . . . . . . . . . . . . . . . . . . . . . . . . . . . . . . . . . . . . . . . . . . 24
5 Подключение FM/AM-антенн . . . . . . . . . . . . . . . . . . . . . . . . . . . . . . . . . 24 6 Подключение к сети (проводное подключение к LAN) . . . . . . . . . 25 7 Подключение записывающих устройств . . . . . . . . . . . . . . . . . . . . . . 26 8 Подключение силового кабеля . . . . . . . . . . . . . . . . . . . . . . . . . . . . . . . 26
9 Выбор языка экранного меню . . . . . . . . . . . . . . . . . . . . . . . . . . . . . . . . 27
10 Беспроводное подключение к сети
(только для RX-V577) . . . . . . . . . . . . . . . . . . . . . . . . . . . . . . . . . . . . . . . . . . . 28
Подключение беспроводной антенны . . . . . . . . . . . . . . . . . . . . . . . . . . . . . . . . . . . . . . . . . . . . . . . . . . . . . . . . . . . 28 Выбор способа подключения . . . . . . . . . . . . . . . . . . . . . . . . . . . . . . . . . . . . . . . . . . . . . . . . . . . . . . . . . . . . . . . . . . . . 29 Подключение аппарата к беспроводной сети . . . . . . . . . . . . . . . . . . . . . . . . . . . . . . . . . . . . . . . . . . . . . . . . . . . . 30 Подключение мобильного устройства к аппарату напрямую (Wireless Direct) . . . . . . . . . . . . . . . . . . . . 36
11 Автоматическая оптимизация настроек колонок
(YPAO) . . . . . . . . . . . . . . . . . . . . . . . . . . . . . . . . . . . . . . . . . . . . . . . . . . . . . . . . . 38
Сообщения об ошибках . . . . . . . . . . . . . . . . . . . . . . . . . . . . . . . . . . . . . . . . . . . . . . . . . . . . . . . . . . . . . . . . . . . . . . . . . . 40 Предупреждения . . . . . . . . . . . . . . . . . . . . . . . . . . . . . . . . . . . . . . . . . . . . . . . . . . . . . . . . . . . . . . . . . . . . . . . . . . . . . . . . . 41
Основная процедура воспроизведения . . . . . . . . . . . . . . . . . . . . . . . . 42
Выбор источника входного сигнала и избранных настроек одним нажатием (SCENE) . . . . . . . . . . . . . . . . . . . . . . . . . . . . . . . . . . . . . . . . . . . . . . 43
Настройка назначения сцены . . . . . . . . . . . . . . . . . . . . . . . . . . . . . . . . . . . . . . . . . . . . . . . . . . . . . . . . . . . . . . . . . . . . 43
Выбор режима звучания . . . . . . . . . . . . . . . . . . . . . . . . . . . . . . . . . . . . . . . 44
Воспроизведение стереоскопических звуковых полей (CINEMA DSP 3D) . . . . . . . . . . . . . . . . . . . . . . . . . 45 Использование необработанного воспроизведения . . . . . . . . . . . . . . . . . . . . . . . . . . . . . . . . . . . . . . . . . . . . . 47 Воспроизведение звука высокого качества (режим непосредственного воспроизведения) . . . . . . . . . . . . . . . . . . . . . . . . . . . . . . . . . . . . . . . . . . . . . . . . . . 48
Усиление басов (Сверхниз. част.) . . . . . . . . . . . . . . . . . . . . . . . . . . . . . . . . . . . . . . . . . . . . . . . . . . . . . . . . . . . . . . . . . 48 Использование сжатых форматов музыки с улучшенным звучанием
(Compressed Music Enhancer) . . . . . . . . . . . . . . . . . . . . . . . . . . . . . . . . . . . . . . . . . . . . . . . . . . . . . . . . . . . . . . . . . . . . . 48
Прослушивание FM/AM-радио . . . . . . . . . . . . . . . . . . . . . . . . . . . . . . . . . 49
Установка шага настройки частоты . . . . . . . . . . . . . . . . . . . . . . . . . . . . . . . . . . . . . . . . . . . . . . . . . . . . . . . . . . . . . . . 49 Выбор частоты для приема . . . . . . . . . . . . . . . . . . . . . . . . . . . . . . . . . . . . . . . . . . . . . . . . . . . . . . . . . . . . . . . . . . . . . . . 49 Сохранение радиостанций (предустановленные станции) . . . . . . . . . . . . . . . . . . . . . . . . . . . . . . . . . . . . . . . 50 Настройка Radio Data System . . . . . . . . . . . . . . . . . . . . . . . . . . . . . . . . . . . . . . . . . . . . . . . . . . . . . . . . . . . . . . . . . . . . . 52
Воспроизведение музыки с iPod . . . . . . . . . . . . . . . . . . . . . . . . . . . . . . . 53
Подключение устройства iPod . . . . . . . . . . . . . . . . . . . . . . . . . . . . . . . . . . . . . . . . . . . . . . . . . . . . . . . . . . . . . . . . . . . 53
Ru 2

Воспроизведение содержимого iPod . . . . . . . . . . . . . . . . . . . . . . . . . . . . . . . . . . . . . . . . . . . . . . . . . . . . . . . . . . . . 53
Воспроизведение музыки с запоминающего устройства
USB . . . . . . . . . . . . . . . . . . . . . . . . . . . . . . . . . . . . . . . . . . . . . . . . . . . . . . . . . . . . 57
Подключение запоминающего устройства USB . . . . . . . . . . . . . . . . . . . . . . . . . . . . . . . . . . . . . . . . . . . . . . . . . . 57 Воспроизведение содержимого запоминающего устройства USB . . . . . . . . . . . . . . . . . . . . . . . . . . . . . . . 57
Воспроизведение музыки на медиа-серверах (ПК/NAS) . . . . . . . . 60
|
Настройка совместного использования носителей . . . . . . . . . . . . . . . . . . . . . . . . . . . . . . . . . . . . . . . . . . . . . . |
60 |
|
Воспроизведение музыкального контента на ПК . . . . . . . . . . . . . . . . . . . . . . . . . . . . . . . . . . . . . . . . . . . . . . . . |
61 |
Прослушивание интернет-радио . . . . . . . . . . . . . . . . . . . . . . . . . . . . . . . 64
Воспроизведение интернет-радио . . . . . . . . . . . . . . . . . . . . . . . . . . . . . . . . . . . . . . . . . . . . . . . . . . . . . . . . . . . . . . . 64 Сохранение избранных интернет-радиостанций (закладки) . . . . . . . . . . . . . . . . . . . . . . . . . . . . . . . . . . . . . 66
Воспроизведение музыки с помощью AirPlay . . . . . . . . . . . . . . . . . . 67
Воспроизведение музыкального контента с iTunes/iPod . . . . . . . . . . . . . . . . . . . . . . . . . . . . . . . . . . . . . . . . . 67
Воспроизведение музыки в нескольких комнатах
(только для RX-V577) . . . . . . . . . . . . . . . . . . . . . . . . . . . . . . . . . . . . . . . . . . . 69
Подготовка Zone B . . . . . . . . . . . . . . . . . . . . . . . . . . . . . . . . . . . . . . . . . . . . . . . . . . . . . . . . . . . . . . . . . . . . . . . . . . . . . . . 69
Просмотр текущего статуса . . . . . . . . . . . . . . . . . . . . . . . . . . . . . . . . . . . . 71
Переключение информации на дисплее передней панели . . . . . . . . . . . . . . . . . . . . . . . . . . . . . . . . . . . . . . 71
Настройка параметров воспроизведения для различных источников воспроизведения (меню Опция) . . . . . . . . . . . . . . . . . . . 72
Элементы меню Опция . . . . . . . . . . . . . . . . . . . . . . . . . . . . . . . . . . . . . . . . . . . . . . . . . . . . . . . . . . . . . . . . . . . . . . . . . . . 72
Настройка различных функций (меню Настройка) . . . . . . . . . . . . . 76
Элементы меню Настройка . . . . . . . . . . . . . . . . . . . . . . . . . . . . . . . . . . . . . . . . . . . . . . . . . . . . . . . . . . . . . . . . . . . . . . 77 Колонка . . . . . . . . . . . . . . . . . . . . . . . . . . . . . . . . . . . . . . . . . . . . . . . . . . . . . . . . . . . . . . . . . . . . . . . . . . . . . . . . . . . . . . . . . . 79 HDMI . . . . . . . . . . . . . . . . . . . . . . . . . . . . . . . . . . . . . . . . . . . . . . . . . . . . . . . . . . . . . . . . . . . . . . . . . . . . . . . . . . . . . . . . . . . . . 83 Звук . . . . . . . . . . . . . . . . . . . . . . . . . . . . . . . . . . . . . . . . . . . . . . . . . . . . . . . . . . . . . . . . . . . . . . . . . . . . . . . . . . . . . . . . . . . . . . 85 ECO . . . . . . . . . . . . . . . . . . . . . . . . . . . . . . . . . . . . . . . . . . . . . . . . . . . . . . . . . . . . . . . . . . . . . . . . . . . . . . . . . . . . . . . . . . . . . . 88 Функция . . . . . . . . . . . . . . . . . . . . . . . . . . . . . . . . . . . . . . . . . . . . . . . . . . . . . . . . . . . . . . . . . . . . . . . . . . . . . . . . . . . . . . . . . 89 Сеть . . . . . . . . . . . . . . . . . . . . . . . . . . . . . . . . . . . . . . . . . . . . . . . . . . . . . . . . . . . . . . . . . . . . . . . . . . . . . . . . . . . . . . . . . . . . . . 91 Язык . . . . . . . . . . . . . . . . . . . . . . . . . . . . . . . . . . . . . . . . . . . . . . . . . . . . . . . . . . . . . . . . . . . . . . . . . . . . . . . . . . . . . . . . . . . . . . 93
Настройка системных параметров
(меню ADVANCED SETUP) . . . . . . . . . . . . . . . . . . . . . . . . . . . . . . . . . . . . . . . 94
Элементы меню ADVANCED SETUP . . . . . . . . . . . . . . . . . . . . . . . . . . . . . . . . . . . . . . . . . . . . . . . . . . . . . . . . . . . . . . . 94 Изменение значения импеданса колонок (SP IMP.) . . . . . . . . . . . . . . . . . . . . . . . . . . . . . . . . . . . . . . . . . . . . . . . 94
Выбор идентификационного кода пульта ДУ (REMOTE ID) . . . . . . . . . . . . . . . . . . . . . . . . . . . . . . . . . . . . . . . . 95 Изменение параметра частоты настройки FM/AM (TU) . . . . . . . . . . . . . . . . . . . . . . . . . . . . . . . . . . . . . . . . . . . 95 Переключение типа видеосигнала (TV FORMAT) . . . . . . . . . . . . . . . . . . . . . . . . . . . . . . . . . . . . . . . . . . . . . . . . . . 95 Восстановление настроек по умолчанию (INIT) . . . . . . . . . . . . . . . . . . . . . . . . . . . . . . . . . . . . . . . . . . . . . . . . . . . 95 Обновление встроенного программного обеспечения (UPDATE) . . . . . . . . . . . . . . . . . . . . . . . . . . . . . . . . 96 Проверка версии встроенного программного обеспечения (VERSION) . . . . . . . . . . . . . . . . . . . . . . . . . . 96
Обновление встроенного программного обеспечения аппарата через cеть . . . . . . . . . . . . . . . . . . . . . . . . . . . . . . . . . . . . . . . . . . . . . . . . . . . . . 97
|
ПРИЛОЖЕНИЕ |
98 |
|
Часто задаваемые вопросы . . . . . . . . . . . . . . . . . . . . . . . . . . . . . . . . . . . |
. 98 |
|
Поиск и устранение неисправностей . . . . . . . . . . . . . . . . . . . . . . . . . . |
. 99 |
|
Питание, система и пульт ДУ . . . . . . . . . . . . . . . . . . . . . . . . . . . . . . . . . . . . . . . . . . . . . . . . . . . . . . . . . . . . . . . . . . . |
. . 99 |
|
Аудио . . . . . . . . . . . . . . . . . . . . . . . . . . . . . . . . . . . . . . . . . . . . . . . . . . . . . . . . . . . . . . . . . . . . . . . . . . . . . . . . . . . . . . . . . . |
.101 |
|
Видео . . . . . . . . . . . . . . . . . . . . . . . . . . . . . . . . . . . . . . . . . . . . . . . . . . . . . . . . . . . . . . . . . . . . . . . . . . . . . . . . . . . . . . . . . . |
.103 |
|
Радио FM/AM . . . . . . . . . . . . . . . . . . . . . . . . . . . . . . . . . . . . . . . . . . . . . . . . . . . . . . . . . . . . . . . . . . . . . . . . . . . . . . . . . . . |
.103 |
|
USB и сеть . . . . . . . . . . . . . . . . . . . . . . . . . . . . . . . . . . . . . . . . . . . . . . . . . . . . . . . . . . . . . . . . . . . . . . . . . . . . . . . . . . . . . . |
.104 |
Сообщения об ошибках на дисплее передней панели . . . . . . . . . 106 Глоссарий . . . . . . . . . . . . . . . . . . . . . . . . . . . . . . . . . . . . . . . . . . . . . . . . . . . . 107
Информация об аудиосигнале . . . . . . . . . . . . . . . . . . . . . . . . . . . . . . . . . . . . . . . . . . . . . . . . . . . . . . . . . . . . . . . . . .107 Информация о видеосигналах и HDMI . . . . . . . . . . . . . . . . . . . . . . . . . . . . . . . . . . . . . . . . . . . . . . . . . . . . . . . . . .108 Сведения о сети . . . . . . . . . . . . . . . . . . . . . . . . . . . . . . . . . . . . . . . . . . . . . . . . . . . . . . . . . . . . . . . . . . . . . . . . . . . . . . . . .108 Технологии Yamaha . . . . . . . . . . . . . . . . . . . . . . . . . . . . . . . . . . . . . . . . . . . . . . . . . . . . . . . . . . . . . . . . . . . . . . . . . . . . .109
Поддерживаемые устройства и форматы файлов . . . . . . . . . . . . . 109 Схема передачи видеосигнала . . . . . . . . . . . . . . . . . . . . . . . . . . . . . . . . 110 Информация о HDMI . . . . . . . . . . . . . . . . . . . . . . . . . . . . . . . . . . . . . . . . . . 111
HDMI Контроль . . . . . . . . . . . . . . . . . . . . . . . . . . . . . . . . . . . . . . . . . . . . . . . . . . . . . . . . . . . . . . . . . . . . . . . . . . . . . . . . . .111 Функция Audio Return Channel (ARC) . . . . . . . . . . . . . . . . . . . . . . . . . . . . . . . . . . . . . . . . . . . . . . . . . . . . . . . . . . . .112 Совместимость сигнала HDMI . . . . . . . . . . . . . . . . . . . . . . . . . . . . . . . . . . . . . . . . . . . . . . . . . . . . . . . . . . . . . . . . . . .113
Справочная диаграмма (задняя панель) . . . . . . . . . . . . . . . . . . . . . . 114 Товарные знаки . . . . . . . . . . . . . . . . . . . . . . . . . . . . . . . . . . . . . . . . . . . . . . 115 Технические характеристики . . . . . . . . . . . . . . . . . . . . . . . . . . . . . . . . . 116 Индекс . . . . . . . . . . . . . . . . . . . . . . . . . . . . . . . . . . . . . . . . . . . . . . . . . . . . . . . 119
Ru 3
Принадлежности
Убедитесь, что в комплект поставки изделия входят следующие принадлежности.
Батарейки (AAA, R03, UM-4) (2 шт.)
|
Вставьте батарейки |
|
надлежащим образом. |
FM-антенна
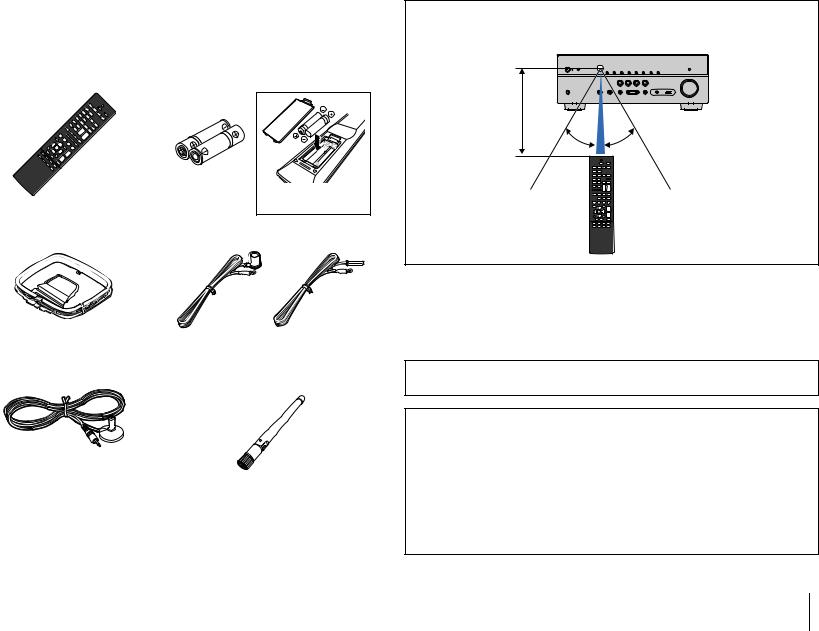
Диапазон работы пульта ДУ
•Направляйте пульт ДУ на сенсор ДУ на аппарате и оставайтесь в пределах рабочей зоны, изображенной ниже.
В пределах 6 м
30° 30°
|
*В зависимости от региона покупки поставляется одна |
|
|
из указанных выше антенн. |
|
|
Микрофон YPAO |
Беспроводная антенна (только для |
|
RX-V577) |
Компакт-диск (Инструкция по эксплуатации)
Руководство по быстрой настройке
Брошюра по безопасности
•На иллюстрациях основного устройства и пульта ДУ в данной инструкции изображена модель RX-V577 (в исполнении для США, если не указано иное).
•Некоторые функции не поддерживаются в определенных регионах.
•В результате усовершенствований изделия технические характеристики и внешний вид аппарата могут изменяться без уведомления.
•Эта инструкция посвящена управлению с помощью пульта ДУ.
•В этом руководстве для обозначения устройств “iPod” и “iPhone” используется слово “iPod”. “iPod” означает как “iPod”, так и “iPhone”, если не указано иное.
• указывает на меры предосторожности при использовании аппарата и ограничения его функций.
• указывает на дополнительные инструкции по оптимальному использованию.
Принадлежности Ru 4
ФУНКЦИИ
Возможности аппарата
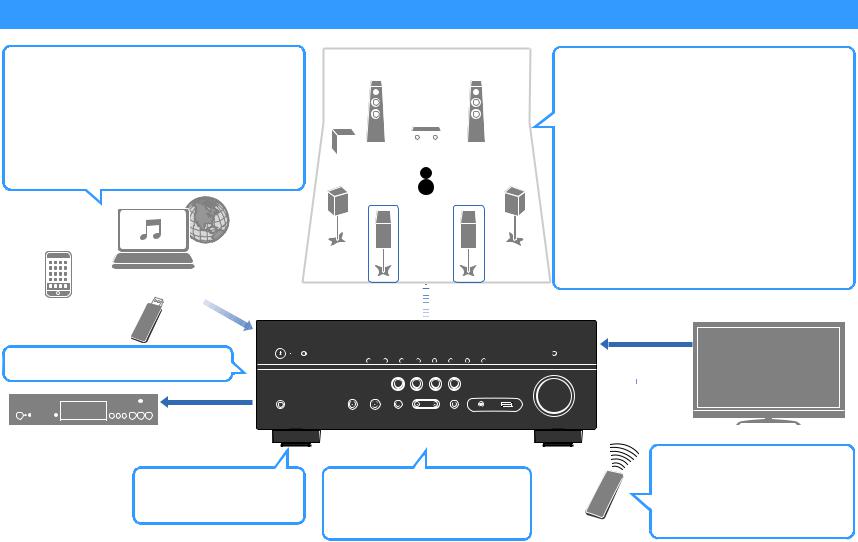
Поддерживается контент различных типов
|
•iPod/iPhone |
.c. 53 |
||
|
•USB |
.c. 57 |
||
|
•Медиа-сервер (ПК/сетевое |
.c. 60 |
||
|
хранилище данных) |
|||
|
•Интернет-радио |
.c. 64 |
||
|
•AirPlay |
.c. 67 |
||
|
Поддержка системы колонок с числом каналов от 2 до |
|||||||||
|
5.1 (до 7.1*). Позволяет наслаждаться любимыми |
|||||||||
|
акустическими пространствами в различных стилях. |
|||||||||
|
• Автоматическая оптимизация настроек |
.c. 38 |
||||||||
|
колонок для конкретного помещения (YPAO) |
.c. 45 |
||||||||
|
• Воспроизведение стереозвука или |
|||||||||
|
многоканального звука со звуковыми |
|||||||||
|
полями, создающими у слушателя ощущение |
|||||||||
|
присутствия в настоящем кинотеатре или |
|||||||||
|
концертном зале. (CINEMA DSP) |
.c. 48 |
||||||||
|
•Использование сжатых форматов |
|||||||||
|
* |
* |
||||||||
|
музыки с улучшенным звучанием |
|||||||||
(Compressed Music Enhancer)
|
•Воспроизведение музыки в |
.c. 69 |
||
|
Содержимое в сети |
нескольких комнатах (Zone B)* |
||
|
Аудио |
Колонки |
* Только для RX-V577 |
|
|
Аудио |
|||
|
iPod/iPhone |
|||
|
Устройство USB |
HDMI Контроль |
Поддерживается формат 3D и сигналы 4K Ultra HD
HDMI Контроль

 Аудио/Видео BD/DVD-проигрыватель
Беспроводное подключение к сети*
.c. 25
* Только для RX-V577
АВ ресивер (аппарат)
Изменение источника входного сигнала и избранных настроек одним нажатием (SCENE)
.c. 43
Аудио
Аудио/Видео
ТВ
Последовательное управление телевизором, АВ ресивером и BD/DVDпроигрывателем HDMI Контроль
|
Пульт ДУ телевизора |
.c. 111 |
|
ФУНКЦИИ Возможности аппарата |
Ru 5 |
|
Множество полезных функций! |
||||
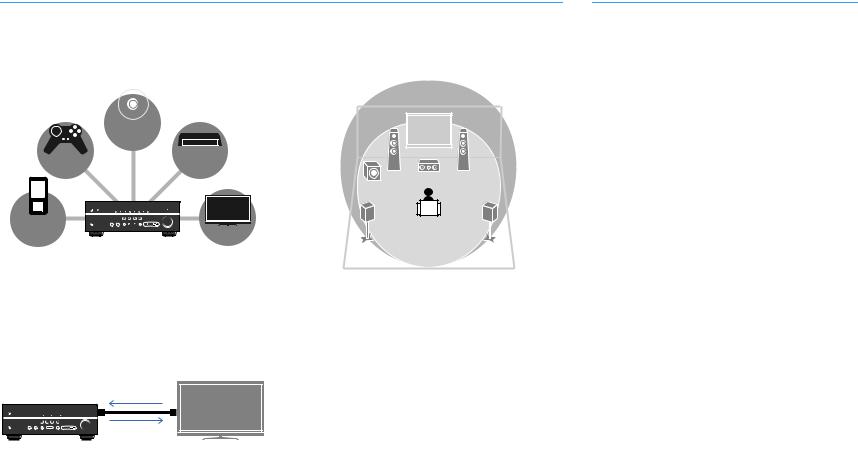
Подключение различных устройств (c. 21) |
Создание трехмерных звуковых полей |
|||
|
Несколько гнезд HDMI и различные входные/выходные |
(c. 45) |
|||
|
гнезда на аппарате позволяют подключать к нему |
Функция Virtual Presence Speaker (VPS) позволяет |
|||
|
видеоустройства (такие как BD/DVD-плееры), |
||||
|
создавать в помещении трехмерное звуковое поле |
||||
|
аудиоустройства (такие как CD-плееры), игровые консоли, |
||||
|
(CINEMA DSP 3D). |
||||
|
портативные аудио плееры, и другие устройства. |
||||
|
BD/DVD- |
||||
|
проигрыватель |
||||
|
Игровая |
Телевизионная |
|||
|
абонентская |
||||
|
приставка |
||||
|
приставка |
||||
|
Портативный |
||||
|
аудио плеер |
ТВ |
|||
|
Воспроизведение телевизионного |
||||
|
аудиосигнала в режиме окружающего |
Воспроизведение с эффектом окружающего |
|||
|
звучания с помощью подключения одного |
||||
|
звука с помощью 5 фронтальных колонок |
||||
|
кабеля HDMI (Audio Return Channel: ARC) |
||||
|
(c. 46) |
||||
|
(c. 19) |
||||
|
Теперь вы можете наслаждаться эффектом окружающего |
||||
|
При использовании телевизора, поддерживающего функцию |
звучания, даже если все колонки окружающего звука |
|||
|
ARC, для вывода видеосигнала на телевизор, ввода |
расположены перед вами. |
|||
|
аудиосигнала с телевизора и передачи сигналов управления |
Воспроизведение звука высокого качества |
|||
|
HDMI нужен только один кабель HDMI. |
||||
|
HDMI Контроль |
(c. 48) |
|||
|
Аудиосигнал |
При включении режима непосредственного |
|||
|
телевизора |
воспроизведения аппарат будет воспроизводить |
|||
|
выбранный источник сигнала по минимальной схеме. Это |
||||
|
Видео с внешнего |
позволяет наслаждаться звучанием в качестве Hi-Fi. |
|||
Низкое энергопотребление |
||||
|
устройства |
||||
|
Простое управление и воспроизведение |
Режим Eco (функция энергосбережения) позволяет снизить |
|||
|
потребление электроэнергии и создать экологически |
||||
|
сохраненной на iPhone или устройстве на |
безвредную систему домашнего кинотеатра (c. 88). |
|||
|
платформе Android™ музыки по |
||||
|
беспроводному подключению |
С помощью разработанного для смартфонов и планшетов приложения “AV CONTROLLER” можно управлять аппаратом, используя iPhone, iPad, iPod touch или устройство на платформе Android. С дополнительной информацией можно ознакомиться на нашем веб-сайте.
Полезные советы
Комбинация входных видео/аудиогнезд не соответствует внешнему устройству…
Используйте пункт “Аудиоввод” в меню “Опция”, чтобы изменить комбинацию входных видео/аудиогнезд для соответствия выходным гнездам внешнего устройства (c. 22).
Видео и аудиосигналы не синхронизированы…
Используйте пункт “Синхрониз.” меню “Настройка”, чтобы настроить задержку между выводом видео- и аудиосигнала (c. 86).
Яхочу слушать звук через колонки телевизора…
Используйте пункт “Аудио Выход” в меню “Настройка” для выбора целевого устройства вывода сигналов, входящих в аппарат (c. 83). В качестве целевого устройства вывода можно использовать колонки телевизора.
Яхочу изменить язык экранного меню…
Используйте пункт “Язык” в меню “Настройка”, чтобы выбрать один из следующих языков: английский, японский, французский, немецкий, испанский, русский, итальянский и китайский (c. 27).
Яхочу обновить встроенное программное обеспечение…
Используйте пункт “Обновление по сети” (c. 97) в меню “Настройка” или пункт “UPDATE” (c. 96) в меню “ADVANCED SETUP” для обновления встроенного программного обеспечения аппарата.
Имеется также множество других параметров, с помощью которых можно настраивать аппарат. Подробнее об этом см. на следующих страницах.
•Настройки функции SCENE (c. 43)
•Настройки звука/видео и информация о сигнале для каждого источника (c. 72)
•Настройки различных функций (c. 77)
•Настройки системы (c. 94)
|
ФУНКЦИИ Возможности аппарата |
Ru 6 |
Названия компонентов и их функции
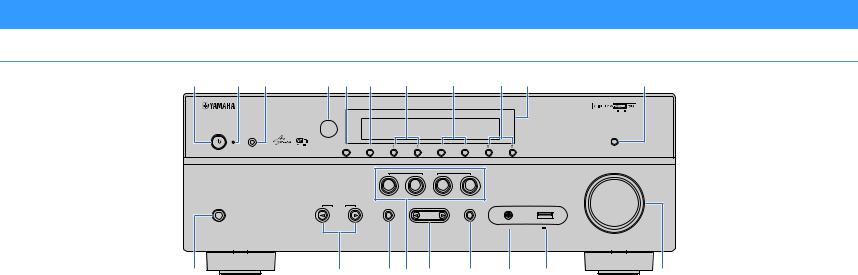
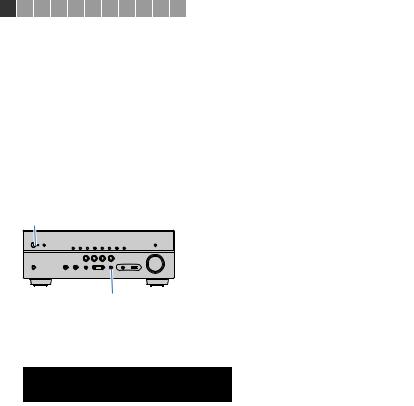
Передняя панель
|
1 2 3 |
4 5 6 7 8 9 : |
A |
|
YPAO MIC |
DIRECT |
|
|
INFO (WPS) MEMORY PRESET FM AM TUNING |
 PHONES
SILENT CINEMA
B
1 zКлавиша питания
Включение/выключение (переход в режим ожидания) аппарата.
2 Индикатор режима ожидания
Загорается, когда аппарат находится в режиме ожидания, в любом из следующих случаев:
•Режим HDMI Контроль включен (c. 83)
•Режим В режим ожидания включен (c. 83)
•Режим Сеть режим ожидания включен (c. 92)
•Заряжается iPod (c. 53)
3 Гнездо YPAO MIC
Для подключения прилагаемого микрофона YPAO (c. 38).
4 Сенсор ДУ
Получает сигналы с пульта ДУ (c. 4).
5 Кнопка INFO (WPS)
Выбор информации, отображаемой на дисплее передней панели (c. 71).
(только для RX-V577)
Вход в настройки для беспроводного подключения к сети LAN (настройка кнопки WPS) при нажатии и удерживании в течение 3 секунд (c. 30).
|
SCENE |
|||||
|
BD |
TV |
NET |
RADIO |
||
|
DVD |
|||||
|
INPUT |
TONE CONTROL |
PROGRAM |
AUX |
||
|
STRAIGHT |
|||||
|
AUDIO |
5V 2.1A |
C D E F G H I
6 Кнопка MEMORY
Сохранение FM/AM-станций в качестве предустановленных радиостанций (c. 50).
7 Кнопки PRESET
Выбор предустановленной FM/AM-радиостанции (c. 51).
8 Кнопки FM и AM
Переключение между диапазонами FM и AM (c. 49).
9 Кнопки TUNING
Выбор радиочастоты (c. 49).
0 Дисплей передней панели
Отображение информации (c. 8).
A Кнопка DIRECT
Включение и выключение режима непосредственного воспроизведения (c. 48).
B Гнездо PHONES
Для подключения наушников.
C Кнопки INPUT
Выбор источника входного сигнала.
D Кнопка TONE CONTROL
Регулировка высокочастотного и низкочастотного диапазона выходного звука (c. 73).
VOLUME
J
E Кнопки SCENE
Выбор сохраненного источника входного сигнала и звуковой программы одним нажатием. А также включение аппарата, когда он находится в режиме ожидания (c. 43).
F Кнопки PROGRAM
Выбор звуковой программы или декодера окружающего звучания (c. 44).
G Кнопка STRAIGHT
Включение и выключение режима прямого декодирования (c. 47).
H Гнездо AUX
Для подключения устройств, таких как портативные аудио плееры (c. 24).
I Гнездо USB
Для подключения запоминающего устройства USB (c. 57) или iPod (c. 53).
J Ручка VOLUME
Регулировка громкости.
|
ФУНКЦИИ Названия компонентов и их функции |
Ru 7 |
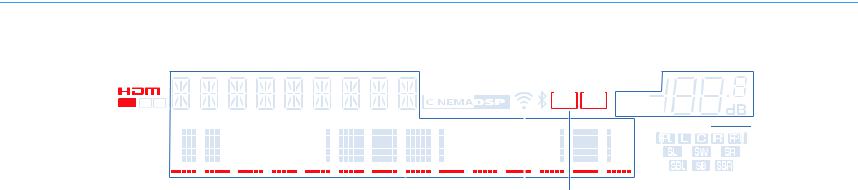
Дисплей передней панели (индикаторы)
|
1 |
2 |
3 |
4 |
5 |
6 |
7 |
|||||||||||||||||||||||
|
CHARGE |
|||||||||||||||||||||||||||||
|
ENHANCER |
STEREO TUNED |
PARTY SLEEP |
MUTE |
||||||||||||||||||||||||||
|
ZONE |
ZONE |
||||||||||||||||||||||||||||
|
OUT 1 2 |
2 A |
3 B |
VOL. |
||||||||||||||||||||||||||
|
ECO |
ADAPTIVE DRC |
VIRTUAL |
|||||||||||||||||||||||||||
|
SP |
IMP.••8 |
MIN |
|||||||||||||||||||||||||||
|
8 |
9 |
0 |
A B |
9 |
C D |
1HDMI
Загорается, когда поступает или выводится сигнал HDMI.
OUT
Загорается, когда выводится сигнал HDMI.
2ENHANCER
Загорается при работе Compressed Music Enhancer (c. 48).
3CINEMA DSP
Загорается при активации режима CINEMA DSP (c. 45) или CINEMA DSP 3D (c. 45).
4STEREO
Загорается при приеме аппаратом стереофонического радиосигнала FM.
TUNED
Загорается при приеме аппаратом сигнала радиостанции FM/AM.
5SLEEP
Загорается при включенном таймере сна.
6MUTE
Мигает во время приглушения аудиосигнала.
7Индикатор громкости
Используется для отображения текущей громкости.
8ECO
Загорается при включенном режиме Eco (c. 88).
9Индикаторы курсора
Показывают работающие в настоящее время клавиши курсора.
0 Окно информации
Используется для отображения текущего состояния (например, названия источника входного сигнала и названия режима звучания). Можно переключать отображаемую информацию, нажимая кнопку INFO (c. 71).
A Индикатор мощности сигнала (только для RX-V577)
Показывает мощность беспроводного сигнала (c. 28).
B Индикаторы ZONE (только для RX-V577)
Показывают зону выхода звукового сигнала (c. 70).
C Индикаторы колонок
Используются для обозначения разъемов колонок, через которые выводятся сигналы.
AФронтальная колонка (левая)
SФронтальная колонка (правая) DЦентральная колонка
FКолонка окружающего звучания (левая) GКолонка окружающего звучания (правая) HТыловая колонка окружающего звучания (левая)* JТыловая колонка окружающего звучания (правая)* KТыловая колонка окружающего звучания* LСабвуфер
* Только для RX-V577
D ADAPTIVE DRC
Загорается при работе Adaptive DRC (c. 73).
|
ФУНКЦИИ Названия компонентов и их функции |
Ru 8 |
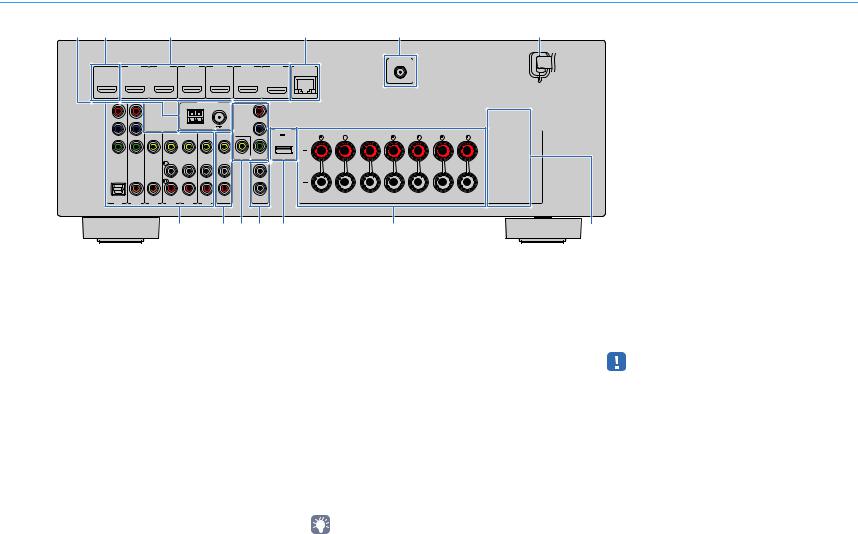
Задняя панель |
|||||||||||||||
|
1 |
2 |
3 |
4 |
5 |
6 |
||||||||||
|
(Модель RX-V577 для США) |
|||||||||||||||
|
WIRELESS |
|||||||||||||||
|
HDMI OUT |
HDMI 1 |
HDMI 2 |
HDMI 3 |
HDMI 4 |
HDMI 5 |
HDMI 6 |
NETWORK |
||||||||
|
(BD/DVD) |
(NET) |
||||||||||||||
|
ARC |
|||||||||||||||
|
ANTENNA |
|||||||||||||||
|
AM |
(RADIO) |
FM |
COMPONENT |
||||||||||||
|
VIDEO |
|||||||||||||||
|
PR |
PR |
||||||||||||||
|
DC OUT |
SPEAKERS |
||||||||||||||
|
PB |
PB |
5V 0.5A |
SURROUND BACK/BI AMP |
||||||||||||
|
FRONT |
CENTER |
/ZONE B |
|||||||||||||
|
SURROUND |
|||||||||||||||
|
SINGLE |
|||||||||||||||
|
Y |
Y |
||||||||||||||
|
COMPONENT |
VIDEO |
MONITOR OUT |
|||||||||||||
|
VIDEO |
1 |
||||||||||||||
|
OPTICAL |
COAXIAL |
COAXIAL |
2 |
||||||||||||
|
AV |
SUBWOOFER |
||||||||||||||
|
( TV ) |
AV 2 |
AV 3 |
AV 4 |
AV 5 |
AV 6 |
OUT |
PRE OUT |
||||||||
|
AV 1 |
|||||||||||||||
|
* Область вокруг выходных видео-/аудиогнезд обозначена |
|||||||||||||||
|
7 |
8 9 0 A |
B |
C |
белым цветом непосредственно на устройстве, чтобы |
|||||||||||
|
избежать ошибок при подключении. |
|||||||||||||||
|
1 Гнезда ANTENNA |
7 Гнезда AV 1–6 |
A Гнездо DC OUT |
|||||||||||||
|
Для подключения к антеннам FM и AM (c. 24). |
Для подключения к воспроизводящим видео-/ |
Для подачи питания на аудио- и видеооборудование |
|||||||||||||
|
2 Гнездо HDMI OUT |
аудиоустройствам и ввода видео-/аудиосигнала (c. 21). |
Yamaha. Подробнее о подключении смотрите в |
|||||||||||||
|
8 Гнезда AV OUT |
инструкции по эксплуатации воспроизводящего |
||||||||||||||
|
Для подключения к HDMI-совместимому телевизору для |
|||||||||||||||
|
устройства. |
|||||||||||||||
|
вывода видео-/аудиосигналов (c. 19). При использовании |
Для вывода видео- и аудиосигнала на записывающее |
||||||||||||||
|
B Разъемы SPEAKERS |
|||||||||||||||
|
функции ARC аудиосигнал телевизора может также |
устройство (например, видеомагнитофон) (c. 26). |
||||||||||||||
|
вводиться через гнездо HDMI OUT. |
9 Гнезда MONITOR OUT |
Для подключения к колонкам (c. 16). |
|||||||||||||
|
3 Гнезда HDMI 1–6 |
|||||||||||||||
|
Гнезда COMPONENT VIDEO: |
|||||||||||||||
|
Для подключения к воспроизводящим устройствам, |
Для подключения к телевизору, который поддерживает |
||||||||||||||
|
совместимым со стандартом HDMI, и для подачи видео-/ |
• Гнезда SURROUND BACK/BI AMP/ZONE B доступны только |
||||||||||||||
|
компонентный видеосигнал, и для вывода видеосигнала |
|||||||||||||||
|
аудиосигналов (c. 21). |
на модели RX-V577. |
||||||||||||||
|
(c. 21). |
|||||||||||||||
4 Гнездо NETWORK
Для проводного подключения к сети (c. 25).
5 Гнездо WiRELESS (только для RX-V577)
Для подключения к прилагаемой беспроводной антенне (c. 28).
6 Силовой кабель
Для подключения к настенной розетке переменного тока (c. 26).
Гнездо VIDEO:
C VOLTAGE SELECTOR
Для подключения к телевизору, который поддерживает
(Только общая модель)
композитный видеосигнал, и вывода видеосигнала
Выбор положения переключателя в зависимости от
(c. 21).
величины напряжения в данном регионе (c. 26).
0 Гнезда SUBWOOFER PRE OUT 1–2 (RX-V577)
Гнездо SUBWOOFER PRE OUT (RX-V477)
Для подключения к сабвуферу (со встроенным усилителем) (c. 16).
•(только для RX-V577)
К аппарату можно подключить 2 сабвуфера (со встроенным усилителем).
|
ФУНКЦИИ Названия компонентов и их функции |
Ru 9 |

Пульт ДУ
|
TRANSMIT |
||||
|
RECEIVER |
||||
|
SLEEP |
||||
|
HDMI |
||||
|
1 |
2 |
3 |
4 |
|
|
5 |
6 |
|||
|
AV |
||||
|
1 |
2 |
3 |
4 |
|
|
5 |
6 |
ZONE A |
||
|
AUX |
USB |
NET |
ZONE B |
|
|
FM |
AM |
|||
|
PRESET |
TUNING |
|||
|
INFO |
MEMORY |
|||
|
MOVIE |
MUSIC SUR. DECODE |
STRAIGHT |
||
|
BASS |
ENHANCER |
DIRECT |
||
|
SCENE |
||||
|
BD |
TV |
NET |
RADIO |
|
|
DVD |
||||
|
SETUP |
OPTION |
|||
|
ENTER |
VOLUME |
|||
|
RETURN |
DISPLAY |
|
TOP |
POP-UP |
MUTE |
|
|
MENU |
MENU |
||
MODE
|
1 Передатчик сигнала ДУ |
|||
|
Передача инфракрасных сигналов. |
|||
|
2 Индикатор TRANSMIT |
|||
|
Загорается при передаче сигналов пульта ДУ. |
|||
|
C |
3 Клавиша SLEEP |
||
|
Автоматическое переключение аппарата в режим |
|||
|
ожидания через заданный период времени (таймер сна). |
|||
|
Нажимайте, чтобы задать период (120 мин., 90 мин., |
|||
|
60 мин., 30 мин, выключено). |
|||
|
4 Клавиши выбора входа |
|||
|
Выбор источника входного сигнала для |
|||
|
D |
воспроизведения. |
||
|
HDMI 1–6 |
HDMI 1–6 |
||
|
AV-1–6 |
AV 1–6 |
||
|
AUX |
AUX (на передней панели) |
||
|
USB |
USB (на передней панели) |
||
|
NET |
Сетевые источники (нажимайте до тех |
||
|
пор, пока не будет выбран нужный |
|||
|
сетевой источник) |
|||
|
5 Клавиши радио |
|||
|
Управление FM/AM-радио (c. 49). |
|||
|
E |
FM |
Переключение на радио FM. |
|
|
AM |
Переключение на радио AM. |
||
|
F |
MEMORY |
Сохранение радиостанций FM/AM в |
|
|
качестве предустановленных. |
|||
|
PRESET |
Выбор предустановленной станции. |
||
|
TUNING |
Выбор радиочастоты. |
||
|
G |
6 Кнопка INFO |
||
|
Выбор информации, отображаемой на дисплее передней |
|||
|
панели (c. 71). |
7 Клавиши выбора режима звучания
Выбор режима звучания (c. 44).
8 Кнопки SCENE
Выбор сохраненного источника входного сигнала и звуковой программы одним нажатием. А также включение аппарата, когда он находится в режиме ожидания (c. 43).
9 Кнопка SETUP
Отображение меню настройки (c. 76).
0 Клавиши управления меню
Клавиши курсора Выбор меню или параметра.
|
ENTER |
Подтверждение выбранного |
|
пункта. |
|
|
RETURN |
Возврат к предыдущему экрану. |
A Кнопка MODE
Переключение между режимами “Stereo” и “Mono” для FM-радиостанций (c. 49).
Переключение в режимы работы iPod (c. 55).
B Клавиши управления внешним устройством
Настройка параметров воспроизведения для iPod (c. 53), запоминающего устройства USB (c. 57) или медиасервера (ПК/сетевого хранилища данных) (c. 60).
Также вы сможете использовать меню и управлять воспроизводящими устройствами, подключенными к аппарату с помощью кабеля HDMI.
•Воспроизводящие устройства должны поддерживать функцию HDMI Контроль. Однако ресивер Yamaha не гарантирует совместимость со всеми устройствами, поддерживающими функцию HDMI Контроль.
C Клавиша RECEIVER z
Включение/выключение (переход в режим ожидания) аппарата.
D Кнопки ZONE
Включение и выключение вывода аудиосигнала в зону Zone A или Zone B (c. 70).
• Кнопки ZONE функционируют только на модели RX-V577.
E Кнопка OPTION
Отображение меню опций (c. 72).
F Кнопки VOLUME
Регулировка громкости.
G Кнопка MUTE
Приглушение выводимого звука.
|
ФУНКЦИИ Названия компонентов и их функции |
Ru 10 |
![]()
ПОДГОТОВКА
Общая процедура настройки
1 Размещение колонок (c. 12)
2 Подключение колонок (c. 16)
3 Подключение телевизора (c. 19)
4Подключение воспроизводящих устройств (c. 21)
5 Подключение FM/AM-антенн (c. 24)
6Подключение к сети (проводное подключение к LAB) (c. 25)
7 Подключение записывающих устройств (c. 26)
8 Подключение кабеля питания (c. 26)
9 Выбор языка экранного меню (c. 27)
10Беспроводное подключение к сети (только для RX-V577) (c. 28)
11Автоматическая оптимизация настроек колонок (YPAO) (c. 38)
Выберите схему расположения колонок в зависимости от их числа и разместите их в комнате.
Подключите колонки к аппарату.
Подключите телевизор к аппарату.
Вы можете подключать к аппарату видеоустройства (например, BD/DVD-проигрыватели) и аудиоустройства (например, CD-проигрыватели).
Подключите прилагаемые FM/AM-антенны к аппарату.
Подключите аппарат к сети с помощью приобретаемого отдельно сетевого кабеля.
Подключите записывающие устройства к аппарату.
После того как вышеуказанные подключения будут выполнены, вставьте силовой кабель.
Выберите нужный язык экранного меню.
Подключите аппарат к беспроводной сети.
Оптимизируйте настройки колонок, такие как баланс громкости и акустические параметры, с учетом вашего помещения (YPAO).
Подготовка полностью завершена. Наслаждайтесь воспроизведением фильмов, музыки, радио и другого содержимого с помощью данного аппарата!
|
ПОДГОТОВКА Общая процедура настройки |
Ru 11 |
1 2 3 4 5 6 7 8 9 10 11
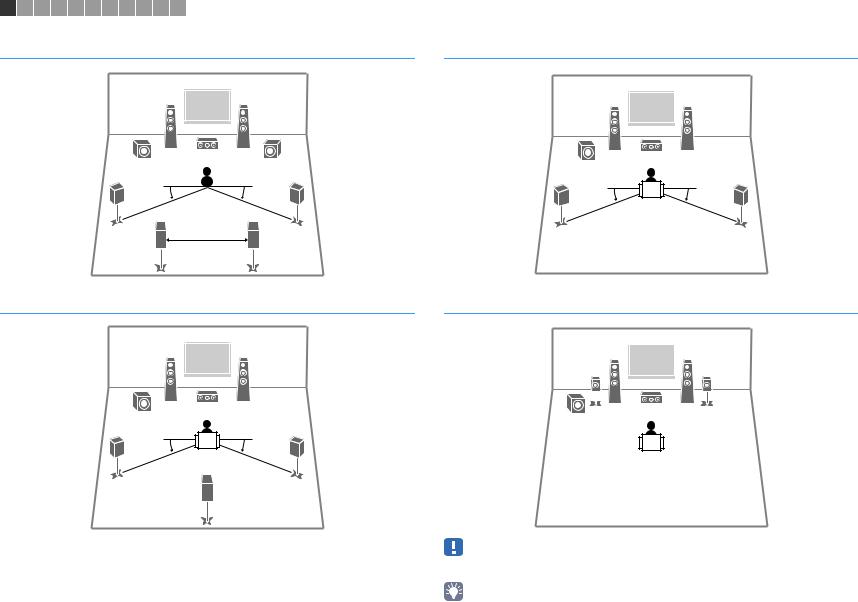
1 Размещение колонок
Выберите схему расположения колонок в зависимости от их числа, а затем разместите колонки и сабвуфер в помещении. в этом разделе описаны типичные примеры расположения колонок.
Предупреждение
•(Только модели для США и Канады)
По умолчанию аппарат настроен на использование колонок с сопротивлением 8 Ω. При подключении колонок с импедансом 6 Ω установите для импеданса колонок аппарата значение “6 Ω MIN”. Более подробные сведения см. в разделе “Изменение значения импеданса колонок” (c. 15).
•(Кроме моделей для США и Канады) Используйте колонки с импедансом не менее 6 Ω.
|
Система колонок (число каналов) |
||||||||||
|
Тип колонок |
Сокр. |
Функция |
5.1 |
|||||||
|
7.1*1 |
6.1*1 |
5.1 |
(Virtual |
4.1 |
3.1 |
2.1 |
||||
|
CINEMA |
||||||||||
|
FRONT) |
||||||||||
|
Фронт левый |
1 |
Для воспроизведения звука левого/правого каналов (стереозвук). |
● |
● |
● |
● |
● |
● |
● |
|
|
Фронт правый |
2 |
● |
● |
● |
● |
● |
● |
● |
||
|
Центр |
3 |
Для воспроизведения звуков центрального канала (например, диалоги и вокал). |
● |
● |
● |
● |
● |
|||
|
Тыл левый |
4 |
Для воспроизведения звука левого/правого каналов окружающего звучания (стереозвук). |
● |
● |
● |
●*2 |
● |
|||
|
Тыл правый |
5 |
● |
● |
● |
●*2 |
● |
||||
|
Центр.тыл. (лев.)*1 |
6 |
Для воспроизведения звука тылового левого/правого каналов окружающего звучания |
● |
|||||||
|
Центр.тыл. (прав.)*1 |
7 |
(стереозвук). |
● |
|||||||
|
Центр.тыл.*1 |
8 |
Воспроизведение звука, полученного смешиванием сигналов с тылового правого/левого каналов |
● |
|||||||
|
окружающего звучания. |
||||||||||
|
Для воспроизведения звуков канала LFE (низкочастотного эффекта) и усиления басовой |
||||||||||
|
Сабвуфер |
9 |
составляющей других каналов. |
● |
● |
● |
● |
● |
● |
● |
|
|
Канал считается как “0.1”. |
||||||||||
|
*1 Только для RX-V577 |
||||||||||
|
*2 Разместите колонки окружающего звука перед ресивером и задайте для параметра “Virtual CINEMA FRONT” (c. 81) в меню “Настройка” значение “Вкл.”. |
•Модель RX-V577 поддерживает системы колонок с числом каналов от 2 до 7.1, модель RX-V477 поддерживает системы колонок с числом каналов от 2 до 5.1.
•(только для RX-V577)
К аппарату можно подключить два сабвуфера (со встроенным усилителем). Два сабвуфера, подключенные к данному аппарату, выводят одинаковый звук.
|
ПОДГОТОВКА Размещение колонок |
Ru 12 |
1 2 3 4 5 6 7 8 9 10 11
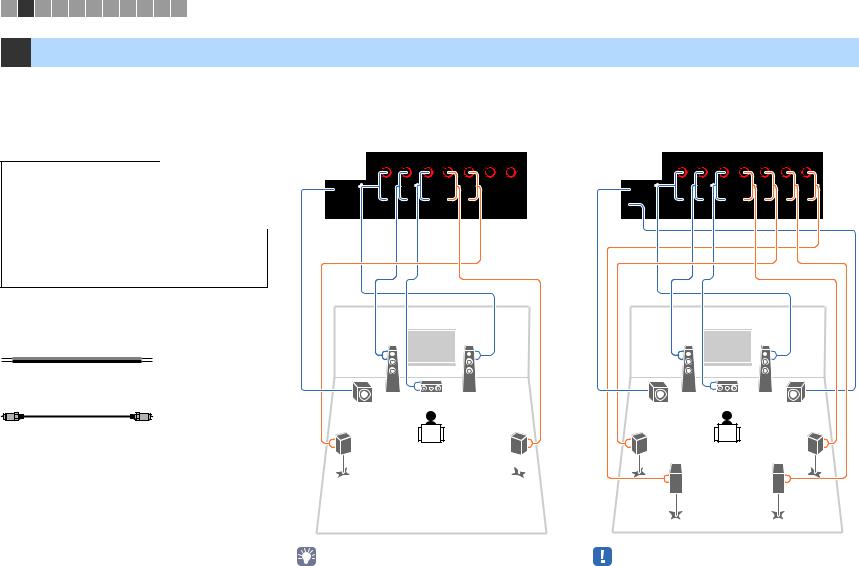
7.1-канальная система (только RX-V577)
4 5
|
10–30° |
10–30° |
||||
|
6 30 см или |
7 |
||||
|
больше |
6.1-канальная система (только RX-V577)
4 5
5.1-канальная система
4 5
5.1-канальная система (Virtual CINEMA FRONT)
•Для использования этой функции задайте для параметра “Virtual CINEMA FRONT” (стр.78) в меню “Настройка” значение “Вкл.”.
•Теперь вы можете наслаждаться эффектом окружающего звучания даже без центральной колонки (фронтальная 4.1-канальная система).
|
ПОДГОТОВКА Размещение колонок |
Ru 13 |

1 2 3 4 5 6 7 8 9 10 11
4.1-канальная система
4 5
3.1-канальная система
|
ПОДГОТОВКА Размещение колонок |
Ru 14 |
|||||
1 2 3 4 5 6 7 8 9 10 11
■ Настройка импеданса колонок
(Только модели для США и Канады)
По умолчанию аппарат настроен на использование колонок с сопротивлением 8 Ом. При подключении колонок на 6 Ом установите сопротивление колонок в положение “6 Ω MIN”.
1Перед подключением колонок подключите силовой кабель к настенной розетке переменного тока.
2Удерживая кнопку STRAIGHT на передней панели, нажмите кнопку z(питание).
z(питание)
STRAIGHT
3Убедитесь, что на дисплее передней панели отображается сообщение “SP IMP.”.
|
CHARGE |
ENHANCER STEREO TUNED PARTY SLEEP |
MUTE |
|
|
ZONE |
ZONE |
||
|
OUT 1 2 |
2 A |
3 B |
VOL. |
|
ECO |


 SP
SP


 IMP.••8¬MIN


 ADAPTIVE DRC VIRTUAL
4 Нажмите STRAIGHT, чтобы выбрать значение “6 Ω MIN”.
5Нажмите кнопку z(питание), чтобы перевести аппарат в режим
ожидания, и извлеките из настенной розетки переменного тока силовой кабель.
Все готово для подключения колонок.
|
ПОДГОТОВКА Размещение колонок |
Ru 15 |
1 2 3 4 5 6 7 8 9 10 11
2 Подключение колонок
|
Подключите колонки, размещенные в комнате, к |
5.1-канальная система |
7.1-канальная система |
||||||
|
аппарату. В качестве примера далее приведены |
||||||||
|
схемы подключения для 5.1-канальной и 7.1- |
(только для RX-V577) |
|||||||
|
канальной системы. При подключении колонок к |
||||||||
|
другим системам см. схему подключения для 5.1- |
Аппарат (вид сзади) |
Аппарат (вид сзади) |
||||||
|
канальной системы. |
||||||||
|
DC OUT |
SPEAKERS |
DC OUT |
SPEAKERS |
|||||
|
PB |
5V 0.5A |
SURROUND BACK/BI AMP |
PB |
5V 0.5A |
SURROUND BACK/BI AMP |
|||
|
CENTER |
/ZONE B |
CENTER |
/ZONE B |
|||||
|
FRONT |
SURROUND |
FRONT |
SURROUND |
|||||
|
Предупреждение |
SINGLE |
SINGLE |
||||||
|
Y |
Y |
|||||||
|
OR OUT |
OR OUT |
|||||||
|
• Перед подключением колонок извлеките из настенной |
1 |
1 |
||||||
|
розетки переменного тока силовой кабель аппарата и |
||||||||
|
выключите сабвуфер. |
SUBWOOFER |
SUBWOOFER |
||||||
|
2 |
2 |
|||||||
|
PRE OUT |
PRE OUT |
•Убедитесь, что жилы кабеля колонки не соприкасаются между собой и не контактируют с металлическими деталями аппарата. Это может привести к повреждению аппарата или колонок. В случае короткого замыкания цепи кабеля колонки при включении аппарата на дисплее передней панели появится сообщение “Check SP Wires”.
|
Кабели, необходимые для подключения |
||||||
|
(продаются отдельно) |
||||||
|
Кабели колонок (по числу колонок) |
1 |
2 |
1 |
2 |
||
|
+ |
+ |
|||||
|
– |
– |
|||||
|
Штекерный аудиокабель (1 шт.: для подключения |
9 |
3 |
9 |
3 |
9 |
|
|
сабвуфера) |
||||||
|
4 |
5 |
4 |
5 |
|||
|
6 |
7 |
|
• (только для RX-V577) |
• Если используется только одна тыловая колонка |
|
К аппарату можно подключить 2 сабвуфера (со встроенным |
окружающего звучания, подключите ее к гнезду SINGLE |
|
усилителем). Два сабвуфера выводят одинаковый звук. |
(слева). |
|
ПОДГОТОВКА Подключение колонок |
Ru 16 |
1 2 3 4 5 6 7 8 9 10 11
■ Подключение кабелей колонок
Кабели колонок состоят из двух проводников. Один подключается к отрицательному (-) разъему аппарата и колонки, а другой – к положительному (+). Если провода имеют разный цвет, чтобы их нельзя было перепутать, подключите черный провод к отрицательному разъему, а другой провод — к положительному.
aСнимите приблизительно 10 мм изоляции на концах кабеля колонки и надежно скрутите оголенные части проводов.
bОткрутите разъем на колонке.
cВставьте оголенные провода кабеля колонки в щель на боковой стороне разъема (правой верхней или левой нижней).
dЗатяните разъем.
 c
c
+ (красный) b


 d a
d a
— (черный)
Использование вилки штекерного типа
(Только в моделях для США, Канады, Китая, Австралии и в общих моделях)
a Затяните разъем на колонке.
b Вставьте вилку штекерного типа в торец разъема.
a 
Банановый штекер
 b
b

■ Подключение сабвуфера
(со встроенным усилителем)
Для подключения сабвуфера используйте штекерный аудиокабель.
Штекерный
Подключение колонок, поддерживающих соединение с раздельным усилением верхних и нижних частот
(только для RX-V577)
Если используются фронтальные колонки, поддерживающие подключения с двухканальным усилением, подключите эти колонки к гнездам FRONT и гнездам SURROUND BACK/BI-AMP/ ZONE B.
Для активации функции двухканального усиления после подключения кабеля питания установите для параметра “Назн.ус.мощн.” (с.79) в меню “Настройка” значение “BI-AMP”.
Аппарат (вид сзади)
|
SPEAKERS |
||
|
SURROUND BACK/BI AMP |
||
|
FRONT |
CENTER |
/ZONE B |
|
SURROUND |
||
|
SINGLE |
•Тыловые колонки окружающего звучания или колонки Zone B в режиме двухканального усиления использоваться не могут.
•Гнезда FRONT и SURROUND BACK/BI-AMP/ZONE B выводят одинаковый звук.
Предупреждение
• Перед выполнением соединений двухканального усиления извлеките кронштейны или кабели, соединяющие низкочастотный и высокочастотный динамики. Подробнее смотрите инструкцию по эксплуатации колонок. Если не используются соединения с двухканальным усилением, перед подключением кабелей колонок убедитесь, что перемычки или кабели подключены.
Подключение колонок Zone B
(только для RX-V577)
Функция Zone A/B позволяет воспроизводить отдельно источники входного сигнала в комнате, где установлен аппарат (Zone A), и в другой комнате (Zone B). Подключение колонок Zone B описано в разделе “Воспроизведение музыки в нескольких комнатах (только для RX-V577)” (c. 69).
•Тыловые колонки окружающего звучания или 2-х полосные фронтальные колонки не могут быть использованы, пока включена функция Zone B.
|
ПОДГОТОВКА Подключение колонок |
Ru 17 |
Входные и выходные гнезда и кабели
■ Видео/аудиогнезда
Гнезда HDMI
Цифровое видео и цифровой звук передаются по одному кабелю. Используйте кабель HDMI.
Кабель HDMI
•Используйте 19-штыревой кабель HDMI с логотипом HDMI. Рекомендуется использовать кабель длиной до 5,0 м, чтобы избежать ухудшения качества сигнала.
•Гнезда HDMI поддерживают функции HDMI Контроль, Audio Return Channel (ARC) и передачи видео в формате 3D и 4K Ultra HD (вывод через аппарат).
•Используйте высокоскоростные кабели HDMI и наслаждайтесь видео в формате 3D или 4K Ultra HD.
■ Видеогнезда
Гнезда COMPONENT VIDEO
Передача видеосигналов с разделением на три компонента: яркость (Y), насыщенность синего цвета (PB) и насыщенность красного цвета (PR).
Используйте компонентный видеокабель с тремя штекерами.
Компонентный видеокабель
Гнезда VIDEO
Используются для передачи аналогового видеосигнала. Используйте штекерный видеокабель.
Штекерный видеокабель
■ Аудиогнезда
Гнезда OPTICAL
Используются для передачи цифрового видеосигнала. Используйте цифровой оптический кабель. Перед использованием кабеля снимите защиту конца (если имеется).
Цифровой оптический кабель
OPTICAL
Гнезда COAXIAL
Используются для передачи цифрового видеосигнала. Используйте цифровой коаксиальный кабель.
Цифровой коаксиальный кабель
Гнезда AUDIO
(Гнезда лев./прав. каналов стереозвука)
Используются для передачи аналогового стереофонического аудиосигнала. Используйте штекерный стереокабель (кабель RCA).
Стереофонический штекерный кабель
(Мини-гнездо стереокабеля)
Используется для передачи аналоговых стереофонических аудиосигналов. Используйте стереокабель с мини-штекером.
Стереокабель с мини-штекером
|
ПОДГОТОВКА Входные и выходные гнезда и кабели |
Ru 18 |
1 2 3 4 5 6 7 8 9 10 11
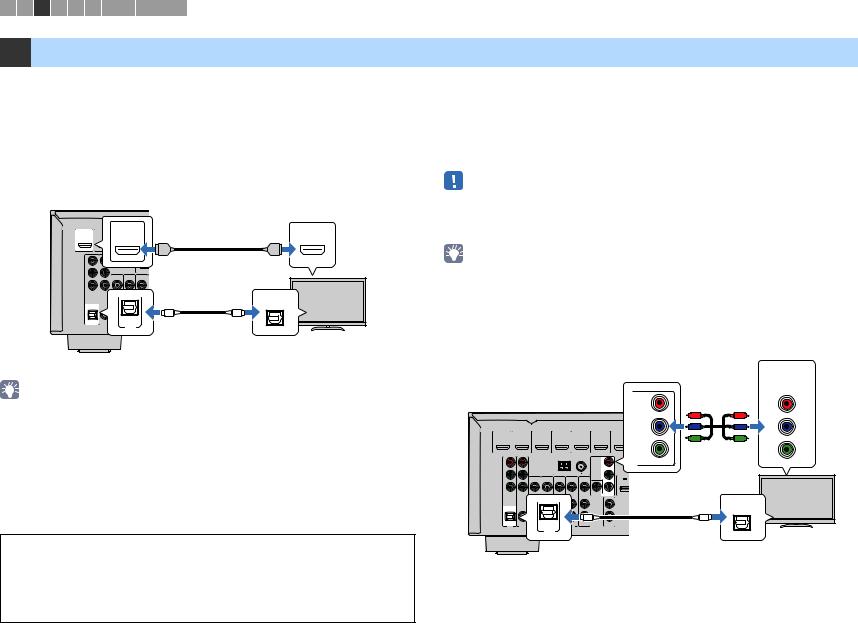
3 Подключение телевизора
Подключите к аппарату телевизор для вывода на него входного видеосигнала аппарата. Вы также можете воспроизводить звук с телевизора на аппарате.
Для наилучшего воспроизведения мы рекомендуем подключать телевизор с помощью кабеля HDMI.
■ Подключение HDMI
Подключите телевизор к аппарату с помощью кабеля HDMI и цифрового оптического кабеля.
Аппарат (вид сзади)
HDMI OUT
|
HDMI OUT |
HDMI 1 |
HDMI 2 |
HDMI 3 |
|
(BD/DVD) |
ARC
AM
PR
PB
|
Гнездо HDMI OUT |
Вход HDMI |
|
HDMI |
|
|
HDMI |
HDMI |
|
Y |
||||||
|
COMPONENT |
VIDEO |
|||||
|
VIDEO |
||||||
|
OPTICAL |
||||||
|
OPTICAL |
O |
O |
||||
|
OPTICAL |
COAXIAL |
COAXIAL |
||||
|
( TV ) |
AV 2 |
AV 3 |
(TV) |
AV 5 |
||
|
AV 1 |
AV 4 |
|||||
|
AV 1 |
||||||
|
Гнездо AV 1 |
Аудиовыход |
ТВ |
||||
|
(OPTICAL) |
(цифровой |
|||||
|
оптический) |
•Подключение телевизора к аппарату с помощью цифрового оптического кабеля не требуется в следующих случаях:
–Если ваш телевизор поддерживает функцию Audio Return Channel (ARC)
–Если вы просматриваете телепрограммы только через телевизионную абонентскую приставку
•Если вы с помощью кабеля HDMI подключите к аппарату телевизор, поддерживающий управление HDMI, то сможете управлять включением и выключением аппарата и регулировать его громкость с помощью пульта ДУ телевизора.
Чтобы использовать функции HDMI Контроль и ARC, необходимо выполнить настройки HDMI на аппарате. Более подробные сведения о настройках см. в разделе “Информация по HDMI” (c. 111).
Функция Audio Return Channel (ARC)
•Функция ARC позволяет передавать аудиосигналы в обоих направлениях. Если вы подключите к аппарату телевизор, поддерживающий ARC с помощью одного кабеля HDMI, вы можете выводить видео/аудиосигнал на телевизор или принимать входной аудиосигнал с телевизора на аппарат.
•При использовании функции ARC, подключайте телевизор к аппарату с помощью кабеля
HDMI, который поддерживает функцию ARC.
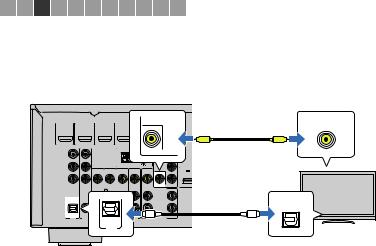
■ Подключение компонентного / композитного видео
При подключении любого видеоустройства с помощью компонентного видеокабеля подключите телевизор к гнездам MONITOR OUT (COMPONENT VIDEO).
При подключении любого видеоустройства с помощью штекерного видеокабеля подключите телевизор к гнезду MONITOR OUT (VIDEO).
•Если телевизор подключен к аппарату не с помощью кабеля HDMI, вы не сможете выводить сигнал на телевизор через интерфейс HDMI.
•Осуществление операций с помощью экрана телевизора возможно только в том случае, если телевизор подключен к аппарату через интерфейс HDMI.
•При просмотре телепрограмм только через телевизионную абонентскую приставку соединять телевизор и аппарат аудиокабелем не нужно.
Подключение COMPONENT VIDEO (с помощью компонентного видеокабеля)
|
Видеовход |
||
|
Гнезда MONITOR OUT |
(компонентный видеосигнал) |
|
|
COMPONENT |
||
|
(COMPONENT VIDEO) |
||
|
VIDEO |
||
|
COMPONENT |
PR |
|
|
Аппарат (вид сзади) |
VIDEO |
|
PR
|
PR |
PR |
PB |
|||||||||
|
PB |
PB |
||||||||||
|
HDMI OUT |
HDMI 1 |
HDMI 2 |
HDMI 3 |
HDMI 4 |
HDMI 5 |
HDMI 6 |
PB |
||||
|
(BD/DVD) |
Y |
||||||||||
|
Y |
Y |
||||||||||
|
ANTENNA |
Y |
||||||||||
|
AM |
(RADIO) |
FM |
COMPONENT |
MONITOR OUT |
|||||||
|
VIDEO |
|||||||||||
|
PR |
PR |
||||||||||
|
DC OU |
|||||||||||
|
PB |
PB |
5V 0.5 |
|||||||||
|
Y |
Y |
||||||||||
|
COMPONENT |
VIDEO |
MONITOR OUT |
|||||||||
|
VIDEO |
|||||||||||
|
1 |
|||||||||||
|
OPTICAL |
|||||||||||
|
OPTICAL |
O |
2 |
O |
||||||||
|
( TV ) |
COAXIAL |
COAXIAL |
AV |
||||||||
|
SUBWOOFER |
|||||||||||
|
OPTICAL |
|||||||||||
|
AV 1 |
AV 2 |
AV 3 |
AV 4 |
AV 5 |
AV 6 |
OUT |
PRE OUT |
||||
|
(TV) |
|||||||||||
|
AV 1 |
ТВ |
||||||||||
|
Гнездо AV 1 |
Аудиовыход |
||||||||||
|
(OPTICAL) |
(цифровой оптический) |
|
ПОДГОТОВКА Подключение телевизора |
Ru 19 |
1 2 3 4 5 6 7 8 9 10 11
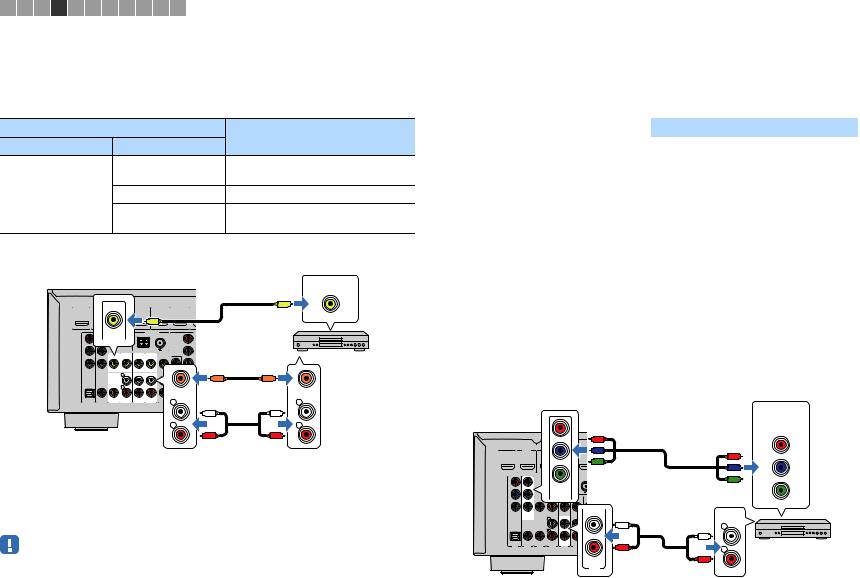
Подключение VIDEO (композитное видео) (с помощью штекерного видеокабеля)
|
Гнездо MONITOR OUT |
Видеовход |
||||||||
|
Аппарат (вид сзади) |
(VIDEO) |
||||||||
|
(композитный видеосигнал) |
|||||||||
|
HDMI OUT |
(BD/DVD) |
HDMI 2 |
HDMI 3 |
VIDEO |
|||||
|
HDMI 1 |
HDMI 4 |
HDMI 5 |
HDMI 6 |
||||||
|
V |
V |
||||||||
|
ANTENNA |
|||||||||
|
AM |
(RADIO) |
FM |
COMPONENT |
OUT |
|||||
|
MONITORVIDEO |
|||||||||
|
PR |
PR |
||||||||
|
DC OU |
|||||||||
|
PB |
PB |
5V 0.5 |
|||||||
|
Y |
Y |
||||||||
|
COMPONENT |
VIDEO |
MONITOR OUT |
|||||||
|
VIDEO |
|||||||||
|
1 |
|||||||||
|
OPTICAL |
|||||||||
|
OPTICAL |
COAXIAL |
COAXIAL |
AVO |
2 |
O |
||||
|
SUBWOOFER |
|||||||||
|
( TV ) |
|||||||||
|
AV 1 |
AV 2 |
AV 3 |
AV 4 |
AV 5 |
AV 6 |
OUT |
PRE OUT |
||
|
OPTICAL |
|||||||||
|
(TV) |
|||||||||
|
AV 1 |
ТВ |
||||||||
|
Гнездо AV 1 |
Аудиовыход |
||||||||
|
(OPTICAL) |
(цифровой оптический) |
|
ПОДГОТОВКА Подключение телевизора |
Ru 20 |

1 2 3 4 5 6 7 8 9 10 11
4 Подключение воспроизводящих устройств
Аппарат оснащен различными входными гнездами, в том числе входными гнездами HDMI, и позволяет подключать различные виды воспроизводящих устройств. Сведения о том, как подключить устройство iPod или запоминающее устройство USB, см. на последующих страницах.
–Подключение устройства iPod (c. 53)
–Подключение запоминающего устройства USB (c. 57)
Подключение видеоустройств (таких как BD/DVDпроигрыватели)
Вы можете подключать к аппарату видеоустройства, такие как BD/DVDпроигрыватели, телевизионные абонентские приставки и игровые консоли. Выберите один из следующих способов подключения в зависимости от набора выходных видео/аудиогнезд видеоустройства. Если на видеоустройстве есть выходное гнездо HDMI, рекомендуем использовать подключение HDMI.
•Если комбинация гнезд входных видео/аудиосигналов на аппарате не подходит для вашего видеоустройства, измените эту комбинацию в соответствии с выходными гнездами вашего устройства (c. 22).
■ Соединение HDMI
Подключите видеоустройство к аппарату с помощью кабеля HDMI.
Гнезда HDMI 1–6
|
HDMI 1 |
HDMI 2 |
HDMI 3 |
HDMI 4 |
HDMI 5 |
HDMI 6 |
(BD/DVD)
Аппарат (вид сзади)
|
HDMI OUT |
HDMI 1 |
HDMI 2 |
HDMI |
|
(BD/DVD) |
Выход HDMI
HDMI
ANTENNA
|
AM |
(RADIO) |
FM |
COMPONENT |
HDMI |
|||||
|
VIDEO |
|||||||||
|
PR |
PR |
||||||||
|
DC OUT |
HDMI |
||||||||
|
PB |
PB |
5V 0.5A |
|||||||
|
Y |
Y |
||||||||
|
COMPONENT |
VIDEO |
MONITOR OUT |
|||||||
|
VIDEO |
|||||||||
|
1 |
|||||||||
|
OPTICAL |
COAXIAL |
COAXIAL |
2 |
||||||
|
AV |
SUBWOOFER |
||||||||
|
( TV ) |
|||||||||
|
AV 1 |
AV 2 |
AV 3 |
AV 4 |
AV 5 |
AV 6 |
OUT |
PRE OUT |
Видеоустройство
Если в качестве источника входного сигнала аппарата выбрать HDMI 1–6, видео/аудиосигнал, который воспроизводится на видеоустройстве, будет выводиться через аппарат.
• Для просмотра видеоизображений, которые выводятся через гнезда HDMI 1–6, необходимо подключить телевизор к гнезду HDMI OUT аппарата (c. 19–21).
■ Подключение компонентного видео
Подключите видеоустройство к аппарату с помощью компонентного видеокабеля и аудиокабеля (цифрового оптического или цифрового коаксиального кабеля). Выберите набор входных гнезд на аппарате в зависимости от набора выходных аудиогнезд видеоустройства.
Выходные гнезда на видеоустройстве
|
Видео |
Аудио |
|
Цифровой оптический |
|
|
кабель |
|
|
Компонентный |
Цифровой |
|
видеосигнал |
коаксиальный |
|
Аналоговый |
|
|
стереокабель |
|
Гнезда AV 1–2
(COMPONENT VIDEO)
Аппарат (вид сзади)
PR
|
HDMI OUT |
HDMI 1 |
HDMI 2 |
HDMI 3 |
PR |
|
(BD/DVD) |
||||
|
PB |
PB |
Y
AM
PR Y
|
COMPONENT |
|||||
|
PB |
VIDEO |
||||
|
Y |
|||||
|
COMPONENT |
VIDEO |
||||
|
VIDEO |
|||||
|
O |
|||||
|
OPTICAL COAXIAL |
COAXIAL |
AV 4 |
OPTICAL |
COAXIAL |
|
|
AV 1 |
AV 3 |
||||
|
( TV ) |
AV 2 |
AV 5 |
|||
|
( TV ) |
C |
||||
|
AV 1 |
AV 2 |
Гнездо AV 1 (OPTICAL) или гнездо AV 2 (COAXIAL)
Входные гнезда на аппарате
AV 1 (COMPONENT VIDEO + OPTICAL)
AV 2 (COMPONENT VIDEO + COAXIAL)
Вам понадобится изменить комбинацию входных видео/аудиогнезд (c. 22).
Видеовыход (компонентный видеосигнал)
COMPONENT
VIDEO
PR
 PR
PR  PB
PB
 PB
PB 
Y  Y
Y

 O
O 

OPTICAL
Видеоустройство
 C
C 
COAXIAL
Аудиовыход (цифровой оптический или цифровой коаксиальный)
Если в качестве источника входного сигнала аппарата выбрать AV 1–2, видео/ аудиосигнал, который воспроизводится на видеоустройстве, будет выводиться через аппарат.
•Для просмотра видеоизображений, которые выводятся через гнезда AV 1–2 (COMPONENT VIDEO), необходимо подключить телевизор к гнездам MONITOR OUT (COMPONENT VIDEO) аппарата (c. 21).
|
ПОДГОТОВКА Подключение воспроизводящих устройств |
Ru 21 |
1 2 3 4 5 6 7 8 9 10 11
■ Подключение композитного видео
Подключите видеоустройство к аппарату с помощью штекерного видеокабеля и аудиокабеля (цифрового коаксиального кабеля или стереофонического штекерного кабеля). Выберите набор входных гнезд на аппарате в зависимости от набора выходных аудиогнезд видеоустройства.
|
Выходные гнезда на видеоустройстве |
Входные гнезда на аппарате |
|||||||
|
Видео |
Аудио |
|||||||
|
Цифровой |
AV 3 (VIDEO + COAXIAL) |
|||||||
|
коаксиальный |
||||||||
|
Композитный |
Аналоговый (стерео) |
AV 4–6 (VIDEO + AUDIO) |
||||||
|
видеосигнал |
||||||||
|
Цифровой оптический Вам понадобится изменить комбинацию |
||||||||
|
кабель |
входных видео/аудиогнезд (c. 22). |
|||||||
|
Видеовыход |
||||||||
|
(композитный видеосигнал) |
||||||||
|
Гнездо AV 3–6 (VIDEO) |
VIDEO |
|||||||
|
HDMI 1 |
HDMI 2 |
HDMI 3 |
HDMI 4 |
HDMI 5 |
V |
|||
|
HDMI OUT |
||||||||
|
(BD/DVD) |
||||||||
|
V |
||||||||
|
VIDEO |
ANTENNA |
COMPONENT |
||||||
|
AM |
(RADIO) FM |
|||||||
|
VIDEO |
Видеоустройство |
|||||||
|
PR |
PR |
|||||||
|
PB |
PB |
|||||||
|
Y |
Y |
|||||||
|
COMPONENT |
VIDEO |
MONITOR OUT |
||||||
|
VIDEO |
||||||||
|
1 |
C |
C |
||||||
|
COAXIAL |
COAXIAL |
|||||||
|
OPTICAL |
COAXIAL |
COAXIAL |
2 |
|||||
|
AV |
L |
SUBWOOFER |
L |
|||||
|
( TV ) |
AV 2 |
AV 3 AV 4 |
AV 5 |
OUT |
PRE OUT |
|||
|
AV 1 |
AV 6 |
|||||||
|
L |
L |
|||||||
|
Аппарат |
R |
R |
||||||
|
R |
R |
|||||||
|
(вид сзади) |
Гнездо AV 3 (COAXIAL) или |
Аудиовыход |
||||||
|
гнезда AV 4–6 (AUDIO) |
(цифровой коаксиальный или |
|||||||
|
аналоговый стереокабель) |
Если в качестве источника входного сигнала аппарата выбрать AV 3–6, видео/ аудиосигнал, который воспроизводится на видеоустройстве, будет выводиться через аппарат.
• Для просмотра видеоизображений, которые выводятся через гнезда AV 3–6 (VIDEO), необходимо подключить телевизор к гнезду MONITOR OUT (VIDEO) аппарата (c. 21).
■ Изменение комбинации входных видео/аудиогнезд
Если комбинация входных видео/аудиогнезд на аппарате не подходит для вашего видеоустройства, измените эту комбинацию в соответствии с выходными гнездами вашего устройства. Можно подключать видеоустройства, в которых предусмотрены следующие выходные видео/аудиогнезда.
|
Выходные гнезда на видеоустройстве |
Входные гнезда на аппарате |
|||
|
Видео |
Аудио |
Видео |
Аудио |
|
|
Цифровой |
HDMI 1–6 |
AV 1 (OPTICAL) |
||
|
оптический кабель |
||||
|
HDMI |
Цифровой |
HDMI 1–6 |
AV 2–3 (COAXIAL) |
|
|
коаксиальный |
||||
|
Аналоговый (стерео) |
HDMI 1–6 |
AV 4–6 (AUDIO) |
||
|
Компонентный |
Аналоговый (стерео) |
AV 1–2 (COMPONENT |
AV 4–6 (AUDIO) |
|
|
видеосигнал |
VIDEO) |
|||
|
Композитный |
Цифровой |
AV 3–6 (VIDEO) |
AV 1 (OPTICAL) |
|
|
видеосигнал |
оптический кабель |
|||
Необходимая настройка
Например, если к гнездам AV 2 (COMPONENT VIDEO) и AV 5 (AUDIO) аппарата подключено видеоустройство, измените комбинацию настроек следующим образом.
|
Видеовыход |
||||||||
|
Гнезда AV 2 (COMPONENT VIDEO) |
(компонентный видеосигнал) |
|||||||
|
COMPONENT |
||||||||
|
Аппарат (вид сзади) |
VIDEO |
|||||||
|
PR |
PR |
|||||||
|
HDMI OUT |
HDMI 1 |
HDMI 2 |
HDMI 3 |
HDM |
PB |
PB |
||
|
(BD/DVD) |
||||||||
|
Y |
PR |
|||||||
|
PB |
||||||||
|
ANTENNA |
Y |
Y |
||||||
|
AM |
(RADIO) FM |
|||||||
|
PR |
||||||||
|
PB |
||||||||
|
Y |
||||||||
|
COMPONENT |
VIDEO |
AUDIO |
||||||
|
VIDEO |
||||||||
|
L |
L |
|||||||
|
L |
||||||||
|
OPTICAL |
COAXIAL |
COAXIAL |
R |
Видеоустройство |
||||
|
( TV ) |
AV 2 |
AV 3 AV 4 |
AV 5 |
AV 6 |
||||
|
AV 1 |
R |
|||||||
|
R |
||||||||
|
AV 5 |
||||||||
|
Гнезда AV 5 |
Аудиовыход |
|||||||
|
(AUDIO) |
(аналоговый стереосигнал) |
|
ПОДГОТОВКА Подключение воспроизводящих устройств |
Ru 22 |
1 2 3 4 5 6 7 8 9 10 11
1После подключения к аппарату внешних устройств (таких как телевизор и воспроизводящие устройства) и силового кабеля включите аппарат.
2Нажмите AV 2 для выбора “AV 2” (гнездо входного видеосигнала, которое будет использоваться) в качестве источника входного сигнала.
AV 2
AUX USB
|
BD |
TV |
NET |
RADIO |
|
|
DVD |
||||
SETUP
OPTION
VOLUME Клавиши курсора
3 Нажмите кнопку OPTION.
4С помощью клавиш курсора (q/w) выберите “Audio In” и
нажмите ENTER.
|
CHARGE |
ENHANCER STEREO TUNED |
SLEEP MUTE |
|
OUT |
VOL. |
|
|
ECO |
Audio In |
ADAPTIVE DRC VIRTUAL |
5С помощью клавиш курсора (e/r) выберите “AV 5” (входное
аудиогнездо, которое будет использоваться).
|
CHARGE |
ENHANCER STEREO TUNED |
SLEEP MUTE |
|
OUT |
VOL. |
ECO


 Audio••••••AV5


 ADAPTIVE DRC VIRTUAL
6 Нажмите кнопку OPTION.
Настройка завершена.
Если в качестве источника входного сигнала аппарата выбрать “AV 2”, нажав кнопку AV 2, то видео/аудиосигнал, который воспроизводится на видеоустройстве, будет выводиться через аппарат.
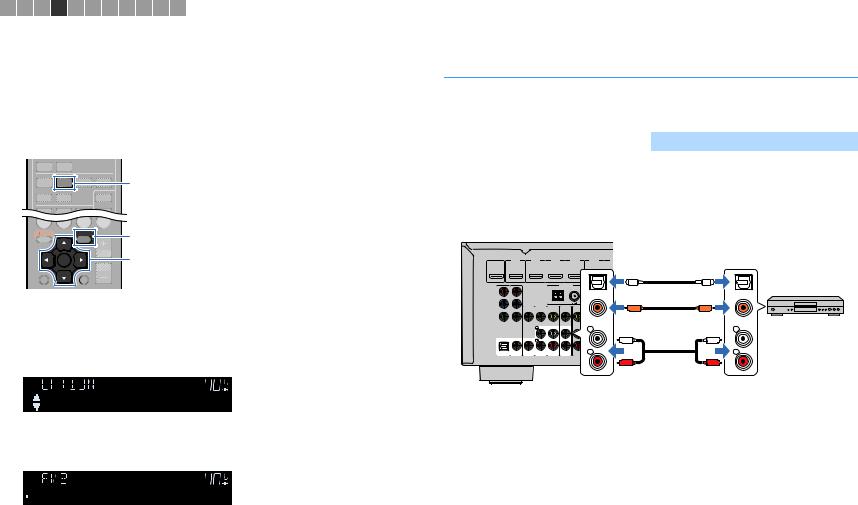
Подключение аудиоустройств (таких как CDпроигрыватели)
Подключите к аппарату аудиоустройства, например CDили MD-проигрыватели. Выберите один из следующих способов подключения в зависимости от набора выходных аудиогнезд аудиоустройства.
|
Выходные аудиогнезда аудиоустройства |
Входные аудиогнезда на аппарате |
|
Цифровой оптический кабель |
AV 1 (OPTICAL) |
|
Цифровой коаксиальный |
AV 2–3 (COAXIAL) |
|
Аналоговый (стерео) |
AV 4–6 (AUDIO) |
Аппарат (вид сзади)
HDMI 1 HDMI 2 HDMI 3 HDMI 4 HDMI 5 H
HDMI OUT (BD/DVD)
|
ANTENNA |
O |
O |
||
|
AM |
(RADIO) |
FM |
COMPONENT |
|
|
VIDEO |
OPTICAL |
|||
|
OPTICAL |
||||
|
PR |
PR |
|
PB |
PB |
C |
C |
||||||||
|
Y |
COAXIAL |
COAXIAL |
Видеоустройство |
||||||||
|
VIDEO |
Y |
||||||||||
|
COMPONENT |
VIDEO |
MONITOR OUT |
|||||||||
|
L |
1 |
L |
|||||||||
|
L |
L |
||||||||||
|
OPTICAL |
COAXIAL |
COAXIAL |
2 |
||||||||
|
AV |
R SUBWOOFER |
R |
|||||||||
|
( TV ) |
|||||||||||
|
AV 1 |
AV 2 |
AV 3 |
AV 4 |
AV 5 |
AV 6 |
OUT |
PRE OUT |
||||
|
R |
R |
||||||||||
|
Гнезда AV 1–6 |
Аудиовыход (цифровой оптический, |
||||||||||
|
цифровой коаксиальный или аналоговый |
|||||||||||
|
стереокабель) |
Если выбрать источник входного сигнала, нажав кнопки AV 1–6, аудиосигнал, который воспроизводится на аудиоустройстве, будет выводиться через аппарат.
|
ПОДГОТОВКА Подключение воспроизводящих устройств |
Ru 23 |
1 2 3 4 5 6 7 8 9 10 11
Подключение к гнезду на передней панели
Используйте гнездо AUX на передней панели для временного подключения к аппарату таких устройств, как видеокамера или портативный аудиоплеер.
Перед подключением устройства к аппарату убедитесь, что устройство остановлено, и уменьшите громкость на аппарате.
|
INPUT |
TONE CONTROL |
PROGRAM |
AUX |
|
STRAIGHT |
Аппарат (вид спереди)
Портативный аудио плеер
Если в качестве источника входного сигнала аппарата выбрать “AUX”, нажав кнопку AUX, то видео/аудиосигнал, который воспроизводится на видеоустройстве, будет выводиться через аппарат.
•Необходимо подготовить аудиокабели, которые соответствуют выходным гнездам на вашем устройстве.
•Сведения о том, как подключить устройство iPod или запоминающее устройство USB, см. в разделе “Подключение устройства iPod” (c. 53) или “Подключение запоминающего устройства USB” (c. 57).
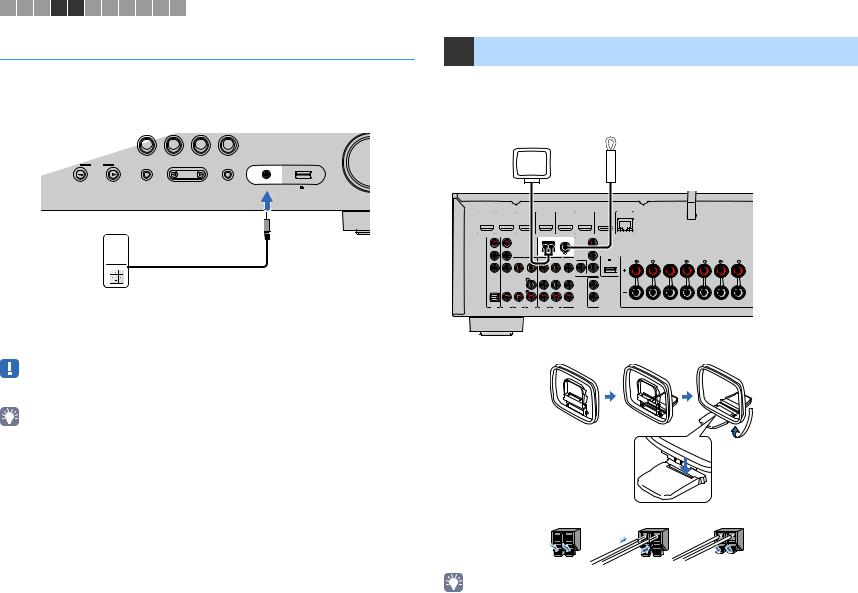
5 Подключение FM/AM-антенн
Подключите прилагаемые FM/AM-антенны к аппарату.
Закрепите крайнюю часть FM-антенны на стене, а AM-антенну разместите на плоской поверхности.
FM-антенна
АМ-антенна
Аппарат (вид сзади)
|
HDMI OUT |
HDMI 1 |
HDMI 2 |
HDMI 3 |
HDMI 4 |
HDMI 5 |
HDMI 6 |
NETWORK |
||||
|
(BD/DVD) |
(NET) |
||||||||||
|
ANTENNA |
|||||||||||
|
AM |
(RADIO) |
FM |
COMPONENT |
||||||||
|
VIDEO |
|||||||||||
|
PR |
PR |
||||||||||
|
DC OUT |
SPEAKERS |
||||||||||
|
PB |
PB |
5V |
0.5A |
SURROUND BACK/BI AMP |
|||||||
|
FRONT |
CENTER |
SURROUND |
|||||||||
|
SINGLE |
|||||||||||
|
Y |
Y |
||||||||||
|
COMPONENT |
VIDEO |
MONITOR OUT |
|||||||||
|
VIDEO |
|||||||||||
|
1 |
|||||||||||
|
OPTICAL |
COAXIAL |
COAXIAL |
2 |
||||||||
|
AV |
SUBWOOFER |
||||||||||
|
( TV ) |
|||||||||||
|
AV 1 |
AV 2 |
AV 3 |
AV 4 |
AV 5 |
AV 6 |
OUT |
PRE OUT |
Сборка и подключение AM-антенны
Удерживайте  Вставьте
  Отпустите
•Отмотайте кабель AM-антенны на необходимую длину.
•Провода рамочной AM-антенны не имеют полярности.
|
ПОДГОТОВКА Подключение FM/AM-антенн |
Ru 24 |
1 2 3 4 5 6 7 8 9 10 11
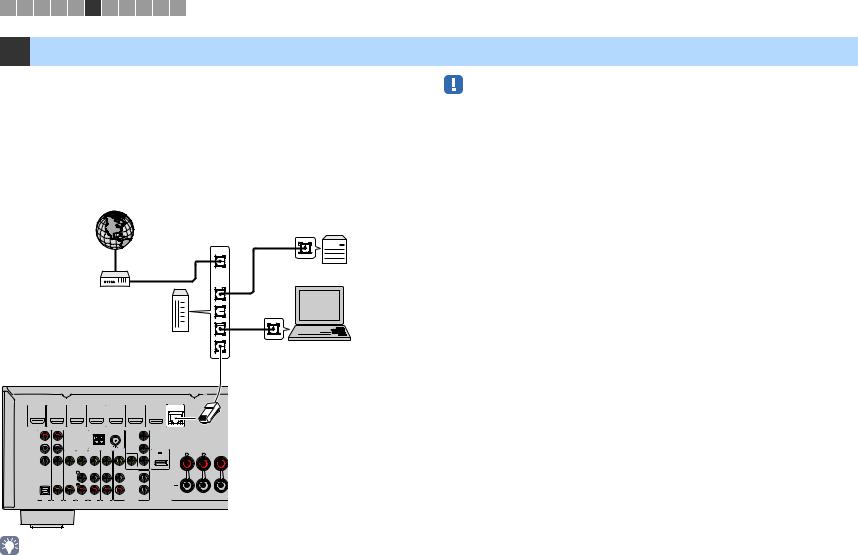
6 Подключение к сети (проводное подключение к LAN)
Для подключения данного аппарата к маршрутизатору используйте продающийся в торговой сети сетевой кабель STP (CAT5 или более скоростной кабель прямого подключения).
Вы можете прослушивать на аппарате интернет-радиостанции или музыкальные файлы, которые хранятся на медиа-серверах, таких как ПК и Network Attached Storage (NAS).
(только для RX-V577)
Вы также можете подключить аппарат к беспроводной сети. Как это сделать, описано в разделе “Беспроводное подключение к сети (только для RX-V577)” (c. 28).
|
Интернет |
Network Attached Storage |
|
|
(NAS) |
||
|
WAN |
||
|
PC |
||
|
LAN |
||
|
Модем |
Маршрутизатор
Сетевой кабель
|
HDMI OUT |
HDMI 1 |
HDMI 2 |
HDMI 3 |
HDMI 4 |
HDMI 5 |
HDMI 6 |
NETWORK |
|||
|
(BD/DVD) |
(NET) |
|||||||||
|
ANTENNA |
||||||||||
|
AM |
(RADIO) |
FM |
COMPONENT |
|||||||
|
VIDEO |
||||||||||
|
PR |
PR |
|||||||||
|
DC OUT |
||||||||||
|
PB |
PB |
5V |
0.5A |
|||||||
|
FRONT |
CENTER |
|||||||||
|
Y |
Y |
|||||||||
|
COMPONENT |
VIDEO |
MONITOR OUT |
||||||||
|
VIDEO |
||||||||||
|
1 |
||||||||||
|
OPTICAL |
COAXIAL |
COAXIAL |
2 |
|||||||
|
AV |
SUBWOOFER |
|||||||||
|
( TV ) |
||||||||||
|
AV 1 |
AV 2 |
AV 3 |
AV 4 |
AV 5 |
AV 6 |
OUT |
PRE OUT |
Аппарат (вид сзади)
•Некоторые программы защиты данных, установленные на ПК, или настройки брандмауэра сетевых устройств могут заблокировать доступ данного аппарата к сетевым устройствам или Интернету. В таких случаях выполните надлежащую настройку программ защиты данных или брандмауэра.
•Каждый из серверов должен находиться в той же подсети, что и сам аппарат.
•Для использования данной службы через Интернет настоятельно рекомендуем использовать широкополосное соединение.
•При использовании маршрутизатора, поддерживающего функцию DHCP, сетевые параметры (IPадрес и т. п.) будут назначены аппарату автоматически, т. е. необходимости настраивать сетевые параметры нет. Если ваш маршрутизатор не поддерживает функцию DHCP или вы хотите настроить сетевые параметры вручную, выполните настройку сети (c. 91).
•Вы можете проверить, правильно ли назначены устройству сетевые параметры (такие как IPадрес и т. п.), в пункте “Информация” (c. 91) меню “Настройка”.
|
ПОДГОТОВКА Подключение к сети (проводное подключение к LAN) |
Ru 25 |
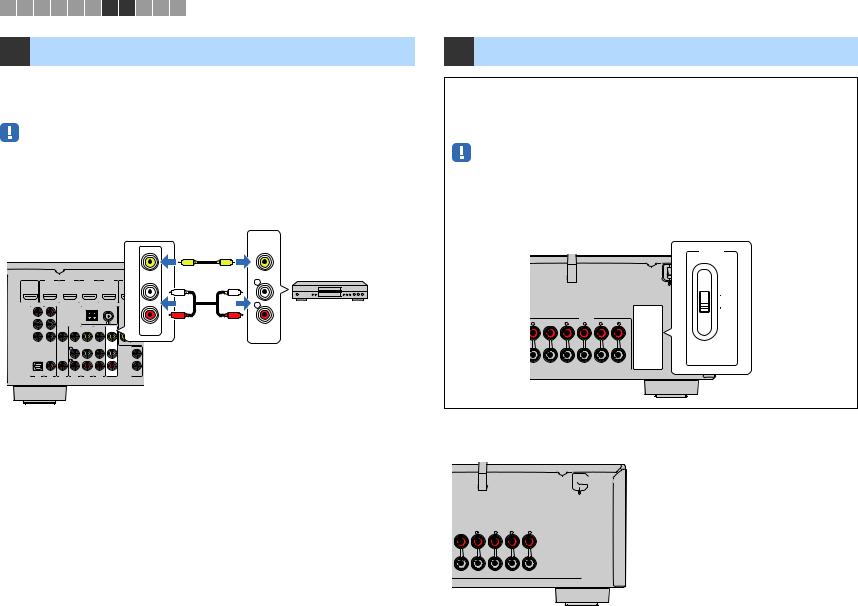
1 2 3 4 5 6 7 8 9 10 11
7 Подключение записывающих устройств
Для подключения записывающих видео- и аудиоустройств используются гнезда AV OUT. Через эти гнезда выводятся аналоговые видео/аудиосигналы, выбранные в качестве входящего сигнала.
•Для копирования видео- и аудиозаписей с какого-либо видеоустройства подключите видеоустройство к гнездам AV 4–6 на аппарате.
•Для копирования аудиозаписей с какого-либо аудиоустройства подключите аудиоустройство к гнездам AV 4–6 или гнезду AUX на аппарате.
•Используйте гнезда AV OUT только для подключения записывающих устройств.
|
Гнезда AV OUT |
Видео / аудиовход |
|||||||||
|
Аппарат (вид сзади) |
VIDEO |
|||||||||
|
V |
V |
|||||||||
|
HDMI OUT |
HDMI 1 |
HDMI 2 |
HDMI 3 |
HDMI 4 |
HDMI 5 |
L |
||||
|
(BD/DVD) |
||||||||||
|
L |
L |
|||||||||
|
ANTENNA |
VIDEO |
R |
Записывающее |
|||||||
|
AM |
(RADIO) |
FM |
COMPONENT |
|||||||
|
PR |
PR |
R |
R |
видеоустройство |
||||||
|
PB |
PB |
AV |
AUDIO |
|||||||
|
OUT |
||||||||||
|
Y |
Y |
|||||||||
|
COMPONENT |
VIDEO |
MONITOR OUT |
||||||||
|
VIDEO |
||||||||||
|
1 |
||||||||||
|
OPTICAL |
COAXIAL |
COAXIAL |
2 |
|||||||
|
AV |
SUBWOOFER |
|||||||||
|
( TV ) |
||||||||||
|
AV 1 |
AV 2 |
AV 3 AV 4 |
AV 5 |
AV 6 |
OUT |
PRE OUT |
8 Подключение силового кабеля
Перед подключением силового кабеля (только общие модели)
Установите переключатель VOLTAGE SELECTOR в положение, соответствующее величине напряжения в данном регионе. Используются следующие значения напряжения переменного тока:110–120/220–240 В, 50/60 Гц.
•Убедитесь, что переключатель VOLTAGE SELECTOR аппарата установлен в соответствии с величиной напряжения в данном регионе ДО ТОГО, КАК подключить силовой кабель к настенной розетке переменного тока. Ненадлежащая установка переключателя VOLTAGE SELECTOR может привести к повреждению аппарата и созданию потенциальной опасности возгорания.
VOLTAGE SELECTOR
Аппарат (вид сзади)
VOLTAGE
SELECTOR
110V–
120V
220V–
240V
|
SPEAKERS |
|
|
SURROUND BACK/BI AMP |
|
|
CENTER |
/ZONE B |
|
SURROUND |
|
|
SINGLE |
После того как вышеуказанные подключения будут выполнены, вставьте силовой кабель.
Аппарат (вид сзади)


 В настенную розетку переменного тока
|
SPEAKERS |
|
|
SURROUND BACK/BI AMP |
|
|
CENTER |
/ZONE B |
|
SURROUND |
|
|
SINGLE |
|
ПОДГОТОВКА Подключение записывающих устройств |
Ru 26 |

1 2 3 4 5 6 7 8 9 10 11
TRANSMIT
|
RECEIVER |
RECEIVER z |
|||||||||||||||||||||||||||||||||||||||||||
|
SLEEP |
||||||||||||||||||||||||||||||||||||||||||||
|
HDMI |
||||||||||||||||||||||||||||||||||||||||||||
|
1 |
2 |
3 |
||||||||||||||||||||||||||||||||||||||||||
|
4 |
||||||||||||||||||||||||||||||||||||||||||||
|
5 |
6 |
|||||||||||||||||||||||||||||||||||||||||||
|
AV |
||||||||||||||||||||||||||||||||||||||||||||
|
1 |
2 |
3 |
||||||||||||||||||||||||||||||||||||||||||
|
4 |
||||||||||||||||||||||||||||||||||||||||||||
|
5 |
6 |
|||||||||||||||||||||||||||||||||||||||||||
|
ZONE A |
||||||||||||||||||||||||||||||||||||||||||||
|
USB |
ZONE B |
|||||||||||||||||||||||||||||||||||||||||||
|
AUX |
NET |
|||||||||||||||||||||||||||||||||||||||||||
|
FM |
AM |
|||||||||||||||||||||||||||||||||||||||||||
|
PRESET |
TUNING |
|||||||||||||||||||||||||||||||||||||||||||
|
INFO |
MEMORY |
|||||||||||||||||||||||||||||||||||||||||||
|
MOVIE |
MUSIC |
SUR. DECODE |
STRAIGHT |
|||||||||||||||||||||||||||||||||||||||||
|
BASS |
ENHANCER |
DIRECT |
||||||||||||||||||||||||||||||||||||||||||
|
SCENE |
||||||||||||||||||||||||||||||||||||||||||||
|
BD |
||||||||||||||||||||||||||||||||||||||||||||
|
TV |
NET |
RADIO |
||||||||||||||||||||||||||||||||||||||||||
|
DVD |
||||||||||||||||||||||||||||||||||||||||||||
|
ENTER |
VOLUME |
Клавиши курсора |
|
|
RETURN |
DISPLAY |
ENTER |
|
|
TOP |
POP-UP |
MUTE |
|
|
MENU |
MENU |
||
MODE
9 Выбор языка экранного меню
Выберите нужный язык экранного меню из следующих языков: английский, японский, французский, немецкий, испанский, русский, итальянский или китайский.
1Нажмите кнопку RECEIVER z, чтобы включить
аппарат.
2Включите телевизор и выберите источник входного видеосигнала телевизора для вывода видеосигнала с аппарата (гнездо HDMI OUT).
•Осуществление операций с помощью экрана телевизора возможно только в том случае, если телевизор подключен к аппарату через интерфейс HDMI. Если это не так, выполняйте операции с помощью дисплея передней панели.
3 Нажмите кнопку SETUP.
4С помощью клавиш курсора выберите “Language” и нажмите ENTER.
S e t u p
S p e a k e r H D M I
S o u n d E C O
F u n c t i o n
С ет ь
L a n g u a g e
E n g l i s h
F r a n ç a i s D e u t s c h E s p a ñ o l
Ру сс кий
I t a l i a n o
5С помощью клавиш курсора выберите нужный язык.
S e t u p
S p e a k e r H D M I
S o u n d E C O
F u n c t i o n
С е ть
L a n g u a g e
E n g l i s h
F r a n ç a i s D e u t s c h E s p a ñ o l
Ру сс кий
I t a l i a n o
6Для выхода из меню нажмите SETUP.
•Информация на дисплее передней панели отображается только на английском языке.
|
ПОДГОТОВКА Выбор языка экранного меню |
Ru 27 |
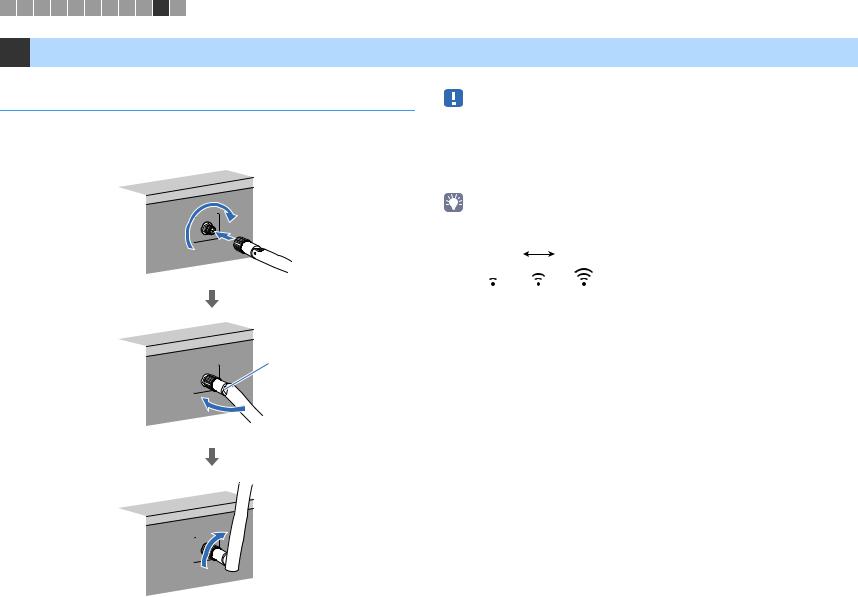
1 2 3 4 5 6 7 8 9 10 11
10 Беспроводное подключение к сети (только для RX-V577)
Подключение беспроводной антенны
Подключите прилагаемую беспроводную антенну к аппарату.
Обязательно выключите аппарат, перед тем как подключать к нему антенну.
Вкрутите
•Не прилагайте к антенне слишком больших усилий. Это может привести к повреждению антенны.
•При установке антенны удерживайте ее за штекер и плотно вкрутите его в гнездо WIRELESS.
•Антенну можно согнуть только в одном направлении. Проверьте ориентацию в месте сгиба и согните антенну в нужном направлении.
•Не подключайте к аппарату другую антенну, кроме как входящую в комплект.
•При упаковке устройства снимите антенну, чтобы избежать ее повреждения.
WIRELESS
•Индикатор уровня сигнала на дисплее передней панели указывает на силу беспроводного сигнала.
Слабый Сильный
Согните
Соединение
WIRELESS
Поверните по часовой стрелке до вертикального положения
WIRELESS
|
ПОДГОТОВКА Беспроводное подключение к сети (только для RX-V577) |
Ru 28 |
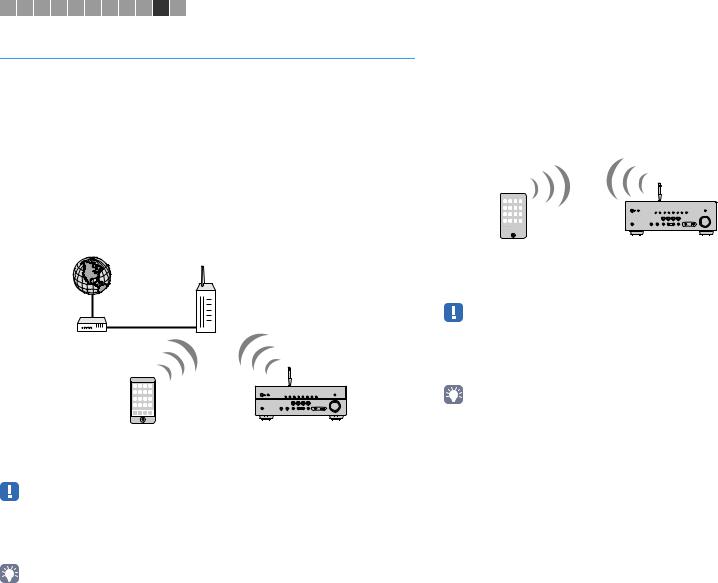
1 2 3 4 5 6 7 8 9 10 11
Выбор способа подключения
Выберите способ подключения в соответствии с вашей сетевой средой.
■Подключение к беспроводному маршрутизатору (точка доступа)
Подключите аппарат к беспроводному маршрутизатору (точке доступа).
Вы можете прослушивать на аппарате интернет-радиостанции, потоковое радио AirPlay или музыкальные файлы, которые хранятся на медиа-серверах (на ПК или в сетевом хранилище данных).
Вы также можете использовать приложение для смартфона/планшета “AV CONTROLLER” для управления аппаратом с мобильных устройств или прослушивания на нем музыкальных файлов, хранящихся на мобильных устройствах.


 Интернет
|
Беспроводной маршрутизатор |
|
|
Модем |
|
|
Мобильное |
|
|
устройство |
|
|
(например, |
Аппарат |
|
iPhone) |
Более подробно данный способ подключения описан в разделе “Подключение аппарата к беспроводной сети” (c. 30).
•Вы не можете использовать беспроводное подключение к LAN одновременно с проводным подключением к LAN (c. 25) или подключением Wireless Direct (c. 36).
•Если аппарат и беспроводной маршрутизатор (точка доступа) расположены слишком далеко друг от друга, устройство не сможет подключиться к беспроводному маршрутизатору (точке доступа). В таком случае разместите их ближе к друг другу.
•Чтобы более подробно узнать о приложении “AV CONTROLLER”, посетите веб-сайт компании Yamaha.
■Подключение без использования беспроводного маршрутизатора (точки доступа)
Подключите мобильное устройство к аппарату напрямую.
Вы сможете использовать приложение для смартфона/планшета “AV CONTROLLER” для управления аппаратом с мобильных устройств или прослушивания на нем музыкальных файлов, хранящихся на мобильных устройствах.
|
Аппарат |
||||||
|
Мобильное устройство |
||||||
|
(например, iPhone) |
Более подробно данный способ подключения описан в разделе “Подключение мобильного устройства к аппарату напрямую (Wireless Direct)” (c. 36).
•Невозможно использовать подключение Wireless Direct одновременно с проводным подключением к LAN (c. 25) или беспроводным подключением к LAN (c. 28).
•Когда включено подключение Wireless Direct, аппарат не сможет подключиться к сети Интернет. Таким образом, вы не можете использовать любые виды интернет-служб, например, интернетрадио.
•Чтобы более подробно узнать о приложении “AV CONTROLLER”, посетите веб-сайт компании Yamaha.
|
ПОДГОТОВКА Беспроводное подключение к сети (только для RX-V577) |
Ru 29 |
1 2 3 4 5 6 7 8 9 10 11
|
Подключение аппарата к беспроводной |
|||||||||||||||||||||||||||||||||||||||
|
TRANSMIT |
|||||||||||||||||||||||||||||||||||||||
|
сети |
|||||||||||||||||||||||||||||||||||||||
|
RECEIVER |
RECEIVER z |
||||||||||||||||||||||||||||||||||||||
|
SLEEP |
|||||||||||||||||||||||||||||||||||||||
|
1 |
2 |
HDMI |
|||||||||||||||||||||||||||||||||||||
|
3 |
|||||||||||||||||||||||||||||||||||||||
|
4 |
Подключить аппарат к беспроводной сети можно несколькими |
||||||||||||||||||||||||||||||||||||||
|
5 |
6 |
способами. |
|||||||||||||||||||||||||||||||||||||
|
AV |
Выберите способ подключения в соответствии с вашей |
||||||||||||||||||||||||||||||||||||||
|
1 |
2 |
3 |
|||||||||||||||||||||||||||||||||||||
|
4 |
|||||||||||||||||||||||||||||||||||||||
|
5 |
6 |
сетевой средой. |
|||||||||||||||||||||||||||||||||||||
|
ZONE A |
|||||||||||||||||||||||||||||||||||||||
|
USB |
ZONE B |
||||||||||||||||||||||||||||||||||||||
|
AUX |
NET |
Вы владелец устройств на |
Да |
||||||||||||||||||||||||||||||||||||
|
PRESET |
TUNING |
платформе iOS (iPhone/iPod |
A (c. 30) |
||||||||||||||||||||||||||||||||||||
|
FM |
AM |
touch)? |
|||||||||||||||||||||||||||||||||||||
|
INFO |
MEMORY |
||||||||||||||||||||||||||||||||||||||
|
MOVIE |
MUSIC |
SUR. DECODE |
STRAIGHT |
Нет |
|||||||||||||||||||||||||||||||||||
|
BASS |
ENHANCER |
DIRECT |
 SCENE
SCENE
|
BD |
TV |
NET |
RADIO |
|
|
DVD |
||||
|
ENTER |
VOLUME |
Клавиши курсора |
|
|
RETURN |
DISPLAY |
ENTER |
|
|
TOP |
POP-UP |
MUTE |
|
|
MENU |
MENU |
||
MODE
|
Имеет ли ваш беспроводной |
Да |
|
|
маршрутизатор (точка |
B (c. 31) |
|
|
доступа) кнопку WPS? |
||
|
Нет |
C (c. 32)
■A: Использование существующих настроек устройств на платформе iOS
Вы можете легко настроить беспроводное подключение, применив параметры подключения на устройствах iOS (iPhone/iPod touch).
Прежде чем продолжить, убедитесь, что ваше устройство iOS подключено к беспроводному маршрутизатору.
•Вам понадобится устройство с системой iOS 5.0 или более поздней версии. Подробнее о поддерживаемых устройствах см. в разделе “Поддерживаемые устройства и форматы файлов” (c. 109).
1Нажмите кнопку RECEIVER z, чтобы включить
аппарат.
2Включите телевизор и выберите источник входного видеосигнала телевизора для вывода видеосигнала с аппарата (гнездо HDMI OUT).
•Осуществление операций с помощью экрана телевизора возможно только в том случае, если телевизор подключен к аппарату через интерфейс HDMI.
3 Нажмите кнопку SETUP.
4С помощью клавиш курсора (q/w) выберите
“Сеть” и нажмите ENTER.
5С помощью клавиш курсора (q/w) выберите
“Сетевое подкл.” и нажмите ENTER.
6С помощью клавиш курсора (e/r) выберите
“Беспроводное” и нажмите ENTER.
С ет е во е п од к л .
|
П од к л юч е н и е |
Б ес п р о вод н о е |
O K : E N T E R
Н а за д : R E T U R N
•Аппарат может автоматически подключиться к точке доступа, к которой он подключался ранее. При этом появится сообщение об успешном подключении. Вы можете проигнорировать это сообщение и переходить к следующему шагу.
7С помощью клавиш курсора (q/w) выберите
“Передача настроек Wi-Fi (iOS)” и нажмите ENTER.
Б ес п р о вод н о е
В ы б е р и т е с п ос о б н а с т р о й к и К н о п к а W P S
P I N — код
П е р е д ач а н а с т р о е к Wi — F i ( i O S ) П о и с к точ к и д ос т у п а
Ус т а н о в к а в ру ч н у ю
OK : ENTER
Назад : RETURN
|
ПОДГОТОВКА Беспроводное подключение к сети (только для RX-V577) |
Ru 30 |
![]()
1 2 3 4 5 6 7 8 9 10 11
TRANSMIT
|
RECEIVER |
|
|
SLEEP |
RECEIVER z |
HDMI
1 2 3 4
5 6
AV
1 2 3 4
8Подключите устройство iOS к гнезду USB и отключите блокировку экрана на устройстве iOS.
AUX
|
AUX |
USB |
NET |
ZONE B |
||
|
FM |
AM |
||||
|
PRESET |
TUNING |
||||
|
INFO |
MEMORY |
||||
|
MOVIE |
MUSIC SUR. DECODE STRAIGHT |
||||
|
BASS |
ENHANCER |
DIRECT |
|||
|
SCENE |
9 Нажмите ENTER на пульте ДУ. |
||||
|
BD |
TV |
NET |
RADIO |
||
|
DVD |
|||||
|
SETUP |
OPTION |
SETUP |
|
ENTER |
10 Коснитесь “Allow” (Разрешить) в сообщении, |
|||||||||||||||||||
|
ENTER |
||||||||||||||||||||
|
VOLUME |
||||||||||||||||||||
|
появившемся на экране устройства iOS. |
||||||||||||||||||||
|
RETURN |
DISPLAY |
|||||||||||||||||||
|
Когда процесс подключения будет завершен, на |
||||||||||||||||||||
|
MENU |
MENU |
|||||||||||||||||||
|
TOP |
POP-UP |
MUTE |
экране телевизора появится сообщение “3авершено”. |
|||||||||||||||||
|
MODE |
11 Для выхода из меню нажмите SETUP.
■B: Использование конфигурации кнопки WPS
Вы можете легко настроить беспроводное соединение с помощью одного нажатия кнопки WPS.
1Нажмите кнопку RECEIVER z, чтобы включить
аппарат.
2Нажмите и удерживайте кнопку INFO (WPS) на передней панели в течение 3 секунд.
На дисплее передней панели появится сообщение “Press WPS button on Access Point”.
3Нажмите кнопку WPS на беспроводном маршрутизаторе (точке доступа).
Когда процесс подключения будет завершен, на дисплее передней панели появится сообщение “Completed”.
Если на дисплее появилось сообщение “Not connected”, повторите процесс подключения с шага 1 или попробуйте иной способ подключения.
•В зависимости от модели маршрутизатора беспроводной сети (точки доступа), устройство может не подключиться к нему. В этом случае попробуйте выполнить подключение с помощью функций “Поиск точки доступа” или “Установка вручную” (c. 32).
•Можно использовать функцию “Кнопка WPS ” (c. 7) в меню “Настройка” для выполнения беспроводного подключения с помощью кнопки WPS.
|
ПОДГОТОВКА Беспроводное подключение к сети (только для RX-V577) |
Ru 31 |

1 2 3 4 5 6 7 8 9 10 11
TRANSMIT
|
RECEIVER |
RECEIVER z |
||||||||||||||||||||||
|
SLEEP |
|||||||||||||||||||||||
|
HDMI |
|||||||||||||||||||||||
|
1 |
2 |
3 |
|||||||||||||||||||||
|
4 |
|||||||||||||||||||||||
|
5 |
6 |
||||||||||||||||||||||
|
AV |
|||||||||||||||||||||||
|
1 |
2 |
3 |
|||||||||||||||||||||
|
4 |
|||||||||||||||||||||||
|
5 |
6 |
||||||||||||||||||||||
|
ZONE A |
|||||||||||||||||||||||
|
USB |
ZONE B |
||||||||||||||||||||||
|
AUX |
NET |
||||||||||||||||||||||
|
FM |
AM |
■C: Использование других способов подключения
Если ваш беспроводной маршрутизатор (точка доступа) не поддерживает настройку подключения с помощью кнопки WPS, выполните следующие действия для настройки параметров беспроводной сети.
1Нажмите кнопку RECEIVER z, чтобы включить
аппарат.
|
PRESET |
TUNING |
|||||||||||||||||||||||||
|
INFO |
MEMORY |
|||||||||||||||||||||||||
|
MOVIE |
MUSIC |
SUR. DECODE |
STRAIGHT |
|||||||||||||||||||||||
|
BASS |
ENHANCER |
DIRECT |
||||||||||||||||||||||||
|
SCENE |
||||||||||||||||||||||||||
|
BD |
||||||||||||||||||||||||||
|
TV |
NET |
RADIO |
||||||||||||||||||||||||
|
DVD |
||||||||||||||||||||||||||
|
ENTER |
VOLUME |
Клавиши курсора |
|
|
RETURN |
DISPLAY |
ENTER |
|
|
TOP |
POP-UP |
MUTE |
|
|
MENU |
MENU |
||
MODE
2Включите телевизор и выберите источник входного видеосигнала телевизора для вывода видеосигнала с аппарата (гнездо HDMI OUT).
•Осуществление операций с помощью экрана телевизора возможно только в том случае, если телевизор подключен к аппарату через интерфейс HDMI.
3 Нажмите кнопку SETUP.
4С помощью клавиш курсора (q/w) выберите
“Сеть” и нажмите ENTER.
5С помощью клавиш курсора (q/w) выберите
“Сетевое подкл.” и нажмите ENTER.
6С помощью клавиш курсора (e/r) выберите
“Беспроводное” и нажмите ENTER.
С ет е во е п од к л .
|
П од к л юч е н и е |
Б ес п р о вод н о е |
O K : E N T E R
Н а за д : R E T U R N
•Аппарат может автоматически подключиться к точке доступа, к которой он подключался ранее. При этом появится сообщение об успешном подключении. Вы можете проигнорировать это сообщение и переходить к следующему шагу.
7С помощью клавиш курсора (q/w) выберите
желаемый способ подключения и нажмите ENTER.
Б ес п р о вод н о е
В ы б е р и т е с п ос о б н а с т р о й к и К н о п к а W P S
P I N — код
П е р е д ач а н а с т р о е к Wi — F i ( i O S ) П о и с к точ к и д ос т у п а
Ус т а н о в к а в ру ч н у ю
OK : ENTER
Назад : RETURN
Доступны следующие способы подключения.
|
Вы можете легко настроить беспроводное |
||
|
Кнопка WPS |
соединение с помощью кнопки WPS, читая |
|
|
инструкции на экране телевизора. Просто |
||
|
следуйте инструкциям, отображаемым на |
||
|
экране телевизора. |
||
|
Вы можете настроить беспроводное |
||
|
соединение, введя PIN-код аппарата в |
||
|
беспроводной маршрутизатор (точку доступа). |
||
|
PIN-код |
Этот метод доступен, если беспроводной |
|
|
маршрутизатор (точка доступа) поддерживает |
||
|
метод PIN-кода для WPS. Более подробные |
||
|
сведения о настройках см. в разделе |
||
|
“Использование PIN-кода для WPS” (c. 33). |
||
|
Передача |
См. раздел “Использование существующих |
|
|
настроек Wi-Fi |
||
|
настроек устройств на платформе iOS” (c. 30). |
||
|
(iOS) |
||
|
Поиск точки |
Беспроводное соединение можно настроить с |
|
|
помощью поиска точки доступа. Более |
||
|
доступа |
подробно этот процесс описан в разделе |
|
|
“Поиск точки доступа” (c. 33). |
||
|
Беспроводное подключение можно настроить, |
||
|
Установка |
введя необходимую информацию (например, |
|
|
SSID) вручную. Более подробно см. в разделе |
||
|
вручную |
||
|
“Настройка беспроводного подключения |
||
|
вручную” (c. 34). |
||
О фунции WPS
WPS (Wi-Fi Protected Setup) представляет собой стандарт, разработанный организацией Wi-Fi Alliance, с помощью которого можно легко создать беспроводную домашнюю сеть.
|
ПОДГОТОВКА Беспроводное подключение к сети (только для RX-V577) |
Ru 32 |

|
1 |
2 |
3 |
4 |
5 |
6 |
7 |
8 |
9 |
10 |
11 |
||||||||||||||
Использование PIN-кода для WPS |
||||||||||||||||||||||||
|
TRANSMIT |
||||||||||||||||||||||||
|
Если вы выберете “PIN-код” в качестве способа подключения, |
||||||||||||||||||||||||
|
RECEIVER |
||||||||||||||||||||||||
|
SLEEP |
на экране телевизора появится список доступных точек |
|||||||||||||||||||||||
|
1 |
2 |
3 |
||||||||||||||||||||||
|
4 |
доступа. |
|||||||||||||||||||||||
|
5 |
6 |
ZONE A |
||
|
AUX |
USB |
NET |
ZONE B |
|
|
MOVIE |
MUSIC |
SUR. DECODE |
STRAIGHT |
|
|
BASS |
ENHANCER |
DIRECT |
||
|
SCENE |
||||
|
BD |
TV |
NET |
RADIO |
|
|
DVD |
||||
|
OPTION |
||||
|
VOLUME |
||||
|
RETURN |
DISPLAY |
|||
|
TOP |
POP-UP |
MUTE |
||
|
MENU |
MENU |
|||
MODE
1С помощью клавиш курсора (q/w) выберите
нужную точку доступа и нажмите ENTER.
На экране телевизора отобразится PIN-код аппарата.
P I N — код
P I N — код : 0 0 0 0 0 0 0 0
В ве д и т е P I N — код в
и н т е р фе й с е точ к и д ос т у п а .
SETUP
OK : ENTER
Назад : RETURN
Клавиши курсора
ENTER
2Введите PIN-код аппарата в беспроводной маршрутизатор (точку доступа).
Подробнее о настройках смотрите в инструкции по эксплуатации беспроводного маршрутизатора (точки доступа).
3Нажмите кнопку ENTER, чтобы начать процесс подключения.
Когда процесс подключения будет завершен, на экране телевизора появится сообщение “3авершено”.
Если на дисплее появилось сообщение “не подключен”, повторите процесс подключения с шага 1 или попробуйте иной способ подключения.
4 Для выхода из меню нажмите SETUP.
Поиск точки доступа
Если вы выберете “Поиск точки доступа” в качестве способа подключения, аппарат начнет поиск точек доступа. Спустя некоторое время на экране телевизора появится список доступных точек доступа.
1С помощью клавиш курсора (q/w) выберите
нужную точку доступа и нажмите ENTER.
На экран телевизора будет выведено окно настроек беспроводного подключения.
П о и с к точ к и д ос т у п а
|
S S I D : |
A c c e s s P o i n t X |
|
Б е зо п а с н ос т ь : |
W PA — P S K ( T K I P ) |
К л юч б е зо п . :
П од к л юч е н и е
Измен : ENTER ОТМЕН : RETURN
2 Нажмите кнопку ENTER.
3С помощью клавиш курсора и кнопки ENTER введите ключ безопасности.
С ет е во е п од к л .
a b c _
( ) [ ] { } < > * ! ? # % &
. , : ; _ | / \ $ ~ ^ ´ ’ ` 0 1 2 3 4 5 6 7 8 9 + — = ← A a B K S P S p a c e D E L →  a b c d e f g h i j k l m n o p q r s t u v w x y z
OK ОТМЕН Очистка
Функции кнопок
|
[←]/[→]: |
Перемещение курсора влево и вправо. |
|
[Aa]: |
Переключение регистра букв (верхний/нижний). |
|
[BKSP]: |
Удаление символа слева от выбранного. |
|
[Space]: |
Вставка пробела. |
|
[DEL]: |
Удаление выбранного символа. |
Завершив ввод ключа, выберите “OK”, чтобы вернуться к предыдущему экрану.
|
ПОДГОТОВКА Беспроводное подключение к сети (только для RX-V577) |
Ru 33 |

|
1 |
2 |
3 |
4 |
5 |
6 |
7 |
8 |
9 10 11 |
|
TRANSMIT |
4 |
|||||||
|
RECEIVER |
||||||||
|
SLEEP |
||||||||
|
1 |
2 |
3 |
4 |
|||||
|
5 |
6 |
ZONE A |
||||||
|
AUX |
USB |
NET |
ZONE B |
|||||
|
MOVIE |
MUSIC SUR. DECODE STRAIGHT |
5 |
||||||
|
BASS |
ENHANCER |
DIRECT |
||||||
|
SCENE |
||||||||
|
BD |
TV |
NET |
RADIO |
|||||
|
DVD |
||||||||
|
SETUP |
||||||||
|
OPTION |
||||||||
|
VOLUME |
Клавиши курсора |
|||||||
|
RETURN |
DISPLAY |
ENTER |
||||||
|
TOP |
POP-UP |
MUTE |
||||||
|
MENU |
MENU |
|||||||
MODE
С помощью клавиш курсора (q/w) выберите
“Подключение” и нажмите ENTER, чтобы начать процесс подключения.
Когда процесс подключения будет завершен, на экране телевизора появится сообщение “3авершено”.
Если на дисплее появилось сообщение “не подключен”, повторите процесс подключения с шага 1 или попробуйте иной способ подключения.
Для выхода из меню нажмите SETUP.
Настройка беспроводного подключения вручную
Если вы выберете “Установка вручную” в качестве способа подключения, на экране телевизора появится окно настройки беспроводного подключения.
Вам нужно задать SSID (имя сети), метод шифрования и ключ безопасности для вашей сети.
Ус т а н о в к а в ру ч н у ю
|
S S I D : |
A c c e s s P o i n t X |
|
Б е зо п а с н ос т ь : |
Н ет |
К л юч б е зо п . :
П од к л юч е н и е
Измен : ENTER ОТМЕН : RETURN
1С помощью клавиш курсора (q/w) выберите
“SSID” и нажмите ENTER.
2С помощью клавиш курсора и кнопки ENTER введите SSID точки доступа.
С ет е во е п од к л .
a b c _
( ) [ ] { } < > * ! ? # % &
. , : ; _ | / \ $ ~ ^ ´ ’ ` 0 1 2 3 4 5 6 7 8 9 + — = ← A a B K S P S p a c e D E L →  a b c d e f g h i j k l m n o p q r s t u v w x y z
OK ОТМЕН Очистка
Завершив ввод ключа, выберите “OK”, чтобы вернуться к предыдущему экрану.
|
ПОДГОТОВКА Беспроводное подключение к сети (только для RX-V577) |
Ru 34 |

|
1 |
2 |
3 |
4 |
5 |
6 |
7 |
8 |
9 |
10 |
11 |
||||||||||||||||||||||||||||||||||||||||||||||||||||||
|
3 С помощью клавиш курсора (q/w) выберите |
||||||||||||||||||||||||||||||||||||||||||||||||||||||||||||||||
|
TRANSMIT |
||||||||||||||||||||||||||||||||||||||||||||||||||||||||||||||||
|
RECEIVER |
||||||||||||||||||||||||||||||||||||||||||||||||||||||||||||||||
|
пункт “Безопасность”, а затем с помощью |
||||||||||||||||||||||||||||||||||||||||||||||||||||||||||||||||
|
SLEEP |
||||||||||||||||||||||||||||||||||||||||||||||||||||||||||||||||
|
клавиш курсора (e/r) выберите нужный метод |
||||||||||||||||||||||||||||||||||||||||||||||||||||||||||||||||
|
1 |
2 |
3 |
||||||||||||||||||||||||||||||||||||||||||||||||||||||||||||||
|
4 |
||||||||||||||||||||||||||||||||||||||||||||||||||||||||||||||||
|
шифрования. |
||||||||||||||||||||||||||||||||||||||||||||||||||||||||||||||||
|
Возможные значения |
||||||||||||||||||||||||||||||||||||||||||||||||||||||||||||||||
|
5 |
6 |
Нет, WEP, WPA-PSK (TKIP), WPA-PSK (AES), WPA2-PSK (AES), |
||||||||||||||||||||||||||||||||||||||||||||||||||||||||||||||
|
ZONE A |
||||||||||||||||||||||||||||||||||||||||||||||||||||||||||||||||
|
Смешанный режим |
||||||||||||||||||||||||||||||||||||||||||||||||||||||||||||||||
|
USB |
ZONE B |
|||||||||||||||||||||||||||||||||||||||||||||||||||||||||||||||
|
AUX |
NET |
|||||||||||||||||||||||||||||||||||||||||||||||||||||||||||||||
|
• Если вы выберите “Нет”, соединение может быть небезопасным, так |
||||||||||||||||||||||||||||||||||||||||||||||||||||||||||||||||
|
как связь не шифруется. |
||||||||||||||||||||||||||||||||||||||||||||||||||||||||||||||||
|
MOVIE |
MUSIC |
SUR. DECODE |
STRAIGHT |
|||||||||||||||||||||||||||||||||||||||||||||||||||||||||||||
|
4 |
||||||||||||||||||||||||||||||||||||||||||||||||||||||||||||||||
|
BASS |
ENHANCER |
DIRECT |
||||||||||||||||||||||||||||||||||||||||||||||||||||||||||||||
|
С помощью клавиш курсора (q/w) выберите |
||||||||||||||||||||||||||||||||||||||||||||||||||||||||||||||||
|
SCENE |
||||||||||||||||||||||||||||||||||||||||||||||||||||||||||||||||
|
BD |
||||||||||||||||||||||||||||||||||||||||||||||||||||||||||||||||
|
TV |
NET |
RADIO |
“Ключ безоп.” и нажмите ENTER. |
|||||||||||||||||||||||||||||||||||||||||||||||||||||||||||||
|
DVD |
||||||||||||||||||||||||||||||||||||||||||||||||||||||||||||||||
|
SETUP |
||||||||||||||||||||||||||||||||||||||||||||||||||||||||||||||||
|
OPTION |
||||||||||||||||||||||||||||||||||||||||||||||||||||||||||||||||
|
Клавиши курсора |
||||||||||||||||||||||||||||||||||||||||||||||||||||||||||||||||
|
VOLUME |
• Если на шаге 3 вы выбрали “Нет”, то эта команда будет недоступна. |
|||||||||||||||||||||||||||||||||||||||||||||||||||||||||||||||
|
ENTER |
||||||||||||||||||||||||||||||||||||||||||||||||||||||||||||||||
|
RETURN |
DISPLAY |
|||||||||||||||||||||||||||||||||||||||||||||||||||||||||||||||
|
5 С помощью клавиш курсора и кнопки ENTER |
||||||||||||||||||||||||||||||||||||||||||||||||||||||||||||||||
|
TOP |
POP-UP |
|||||||||||||||||||||||||||||||||||||||||||||||||||||||||||||||
|
MUTE |
||||||||||||||||||||||||||||||||||||||||||||||||||||||||||||||||
|
MENU |
MENU |
введите ключ безопасности. |
||||||||||||||||||||||||||||||||||||||||||||||||||||||||||||||
|
MODE |
Если вы выбрали “WEP” в шаге 3, введите 5- или 13- |
|||||||||||||||||||||||||||||||||||||||||||||||||||||||||||||||
|
символьную строку, или же 10 или 26 |
||||||||||||||||||||||||||||||||||||||||||||||||||||||||||||||||
|
шестнадцатеричных цифр. |
||||||||||||||||||||||||||||||||||||||||||||||||||||||||||||||||
|
Если на шаге 3 вы выбрали метод, отличный от “WEP”, |
||||||||||||||||||||||||||||||||||||||||||||||||||||||||||||||||
|
введите символьную строку от 8 до 63 символов, или |
||||||||||||||||||||||||||||||||||||||||||||||||||||||||||||||||
|
же 64 шестнадцатеричных цифры. |
||||||||||||||||||||||||||||||||||||||||||||||||||||||||||||||||
|
С ет е во е п од к л . |
||||||||||||||||||||||||||||||||||||||||||||||||||||||||||||||||
|
a b c _ |
||||||||||||||||||||||||||||||||||||||||||||||||||||||||||||||||
|
( ) [ ] { } < > * ! ? # % & |
||||||||||||||||||||||||||||||||||||||||||||||||||||||||||||||||
|
. , : ; _ | / \ $ ~ ^ ´ ’ ` |
||||||||||||||||||||||||||||||||||||||||||||||||||||||||||||||||
|
0 1 2 3 4 5 6 7 8 9 + — = |
||||||||||||||||||||||||||||||||||||||||||||||||||||||||||||||||
|
← A a B K S P S p a c e D E L → |
||||||||||||||||||||||||||||||||||||||||||||||||||||||||||||||||
|
a b c d e f g h i j k l m |
||||||||||||||||||||||||||||||||||||||||||||||||||||||||||||||||
|
n o p q r s t u v w x y z |
||||||||||||||||||||||||||||||||||||||||||||||||||||||||||||||||
|
OK |
||||||||||||||||||||||||||||||||||||||||||||||||||||||||||||||||
|
ОТМЕН |
||||||||||||||||||||||||||||||||||||||||||||||||||||||||||||||||
|
Очистка |
||||||||||||||||||||||||||||||||||||||||||||||||||||||||||||||||
|
Завершив ввод ключа, выберите “OK”, чтобы |
||||||||||||||||||||||||||||||||||||||||||||||||||||||||||||||||
|
вернуться к предыдущему экрану. |
С помощью клавиш курсора (q/w) выберите
“Подключение” и нажмите ENTER, чтобы начать процесс подключения.
Когда процесс подключения будет завершен, на экране телевизора появится сообщение “3авершено”.
Если на экране появилось сообщение “не подключен”, убедитесь, что вся информация введена правильно, и повторите шаги с пункта 1.
Для выхода из меню нажмите SETUP.
|
ПОДГОТОВКА Беспроводное подключение к сети (только для RX-V577) |
Ru 35 |

1 2 3 4 5 6 7 8 9 10 11
|
Подключение мобильного устройства к |
|||||||||||||
|
TRANSMIT |
|||||||||||||
|
SLEEP |
RECEIVER z |
аппарату напрямую (Wireless Direct) |
|||||||||||
|
RECEIVER |
|||||||||||||
|
HDMI |
|||||||||||||
|
1 |
2 |
3 |
|||||||||||
|
4 |
Выполните шаги, описанные ниже, чтобы подключить |
||||||||||||
|
5 |
6 |
||||||||||||||||||||||||||||||||||||
|
AV |
|||||||||||||||||||||||||||||||||||||
|
1 |
2 |
3 |
|||||||||||||||||||||||||||||||||||
|
4 |
|||||||||||||||||||||||||||||||||||||
|
5 |
6 |
||||||||||||||||||||||||||||||||||||
|
ZONE A |
|||||||||||||||||||||||||||||||||||||
|
USB |
ZONE B |
||||||||||||||||||||||||||||||||||||
|
AUX |
NET |
||||||||||||||||||||||||||||||||||||
|
FM |
AM |
||||||||||||||||||||||||||||||||||||
|
PRESET |
TUNING |
||||||||||||||||||||||||||||||||||||
|
INFO |
MEMORY |
||||||||||||||||||||||||||||||||||||
|
MOVIE |
MUSIC |
SUR. DECODE |
STRAIGHT |
||||||||||||||||||||||||||||||||||
|
BASS |
ENHANCER |
DIRECT |
 SCENE
SCENE 
мобильное устройство к аппарату напрямую.
•Соединение Wireless Direct может быть небезопасным, так как связь недостаточно шифруется. Аппарат может сработать устройством воспроизведения для беспроводных устройств, подключенные к нему без разрешения.
1Нажмите кнопку RECEIVER z, чтобы включить
аппарат.
|
BD |
TV |
NET |
RADIO |
2 Включите телевизор и выберите источник |
|
|
DVD |
|||||
|
SETUP |
OPTION |
SETUP |
|||
|
входного видеосигнала телевизора для вывода |
|||||
|
ENTER |
VOLUME |
Клавиши курсора |
видеосигнала с аппарата (гнездо HDMI OUT). |
||
|
RETURN |
DISPLAY |
ENTER |
|
TOP |
POP-UP |
MUTE |
||||
|
MENU |
MENU |
|||||
• Осуществление операций с помощью экрана телевизора возможно
|
MODE |
только в том случае, если телевизор подключен к аппарату через |
||
|
интерфейс HDMI. |
3 Нажмите кнопку SETUP.
4С помощью клавиш курсора (q/w) выберите
“Сеть” и нажмите ENTER.
5С помощью клавиш курсора (q/w) выберите
“Сетевое подкл.” и нажмите ENTER.
6С помощью клавиш курсора (e/r) выберите
“Wireless Direct” и нажмите ENTER.
С ет е во е п од к л .
|
П од к л юч е н и е |
Wi r e l e s s D i r e c t |
O K : E N T E R
Н а за д : R E T U R N
7С помощью клавиш курсора (q/w) выберите
пункт “Безопасность”, а затем с помощью клавиш курсора (e/r) выберите нужный метод
шифрования.
Возможные значения
Нет, WEP
•Если вы выберите “Нет”, соединение может быть небезопасным, так как связь не шифруется.
8С помощью клавиш курсора (qw/ ) выберите
“Ключ безоп.” и нажмите ENTER.
• Если на шаге 7 вы выбрали “Нет”, то эта команда будет недоступна.
9С помощью клавиш курсора и кнопки ENTER введите ключ безопасности.
Введите 5- или 13-символьную строку.
С ет е во е п од к л .
a b c _
( ) [ ] { } < > * ! ? # % &
. , : ; _ | / \ $ ~ ^ ´ ’ ` 0 1 2 3 4 5 6 7 8 9 + — = ← A a B K S P S p a c e D E L →  a b c d e f g h i j k l m n o p q r s t u v w x y z
OK ОТМЕН Очистка
Завершив ввод ключа, выберите “OK”, чтобы вернуться к предыдущему экрану.
•Прежде чем перейти к следующему шагу, запишите следующую информацию. Эта информация вам будет необходима для выполнения настроек Wi-Fi на мобильном устройстве.
–Имя сети SSID, отображенное на экране телевизора
–Ключ безопасности, который вы только что ввели
|
ПОДГОТОВКА Беспроводное подключение к сети (только для RX-V577) |
Ru 36 |

|
1 |
2 |
3 |
4 |
5 |
6 |
7 |
8 |
9 10 11 |
|
TRANSMIT |
10 |
|||||||
|
RECEIVER |
||||||||
|
SLEEP |
||||||||
|
1 |
2 |
3 |
4 |
|||||
|
5 |
6 |
ZONE A |
||||||
|
AUX |
USB |
NET |
ZONE B |
|||||
|
MOVIE |
MUSIC SUR. DECODE STRAIGHT |
11 |
||||||
|
BASS |
ENHANCER |
DIRECT |
||||||
|
SCENE |
||||||||
|
BD |
TV |
NET |
RADIO |
|||||
|
DVD |
||||||||
|
SETUP |
||||||||
|
OPTION |
||||||||
|
VOLUME |
Клавиши курсора |
|||||||
|
RETURN |
DISPLAY |
ENTER |
||||||
|
TOP |
POP-UP |
MUTE |
||||||
|
MENU |
MENU |
|||||||
MODE
12
С помощью клавиш курсора (q/w) выберите
“Сохранить” и нажмите ENTER, чтобы сохранить настройки.
Это завершает процесс настроек, и на экране телевизора появится сообщение “3авершено”.
Далее, выполните настройки Wi-Fi на мобильном устройстве.
Выполнение настроек Wi-Fi на мобильном устройстве.
Подробнее о настройках вашего мобильного устройства см. в инструкции по его эксплуатации.
aВключите функцию Wi-Fi на мобильном устройстве.
bВыберите SSID, отображенный на шаге 9, из списка имеющихся точек доступа.
cКогда вам будет предложено ввести пароль, введите ключ безопасности, отображенный на шаге 9.
Для выхода из меню нажмите SETUP.
|
ПОДГОТОВКА Беспроводное подключение к сети (только для RX-V577) |
Ru 37 |
 Loading…
-
Страница 1
AV Receiver Owner’s Manual Read the supplied booklet “Safety Brochure” before using the unit. English 00_RX-V477_V577_om_U.book Page 1 Monday, November 11, 2013 1:19 PM[…]
-
Страница 2
En 2 CO N T E N T S Accessories . . . . . . . . . . . . . . . . . . . . . . . . . . . . . . . . . . . . . . . . . . . . . . . . . . . . . . 4 FEATURES 5 What you can do with the unit . . . . . . . . . . . . . . . . . . . . . . . . . . . . . . . . . . . . 5 Part names and functions . . . . . . . . . . . . . . . . . . . . . . . . . . . . . . . . . . […]
-
Страница 3
En 3 Connecting a USB storage device . . . . . . . . . . . . . . . . . . . . . . . . . . . . . . . . . . . . . . . . . . . . . . . . . . . . . . . . . . . . . . . . . . 57 Playback of USB storage device content s . . . . . . . . . . . . . . . . . . . . . . . . . . . . . . . . . . . . . . . . . . . . . . . . . . . . . . . . . . 57 Playing back music[…]
-
Страница 4
Accessories En 4 Ac cessories Check that the following accessories are supplied with the product. Remote control Batteries (AAA, R03, UM-4) (x2) AM antenna FM antenna *One of the above is supplied depen ding on the region of purchase. YPAO microphone Wireless antenna (RX-V577 only) CD-ROM (Owner’s Manual) Easy Setu[…]
-
Страница 5
FEATURES ➤ What you can do with the unit En 5 FEA TURES Wha t you can do with the unit A V receiver (the unit) Speakers BD /DVD pl ayer HDMI Control Audio/Video TV remote control Aud i o HDMI Control Aud i o Audio/Video TV Sequential operation of a TV , A V receiver , and BD/D VD play er (HDMI Control) . p.111 Change the input source and fav orit[…]
-
Страница 6
FEATURES ➤ What you can do with the unit En 6 F ull of useful func tions! ❑ Connecting various devices (p .21) A number of HDMI jacks and various inp ut/output jacks on the unit allow you to connect video devices (such as BD/DVD players), audio de vices (such as CD players), game consoles, por table audio player , and other devices. ❑ Playing[…]
-
Страница 7
FEATURES ➤ Part names and functions En 7 Fro nt pa n el 1 z (power) key T urns on/of f (standby) the unit . 2 Standby indicator Lights up when the unit is in standby mode under any of the following conditions. • HDMI Control is enabled (p.83) • Standby Through is enabled (p.83) • Network Standby is enabled (p.92) • An iPod is being charge[…]
-
Страница 8
FEATURES ➤ Part names and functions En 8 Fr ont display (indicators) 1 HDMI Lights u p when H DMI signal s are being in put or ou tput. OUT Lights up when HDMI signals are being out put. 2 ENHANCER Lights up when Compressed Music Enhancer (p.48) is working. 3 CINEMA DSP Lights up when CINEMA DSP (p.45) or CINEMA DSP 3D (p.45) is working. 4 STEREO[…]
-
Страница 9
FEATURES ➤ Part names and functions En 9 Rear panel 1 ANTENNA jacks For connecting to FM and AM antennas (p. 24). 2 HDMI OUT jack For connecting to an HDMI-compatible TV and output ting video/audio signals (p.19). When using ARC, TV audio signal can also be input throu g h the HDMI OUT jack. 3 HDMI 1–6 jacks For connecting to HDMI-compatible pl[…]
-
Страница 10
FEATURES ➤ Part names and functions En 10 Remote control 1 Remote control signal transmitt er T ransmits infrar ed signals. 2 TRANSMIT indicator Lights up when remote con trol signals ar e transmitted. 3 SLEEP key Switches the unit to standby mode automatical ly after a specified period of time has elapsed (sleep ti mer). Press repeatedly to set […]
-
Страница 11
PREPARATIONS ➤ General setup procedure En 11 PREP ARA TIONS This completes all the preparations. Enjoy playing movies, music, ra dio and other content with the unit! General se tup proc edure 1 Placing speak ers (p.12) Select the speaker layout for the n umber of speaker s that you are using and place them in your room. 2 C onnec ting speakers (p[…]
-
Страница 12
PREPARATIONS ➤ Placing speakers En 12 Select the speaker layout for the num ber of speakers that you are using and place the speakers and subwoofer in your room. This section describes the representative speaker layout examples. *1 RX-V577 only *2 Place the surround speakers in front and set «Vir tual CINEMA FRONT» (p.81) in the «S[…]
-
Страница 13
PREPARATIONS ➤ Placing speakers En 13 7.1-channel system (RX -V577 only) 6.1-channel system (RX -V577 only) 5.1- channel sy stem 5.1- channel sy stem ( Virtual CI NEMA FRONT ) • T o utiliz e this configuration, set «Vir tual CINEMA FRONT» (p.78) in the «Setup» menu to «On». • Y ou can enjoy surround sound ev en w[…]
-
Страница 14
PREPARATIONS ➤ Placing speakers En 14 4.1-channel system 3.1-channel system 2.1- channel sy stem 45 12 9 10° to 30° 10° to 30° 12 3 9 12 9 1 2 3 4 5 6 7 8 9 10 11 00_RX-V477_V577_om_U.book Page 14 Monday, Novemb er 11, 2013 1:19 PM[…]
-
Страница 15
PREPARATIONS ➤ Placing speakers En 15 ■ Setting the speaker impedance (U.S.A. and Canada models only) Under its default settings, the unit is config ured for 8-ohm speakers. When connecting 6-ohm speakers, set the speaker impedance to “6 Ω MIN”. 1 Before connecting speakers, connect the power cable to an A C wall outlet. 2 While holding do[…]
-
Страница 16
PREPARATIONS ➤ Connecting speakers En 16 Connect the speakers placed in your room to the unit. The following diagrams provide connections for 5.1- and 7.1-channel systems as examples. For other systems, connect speakers while referring to the connection diagram for the 5.1-channel system. Cables required for connection (commercially a vailable) S[…]
-
Страница 17
PREPARATIONS ➤ Connecting speakers En 17 ■ Connecting speaker cables Speaker cables have two wires. One is for connecting the negative (-) ter minal of the unit and the speaker , and the other is for the positive (+) ter minal. If the wires ar e colored to prevent confusion, connect the black wire to the negative and the other wire to the posit[…]
-
Страница 18
PREPARATIONS ➤ Input/outpu t jacks and cables En 18 ■ Video/audio jacks ❑ HDMI jacks T ransmit digital video and digi tal sound through a single jack. Use an HDMI cable. • Use a 19-pin HDMI cable with the HDMI logo. We recommend using a cable less than 5.0 m (16.4 ft) long to prev ent signal qua lity degradation. • The unit’ s HDMI jack[…]
-
Страница 19
PREPARATIONS ➤ Connecting a TV En 19 Connect a TV to the unit so that video input to the unit can be output to the TV . Y ou can also enjoy playback of TV audio on the unit. T o maximize the per formance of the unit, we recommend connecting a TV with an HDMI cable. ■ HDMI connec tion Connect the TV to the unit with a n HDMI cable and a digital […]
-
Страница 20
PREPARATIONS ➤ Connecting a TV En 20 ❑ VIDEO (composite video) conn ection (with a video pin cable) AV 1 AV 2 AV 3 AV 5 AV 6 OPTICAL COAXIAL COAXIAL ( TV ) COMPONENT VIDEO COMPONENT VIDEO P B Y VIDEO AV MONITOR OUT OUT AV 4 P R P B Y P R FM ANTENNA AM HDMI 1 ( BD/DVD ) HDMI 2 HDMI 3 HDMI 4 ( RADIO ) SUBWOOFER PRE OUT 2 1 HDMI 5 DC O U 5V 0. 5 H[…]
-
Страница 21
PREPARATIONS ➤ Connecting playback devices En 21 The unit is equipped with a variet y of inpu t jacks including HDMI inpu t jacks to allow you to connect different types of playback devices. For information on how to connect an iPod or a USB storage de vice, see the following pages. – Connecting an iPod (p.53) – Connecting a USB storage devic[…]
-
Страница 22
PREPARATIONS ➤ Connecting playback devices En 22 ■ Composite video connec tion Connect a video device to the unit with a vi deo pin cable and an audio cable (dig ital coaxial or stereo pin cable). Choose a set of input jacks (on the unit) depending on the audio output jacks available on your video device. If you select the input source by press[…]
-
Страница 23
PREPARATIONS ➤ Connecting playback devices En 23 1 After connecting extern al devices (such as a TV and playbac k devices) and power cable of the unit, turn on the un it. 2 Press A V 2 to select “A V 2” (vide o input jack to be used) as the input source. 3 Press OPTION. 4 Use the cursor keys ( q / w ) to select “Audio In” and press ENTER.[…]
-
Страница 24
PREPARATIONS ➤ Connecting the FM/AM antennas En 24 Co nnecting to the jack on the front panel Use the AUX jack on the front panel to te mporarily connect devices su ch as portable audio players to the unit. Before making a connection, stop playback on the device and tu rn down the volume on the unit. If you select “AUX” as the input source by[…]
-
Страница 25
PREPARATIONS ➤ Connecting to a network (wired LAN connection) En 25 Connect the unit to your router with a comme rcially-available STP network cable (CA T -5 or higher straight cable). Y ou can enjoy Internet radio or music files stored on media servers, such as PCs and Network Attached Storage (NAS ), on the unit. (RX-V577 only) Y ou can also co[…]
-
Страница 26
PREPARATIONS ➤ Connecting recording devices En 26 Y ou can connect video/audio recor d ing devices to the A V OUT jacks. These jacks output analog video/audio sig nals selected as the input. • T o cop y video/audio from a video device, connect the video device to the A V 4–6 jacks of the unit. • T o cop y audio from an audio device, connect[…]
-
Страница 27
PREPARATIONS ➤ Selecting an on-screen menu language En 27 Select the desired on-screen menu language from English (default), Japanese, French, German, S panish, Russian, Italian and Chinese. 1 Press RECEIVER z to turn o n the unit. 2 T urn on the TV and switch the TV inpu t to display video fr om the unit (HDMI OUT jack). • Operations with TV s[…]
-
Страница 28
PREPARATIONS ➤ Connecting to a network wirelessly (RX-V577 only) En 28 Attaching the wireless ant enna Attach the supplied wireless antenna to the unit. Be sure to turn off the unit before attaching the antenna. • Do not apply excessive f orce on the antenna. Doing so may damage the antenna. • When attaching the antenna, hold the root of the […]
-
Страница 29
PREPARATIONS ➤ Connecting to a network wirelessly (RX-V577 only) En 29 Selecting the connection method Select a connection method according to your network environment. ■ Connecting with a wireless router (acc e ss point) Connect the unit to a wireless router (access point). Y ou can enjoy Internet radio, AirPlay , or music files stor ed on med[…]
-
Страница 30
PREPARATIONS ➤ Connecting to a network wirelessly (RX-V577 only) En 30 1234 5 6 FM INFO MEMORY AM PRESET TUNING SCENE RETURN TOP MENU POP-UP MENU VOLUME BD DVD TV NET RADIO MUTE DISPLAY ENTER TRANSMIT RECEIVER HDMI AV SLEEP AUX USB 5 6 NET ZONE B ZONE A MOVIE MUSIC SUR. DECODE STRAIGHT ENHANCER BASS DIRECT MODE SETUP OPTION 234 1 1 2 3 4 5 6 FM I[…]
-
Страница 31
PREPARATIONS ➤ Connecting to a network wirelessly (RX-V577 only) En 31 1234 5 6 FM INFO MEMORY AM PRESET TUNING SCENE RETURN TOP MENU POP-UP MENU VOLUME BD DVD TV NET RADIO MUTE DISPLAY ENTER TRANSMIT RECEIVER HDMI AV SLEEP AUX USB 5 6 NET ZONE B ZONE A MOVIE MUSIC SUR. DECODE STRAIGHT ENHANCER BASS DIRECT MODE SETUP OPTION 234 1 1 2 3 4 5 6 FM I[…]
-
Страница 32
PREPARATIONS ➤ Connecting to a network wirelessly (RX-V577 only) En 32 1234 5 6 FM INFO MEMORY AM PRESET TUNING SCENE RETURN TOP MENU POP-UP MENU VOLUME BD DVD TV NET RADIO MUTE DISPLAY ENTER TRANSMIT RECEIVER HDMI AV SLEEP AUX USB 5 6 NET ZONE B ZONE A MOVIE MUSIC SUR. DECODE STRAIGHT ENHANCER BASS DIRECT MODE SETUP OPTION 234 1 1 2 3 4 5 6 FM I[…]
-
Страница 33
PREPARATIONS ➤ Connecting to a network wirelessly (RX-V577 only) En 33 1234 5 6 FM INFO MEMORY AM PRESET TUNING SCENE RETURN TOP MENU POP-UP MENU VOLUME BD DVD TV NET RADIO MUTE DISPLAY ENTER TRANSMIT RECEIVER HDMI AV SLEEP AUX USB 5 6 NET ZONE B ZONE A MOVIE MUSIC SUR. DECODE STRAIGHT ENHANCER BASS DIRECT MODE SETUP OPTION 234 1 S CEN E RETURN T[…]
-
Страница 34
PREPARATIONS ➤ Connecting to a network wirelessly (RX-V577 only) En 34 4 Use the cursor keys ( q / w ) to select “Connect” and press ENTER to star t the connection process. When the connect ion process finish es, “Complet ed” appears on the TV screen. If “Not connected” appea rs, repeat from s tep 1 or tr y another connecti on method.[…]
-
Страница 35
PREPARATIONS ➤ Connecting to a network wirelessly (RX-V577 only) En 35 3 Use the cursor keys ( q / w ) to select “Security” and the cursor keys ( e / r ) to select the encryption method. Choices None, WEP , WP A-PSK (TKIP), WP A-PSK (AES), WP A2-PSK (AES), Mixed Mode • If you select “None”, the connection may be insecure since the commu[…]
-
Страница 36
PREPARATIONS ➤ Connecting to a network wirelessly (RX-V577 only) En 36 C onnec ting a mobile device to the unit dire ctly ( Wir eless Direct) Follow the procedure below to connect a mobile device to the unit directly . • Wireless Direct connection may be insecure since the communication is not strongly encrypted . The unit may operate b y playb[…]
-
Страница 37
PREPARATIONS ➤ Connecting to a network wirelessly (RX-V577 only) En 37 10 Use the cursor keys ( q / w ) to select “Sa ve” and press ENTER to save the setting. This completes the setti ngs and “Completed” appears on the TV screen. Next , configure the Wi-Fi set tings of a mobile de vice. 11 Configure the Wi-Fi settings of a m obile de vice[…]
-
Страница 38
PREPARATIONS ➤ Optimizing the speaker settings automatically (YPAO) En 38 The Y amaha Parametric r oom Acoustic Optimizer (YP AO) function detects speaker connections, measures the distances from them to your listening position(s), and then automatically optimizes the speaker settings, such as volume balanc e and acoustic parameters, to suit your[…]
-
Страница 39
PREPARATIONS ➤ Optimizing the speaker settings automatically (YPAO) En 39 5 T o start the measurement, use the cursor keys to select “Star t” and press SETUP. The measurement will star t in 10 second s. Press ENTER t o star t the measurement immediat ely . • T o stop the measurement temporarily , press RETURN and follow the procedure in “[…]
-
Страница 40
PREPARATIONS ➤ Optimizing the speaker settings automatically (YPAO) En 40 Error messages If any error message is displayed during the meas urement, resolve the problem and perform Y P AO again. TV screen Front display ■ Procedure to handle err ors 1 Check the content of error message and press ENTER. 2 Use the cursor keys ( e / r ) to sele ct t[…]
-
Страница 41
PREPARATIONS ➤ Optimizing the speaker settings automatically (YPAO) En 41 W arning messages If a warnin g message is displayed after the measurement, you can still save the measurement results by following on-screen inst ructions. However , we r ecommend you perfor m YP AO again in or der to use the unit with the optimal speaker settings. TV scre[…]
-
Страница 42
PLAYBACK ➤ Basic playback procedure En 42 1234 5 6 FM INFO MEMORY AM PRESET TUNING SCENE RETURN TOP MENU POP-UP MENU VOLUME BD DVD TV NET RADIO MUTE DISPLAY ENTER TRANSMIT RECEIVER HDMI AV SLEEP AUX USB 5 6 NET ZONE B ZONE A MOVIE MUSIC SUR. DECODE STRAIGHT ENHANCER BASS DIRECT MODE SETUP OPTION 234 1 S CEN E RETURN TO P MENU PO P- U P MENU B D D[…]
-
Страница 43
PLAYBACK ➤ Selecting the input source and favori te settings with one touch (SCEN E) En 43 1234 5 6 FM INFO MEMORY AM PRESET TUNING SCENE RETURN TOP MENU POP-UP MENU VOLUME BD DVD TV NET RADIO MUTE DISPLAY ENTER TRANSMIT RECEIVER HDMI AV SLEEP AUX USB 5 6 NET ZONE B ZONE A MOVIE MUSIC SUR. DECODE STRAIGHT ENHANCER BASS DIRECT MODE SETUP OPTION 23[…]
-
Страница 44
PLAYBACK ➤ Selecting the sound mode En 44 1234 5 6 FM INFO MEMORY AM PRESET TUNING SCENE RETURN TOP MENU POP-UP MENU VOLUME BD DVD TV NET RADIO MUTE DISPLAY ENTER TRANSMIT RECEIVER HDMI AV SLEEP AUX USB 5 6 NET ZONE B ZONE A MOVIE MUSIC SUR. DECODE STRAIGHT ENHANCER BASS DIRECT MODE SETUP OPTION 234 1 1 2 3 4 5 6 FM INFO MEM O R Y AM P RE S ET T […]
-
Страница 45
PLAYBACK ➤ Selecting the sound mode En 45 Enjoying stereosc opic soun d fields ( CINEMA DSP 3D ) The unit is equipped with a varie ty of sound programs that utilize Y amaha’s original DSP technology (CINEMA DSP 3D). It allows you to easily create sound fields like actual movie theaters or concer t halls in your ro om and enjoy natural stereo[…]
-
Страница 46
PLAYBACK ➤ Selecting the sound mode En 46 ■ S ound programs suitable for music/stereo playback (MUSIC) The following sound programs are opti mized for listening to music sources. Y ou can also select stereo playback. • CINEMA DSP 3D (p.45) and Virtual CINEMA DSP (p.46) do not work when «2ch Stereo», «5ch Stereo» or «7[…]
-
Страница 47
PLAYBACK ➤ Selecting the sound mode En 47 1234 5 6 FM INFO MEMORY AM PRESET TUNING SCENE RETURN TOP MENU POP-UP MENU VOLUME BD DVD TV NET RADIO MUTE DISPLAY ENTER TRANSMIT RECEIVER HDMI AV SLEEP AUX USB 5 6 NET ZONE B ZONE A MOVIE MUSIC SUR. DECODE STRAIGHT ENHANCER BASS DIRECT MODE SETUP OPTION 234 1 1 2 3 4 5 6 FM INFO MEM O R Y AM P RE S E T T[…]
-
Страница 48
PLAYBACK ➤ Selecting the sound mode En 48 1234 5 6 FM INFO MEMORY AM PRESET TUNING SCENE RETURN TOP MENU POP-UP MENU VOLUME BD DVD TV NET RADIO MUTE DISPLAY ENTER TRANSMIT RECEIVER HDMI AV SLEEP AUX USB 5 6 NET ZONE B ZONE A MOVIE MUSIC SUR. DECODE STRAIGHT ENHANCER BASS DIRECT MODE SETUP OPTION 234 1 1 2 3 4 5 6 FM INFO MEM O R Y AM P RE S ET T […]
-
Страница 49
PLAYBACK ➤ Listening to FM/AM radio En 49 Y ou can tune into a radio station by specifying its frequency or selecting from register e d radio stations. • The radio frequencies differ depending on the country or region where the unit is being used. The explanation of this section uses a display with frequencies used in U.K. and Europe models. ?[…]
-
Страница 50
PLAYBACK ➤ Listening to FM/AM radio En 50 Registering fav orite radio stations (presets) Y ou can r egiste r up to 40 radio st ations as presets. Once you have registered stations, you can easily tune into them by selecting their preset numbers. ■ Registering radio stat io ns autom atically (Auto P reset) Automatically register FM radio stat io[…]
-
Страница 51
PLAYBACK ➤ Listening to FM/AM radio En 51 ■ S electing a preset station T une into a r egistered radio station by selecting its preset number . 1 Press FM or AM to select “TUNER” as the input sour ce . 2 Press PRESET repeated ly to select the desired radio station. • “No Presets” appears when no radio stations are registered. ■ Clea[…]
-
Страница 52
PLAYBACK ➤ Listening to FM/AM radio En 52 Radio Da ta Sy stem tuning (U.K. and Europe models only) Radio Data System is a data transmission system used by FM stations in many countries. The uni t can receive various types of Radio Data System data, such as “Program Service”, “Program T ype,” “Radio T ext” and “Clock Time ”, when i[…]
-
Страница 53
PLAYBACK ➤ Playing back iPod music En 53 Y ou can play back iPod music on the unit using a USB cable supplied with the iPod. • Y ou cannot play back iP od video on the unit. • For details on pla yable iP od devices, see “Suppor ted devices and file f or mats” (p.109). C onnec ting an iPod Connect your iPod to the unit with the USB cable s[…]
-
Страница 54
PLAYBACK ➤ Playing back iPod music En 54 2 Use the cursor keys to select an item and press ENTER. If a song is selecte d, pla ybac k star ts and the pla yback screen is displa yed. • T o retur n to the previous screen, press RETURN. • T o switch between the browse and pla yback screens during playback, press DISPLA Y. • T o op erate the iP […]
-
Страница 55
PLAYBACK ➤ Playing back iPod music En 55 ■ Playback screen 1 Status indicators Display the current r epeat/shuffle se ttings (p.56) and playback status (such as play/pause). 2 Playback inf orm ation Displays the artist name, album name, song title, and elapsed time/song length. Use the following r emote control keys to contr ol playback. ■ Op[…]
-
Страница 56
PLAYBACK ➤ Playing back iPod music En 56 ■ Rep eat/shuffle settings Y ou can configure the r epeat/shuffle settings of your iPod. • During simple play , configure the repeat/shuffle settings directly on your iP od or press MODE to display the TV menu screen and then f ollow the procedure below . 1 When “USB” is selected as the input sour […]
-
Страница 57
PLAYBACK ➤ Playing back music stored on a USB storage device En 57 Y ou can play back music files stor ed on a USB storage device on the unit. • For details on pla yable USB devices, see “Supported devices and file formats” (p.109). C onnec ting a USB storage device 1 Connect the USB storage device to the USB jack. • If the USB storage de[…]
-
Страница 58
PLAYBACK ➤ Playing back music stored on a USB storage device En 58 2 Use the cursor keys to select an item and press ENTER. If a song is selecte d, pla ybac k star ts and the pla yback screen is displa yed. • T o retur n to the previous screen, press RETURN. • T o switch between the browse and pla yback screens during playback, press DISPLA Y[…]
-
Страница 59
PLAYBACK ➤ Playing back music stored on a USB storage device En 59 ■ Playback screen 1 Status indicators Display the current r epeat/shuffle se ttings (p.59) and playback status (such as play/pause). 2 Playback inf orm ation Displays the artist name, album name, song title, and elapsed time. Use the following r emote control keys to contr ol pl[…]
-
Страница 60
PLAYBACK ➤ Playing back music stored on media servers (PCs/NAS) En 60 Y ou can play back music files stor ed on y our PC or DLNA-compa tible NAS on the unit. • T o use this function, the unit and your PC m ust be connected to the same router (p.25). Y ou can check whether the network parameters (such as the IP address) are proper ly assigned to[…]
-
Страница 61
PLAYBACK ➤ Playing back music stored on media servers (PCs/NAS) En 61 Playback of PC music c ontents Follow the procedure below to operate the PC music contents and start playback. Y ou can contr ol the PC/NAS with the menu displayed on the TV screen. • Operations with TV screen are availab le only when your TV is connected to the unit via HDMI[…]
-
Страница 62
PLAYBACK ➤ Playing back music stored on media servers (PCs/NAS) En 62 ■ Browse scr een 1 List name 2 Contents list Displays the list of PC content. Use the cursor keys to select an item and press ENTER to confirm the selection. 3 Item number/total 4 Status indicators Display the current r epeat/shuffle se ttings (p.63) and playback status (such[…]
-
Страница 63
PLAYBACK ➤ Playing back music stored on media servers (PCs/NAS) En 63 ■ Rep eat/shuffle settings Y ou can configure the r epeat/shuffle settings for the playback of PC music content. 1 When “SER VER” is selected as the input source, press OPTION. 2 Use the cursor keys to select “Repeat” (Repeat) or “Shuffle” (Shuffle) and press ENTE[…]
-
Страница 64
PLAYBACK ➤ Listening to Internet radio En 64 Y ou can listen to Internet radio stations from all over the world. • Operations with TV screen are availab le only when your TV is connected to the unit via HDMI. If not, carr y out operations while viewing the front displa y . • T o use this function, the unit must be connected to the Internet (p[…]
-
Страница 65
PLAYBACK ➤ Listening to Internet radio En 65 ■ Browse scr een 1 List name 2 Contents list Displays the list of Internet radio cont ent. Use the cur sor keys to select an item and pr ess ENTER to confi rm the selection. 3 Item number/total 4 Playbac k indicator 5 Operation menu Press the cursor key ( r ) and then use the curso r keys ( q / w ) t[…]
-
Страница 66
PLAYBACK ➤ Listening to Internet radio En 66 Registering fav orite Internet radio sta tions (b ookmarks) Y ou can r e gister your favorite Internet radio stations to t he “Bookmarks” fol der . ■ Registering the station with the Option menu Follow the procedure below to register your favorite station to the “Bookmarks” fol der . 1 While […]
-
Страница 67
PLAYBACK ➤ Playing back music with AirPlay En 67 The AirPlay function allows you to p lay b ack iT unes or iPod touch/iPhone/iPa d music on the unit via network.” • This section describes «iPod touch», «iPhone» and «iPad» as the «iP od». «iPod» ref ers to » iP od touch», «iPhone[…]
-
Страница 68
PLAYBACK ➤ Playing back music with AirPlay En 68 • Y ou can tur n on the unit automatically when star ting playback on iT unes or iP od by setting “Network Standby” (p.92) in the “Setup” menu to “On”. • Y ou can edit the net work name (the unit’ s name on the network) displayed on iT unes/iP od in “Network Name” (p.92) in th[…]
-
Страница 69
PLAYBACK ➤ Playing back music in mult iple rooms (RX-V577 only) En 69 The Zone A/B function allows you to play back an input source in the room where the unit is installed (Zone A) and in another room (Zone B). For example, you can turn on Zo ne A (turn off Zone B) when you are in the living room, and turn on Zone B (tur n off Zone A) when you ar[…]
-
Страница 70
PLAYBACK ➤ Playing back music in mult iple rooms (RX-V577 only) En 70 ■ Basic playback procedur e 1 Press ZONE A or ZONE B to enable/disable audio output to Zone A or Zone B. 2 Use the input selection keys to select an input sour ce . 3 Start playback on the external de vice or select a radio station. 4 Press V OLUME to adjust the volume. ■ C[…]
-
Страница 71
PLAYBACK ➤ Viewing the current status En 71 Sw itching inf ormation on th e front displa y 1 Press INFO. Each time y ou press the key , the displa yed item changes . About 3 seconds later , the correspondi ng information fo r the displa yed item appears . • A vailable items vary depending on the selected input source. The displayed item can als[…]
-
Страница 72
PLAYBACK ➤ Configuring playback settings for di fferent playback sources (Option menu) En 72 Y ou can configure separate playback settin gs for different playback sour ces. This menu is available on the front panel (or on the TV screen), allowing you to easily configure settings during playback. 1 Press OPTION. Front display TV screen 2 Use the c[…]
-
Страница 73
PLAYBACK ➤ Configuring playback settings for di fferent playback sources (Option menu) En 73 ■ T o ne Co nt r ol ( T on e Co n t ro l ) Adjusts the high-frequency range (T r eble) and lo w-frequency range (Bass) of sounds. Choices T reble (T reble), Bass (Bass) Setting range -6.0 dB to Bypass (Bypass ) to +6.0 dB (0.5 dB increments) • Y ou ca[…]
-
Страница 74
PLAYBACK ➤ Configuring playback settings for di fferent playback sources (Option menu) En 74 • Some early Dolby Digital Surround EX or DTS-ES sources do not contain a flag for reproducing surround back channel. We recommend y ou se t “Extended Surround” to “ b PLIIx Movie” or “EX/ES” when playing back those sources. ❑ Enhancer (En[…]
-
Страница 75
PLAYBACK ➤ Configuring playback settings for di fferent playback sources (Option menu) En 75 ■ Audio In (Audio In) Combines the video jack of the selected in put source (HDMI 1–6 or A V 1–6) with an audio jack of others. For example, use this function in the following cases. • Connecting a playback de vice that supports H DMI video output[…]
-
Страница 76
CONFIGURATIONS ➤ Configuring various fun ctions (Setup menu) En 76 C ONFIGURA TIONS Y ou can configure the unit’ s various function with the menu displayed on the TV screen. • Operations with TV screen are av aila ble only when your TV is connected to the unit via HDMI. If not, carry out operations while viewing the front display . • If new[…]
-
Страница 77
CONFIGURATIONS ➤ Configuring various fun ctions (Setup menu) En 77 Setu p me nu it em s Menu Item Function Pag e Speaker Configuration Pow e r A m p A s s ig n (RX-V577 only) Selects a speaker system. 79 Subwoofer Selects whether or not a subwoofer is connected. 79 Front Selects the size of the front speakers. 79 Center Selects whether or not a c[…]
-
Страница 78
CONFIGURATIONS ➤ Configuring various fun ctions (Setup menu) En 78 Sound DSP Par ameter CINEMA DSP 3D Mode Enables/disables CINEMA DSP 3D. 85 Panorama Enables/disables the bro adening effect of th e front sound field. 85 Center Width Adjusts the br oadening effect of th e center sound field. 85 Dimension Adjusts the difference in level betwe en t[…]
-
Страница 79
CONFIGURATIONS ➤ Configuring various fun ctions (Setup menu) En 79 Speaker Configures the speaker settings manually . • Default settings are underlined. ■ Configuration Configures the output characteristics of the speakers. • When you configure the speaker size , select “Large” if the woofer diameter of your speak er is 16 cm (6-1/4”)[…]
-
Страница 80
CONFIGURATIONS ➤ Configuring various fun ctions (Setup menu) En 80 Selects whether or not surround speakers are connected and their sizes. Settings (RX-V577 only) Selects whether or not surround back speakers are connected and their sizes. Settings • “Surround Back” is automatically set to “None” when “P ower Amp Assign” is set to ?[…]
-
Страница 81
CONFIGURATIONS ➤ Configuring various fun ctions (Setup menu) En 81 Selects whether to use the front 5-channel speaker (Virtual CINEMA FRONT) configuration. Settings • Select «On» only when utilizing the Vir tual CINEMA FRONT configuration (p .13). • This setting is not availab le when “Surround” is set to “None”. ■ Distanc[…]
-
Страница 82
CONFIGURATIONS ➤ Configuring various fun ctions (Setup menu) En 82 ■ Te s t To n e Enables/disables the test tone output. T est tone output helps you to adjust the speaker balance or equalizer while confir ming its effect. Settings Off Does not output test to nes. On Outputs test tones automati cally when you adjust the speaker balance or equal[…]
-
Страница 83
CONFIGURATIONS ➤ Configuring various fun ctions (Setup menu) En 83 HDMI Configures the HDMI settings. • Default settings are underlined. ■ Configuration Enables/disables HDMI Control (p.111). Settings • T o use HDMI control, you need to perform the HDMI Control link setup (p.111) after connecting HDMI Control-compatible devices . Selects a […]
-
Страница 84
CONFIGURATIONS ➤ Configuring various fun ctions (Setup menu) En 84 Enables/disables ARC (p.21) when “HDMI Control” is set to “On”. Settings • Y ou do not need to change this setting normally . In case noises are produced from the speakers connected to the unit because TV audio signals input to the u nit via ARC are not suppor ted by the[…]
-
Страница 85
CONFIGURATIONS ➤ Configuring various fun ctions (Setup menu) En 85 Sou nd Configures the audio output settings. • Default settings are underlined. ■ DSP Parameter Configures the surround decoder settings. Enables/disables CINEMA DSP 3D (p.45). If this func tion is set to “On”, CINEMA DSP 3D functions with the selected soun d programs (exc[…]
-
Страница 86
CONFIGURATIONS ➤ Configuring various fun ctions (Setup menu) En 86 ■ Lipsync Adjusts the delay between video and audio output. • Y ou can enable/disable the Lipsync function by input sources in “Lipsync” (p.74) in the “Option” menu. Selects the method to adjust the delay between video and aud io output. Setting range • “Select” […]
-
Страница 87
CONFIGURATIONS ➤ Configuring various fun ctions (Setup menu) En 87 (RX-V577 only) Selects whether to adjust the volume for Zone B in conjunction with the volume for Zone A. Settings • If “ZoneB V olume” is set to “Async. ”, the volume f or Zone B is temporarily set to -40 dB. As necessar y , adjust the volume using the remote control (p[…]
-
Страница 88
CONFIGURATIONS ➤ Configuring various fun ctions (Setup menu) En 88 EC O Configures the power supply settings. • Default settings are underlined. ■ Auto P ower Standby Set the amount of time for the auto-standby function. Settings Default U.K. and Europe models: 20 minut es Other mode ls: Off • Just bef ore the unit en ters standby mode, “[…]
-
Страница 89
CONFIGURATIONS ➤ Configuring various fun ctions (Setup menu) En 89 Fu n c ti o n Configures the functions that make the unit easier to use. • Default settings are underlined. ■ I nput Rename Changes the input source name displayed on the front display . Input sources HDMI 1–6, A V 1–6, USB, AUX ■ Procedure 1 Use the cursor keys ( q / w […]
-
Страница 90
CONFIGURATIONS ➤ Configuring various fun ctions (Setup menu) En 90 ■ DC OUT Configures the DC OUT jack setting. Selects how to supply power to the Y amaha A V accessory connected to the DC OUT jack. Settings Powe r M o de Continuous Supplies power through the DC OUT jack cont inuously regar dless of the power state (on/sta ndby) of the unit. Po[…]
-
Страница 91
CONFIGURATIONS ➤ Configuring various fun ctions (Setup menu) En 91 Network Configures the network settings. • Default settings are underlined. ■ Information Displays the network information on the unit. * RX-V577 only ■ Network Connection (RX-V577 only) Selects the network connection method. Choices ■ IP Address Configures the network par[…]
-
Страница 92
CONFIGURATIONS ➤ Configuring various fun ctions (Setup menu) En 92 ■ MAC A ddress F ilter Sets the MAC address filter to limit access to the unit from other network devices. • Operation of the AirPlay function (p .67) or the DMC is not limited by this setting. Enables/disables the MAC address filter . Settings Specifies the MAC addresses (up […]
-
Страница 93
CONFIGURATIONS ➤ Configuring various fun ctions (Setup menu) En 93 ■ Network Update Updates the fir mware via the network. Starts the process to update the unit’ s fir mware. For details, see “Updating the unit’ s firmware” (p.97). Displays the version of the fir mware installed on the unit. Displays the system ID number . Language Sele[…]
-
Страница 94
CONFIGURATIONS ➤ Configuring the system sett ings (ADVANCED SETUP menu) En 94 Configure the system settings of the unit while viewing the front display . 1 Set the unit to standby mode. 2 While holding down STRAIGHT on the front panel, press z (power). 3 Press PROGRAM to select an item. 4 Press STRAIGHT to select a setting. 5 Press z (power) to s[…]
-
Страница 95
CONFIGURATIONS ➤ Configuring the system sett ings (ADVANCED SETUP menu) En 95 Selecting the remote c ontrol ID (REMO TE ID) Change the unit’ s remote control ID so that it matches the remote control’ s ID (d efault: ID1). When using multiple Y amaha A V r eceivers, you can set each remote contr ol with a unique remote control ID for its corre[…]
-
Страница 96
CONFIGURATIONS ➤ Configuring the system sett ings (ADVANCED SETUP menu) En 96 Updating the firm ware (UPDA TE) New firmware that provides additional f eatures or product improvements will be released as needed. Updates can be downloaded from our website. If the unit is connected to the Inter net, you can download the fir mware via the network. Fo[…]
-
Страница 97
CONFIGURATIONS ➤ Updating the unit’s firmware via the network En 97 New firmware that provides a dditional features or product improvements will be released as needed. If the unit is connected to the Internet, you can download the firmware via the network and update it. • Y ou can also update the firmware using the USB memor y device from the[…]
-
Страница 98
APPENDIX ➤ Frequently asked questions En 98 APPENDIX The new spea ker sy stem does not provide an ideal sound balance … If you have changed sp eakers or have a ne w speaker system, use YP AO to optimize the speaker settings again (p.38). If you want to ad just the speaker setting s manually , use “Speaker” in the “Setup” menu (p.79). Si[…]
-
Страница 99
APPENDIX ➤ Troubleshooting En 99 Refer to the table below when the unit doe s not function properly . If the problem you are experiencing is not listed below or if the instructions below do not help, tur n off the unit, disconnect the power cable, and contact the nearest authorized Y amaha dealer or service center . First , check the following: a[…]
-
Страница 100
APPENDIX ➤ Troubleshooting En 100 The unit cannot be controlled using the remote control. The unit is out of the operating range. Use the remote control within th e operating range (p.4). The batteries are weak. Replace w ith new batteries. The unit’ s remote contr ol sensor is exposed to direct sunlight or strong l ighting. Adjust the lighting[…]
-
Страница 101
APPENDIX ➤ Troubleshooting En 101 Aud i o Proble m Cause Remedy No sound. Another input sour ce is selected. Select an appropriate inpu t source with the input selection keys. Signals that the unit cannot r e produce ar e being input. Some digital audio formats cannot be played back on the unit. T o check the audio format of the input signal, use[…]
-
Страница 102
APPENDIX ➤ Troubleshooting En 102 No sound from the playback de vice (connected to the unit with HDMI). The TV does not support HDCP (High-bandwidth Digital Content Protection). Refer to the instructio n manuals for the TV and check the TV’ s specificatio ns. The unit is set not to output audio input thr ough HDMI jacks from the SPEAKE RS termi[…]
-
Страница 103
APPENDIX ➤ Troubleshooting En 103 Vi d e o FM/AM r adio Proble m Cause Remedy No video. Another input sour ce is selected on the unit. S elect an appropriate input sour ce with the input selection keys. Another input sour ce is selected on the TV . Sw itch the TV input to display the video from t he unit. The video signal output from the unit is […]
-
Страница 104
APPENDIX ➤ Troubleshooting En 104 USB and netw ork Proble m Cause Remedy The unit does not detect the USB device. The USB device is not connected to the USB jack secur ely . T urn of f t he unit, reconnect your USB device, and turn the unit on aga in. The file system of the USB device is not F A T16 or F A T32. Use a USB device with F A T16 or F […]
-
Страница 105
APPENDIX ➤ Troubleshooting En 105 (RX-V577 only) Wireless network is not f oun d. Microwave ove ns or other wir eless devices in your neighborhood might disturb the wir eless communication. T urn off these devices. Access to t he network is restr icted by the fire wall settings of th e wireless r outer (access point). Check the firewall sett ing […]
-
Страница 106
APPENDIX ➤ Error indications on the front display En 106 Error indications on the front displa y Message Cause Remedy Access denied Access to the PC is deni ed. Configure the sharing sett ings and select the uni t as a device to which music conte nts are sha red (p.60). Access err or The unit cannot access the USB device. T urn off the unit and r[…]
-
Страница 107
APPENDIX ➤ Glossary En 107 Aud io in for mat io n ■ Audio decoding format Dolb y Digital Dolby Digital is a compressed digital audio format developed by Dolby Laboratories , Inc. that supports 5.1-channel audio. This technology is used for audio on most DVD disc s. Dolby Digital EX Dolby Digital EX creates total 6.1-channel audio from 5.1-chann[…]
-
Страница 108
APPENDIX ➤ Glossary En 108 Sampling frequency/Quantization bit Sampling frequency and quantization bits indicate the quantity of inform ation when an analog audio signal is digitized. These values are noted as in the following example: “48 kHz/24-bit”. • Sampling frequency Sampling frequency (the number of times the signal is sampled per se[…]
-
Страница 109
APPENDIX ➤ Supported devices and file formats En 109 Ya m a h a t e c h n o l o g i e s CINEMA DSP (Digital Sound Field Processor) Since the Dolby Surround and DTS systems were originally designed for use in movie theaters, their effect is best experienced in a theater that has many speakers designed for acoustic effects. Since home conditions (s[…]
-
Страница 110
APPENDIX ➤ Video signal flow En 110 ■ File formats ❑ USB • The unit suppor ts playback of WA V (PCM format only), MP3, WMA, MPEG-4 AAC, FLAC and ALAC (Apple Lossless Audio Co dec) files (1- or 2-channel audio only). • The unit is compatible with sampling rate o f up to 192 kHz for WA V and FLAC files, 96 kHz for ALAC files, and 48 kHz for[…]
-
Страница 111
APPENDIX ➤ Information on HDMI En 111 HDMI C ontrol HDMI Control allows you to operate exter nal devices via HDMI. If you connect a TV that supports HDMI Control to the unit with an HDMI cable, you can control the unit (such as power and volume) with TV remote control operations. Y ou ca n also control playback devices (such as HDMI Control-compa[…]
-
Страница 112
APPENDIX ➤ Information on HDMI En 112 f If you made a digita l optical cable connect ion between the TV an d the unit, use the cursor k eys ( q / w ) to select «TV Audio Input» and the curs or ke ys ( e / r ) to select «A V 1». g Press SETUP . 3 Enable HDMI Control on the TV and playback devices (such as HDMI Control-compatibl[…]
-
Страница 113
APPENDIX ➤ Information on HDMI En 113 HDMI signal c ompatibility Au dio signa ls Video signals The unit is compatible with the video signals of the following resolutions: • When CPPM copy-protected D VD-A udio is play ed back, video/audio signals may not be output, depending on the type of the D VD player . • The unit is not compatible with H[…]
-
Страница 114
APPENDIX ➤ Reference diagram (rear panel) En 114 • The area around the video/audio output jacks is marked in white on the actual product to prevent improper connections. Refer ence diagr am (rear panel) FRONT CENTER SURROUND SINGLE SURROUND BACK/BI AMP /ZONE B AV 1 AV 2 AV 3 AV 5 AV 6 OPTICAL COAXIAL COAXIAL ( TV ) COMPONENT VIDEO COMPONENT VID[…]
-
Страница 115
APPENDIX ➤ Trademarks En 115 Manufactured under license from Dolby Laboratories. Dolby , Pro Logic, Surround EX and the double-D symbol are trademarks of Dolby Laboratories. (For RX-V477) Manufactured under license under U.S. Patent Nos: 5,956,674; 5,974,380; 6,226,616; 6,487,535; 7,212,872; 7,333,92 9; 7,392,195; 7,272,567 & other U.S. and w[…]
-
Страница 116
APPENDIX ➤ Specifications En 116 Input jacks • Analog Audio Audio x 4 (A V 4–6, AUX [Mini Jack]) • Digital Audio (Supported fr equencies: 32 kHz to 96 kHz) Optical x 1 (A V 1) Coaxial x 2 (A V 2–3) •V i d e o Composite x 4 (A V 3–6) Component x 2 (A V 1–2) • HDMI Input HDMI x 6 (HDMI 1–6) • Other jacks [RX-V5 77] — USB x 1 (U […]
-
Страница 117
APPENDIX ➤ Specifications En 117 Compatible Decoding Formats • Decoding Format — Dolby T rueHD, Dolby Digital Plus — Dolby Digital EX [RX-V577] — Dolby Digital — DTS-HD Master Audio, DTS-HD High Resolution Audio, DTS Express — DTS, DTS 96/24, DTS-ES Matrix 6.1, DTS-ES Discrete 6.1 • Post Decoding Format [RX-V5 77] — Dolby Pro Logic — Dolby Pr[…]
-
Страница 118
APPENDIX ➤ Specifications En 118 Vid e o S ec ti o n • V ideo Signal T ype [U.S.A., Canada, Korea, T aiwan and General models] … NTSC [Other mode ls]……….. …………. ……………. …………. …………… P AL • V ideo Signal Level Composite …………………. ……………. …………. ………. 1 Vp-p/75 Ω Compo[…]
-
Страница 119
APPENDIX ➤ Index En 119 Symbols Envelope icon ( p ) 97 Lock icon ( o ) 89 Numerics 2.1-channel system 14 2ch Stereo (sound program) 46 3.1-channel system 14 4.1-channel system 14 4K Ultra HD 113 5.1-channel system 13 , 16 5.1-channel system (Virtual CINEMA FRONT) 13 5ch Stereo (sound program) 46 6.1-channel system 13 7.1-channel system 13 , 16 7c[…]
-
Страница 120
APPENDIX ➤ Index En 120 E ECO (Setup menu) 88 ECO Mode (ECO, Setup menu) 88 Enhancer (DSP/Surround, Option menu) 74 ENHANCER (sound mode) 48 EQ Select (Equalizer, Setup menu) 81 Equalizer (Speaker, Setup menu) 81 Error indication (front display) 106 EX/ES (Extended Surround, Option menu) 73 EXTD (DSP/Surround, Option menu ) 73 Extended Surround ([…]
-
Страница 121
APPENDIX ➤ Index En 121 P PAL (TV FORMAT, ADVANCED SETUP menu) 95 Panorama (DSP Parameter, Setup menu) 85 PC content playback 61 PEQ (Equalizer, Setup menu) 81 Perform Update (Network Update, Setup menu) 93 PIN Code (Wireless (Wi-Fi), Setup menu) 33 Please wait (error indication) 106 Power Amp Assign (Speaker, Setup menu) 79 Power management 88 P[…]
-
Страница 122
APPENDIX ➤ Index En 122 Virtual Presence Speaker (VPS) 6 Voltage selection 26 Volume (Sound, Setup menu) 86 Volume Interlock (Option menu) 75 Volume Trim (Option menu) 74 VPS (Virtual Presence Speaker) 6 vTuner ID (Information, Setup menu) 91 W Wi-Fi 108 Wired (Network Connection, Setup menu) 91 Wireless (Wi-Fi) (Network Connection, Setup menu) 3[…]
-
Страница 123
© 2014 Yamaha Corporation YG068A0/EN 00_RX-V477_V577_om_U.book Page 123 Monday, November 11, 20 13 1:19 PM[…]
-
Page 1
AV Receiver Owner’s Manual Read the supplied booklet “Safety Brochure” before using the unit. English… -
Page 2: Table Of Contents
FEATURES 10 Connecting to a network wirelessly (RX-V577 only) … . 28 Attaching the wireless antenna …………..28 What you can do with the unit .
-
Page 3
Audio ………………. .101 Playing back music in multiple rooms (RX-V577 only) … . . 69 Video . -
Page 4: Accessories
YPAO microphone Wireless antenna (RX-V577 only) • The illustrations of the main unit used in this manual are of the RX-V577 (U.S.A. model), unless otherwise specified. • Some features are not available in certain regions. • Due to product improvements, specifications and appearance are subject to change without notice.
-
Page 5: Features
• Enjoying compressed music with enhanced sound (Compressed Music Enhancer) . p.69 • Playing back music in multiple rooms (Zone B)* Network contents * RX-V577 only Speakers Audio Audio iPod/iPhone HDMI Control USB device 3D and 4K Ultra HD signals supported…
-
Page 6: Full Of Useful Functions
Full of useful functions! Useful tips The combination of video/audio input jacks does not ❑ Connecting various devices (p.21) ❑ Creating 3-dimensional sound fields (p.45) match an external device… A number of HDMI jacks and various input/output jacks The Virtual Presence Speaker (VPS) function allows you Use “Audio In”…
-
Page 7: Part Names And Functions
INFO (WPS) key PHONES jack Selects the information displayed on the front display (p.71). USB jack For connecting headphones. (RX-V577 only) For connecting a USB storage device (p.57) or an iPod INPUT keys Enters the wireless LAN connection setup (WPS button (p.53).
-
Page 8: Front Display (Indicators)
Lights up when the unit is receiving a stereo FM radio signal. INFO (p.71). ADAPTIVE DRC TUNED Signal strength indicator (RX-V577 only) Lights up when Adaptive DRC (p.73) is working. Lights up when the unit is receiving an FM/AM radio station Indicates the strength of the wireless signal (p.28).
-
Page 9: Rear Panel
DC OUT jack For connecting to FM and AM antennas (p.24). For connecting to video/audio playback devices and For supplying power to a Yamaha AV accessory. For details inputting video/audio signals (p.21). on connections, refer to the instruction manual of the AV HDMI OUT jack accessory.
-
Page 10: Remote Control
ZONE A Select an input source for playback. • The playback devices must support HDMI Control. However, HDMI 1–6 HDMI 1–6 jacks Yamaha does not assure the operation of all HDMI ZONE B Control-compatible devices. AV 1–6 AV 1–6 jacks…
-
Page 11: Preparations
Select the desired on-screen menu language. (p.27) Connecting to a network wirelessly Connect the unit to a network wirelessly. (RX-V577 only) (p.28) Optimizing the speaker settings Optimize the speaker settings, such as volume balance and acoustic parameters, to suit your room automatically (YPAO) (p.38) (YPAO).
-
Page 12: Placing Speakers
*1 RX-V577 only *2 Place the surround speakers in front and set «Virtual CINEMA FRONT» (p.81) in the «Setup» menu to «On». • RX-V577 supports 2- to 7.1-channel system, and RX-V477 supports 2- to 5.1-channel speaker system. • (RX-V577 only) You can connect two subwoofers (with built-in amplifier) to the unit.
-
Page 13: Channel System
1 2 3 4 5 6 7 8 9 10 11 7.1-channel system (RX-V577 only) 5.1-channel system 10° to 30° 10° to 30° 10° to 30° 10° to 30° 30 cm (1 ft) or more 6.1-channel system (RX-V577 only) 5.1-channel system (Virtual CINEMA FRONT) 10°…
-
Page 14
1 2 3 4 5 6 7 8 9 10 11 4.1-channel system 2.1-channel system 10° to 30° 10° to 30° 3.1-channel system PREPARATIONS ➤ Placing speakers… -
Page 15
1 2 3 4 5 6 7 8 9 10 11 ■ Setting the speaker impedance (U.S.A. and Canada models only) Under its default settings, the unit is configured for 8-ohm speakers. When connecting 6-ohm speakers, set the speaker impedance to “6 Ω MIN”. Before connecting speakers, connect the power cable to an AC wall outlet. -
Page 16: Connecting Speakers
– – Audio pin cable (x1: for connecting a subwoofer) • (RX-V577 only) • When using only one surround back speaker, connect it to the You can connect 2 subwoofers (with built-in amplifier) to the unit. SINGLE jack (L side).
-
Page 17: Connecting Front Speakers That Support Bi-Amp Connections
(Zone B). To connect the Zone B d Tighten the terminal. speakers, see “Playing back music in multiple rooms (RX-V577 only)” (p.69). + (red) • Surround back speakers or bi-amplified front speakers cannot be used while the Zone B function is enabled.
-
Page 18: Input/Output Jacks And Cables
Input/output jacks and cables ■ ■ ■ Video/audio jacks Video jacks Audio jacks ❑ HDMI jacks ❑ COMPONENT VIDEO jacks ❑ OPTICAL jacks Transmit digital video and digital sound through a single Transmit video signals separated into three Transmit digital audio signals. Use a digital optical jack.
-
Page 19: Connecting A Tv
1 2 3 4 5 6 7 8 9 10 11 Connecting a TV ■ Connect a TV to the unit so that video input to the unit can be output to the TV. You can Component / composite video connection also enjoy playback of TV audio on the unit.
-
Page 20
1 2 3 4 5 6 7 8 9 10 11 ❑ VIDEO (composite video) connection (with a video pin cable) MONITOR OUT Video input (VIDEO) jack The unit (rear) (composite video) VIDEO HDMI 1 HDMI 2 HDMI 3 HDMI 4 HDMI 5 HDMI 6 HDMI OUT… -
Page 21: Connecting Playback Devices
1 2 3 4 5 6 7 8 9 10 11 Connecting playback devices ■ The unit is equipped with a variety of input jacks including HDMI input jacks to allow Component video connection you to connect different types of playback devices. For information on how to connect Connect a video device to the unit with a component video cable and an audio cable an iPod or a USB storage device, see the following pages.
-
Page 22: Changing The Combination Of Video/Audio Input Jacks
1 2 3 4 5 6 7 8 9 10 11 ■ ■ Composite video connection Changing the combination of video/audio input jacks Connect a video device to the unit with a video pin cable and an audio cable (digital If the combination of video/audio input jacks available on the unit does not match your coaxial or stereo pin cable).
-
Page 23: Connecting Audio Devices (Such As Cd Players)
1 2 3 4 5 6 7 8 9 10 11 Connecting audio devices (such as CD players) After connecting external devices (such as a TV and playback devices) and power cable of the unit, turn on the unit. Connect audio devices such as CD players and MD players to the unit. Depending on the audio output jacks available on your audio device, choose one of the following Press AV 2 to select “AV 2”…
-
Page 24: Connecting To The Jack On The Front Panel
1 2 3 4 5 6 7 8 9 10 11 Connecting to the jack on the front panel Connecting the FM/AM antennas Use the AUX jack on the front panel to temporarily connect devices such as portable Connect the supplied FM/AM antennas to the unit. audio players to the unit.
-
Page 25: Connecting To A Network (Wired Lan Connection)
(RX-V577 only) • To use the service via the Internet, broadband connection is strongly recommended. You can also connect the unit to a network wirelessly. For details, see «Connecting to a network wirelessly (RX-V577 only)» (p.28). Network Attached Storage Internet…
-
Page 26: Connecting Recording Devices
1 2 3 4 5 6 7 8 9 10 11 Connecting recording devices Connecting the power cable You can connect video/audio recording devices to the AV OUT jacks. These jacks Before connecting the power cable (General model only) output analog video/audio signals selected as the input. Set the switch position of VOLTAGE SELECTOR according to your local voltage.
-
Page 27: Selecting An On-Screen Menu Language
1 2 3 4 5 6 7 8 9 10 11 Selecting an on-screen menu language TRANSMIT TRANSMIT RECEIVER RECEIVER z RECEIVER z SLEEP SLEEP Select the desired on-screen menu language from English HDMI HDMI To exit from the menu, press SETUP. (default), Japanese, French, German, Spanish, Russian, Italian and Chinese.
-
Page 28: Connecting To A Network Wirelessly (Rx-V577 Only)
• The signal strength indicator on the front display indicates the strength of the wireless signal. Weak Strong Bend Joint ES S W IR EL Turn clockwise to the vertical position ES S W IR EL PREPARATIONS ➤ Connecting to a network wirelessly (RX-V577 only)
-
Page 29: Selecting The Connection Method
• When Wireless Direct is enabled, the unit cannot connect to the Internet. Therefore, you cannot use any kind of Internet service such as Internet radio. Mobile device • For details on “AV CONTROLLER”, visit the Yamaha website. (such as iPhone) The unit For details on connection, see “Connecting the unit to a wireless network”…
-
Page 30: Connecting The Unit To A Wireless Network
(HDMI OUT jack). : ENTER Back : RETURN • Operations with TV screen are available only when your TV is connected to the unit via HDMI. Press SETUP. PREPARATIONS ➤ Connecting to a network wirelessly (RX-V577 only)
-
Page 31
In this case, try connection with «Access Point Scan» or «Manual Setting» (p.32). • You can use “WPS Button” (p.7) in the “Setup” menu to set up a wireless connection with the WPS button. PREPARATIONS ➤ Connecting to a network wirelessly (RX-V577 only) -
Page 32
• The unit may connect automatically to the access point to which it has connected previously. In this case, the message indicating the successful connection will appear. You can ignore this message and proceed to the next step. PREPARATIONS ➤ Connecting to a network wirelessly (RX-V577 only) -
Page 33
Deletes the character to the left of the selected one. [Space]: Enters a space. [DEL]: Deletes the selected character. When finished entering the key, select “OK” to return to the previous screen. PREPARATIONS ➤ Connecting to a network wirelessly (RX-V577 only) -
Page 34
← A a → B K S P S p a c e D E L CANCEL CLEAR When finished entering the key, select “OK” to return to the previous screen. PREPARATIONS ➤ Connecting to a network wirelessly (RX-V577 only) -
Page 35
← A a → B K S P S p a c e D E L CANCEL CLEAR When finished entering the key, select “OK” to return to the previous screen. PREPARATIONS ➤ Connecting to a network wirelessly (RX-V577 only) -
Page 36: Connecting A Mobile Device To The Unit Directly (Wireless Direct)
– SSID displayed on the TV screen – Security key you have just entered : E N T E R B a c k : R E T U R N PREPARATIONS ➤ Connecting to a network wirelessly (RX-V577 only)
-
Page 37
9. Cursor keys ENTER VOLUME VOLUME ENTER RETURN RETURN DISPLAY DISPLAY To exit from the menu, press SETUP. POP-UP POP-UP MUTE MUTE MENU MENU MENU MENU MODE MODE PREPARATIONS ➤ Connecting to a network wirelessly (RX-V577 only) -
Page 38: Optimizing The Speaker Settings Automatically (Ypao)
RECEIVER RECEIVER z RECEIVER z SLEEP SLEEP The Yamaha Parametric room Acoustic Optimizer (YPAO) function HDMI HDMI Place the YPAO microphone at your listening detects speaker connections, measures the distances from them to your listening position(s), and then automatically optimizes the…
-
Page 39
1 2 3 4 5 6 7 8 9 10 11 TRANSMIT TRANSMIT To start the measurement, use the cursor keys to To save the measurement results, use the cursor RECEIVER RECEIVER select “Start” and press SETUP. keys (e/r) to select “SAVE” and press ENTER. SLEEP SLEEP HDMI… -
Page 40: Error Messages
Use the cursor keys (e/r) to select the Exit YPAO, and turn off and on the unit. If this error occurs E-10:Internal Err. An internal error has occurred. repeatedly, contact the nearest authorized Yamaha dealer or desired operation. (E-10:INTERNAL) service center.
-
Page 41: Warning Messages
Warning messages If a warning message is displayed after the measurement, you can still save the measurement results by following on-screen instructions. However, we recommend you perform YPAO again in order to use the unit with the optimal speaker settings. Warning message Cause Remedy…
-
Page 42: Playback
PLAYBACK TRANSMIT TRANSMIT RECEIVER RECEIVER SLEEP SLEEP HDMI Basic playback procedure Input selection keys Turn on the external devices (such as a TV or ZONE A ZONE A BD/DVD player) connected to the unit. ZONE B ZONE B PRESET PRESET TUNING TUNING Use the input selection keys to select an input…
-
Page 43: Selecting The Input Source And Favorite Settings With One Touch
The SCENE function allows you to select the assigned input source, Configuring scene assignments HDMI HDMI sound program, Compressed Music Enhancer on/off, and target zones (RX-V577 only) with just one touch. Perform the following operations to prepare the Press SCENE. ZONE A ZONE A settings you want to assign to a scene.
-
Page 44: Selecting The Sound Mode
Selecting the sound mode TRANSMIT TRANSMIT RECEIVER RECEIVER SLEEP SLEEP ❑ Enabling Compressed Music Enhancer The unit is equipped with a variety of sound programs and HDMI HDMI surround decoders that allow you to enjoy playback sources with • Press ENHANCER. your favorite sound mode (such as sound field effect or stereo This mode lets you enjoy compressed music with additional depth playback).
-
Page 45: Enjoying Stereoscopic Sound Fields (Cinema Dsp 3D)
You’ll never get tired listening for long periods. The unit is equipped with a variety of sound programs that utilize Yamaha’s original DSP technology (CINEMA DSP 3D). It allows you to easily create sound fields like actual This program reproduces monaural video sources, such as classic movies, in an atmosphere of a good old movie theater.
-
Page 46: Virtual Cinema Dsp
2 channels and output from the front speakers (this program does not utilize CINEMA DSP). (RX-V577: 7ch Stereo, RX-V477: 5ch Stereo) Use this program to output sound from all speakers. When you play back…
-
Page 47: Enjoying Unprocessed Playback
Use the Dolby Pro Logic II decoder (or Dolby Pro Logic IIx decoder) suitable for music. bPLIIx Music* • (RX-V577 only) bPLII Game To enable 6.1/7.1-channel playback from 5.1-channel sources when surround Use the Dolby Pro Logic II decoder (or Dolby Pro back speakers are used, set “Extended Surround”…
-
Page 48: Enjoying Pure High Fidelity Sound (Direct Playback)
Enjoying pure high fidelity sound Enjoying compressed music with enhanced TRANSMIT TRANSMIT (direct playback) sound (Compressed Music Enhancer) RECEIVER RECEIVER SLEEP SLEEP HDMI HDMI When the direct playback mode is enabled, the unit plays back the selected source with the least circuitry in order to reduce the electrical noise from other circuitry (such as the front display).
-
Page 49: Listening To Fm/Am Radio
Listening to FM/AM radio TRANSMIT TRANSMIT RECEIVER RECEIVER SLEEP SLEEP You can tune into a radio station by specifying its frequency or Selecting a frequency for reception HDMI HDMI selecting from registered radio stations. Press FM or AM to select a band. •…
-
Page 50: Registering Favorite Radio Stations (Presets)
Registering favorite radio stations (presets) When the Auto Preset process finishes, “FINISH” appears and the TRANSMIT TRANSMIT “Option” menu closes automatically. RECEIVER RECEIVER SLEEP SLEEP You can register up to 40 radio stations as presets. Once you have CHARGE ENHANCER STEREO TUNED SLEEP MUTE HDMI…
-
Page 51
■ ■ Selecting a preset station Clearing preset stations TRANSMIT TRANSMIT Tune into a registered radio station by selecting its preset number. Clear radio stations registered to the preset numbers. RECEIVER RECEIVER SLEEP SLEEP HDMI HDMI Press FM or AM to select “TUNER” as the input Press FM or AM to select “TUNER”… -
Page 52: Radio Data System Tuning
Radio Data System tuning TRANSMIT TRANSMIT • “Program Service”, “Program Type”, “Radio Text”, and “Clock Time” are not RECEIVER RECEIVER SLEEP SLEEP (U.K. and Europe models only) displayed if the radio station does not provide the Radio Data System HDMI HDMI service.
-
Page 53: Playing Back Ipod Music
Playing back iPod music TRANSMIT TRANSMIT RECEIVER RECEIVER SLEEP SLEEP You can play back iPod music on the unit using a USB cable Playback of iPod content HDMI HDMI supplied with the iPod. Follow the procedure below to operate the iPod contents and start playback.
-
Page 54
■ Browse screen TRANSMIT TRANSMIT Use the cursor keys to select an item and press RECEIVER RECEIVER ENTER. SLEEP SLEEP HDMI HDMI If a song is selected, playback starts and the playback i P o d M u s i c screen is displayed. -
Page 55: Playback Screen
■ ■ Playback screen Operating the iPod itself or remote control TRANSMIT TRANSMIT (simple play) RECEIVER RECEIVER SLEEP SLEEP HDMI HDMI i P o d Press MODE to switch to the simple play mode. N o w P l a y i n g The TV menu screen turns off and iPod operations are A r t i s t N a m e A l b u m N a m e…
-
Page 56
■ Repeat/shuffle settings TRANSMIT TRANSMIT You can configure the repeat/shuffle settings of your iPod. RECEIVER RECEIVER SLEEP SLEEP HDMI HDMI • During simple play, configure the repeat/shuffle settings directly on your iPod or press MODE to display the TV menu screen and then follow the procedure below. ZONE A ZONE A When “USB”… -
Page 57: Playing Back Music Stored On A Usb Storage Device
Playing back music stored on a USB storage device TRANSMIT TRANSMIT RECEIVER RECEIVER SLEEP SLEEP You can play back music files stored on a USB storage device on Playback of USB storage device contents HDMI HDMI the unit. Follow the procedure below to operate the USB storage device contents and start playback.
-
Page 58
■ Browse screen TRANSMIT TRANSMIT Use the cursor keys to select an item and press RECEIVER RECEIVER ENTER. SLEEP SLEEP HDMI HDMI U S B If a song is selected, playback starts and the playback T o p screen is displayed. B l u e s C l a s s i c a l E l e c t r o n i c a… -
Page 59
■ ■ Playback screen Repeat/shuffle settings TRANSMIT TRANSMIT You can configure the repeat/shuffle settings for playback of USB RECEIVER RECEIVER SLEEP SLEEP storage device contents. HDMI HDMI U S B N o w P l a y i n g When “USB”… -
Page 60: Playing Back Music Stored On Media Servers (Pcs/Nas)
Select “Library”, then “Media Sharing”. (p.91) in the “Setup” menu. • (RX-V577 only) The audio may be interrupted while using the wireless network connection. In this case, use the wired Check the “Share my media to” box, select the unit’s icon, and click network connection.
-
Page 61: Playback Of Pc Music Contents
Playback of PC music contents TRANSMIT TRANSMIT Use the cursor keys to select an item and press RECEIVER RECEIVER ENTER. SLEEP SLEEP Follow the procedure below to operate the PC music contents and HDMI HDMI start playback. If a song is selected, playback starts and the playback You can control the PC/NAS with the menu displayed on the TV screen is displayed.
-
Page 62
■ ■ Browse screen Playback screen TRANSMIT TRANSMIT RECEIVER RECEIVER SLEEP SLEEP HDMI HDMI S E R V E R S E R V E R N A S A N o w P l a y i n g B l u e s C l a s s i c a l A r t i s t N a m e… -
Page 63
■ Repeat/shuffle settings TRANSMIT TRANSMIT You can configure the repeat/shuffle settings for the playback of PC RECEIVER RECEIVER SLEEP SLEEP music content. HDMI HDMI When “SERVER” is selected as the input source, press OPTION. ZONE A ZONE A Use the cursor keys to select “Repeat” (Repeat) or ZONE B ZONE B “Shuffle”… -
Page 64: Listening To Internet Radio
Listening to Internet radio TRANSMIT TRANSMIT RECEIVER RECEIVER SLEEP SLEEP You can listen to Internet radio stations from all over the world. Playback of Internet radio HDMI HDMI Follow the procedure below to select an Internet radio station and • Operations with TV screen are available only when your TV is connected to the start playback.
-
Page 65
■ ■ Browse screen Playback screen TRANSMIT TRANSMIT RECEIVER RECEIVER SLEEP SLEEP HDMI HDMI N E T R A D I O N E T R A D I O T o p N o w P l a y i n g B o o k m a r k s L o c a t i o n s S t a t i o n N a m e… -
Page 66: Registering Favorite Internet Radio Stations (Bookmarks)
Registering favorite Internet radio stations (bookmarks) TRANSMIT TRANSMIT RECEIVER RECEIVER SLEEP SLEEP You can register your favorite Internet radio stations to the HDMI HDMI Access the vTuner website “Bookmarks” folder. (http://yradio.vtuner.com/) with the web browser on ■ your PC and enter the vTuner ID. Registering the station with the Option menu ZONE A…
-
Page 67: Playing Back Music With Airplay
The unit • If the icon does not appear, check whether the unit and PC/iPod are connected to the router properly. (RX-V577 can be connected wirelessly to a network.) iPod On the iTunes/iPod, click (tap) the AirPlay icon and select the unit (network name of the unit) as the audio output device.
-
Page 68
Use the following remote control keys to control playback. TRANSMIT TRANSMIT • You can turn on the unit automatically when starting playback on iTunes or iPod by RECEIVER RECEIVER External device SLEEP SLEEP Function setting “Network Standby” (p.92) in the “Setup” menu to “On”. operation keys HDMI HDMI… -
Page 69: Playing Back Music In Multiple Rooms (Rx-V577 Only)
Zone B separately (p.70). • You can automatically enable/disable the audio output to Zone A/B in conjunction with a scene selection (p.43) Zone B Zone A PLAYBACK ➤ Playing back music in multiple rooms (RX-V577 only)
-
Page 70
Use the cursor keys (q/w) to select “ZoneB Trim” (ZB.Trim) and the cursor keys (e/r) to adjust the setting. Setting range -10.0 dB to +10.0 dB (0.5 dB increments) Default 0.0 dB PLAYBACK ➤ Playing back music in multiple rooms (RX-V577 only) -
Page 71: Viewing The Current Status
Viewing the current status TRANSMIT TRANSMIT RECEIVER RECEIVER SLEEP SLEEP HDMI HDMI Switching information on the front display Press INFO. ZONE A ZONE A Each time you press the key, the displayed item changes. ZONE B ZONE B CHARGE ENHANCER STEREO TUNED SLEEP MUTE PRESET…
-
Page 72: Configuring Playback Settings For Different Playback Sources
S i g n a l I n f o is adjusted. A u d i o I n DSP/Surround (DSP/Surround) (RX-V577 only) Extended Surround Selects how to play back 5.1- to 7.1-channel sources (EXTD) when surround back speakers are used.
-
Page 73
❑ Extended Surround (EXTD) Setting range -6.0 dB to Bypass (Bypass) to +6.0 dB (0.5 dB increments) (RX-V577 only) Selects how to play back 5.1- to 7.1-channel sources when surround back speakers are used. • You can also adjust the tone with the front panel controls. Press TONE CONTROL to select «Treble» or «Bass», then press PROGRAM to make an adjustment. -
Page 74
■ Lipsync (Lipsync) Enables/disables the adjustment configured in “Lipsync” (p.86) in the “Setup” menu. • Some early Dolby Digital Surround EX or DTS-ES sources do not contain a flag for reproducing surround back channel. We recommend you set “Extended Surround” to “bPLIIx Movie” or “EX/ES” when playing back those sources. -
Page 75
■ ■ Audio In (Audio In) Volume Interlock (Interlock) Combines the video jack of the selected input source (HDMI 1–6 or AV 1–6) with an Enables/disables volume controls from iTunes/iPod via AirPlay. audio jack of others. For example, use this function in the following cases. Settings •… -
Page 76: Configurations
CONFIGURATIONS Configuring various functions (Setup menu) You can configure the unit’s various function with the menu displayed on the TV screen. Use the cursor keys (e/r) to select a setting and press ENTER. To exit from the menu, press SETUP. •…
-
Page 77: Setup Menu Items
Setup menu items Menu Item Function Page (RX-V577 only) Power Amp Assign Selects a speaker system. Subwoofer Selects whether or not a subwoofer is connected. Front Selects the size of the front speakers. Center Selects whether or not a center speaker is connected and its size.
-
Page 78
Max Volume Volume Initial Volume Sets the initial volume for when this receiver is turned on. (RX-V577 only) ZoneB Volume Selects whether to adjust the volume for Zone B in conjunction with the volume for Zone A. Auto Power Standby Set the amount of time for the auto-standby function. -
Page 79: Speaker
(6-1/4”) or larger or “Small” if it is smaller than 16 cm (6-1/4”). Power Amp Assign • “Front” is automatically set to “Large” when “Subwoofer” is set to “None”. (RX-V577 only) Selects a speaker system. Center In addition to the 5.1- or 7.1-channel speaker system, various speaker Selects whether or not a center speaker is connected and its size.
-
Page 80
Sets the phase of the subwoofer. When the bass sound is lacking or unclear, switch the subwoofer phase. Surround Back Settings (RX-V577 only) Normal Does not reverse the subwoofer phase. Selects whether or not surround back speakers are connected and their sizes. -
Page 81
Choices Set “EQ Select” to “GEQ”. Front L, Front R, Center, Surround L, Surround R, Surround Back L (RX-V577 only), Use the cursor keys (q/w) to select “Channel” and the cursor keys (e/r) to Surround Back R (RX-V577 only), Subwoofer select the desired speaker channel. -
Page 82: Test Tone
■ Test Tone Enables/disables the test tone output. Test tone output helps you to adjust the speaker balance or equalizer while confirming its effect. Settings Does not output test tones. Outputs test tones automatically when you adjust the speaker balance or equalizer.
-
Page 83: Hdmi
HDMI Configures the HDMI settings. Standby Through Select whether to output videos/audio (input through HDMI jacks) to the TV when • Default settings are underlined. the unit is in standby mode. If this function is set to “On”, you can use the input selection keys (HDMI 1–6) to select an HDMI input even when the unit is in ■…
-
Page 84
Enables/disables ARC (p.21) when “HDMI Control” is set to “On”. Settings Disables ARC. Enables ARC. • You do not need to change this setting normally. In case noises are produced from the speakers connected to the unit because TV audio signals input to the unit via ARC are not supported by the unit, set “ARC”… -
Page 85: Sound
Adjusts the difference in level between the front and surround sound fields. Higher • Default settings are underlined. to strengthen the front sound field and lower to strengthen the surround sound field. This setting is effective when “bPLII Music” or “bPLIIx Music” (RX-V577 ■ DSP Parameter only) is selected.
-
Page 86
■ ■ Lipsync Volume Adjusts the delay between video and audio output. Configures the volume settings. Scale • You can enable/disable the Lipsync function by input sources in “Lipsync” (p.74) in the “Option” menu. Switches the scale of the volume display. Select Settings Selects the method to adjust the delay between video and audio output. -
Page 87
ZoneB Volume (RX-V577 only) Selects whether to adjust the volume for Zone B in conjunction with the volume for Zone A. Settings Adjusts the volume for Zone B in conjunction with the volume for Sync. Zone A. Does not adjust the volume for Zone B in conjunction with the volume Async. -
Page 88: Eco
Configures the power supply settings. • Default settings are underlined. ■ Auto Power Standby Set the amount of time for the auto-standby function. Settings Does not set the unit to standby mode automatically. Sets the unit to standby mode when you have not operated the unit 20 minutes and the unit has not detected any input signal for the specified time.
-
Page 89: Function
Function Configures the functions that make the unit easier to use. To confirm the new name, press ENTER. • Default settings are underlined. • To cancel the entry, press RETURN. ■ Input Rename To change another input source name, repeat steps 1 to 3. To exit from the menu, press SETUP.
-
Page 90
■ DC OUT Configures the DC OUT jack setting. Power Mode Selects how to supply power to the Yamaha AV accessory connected to the DC OUT jack. Settings Supplies power through the DC OUT jack continuously regardless of Continuous the power state (on/standby) of the unit. -
Page 91: Network
Specifies the IP address of the primary DNS server. DNS Server (S) Specifies the IP address of the secondary DNS server. * RX-V577 only ■ Network Connection Use the cursor keys (e/r) to move the edit position and the cursor keys (q/w) to select a value.
-
Page 92: Network Standby
■ ■ MAC Address Filter Network Standby Sets the MAC address filter to limit access to the unit from other network devices. Selects whether the unit can be turned on from other network devices (network standby). Settings • Operation of the AirPlay function (p.67) or the DMC is not limited by this setting. Disables the network standby function.
-
Page 93: Language
■ Network Update Language Updates the firmware via the network. Select an on-screen menu language. Perform Update Starts the process to update the unit’s firmware. For details, see “Updating the • Default settings are underlined. unit’s firmware” (p.97). Settings Firmware Version English English 日本語…
-
Page 94: Configuring The System Settings (Advanced Setup Menu)
Configuring the system settings (ADVANCED SETUP menu) Configure the system settings of the unit while viewing the front display. ADVANCED SETUP menu items Set the unit to standby mode. While holding down STRAIGHT on the front panel, press z (power). •…
-
Page 95: Selecting The Remote Control Id (Remote Id)
Since the unit automatically selects the video signal type so that it matches to the TV, it ID1). When using multiple Yamaha AV receivers, you can set each remote control with a is unnecessary to change the setting normally. Change the setting only when images unique remote control ID for its corresponding receiver.
-
Page 96: Updating The Firmware (Update)
Updating the firmware (UPDATE) CHARGE ENHANCER STEREO TUNED SLEEP MUTE VOL. UPDATE•••••USB ADAPTIVE DRC VIRTUAL New firmware that provides additional features or product improvements will be released as needed. Updates can be downloaded from our website. If the unit is connected to the Internet, you can download the firmware via the network.
-
Page 97: Updating The Unit’s Firmware Via The Network
• To perform the following procedure, your TV must be connected to the unit via SETUP OPTION OPTION HDMI. If not, perform the update from the “ADVANCED SETUP” menu (p.96). The firmware update is complete. • For details on update, visit the Yamaha website. Cursor keys ENTER VOLUME VOLUME ENTER…
-
Page 98: Appendix
(p.86). Yamaha product or another remote control may work on the unit. If this happens, register different remote control IDs for the devices that you want to control with each remote control (p.95).
-
Page 99: Troubleshooting
The power does not turn on. consecutively. If the unit is in this condition, the standby indicator nearest Yamaha dealer or service center to request repair. on the unit blinks when you try to turn on the power. Hold down z (power) on the front panel for more than 10 seconds to initialize The internal microcomputer has frozen, due to an external electric The power does not turn off.
-
Page 100
Problem Cause Remedy The unit is out of the operating range. Use the remote control within the operating range (p.4). The batteries are weak. Replace with new batteries. The unit’s remote control sensor is exposed to direct sunlight or The unit cannot be controlled using the remote Adjust the lighting angle, or reposition the unit. -
Page 101: Audio
“Signal Info” in the “Option” menu (p.74). No sound. (RX-V577 only) Press ZONE A (ZONE B) to enable audio output to Zone A (or Zone B). Audio output to Zone A (or Zone B) is disabled.
-
Page 102
Problem Cause Remedy The TV does not support HDCP (High-bandwidth Digital Content Refer to the instruction manuals for the TV and check the TV’s specifications. Protection). No sound from the playback device (connected to The unit is set not to output audio input through HDMI jacks from In “Audio Output”… -
Page 103: Video
Video Problem Cause Remedy Another input source is selected on the unit. Select an appropriate input source with the input selection keys. Another input source is selected on the TV. Switch the TV input to display the video from the unit. Check the video output setting of the playback device.
-
Page 104: Usb And Network
The wireless router (access point) is turned off. Turn on the wireless router. (RX-V577 only) The unit and the wireless router (access point) are too far apart. Place the unit and the wireless router (access point) closer to each other.
-
Page 105
Microwave ovens or other wireless devices in your neighborhood Turn off these devices. might disturb the wireless communication. (RX-V577 only) Wireless network is not found. Access to the network is restricted by the firewall settings of the Check the firewall setting of the wireless router (access point). -
Page 106: Error Indications On The Front Display
DC OUT jack. Internal Error An internal error has occurred. Contact the nearest authorized Yamaha dealer or service center. No content There are no playable files in the selected folder. Select a folder that contains files supported by the unit.
-
Page 107: Glossary
Glossary Audio information DTS Express DTS Express is a compressed digital audio format that supports 5.1-channel audio and allows a higher compression rate than the DTS Digital Surround format developed by DTS, Inc. This technology is developed for audio streaming services on the Internet and secondary audio on BD (Blu-ray discs). ■…
-
Page 108: Hdmi And Video Information
Sampling frequency/Quantization bit HDMI and video information Sampling frequency and quantization bits indicate the quantity of information when an analog audio signal is digitized. These values are noted as in the following example: “48 kHz/24-bit”. Component video signal • Sampling frequency With the component video signal system, the video signal is separated into the Y signal for luminance and Sampling frequency (the number of times the signal is sampled per second) is called the sampling rate.
-
Page 109: Yamaha Technologies
Based on a wealth of actually measured data, CINEMA DSP, Yamaha’s original DSP technology provides the audiovisual experience of a movie theater in your own • This unit supports USB mass storage class devices (e.g., flash memories or portable home.
-
Page 110: Video Signal Flow
Video signal flow About HTC Connect This receiver features “HTC Connect”, a simple way to enjoy all music content from your HTC Connect certified smartphone. Video signals input from a video device to the unit are output to a TV as shown below. 1.
-
Page 111: Information On Hdmi
To use HDMI Control, you need to perform the following HDMI Control link setup after Information on HDMI connecting the TV and playback devices. For details on settings and operating your TV, refer to the instruction manual for the TV. HDMI Control HDMI Control allows you to operate external devices via HDMI.
-
Page 112: Audio Return Channel (Arc)
f If you made a digital optical cable connection between the TV and the unit, use the Audio Return Channel (ARC) cursor keys (q/w) to select «TV Audio Input» and the cursor keys (e/r) to select «AV 1». ARC allows you to input TV audio to the unit with the HDMI cable which transmits video g Press SETUP.
-
Page 113: Hdmi Signal Compatibility
HDMI signal compatibility Audio signals Audio signal type Audio signal format Compatible media (example) 2ch Linear PCM 2ch, 32 to 192 kHz, 16/20/24 bit CD, DVD-Video, DVD-Audio DVD-Audio, BD (Blu-ray disc), Multichannel Linear PCM 8ch, 32 to 192 kHz, 16/20/24 bit HD DVD 2 to 5.1ch, 2.8224 MHz, 1 bit SACD…
-
Page 114: Reference Diagram (Rear Panel)
MONITOR OUT VIDEO OPTICAL COAXIAL COAXIAL SUBWOOFER ( TV ) PRE OUT (RX-V577 U.S.A. model) • The area around the video/audio output jacks is marked in white on the actual product to prevent improper connections. APPENDIX ➤ Reference diagram (rear panel)
-
Page 115: Trademarks
HDMI Licensing LLC in the trademarks or trademarks of HTC Corporation. United States and other countries. x.v.Color™ “x.v.Color” is a trademark of Sony Corporation. “SILENT CINEMA” is a trademark of Yamaha Corporation. APPENDIX ➤ Trademarks…
-
Page 116: Specifications
— NETWORK (Wired) x 1 (100Base-TX/10Base-T) • Internet Radio — 576i/50 Hz — NETWORK (Wireless) x 1 (IEEE802.11b/IEEE802.11g) — 480p/60 Hz Wireless Network [RX-V577] [RX-V477] — 576p/50 Hz — USB x 1 (USB2.0) • Wireless LAN Standards — 720p/60 Hz, 50 Hz — NETWORK (Wired) x 1 (100Base-TX/10Base-T) IEEE802.11b, IEEE802.11g…
-
Page 117
• Maximum Input Signal Surround L/R…………95 W+95 W AV 4 etc. (1 kHz, 0.5% THD, Effect On) ……2.3 V Surround Back L/R [RX-V577] ……. 95 W+95 W • Output Level / Output Impedance AV OUT………….. 200 mV/1.2 kΩ SUBWOOFER…………1 V/1.2 kΩ… -
Page 118
Video Section General • Weight [RX-V577]…………8.1 kg (17.9 lbs) • Video Signal Type • Power Supply [RX-V477]…………8.0 kg (17.6 lbs) [U.S.A., Canada, Korea, Taiwan and General models] … NTSC [U.S.A. and Canada models] ……AC 120 V, 60 Hz [Other models]………….. -
Page 119: Index
Index Symbols Auto Power Standby (ECO, Setup menu) Crossover (Speaker, Setup menu) Auto Preset (FM radio, Option menu) Crossover frequency setting (subwoofer) Envelope icon (p) Automatic speaker setting optimization Lock icon (o) Automatic station preset (FM radio) Numerics DC OUT (Function, Setup menu) AutoPowerStdby (ECO, Setup menu) DC Overloaded (error indication) 2.1-channel system…
-
Page 120
HDMI Control (HDMI, Setup menu) MAC Address (MAC Address Filter, Setup menu) HDMI OUT (TV) (Audio Output, Setup menu) MAC Address Filter (Network, Setup menu) ECO (Setup menu) HDMI signal compatibility Manual Setting (Wireless (Wi-Fi), Setup menu) ECO Mode (ECO, Setup menu) Headphones Manual station preset (FM/AM radio) Enhancer (DSP/Surround, Option menu) -
Page 121
Sci-Fi (sound program) SUR.DECODE (sound mode) Security (Information, Setup menu) Surround (Speaker, Setup menu) PAL (TV FORMAT, ADVANCED SETUP menu) Select (Lipsync, Setup menu) Surround Back (Speaker, Setup menu) Panorama (DSP Parameter, Setup menu) Setup menu Surround decoder PC content playback Share Wi-Fi Settings (iOS) (Wireless (Wi-Fi), Setup SW.Trim (Volume Trim, Option menu) PEQ (Equalizer, Setup menu) -
Page 122
Wired (Network Connection, Setup menu) Wireless (Wi-Fi) (Network Connection, Setup menu) Wireless Direct (Network Connection, Setup menu) WPS Button (Wireless (Wi-Fi), Setup menu) WPS button configuration Yamaha Parametric room Acoustic Optimizer (YPAO) YPAO (Yamaha Parametric room Acoustic Optimizer) YPAO error message… -
Page 123
© 2014 Yamaha Corporation YG068A0/EN… -
Page 126
Supplement for Pandora® Using the Pandora service Account setup for Pandora the cursor keys to select “NO” and press The Pandora service is available in the U.S.A., Australia and New ENTER. Zealand only. If you have not set up your Pandora account yet, the Le service Pandora est disponible aux États-Unis, en Australie et en Nouvelle-Zélande uniquement. -
Page 127: Creating Pandora Stations
Perform the following procedure. • If playback of any Pandora station is ongoing, the playback screen is displayed. Press RETURN to display the browse If both artists and tracks are found screen. a Use the cursor keys to select “ARTISTS” or “TRACKS”…
-
Page 128: Playback Of Pandora Stations
■ Browse screen ■ Playback screen Playback of Pandora stations If you have created Pandora stations, follow the procedure below to select a Pandora station to be played. Press NET repeatedly to select “Pandora” as the input source. The browse screen (My Station list) is displayed on the TV.
-
Page 129
The browse screen (My Station list) for the selected Pandora account is displayed. Pandora and Pandora Internet Radio logo are registered trademarks or trademarks of Pandora Media, Inc. in the United States and/or other countries. © 2014 Yamaha Corporation YG068A0/NS3EN… -
Page 136
English Information about third party software licenses This product incorporates the following third party software. For information (copyright, etc) about each software, please read the terms and conditions stated below. By using this product, you will be deemed to have accepted the terms and conditions. ■… -
Page 137
■ ■ About The Independent JPEG About Network Permission is NOT granted for the use of any IJG author’s name or company name in advertising or Group’s JPEG software Copyright © 1988 Stephen Deering. publicity relating to this software or products derived from it. -
Page 138
■ About PNG Reference Library PARTICULAR PURPOSE ARE DISCLAIMED. IN NO John Bowler EVENT SHALL THE REGENTS OR CONTRIBUTORS BE Kevin Bracey ibpng versions 1.2.6, August 15, 2004, through 1.4.5, LIABLE FOR ANY DIRECT, INDIRECT, INCIDENTAL, Sam Bushell December 9, 2010, are Copyright © 2004, 2006-2010 SPECIAL, EXEMPLARY, OR CONSEQUENTIAL Magnus Holmgren Glenn Randers-Pehrson, and are distributed according… -
Page 139
Do not disassemble, decompile, or reverse engineer liable for any damages arising from the use of this the software included in Yamaha AV products. software. 1. Redistributions of source code must retain the above copyright notice, this list of conditions and the Permission is granted to anyone to use this software for following disclaimer.
-
Page 1: Yamaha RX-V577
AV Receiver Owner’s Manual Read the supplied booklet “Safety Brochure” before using the unit. English 00_RX-V477_V577_om_U.book Page 1 Monday, November 11, 2013 1:19 PM[…]
-
Page 2: Yamaha RX-V577
En 2 CO N T E N T S Accessories . . . . . . . . . . . . . . . . . . . . . . . . . . . . . . . . . . . . . . . . . . . . . . . . . . . . . . 4 FEATURES 5 What you can do with the unit . . . . . . . . . . . . . . . . . . . . . . . . . . . . . . . . . . . . 5 Part names and functions . . . . . . . . . . . . . . . . . . . . . . . . . . . . . . . . . . […]
-
Page 3: Yamaha RX-V577
En 3 Connecting a USB storage device . . . . . . . . . . . . . . . . . . . . . . . . . . . . . . . . . . . . . . . . . . . . . . . . . . . . . . . . . . . . . . . . . . 57 Playback of USB storage device content s . . . . . . . . . . . . . . . . . . . . . . . . . . . . . . . . . . . . . . . . . . . . . . . . . . . . . . . . . . 57 Playing back music[…]
-
Page 4: Yamaha RX-V577
Accessories En 4 Ac cessories Check that the following accessories are supplied with the product. Remote control Batteries (AAA, R03, UM-4) (x2) AM antenna FM antenna *One of the above is supplied depen ding on the region of purchase. YPAO microphone Wireless antenna (RX-V577 only) CD-ROM (Owner’s Manual) Easy Setu[…]
-
Page 5: Yamaha RX-V577
FEATURES ➤ What you can do with the unit En 5 FEA TURES Wha t you can do with the unit A V receiver (the unit) Speakers BD /DVD pl ayer HDMI Control Audio/Video TV remote control Aud i o HDMI Control Aud i o Audio/Video TV Sequential operation of a TV , A V receiver , and BD/D VD play er (HDMI Control) . p.111 Change the input source and fav orit[…]
-
Page 6: Yamaha RX-V577
FEATURES ➤ What you can do with the unit En 6 F ull of useful func tions! ❑ Connecting various devices (p .21) A number of HDMI jacks and various inp ut/output jacks on the unit allow you to connect video devices (such as BD/DVD players), audio de vices (such as CD players), game consoles, por table audio player , and other devices. ❑ Playing[…]
-
Page 7: Yamaha RX-V577
FEATURES ➤ Part names and functions En 7 Fro nt pa n el 1 z (power) key T urns on/of f (standby) the unit . 2 Standby indicator Lights up when the unit is in standby mode under any of the following conditions. • HDMI Control is enabled (p.83) • Standby Through is enabled (p.83) • Network Standby is enabled (p.92) • An iPod is being charge[…]
-
Page 8: Yamaha RX-V577
FEATURES ➤ Part names and functions En 8 Fr ont display (indicators) 1 HDMI Lights u p when H DMI signal s are being in put or ou tput. OUT Lights up when HDMI signals are being out put. 2 ENHANCER Lights up when Compressed Music Enhancer (p.48) is working. 3 CINEMA DSP Lights up when CINEMA DSP (p.45) or CINEMA DSP 3D (p.45) is working. 4 STEREO[…]
-
Page 9: Yamaha RX-V577
FEATURES ➤ Part names and functions En 9 Rear panel 1 ANTENNA jacks For connecting to FM and AM antennas (p. 24). 2 HDMI OUT jack For connecting to an HDMI-compatible TV and output ting video/audio signals (p.19). When using ARC, TV audio signal can also be input throu g h the HDMI OUT jack. 3 HDMI 1–6 jacks For connecting to HDMI-compatible pl[…]
-
Page 10: Yamaha RX-V577
FEATURES ➤ Part names and functions En 10 Remote control 1 Remote control signal transmitt er T ransmits infrar ed signals. 2 TRANSMIT indicator Lights up when remote con trol signals ar e transmitted. 3 SLEEP key Switches the unit to standby mode automatical ly after a specified period of time has elapsed (sleep ti mer). Press repeatedly to set […]
-
Page 11: Yamaha RX-V577
PREPARATIONS ➤ General setup procedure En 11 PREP ARA TIONS This completes all the preparations. Enjoy playing movies, music, ra dio and other content with the unit! General se tup proc edure 1 Placing speak ers (p.12) Select the speaker layout for the n umber of speaker s that you are using and place them in your room. 2 C onnec ting speakers (p[…]
-
Page 12: Yamaha RX-V577
PREPARATIONS ➤ Placing speakers En 12 Select the speaker layout for the num ber of speakers that you are using and place the speakers and subwoofer in your room. This section describes the representative speaker layout examples. *1 RX-V577 only *2 Place the surround speakers in front and set «Vir tual CINEMA FRONT» (p.81) in the «S[…]
-
Page 13: Yamaha RX-V577
PREPARATIONS ➤ Placing speakers En 13 7.1-channel system (RX -V577 only) 6.1-channel system (RX -V577 only) 5.1- channel sy stem 5.1- channel sy stem ( Virtual CI NEMA FRONT ) • T o utiliz e this configuration, set «Vir tual CINEMA FRONT» (p.78) in the «Setup» menu to «On». • Y ou can enjoy surround sound ev en w[…]
-
Page 14: Yamaha RX-V577
PREPARATIONS ➤ Placing speakers En 14 4.1-channel system 3.1-channel system 2.1- channel sy stem 45 12 9 10° to 30° 10° to 30° 12 3 9 12 9 1 2 3 4 5 6 7 8 9 10 11 00_RX-V477_V577_om_U.book Page 14 Monday, Novemb er 11, 2013 1:19 PM[…]
-
Page 15: Yamaha RX-V577
PREPARATIONS ➤ Placing speakers En 15 ■ Setting the speaker impedance (U.S.A. and Canada models only) Under its default settings, the unit is config ured for 8-ohm speakers. When connecting 6-ohm speakers, set the speaker impedance to “6 Ω MIN”. 1 Before connecting speakers, connect the power cable to an A C wall outlet. 2 While holding do[…]
-
Page 16: Yamaha RX-V577
PREPARATIONS ➤ Connecting speakers En 16 Connect the speakers placed in your room to the unit. The following diagrams provide connections for 5.1- and 7.1-channel systems as examples. For other systems, connect speakers while referring to the connection diagram for the 5.1-channel system. Cables required for connection (commercially a vailable) S[…]
-
Page 17: Yamaha RX-V577
PREPARATIONS ➤ Connecting speakers En 17 ■ Connecting speaker cables Speaker cables have two wires. One is for connecting the negative (-) ter minal of the unit and the speaker , and the other is for the positive (+) ter minal. If the wires ar e colored to prevent confusion, connect the black wire to the negative and the other wire to the posit[…]
-
Page 18: Yamaha RX-V577
PREPARATIONS ➤ Input/outpu t jacks and cables En 18 ■ Video/audio jacks ❑ HDMI jacks T ransmit digital video and digi tal sound through a single jack. Use an HDMI cable. • Use a 19-pin HDMI cable with the HDMI logo. We recommend using a cable less than 5.0 m (16.4 ft) long to prev ent signal qua lity degradation. • The unit’ s HDMI jack[…]
-
Page 19: Yamaha RX-V577
PREPARATIONS ➤ Connecting a TV En 19 Connect a TV to the unit so that video input to the unit can be output to the TV . Y ou can also enjoy playback of TV audio on the unit. T o maximize the per formance of the unit, we recommend connecting a TV with an HDMI cable. ■ HDMI connec tion Connect the TV to the unit with a n HDMI cable and a digital […]
-
Page 20: Yamaha RX-V577
PREPARATIONS ➤ Connecting a TV En 20 ❑ VIDEO (composite video) conn ection (with a video pin cable) AV 1 AV 2 AV 3 AV 5 AV 6 OPTICAL COAXIAL COAXIAL ( TV ) COMPONENT VIDEO COMPONENT VIDEO P B Y VIDEO AV MONITOR OUT OUT AV 4 P R P B Y P R FM ANTENNA AM HDMI 1 ( BD/DVD ) HDMI 2 HDMI 3 HDMI 4 ( RADIO ) SUBWOOFER PRE OUT 2 1 HDMI 5 DC O U 5V 0. 5 H[…]
-
Page 21: Yamaha RX-V577
PREPARATIONS ➤ Connecting playback devices En 21 The unit is equipped with a variet y of inpu t jacks including HDMI inpu t jacks to allow you to connect different types of playback devices. For information on how to connect an iPod or a USB storage de vice, see the following pages. – Connecting an iPod (p.53) – Connecting a USB storage devic[…]
-
Page 22: Yamaha RX-V577
PREPARATIONS ➤ Connecting playback devices En 22 ■ Composite video connec tion Connect a video device to the unit with a vi deo pin cable and an audio cable (dig ital coaxial or stereo pin cable). Choose a set of input jacks (on the unit) depending on the audio output jacks available on your video device. If you select the input source by press[…]
-
Page 23: Yamaha RX-V577
PREPARATIONS ➤ Connecting playback devices En 23 1 After connecting extern al devices (such as a TV and playbac k devices) and power cable of the unit, turn on the un it. 2 Press A V 2 to select “A V 2” (vide o input jack to be used) as the input source. 3 Press OPTION. 4 Use the cursor keys ( q / w ) to select “Audio In” and press ENTER.[…]
-
Page 24: Yamaha RX-V577
PREPARATIONS ➤ Connecting the FM/AM antennas En 24 Co nnecting to the jack on the front panel Use the AUX jack on the front panel to te mporarily connect devices su ch as portable audio players to the unit. Before making a connection, stop playback on the device and tu rn down the volume on the unit. If you select “AUX” as the input source by[…]
-
Page 25: Yamaha RX-V577
PREPARATIONS ➤ Connecting to a network (wired LAN connection) En 25 Connect the unit to your router with a comme rcially-available STP network cable (CA T -5 or higher straight cable). Y ou can enjoy Internet radio or music files stored on media servers, such as PCs and Network Attached Storage (NAS ), on the unit. (RX-V577 only) Y ou can also co[…]
-
Page 26: Yamaha RX-V577
PREPARATIONS ➤ Connecting recording devices En 26 Y ou can connect video/audio recor d ing devices to the A V OUT jacks. These jacks output analog video/audio sig nals selected as the input. • T o cop y video/audio from a video device, connect the video device to the A V 4–6 jacks of the unit. • T o cop y audio from an audio device, connect[…]
-
Page 27: Yamaha RX-V577
PREPARATIONS ➤ Selecting an on-screen menu language En 27 Select the desired on-screen menu language from English (default), Japanese, French, German, S panish, Russian, Italian and Chinese. 1 Press RECEIVER z to turn o n the unit. 2 T urn on the TV and switch the TV inpu t to display video fr om the unit (HDMI OUT jack). • Operations with TV s[…]
-
Page 28: Yamaha RX-V577
PREPARATIONS ➤ Connecting to a network wirelessly (RX-V577 only) En 28 Attaching the wireless ant enna Attach the supplied wireless antenna to the unit. Be sure to turn off the unit before attaching the antenna. • Do not apply excessive f orce on the antenna. Doing so may damage the antenna. • When attaching the antenna, hold the root of the […]
-
Page 29: Yamaha RX-V577
PREPARATIONS ➤ Connecting to a network wirelessly (RX-V577 only) En 29 Selecting the connection method Select a connection method according to your network environment. ■ Connecting with a wireless router (acc e ss point) Connect the unit to a wireless router (access point). Y ou can enjoy Internet radio, AirPlay , or music files stor ed on med[…]
-
Page 30: Yamaha RX-V577
PREPARATIONS ➤ Connecting to a network wirelessly (RX-V577 only) En 30 1234 5 6 FM INFO MEMORY AM PRESET TUNING SCENE RETURN TOP MENU POP-UP MENU VOLUME BD DVD TV NET RADIO MUTE DISPLAY ENTER TRANSMIT RECEIVER HDMI AV SLEEP AUX USB 5 6 NET ZONE B ZONE A MOVIE MUSIC SUR. DECODE STRAIGHT ENHANCER BASS DIRECT MODE SETUP OPTION 234 1 1 2 3 4 5 6 FM I[…]
-
Page 31: Yamaha RX-V577
PREPARATIONS ➤ Connecting to a network wirelessly (RX-V577 only) En 31 1234 5 6 FM INFO MEMORY AM PRESET TUNING SCENE RETURN TOP MENU POP-UP MENU VOLUME BD DVD TV NET RADIO MUTE DISPLAY ENTER TRANSMIT RECEIVER HDMI AV SLEEP AUX USB 5 6 NET ZONE B ZONE A MOVIE MUSIC SUR. DECODE STRAIGHT ENHANCER BASS DIRECT MODE SETUP OPTION 234 1 1 2 3 4 5 6 FM I[…]
-
Page 32: Yamaha RX-V577
PREPARATIONS ➤ Connecting to a network wirelessly (RX-V577 only) En 32 1234 5 6 FM INFO MEMORY AM PRESET TUNING SCENE RETURN TOP MENU POP-UP MENU VOLUME BD DVD TV NET RADIO MUTE DISPLAY ENTER TRANSMIT RECEIVER HDMI AV SLEEP AUX USB 5 6 NET ZONE B ZONE A MOVIE MUSIC SUR. DECODE STRAIGHT ENHANCER BASS DIRECT MODE SETUP OPTION 234 1 1 2 3 4 5 6 FM I[…]
-
Page 33: Yamaha RX-V577
PREPARATIONS ➤ Connecting to a network wirelessly (RX-V577 only) En 33 1234 5 6 FM INFO MEMORY AM PRESET TUNING SCENE RETURN TOP MENU POP-UP MENU VOLUME BD DVD TV NET RADIO MUTE DISPLAY ENTER TRANSMIT RECEIVER HDMI AV SLEEP AUX USB 5 6 NET ZONE B ZONE A MOVIE MUSIC SUR. DECODE STRAIGHT ENHANCER BASS DIRECT MODE SETUP OPTION 234 1 S CEN E RETURN T[…]
-
Page 34: Yamaha RX-V577
PREPARATIONS ➤ Connecting to a network wirelessly (RX-V577 only) En 34 4 Use the cursor keys ( q / w ) to select “Connect” and press ENTER to star t the connection process. When the connect ion process finish es, “Complet ed” appears on the TV screen. If “Not connected” appea rs, repeat from s tep 1 or tr y another connecti on method.[…]
-
Page 35: Yamaha RX-V577
PREPARATIONS ➤ Connecting to a network wirelessly (RX-V577 only) En 35 3 Use the cursor keys ( q / w ) to select “Security” and the cursor keys ( e / r ) to select the encryption method. Choices None, WEP , WP A-PSK (TKIP), WP A-PSK (AES), WP A2-PSK (AES), Mixed Mode • If you select “None”, the connection may be insecure since the commu[…]
-
Page 36: Yamaha RX-V577
PREPARATIONS ➤ Connecting to a network wirelessly (RX-V577 only) En 36 C onnec ting a mobile device to the unit dire ctly ( Wir eless Direct) Follow the procedure below to connect a mobile device to the unit directly . • Wireless Direct connection may be insecure since the communication is not strongly encrypted . The unit may operate b y playb[…]
-
Page 37: Yamaha RX-V577
PREPARATIONS ➤ Connecting to a network wirelessly (RX-V577 only) En 37 10 Use the cursor keys ( q / w ) to select “Sa ve” and press ENTER to save the setting. This completes the setti ngs and “Completed” appears on the TV screen. Next , configure the Wi-Fi set tings of a mobile de vice. 11 Configure the Wi-Fi settings of a m obile de vice[…]
-
Page 38: Yamaha RX-V577
PREPARATIONS ➤ Optimizing the speaker settings automatically (YPAO) En 38 The Y amaha Parametric r oom Acoustic Optimizer (YP AO) function detects speaker connections, measures the distances from them to your listening position(s), and then automatically optimizes the speaker settings, such as volume balanc e and acoustic parameters, to suit your[…]
-
Page 39: Yamaha RX-V577
PREPARATIONS ➤ Optimizing the speaker settings automatically (YPAO) En 39 5 T o start the measurement, use the cursor keys to select “Star t” and press SETUP. The measurement will star t in 10 second s. Press ENTER t o star t the measurement immediat ely . • T o stop the measurement temporarily , press RETURN and follow the procedure in “[…]
-
Page 40: Yamaha RX-V577
PREPARATIONS ➤ Optimizing the speaker settings automatically (YPAO) En 40 Error messages If any error message is displayed during the meas urement, resolve the problem and perform Y P AO again. TV screen Front display ■ Procedure to handle err ors 1 Check the content of error message and press ENTER. 2 Use the cursor keys ( e / r ) to sele ct t[…]
-
Page 41: Yamaha RX-V577
PREPARATIONS ➤ Optimizing the speaker settings automatically (YPAO) En 41 W arning messages If a warnin g message is displayed after the measurement, you can still save the measurement results by following on-screen inst ructions. However , we r ecommend you perfor m YP AO again in or der to use the unit with the optimal speaker settings. TV scre[…]
-
Page 42: Yamaha RX-V577
PLAYBACK ➤ Basic playback procedure En 42 1234 5 6 FM INFO MEMORY AM PRESET TUNING SCENE RETURN TOP MENU POP-UP MENU VOLUME BD DVD TV NET RADIO MUTE DISPLAY ENTER TRANSMIT RECEIVER HDMI AV SLEEP AUX USB 5 6 NET ZONE B ZONE A MOVIE MUSIC SUR. DECODE STRAIGHT ENHANCER BASS DIRECT MODE SETUP OPTION 234 1 S CEN E RETURN TO P MENU PO P- U P MENU B D D[…]
-
Page 43: Yamaha RX-V577
PLAYBACK ➤ Selecting the input source and favori te settings with one touch (SCEN E) En 43 1234 5 6 FM INFO MEMORY AM PRESET TUNING SCENE RETURN TOP MENU POP-UP MENU VOLUME BD DVD TV NET RADIO MUTE DISPLAY ENTER TRANSMIT RECEIVER HDMI AV SLEEP AUX USB 5 6 NET ZONE B ZONE A MOVIE MUSIC SUR. DECODE STRAIGHT ENHANCER BASS DIRECT MODE SETUP OPTION 23[…]
-
Page 44: Yamaha RX-V577
PLAYBACK ➤ Selecting the sound mode En 44 1234 5 6 FM INFO MEMORY AM PRESET TUNING SCENE RETURN TOP MENU POP-UP MENU VOLUME BD DVD TV NET RADIO MUTE DISPLAY ENTER TRANSMIT RECEIVER HDMI AV SLEEP AUX USB 5 6 NET ZONE B ZONE A MOVIE MUSIC SUR. DECODE STRAIGHT ENHANCER BASS DIRECT MODE SETUP OPTION 234 1 1 2 3 4 5 6 FM INFO MEM O R Y AM P RE S ET T […]
-
Page 45: Yamaha RX-V577
PLAYBACK ➤ Selecting the sound mode En 45 Enjoying stereosc opic soun d fields ( CINEMA DSP 3D ) The unit is equipped with a varie ty of sound programs that utilize Y amaha’s original DSP technology (CINEMA DSP 3D). It allows you to easily create sound fields like actual movie theaters or concer t halls in your ro om and enjoy natural stereo[…]
-
Page 46: Yamaha RX-V577
PLAYBACK ➤ Selecting the sound mode En 46 ■ S ound programs suitable for music/stereo playback (MUSIC) The following sound programs are opti mized for listening to music sources. Y ou can also select stereo playback. • CINEMA DSP 3D (p.45) and Virtual CINEMA DSP (p.46) do not work when «2ch Stereo», «5ch Stereo» or «7[…]
-
Page 47: Yamaha RX-V577
PLAYBACK ➤ Selecting the sound mode En 47 1234 5 6 FM INFO MEMORY AM PRESET TUNING SCENE RETURN TOP MENU POP-UP MENU VOLUME BD DVD TV NET RADIO MUTE DISPLAY ENTER TRANSMIT RECEIVER HDMI AV SLEEP AUX USB 5 6 NET ZONE B ZONE A MOVIE MUSIC SUR. DECODE STRAIGHT ENHANCER BASS DIRECT MODE SETUP OPTION 234 1 1 2 3 4 5 6 FM INFO MEM O R Y AM P RE S E T T[…]
-
Page 48: Yamaha RX-V577
PLAYBACK ➤ Selecting the sound mode En 48 1234 5 6 FM INFO MEMORY AM PRESET TUNING SCENE RETURN TOP MENU POP-UP MENU VOLUME BD DVD TV NET RADIO MUTE DISPLAY ENTER TRANSMIT RECEIVER HDMI AV SLEEP AUX USB 5 6 NET ZONE B ZONE A MOVIE MUSIC SUR. DECODE STRAIGHT ENHANCER BASS DIRECT MODE SETUP OPTION 234 1 1 2 3 4 5 6 FM INFO MEM O R Y AM P RE S ET T […]
-
Page 49: Yamaha RX-V577
PLAYBACK ➤ Listening to FM/AM radio En 49 Y ou can tune into a radio station by specifying its frequency or selecting from register e d radio stations. • The radio frequencies differ depending on the country or region where the unit is being used. The explanation of this section uses a display with frequencies used in U.K. and Europe models. ?[…]
-
Page 50: Yamaha RX-V577
PLAYBACK ➤ Listening to FM/AM radio En 50 Registering fav orite radio stations (presets) Y ou can r egiste r up to 40 radio st ations as presets. Once you have registered stations, you can easily tune into them by selecting their preset numbers. ■ Registering radio stat io ns autom atically (Auto P reset) Automatically register FM radio stat io[…]
-
Page 51: Yamaha RX-V577
PLAYBACK ➤ Listening to FM/AM radio En 51 ■ S electing a preset station T une into a r egistered radio station by selecting its preset number . 1 Press FM or AM to select “TUNER” as the input sour ce . 2 Press PRESET repeated ly to select the desired radio station. • “No Presets” appears when no radio stations are registered. ■ Clea[…]
-
Page 52: Yamaha RX-V577
PLAYBACK ➤ Listening to FM/AM radio En 52 Radio Da ta Sy stem tuning (U.K. and Europe models only) Radio Data System is a data transmission system used by FM stations in many countries. The uni t can receive various types of Radio Data System data, such as “Program Service”, “Program T ype,” “Radio T ext” and “Clock Time ”, when i[…]
-
Page 53: Yamaha RX-V577
PLAYBACK ➤ Playing back iPod music En 53 Y ou can play back iPod music on the unit using a USB cable supplied with the iPod. • Y ou cannot play back iP od video on the unit. • For details on pla yable iP od devices, see “Suppor ted devices and file f or mats” (p.109). C onnec ting an iPod Connect your iPod to the unit with the USB cable s[…]
-
Page 54: Yamaha RX-V577
PLAYBACK ➤ Playing back iPod music En 54 2 Use the cursor keys to select an item and press ENTER. If a song is selecte d, pla ybac k star ts and the pla yback screen is displa yed. • T o retur n to the previous screen, press RETURN. • T o switch between the browse and pla yback screens during playback, press DISPLA Y. • T o op erate the iP […]
-
Page 55: Yamaha RX-V577
PLAYBACK ➤ Playing back iPod music En 55 ■ Playback screen 1 Status indicators Display the current r epeat/shuffle se ttings (p.56) and playback status (such as play/pause). 2 Playback inf orm ation Displays the artist name, album name, song title, and elapsed time/song length. Use the following r emote control keys to contr ol playback. ■ Op[…]
-
Page 56: Yamaha RX-V577
PLAYBACK ➤ Playing back iPod music En 56 ■ Rep eat/shuffle settings Y ou can configure the r epeat/shuffle settings of your iPod. • During simple play , configure the repeat/shuffle settings directly on your iP od or press MODE to display the TV menu screen and then f ollow the procedure below . 1 When “USB” is selected as the input sour […]
-
Page 57: Yamaha RX-V577
PLAYBACK ➤ Playing back music stored on a USB storage device En 57 Y ou can play back music files stor ed on a USB storage device on the unit. • For details on pla yable USB devices, see “Supported devices and file formats” (p.109). C onnec ting a USB storage device 1 Connect the USB storage device to the USB jack. • If the USB storage de[…]
-
Page 58: Yamaha RX-V577
PLAYBACK ➤ Playing back music stored on a USB storage device En 58 2 Use the cursor keys to select an item and press ENTER. If a song is selecte d, pla ybac k star ts and the pla yback screen is displa yed. • T o retur n to the previous screen, press RETURN. • T o switch between the browse and pla yback screens during playback, press DISPLA Y[…]
-
Page 59: Yamaha RX-V577
PLAYBACK ➤ Playing back music stored on a USB storage device En 59 ■ Playback screen 1 Status indicators Display the current r epeat/shuffle se ttings (p.59) and playback status (such as play/pause). 2 Playback inf orm ation Displays the artist name, album name, song title, and elapsed time. Use the following r emote control keys to contr ol pl[…]
-
Page 60: Yamaha RX-V577
PLAYBACK ➤ Playing back music stored on media servers (PCs/NAS) En 60 Y ou can play back music files stor ed on y our PC or DLNA-compa tible NAS on the unit. • T o use this function, the unit and your PC m ust be connected to the same router (p.25). Y ou can check whether the network parameters (such as the IP address) are proper ly assigned to[…]
-
Page 61: Yamaha RX-V577
PLAYBACK ➤ Playing back music stored on media servers (PCs/NAS) En 61 Playback of PC music c ontents Follow the procedure below to operate the PC music contents and start playback. Y ou can contr ol the PC/NAS with the menu displayed on the TV screen. • Operations with TV screen are availab le only when your TV is connected to the unit via HDMI[…]
-
Page 62: Yamaha RX-V577
PLAYBACK ➤ Playing back music stored on media servers (PCs/NAS) En 62 ■ Browse scr een 1 List name 2 Contents list Displays the list of PC content. Use the cursor keys to select an item and press ENTER to confirm the selection. 3 Item number/total 4 Status indicators Display the current r epeat/shuffle se ttings (p.63) and playback status (such[…]
-
Page 63: Yamaha RX-V577
PLAYBACK ➤ Playing back music stored on media servers (PCs/NAS) En 63 ■ Rep eat/shuffle settings Y ou can configure the r epeat/shuffle settings for the playback of PC music content. 1 When “SER VER” is selected as the input source, press OPTION. 2 Use the cursor keys to select “Repeat” (Repeat) or “Shuffle” (Shuffle) and press ENTE[…]
-
Page 64: Yamaha RX-V577
PLAYBACK ➤ Listening to Internet radio En 64 Y ou can listen to Internet radio stations from all over the world. • Operations with TV screen are availab le only when your TV is connected to the unit via HDMI. If not, carr y out operations while viewing the front displa y . • T o use this function, the unit must be connected to the Internet (p[…]
-
Page 65: Yamaha RX-V577
PLAYBACK ➤ Listening to Internet radio En 65 ■ Browse scr een 1 List name 2 Contents list Displays the list of Internet radio cont ent. Use the cur sor keys to select an item and pr ess ENTER to confi rm the selection. 3 Item number/total 4 Playbac k indicator 5 Operation menu Press the cursor key ( r ) and then use the curso r keys ( q / w ) t[…]
-
Page 66: Yamaha RX-V577
PLAYBACK ➤ Listening to Internet radio En 66 Registering fav orite Internet radio sta tions (b ookmarks) Y ou can r e gister your favorite Internet radio stations to t he “Bookmarks” fol der . ■ Registering the station with the Option menu Follow the procedure below to register your favorite station to the “Bookmarks” fol der . 1 While […]
-
Page 67: Yamaha RX-V577
PLAYBACK ➤ Playing back music with AirPlay En 67 The AirPlay function allows you to p lay b ack iT unes or iPod touch/iPhone/iPa d music on the unit via network.” • This section describes «iPod touch», «iPhone» and «iPad» as the «iP od». «iPod» ref ers to » iP od touch», «iPhone[…]
-
Page 68: Yamaha RX-V577
PLAYBACK ➤ Playing back music with AirPlay En 68 • Y ou can tur n on the unit automatically when star ting playback on iT unes or iP od by setting “Network Standby” (p.92) in the “Setup” menu to “On”. • Y ou can edit the net work name (the unit’ s name on the network) displayed on iT unes/iP od in “Network Name” (p.92) in th[…]
-
Page 69: Yamaha RX-V577
PLAYBACK ➤ Playing back music in mult iple rooms (RX-V577 only) En 69 The Zone A/B function allows you to play back an input source in the room where the unit is installed (Zone A) and in another room (Zone B). For example, you can turn on Zo ne A (turn off Zone B) when you are in the living room, and turn on Zone B (tur n off Zone A) when you ar[…]
-
Page 70: Yamaha RX-V577
PLAYBACK ➤ Playing back music in mult iple rooms (RX-V577 only) En 70 ■ Basic playback procedur e 1 Press ZONE A or ZONE B to enable/disable audio output to Zone A or Zone B. 2 Use the input selection keys to select an input sour ce . 3 Start playback on the external de vice or select a radio station. 4 Press V OLUME to adjust the volume. ■ C[…]
-
Page 71: Yamaha RX-V577
PLAYBACK ➤ Viewing the current status En 71 Sw itching inf ormation on th e front displa y 1 Press INFO. Each time y ou press the key , the displa yed item changes . About 3 seconds later , the correspondi ng information fo r the displa yed item appears . • A vailable items vary depending on the selected input source. The displayed item can als[…]
-
Page 72: Yamaha RX-V577
PLAYBACK ➤ Configuring playback settings for di fferent playback sources (Option menu) En 72 Y ou can configure separate playback settin gs for different playback sour ces. This menu is available on the front panel (or on the TV screen), allowing you to easily configure settings during playback. 1 Press OPTION. Front display TV screen 2 Use the c[…]
-
Page 73: Yamaha RX-V577
PLAYBACK ➤ Configuring playback settings for di fferent playback sources (Option menu) En 73 ■ T o ne Co nt r ol ( T on e Co n t ro l ) Adjusts the high-frequency range (T r eble) and lo w-frequency range (Bass) of sounds. Choices T reble (T reble), Bass (Bass) Setting range -6.0 dB to Bypass (Bypass ) to +6.0 dB (0.5 dB increments) • Y ou ca[…]
-
Page 74: Yamaha RX-V577
PLAYBACK ➤ Configuring playback settings for di fferent playback sources (Option menu) En 74 • Some early Dolby Digital Surround EX or DTS-ES sources do not contain a flag for reproducing surround back channel. We recommend y ou se t “Extended Surround” to “ b PLIIx Movie” or “EX/ES” when playing back those sources. ❑ Enhancer (En[…]
-
Page 75: Yamaha RX-V577
PLAYBACK ➤ Configuring playback settings for di fferent playback sources (Option menu) En 75 ■ Audio In (Audio In) Combines the video jack of the selected in put source (HDMI 1–6 or A V 1–6) with an audio jack of others. For example, use this function in the following cases. • Connecting a playback de vice that supports H DMI video output[…]
-
Page 76: Yamaha RX-V577
CONFIGURATIONS ➤ Configuring various fun ctions (Setup menu) En 76 C ONFIGURA TIONS Y ou can configure the unit’ s various function with the menu displayed on the TV screen. • Operations with TV screen are av aila ble only when your TV is connected to the unit via HDMI. If not, carry out operations while viewing the front display . • If new[…]
-
Page 77: Yamaha RX-V577
CONFIGURATIONS ➤ Configuring various fun ctions (Setup menu) En 77 Setu p me nu it em s Menu Item Function Pag e Speaker Configuration Pow e r A m p A s s ig n (RX-V577 only) Selects a speaker system. 79 Subwoofer Selects whether or not a subwoofer is connected. 79 Front Selects the size of the front speakers. 79 Center Selects whether or not a c[…]
-
Page 78: Yamaha RX-V577
CONFIGURATIONS ➤ Configuring various fun ctions (Setup menu) En 78 Sound DSP Par ameter CINEMA DSP 3D Mode Enables/disables CINEMA DSP 3D. 85 Panorama Enables/disables the bro adening effect of th e front sound field. 85 Center Width Adjusts the br oadening effect of th e center sound field. 85 Dimension Adjusts the difference in level betwe en t[…]
-
Page 79: Yamaha RX-V577
CONFIGURATIONS ➤ Configuring various fun ctions (Setup menu) En 79 Speaker Configures the speaker settings manually . • Default settings are underlined. ■ Configuration Configures the output characteristics of the speakers. • When you configure the speaker size , select “Large” if the woofer diameter of your speak er is 16 cm (6-1/4”)[…]
-
Page 80: Yamaha RX-V577
CONFIGURATIONS ➤ Configuring various fun ctions (Setup menu) En 80 Selects whether or not surround speakers are connected and their sizes. Settings (RX-V577 only) Selects whether or not surround back speakers are connected and their sizes. Settings • “Surround Back” is automatically set to “None” when “P ower Amp Assign” is set to ?[…]
-
Page 81: Yamaha RX-V577
CONFIGURATIONS ➤ Configuring various fun ctions (Setup menu) En 81 Selects whether to use the front 5-channel speaker (Virtual CINEMA FRONT) configuration. Settings • Select «On» only when utilizing the Vir tual CINEMA FRONT configuration (p .13). • This setting is not availab le when “Surround” is set to “None”. ■ Distanc[…]
-
Page 82: Yamaha RX-V577
CONFIGURATIONS ➤ Configuring various fun ctions (Setup menu) En 82 ■ Te s t To n e Enables/disables the test tone output. T est tone output helps you to adjust the speaker balance or equalizer while confir ming its effect. Settings Off Does not output test to nes. On Outputs test tones automati cally when you adjust the speaker balance or equal[…]
-
Page 83: Yamaha RX-V577
CONFIGURATIONS ➤ Configuring various fun ctions (Setup menu) En 83 HDMI Configures the HDMI settings. • Default settings are underlined. ■ Configuration Enables/disables HDMI Control (p.111). Settings • T o use HDMI control, you need to perform the HDMI Control link setup (p.111) after connecting HDMI Control-compatible devices . Selects a […]
-
Page 84: Yamaha RX-V577
CONFIGURATIONS ➤ Configuring various fun ctions (Setup menu) En 84 Enables/disables ARC (p.21) when “HDMI Control” is set to “On”. Settings • Y ou do not need to change this setting normally . In case noises are produced from the speakers connected to the unit because TV audio signals input to the u nit via ARC are not suppor ted by the[…]
-
Page 85: Yamaha RX-V577
CONFIGURATIONS ➤ Configuring various fun ctions (Setup menu) En 85 Sou nd Configures the audio output settings. • Default settings are underlined. ■ DSP Parameter Configures the surround decoder settings. Enables/disables CINEMA DSP 3D (p.45). If this func tion is set to “On”, CINEMA DSP 3D functions with the selected soun d programs (exc[…]
-
Page 86: Yamaha RX-V577
CONFIGURATIONS ➤ Configuring various fun ctions (Setup menu) En 86 ■ Lipsync Adjusts the delay between video and audio output. • Y ou can enable/disable the Lipsync function by input sources in “Lipsync” (p.74) in the “Option” menu. Selects the method to adjust the delay between video and aud io output. Setting range • “Select” […]
-
Page 87: Yamaha RX-V577
CONFIGURATIONS ➤ Configuring various fun ctions (Setup menu) En 87 (RX-V577 only) Selects whether to adjust the volume for Zone B in conjunction with the volume for Zone A. Settings • If “ZoneB V olume” is set to “Async. ”, the volume f or Zone B is temporarily set to -40 dB. As necessar y , adjust the volume using the remote control (p[…]
-
Page 88: Yamaha RX-V577
CONFIGURATIONS ➤ Configuring various fun ctions (Setup menu) En 88 EC O Configures the power supply settings. • Default settings are underlined. ■ Auto P ower Standby Set the amount of time for the auto-standby function. Settings Default U.K. and Europe models: 20 minut es Other mode ls: Off • Just bef ore the unit en ters standby mode, “[…]
-
Page 89: Yamaha RX-V577
CONFIGURATIONS ➤ Configuring various fun ctions (Setup menu) En 89 Fu n c ti o n Configures the functions that make the unit easier to use. • Default settings are underlined. ■ I nput Rename Changes the input source name displayed on the front display . Input sources HDMI 1–6, A V 1–6, USB, AUX ■ Procedure 1 Use the cursor keys ( q / w […]
-
Page 90: Yamaha RX-V577
CONFIGURATIONS ➤ Configuring various fun ctions (Setup menu) En 90 ■ DC OUT Configures the DC OUT jack setting. Selects how to supply power to the Y amaha A V accessory connected to the DC OUT jack. Settings Powe r M o de Continuous Supplies power through the DC OUT jack cont inuously regar dless of the power state (on/sta ndby) of the unit. Po[…]
-
Page 91: Yamaha RX-V577
CONFIGURATIONS ➤ Configuring various fun ctions (Setup menu) En 91 Network Configures the network settings. • Default settings are underlined. ■ Information Displays the network information on the unit. * RX-V577 only ■ Network Connection (RX-V577 only) Selects the network connection method. Choices ■ IP Address Configures the network par[…]
-
Page 92: Yamaha RX-V577
CONFIGURATIONS ➤ Configuring various fun ctions (Setup menu) En 92 ■ MAC A ddress F ilter Sets the MAC address filter to limit access to the unit from other network devices. • Operation of the AirPlay function (p .67) or the DMC is not limited by this setting. Enables/disables the MAC address filter . Settings Specifies the MAC addresses (up […]
-
Page 93: Yamaha RX-V577
CONFIGURATIONS ➤ Configuring various fun ctions (Setup menu) En 93 ■ Network Update Updates the fir mware via the network. Starts the process to update the unit’ s fir mware. For details, see “Updating the unit’ s firmware” (p.97). Displays the version of the fir mware installed on the unit. Displays the system ID number . Language Sele[…]
-
Page 94: Yamaha RX-V577
CONFIGURATIONS ➤ Configuring the system sett ings (ADVANCED SETUP menu) En 94 Configure the system settings of the unit while viewing the front display . 1 Set the unit to standby mode. 2 While holding down STRAIGHT on the front panel, press z (power). 3 Press PROGRAM to select an item. 4 Press STRAIGHT to select a setting. 5 Press z (power) to s[…]
-
Page 95: Yamaha RX-V577
CONFIGURATIONS ➤ Configuring the system sett ings (ADVANCED SETUP menu) En 95 Selecting the remote c ontrol ID (REMO TE ID) Change the unit’ s remote control ID so that it matches the remote control’ s ID (d efault: ID1). When using multiple Y amaha A V r eceivers, you can set each remote contr ol with a unique remote control ID for its corre[…]
-
Page 96: Yamaha RX-V577
CONFIGURATIONS ➤ Configuring the system sett ings (ADVANCED SETUP menu) En 96 Updating the firm ware (UPDA TE) New firmware that provides additional f eatures or product improvements will be released as needed. Updates can be downloaded from our website. If the unit is connected to the Inter net, you can download the fir mware via the network. Fo[…]
-
Page 97: Yamaha RX-V577
CONFIGURATIONS ➤ Updating the unit’s firmware via the network En 97 New firmware that provides a dditional features or product improvements will be released as needed. If the unit is connected to the Internet, you can download the firmware via the network and update it. • Y ou can also update the firmware using the USB memor y device from the[…]
-
Page 98: Yamaha RX-V577
APPENDIX ➤ Frequently asked questions En 98 APPENDIX The new spea ker sy stem does not provide an ideal sound balance … If you have changed sp eakers or have a ne w speaker system, use YP AO to optimize the speaker settings again (p.38). If you want to ad just the speaker setting s manually , use “Speaker” in the “Setup” menu (p.79). Si[…]
-
Page 99: Yamaha RX-V577
APPENDIX ➤ Troubleshooting En 99 Refer to the table below when the unit doe s not function properly . If the problem you are experiencing is not listed below or if the instructions below do not help, tur n off the unit, disconnect the power cable, and contact the nearest authorized Y amaha dealer or service center . First , check the following: a[…]
-
Page 100: Yamaha RX-V577
APPENDIX ➤ Troubleshooting En 100 The unit cannot be controlled using the remote control. The unit is out of the operating range. Use the remote control within th e operating range (p.4). The batteries are weak. Replace w ith new batteries. The unit’ s remote contr ol sensor is exposed to direct sunlight or strong l ighting. Adjust the lighting[…]
-
Page 101: Yamaha RX-V577
APPENDIX ➤ Troubleshooting En 101 Aud i o Proble m Cause Remedy No sound. Another input sour ce is selected. Select an appropriate inpu t source with the input selection keys. Signals that the unit cannot r e produce ar e being input. Some digital audio formats cannot be played back on the unit. T o check the audio format of the input signal, use[…]
-
Page 102: Yamaha RX-V577
APPENDIX ➤ Troubleshooting En 102 No sound from the playback de vice (connected to the unit with HDMI). The TV does not support HDCP (High-bandwidth Digital Content Protection). Refer to the instructio n manuals for the TV and check the TV’ s specificatio ns. The unit is set not to output audio input thr ough HDMI jacks from the SPEAKE RS termi[…]
-
Page 103: Yamaha RX-V577
APPENDIX ➤ Troubleshooting En 103 Vi d e o FM/AM r adio Proble m Cause Remedy No video. Another input sour ce is selected on the unit. S elect an appropriate input sour ce with the input selection keys. Another input sour ce is selected on the TV . Sw itch the TV input to display the video from t he unit. The video signal output from the unit is […]
-
Page 104: Yamaha RX-V577
APPENDIX ➤ Troubleshooting En 104 USB and netw ork Proble m Cause Remedy The unit does not detect the USB device. The USB device is not connected to the USB jack secur ely . T urn of f t he unit, reconnect your USB device, and turn the unit on aga in. The file system of the USB device is not F A T16 or F A T32. Use a USB device with F A T16 or F […]
-
Page 105: Yamaha RX-V577
APPENDIX ➤ Troubleshooting En 105 (RX-V577 only) Wireless network is not f oun d. Microwave ove ns or other wir eless devices in your neighborhood might disturb the wir eless communication. T urn off these devices. Access to t he network is restr icted by the fire wall settings of th e wireless r outer (access point). Check the firewall sett ing […]
-
Page 106: Yamaha RX-V577
APPENDIX ➤ Error indications on the front display En 106 Error indications on the front displa y Message Cause Remedy Access denied Access to the PC is deni ed. Configure the sharing sett ings and select the uni t as a device to which music conte nts are sha red (p.60). Access err or The unit cannot access the USB device. T urn off the unit and r[…]
-
Page 107: Yamaha RX-V577
APPENDIX ➤ Glossary En 107 Aud io in for mat io n ■ Audio decoding format Dolb y Digital Dolby Digital is a compressed digital audio format developed by Dolby Laboratories , Inc. that supports 5.1-channel audio. This technology is used for audio on most DVD disc s. Dolby Digital EX Dolby Digital EX creates total 6.1-channel audio from 5.1-chann[…]
-
Page 108: Yamaha RX-V577
APPENDIX ➤ Glossary En 108 Sampling frequency/Quantization bit Sampling frequency and quantization bits indicate the quantity of inform ation when an analog audio signal is digitized. These values are noted as in the following example: “48 kHz/24-bit”. • Sampling frequency Sampling frequency (the number of times the signal is sampled per se[…]
-
Page 109: Yamaha RX-V577
APPENDIX ➤ Supported devices and file formats En 109 Ya m a h a t e c h n o l o g i e s CINEMA DSP (Digital Sound Field Processor) Since the Dolby Surround and DTS systems were originally designed for use in movie theaters, their effect is best experienced in a theater that has many speakers designed for acoustic effects. Since home conditions (s[…]
-
Page 110: Yamaha RX-V577
APPENDIX ➤ Video signal flow En 110 ■ File formats ❑ USB • The unit suppor ts playback of WA V (PCM format only), MP3, WMA, MPEG-4 AAC, FLAC and ALAC (Apple Lossless Audio Co dec) files (1- or 2-channel audio only). • The unit is compatible with sampling rate o f up to 192 kHz for WA V and FLAC files, 96 kHz for ALAC files, and 48 kHz for[…]
-
Page 111: Yamaha RX-V577
APPENDIX ➤ Information on HDMI En 111 HDMI C ontrol HDMI Control allows you to operate exter nal devices via HDMI. If you connect a TV that supports HDMI Control to the unit with an HDMI cable, you can control the unit (such as power and volume) with TV remote control operations. Y ou ca n also control playback devices (such as HDMI Control-compa[…]
-
Page 112: Yamaha RX-V577
APPENDIX ➤ Information on HDMI En 112 f If you made a digita l optical cable connect ion between the TV an d the unit, use the cursor k eys ( q / w ) to select «TV Audio Input» and the curs or ke ys ( e / r ) to select «A V 1». g Press SETUP . 3 Enable HDMI Control on the TV and playback devices (such as HDMI Control-compatibl[…]
-
Page 113: Yamaha RX-V577
APPENDIX ➤ Information on HDMI En 113 HDMI signal c ompatibility Au dio signa ls Video signals The unit is compatible with the video signals of the following resolutions: • When CPPM copy-protected D VD-A udio is play ed back, video/audio signals may not be output, depending on the type of the D VD player . • The unit is not compatible with H[…]
-
Page 114: Yamaha RX-V577
APPENDIX ➤ Reference diagram (rear panel) En 114 • The area around the video/audio output jacks is marked in white on the actual product to prevent improper connections. Refer ence diagr am (rear panel) FRONT CENTER SURROUND SINGLE SURROUND BACK/BI AMP /ZONE B AV 1 AV 2 AV 3 AV 5 AV 6 OPTICAL COAXIAL COAXIAL ( TV ) COMPONENT VIDEO COMPONENT VID[…]
-
Page 115: Yamaha RX-V577
APPENDIX ➤ Trademarks En 115 Manufactured under license from Dolby Laboratories. Dolby , Pro Logic, Surround EX and the double-D symbol are trademarks of Dolby Laboratories. (For RX-V477) Manufactured under license under U.S. Patent Nos: 5,956,674; 5,974,380; 6,226,616; 6,487,535; 7,212,872; 7,333,92 9; 7,392,195; 7,272,567 & other U.S. and w[…]
-
Page 116: Yamaha RX-V577
APPENDIX ➤ Specifications En 116 Input jacks • Analog Audio Audio x 4 (A V 4–6, AUX [Mini Jack]) • Digital Audio (Supported fr equencies: 32 kHz to 96 kHz) Optical x 1 (A V 1) Coaxial x 2 (A V 2–3) •V i d e o Composite x 4 (A V 3–6) Component x 2 (A V 1–2) • HDMI Input HDMI x 6 (HDMI 1–6) • Other jacks [RX-V5 77] — USB x 1 (U […]
-
Page 117: Yamaha RX-V577
APPENDIX ➤ Specifications En 117 Compatible Decoding Formats • Decoding Format — Dolby T rueHD, Dolby Digital Plus — Dolby Digital EX [RX-V577] — Dolby Digital — DTS-HD Master Audio, DTS-HD High Resolution Audio, DTS Express — DTS, DTS 96/24, DTS-ES Matrix 6.1, DTS-ES Discrete 6.1 • Post Decoding Format [RX-V5 77] — Dolby Pro Logic — Dolby Pr[…]
-
Page 118: Yamaha RX-V577
APPENDIX ➤ Specifications En 118 Vid e o S ec ti o n • V ideo Signal T ype [U.S.A., Canada, Korea, T aiwan and General models] … NTSC [Other mode ls]……….. …………. ……………. …………. …………… P AL • V ideo Signal Level Composite …………………. ……………. …………. ………. 1 Vp-p/75 Ω Compo[…]
-
Page 119: Yamaha RX-V577
APPENDIX ➤ Index En 119 Symbols Envelope icon ( p ) 97 Lock icon ( o ) 89 Numerics 2.1-channel system 14 2ch Stereo (sound program) 46 3.1-channel system 14 4.1-channel system 14 4K Ultra HD 113 5.1-channel system 13 , 16 5.1-channel system (Virtual CINEMA FRONT) 13 5ch Stereo (sound program) 46 6.1-channel system 13 7.1-channel system 13 , 16 7c[…]
-
Page 120: Yamaha RX-V577
APPENDIX ➤ Index En 120 E ECO (Setup menu) 88 ECO Mode (ECO, Setup menu) 88 Enhancer (DSP/Surround, Option menu) 74 ENHANCER (sound mode) 48 EQ Select (Equalizer, Setup menu) 81 Equalizer (Speaker, Setup menu) 81 Error indication (front display) 106 EX/ES (Extended Surround, Option menu) 73 EXTD (DSP/Surround, Option menu ) 73 Extended Surround ([…]
-
Page 121: Yamaha RX-V577
APPENDIX ➤ Index En 121 P PAL (TV FORMAT, ADVANCED SETUP menu) 95 Panorama (DSP Parameter, Setup menu) 85 PC content playback 61 PEQ (Equalizer, Setup menu) 81 Perform Update (Network Update, Setup menu) 93 PIN Code (Wireless (Wi-Fi), Setup menu) 33 Please wait (error indication) 106 Power Amp Assign (Speaker, Setup menu) 79 Power management 88 P[…]
-
Page 122: Yamaha RX-V577
APPENDIX ➤ Index En 122 Virtual Presence Speaker (VPS) 6 Voltage selection 26 Volume (Sound, Setup menu) 86 Volume Interlock (Option menu) 75 Volume Trim (Option menu) 74 VPS (Virtual Presence Speaker) 6 vTuner ID (Information, Setup menu) 91 W Wi-Fi 108 Wired (Network Connection, Setup menu) 91 Wireless (Wi-Fi) (Network Connection, Setup menu) 3[…]
-
Page 123: Yamaha RX-V577
© 2014 Yamaha Corporation YG068A0/EN 00_RX-V477_V577_om_U.book Page 123 Monday, November 11, 20 13 1:19 PM[…]