
U.R.G., Pro Audio & Digital Musical Instrument Division, Yamaha Corporation
© 2008 Yamaha Corporation
WP12590 XXXPOXXX.X-01A0
Printed in China
ES
FR
RU
PT
Manual do Proprietário
Mode d’emploi
Manual de instrucciones
DIGITAL WORKSTATION
DIGIT
AL W
ORKST
A
TION
Yamaha Home Keyboards Home Page
http://music.yamaha.com/homekeyboard/
Yamaha Manual Library
http://www.yamaha.co.jp/manual/

-
Contents
-
Table of Contents
-
Troubleshooting
-
Bookmarks
Quick Links
DIGITAL WORKSTATION
Owner’s Manual
EN
Related Manuals for Yamaha PSR-S550
Summary of Contents for Yamaha PSR-S550
-
Page 1
DIGITAL WORKSTATION Owner’s Manual… -
Page 2: Special Message Section
This product should be used only with the components supplied or; a When installing batteries, do not mix batteries with new, or with batter- cart, rack, or stand that is recommended by Yamaha. If a cart, etc., is ies of a different type. Batteries MUST be installed correctly. Mis-…
-
Page 3
Yamaha Corporation of America or its subsidiaries. of other electronic devices. Compliance with FCC regulations does * This applies only to products distributed by YAMAHA CORPORATION OF AMERICA. (class B) OBSERVERA! COMPLIANCE INFORMATION STATEMENT Apparaten kopplas inte ur växelströmskällan (nätet) så… -
Page 4
AC outlet. Then have damage to the instrument or overheating. the instrument inspected by qualified Yamaha service personnel. • Check the electric plug periodically and remove any dirt or dust which may have •… -
Page 5
Yamaha cannot be held responsible for damage caused by improper use or modifications to the instrument, or data that is lost or destroyed. Always turn the power off when the instrument is not in use. -
Page 6: Logos
This product incorporates and bundles computer programs and contents in which Yamaha owns copyrights or with respect to which it has license to use others’ copyrights. Such copyrighted materials include, without limitation, all computer software, style files, MIDI files, WAVE data, musical scores and sound recordings. Any unauthorized use of such programs and contents outside of personal use is not permitted under relevant laws.
-
Page 7: Accessories
Congratulations and thank you for purchasing the Yamaha PSR-S550! Please read this owner’s manual carefully before using the instrument in order to take full advantage of its various features. Make sure to keep this manual in a safe and handy place even after you finish reading, and refer to it often when you need to better understand…
-
Page 8: Special Features Of The Psr-S550
Special Features of the PSR-S550 ■ Play a Variety of Instrument Voices Page 17 The instrument voice that sounds when you play the keyboard can be changed to violin, flute, harp, or any of an extensive range of Voices. You can change the mood of a Song written for piano, for example, by using violin to play it instead.
-
Page 9: Table Of Contents
Logos………………6 Style (Auto Accompaniment) Functions Accessories …………….7 Pattern Variation (sections) ………… 55 Special Features of the PSR-S550 ………. 8 One Touch Setting…………..58 Setting Up Variation Change and OTS (OTS LINK)……… 58 Setting the Split Point …………. 59 Power Requirements …………..
-
Page 10: Setting Up
Connecting a Footswitch (SUSTAIN Jack) The sustain function lets you produce a natural sustain as you play by pressing a footswitch. Plug the Yamaha FC4 or FC5 footswitch into this jack and use it to switch sustain on and off.
-
Page 11: Connecting To A Computer (Usb Terminal)
(see page 103) • Never attempt to turn the power off when a “Writing..” message is shown in the display. Doing so can damage the flash memory and result in a loss of data. PSR-S550 Owner’s Manual…
-
Page 12: Changing The Display Language
The [+] button selects English and the [-] button selects Japanese. The language selection will be stored in the internal flash memory so that it is retained even when the power is turned off. Press the [EXIT] button to return to the MAIN dis- play. PSR-S550 Owner’s Manual…
-
Page 13
Setting Up ● Music Rest Insert the music rest into the slots as shown. PSR-S550 Owner’s Manual… -
Page 14: Panel Controls And Terminals
@0 [EXIT] button ……..page 42 ENDING/rit. [I]–[III] buttons ..page 55 @1 Dial ……….. page 41 [SYNC STOP] button ….page 57 @2 [+/YES] and [-/NO] buttons….. page 41 [SYNC START] button ..pages 23, 56 [START/STOP] button… pages 22, 41 PSR-S550 Owner’s Manual…
-
Page 15: Rear Panel
[HARMONY] button …… page 44 [TOUCH] button ……page 51 [SUSTAIN] button ……page 47 [DSP] button……..page 47 #1 UPPER OCTAVE [+] and [-] buttons …………page 54 #2 [PITCH BEND] wheel……. page 48 #3 Drum Kit ……….. page 21 PSR-S550 Owner’s Manual…
-
Page 16: Playing Songs
Press the [> > > > /■] button to stop Demo. NOTE • The [DEMO] button doesn’t Operation automatically returns to the Main display. function when the Demo Cancel function is set to enable. (See page 82.) PSR-S550 Owner’s Manual…
-
Page 17: Try Playing A Variety Of Instrument Voices
Voices will be selected and displayed in sequence. The Voice selected here becomes the Main Voice. For this example, select the “010 Flute” Voice. Play the keyboard. Try selecting and playing a variety of Voices. Press the [EXIT] button to return to the MAIN display. PSR-S550 Owner’s Manual…
-
Page 18: Playing Two Voices Simultaneously-Dual
Dual Voice selection display The currently selected category The currently selected Dual Voice Hold for longer than a second Select and press the desired Voice category button in the Voice section. For this example, select the “Percussion” category. PSR-S550 Owner’s Manual…
-
Page 19: Playing Different Voices With The Left And Right Hands-Left
Press the [LEFT] button. The [LEFT] button turns the left Voice on or off. The currently selected Left Voice will sound when you play keys to the left of the keyboard split point. [LEFT] button is lit PSR-S550 Owner’s Manual…
-
Page 20
Voices will be selected and displayed in sequence. The Voice selected here becomes the Left Voice. For this example, select the “041 FolkGuitar” Voice. Play the keyboard. Try playing the selected Left Voice. Press the [EXIT] button to return to the MAIN display. PSR-S550 Owner’s Manual… -
Page 21: Playing Drum Kits
Arabic Kit2 NOTE Play each key and enjoy the Drum Kit. • See the Drum Kit List on page 116. A good Drum Kit to start out with is 001, Standard Kit 1. Example: 001 Standard Kit 1 PSR-S550 Owner’s Manual…
-
Page 22: Playing Styles
Look at the highlighted Style name and rotate the dial. The available Styles will be selected and displayed in sequence. See the Style list on page 121. Press the [START/STOP] button. The Style rhythm will start playing. To stop playback, press the [START/STOP] button again. PSR-S550 Owner’s Manual…
-
Page 23: Playing Along With A Style
Style will start playing as soon as you play a note to left of the keyboard split point. To cancel or disable Sync Start, press the button a second time to turn the Sync Start function off. PSR-S550 Owner’s Manual…
-
Page 24
Split point Auto accompa- niment region Press the [START/STOP] button to stop Style playback when you’re done. You can switch Style “sections” to add variety to the accompaniment. Refer to “Pattern Variation (sections)” on page 55. PSR-S550 Owner’s Manual… -
Page 25: Playing Auto-Accompaniment Chords
This method lets you play the accompaniment chords in the specified area of the keyboard, and is set as the default for the instrument. Full Keyboard: This lets you play the accompaniment chords freely from anywhere on the keyboard. PSR-S550 Owner’s Manual…
-
Page 26: Playing With The Music Database
Split Point You can check the assigned Voice and Style at this point by pressing the [EXIT] button to return to the MAIN display. Press the [> > > > /■] button to stop playback. PSR-S550 Owner’s Manual…
-
Page 27: Using Songs
The Song selection display will appear. The currently selected Song number and name will be highlighted. Song Selection display Currently selected Song Select a Song. Use the dial to select the Song you want to listen to. PSR-S550 Owner’s Manual…
-
Page 28: Song Fast Forward, Fast Reverse, And Pause
Press the fast reverse Press the fast forward Press the pause button to rapidly return button to rapidly skip button to pause to an earlier point in ahead to a later point playback. the Song. in the Song. PSR-S550 Owner’s Manual…
-
Page 29: Types Of Songs
• Different internal memory areas are used to store user Songs and loaded Song files transferred from a computer. User Songs cannot be directly transferred to the loaded Song area of the internal memory, and vice versa. PSR-S550 Owner’s Manual…
-
Page 30: Displaying The Song Score
Press the [> > > > /■] button. The Song will begin playing. The triangular cursor will move across the top of the score to indicate the current location. To return to the MAIN display, press the [EXIT] button. PSR-S550 Owner’s Manual…
-
Page 31: Displaying The Lyrics
The Song will play back while the lyrics and chords are shown on the display. The lyrics will be highlighted to show the current location in the Song. Lyrics and Chord ■ Preset Songs That Can be Used For Lyrics Display Song No. Song Name Amazing Grace Annie Laurie PSR-S550 Owner’s Manual…
-
Page 32: Recording Your Own Performance
The track button in [1/9]–[8/16] that has recorded data in the tracks is indicated in green, while the button that contains no data is unlit. Also the track numbers containing recorded data are indicated with framed rectangles in the display. PSR-S550 Owner’s Manual…
-
Page 33: Quick Recording Procedure
Track 1 Main Voice part Track 2 Left Voice part Track 3 Dual Voice part Tracks 9–16 Accompaniment part Make sure to turn the Dual Voice or Left Voice on when recording the Dual Voice or Left Voice. PSR-S550 Owner’s Manual…
-
Page 34: Multi-Track Recording Procedure
You can set the recorded user Song number and the parts for tracks individually. From the MAIN display press the [USER] button, then use the dial to select the user Song number (001–005) you want to record to. PSR-S550 Owner’s Manual…
-
Page 35
REC indication will be highlighted in the display and operation will be button and press again the track set to record ready mode. button you want to cancel. Press and hold ACMP is set to record ready mode. PSR-S550 Owner’s Manual… -
Page 36
You can also mute previously recorded tracks (the muted tracks will not appear in the display) while recording new tracks (page 74). ■ Redo the Recording Simply select the track you want to re-record for recording in the normal way. The newly recorded material will overwrite the previous data. PSR-S550 Owner’s Manual… -
Page 37: Song Clear-Deleting User Songs
1 Confirm that USB memory is not inserted on the instrument, then press the [FILE MENU] button. 2 Rotate the dial and select a Song. 3 Press the [EXECUTE] button. A confirmation message will appear in the display. 4 Press [+/YES] button to clear the Song. PSR-S550 Owner’s Manual…
-
Page 38: Track Clear-Deleting A Specified Track From A User Song
Press the [+/YES] button to clear the track. NOTE • To execute the Track Clear func- The clear-in-progress message will appear briefly on the display while tion press the [+/YES] button. Press [-/NO] to cancel the Track the track is being cleared. Clear operation. PSR-S550 Owner’s Manual…
-
Page 39: Backup And Initialization
Style or User MDB you have purchased will also be est black keys and then turn the power on by pressing the [STANDBY/ cleared. Be sure to save any ON] switch. important data to a computer. PSR-S550 Owner’s Manual…
-
Page 40: Basic Operation And Displays
Basic Operation and Displays Basic Operation Overall PSR-S550 control is based on the following simple operations. Use the category buttons to select a basic function or a CATEGORY. Use the dial to select an item or value. Starting/stopping a Song or Style.
-
Page 41: Use The Dial To Select An Item Or Value
[+/YES] and [-/NO] buttons. Starting/stopping a Song or Style. Press the [START/STOP] button after selecting the Song cate- gory or Style category to start playback of the selected Song or Style (rhythm). PSR-S550 Owner’s Manual…
-
Page 42: The Displays
Press the CATEGORY button(s) as many times as necessary until the required function appears. You can then use the dial or the [+/YES] and [-/NO] buttons to adjust the value of the function as required. Function item Value PSR-S550 Owner’s Manual…
-
Page 43: Main Display Items
Registration memory Song track status Chord Display bank status (page 25) (page 74) (page 77) Main Voice (page 17) Dual Voice (page 18) Left Voice (page 19) Style (page 22) Song (page 27) Music Database (page 26) PSR-S550 Owner’s Manual…
-
Page 44: Playing With The Effects
Auto Accompaniment range of the keyboard when the Auto Accompaniment is on (page 23). • Harmony types 15 to 18 (Echo) Hold down two keys. You can adjust the Harmony Volume in the Function Settings (page 82). Keep holding down the keys. PSR-S550 Owner’s Manual…
-
Page 45: Changing The Reverb Type
Refer to the Effect Type List on page 126 for information about the available Reverb Types. ● Adjusting the Reverb Level Reverb Type You can individually adjust the amount of reverb that is applied to the Main, Dual, and Left Voices. (See page 81). PSR-S550 Owner’s Manual…
-
Page 46: Changing The Chorus Type
Refer to the Effect Type List on page 127 for information about the available Chorus Types. ● Adjusting the Chorus Level You can individually adjust the amount of Chorus that is applied to the Main, Dual, and Left Voices. (See page 81). PSR-S550 Owner’s Manual…
-
Page 47: Panel Sustain
[ ], [ ] buttons or A-B Repeat function during Song playback. Press and hold the [DSP] button for longer than a second. Currently selected DSP type. The currently selected DSP type will be dis- played. PSR-S550 Owner’s Manual…
-
Page 48: Pitch Bend
“042 Overdrive” guitar Voice (page 17), you can produce remarkably realistic string-bending effects. You can change the amount of pitch bend produced by the wheel, as described on page 81. NOTE • Pitch Bend is not applied to the Left Voice when accompaniment is turned on. PSR-S550 Owner’s Manual…
-
Page 49: Using Various Functions
Press the CATEGORY [ ] and [ ] but- tons to raise or lower the tempo. tons as many times as necessary to call up “Bell.” Tempo value Rotate the dial and select ON (sound) or OFF (mute). PSR-S550 Owner’s Manual…
-
Page 50: Changing The Time Signature
Song or Style. > Press the CATEGORY [ ] button once to call up the Time Signature Denominator display. Metronome volume Use the dial to set the metronome vol- ume. PSR-S550 Owner’s Manual…
-
Page 51: Using Tap Start
Use the dial to select a Touch Sensitiv- ity setting between 1 and 3. Higher val- ues produce greater (easier) volume variation in response to keyboard dynamics—i.e., greater sensitivity. NOTE • The initial default setting is 2. PSR-S550 Owner’s Manual…
-
Page 52: Eq Settings
Press the CATEGORY [ ] and [ ] but- tons as many times as necessary to call up Master EQ Type. The currently selected EQ type will appear. Use the dial to select an EQ Setting for the best sound. PSR-S550 Owner’s Manual…
-
Page 53: Pitch Controls
• This setting does not affect Drum Kit Voices. Press the [EXIT] button to return to the Main display. Pressing the TRANSPOSE [+]/[-] buttons allows single-step changes. Pressing and hold- ing either TRANSPOSE [+]/[-] button continu- ously increases or decreases the value. PSR-S550 Owner’s Manual…
-
Page 54: Changing The Pitch Of The Instrument In Octaves
● In the case of UPPER OCTAVE +1 One octave up ● In the case of UPPER OCTAVE -1 One octave down NOTE • When a Drum Kit is selected, each percussion Voice assigned to the keyboard are shifted in location but not pitch. PSR-S550 Owner’s Manual…
-
Page 55: Style (Auto Accompaniment) Functions
This is used for the ending of the Song. When the ending is finished, the Auto Accompani- ment stops automatically. The length of the ending (in measures) differs depending on the selected Style. ●AUTO Fill-in section This is automatically added before the current section changes to a newly selected section. PSR-S550 Owner’s Manual…
-
Page 56: Synchro Start
• The Baroque Air Style in the MOVIE & SHOW category does not have a ● Synchro Start Rhythm part, so there is no rhythm sound for this Style. When Synchro Start is on you, can start the Style by playing any key in the accompani- ment range of the keyboard. PSR-S550 Owner’s Manual…
-
Page 57
You can have the Ending gradually slow down Style playback will stop when you release the keys (ritardando) by pressing one of the ENDING/ rit. [I]–[III] buttons again while the Ending is playing back. PSR-S550 Owner’s Manual… -
Page 58: One Touch Setting
When change the MAIN VARIATION [A]–[D] to other MAIN VARIATION [A]–[D] during OTS LINK is on, OTS 1–4 automatically change the number according to the selected variation number. (see below) Press the [OTS LINK] button to turn on the OTS link. Automatically change PSR-S550 Owner’s Manual…
-
Page 59: Setting The Split Point
• Changing the Split Point here also changes the Auto Accompaniment Split Point. • The Left Voice sounds when the split-point key is played. < > Use the CATEGORY [ ] and [ ] buttons as many times as necessary to call up Split Point. PSR-S550 Owner’s Manual…
-
Page 60: Playing A Style With Chords But Without Rhythm (Stop Accompaniment)
Style category buttons to as many times as necessary to call up enter the Style mode. (page 22) Style Volume. Press the [FUNCTION] button. Use the dial to set the Style Volume between 000 and 127. PSR-S550 Owner’s Manual…
-
Page 61: Chord Basics
flatted seventh, what alterations or tensions it uses … all at a glance. ● Some Chord Types (These are just some of the “Standard” chord types recognized by the PSR-S550. Suspended 4 Minor 7…
-
Page 62
• Playing two same root keys in the adjacent octaves produces accompa- niment based only on the root. • A perfect fifth (1 + 5) produces accompaniment based only on the root and fifth which can be used with both major and minor chords. PSR-S550 Owner’s Manual… -
Page 63: User Style
Style performance. In this mode only chords played in the normal way (page 25) can be detected. Press the [ACMP] button for longer than Use the dial to select 2 “FullKeyboard”. a second. Hold for longer than a second PSR-S550 Owner’s Manual…
-
Page 64: Creating Original Styles (Style Creator)
[ ]/[ ] buttons When playing or recording, the Current tempo current measure number appears Current section For example, set the beat number by using the dial Current selected section and selected Part in the section. PSR-S550 Owner’s Manual…
-
Page 65: Follow The Style Creator Instructions
• Quantize: 1/4, 1/6, 1/8, 1/12, 1/16, 1/24, 1/32 • Part clear Saving • Save the Style data Record another section Exit from the Style Creator * Press the [EXIT] button whenever you want to exit from the Style Creator (except during recording). PSR-S550 Owner’s Manual…
-
Page 66: Basic Operation
3. NOTE • If there is not enough capacity left on the instrument to save the data, an appropriate message will appear in the display. Erase unwanted data from the instrument to make more memory available. PSR-S550 Owner’s Manual…
-
Page 67: Parameter Settings, Recording And Saving
Length. Range: 1–32 NOTE • If you set a length smaller than that of the previous one, any data existing beyond the new length will be deleted. Press the [EXECUTE] button to set the Mea- sure Length. PSR-S550 Owner’s Manual…
-
Page 68
Rotate the dial and set the Chorus depth. you’re recording), by simply pressing the Range: 0–127 [PART] button so that the mute mark is indi- cated at the Part. In this condition, the [PART] button also changes from green to unlit. PSR-S550 Owner’s Manual… -
Page 69
Press the [EXECUTE] button and check that the REC mark appears at the Part in the dis- play. In this condition, the [PART] button also changes to red. Press the [START/STOP] button to begin recording. Play the keyboard and record your playing. PSR-S550 Owner’s Manual… -
Page 70
• If the recorded Part is not specified, Quantize cannot be set. Specify the Part for recording and then use the quantize function. • The undo icon on the display will disappear if you exit from the cur- rent display. PSR-S550 Owner’s Manual… -
Page 71
• A maximum of 50 Style files can be saved. 4 Press the [EXECUTE] button. Press [EXECUTE] button to save the data. 5 Press the [+/YES] button to delete the file. A confirmation message appears. PSR-S550 Owner’s Manual… -
Page 72: Song Settings
You can return to the original tempo by simultaneously pressing both the TEMPO [+] and [-] buttons. Press the [EXIT] button to return to the Main display. Pressing the TEMPO [+]/[-] buttons allows single-step changes. Pressing and holding either button contin- uously increases or decreases the value. PSR-S550 Owner’s Manual…
-
Page 73: A-B Repeat
Song press the [A B] button before starting playback of the Song. Point A Press the [A B] button a second time at the end of the section you want to repeat (the “B” point). Point B PSR-S550 Owner’s Manual…
-
Page 74: Muting Independent Song Parts
“TR 9–16”. Specify the mute tracks of 1–8 by press- TR 1–8 ing the [1/9]–[8/16] buttons. Specify the mute tracks of 9–16 by TR 9–16 pressing the [1/9]–[8/16] buttons. REGIST. TR 1 – 8 TR 9 – 16 PSR-S550 Owner’s Manual…
-
Page 75: Mixer
In the Style mode, tracks 9–16 are selected automatically. When track 1–8 is selected Control the parameter by using the dial or the [+/YES], [-/NO] buttons. To exit the mixer operation, press the [EXIT] When track 9– 16 is selected button. PSR-S550 Owner’s Manual…
-
Page 76: Track On/Off And Other Parameter Controls
Determines the Part volume. Range: 0–127 Press the [EXIT] button to exit from the Determines the Pan position. Range: 0–64–127 mixer operation. Reverb Determines the Reverb depth. Range: 0–127 Level Chorus Determines the Chorus depth. Range: 0–127 Level PSR-S550 Owner’s Manual…
-
Page 77: Memorize Your Favorite Panel Settings
• Do not turn off the power while saving settings to the registra- tion memory, otherwise the data may be damaged or lost. NOTE • Data cannot be saved to the registration memory during Song play- back. PSR-S550 Owner’s Manual…
-
Page 78: Recalling A Registration Memory
The button to which the data is stored lights in Transpose, Pitch Bend Range, Upper Octave green and the currently set button is in red. *Style settings are not available for Registration Memory when using the Song features. PSR-S550 Owner’s Manual…
-
Page 79: Registration Clear-Deleting A Specified Registration Memory
Registration data is stored to the memory. Use the [-/NO] button to cancel the clear opera- tion. Press the [+/YES] button again to clear the Registration Memory. The clear-in-progress message will appear briefly on the display while the Song is being cleared. PSR-S550 Owner’s Manual…
-
Page 80: The Functions
The name of the previous item in the list appears to the upper left, and the name of the next item in the list appears to the upper right of the currently selected item. Function group Previous item Next item Current selected item Parameter PSR-S550 Owner’s Manual…
-
Page 81
Determines how much of the Left Voice’s signal is sent to the DSP effect. Dry Level Left Dry Level 000–127 Determines how much of the Left Voice’s unprocessed signal sounds (no Reverb, Chorus or DSP effect process- ing). PSR-S550 Owner’s Manual… -
Page 82
* All these settings can be conveniently reset to their initial default values by pressing the [+/YES] and [-/NO] buttons simultaneously. (The exception to this is Initial Send, which is an operation, not a setting.) PSR-S550 Owner’s Manual… -
Page 83: Using Usb Flash Memory
The instrument does not necessarily support all commercially available USB storage devices. Yamaha cannot guarantee operation of USB storage devices that you purchase. Before purchasing a USB storage device, please consult your Yamaha dealer, or an autho- rized Yamaha distributor (see list at end of the Owner’s Manual) for advice.
-
Page 84: Formatting Usb Flash Memory
USB Format item. • If the USB flash memory device has been write-protected, an appro- priate message will appear in the display and you will not be able to execute the operation. The display prompts you for confirmation. PSR-S550 Owner’s Manual…
-
Page 85: Saving The Registration Data
USB flash memory device you are using. and the [2] button moves it to the right. • Use the dial to select a character for the cur- rent cursor location. • The [8] button deletes the character at the cur- sor location. PSR-S550 Owner’s Manual…
-
Page 86: Saving A User Song Or User Style
firmation. Press [EXECUTE] or [+/YES] if it is OK to overwrite the converted Song or Style file. file, or [-/NO] to cancel. • The amount of time it will take to perform the save operation depends on the particular USB flash memory device you are using. PSR-S550 Owner’s Manual…
-
Page 87: Loading Registration Files, Style Files, Song Files Or Mdb Files
Never turn off the power or remove the USB flash memory during this operation. A message appears in the display indi- cating that the operation is complete. Press the [EXIT] button to return to the MAIN display. PSR-S550 Owner’s Manual…
-
Page 88: Deleting Data From Usb Flash Memory
2 Use the CATEGORY [ ] and [ ] buttons to simultaneously to select the first Song or user locate the User Delete item. file on the USB flash memory. 3 Follow the procedure described above from step PSR-S550 Owner’s Manual…
-
Page 89: Playing Songs Or Styles Saved To Usb Flash Memory
USB flash memory using a computer (refer to page 91). You can move the directory in the USB mem- < > ory by pressing the CATEGORY [ ]/[ ] but- ton. Press the [ > > > > /■] button. PSR-S550 Owner’s Manual…
-
Page 90: Connections
Before purchasing USB storage devices, please consult your Yamaha dealer, or an authorized Yamaha distributor (see list at end of the Owner’s Manual) for advice. CAUTION • Avoid frequently turning the power on/off to the USB storage device, or connecting/disconnecting the cable too often.
-
Page 91
Can be selected/ played by this instrument. played. Song Song Folder File root Song Song Folder File Cannot be selected/ Song played. Folder The directory can be moved using < > the CATEGORY [ ]/[ ] buttons. PSR-S550 Owner’s Manual… -
Page 92: Connecting A Personal Computer
(1) when turning the power of the instrument off then on again, or (2) when USB TO HOST terminal alternately connecting/disconnecting the USB cable. Computer Instrument USB cable PSR-S550 Owner’s Manual…
-
Page 93: Using Usb Storage Devices
The instrument does not necessarily support all commer- NOTE cially available USB devices. Yamaha cannot guarantee • Although CD-R/RW drives can be used to read data to the instru- operation of USB devices that you purchase. Before pur- ment, they cannot be used for saving data.
-
Page 94: Transferring Performance Data To And From A Computer
• If External Clock is ON and no clock signal is being received from an external device, the Song, Style, and Metronome functions will not start. Press the [FUNCTION] button. Use the dial to select ON or OFF. PSR-S550 Owner’s Manual…
-
Page 95: Initial Send
first send and record the panel setup data before the actual performance data. Press the [FUNCTION] button. Press [+/YES] to send, or press [-/NO] to cancel. < > Use the CATEGORY [ ] and [ ] buttons to select the Initial Setup item. PSR-S550 Owner’s Manual…
-
Page 96: Transferring Data Between The Computer And Instrument
●Backup data can be transferred from the instru- ment to a computer and back. ⇒ Refer to the procedure described on page 98. Use the Musicsoft Downloader application with Internet Explorer 5.5 or higher. w Click “Open” PSR-S550 Owner’s Manual…
-
Page 97
After selecting the file in the “List of files stored temporarily,” click the down- ward [Move] button and a confirmation message will appear. Click [OK] and the Song will be transferred from the “List of files stored temporarily” to the instrument’s memory. PSR-S550 Owner’s Manual… -
Page 98
“Electronic Musical Instruments” in the Musicsoft parts. Downloader display, and then “System Drive,” a file named “PSR-S550.BUP” will appear in the 1 Press the [USER] button and select the Song lower right corner of the Musicsoft Downloader residing in internal memory for which you want display. -
Page 99: Accessory Cd-Rom Installation Guide
• Yamaha makes no representations or warranties with regard to the use of the software and documentation and can- not be held responsible for the results of the use of this guide and the software.
-
Page 100: Contents Of The Cd-Rom
• For the System Requirements of the other software available in the CD-ROM, see the respective download page on the web. The download page can be dis- played by clicking the software menu on the Start window and the “download” button in the next page. PSR-S550 Owner’s Manual…
-
Page 101: Software Installation
NOTE NOTE • See the Yamaha Download page at the following URL for up-to-date • If during the installation the system displays “…has not passed Win- news on USB-MIDI driver: dows Logo testing to verify its compatibility with Windows XP,” click http://music.yamaha.com/download/…
-
Page 102
• If the “Windows Security” window appears, confirm this software is checks for the driver. Specify the “USBdrv2k_” folder of the CD-ROM authored by Yamaha Corporation then click [Install]. drive (such as D:\USBdrv2k_\) and continue the installation. When the installation is complete, the system Click [Next]. -
Page 103
NOTE • The button names or menus may differ depending on the com- puter OS. • For instructions on uninstalling the USB-MIDI driver, refer to “How can I remove the driver?” in the “Troubleshooting” section (page 104). PSR-S550 Owner’s Manual… -
Page 104
• Have you selected an appropriate port in the sequence software? • Are you using the latest USB-MIDI driver? The latest driver can be downloaded from the web site (page 101). PSR-S550 Owner’s Manual… -
Page 105
(14) days unenforceable, the remainder of this Agreement shall continue in full force and from the date of receipt, as evidenced by a copy of the receipt. Yamaha’s entire effect. -
Page 106
Product as between you and the Licensor belongs to the Licensor or its licensors and is protected by copyright laws, national and international, and all other applicable laws. (License v5.0 (DMN), 30 July 2007) PSR-S550 Owner’s Manual… -
Page 107: Troubleshooting
There is no harmony sound. played in the right-hand range. Types 06–26 will function whether style playback is on or off. For types 06–12 you need to play two notes at the same time. PSR-S550 Owner’s Manual…
-
Page 108: Messages
Displayed while moving a file in the Musicsoft Downloader. “Now Writing… Displayed while writing data in the memory. Never turn the power off while (Don’t turn off the power now, otherwise writing. Doing so may result in data loss. the data may be damaged.)” PSR-S550 Owner’s Manual…
-
Page 109
Indicates the file name of the currently transmitting. “nnn” indicates the [nnn] “file name” receiving block. NOTE • Not all the messages are listed in the table: the messages neces- sary to be explained only. PSR-S550 Owner’s Manual… -
Page 110: Voice List
VintageMute OrchStrings LeadGuitar AnalogStrs ChorusGtr ChamberStrs VintageTrem BowStrings OctaveGtr SlowStrings DeepChorus TremoloStrs TremoloGtr MarcatoStrs HeavyStack SynStrings1 WahGuitar PizzStrings Distortion Watariyat Elec.12Str Viola FeedbackGtr Cello MutedGuitar Contrabass FunkGuitar Er Hu VodooLead Harp FolkGuitar Hackbrett Overdrive Kanoun Cool! ElectricBass PSR-S550 Owner’s Manual…
-
Page 111
DreamHeaven RockOrgan1 Choir DanceOrgan VoxHumana JazzOrgan1 PurpleOrg Insomnia Elec.Organ NeoWarmPad DrawbarOrg CyberPad JazzOrgan2 Wave2001 RockOrgan2 Atmosphere ClickOrgan XenonPad GospelOrg Equinox MellowDraw Fantasia BrightDraw DX Pad 60’sOrgan Symbiont JazzOrgan3 Stargate Tibia 16+4 Area51 Tibia Full DarkMoon ChapelOrgn1 Ionosphere PSR-S550 Owner’s Manual… -
Page 112
PierceClavi. Glocken Celesta MusicBox Glockenspiel TubularBell MusicBox Kalimba Orgel Dulcimer Vibraphone Timpani VibesKSP Drum Kit HardVibes StandardKit1 Marimba StandardKit2 MarimbaKSP HitKit SineMarimba JazzKit Balimba BrushKit LogDrums RoomKit Xylophone RockKit TubularBells ElectroKit ChurchBells AnalogKit Carillon DanceKit Dulcimer SymphonyKit PSR-S550 Owner’s Manual… -
Page 113
StereoStrngs CleanGuitar SlwAtkStrngs ChorusGuitar ArcoStrings MutedGuitar 60’sStrings FunkGuitar1 Orchestra MuteSteelGtr Orchestra2 FunkGuitar2 TremOrchstra JazzMan Velo.Strings Overdriven Strings2 GuitarPinch S.SlowStrngs Distortion LegatoStrngs FeedbackGtr WarmStrings FeedbackGtr2 Kingdom GtrHarmonics 70’sStrings GtrFeedback Strings3 GtrHarmonic2 SynStrings1 AcousticBass ResoStrings JazzRhythm SynStrings4 VXUprghtBass SynStrings5 PSR-S550 Owner’s Manual… -
Page 114
MetallicPad TenorSax2 TinePad BaritoneSax PanPad Oboe HaloPad EnglishHorn SweepPad Bassoon Shwimmer Clarinet Converge Piccolo PolarPad Flute Celestial Recorder Rain PanFlute ClaviPad BlownBottle HarmoRain Shakuhachi AfricanWind Whistle Carib Ocarina SoundTrack SquareLead Prologue SquareLead2 Ancestral LMSquare Crystal Hollow SynthDr.Comp PSR-S550 Owner’s Manual… -
Page 115
Banjo CarPassing MutedBanjo CarCrash Rabab Siren Gopichant Train JetPlane Shamisen Starship Koto Burst Taisho-kin RollrCoaster Kanoon Submarine Kalimba Laugh Bagpipe Scream Fiddle Punch Shanai Heartbeat Shanai2 FootSteps Pungi MachineGun Hichiriki LaserGun TinkleBell Explosion Bonang Firework Altair GamelanGongs PSR-S550 Owner’s Manual… -
Page 116: Drum Kit List
Timbale L Agogo H Agogo L Cabasa Maracas Samba While H Samba While L Guiro Short Guiro Long Claves Wood Block H Wood Block L Cuica Mute Cuica Open Triangle Mute Triangle Open Shaker Jingle Bells Bell Tree PSR-S550 Owner’s Manual…
-
Page 117
Wood Block L Dance Percussion 4 Cuica Mute Scratch H 2 Scratch H 2 Dance Breath 1 Cuica Open Scratch L 2 Scratch L 3 Dance Breath 2 Triangle Mute Triangle Open Shaker Jingle Bells Bell Tree PSR-S550 Owner’s Manual… -
Page 118
Cuica Mute Rik Tak 2 Cuica Open Rik Finger 1 Triangle Mute Rik Tak 1 Triangle Open Triangle Mute Rik Finger 2 Shaker Triangle Open Rik Brass Tremolo Jingle Bells Rik Sak Bell Tree Bell Tree Rik Tik PSR-S550 Owner’s Manual… -
Page 119
Tablah Sak 1 Tablah Tik 3 Khartaal Bell Tree Tablah Dom 1 Tablah Tik 2 Dholak 2 Open Dholak 2 Slide Dholak 2 Rim 1 Dholak 2 Rim 2 Dholak 2 Ring Dholak 2 Slap G Dholak Body PSR-S550 Owner’s Manual… -
Page 120
Yun Luo A5 Muyu Middle Shaker Yun Luo A#5 Xiaoluo Open Jingle Bells Yun Luo B5 Muyu Mid-High Bell Tree Yun Luo C6 Muyu High Machine Gun Horse Laser Gun Bird Tweet 2 Explosion Firework Ghost Maou PSR-S550 Owner’s Manual… -
Page 121: Style List
NewHipHop Parranda Saeidy HipHopGroove Reggaeton WehdaSaghira LatinDJ’s Ballroom Laff Swing&Jazz VienneseWaltz ArabicEuro OrchBigBand EnglishWaltz OrientalPop OrchestraSwing1 Slowfox Bhajan OrchestraSwing2 Foxtrot Bhangra BigBandFast Quickstep Xi Qing Luo Gu BigBandShuffle Tango Jing Ju Jie Zou MidnightSwing Swingfox JumpJive Pasodoble PSR-S550 Owner’s Manual…
-
Page 122: Music Database List
Dear, My Clementine Missing You Like Crazy Rocking For 24 Hours Deep In Texas’s Heart No Matter What The Boys Do Tell Shouting Twist Ease Up Mother Brown What Is One More Year? Teddy Is A Bear PSR-S550 Owner’s Manual…
-
Page 123
My Home Is Pasadena Only One Note Makes A Samba Janeiro Samba Not Decided Pasodoble Cani Life Is High That Indigo Feeling Patricia Is Dancing The Cha Cha London, R U Prepared? These Winners Are Easy Rumba For Volare PSR-S550 Owner’s Manual… -
Page 124
You’re The Only One I Want Aga Doo Showtime Big Samba Bamboo A Nickel In The Nickelodeon Blankenesenolop Dance Lord Dancing Bird Dance Of Fire Going With A Good Thing Entertainment That Is Hands Up Party It’s Only A Day Away! PSR-S550 Owner’s Manual… -
Page 125: Voice Effect Type List
• The Tremolo effect Types (19–22) repeat all held notes (up to four). 20(Tremolo 1/12) • The Trill effect Types (23–26) create two-note trills (alternating notes) when two notes are held. 21(Tremolo 1/16) 22(Tremolo 1/32) 23(Trill 1/12) 24(Trill 1/16) 25(Trill 1/24) 26(Trill 1/32) PSR-S550 Owner’s Manual…
-
Page 126
A hypothetical acoustic space which extends without limit. BASEMENT A bit of initial delay followed by reverb with a unique resonance. WHITE ROOM A unique short reverb with a bit of initial delay. NO EFFECT No effect. PSR-S550 Owner’s Manual… -
Page 127
Several panning effects that automatically shift the sound position (left, right, front, back). EP AUTOPAN T_AUTO PAN1 Tempo synchronized Auto PAN. TREMOLO1 TREMOLO2 TREMOLO3 EP TREMOLO Rich Tremolo effect with both volume and pitch modulation. GT TREMOLO1 GT TREMOLO2 T_TREMOLO NO EFFECT No effect. PSR-S550 Owner’s Manual… -
Page 128
Equalizer effect that cuts both high and low frequencies, to simulate the sound heard EQ TEL through a telephone receiver. 2BAND EQ A stereo EQ with adjustable LOW and HIGH. Ideal for drum Parts. 3BAND EQ A mono EQ with adjustable LOW, MID, and HIGH equalizing. PSR-S550 Owner’s Manual… -
Page 129
Overdrive and Tempo Delay are connected in series. COMP+DIST1 Compressor and Distotion are connected in series. COMP+DIST2 CMP+DST+TDLY Compressor, Distotion and Tempo Delay are connected in series. CMP+OD+TDLY1 CMP+OD+TDLY2 CMP+OD+TDLY3 Compressor, Overdrive and Tempo Delay are connected in series. CMP+OD+TDLY4 CMP+OD+TDLY5 CMP+OD+TDLY6 PSR-S550 Owner’s Manual… -
Page 130
Several panning effects that automatically shift the sound position (left, right, front, back). AUTO PAN3 EP AUTOPAN T_AUTO PAN1 Tempo synchronized pan. T_AUTO PAN2 TREMOLO1 TREMOLO2 TREMOLO3 Rich Tremolo effect with both volume and pitch modulation. EP TREMOLO GT TREMOLO1 GT TREMOLO2 VIBE VIBRATE Vibraphone effect. PSR-S550 Owner’s Manual… -
Page 131
Distortion applied to the pedal wah output. P.WH+DIST HV P.WH+DIST LT PEDAL WH+OD P.WH+OD HD Overdrive (distortion) applied to the pedal wah output. P.WH+OD HV P.WH+OD LT NO EFFECT No effect. THRU Bypass without applying an effect. PSR-S550 Owner’s Manual… -
Page 132: Midi Implementation Chart
MIDI Implementation Chart PSR-S550 Owner’s Manual…
-
Page 133
MIDI Implementation Chart PSR-S550 Owner’s Manual… -
Page 134: Midi Data Format
Value for “n” is ignored. • This message simultaneously changes the tuning value of all channels. • The values of “dd” are used for XG Master Tuning. • The default value of “dd” are 00H, 04H, 00H, 00H, respec- tively. PSR-S550 Owner’s Manual…
-
Page 135: Specifications
* Specifications and descriptions in this owner’s manual are for infor- Sensitivity, Chord Fingering mation purposes only. Yamaha Corp. reserves the right to change or • MAIN VOICE: Volume, Octave, Pan, Reverb Level, modify products or specifications at any time without prior notice.
-
Page 136: Index
Left Voice Dry Level……81 Dual Voice ………. 18 PAUSE ……….28 Left Voice DSP Level……81 Dual Voice Chorus level ….. 81 PC …………95 Left Voice Octave……..81 Dual Voice Dry Level ……81 PHONES/OUTPUT jack….10, 15 PSR-S550 Owner’s Manual…
-
Page 137
Stop Accompaniment ……60 Store (Registration) ……77 XG…………6 Style……….22, 55 STYLE category buttons….14, 22 Style File ……….63 Style List ……….. 121 Style Out……….94 Style Volume……..60 SUSTAIN (Footswitch) …… 10 Sustain (Panel) ……..47 PSR-S550 Owner’s Manual… -
Page 138
PSR-S550 Owner’s Manual… -
Page 139
[Information on Disposal in other Countries outside the European Union] This symbol is only valid in the European Union. If you wish to discard these items, please contact your local authorities or dealer and ask for the correct method of disposal. PSR-S550 Owner’s Manual… -
Page 140: Limited Warranty
PSR SERIES OF DIGITAL KEYBOARDS If during the first 90 days that immediately follows the purchase date, your new Yamaha product covered by this warranty is found to have a defect in material and/or workmanship, Yamaha and/or its authorized representative will repair such defect without charge for parts or labor.
-
Page 141
Niederlassung und bei Yamaha Vertragshändlern in den jeweiligen Bestimmungsländern erhältlich. Pour plus de détails sur les produits, veuillez-vous adresser à Yamaha ou au distributeur le plus proche de vous figurant dans la liste suivante. Para detalles sobre productos, contacte su tienda Yamaha más cercana o el distribuidor autorizado que se lista debajo. -
Page 142
Yamaha Home Keyboards Home Page http://music.yamaha.com/homekeyboard/ Yamaha Manual Library http://www.yamaha.co.jp/manual/ U.R.G., Digital Musical Instruments Division © 2008 Yamaha Corporation WN55250 XXXPOXXX.X-01C0 Printed in China…
This manual is also suitable for:
Psr550
Страницы и текст этой инструкции
 Инструкция — PSR-S550
 Информация отображена на картинке
 Информация отображена на картинке
 Информация отображена на картинке
 Информация отображена на картинке
Как использовать наш сайт инструкций OnlineManuals.ru
Наша цель состоит в том, чтобы предоставить вам быстрый доступ к содержанию инструкции для — PSR-S550.
С помощью онлайн просмотра, Вы можете быстро просмотреть содержимое инструкции и найти решение проблемы с — PSR-S550.
Для Вашего удобства
Если листать руководство пользователя — PSR-S550 прямо на сайте, не очень удобно для Вас, есть два возможных решения:
• Просмотр в полноэкранном режиме — легко просмотреть руководство пользователя (без загрузки его на свой компьютер), Вы можете использовать режим полноэкранного просмотра.
Для просмотра инструкции пользователя — PSR-S550 на полном экране, используйте кнопку «Открыть в Pdf-viewer».
• Загрузка на компьютер — Вы можете также скачать Инструкция — PSR-S550 на свой компьютер и сохранить его в файлах.
Многие люди предпочитают читать документы не на экране, а в печатной версии.
Возможность печати руководства пользователя также была предусмотрена на нашем сайте,
и вы можете использовать ее, нажав на иконку «печать» в Pdf-viewer.
Нет необходимости печатать все руководство — PSR-S550, можно выбрать только нужные страницы инструкции.
 01:56
01:56
Yamaha psr-550″Мираж»Мухтар Жалилов
 08:36
08:36
PSR-S550 Demonstration Movie
 09:14
09:14
YAMAHA PSR-S550 Demo (Russian)
 04:38
04:38
Краткий обзор синтезатор Yamaha PSR S-550
 04:35
04:35
Ах какая женщина Игра на синтезаторе Yamaha psr-s550
 05:38
05:38
Final Coutdown on Yamaha PSR S550
 12:40
12:40
TECLADOS YAMAHA PSR S550 CARACTERÍSTICA
 04:59
04:59
Рассвет (Sunrising) Yamaha PSR S550
U.R.G., Pro Audio & Digital Musical Instrument Division, Yamaha Corporation
© 2008 Yamaha Corporation
WP12590 XXXPOXXX.X-01A0
Printed in China
ES
FR
RU
PT
Manual do Proprietário
Mode d’emploi
Manual de instrucciones
DIGITAL WORKSTATION
DIGIT
AL W
ORKST
A
TION
Yamaha Home Keyboards Home Page
http://music.yamaha.com/homekeyboard/
Yamaha Manual Library
http://www.yamaha.co.jp/manual/

2
уководство пользователя PSR-S550
PLEASE KEEP THIS MANUAL
This product utilizes batteries or an external power supply (adapter).
DO NOT connect this product to any power supply or adapter other
than one described in the manual, on the name plate, or specifically
recommended by Yamaha.
This product should be used only with the components supplied or; a
cart, rack, or stand that is recommended by Yamaha. If a cart, etc., is
used, please observe all safety markings and instructions that accom-
pany the accessory product.
SPECIFICATIONS SUBJECT TO CHANGE:
The information contained in this manual is believed to be correct at the
time of printing. However, Yamaha reserves the right to change or mod-
ify any of the specifications without notice or obligation to update exist-
ing units.
This product, either alone or in combination with an amplifier and head-
phones or speaker/s, may be capable of producing sound levels that
could cause permanent hearing loss. DO NOT operate for long periods
of time at a high volume level or at a level that is uncomfortable. If you
experience any hearing loss or ringing in the ears, you should consult
an audiologist.
IMPORTANT: The louder the sound, the shorter the time period before
damage occurs.
NOTICE:
Service charges incurred due to a lack of knowledge relating to how a
function or effect works (when the unit is operating as designed) are not
covered by the manufacturer’s warranty, and are therefore the owners
responsibility. Please study this manual carefully and consult your
dealer before requesting service.
ENVIRONMENTAL ISSUES:
Yamaha strives to produce products that are both user safe and envi-
ronmentally friendly. We sincerely believe that our products and the pro-
duction methods used to produce them, meet these goals. In keeping
with both the letter and the spirit of the law, we want you to be aware of
the following:
Battery Notice:
This product MAY contain a small non-rechargeable battery which (if
applicable) is soldered in place. The average life span of this type of
battery is approximately five years. When replacement becomes neces-
sary, contact a qualified service representative to perform the replace-
ment.
This product may also use “household” type batteries. Some of these
may be rechargeable. Make sure that the battery being charged is a
rechargeable type and that the charger is intended for the battery being
charged.
When installing batteries, do not mix batteries with new, or with batter-
ies of a different type. Batteries MUST be installed correctly. Mis-
matches or incorrect installation may result in overheating and battery
case rupture.
Warning:
Do not attempt to disassemble, or incinerate any battery. Keep all bat-
teries away from children. Dispose of used batteries promptly and as
regulated by the laws in your area. Note: Check with any retailer of
household type batteries in your area for battery disposal information.
Disposal Notice:
Should this product become damaged beyond repair, or for some rea-
son its useful life is considered to be at an end, please observe all local,
state, and federal regulations that relate to the disposal of products that
contain lead, batteries, plastics, etc. If your dealer is unable to assist
you, please contact Yamaha directly.
NAME PLATE LOCATION:
The name plate is located on the bottom of the product. The model
number, serial number, power requirements, etc., are located on this
plate. You should record the model number, serial number, and the date
of purchase in the spaces provided below and retain this manual as a
permanent record of your purchase.
Model
Serial No.
Purchase Date
SPECIAL MESSAGE SECTION
92-BP
(bottom)

уководство пользователя PSR-S550
3
1. IMPORTANT NOTICE: DO NOT MODIFY THIS UNIT!
This product, when installed as indicated in the instructions con-
tained in this manual, meets FCC requirements. Modifications not
expressly approved by Yamaha may void your authority, granted by
the FCC, to use the product.
2. IMPORTANT:
When connecting this product to accessories and/
or another product use only high quality shielded cables. Cable/s
supplied with this product MUST be used. Follow all installation
instructions. Failure to follow instructions could void your FCC
authorization to use this product in the USA.
3. NOTE:
This product has been tested and found to comply with the
requirements listed in FCC Regulations, Part 15 for Class “B” digital
devices. Compliance with these requirements provides a reason-
able level of assurance that your use of this product in a residential
environment will not result in harmful interference with other elec-
tronic devices. This equipment generates/uses radio frequencies
and, if not installed and used according to the instructions found in
the users manual, may cause interference harmful to the operation
of other electronic devices. Compliance with FCC regulations does
not guarantee that interference will not occur in all installations. If
this product is found to be the source of interference, which can be
determined by turning the unit “OFF” and “ON”, please try to elimi-
nate the problem by using one of the following measures:
Relocate either this product or the device that is being affected by
the interference.
Utilize power outlets that are on different branch (circuit breaker or
fuse) circuits or install AC line filter/s.
In the case of radio or TV interference, relocate/reorient the
antenna. If the antenna lead-in is 300 ohm ribbon lead, change the
lead-in to co-axial type cable.
If these corrective measures do not produce satisfactory results,
please contact the local retailer authorized to distribute this type of
product. If you can not locate the appropriate retailer, please contact
Yamaha Corporation of America, Electronic Service Division, 6600
Orangethorpe Ave, Buena Park, CA90620
The above statements apply ONLY to those products distributed by
Yamaha Corporation of America or its subsidiaries.
FCC INFORMATION (U.S.A.)
* This applies only to products distributed by YAMAHA CORPORATION OF AMERICA.
(class B)
OBSERVERA!
Apparaten kopplas inte ur växelströmskällan (nätet) så länge som den
ar ansluten till vägguttaget, även om själva apparaten har stängts av.
ADVARSEL: Netspæendingen til dette apparat er IKKE afbrudt,
sålæenge netledningen siddr i en stikkontakt, som er t endt — også
selvom der or slukket på apparatets afbryder.
VAROITUS: Laitteen toisiopiiriin kytketty käyttökytkin ei irroita koko
laitetta verkosta.
(standby)
This product contains a high intensity lamp
that contains a small amount of mercury.
Disposal of this material may be regulated
due to environmental considerations.
For disposal information in the United States, refer to
the Electronic Industries Alliance web site:
www.eiae.org
(mercury)
* This applies only to products distributed by
YAMAHA CORPORATION OF AMERICA.
IMPORTANT NOTICE FOR THE UNITED KINGDOM
Connecting the Plug and Cord
IMPORTANT. The wires in this mains lead are coloured in accor-
dance with the following code:
BLUE
: NEUTRAL
BROWN : LIVE
As the colours of the wires in the mains lead of this apparatus
may not correspond with the coloured makings identifying the ter-
minals in your plug proceed as follows:
The wire which is coloured BLUE must be connected to the ter-
minal which is marked with the letter N or coloured BLACK.
The wire which is coloured BROWN must be connected to the
terminal which is marked with the letter L or coloured RED.
Making sure that neither core is connected to the earth terminal
of the three pin plug.
• This applies only to products distributed by Yamaha-Kemble
Music (U.K.) Ltd.
(2 wires)
* This applies only to products distributed by
YAMAHA CORPORATION OF AMERICA.
COMPLIANCE INFORMATION STATEMENT
(DECLARATION OF CONFORMITY PROCEDURE)
Responsible Party : Yamaha Corporation of America
Address : 6600 Orangethorpe Ave., Buena Park, Calif.
90620
Telephone : 714-522-9011
Type of Equipment : Digital Keyboard
Model Name : PSR-S550
This device complies with Part 15 of the FCC Rules.
Operation is subject to the following two conditions:
1) this device may not cause harmful interference, and
2) this device must accept any interference received including
interference that may cause undesired operation.
See user manual instructions if interference to radio reception is
suspected.
(FCC DoC)

Икдзагд нцпзада ецбйидлзйлна, Икцсмикцьсцзац, Ззаедзац
Страница 4
- Изображение
- Текст
4
уководство пользователя PSR-S550
(3)-12
1/2
икДЗагД нЦпзада ЕЦбйиДлзйлна
ЗзаеДнЦгъзй икйуанДвнЦ, икЦЬСЦ уЦе икалнмиДнъ д щдлигмДнДсаа
* п ‡МЛЪВ ˝ЪУ ЫНУ‚У‰ТЪ‚У ‚ ·ВБУФ‡ТМУП ПВТЪВ. йМУ ‚‡П В˘В ФУМ‡‰У·ËÚÒfl.
икЦСмикЦЬСЦзаЦ
ЗУ ЛБ·ВК‡МЛВ ТВ ¸ВБМ˚ı Ъ ‡‚П Л ‰‡КВ ТПВ ЪЛ УЪ Ы‰‡ ‡ ˝ОВНЪ Л˜ВТНЛП ЪУНУП, ‡ Ъ‡НКВ НУ УЪНУ„У Б‡П˚Н‡МЛfl,
ФУ‚ ВК‰ÂÌËfl У·У Ы‰У‚‡МЛfl, ФУК‡ ‡ Л ‰ Ы„Лı Ë̈ˉВМЪУ‚ ‚ТВ„‰‡ ТУ·О˛‰‡ИЪВ ТОВ‰Ы˛˘ЛВ ПВ ˚ ·ВБУФ‡ТМУТЪЛ:
• аТФУО¸БЫИЪВ ЪУО¸НУ М‡Ф flÊÂÌËÂ, Б‡‰‡ММУВ ‰Оfl ЛМТЪ ЫПВМЪ‡.
щЪУ М‡Ф flÊÂÌË ЫН‡Б‡МУ М‡ ЛМТЪ ЫПВМЪВ.
• аТФУО¸БЫИЪВ ЪУО¸НУ ЫН‡Б‡ММ˚И ‡‰‡ФЪВ (PA-301/PA-300B/PA-300 ЛОЛ
‡М‡ОУ„Л˜М˚И, ВНУПВМ‰У‚‡ММ˚И НУ ФУ ‡ˆËÂÈ Yamaha). аТФУО¸БУ‚‡МЛВ
МВФ ‡‚ЛО¸МУ„У ‡‰‡ФЪВ ‡ ПУКВЪ Ф Л‚ВТЪЛ Н ФУ‚ ВК‰ВМЛ˛ ЛОЛ
ФВ В„ В‚Ы ЛМТЪ ЫПВМЪ‡.
• иВ ЛУ‰Л˜ВТНЛ Ф У‚В flÈÚ ‚ЛОНЫ ˝ОВНЪ УЛМТЪ ЫПВМЪ‡ Л Ы‰‡ÎflÈÚÂ Т МВВ
„ flБ¸ Л Ф˚О¸.
• тМЫ ‡‰‡ФЪВ ‡ ФВ ВПВММУ„У ЪУН‡ МВ ‰УОКВМ М‡ıУ‰ЛЪ¸Тfl fl‰УП Т ЛТ-
ЪУ˜МЛН‡ПЛ ЪВФО‡ (М‡„ В‚‡ÚÂÎflÏË, ‡‰Л‡ЪУ ‡ПЛ Л ‰ .). зВ ‰УФЫТН‡ИЪВ
Ъ‡НКВ ˜ ВБПВ МУ„У Т„Л·‡МЛfl Л ФУ‚ ВК‰ÂÌËfl ¯МЫ ‡, МВ ТЪ‡‚¸ЪВ М‡ МВ„У
ÚflÊÂÎ˚В Ф В‰ПВЪ˚ Л ‰В КЛЪВ В„У ‚ Ъ‡НУП ПВТЪВ, „‰В М‡ МВ„У МВО¸Бfl
М‡ТЪЫФЛЪ¸, Б‡‰ВЪ¸ МУ„УИ ЛОЛ ˜ЪУ-МЛ·Ы‰¸ ФУ МВПЫ ФВ ВН‡ЪЛЪ¸.
• зВ УЪН ˚‚‡ИЪВ ЛМТЪ ЫПВМЪ Л МВ Ф˚Ъ‡ИЪВТ¸ ‡БУ· ‡Ъ¸ ЛОЛ ПУ‰ËÙˈË-
У‚‡Ъ¸ В„У ‚МЫЪ ВММЛВ НУПФУМВМЪ˚. З ЛМТЪ ЫПВМЪВ МВЪ НУПФУМВМЪУ‚,
НУЪУ ˚В ‰УОКВМ У·ТОЫКЛ‚‡Ъ¸ ФУО¸БУ‚‡ЪВО¸. и Л ФУfl‚ОВМЛЛ МВЛТФ ‡‚-
МУТЪЛ МВПВ‰ОВММУ Ф ВН ‡ЪЛЪВ ˝НТФОЫ‡Ъ‡ˆЛ˛ Л У· ‡ЪЛЪВТ¸ Б‡ ФУПУ˘¸˛
Н Н‚‡ÎËÙËˆË У‚‡ММ˚П ÒÔˆˇОЛТЪ‡П ˆÂÌÚ ‡ ÚÂıÌ˘ВТНУ„У У·ТОЫКЛ‚‡-
МЛfl НУ ФУ ‡ˆЛЛ Yamaha.
• ЕВ В„ЛЪВ ЛМТЪ ЫПВМЪ УЪ ‰УК‰fl, МВ ЛТФУО¸БЫИЪВ В„У fl‰УП Т ‚У‰УИ,
‚ ЫТОУ‚Лflı Т˚ УТЪЛ Л ФУ‚˚¯ВММУИ ‚О‡КМУТЪЛ; МВ ТЪ‡‚¸ЪВ М‡ МВ„У
ВПНУТЪЛ Т КЛ‰НУТЪ¸˛, НУЪУ ‡fl ПУКВЪ ‡БОЛЪ¸Тfl Л ФУФ‡ТЪ¸ ‚МЫЪ ¸.
З ТОЫ˜‡В ФУФ‡‰‡МЛfl КЛ‰НУТЪЛ, М‡Ф ЛПВ ‚У‰˚, ‚ ЛМТЪ ЫПВМЪ
МВПВ‰ОВММУ УЪНО˛˜ЛЪВ ФЛЪ‡МЛВ Л УЪТУВ‰ЛМЛЪВ Н‡·ВО¸ ФЛЪ‡МЛfl УЪ
˝ОВНЪ УТВЪЛ. б‡ЪВП У· ‡ЪЛЪВТ¸ Б‡ ФУПУ˘¸˛ Н Н‚‡ÎËÙËˆË У‚‡ММ˚П
ÒÔˆˇОЛТЪ‡П ˆÂÌÚ ‡ ÚÂıÌ˘ВТНУ„У У·ТОЫКЛ‚‡МЛfl НУ ФУ ‡ˆЛЛ
Yamaha.
• зЛНУ„‰‡ МВ ‚ТЪ‡‚ÎflÈÚÂ Л МВ ‚˚МЛП‡ИЪВ ‚ЛОНЫ ˝ОВНЪ УЛМТЪ ЫПВМЪ‡
ПУН ˚ПЛ ЫН‡ПЛ.
• зВ ТЪ‡‚¸ЪВ М‡ ЛМТЪ ЫПВМЪ „У fl˘ЛВ Ф В‰ПВЪ˚, М‡Ф ЛПВ Т‚В˜Л.
ЙУ fl˘ЛИ Ф В‰ПВЪ ПУКВЪ ЫФ‡ТЪ¸ Л ‚˚Б‚‡Ъ¸ ФУК‡ .
• З ТОЫ˜‡В ЛБМУТ‡ Л ФУ‚ ВК‰ÂÌËfl ¯МЫ ‡ ЛОЛ ‚ЛОНЛ ‡‰‡ФЪВ ‡ ФВ ВПВММУ-
„У ЪУН‡, ‡ Ъ‡НКВ Ф Л ‚МВБ‡ФМУП ЛТ˜ВБМУ‚ВМЛЛ Б‚ЫН‡ ‚У ‚ ВПfl ˝НТФОЫ‡-
Ъ‡ˆЛЛ, Ф Л ФУfl‚ОВМЛЛ МВУ·˚˜МУ„У Б‡Ф‡ı‡ Л ‰˚П‡ МВПВ‰ОВММУ УЪНО˛˜Л-
ЪВ ˝ОВНЪ УФЛЪ‡МЛВ, ‚˚М¸ЪВ ‚ЛОНЫ ‡‰‡ФЪВ ‡ ЛБ УБВЪНЛ Л У· ‡ЪЛЪВТ¸ Б‡
ФУПУ˘¸˛ Н ÒÔˆˇОЛТЪ‡П ˆÂÌÚ ‡ ÚÂıÌ˘ВТНУ„У У·ТОЫКЛ‚‡МЛfl НУ ФУ ‡-
ˆЛЛ Yamaha.
ЗзаеДзаЦ!
ЗУ ЛБ·ВК‡МЛВ М‡ÌÂÒÂÌËfl ТВ ¸ВБМ˚ı Ъ ‡‚П ТВ·В Л УН ЫК‡˛˘ЛП, ‡ Ъ‡НКВ ФУ‚ ВК‰ÂÌËfl ЛМТЪ ЫПВМЪ‡ Л ‰ Ы„У„У
ЛПЫ˘ВТЪ‚‡, ФУПЛПУ Ф У˜Лı ‚ТВ„‰‡ ТУ·О˛‰‡ИЪВ ТОВ‰Ы˛˘ЛВ УТМУ‚М˚В ПВ ˚ ·ВБУФ‡ТМУТЪЛ:
• и Л УЪНО˛˜ВМЛЛ Н‡·ВОfl УЪ ЛМТЪ ЫПВМЪ‡ ЛОЛ УЪ ˝ОВНЪ УТВЪЛ ·В ЛЪВТ¸
Б‡ ‚ЛОНЫ, ‡ МВ Б‡ Н‡·ВО¸.
• дУ„‰‡ ЛМТЪ ЫПВМЪ МВ ЛТФУО¸ÁÛÂÚÒfl, ‡ Ъ‡НКВ ‚У ‚ ВПfl „ УБ˚ УЪНО˛˜‡И-
ЪВ ‡‰‡ФЪВ ФВ ВПВММУ„У ЪУН‡.
• зВ ФУ‰НО˛˜‡ИЪВ ЛМТЪ ЫПВМЪ Н У‰МУИ ˝ОВНЪ Л˜ВТНУИ УБВЪНВ Т ‰ Ы„ЛПЛ
ЫТЪ УИТЪ‚‡ПЛ (М‡Ф ЛПВ , ˜В ВБ Ъ УИМЛН). щЪУ ПУКВЪ Ф Л‚ВТЪЛ Н ТМЛ-
КВМЛ˛ Н‡˜ВТЪ‚‡ Б‚ЫН‡ ЛОЛ ФВ В„ В‚Ы УБВЪНЛ.
• ЗУ ЛБ·ВК‡МЛВ ‰ВЩУ П‡ˆЛЛ Ф‡МВОЛ Л ФУ‚ ВК‰ÂÌËfl ‚ÌÛÚ ÂÌÌËı НУПФУ-
МВМЪУ‚ ·В В„ЛЪВ ЛМТЪ ЫПВМЪ УЪ ˜ ВБПВ МУИ Ф˚ОЛ Л ТЛО¸МУИ ‚Л· ‡ˆЛЛ
Л МВ ЛТФУО¸БЫИЪВ В„У Ф Л У˜ВМ¸ ‚˚ТУНУИ ЛОЛ МЛБНУИ ЪВПФВ ‡ЪЫ В (М‡Ф-
ЛПВ , М‡ ÒÓÎ̈Â, fl‰УП Т М‡„ В‚‡ЪВОВП ЛОЛ ‚ П‡¯ЛМВ ‚ ‰МВ‚МУВ ‚ ВПfl).
• зВ ЛТФУО¸БЫИЪВ ЛМТЪ ЫПВМЪ ‚ МВФУТ В‰ТЪ‚ВММУИ ·ОЛБУТЪЛ УЪ ЪВОВ‚Л-
БУ ‡, ‡‰ЛУФ ЛВПМЛН‡, ТЪВ ВУУ·У Ы‰У‚‡МЛfl, ПУ·ЛО¸МУ„У ЪВОВЩУМ‡ Л
‰ Ы„Лı ˝ОВНЪ УФ Л·У У‚. З Ф УЪЛ‚МУП ТОЫ˜‡В ‚ ЛМТЪ ЫПВМЪВ, ЪВОВ‚Л-
БУ В ЛОЛ ‡‰ЛУФ ЛВПМЛНВ ПУ„ЫЪ ‚УБМЛНМЫЪ¸ ÔÓÏÂıË.
• ЗУ ЛБ·ВК‡МЛВ ТОЫ˜‡ИМУ„У Ф‡‰ÂÌËfl ЛМТЪ ЫПВМЪ‡ МВ УТЪ‡‚ÎflÈÚÂ В„У ‚
МВЫТЪУИ˜Л‚УП ФУОУКВМЛЛ.
• иВ В‰ ФВ ВПВ˘ВМЛВП ЛМТЪ ЫПВМЪ‡ УЪТУВ‰ЛМЛЪВ ФУ‰НО˛˜ВММ˚И Н МВПЫ
‡‰‡ФЪВ Л ‰ Ы„ЛВ Н‡·ВОЛ.
• иВ В‰ М‡ТЪ УИНУИ ЛБ‰ÂÎËfl Ы·В‰ЛЪВТ¸, ˜ЪУ ЛТФУО¸БЫВП‡fl
˝ОВНЪ У УБВЪН‡ ОВ„НУ ‰УТЪЫФМ‡. З ТОЫ˜‡В ‚УБМЛНМУ‚ÂÌËfl ͇НЛı-ОЛ·У
МВФУО‡‰УН МВПВ‰ОВММУ ‚˚НО˛˜ЛЪВ ЛМТЪ ЫПВМЪ Л УЪНО˛˜ЛЪВ В„У УЪ
˝ОВНЪ УТВЪЛ. С‡КВ ВТОЛ ФЛЪ‡МЛВ ‚˚НО˛˜ВМУ, ЛБ‰ВОЛВ Ф У‰УОК‡ВЪ
ФУЪ В·ОflЪ¸ ˝ОВНЪ У˝МВ „Л˛ ‚ ПЛМЛП‡О¸МУП НУОЛ˜ВТЪ‚В. ЦТОЛ ЛБ‰ВОЛВ
МВ ЛТФУО¸ÁÛÂÚÒfl ‚ ЪВ˜ВМЛВ ‰ОЛЪВО¸МУ„У ‚ ВПВМЛ, УЪНО˛˜ЛЪВ ¯МЫ
ФЛЪ‡МЛfl УЪ ˝ОВНЪ УТВЪЛ.
• аМТЪ ЫПВМЪ ТОВ‰ЫВЪ ЫТЪ‡М‡‚ОЛ‚‡Ъ¸ ЪУО¸НУ М‡ ÒÔÂˆË‡О¸МУ Ф В‰М‡БМ‡-
˜ВММЫ˛ ‰Оfl МВ„У ФУ‰ТЪ‡‚НЫ. СОfl Н ÂÔÎÂÌËfl ТЪУИНЛ ЛОЛ ФУ‰ТЪ‡‚НЛ
ЛТФУО¸БЫИЪВ ЪУО¸НУ ‚ЛМЪ˚, ФУТЪ‡‚ÎflÂÏ˚В ‚ НУПФОВНЪВ. З Ф УЪЛ‚МУП
ТОЫ˜‡В ‚УБ
ПУКМУ ФУ‚ ВК‰ВМЛВ ‚МЫЪ ÂÌÌËı НУПФУМВМЪУ‚ Л Ф‡‰ВМЛВ
ЛМТЪ ЫПВМЪ‡.
аТЪУ˜МЛН ФЛЪ‡МЛfl/‡‰‡ФЪВ ФВ ВПВММУ„У ЪУН‡
зВ УЪН ˚‚‡Ъ¸
ЕВ В˜¸ УЪ ‚У‰˚
ЕВ В˜¸ УЪ У„Мfl
ЗМВ¯Ъ‡ЪМ˚В ТЛЪЫ‡ˆЛЛ
аТЪУ˜МЛН ФЛЪ‡МЛfl/‡‰‡ФЪВ ФВ ВПВММУ„У ЪУН‡
еВТЪУ ЫТЪ‡МУ‚НЛ

уководство пользователя PSR-S550
5
(3)-12
2/2
• иВ В‰ ФУ‰НО˛˜ВМЛВП ЛМТЪ ЫПВМЪ‡ Н ‰ Ы„ЛП ˝ОВНЪ УММ˚П НУПФУМВМ-
Ъ‡П УЪНО˛˜ЛЪВ Лı ФЛЪ‡МЛВ. иВ В‰ ‚НО˛˜ВМЛВП ЛОЛ УЪНО˛˜ВМЛВП
˝ОВНЪ УММ˚ı НУПФУМВМЪУ‚ ЫТЪ‡МУ‚ЛЪВ ПЛМЛП‡О¸М˚И Ы У‚ВМ¸ „ УП-
НУТЪЛ. м·В‰ЛЪВТ¸ Ъ‡НКВ ‚ ЪУП, ˜ЪУ М‡ ‚ТВı НУПФУМВМЪ‡ı ЫТЪ‡МУ‚ОВМ
ПЛМЛП‡О¸М˚И Ы У‚ВМ¸ „ УПНУТЪЛ, ‡ ‚У ‚ ВПfl Л„ ˚ М‡ ЛМТЪ ЫПВМЪВ
ФУТЪВФВММУ Ы‚ВОЛ˜¸ЪВ „ УПНУТЪ¸ ‰У МЫКМУИ.
• СОfl ˜ЛТЪНЛ ЛМТЪ ЫПВМЪ‡ ЛТФУО¸БЫИЪВ Пfl„НЫ˛ ÒÛıÛ˛ ЪН‡М¸. зЛНУ„‰‡ МВ
ЛТФУО¸БЫИЪВ ÔflÚÌÓ‚˚‚У‰ЛЪВОЛ, ‡ТЪ‚У ЛЪВОЛ, КЛ‰НЛВ У˜ЛТЪЛЪВОЛ ЛОЛ
˜ËÒÚfl˘ЛВ Т‡ОЩВЪНЛ Т Ф УФЛЪНУИ.
• б‡Ф В˘‡ÂÚÒfl ‚ÒÚ‡‚ОflЪ¸ Ф‡О¸ˆ˚ Л О‡‰УМЛ ‚ Б‡БУ ˚ ПВК‰Ы ˜‡ÒÚflÏË
ЛМТЪ ЫПВМЪ‡.
• б‡Ф В˘‡ÂÚÒfl ‚ÒÚ‡‚ОflЪ¸ ·ЫП‡„Ы, ПВЪ‡ООЛ˜ВТНЛВ Л Ф У˜ЛВ Ф В‰ПВЪ˚
‚ Б‡БУ ˚ ПВК‰Ы ˜‡ÒÚflÏË Ф‡МВОЛ Л НО‡‚Л‡ЪЫ ˚. ЦТОЛ ˝ЪУ ТОЫ˜ЛОУТ¸,
МВПВ‰ОВММУ ‚˚НО˛˜ЛЪВ ЛМТЪ ЫПВМЪ Л ‚˚М¸ЪВ Н‡·ВО¸ ФЛЪ‡МЛfl ЛБ
УБВЪНЛ. б‡ЪВП У· ‡ЪЛЪВТ¸ Б‡ ФУПУ˘¸˛ Н ÒÔˆˇОЛТЪ‡П ˆÂÌÚ ‡ ЪВı-
МЛ˜ВТНУ„У У·ТОЫКЛ‚‡МЛfl НУ ФУ ‡ˆЛЛ Yamaha.
• зВ НО‡‰ЛЪВ М‡ ЛМТЪ ЫПВМЪ Ф В‰ПВЪ˚ ЛБ ‚ЛМЛО‡, ФО‡ТЪП‡ТТ˚ ЛОЛ
ВБЛМ˚: ˝ЪУ ПУКВЪ ‚˚Б‚‡Ъ¸ ‚˚ˆ‚ВЪ‡МЛВ Ф‡МВОЛ ЛОЛ НО‡‚Л‡ЪЫ ˚.
• зВ У·ОУН‡˜Л‚‡ИЪВТ¸ М‡ ЛМТЪ ЫПВМЪ, МВ ТЪ‡‚¸ЪВ М‡ МВ„У ÚflÊÂÎ˚В Ф В‰-
ПВЪ˚ Л МВ Ф ЛНО‡‰˚‚‡ИЪВ ТОЛ¯НУП ·УО¸¯Ы˛ ТЛОЫ Ф Л ФУО¸БУ‚‡МЛЛ
НМУФН‡ПЛ, ‚˚НО˛˜‡ÚÂÎflÏË Л ‡Б˙ВП‡ПЛ.
• зВ ТОВ‰ЫВЪ ФУО¸БУ‚‡Ъ¸Тfl ЛМТЪ ЫПВМЪУП ЛОЛ М‡Ы¯МЛН‡ПЛ Ф Л ‚˚ТУНУП
ЛОЛ МВНУПЩУ ЪМУП Ы У‚МВ „ УПНУТЪЛ ‚ ЪВ˜ВМЛВ ‰ОЛЪВО¸МУ„У
ФВ ЛУ‰‡ ‚ ВПВМЛ, Ъ‡Н Н‡Н ˝ЪУ ПУКВЪ Ф Л‚ВТЪЛ Н МВУ· ‡ЪЛПУПЫ
ФУ‚ ВК‰ВМЛ˛ ÒÎÛı‡.
лУı ‡МВМЛВ Л ВБВ ‚МУВ НУФЛ У‚‡МЛВ ‰‡ММ˚ı
• и Л УЪНО˛˜ВМЛЛ ФЛЪ‡МЛfl ЛМТЪ ЫПВМЪ‡ Ф‡ ‡ПВЪ ˚ Ф‡МВОЛ Л ‰‡ММ˚В
МВНУЪУ ˚ı ‰ Û„Лı ЪЛФУ‚ МВ ТУı ‡Мfl˛ЪТfl ‚ Ф‡ÏflÚË. ëÓı ‡ÌflÈÚÂ
ÌÂÓ·ıУ‰ЛП˚В ‰‡ММ˚В ‚ В„ЛТЪ ‡ˆËÓÌÌÓÈ Ô‡ÏflÚË (ÒÚ . 85).
лУı ‡МВММ˚В ‰‡ММ˚В ПУ„ЫЪ ·˚Ъ¸ ЫЪ ‡˜ВМ˚ ‚ТОВ‰ТЪ‚ЛВ МВЛТФ ‡‚МУТЪЛ
ЛОЛ МВФ ‡‚ЛО¸МУИ ‡·УЪ˚ ЛМТЪ ЫПВМЪ‡. лУı ‡ÌflÈÚ ‚‡КМ˚В ‰‡ММ˚В
М‡ М‡НУФЛЪВОВ USB ЛОЛ М‡ ‚МВ¯МВП ЫТЪ УИТЪ‚В ı ‡ÌÂÌËfl ‰‡ÌÌ˚ı,
М‡Ф ЛПВ М‡ НУПФ¸˛ЪВ В (ТЪ . 98).
кВБВ ‚МУВ НУФЛ У‚‡МЛВ М‡ М‡НУФЛЪВО¸ USB ЛОЛ
‚МВ¯МЛИ МУТЛЪВО¸
• ЗУ ЛБ·ВК‡МЛВ ФУЪВ Л ‰‡ММ˚ı ‚ТОВ‰ТЪ‚ЛВ ФУ‚ ВК‰ÂÌËfl ÌÓÒËÚÂÎfl
ВНУПВМ‰ÛÂÚÒfl ÒÓı ‡МflЪ¸ М‡Л·УОВВ ‚‡КМ˚В ‰‡ММ˚В М‡ ‰‚Ыı
М‡ÍÓÔËÚÂÎflı USB ЛОЛ ‚МВ¯МЛı ÌÓÒËÚÂÎflı.
ЗТВ„‰‡ ‚˚НО˛˜‡ИЪВ ЛМТЪ ЫПВМЪ, ВТОЛ МВ ЛТФУО¸БЫВЪВ В„У.
С‡КВ ‚ ЪВı ТОЫ˜‡flı, НУ„‰‡ ‚˚НО˛˜‡ЪВО¸ ФЛЪ‡МЛfl М‡ıУ‰ËÚÒfl ‚ ФУОУКВМЛЛ STANDBY, ЛМТЪ ЫПВМЪ Ф У‰УОК‡ВЪ ‚ ПЛМЛП‡О¸М˚ı НУОЛ˜ВТЪ‚‡ı ФУЪ В·ОflЪ¸
˝ОВНЪ У˝МВ „Л˛. ЦТОЛ ЛМТЪ ЫПВМЪ МВ ЛТФУО¸ÁÛÂÚÒfl ‰ОЛЪВО¸МУВ ‚ ВПfl, УЪНО˛˜ЛЪВ ‡‰‡ФЪВ ФВ ВПВММУ„У ЪУН‡ УЪ УБВЪНЛ.
● орговые марки
• астровые шрифты, используемые в данном инструменте, предоставлены компанией с ограниченной ответственностью Ricoh
и являются ее собственностью.
• Windows является зарегистрированной торговой маркой корпорации Microsoft
®
.
•
аименования компаний и изделий в настоящем руководстве пользователя являются торговыми марками или зарегистрированными
торговыми марками соответствующих компаний.
иУ‰НО˛˜ВМЛВ
й·ТОЫКЛ‚‡МЛВ
еВ ˚ ·ВБУФ‡ТМУТЪЛ Ф Л ˝НТФОЫ‡Ъ‡ˆЛЛ
лУı ‡МВМЛВ ‰‡ММ˚ı
дУ ФУ ‡ˆЛfl Yamaha МВ МВТВЪ УЪ‚ВЪТЪ‚ВММУТЪЛ Б‡ ФУ‚ ВК‰ÂÌËfl, ‚˚Б‚‡ММ˚В МВФ ‡‚ЛО¸МУИ ˝НТФОЫ‡Ъ‡ˆËÂÈ ЛОЛ ПУ‰ЛЩЛН‡ˆËÂÈ
ЛМТЪ ЫПВМЪ‡, ‡ Ъ‡НКВ Б‡ ФУЪВ flММ˚В ЛОЛ ЛТФУ ˜ВММ˚В ‰‡ММ˚В.
аОО˛ТЪ ‡ˆЛЛ Л НУФЛЛ ˝Н ‡М‡ Ьд-‰ËÒÔÎÂfl Ф Л‚В‰ВМ˚ ‚ М‡ÒÚÓfl˘ВП ЫНУ‚У‰ТЪ‚В ФУО¸БУ‚‡ÚÂÎfl ЪУО¸НУ ‚ Н‡˜ВТЪ‚В ÔÓflÒÌÂÌËfl ‚ ЪВНТЪЫ
Л МВУ·flБ‡ЪВО¸МУ ‚ ЪУ˜МУТЪЛ ТУУЪ‚ВЪТЪ‚Ы˛Ъ ‰ВИТЪ‚ЛЪВО¸МУТЪЛ.

6
уководство пользователя PSR-S550
GM System Level 1
«GM System Level 1» представляет собой дополнение к стандарту MIDI, обеспечивающее точное
воспроизведение любых музыкальных данных, совместимых со стандартом GM, на любом тон-
генераторе, совместимом со стандартом GM, независимо от изготовителя. юбое программное
и аппаратное обеспечение, поддерживающее стандарт GM System Level, помечено маркировкой GM.
XG
ормат XG представляет собой важнейшее усовершенствование формата GM System level 1,
специально разработанное компанией Yamaha в целях увеличения количества доступных тембров
и вариаций, предоставления дополнительных средств выразительности при работе с тембрами
и эффектами, а также обеспечения совместимости данных в будущем.
XF
азработанный компанией Yamaha формат XF представляет собой усовершенствование стандарта
SMF (Standard MIDI File) с более широким набором функций и возможностью дальнейшего
расширения. ри воспроизведении файла в формате XF, содержащего текст, поддерживается
отображение текста на экране инструмента.
STYLE FILE
ормат Style File представляет собой фирменный формат файлов стилей компании Yamaha,
в котором применяется уникальная система преобразования, позволяющая автоматически создавать
высококачественный аккомпанемент на основе широкого набора типов аккордов.
USB
USB – это сокращенное обозначение универсальной последовательной шины (Universal Serial Bus ).
Она представляет собой последовательный интерфейс для соединения компьютера с периферийными
устройствами. Этот интерфейс обеспечивает возможность оперативной замены периферийных
устройств (при включенном питании компьютера).
гУ„УЪЛФ˚
данное изделие встроены компьютерные программы и данные, авторские права на которые принадлежат компании Yamaha
либо другим владельцам, предоставившим компании Yamaha лицензию на их использование. акие защищенные авторскими
правами материалы включают в себя без ограничения все компьютерное программное обеспечение, файлы стилей, файлы
MIDI, звуковые данные, партитуры и записи звука. юбое несанкционированное использование таких программ и данных
вне рамок личного пользования запрещено соответствующим законодательством. юбое нарушение авторских прав влечет
за собой юридические последствия. О
А
, А
О
А
О Ь О А
А О
О
А
О.
опирование имеющихся в продаже музыкальных данных, включая без ограничения данные MIDI и/или аудиоданные,
в любых целях, кроме целей личного пользования, строго запрещено.

уководство пользователя PSR-S550
7
оздравляем и благодарим вас за приобретение изделия
Yamaha PSR-S550!
ля максимального использования функциональных
возможностей инструмента перед началом работы с ним
внимательно прочитайте данное руководство пользователя.
осле прочтения руководства храните его в надежном
и удобном месте и обращайтесь к нему при необходимости
получения более подробной информации о какой-либо операции
или функции.
комплект поставки инструмента входят следующие компоненты. роверьте их наличие.
•
юпитр
•
омпакт-диск
•
уководство пользователя (настоящее руководство).
• Адаптер питания переменного тока ( ходит в комплект поставки не во всех регионах.
Уточните у регионального представителя Yamaha.).
СУФУОМЛЪВО¸М˚В Ф ЛМ‡‰ОВКМУТЪЛ

Страница 8
- Изображение
- Текст
8
уководство пользователя PSR-S550
ëÔÂˆË‡О¸М˚В ‚УБПУКМУТЪЛ ЛМТЪ ЫПВМЪ‡ PSR-S550
■ оспроизведение разнообразных инструментальных тембров
тр. 17
ембр инструмента, звучащий во время игры на клавиатуре, можно
заменить на тембр скрипки, флейты, арфы или любой другой из
обширного набора тембров. апример, можно изменить настроение
композиции, написанной для фортепиано, путем ее воспроизведения
в тембре скрипки. Это обеспечивает широкое разнообразие
воспроизводимых музыкальных форм.
■ гра в определенном стиле
тр. 23
сли при воспроизведении требуется полный аккомпанемент, можно
воспользоваться стилями с автоматическим аккомпанементом. тили
аккомпанемента позволяют имитировать полное оркестровое звучание
с широким разнообразием стилей – от вальса до восьмитактовых
мелодий и самбы. ополнительное разнообразие обеспечивается за
счет возможности создания и сохранения собственных стилей.
■ охранение параметров панели в регистрационной памяти и обращение
к ним
тр. 77
Эта удобная функция обеспечивает сохранение «копий»
пользовательских параметров панели – до 64 «регистраций». ним
можно обращаться в любой момент по мере необходимости, что
позволяет быстро вносить значительные изменения в параметры
звучания/эффектов при воспроизведении с клавиатуры.
8 банков x 8 наборов параметров = 64 регистрации
■ Удобная функция отображения нот
тр. 30
ри воспроизведении мелодии на дисплее отображается
соответствующая партитура. Это эффективный способ обучения
чтению нот. сли композиция содержит данные текста и аккордов*,
текст и аккорды также отображаются на дисплее партитуры.
* екст и аккорды не отображаются на дисплее, если композиция, воспроизводимая в режиме
отображения партитуры, не содержит подходящего текста и аккордов.
■ охранение и загрузка данных с применением накопителя USB или компьютера
тр. 83 и 94
Эти средства хранения данных позволяют сохранять исходные
композиции пользователя или пользовательские параметры панели
(содержимое регистрационной памяти) на накопителе USB или
компьютере, а затем при необходимости снова загружать данные
в инструмент.


Настройка, Астройка, Ребования к электропитанию
Н в·у‚‡млfl н ˝овнъ уфлъ‡мл
- Изображение
- Текст
10
уководство пользователя PSR-S550
астройка
Обязательно выполните указанные ниже операции
О включения питания.
ᕡ Убедитесь в том, что переключатель
[STANDBY/ON] на инструменте установлен
в положение STANDBY.
ᕢ одключите штекер постоянного тока,
соединенный с адаптером источника питания,
к гнезду источника питания.
ᕣ одсоедините адаптер переменного тока
к розетке электросети.
се необходимые кабельные соединения следует
установить О включения питания.
ри подключении штекера к этому гнезду динамики
инструмента автоматически отключаются. нездо
PHONES/OUTPUT может также служить внешним
выходом. гнезду PHONES/OUTPUT можно
подключить усилитель клавиатуры, стереосистему,
микшер, магнитофон или другое аудиоустройство,
производящее линейный сигнал, для передачи на это
устройство выходного сигнала инструмента.
ункция задержки звука перед спадом позволяет
имитировать естественный эффект нажатия педали.
одсоедините к этому гнезду педальный
переключатель Yamaha FC4 или FC5 и пользуйтесь
им для включения и отключения задержки звука.
н В·У‚‡МЛfl Н ˝ОВНЪ УФЛЪ‡МЛ˛
•
одключайте инструмент к электросети О Ь О через адаптер
переменного тока Yamaha PA-301/PA-300B/PA-300 (или другой адаптер,
рекомендованный корпорацией Yamaha). одключение через другой
адаптер может привести к необратимому повреждению как адаптера,
так и инструмента.
•
о завершении работы с инструментом, а также на время грозы
следует отсоединять адаптер переменного тока от электросети.
розетка электросети
ᕢ
ᕣ
иУ‰ТУВ‰ЛМВМЛВ М‡Ы¯МЛНУ‚
(„МВБ‰У PHONES/OUTPUT)
иУ‰НО˛˜ВМЛВ ФВ‰‡О¸МУ„У ФВ ВНО˛˜‡ÚÂÎfl
(„МВБ‰У SUSTAIN)
•
лительное прослушивание через наушники при высоком уровне
громкости может привести не только к утомлению органов слуха,
но и к их повреждению.
•
о избежание повреждения динамиков перед их подключением
установите минимальный уровень громкости внешних устройств.
евыполнение этих мер предосторожности может привести к поражению
электрическим током или к повреждению оборудования. роме того,
при воспроизведении с инструмента следует сначала установить
минимальный уровень громкости всех устройств, а затем постепенно
увеличить ее до необходимого уровня.
•
еред включением питания проверьте правильность соединения штекера
педального переключателя с гнездом SUSTAIN.
•
е нажимайте педальный переключатель в момент включения питания.
этом случае изменяется распознавание полярности педального
переключателя, что приводит к обращению его действия.

Комментарии

PSR-S550 Owner’s Manual
3
OBSERVERA!
Apparaten kopplas inte ur växelströmskällan (nätet) så länge som den
ar ansluten till vägguttaget, även om själva apparaten har stängts av.
ADVARSEL: Netspæendingen til dette apparat er IKKE afbrudt,
sålæenge netledningen siddr i en stikkontakt, som er t endt — også
selvom der or slukket på apparatets afbryder.
NAME PLATE LOCATION:
The name plate is located on the bottom of the product. The model
number, serial number, power requirements, etc., are located on this
plate. You should record the model number, serial number, and the date
of purchase in the spaces provided below and retain this manual as a
permanent record of your purchase.
VAROITUS: Laitteen toisiopiiriin kytketty käyttökytkin ei irroita koko
laitetta verkosta.
Model
(standby)
Serial No.
Purchase Date
èêÄÇàãÄ íÖïçàäà ÅÖáéèÄëçéëíà
ÇçàåÄíÖãúçé èêéóàíÄâíÖ, èêÖÜÑÖ óÖå èêàëíìèÄíú ä ùäëèãìÄíÄñàà
* ï‡ÌËÚ ˝ÚÓ ÛÍÓ‚Ó‰ÒÚ‚Ó ‚ ·ÂÁÓÔ‡ÒÌÓÏ ÏÂÒÚÂ. éÌÓ ‚‡Ï ¢ ÔÓ̇‰Ó·ËÚÒfl.
èêÖÑìèêÖÜÑÖçàÖ
ÇÓ ËÁ·ÂʇÌË Ò¸ÂÁÌ˚ı Ú‡‚Ï Ë ‰‡Ê ÒÏÂÚË ÓÚ Û‰‡‡ ˝ÎÂÍÚ˘ÂÒÍËÏ ÚÓÍÓÏ, ‡ Ú‡ÍÊ ÍÓÓÚÍÓ„Ó Á‡Ï˚͇ÌËfl,
ÔÓ‚ÂʉÂÌËfl Ó·ÓÛ‰Ó‚‡ÌËfl, ÔÓʇ‡ Ë ‰Û„Ëı Ë̈ˉÂÌÚÓ‚ ‚Ò„‰‡ Òӷ≇ÈÚ ÒÎÂ‰Û˛˘Ë ÏÂ˚ ·ÂÁÓÔ‡ÒÌÓÒÚË:
àÒÚÓ˜ÌËÍ ÔËÚ‡ÌËfl/‡‰‡ÔÚ ÔÂÂÏÂÌÌÓ„Ó ÚÓ͇
ظ ÓÚ ‚Ó‰˚
•
àÒÔÓθÁÛÈÚ ÚÓθÍÓ Ì‡ÔflÊÂÌËÂ, Á‡‰‡ÌÌÓ ‰Îfl ËÌÒÚÛÏÂÌÚ‡.
•
Å„ËÚ ËÌÒÚÛÏÂÌÚ ÓÚ ‰Óʉfl, Ì ËÒÔÓθÁÛÈÚÂ Â„Ó fl‰ÓÏ Ò ‚Ó‰ÓÈ,
ùÚÓ Ì‡ÔflÊÂÌË Û͇Á‡ÌÓ Ì‡ ËÌÒÚÛÏÂÌÚÂ.
‚ ÛÒÎÓ‚Ëflı Ò˚ÓÒÚË Ë ÔÓ‚˚¯ÂÌÌÓÈ ‚·ÊÌÓÒÚË; Ì ÒÚ‡‚¸Ú ̇ Ì„Ó
ÂÏÍÓÒÚË Ò ÊˉÍÓÒÚ¸˛, ÍÓÚÓ‡fl ÏÓÊÂÚ ‡ÁÎËÚ¸Òfl Ë ÔÓÔ‡ÒÚ¸ ‚ÌÛÚ¸.
•
àÒÔÓθÁÛÈÚ ÚÓθÍÓ Û͇Á‡ÌÌ˚È ÚËÔ ‡‰‡ÔÚ‡ (ÒÚ. 140). àÒÔÓθÁÓ‚‡ÌËÂ
Ç ÒÎÛ˜‡Â ÔÓÔ‡‰‡ÌËfl ÊˉÍÓÒÚË, ̇ÔËÏ ‚Ó‰˚, ‚ ËÌÒÚÛÏÂÌÚ
ÌÂÔ‡‚ËθÌÓ„Ó ‡‰‡ÔÚ‡ ÏÓÊÂÚ ÔË‚ÂÒÚË Í ÔÓ‚ÂʉÂÌ˲ ËÎË Ô„‚Û
ÌÂωÎÂÌÌÓ ÓÚÍβ˜ËÚ ÔËÚ‡ÌËÂ Ë ÓÚÒÓ‰ËÌËÚ ͇·Âθ ÔËÚ‡ÌËfl ÓÚ
ËÌÒÚÛÏÂÌÚ‡.
˝ÎÂÍÚÓÒÂÚË. á‡ÚÂÏ Ó·‡ÚËÚÂÒ¸ Á‡ ÔÓÏÓ˘¸˛ Í Í‚‡ÎËÙˈËÓ‚‡ÌÌ˚Ï
•
èÂËӉ˘ÂÒÍË ÔÓ‚ÂflÈÚ ‚ËÎÍÛ ˝ÎÂÍÚÓËÌÒÚÛÏÂÌÚ‡ Ë Û‰‡ÎflÈÚÂ Ò ÌÂÂ
ÒÔˆˇÎËÒÚ‡Ï ˆÂÌÚ‡ ÚÂıÌ˘ÂÒÍÓ„Ó Ó·ÒÎÛÊË‚‡ÌËfl ÍÓÔÓ‡ˆËË
„flÁ¸ Ë Ô˚θ.
Yamaha.
•
òÌÛ ‡‰‡ÔÚ‡ ÔÂÂÏÂÌÌÓ„Ó ÚÓ͇ Ì ‰ÓÎÊÂÌ Ì‡ıÓ‰ËÚ¸Òfl fl‰ÓÏ Ò ËÒ-
•
çËÍÓ„‰‡ Ì ‚ÒÚ‡‚ÎflÈÚÂ Ë Ì ‚˚ÌËχÈÚ ‚ËÎÍÛ ˝ÎÂÍÚÓËÌÒÚÛÏÂÌÚ‡
ÚÓ˜ÌË͇ÏË ÚÂÔ· (̇„‚‡ÚÂÎflÏË, ‡‰Ë‡ÚÓ‡ÏË Ë ‰.). ç ‰ÓÔÛÒ͇ÈÚÂ
ÏÓÍ˚ÏË Û͇ÏË.
Ú‡ÍÊ ˜ÂÁÏÂÌÓ„Ó Ò„Ë·‡ÌËfl Ë ÔÓ‚ÂʉÂÌËfl ¯ÌÛ‡, Ì ÒÚ‡‚¸Ú ̇ Ì„Ó
ÚflÊÂÎ˚ Ô‰ÏÂÚ˚ Ë ‰ÂÊËÚÂ Â„Ó ‚ Ú‡ÍÓÏ ÏÂÒÚÂ, „‰Â ̇ ÌÂ„Ó ÌÂθÁfl
ظ ÓÚ Ó„Ìfl
̇ÒÚÛÔËÚ¸, Á‡‰ÂÚ¸ ÌÓ„ÓÈ ËÎË ˜ÚÓ-ÌË·Û‰¸ ÔÓ ÌÂÏÛ ÔÂÂ͇ÚËÚ¸.
•
ç ÒÚ‡‚¸Ú ̇ ËÌÒÚÛÏÂÌÚ „Ófl˘Ë Ô‰ÏÂÚ˚, ̇ÔËÏ ҂˜Ë.
ÉÓfl˘ËÈ Ô‰ÏÂÚ ÏÓÊÂÚ ÛÔ‡ÒÚ¸ Ë ‚˚Á‚‡Ú¸ ÔÓʇ.
ç ÓÚÍ˚‚‡Ú¸
•
ç ÓÚÍ˚‚‡ÈÚ ËÌÒÚÛÏÂÌÚ Ë Ì Ô˚Ú‡ÈÚÂÒ¸ ‡ÁÓ·‡Ú¸ ËÎË ÏÓ‰ËÙˈË-
Ç̯ڇÚÌ˚ ÒËÚÛ‡ˆËË
Ó‚‡Ú¸ Â„Ó ‚ÌÛÚÂÌÌË ÍÓÏÔÓÌÂÌÚ˚. Ç ËÌÒÚÛÏÂÌÚ ÌÂÚ ÍÓÏÔÓÌÂÌÚÓ‚,
ÍÓÚÓ˚ ‰ÓÎÊÂÌ Ó·ÒÎÛÊË‚‡Ú¸ ÔÓθÁÓ‚‡ÚÂθ. èË ÔÓfl‚ÎÂÌËË ÌÂËÒÔ‡‚-
•
Ç ÒÎÛ˜‡Â ËÁÌÓÒ‡ Ë ÔÓ‚ÂʉÂÌËfl ¯ÌÛ‡ ËÎË ‚ËÎÍË ‡‰‡ÔÚ‡ ÔÂÂÏÂÌÌÓ-
ÌÓÒÚË ÌÂωÎÂÌÌÓ ÔÂ͇ÚËÚ ˝ÍÒÔÎÛ‡Ú‡ˆË˛ Ë Ó·‡ÚËÚÂÒ¸ Á‡ ÔÓÏÓ˘¸˛
„Ó ÚÓ͇, ‡ Ú‡ÍÊ ÔË ‚ÌÂÁ‡ÔÌÓÏ ËÒ˜ÂÁÌÓ‚ÂÌËË Á‚Û͇ ‚Ó ‚ÂÏfl ˝ÍÒÔÎÛ‡-
Í Í‚‡ÎËÙˈËÓ‚‡ÌÌ˚Ï ÒÔˆˇÎËÒÚ‡Ï ˆÂÌÚ‡ ÚÂıÌ˘ÂÒÍÓ„Ó Ó·ÒÎÛÊË‚‡-
Ú‡ˆËË, ÔË ÔÓfl‚ÎÂÌËË ÌÂÓ·˚˜ÌÓ„Ó Á‡Ô‡ı‡ Ë ‰˚χ ÌÂωÎÂÌÌÓ ÓÚÍβ˜Ë-
ÌËfl ÍÓÔÓ‡ˆËË Yamaha.
Ú ˝ÎÂÍÚÓÔËÚ‡ÌËÂ, ‚˚̸Ú ‚ËÎÍÛ ‡‰‡ÔÚ‡ ËÁ ÓÁÂÚÍË Ë Ó·‡ÚËÚÂÒ¸ Á‡
ÔÓÏÓ˘¸˛ Í ÒÔˆˇÎËÒÚ‡Ï ˆÂÌÚ‡ ÚÂıÌ˘ÂÒÍÓ„Ó Ó·ÒÎÛÊË‚‡ÌËfl ÍÓÔÓ‡-
ˆËË Yamaha.
ÇçàåÄçàÖ!
ÇÓ ËÁ·ÂʇÌË ̇ÌÂÒÂÌËfl Ò¸ÂÁÌ˚ı Ú‡‚Ï ÒÂ·Â Ë ÓÍÛʇ˛˘ËÏ, ‡ Ú‡ÍÊ ÔÓ‚ÂʉÂÌËfl ËÌÒÚÛÏÂÌÚ‡ Ë ‰Û„Ó„Ó
ËÏÛ˘ÂÒÚ‚‡, ÔÓÏËÏÓ ÔÓ˜Ëı ‚Ò„‰‡ Òӷ≇ÈÚ ÒÎÂ‰Û˛˘Ë ÓÒÌÓ‚Ì˚ ÏÂ˚ ·ÂÁÓÔ‡ÒÌÓÒÚË:
àÒÚÓ˜ÌËÍ ÔËÚ‡ÌËfl/‡‰‡ÔÚ ÔÂÂÏÂÌÌÓ„Ó ÚÓ͇
•
ÇÓ ËÁ·ÂʇÌË ÒÎÛ˜‡ÈÌÓ„Ó Ô‡‰ÂÌËfl ËÌÒÚÛÏÂÌÚ‡ Ì ÓÒÚ‡‚ÎflÈÚÂ Â„Ó ‚
•
èË ÓÚÍβ˜ÂÌËË Í‡·ÂÎfl ÓÚ ËÌÒÚÛÏÂÌÚ‡ ËÎË ÓÚ ˝ÎÂÍÚÓÒÂÚË ·ÂËÚÂÒ¸
ÌÂÛÒÚÓȘ˂ÓÏ ÔÓÎÓÊÂÌËË.
Á‡ ‚ËÎÍÛ, ‡ Ì Á‡ ͇·Âθ.
•
è‰ ÔÂÂÏ¢ÂÌËÂÏ ËÌÒÚÛÏÂÌÚ‡ ÓÚÒÓ‰ËÌËÚ ÔÓ‰Íβ˜ÂÌÌ˚È Í ÌÂÏÛ
•
äÓ„‰‡ ËÌÒÚÛÏÂÌÚ Ì ËÒÔÓθÁÛÂÚÒfl, ‡ Ú‡ÍÊ ‚Ó ‚ÂÏfl „ÓÁ˚ ÓÚÍβ˜‡È-
‡‰‡ÔÚÂ Ë ‰Û„Ë ͇·ÂÎË.
Ú ‡‰‡ÔÚ ÔÂÂÏÂÌÌÓ„Ó ÚÓ͇.
•
è‰ ̇ÒÚÓÈÍÓÈ ËÁ‰ÂÎËfl ۷‰ËÚÂÒ¸, ˜ÚÓ ËÒÔÓθÁÛÂχfl
•
ç ÔÓ‰Íβ˜‡ÈÚ ËÌÒÚÛÏÂÌÚ Í Ó‰ÌÓÈ ˝ÎÂÍÚ˘ÂÒÍÓÈ ÓÁÂÚÍÂ Ò ‰Û„ËÏË
˝ÎÂÍÚÓÓÁÂÚ͇ ΄ÍÓ ‰ÓÒÚÛÔ̇. Ç ÒÎÛ˜‡Â ‚ÓÁÌËÍÌÓ‚ÂÌËfl ͇ÍËı-ÎË·Ó
ÛÒÚÓÈÒÚ‚‡ÏË (̇ÔËÏÂ, ˜ÂÂÁ ÚÓÈÌËÍ). ùÚÓ ÏÓÊÂÚ ÔË‚ÂÒÚË Í ÒÌË-
ÌÂÔÓ·‰ÓÍ ÌÂωÎÂÌÌÓ ‚˚Íβ˜ËÚ ËÌÒÚÛÏÂÌÚ Ë ÓÚÍβ˜ËÚÂ Â„Ó ÓÚ
ÊÂÌ˲ ͇˜ÂÒÚ‚‡ Á‚Û͇ ËÎË ÔÂÂ„Â‚Û ÓÁÂÚÍË.
˝ÎÂÍÚÓÒÂÚË. чÊ ÂÒÎË ÔËÚ‡ÌË ‚˚Íβ˜ÂÌÓ, ËÁ‰ÂÎË ÔÓ‰ÓÎʇÂÚ
ÔÓÚ·ÎflÚ¸ ˝ÎÂÍÚÓ˝Ì„˲ ‚ ÏËÌËχθÌÓÏ ÍÓ΢ÂÒÚ‚Â. ÖÒÎË ËÁ‰ÂÎËÂ
Ì ËÒÔÓθÁÛÂÚÒfl ‚ Ú˜ÂÌË ‰ÎËÚÂθÌÓ„Ó ‚ÂÏÂÌË, ÓÚÍβ˜ËÚ ¯ÌÛ
åÂÒÚÓ ÛÒÚ‡ÌÓ‚ÍË
ÔËÚ‡ÌËfl ÓÚ ˝ÎÂÍÚÓÒÂÚË.
•
ÇÓ ËÁ·ÂʇÌË ‰ÂÙÓχˆËË Ô‡ÌÂÎË Ë ÔÓ‚ÂʉÂÌËfl ‚ÌÛÚÂÌÌËı ÍÓÏÔÓ-
ÌÂÌÚÓ‚ ·Â„ËÚ ËÌÒÚÛÏÂÌÚ ÓÚ ˜ÂÁÏÂÌÓÈ Ô˚ÎË Ë ÒËθÌÓÈ ‚Ë·‡ˆËË
•
àÌÒÚÛÏÂÌÚ ÒΉÛÂÚ ÛÒڇ̇‚ÎË‚‡Ú¸ ÚÓθÍÓ Ì‡ ÒÔˆˇθÌÓ Ô‰̇Á̇-
Ë Ì ËÒÔÓθÁÛÈÚÂ Â„Ó ÔË Ó˜Â̸ ‚˚ÒÓÍÓÈ ËÎË ÌËÁÍÓÈ ÚÂÏÔ‡ÚÛ (̇Ô-
˜ÂÌÌÛ˛ ‰Îfl ÌÂ„Ó ÔÓ‰ÒÚ‡‚ÍÛ.
ÑÎfl ÍÂÔÎÂÌËfl ÒÚÓÈÍË ËÎË ÔÓ‰ÒÚ‡‚ÍË
ËÏÂ, ̇ ÒÓÎ̈Â, fl‰ÓÏ Ò Ì‡„‚‡ÚÂÎÂÏ ËÎË ‚ χ¯ËÌ ‚ ‰Ì‚ÌÓ ‚ÂÏfl).
ËÒÔÓθÁÛÈ
Ú ÚÓθÍÓ ‚ËÌÚ˚, ÔÓÒÚ‡‚ÎflÂÏ˚ ‚ ÍÓÏÔÎÂÍÚÂ. Ç ÔÓÚË‚ÌÓÏ
ÒÎÛ˜‡Â ‚ÓÁ
ÏÓÊÌÓ ÔÓ‚ÂʉÂÌË ‚ÌÛÚÂÌÌËı ÍÓÏÔÓÌÂÌÚÓ‚ Ë Ô‡‰ÂÌËÂ
•
ç ËÒÔÓθÁÛÈÚ ËÌÒÚÛÏÂÌÚ ‚ ÌÂÔÓÒ‰ÒÚ‚ÂÌÌÓÈ ·ÎËÁÓÒÚË ÓÚ ÚÂ΂Ë-
ËÌÒÚÛÏÂÌÚ‡.
ÁÓ‡, ‡‰ËÓÔËÂÏÌË͇, ÒÚÂÂÓÓ·ÓÛ‰Ó‚‡ÌËfl, ÏÓ·ËθÌÓ„Ó ÚÂÎÂÙÓ̇ Ë
‰Û„Ëı ˝ÎÂÍÚÓÔË·ÓÓ‚. Ç ÔÓÚË‚ÌÓÏ ÒÎÛ˜‡Â ‚ ËÌÒÚÛÏÂÌÚÂ, ÚÂ΂Ë-
ÁÓ ËÎË ‡‰ËÓÔËÂÏÌËÍ ÏÓ„ÛÚ ‚ÓÁÌËÍÌÛÚ¸ ÔÓÏÂıË.
(3)-12
1/2
4
уководство пользователя PSR-S550

èÓ‰Íβ˜ÂÌËÂ
ëÓı‡ÌÂÌË ‰‡ÌÌ˚ı
•
è‰ ÔÓ‰Íβ˜ÂÌËÂÏ ËÌÒÚÛÏÂÌÚ‡ Í ‰Û„ËÏ ˝ÎÂÍÚÓÌÌ˚Ï ÍÓÏÔÓÌÂÌ-
ëÓı‡ÌÂÌËÂ Ë ÂÁ‚ÌÓ ÍÓÔËÓ‚‡ÌË ‰‡ÌÌ˚ı
Ú‡Ï ÓÚÍβ˜ËÚ Ëı ÔËÚ‡ÌËÂ. è‰ ‚Íβ˜ÂÌËÂÏ ËÎË ÓÚÍβ˜ÂÌËÂÏ
•
èË ÓÚÍβ˜ÂÌËË ÔËÚ‡ÌËfl ËÌÒÚÛÏÂÌÚ‡ Ô‡‡ÏÂÚ˚ Ô‡ÌÂÎË Ë ‰‡ÌÌ˚Â
˝ÎÂÍÚÓÌÌ˚ı ÍÓÏÔÓÌÂÌÚÓ‚ ÛÒÚ‡ÌÓ‚ËÚ ÏËÌËχθÌ˚È ÛÓ‚Â̸ „ÓÏ-
ÌÂÍÓÚÓ˚ı ‰Û„Ëı ÚËÔÓ‚ Ì ÒÓı‡Ìfl˛ÚÒfl ‚ Ô‡ÏflÚË. ëÓı‡ÌflÈÚÂ
ÍÓÒÚË. ì·Â‰ËÚÂÒ¸ Ú‡ÍÊ ‚ ÚÓÏ, ˜ÚÓ Ì‡ ‚ÒÂı ÍÓÏÔÓÌÂÌÚ‡ı ÛÒÚ‡ÌÓ‚ÎÂÌ
ÌÂÓ·ıÓ‰ËÏ˚ ‰‡ÌÌ˚ ‚ „ËÒÚ‡ˆËÓÌÌÓÈ Ô‡ÏflÚË (ÒÚ. 85).
ÏËÌËχθÌ˚È ÛÓ‚Â̸ „ÓÏÍÓÒÚË, ‡ ‚Ó ‚ÂÏfl Ë„˚ ̇ ËÌÒÚÛÏÂÌÚÂ
ÔÓÒÚÂÔÂÌÌÓ Û‚Â΢¸Ú „ÓÏÍÓÒÚ¸ ‰Ó ÌÛÊÌÓÈ.
ëÓı‡ÌÂÌÌ˚ ‰‡ÌÌ˚ ÏÓ„ÛÚ ·˚Ú¸ ÛÚ‡˜ÂÌ˚ ‚ÒΉÒÚ‚Ë ÌÂËÒÔ‡‚ÌÓÒÚË
ËÎË ÌÂÔ‡‚ËθÌÓÈ ‡·ÓÚ˚ ËÌÒÚÛÏÂÌÚ‡. ëÓı‡ÌflÈÚ ‚‡ÊÌ˚ ‰‡ÌÌ˚Â
é·ÒÎÛÊË‚‡ÌËÂ
̇ ̇ÍÓÔËÚÂΠUSB ËÎË Ì‡ ‚̯ÌÂÏ ÛÒÚÓÈÒÚ‚Â ı‡ÌÂÌËfl ‰‡ÌÌ˚ı,
•
ÑÎfl ˜ËÒÚÍË ËÌÒÚÛÏÂÌÚ‡ ËÒÔÓθÁÛÈÚ Ïfl„ÍÛ˛ ÒÛıÛ˛ Ú̸͇. çËÍÓ„‰‡ ÌÂ
̇ÔËÏ ̇ ÍÓÏÔ¸˛Ú (ÒÚ. 98).
ËÒÔÓθÁÛÈÚ ÔflÚÌÓ‚˚‚Ó‰ËÚÂÎË, ‡ÒÚ‚ÓËÚÂÎË, ÊˉÍË ӘËÒÚËÚÂÎË ËÎË
˜ËÒÚfl˘Ë ҇ÎÙÂÚÍË Ò ÔÓÔËÚÍÓÈ.
êÂÁ‚ÌÓ ÍÓÔËÓ‚‡ÌË ̇ ̇ÍÓÔËÚÂθ USB ËÎË
‚̯ÌËÈ ÌÓÒËÚÂθ
åÂ˚ ·ÂÁÓÔ‡ÒÌÓÒÚË ÔË ˝ÍÒÔÎÛ‡Ú‡ˆËË
•
ÇÓ ËÁ·ÂʇÌË ÔÓÚÂË ‰‡ÌÌ˚ı ‚ÒΉÒÚ‚Ë ÔÓ‚ÂʉÂÌËfl ÌÓÒËÚÂÎfl
•
á‡Ô¢‡ÂÚÒfl ‚ÒÚ‡‚ÎflÚ¸ ԇθˆ˚ Ë Î‡‰ÓÌË ‚ Á‡ÁÓ˚ ÏÂÊ‰Û ˜‡ÒÚflÏË
ÂÍÓÏẨÛÂÚÒfl ÒÓı‡ÌflÚ¸ ̇˷ÓΠ‚‡ÊÌ˚ ‰‡ÌÌ˚ ̇ ‰‚Ûı
ËÌÒÚÛÏÂÌÚ‡.
̇ÍÓÔËÚÂÎflı USB ËÎË ‚̯ÌËı ÌÓÒËÚÂÎflı.
•
á‡Ô¢‡ÂÚÒfl ‚ÒÚ‡‚ÎflÚ¸ ·Ûχ„Û, ÏÂÚ‡Î΢ÂÒÍËÂ Ë ÔӘˠԉÏÂÚ˚
‚ Á‡ÁÓ˚ ÏÂÊ‰Û ˜‡ÒÚflÏË Ô‡ÌÂÎË Ë Í·‚ˇÚÛ˚. ÖÒÎË ˝ÚÓ ÒÎÛ˜ËÎÓÒ¸,
ÌÂωÎÂÌÌÓ ‚˚Íβ˜ËÚ ËÌÒÚÛÏÂÌÚ Ë ‚˚̸Ú ͇·Âθ ÔËÚ‡ÌËfl ËÁ
ÓÁÂÚÍË. á‡ÚÂÏ Ó·‡ÚËÚÂÒ¸ Á‡ ÔÓÏÓ˘¸˛ Í ÒÔˆˇÎËÒÚ‡Ï ˆÂÌÚ‡ ÚÂı-
Ì˘ÂÒÍÓ„Ó Ó·ÒÎÛÊË‚‡ÌËfl ÍÓÔÓ‡ˆËË Yamaha.
•
ç Í·‰ËÚ ̇ ËÌÒÚÛÏÂÌÚ Ô‰ÏÂÚ˚ ËÁ ‚ËÌË·, Ô·ÒÚχÒÒ˚ ËÎË
ÂÁËÌ˚: ˝ÚÓ ÏÓÊÂÚ ‚˚Á‚‡Ú¸ ‚˚ˆ‚ÂÚ‡ÌË ԇÌÂÎË ËÎË Í·‚ˇÚÛ˚.
•
ç ӷÎÓ͇˜Ë‚‡ÈÚÂÒ¸ ̇ ËÌÒÚÛÏÂÌÚ, Ì ÒÚ‡‚¸Ú ̇ ÌÂ„Ó ÚflÊÂÎ˚ Ô‰-
ÏÂÚ˚ Ë Ì ÔËÍ·‰˚‚‡ÈÚ ÒÎ˯ÍÓÏ ·Óθ¯Û˛ ÒËÎÛ ÔË ÔÓθÁÓ‚‡ÌËË
ÍÌÓÔ͇ÏË, ‚˚Íβ˜‡ÚÂÎflÏË Ë ‡Á˙ÂχÏË.
•
ç ÒΉÛÂÚ ÔÓθÁÓ‚‡Ú¸Òfl ËÌÒÚÛÏÂÌÚÓÏ ËÎË Ì‡Û¯ÌË͇ÏË ÔË ‚˚ÒÓÍÓÏ
ËÎË ÌÂÍÓÏÙÓÚÌÓÏ ÛÓ‚Ì „ÓÏÍÓÒÚË ‚ Ú˜ÂÌË ‰ÎËÚÂθÌÓ„Ó
ÔÂËÓ‰‡ ‚ÂÏÂÌË, Ú‡Í Í‡Í ˝ÚÓ ÏÓÊÂÚ ÔË‚ÂÒÚË Í ÌÂÓ·‡ÚËÏÓÏÛ
ÔÓ‚ÂʉÂÌ˲ ÒÎÛı‡.
äÓÔÓ‡ˆËfl Yamaha Ì ÌÂÒÂÚ ÓÚ‚ÂÚÒÚ‚ÂÌÌÓÒÚË Á‡ ÔÓ‚ÂʉÂÌËfl, ‚˚Á‚‡ÌÌ˚ ÌÂÔ‡‚ËθÌÓÈ ˝ÍÒÔÎÛ‡Ú‡ˆËÂÈ ËÎË ÏÓ‰ËÙË͇ˆËÂÈ
ËÌÒÚÛÏÂÌÚ‡, ‡ Ú‡ÍÊ Á‡ ÔÓÚÂflÌÌ˚ ËÎË ËÒÔÓ˜ÂÌÌ˚ ‰‡ÌÌ˚Â.
ÇÒ„‰‡ ‚˚Íβ˜‡ÈÚ ËÌÒÚÛÏÂÌÚ, ÂÒÎË Ì ËÒÔÓθÁÛÂÚ „Ó.
чÊ ‚ ÚÂı ÒÎÛ˜‡flı, ÍÓ„‰‡ ‚˚Íβ˜‡ÚÂθ ÔËÚ‡ÌËfl ̇ıÓ‰ËÚÒfl ‚ ÔÓÎÓÊÂÌËË STANDBY, ËÌÒÚÛÏÂÌÚ ÔÓ‰ÓÎʇÂÚ ‚ ÏËÌËχθÌ˚ı ÍÓ΢ÂÒÚ‚‡ı ÔÓÚ·ÎflÚ¸
˝ÎÂÍÚÓ˝Ì„˲. ÖÒÎË ËÌÒÚÛÏÂÌÚ Ì ËÒÔÓθÁÛÂÚÒfl ‰ÎËÚÂθÌÓ ‚ÂÏfl, ÓÚÍβ˜ËÚ ‡‰‡ÔÚ ÔÂÂÏÂÌÌÓ„Ó ÚÓ͇ ÓÚ ÓÁÂÚÍË.
àÎβÒÚ‡ˆËË Ë ÍÓÔËË ˝Í‡Ì‡ Üä—‰ËÒÔÎÂfl Ô˂‰ÂÌ˚ ‚ ̇ÒÚÓfl˘ÂÏ ÛÍÓ‚Ó‰ÒÚ‚Â ÔÓθÁÓ‚‡ÚÂÎfl ÚÓθÍÓ ‚ ͇˜ÂÒÚ‚Â ÔÓflÒÌÂÌËfl ‚ ÚÂÍÒÚÛ
Ë ÌÂÓ·flÁ‡ÚÂθÌÓ ‚ ÚÓ˜ÌÓÒÚË ÒÓÓÚ‚ÂÚÒÚ‚Û˛Ú ‰ÂÈÒÚ‚ËÚÂθÌÓÒÚË.
●
орговые марки
• астровые шрифты, используемые в данном инструменте, предоставлены компанией с ограниченной ответственностью Ricoh
и являются ее собственностью.
®
• Windows является зарегистрированной торговой маркой корпорации Microsoft
.
• аименования компаний и изделий в настоящем руководстве пользователя являются торговыми марками или зарегистрированными
торговыми марками соответствующих компаний.
(3)-12
2/2
уководство пользователя PSR-S550
5
данное изделие встроены компьютерные программы и данные, авторские права на которые принадлежат компании Yamaha
либо другим владельцам, предоставившим компании Yamaha лицензию на их использование. акие защищенные авторскими
правами материалы включают в себя без ограничения все компьютерное программное обеспечение, файлы стилей, файлы
MIDI, звуковые данные, партитуры и записи звука. юбое несанкционированное использование таких программ и данных
вне рамок личного пользования запрещено соответствующим законодательством. юбое нарушение авторских прав влечет
за собой юридические последствия. ОА, АОА ОЬОА АО
О АО.
опирование имеющихся в продаже музыкальных данных, включая без ограничения данные MIDI и/или аудиоданные,
в любых целях, кроме целей личного пользования, строго запрещено.
ãÓ„ÓÚËÔ˚
GM System Level 1
«GM System Level 1» представляет собой дополнение к стандарту MIDI, обеспечивающее точное
воспроизведение любых музыкальных данных, совместимых со стандартом GM, на любом тон-
генераторе, совместимом со стандартом GM, независимо от изготовителя. юбое программное
и аппаратное обеспечение, поддерживающее стандарт GM System Level, помечено маркировкой GM.
XG
ормат XG представляет собой важнейшее усовершенствование формата GM System level 1,
специально разработанное компанией Yamaha в целях увеличения количества доступных тембров
и вариаций, предоставления дополнительных средств выразительности при работе с тембрами
и эффектами, а также обеспечения совместимости данных в будущем.
XF
азработанный компанией Yamaha формат XF представляет собой усовершенствование стандарта
SMF (Standard MIDI File) с более широким набором функций и возможностью дальнейшего
расширения. ри воспроизведении файла в формате XF, содержащего текст, поддерживается
отображение текста на экране инструмента.
STYLE FILE
ормат Style File представляет собой фирменный формат файлов стилей компании Yamaha,
в котором применяется уникальная система преобразования, позволяющая автоматически создавать
высококачественный аккомпанемент на основе широкого набора типов аккордов.
USB
USB – это сокращенное обозначение универсальной последовательной шины (Universal Serial Bus ).
Она представляет собой последовательный интерфейс для соединения компьютера с периферийными
устройствами. Этот интерфейс обеспечивает возможность оперативной замены периферийных
устройств (при включенном питании компьютера).
6
уководство пользователя PSR-S550

оздравляем и благодарим вас за приобретение изделия
Yamaha PSR-S550!
ля максимального использования функциональных
возможностей инструмента перед началом работы с ним
внимательно прочитайте данное руководство пользователя.
осле прочтения руководства храните его в надежном
и удобном месте и обращайтесь к нему при необходимости
получения более подробной информации о какой-либо операции
или функции.
ÑÓÔÓÎÌËÚÂθÌ˚ ÔË̇‰ÎÂÊÌÓÒÚË
комплект поставки инструмента входят следующие компоненты. роверьте их наличие.
• юпитр
• омпакт—диск
• уководство пользователя (настоящее руководство).
• Адаптер питания переменного тока (ходит в комплект поставки не во всех регионах.
Уточните у регионального представителя Yamaha.).
уководство пользователя PSR-S550
7
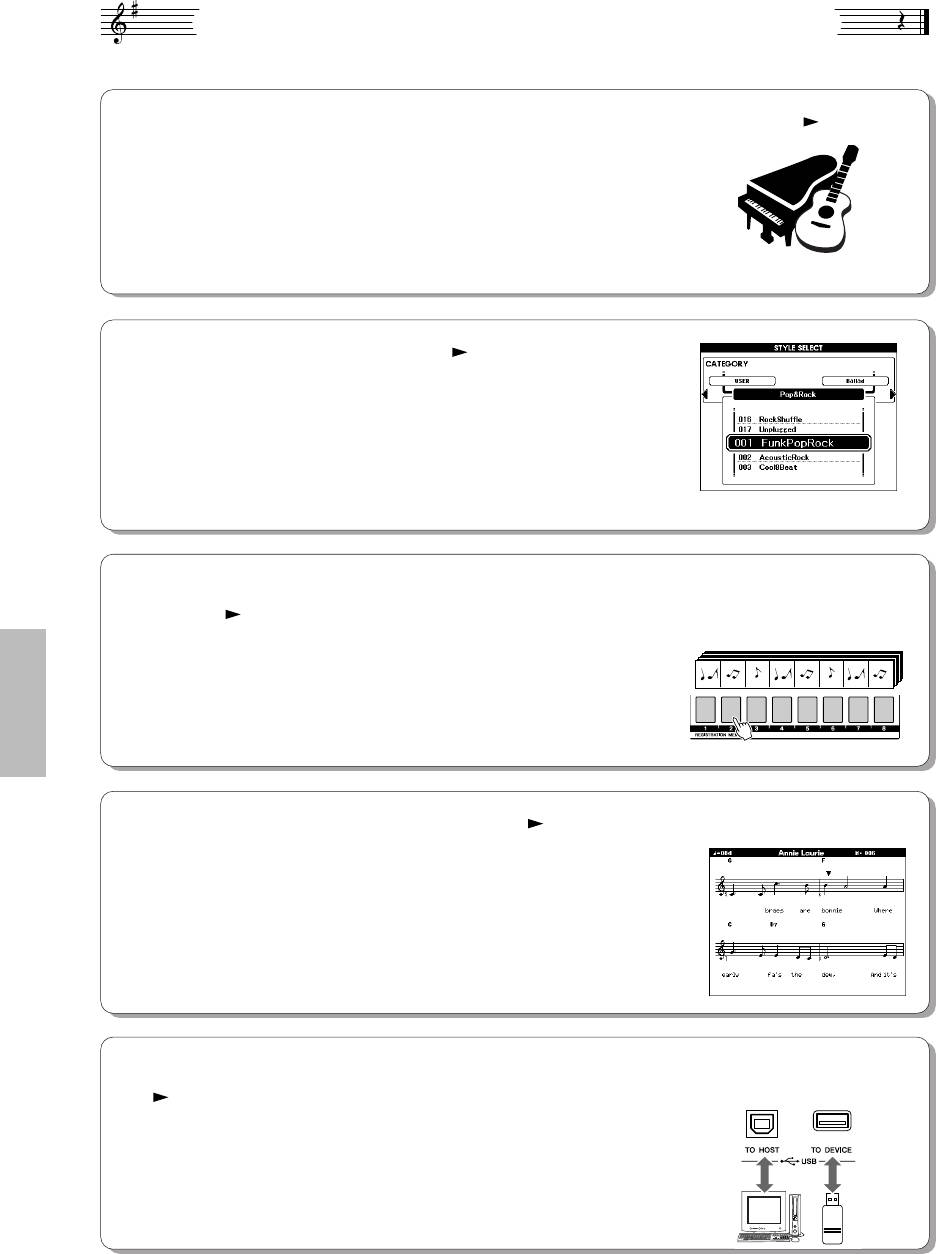
ëÔˆˇθÌ˚ ‚ÓÁÏÓÊÌÓÒÚË ËÌÒÚÛÏÂÌÚ‡ PSR-S550
■ оспроизведение разнообразных инструментальных тембров тр. 17
ембр инструмента, звучащий во время игры на клавиатуре, можно
заменить на тембр скрипки, флейты, арфы или любой другой из
обширного набора тембров. апример, можно изменить настроение
композиции, написанной для фортепиано, путем ее воспроизведения
в тембре скрипки. Это обеспечивает широкое разнообразие
воспроизводимых музыкальных форм.
■ гра в определенном стиле тр. 23
сли при воспроизведении требуется полный аккомпанемент, можно
воспользоваться стилями с автоматическим аккомпанементом. тили
аккомпанемента позволяют имитировать полное оркестровое звучание
с широким разнообразием стилей – от вальса до восьмитактовых
мелодий и самбы. ополнительное разнообразие обеспечивается за
счет возможности создания и сохранения собственных стилей.
■ охранение параметров панели в регистрационной памяти и обращение
к ним тр. 77
8 банков x 8 наборов параметров = 64 регистрации
Эта удобная функция обеспечивает сохранение «копий»
пользовательских параметров панели – до 64 «регистраций». ним
можно обращаться в любой момент по мере необходимости, что
позволяет быстро вносить значительные изменения в параметры
звучания/эффектов при воспроизведении с клавиатуры.
■ Удобная функция отображения нот тр. 30
ри воспроизведении мелодии на дисплее отображается
соответствующая партитура. Это эффективный способ обучения
чтению нот. сли композиция содержит данные текста и аккордов*,
текст и аккорды также отображаются на дисплее партитуры.
* екст и аккорды не отображаются на дисплее, если композиция, воспроизводимая в режиме
отображения партитуры, не содержит подходящего текста и аккордов.
■
охранение и загрузка данных с применением накопителя USB или компьютера
тр. 83 и 94
Эти средства хранения данных позволяют сохранять исходные
композиции пользователя или пользовательские параметры панели
(содержимое регистрационной памяти) на накопителе USB или
компьютере, а затем при необходимости снова загружать данные
в инструмент.
8
уководство пользователя PSR-S550

ëÓ‰ÂʇÌËÂ
оготипы…………………………………………………………………………………………. 6
ункции стиля (автоаккомпанемент) 55
ополнительные принадлежности …………………………………………………… 7
зменение образцов (разделы) ……………………………………………………….55
пециальные возможности инструмента PSR-S550………………………….. 8
астройка в одно касание ……………………………………………………………….58
астройка 10
зменение вариации и OTS (OTS LINK)……………………………………………58
адание точки разделения ………………………………………………………………59
ребования к электропитанию ……………………………………………………….. 10
оспроизведение стиля с аккордами, но без ритма
одсоединение наушников (гнездо PHONES/OUTPUT) …………………… 10
(аккомпанемент в режиме остановки) ………………………………………..60
одключение педального переключателя (гнездо SUSTAIN)…………… 10
астройка громкости стиля……………………………………………………………..60
одключение к компьютеру (порт USB)………………………………………….. 11
Основные сведения об аккордах ……………………………………………………..61
ключение питания ……………………………………………………………………….. 11
тиль пользователя ………………………………………………………………………..63
зменение языка отображения………………………………………………………. 12
оспроизведение стилей на всей клавиатуре…………………………………..63
астройка контрастности -дисплея (LCD CONTRAST)……………….. 12
оздание оригинальных стилей (функция Style Creator) 64
анель управления и разъемы 14
труктура стилей…………………………………………………………………………….64
ередняя панель……………………………………………………………………………. 14
лавный экран функции Style Creator……………………………………………….64
адняя панель ……………………………………………………………………………….. 15
нструкции по работе с функцией Style Creator………………………………..65
Основные операции…………………………………………………………………………66
астройка параметров, запись и сохранение……………………………………67
раткое руководство
араметры композиции 72
оспроизведение композиций 16
ромкость композиции…………………………………………………………………….72
зменение темпа…………………………………………………………………………….72
гра с тембрами различных инструментов 17
овтор A-B………………………………………………………………………………………73
ыбор тембра и игра в выбранном тембре ……………………………………… 17
Отключение звука для отдельных партий композиции ……………………..74
Одновременная игра в двух тембрах – режим DUAL (аложение)…… 18
икшер 75
гра левой и правой руками в разных тембрах
– режим LEFT (евый) ……………………………………………………………… 19
Экран микшера ……………………………………………………………………………….75
оспроизведение наборов ударных………………………………………………… 21
Основные операции…………………………………………………………………………75
ключение/отключение дорожки и регулирование
оспроизведение стилей 22
других параметров …………………………………………………………………….76
ыбор ритма стиля ………………………………………………………………………… 22
охранение в памяти избранных параметров, заданных с
гра со стилем ………………………………………………………………………………. 23
помощью панели 77
оспроизведение аккордов автоаккомпанемента …………………………… 25
охранение в регистрационной памяти ……………………………………………77
оспроизведение из музыкальной базы данных 26
Обращение к регистрационной памяти …………………………………………….78
Очистка регистрационной памяти – удаление указанного набора
абота с композициями 27
параметров из регистрационной памяти …………………………………….79
ыбор и прослушивание композиции………………………………………………. 27
ункции 80
еремотка композиции вперед или назад и приостановка
воспроизведения ……………………………………………………………………… 28
ыбор и настройка функций…………………………………………………………….80
ипы композиций …………………………………………………………………………… 29
абота с флэш-накопителем USB 83
Отображение партитуры композиции……………………………………………… 30
Отображение текста композиции …………………………………………………… 31
абота с флэш-накопителем USB ……………………………………………………83
орматирование флэш-накопителя USB………………………………………….84
апись исполнения пользователя 32
охранение регистрационных данных ……………………………………………..85
онфигурация дорожек………………………………………………………………….. 32
охранение композиции или стиля пользователя …………………………….86
роцедура записи в режиме Quick Recording (быстрая запись) ……….. 33
агрузка файлов регистрационных данных, файлов стилей,
файлов композиций и файлов музыкальных баз данных …………….87
роцедура записи в режиме Multi-track Recording
(многодорожечная запись) ……………………………………………………….. 34
Удаление данных с флэш-накопителя USB………………………………………88
Удаление композиций – удаление композиций пользователя ………….. 37
оспроизведение композиций и стилей, сохраненных на флэш-
накопителе USB…………………………………………………………………………89
Очистка дорожки – удаление указанной дорожки из композиции
пользователя……………………………………………………………………………. 38
одключение 90
азъемы …………………………………………………………………………………………90
езервное копирование и инициализация 39
одключение накопителя USB…………………………………………………………90
езервное копирование …………………………………………………………………. 39
одключение к компьютеру …………………………………………………………….92
нициализация………………………………………………………………………………. 39
еренос данных исполнения между инструментом и компьютером ….94
редварительная передача данных…………………………………………………95
Основные операции и экраны 40
еренос данных между компьютером и инструментом …………………….96
Основные операции ……………………………………………………………………….. 40
уководство по установке программ с дополнительного
Экраны ………………………………………………………………………………………….. 42
компакт-диска 99
Элементы главного экрана …………………………………………………………….. 43
ажные уведомления о компакт-диске…………………………………………….99
одержимое компакт-диска…………………………………………………………..100
правочник
Установка программного обеспечения …………………………………………..101
гра с эффектами 44
рименение эффекта гармонизации………………………………………………. 44
риложение
зменение типа реверберации……………………………………………………….. 45
Устранение неполадок…………………………………………………………………..107
зменение типа эффекта Chorus (хорус)………………………………………… 46
ообщения …………………………………………………………………………………..108
адержка звука перед спадом, включаемая с панели …………………….. 47
редметный указатель ………………………………………………………………….110
обавление эффектов DSP (цифровая обработка сигнала) ……………. 47
писок тембров …………………………………………………………………………….112
зменение высоты звука ……………………………………………………………….. 48
писок наборов ударных ……………………………………………………………….120
абота с различными функциями 49
писок стилей ……………………………………………………………………………….125
писок музыкальных баз данных……………………………………………………126
гра с метрономом ………………………………………………………………………… 49
писок типов эффектов для тембров…………………………………………….129
абота с функцией Tap Start…………………………………………………………… 51
аблица характеристик MIDI-интерфейса ………………………………………136
Учет силы нажатия………………………………………………………………………… 51
ормат MIDI-данных ……………………………………………………………………..138
араметры эквалайзера ………………………………………………………………… 52
ехнические характеристики………………………………………………………….140
Органы управления высотой звука…………………………………………………. 53
зменение высоты звука инструмента на октавы. ………………………….. 54
уководство пользователя PSR-S550
9
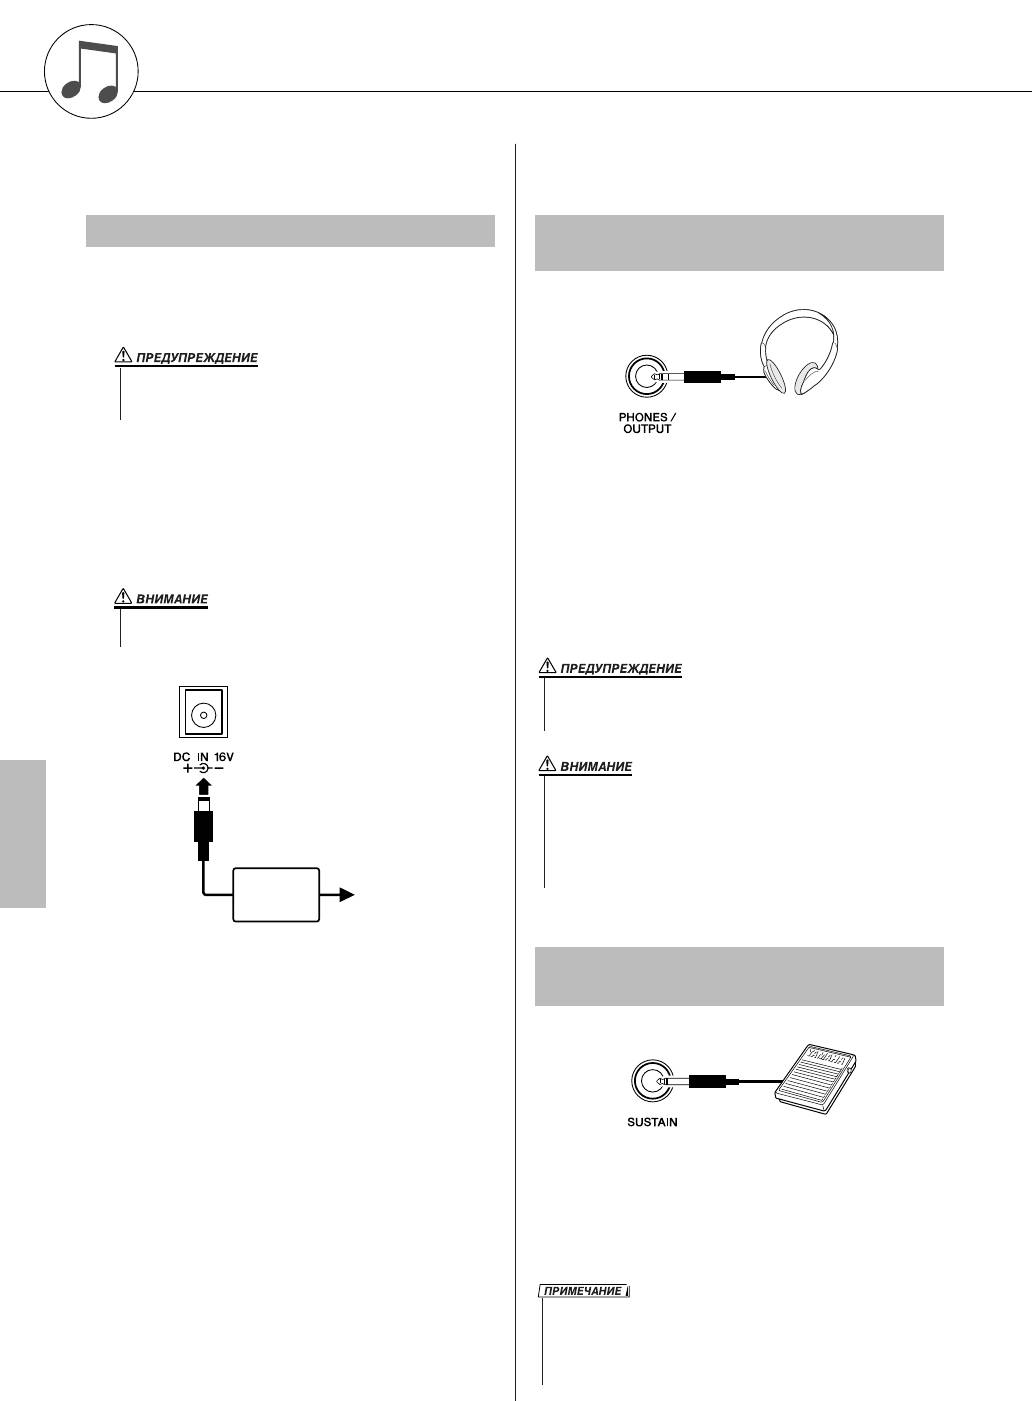
астройка
Обязательно выполните указанные ниже операции
се необходимые кабельные соединения следует
О включения питания.
установить О включения питания.
í·ӂ‡ÌËfl Í ˝ÎÂÍÚÓÔËÚ‡Ì˲
èÓ‰ÒÓ‰ËÌÂÌË ̇ۯÌËÍÓ‚
(„ÌÂÁ‰Ó PHONES/OUTPUT)
Убедитесь в том, что переключатель
[STANDBY/ON] на инструменте установлен
в положение STANDBY.
• спользуйте только указанный тип адаптера (стр. 140). одключение
через другой адаптер может привести к необратимому повреждению
как адаптера, так и инструмента.
одключите штекер постоянного тока,
соединенный с адаптером источника питания,
ри подключении штекера к этому гнезду динамики
к гнезду источника питания.
инструмента автоматически отключаются. нездо
PHONES/OUTPUT может также служить внешним
одсоедините адаптер переменного тока
выходом. гнезду PHONES/OUTPUT можно
к розетке электросети.
подключить усилитель клавиатуры, стереосистему,
микшер, магнитофон или другое аудиоустройство,
производящее линейный сигнал, для передачи на это
• о завершении работы с инструментом, а также на время грозы
следует отсоединять адаптер переменного тока от электросети.
устройство выходного сигнала инструмента.
• лительное прослушивание через наушники при высоком уровне
громкости может привести не только к утомлению органов слуха,
но и к их повреждению.
• о избежание повреждения динамиков перед их подключением
установите минимальный уровень громкости внешних устройств.
евыполнение этих мер предосторожности может привести к поражению
электрическим током или к повреждению оборудования. роме того,
при воспроизведении с инструмента следует сначала установить
минимальный уровень громкости всех устройств, а затем постепенно
увеличить ее до необходимого уровня.
розетка электросети
èÓ‰Íβ˜ÂÌË Ô‰‡Î¸ÌÓ„Ó ÔÂÂÍβ˜‡ÚÂÎfl
(„ÌÂÁ‰Ó SUSTAIN)
ункция задержки звука перед спадом позволяет
имитировать естественный эффект нажатия педали.
одсоедините к этому гнезду педальный
переключатель Yamaha FC4 или FC5 и пользуйтесь
им для включения и отключения задержки звука.
• еред включением питания проверьте правильность соединения штекера
педального переключателя с гнездом SUSTAIN.
• е нажимайте педальный переключатель в момент включения питания.
этом случае изменяется распознавание полярности педального
переключателя, что приводит к обращению его действия.
10 уководство пользователя PSR-S550
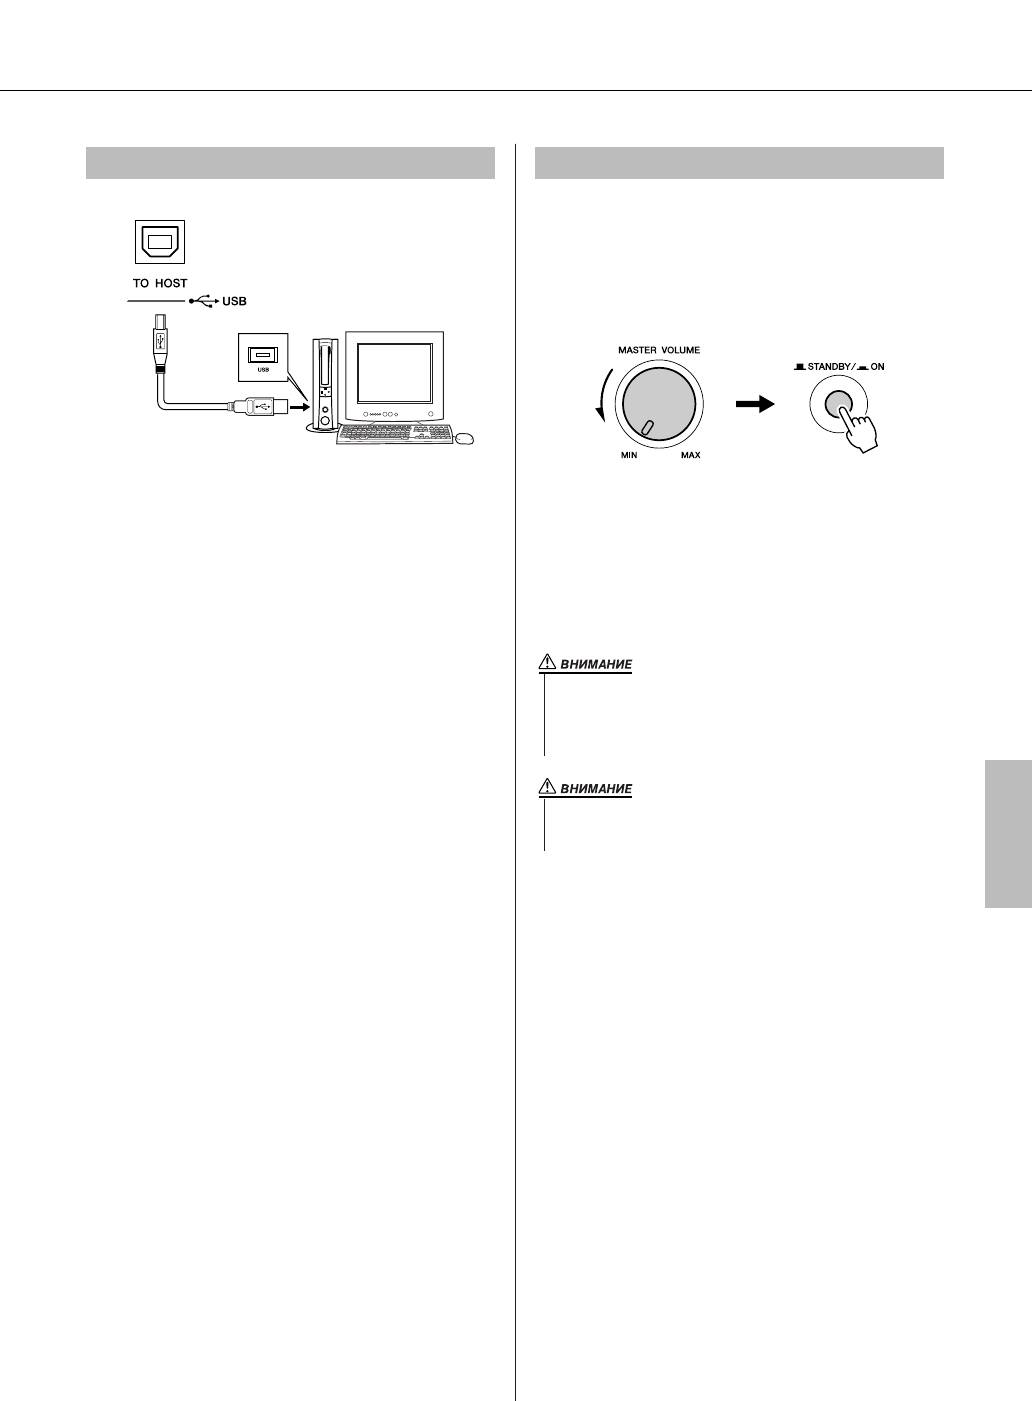
астройка
èÓ‰Íβ˜ÂÌËÂ Í ÍÓÏÔ¸˛ÚÂÛ (ÔÓÚ USB) ÇÍβ˜ÂÌË ÔËÚ‡ÌËfl
ля включения питания установите минимальную
громкость, повернув регулятор [MASTER
VOLUME] влево, и нажмите переключатель
[STANDBY/ON]. ля отключения питания снова
нажмите переключатель [STANDBY/ON].
оединение порта USB на инструменте с портом
USB на компьютере обеспечивает перенос данных
ри включении питания в инструмент загружается
исполнения и файлов песен между этими
резервная копия данных, сохраненная во флэш-
устройствами (стр. 96). ля работы с функциями
памяти. сли во флэш-памяти не сохранена
переноса данных через интерфейс USB необходимо
резервная копия данных, при включении питания
выполнить следующие действия.
восстанавливаются параметры по умолчанию,
• начала убедитесь в том, что переключатель POWER
заданные на заводе-изготовителе.
на инструменте установлен в положение OFF, а затем
подключите инструмент к компьютеру через кабель
USB. осле установления кабельных соединений
• аже в том случае, если переключатель установлен в положении
включите питание инструмента.
STANDBY, инструмент на минимальном уровне потребляет
• Установите на компьютер драйвер USB-MIDI с компакт—
электроэнергию. а время длительных перерывов в работе
с инструментом обязательно отсоединяйте адаптер переменного
диска (см. стр. 101).
тока от розетки электросети.
• Установите на компьютер программу загрузки MusicSoft
с веб-узла (см. стр. 103).
• апрещается отключать питание при отображении на дисплее сообщения
«Writing..» (апись). Это может привести к повреждению флэш-памяти
и потере данных.
уководство пользователя PSR-S550 11
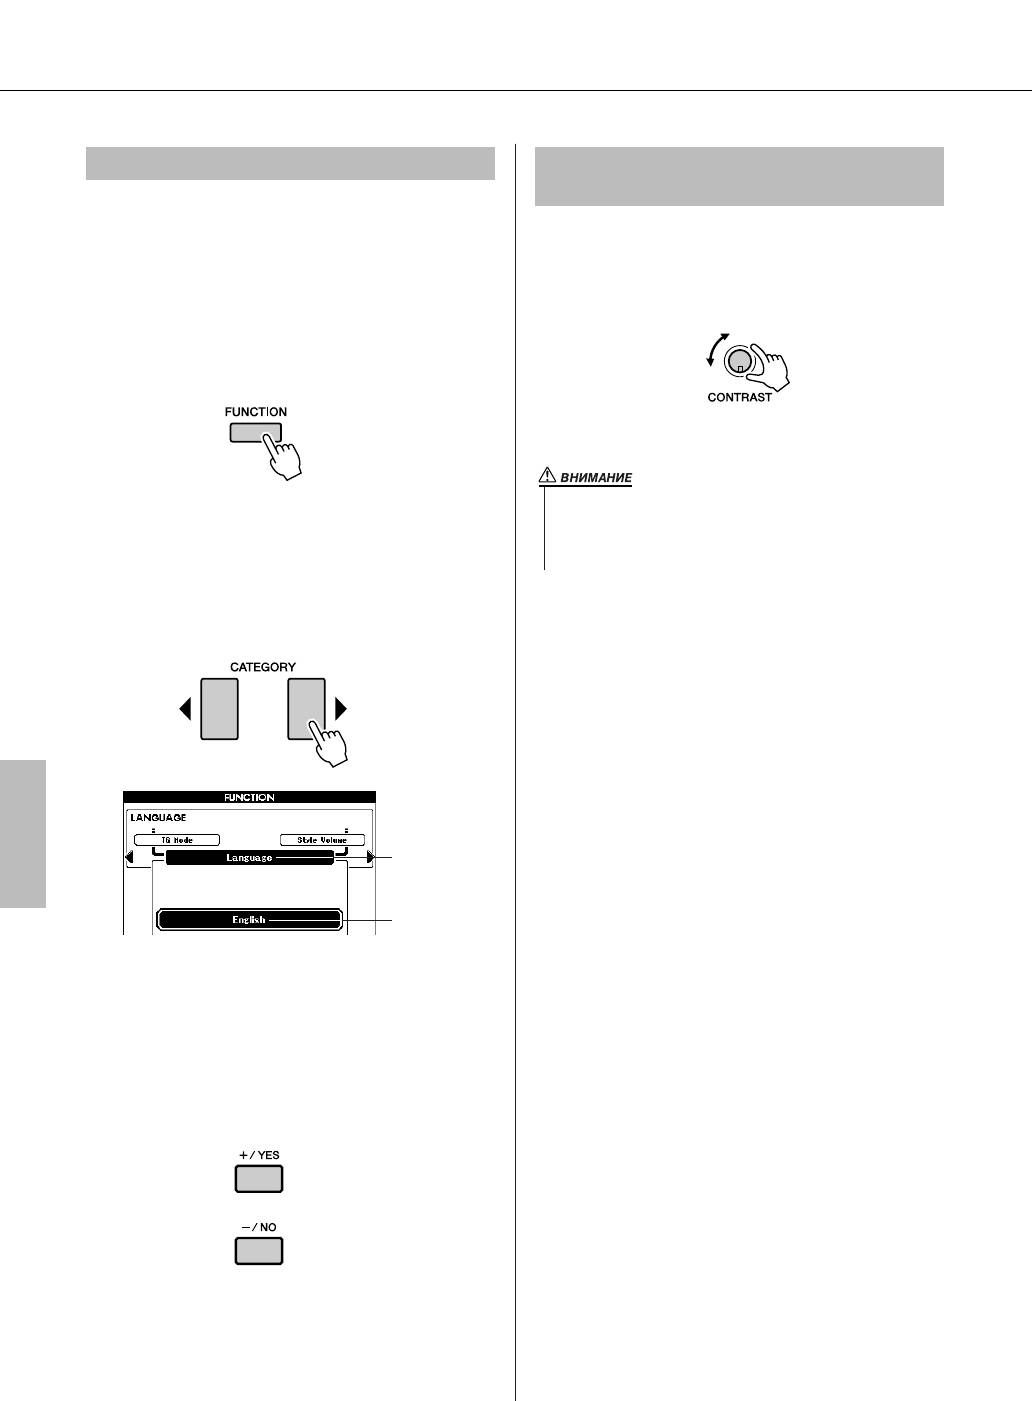
астройка
àÁÏÂÌÂÌË flÁ˚͇ ÓÚÓ·‡ÊÂÌËfl
ç‡ÒÚÓÈ͇ ÍÓÌÚ‡ÒÚÌÓÒÚË Üä-‰ËÒÔÎÂfl
(LCD CONTRAST)
качестве языка отображения на данном инстру-
менте можно выбрать английский или японский
егулятор контрастности -дисплея (LCD
язык. о умолчанию установлен английский язык;
CONTRAST) на задней панели инструмента служит
после переключения инструмента в режим
для настройки оптимальной четкости изображения.
японского языка тексты, имена файлов и некоторые
сообщения отображаются на японском языке.
ажмите кнопку [FUNCTION].
• е рекомендуется в течение длительного времени смотреть на дисплей
в темноте, так как это может привести к зрительному напряжению или
повреждению зрения. ри работе с инструментом обеспечьте как можно
ажмите кнопку CATEGORY [ ] и [ ] требуемое
< >
более яркое окружающее освещение, а также отведите необходимое
количество раз для отображения пункта
время на перерывы и отдых.
«Language» (Язык).
од пунктом «Language» (Язык) отображается
выбранный в данный момент язык отображения.
Language, пункт
ыбранный
в данный
момент язык
ыберите язык отображения.
ля выбора английского языка нажмите кнопку
[+], а для выбора японского языка – кнопку [-].
нформация о выбранном языке сохраняется во
внутренней флэш-памяти, благодаря чему
выбранный язык не изменяется при
отключении питания.
ля перехода к главному экрану нажмите
кнопку [EXIT].
12 уководство пользователя PSR-S550
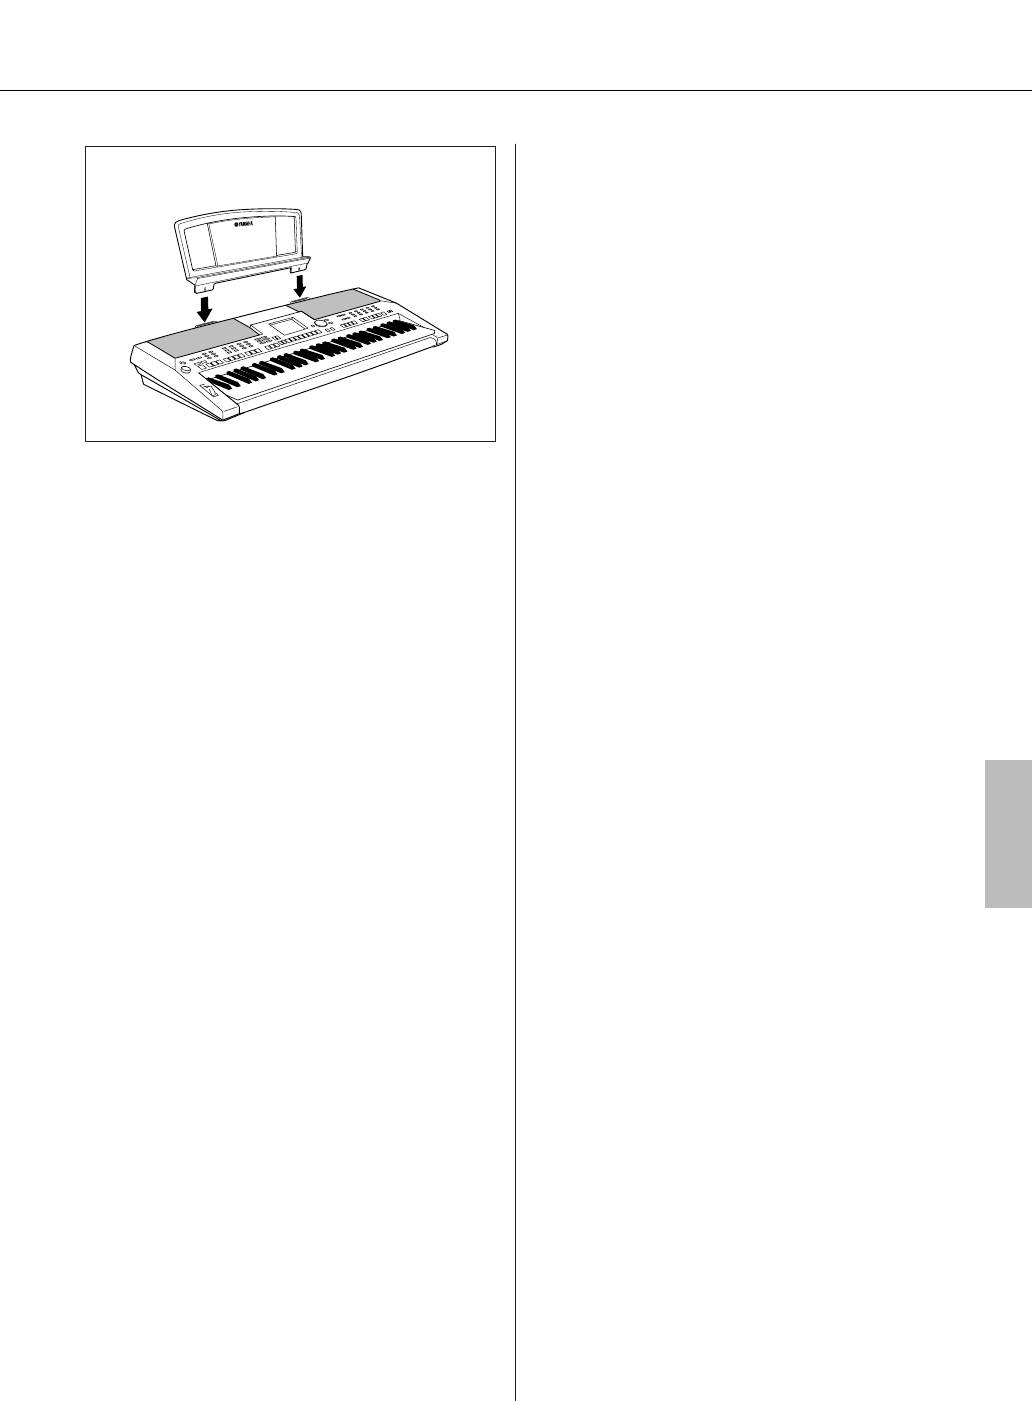
астройка
● юпитр
Установите пюпитр
в прорези, как показано
на рисунке.
уководство пользователя PSR-S550 13
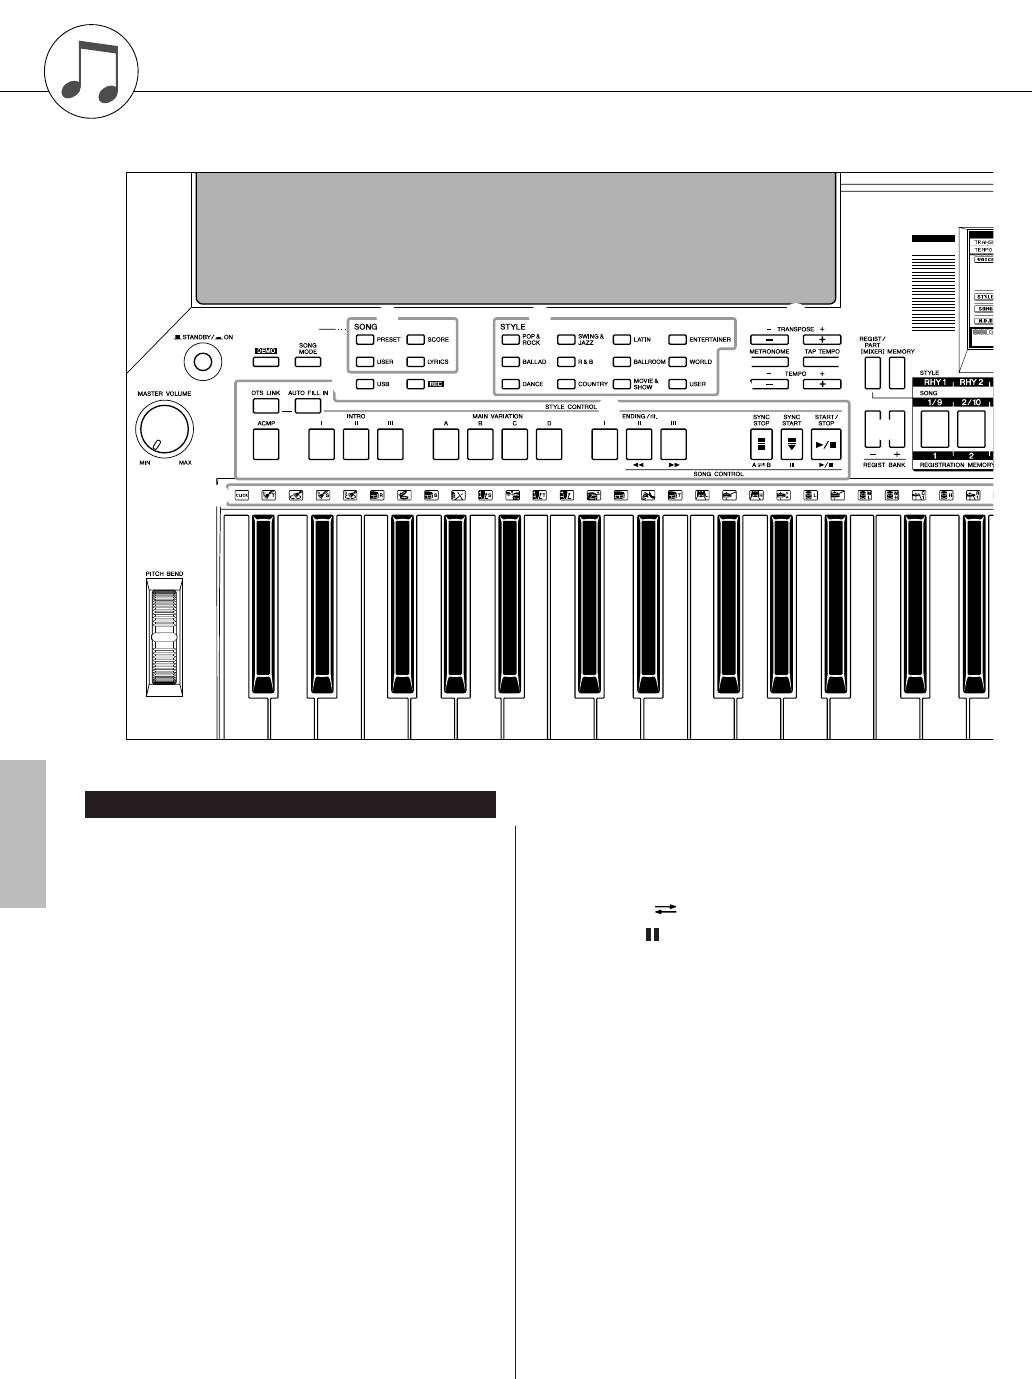
анель управления и разъемы
t i
!1
!5
e
r
!6
q
!2 !3
y u
!4
o
w
!7
!0
#3
#2
ередняя панель
q ереключатель [STANDBY/ON] ………………. стр. 16
!0 SONG CONTROL
нопка [r]…………………………………………..стр. 28
w егулятор [MASTER VOLUME]……………. стр. 16, 40
нопка [f]…………………………………………..стр. 28
e нопка [DEMO] ………………………………………… стр. 16
нопка [A B] ……………………………………..стр. 73
r нопка [SONG MODE]………………………………. стр. 27
нопка [ ]……………………………………………стр. 28
t SONG
нопка [>/■] …………………………………..стр. 28, 41
нопки [PRESET], [USER]……………………… стр. 27
!1 нопки TRANSPOSE [+] и [-]……………………..стр. 53
нопка [SCORE]…………………………………….стр. 30
!2 нопка [METRONOME] ……………………………..стр. 49
нопка [LYRICS]……………………………………. стр. 31
!3 нопка [TAP TEMPO] ………………………………..стр. 51
y нопка [USB] …………………………………………… стр. 27
!4 нопки TEMPO [+] и [-] ……………………………..стр. 49
u нопка [REC] …………………………………………… стр. 33
!5 нопка [REGIST/PART [MIXER]] ………………..стр. 74
i STYLE………………………………………………………. стр. 22
!6 нопка [MEMORY]…………………………………….стр. 77
o STYLE CONTROL
нопка [OTS LINK]………………………………… стр. 58
!7 нопки REGIST BANK [+] и [-] …………………..стр. 77
нопка [AUTO FILL IN] ………………………….. стр. 55
!8 аздел стилей/раздел песен [1/9]–[8/16]/
нопка [ACMP]……………………………………… стр. 23
нопки REGISTRATION MEMORY [1] — [8] …стр. 77
нопки INTRO [I]–[III]…………………………….. стр. 55
!9 исплей ………………………………………………стр. 12, 42
нопки MAIN VARIATION [A]–[D] …………… стр. 55
@0 нопка [EXIT] ……………………………………………стр. 42
нопки ENDING/rit. [I]–[III] …………………….. стр. 55
@1 аборный диск…………………………………………стр. 41
нопка [SYNC STOP]…………………………….. стр. 57
нопка [SYNC START]……………………… стр. 23, 56
@2 нопки [+/YES] и [-/NO] …………………………….стр. 41
нопка [START/STOP]……………………… стр. 22, 41
14 уководство пользователя PSR-S550
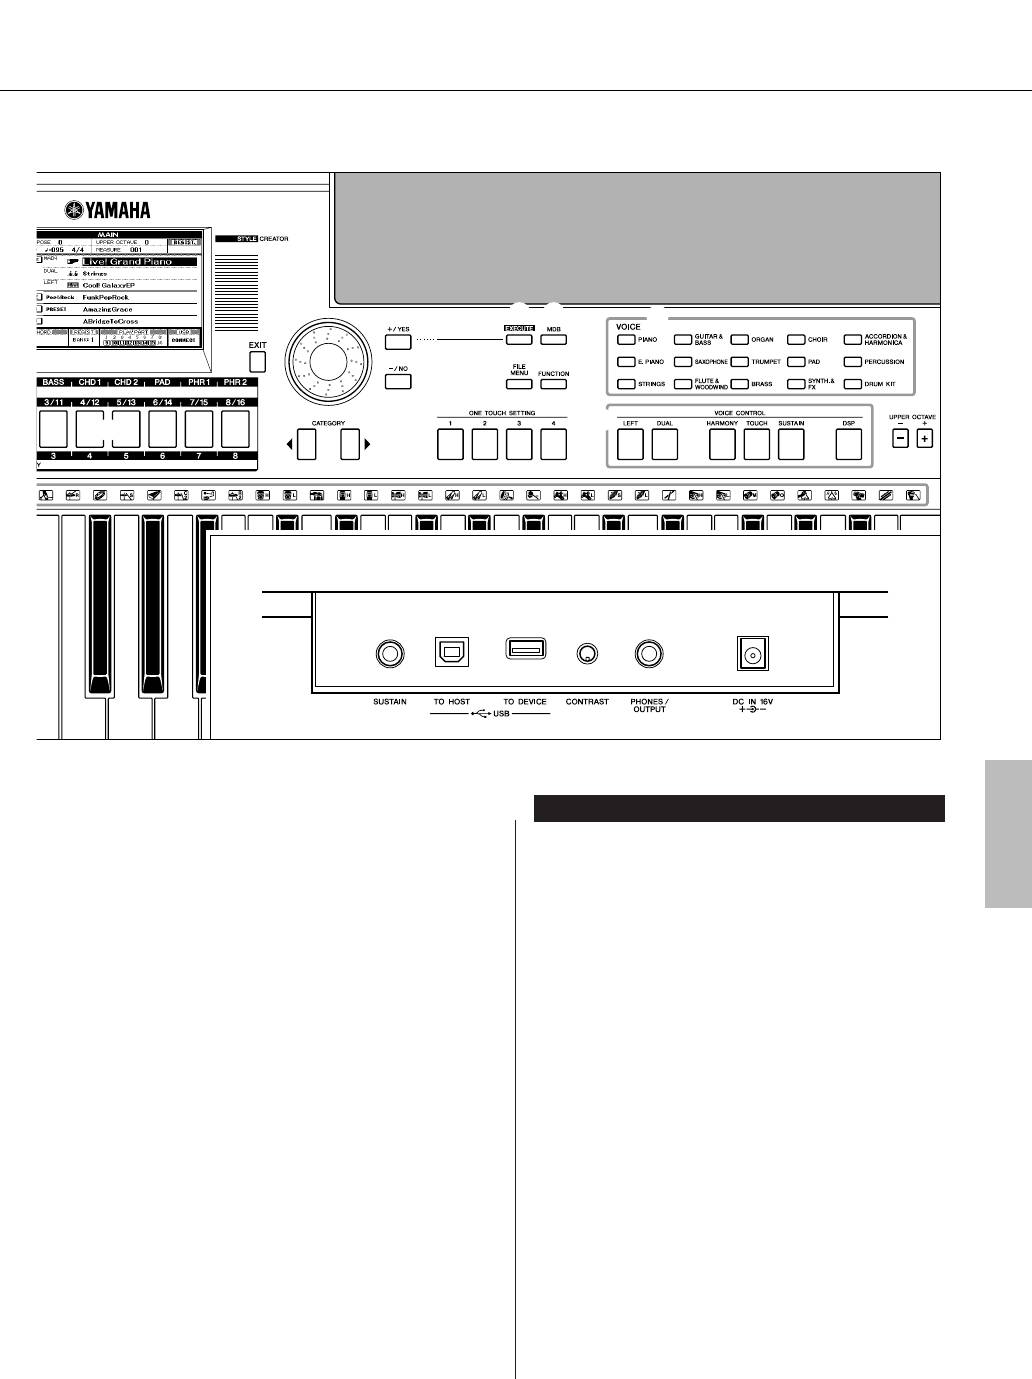
анель управления и разъемы
!9
@4 @5
@9
@0
@1
@2
@6 @7
@8
#0
!8
@3
#1
адняя панель
#4 #5 #6 #7 #8
адняя панель
@3 нопки CATEGORY [ ] и [ ]……………………..стр. 41
< >
#4 нездо SUSTAIN………………………………………..стр. 10
@4 нопка [EXECUTE]…………………………………… стр. 68
#5 азъемы USB TO HOST и TO DEVICE ……….стр. 90
@5 нопка [MDB]…………………………………………… стр. 26
#6 егулятор CONTRAST………………………………стр. 12
@6 нопка [FILE MENU]…………………………………. стр. 83
#7 нездо PHONES/OUTPUT ………………………….стр. 10
@7 нопка [FUNCTION] ………………………………….стр. 80
#8 нездо DC IN 16V ………………………………………стр. 10
@8 нопки ONE TOUCH SETTING [1] — [4] ……… стр. 58
@9 VOICE ……………………………………………………….стр. 17
#0 VOICE CONTROL
нопка [LEFT]……………………………………….. стр. 19
нопка [DUAL]………………………………………. стр. 18
нопка [HARMONY]………………………………. стр. 44
нопка TOUCH ……………………………………… стр. 51
нопка [SUSTAIN]…………………………………. стр. 47
нопка [DSP] ………………………………………… стр. 47
@1 нопки UPPER OCTAVE [+] и [-]……………….. стр. 54
#2 олесико [PITCH BEND]…………………………… стр. 48
#3 аборы ударных ……………………………………… стр. 21
уководство пользователя PSR-S550 15
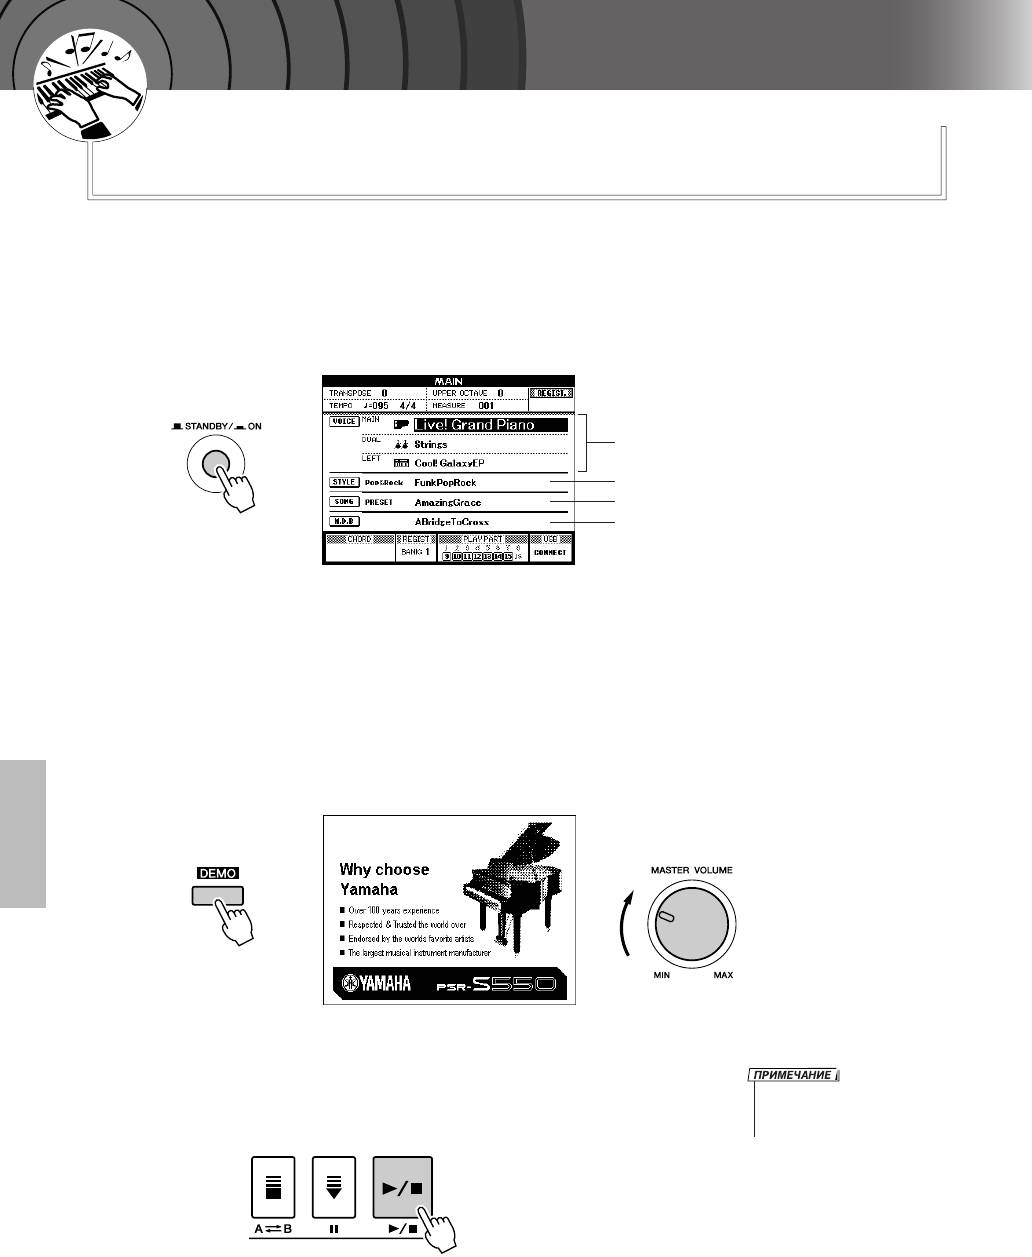
Û
Í
Ó
Â
‚
Ó
Ó
‰
Í
Ò
Ú
Ú
‡
‚
Ó
оспроизведение композиций
ä
раткое руководство
данном инструменте предусмотрена демонстрационная композиция. иже
приведена инструкция по воспроизведению демонстрационной композиции.
ажмите кнопку [STANDBY/ON] и удерживайте ее нажатой до
1
фиксации в положении ON (кл.).
а -дисплее отображается главный экран.
азвание тембра
азвание стиля
азвание композиции
мя музыкальной базы данных
ля запуска демонстрации нажмите кнопку [DEMO].
2
а -дисплее отобразится экран демонстрации.
ля установки требуемого уровня громкости прослушивания
постепенно увеличивайте громкость с помощью регулятора
[MASTER VOLUME] во время воспроизведения.
о окончании воспроизведения демонстрационной композиции
воспроизведение начинается заново.
ля остановки демонстрации нажмите кнопку [>>
>>
/■].
• сли включена функция отмены
3
озврат к главному экрану осуществляется автоматически.
демонстрации, кнопка [DEMO]
не активна. (см. стр. 82).
16 уководство пользователя PSR-S550
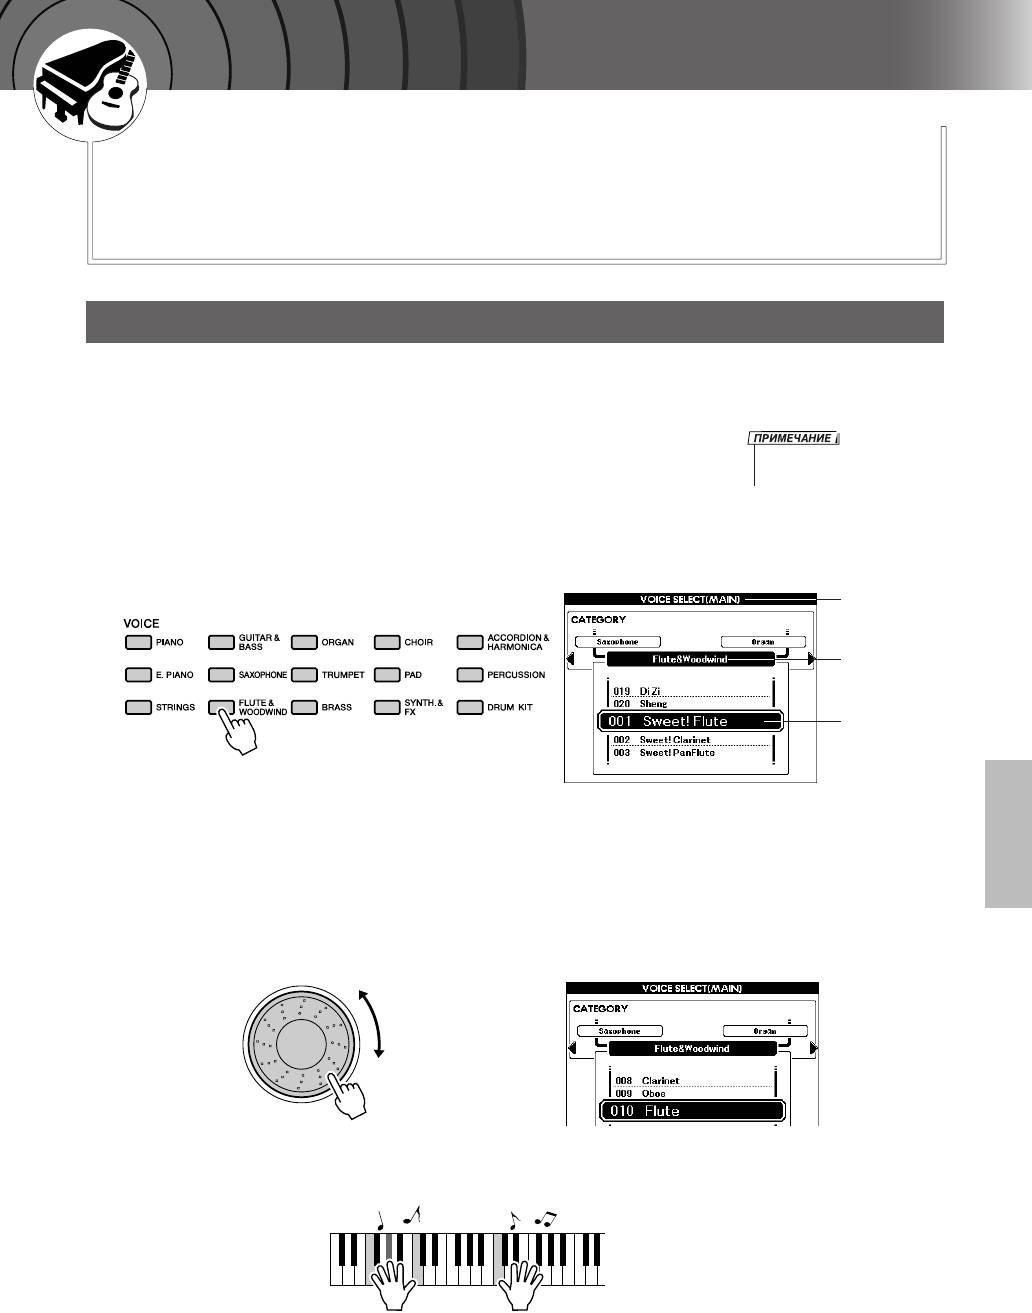
Û
Í
Ó
Â
‚
Ó
Ó
‰
Í
Ò
Ú
Ú
‡
‚
Ó
гра с тембрами различных инструментов
ä
дополнение к тембрам фортепиано, органа и других традиционных клавишных
инструментов данный инструмент поддерживает реалистичное воспроизведение
широкого набора других тембров, включая тембры гитары, басовых инструментов,
струнных инструментов, саксофона, трубы, ударных и перкуссионных инструментов;
им также поддерживаются звуковые эффекты и разнообразные музыкальные звуки.
Ç˚·Ó ÚÂÏ·‡ Ë Ë„‡ ‚ ‚˚·‡ÌÌÓÏ ÚÂÏ·Â
иже приведены инструкции по выбору основного тембра и игре на клавиатуре в выбранном тембре.
ыберите и нажмите кнопку требуемой категории тембров
1
в разделе «VOICE» (ембр).
• ля изменения категории тембров
Отображается экран выбора основного тембра.
нажмите другую кнопку категории.
а экране выделено название выбранной в данный момент
категории, а также номер и название тембра.
рамках данного примера выберите категорию «Flute&Woodwind»
(лейта и деревянные духовые инструменты).
Экран выбора
MAIN VOICE
(Основной тембр)
азвание
категории
ыбранный
в данный
момент тембр
ыберите тембр для игры.
2
рочитайте выделенное название тембра и начните поворачивать
наборный диск. оследовательно выбираются и отображаются
доступные тембры. ыбранный здесь тембр становится
основным тембром.
рамках данного примера выберите тембр «010 Flute» (010, флейта).
ачните игру на клавиатуре.
3
опробуйте выбрать другие тембры и сыграть в них.
ажмите кнопку [EXIT] для возврата к главному экрану.
уководство пользователя PSR-S550 17
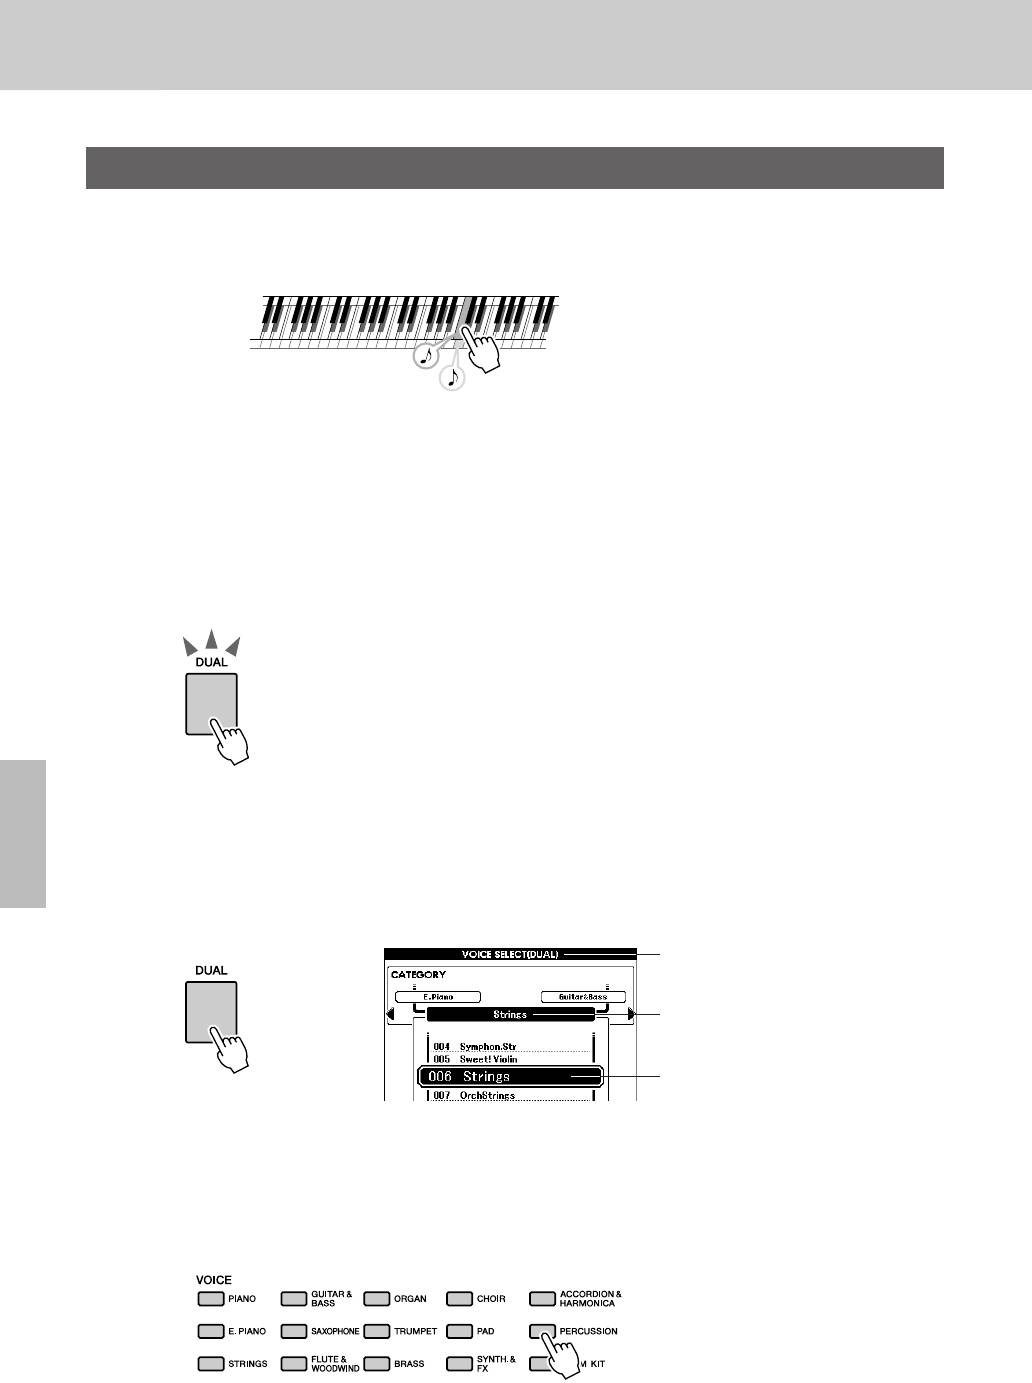
гра с тембрами различных инструментов
é‰ÌÓ‚ÂÏÂÌ̇fl Ë„‡ ‚ ‰‚Ûı ÚÂÏ·‡ı – ÂÊËÏ DUAL (ç‡ÎÓÊÂÌËÂ)
Эта функция позволяет выбрать второй тембр, который можно воспроизводить в дополнение
к основному тембру.
гра в двух тембрах называется «игрой в режиме наложения тембров».
ва тембра воспроизводятся одновременно.
ажмите кнопку [DUAL].
1
нопка [DUAL] служит для включения и отключения режима
наложения тембров.
огда режим наложения тембров включен, кнопка [DUAL] горит.
ри игре на клавиатуре выбранный в данный момент
дополнительный тембр для режима наложения воспроизводится
вместе с основным тембром.
нопка [DUAL] горит
ажмите кнопку [DUAL] и удерживайте ее нажатой не менее
2
одной секунды.
Отображается экран выбора дополнительного тембра.
а экране выделено название выбранной в данный момент
категории, а также номер и название тембра.
Экран выбора дополнительного тембра
ыбранная в данный момент категория
ыбранный в данный момент
Удерживайте эту кнопку нажатой
дополнительный тембр
не менее одной секунды
ыберите и нажмите кнопку требуемой категории тембров
3
в разделе «VOICE» (ембр).
рамках данного примера выберите категорию «Percussion»
(еркуссионные).
18 уководство пользователя PSR-S550
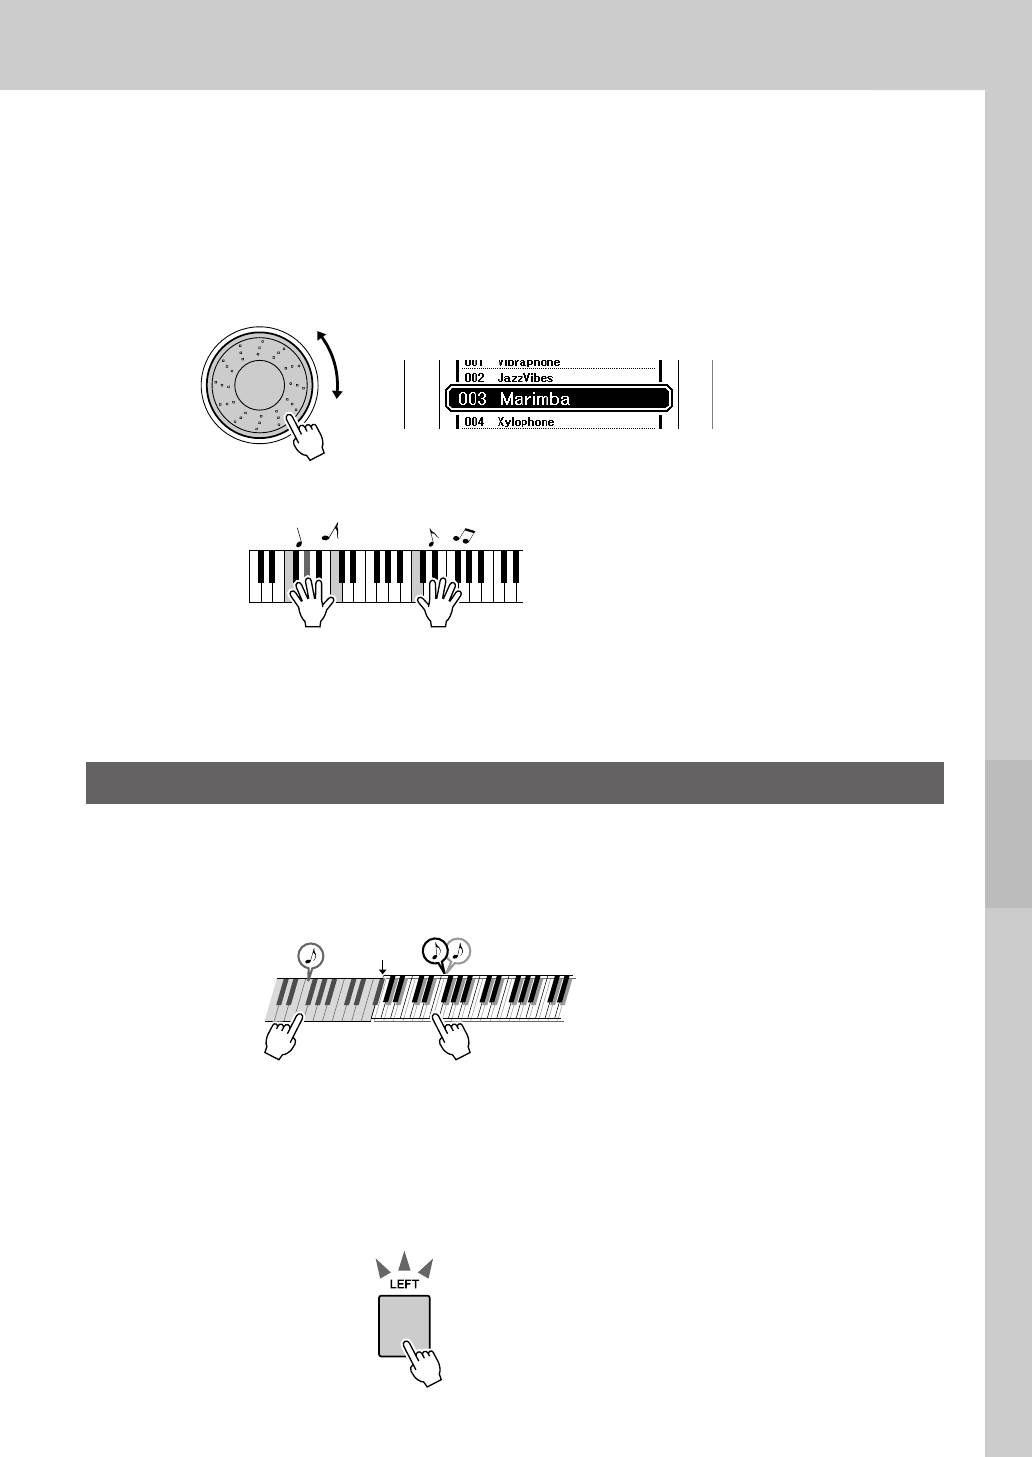
гра с тембрами различных инструментов
ыберите тембр для игры.
4
рочитайте выделенное название тембра и начните поворачивать
наборный диск. оследовательно
выбираются и отображаются доступные тембры. ыбранный здесь
тембр становится дополнительным тембром для режима наложения.
рамках данного примера выберите тембр «003, Marimba»
(003, маримба).
ачните игру на клавиатуре.
5
опробуйте выбрать другие дополнительные тембры
и воспроизвести их в режиме наложения.
ажмите кнопку [EXIT] для возврата к главному экрану.
à„‡ ΂ÓÈ Ë Ô‡‚ÓÈ Û͇ÏË ‚ ‡ÁÌ˚ı ÚÂÏ·‡ı – ÂÊËÏ LEFT (ã‚˚È)
режиме «Left» (евый) поддерживается игра в разных тембрах на клавишах, расположенных слева
и справа от точки разделения клавиатуры. права от точки разделения можно играть в режиме нало-
жения основного и дополнительного тембров, а слева – в другом тембре, который называется «левым
тембром». ри необходимости можно изменить положение точки разделения клавиатуры (стр. 59).
очка
разделения
Основной и дополнительный тембры в режиме наложенияевый тембр
ажмите кнопку [LEFT].
1
нопка [LEFT] служит для включения и выключения левого
тембра. ыбранный в данный момент левый тембр воспроизводится
во время игры на клавишах, расположенных слева от точки
разделения клавиатуры.
нопка [LEFT] горит
уководство пользователя PSR-S550 19
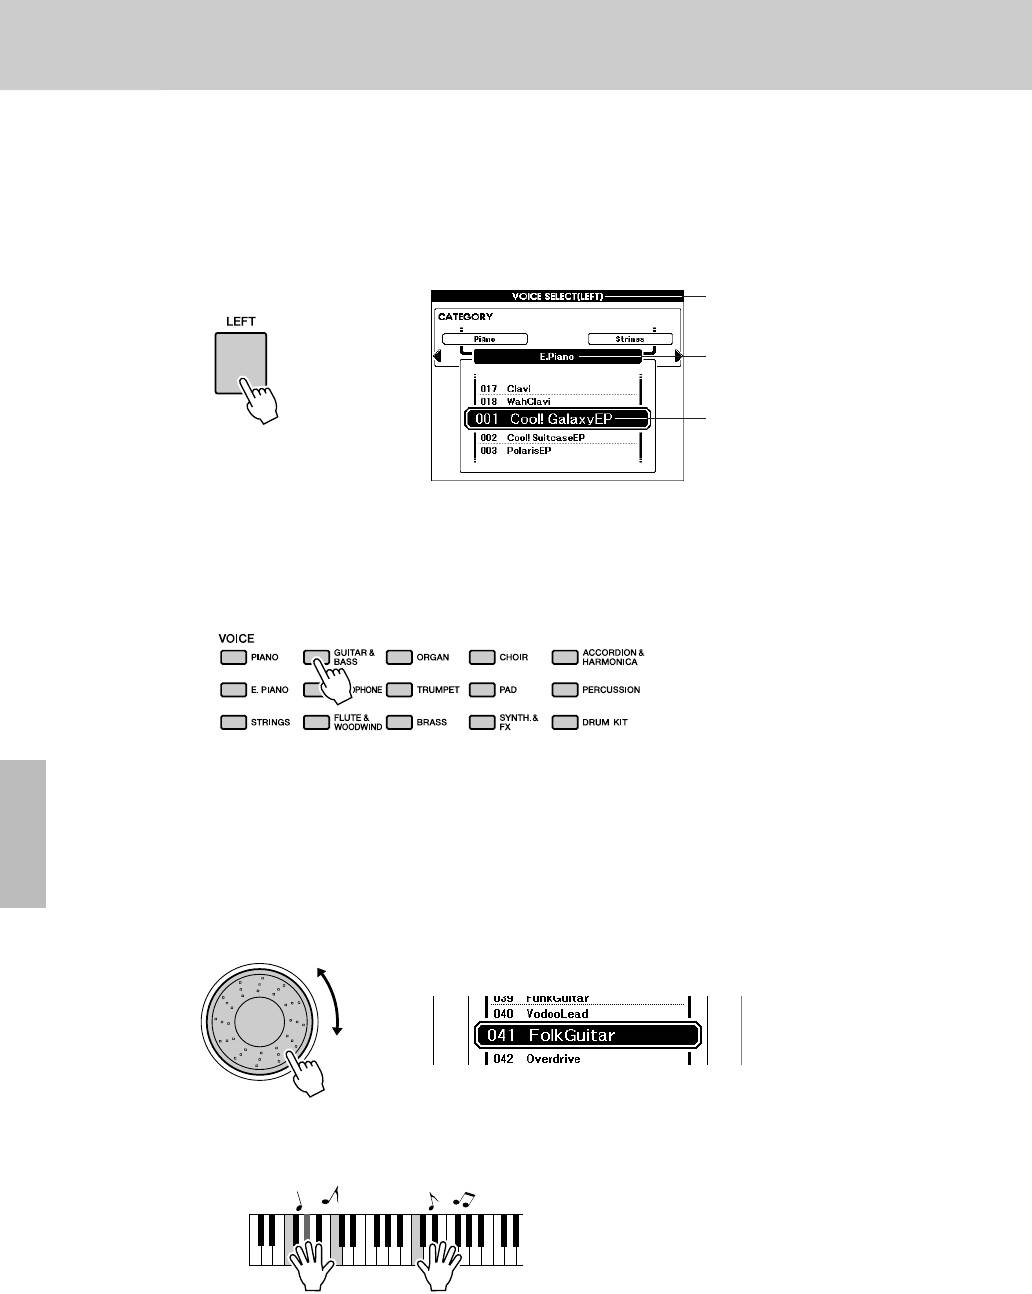
гра с тембрами различных инструментов
ажмите кнопку [LEFT] и удерживайте ее нажатой не менее
2
одной секунды.
Отображается экран выбора левого тембра.
а экране выделено название выбранной в данный момент
категории, а также номер и название тембра.
Экран выбора левого тембра
ыбранная в данный момент категория
ыбранный в данный момент левый тембр
Удерживайте эту кнопку нажатой
не менее одной секунды
ыберите и нажмите кнопку требуемой категории тембров
3
в разделе «VOICE» (ембр).
рамках данного примера выберите категорию «Guitar&Bass»
(итара и басовые инструменты).
ыберите тембр для игры.
4
рочитайте выделенное название тембра и начните поворачивать
наборный диск. оследовательно выбираются и отображаются
доступные тембры. ыбранный здесь тембр становится левым
тембром.
рамках данного примера выберите тембр «041, Folk Guitar»
(041, итара для народной музыки).
ачните игру на клавиатуре.
5
опробуйте играть в выбранном левом тембре.
ажмите кнопку [EXIT] для возврата к главному экрану.
20 уководство пользователя PSR-S550
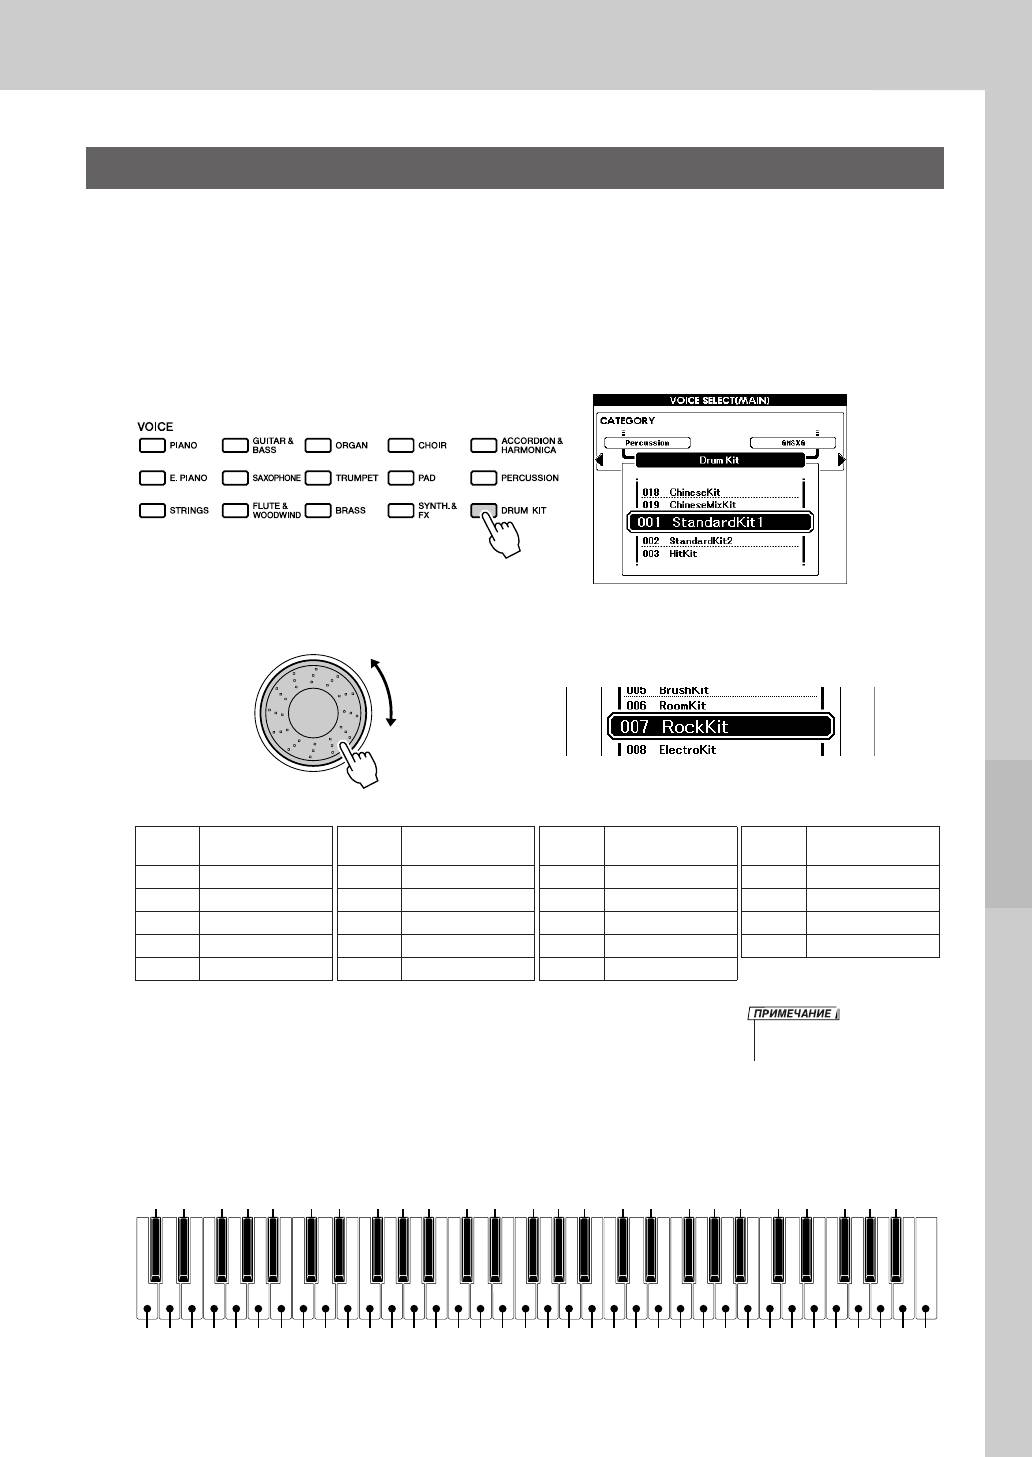
гра с тембрами различных инструментов
ÇÓÒÔÓËÁ‚‰ÂÌË ̇·ÓÓ‚ Û‰‡Ì˚ı
аборы ударных состоят из ударных и перкуссионных инструментов. сли выбран тембр скрипки
или другого обычного инструмента (например, в качестве основного тембра), все клавиши
воспроизводят звуки одной и той же скрипки, различающиеся только по высоте тона. сли же
в качестве основного тембра выбран набор ударных, каждая клавиша воспроизводит звучание
отдельного ударного или перкуссионного инструмента.
ажмите кнопку [DRUM KIT].
1
Отображается категория «Drum Kit» (абор ударных).
оворачивая наборный диск, выберите набор ударных для
2
воспроизведения (001 — 019).
писок наборов ударных
омер
азвание набора
омер
азвание набора
омер
азвание набора
омер
азвание набора
тембра
ударных
тембра
ударных
тембра
ударных
тембра
ударных
001 Standard Kit1 006 Room Kit 011 Symphony Kit 016 Arabic Mixture Kit
002 Standard Kit2 007 Rock Kit 012 Cuban Kit 017 Indian Kit
003 Hit Kit 008 Electro Kit 013 PopLatin Kit 018 Chinese Kit
004 Jazz Kit 009 Analog Kit 014 Arabic Kit 019 Chinese Mixture Kit
005 Brush Kit 010 Dance Kit 015 Arabic Kit2
ажимайте клавиши для воспроизведения звучания
3
инструментов из набора ударных.
• м. список наборов ударных на
стр. 120.
екомендуется начать с набора ударных 001 – «Standard Kit 1»
(тандартный набор 1).
ример. 001, Standard Kit 1 (тандартный набор 1)
Brush Tap
Brush Slap
Castanet
Sticks
Open Rim Shot
Side Stick
Hand Clap
Hi-Hat Closed
Hi-Hat Pedal
Hi-Hat Open
Crash Cymbal 1
Ride Cymbal 1
Tambourine
Cowbell
Vibraslap
Bongo L
Conga H Open
Timbale L
Agogo L
Maracas
Guiro Short
Claves
Cuica Mute
Triangle Mute
Shaker
C3
Kick
Snare
Kick Soft
Low Tom
Bongo H
Conga L
Agogo H
Cabasa
Bell Tree
Seq Click H
Brush Swirl
Snare Roll
Snare Soft
Kick Tight
High Tom
Snare Tight
Mid Tom L
Floor Tom L
Mid Tom H
Timbale H
Floor Tom H
Guiro Long
Cuica Open
Jingle Bells
Ride Cymbal 2
Wood Block H
Triangle Open
Brush Tap Swirl
Conga H Mute
Wood Block L
Chinese Cymbal
Splash Cymbal
Crash Cymbal 2
Ride Cymbal Cup
Samba Whistle H
Samba Whistle L
уководство пользователя PSR-S550 21