-
Contents
-
Table of Contents
-
Troubleshooting
-
Bookmarks
Quick Links
Related Manuals for Yamaha PortaTone PSR-510
Summary of Contents for Yamaha PortaTone PSR-510
-
Page 2
Musikinstrument Typ: PSR-510… -
Page 3
Congratulations! You are the proud owner of a Yamaha PSR-510. Your PSR-510 is a high- quality musical instrument that incorporates advanced Yamaha digital tech- nology and many versatile features. In order to obtain maximum performance and enjoyment from your PSR-510, we urge you to read this Owner’s Manual thoroughly while trying out the various features described. -
Page 6: Taking Care Of Your Portatone
If this occurs, move the instrument further away from the affected equipment. • The PSR-510 contains no user serviceable parts. Opening it or tampering with it in anyway can lead to irreparable damage and possibly electric shock.
-
Page 7
Preparation Your PSR-510 will run either from an optional power adaptor or batteries*. Follow the instructions below according to the power source you intend to use. For battery operation the PSR-510 requires six 1.5V SUM-1, “D” size, R-20 or equivalent batteries. -
Page 8
HEADPHONES/AUX OUT jack. The HEAD- PHONES/AUX OUT jack can also be used to deliver the output of the PSR-510 to a keyboard amplifier, stereo sound system, mixing console or tape recorder. An optional Yamaha FC4 or FC5 footswitch can be plugged into the rear-panel SUSTAIN PEDAL jack. -
Page 9: Listen To The Demo
Listen to the Demo! | | | | | | | | | | | | | | | | | | | | | | | | | | | | | | | | | | | | | | | | | | | | | | | | | | | | | | | | | | | | | | | | | | | | | | | | | | | | | | | | | | | | | | | | | | | | | | | | | | | | | | | | | | | | | | | | | | | | | | | | | | | | | | | | | | | | | | | | | | | | | Before playing the demo turn the power ON by pressing the POWER switch (the panel indicators and MULTI DISPLAY will light), and turn the MASTER VOLUME control up (clockwise) about a quarter-turn from its…
-
Page 10: Basic Editing Procedure
LECT] button (its indicator will light). The number shown on the MULTI DISPLAY will be the current value of the selected parameter. The PSR-510 lets you edit parameters using four different methods. Use the one that best suits the parameter you have selected:…
-
Page 11
| | | | | | | | | | | | | | | | | | | | | | | | | | | | | | | | | | | | | | | | | | | | | | | | | | | | | | | | | | | | | | | | | | | | | | | | | | | | | | | | | | | | | | | | | | | | | | | | | | | | | | | | | | | | | | | | | | | | | | | | | | | | | | | | | | | | | | | | | | | | | The [ ] and [ ] buttons immediately to the right of the MULTI DIS- PLAY can be used to increment (increase by one) or decrement (decrease by one) the currently selected parameter. -
Page 12
The unique ORCHESTRATION button group in the PSR-510’s VOICE control section lets you select and play from one to four “parts” at the same time using a variety of “orchestrations”. One of the PSR-510’s 128 voices is assigned to each part. -
Page 13
| | | | | | | | | | | | | | | | | | | | | | | | | | | | | | | | | | | | | | | | | | | | | | | | | | | | | | | | | | | | | | | | | | | | | | | | | | | | | | | | | | | | | | | | | | | | | | | | | | | | | | | | | | | | | | | | | | | | | | | | | | | | | | | | | | | | | | | | | | | | |… -
Page 14
Selecting & Playing the Voices You can assign any of the PSR-510’s 128 voices to each of the ORCHESTRATION parts, whether the part is currently ON or OFF. | | | | | | | | | | | | | | | | | | | | | | | | | | | | | | | | | | | | | | | | | | | | | | | | | | | | | | | | | | | | | | | | | | | | | | | | | | | | | | | | | | | | | | | | | | | | | | | | | | | | | | | | | | | | | | | | | | | | | | | | | | | | | | | | | | | | | | | | | | | | | You don’t need to do this if the [VOICE SELECT] indicator is already… -
Page 15
You can individually set the volume of each orchestration part to set up the ideal balance between parts. You can individually shift the octave of each orchestration part up or down by up to two octaves. This makes it easy, for example, to lower the pitch of a bass voice to an appropriate octave without affecting the other parts in your orchestration. -
Page 16
Selecting & Playing the Voices The PSR-510 features a built-in digital signal processor (DSP) that can be used to apply a range of reverb and delay effects to the PSR-510 voices. The [DSP TYPE] button in the OVERALL CONTROL section (page 21) determines the type of effect to be applied, while the VOICE section [DSP DEPTH] button lets you individually set the amount of effect applied to each orchestration part. -
Page 17
Auto Harmony is used with the PSR-510’s Auto Accompaniment feature except for Full fingering mode (see page 23). It automatically adds appropriate harmony notes to a single-note melody line you play on the key- board. You can choose from 10 different types of harmony that can be assigned to the right-hand orchestration parts. -
Page 18
Selecting & Playing the Voices The PSR-510 has a range of 12 delay-based effects — in addition to the DSP effects (pages 14 and 21) — that can be selected and applied to the right-hand orchestration parts (the left-hand orchestration parts are not af- fected). -
Page 19
The PSR-510 has 8 different drum and percussion “kits” that can be played on the keyboard when the Key- board Percussion function is turned ON. The types of drum and percussion instruments played by the various keys when Keyboard Percussion function is selected are marked by symbols above the keys. -
Page 20
Release the PITCH BEND wheel when you’ve set the required pitch bend range. If you have plugged an optional Yamaha FC4 or FC5 footswitch into the PSR-510’s rear-panel SUSTAIN PEDAL jack, the footswitch can be used as a damper pedal, controlling sustain. Press the pedal to sustain notes after… -
Page 21: Overall Control
Overall Control This function lets you set the split point (the key that separates the left-hand and right-hand orchestration parts) to any key on the keyboard. | | | | | | | | | | | | | | | | | | | | | | | | | | | | | | | | | | | | | | | | | | | | | | | | | | | | | | | | | | | | | | | | | | | | | | | | | | | | | | | | | | | | | | | | | | | | | | | | | | | | | | | | | | | | | | | | | | | | | | | | | | | | | | | | | | | | | | | | | | | | | To set the split point for the left- and right-hand orchestration parts, make sure that the [AUTO ACCOMP] indicator is off before proceeding.
-
Page 22
Overall Control The PSR-510 [TRANSPOSE] button makes it possible to shift the pitch of the PSR-510 up or down in semi- tone intervals up to a maximum of 12 semitones (one octave). Transposing the pitch of the PSR-510 keyboard makes it easier to play in difficult key signatures, and you can easily match the pitch of the keyboard to the range of a singer or other instrumentalist. -
Page 23
The [DSP TYPE] button selects one of eight digital effects that you can use for extra depth and expressive power. This button determines the type of effect to be used, while the [DSP DEPTH] button in the VOICE sec- tion allow the depth of the effect to be individually set for each orchestration part. | | | | | | | | | | | | | | | | | | | | | | | | | | | | | | | | | | | | | | | | | | | | | | | | | | | | | | | | | | | | | | | | | | | | | | | | | | | | | | | | | | | | | | | | | | | | | | | | | | | | | | | | | | | | | | | | | | | | | | | | | | | | | | | | | | | | | | | | | | | | | Press the OVERALL CONTROL section [DSP TYPE] button. -
Page 24
Overall Control This function varies the touch sensitivity of the keyboard. Use this capability to adjust the PSR-510’s touch sensitivity for the best results with your own particular playing style. | | | | | | | | | | | | | | | | | | | | | | | | | | | | | | | | | | | | | | | | | | | | | | | | | | | | | | | | | | | | | | | | | | | | | | | | | | | | | | | | | | | | | | | | | | | | | | | | | | | | | | | | | | | | | | | | | | | | | | | | | | | | | | | | | | | | | | | | | | | | | Press the OVERALL CONTROL section [TOUCH SENSE] button. -
Page 25: Auto Accompaniment
Auto Accompaniment Any of the PSR-510’s 103 accompaniment styles can be selected via the normal editing procedure. This can be done either before or during accompaniment playback. See page 62 for descriptions of all 103 styles. | | | | | | | | | | | | | | | | | | | | | | | | | | | | | | | | | | | | | | | | | | | | | | | | | | | | | | | | | | | | | | | | | | | | | | | | | | | | | | | | | | | | | | | | | | | | | | | | | | | | | | | | | | | | | | | | | | | | | | | | | | | | | | | | | | | | | | | | | | | | | When you press the [STYLE SELECT] button the currently selected style number will appear on the MULTI DISPLAY.
-
Page 26
Auto Accompaniment The PSR-510 has 5 Auto Accompaniment fingering modes, selected via the [FINGERING] button. | | | | | | | | | | | | | | | | | | | | | | | | | | | | | | | | | | | | | | | | | | | | | | | | | | | | | | | | | | | | | | | | | | | | | | | | | | | | | | | | | | | | | | | | | | | | | | | | | | | | | | | | | | | | | | | | | | | | | | | | | | | | | | | | | | | | | | | | | | | | | To set the Auto Accompaniment split point, first turn Auto Accompani- ment ON —… -
Page 27
The Chord 1 mode is ideal if you already know how to play chords on a keyboard, since it allows you to supply your own chords for the Auto Ac- companiment feature. The PSR-510 will accept the following chord types:… -
Page 28
Simultaneously press the root key and both a white and black key to its left. This is a combination of the Single and Chord 1 modes. In this mode the PSR-510 automatically discriminates between Single and Chord 1 mode fingerings and generates the appropriate accompaniment. -
Page 29
Chords played in the Auto Accompaniment section of the keyboard are also detected and played by the PSR-510 Auto Accompaniment system when the accompaniment is stopped (except for Full fingering mode). In this case the bass note and chord voices are selected automatically. -
Page 30
Auto Accompaniment The PSR-510 provides a range of accompaniment “sections” — introduction, fill-ins, variations on the main pattern, ending — that you can select to control the “flow” of the accompaniment to achieve the desired musical results. Accompaniment start/stop and sections are controlled by the ACCOMPANIMENT CONTROL buttons. -
Page 31
| | | | | | | | | | | | | | | | | | | | | | | | | | | | | | | | | | | | | | | | | | | | | | | | | | | | | | | | | | | | | | | | | | | | | | | | | | | | | | | | | | | | | | | | | | | | | | | | | | | | | | | | | | | | | | | | | | | | | | | | | | | | | | | | | | | | | | | | | | | | | Any of the PSR-510 accompaniment patterns can be started with an appro- priate introduction by pressing the [INTRO] button and then the [START/ STOP] button. -
Page 32
Auto Accompaniment The [FADE IN/OUT] button can be used to produce smooth accompaniment and melody fade-ins or fade- outs. | | | | | | | | | | | | | | | | | | | | | | | | | | | | | | | | | | | | | | | | | | | | | | | | | | | | | | | | | | | | | | | | | | | | | | | | | | | | | | | | | | | | | | | | | | | | | | | | | | | | | | | | | | | | | | | | | | | | | | | | | | | | | | | | | | | | | | | | | | | | | An accompaniment in progress can be stopped immediately by pressing the [START/STOP] button or the [SYNC-START/STOP] button. -
Page 33
(21) can be recalled instantly by pressing both the [+] and [–] buttons at the same time. The PSR-510 Auto Accompaniment system includes eight TRACK buttons which allow you to control the accompaniment ar- rangement in real time. You can turn tracks on or off while playing for extra accompaniment variety. -
Page 34
RHYTHM 1, BASS, and PAD CHORD. To make the TRACK buttons even more versatile, the PSR-510 features a REVOICE function that lets you individually change the voices and several related VOICE section parameters assigned to each track. The param-… -
Page 35
| | | | | | | | | | | | | | | | | | | | | | | | | | | | | | | | | | | | | | | | | | | | | | | | | | | | | | | | | | | | | | | | | | | | | | | | | | | | | | | | | | | | | | | | | | | | | | | | | | | | | | | | | | | | | | | | | | | | | | | | | | | | | | | | | | | | | | | | | | | | | Use the [+] and [–] buttons, the number buttons, the data dial, or the [VOICE SELECT] button itself to select a new voice for the selected track. -
Page 36: One Touch Setting
One Touch Setting The One Touch Setting function recalls the following settings: | | | | | | | | | | | | | | | | | | | | | | | | | | | | | | | | | | | | | | | | | | | | | | | | | | | | | | | | | | | | | | | | | | | | | | | | | | | | | | | | | | | | | | | | | | | | | | | | | | | | | | | | | | | | | | | | | | | | | | | | | | | | | | | | | | | | | | | | | | | | | You can, of course, create your original setting by editing the One Touch Setting data, and store it into the Registration Memory.
-
Page 37: Registration Memory
Registration Memory The panel settings listed above can be stored to any one of the four REGISTRATION MEMORY buttons by press- ing the button — [1], [2], [3], or [4] — while holding the [MEMORIZE] button. The indicator of the selected button will light continuously indicating that the data has been stored.
-
Page 38
Registration Memory | | | | | | | | | | | | | | | | | | | | | | | | | | | | | | | | | | | | | | | | | | | | | | | | | | | | | | | | | | | | | | | | | | | | | | | | | | | | | | | | | | | | | | | | | | | | | | | | | | | | | | | | | | | | | | | | | | | | | | | | | | | | | | | | | | | | | | | | | | | | | The settings stored to a REGISTRATION MEMORY button can be recalled at any time simply by pressing the appropriate button. -
Page 39
Each PAGE MEMORY holds a different song, so the PSR-510 can retain up to 4 complete songs in memory, and these can be selected and played back simply by selecting the appropriate PAGE MEMORY. -
Page 40
Record Functions The SONG MEMORY ACCOMP track records the following operations and data: | | | | | | | | | | | | | | | | | | | | | | | | | | | | | | | | | | | | | | | | | | | | | | | | | | | | | | | | | | | | | | | | | | | | | | | | | | | | | | | | | | | | | | | | | | | | | | | | | | | | | | | | | | | | | | | | | | | | | | | | | | | | | | | | | | | | | | | | | | | | | If necessary, press the [PAGE #] button to select the PAGE MEMORY number to which you want to record. -
Page 41
| | | | | | | | | | | | | | | | | | | | | | | | | | | | | | | | | | | | | | | | | | | | | | | | | | | | | | | | | | | | | | | | | | | | | | | | | | | | | | | | | | | | | | | | | | | | | | | | | | | | | | | | | | | | | | | | | | | | | | | | | | | | | | | | | | | | | | | | | | | | | Recording will begin as soon as you play a chord on the Auto Accompani- ment section of the keyboard. -
Page 42
Record Functions The SONG MEMORY MELODY tracks record the following operations and data: | | | | | | | | | | | | | | | | | | | | | | | | | | | | | | | | | | | | | | | | | | | | | | | | | | | | | | | | | | | | | | | | | | | | | | | | | | | | | | | | | | | | | | | | | | | | | | | | | | | | | | | | | | | | | | | | | | | | | | | | | | | | | | | | | | | | | | | | | | | | | Select the voice you want to record with (the R1 and R2 voices can be used), and set the voice effects and other parameters as required. -
Page 43
| | | | | | | | | | | | | | | | | | | | | | | | | | | | | | | | | | | | | | | | | | | | | | | | | | | | | | | | | | | | | | | | | | | | | | | | | | | | | | | | | | | | | | | | | | | | | | | | | | | | | | | | | | | | | | | | | | | | | | | | | | | | | | | | | | | | | | | | | | | | | If necessary, press the [PAGE #] button to select the PAGE MEMORY number containing the song you want to play back. -
Page 44
Record Functions You can start SONG MEMORY recording or playback from any specified measure, as long as the specified measure is within the range of measures that has already been recorded: | | | | | | | | | | | | | | | | | | | | | | | | | | | | | | | | | | | | | | | | | | | | | | | | | | | | | | | | | | | | | | | | | | | | | | | | | | | | | | | | | | | | | | | | | | | | | | | | | | | | | | | | | | | | | | | | | | | | | | | | | | | | | | | | | | | | | | | | | | | | | Press the SONG [RESET] button to go directly to the first measure of the song and turn ON all tracks that contain data. -
Page 45
The PSR-510 MULTI PADS can be used to record short rhythmic or melodic sequences, percussion fill-ins, or single percussion sounds that can be played at any time simply by pressing the appropriate pad. Pads [1] and [2] play back exactly as recorded, while pads [3] and [4] are “CHORD MATCH” types which are automatically trans- posed to match chords played using the PSR-510 Auto-accompaniment feature. -
Page 46
MULTI PADS [3] and [4] are “CHORD MATCH” types, and the data they contain will be automatically transposed to match chords played using the PSR-510 Auto Accompaniment feature. MULTI PAD playback can be terminated by pressing the MULTI PADS [STOP] button. -
Page 47
Style number “00” in each PAGE MEMORY is a “custom accompaniment” that you can record yourself and use with the PSR-510’s Auto Accompaniment feature. Custom accompaniments can be created only using the tracks which have the preset accompaniment style data. -
Page 48
(not number “00”), the ARE YOU SURE? indicator will light and the PSR-510 will ask “Are you sure?” (see NOTES, below). Press the [YES] button if you want to go ahead with the record procedure, thus erasing the previous contents of the custom accompani- ment. -
Page 49
| | | | | | | | | | | | | | | | | | | | | | | | | | | | | | | | | | | | | | | | | | | | | | | | | | | | | | | | | | | | | | | | | | | | | | | | | | | | | | | | | | | | | | | | | | | | | | | | | | | | | | | | | | | | | | | | | | | | | | | | | | | | | | | | | | | | | | | | | | | | | Recording will begin as soon as you press the ACCOMPANIMENT CON- TROL section [START/STOP] button or play a chord or note on the keyboard. -
Page 50
Record Functions In addition to the realtime-recording procedures described above, the PSR-510 has a “step recording” mode in which notes can be entered one at a time with precise timing and length. | | | | | | | | | | | | | | | | | | | | | | | | | | | | | | | | | | | | | | | | | | | | | | | | | | | | | | | | | | | | | | | | | | | | | | | | | | | | | | | | | | | | | | | | | | | | | | | | | | | | | | | | | | | | | | | | | | | | | | | | | | | | | | | | | | | | | | | | | | | | |… -
Page 51
| | | | | | | | | | | | | | | | | | | | | | | | | | | | | | | | | | | | | | | | | | | | | | | | | | | | | | | | | | | | | | | | | | | | | | | | | | | | | | | | | | | | | | | | | | | | | | | | | | | | | | | | | | | | | | | | | | | | | | | | | | | | | | | | | | | | | | | | | | | | | “Gate Time”… -
Page 52
Record Functions | | | | | | | | | | | | | | | | | | | | | | | | | | | | | | | | | | | | | | | | | | | | | | | | | | | | | | | | | | | | | | | | | | | | | | | | | | | | | | | | | | | | | | | | | | | | | | | | | | | | | | | | | | | | | | | | | | | | | | | | | | | | | | | | | | | | | | | | | | | | | The following chart shows the step size and gate time settings required to enter a variety of notes: It’s also possible to specify the step sizes for all notes by specifying the… -
Page 53
RECORDING section [QUANTIZE] button. Both the [QUANTIZE] and track/pad button indicators will flash. The ARE YOU SURE? indicator will light and the PSR-510 will ask “Are you sure?” Press the [YES] button if you want to go ahead with the quantize opera- tion, thus irreversibly altering the selected track or pad. -
Page 54
Press the appropriate track or pad button while holding the [CLEAR] button. The ARE YOU SURE? indicator will light and the PSR-510 will ask “Are you sure?” Press the [YES] button if you want to go ahead with the clear operation, thus erasing the selected track or pad. -
Page 55
| | | | | | | | | | | | | | | | | | | | | | | | | | | | | | | | | | | | | | | | | | | | | | | | | | | | | | | | | | | | | | | | | | | | | | | | | | | | | | | | | | | | | | | | | | | | | | | | | | | | | | | | | | | | | | | | | | | | | | | | | | | | | | | | | | | | | | | | | | | | | Press the track or pad button corresponding to the track or pad you want to alter while holding the RECORDING section [REWRITE SETTING] button (for a Custom Accompaniment, first select the section you want to… -
Page 56
Page Memory | | | | | | | | | | | | | | | | | | | | | | | | | | | | | | | | | | | | | | | | | | | | | | | | | | | | | | | | | | | | | | | | | | | | | | | | | | | | | | | | | | | | | | | | | | | | | | | | | | | | | | | | | | | | | | | | | | | | | | | | | | | | | | | | | | | | | | | | | | | | | Press the [PAGE #] button once and the current page number will appear on the MULTI DISPLAY. -
Page 57
| | | | | | | | | | | | | | | | | | | | | | | | | | | | | | | | | | | | | | | | | | | | | | | | | | | | | | | | | | | | | | | | | | | | | | | | | | | | | | | | | | | | | | | | | | | | | | | | | | | | | | | | | | | | | | | | | | | | | | | | | | | | | | | | | | | | | | | | | | | | | The PSR-510 MIDI IN connector receives MIDI data from an external MIDI device which can be used to control the PSR-510. The MIDI OUT connector transmits MIDI data generated by the PSR-510 (e.g. note and velocity data produced by playing the keyboard). -
Page 58
The entire contents of the currently selected PSR-510 PAGE MEMORY (CUSTOM ACCOMP, MULTI PADS, SONG MEMORY, REGISTRATION MEMORY) can be dumped to a second PSR-510 or to a bulk storage de- vice such as a MIDI data recorder or MIDI computer. -
Page 59
The PSR-510 will automatically receive bulk dump data from another PSR-510 or MIDI data storage de- vice as long as the MIDI OUT terminal of the external device is properly connected to the MIDI IN connector of the PSR-510, and PSR-510 MIDI reception is enabled. -
Page 60
The [RECEIVE CH/CL/COM] button is used to specify the reception mode for each of the 16 MIDI channels, the internal or external clock mode, and MIDI start/stop command reception mode. The PSR-510 allows any of five reception modes to be individually assigned to MIDI channels 1 through 16. The five modes are: RX OFF: Reception disabled. -
Page 61
PSR-510’s time-based functions (Auto Accompaniment, SONG MEMORY, etc.) are controlled by its own inter- nal clock, the speed of which is set by the PSR-510 [TEMPO] button. When MIDI clock reception is enabled, however, all timing is controlled by an external MIDI clock signal received via the PSR-510 MIDI IN terminal (the PSR-510 [TEMPO] setting has no effect). -
Page 62
MIDI The PSR-510 allows independent MIDI transmit channels to be assigned to the L and R ORCHESTRATION voices. It is also possible to independently turn local control and MIDI output on or off for the L and R voices. The L and R ORCHESTRATION voices can be independently set to transmit on any of the 16 MIDI channels as… -
Page 63
The PSR-510 can play up to 28 individual notes at the same time (i.e. it has a maximum “polyphony” of 28). This number includes all voices used: dual, split, auto accompaniment, song memory, and multi pads. If the maximum polyphony of the PSR-510 is exceeded, the excess notes will be truncated (they will not sound). -
Page 64
| | | | | | | | | | | | | | | | | | | | | | | | | | | | | | | | | | | | | | | | | | | | | | | | | | | | | | | | | | | | | | | | | | | | | | | | | | | | | | | | | | | | | | | | | | | | | | | | | | | | | | | | | | | | | | | | | | | | | | | | | | | | | | | | | | | | | | | | | | | | |… -
Page 65
| | | | | | | | | | | | | | | | | | | | | | | | | | | | | | | | | | | | | | | | | | | | | | | | | | | | | | | | | | | | | | | | | | | | | | | | | | | | | | | | | | | | | | | | | | | | | | | | | | | | | | | | | | | | | | | | | | | | | | | | | | | | | | | | | | | | | | | | | | | | |… -
Page 66
| | | | | | | | | | | | | | | | | | | | | | | | | | | | | | | | | | | | | | | | | | | | | | | | | | | | | | | | | | | | | | | | | | | | | | | | | | | | | | | | | | | | | | | | | | | | | | | | | | | | | | | | | | | | | | | | | | | | | | | | | | | | | | | | | | | | | | | | | | | | |… -
Page 67
All PSR-510 page memory settings are retained in memory even when the power switch is turned OFF as long as the PSR-510 is powered by batteries or an AC adapter. You can, however, restore the factory default set- tings for all four page memories or a single specified page memory by following the procedures outlined below. -
Page 68
| | | | | | | | | | | | | | | | | | | | | | | | | | | | | | | | | | | | | | | | | | | | | | | | | | | | | | | | | | | | | | | | | | | | | | | | | | | | | | | | | | | | | | | | | | | | | | | | | | | | | | | | | | | | | | | | | | | | | | | | | | | | | | | | | | | | | | | | | | | | |… -
Page 69
Something not working as it should? In many cases what appears to be a malfunction can be traced to a sim- ple error that can be remedied immediately. Before assuming that your PSR-510 is faulty, please check the fol- lowing points. -
Page 70
| | | | | | | | | | | | | | | | | | | | | | | | | | | | | | | | | | | | | | | | | | | | | | | | | | | | | | | | | | | | | | | | | | | | | | | | | | | | | | | | | | | | | | | | | | | | | | | | | | | | | | | | | | | | | | | | | | | | | | | | | | | | | | | | | | | | | | | | | | | | |… -
Page 71
| | | | | | | | | | | | | | | | | | | | | | | | | | | | | | | | | | | | | | | | | | | | | | | | | | | | | | | | | | | | | | | | | | | | | | | | | | | | | | | | | | | | | | | | | | | | | | | | | | | | | | | | | | | | | | | | | | | | | | | | | | | | | | | | | | | | | | | | | | | | |… -
Page 72
| | | | | | | | | | | | | | | | | | | | | | | | | | | | | | | | | | | | | | | | | | | | | | | | | | | | | | | | | | | | | | | | | | | | | | | | | | | | | | | | | | | | | | | | | | | | | | | | | | | | | | | | | | | | | | | | | | | | | | | | | | | | | | | | | | | | | | | | | | | | |… -
Page 73
| | | | | | | | | | | | | | | | | | | | | | | | | | | | | | | | | | | | | | | | | | | | | | | | | | | | | | | | | | | | | | | | | | | | | | | | | | | | | | | | | | | | | | | | | | | | | | | | | | | | | | | | | | | | | | | | | | | | | | | | | | | | | | | | | | | | | | | | | | | | |… -
Page 74
| | | | | | | | | | | | | | | | | | | | | | | | | | | | | | | | | | | | | | | | | | | | | | | | | | | | | | | | | | | | | | | | | | | | | | | | | | | | | | | | | | | | | | | | | | | | | | | | | | | | | | | | | | | | | | | | | | | | | | | | | | | | | | | | | | | | | | | | | | | | |… -
Page 75
| | | | | | | | | | | | | | | | | | | | | | | | | | | | | | | | | | | | | | | | | | | | | | | | | | | | | | | | | | | | | | | | | | | | | | | | | | | | | | | | | | | | | | | | | | | | | | | | | | | | | | | | | | | | | | | | | | | | | | | | | | | | | | | | | | | | | | | | | | | | |… -
Page 76
* Specifications subject to change without notice. | | | | | | | | | | | | | | | | | | | | | | | | | | | | | | | | | | | | | | | | | | | | | | | | | | | | | | | | | | | | | | | | | | | | | | | | | | | | | | | | | | | | | | | | | | | | | | | | | | | | | | | | | | | | | | | | | | | | | | | | | | | | | | | | | | | | | | | | | | | | |…

Entsorgung leerer Batterien (nur innerhalb Deutschlands)
Leisten Sie einen Beitrag zum Umweltschutz. Verbrauchte Batterien oder
Akkumulatoren dürfen nicht in den Hausmüll. Sie können bei einer
Sammelstelle für Altbatterien bzw. Sondermüll abgegeben werden.
Informieren Sie sich bei Ihrer Kommune.
CANADA
THIS DIGITAL APPARATUS DOES NOT EXCEED THE “CLASS B”
LIMITS FOR RADIO NOISE EMISSIONS FROM DIGITAL APPARATUS
SET OUT IN THE RADIO INTERFERENCE REGULATION OF THE
CANADIAN DEPARTMENT OF COMMUNICATIONS.
LE PRESENT APPAREIL NUMERIQUE N’EMET PAS DE BRUITS
RADIOELECTRIQUES DEPASSANT LES LIMITES APPLICABLES AUX
APPAREILS NUMERIQUES DE LA “CLASSE B” PRESCRITES DANS
LE REGLEMENT SUR LE BROUILLAGE RADIOELECTRIQUE EDICTE
PAR LE MINISTERE DES COMMUNICATIONS DU CANADA.
• This applies only to products distributed by Yamaha Canada Music Ltd.
• Ceci ne s’applique qu’aux produits distribués par Yamaha Canada Music Ltd.
The serial number of this product may be found on the bottom of the unit.
You should note this serial number in the space provided below and
retain this manual as a permanent record of your purchase to aid identifi-
cation in the event of theft.
Model No.
PSR-510
Serial No.
• This applies only to products distributed by Yamaha Europa GmbH.
• Dies bezieht sich nur auf die von der Yamaha Europa GmbH vertriebenen Produkte.
IMPORTANT NOTICE: DO NOT MODIFY THIS UNIT!
This product, when installed as indicated in the instructions contained in this
manual, meets FCC requirements. Modifications not expressly approved by
Yamaha may void your authority, granted by the FCC, to use the product.
IMPORTANT:
When connecting this product to accessories and/or another
product use only high quality shielded cables. Cable/s supplied with this
product MUST be used. Follow all installation instructions. Failure to follow
instructions could void your FCC authorization to use this product in the USA.
NOTE:
This product has been tested and found to comply with the require-
ments listed in FCC Regulations, Part 15 for Class “B” digital devices. Compli-
ance with these requirements provides a reasonable level of assurance that
your use of this product in a residential environment will not result in harmful
interference with other electronic devices. This equipment generates/uses
radio frequencies and, if not installed and used according to the instructions
found in the users manual, may cause interference harmful to the operation of
other electronic devices. Compliance with FCC regulations does not guaran-
tee that interference will not occur in all installations. If this product is found
to be the source of interference, which can be determined by turning the unit
“OFF” and “ON”, please try to eliminate the problem by using one of the
following measures:
• Relocate either this product or the device that is being affected by the
interference.
• Utilize power outlets that are on different branch (circuit breaker or fuse)
circuits or install AC line filter/s.
• In the case of radio or TV interference, relocate/reorient the antenna. If the
antenna lead-in is 300 ohm ribbon lead, change the lead-in to co-axial
type cable.
If these corrective measures do not produce satisfactory results, please
contact the local retailer authorized to distribute this type of product. If you
can not locate the appropriate retailer, please contact Yamaha Corporation
of America, Electronic Service Division, 6600 Orangethorpe Ave, Buena
Park, CA90620
• This applies only to products distributed by Yamaha Corporation of America.
FCC INFORMATION (U.S.A.)
This product utilizes batteries or an external power supply (adapter). DO
NOT connect this product to any power supply or adapter other than one
described in the manual, on the name plate, or specifically recommended by
Yamaha.
This product should be used only with the components supplied or; a cart,
rack, or stand that is recommended by Yamaha. If a cart, etc., is used,
please observe all safety markings and instructions that accompany the
accessory product.
SPECIFICATIONS SUBJECT TO CHANGE:
The information contained in this manual is believed to be correct at the time
of printing. However, Yamaha reserves the right to change or modify any of
the specifications without notice or obligation to update existing units.
This product, either alone or in combination with an amplifier and head-
phones or speaker/s, may be capable of producing sound levels that could
cause permanent hearing loss. DO NOT operate for long periods of time at a
high volume level or at a level that is uncomfortable. If you experience any
hearing loss or ringing in the ears, you should consult an audiologist.
IMPORTANT: The louder the sound, the shorter the time period before
damage occurs.
NOTICE:
Service charges incurred due to a lack of knowledge relating to how a func-
tion or effect works (when the unit is operating as designed) are not covered
by the manufacturer’s warranty, and are therefore the owners responsibility.
Please study this manual carefully and consult your dealer before requesting
service.
ENVIRONMENTAL ISSUES:
Yamaha strives to produce products that are both user safe and environ-
mentally friendly. We sincerely believe that our products and the production
methods used to produce them, meet these goals. In keeping with both the
letter and the spirit of the law, we want you to be aware of the following:
Battery Notice: This product MAY contain a small non-rechargeable battery
which (if applicable) is soldered in place. The average life span of this type
of battery is approximately five years. When replacement becomes neces-
sary, contact a qualified service representative to perform the replacement.
This product may also use “household” type batteries. Some of these may
be rechargeable. Make sure that the battery being charged is a recharge-
able type and that the charger is intended for the battery being charged.
When installing batteries, do not mix batteries with new, or with batteries of
a different type. Batteries MUST be installed correctly. Mismatches or
incorrect installation may result in overheating and battery case rupture.
Warning: Do not attempt to disassemble, or incinerate any battery. Keep
all batteries away from children. Dispose of used batteries promptly and as
regulated by the laws in your area. Note: Check with any retailer of house-
hold type batteries in your area for battery disposal information.
Disposal Notice: Should this product become damaged beyond repair, or
for some reason its useful life is considered to be at an end, please ob-
serve all local, state, and federal regulations that relate to the disposal of
products that contain lead, batteries, plastics, etc. If your dealer is unable
to assist you, please contact Yamaha directly.
NAME PLATE LOCATION:
The name plate is located on the bottom of the product. The model
number, serial number, power requirements, etc., are located on this plate.
You should record the model number, serial number, and the date of
purchase in the spaces provided below and retain this manual as a perma-
nent record of your purchase.
Model
Serial No.
Purchase Date
SPECIAL MESSAGE SECTION
PLEASE KEEP THIS MANUAL
Wichtiger Hinweis für die Benutzung in der Bundesrepublik Deutschland.
Bescheinigung des Importeurs
Hiermit wird bescheinigt, daß der/die/das
Musikinstrument Typ: PSR-510
(Gerät, Typ, Bezeichnung)
in Übereinstimmung mit den Bestimmungen der
VERFÜGUNG 1046/84
(Amtsblattverfügung)
funk-entstört ist.
Der Deutschen Bundespost wurde das Inverkehrbringen dieses Gerätes
angezeigt und die Berechtigung zur Überprüfung der Serie auf
Einhaltung der Bestimmungen eingeräumt.
Yamaha Europa GmbH
Name des Importeurs

- Manuals
- Brands
- Yamaha Manuals
- Electronic Keyboard
- PortaTone PSR-510
- Owner’s manual
-
Contents
-
Table of Contents
-
Troubleshooting
-
Bookmarks
Quick Links
Related Manuals for Yamaha PortaTone PSR-510
Summary of Contents for Yamaha PortaTone PSR-510
-
Page 2: Special Message Section
• This applies only to products distributed by Yamaha Europa GmbH. You should note this serial number in the space provided below and • Dies bezieht sich nur auf die von der Yamaha Europa GmbH vertriebenen Produkte. retain this manual as a permanent record of your purchase to aid identifi- cation in the event of theft.
-
Page 3: Table Of Contents
Congratulations! You are the proud owner of a Yamaha PSR-510. Your PSR-510 is a high- quality musical instrument that incorporates advanced Yamaha digital tech- nology and many versatile features. In order to obtain maximum performance and enjoyment from your PSR-510, we urge you to read this Owner’s Manual thoroughly while trying out the various features described.
-
Page 6: Taking Care Of Your Portatone
MIDI cables. YAMAHA is not responsible for damage caused by improper handling or operation. | | | | | | | | | | | | | | | | | | | | | | | | | | | | | | | | | | | | | | | | | | | | | | | | | | | | | | | | | | | | | | | | | | | | | | | | | | | | | | | | | | | | | | | | | | | | | | | | | | | | | | | | | | | | | | | | | | | | | | | | | | | | | | | | | | | | | | | | | | | | |…
-
Page 7: Preparation
AC adaptor) during any PSR-510 record operation! Doing so can result in a loss of data. Using An Optional AC Power Adaptor ………………..Plug the DC output cable from an optional Yamaha PA-3, PA-4, PA-5, PA- DC 10-12V IN PA-3,…
-
Page 8: Using Headphones Or An External Sound System
Stereo sound system The Sustain Pedal An optional Yamaha FC4 or FC5 footswitch can be plugged into the SUSTAIN PEDAL rear-panel SUSTAIN PEDAL jack. The sustain pedal functions as a damper pedal, controlling sustain. Press the pedal to sustain notes after the keys are released.
-
Page 9: Listen To The Demo
Listen to the Demo! Once you’ve set up your PSR-510, try listening to the pre-programmed demonstration songs — they’ll give you a good idea of what the PSR-510 can do! DEMO SONG # POWER MASTER VOLUME START/ STOP Turn the Power ON & Set the Volume ………………..Before playing the demo turn the power ON by pressing the POWER switch (the panel indicators and MULTI DISPLAY will light), and turn the MASTER VOLUME control up (clockwise) about a quarter-turn from its…
-
Page 10: Basic Editing Procedure
Basic Editing Procedure The PSR-510 features a flexible-but-consistent interface that lets you edit just about all of its parameters using the same basic procedure. Once familiar with the system, you’ll be able to edit any parameter quickly and easily. Here’s the basic procedure: BEAT RESET MULTI DISPLAY…
-
Page 11
2-2: The [+] and [−] Buttons The [+] and [−] buttons immediately to the right of the MULTI DIS- PLAY can be used to increment (increase by one) or decrement (decrease by one) the currently selected parameter. Press the [+] button briefly to in- RESET crement the parameter value, or the [−] button to decrement. -
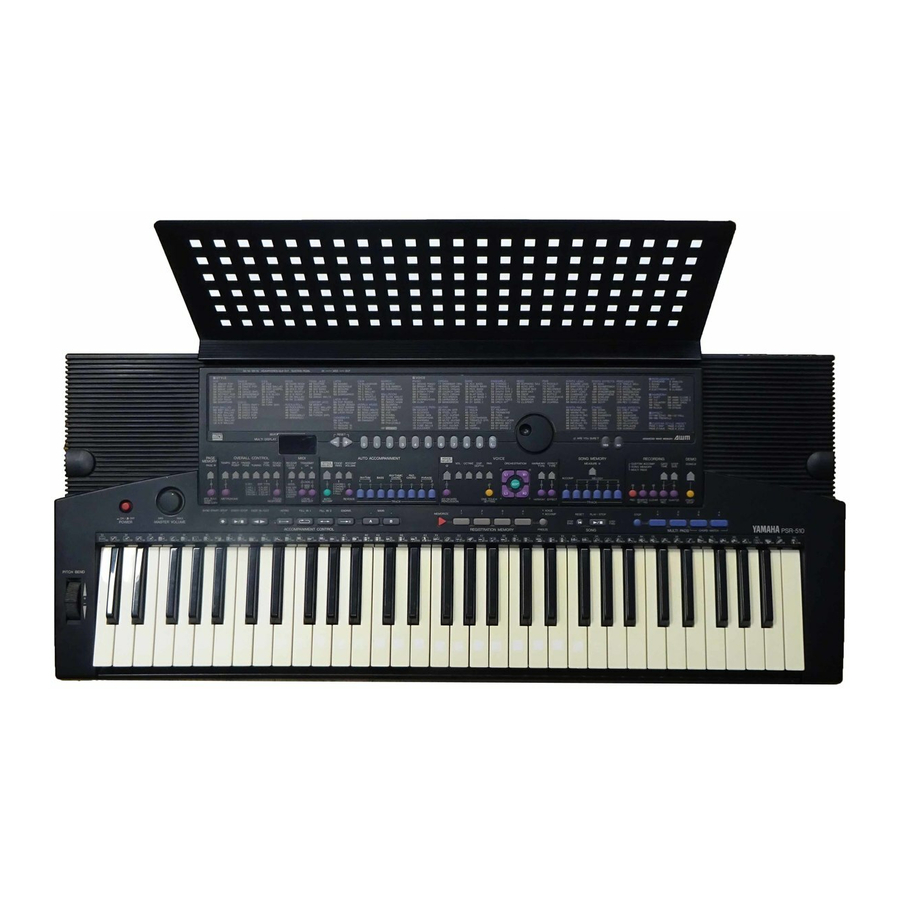
Page 12: Selecting & Playing The Voices
Selecting & Playing the Voices The PSR-510 has 128 stunning voices plus 8 different drum and percussion kits that you can select and play in a number of ways. VOICE VOICE SELECT OCTAVE DSP ORCHESTRATION HARMONY EFFECT DEPTH TYPE TYPE EDIT KEYBOARD ONE TOUCH…
-
Page 13
Dual Mode Split & Dual Modes In the dual mode both the [R1] and [R2] part There are five possible combinations of the split voices are selected so they can be played simultane- and dual modes, as shown below. The part for the ously across the entire keyboard. -
Page 14: Voice Assignment
Selecting & Playing the Voices Voice Assignment You can assign any of the PSR-510’s 128 voices to each of the ORCHESTRATION parts, whether the part is currently ON or OFF. Press the [VOICE SELECT] Button ………………….. You don’t need to do this if the [VOICE SELECT] indicator is already VOICE SELECT lit.
-
Page 15: Volume
Volume You can individually set the volume of each orchestration part to set up the ideal balance between parts. Select the Part You Want to Edit ………………….Use the ORCHESTRATION [EDIT] button to select the part you want to edit. Press the [VOL] Button ……………………..
-
Page 16: Dsp Depth
Selecting & Playing the Voices DSP Depth The PSR-510 features a built-in digital signal processor (DSP) that can be used to apply a range of reverb and delay effects to the PSR-510 voices. The [DSP TYPE] button in the OVERALL CONTROL section (page 21) determines the type of effect to be applied, while the VOICE section [DSP DEPTH] button lets you individually set the amount of effect applied to each orchestration part.
-
Page 17: Auto Harmony
Auto Harmony Auto Harmony is used with the PSR-510’s Auto Accompaniment feature except for Full fingering mode (see page 23). It automatically adds appropriate harmony notes to a single-note melody line you play on the key- board. You can choose from 10 different types of harmony that can be assigned to the right-hand orchestration parts.
-
Page 18: Effects
Selecting & Playing the Voices Effects The PSR-510 has a range of 12 delay-based effects — in addition to the DSP effects (pages 14 and 21) — that can be selected and applied to the right-hand orchestration parts (the left-hand orchestration parts are not af- fected).
-
Page 19: Keyboard Percussion
Keyboard Percussion The PSR-510 has 8 different drum and percussion “kits” that can be played on the keyboard when the Key- board Percussion function is turned ON. The types of drum and percussion instruments played by the various keys when Keyboard Percussion function is selected are marked by symbols above the keys. Turn Keyboard Percussion ON ………………….
-
Page 20: Pitch Bend
Release the PITCH BEND wheel when you’ve set the required pitch bend range. Sustain If you have plugged an optional Yamaha FC4 or FC5 footswitch into the SUSTAIN PEDAL PSR-510’s rear-panel SUSTAIN PEDAL jack, the footswitch can be used as a damper pedal, controlling sustain. Press the pedal to sustain notes after the keys are released.
-
Page 21: Overall Control
Overall Control The OVERALL CONTROL section includes a range of parameters that, as their title suggests, apply to the overall sound of the PSR-510. OVERALL CONTROL TEMPO SPLIT TRANS- TOUCH POINT POSE TUNING TYPE SENSE 0 OFF DSP TYPE ……..1 HALL 1 5 PLATE 1 2 HALL 2…
-
Page 22: Transpose
Overall Control Transpose The PSR-510 [TRANSPOSE] button makes it possible to shift the pitch of the PSR-510 up or down in semi- tone intervals up to a maximum of 12 semitones (one octave). Transposing the pitch of the PSR-510 keyboard makes it easier to play in difficult key signatures, and you can easily match the pitch of the keyboard to the range of a singer or other instrumentalist.
-
Page 23: Dsp Type
DSP Type The [DSP TYPE] button selects one of eight digital effects that you can use for extra depth and expressive power. This button determines the type of effect to be used, while the [DSP DEPTH] button in the VOICE sec- tion allow the depth of the effect to be individually set for each orchestration part.
-
Page 24: Touch Sensitivity
Overall Control Touch Sensitivity This function varies the touch sensitivity of the keyboard. Use this capability to adjust the PSR-510’s touch sensitivity for the best results with your own particular playing style. Press the [TOUCH SENSE] Button ………………….. Press the OVERALL CONTROL section [TOUCH SENSE] button. The TOUCH SENSE current sensitivity setting will appear on the MULTI DISPLAY.
-
Page 25: Auto Accompaniment
Auto Accompaniment The PSR-510 has 103 accompaniment styles that can be used to provide fully-orchestrated Auto Accompaniment. When the Auto Accompaniment function is turned ON, the PSR-510 creates fully-orchestrated rhythm, bass, and chord accompaniment based on chords you play with the left hand in the Auto Accompaniment section of the keyboard (i.e.
-
Page 26: Setting The Auto Accompaniment Split Point
Auto Accompaniment Setting the Auto Accompaniment Split Point To set the Auto Accompaniment split point, first turn Auto Accompani- SPLIT STYLE POINT SELECT ment ON — press the [AUTO ACCOMP] button so that its indicator lights — then proceed with steps 2 and 3 as described in “Split Point Change” on page 19.
-
Page 27
Mode 1: Chord 1 The Chord 1 mode is ideal if you already know how to play chords on a keyboard, since it allows you to supply your own chords for the Auto Ac- companiment feature. The PSR-510 will accept the following chord types: Example for “C”… -
Page 28
Auto Accompaniment Mode 2: Chord 2 This is essentially the same as the Chord 1 mode, above, except that the lowest note played in the Auto Accompaniment section of the keyboard will be played by the bass part rather than the chord root. C on E C on G SINGLE mode fingering makes it simple to produce beautifully orches-… -
Page 29: Tempo Control
Mode 5: Full In this mode chords played anywhere on the keyboard are detected and used for Auto Accompaniment. Otherwise the keyboard functions normally, and the entire range is available for playing. Chord recognition is the same as in the Chord 1 mode. Please note that in this mode all notes you play on the keyboard at any one time will be interpreted as the Auto Accompani- ment chord.
-
Page 30: Accompaniment Control
Auto Accompaniment Accompaniment Control The PSR-510 provides a range of accompaniment “sections” — introduction, fill-ins, variations on the main pattern, ending — that you can select to control the “flow” of the accompaniment to achieve the desired musical results. Accompaniment start/stop and sections are controlled by the ACCOMPANIMENT CONTROL buttons. Straight Start ……………………….
-
Page 31
Starting the Accompaniment with an Introduction …………….Any of the PSR-510 accompaniment patterns can be started with an appro- INTRO priate introduction by pressing the [INTRO] button and then the [START/ STOP] button. Once the [INTRO] button is pressed, the [INTRO] indicator will be lit continuously and the MAIN [A] or [B] indicator will flash to indicate which INTRO MAIN… -
Page 32
Auto Accompaniment Stopping the Accompaniment ………………….. An accompaniment in progress can be stopped immediately by pressing SYNC-START/STOP START/STOP ENDING the [START/STOP] button or the [SYNC-START/STOP] button. In the latter case the synchro start mode will be engaged when the accompaniment stops. -
Page 33: Accompaniment Volume
Accompaniment Volume While the VOICE control section [VOL] button can be used to set the volume levels of the orchestration parts, the [ACCOMP VOLUME] button can be used to adjust the volume of the selected accompaniment in relation to the voices. Press the [ACCOMP VOLUME] Button ………………..
-
Page 34: Re-Voicing The Tracks
Auto Accompaniment BASS: The BASS track always plays a bass line, but the voice will change to fit the selected style … acoustic bass, synth bass, tuba, etc. RHYTHMIC CHORD 1 & 2: Both these tracks provide the rhythmic chordal accompaniment required by each style.
-
Page 35
Make the Required Voice Settings ………………….Use the [+] and [–] buttons, the number buttons, the data dial, or the VOICE [VOICE SELECT] button itself to select a new voice for the selected SELECT OCTAVE DSP DEPTH track. You can also use the [VOL], [OCTAVE], [DSP DEPTH], and [PAN] buttons to change the corresponding parameters for the selected voice. -
Page 36: One Touch Setting
One Touch Setting Each PSR-510 accompaniment style has a suitable preset voice and other settings that can be instantly recalled by pressing the [ONE TOUCH SETTING] button in the VOICE control section. This makes it simple to recall the optimum settings for each style in one quick operation. To use the One Touch Setting function: select a style, press the [ONE TOUCH SETTING] button so that its indicator lights, then play.
-
Page 37: Registration Memory
Registration Memory The PSR-510 REGISTRATION MEMORY can be used to store four complete sets of VOICE and AUTO ACCOMPANIMENT settings that can be recalled anytime at the touch of a button. The REGISTRATION MEMORY stores the following parameters: VOICE AUTO ACCOMPANIMENT 1.
-
Page 38
Registration Memory Recalling the Settings ……………………..The settings stored to a REGISTRATION MEMORY button can be recalled at any time simply by pressing the appropriate button. The indicator of the selected button will light continu- ously when initially recalled, but will flash as soon as any change is made to the panel settings. -
Page 39: Record Functions
Record Functions The PSR-510 RECORDING section controls three recording functions: The SONG MEMORY: Record complete songs including an accompaniment track and up to five melody tracks. Each PAGE MEMORY holds a different song. MULTI PADS: Record short chord, melody, or rhythm sequences that can be played back anytime by simply pressing a button.
-
Page 40: Realtime Accompaniment Track Recording
Record Functions Realtime Accompaniment Track Recording The SONG MEMORY ACCOMP track records the following operations and data: • Chord changes. • Auto accompaniment TRACK button operations. • Intro, Main, Fill in, & Ending sections. • Tempo. • Accompaniment volume. • Style number. •…
-
Page 41
Record …………………………Recording will begin as soon as you play a chord on the Auto Accompani- ment section of the keyboard. If you’ve selected a MELODY track to record with the ACCOMP track, a right-hand note will also start the recording proc- ess. -
Page 42: Realtime Melody Track Recording
Record Functions Realtime Melody Track Recording The SONG MEMORY MELODY tracks record the following operations and data: • Key on/off • Volume. • Effect on/off & effect type. (i.e. notes played on the keyboard). • Pan. • Sustain (footswitch) on/off. •…
-
Page 43: Accompaniment And Melody Playback
Accompaniment And Melody Playback Select a PAGE MEMORY ……………………If necessary, press the [PAGE #] button to select the PAGE MEMORY PAGE MEMORY number containing the song you want to play back. When a new PAGE PAGE # MEMORY number is selected the ARE YOU SURE? indicator will flash and the “Are you sure?”…
-
Page 44: The [Reset] Button
Record Functions The [RESET] Button Press the SONG [RESET] button to go directly to the first measure of RESET PLAY/STOP the song and turn ON all tracks that contain data. Measure number “001” STEP STEP will appear on the MULTI DISPLAY. The [RESET] button also functions during playback or realtime recording.
-
Page 45: The Multi Pads
The Multi Pads The PSR-510 MULTI PADS can be used to record short rhythmic or melodic sequences, percussion fill-ins, or single percussion sounds that can be played at any time simply by pressing the appropriate pad. Pads [1] and [2] play back exactly as recorded, while pads [3] and [4] are “CHORD MATCH”…
-
Page 46: Playback
Record Functions Engage the MULTI PAD Record Ready Mode ………………Press one of the MULTI PAD buttons — [1] through [4] — while holding the [REC] button. The [REC] button indicator and the selected MULTI PAD indictor will flash to indicate that the record ready mode is engaged, and the metronome will begin to sound at the currently selected tempo if the OVER- ALL CONTROL section [METRONOME] button indicator is lit.
-
Page 47: Custom Accompaniment
Custom Accompaniment Style number “00” in each PAGE MEMORY is a “custom accompaniment” that you can record yourself and use with the PSR-510’s Auto Accompaniment feature. Custom accompaniments can be created only using the tracks which have the preset accompaniment style data. The CUSTOM ACCOMPANIMENT records the following operations and data: •…
-
Page 48
Record Functions Select a Style & Section ……………………. Select an accompaniment style that will serve as an appropriate founda- tion for the type of accompaniment you want to record. Also use the AC- COMPANIMENT CONTROL buttons to select the particular section you want to record: INTRO, MAIN A, MAIN B, FILL 1 (for MAIN A or B), FILL 2 (for MAIN A or B), ENDING. -
Page 49: Using A Custom Accompaniment
Record …………………………Recording will begin as soon as you press the ACCOMPANIMENT CON- SYNC-START/STOP START/STOP FADE IN/OUT TROL section [START/STOP] button or play a chord or note on the keyboard. The preset accompaniment style data in the track being recorded will be en- tirely erased (except the data you have entered).
-
Page 50: Step Recording
Record Functions Step Recording In addition to the realtime-recording procedures described above, the PSR-510 has a “step recording” mode in which notes can be entered one at a time with precise timing and length. • Only chord sequences can be step-recorded to Song Memory Accomp track. The RE- NOTES WRITE SETTING function (page 52) can be used after step recording to change other parameters as required.
-
Page 51
Specify the Required Gate Time ………………….“Gate Time” refers to the actual length of the note to be entered in rela- GATE STEP tion to the note’s step size — i.e. whether the note is staccato, legato, etc. TIME SIZE Gate times are specified as percentages of the total note length, as shown in the list below. -
Page 52
Record Functions The following chart shows the step size and gate time settings required Example to enter a variety of notes: MULTI DISPLAY (Beat/Clock) MULTI DISPLAY (Step Size) MULTI DISPLAY (Gate Time) Note Hold Hold Hold PLAY/STOP PLAY/STOP PLAY/STOP PLAY/STOP STEP STEP STEP… -
Page 53: Editing Functions
Editing Functions The following functions make it possible to “edit” recorded data to polish and refine your sound. • When using any of the editing functions on a custom style, be sure to NOTES select style number 00 before engaging the editing function. Quantization It is possible to “quantize”…
-
Page 54: Clearing Tracks
Record Functions Clearing Tracks The [CLEAR] button can be used to completely erase the following data: • All data after the current measure in the specified SONG MEMORY track. • All data from the specified CUSTOM ACCOMPANIMENT track. • All data from the specified MULTI PAD. For a SONG MEMORY Track, Set the Start Measure …………….
-
Page 55
Select the Track or Pad to be Altered ………………..Press the track or pad button corresponding to the track or pad you want to alter while holding the RECORDING section [REWRITE SETTING] button (for a Custom Accompaniment, first select the section you want to REWRITE edit). -
Page 56: Page Memory
Page Memory In addition to the REGISTRATION MEMORY described on page 35, the PSR-510 has a PAGE MEMORY that stores panel control and parameter settings plus the contents of the SONG MEMORY, CUSTOM ACCOM- PANIMENT, and MULTI PADS. There are four PAGE MEMORY locations, each holding a complete set of parameters and recorded data.
-
Page 57: Midi
MIDI MIDI, the Musical Instrument Digital Interface, is a world-standard communication interface that allows MIDI-compatible musical instruments and equipment to share musical information and control one another. This makes it possible to create “systems” of MIDI instruments and equip- ment that offer far greater versatility and control than is available with isolated instruments. PAGE MIDI MEMORY…
-
Page 58: Midi Bulk Dump
MIDI MIDI Bulk Dump MIDI bulk dump operations allow large amounts of MIDI data to be transmitted from one device to another. The entire contents of the currently selected PSR-510 PAGE MEMORY (CUSTOM ACCOMP, MULTI PADS, SONG MEMORY, REGISTRATION MEMORY) can be dumped to a second PSR-510 or to a bulk storage de- vice such as a MIDI data recorder or MIDI computer.
-
Page 59: Page Copy
Bulk Dump Reception ……………………..The PSR-510 will automatically receive bulk dump data from another PSR-510 or MIDI data storage de- vice as long as the MIDI OUT terminal of the external device is properly connected to the MIDI IN connector of the PSR-510, and PSR-510 MIDI reception is enabled.
-
Page 60: Midi Reception Modes
MIDI MIDI Reception Modes The [RECEIVE CH/CL/COM] button is used to specify the reception mode for each of the 16 MIDI channels, the internal or external clock mode, and MIDI start/stop command reception mode. Channel Reception Modes The PSR-510 allows any of five reception modes to be individually assigned to MIDI channels 1 through 16. The five modes are: Mode “0”…
-
Page 61: Clock Mode
Clock Mode Reception of an external MIDI clock signal can be enabled or disabled as required. When disabled, all of the PSR-510’s time-based functions (Auto Accompaniment, SONG MEMORY, etc.) are controlled by its own inter- nal clock, the speed of which is set by the PSR-510 [TEMPO] button. When MIDI clock reception is enabled, however, all timing is controlled by an external MIDI clock signal received via the PSR-510 MIDI IN terminal (the PSR-510 [TEMPO] setting has no effect).
-
Page 62: Midi Transmission
MIDI MIDI Transmission The PSR-510 allows independent MIDI transmit channels to be assigned to the L and R ORCHESTRATION voices. It is also possible to independently turn local control and MIDI output on or off for the L and R voices. MIDI Transmit Channels The L and R ORCHESTRATION voices can be independently set to transmit on any of the 16 MIDI channels as follows:…
-
Page 63: Appendix
Appendix Voice & Polyphony List The PSR-510 can play up to 28 individual notes at the same time (i.e. it has a maximum “polyphony” of 28). This number includes all voices used: dual, split, auto accompaniment, song memory, and multi pads. If the maximum polyphony of the PSR-510 is exceeded, the excess notes will be truncated (they will not sound).
-
Page 64: Style List
Appendix Style List Name Panel Name Rhythm Comments 16-Beat Pop 16BEAT POP 16-Beat Contemporary 16-beat pop. 8-Beat Pop 8BEAT POP 8-Beat Bright piano/guitar-based ’70s pop. 8-Beat Light 8BEAT LIGHT 8-Beat Eight-beat easy-listening style with arpeggiated piano part. FolkRock FOLKROCK 16-Beat Guitar-based folk-rock.
-
Page 65
Name Panel Name Rhythm Comments Rock & Roll Rock & Roll ROCK&ROLL 12-Beat Old-time ’60s Rock&Roll. Boogie Woogie BOOGIE 12-Beat Late ’50s piano-based rock ‘n’ roll, with boogie woogie bass. Brass in PHRASE 1 &2, piano bass in PAD. Twist TWIST 8-Beat Straight-eight boogie, with a ”Twist.”… -
Page 66
Appendix Style List Name Panel Name Rhythm Comments World Music Polka POLKA 8-Beat Traditional Polka style with acoustic instruments. Try altering the arrangement by bringing the accordion and the horn parts in and out. Traditional Waltz TRAD WALTZ Three-Four European waltz with guitar, accordion, clarinet, bass, drums and a string pad. Use CHORD 1 &… -
Page 67: Reset Procedures & Page Memory Default Settings
Reset Procedures & Page Memory Default Settings All PSR-510 page memory settings are retained in memory even when the power switch is turned OFF as long as the PSR-510 is powered by batteries or an AC adapter. You can, however, restore the factory default set- tings for all four page memories or a single specified page memory by following the procedures outlined below.
-
Page 68
Appendix Page Memory Default Settings ORCHESTRATION VOICE AUTO OVERALL CONTROL MULTI CUSTOM ACCOMPANIMENT PADS ACCOMP On/Off VOICE OCTAVE HARMONY EFFECT STYLE VOL TEMPO SPLIT POINT P.B. TOUCH 1/2/3/4 style00 DEPTH On/Off TYPE On/Off TYPE Split mode Accomp. Range On/Off SENSE REGIST1 L1 PERCUSS. -
Page 69: Troubleshooting
Troubleshooting Something not working as it should? In many cases what appears to be a malfunction can be traced to a sim- ple error that can be remedied immediately. Before assuming that your PSR-510 is faulty, please check the fol- lowing points.
-
Page 70: Index
Index + and – buttons ……..9 Introduction (Intro) ……29 Re-voice ……….32 Reception modes, MIDI ….58 Record functions ……37-52 AC power adaptor ……. 5 Registration memory ……35 Accompaniment control ….28 Keyboard percussion ……17 Reset button ……..
-
Page 71: Percussion Kit List
Percussion Kit List / Verzeichnis der Schlagzeug- und Percussion-Set * “<——” indicates the content is the same as that of Standard Kit. * “<——” zeigt an, daß der Inhalt identisch mit dem Standardset ist. * Only 1 note can be played at a time when Keyboard Percussion is engaged. * Bei aktivierter Keyboard Percussion-Funktion kann zu einem Zeitpunkt jeweils nur eine Note gespielt werden.
-
Page 72
ts / Liste des kits de percussion / Lista de juegos de percusión * “<——” indique que le contenu est le même que celui du kit standard. * “<——” indica que el contenido es el mismo que el del juego estándar. * Une seule note peut être jouée à… -
Page 73: Midi Implementation Chart
MIDI Implementation Chart / Implementierungstabelle / Table [Portable Keyboard] Date: 1993. 6. 15 MIDI Implementation Chart Model: PSR-510 Version: 1.00 Function Transmitted Recognized Remarks Basic Default 1~16 CH 1~16 CH (*1) Channel Changed 1~16 CH 1~16 CH (*1) Default Mode 3 (*1) Mode Messages…
-
Page 74
d’implémentation / Gráfico de implememtación *1. The following modes can be set individually for each channel via *9. GM melody voices 0 through 127 become panel voices 1 through the panel control: 128. Mode 00: Reception OFF. Rhythm voices 0, 8, 16, 24, 25, 32, 40, and 48 become panel Mode 01: Direct tone generator control. -
Page 75
GM System Level 1 The existing MIDI protocol allows performance and Le protocole MIDI existant permet le transfert des other data to be transferred between different instruments, données d’exécution et autres entre plusieurs instruments, even if they are from different manufacturers. This means, même s’ils ne sont pas de la même marque. -
Page 76: Specifications
Specifications / Technische Daten / Spécifications / Especificaciones Keyboards: SONG MEMORY: 61 standard-size keys (C1~C6) with touch response. MEASURE # TRACK: ACCOMP, MELODY 1~5 VOICE: AWM128 voices: 01~128 SONG: Polyphony: 28 RESET (STEP BWD), PLAY/STOP (STEP FWD) KEYBOARD PERCUSSION: 1~8 VOL: 00~24 RECORDING: OCTAVE: -2~2…
-
Page 77
M.D.G., EMI Division © 1993 Yamaha Corporation…
Entsorgung leerer Batterien (nur innerhalb Deutschlands)
Leisten Sie einen Beitrag zum Umweltschutz. Verbrauchte Batterien oder
Akkumulatoren dürfen nicht in den Hausmüll. Sie können bei einer
Sammelstelle für Altbatterien bzw. Sondermüll abgegeben werden.
Informieren Sie sich bei Ihrer Kommune.
CANADA
THIS DIGITAL APPARATUS DOES NOT EXCEED THE “CLASS B”
LIMITS FOR RADIO NOISE EMISSIONS FROM DIGITAL APPARATUS
SET OUT IN THE RADIO INTERFERENCE REGULATION OF THE
CANADIAN DEPARTMENT OF COMMUNICATIONS.
LE PRESENT APPAREIL NUMERIQUE N’EMET PAS DE BRUITS
RADIOELECTRIQUES DEPASSANT LES LIMITES APPLICABLES AUX
APPAREILS NUMERIQUES DE LA “CLASSE B” PRESCRITES DANS
LE REGLEMENT SUR LE BROUILLAGE RADIOELECTRIQUE EDICTE
PAR LE MINISTERE DES COMMUNICATIONS DU CANADA.
• This applies only to products distributed by Yamaha Canada Music Ltd.
• Ceci ne s’applique qu’aux produits distribués par Yamaha Canada Music Ltd.
The serial number of this product may be found on the bottom of the unit.
You should note this serial number in the space provided below and
retain this manual as a permanent record of your purchase to aid identifi-
cation in the event of theft.
Model No.
PSR-510
Serial No.
• This applies only to products distributed by Yamaha Europa GmbH.
• Dies bezieht sich nur auf die von der Yamaha Europa GmbH vertriebenen Produkte.
IMPORTANT NOTICE: DO NOT MODIFY THIS UNIT!
This product, when installed as indicated in the instructions contained in this
manual, meets FCC requirements. Modifications not expressly approved by
Yamaha may void your authority, granted by the FCC, to use the product.
IMPORTANT:
When connecting this product to accessories and/or another
product use only high quality shielded cables. Cable/s supplied with this
product MUST be used. Follow all installation instructions. Failure to follow
instructions could void your FCC authorization to use this product in the USA.
NOTE:
This product has been tested and found to comply with the require-
ments listed in FCC Regulations, Part 15 for Class “B” digital devices. Compli-
ance with these requirements provides a reasonable level of assurance that
your use of this product in a residential environment will not result in harmful
interference with other electronic devices. This equipment generates/uses
radio frequencies and, if not installed and used according to the instructions
found in the users manual, may cause interference harmful to the operation of
other electronic devices. Compliance with FCC regulations does not guaran-
tee that interference will not occur in all installations. If this product is found
to be the source of interference, which can be determined by turning the unit
“OFF” and “ON”, please try to eliminate the problem by using one of the
following measures:
• Relocate either this product or the device that is being affected by the
interference.
• Utilize power outlets that are on different branch (circuit breaker or fuse)
circuits or install AC line filter/s.
• In the case of radio or TV interference, relocate/reorient the antenna. If the
antenna lead-in is 300 ohm ribbon lead, change the lead-in to co-axial
type cable.
If these corrective measures do not produce satisfactory results, please
contact the local retailer authorized to distribute this type of product. If you
can not locate the appropriate retailer, please contact Yamaha Corporation
of America, Electronic Service Division, 6600 Orangethorpe Ave, Buena
Park, CA90620
• This applies only to products distributed by Yamaha Corporation of America.
FCC INFORMATION (U.S.A.)
This product utilizes batteries or an external power supply (adapter). DO
NOT connect this product to any power supply or adapter other than one
described in the manual, on the name plate, or specifically recommended by
Yamaha.
This product should be used only with the components supplied or; a cart,
rack, or stand that is recommended by Yamaha. If a cart, etc., is used,
please observe all safety markings and instructions that accompany the
accessory product.
SPECIFICATIONS SUBJECT TO CHANGE:
The information contained in this manual is believed to be correct at the time
of printing. However, Yamaha reserves the right to change or modify any of
the specifications without notice or obligation to update existing units.
This product, either alone or in combination with an amplifier and head-
phones or speaker/s, may be capable of producing sound levels that could
cause permanent hearing loss. DO NOT operate for long periods of time at a
high volume level or at a level that is uncomfortable. If you experience any
hearing loss or ringing in the ears, you should consult an audiologist.
IMPORTANT: The louder the sound, the shorter the time period before
damage occurs.
NOTICE:
Service charges incurred due to a lack of knowledge relating to how a func-
tion or effect works (when the unit is operating as designed) are not covered
by the manufacturer’s warranty, and are therefore the owners responsibility.
Please study this manual carefully and consult your dealer before requesting
service.
ENVIRONMENTAL ISSUES:
Yamaha strives to produce products that are both user safe and environ-
mentally friendly. We sincerely believe that our products and the production
methods used to produce them, meet these goals. In keeping with both the
letter and the spirit of the law, we want you to be aware of the following:
Battery Notice: This product MAY contain a small non-rechargeable battery
which (if applicable) is soldered in place. The average life span of this type
of battery is approximately five years. When replacement becomes neces-
sary, contact a qualified service representative to perform the replacement.
This product may also use “household” type batteries. Some of these may
be rechargeable. Make sure that the battery being charged is a recharge-
able type and that the charger is intended for the battery being charged.
When installing batteries, do not mix batteries with new, or with batteries of
a different type. Batteries MUST be installed correctly. Mismatches or
incorrect installation may result in overheating and battery case rupture.
Warning: Do not attempt to disassemble, or incinerate any battery. Keep
all batteries away from children. Dispose of used batteries promptly and as
regulated by the laws in your area. Note: Check with any retailer of house-
hold type batteries in your area for battery disposal information.
Disposal Notice: Should this product become damaged beyond repair, or
for some reason its useful life is considered to be at an end, please ob-
serve all local, state, and federal regulations that relate to the disposal of
products that contain lead, batteries, plastics, etc. If your dealer is unable
to assist you, please contact Yamaha directly.
NAME PLATE LOCATION:
The name plate is located on the bottom of the product. The model
number, serial number, power requirements, etc., are located on this plate.
You should record the model number, serial number, and the date of
purchase in the spaces provided below and retain this manual as a perma-
nent record of your purchase.
Model
Serial No.
Purchase Date
SPECIAL MESSAGE SECTION
PLEASE KEEP THIS MANUAL
Wichtiger Hinweis für die Benutzung in der Bundesrepublik Deutschland.
Bescheinigung des Importeurs
Hiermit wird bescheinigt, daß der/die/das
Musikinstrument Typ: PSR-510
(Gerät, Typ, Bezeichnung)
in Übereinstimmung mit den Bestimmungen der
VERFÜGUNG 1046/84
(Amtsblattverfügung)
funk-entstört ist.
Der Deutschen Bundespost wurde das Inverkehrbringen dieses Gerätes
angezeigt und die Berechtigung zur Überprüfung der Serie auf
Einhaltung der Bestimmungen eingeräumt.
Yamaha Europa GmbH
Name des Importeurs
Краткое содержание страницы № 1
Краткое содержание страницы № 2
Wichtiger Hinweis für die Benutzung in der Bundesrepublik Deutschland. CANADA Bescheinigung des Importeurs Hiermit wird bescheinigt, daß der/die/das THIS DIGITAL APPARATUS DOES NOT EXCEED THE “CLASS B” LIMITS FOR RADIO NOISE EMISSIONS FROM DIGITAL APPARATUS Musikinstrument Typ: PSR-510 SET OUT IN THE RADIO INTERFERENCE REGULATION OF THE (Gerät, Typ, Bezeichnung) CANADIAN DEPARTMENT OF COMMUNICATIONS. in Übereinstimmung mit den Bestimmungen der LE PRESENT APPAREIL NUMERIQUE N’EMET PAS DE BRUITS V
Краткое содержание страницы № 3
Congratulations! You are the proud owner of a Yamaha PSR-510. Your PSR-510 is a high- quality musical instrument that incorporates advanced Yamaha digital tech- nology and many versatile features. In order to obtain maximum performance and enjoyment from your PSR-510, we urge you to read this Owner’s Manual thoroughly while trying out the various features described. Keep the Owner’s Manual in a safe place for later reference. Contents Panel Controls 2 Record Functions 37 Song Memory …………
Краткое содержание страницы № 4
Краткое содержание страницы № 5
Краткое содержание страницы № 6
Taking Care of Your PortaTone Your PortaTone will give you years of playing pleasure if you follow the simple rules given below: Location Handling and Transport Do not expose the instrument to the following • Never apply excessive force to the controls, con- conditions to avoid deformation, discoloration, or nectors or other parts of the instrument. more serious damage. • Always unplug cables by gripping the plug firmly, not by pulling on the cable. • Direct sunlight (e.g. near a window). •
Краткое содержание страницы № 7
Preparation This section contains information about setting up your PSR-510 and preparing to play. Be sure to go through this section carefully before using your PSR-510. SUSTAIN PEDAL HEADPHONES/ DC 10-12V IN AUX OUT Power Supply Your PSR-510 will run either from an optional power adaptor or batteries*. Follow the instructions below according to the power source you intend to use. * When batteries are used the sound of the PSR-510 may be distorted at high volume levels. This is because the p
Краткое содержание страницы № 8
Preparation Using Headphones Or an External Sound System HEADPHONES/ A standard pair of stereo headphones can be plugged into the rear-panel AUX OUT HEADPHONES/AUX OUT jack for private practice or late-night playing. The internal speaker system is automatically shut off when a pair of head- phones is plugged into the HEADPHONES/AUX OUT jack. The HEAD- PHONES/AUX OUT jack can also be used to deliver the output of the PSR-510 to a keyboard amplifier, stereo sound system, mixing console or tape
Краткое содержание страницы № 9
Listen to the Demo! Once you’ve set up your PSR-510, try listening to the pre-programmed demonstration songs — they’ll give you a good idea of what the PSR-510 can do! DEMO SONG # ON/ OFF MIN MAX POWER MASTER VOLUME START/ STOP ZTurn the Power ON & Set the Volume …………………………………………………………………………………….. Before playing the demo turn the power ON by pressing the POWER switch (the panel indicators and MULTI DISPLAY will light), and tur
Краткое содержание страницы № 10
Basic Editing Procedure The PSR-510 features a flexible-but-consistent interface that lets you edit just about all of its parameters using the same basic procedure. Once familiar with the system, you’ll be able to edit any parameter quickly and easily. Here’s the basic procedure: BEAT RESET MULTI DISPLAY + – –+ _ _ 0 1 234 5 6789 1 ZPress a Function Button ………………………………………………………………………………………………………… First press the butt
Краткое содержание страницы № 11
2-2: The [+] and [−] Buttons The [+] and [−] buttons immediately to the right of the MULTI DIS- PLAY can be used to increment (increase by one) or decrement (decrease by one) the currently selected parameter. Press the [+] button briefly to in- RESET crement the parameter value, or the [−] button to decrement. If you hold the –+ [+] or [−] button down, the value will increment or decrement continuously — simply release the button when the desired value has been reached. 2-3: The Number Buttons T
Краткое содержание страницы № 12
Selecting & Playing the Voices The PSR-510 has 128 stunning voices plus 8 different drum and percussion kits that you can select and play in a number of ways. VOICE VOICE SELECT VOL OCTAVE DSP PAN ORCHESTRATION HARMONY EFFECT DEPTH TYPE TYPE L1 R1 EDIT L2 R2 KEYBOARD ONE TOUCH HARMONY EFFECT PERCUSSION SETTING Orchestration The unique ORCHESTRATION button group in the PSR-510’s VOICE control section lets you select and play from one to four “parts” at the same time using a variety of “or
Краткое содержание страницы № 13
Dual Mode Split & Dual Modes In the dual mode both the [R1] and [R2] part There are five possible combinations of the split voices are selected so they can be played simultane- and dual modes, as shown below. The part for the ously across the entire keyboard. To select the dual single-voice side of the combination is selected sim- mode, make sure that both the [L1] and [L2] indica- ply by pressing the appropriate part button, while for tors are out, then press both the [R1] and [R2] but- the
Краткое содержание страницы № 14
Selecting & Playing the Voices Voice Assignment You can assign any of the PSR-510’s 128 voices to each of the ORCHESTRATION parts, whether the part is currently ON or OFF. ZPress the [VOICE SELECT] Button …………………………………………………………………………………………. You don’t need to do this if the [VOICE SELECT] indicator is already VOICE SELECT lit. Also make sure that the [KEYBOARD PERCUSSION] indicator is out. KEYBOARD PERCUSSION XSelect the Part
Краткое содержание страницы № 15
Volume You can individually set the volume of each orchestration part to set up the ideal balance between parts. ZSelect the Part You Want to Edit …………………………………………………………………………………………….. Use the ORCHESTRATION [EDIT] button to select the part you want to edit. XPress the [VOL] Button ………………………………………………………………………………………………………….. VOL Press the VOICE con
Краткое содержание страницы № 16
Selecting & Playing the Voices DSP Depth The PSR-510 features a built-in digital signal processor (DSP) that can be used to apply a range of reverb and delay effects to the PSR-510 voices. The [DSP TYPE] button in the OVERALL CONTROL section (page 21) determines the type of effect to be applied, while the VOICE section [DSP DEPTH] button lets you individually set the amount of effect applied to each orchestration part. ZSelect the Part You Want to Edit……………………………………
Краткое содержание страницы № 17
Auto Harmony Auto Harmony is used with the PSR-510’s Auto Accompaniment feature except for Full fingering mode (see page 23). It automatically adds appropriate harmony notes to a single-note melody line you play on the key- board. You can choose from 10 different types of harmony that can be assigned to the right-hand orchestration parts. ZTurn Auto Harmony ON …………………………………………………………………………………………………………. HARMONY Pre
Краткое содержание страницы № 18
Selecting & Playing the Voices Effects The PSR-510 has a range of 12 delay-based effects — in addition to the DSP effects (pages 14 and 21) — that can be selected and applied to the right-hand orchestration parts (the left-hand orchestration parts are not af- fected). ZTurn the Effect ON …………………………………………………………………………………………………………………. EFFECT TYPE Press the [EFFECT] button so that its indicator lights. This turn
Краткое содержание страницы № 19
Keyboard Percussion The PSR-510 has 8 different drum and percussion “kits” that can be played on the keyboard when the Key- board Percussion function is turned ON. The types of drum and percussion instruments played by the various keys when Keyboard Percussion function is selected are marked by symbols above the keys. ZTurn Keyboard Percussion ON ………………………………………………………………………………………………. VOICE Press the [KEYBOARD PERCUSSION]
Краткое содержание страницы № 20
Selecting & Playing the Voices Pitch Bend PITCH BEND The PITCH BEND wheel to the left of the keyboard allows the note pitch to be bent up or down — roll the wheel away from you to bend up, and toward you to bend down (this situation can be reversed, as described + below). When the PITCH BEND wheel is moved almost all the way in – either direction, the current pitch bend range value will appear on the MULTI DISPLAY (see below). Setting the Pitch Bend Range The maximum amount of pitch bend p
Смотреть руководство для Yamaha Portatone PSR-510 ниже. Все руководства на ManualsCat.com могут просматриваться абсолютно бесплатно. Нажав кнопку «Выбор языка» вы можете изменить язык руководства, которое хотите просмотреть.

MANUALSCAT | RU
Вопросы и ответы
У вас есть вопрос о Yamaha Portatone PSR-510, но вы не можете найти ответ в пользовательском руководстве? Возможно, пользователи ManualsCat.com смогут помочь вам и ответят на ваш вопрос. Заполните форму ниже — и ваш вопрос будет отображаться под руководством для Yamaha Portatone PSR-510. Пожалуйста, убедитесь, что вы опишите свои трудности с Yamaha Portatone PSR-510 как можно более детально. Чем более детальным является ваш вопрос, тем более высоки шансы, что другой пользователь быстро ответит на него. Вам будет автоматически отправлено электронное письмо, чтобы проинформировать вас, когда кто-то из пользователей ответит на ваш вопрос.
где кнопка выбор языка
Андрей2022-03-01
Здравствуйте! Направьте пожалуйста мануал на русском языке. Спасибо. С уважением, Марат
Марат2022-01-14
Задать вопрос о Yamaha Portatone PSR-510
- Бренд:
- Yamaha
- Продукт:
- Клавиатуры
- Модель/название:
- Portatone PSR-510
- Тип файла:
- Доступные языки:
- —
Сопутствующие товары Yamaha Portatone PSR-510
Wichtiger Hinweis für die Benutzung in der Bundesrepublik Deutschland. Bescheinigung des Importeurs Hiermit wird bescheinigt, daß der/die/das CANADA THIS DIGITAL APPARATUS DOES NOT EXCEED THE “CLASS B” LIMITS FOR RADIO NOISE EMISSIONS FROM DIGITAL APPARATUS SET OUT IN THE RADIO INTERFERENCE
Congratulations! You are the proud owner of a Yamaha PSR-510. Your PSR-510 is a highquality musical instrument that incorporates advanced Yamaha digital technology and many versatile features. In order to obtain maximum performance and enjoyment from your PSR-510, we urge you to read this Owner’s
Taking Care of Your PortaTone Your PortaTone will give you years of playing pleasure if you follow the simple rules given below: ■ Location Do not expose the instrument to the following conditions to avoid deformation, discoloration, or more serious damage. • Direct sunlight (e.g. near a window). •
Preparation This section contains information about setting up your PSR-510 and preparing to play. Be sure to go through this section carefully before using your PSR-510. SUSTAIN PEDAL HEADPHONES/ AUX OUT DC 10-12V IN ■ Power Supply Your PSR-510 will run either from an optional power adaptor or
Preparation ■ Using Headphones Or an External Sound System HEADPHONES/ AUX OUT A standard pair of stereo headphones can be plugged into the rear-panel HEADPHONES/AUX OUT jack for private practice or late-night playing. The internal speaker system is automatically shut off when a pair of headphones
Listen to the Demo! Once you’ve set up your PSR-510, try listening to the pre-programmed demonstration songs — they’ll give you a good idea of what the PSR-510 can do! DEMO SONG # ON/ OFF MIN POWER MAX MASTER VOLUME START/ STOP ZTurn the Power ON & Set the Volume
Basic Editing Procedure The PSR-510 features a flexible-but-consistent interface that lets you edit just about all of its parameters using the same basic procedure. Once familiar with the system, you’ll be able to edit any parameter quickly and easily. Here’s the basic procedure: BEAT RESET MULTI
2-2: The [+] and [−] Buttons RESET – + 2-3: The Number Buttons 0 1 2 3 The number buttons — to the right of the [+] and [−] buttons — allow direct numeric entry of the desired value, and are therefore the fastest way to edit in many situations. To select a voice, for example, choose one of the 128
Selecting & Playing the Voices The PSR-510 has 128 stunning voices plus 8 different drum and percussion kits that you can select and play in a number of ways. VOICE SELECT VOICE VOL OCTAVE DSP DEPTH PAN ORCHESTRATION L1 HARMONY EFFECT TYPE TYPE R1 EDIT L2 KEYBOARD PERCUSSION ONE TOUCH SETTING R2
● Dual Mode ● Split & Dual Modes In the dual mode both the [R1] and [R2] part voices are selected so they can be played simultaneously across the entire keyboard. To select the dual mode, make sure that both the [L1] and [L2] indicators are out, then press both the [R1] and [R2] buttons
Selecting & Playing the Voices ■ Voice Assignment You can assign any of the PSR-510’s 128 voices to each of the ORCHESTRATION parts, whether the part is currently ON or OFF. ZPress the [VOICE SELECT] Button
■ Volume You can individually set the volume of each orchestration part to set up the ideal balance between parts. ZSelect the Part You Want to Edit …………………………………………………………………………………………….. Use the ORCHESTRATION [EDIT] button to
Selecting & Playing the Voices ■ DSP Depth The PSR-510 features a built-in digital signal processor (DSP) that can be used to apply a range of reverb and delay effects to the PSR-510 voices. The [DSP TYPE] button in the OVERALL CONTROL section (page 21) determines the type of effect to be applied,
■ Auto Harmony Auto Harmony is used with the PSR-510’s Auto Accompaniment feature except for Full fingering mode (see page 23). It automatically adds appropriate harmony notes to a single-note melody line you play on the keyboard. You can choose from 10 different types of harmony that can be
Selecting & Playing the Voices ■ Effects The PSR-510 has a range of 12 delay-based effects — in addition to the DSP effects (pages 14 and 21) — that can be selected and applied to the right-hand orchestration parts (the left-hand orchestration parts are not affected). ZTurn the Effect ON
■ Keyboard Percussion The PSR-510 has 8 different drum and percussion “kits” that can be played on the keyboard when the Keyboard Percussion function is turned ON. The types of drum and percussion instruments played by the various keys when Keyboard Percussion function is selected are marked by
Selecting & Playing the Voices ■ Pitch Bend PITCH BEND The PITCH BEND wheel to the left of the keyboard allows the note pitch to be bent up or down — roll the wheel away from you to bend up, and toward you to bend down (this situation can be reversed, as described below). When the PITCH BEND wheel
Overall Control The OVERALL CONTROL section includes a range of parameters that, as their title suggests, apply to the overall sound of the PSR-510. OVERALL CONTROL TEMPO SPLIT TRANSDSP POINT POSE TUNING TYPE TOUCH SENSE 0 OFF DSP TYPE ………………………………. 1 HALL 1 2 HALL 2 3 ROOM
Overall Control ■ Transpose The PSR-510 [TRANSPOSE] button makes it possible to shift the pitch of the PSR-510 up or down in semitone intervals up to a maximum of 12 semitones (one octave). Transposing the pitch of the PSR-510 keyboard makes it easier to play in difficult key signatures, and you
■ DSP Type The [DSP TYPE] button selects one of eight digital effects that you can use for extra depth and expressive power. This button determines the type of effect to be used, while the [DSP DEPTH] button in the VOICE section allow the depth of the effect to be individually set for each
Overall Control ■ Touch Sensitivity This function varies the touch sensitivity of the keyboard. Use this capability to adjust the PSR-510’s touch sensitivity for the best results with your own particular playing style. ZPress the [TOUCH SENSE] Button
Auto Accompaniment The PSR-510 has 103 accompaniment styles that can be used to provide fully-orchestrated Auto Accompaniment. When the Auto Accompaniment function is turned ON, the PSR-510 creates fully-orchestrated rhythm, bass, and chord accompaniment based on chords you play with the left hand
Auto Accompaniment ■ Setting the Auto Accompaniment Split Point To set the Auto Accompaniment split point, first turn Auto Accompaniment ON — press the [AUTO ACCOMP] button so that its indicator lights — then proceed with steps 2 and 3 as described in “Split Point Change” on page 19. The default
● Mode 1: Chord 1 The Chord 1 mode is ideal if you already know how to play chords on a keyboard, since it allows you to supply your own chords for the Auto Accompaniment feature. The PSR-510 will accept the following chord types: Example for “C” chords CM 9 C6 9 ( ( ) CMadd 9 CM7 #11 ( CM 7 ) CM 6
Auto Accompaniment ● Mode 2: Chord 2 C ● Mode 3: Single C Cm C7 Cm7 This is essentially the same as the Chord 1 mode, above, except that the lowest note played in the Auto Accompaniment section of the keyboard will be played by the bass part rather than the chord root. C on E C on G SINGLE mode
● Mode 5: Full In this mode chords played anywhere on the keyboard are detected and used for Auto Accompaniment. Otherwise the keyboard functions normally, and the entire range is available for playing. Chord recognition is the same as in the Chord 1 mode. Please note that in this mode all notes
Auto Accompaniment ■ Accompaniment Control The PSR-510 provides a range of accompaniment “sections” — introduction, fill-ins, variations on the main pattern, ending — that you can select to control the “flow” of the accompaniment to achieve the desired musical results. Accompaniment start/stop and
● Starting the Accompaniment with an Introduction ………………………………………………………………….. Any of the PSR-510 accompaniment patterns can be started with an appropriate introduction by pressing the [INTRO] button and then the [START/ STOP] button. INTRO Once the
Auto Accompaniment ● Stopping the Accompaniment ………………………………………………………………………………………………… SYNC-START/STOP START/STOP An accompaniment in progress can be stopped immediately by pressing the [START/STOP] button or the
■ Accompaniment Volume While the VOICE control section [VOL] button can be used to set the volume levels of the orchestration parts, the [ACCOMP VOLUME] button can be used to adjust the volume of the selected accompaniment in relation to the voices. ZPress the [ACCOMP VOLUME] Button
Auto Accompaniment BASS: RHYTHMIC CHORD 1 & 2: PAD CHORD: PHRASE 1 & 2: The BASS track always plays a bass line, but the voice will change to fit the selected style … acoustic bass, synth bass, tuba, etc. Both these tracks provide the rhythmic chordal accompaniment required by each style. You’ll
XMake the Required Voice Settings ………………………………………………………………………………………….. VOICE SELECT VOL OCTAVE DSP DEPTH PAN Use the [+] and [–] buttons, the number buttons, the data dial, or the [VOICE SELECT] button itself to select a new voice
One Touch Setting Each PSR-510 accompaniment style has a suitable preset voice and other settings that can be instantly recalled by pressing the [ONE TOUCH SETTING] button in the VOICE control section. This makes it simple to recall the optimum settings for each style in one quick operation. To use
Registration Memory The PSR-510 REGISTRATION MEMORY can be used to store four complete sets of VOICE and AUTO ACCOMPANIMENT settings that can be recalled anytime at the touch of a button. The REGISTRATION MEMORY stores the following parameters: VOICE AUTO ACCOMPANIMENT 1. Voice numbers for all four
Registration Memory ● Recalling the Settings ……………………………………………………………………………………………………………. 1 2 3 The settings stored to a REGISTRATION MEMORY button can be recalled at any time simply by pressing the appropriate button.
Record Functions The PSR-510 RECORDING section controls three recording functions: ● The SONG MEMORY: Record complete songs including an accompaniment track and up to five melody tracks. Each PAGE MEMORY holds a different song. ● MULTI PADS: Record short chord, melody, or rhythm sequences that can
Record Functions ■ Realtime Accompaniment Track Recording The SONG MEMORY ACCOMP track records the following operations and data: • Chord changes. • Intro, Main, Fill in, & Ending sections. • Accompaniment volume. • Fade-in/out. • Auto accompaniment TRACK button operations. • Tempo. • Style number.
VRecord ………………………………………………………………………………………………………………………………….. SYNC-START/STOP START/STOP Recording will begin as soon as you play a chord on the Auto Accompaniment section of the keyboard. If you’ve
Record Functions ■ Realtime Melody Track Recording The SONG MEMORY MELODY tracks record the following operations and data: • Key on/off (i.e. notes played on the keyboard). • Key velocity. • Voice number (Percussion Kit Number). • Volume. • Pan. • DSP depth. • Harmony on/off & harmony type. •
■ Accompaniment And Melody Playback ZSelect a PAGE MEMORY ……………………………………………………………………………………………………….. If necessary, press the [PAGE #] button to select the PAGE MEMORY number containing the song you want to play back. When
Record Functions ■ The [RESET] Button RESET PLAY/STOP STEP BWD STEP FWD Press the SONG [RESET] button to go directly to the first measure of the song and turn ON all tracks that contain data. Measure number “001” will appear on the MULTI DISPLAY. The [RESET] button also functions during playback or
The Multi Pads The PSR-510 MULTI PADS can be used to record short rhythmic or melodic sequences, percussion fill-ins, or single percussion sounds that can be played at any time simply by pressing the appropriate pad. Pads [1] and [2] play back exactly as recorded, while pads [3] and [4] are “CHORD
Record Functions CEngage the MULTI PAD Record Ready Mode ………………………………………………………………………….. Press one of the MULTI PAD buttons — [1] through [4] — while holding the [REC] button. The [REC] button indicator and the selected MULTI PAD indictor will
Custom Accompaniment Style number “00” in each PAGE MEMORY is a “custom accompaniment” that you can record yourself and use with the PSR-510’s Auto Accompaniment feature. Custom accompaniments can be created only using the tracks which have the preset accompaniment style data. The CUSTOM
Record Functions XSelect a Style & Section …………………………………………………………………………………………………………. Select an accompaniment style that will serve as an appropriate foundation for the type of accompaniment you want to record. Also use
BRecord ………………………………………………………………………………………………………………………………….. SYNC-START/STOP RHYTHM 1 2 START/STOP BASS FADE IN/OUT RHYTHMIC CHORD 1 2 TRACK CLEAR Recording will begin as soon as you press the
Record Functions Step Recording In addition to the realtime-recording procedures described above, the PSR-510 has a “step recording” mode in which notes can be entered one at a time with precise timing and length. NOTES • Only chord sequences can be step-recorded to Song Memory Accomp track. The
CSpecify the Required Gate Time …………………………………………………………………………………………….. GATE TIME STEP REC “Gate Time” refers to the actual length of the note to be entered in relation to the note’s step size — i.e. whether the note is staccato,
Record Functions The following chart shows the step size and gate time settings required to enter a variety of notes: Example MULTI DISPLAY (Beat/Clock) MULTI DISPLAY (Step Size) MULTI DISPLAY (Gate Time) Note Hold Hold PLAY/STOP PLAY/STOP STEP FWD PLAY/STOP STEP FWD Hold
Editing Functions The following functions make it possible to “edit” recorded data to polish and refine your sound. NOTES • When using any of the editing functions on a custom style, be sure to select style number 00 before engaging the editing function. ■ Quantization It is possible to “quantize”
Record Functions ■ Clearing Tracks The [CLEAR] button can be used to completely erase the following data: • All data after the current measure in the specified SONG MEMORY track. • All data from the specified CUSTOM ACCOMPANIMENT track. • All data from the specified MULTI PAD. ZFor a SONG MEMORY
XSelect the Track or Pad to be Altered ……………………………………………………………………………………… Press the track or pad button corresponding to the track or pad you want to alter while holding the RECORDING section [REWRITE SETTING] button (for a Custom
Page Memory REGISTR ATION MEMOR Y SONG MEMO RY In addition to the REGISTRATION MEMORY described on page 35, the PSR-510 has a PAGE MEMORY that stores panel control and parameter settings plus the contents of the SONG MEMORY, CUSTOM ACCOMPANIMENT, and MULTI PADS. There are four PAGE MEMORY
MIDI MIDI, the Musical Instrument Digital Interface, is a world-standard communication interface that allows MIDI-compatible musical instruments and equipment to share musical information and control one another. This makes it possible to create “systems” of MIDI instruments and equipment that
MIDI MIDI Bulk Dump MIDI bulk dump operations allow large amounts of MIDI data to be transmitted from one device to another. The entire contents of the currently selected PSR-510 PAGE MEMORY (CUSTOM ACCOMP, MULTI PADS, SONG MEMORY, REGISTRATION MEMORY) can be dumped to a second PSR-510 or to a bulk
● Bulk Dump Reception ……………………………………………………………………………………………………………. The PSR-510 will automatically receive bulk dump data from another PSR-510 or MIDI data storage device as long as the MIDI OUT terminal of the external
MIDI MIDI Reception Modes The [RECEIVE CH/CL/COM] button is used to specify the reception mode for each of the 16 MIDI channels, the internal or external clock mode, and MIDI start/stop command reception mode. ■ Channel Reception Modes The PSR-510 allows any of five reception modes to be
■ Clock Mode Reception of an external MIDI clock signal can be enabled or disabled as required. When disabled, all of the PSR-510’s time-based functions (Auto Accompaniment, SONG MEMORY, etc.) are controlled by its own internal clock, the speed of which is set by the PSR-510 [TEMPO] button. When
MIDI MIDI Transmission The PSR-510 allows independent MIDI transmit channels to be assigned to the L and R ORCHESTRATION voices. It is also possible to independently turn local control and MIDI output on or off for the L and R voices. ■ MIDI Transmit Channels The L and R ORCHESTRATION voices can be
Appendix ■ Voice & Polyphony List The PSR-510 can play up to 28 individual notes at the same time (i.e. it has a maximum “polyphony” of 28). This number includes all voices used: dual, split, auto accompaniment, song memory, and multi pads. If the maximum polyphony of the PSR-510 is exceeded, the
Appendix ■ Style List # Name Pop Panel Name Rhythm Comments 01 16-Beat Pop 16BEAT POP 16-Beat Contemporary 16-beat pop. 02 8-Beat Pop 8BEAT POP 8-Beat Bright piano/guitar-based ’70s pop. 03 8-Beat Light 8BEAT LIGHT 8-Beat Eight-beat easy-listening style with arpeggiated piano part. 04 FolkRock
# Name Rock & Roll Panel Name Rhythm Comments ROCK&ROLL 12-Beat Old-time ’60s Rock&Roll. 12-Beat Late ’50s piano-based rock ‘n’ roll, with boogie woogie bass. Brass in piano bass in PAD. 43 Rock & Roll 44 Boogie Woogie BOOGIE 45 Twist TWIST 46 Rockabilly ROCKABILLY 12-Beat Simple, updated version
Appendix ■ Style List # Name World Music Panel Name Rhythm 8-Beat Comments 80 Polka POLKA 81 Traditional Waltz TRAD WALTZ Three-Four European waltz with guitar, accordion, clarinet, bass, drums and a string pad. Use CHORD 1 & 2 and PHRASE 1 for guitar/accordion arrangement. 82 Sevillianas
■ Reset Procedures & Page Memory Default Settings All PSR-510 page memory settings are retained in memory even when the power switch is turned OFF as long as the PSR-510 is powered by batteries or an AC adapter. You can, however, restore the factory default settings for all four page memories or a
Appendix ● Page Memory Default Settings ORCHESTRATION REGIST1 REGIST2 PAGE1 REGIST3 REGIST4 REGIST1 REGIST2 PAGE2 REGIST3 REGIST4 REGIST1 REGIST2 PAGE3 REGIST3 REGIST4 REGIST1 REGIST2 PAGE4 REGIST3 REGIST4 R1 R2 L1 L2 PERCUSS. R1 R2 L1 L2 PERCUSS. R1 R2 L1 L2 PERCUSS. R1 R2 L1 L2 PERCUSS. R1 R2 L1
■ Troubleshooting Something not working as it should? In many cases what appears to be a malfunction can be traced to a simple error that can be remedied immediately. Before assuming that your PSR-510 is faulty, please check the following points. PROBLEM POSSIBLE CAUSE/SOLUTION • The PSR-510
Index + and – buttons …………………………….. 9 I R Introduction (Intro) ……………………….. 29 Local & MIDI output …………………….. 60 Re-voice …………………………………….. 32 Reception modes, MIDI ……………….. 58 Record functions
Percussion Kit List / Verzeichnis der Schlagzeug- und Percussion-Set * “<——” indicates the content is the same as that of Standard Kit. * Only 1 note can be played at a time when Keyboard Percussion is engaged. * The number in parentheses () after the percussion kit name is the MIDI program number.
ts / Liste des kits de percussion / Lista de juegos de percusión * “<——” indique que le contenu est le même que celui du kit standard. * Une seule note peut être jouée à la fois lorsque le mode de percussion au clavier est activé. * Le nombre entre parenthèses ( ) indiqué après le nom du kit de
MIDI Implementation Chart / Implementierungstabelle / Table [Portable Keyboard] Model: PSR-510 MIDI Implementation Chart Function Transmitted Recognized Basic Channel Default Changed 1~16 CH 1~16 CH 1~16 CH (*1) 1~16 CH (*1) Mode Default Messages Altered Mode 3 X ***************** (*1) X X : True
d’implémentation / Gráfico de implememtación *1. The following modes can be set individually for each channel via the panel control: Mode 00: Reception OFF. Mode 01: Direct tone generator control. Mode 02: Same as keyboard note on/off operation. Mode 03: Same as auto-accompaniment chord fingering.
■ GM System Level 1 The existing MIDI protocol allows performance and other data to be transferred between different instruments, even if they are from different manufacturers. This means, for example, that sequence data that was originally created to control a tone generator from manufacturer A
Specifications / Technische Daten / Spécifications / Especificaciones Keyboards: 61 standard-size keys (C1~C6) with touch response. VOICE: AWM128 voices: 01~128 Polyphony: 28 KEYBOARD PERCUSSION: 1~8 VOL: 00~24 OCTAVE: -2~2 DSP DEPTH: 00~15 PAN: –7~7 ONE TOUCH SETTING ORCHESTRATION: R1/R2/L1/L2
M.D.G., EMI Division © 1993 Yamaha Corporation
- Инструкции и руководства
- Бренды
- Yamaha
- PSR-510
- Справочник Пользователя
![]()
Найди любой мануал:
Например: Sony VGN-FW460J/T
Вы можете бесплатно скачать Руководство по эксплуатации для Yamaha PSR-510.
Также вы сможете прочесть онлайн этот документ без скачивания.
Скачать Руководство по эксплуатации для Yamaha PSR-510
Тип файла
PDF
Размер
2.52 Mb
Кол-во страниц
77
Просмотров
8258
Читать онлайн Руководство по эксплуатации для Yamaha PSR-510 (Страница 1)

Другие Клавиатуры и мыши Yamaha PSR-510
Топ Yamaha Клавиатуры и мыши
Вопросы
Ранее вы смотрели
Эта страница полезна для вас? Поделитесь ссылкой: