-
Contents
-
Table of Contents
-
Bookmarks
Quick Links
ADMS-10
Instruction Manual
The ADMS-10 software provides convenient editing of the FT-70DR/DE memory channel
frequencies, channel information and alpha tags, using a personal computer. Also the trans-
ceiver parameters and the setup menu items may be edited and configured easily from the
computer keyboard.
YAESU MUSEN CO., LTD.
Related Manuals for Yaesu FT-70DR
Summary of Contents for Yaesu FT-70DR
-
Page 1
ADMS-10 Instruction Manual The ADMS-10 software provides convenient editing of the FT-70DR/DE memory channel frequencies, channel information and alpha tags, using a personal computer. Also the trans- ceiver parameters and the setup menu items may be edited and configured easily from the computer keyboard. -
Page 2: Table Of Contents
• Tx Power …………….22 • Skip ………………. 22 Execute the ADMS-10 ……….. 6 • AUTO STEP …………..22 Connecting the FT-70DR/DE to a computer ..6 • Step ………………. 22 Installing the Driver Software …….. 8 • TAG ………………. 22 •…
-
Page 3
• Tx Power …………….28 • AUTO STEP …………..28 • Step ………………. 29 • TAG ………………. 29 • ATT ………………29 • S Meter SQL …………..29 • BELL …………….. 29 • Half DEV …………….29 • Clock Shift …………….. 29 •… -
Page 4: Introduction
• Do not resell the software or manuals. • All responsibility for the use of this software lies with the customer. Yaesu cannot be held re- sponsible in any way for any damages or losses, which may be incurred by the customer as a result of using this software.
-
Page 5: Cpu
ADMS-10 Programming Software Installation ( 5 page) ↓ Activating the ADMS-10 Programming Software ( 6 page) ↓ Connecting the FT-70DR/DE with a PC ( 6 page) ↓ Updating of the driver software ( 8 page) ↓ To a explanation of operation of the ADMS-10 (…
-
Page 6: Setup Of The Adms-10
(64 bit) computer is shown below for the purpose of explanation. Preparation Please download the ADMS-10 software from the Yaesu Website for details (http://www.yaesu.com/). Download the ADMS-10 Programming Software to the same folder, and extract the downloaded zip file.
-
Page 7: Unistalling The Adms-10
Double-click the “FT-70D ADMS-10 EXP” icon on the desktop of a computer. Click “Exit” in the “File” menu to close the ADMS-10. Connecting the FT-70DR/DE to a computer 1. Remove the battery pack and connect the AC adapter to a wall outlet and then insert the DC connector to the FT-70DR/DE EXT DC IN terminal.
-
Page 8
3. Remove the plug of the SAD-18B/SAD-11 with the trans- ceiver ON. 4. Use the supplied USB cable to connect the FT-70DR/DE DATA terminal to the USB connector of a computer. • Insert the USB cable into the DATA terminal until you hear a clicking sound. -
Page 9: Installing The Driver Software
Installing the Driver Software When a computer is connected with FT-70DR/DE for the first time, it is necessary to install driver software in a computer. 1. Connect the FT-70DR/DE to a computer (Refer to the “Connecting the FT-70DR/DE to a computer”).
-
Page 10
11. From the menu bar, select “Communications” menu, and then click on the “COM port Settings”, then select the port number of wrote down in step 9. • To finish the installation, close the ADMS-10, and turn off the FT-70DR/DE, then disconnect the cables. -
Page 11: Display Examples
Click the left mouse button on each Menu in the Menu bar to settings the import/export of the data file, get data form FT-70DR/DE and send data to FT-70DR/DE. For more details, see “Names and Functions of Menu Bar ”.
-
Page 12: Tab Menu
TAB Menu Click the left mouse button on each TAB in the title bar (PMS, VFO, etc) to display the frequency list of the desired memory channels, VFO and other preset transceiver settings. For more details, see “Setting the Template Items”. Set mode screen Basic setting items which are not related to memory channels can be configured from “Set Mode”.
-
Page 13: Names And Functions Of Menu Bar
Names and Functions of Menu Bar File • New Click the left mouse button on the “New” parameter in the “File” menu to open a new configuration file. Multiple configuration files may be created and opened at the same time. Standard values are preset for each memory channel, VFO and set mode.
-
Page 14: Import With Ft-70D Format
• Import with FT-70D format ADMS-10 data files may be created using a spreadsheet such as Microsoft Excel. To create a data file for the import of data, save the spreadsheet in the «CSV» comma separated file format. A spreadsheet may be easily created by exporting the template data in the «CSV» format using the ADMS-10 «Export»…
-
Page 15: Edit
Edit Click the row to edit, then perform the following each operations. Part of setting items of each row cannot be cut, copy, and paste is not possible. • Undo To undo the edited data, click the left mouse button on the «Undo» parameter in the «Edit» menu. •…
-
Page 16: Find Next
• Find Next Click the left mouse button on the «Find Next» parameter in the «Edit» menu to move to the next candi- date character string. • Goto Channel Move the cursor to the desired channel, click the left mouse button on the «Goto Channel» parameter in the «Edit»…
-
Page 17: Add Frequency Range
• Add Frequency Range New channels may be created in designated frequency steps from the starting frequency by clicking the left mouse button on the «Add Frequency Range» parameter in the «Edit» menu. The «Add Frequency Range» window will open. A specified number of memory channels may be created, beginning from the starting frequency in the specified frequency steps.
-
Page 18: With The Ft-70Dr/De)
USB cable between the FT-70DR/DE and the computer. Follow the on-screen instructions to acquire data from the FT-70DR/DE. When the data transfer is com- pleted, the template screen received from the FT-70DR/DE appears on the computer display.
-
Page 19: Settings
Settings • Set Mode From the set mode menu, you can customize the various functions of the FT-70DR/DE according to your preferences. The ADMS-10 software displays the set mode menu in an easy-to-understand manner where you can change and save the setting values.
-
Page 20: Tool Bar
• Tool Bar Click the left mouse button on the «Toolbar» parameter in the «Setting» menu to display or hide the Toolbar. A check mark appears next to the «Toolbar» parameter when the Toolbar is displayed. • Status Bar The “Status Bar” describes the action to be executed by the selected menu item, or the depressed toolbar button, and keyboard latch state.
-
Page 21: Setting The Template Items
Setting the Template Items Memory Use this page to edit the Memory channels data, Skip Memory channels, or PMS (Programmable Memory Scan) memory channels. • Memories Enter and edit the frequencies you normally use to the memory channels. Up to 900 channels can be registered.
-
Page 22: Offset Direction
• Offset Direction Set the frequency shift direction. OFF: The transmit frequency is not shifted. -RPT: The transmit frequency is shifted to the minus offset. +RPT: The transmit frequency is shifted to the plus offset. The transmit frequency is not shifted. •…
-
Page 23: User Ctcss
• User CTCSS Select the idle line frequency to remove signals such as idle line signals used by private railways and control signals of MCA radio system. • Tx Power This item selects the TX Power. • Skip Select the scanning condition for receiving channels. OFF: Performs scanning according to the set mode basic setting –SCAN RESUME.
-
Page 24: Clock Shift
Comments may be added to the registered memory channels. Up to 255 letters can be used. This func- tion is useful in organizing the memory channels by, for example, applying a category name to each channel. These comments are not transferred to the FT-70DR/DE. ADMS — 10 Instruction Manual…
-
Page 25: Vfo
About the setting items of VFO frequencies • Receive Frequency Enter the VFO frequencies for each band. The FT-70DR default Frequencies are pre-entered into the ADMS-10 standard template. A frequency that is out of the transceiver’s range cannot be entered. When the error pop-up window is opened, enter the correct frequency.
-
Page 26: Auto Mode
• AUTO MODE When tick the check box of AUTO MODE, the receive mode (FM mode or AM mode) is automatically se- lected. Un-ticking the checkbox enables selecting the operating mode. • MODE Select the operating mode for receive channel. The selected frequency band is set to FM mode.
-
Page 27: Step
Comments may be added to the edited VFO channels. Up to 255 letters can be used. This function is useful in organizing the VFO channels by, for example, applying a category name to each channel. These comments are not transferred to the FT-70DR/DE. ADMS — 10 Instruction Manual…
-
Page 28: Home
About the setting items of HOME channel frequency • Receive Frequency / Transmit Frequency Enter any desired changes into Home Channel frequency. The FT-70DR default Frequencies are pre-en- tered into the ADMS-10 standard template. A frequency that is out of the transceiver’s range cannot be entered. When the error pop-up window is opened, enter the correct frequency.
-
Page 29: Mode
• MODE Select the operating mode for receive channel. The selected frequency band is set to FM mode. The selected frequency band is set to AM mode. • AMS The AMS (Automatic Mode Select) function automatically selected the transmission mode in accordance with the received signals may set ON/OFF.
-
Page 30
Comments may be added to the edited HOME channels. Up to 255 letters can be used. This function is useful in organizing the HOME channels by, for example, applying a category name to each channel. These comments are not transferred to the FT-70DR/DE. ADMS — 10 Instruction Manual… -
Page 31
Troubleshooting The FT-70DR/DE cannot receive or transmit data to the computer. The Data transfer does not start. • Verify that the programming cable is correctly connected to the FT-70DR/DE data port and to the Com- puter. Connect correctly. • The battery of the FT-70DR/DE may be depleted.
This manual is also suitable for:
Ft-70de
-
Page 1
C4FM/FM 144/430MHz DIGITAL/ANALOG TRANSCEIVER FT-70D FT-70D Operating Manual… -
Page 2: Table Of Contents
Contents Introduction ………….. 1 VFO Scan …………..27 Memory Channel Scanning ……..27 Quick Guide …………. 2 Setting the Receive Operation When Scanning Stops … 28 Controls & Connections ……… 3 Weather Alert Scan ……….28 Transceiver …………… 3 Skip Memory Channel and Specified Memory Channel … 29 The Keypad Functions ……….
-
Page 3: Introduction
We urge you to read this manual in its entirety, and also the Advance Manual ( available for down- load on the Yaesu website ) , to gain a full understanding of the amazing capability of the exciting new FT-70DR/FT-70DE Transceiver.
-
Page 4: Quick Guide
) switch to conclude z Transmitting inputting. While pressing and holding the PTT ( Normal operation ( VFO Mode ) screen switch, speak into the microphone. will be displayed z Receiving Release the to return to receive mode. FT-70DR/FT-70DE Operating Manual…
-
Page 5: Controls & Connections
When the power is ON, press and hold the switch again to turn the Power OFF. • When the power is ON, press this button briefly to engage, or release the key lock. Battery pack* ( 12 ) FT-70DR/FT-70DE Operating Manual…
-
Page 6
12 ) *: When the included antenna and battery pack are installed and the MIC/SP jack, DATA terminal, and EXT DC IN jack are securely covered with rubber caps, the FT-70DR/DE meets the water- proofing performance conforming to IP54. FT-70DR/FT-70DE Operating Manual… -
Page 7: The Keypad Functions
“?”, or “!” on inputting the frequency. during repeater operation. *: VW icon is displayed when Set Mode [ 16 DIG VW ] ( 36 ) is set to “ON” ( the default setting is “OFF” ) . FT-70DR/FT-70DE Operating Manual…
-
Page 8: Display
Appears when the PAGER function is enabled. The battery condition is displayed in 4 steps. ( No display ) ׃Full battery power ׃Enough battery power ׃Battery is depleted. Charge battery. ( ׃When blinking ) Charge battery immediately. FT-70DR/FT-70DE Operating Manual…
-
Page 9
Appears when the bell function in the analog FM mode is enabled. Appears when the lock function is enabled. V/D mode ( Normal digital mode ) Voice FR mode ( Voice wide mode ) Analog FM mode AM mode ( Receive only ) DTMF Autodialer Active – FT-70DR/FT-70DE Operating Manual… -
Page 10: Safety Precautions ( Be Sure To Read )
Be sure to read these important precautions, and use this product safely. Yaesu is not liable for any failures or problems caused by the use or misuse of this product by the pur- chaser or any third party. Also, Yaesu is not liable for damages caused through the use of this product by the purchaser or any third party, except in cases where ordered to pay damages under the laws.
-
Page 11
Do not use DC power cords other than the product or Yaesu Amateur Customer Support. one enclosed or specified. Do not bend, twist, pull, heat and modify This may result in fire, electric shock and the power cord and connection cables in equipment malfunctions. -
Page 12
DATA terminal when water drops have accumulated on the transceiver, or when it is placed in a wet environment. This may result in water penetrating the transceiver, and caus- ing equipment failure. This product is not totally waterproof, and must never be immersed in water. FT-70DR/FT-70DE Operating Manual… -
Page 13: About This Manual
Availability of accessories may vary. Some accessories are supplied as standard to meet local re- quirements, while others may be unavailable in some regions. Consult your Yaesu Dealer for de- tails regarding these and any newly-available options. Connection of any accessory not approved by Yaesu, should it cause damage, may void the Limited Warranty on this apparatus.
-
Page 14: Preparation
Removing the Battery Pack 1. Slide the battery pack lock plate to the “UNLOCK” position. Unlock 2. Push the release button ( PUSH ) and tilt the Belt Clip outward, and then remove the battery pack. FT-70DR/FT-70DE Operating Manual…
-
Page 15: Charging The Battery Pack
Connecting to an External Power Supply Using a Power Cable The optional DC cable ( E-DC-6 ) allows the transceiver to be connected to an external DC power supply. FT-70DR/FT-70DE Operating Manual…
-
Page 16: Operation
Characters that may be inputted for the call sign are the numbers 0-9, letters ”A – Z” in upper case, the hyphen and the slash. Adjusting the Volume Level 1. While pressing and holding the VOL knob, rotate the DIAL knob to adjust the volume to a comfortable level. FT-70DR/FT-70DE Operating Manual…
-
Page 17: Adjusting The Squelch Setting
2. Press the PTT switch to save the setting and return to normal operation. In the default setting, of the frequency step is set to “AUTO”, which automatically provides a suitable frequency step according to the frequency band. FT-70DR/FT-70DE Operating Manual…
-
Page 18: Selecting The Communication Mode
Selecting the Communication Mode Using AMS ( Automatic Mode Select ) function The FT-70DR/DE transceiver is equipped with the AMS ( Automatic Mode Select ) func- tion which automatically selects the communication mode corresponding to the received signal. 1. Press and hold the [ AMS ] key to turn the AMS function ON or OFF.
-
Page 19: Fixing The Communication Mode
As a result, the transmitting power level is automatically set to Low Power. If transmission continues while the high temperature protection function is active, the transceiver will be forcibly returned to the receive mode. FT-70DR/FT-70DE Operating Manual…
-
Page 20: Changing The Transmission Power Level
The [ 7 ] ( P1 ) is [ 12 DC VLT ] ( 36 ) and [ 8 ] ( P2 ) key is [ 47 RX MOD ] ( 37 ) as a default assignment. FT-70DR/FT-70DE Operating Manual…
-
Page 21: Using The Convenient Digital C4Fm Feature
2. When accessing the C4FM digital repeater controlled by the DG-ID number, set the transmit DG-ID number of the FT-70DR/DE to that of the repeater input. Even in that case, if the receive DG-ID number of the FT-70DR/DE is set to “00”, all the downlink signals from the repeater may be received.
-
Page 22: Communicating Only With The Specific Members By Setting The Dg-Id Number Except For «00
If the receive DG-ID is set to a number other than “00”, only signals with that DG-ID will be received. Normally, set the receive DG-ID number to “00” except when communication is desired only with group members. FT-70DR/FT-70DE Operating Manual…
-
Page 23: About The Gm ( Group Monitor ) Feature
GM information screen (Automatically switching display) Group Mode Display Own DG-ID Number Display Memory Tag Display Frequency Display :Memory tag display is displayed in the case of the memory channel or the home channel setting the memory tag. FT-70DR/FT-70DE Operating Manual…
-
Page 24: Displaying The Information Of The Other Station Received By Gm ( Group Monitor ) Function
LCD. • Up to 24 stations may be displayed in order of their reception. z The FT-70DR/DE may not send its own location information because the FT-70DR/DE is not equipped with the GPS function.
-
Page 25: Repeater Operation
T-CALL switch, and use the PTT switch to activate the transmitter thereafter. If needed, the FT-70DR ( USA/Asian version ) , may be set to access repeaters which re- quire a 1750 Hz burst tone by setting the MONI/T-CALL switch to serve as a “Tone Call”…
-
Page 26: Using The Memory
For additional details on the Skip Search Memory, PMS memory channel and Memory Bank, refer to the Advanced Manual which may be downloaded from the Yaesu website. CAUTIONS! The information registered to memory channels can be corrupted by incorrect operation, static electricity, or electrical noise.
-
Page 27: Registering To Memory Channels
10 memory channels. z The transceiver may be placed into a Memory Channel Only mode, ( which restricts the FT-70DR/DE to operate only on the memory channels ) , by pressing the [ V/M ] key, while pressing the Power ( Lock ) switch to turn the transceiver ON.
-
Page 28: Clearing Memories
The beep sounds and the home channel frequency is changed. For additional details on the following functions, refer to the Advanced Manual which may be downloaded from the Yaesu website. Split Memory Two different frequencies, one for receive and another for transmit, can be registered to a memory channel.
-
Page 29: Scanning Function
• Weather Alert Scan For additional details on the Programmable Memory Scan ( PMS ) and Memory Bank Scan, refer to the Advanced Manual which may be downloaded from the Yaesu website. VFO Scan VFO scan function scans the frequencies, and detects signals.
-
Page 30: Setting The Receive Operation When Scanning Stops
NOAA Alert Tone while operating using VFO scan or Memory channel scan. When the Weather Alert Scan feature is engaged, the FT-70DR/DE will check the Weather Broadcast Channels for activity every five seconds while scanning. If you watch…
-
Page 31: Skip Memory Channel And Specified Memory Channel
163.275 MHz For additional details on the following functions, refer to the Advanced Manual which may be downloaded from the Yaesu website. Skip Memory Channel and Specified Memory Channel Two types of memory channels may be designated, “skip memory channels” and “speci- fied memory channels”…
-
Page 32: Using The Wires-X Function
You may employ Internet communications by connecting from your transceiver to a WIRES-X local node station. FT-70DR/DE does not accommodate the transmission/reception of messages, images, audio messages, or location information. Connecting to a WIRES-X node in the C4FM mode (*Recommended) z Ascertain the DSQ code or the DG-ID setting of the WIRES-X node station.
-
Page 33
(the C0 screen) Most recent connected node ID or room ID is dis- played. A single press of the [AMS] key or PTT switch while this screen is displayed, will connect to the most recent node/room. FT-70DR/FT-70DE Operating Manual… -
Page 34
(C0 / C1 — C5 / En screen*) (*The PTT switch is disabled on the En screen) Press and hold the [BAND] key Disconnect from the connected node or room. (Lc / Cn / C0 / C1 — C5 / En Screen) FT-70DR/FT-70DE Operating Manual… -
Page 35: Connect And Communicate With Wires-X In Analog Mode
8. When communication is completed, press and hold the [MODE] key to exit WIRES-X mode. z About WIRES-X open node stations A listing of the WIRES-X open node stations, with their location, operation mode, etc. is posted on the Yaesu WIRES-X website. https://www.yaesu.com/jp/en/wires-x/index.php Connect and communicate with WIRES-X in analog mode Confirm that the node station setting is in analog mode.
-
Page 36: Convenient Functions
Convenient Functions For additional details on the following functions, refer to the Advanced Manual which may be downloaded from the Yaesu website. Tone squelch feature The tone squelch opens the speaker audio only when a signal containing the specified CTCSS tone is received. By matching the tone frequency with the partner station in ad- vance, a quiet standby is possible.
-
Page 37: Using Set Mode
On some setting screens, key operation is different than described in the above steps ( For example, inputting the characters, etc. ) . Refer to the Advance manual. For additional details, refer to the Advanced Manual which may be downloaded from the Yaesu website. Display and Key Lamp Dimmer The illumination level of the display and keys may be adjusted from the six levels.
-
Page 38: Tables Of Set Mode Operations
OFF / 2 SEC – 5 SEC – 10 SEC / CONT keys to be lit. ( LED lights up ) LED.LGT Turn ON the LED light. LOCK Configure the lock mode setting. KEY / DIAL / K+D / PTT / K+P / D+P / ALL FT-70DR/FT-70DE Operating Manual…
-
Page 39
Turn the weather alert scan on/off. OFF / ON WIDE / NARROW W/N.DEV Set the Transmit Modulation Level. W-DGID Setting of the WIRES-X DGID AUTO / DGID01 – DGID99 ( up to 10 characters ) MYCALL Set the call sign. FT-70DR/FT-70DE Operating Manual… -
Page 40: Restoring To Defaults ( Reset )
38 PAG.CDR 39 PAG.CDT 41 PSWDWT 44 RF SQL 46 RPT.FRQ 47 RX MOD 49 SCM.WTH 50 SCV.WTH 54 SQL.EXP 62 W/N.DEV 64 MYCALL To cancel the resetting, press any key except the [ F ] key. FT-70DR/FT-70DE Operating Manual…
-
Page 41: Specifications
At least 50 dB below ( @TX Power Low ) European version At least 60 dB below ( @TX Power High, Middle ) At least 55 dB below ( @TX Power Low ) Microphone Impedance: 2 kΩ FT-70DR/FT-70DE Operating Manual…
-
Page 42: Eu Declaration Of Conformity
Frequency ranges will vary according to transceiver version; check with your dealer. EU Declaration of Conformity We, Yaesu Musen Co. Ltd of Tokyo, Japan, hereby declare that this radio equipment FT-70DE is in full compliance with EU Radio Equipment Directive 2014/53/EU. The full text of the Declaration of Conformity for this product is available to view at http://www.
-
Page 43
Changes or modifications to this device that are not expressly approved by YAESU MUSEN could void the user’s authorization to operate this device. z This device complies with part 15 of the FCC Rules. Operation is subject to the following two conditions: ( 1 ) This device may not cause harmful interference, and ( 2 ) this device must accept any interference including received, interference that may cause undesired operation.
- Рации (все)
- Профессиональные ▾
- Любительские ▾
- Морские радиостанции
- Авиационные радиостанции
- Радиостанции WCDMA
- Авионика ▾
- Трансиверы SUN SDR
- Радиостанции Motorola ▾
- Радиостанции Hytera ▾
- Радиостанции Kirisun ▾
- Аксессуары ▾
-
Антенны для раций ▾
- Антенно-фидерное оборудование ▾
- Усилители мощности
- Преобразователи напряжения
- Блоки питания ▾
- Кейсы Байкал
- Измерительные приборы
- Мачты
- Системы охраны, видеонаблюдения и контроля доступа
- Строителям
- Дальнобойщикам
- Авиационные
- Охранные предприятия
- Рации 1 ватт
- Рации 2 ватта
- Рации 4 ватта
- Рации 5 ватт
- Рации 8 ватт
- Рации 10 ватт
- Для леса
- Для охоты
- Для больниц
- Для мероприятий
- Горнолыжные склоны
- Для страйкбола
- Для улицы
- Для города
- Рации двухдиапазонные
- Рации UHF диапазона
- Рации VHF диапазона
Для профессионалов:
Макс. мощность:
Среда эксплуатации:
Параметры:
- Профессиональные радиостанции ▾
- Любительские радиостанции ▾
- Радиостанции WCDMA
- Аксессуары ▾
- Системы охраны, видеонаблюдения и контроля доступа
- Рации
- Рации 1 ватт
- Рации 2 ватта
- Рации 4 ватта
- Рации 5 ватт
- Рации 8 ватт
- Рации 10 ватт
- Для леса
- Для охоты
- Для больниц
- Для мероприятий
Макс. мощность:
Среда эксплуатации:
Инструкции для радиостанций

Большинство инструкций для радиостанций представлено в формате
PDF. для их просмотра на нашем компьютере должна быть установлена программа Adobe Acrobat Reader.
для улучшения качества предоставляемых услуг, проявляя заботу о клиентах, мы стараемся своевременно обновлять и добавлять инструкции для радиостанций на русском языке. н случае, если вы обнаружили ошибки или неточности в инструкциях, пишите на основной форум по радиостанциям с указанием вероятной ошибки.
|
|
- AnyTone AT-310M
- AOR AR-3000
- Baofeng KS-315
- Baofeng Mini 1
- Baofeng UV-5R
- Baofeng UV-5R 3800
- BF-A58
- BF-T3
- BFDX BF-RT7500
- CB TTI TCB-775
- Codan NGT SRx
- Comet CAA-500 Mark II
- COMET CMX2300
- FlightLine FL-760
- FlightLine FL-M1000A
- FT-4X
- FT-897
- FTM-300DR
- FTM-3200DR
- FTM-6000R
- iradio DP-168
- MFJ-259B
- MFJ-259B
- MH-85A11U
- Nissei NS-520A
- Nissei NS-60A
- NISSEI RS-101
- NISSEI RS-102
- NISSEI RS-402
- NISSEI RS-50
- NISSEI RS-502
- NISSEI TX-502
- OPEK BS-450
- OPEK HF-BD1
- OPEK HVT-600
- OPEK UH-2401
- OPEK UVS-200
- OPEK VH-2201
- SDC 225
- STEALTH 2390
- STEALTH 6010
- STEALTH 9360
- STEALTH 9400
- SURECOM SA-160
- SURECOM SA-250
- SURECOM SF-401 PLUS
- SURECOM SR-328
- SURECOM SW-102-N
- Vertex EVX-R70
- Vertex VX-1400
- Vertex VX-2100/2200
- Vertex VX-231
- Vertex VX-3000
- VERTEX VX-3200
- Vertex VX-510
- Vertex VXA-220
- VERTEX VXR-7000 UD
- VERTEX VXR-7000 VC
- VERTEX VXR-9000 UA
- VERTEX VXR-9000 UD
- Vertex VZ-30
- VL-1000
- Xiego X108g
- Xiego X1M
- XIEGU G90
- Yaesu FC-30
- Yaesu FT DX 5000MP
- Yaesu FT DX-1200
- Yaesu FT DX-3000D
- Yaesu FT-1900R
- Yaesu FT-1907
- YAESU FT-1DR
- YAESU FT-1DR с чехлом CSC-97
- YAESU FT-250/FNB-83/VAC-10
- Yaesu FT-252
- Yaesu FT-257
- Yaesu FT-25R
- Yaesu FT-270R
- Yaesu FT-2900R
- Yaesu FT-2980R
- Yaesu FT-5DR
- Yaesu FT-60R
- Yaesu FT-65
- Yaesu FT-70DR
- Yaesu FT-7800R
- Yaesu FT-7900R
- Yaesu FT-817ND
- Yaesu FT-818ND
- Yaesu FT-847
- Yaesu FT-857D
- Yaesu FT-8800R
- Yaesu FT-8900R
- Yaesu FT-891
- Yaesu FT-991
- Yaesu FT-991A
- Yaesu FT2-DR
- Yaesu FT3DR
- Yaesu FTA-250L
- Yaesu FTA-450L
- Yaesu FTA-550
- Yaesu FTDX-10
- Yaesu FTDX101D
- Yaesu FTM-100DR
- Yaesu FTM-3100R
- Yaesu FTM-3207DR
- Yaesu G-1000 DXC
- Yaesu G-1000DXA
- Yaesu G-250
- Yaesu G-2800DXA
- Yaesu G-450A
- Yaesu G-5500
- Yaesu G-650
- Yaesu G-800DXA
- Yaesu G-800SA
- Yaesu VX-120/VX-170
- Yaesu VX-177
- Yaesu VX-1R
- Yaesu VX-3R
- Yaesu VX-6R
- Yaesu VX-7R
- Yaesu VX-8DR
- YAESU VXA-710
- Антенна Yaesu YA-31
- Антенна базовая COMET C-150BX-L
- Антенный тюнер Yaesu FC-40
- Базово-мобильная радиостанция CB КРУИЗ-608М
- Базово-мобильная радиостанция VERTEX VX-4000 V/U/LB
- Базово-мобильный трансивер Yaesu FTM-7250 DR
- Байкал 20
- Байкал 500
- Байкал 501
- Байкал 7,8 144-174 МГц
- Байкал-10
- Байкал-15 (136-174МГц)
- Байкал-15 (400-470 МГц)
- Байкал-27
- Байкал-35 UHF
- Байкал-35 VHF
- Байкал-7
- Байкал-9+ В1
- БК23Л1
- БК30Л1
- БК30Л2
- БК30Л3
- БК50Л3
- БЛ30Л5
- БЛ50Л2
- Блок питания
- Блок питания Manson SSP 8080
- Блок питания Байкал БК1830
- Импульсный преобразователь SDC-210/225/245
- КВ-трансивер Vertex FT-600
- Круиз 64
- Круиз 90
- Круиз 90 VHF
- Круиз 98
- Круиз-1
- Круиз-3
- Круиз-55
- КРУИЗ-63
- Круиз-78
- Круиз-7P
- Линейный КВ-усилитель HL-1.2KFX
- Морская рация Vertex HX-280S
- Морская рация Vertex HX-370S
- Мотор для поворотного устройства Yaesu G-800DXA
- Переключатель резервного питания MS-928
- Портативная авиационная радиостанция YAESU FTA-230
- Портативная авиационная радиостанция YAESU FTA-310
- Портативная авиационная рация Vertex VXA-300
- Портативная радиостанция APOLLO GPFRS-200
- Портативная радиостанция APOLLO GPX-210Портативная радиостанция APOLLO GPX-210
- Портативная радиостанция KIRISUN PT-3209
- Портативная радиостанция Vertex VXA-210
- Портативная радиостанция WOUXUN KG-UV6D
- Портативная радиостанция КРУИЗ-22
- Портативная радиостанция КРУИЗ-62
- Профессиональная портативная рация Wouxun KG-UVA1
- Профессиональная радиостанция CB TTI TCB-900
- Профессиональная радиостанция Vertex VX-5500
- Радиостанция CODAN-NGT-SRX-TCVR-CON-PACKAGE в комплекте
- Радиостанция Vertex HX-600s
- Радиостанция Yaesu FT-90R
- радиостанция Байкал-50
- Радиостанция профессиональная Vertex VX-4200
- Рация Vertex VX-920
- Рация Yaesu FT-3000M
- Рация Yaesu FT-450D
- Рация Yaesu FTM-350R
- Рация Yaesu FTM-400DR B3 EXP
- Рация Yaesu FTM-400XDR
- Рация Yaesu VX-110
- Рация Yaesu VX-127
- Рация Yaesu VX-2R
- Рация Байкал 21
- Рация Байкал-17
- Рация Круиз 6
- Рация КРУИЗ-77
- Рация Круиз-9
- Рация морская Vertex HX-500S
- Рация портативная профессиональная Vertex VX-500UD
- Рация портативная профессиональная Круиз-38
- Усилитель мощности TOKYO HY-POWER HL-1.5 Kfx(1 кВт, 1.8-28 МГц) TOKYO HY-POWER
- Усилитель мощности TOKYO HY-POWER HL-450B (400 ватт, 3.5-28 МГц)

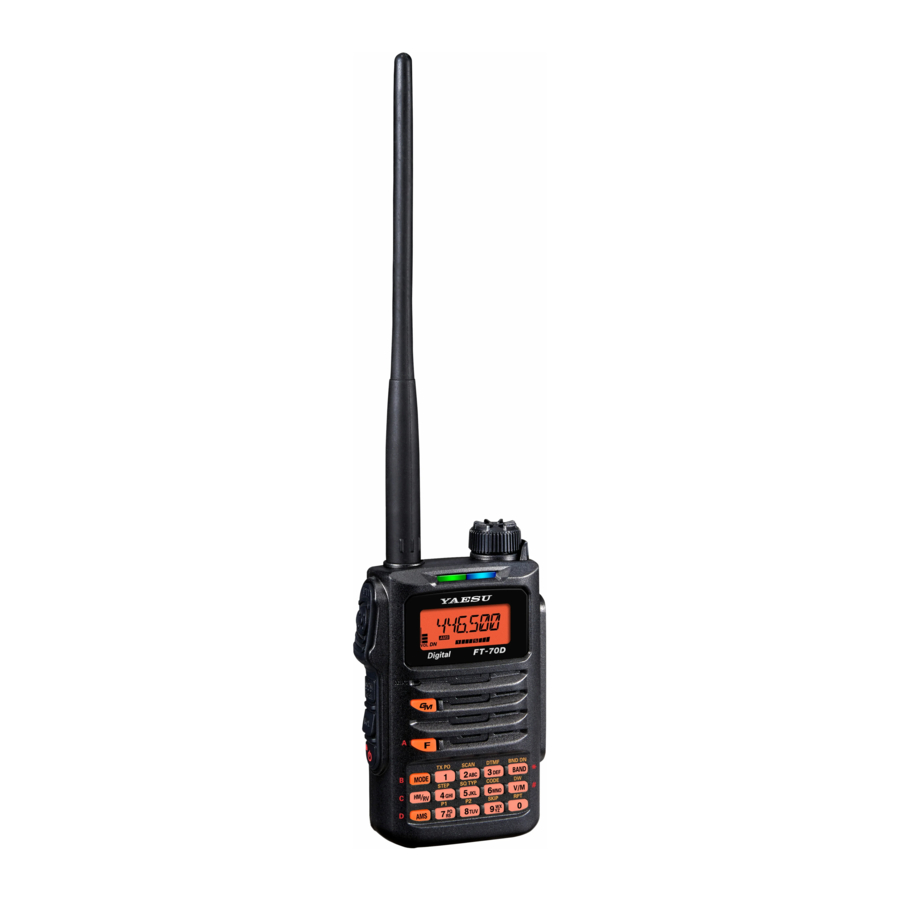
Yaesu FT-70

Yaesu FT-70 — портативная двухдиапазонная цифроаналоговая радиостанция 144/430 МГц мощностью 5 Вт.
Yaesu FT-70
может работать как в режиме аналогового FM, так и в цифровом Yaesu System Fusion C4FM.
Владельцы отмечают высокое качество модуляции этого радио и очень громкий, высококачественный звук из 0,7 Вт динамика. В режиме цифровой модуляции C4FM высокое качество звука достигается за счет превосходной технологии кодирования, а также функций контроля и коррекции ошибок.
Индикаторы в верхней части радиостанции Yaesu FT-70 меняют цвет в зависимости от режима работы. Yaesu FT-70 имеет функцию AMS — распознавание принимаемого сигнала и автоматический переход в принятый режим — C4FM или FM.
При работе в C4FM Yaesu FT-70 передает в эфир позывной оператора и идентификатор рации. В цифровом режиме эфирные шумы полностью отсутствуют. Оператор имеет возможность общаться со всем миром подключаясь к ближайшему узлу или создав собственный узел.
Yaesu FT-70 характеристики:
• Частотный диапазон передачи: 144-148 MHz, 430-450 MHz
• Частотный диапазон приема: 108-579,995 MHz
• Мощность: 0.5, 2, 5 W
• Шаг сетки: 5, 6.25, 10, 12.5, 15, 20, 25, 50, 100 kHz
• Каналов памяти: 1105
• Антенный разъем — SMA-мама
• Размер (WxHxF): 60 x 98 x 33 mm
• Вес: 225 грамм
• Стандарт защиты IP54
• Совместима с System Fusion WIRES-X
• Многоцветные индикаторы режимов
• VFO сканирование
• Сканирование каналов памяти
• Приоритетное сканирование
• Аккумулятор Li-ion 1800 mAh
• Кабель USB для подключения к ПК
• Возможность клонирования данных
• CTCSS / DCS коды
• APO — автоматическое выключение
• TOT — ограничение времени передачи
• BCLO — блокировка занятого канала
Yaesu FT-70 буклет
FT-70D_CATALOG_201705
( 2.77 MB )
Yaesu FT-70 руководство пользователя
FT-70DR/DE Operating Manual (Including the WIRES-X function information) 1/9/2020
( 11.20 MB )
FT-70DR/DE Advance Manual
( 6.06 MB )
FT-70DR/DE Deutsch Advance Manual
( 6.28 MB )
FT-70DR/DE Deutsch Operating Manual
( 11.03 MB )
FT-70DR/DE French Advance Manual
( 6.26 MB )
FT-70DR/DE French Operating Manual
( 11.02 MB )
FT-70DR/DE Italiano Advance Manual
( 6.29 MB )
FT-70DR/DE Italiano Operating Manual
( 11.02 MB )
FT-70DR/DE Programming Software ADMS-10 Instruction Manual (2211-C)
( 4.30 MB )
FT-70DR/DE Spanish Advance Manual
( 6.28 MB )
FT-70DR/DE Spanish Operating Manual
( 11.01 MB )
Программы и прошивки для Yaesu FT-70
FT-70DR/DE Firmware Update MAIN (EXP: Ver. 1.11)
( 12.81 MB )
FT-70DR/DE Firmware Update MAIN (USA: Ver. 1.11)
( 12.81 MB )
FT-70DR/FT-70DE ADMS-10 Programming Software (Ver.1.0.1.0)
( 69.28 MB )
FT-70DR/FT-70DE Update Firmware Information (Rev 1) 11/08/17
( 37.29 KB )
Yaesu FT-70 аксессуары