Скачать руководство пользователя
XP-PEN New UI Driver Manual V1.2(Russian)
Dec 04,2020 PM 12:19
Deco 01V2 Инструкция по эсплуатации
Oct 24,2019 PM 17:42
программное обеспечение и драйверы
XPPenMac_3.4.9_230829
Aug 31,2023 PM 17:39
XPPenMac_3.4.8_230804
Aug 14,2023 PM 17:09
XPPenWin_3.4.9.230815
Aug 17,2023 PM 17:58
XPPenWin_3.4.8.230725
Aug 08,2023 AM 11:28
Ubuntu、Centos、Fedora、Red Hat、Manjaro、Arch、Debian、OpenSUSE、elementary OS、Mint、ezgo Linux、Pop!_OS、Mageia
XPPen-Pentablet-Linux3.4.6-230714.tar.gz
Jul 19,2023 PM 15:30
Ubuntu、Debian、elementary OS、Mint、ezgo Linux、Pop!_OS
XPPen-pentablet-3.2.3.230215-1.x86_64.deb
Mar 21,2023 AM 10:22
Centos、Fedora、Red Hat、OpenSUSE、Mageia
XPPen-pentablet-3.2.3.230215-1.x86_64.rpm
Mar 21,2023 AM 10:22
Manual and Quickguide download
XP-PEN New UI Driver Manual V1.2(English)
Jan 05,2021 PM 16:17
XP-PEN New UI Driver Manual V1.2(Polish)
Jan 05,2021 PM 16:18
Deco 01V2 User Manual
Oct 24,2019 PM 17:35
DECO 01 V2 User Manual(Dutch)
Dec 21,2020 PM 15:35
XP-PEN New UI Driver Manual V1.2(Dutch)
Jan 05,2021 PM 16:16
Deco 01V2 User Manual(Polish)
Oct 24,2019 PM 17:48
Deco 01 V2 User Manual(Czech)
Jul 15,2020 PM 12:30
SOFTWARE & DRIVERS
XPPenMac_3.4.9_230829
Aug 31,2023 PM 17:29
XPPenMac_3.4.8_230804
Aug 14,2023 PM 16:11
XPPenWin_3.4.9.230815
Aug 17,2023 PM 17:49
XPPenWin_3.4.8.230725
Aug 08,2023 AM 11:02
Ubuntu、Centos、Fedora、Red Hat、Manjaro、Arch、Debian、OpenSUSE、elementary OS、Mint、ezgo Linux、Pop!_OS、Mageia
XPPen-Pentablet-Linux3.4.6-230714.tar.gz
Jul 19,2023 PM 15:15
Ubuntu、Debian、elementary OS、Mint、ezgo Linux、Pop!_OS
XPPen-pentablet-3.2.3.230215-1.x86_64.deb
Mar 21,2023 AM 09:44
Centos、Fedora、Red Hat、OpenSUSE、Mageia
XPPen-pentablet-3.2.3.230215-1.x86_64.rpm
Mar 21,2023 AM 09:47
Contents
Introduction
Product Overview
Included with your product
Wireless Shortcut Remote
Connection
Compatibility
FAQS
Introduction
Thank you for choosing XPPen Deco Pro(Gen 2) Drawing Tablet. This user manual is specially designed to detail the product’s functions and features. Please read this manual before using the product to ensure safe and proper use.
Due to the latest product improvements, content may differ from the final product and is subject to change without prior notice.
Note: The pictures in the User Manual are for reference only. The User Manual supplied with the device may vary depending on the model.
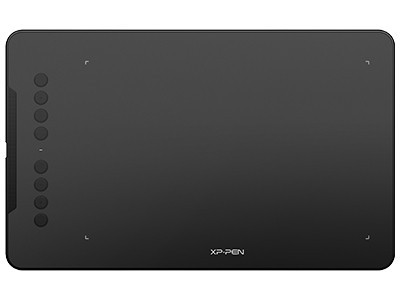
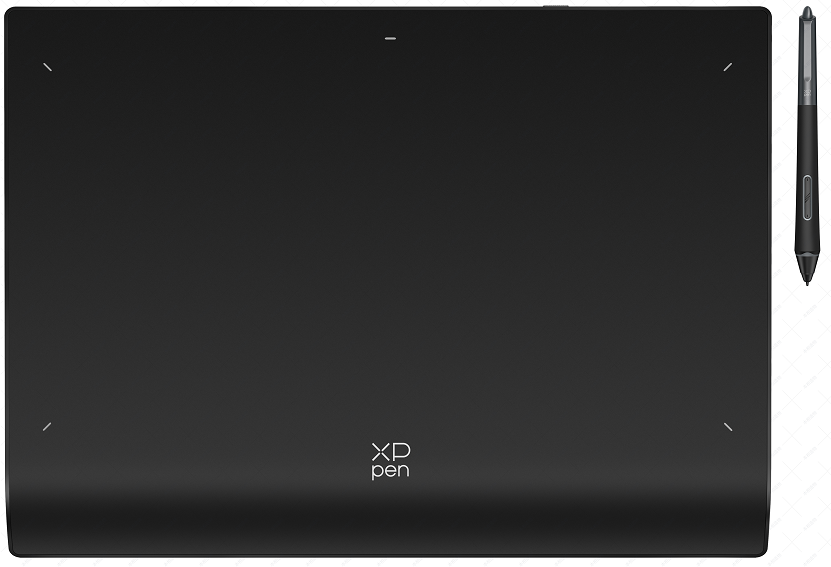
Product Overview
Drawing Tablet
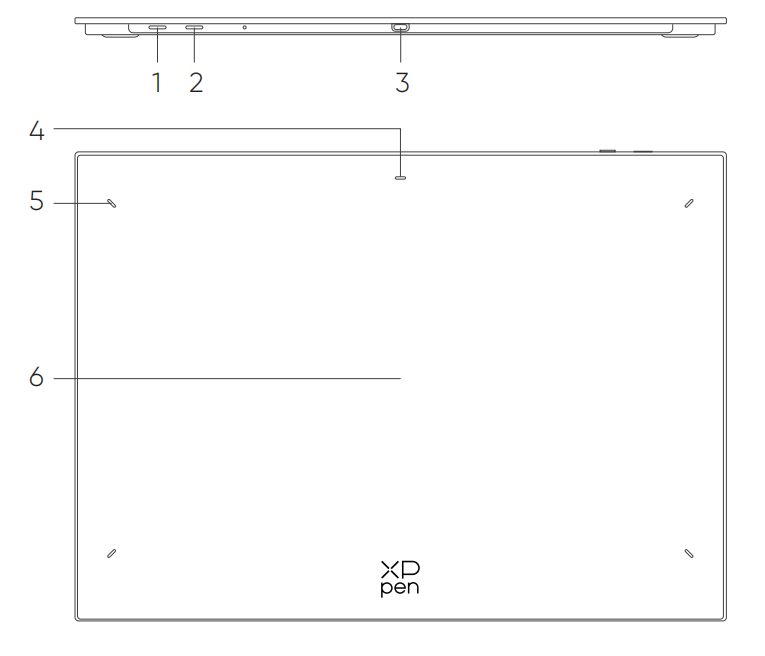
1. Power Key
a. Long press for 3 seconds:Power on or off
b. Long press for 6 seconds:Bluetooth pairing mode
2. Bluetooth Switching Button
3. USB -C port
4. Indicator 1
In blue status:
a. Flashing slowly: Waiting for Bluetooth connection
b. Flashing quickly: Waiting for Bluetooth pairing
(Long press the Power Key for 6 seconds)
c. Always On: Successfully paired
In red status:
a. Flashing: Low battery (≤ 20%)
b. Always On: Charging
c. Off: Fully charged
The purple status indicates that the red and blue indicators are both On simultaneously.
5. Indicator 2
a. Off: The stylus is beyond the active area
b. Always On: The stylus enters into the active area
6. Active Area
Included with your product
Drawing Tablet x1
Stylus x1
Pen Nibs x4
Felt Nibs x4
Pen Case x1
USB-C to USB-C Cable x1
USB-C to USB-A Cable x1
Wireless Shortcut Remote x1**
Bluetooth Receiver x1 (use with Wireless Shortcut Remote)***
Glove x1
* The list is for illustrative purposes only. Please refer to the actual product.
** Due to different product specifications, the Wireless Shortcut Remote may not be standard. Please refer to the actual product.
*** Due to different product specifications, the Bluetooth receiver may not be standard. Please refer to the actual product.
Wireless Shortcut Remote
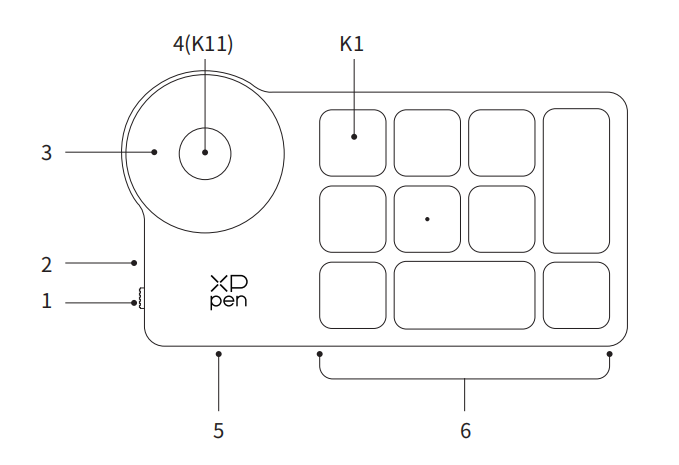
1. Power Slide Switch
2. Indicator light
In blue status:
a. Flashing slowly: No Bluetooth connected.
b. Flashing quickly: Waiting for Bluetooth pairing.
c. Always on: Successfully paired (Always on for 30 seconds and then off)
In red status:
a. Flashing: Low battery (≤20%)
b. Always on: Charging
c. Off: Fully charged.
A purple color indicates that the red and the blue indicator are both on simultaneously.
3. Roller
4. Roller Switch Key (Long press for 6 seconds to enter Bluetooth pairing)
5. USB-C Port
6. Shortcut Key Group
4 customizable groups of 10 keys per application for a total of 40 shortcut keys. You can disable sets if they are not needed.
Group One is enabled by default, and K1 is the toggle key. Click to switch between Group.
* The list is for illustrative purposes only. Please refer to the actual product.
Connection
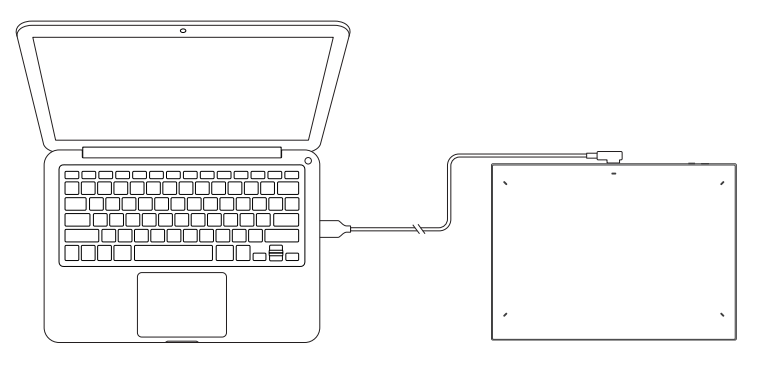
Wired Connection
Drawing Tablet
Please connect the USB-C to USB-C cable or the USB-C to USB-A cable to the USB port on the computer and the USB-C port on the tablet respectively.
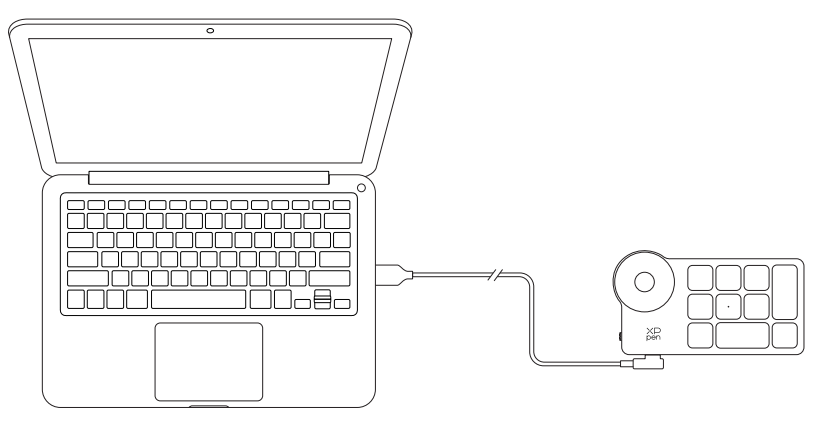
Wireless Shortcut Remote
Please connect the USB-C to USB-C cable or the USB-C to USB-A cable to the USB port on the computer and the USB-C port on the Wireless Shortcut Remote respectively.
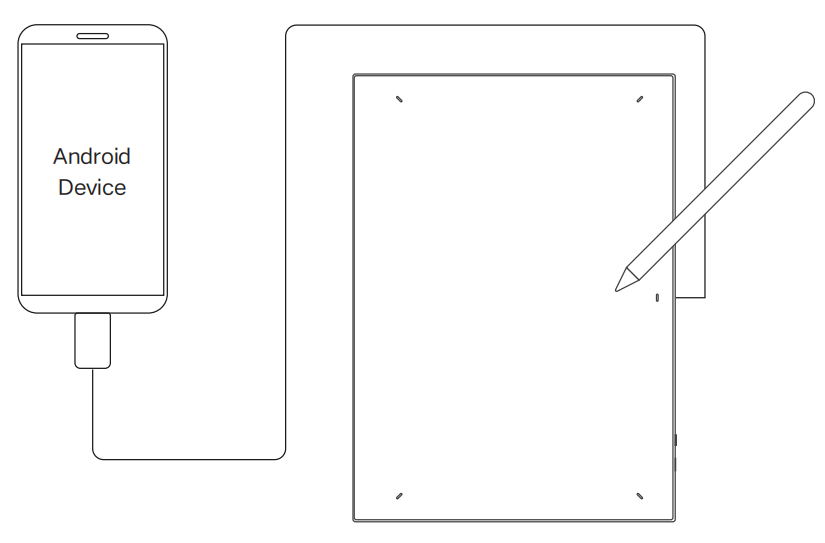
Connect to Android Phone or Tablet
1. Please connect the USB-C to USB-C cable to the Android device and the drawing tablet respectively.
2. Please place the XPPen drawing tablet and the Android device upright, and open an Android App with support for pressure sensing.
3. Please disable the auto-rotate function in the Android device, and keep the screen in portrait mode.
* Currently, the drawing tablet can only be used normally when the Android device is in portrait mode. It will not be used normally when in landscape mode.
Wireless Connection
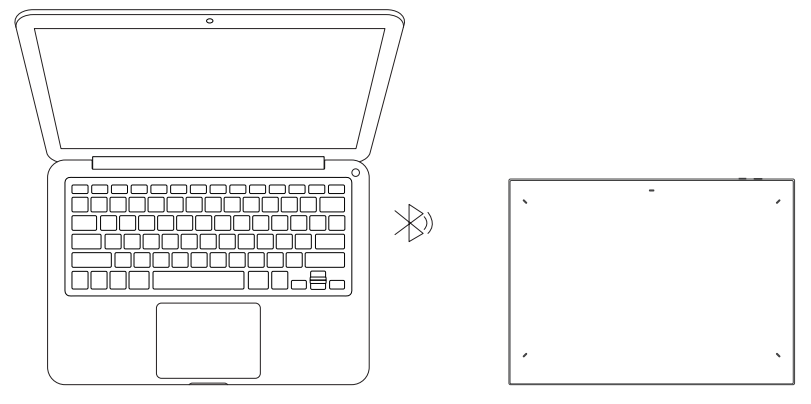
A. Direct Bluetooth Connection
Drawing Tablet
1. Press and hold the power switch for 3 seconds to turn on the drawing tablet, and the indicator light 1 flashes in blue; then long press the power switch for 6 seconds to enter Bluetooth pairing and the indicator light 1 flashes in blue quickly.
2. Turn on the Bluetooth on the computer, add Bluetooth device, search for the device name «Deco Pro *** «, and click to complete the Bluetooth pairing, with the blue indicator light 1 always on.
3. Press and hold the power switch for 3 seconds to shut down. Indicator 1 will be off.
Wireless Shortcut Remote
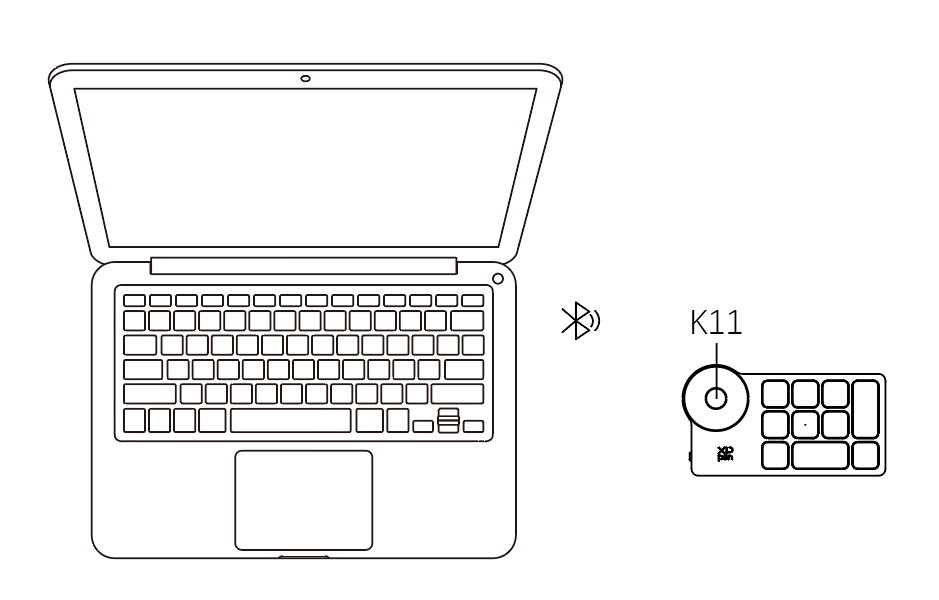
1. Slide the Wireless Shortcut Remote power switch and the blue indicator light flashes slowly. Then long press the K11 shortcut key for 6 seconds to enter Bluetooth pairing and the blue indicator light flashes quickly.
2. Turn on the Bluetooth on the computer, add Bluetooth device, search for device name “Shortcut Remote” and complete Bluetooth pairing by clicking the device name “Shortcut Remote”, with the blue indicator always on. The indicator will be off after 30 seconds.
3. Slide the power switch again to turn off the device.
B. Connection via Bluetooth Receiver
Only Wireless Shortcut Remote Supported
Plug the Bluetooth receiver into the computer and slide the power switch, with the indicator light always on in blue. The blue indicator will be off after 30 seconds.

*If the Bluetooth receiver needs to re-pair with the device, please download the wireless pairing tool from the official website of XPPen (https://www.xp-pen.com) according to the product model, and refer to the operation guide for pairing connection.
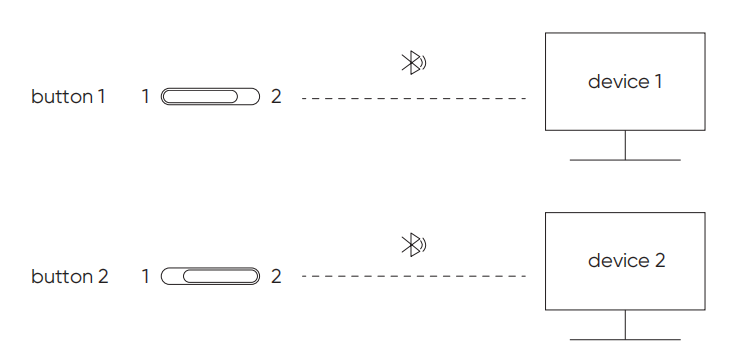
Bluetooth Device Switching
The drawing tablet supports connection to two Bluetooth devices.
1. With the drawing tablet on, toggle the Bluetooth switching button to position 1, long press the power button for 6 seconds, and the drawing tablet is paired with device 1.
2. With the drawing tablet on, toggle the Bluetooth switching button to position 2, press and hold the power key for 6 seconds, and the drawing tablet is paired with device 2.
3. Toggle the Bluetooth switching button to switch the Bluetooth connection between the two devices.
Compatibility
Drawing Tablet
Wired Connection;
Windows 7 (or later), macOS 10.10 (or later), Android 10.0 (or later),
Chrome OS 88 (or later), Harmony OS, Linux.
Bluetooth Connection:
Windows 10 (or later), macOS 10.10 (or later).
Wireless Shortcut Remote
Wired or Dongle Connection;
Windows 7 (or later), macOS 10.10 (or later), Linux.
Bluetooth Connection:
Windows 10 (or later), macOS 10.10 (or later).
Product Settings
Driver Installation
To ensure the device works properly, please install the driver before using it.
Please download the driver suitable for your product model from XPPen website (https://www.xp-pen.com).
Notes:
1. Before installing the driver, please turn off all antivirus software and graphics software.
2. Uninstall drivers (if any) for other drawing displays/tablets before the installation.
3. Restart your computer after the installation is completed.
4. For the best performance for your device, we recommend you to install the latest driver.
Windows:
Unzip file. Run the «exe» file as administrator, and follow the prompts to complete the installation.
Mac:
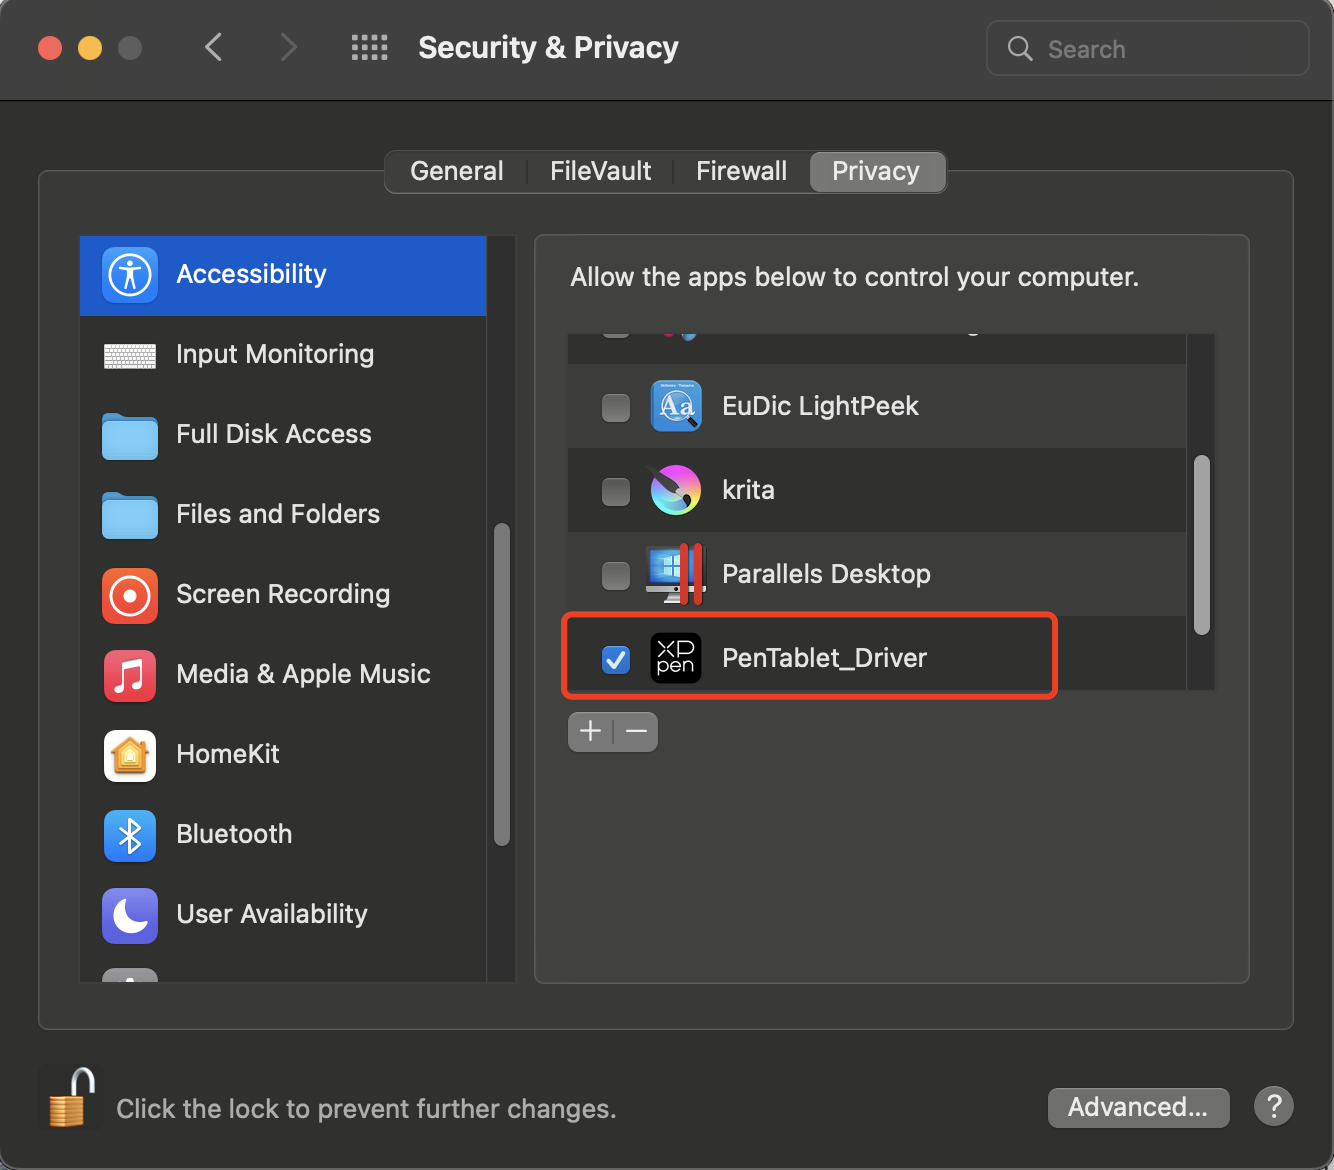
Unzip file. Run the «dmg» file and follow the prompts to complete the installation. Go to System Preference -> Security & Privacy -> Accessibility settings and click the lock icon in the lower left corner to unlock the settings. Tick the checkbox on the left of the PenTable_Driver application to enable accessibility. Then click the lock icon to lock the settings.
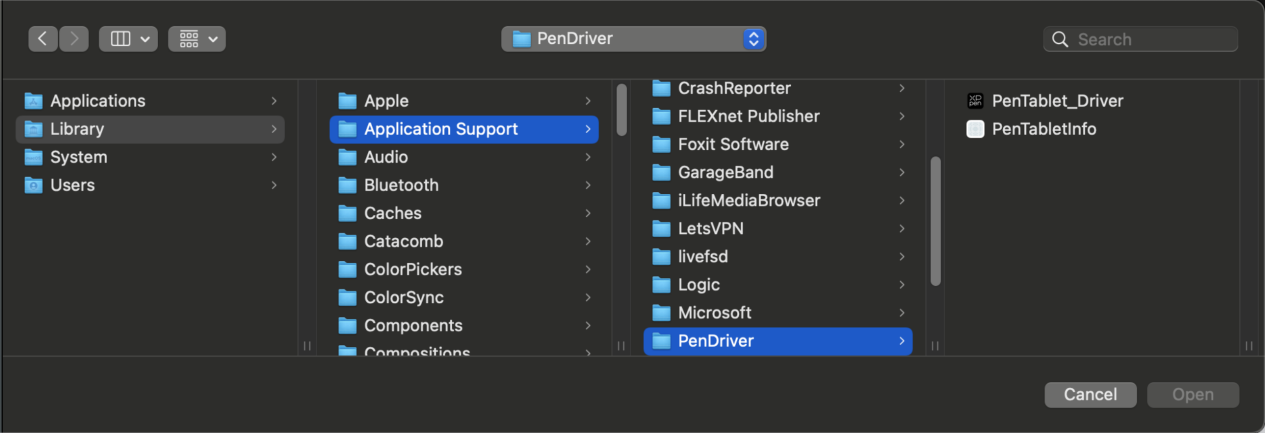
If there is no PenTablet_Driver on the list, go to Library -> Application Support -> PenDriver to add the driver manually.
Linux:
Deb: Enter command sudo dpkg -i. Drag the installation file to the window and execute the command;
Rpm: Enter command sudo rpm -i. Drag the installation file to the window and execute the command;
Tag.gz: Unzip file. Enter command sudo. Drag install.sh to the window and execute command.
Introduction to Driver
The driver will run automatically after being installed. If it does not run automatically, go to the driver folder to run it manually.
Windows: Start -> Pentablet
Mac: Application -> XP-PenPenTabletPro -> PenTablet
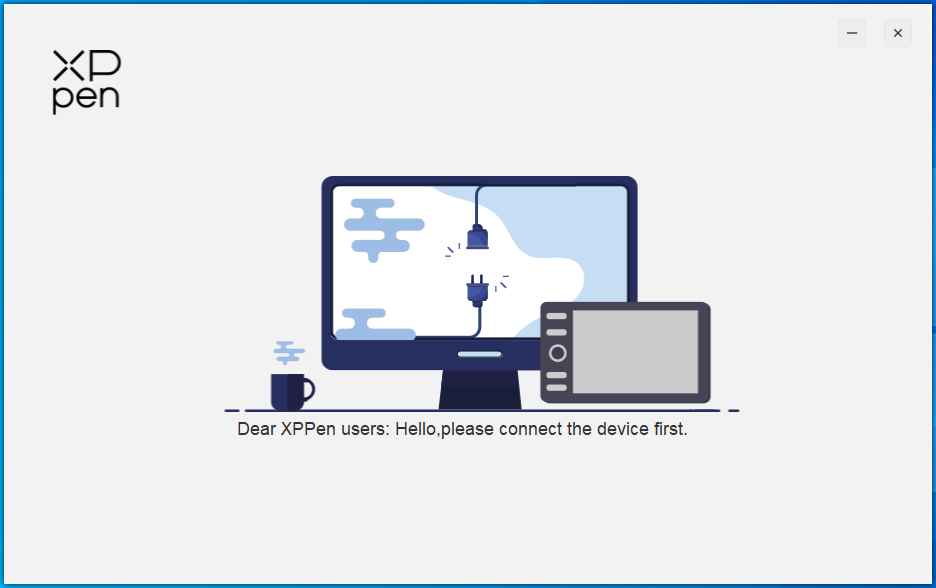
If the device is not connected or the connection fails, you can see the following prompt. In this case, try to restart your computer or the driver, or contact our service staff for support.
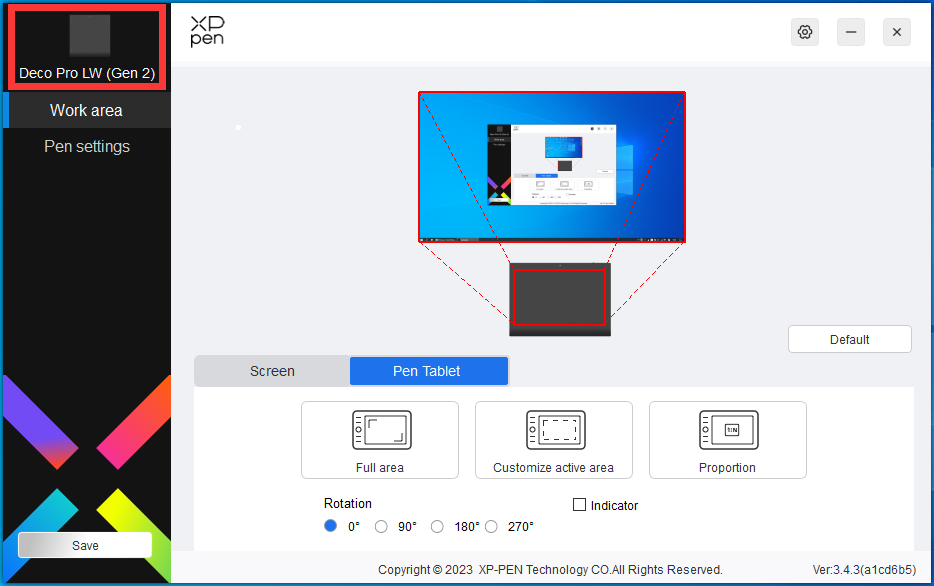
If the device is connected to your computer successfully, the device image and name will be displayed in the upper left corner of the driver.
You can connect up to 3 devices via the driver at the same time. Customize a specific device’s settings after switching to that device, and all changes made will only apply to that device.
Device Settings
Drawing Tablet
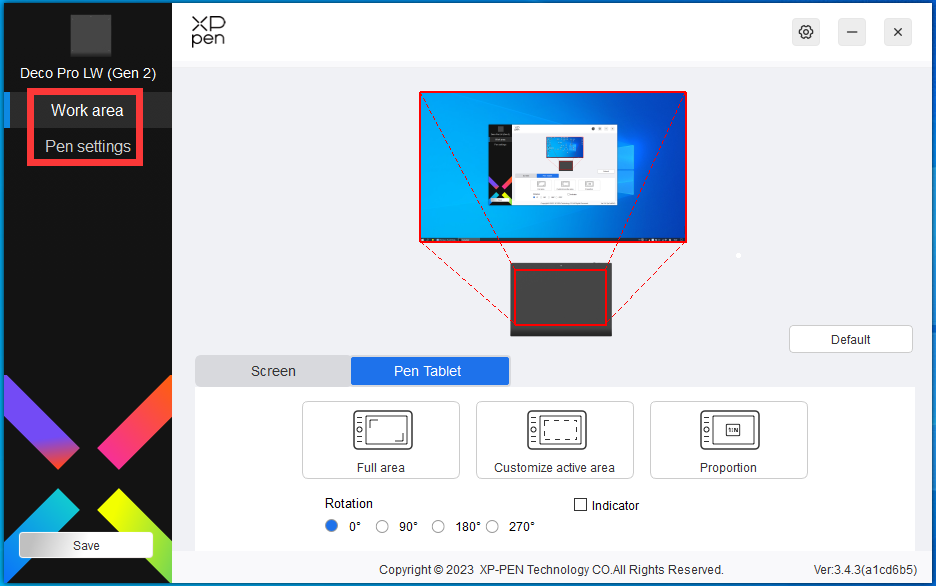
You can set the drawing display functions, including:
1. Work Area
2. Pen Settings
Work Area
Go to Work area and define the mapping between the device’s work area and the screen display area.
Screen

You can set the mapping between the display area of the current screen and the device.
If multiple monitors are used in duplicate mode, the work area of the device will be mapped to all monitors. When the pen moves in the work area, the cursor on all monitors will move at the same time.
If multiple monitors are used in extend mode, go to the monitor tabs to select one of the monitors that the work area of the device will be mapped to. XPPen drawing display is selected by default.
There are two available options to set the screen mapping area:
1)Set full screen: After you select it, the device will be mapped to the whole area of the selected monitor.
2)Customize screen area: There are three ways to customize the screen area:
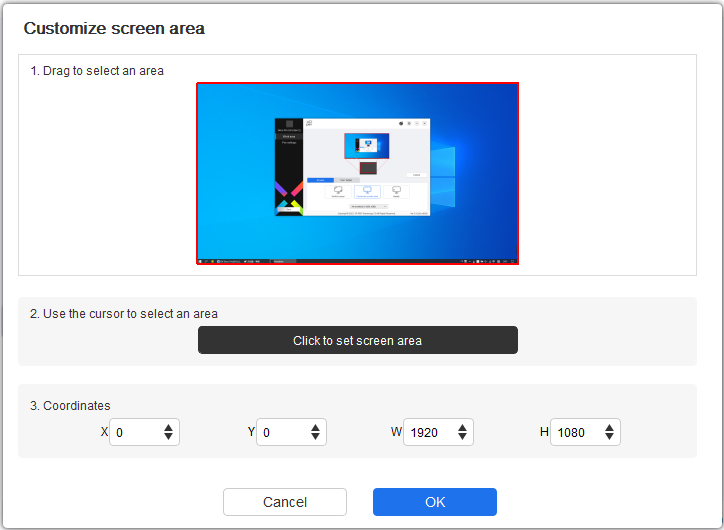
a) Drag to select an area: Drag the cursor from one point to another on the screen.
b) Use the cursor to select an area: Select «Click to set screen area», then click the upper left corner position and lower right corner position to select on the screen.
c) Coordinates: Manually enter coordinates in the corresponding input boxes for X, Y, W and H.
3) Identify: Identify all connected monitors. The numeric identifier will be displayed in the lower left corner of each monitor.
Drawing Tablet
You can set the work area of current device here. The driver enables three ways to set the work area of the device.
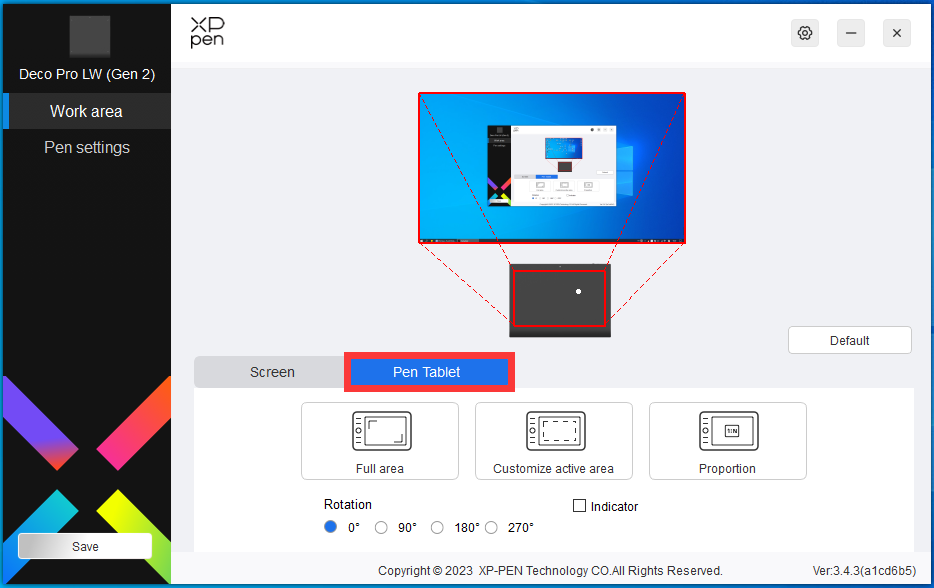
1) Full area: The whole work area of the device is available.
2) Customize active area: There are three ways to customize the work area.
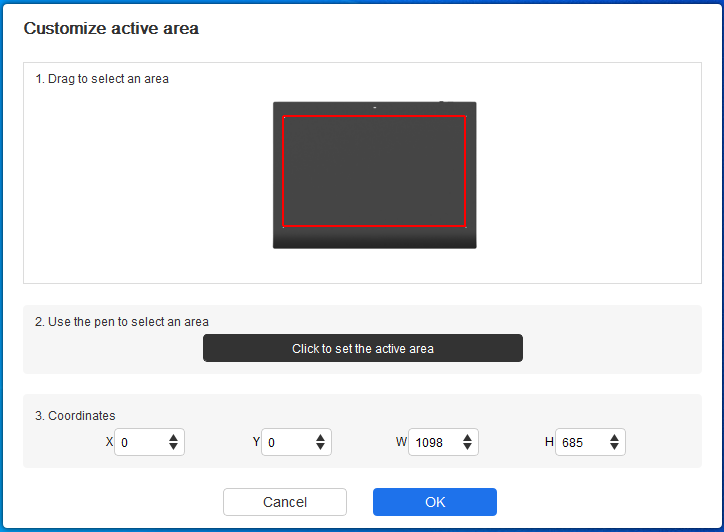
a) Drag to select an area: Drag the cursor from one point to another on the device.
b) Use the pen to select an area: Select «Click to set active area», then use stylus to click the upper left corner position and lower right corner position on your device.
c) Coordinates: Manually enter coordinates in the corresponding input boxes for X, Y, W and H.
3) Proportion: Scale your device’s work area and selected display area proportionately. For example: After selecting proportion, if your draw a circle on the device, a circle will appear on the screen, but some part of the work area may not be used. But if you don’t choose the proportion and draw a circle, then the circle may change into an ellipse on the screen.
Rotation:
You can set the device to 0°, 90°, 180° and 270° clockwise for use.
Left-handed mode: Rotate 180°.
Application
The driver allows you to set pen keys, shortcut keys and roller/touch functions for a specific application.
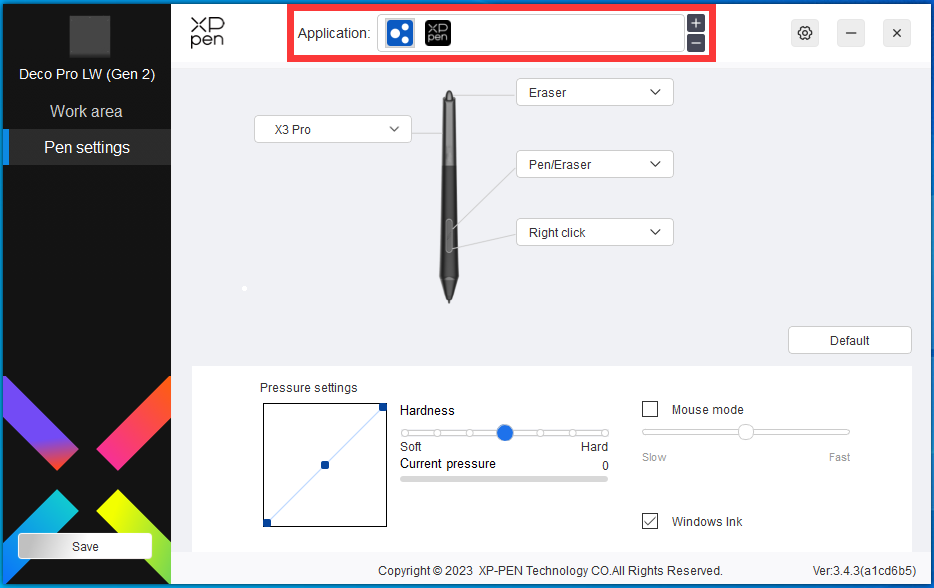
Select an application from the list of applications at the top of the driver, tick the application, and then customize its pen keys, shortcut keys and roller/touch functions.
For example, if you select an application and change the pen’s configuration in the driver, the change is valid only when you use the application. When you run another application, the driver will recognize it automatically. You can add up to 7 applications.
1. Click the + icon on the top right of the application bar to open the application list;
2. Select an application to be added from the running applications or click Browse to add from the installed applications;
3. Click «OK» to add the selected application;
4. Select an added application, and click the — icon on the top right of the application bar to delete the application.
If you select all other applications, it will apply to other non-customized applications.
Pen settings
When the stylus is within the work area, the device will recognize the stylus and add it to the driver. The stylus used should be compatible with the device.
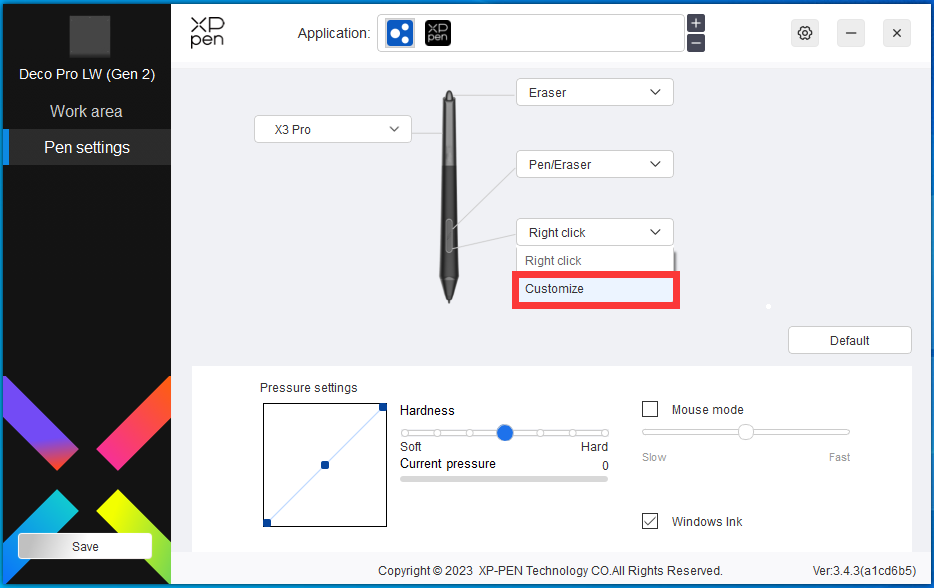
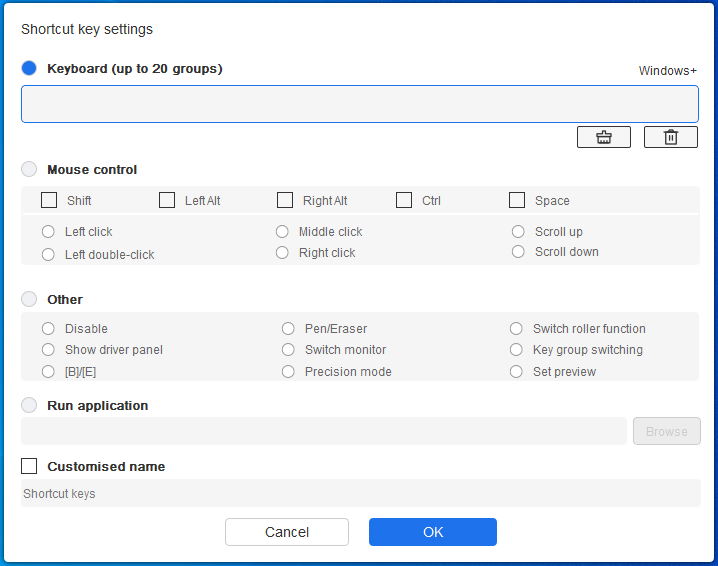
Click «Customize» in the drop-down menu to go to shortcut key settings and customize pen key functions.
Before setting shortcut key functions, tick to select any of the options under Keyboard, Mouse Control, Others, and Run Application.
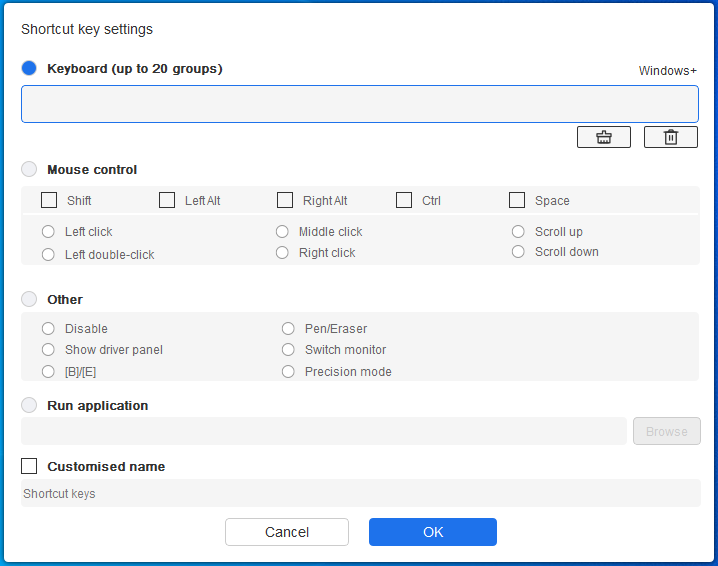
Keyboard:
You can set keyboard shortcut, for example, set it as “Alt+A” in 3D MAX, so the alignment tool can be used.
Multiple groups of shortcut keys can be set. For example, type Ctrl+C, Ctrl+V, and when you press the key, the shortcut key functions set will all run once.
Windows (Command): You can add a combination key containing system key, for example: to enter Win(Cmd)+Shift+3, you can press Shift+3 and the driver will bring the system key automatically.
Mouse control:
Set the key combination of mouse and keyboard. With the «Shift» and «Left Click» selected, the shortcut actions can be enabled in application that supports such key combinations.
Other:
Precision mode: Limit the device’s work area to a certain area. This function may allow you to create more detailed drawings.
Run application:
Run the selected application.
Customized name:
You can customize the name of the current key settings.
Pressure settings:
The sensitivity of pressure can be adjusted by adjusting the Output and Pen Pressure curve or moving the slider on the progress bar.
Current pressure can test your current pen pressure.
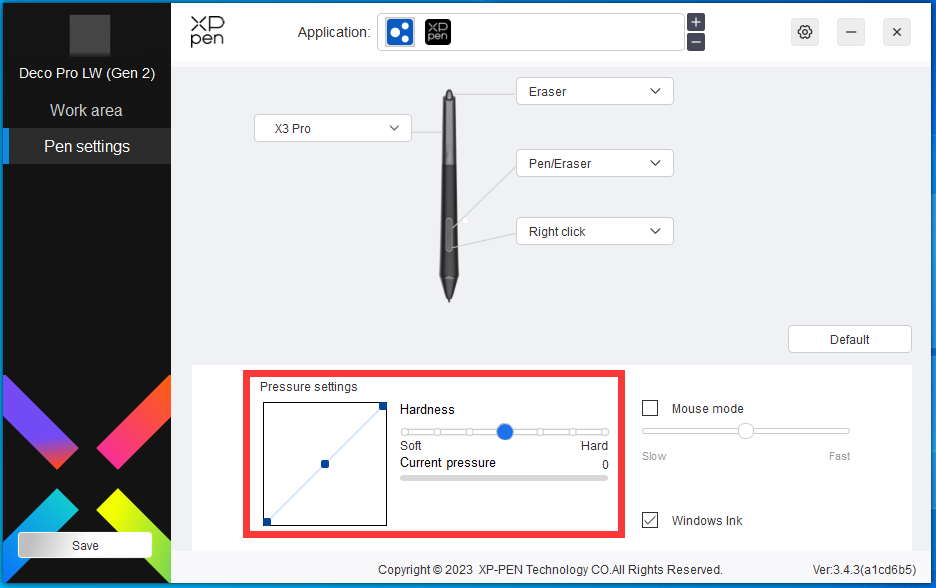
Mouse mode:
When you move your pen out of the work area, the cursor will stay where you leave, which is like operating a mouse. Select the mode and you can adjust the speed of the cursor on your device. If you do not select the mode, the pen mode applies by default.
Windows Ink (for Windows only):
Windows supports the handwriting function. If you need to use this function in Microsoft Office/Whiteboard or other software, do not turn it off.
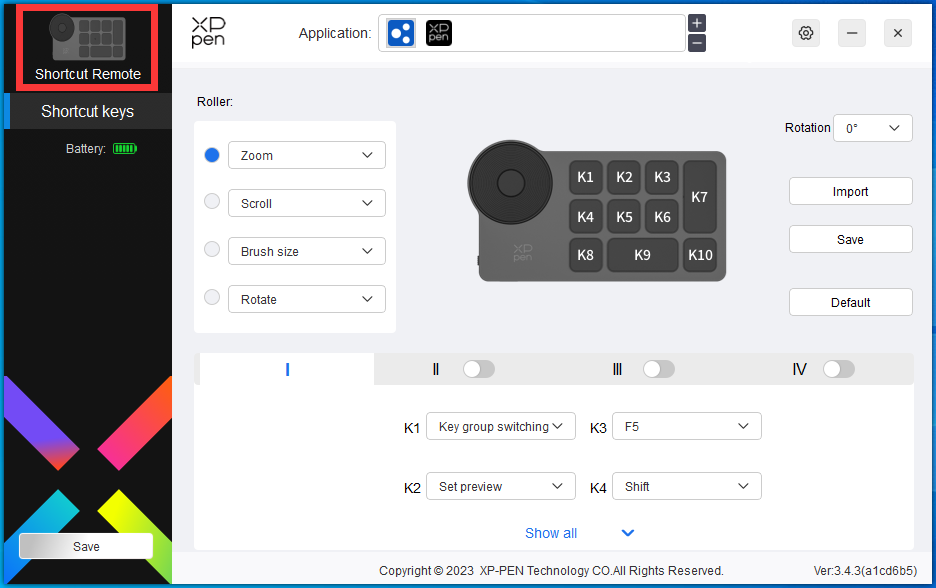
Wireless Shortcut Remote
Application
Customize the functions of the device under the application.
For example, if you select an application and change the configuration, the changes will only be effective when using the application. When switching between different applications, the driver will automatically recognize. When the first application is selected, it will apply to other non-customized applications.
You can add up to seven applications.
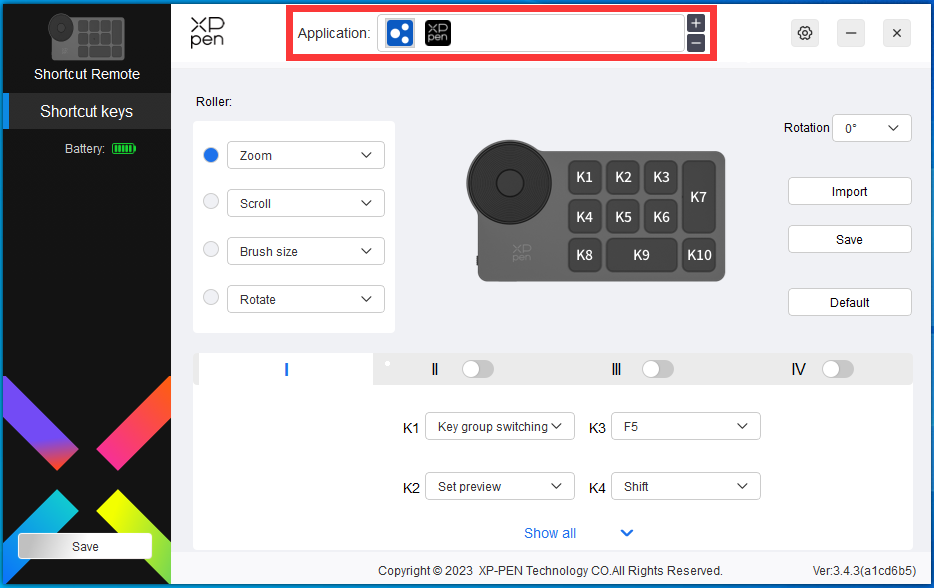
1. Click the + icon on the top right of the application bar to open the application list;
2. Select an application to be added from the running applications or click Browse to add from the installed applications;
3. Click «OK» to add the selected application;
Roller
Through the key in the middle of the roller, you can switch between the functional groups of the roller.
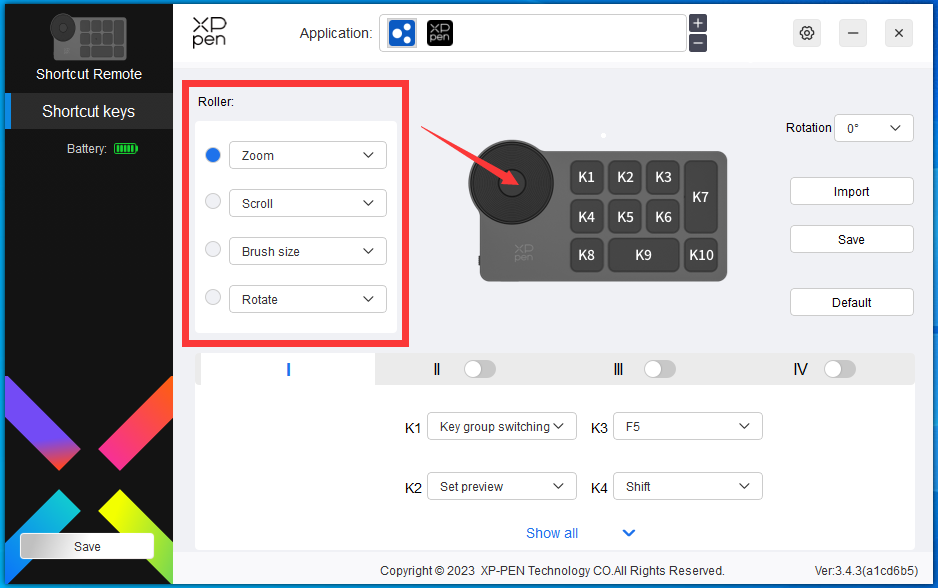
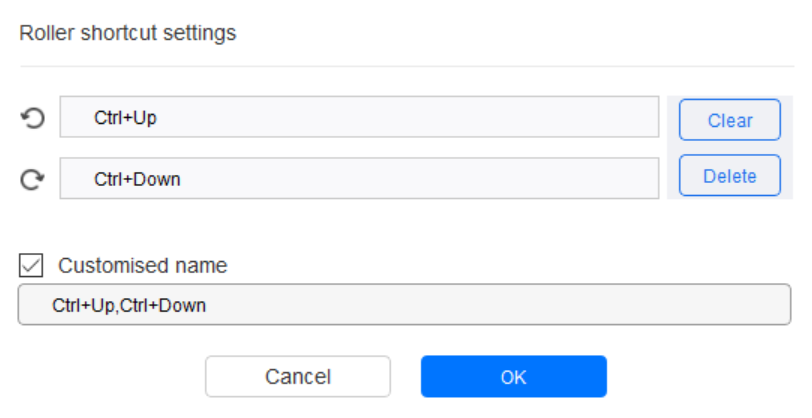
Customize:
Select «Customize» in the drop-down menu and enter the keys or key combinations through the keyboard to define the clockwise and counterclockwise functions of the roller.
Import/Save
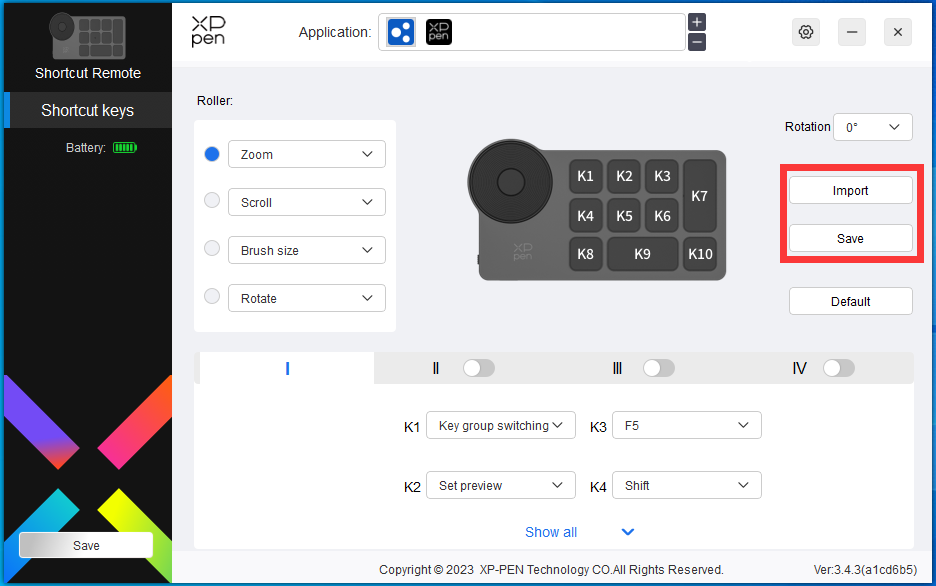
Import:
Import the configuration saved in the device into the driver under the selected application.
Save:
Save the configuration under the currently selected application to the device.
Note: please use the «Import» and «Save» functions in the case of wired connection. The configuration of «Import» and «Save» does not include the rotation setting, and is only valid under the same operating system.
Shortcut keys
The driver provides four groups of shortcut keys. The first group of shortcut keys is used by default (cannot be disabled). Each group of keys can be customized for different functions. After enabling, you can switch between the enabled groups through «key group switching» (the default is K1 key, which can be customized as other keys).
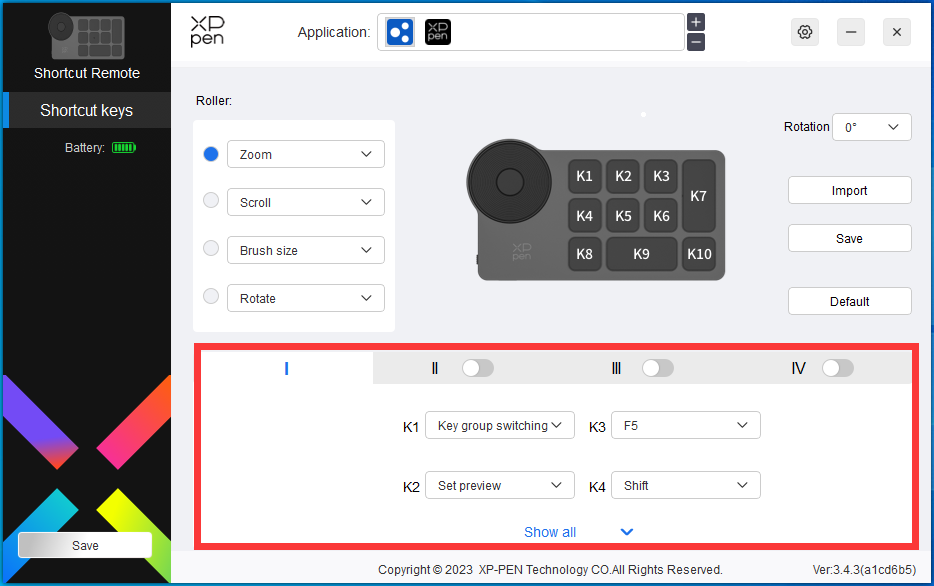
Set preview
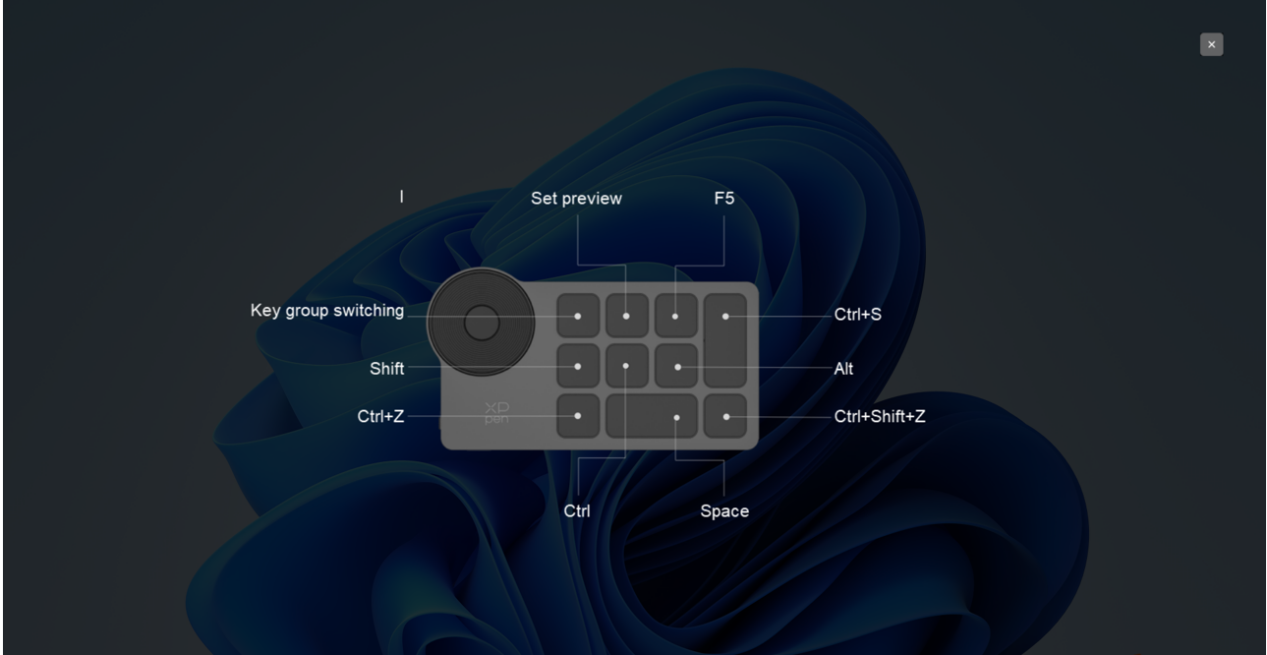
View the key group functions in use. If you select the key group that is not enabled in the driver, Functions of the group I will be displayed by default. Click the close button on the upper right to close the window.
Customize:
Select «Customize» in the drop-down menu to customize the function of each key and select «Mouse control» or «Keyboard» in «Customize» to customize the key combination.
Keyboard:
Set keyboard shortcuts, for example, set to «Alt + A» in the 3D MAX application to use the alignment tool.
Multiple groups of shortcut keys can be set. For example, type Ctrl+C, Ctrl+V, and when you press the key, the shortcut key functions set will all run once.
Windows (Command): Add a combination key with system key. For example, when you need to type Win (Cmd) +left, press left, and the drive will automatically bring the system key.
Mouse control:
Set the key combination of mouse and keyboard. With the «Shift» and «Left Click» selected, the shortcut actions can be enabled in application that supports such key combinations.
Other:
Precision mode: Limit the device’s work area to a certain area. This function may allow you to create more detailed drawings.
Driver Settings
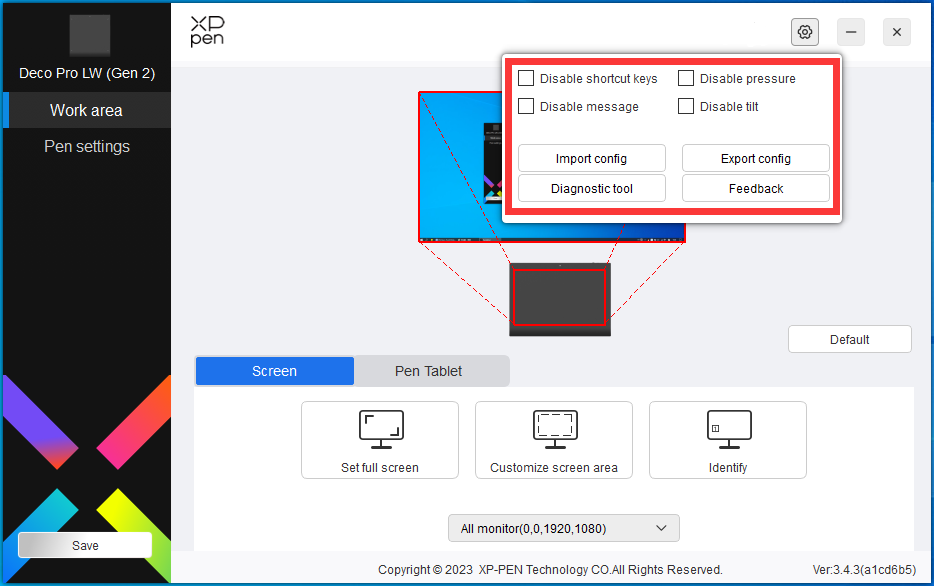
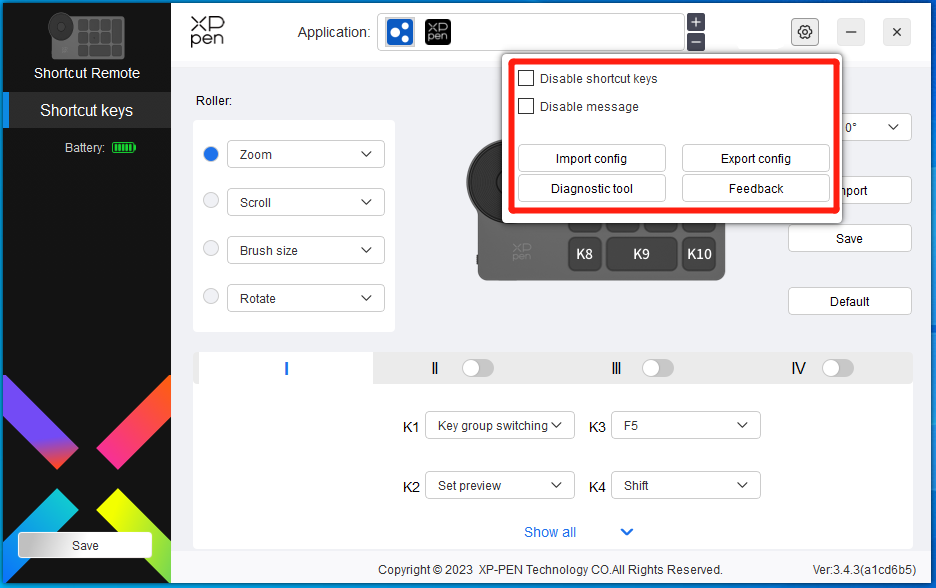
Disable shortcut Keys:
Disable the functions and prompts of all keys of the device.
Disable message:
When you press a key, no key message will be displayed at the bottom of the screen.
Disable pressure:
You will not feel the pressure of the stylus when using the stylus.
Disable tilt:
This will disable the tilt effect of the stylus.
Import & Export config:
You can import/export configurations to read or save their settings. (When you need to import or export the changed functions, click the «Store» button on the left side of the driver interface first to save the current configuration. This function is available for only the same operating system.)
Diagnostic tool:
You can use the diagnostic tool in case of any problems while using the driver.
Feedback:
If you have any questions or suggestions during the use of the driver, you can give us feedback through this page.
Driver Uninstallation
Windows:
Go to Start -> Settings -> Apps -> Apps & Features, find «Pentablet» and then click «Uninstall» as per prompts.
Mac:
Go to -> Applications, find XP-PenPentabletPro, click «UninstallPenTablet» as per prompts.
Linux:
Deb: Enter command sudo dpkg -r xp-pen-pentablet and execute the command;
Rpm: Enter command sudo rpm -e xp-pen-pentablet and execute the command;
Tag.gz: Unzip file. Enter command sudo. Drag uninstall.sh to the window and execute the command.
FAQs
1. Computer fails to recognize the device.
1) Check if your computer’s USB port used works normally. If not, use another USB port.
2. Stylus does not work.
1) Make sure you are using the stylus that originally came with your device;
2) Make sure you installed the driver correctly, and check if the pen settings of the driver is normal.
3. The drawing software cannot sense the pen pressure while the cursor can move.
1) Check if the drawing software supports pen pressure;
2) Download the latest driver from XPPen website, and check if the pen pressure is normal in the driver;
3) Before installing the driver, turn off your antivirus software and graphics software;
4) Uninstall drivers for other drawing displays before installation;
5) Restart your computer after the installation is completed;
6) If the pen pressure is normal in the driver (Windows: ensure Windows Ink is enabled in the pen settings of the driver), run the drawing software and test it again.
4. Line latency during drawing with the software.
Check if the computer configuration (CPU&GPU) meets the recommended configuration requirements for the drawing software installed, and optimize related functions via settings according to the FAQs posted on the official website of the drawing software.
5. Paired device fails to connect.
1) Open the Bluetooth connection interface in the operating system and delete the Bluetooth connection of the drawing tablet or Wireless Shortcut Remote;
2) Repeat the Bluetooth wireless connection steps to re-pair and connect the device.
Notes:
This device complies with Industry Canada licence-exempt RSS standard (s). Operation is subject to the following two conditions:
(1) this device may not cause interference, and
(2) this device must accept any interference, including interference that may cause undesired operation of the device.
If you need any further assistance, please contact us at:
Website: www.xp-pen.com
Email: service@xp-pen.com
- Manuals
- Brands
- XP-PEN Manuals
- Graphics Tablet
- Deco 01 V2
- User manual
-
Contents
-
Table of Contents
-
Bookmarks
Quick Links
Related Manuals for XP-PEN Deco 01 V2
Summary of Contents for XP-PEN Deco 01 V2
-
Page 1
User Manual Deco 01 V2… -
Page 2
℃ ℃ 1… -
Page 3: Table Of Contents
Contents I. Product Overview Overview II. Driver Installation Windows III. Driver Settings UI Windows IV. Driver Uninstall Windows V. FAQ 2…
-
Page 4: Product Overview
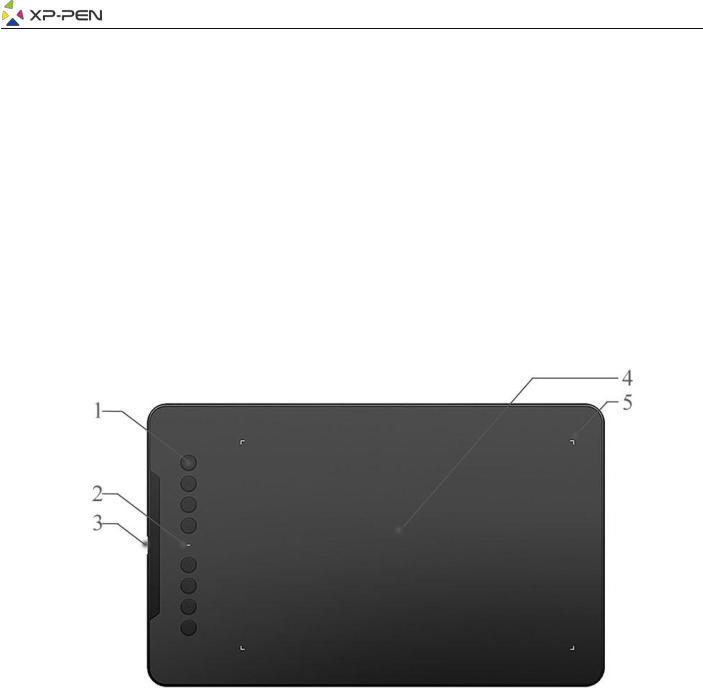
Thank you for purchasing the XP-Pen tablet. Our product user manual currently supports English, Russian, Japanese, German, Korean, Chinese, Italian, Spanish, and French. We apologize if your preferred language is not supported. { I. Product Overview} Overview Image 1-1. Overview 1.
-
Page 5: Driver Installation
Mac OS X 10.10 or above Notes: (1). Uninstall any existing tablet software before attempting to install the Deco 01 V2’s driver. Other tablet drivers may conflict with the Deco 01 V2’s driver or prevent installation entirely. (2). You can download the latest driver version from the XP-Pen website (www.xp-pen.com) and be sure to extract the “.zip”…
-
Page 6: Driver Settings Ui
{III. Driver Settings UI} Windows The Deco 01 V2’s driver settings can be opened in two ways: Double-click the driver’s icon ( ) in system tray or your desktop. Driver UI Image 3-1: UI 1.1. Pen Function Settings You may customize the functions of your tablet pen’s barrel buttons here. Use the “Function Key”…
-
Page 7
Image 3-2: Pen Functions Setting Note: Pen/Eraser Toggle With the stylus in range working area, press the assigned barrel button to toggle between pen and eraser modes in compatible drawing software. The current mode will briefly be displayed on your monitor. 1.2. -
Page 8
The dimensions of your tablet’s on-screen work area can be changed here. Please click the top-left and bottom-right to customize. 0、90、180 & 270 angles: The Deco 01 V2 are set up for 0, 90, 180 and 270 angles and when you set it, you must also rotate your Deco 01 V2. Left hand is 180 angles. -
Page 9
Image 3-5: Current Screen 1.5. Import & Export Profiles You can use the Import & Export Profile function to save/load your barrel buttons and shortcut key settings. Note: When you finish setting up your barrel buttons and shortcut keys, click the OK button to save and exit the tablet settings menu. -
Page 10
Image 3-6: Export Profile Image 3-7: Import Profile 9… -
Page 11
1.7. Express Keys Setting Notes: (a). The Deco 01 V2’s shortcut keys are designed to work with US English keyboards. Keys may not function correctly with the other keyboard languages. (b). By default, the Deco 01 V2 express keys are mapped to standard Photoshop keyboard shortcuts. Keys can be customized to function efficiently in other software. -
Page 12
In this tab, you may edit the functions of the Deco 01 V2 shortcut keys. Use the “Definition” option to ’s program custom keystrokes. Image 3-11: Function Key You can set each shortcut key for different software. a. Click the “+” button to go to Select Program tab. -
Page 13
b. You can choose Default or use Browse to select your choice of software. Image 3-13: Select Program c. Return to the shortcut key settings tab, click the tablet icon, and then customize the shortcut keys. When you are finished, click “OK” and exit the tablet settings menu. Control: You can adjust “Tablet Light”… -
Page 14: Mac
You can click the Default button to restore default settings. 1.9. XP-Pen Logo Click our logo to visit our website. To open the Deco 01 V2’s driver settings, open Finder > Applications > PenTabletSetting. Driver UI Image 3-15: Tablet Setting 1.
-
Page 15
Image 3-18: Configuration Setting 1.3. Work Area Orientation: 0, 90, 180 & 270: The Deco 01 V2 can also be configured for 0, 90, 180 & 270 angles. Be sure to rotate the actual physical tablet as well. 14… -
Page 16
Image 3-19: Work Area Orientation 1.4.Output: You can adjust pen pressure to “Output” or “Press” sensitivity on here. It shows the current pressure level being exerted on your tablet and can be used to test pen pressure. Image 3-20: Output 1.5. -
Page 17
1.6. Import & Export Profiles You can use the Import & Export Profile function to save/load your barrel buttons and shortcut keys setting. Image 3-22: Export configuration file Image 3-23: Import configuration file 1.7 Mojave Setup Navigation If your system Mojave, please click this button to setup your tablet and reboot. 16… -
Page 18
Image 3-24: Mojave Setup Navigation 2.Monitor The “Monitor” tab allows you to configure Deco 01 V2 for use with single or dual monitors. The tablet can also be configured to use only a portion of your display. Image 3-25: Monitor 3. -
Page 19
4. Express Keys Notes: (a). The Deco 01 V2’s shortcut keys are designed to work with US English keyboards. Keys may not function correctly with the other keyboard languages. (b). By default, the Deco 01 V2’s express keys are mapped to standard Photoshop keyboard shortcuts. Keys can be customized to function efficiently in other software. -
Page 20
You may choose your preferred functions for the Deco 01 V2’s shortcut keys. Use the “Reset Customer Defined” option to program custom keystrokes. Image 3-28: Action Setting You can set each shortcut key for different software. a. Click the “+” button to go to Select Program tab. -
Page 21
b. Your choice of software. Image 3-30: Select Program c. Return to the shortcut key settings tab, click the tablet icon then customize the shortcut keys. When you are finished, click the OK button and exit the tablet settings menu. Image 3-31: Hot Key 20… -
Page 22
Image 3-32: Action Setting 5. About This tab displays the current version of your driver software. Image 3-33: About 21… -
Page 23: Driver Uninstall
Open [Finder]→ [Application]→ [Pen Tablet], then click “Uninstall Pen Tablet” and follow the on-screen instructions. Image 4-1: Mac uninstall Note: When attempting to reinstall the Deco 01 V2 driver, be sure to reboot your computer after the uninstall is complete. 22…
-
Page 24: Faq
1. I can’t use the stylus to control the cursor. Uninstall the Deco 01 V2 driver. If its uninstaller will not run, run the driver’s installer again, then allow it to uninstall the driver. Reboot, then connect the tablet to your computer and test your stylus.
![]()
Руководство пользователя
Deco 01 V2


Содержание
I. Обзор продукта Обзор
II. Установка драйвера
Windows
Mac
III. Интерфейс настроек драйвера
Windows
Mac
IV. Удаление драйвера
Windows
Mac
V. FAQ
Благодарим Вас за покупку графического планшета XP-Pen. В настоящее время руководство пользователя нашего продукта поддерживает английский, русский, японский, немецкий, корейский, китайский, итальянский, испанский и французский языки. Мы приносим свои извинения, если предпочитаемый вами язык не поддерживается.
{ I. Обзор продукта}
Обзор
Рисунок 1.1. Обзор
1.Экспресс-клавиши
2.Индикатор состояния:
а. Синий, мигающий: стилус находится в зоне действия, но не касается рабочей зоны. б. Синий, немигающий: стилус находится в рабочей области.
с. Нет света: стилус находится вне рабочей области.
3.USB порт
4.Рабочая область
5.Границы рабочей области
{II. Установка драйвера}
Поддерживаемые операционные системы:
Windows 7, 8, 10 и выше
Mac OS X 10.10 и выше
ПРИМЕЧАНИЯ:
(1). Перед установкой драйвера Deco 01 V2 удалите все имеющееся драйверы графических планшетов. Другие драйверы графических планшетов могут не работать с драйвером Deco 01 V2 или полностью препятствовать установке.
(2). Вы можете загрузить последнюю версию драйвера с веб-сайта XP-Pen (www.xp-pen.ru). Распакуйте содержимое файла «.zip» перед запуском «.exe» или «.pkg».
Windows
(1). Подключите Deco 01 V2 к компьютеру с помощью прилагаемого кабеля USB.
(2). Загрузите последнюю версию драйвера Deco 01 V2 с сайта (www.xp-pen.ru), раздел «Поддержка»
(3). Распакуйте содержимое файла «.zip» перед запуском файла «.exe».
(4). После успешной установки иконка драйвера ( ) появится на панели задач и на рабочем столе. Если иконка отсутствует, удалите драйвер, перезагрузите компьютер и повторите шаг 2.
Mac
(1). Подключите Deco 01 V2 к компьютеру с помощью прилагаемого кабеля USB.
(2). Загрузите последнюю версию драйвера Deco 01 V2 с сайта (www.xp-pen.ru), раздел «Поддержка»
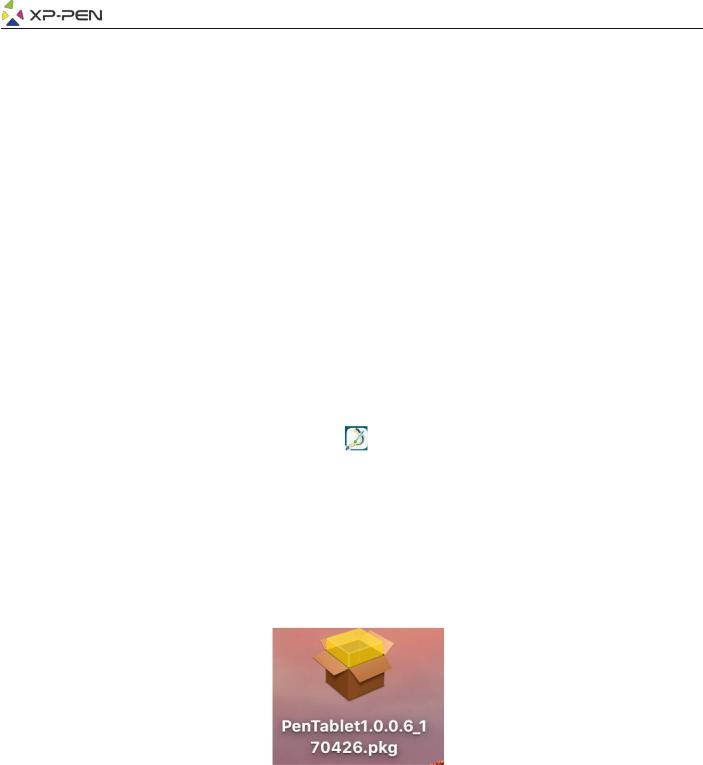
(3). Распакуйте содержимое файла «.zip» перед запуском «.pkg».
Рисунок 2.1. Драйвер для Mac
{III. Настройки драйвера}
Windows
Настройки драйвера Deco 01 V2 можно открыть двумя способами:
Дважды щелкните на иконку драйвера (  ) на панели задач или на рабочем столе.
Пользовательский интерфейс драйвера
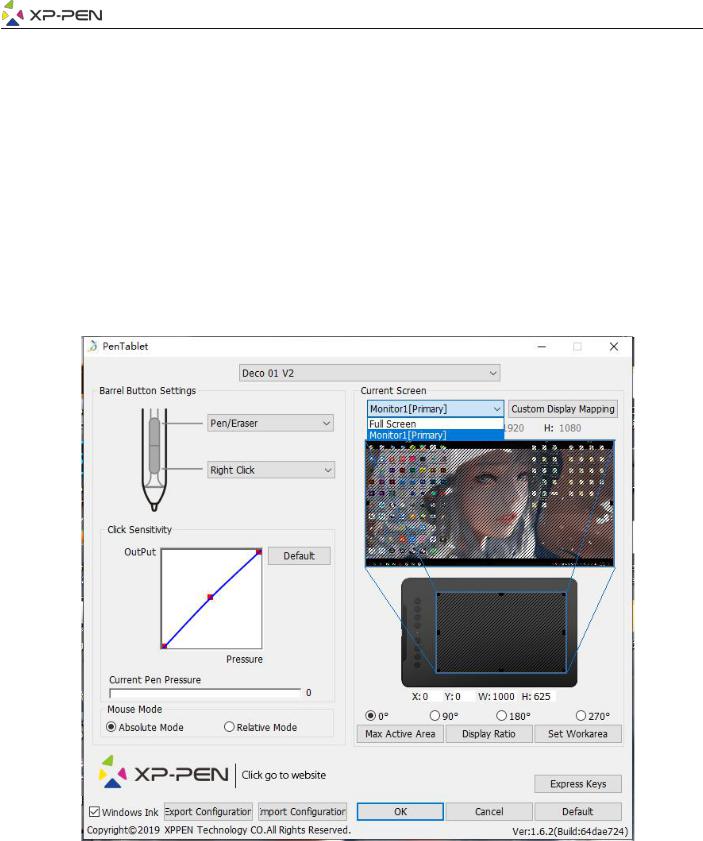
Рисунок 3.1. Пользовательский интерфейс
1.1.Настройки функций пера
Здесь Вы можете настроить кнопки пера. Используйте опцию «Функциональная клавиша»/ Function Key для программирования пользовательских нажатий клавиш.
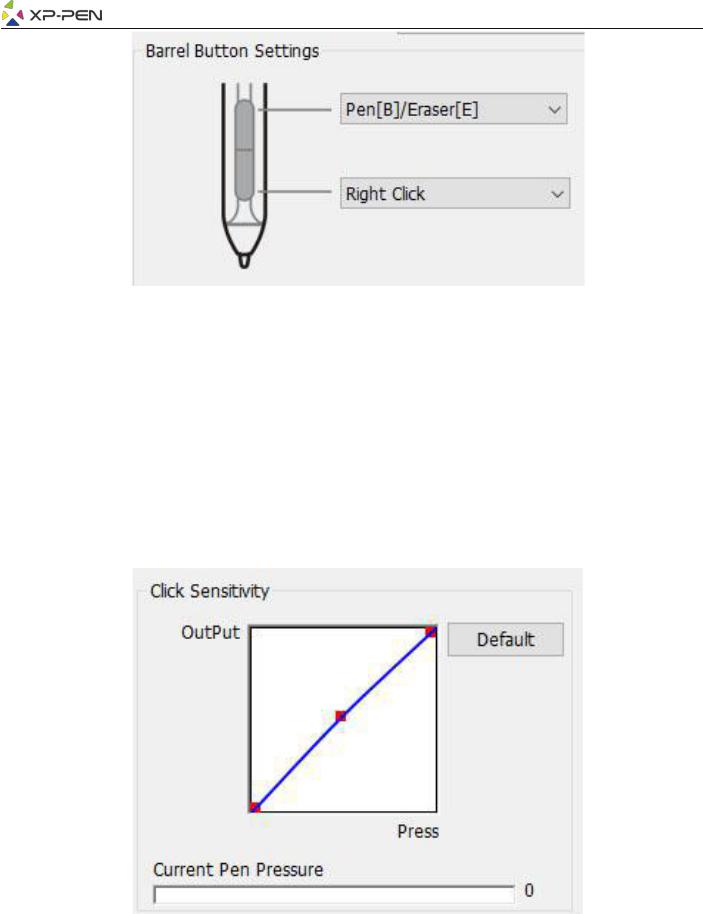
Рисунок 3.2. Настройки кнопок пера
Примечания:
Режим переключения Перо/Ластик Находясь в рабочей области стилуса, нажмите заданную кнопку на пере, чтобы переключаться между
режимами пера и ластика в совместимых графических редакторах. Текущий режим будет кратко отображаться на вашем мониторе.
1.2.Чувствительность нажатия и давление пера
Здесь вы можете настроить давление пера в сторону «Реакции» или «Нажать».
Данные показатели давления пера показывает текущий уровень давления пера на планшете и могут использоваться для проверки давления пера.
Рисунок 3.3. Режим настройки давления пера
1.3.Режим мыши
Абсолютный режим (Перо): стандартный режим планшета; каждая точка рабочей области планшета соответствует абсолютной точке на дисплее компьютера.
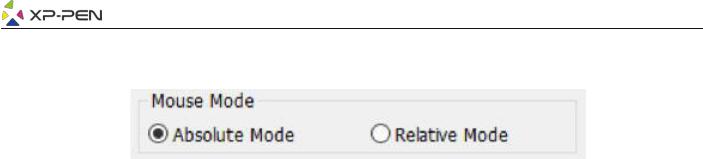
Относительный режим (Мышь): режим мыши; рабочая область планшета не соответствует абсолютным точкам на дисплее компьютера, а перо работает как стандартная мышь.
Рисунок 3.4. Режим Мыши
1.4.Рабочий экран
Deco 01 V2 может быть настроен для использования с одним или двумя мониторами.
Если выбран только один монитор, ваш планшетный ввод будет ограничен этим конкретным монитором.
Пользовательское отображение экрана:
Здесь можно изменить размеры экранной рабочей области планшета. Пожалуйста, нажмите вверху слева и внизу справа, чтобы настроить.
Поворот планшета на 0, 90, 180 и 270 градусов
Deco 01 V2 можно настроить на поворот планшета на 0, 90, 180 и 270 градусов, При данных установках не забудьте перевернуть ваш планшет.
Настройка под правую руку: 180 градусов.
Вы можете настроить экранную рабочую область планшета на этой вкладке.
Задайте рабочую область:
Когда вы нажимаете кнопку «Задать рабочую область», вы можете использовать перо для настройки рабочей области Deco 01 V2. Пожалуйста, нажмите вверху слева и внизу справа, чтобы настроить.
Соотношение дисплея:
Вы можете установить рабочую область Deco 01 V2, чтобы настроить экранную рабочую область планшета в соответствии с разрешением вашего монитора.
Макс. активная зона:
Вы можете установить рабочую зону Deco 01 V2 на максимум.
 Loading…