- Manuals
- Brands
- Xerox Manuals
- All in One Printer
- B1025
- System administrator manual
-
Contents
-
Table of Contents
-
Bookmarks
Quick Links
V
1.1
ERSION
O
2018
CTOBER
702P06571
Xerox
B1025 Multifunction Printer
®
System Administrator Guide
Related Manuals for Xerox B1025
Summary of Contents for Xerox B1025
-
Page 1
ERSION 2018 CTOBER 702P06571 Xerox B1025 Multifunction Printer ® System Administrator Guide… -
Page 2
© 2018 Xerox Corporation. All rights reserved. Unpublished rights reserved under the copyright laws of the United States. Contents of this publication may not be reproduced in any form without permission of Xerox Corporation. Copyright protection claimed includes all forms of matters of copyrightable materials and information now allowed by statutory or judicial law or hereinafter granted, including without limitation, material generated from the software programs which are displayed on the screen such as styles, templates, icons, screen displays, looks, and so on. -
Page 3: Table Of Contents
TCP/IP ……………………… 20 Enabling TCP/IP at the Printer Control Panel …………..20 Configuring the Network Address Manually at the Printer Control Panel ……20 Configuring DNS Settings at the Printer Control Panel…………20 Configuring IP Settings in Xerox ® CentreWare ®…
-
Page 4
Restricting Access to the Device Web Interface …………..58 Verifying the Software ………………….59 5 Printing……………………….61 Enabling the Device Startup Page ………………62 Managing Banner Page Printing Options…………….63 Enabling Banner Page Printing in Xerox CentreWare Internet Services……63 ® ®… -
Page 5
Setting the Delete Held Job After Timer …………….. 74 6 Copying………………………..75 Changing the Default Copy Settings ………………76 Specifying Default Copy Settings in Xerox®CentreWare®Internet Services…… 76 Setting Defaults for Covers at the Control Panel …………… 76 Changing the Copy Feature Order on the Control Panel………… 76 Showing, Locking, and Hiding Copy Features on the Control Panel…….. -
Page 6
9 Administrator Tools ………………….105 Monitoring Alerts and Status ………………..106 Alert Notification ………………….106 Date and Time Settings ………………….. 107 Energy Saving Settings ………………….108 Setting the Power Saver Mode Timers in Xerox ® CentreWare ® InternetServices….108 Entry Screen Defaults………………….109 Smart eSolutions and Billing Information……………. -
Page 7: Introduction
Use this guide to help you install, configure, and manage your printer on a network. Note: • Network features are not available when you are connected over USB. • Embedded fax features are not available for all printer models. Xerox ® B1025 Multifunction Printer System Administrator Guide…
-
Page 8: Configuration Overview
Web browser. For details, refer to Accessing Xerox ® CentreWare ® Internet Services. Note: You can access most configuration settings in Xerox CentreWare Internet ® ® Services on the Properties tab. 6. Configure authentication. For details, refer to Setting Access Rights.
-
Page 9: More Information
Online Support Assistant, and driver downloads. Information about menus or error messages Press the control panel Help (?) button. Information Pages Print from the control panel, or from Xerox ® CentreWare Internet Services, click ® Status→Information Pages.
-
Page 11: Initial Setup
Initial Setup This chapter contains: • Physically Connecting the Printer………………..12 • Assigning a Network Address ………………… 13 • Accessing Administration and Configuration Settings…………..14 • Initial Setup in Xerox ® CentreWare ® Internet Services …………… 16 • Changing the System Administrator Password…………….18 Xerox ®…
-
Page 12: Physically Connecting The Printer
2. If your printer has fax installed, connect the printer to a correctly configured telephone line. 3. Connect the power cord to the printer, then plug the power cord into an electrical outlet. Xerox ® B1025 Multifunction Printer System Administrator Guide…
-
Page 13: Assigning A Network Address
Assigning a Network Address The printer acquires a network address automatically from a DHCP server by default. To assign a static IP address, refer to Configuring the Network Address Manually at the Printer Control Panel. Xerox ® B1025 Multifunction Printer System Administrator Guide…
-
Page 14: Accessing Administration And Configuration Settings
® CentreWare ® Internet Services, or at the control panel. Most printer models have a default configuration that restricts access to some settings. Access is restricted for settings on the Properties tab in Xerox ® CentreWare ® Internet Services, and settings on the Machine Status menu on the control panel touch screen.
-
Page 15
• High 2: Select this option for altitudes from 3000–4000 m (9842–13123 ft). • High 3: Select this option for altitudes from 2000–3000 m (6561–9842 ft). • High 4: Select this option for altitudes from 1000–2000 m (3280–6561 ft). 4. Touch OK. Xerox ® B1025 Multifunction Printer System Administrator Guide… -
Page 16: Initial Setup In Xerox ® Centreware ® Internet Services
2. For Machine Name, type a name for the printer. 3. For Location, type the location of the printer. 4. For Xerox Asset Tag Number and Customer Asset Tag Number, type unique identifiers as needed. 5. Click Apply. P P r r i i n n t t i i n n g g t t h h e e C C o o n n f f i i g g u u r r a a t t i i o o n n R R e e p p o o r r t t The Configuration Report lists all current settings of the printer.
-
Page 17: Using The Configuration Page
To rearrange the services on the control panel touch screen, select a service, then click the needed arrow button. You can choose the Move Top, Move Up, Move Down, or Move Bottom arrow buttons. Xerox ® B1025 Multifunction Printer System Administrator Guide…
-
Page 18: Changing The System Administrator Password
Initial Setup Changing the System Administrator Password Xerox recommends that you change the default system administrator password after you configure the printer. Be sure to store the password in a secure location. The default password is 1111. 1. In Xerox ®…
-
Page 19: Network Connectivity
• HTTP ……………………….32 • Google Cloud Print ……………………33 • Proxy Server ……………………..35 • WSD ……………………….36 • Configuring SNTP ……………………37 • Mopria……………………….38 • Wireless Network Connection ………………… 39 Xerox ® B1025 Multifunction Printer System Administrator Guide…
-
Page 20: Tcp/Ip
4. Touch TCP/IP Enablement. 5. For IPv4 or IPv6, touch Enable, then touch OK. Note: By default, TCP/IP is enabled. If you disable TCP/IP, enable it at the printer control panel before you access Xerox CentreWare Internet Services. ® ®…
-
Page 21: Configuring Ip Settings In Xerox ® Centreware ® Internet Services
I I n n t t e e r r n n e e t t S S e e r r v v i i c c e e s s If your printer has a valid network address, you can configure TCP/IP settings in Xerox ®…
-
Page 22
• Enter a valid IPv6 Domain Name. • For Primary DNSv6 Server Address, enter an IP address. • For Secondary DNSv6 Server Address, enter an IP address. • To enable Dynamic DNSv6 Registration, select Enable. 7. Click Apply. Xerox ® B1025 Multifunction Printer System Administrator Guide… -
Page 23: Slp
5. Under Multicast Radius, type a value from 0 through 255. 6. For Maximum Transmission Unit (MTU), type a value from 484 through 32768. 7. For Registration Lifetime, type a value in hours. 8. Click Apply. Xerox ® B1025 Multifunction Printer System Administrator Guide…
-
Page 24: Snmp
Network Connectivity SNMP Simple Network Management Protocol (SNMP) is a set of network protocols designed to allow you to manage and monitor devices on your network. You can use the SNMP configuration pages in Xerox CentreWare Internet Services to: ®…
-
Page 25: Configuring Snmpv3
The passphrase used to encrypt the data must match the passphrase on the Server. Note: Ensure that the passwords are at least eight characters in length. You can include any characters except control characters. 9. Click Apply. Xerox ® B1025 Multifunction Printer System Administrator Guide…
-
Page 26: Wins
4. For Primary Server IP Address, type the IP address for your primary server. 5. For Secondary Server IP Address, enter the IP Address as needed. Note: If DHCP is configured, WINS IP addresses are overridden. 6. Click Apply. Xerox ® B1025 Multifunction Printer System Administrator Guide…
-
Page 27: Configuring Lpr/Lpd
® CentreWare ® Internet Services, click Properties→Connectivity→Protocols. 2. Click LPR/LPD. 3. For Protocol, select Enable. 4. Type an LPR/LPD Port Number or use the default port number of 515. 5. Click Apply. Xerox ® B1025 Multifunction Printer System Administrator Guide…
-
Page 28: Raw Tcp/Ip Printing
1. At the printer control panel, press the Machine Status button. 2. Touch Network Settings→Advanced Settings. 3. Touch Raw TCP/IP-Printing. 4. Touch Enable. 5. Ensure that Port Number is set to 9100. 6. Touch OK. Xerox ® B1025 Multifunction Printer System Administrator Guide…
-
Page 29: Configuring Ipp
CentreWare ® Internet Services, click Properties→Connectivity→Protocols. 2. Click IPP. 3. For Protocol, select Enable. 4. Enter additional information as needed. 5. For Secure IPP Connection with SSL/TLS, select Enable. 6. Click Apply. Xerox ® B1025 Multifunction Printer System Administrator Guide…
-
Page 30: Ldap Server
• Authenticated User: The printer uses the user name and password of the authenticated user to access the server. c. To look up the user DN, for Lookup User’s DN, select Enable. 7. To configure LDAP Bind, perform the following steps. Xerox ® B1025 Multifunction Printer System Administrator Guide…
-
Page 31: System Administrator Guide
11. To append an email domain to login credentials, perform the following steps. a. For Append an email domain to the login credentials, select Enable. b. Type the domain name for your server. 12. Click Save. Xerox ® B1025 Multifunction Printer System Administrator Guide…
-
Page 32: Http
6. For HTTP Security Mode, select a security option. Note: To allow connections to the Xerox device using HTTPS only, select Require HTTPS. 7. To enable one or more TLS versions, for TLSv 1.0, TLSv 1.1, or TLSv 1.2, select Enable.
-
Page 33: Google Cloud Print
Note: Cloud Job Conversion uses both Google Cloud Printing and Local Printing. Currently, only specialized third-party apps require conversion. Xerox recommends that you leave Cloud Job Conversion disabled unless you use an app that requires it. • To allow Printer Working Group (PWG) printing, for Enable PWG, select Enable.
-
Page 34: System Administrator Guide
Network Connectivity 9. To update the Registration Status displayed in your Web browser, refresh the Xerox ® CentreWare ® Internet Services Web page. 10. To access the Google Cloud Print feature, in your Google account, click Manage Your Printer. The default printer name appears in this format: Model name (MAC address).
-
Page 35: Proxy Server
11. To add a proxy exception list, for Exception List, type the URL. 12. To use the configured default proxy settings script, for Use automatic configuration script, type the URL. 13. Click Apply. Xerox ® B1025 Multifunction Printer System Administrator Guide…
-
Page 36: Wsd
E E n n a a b b l l i i n n g g W W S S D D 1. In Xerox CentreWare Internet Services, click Properties→Connectivity→Protocols. ® ® 2. Click WSD. 3. For WSD Protocol, select Enable. 4. Click Apply. Xerox ® B1025 Multifunction Printer System Administrator Guide…
-
Page 37: Configuring Sntp
Internet Services, click Properties→Connectivity→Protocols. 2. Click SNTP. 3. For Name or IP Address, select an option. 4. Type the appropriately formatted IP address. 5. For Enable SNTP Broadcast, select the check box. 6. Click Apply. Xerox ® B1025 Multifunction Printer System Administrator Guide…
-
Page 38: Mopria
• The name and location of your printer appears in a list of Mopria-enabled printers on connected devices. To configure Mopria: 1. In Xerox ® CentreWare ® Internet Services, click Properties→Connectivity→Protocols. 2. Click Mopria. 3. For Protocol, select Enable. 4. Click Apply. Xerox ® B1025 Multifunction Printer System Administrator Guide…
-
Page 39: Wireless Network Connection
Before starting, you must get the setup and configuration information, such as name and passphrase, from the router. After you collect the network information, you can set up the printer from the control panel or from Xerox ®…
-
Page 40: System Administrator Guide
6. For Security Key or Passphrase, type the passphrase. 7. For Address Acquisition, select a protocol option. If you select Static, you can change the IP Address, Subnet Mask, and Gateway Mask, as needed. 8. Click Apply. Xerox ® B1025 Multifunction Printer System Administrator Guide…
-
Page 41: Configuring Wi-Fi Direct
6. To set the printer as Group Owner for a Wi-Fi Direct group, similar to a wireless access point, select Activate. 7. Enter a Network Key or use the default value. 8. To hide the Network Key, select the check box. 9. Click Apply. Xerox ® B1025 Multifunction Printer System Administrator Guide…
-
Page 43: Security
• Displaying or Hiding Network Settings ………………54 • System Timeout……………………. 55 • USB Port Security ……………………56 • Security Certificates ……………………57 • Restricting Access to the Device Web Interface …………….58 • Verifying the Software ………………….. 59 Xerox ® B1025 Multifunction Printer System Administrator Guide…
-
Page 44: Setting Access Rights
• Network Authentication: This option enables network authentication. To prove their identity, users type their user name and password at the control panel or in Xerox ® CentreWare ®…
-
Page 45: Configuring The Log Out Confirmation Screen
3. To enable the log out confirmation screen, select Show at Log Out. 4. To show the log out confirmation screen after every job, select Show After Every Job. 5. To disable the log out confirmation screen, select Don’t Show. Xerox ® B1025 Multifunction Printer System Administrator Guide…
-
Page 46: Setting Print Permissions
® Internet Services, click Properties→Login / Permissions. 2. Click Print Permissions. 3. For 2-Sided Printing Policy, select On or Off. 4. For Secure Print Policies, select On or Off. 5. Click Save. Xerox ® B1025 Multifunction Printer System Administrator Guide…
-
Page 47: Device User Database
• Export to File: Select this option to export the Device User Database to a .csv file. Select a location to store the file. To edit or delete a user, for the user, click the appropriate icon. Xerox ® B1025 Multifunction Printer System Administrator Guide…
-
Page 48: Secure Http (Tls)
• Ensure that DNS is enabled and configured. • Ensure that the date and time configured on the printer is correct. The time that is set on the printer is used to set the start time for the Xerox ®…
-
Page 49: Ip Filtering
3. To enable IP filtering, select IPv4 Filtering Enabled, IPv6 Filtering Enabled, or both. 4. To permit access to the device, type the IP Address and Port or Prefix as needed. 5. Click Apply. Xerox ® B1025 Multifunction Printer System Administrator Guide…
-
Page 50: Ip Sec
For Shared Secret, enter the shared key value. For Verify Shared Secret, reenter the shared key value. 7. To save the new shared key, select Select to save new Shared Secret. 8. Click Apply. Xerox ® B1025 Multifunction Printer System Administrator Guide…
-
Page 51: Concealing Or Showing Job Names
All other job names appear on the control panel. • Conceal All Job Names: This option prevents all job names from appearing on the control panel. 4. Click Apply. Xerox ® B1025 Multifunction Printer System Administrator Guide…
-
Page 52: Configuring 802.1X In Xerox ® Centreware ® Internet Services
E E n n a a b b l l i i n n g g a a n n d d C C o o n n f f i i g g u u r r i i n n g g 8 8 0 0 2 2 . . 1 1 X X a a t t t t h h e e C C o o n n t t r r o o l l P P a a n n e e l l Note: • When the printer is in FIPS 140 mode, EAP-TLS authentication is required. • To configure 802.1X settings for EAP-TLS, use Xerox ® CentreWare ®…
-
Page 53: System Administrator Guide
7. Using the touch-screen keyboard, type the user name and server that your authentication switch requires. Touch OK. 8. Touch Password, then type the password using the touch-screen keyboard. 9. Touch OK. Xerox ® B1025 Multifunction Printer System Administrator Guide…
-
Page 54: Displaying Or Hiding Network Settings
Internet Services, click Properties→Security. 2. Click Display Network Settings. 3. To show network information, select Show IPv4 Address or Show Host Name. To hide network information, select Hide Network Information. 4. Click Apply. Xerox ® B1025 Multifunction Printer System Administrator Guide…
-
Page 55: System Timeout
Timeout (Mins), and Timeout (Secs), touch the arrows. 4. To instruct the printer to display a warning message before it logs a user out of the touch screen, under Warning Screen, touch Enabled. 5. Touch OK. Xerox ® B1025 Multifunction Printer System Administrator Guide…
-
Page 56: Usb Port Security
2. Click USB Port Security. 3. To enable a port, for the port, select the check box. 4. To disable a port, for the port, clear the check box. 5. Click Apply. Xerox ® B1025 Multifunction Printer System Administrator Guide…
-
Page 57: Security Certificates
I I n n s s t t a a l l l l i i n n g g a a T T r r u u s s t t e e d d C C A A C C e e r r t t i i f f i i c c a a t t e e If the printer uses the Xerox Device Certificate, and a user attempts to access the printer using ®…
-
Page 58: Restricting Access To The Device Web Interface
2. Click Security Settings. 3. To restrict access to the Web interface, for Lock WebUI, select the check box. To allow access to the Web interface, clear the check box. 4. Click Apply. Xerox ® B1025 Multifunction Printer System Administrator Guide…
-
Page 59: Verifying The Software
You can test the printer software to confirm that it is operating correctly. The test checks software files to confirm that they are not corrupt. If the printer software appears to function improperly, a Xerox representative can ask you to perform this test. 1. In Xerox ®…
-
Page 61: Printing
• Configuring Secure Print Settings ………………..68 • UNIX and Linux Printing………………….69 • Print from USB ……………………… 72 • Managing Saved Jobs …………………… 73 • Setting the Delete Held Job After Timer ………………74 Xerox ® B1025 Multifunction Printer System Administrator Guide…
-
Page 62: Enabling The Device Startup Page
The Startup page provides basic printer configuration and network information. 1. In Xerox ® CentreWare ® Internet Services, click Properties→Services. 2. Click Printing→Device Start-Up Page. 3. To enable the Startup page, for Device Start-Up Page, select Enabled. 4. Click Apply. Xerox ® B1025 Multifunction Printer System Administrator Guide…
-
Page 63: Managing Banner Page Printing Options
Managing Banner Page Printing Options You can set the printer to print a banner page with each print job. The banner page contains information identifying the user and job name. You can set this option in the print driver, in Xerox ®…
-
Page 64: Printing An Error Page
1. In Xerox ® CentreWare ® Internet Services, click Properties→Services. 2. Click Printing→Error Page. 3. To print an error page when a print job fails, for Error Page Settings, select Enable. 4. Click Apply. Xerox ® B1025 Multifunction Printer System Administrator Guide…
-
Page 65: Configuring Default Print Settings
Printing Configuring Default Print Settings 1. In Xerox ® CentreWare ® Internet Services, click Properties→Services. 2. Click Printing→General. 3. Configure as needed. 4. Click Apply. Xerox ® B1025 Multifunction Printer System Administrator Guide…
-
Page 66: Enabling Print Spooling Settings
Enabling Print Spooling Settings 1. In Xerox ® CentreWare ® Internet Services, click Properties→Services. 2. Click Printing→Print Spooling. 3. To enable print spooling, for Print Spooling Settings, select Enabled. 4. Click Apply. Xerox ® B1025 Multifunction Printer System Administrator Guide…
-
Page 67: Printing Reports
Your printer has a printable set of reports. These include configuration and font information, demonstration pages, and more. 1. In Xerox ® CentreWare ® Internet Services, click Properties→Services. 2. Click Printing→Reports. 3. To print a report, next to the report name, click Print. Xerox ® B1025 Multifunction Printer System Administrator Guide…
-
Page 68: Configuring Secure Print Settings
C C o o n n f f i i g g u u r r i i n n g g S S e e c c u u r r e e P P r r i i n n t t 1. In Xerox ® CentreWare ® Internet Services, click Properties→Services. 2. Click Printing→Secure Print. 3. Enter a value for the minimum passcode length. 4. Click Apply. Xerox ® B1025 Multifunction Printer System Administrator Guide…
-
Page 69: Unix And Linux Printing
P P r r i i n n t t e e r r M M a a n n a a g g e e r r ® ® Before you begin: Ensure that you have root or superuser privileges to install Xerox Printer Manager. ®…
-
Page 70: Printing With Xeroxprint
® You do not need both drivers. Xerox recommends that you install one of the full-featured custom print drivers for Linux. To locate drivers for your printer, refer to www.xerox.com/office/drivers. If you use CUPS, ensure that CUPS is installed and running on your workstation. The instructions for installing and building CUPS are contained in the CUPS Software Administrators Manual, written and copyrighted by Easy Software Products.
-
Page 71: System Administrator Guide
PPD for CUPS from the Drivers and Downloads page on the Xerox Support website. 2. Copy the PPD into the CUPS ppd/Xerox folder on your workstation. If you are unsure of the location of the folder, use the Find command to locate the PPD files.
-
Page 72: Print From Usb
® Internet Services, click Properties→Services. 2. Click USB. 3. For Enable Print from USB, select Enable. 4. To configure Print From USB Settings, for Defaults, click the Pencil icon. 5. Click Save. Xerox ® B1025 Multifunction Printer System Administrator Guide…
-
Page 73: Managing Saved Jobs
Quantity. 3. Click Print Job. • To delete one or more saved jobs, for each print job that you want to delete, select the check box, then click Delete Job. Xerox ® B1025 Multifunction Printer System Administrator Guide…
-
Page 74: Setting The Delete Held Job After Timer
4. To enable the Delete Held Job After timer, touch Enabled. 5. To select the desired time, press the arrow buttons, or enter a value using the numeric keypad. 6. Touch OK. Xerox ® B1025 Multifunction Printer System Administrator Guide…
-
Page 75: Copying
Copying This chapter contains: • Changing the Default Copy Settings ………………76 • Specifying ID Card Copy Settings………………..78 Xerox ® B1025 Multifunction Printer System Administrator Guide…
-
Page 76: Changing The Default Copy Settings
Changing the Default Copy Settings The printer uses the default copy settings on all copy jobs unless you change them for an individual job. You can modify the default copy settings. Specifying Default Copy Settings in Xerox ® CentreWare Internet Services ®…
-
Page 77: Showing, Locking, And Hiding Copy Features On The Control Panel
3. To change a preset, touch an existing preset, then touch the left or right arrow buttons. 4. To restore the original values, touch Reset All. 5. After you have changed your presets, touch OK. Xerox ® B1025 Multifunction Printer System Administrator Guide…
-
Page 78: Specifying Id Card Copy Settings
To access this feature at the control panel, log in as a system administrator. 2. Touch Service Settings→ID Card Copy→Feature Order. 3. To change the position of a feature, select the feature, then use the arrows. 4. When finished, touch OK. Xerox ® B1025 Multifunction Printer System Administrator Guide…
-
Page 79: Scanning
• Scanning to an Email Address ………………..87 • Email ……………………….88 • Scan to USB……………………..91 • Enabling Remote Scanning using TWAIN ………………. 92 • Configuring Scan To Destination ………………..93 Xerox ® B1025 Multifunction Printer System Administrator Guide…
-
Page 80: Scanning Setup Overview
® CentreWare ® Internet Services. For details, refer to Address Books. • If you are scanning to an email address, configure the email server in Xerox ® CentreWare ® Internet Services. For details, refer to Scanning to an Email Address.
-
Page 81: Configuring Image Settings
3. In the TIFF Settings area, select a compression option. 4. To use Mixed Raster Content (MRC) Compression for PDF output, in the PDF Settings area, for MRC Compression, select Enable. 5. Click Apply. Xerox ® B1025 Multifunction Printer System Administrator Guide…
-
Page 82: Setting Up Scan To Destination
To update the password for an existing Login Name, for Select to save new password, select the check box. 11. Click Save, or select Add Another Contact After Saving, then click Save & Add Another. Xerox ® B1025 Multifunction Printer System Administrator Guide…
-
Page 83: Setting Up Scanning To An Smb Folder
To update the password for an existing Login Name, for Select to save new password, select the check box. 11. Click Save, or select Add Another Contact After Saving, then click Save & Add Another. Xerox ® B1025 Multifunction Printer System Administrator Guide…
-
Page 84: Setting Up Scanning To An Http Server
To update the password for an existing Login Name, for Select to save new password, select the check box. 11. Click Save, or select Add Another Contact After Saving, then click Save & Add Another. Xerox ® B1025 Multifunction Printer System Administrator Guide…
-
Page 85: Setting Up Scanning To An Https Server
10. For Login Name, to access the shared folder on the computer, type the user name. The printer uses this login name to access the shared folder. This field is required. a. For Password and Retype Password, type and confirm the password. Xerox ® B1025 Multifunction Printer System Administrator Guide…
-
Page 86: Setting Up Scanning To An Sftp Server
To update the password for an existing Login Name, for Select to save new password, select the check box. 11. Click Save, or select Add Another Contact After Saving, then click Save & Add Another. Xerox ® B1025 Multifunction Printer System Administrator Guide…
-
Page 87: Scanning To An Email Address
• Configure SMTP settings. For details, refer to Configuring SMTP Server Settings. • Note the IP address or host name of the server. For instructions on using this feature, refer to the User Guide for your printer model. Xerox ® B1025 Multifunction Printer System Administrator Guide…
-
Page 88: Email
Scanning Email Configure email settings on the Email Setup page in Xerox CentreWare Internet Services. Email ® ® settings apply to all services that use SMTP, including Internet Fax and Scan to Email. A A c c c c e e s s s s i i n n g g t t h h e e E E m m a a i i l l S S e e t t u u p p P P a a g g e e 1.
-
Page 89: Editing Optional Email Settings
• Always On; Not editable by user: Use this option to restrict users from enabling or disabling Email Encryption at the control panel. • On; Editable by user: Use this option to allow users to enable or disable Email Encryption at the control panel. Xerox ® B1025 Multifunction Printer System Administrator Guide…
-
Page 90
To access this feature at the printer control panel, log in as a system administrator. 2. Touch Service Settings→Email→Show / Lock / Hide Features. 3. Touch a feature, then select an option. 4. When finished, touch OK. Xerox ® B1025 Multifunction Printer System Administrator Guide… -
Page 91: Scan To Usb
To access this feature at the printer control panel, log in as a system administrator. 2. Touch Service Settings→Scan To USB→Show / Lock / Hide Features. 3. Touch a feature, then select an option. 4. When finished, touch OK. Xerox ® B1025 Multifunction Printer System Administrator Guide…
-
Page 92: Enabling Remote Scanning Using Twain
To enable remote scanning using TWAIN: 1. In Xerox ® CentreWare ® Internet Services, click Properties→Services. 2. Click Remote Start (TWAIN). 3. For Start Job via Remote Program, click On. 4. Click Apply. Xerox ® B1025 Multifunction Printer System Administrator Guide…
-
Page 93: Configuring Scan To Destination
2. For Defaults, click the Pencil icon. 3. To modify input or output settings, click Input Settings or Output Settings. 4. For Default, click Edit. 5. Change the settings as needed. For details, refer to the Help in Xerox ® CentreWare ®…
-
Page 94: Changing The Scan To Feature Order On The Control Panel
To access this feature at the printer control panel, log in as a system administrator. 2. Touch Service Settings→Scan To→Show / Lock / Hide Features. 3. Touch a feature, then select an option. 4. When finished, touch OK. Xerox ® B1025 Multifunction Printer System Administrator Guide…
-
Page 95: Faxing
Faxing This chapter contains: • Fax Overview……………………..96 Xerox ® B1025 Multifunction Printer System Administrator Guide…
-
Page 96: Fax Overview
Note: For details, contact your Xerox representative. C C o o n n f f i i g g u u r r i i n n g g F F a a x x S S e e t t t t i i n n g g s s f f r r o o m m X X e e r r o o x x C C e e n n t t r r e e W W a a r r e e ®…
-
Page 97: Configuring Required Fax Settings At The Control Panel
4. Touch Fax Wizard Settings. 5. For Fax Country Setting, select your country from the list. 6. Touch the Next arrow. 7. For Line Number, type the fax number using the touch screen keypad. Xerox ® B1025 Multifunction Printer System Administrator Guide…
-
Page 98: Fax Security
6. To select an option for the incoming ring, dial tone, and transmission tones, touch Fax Card Volume, select options as needed, then touch OK. 7. To select the printer tray to use to print faxes, touch Fax Receive Tray. a. For each tray, select On or Off. Xerox ® B1025 Multifunction Printer System Administrator Guide…
-
Page 99
9. To include header text on outgoing faxes, perform the following steps: a. Touch Send Header Text, then select On. b. Touch Enter text to include in Send Header. c. In the field provided, type the text, then touch OK. Xerox ® B1025 Multifunction Printer System Administrator Guide… -
Page 100
To access this feature at the control panel, log in as a system administrator. 2. Touch Service Settings→Fax→Feature Order. 3. To change the position of a feature, select the feature. To move the feature, use the arrow buttons. 4. When finished, touch OK. Xerox ® B1025 Multifunction Printer System Administrator Guide… -
Page 101: Fax Polling
7. To assign a passcode to the mailbox, touch Passcode Protect. Type a 4-digit passcode, then touch the Next arrow. Users are prompted to type the passcode when storing faxes in the mailbox or when printing faxes from the mailbox. Xerox ® B1025 Multifunction Printer System Administrator Guide…
-
Page 102: Fax Reports
S S e e t t t t i i n n g g U U p p F F a a x x R R e e p p o o r r t t s s a a t t t t h h e e C C o o n n t t r r o o l l P P a a n n e e l l 1. At the control panel, press the Machine Status button. 2. Touch Service Settings. 3. Touch Fax. Xerox ® B1025 Multifunction Printer System Administrator Guide…
-
Page 103
• To configure broadcast and multiple-poll reports, touch Broadcast and Multi-poll Report. Select the condition for printing broadcast and multiple-poll reports, then touch OK. 6. To exit Fax Report Setup, touch X. Xerox ® B1025 Multifunction Printer System Administrator Guide… -
Page 105: Administrator Tools
• Smart eSolutions and Billing Information …………….. 110 • Cloning ………………………. 113 • Address Books…………………….. 114 • Font Management Utility………………….118 • Customizing Printer Contact Information …………….. 119 • Restarting the Printer in Xerox ® CentreWare ® Internet Services……….120 •…
-
Page 106: Monitoring Alerts And Status
7. For Drum Cartridge Reorder Notification, enter the percentage of life remaining that triggers an alert. 8. To display the status on the control panel, select Drum Cartridge Status. 9. Click Apply. Xerox ® B1025 Multifunction Printer System Administrator Guide…
-
Page 107: Date And Time Settings
Automatically adjust clock for daylight saving changes. 5. Select a date format, then select the Day, Month, and Year. 6. Select a time format, then type the Hours and Minutes. Select AM or PM. 7. Click Apply. Xerox ® B1025 Multifunction Printer System Administrator Guide…
-
Page 108: Energy Saving Settings
• Specify how long the printer remains idle before it goes from ready mode to low-power mode. • Specify how long the printer remains idle before automatically going from low-power mode to sleep mode. 4. Touch OK. Xerox ® B1025 Multifunction Printer System Administrator Guide…
-
Page 109: Entry Screen Defaults
Use this page to set the default screens that appear on the touch screen when you press buttons on the printer control panel. 1. In Xerox ® CentreWare ® Internet Services, click Properties→General Setup. 2. Click Entry Screen Defaults. 3. Configure settings as needed, then click Apply. Xerox ® B1025 Multifunction Printer System Administrator Guide…
-
Page 110: Smart Esolutions And Billing Information
Note: Smart eSolutions is not available in all countries. Refer to your Xerox representative for details. B B e e f f o o r r e e Y Y o o u u B B e e g g i i n n •…
-
Page 111
Note: If the % Life Remaining is unknown, no data has been transmitted to Xerox. M M a a i i n n t t e e n n a a n n c c e e A A s s s s i i s s t t a a n n t t Maintenance Assistant provides options for troubleshooting your printer. -
Page 112: View Usage And Billing Information
1. In Xerox ® CentreWare ® Internet Services, click Properties→General Setup→Billing & Counters. 2. Click Usage Counters. 3. To update the page, click Refresh. Xerox ® B1025 Multifunction Printer System Administrator Guide…
-
Page 113: Cloning
2. Click Browse or Choose File, navigate to the location of the clone file, then click Open. 3. Click Install. 4. Click OK. Note: When the process is complete, the printer restarts automatically. Xerox ® B1025 Multifunction Printer System Administrator Guide…
-
Page 114: Address Books
Viewing Contacts A contact is a user with an associated email address, fax number, or scan destination. You can add a contact to a group or mark it as a Favorite. To view a contact in Xerox ® CentreWare ®…
-
Page 115
• To view an example of the appropriate format for the .csv file, download a sample file. 1. In Xerox ® CentreWare ® Internet Services, click Address Book. 2. From the Management dropdown list, select Import from File. Xerox ® B1025 Multifunction Printer System Administrator Guide… -
Page 116
Legacy Mode omits favorites, groups, fax, and Scan To Destination contact information. Display Name is changed to Friendly Name, allowing you to import the file directly to an older Xerox ®… -
Page 117: Network Address Book
4. Select Export in Legacy Mode as needed. Legacy Mode omits favorites, groups, fax, and Scan To Destination contact information. Display Name is changed to Friendly Name, allowing you to import the file directly to an older Xerox ® printer without mapping address book fields.
-
Page 118: Font Management Utility
Administrator Tools Font Management Utility The CentreWare Font Management Utility allows you to manage fonts on one or more printers on your network. You can download the Xerox CentreWare Font Management Utility on the Xerox ® website at www.xerox.com/office/B1022_B1025drivers. Use the utility to download soft fonts to your printer, such as your company branded fonts or unicode fonts to support multiple languages.
-
Page 119: Customizing Printer Contact Information
Administrator Tools Customizing Printer Contact Information The support page in Xerox ® CentreWare ® Internet Services displays contact information for service and supplies as well as contact information for your system administrator. You can customize this information to display your company details for printer users.
-
Page 120: Restarting The Printer In Xerox ® Centreware ® Internet Services
Administrator Tools Restarting the Printer in Xerox CentreWare ® ® Internet Services 1. In Xerox CentreWare Internet Services, click Status→General. ® ® 2. Click Reboot Machine, then click OK. Xerox ® B1025 Multifunction Printer System Administrator Guide…
-
Page 121: Resetting The Printer To Factory Default Settings
Administrator Tools Resetting the Printer to Factory Default Settings 1. In Xerox CentreWare Internet Services, click Status→General. ® ® 2. To restore the original network default settings, click Network Factory Default. Xerox ® B1025 Multifunction Printer System Administrator Guide…
-
Page 122: Updating The Printer Software
Administrator Tools Updating the Printer Software You can update your printer when Xerox releases a new version of printer software or firmware. Before you begin: • Determine the current software version of your printer. • Download the latest software update. From the Xerox Support website at www.xerox.com/office/…
(Ocr-Read Summary of Contents of some pages of the Xerox B1025 Document (Main Content), UPD: 26 June 2023)
-
100, d. Touch OK again. 10. To send multiple fax jobs to a single destination during one transmission, touch Batch Send, touch Enabled, then touch OK. 11. To compensate for poor line quality, touch Error Correction Mode, touch Enabled, then touch OK. SSeettttiinngg FFaaxx FFeeaattuurree DDeeffaauullttss The printer uses the default fax feature settings on all embedded fax jobs, unless you change the settings for an individual job. You can modify the default f…
-
22, • To configure the printer to assign itself an address if a DHCP server does not provide one, for Self-Assigned Address, select Enabled. • To allow users to see and connect to the printer using Bonjour, for Multicast DNS, select Enabled. 10. Click Apply. CCoonnffiigguurriinngg IIPPvv66 IPv6 hosts can automatically configure themselves when connected to a routed IPv6 network using the Internet Control Message Prot…
-
81, Configuring Image Settings You can configure compression settings for the scanned image. • TIFF Specification Supplement 2: This compression method is a Deflate TIFF 6.0 extension that prevents image-quality loss. • LZW: This compression method prevents image-quality loss and retains a small file size. • MRC Compression: This compression method separates the scanned image into components, and …
-
66, Enabling Print Spooling Settings 1. In Xerox ® CentreWare ® Internet Services, click Properties→Services. 2. Click Printing→Print Spooling. 3. To enable print spooling, for Print Spooling Settings, select Enabled. 4. Click Apply. 66 Xerox ® B1025 Multifunction Printer System Administrator Guide Printing
… -
92, Xerox B1025 Enabling Remote Scanning using TWAIN Enable Remote Start to allow users to scan images into a TWAIN-compliant application using the TWAIN driver. Before you begin: Enable the Scan Extension Web service. For details, refer to HTTP. To enable remote scanning using TWAIN: 1. In Xerox ® CentreWare ® Internet Services, click Properties→Services. 2. Click Remote Start (TWAIN). 3. For Start Job via Remote Program, click On. 4. Click Apply. 92 Xe…
-
87, Scanning to an Email Address The email feature allows you to scan a document and send it to an email address as an attachment. Before you begin: • Configure SMTP settings. For details, refer to Configuring SMTP Server Settings. • Note the IP address or host name of the server. For instructions on using this feature, refer to the User Guide for your printer model. Xerox ® B1025 Multifunction Printer System Administrator Guide 87 Scanning
… -
23, SLP Printers use Service Location Protocol (SLP) to announce and look up services on a local network without prior configuration. When SLP is enabled, the printer becomes a Service Agent (SA) and announces its services to User Agents (UA) on the network using SLP. Directory Agents (DA) are components that cache services. They are used in larger networks to reduce the amount of traffic. DAs are optional. If a DA is present, then User Agents (UAs) and System Agents (SAs) a…
-
64, Printing an Error Page 1. In Xerox ® CentreWare ® Internet Services, click Properties→Services. 2. Click Printing→Error Page. 3. To print an error page when a print job fails, for Error Page Settings, select Enable. 4. Click Apply. 64 Xerox ® B1025 Multifunction Printer System Administrator Guide Printing
… -
101, Xerox B1025 SShhoowwiinngg,, LLoocckkiinngg,, aanndd HHiiddiinngg FFaaxx FFeeaattuurreess oonn tthhee CCoonnttrrooll PPaanneell You can select the features to appear on the control panel, and lock the settings to prevent changes. To set controls for fax features: 1. At the control panel, press the Machine Status button. Note: To access this feature at the printer control panel, log in as a system administrator. 2. Touch Service Settings→Fax→Show / L…
-
20, TCP/IP Computers and printers primarily use TCP/IP protocols to communicate over an Ethernet network. Bonjour is a discovery protocol that allows devices on a TCP/IP network to discover each other without knowledge of specific IP addresses. Bonjour is built in to Macintosh operating systems. You can install Bonjour on Windows devices. With TCP/IP protocols, each printer and computer requires a unique IP address. Many networks, and cable and DSL routers have a Dynamic Host Configuration P…
-
43, Xerox ® B1025 Multifunction Printer System Administrator Guide 43 4 Security This chapter contains: • Setting Access Rights ………………………………………………………………………………………………….. 44 • Setting Print Permissions ……………………………………………………………………………………………… 46 • Device User Database…………
-
25, Xerox B1025 Configuring SNMPv3 SNMPv3 is the current standard version of SNMP defined by the Internet Engineering Task Force (IETF). It provides three important security features: • Message integrity to ensure that a packet has not been tampered with in transit • Authentication to verify that the message is from a valid source • Encryption of packets to prevent unauthorized access CCoonnffiigguurriinngg SSNNMMPPvv11//vv22cc wwiitthh SSNNMMPPvv33 SNMP version 1 (SN…
-
90, b. If you select On; Editable by user, select the default setting for users at the control panel. For Email Encryption Default, select On or Off. c. For Encryption Algorithm, select the algorithm used by your email server. 5. For From Field Display, select an option. 6. For User Policies, configure settings as needed. a. For «To:» Field Security Options, select a restriction policy. b. For Restrict to…
-
117, Xerox B1025 3. For Delimiter, select an option. 4. Select Export in Legacy Mode as needed. Legacy Mode omits favorites, groups, fax, and Scan To Destination contact information. Display Name is changed to Friendly Name, allowing you to import the file directly to an older Xerox ® printer without mapping address book fields. 5. Click Export. CCoonnttrroolllliinngg AAcccceessss ttoo tthhee DDeevviiccee AAddddrreessss BBooookk You can control which users can view and manag…
-
11, Xerox ® B1025 Multifunction Printer System Administrator Guide 11 2 Initial Setup This chapter contains: • Physically Connecting the Printer…………………………………………………………………………………… 12 • Assigning a Network Address ……………………………………………………………………………………….. 13 • Accessing Administration and Configurat…
-
40, 8. For Root Certificate Setup, upload a Root Certificate. 9. For Client Certificate Setup, upload a Client Certificate, then type the Private Key Password. 10. For Address Acquisition, select a protocol option. If you select Static, you can change the IP Address, Subnet Mask, and Gateway Mask as needed. 11. Click Apply. CCoonnffiigguurriinngg tthhee PPrriinntteerr ffoorr aann OOppeenn SSyysstteemm 1. In Xerox ® CentreWare ® In…
-
69, UNIX and Linux Printing The Xerox ® Print Driver package provides tools for you to manage printers connected in UNIX and Linux environments. The Xerox ® print drivers provide a GUI-based driver dialog for printer feature selections. You can select print drivers based on your operating system. XXeerrooxx ®® PPrriinntteerr MMaannaaggeerr Xerox ® Printer Manager is an application that allows you to manage and print to multiple printers in UNIX and Linux envir…
ВЕРСИЯ 1.1
ОКТЯБРЬ 2018 Г.
702P06481
Многофункциональное устройство
Xerox
®
B1025
Руководство пользователя

© Корпорация Xerox, 2018 г. Все права защищены. Xerox
®
, Xerox и Design
®
являются товарными знаками
корпорации Xerox в США и других странах.
Apple
®
, AirPrint
®
, Bonjour
®
, Mac
®
и Mac OS
®
являются товарными знаками или зарегистрированными товар-
ными знаками компании Apple Inc. в США и других странах.
Служба веб-печати Google Cloud Print
™
, служба веб-почты Gmail
™
и мобильная платформа Android
™
явля-
ются товарными знаками компании Google, Inc.
HP-GL
®
, HP-UX
®
и PCL
®
являются зарегистрированными товарными знаками корпорации Hewlett-Packard в
США и других странах.
Microsoft
®
, OneDrive
®
, Windows Vista
®
, Windows
®
и Windows Server
®
являются зарегистрированными товар-
ными знаками корпорации Microsoft в США и других странах.
McAfee
®
, ePolicy Orchestrator
®
и McAfee ePO
™
являются товарными знаками или зарегистрированными то-
варными знаками компании McAfee Inc. в США и других странах.
Mopria является товарным знаком Mopria Alliance.
UNIX
®
является товарным знаком, зарегистрированным в США и других странах, с эксклюзивной лицензией
через компанию X/Open Company Limited.
Wi-Fi CERTIFIED Wi-Fi Direct
®
является товарным знаком ассоциации Wi-Fi Alliance.

Многофункциональное устройство Xerox
®
B1025
Руководство пользователя
3
1 Безопасность...................................................................................................................... 9
Уведомления по технике безопасности ......................................................................... 10
Электробезопасность ..................................................................................................... 11
Общие инструкции ................................................................................................... 11
Шнур питания ........................................................................................................... 11
Аварийное отключение электропитания ................................................................. 12
Меры безопасности при работе с лазерным оборудованием................................. 12
Безопасность при эксплуатации .................................................................................... 13
Указания по эксплуатации ....................................................................................... 13
Выделение озона...................................................................................................... 13
Размещение принтера .............................................................................................. 14
Расходные материалы для принтера ....................................................................... 14
Техника безопасности при обслуживании..................................................................... 15
Символы на принтере..................................................................................................... 16
Контактные данные для обращения по вопросам охраны труда, техники безопасности
и охраны окружающей среды ........................................................................................ 18
2 Начало работы ................................................................................................................19
Узлы и детали принтера ................................................................................................. 20
Вид спереди .............................................................................................................. 20
Вид сзади .................................................................................................................. 20
Внутренние компоненты .......................................................................................... 21
Податчик оригиналов............................................................................................... 21
Панель управления .................................................................................................. 23
Информационные страницы .......................................................................................... 25
Доступ к информационным страницам и их печать ................................................ 25
Печать отчета о конфигурации ................................................................................ 25
Функции системного администратора ........................................................................... 26
Xerox
®
CentreWare
®
Internet Services ....................................................................... 26
Доступ к приложению Xerox
®
CentreWare
®
Internet Services.................................... 26
Определение IP-адреса принтера............................................................................ 26
Автоматический сбор данных .................................................................................. 27
Ассистент по обслуживанию .................................................................................... 27
Просмотр счетчиков учета и использования ........................................................... 28
Дополнительные сведения............................................................................................. 29
Установка и настройка................................................................................................... 30
Краткие сведения по установке и настройке .......................................................... 30
Выбор места установки для принтера ..................................................................... 30
Подключение принтера ............................................................................................ 30
Установка настроек сети .......................................................................................... 34
Включение на принтере режима сканирования ...................................................... 34
Режим энергосбережения ........................................................................................ 35
Установка драйвера ................................................................................................. 35
Установка принтера в качестве веб-службы WSD ................................................... 39
Печать с мобильных устройств с помощью службы Mopria и Google Cloud
Print........................................................................................................................... 40
3 Использование служб....................................................................................................41
Копирование................................................................................................................... 42

4
Многофункциональное устройство Xerox
®
B1025
Руководство пользователя
Копирование............................................................................................................. 43
Изменение настроек копирования........................................................................... 44
Выбор копирования книги ....................................................................................... 50
Копирование обложек.............................................................................................. 50
Создание брошюры .................................................................................................. 51
Сканировать (куда) ........................................................................................................ 52
Отправка изображения сканирования на выходное устройство ............................ 52
Сканирование в электронную почту ........................................................................ 53
Сканирование в общую папку на компьютере в сети.............................................. 55
Запуск сканирования c компьютера ........................................................................ 58
Сканирование на USB-накопитель........................................................................... 58
Настройка параметров сканирования..................................................................... 59
Электронная почта ......................................................................................................... 65
Сканирование в электронную почту ........................................................................ 65
Факс ................................................................................................................................ 68
Отправка факса ........................................................................................................ 68
Установка параметров факса................................................................................... 69
Использование почтовых ящиков факса.................................................................. 73
Опрос ........................................................................................................................ 74
Копир. удостовер. ........................................................................................................... 76
Копирование удостоверения.................................................................................... 76
USB.................................................................................................................................. 78
Сканирование на USB-накопитель........................................................................... 78
Печать с USB-накопителя ......................................................................................... 78
Сохраненные работы ..................................................................................................... 80
Печать из списка сохраненных работ ...................................................................... 80
Адресная книга............................................................................................................... 81
Добавление контакта в адресную книгу.................................................................. 81
Импортирование записи контакта в адресную книгу.............................................. 82
Изменение и удаление контактов в адресной книге с помощью приложения
Xerox
®
CentreWare
®
Internet Services ....................................................................... 82
Статус работы................................................................................................................. 83
Проверка статуса работы с панели управления...................................................... 83
Удаление выполняемой работы печати................................................................... 83
Статус аппарата ............................................................................................................. 84
Определение IP-адреса принтера............................................................................ 84
Просмотр предупреждений на панели управления................................................. 84
Проверка состояния расходных материалов принтера........................................... 85
Проверка показаний счетчиков учета ..................................................................... 85
4 Печать.................................................................................................................................87
Краткие сведения о печати ............................................................................................ 88
Выбор параметров печати ............................................................................................. 89
Справочная система драйвера принтера ................................................................ 89
Параметры печати Windows..................................................................................... 90
Параметры печати Macintosh................................................................................... 91
Параметры печати в системе Linux .......................................................................... 91
Параметры мобильной печати................................................................................. 94
Использование функции «Печатать с» ..................................................................... 94
Функции печати .............................................................................................................. 96

Многофункциональное устройство Xerox
®
B1025
Руководство пользователя
5
Управление работами .............................................................................................. 96
Печать работ специальных типов ............................................................................ 97
Выбор параметров бумаги для печати .................................................................... 98
Масштабирование.................................................................................................... 98
Двусторонняя печать................................................................................................ 98
Печать зеркальных изображений ............................................................................ 99
Печать нескольких страниц на одном листе............................................................ 99
Качество печати ....................................................................................................... 99
Печать брошюр......................................................................................................... 99
Печать обложек ...................................................................................................... 100
Печать водяных знаков в системе Windows........................................................... 101
Выбор ориентации страниц ................................................................................... 101
Использование бумаги пользовательского формата .................................................. 103
Печатать на бумаге нестандартного размера ....................................................... 103
Указание настраиваемого размера бумаги........................................................... 103
5 Бумага и другие материалы..................................................................................... 107
Поддерживаемые виды бумаги.................................................................................... 108
Заказ бумаги .......................................................................................................... 108
Общие указания по вкладыванию бумаги в лотки ................................................ 108
Повреждающая принтер бумага ............................................................................ 108
Рекомендации по хранению бумаги ...................................................................... 109
Поддерживаемые типы и плотность бумаги.......................................................... 109
Поддерживаемые стандартные форматы бумаги ................................................. 110
Поддерживаемые нестандартные размеры бумаги .............................................. 110
Поддерживаемые типы и плотность бумаги для автоматической двусторонней
печати ..................................................................................................................... 110
Поддерживаемые стандартные форматы бумаги для автоматической двусто-
ронней печати ........................................................................................................ 111
Поддерживаемые нестандартные форматы бумаги для автоматической дву-
сторонней печати ................................................................................................... 111
Вкладывание бумаги в лотки ....................................................................................... 113
Вкладывание бумаги в лоток 1 .............................................................................. 113
Вкладывание бумаги в опциональный лоток 2 ..................................................... 115
Вкладывание бумаги в обходной лоток................................................................. 117
6 Для обслуживания....................................................................................................... 121
Чистка принтера........................................................................................................... 122
Общие меры предосторожности ............................................................................ 122
Очистка наружных поверхностей........................................................................... 122
Чистка сканера ....................................................................................................... 122
Заказ расходных материалов ...................................................................................... 125
Когда заказывать расходные материалы.............................................................. 125
Проверка состояния расходных материалов принтера......................................... 125
Расходные материалы............................................................................................ 125
Регулярно заменяемые модули.............................................................................. 126
Тонер-картриджи ................................................................................................... 126
Принт-картриджи ................................................................................................... 128
Вторичная переработка расходных материалов................................................... 128
Перемещение принтера ............................................................................................... 129
Проверка показаний счетчиков учета ......................................................................... 131

6
Многофункциональное устройство Xerox
®
B1025
Руководство пользователя
7 Устранение неисправностей .................................................................................... 133
Устранение общих неисправностей ............................................................................. 134
Перезагрузка принтера.......................................................................................... 134
Принтер не включается .......................................................................................... 134
Принтер часто перезагружается или отключается ................................................ 134
Документ печатается не из указанного лотка ....................................................... 135
Проблемы при автоматической двусторонней печати .......................................... 135
Лоток для бумаги не закрывается ......................................................................... 135
Печать занимает слишком много времени ............................................................ 136
Работа не печатается ............................................................................................. 136
Посторонний шум в принтере ................................................................................ 137
Конденсация внутри принтера............................................................................... 137
Сообщения о состоянии тонер-картриджа ............................................................ 138
Сообщения о состоянии принт-картриджа ............................................................ 138
Застревание бумаги ..................................................................................................... 139
Предотвращение застревания бумаги ................................................................... 139
Нахождение застрявшей бумаги............................................................................ 140
Извлечение застрявшей бумаги ............................................................................. 141
Устранение застревания бумаги ............................................................................ 154
Проблемы с качеством печати ..................................................................................... 156
Контроль качества печати...................................................................................... 156
Устранение проблем с качеством печати .............................................................. 156
Проблемы при копировании и сканировании ............................................................. 160
Проблемы с факсом...................................................................................................... 161
Проблемы при отправке факсов ............................................................................ 161
Проблемы при приеме факсов ............................................................................... 162
Получение помощи....................................................................................................... 164
Сообщения на панели управления ........................................................................ 164
Использование встроенных средств устранения неисправностей ....................... 164
Информационные страницы .................................................................................. 165
Online Support Assistant (Онлайновый ассистент поддержки) ............................... 166
Дополнительные сведения..................................................................................... 167
A Характеристики............................................................................................................ 169
Конфигурации и опции принтера................................................................................. 170
Доступные конфигурации ...................................................................................... 170
Стандартные функции............................................................................................ 171
Габаритные размеры и вес .......................................................................................... 173
Масса и габаритные размеры................................................................................ 173
Размеры аппаратов в стандартной конфигурации................................................ 173
Габаритные требования......................................................................................... 174
Требования к окружающей среде................................................................................ 175
Температура........................................................................................................... 175
Относительная влажность...................................................................................... 175
Высота над уровнем моря ...................................................................................... 175
Электропитание............................................................................................................ 176
Напряжение и частота питания ............................................................................. 176
Энергопотребление ................................................................................................ 176
Эксплуатационные характеристики............................................................................. 177

Многофункциональное устройство Xerox
®
B1025
Руководство пользователя
7
Время разогрева принтера..................................................................................... 177
Скорость печати ..................................................................................................... 177
B Информация о соответствии стандартам ............................................................ 179
Соответствие основным стандартам............................................................................ 180
Аппарат удовлетворяет требованиям ENERGY STAR
®
........................................... 180
Европейский Союз .................................................................................................. 180
Соглашение ЕС по оборудованию для создания изображений (группа 4). Эко-
логическая информация......................................................................................... 181
Сертификация Евразийского экономического сообщества ................................... 182
Германия ................................................................................................................ 182
Правила ограничения содержания вредных веществ для Турции ........................ 183
Нормативная информация для адаптера беспроводной сети 2,4 ГГц .................. 183
Ограничения на копирование ...................................................................................... 184
Ограничения на копирование ................................................................................ 184
Ограничения на передачу факсов................................................................................ 185
Требования к заголовкам отправляемых факсов.................................................. 185
Европейский Союз .................................................................................................. 185
Ограничения на передачу факсов ЮАР ................................................................. 185
Material Safety Data Sheets (Данные по безопасности материалов)........................... 186
C Вторичная переработка и утилизация ................................................................. 187
Все страны .................................................................................................................... 188
Европейский Союз ........................................................................................................ 189
Бытовое использование ......................................................................................... 189
Профессиональное использование ........................................................................ 189
Корпоративные пользователи в Европейском Союзе............................................ 189
Утилизация за пределами Европейского Союза .................................................... 189
Символ предупреждения для аккумуляторов ....................................................... 190
Извлечение аккумуляторов.................................................................................... 190
Другие страны .............................................................................................................. 191
D Функции.......................................................................................................................... 193


Многофункциональное устройство Xerox
®
B1025
Руководство пользователя
9
1
Безопасность
Данный принтер и рекомендуемые расходные материалы разработаны с учетом строгих
требований техники безопасности и прошли проверки на соответствие этим требованиям.
Точное соблюдение следующих правил обеспечит длительную и безопасную работу принте-
ра Xerox.
Содержание главы:
• Уведомления по технике безопасности ............................................................................. 10
• Электробезопасность ......................................................................................................... 11
• Безопасность при эксплуатации ........................................................................................ 13
• Техника безопасности при обслуживании ......................................................................... 15
• Символы на принтере......................................................................................................... 16
• Контактные данные для обращения по вопросам охраны труда, техники безопасно-
сти и охраны окружающей среды ...................................................................................... 18

Уведомления по технике безопасности
Прежде чем приступать к эксплуатации принтера, внимательно ознакомьтесь с приведенны-
ми ниже указаниями. Соблюдение этих указаний позволит обеспечить длительную и без-
опасную эксплуатацию принтера.
Принтер и расходные материалы Xerox
®
разработаны и проверены на предмет соответствия
строгим требованиям безопасности. Эти требования включают проводимые агентствами по
безопасности испытания, утверждение и подтверждение соответствия установленным стан-
дартам по электромагнитной совместимости и охране окружающей среды.
Проверка безопасности и рабочих характеристик данного принтера выполнялась только с
использованием материалов Xerox
®
.
Примечание. Любое несанкционированное изменение, включая добавление новых
функций или подключение внешних устройств, может повлиять на соответствие прин-
тера сертификационным требованиям. Дополнительную информацию можно получить
в представительстве Xerox.
10
Многофункциональное устройство Xerox
®
B1025
Руководство пользователя
Безопасность

Электробезопасность
ООббщщииее ииннссттррууккццииии
ПРЕДУПРЕЖДЕНИЕ.
• Не вставляйте никаких предметов в щели и отверстия принтера. Прикосновение к
электрическим контактам или короткое замыкание могут привести к пожару или
поражению электрическим током.
• Не снимайте крышки и ограждения, закрепленные винтами, за исключением
случаев установки дополнительного оборудования и выполнения специальных
инструкций. Прежде чем выполнять такие установки, отключите питание принтера.
Для снятия крышек и ограждений при установке дополнительного оборудования
отсоедините шнур питания. Кроме устанавливаемого дополнительного
оборудования, под этими крышками нет компонентов, подлежащих обслуживанию
пользователем.
ПРЕДУПРЕЖДЕНИЕ. Угроза вашей безопасности возникает в следующих случаях:
• Шнур питания поврежден или изношен.
• В принтер попала жидкость.
• Принтер намок.
• Принтер дымится или поверхность нагревается больше обычного.
• Принтер издает необычный шум или запах.
• Из-за принтера срабатывает автоматический выключатель, предохранитель или
другое защитное устройство.
При возникновении любой из перечисленных ситуаций выполните следующие действия:
1. Сразу отключите питание принтера.
2. Выньте вилку шнура питания из розетки.
3. Обратитесь в уполномоченное сервисное представительство.
ШШннуурр ппииттаанниияя
Используйте шнур питания, который входит в комплект поставки принтера.
• Не используйте удлинители. Запрещается снимать и модифицировать вилку шнура
питания.
• Подключайте шнур питания напрямую к правильно заземленной электрической розетке.
Убедитесь, что шнур надежно подключен с обоих концов. Если вы не знаете, заземлена
ли розетка, попросите специалиста проверить ее.
• Не используйте вилку адаптера с заземлением для подключения принтера к сетевой
розетке без контакта заземления.
ПРЕДУПРЕЖДЕНИЕ. Правильное заземление принтера защищает от
поражения током. При неправильном использовании электрические устройства
могут представлять опасность.
• Убедитесь, что принтер подключен к розетке сети с правильными параметрами
электропитания. При необходимости проверьте электротехнические характеристики
вместе со специалистом.
• Не размещайте принтер в таком месте, где на шнур питания могут случайно наступить.
Многофункциональное устройство Xerox
®
B1025
Руководство пользователя
11
Безопасность

• Не ставьте предметы на шнур питания.
• При повреждении или износе шнура питания замените его.
• Во избежание поражения электрическим током и повреждения шнура питания при
отсоединении его от розетки держитесь за вилку.
• Сетевая розетка должна быть установлена в непосредственной близости от принтера, а
доступ к ней не должен быть затруднен.
Шнур питания подключается через гнездо на задней панели принтера. Если потребуется
полностью отключить электропитание принтера, выньте вилку шнура питания из розетки.
ААввааррииййннооее ооттккллююччееннииее ээллееккттррооппииттаанниияя
При возникновении любого из следующих условий немедленно отключите питание
аппарата. Выньте вилку шнура питания из розетки. В следующих случаях необходимо
обращаться в авторизованный сервисный центр Xerox для устранения неисправности:
• Аппарат издает необычные шумы или запахи.
• Шнур питания поврежден или изношен.
• Срабатывание автомата настенного щитка, предохранителя или другого защитного
устройства.
• В принтер попала жидкость.
• Принтер намок.
• Произошло повреждение любого компонента принтера.
ММееррыы ббееззооппаассннооссттии ппррии ррааббооттее сс ллааззееррнныымм
ооббооррууддооввааннииеемм
Данный лазерный принтер соответствует стандартам для лазерных устройств,
установленным правительственными, государственными и международными
организациями, и сертифицирован как лазерное устройство класса 1. Этот принтер не
является источником опасного излучения, поскольку луч полностью закрыт кожухами на
всех этапах эксплуатации и технического обслуживания пользователями.
Предупреждение об опасности лазера. Использование не описанных здесь
регулировок, настроек или процедур может привести к опасному воздействию
лазерного излучения.
12
Многофункциональное устройство Xerox
®
B1025
Руководство пользователя
Безопасность

Безопасность при эксплуатации
Принтер и расходные материалы разработаны с учетом строгих требований техники без-
опасности и прошли проверку на соответствие этим требованиям. Эти требования включают
проверку и утверждение агентствами по техники безопасности, а также соответствие устано-
вленным стандартам охраны окружающей среды.
Соблюдение вами перечисленных условий обеспечит длительную и безопасную работу
принтера.
УУккааззаанниияя ппоо ээккссппллууааттааццииии
• Не извлекайте бумагу из лотков в процессе печати.
• Не открывайте дверцы во время печати.
• Не двигайте принтер во время печати.
• Следите за тем, чтобы руки, волосы, галстук и т. п. не попали между роликами вывода и
подачи принтера.
• Опасные участки принтера закрыты крышками, которые снимаются с помощью
инструмента. Не снимайте защитные крышки.
Предупреждение об опасности ожога. Металлические поверхности на участке
фьюзера нагреваются. Извлекая застрявшую бумагу на этом участке,
соблюдайте осторожность, чтобы не коснуться металлической поверхности.
• Запрещается блокировать устройства электрической и механической блокировки.
• Не пытайтесь извлечь бумагу, застрявшую глубоко внутри принтера. Немедленно
выключите принтер и обратитесь в региональное представительство компании Xerox.
• Во избежание опрокидывания не двигайте аппарат, когда все лотки выдвинуты.
ВВыыддееллееннииее ооззооннаа
В процессе обычной работы принтера выделяется озон. Количество выделяемого озона
зависит от объемов копирования. Озон тяжелее воздуха и выделяется в количествах,
недостаточных для причинения вреда здоровью. Принтер следует устанавливать в хорошо
проветриваемом помещении.
Дополнительную информацию можно получить в региональном представительстве Xerox
или по адресу www.xerox.com/environment_europe.
Многофункциональное устройство Xerox
®
B1025
Руководство пользователя
13
Безопасность

РРааззммеещщееннииее ппррииннттеерраа
• Принтер следует устанавливать на ровной, прочной и устойчивой поверхности, которая
может выдержать его вес. Сведения о весе принтера см. раздел Габаритные размеры и
вес.
• Не блокируйте и не закрывайте щели и отверстия принтера. Эти отверстия
предназначены для вентиляции и предотвращения перегрева принтера.
• Размещайте принтер таким образом, чтобы оставалось достаточно свободного места для
работы и обслуживания.
• Принтер не следует устанавливать в пыльных помещениях и пространствах.
• Принтер нельзя хранить и эксплуатировать в условиях высоких и низких температур или
высокой влажности.
• Не размещайте принтер рядом с источником тепла.
• Не размещайте принтер в местах, где он может подвергнуться воздействию прямых
солнечных лучей, иначе могут повредиться чувствительные к свету компоненты.
• Не размещайте принтер на пути потока холодного воздуха из кондиционера.
• Не размещайте принтер в местах с высоким уровнем вибрации.
• Наилучшая производительность принтера обеспечивается на высоте, указанной в
разделе Высота над уровнем моря.
РРаассххоодднныыее ммааттееррииааллыы ддлляя ппррииннттеерраа
• Используйте расходные материалы, предназначенные для данной модели принтера.
Применение неподходящих материалов может привести к ухудшению работы принтера
и возникновению опасных ситуаций.
• Выполняйте требования всех указаний, имеющихся на принтере, дополнительных
устройствах и расходных материалах или в поставляемой к ним документации.
• Храните расходные материалы в соответствии с указаниями, приведенными на их
упаковке.
• Храните расходные материалы в недоступном для детей месте.
• Не бросайте тонер- и принт-картриджи в открытый огонь.
• При обращении с картриджами (такими как тонер-картриджи) соблюдайте
осторожность — берегите глаза и незащищенные участки тела. При попадании тонера в
глаза может возникать раздражение и воспаление. Не пытайтесь разбирать картридж —
тонер может попасть в глаза или на незащищенные участки тела.
14
Многофункциональное устройство Xerox
®
B1025
Руководство пользователя
Безопасность

Техника безопасности при обслуживании
• Не выполняйте никакие операции по обслуживанию, не указанные в документации
принтера.
• Протирайте принтер сухой безворсовой тканью.
• Не сжигайте расходные материалы и регулярно заменяемые модули.
• Информация о программах утилизации расходных материалов Xerox содержится по ад-
ресу www.xerox.com/gwa.
ПРЕДУПРЕЖДЕНИЕ. Не применяйте аэрозольные очистители. При контакте с электро-
механическим оборудованием аэрозольные очистители могут быть взрыво- и
пожароопасны.
Многофункциональное устройство Xerox
®
B1025
Руководство пользователя
15
Безопасность
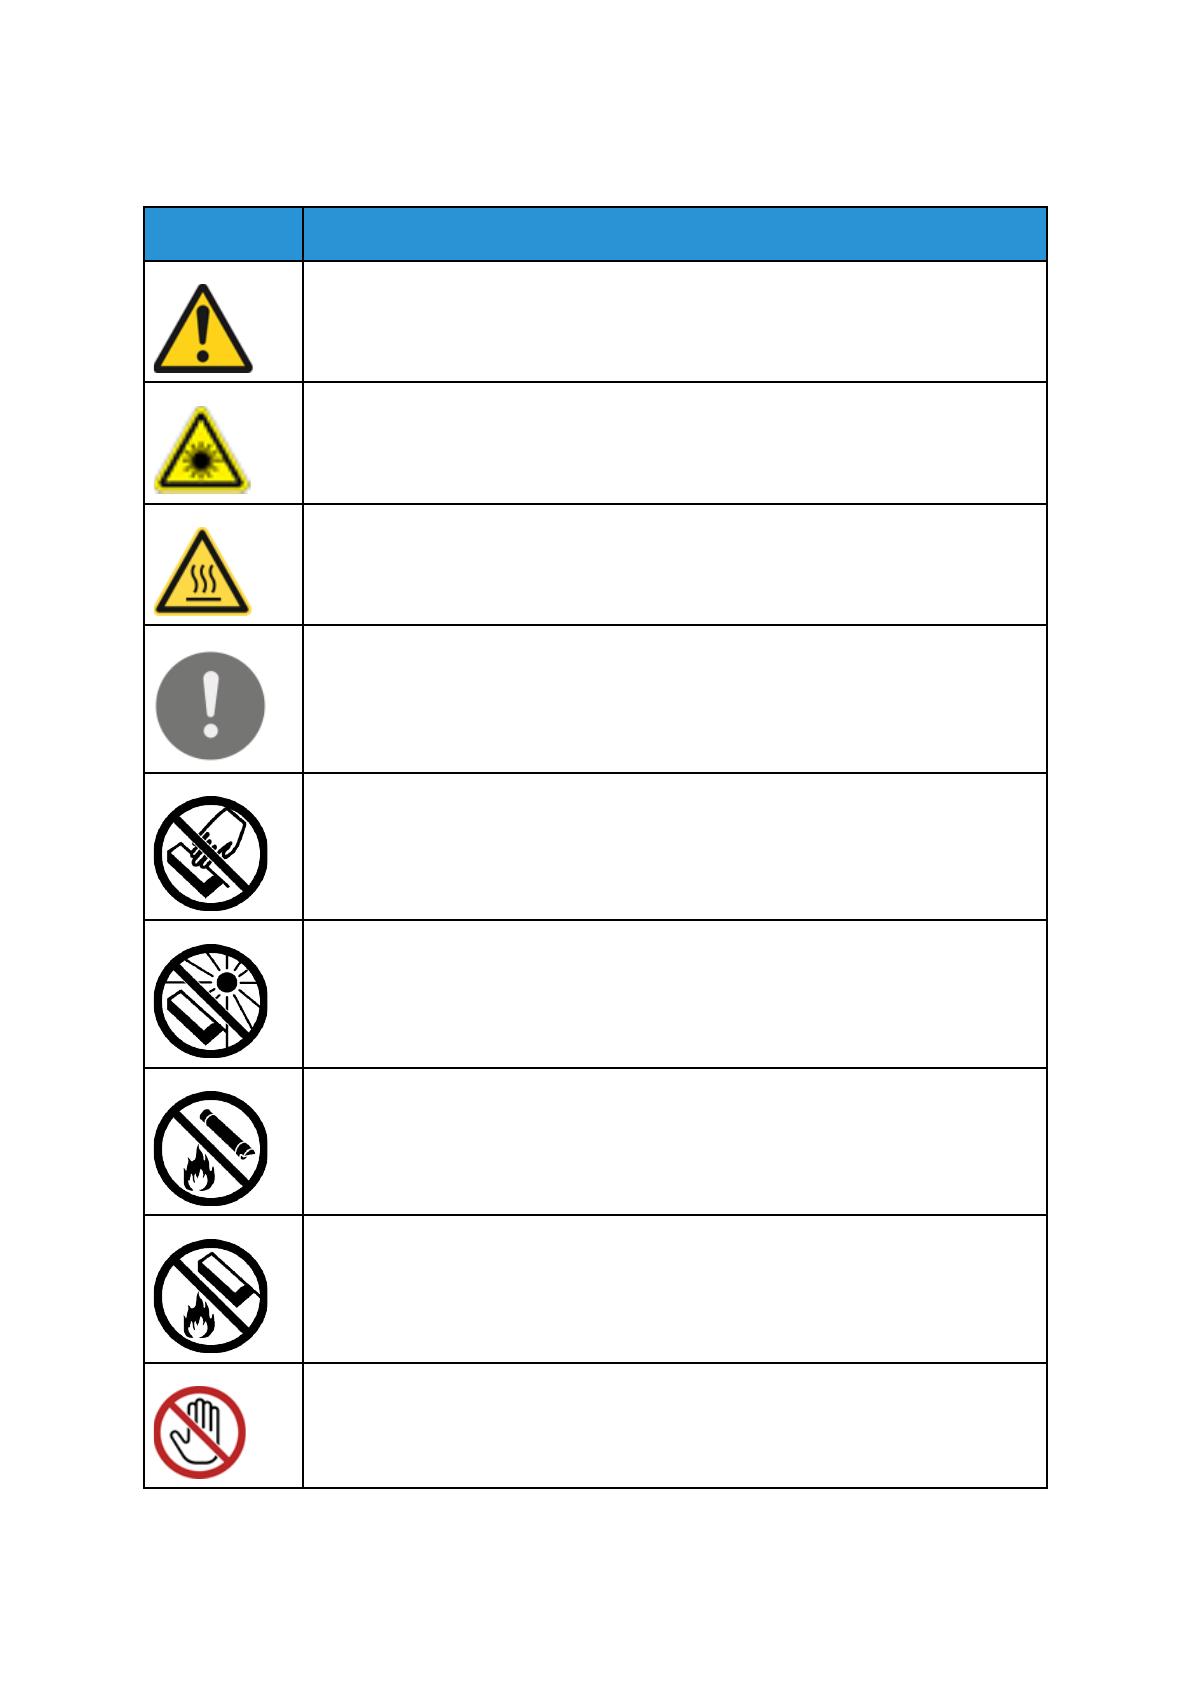
Символы на принтере
Знак Описание
Осторожно!
Указывается опасность, которая в случае неосторожности может привести к тяже-
лой травме или даже гибели.
Предупреждение о лазерном облучении
Указывает, что использование не описанных здесь регулировок, настроек или
процедур может привести к опасному воздействию лазерного излучения.
.
Предупреждение об опасности ожога
Наружная или внутренняя поверхность принтера может нагреваться. Во избежа-
ние травм соблюдайте осторожность.
Внимание
Указывается обязательное действие, которое необходимо выполнить для предот-
вращения материального ущерба.
Не касайтесь данной детали или участка принтера.
Не допускайте воздействия прямого солнечного света на принт-картриджи.
Не сжигайте тонер-картриджи.
Не сжигайте принт-картриджи.
Не касайтесь данной детали или участка принтера.
16
Многофункциональное устройство Xerox
®
B1025
Руководство пользователя
Безопасность

Знак Описание
Не используйте бумагу со скобками и т. д.
Не используйте бумагу со скрепками.
Не используйте бумагу со складками и загибами, скрученную и мятую бумагу.
Многофункциональное устройство Xerox
®
B1025
Руководство пользователя
17
Безопасность

Контактные данные для обращения по
вопросам охраны труда, техники
безопасности и охраны окружающей среды
За дополнительной информацией по вопросам охраны труда, техники безопасности и окру-
жающей среды, связанным с эти принтером и расходными материалами Xerox, обращайтесь
Сведения о безопасности принтера для Европы см. по адресу www.xerox.com/environment_
europe.
18
Многофункциональное устройство Xerox
®
B1025
Руководство пользователя
Безопасность

Многофункциональное устройство Xerox
®
B1025
Руководство пользователя
19
2
Начало работы
Содержание главы:
• Узлы и детали принтера ..................................................................................................... 20
• Информационные страницы .............................................................................................. 25
• Функции системного администратора ............................................................................... 26
• Дополнительные сведения ................................................................................................. 29
• Установка и настройка ....................................................................................................... 30
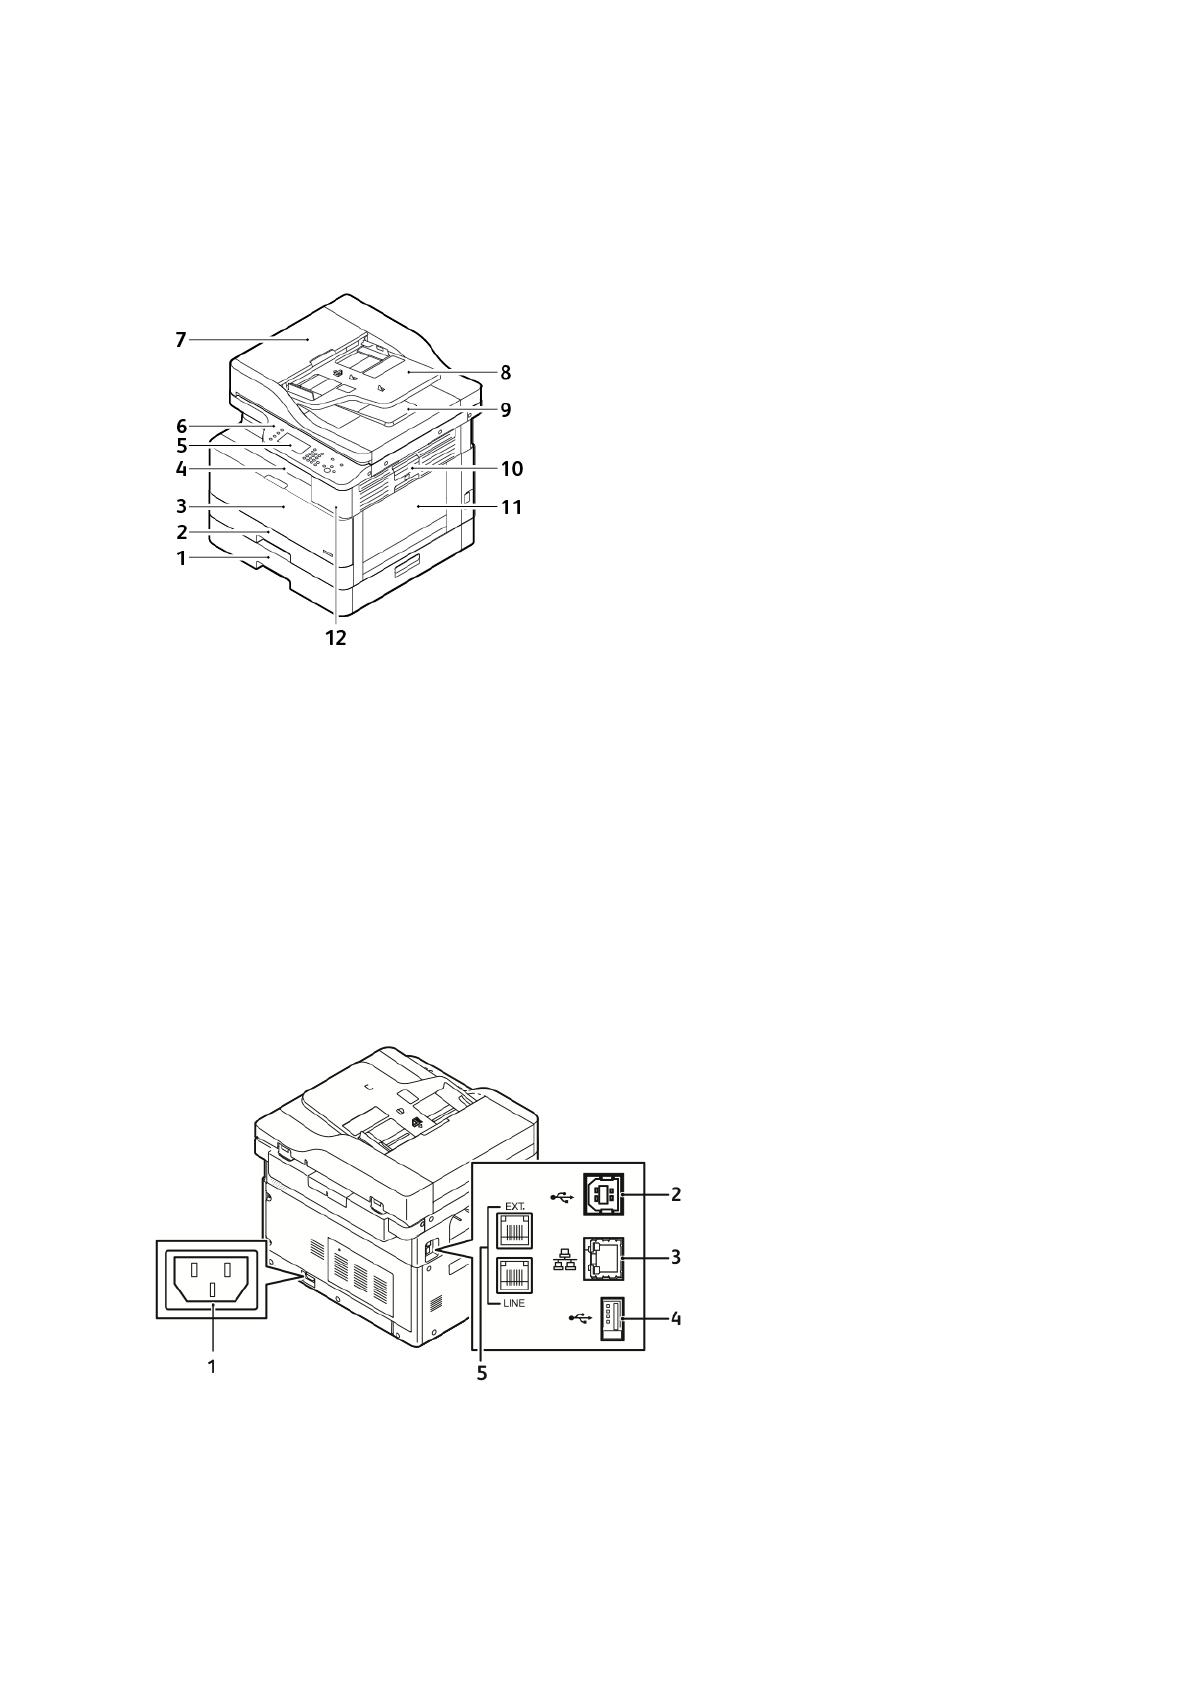
Узлы и детали принтера
ВВиидд ссппееррееддии
1. Лоток 2 дополнительного податчика
на 250 листов
2. Лоток 1 на 250 листов
3. Крышка передней дверцы
4. Выходной лоток
5. Сенсорный экран
6. Панель управления
7. Верхняя крышка податчика
оригиналов
8. Входной лоток податчика оригиналов
9. Выходной лоток податчика
оригиналов
10. Защелка боковой крышки
11. Обходной лоток
12. Порт USB
ВВиидд ссззааддии
1. Гнездо питания
2. Порт USB, тип B
3. Разъем Ethernet
4. Порт USB, тип А
5. Гнездо для линии факса (опция)
20
Многофункциональное устройство Xerox
®
B1025
Руководство пользователя
Начало работы
© 2018 Xerox Corporation. All rights reserved. Unpublished rights reserved under the copyright laws of the United
States. Contents of this publication may not be reproduced in any form without permission of Xerox Corporation.
Copyright protection claimed includes all forms of matters of copyrightable materials and information now allowed by
statutory or judicial law or hereinafter granted, including without limitation, material generated from the software
programs which are displayed on the screen such as styles, templates, icons, screen displays, looks, and so on.
Xerox
®
and Xerox and Design
PagePack
®
, eClick
®
, PrintingScout
MeterAssistant
®
, SuppliesAssistant
ColorQube
®
, Global Print Driver
States and / or other countries.
Adobe
®
Reader
®
, Adobe
®
of Adobe Systems Incorporated in the United States and/or other countries.
Apple
®
, Bonjour
®
, EtherTalk
Apple Inc., registered in the U.S. and other countries. AirPrint
Google Cloud Print
™
web printing service, Gmail
trademarks of Google, Inc.
HP-GL
®
, HP-UX
®
, and PCL
countries.
IBM
®
and AIX
®
are trademarks of International Business Machines Corporation in the United States and/or other
countries.
Microsoft
®
, Windows Vista
the United States and other countries.
McAfee
®
, ePolicy Orchestrator
United States and other countries.
Novell
®
, NetWare
®
, NDPS
United States and other countries.
PANTONE
®
and other Pantone, Inc. trademarks are the property of Pantone, Inc.
SGI
®
and IRIX
®
are trademarks of Silicon Graphics International Corp. or its subsidiaries in the United States and/or
other countries.
Sun, Sun Microsystems, and Solaris are trademarks or registered trademarks of Oracle and/or its affiliates in the
United States and other countries.
UNIX
®
is a trademark in the United States and other countries, licensed exclusively through X/ Open Company Limited.
Wi-Fi CERTIFIED Wi-Fi Direct
®
, Phaser
®
, PhaserSMART
®
, Walk-Up
®
, WorkCentre
®
, Xerox Secure Access Unified ID System
®
, and Mobile Express Driver
Type Manager
®
, ATM
™
, Flash
™
, TrueType
®
, iPad
®
, iPhone
™
webmail service, and Android
®
are trademarks of Hewlett-Packard Corporation in the United States and/or other
®
, Windows
®
, OneDrive
®
®
, and McAfee ePO
™
®
, NDS
®
, IPX
™
, and Novell Distributed Print Services
®
is a trademark of the Wi-Fi Alliance.
®
, PhaserMatch
®
, PhaserCal
®
, FreeFlow
®
, SMARTsend
®
are trademarks of Xerox Corporation in the United
®
, Macromedia
®
, Photoshop
®
, iPod
®
, iPod touch
®
and the AirPrint Logo
, and Windows Server
®
are trademarks of Microsoft Corporation in
are trademarks or registered trademarks of McAfee, Inc. in the
®
, PhaserMeter
™
®
, Scan to PC Desktop
®
, Xerox Extensible Interface Platform
®
, and PostScript
®
, Mac
®
, and Mac OS
®
are trademarks of
®
, are trademarks of Apple Inc.
™
mobile technology platform are
™
are trademarks of Novell, Inc. in the
, CentreWare
®
,
®
,
®
,
®
are trademarks
Download or browse on-line these System Administrator Manual for Xerox B1025 All in One Printer.
More Manuals:
In case you failed to obtain relevant information in this document, please, look through related operating manuals and user instructions for Xerox B1025.
Just click one of the links below to go to the selected manual:


Summary of Contents:
 |
[Page 1] Xerox B1025 VERSION 1.1 O CTOBER 2018 702P06571 Xerox ® B1025 Multifunction Printer System Administrator Guide |
 |
[Page 2] Xerox B1025 © 2018 Xerox Corporation. All rights reserved. Unpublished rights reserved under the copyright laws of the United States. Contents of this publication may not be reproduced in any form without permission of Xerox Corporation. Copyright protection cl… |
 |
[Page 3] Xerox B1025 Xerox ® B1025 Multifunction Printer System Administrator Guide 3 1 Introduction………………………………………………………………………………………………………………. 7 Configuration Overview………………… |
 |
[Page 4] Xerox B1025 4 Xerox ® B1025 Multifunction Printer System Administrator Guide Proxy Server…………………………………………………………………………………………………………… 35 Configuring the Proxy Server……………….. |
 |
[Page 5] Xerox B1025 Xerox ® B1025 Multifunction Printer System Administrator Guide 5 Configuring Default Print Settings……………………………………………………………………………… 65 Enabling Print Spooling Settings……………………… |
 |
[Page 6] Xerox B1025 6 Xerox ® B1025 Multifunction Printer System Administrator Guide Before You Begin ………………………………………………………………………………………………. 93 Configuring Default Scan Settings…………………… |
 |
[Page 7] Xerox B1025 Xerox ® B1025 Multifunction Printer System Administrator Guide 7 1 Introduction This chapter contains: • Configuration Overview…………………………………………………………………………………………………. 8 • M… |
 |
[Page 8] Xerox B1025 Configuration Overview When you configure the printer for the first time, complete the following tasks. 1. Connect your printer to a network with an Ethernet cable. 2. Confirm that your network recognizes your printer. By default, the printer receive… |
 |
[Page 9] Xerox B1025 More Information You can obtain more information about your printer from these sources: Resource Location Installation Guide Packaged with the printer. Other documentation for your printer www.xerox.com/office/B1022_B1025docs Technical support inform… |
 |
[Page 10] Xerox B1025 … |
 |
[Page 11] Xerox B1025 Xerox ® B1025 Multifunction Printer System Administrator Guide 11 2 Initial Setup This chapter contains: • Physically Connecting the Printer…………………………………………………………………………………… 12 • Ass… |
 |
[Page 12] Xerox B1025 Physically Connecting the Printer 1. Connect one end of a Category 5 or better Ethernet cable to the Ethernet port on the back of the printer. Connect the other end of the cable to a correctly configured network port. 2. If your printer has fax insta… |
 |
[Page 13] Xerox B1025 Assigning a Network Address The printer acquires a network address automatically from a DHCP server by default. To assign a static IP address, refer to Configuring the Network Address Manually at the Printer Control Panel. Xerox ® B1025 Multifunctio… |
 |
[Page 14] Xerox B1025 Accessing Administration and Configuration Settings You can access the administration and configuration settings from Device Settings on the control panel touch screen, or from the Properties tab in Xerox ® CentreWare ® Internet Services. The contr… |
 |
[Page 15] Xerox B1025 Note: You can change these settings at any time. For details, refer to the User Guide for your printer. SSeettttiinngg AAllttiittuuddee AAddjjuussttmmeenntt Atmospheric pressure, determined by altitude, can affect print quality. If the printer is at … |
 |
[Page 16] Xerox B1025 Initial Setup in Xerox ® CentreWare ® Internet Services Xerox ® CentreWare ® Internet Services is the administration and configuration software installed on the embedded Web server in the printer. It allows you to configure and administer the pri… |
 |
[Page 17] Xerox B1025 UUssiinngg tthhee CCoonnffiigguurraattiioonn PPaaggee The Configuration page provides current detailed configuration information about the device. You can refer to this page to view information such as installed options, network setup information, in… |
 |
[Page 18] Xerox B1025 Changing the System Administrator Password Xerox recommends that you change the default system administrator password after you configure the printer. Be sure to store the password in a secure location. The default password is 1111. 1. In Xerox ® Ce… |
 |
[Page 19] Xerox B1025 Xerox ® B1025 Multifunction Printer System Administrator Guide 19 3 Network Connectivity This chapter contains: • TCP/IP ………………………………………………………………………………………………………………… |
 |
[Page 20] Xerox B1025 TCP/IP Computers and printers primarily use TCP/IP protocols to communicate over an Ethernet network. Bonjour is a discovery protocol that allows devices on a TCP/IP network to discover each other without knowledge of specific IP addresses. Bonjour i… |
 |
[Page 21] Xerox B1025 c. Touch OK. Note: For the following steps, if DHCP is enabled, the Domain Name and DNS Servers cannot be set manually. d. Touch Domain Name, then touch the Requested Domain Name field. To type the fully qualified domain name, use the touch screen ke… |
 |
[Page 22] Xerox B1025 • To configure the printer to assign itself an address if a DHCP server does not provide one, for Self-Assigned Address, select Enabled. • To allow users to see and connect to the printer using Bonjour, for Multicast DNS, select Enabled. 10. Clic… |
 |
[Page 23] Xerox B1025 SLP Printers use Service Location Protocol (SLP) to announce and look up services on a local network without prior configuration. When SLP is enabled, the printer becomes a Service Agent (SA) and announces its services to User Agents (UA) on the netw… |
 |
[Page 24] Xerox B1025 SNMP Simple Network Management Protocol (SNMP) is a set of network protocols designed to allow you to manage and monitor devices on your network. You can use the SNMP configuration pages in Xerox ® CentreWare ® Internet Services to: • Enable or d… |
 |
[Page 25] Xerox B1025 Configuring SNMPv3 SNMPv3 is the current standard version of SNMP defined by the Internet Engineering Task Force (IETF). It provides three important security features: • Message integrity to ensure that a packet has not been tampered with in transi… |
 |
[Page 26] Xerox B1025 WINS When running WINS, the printer registers its IP address and NetBIOS Host Name with a WINS server. WINS allows the printer to communicate using host name only. Using Microsoft Networking removes significant overhead for systems administrators. CC… |
 |
[Page 27] Xerox B1025 Configuring LPR/LPD The Line Printer Daemon (LPD) and Line Printer Remote (LPR) protocols provide printer spooling and network print server functionality for UNIX-based systems, such as HP-UX, Linux, and Macintosh. 1. In Xerox ® CentreWare ® Intern… |
 |
[Page 28] Xerox B1025 Raw TCP/IP Printing Raw TCP/IP is used to open a TCP socket-level connection over Port 9100, and stream a print-ready file to the printer input buffer. It then closes the connection either after sensing an End Of Job character in the PDL or after exp… |
 |
[Page 29] Xerox B1025 Configuring IPP Internet Printing Protocol (IPP) is a standard network protocol that allows you to print and manage jobs remotely. 1. In Xerox ® CentreWare ® Internet Services, click Properties→Connectivity→Protocols. 2. Click IPP. 3. For Proto… |
 |
[Page 30] Xerox B1025 LDAP Server Lightweight Directory Access Protocol (LDAP) is a protocol used to process queries and updates to an LDAP information directory, on an external server. LDAP can also be used for network authentication and authorization. The LDAP Server pa… |
 |
[Page 31] Xerox B1025 a. To specify the Bind Method to connect to the directory server, select an option. • Anonymous: This method does not require authentication to connect to the directory server. • Simple: This method uses a DN-password combination to authenticate … |
 |
[Page 32] Xerox B1025 HTTP Hypertext Transfer Protocol (HTTP) is a request-response standard protocol between clients and servers. Clients that make HTTP requests are called User Agents (UAs). Servers that respond to these requests for resources, such as HTML pages, are c… |
 |
[Page 33] Xerox B1025 Google Cloud Print Google Cloud Print allows you to print documents from a device connected to the Internet, without using a print driver. You can send documents to the printer from anywhere, including documents stored in the cloud, a personal comput… |
 |
[Page 34] Xerox B1025 9. To update the Registration Status displayed in your Web browser, refresh the Xerox ® CentreWare ® Internet Services Web page. 10. To access the Google Cloud Print feature, in your Google account, click Manage Your Printer. The default printer na… |
 |
[Page 35] Xerox B1025 Proxy Server A proxy server acts as a go-between for clients seeking services and servers that provide them. The proxy server filters client requests and if the requests meet the proxy server filtering rules, it grants the request and allows the conn… |
 |
[Page 36] Xerox B1025 WSD Web Services for Devices (WSD) is technology from Microsoft that provides a standard method for discovering and using network connected devices. It is supported in Windows Vista, Windows Server 2008, and newer operating systems. WSD is one of sev… |
 |
[Page 37] Xerox B1025 Configuring SNTP Simple Network Time Protocol (SNTP) synchronizes the internal clocks of computers over a network connection. 1. In Xerox ® CentreWare ® Internet Services, click Properties→Connectivity→Protocols. 2. Click SNTP. 3. For Name or I… |
 |
[Page 38] Xerox B1025 Mopria Mopria is a software feature that enables users to print from mobile devices without requiring a print driver. You can use Mopria to print from your mobile device to Mopria-enabled printers. Note: • Only Mopria-enabled devices support Mopria… |
 |
[Page 39] Xerox B1025 Wireless Network Connection A wireless local area network (WLAN) provides the means to connect two or more devices in a local area network (LAN) without a physical connection. The printer can connect to a wireless LAN that includes a wireless router … |
 |
[Page 40] Xerox B1025 8. For Root Certificate Setup, upload a Root Certificate. 9. For Client Certificate Setup, upload a Client Certificate, then type the Private Key Password. 10. For Address Acquisition, select a protocol option. If you select Static, you can change th… |
 |
[Page 41] Xerox B1025 CCoonnffiigguurriinngg WWii—FFii DDiirreecctt You can connect to your printer from a Wi-Fi mobile device, such as a tablet, computer, or smart phone, using Wi-Fi Direct. Note: Wi-Fi Direct is disabled by default. To configure Wi-Fi Direct: 1. In Xer… |
 |
[Page 42] Xerox B1025 … |
 |
[Page 43] Xerox B1025 Xerox ® B1025 Multifunction Printer System Administrator Guide 43 4 Security This chapter contains: • Setting Access Rights ………………………………………………………………………………………………….. 44 • Se… |
 |
[Page 44] Xerox B1025 Setting Access Rights You can control access to services and features by setting up authentication and authorization. Personalization allows the printer to retrieve user information to customize features. AAuutthheennttiiccaattiioonn Authentication i… |
 |
[Page 45] Xerox B1025 CCoonnffiigguurriinngg tthhee LLoogg OOuutt CCoonnffiirrmmaattiioonn SSccrreeeenn 1. In Xerox ® CentreWare ® Internet Services, click Properties→Login / Permissions. 2. Click Login Methods. 3. To enable the log out confirmation screen, select Sho… |
 |
[Page 46] Xerox B1025 Setting Print Permissions You can set print permissions for 1-sided or 2-sided printing, and secure printing. 1. In Xerox ® CentreWare ® Internet Services, click Properties→Login / Permissions. 2. Click Print Permissions. 3. For 2-Sided Printing … |
 |
[Page 47] Xerox B1025 Device User Database The Device User Database stores user credential information for local authentication. When you configure local authentication, the printer checks the credentials that users provide against the information in the database. You can… |
 |
[Page 48] Xerox B1025 Secure HTTP (TLS) To establish an HTTP Secure (HTTPS) connection to the printer, you can use TLS to encrypt data sent over HTTP. You can enable TLS encryption for the following features. • Configuring the printer in Xerox ® CentreWare ® Internet … |
 |
[Page 49] Xerox B1025 IP Filtering You can prevent unauthorized network access by creating an IP Filter to block or allow data sent from particular IP addresses. Note: Be careful not to filter the IP address of any device used to administer the printer. EEnnaabblliinngg I… |
 |
[Page 50] Xerox B1025 IP Sec Internet Protocol Security (IP Sec) is a group of protocols used to secure Internet Protocol (IP) communications. The IP Sec feature authenticates and encrypts each IP data packet. If you select IP Sec, all printer traffic uses IP Sec protocol… |
 |
[Page 51] Xerox B1025 Concealing or Showing Job Names You can conceal job names on the printer control panel. 1. In Xerox ® CentreWare ® Internet Services, click Properties→Security. 2. Click Conceal Job Names. 3. Select an option: • Show All Job Names: This option … |
 |
[Page 52] Xerox B1025 802.1X 802.1X is an Institute for Electrical and Electronics Engineers (IEEE) standard that defines a method for port-based network access control or authentication. In an 802.1X secured network, the printer must be authenticated by a central authori… |
 |
[Page 53] Xerox B1025 1. At the printer control panel, press the Machine Status button. 2. Touch Network Settings→Advanced Settings. 3. Touch 802.1X. 4. Touch Enable. 5. Touch Authentication Method, then select the method used on your network. 6. Touch Username. 7. Usin… |
 |
[Page 54] Xerox B1025 Displaying or Hiding Network Settings You can show or hide the IPv4 address or host name of the printer on the control panel touch screen. 1. In Xerox ® CentreWare ® Internet Services, click Properties→Security. 2. Click Display Network Settings…. |
 |
[Page 55] Xerox B1025 System Timeout You can specify how long the printer waits to log out an inactive user. SSeettttiinngg SSyysstteemm TTiimmeeoouutt VVaalluueess 1. In Xerox ® CentreWare ® Internet Services, click Properties→Security. 2. Click System Timeout. 3. Fo… |
 |
[Page 56] Xerox B1025 USB Port Security You can prevent unauthorized access to the printer through USB ports by disabling the ports. Note: If USB ports are disabled, you cannot update the software or print from a USB Flash drive. EEnnaabblliinngg oorr DDiissaabblliinngg U… |
 |
[Page 57] Xerox B1025 Security Certificates A digital certificate is a file that contains data used to verify the identity of the client or server in a network transaction. A certificate also contains a public key used to create and verify digital signatures. One device p… |
 |
[Page 58] Xerox B1025 Restricting Access to the Device Web Interface You can lock the Web interface for the device. When the Web interface is locked, all areas of the Web interface are inaccessible until users logs in. When the Web interface is unlocked, users can access … |
 |
[Page 59] Xerox B1025 Verifying the Software You can test the printer software to confirm that it is operating correctly. The test checks software files to confirm that they are not corrupt. If the printer software appears to function improperly, a Xerox representative ca… |
 |
[Page 60] Xerox B1025 … |
 |
[Page 61] Xerox B1025 Xerox ® B1025 Multifunction Printer System Administrator Guide 61 5 Printing This chapter contains: • Enabling the Device Startup Page …………………………………………………………………………………. 62 • Managing B… |
 |
[Page 62] Xerox B1025 Enabling the Device Startup Page The Startup page provides basic printer configuration and network information. 1. In Xerox ® CentreWare ® Internet Services, click Properties→Services. 2. Click Printing→Device Start-Up Page. 3. To enable the St… |
 |
[Page 63] Xerox B1025 Managing Banner Page Printing Options You can set the printer to print a banner page with each print job. The banner page contains information identifying the user and job name. You can set this option in the print driver, in Xerox ® CentreWare ® I… |
 |
[Page 64] Xerox B1025 Printing an Error Page 1. In Xerox ® CentreWare ® Internet Services, click Properties→Services. 2. Click Printing→Error Page. 3. To print an error page when a print job fails, for Error Page Settings, select Enable. 4. Click Apply. 64 Xerox ® … |
 |
[Page 65] Xerox B1025 Configuring Default Print Settings 1. In Xerox ® CentreWare ® Internet Services, click Properties→Services. 2. Click Printing→General. 3. Configure as needed. 4. Click Apply. Xerox ® B1025 Multifunction Printer System Administrator Guide 65 Pr… |
 |
[Page 66] Xerox B1025 Enabling Print Spooling Settings 1. In Xerox ® CentreWare ® Internet Services, click Properties→Services. 2. Click Printing→Print Spooling. 3. To enable print spooling, for Print Spooling Settings, select Enabled. 4. Click Apply. 66 Xerox ® B1… |
 |
[Page 67] Xerox B1025 Printing Reports Your printer has a printable set of reports. These include configuration and font information, demonstration pages, and more. 1. In Xerox ® CentreWare ® Internet Services, click Properties→Services. 2. Click Printing→Reports. 3… |
 |
[Page 68] Xerox B1025 Configuring Secure Print Settings You can configure Secure Print settings to specify how the printer behaves when a user sends a Secure Print job to the printer. CCoonnffiigguurriinngg SSeeccuurree PPrriinntt 1. In Xerox ® CentreWare ® Internet Ser… |
 |
[Page 69] Xerox B1025 UNIX and Linux Printing The Xerox ® Print Driver package provides tools for you to manage printers connected in UNIX and Linux environments. The Xerox ® print drivers provide a GUI-based driver dialog for printer feature selections. You can select … |
 |
[Page 70] Xerox B1025 The file automatically downloads to the default location for your computer file downloads. 8. To install the Xerox ® Print Driver package: a. Open the package with your OS package manager. b. To install using a command-line utility, change to the di… |
 |
[Page 71] Xerox B1025 IInnssttaalllliinngg tthhee PPPPDD oonn tthhee WWoorrkkssttaattiioonn 1. If available, download the Xerox ® PPD for CUPS from the Drivers and Downloads page on the Xerox Support website. 2. Copy the PPD into the CUPS ppd/Xerox folder on your worksta… |
 |
[Page 72] Xerox B1025 Print from USB This feature allows you to print a file that is stored on a USB Flash Drive from the USB port on the printer control panel. Before you begin: Enable USB ports. For details, refer to USB Port Security. EEnnaabblliinngg PPrriinntt ffrroo… |
 |
[Page 73] Xerox B1025 Managing Saved Jobs Saved jobs are documents sent to the printer and stored there for future use. Any saved jobs appear on the Saved Jobs page. Use the Saved Jobs page to view, print, and delete saved jobs, and create and manage folders in which they… |
 |
[Page 74] Xerox B1025 Setting the Delete Held Job After Timer When the Delete Held Job After timer expires, jobs held in the Active Jobs and Personal & Secure Jobs tabs are deleted. 1. At the printer control panel, press the Machine Status button. 2. Touch Device Sett… |
 |
[Page 75] Xerox B1025 Xerox ® B1025 Multifunction Printer System Administrator Guide 75 6 Copying This chapter contains: • Changing the Default Copy Settings ……………………………………………………………………………… 76 • Specifying ID… |
 |
[Page 76] Xerox B1025 Changing the Default Copy Settings The printer uses the default copy settings on all copy jobs unless you change them for an individual job. You can modify the default copy settings. Specifying De fault Copy Settings in Xerox ® CentreWare ® Inte… |
 |
[Page 77] Xerox B1025 3. To change the position of a feature, select the feature, then use the arrows. 4. When finished, touch OK. SShhoowwiinngg,, LLoocckkiinngg,, aanndd HHiiddiinngg CCooppyy FFeeaattuurreess oonn tthhee CCoonnttrrooll PPaanneell You can select the feat… |
 |
[Page 78] Xerox B1025 Specifying ID Card Copy Settings 1. In Xerox ® CentreWare ® Internet Services, click Properties→Services. 2. Click ID Card Copy. 3. For Defaults, click the Pencil icon. 4. Configure settings as needed, then click Save. CChhaannggiinngg tthhee IID… |
 |
[Page 79] Xerox B1025 Xerox ® B1025 Multifunction Printer System Administrator Guide 79 7 Scanning This chapter contains: • Scanning Setup Overview…………………………………………………………………………………………….. 80 • Configu… |
 |
[Page 80] Xerox B1025 Scanning Setup Overview If the printer is connected to a network, it is enabled for scanning. Before you can scan, ensure that you do the following: • If you are scanning to a shared folder on your computer, share the folder, set the correct permis… |
 |
[Page 81] Xerox B1025 Configuring Image Settings You can configure compression settings for the scanned image. • TIFF Specification Supplement 2: This compression method is a Deflate TIFF 6.0 extension that prevents image-quality loss. • LZW: This compression method p… |
 |
[Page 82] Xerox B1025 Setting Up Scan To Destination SSeettttiinngg UUpp SSccaannnniinngg ttoo aann FFTTPP SSeerrvveerr Before you begin: • Ensure that FTP services are running on the server or computer where you want to store scanned image files. Note the IP address or… |
 |
[Page 83] Xerox B1025 SSeettttiinngg UUpp SSccaannnniinngg ttoo aann SSMMBB FFoollddeerr Before you begin: • Ensure that SMB services are running on the server or computer where you want to store scanned image files. Note the IP address or host name. • Create a user a… |
 |
[Page 84] Xerox B1025 SSeettttiinngg UUpp SSccaannnniinngg ttoo aann HHTTTTPP SSeerrvveerr Before you begin: • Ensure that Web services are installed on the server where you want to store scanned images. Examples of Web servers include Microsoft Internet Information Ser… |
 |
[Page 85] Xerox B1025 SSeettttiinngg UUpp SSccaannnniinngg ttoo aann HHTTTTPPSS SSeerrvveerr Before you begin: • Ensure that Web services are installed on the server where you want to store scanned images. Examples of Web servers include Microsoft Internet Information S… |
 |
[Page 86] Xerox B1025 b. To update the password for an existing Login Name, for Select to save new password, select the check box. 11. Click Save, or select Add Another Contact After Saving, then click Save & Add Another. SSeettttiinngg UUpp SSccaannnniinngg ttoo aann… |
 |
[Page 87] Xerox B1025 Scanning to an Email Address The email feature allows you to scan a document and send it to an email address as an attachment. Before you begin: • Configure SMTP settings. For details, refer to Configuring SMTP Server Settings. • Note the IP addr… |
 |
[Page 88] Xerox B1025 Email Configure email settings on the Email Setup page in Xerox ® CentreWare ® Internet Services. Email settings apply to all services that use SMTP, including Internet Fax and Scan to Email. AAcccceessssiinngg tthhee EEmmaaiill SSeettuupp PPaaggee… |
 |
[Page 89] Xerox B1025 EEddiittiinngg OOppttiioonnaall EEmmaaiill SSeettttiinnggss You can use optional email settings to configure common features that apply to all emails sent from the printer. Common features include email receipts, message body and signature, and From … |
 |
[Page 90] Xerox B1025 b. If you select On; Editable by user, select the default setting for users at the control panel. For Email Encryption Default, select On or Off. c. For Encryption Algorithm, select the algorithm used by your email server. 5. For From Field Display, … |
 |
[Page 91] Xerox B1025 Scan to USB You can insert a USB Flash Drive into the printer, scan a document, and store the scanned file on the USB drive. Before you begin: Enable USB ports. For details, refer to USB Port Security. EEnnaabblliinngg SSccaann ttoo UUSSBB 1. In Xero… |
 |
[Page 92] Xerox B1025 Enabling Remote Scanning using TWAIN Enable Remote Start to allow users to scan images into a TWAIN-compliant application using the TWAIN driver. Before you begin: Enable the Scan Extension Web service. For details, refer to HTTP. To enable remote sc… |
 |
[Page 93] Xerox B1025 Configuring Scan To Destination The Scan To Destination feature allows you to associate scan destinations with address book contacts. Users can select these contacts when scanning using the Scan To feature. BBeeffoorree YYoouu BBeeggiinn • Add at l… |
 |
[Page 94] Xerox B1025 CChhaannggiinngg tthhee SSccaann TToo FFeeaattuurree OOrrddeerr oonn tthhee CCoonnttrrooll PPaanneell You can change the order in which scan to destination features appear on the control panel touch screen. To change the feature order: 1. At the prin… |
 |
[Page 95] Xerox B1025 Xerox ® B1025 Multifunction Printer System Administrator Guide 95 8 Faxing This chapter contains: • Fax Overview……………………………………………………………………………………………………………… 96 … |
 |
[Page 96] Xerox B1025 Fax Overview You can use the Fax feature to scan a document and send it to a fax machine. When you send a fax from the printer control panel, the printer scans the document and transmits it to a fax machine using a dedicated telephone line. To use th… |
 |
[Page 97] Xerox B1025 CCoonnffiigguurriinngg FFaaxx IInnccoommiinngg aanndd OOuuttggooiinngg PPoolliicciieess 1. In Xerox ® CentreWare ® Internet Services, click Properties→Services→Fax. 2. To configure fax policies, for Incoming/Outgoing Policies, click the Pencil … |
 |
[Page 98] Xerox B1025 8. For Line Name, type a line name for the printer. 9. For Line Configuration, touch an option. If you have a 10-pulse-per-second line, select Pulse. 10. Touch Next. 11. To restart the printer, touch Reboot. FFaaxx SSeeccuurriittyy CCoonnffiigguurrii… |
 |
[Page 99] Xerox B1025 b. To select options for fitting the scanned image to the loaded paper size, select an option: • Reduce to Fit: This option reduces the size of the scanned image, and allows the image to fit into a smaller area on the page. • Discard Bottom: This… |
 |
[Page 100] Xerox B1025 d. Touch OK again. 10. To send multiple fax jobs to a single destination during one transmission, touch Batch Send, touch Enabled, then touch OK. 11. To compensate for poor line quality, touch Error Correction Mode, touch Enabled, then touch OK. SSee… |