See Achievements for list of achievements and their rewards.
- Chain Smoker (At any point in the game, have 30 cigarettes in your inventory)
- Start an easy-difficulty game as Haru and go to the shop. Keep rerolling stock/going into and out of the shop until you can buy two more units of Cigarettes, then «use» all three in your inventory (since you start with one).
- Junior Priest (Purify two cursed places in a single playthrough)
- With a Holy Candle in your inventory, certain random events can call for using it to purify a location. You only need one Holy Candle, as it is not used up. The events are School Bathroom in School, Eyes in the Dark in Mansion, and Lovesick Corner in Downtown.
- Paranoia Agent (Defeat an enemy with a Baseball Bat)
- Simply get the Baseball Bat weapon from the Apartment Stalker, then bludgeon someone to death with it.
- Peeping Tom (Discover a hole in the painting)
- During the village festival case, you can inspect the painting in your room — click the actual painting to unlock the option to check it out. You will find a hole and unlock this achievement. This action also allows you to investigate the backroom of the Inn and obtain the Karukosa Mask needed for the next achievement.
- Perfect Disguise (Enter the overgrown factory wearing Ritual Robe and Karukosa mask)
- This is easiest to get after you’ve unlocked the Occult Shop. Buy a Ritual Robe, then do the Far-out Fable of a Fear Festival case. When in your room at the Inn, you can inspect the painting — click the painting in your room to unlock the option to check it out and find a peephole (also unlocking the Peeping Tom achievement). After this, from the overworld you can choose to explore the Staff-Only area of the Inn, which will grant you the Karukosa Mask (either as a drop from the Perverted Innkeeper enemy if you pass the skill check, or directly from the event results if you fail it). When worn with the Ritual Robe, this mask will grant you the achievement once you enter the final location. You can also rarely get the Karukosa mask from the Sculptures event while investigating the School.
- Frequent Buyer (Shop for items ten times in a single run)
- You don’t actually need to buy something. Simply enter, leave, and re-enter the shop ten times in one playthrough.
- Lightburn (Equip two sources of light at the same time)
- Torch can be found by completing side quest from Sorrowful Saga of the Moonlight Sailors in Timeline B, or in the Spine-Chilling Story of School Scissors Mystery if the school is burned down from the Macabre Memoir of Morbid Mermaids.
- Flashlight can be bought from the Shop and Hardware Store or acquired by passing a Charisma check in the event Hunting Party.
- Otherwordly Thirst (Drink the blood of a forgotten beast and survive)
- This achievement is very RNG-dependent and can only be done if you have the Alarming Account of Abnormal Arms mystery available and have Extended Card Pack A unlocked and enabled.
- Complete Alarming Account of Abnormal Arms while on Timeline A and finish the secondary objective so that you can get a Tiny Key.
- Investigate the School location until you get the Trophy Case event. Use the Tiny Key to obtain the Goblet.
- Continue doing investigations until you get a chance for an Otherworld event (if you have the Doom to spare, farming the School Library or History Club for the Void spell might help).
- If the Otherworld event is Upper Kingdom, you’ll be able to fill the Goblet.
- Use the filled Goblet and the achievement will unlock.
- Junior Scout (Investigate 20 locations with a Compass equipped)
- Fairly easy one. Buy a Compass in a Shop as early in the playthrough as possible and just have it equipped while you play your game, and you’ll unlock this.
- House of Paper (As Miku, take a hostage while wearing the Tokyo outfit)
- Playing as Miku, put on the Tokyo outfit and go raise your DOOM rating to 80% or so. Equip a weapon and intimidate a student in the Schoolyard into following you to unlock the achievement.
- This Is For My Friends (As Aiko, defeat the Mad Janitor)
- Start a game as Aiko, and if the Mermaid case isn’t in your list of mysteries, restart until it is. Simply play the case normally, defeat Mad Janitor without using special context actions, and the achievement is yours.
- Wait For It (During combat, prepare to strike but don’t attack that turn)
- In fight, use the Prepare Attack action last in a turn.
- Team Kill (Backstab a follower)
- You’ll need to have Paranoia curse for this. It will enable the «KILL» option on ally screen.
- Say Hello (Meet your _other_ neighbor)
- To unlock this achievement, alt+tab out of the game for a minute and then alt+tab back in. There is a chance the neighbor will appear.
- Junior Librarian (Discard three books in one playthrough)
- Finding three discardable books is RNG-dependent and requires either luck or continuously looking for corresponding events. The most suitable locations for it are School, Mansion, and Village.
- Library Notes can sometimes be found in a drawer in your home.
- Cursed Grimoire and There Was a Hole Here are guaranteed to give a book when the right option is chosen.
- Stalker Girl, Curious Bookstore, Cold Trail, Professor Takeuchi, Shimo-Kage, Moving Company, and My Weird Collection have chances of giving a book.
- Investigate locations until you get one of the above events.
- The Occult Shop and History Club both have a chance of stocking books for sale.
- If you have the But Dad!!! challenge unlocked, selecting it will give you an additional book at the start.
- We Don’t Need Eyes (Destroy your eye and open the third one)
- You will need 1) the Occult Shop unlocked and available to use; 2) the Glass Eye unlocked by the Peeping Tom achievement. In the Occult Shop, reroll until you find the Glass Eye. Use it. Then go study spells at the school until you get the Third Eye spell and cast it.
- True Idol (At any point in the game, have 4 followers)
- Go to the Schoolyard and simply ask or threaten people to follow you. Starting as Mizuki also gives you an ally.
- Classy Ritual (Sacrifice your ally with a Ritual Dagger equipped)
- You need to get Ending A for Horrible History of Household Hell with the Ritual Dagger equipped to sacrifice a follower with the dagger.
- Peeking Tom (Meet a school wraith haunting the corridor)
- During the Spine-Chilling Story of School Scissors mystery, select the ‘PEEK OUTSIDE’ option when it becomes available and open the door.
- Awoo (Call Junko)
- To unlock this achievement, watch TV in your home and use the phone to dial 56709 (a lyric from the Junko Ohashi song «Telephone»).
- Paid in Blood (Have your ally die during a combat encounter)
- When you have a follower, there is an battle option in Support Actions to have your ally attempt to distract the enemy. This action has a chance to kill the follower, so simply do that until your ally dies.
- Exorcism (Exorcise a ghost)
- Find a Ghost enemy and use the correct 5 bow-clap prayer sequence to exorcise them. This one is random and while it’s not hard, it’s kind of a pain to figure out the right order.
- Never-Ending Summer (Change the date and stop the curse)
- To unlock this achievement, click on the date in the top-left corner.
- Restless (Complete a playthrough without resting)
- This means no visits to Rest at HOME during the game; taking baths between mysteries and the special «rest a bit» action at the Lighthouse are fine.
- Scholar (Research five spells in a single game)
- Easy achievement. Go to the School Library and simply research five spells.
- Transfer Girl (Complete a game with the first character)
- Fit Girl (Complete a game with the second character)
- Thug Survivor (Complete a game with the third character)
- Idol Survivor (Complete a game with the fourth character)
- Reporter Survivor (Complete a game with the fifth character)
- Lungful of Air (Complete the Cold Turkey challenge)
- Grounded Forever (Complete the But Dad!! challenge)
- This challenge requires you to have unlocked Moriko Ishii before you can attempt it.
- Student Survivor (Complete a game with the sixth character)
- Mimi needs first to be unlocked with the World Saved II achievement.
- Chaos Survivor (Complete a game with the seventh character)
- Miku needs first to be unlocked with the Soft Side achievement.
- Bad Luck (Roll a 1 during a stat check)
- This is going to happen more often than you’d want it to.
- From the Brink (Defeat an Old God with over 90% Doom)
- Need No Education (Burn down the school building)
- This is achieved by selecting the «TOPPLE A LAMP» option in combat with the Mad Janitor at the end of the Macabre Memoir of Morbid Mermaids mystery.
- Boop (Surprise the dog)
- When you’re shopping, click that cute dog’s nose and he’ll bark at you, unlocking the achievement.
- My Dear Ghost (Complete the Ghastly Presence challenge)
- Most Popular Idol (Complete the Ghost Town challenge)
- World Saved I (Win your first playthrough)
- World Saved II (Win your second playthrough)
- World Saved III (Win your third playthrough)
- World Saved IV (Win your fourth playthrough)
- World Doomed I (Lose your playthrough due to Reason loss)
- World Doomed II (Lose your playthrough due to Stamina loss)
- Painted Hospital (Win your fifth playthrough)
- Onyx Medallion (Gather five curses)
- Witch’s Tree can be used 3 times to get 3 curses right at the start of the game.
- Consuming a Lump of Flesh has a 3/4 chance to give you one curse, and it can be bought repeatedly at the Occult Shop.
- World Doomed III (Lose your playthrough due to Doom)
- Eldritch Backstory I (Win a playthrough using World of Horror backstory)
- Eldritch Backstory II (Win a playthrough using Medical History backstory)
- Medical History needs first to be unlocked with the Eldritch Backstory I achievement.
- Eldritch Backstory III (Win a playthrough using Hunted by the Cult backstory)
- Hunted by the Cult needs first to be unlocked with the Eldritch Backstory II achievement.
- Eldritch Backstory IV (Win a playthrough using Inheritance backstory)
- The Seventh Curse needs first to be unlocked with the Eldritch Backstory III achievement.
- Eldritch Backstory V (Win a playthrough using Ill-Fated backstory)
- Ill-Fated needs first to be unlocked with the Eldritch Backstory IV achievement.
- Club Member (Join the club)
- First you need to unlock the History Club location at School, then go there and buy 4 things to get the special ending.
- Eldritch Backstory VI (Win a playthrough using Knight-Errant backstory)
- Knight-Errant needs first to be unlocked with the Junior Librarian achievement.
- Soft Side (Buy and return an expensive drug)
- Before you attempt this, you need to complete 25 other achievements to unlock the Illegal Den location.
- First, defeat the Rioter enemy in the Downtown area to obtain Prescription.
- Second, gather 4 Funds and take the Prescription to the Hospital Pharmacy. Select the Prescription and ‘use’ it at the Pharmacy to obtain an Expensive Drug (which is not an item).
- Finally, go to the Illegal Den location. Instead of the usual shop screen, you will meet Miku.
- Blood Deal (Feed an Outer Entity)
- Once you’ve unlocked the Monument location (Junior Priest achievement), you can lower Doom there for a bloody price. The first time you do so will unlock this achievement.
- Shiokawa History I (Unlock 15 achievements)
- Shiokawa History II (Unlock 20 achievements)
- Shiokawa History III (Unlock 25 achievements)
- Shiokawa History IV (Unlock 30 achievements)
- Shiokawa History V (Unlock 40 achievements)
- Shiokawa History VI (Unlock 50 achievements)
- True Despair (Win a playthrough on Hard difficulty)
- Final Stand I (Reach turn 30 in Endless Mode)
- Final Stand II (Reach turn 40 in Endless Mode)
- Final Stand III (Reach turn 50 in Endless Mode)
- Mira (Solve the Blue Gem riddle)
- First, obtain the Blue Gem from the ‘Discount Item’ selection at the Dog Shop.
- Second, investigate the Seaside until you get the Lighthouse Rumor event.
- Third, investigate the School until you get the Empty Corridor (or is it?) event.
- Finally, investigate the Forest until you get the Strange Lights event.
- Something Evil (Meet and defeat Something Evil)
- See Guide: Something Truly Evil
- True Anarchy (Complete the Parole Violation challenge)
- This challenge requires you to have unlocked Miku before you can attempt it.
- Hail to the King (As Moriko, defeat an enemy using a working Chainsaw)
- First you must unlock Moriko Ishii, unlock and win a game with Miku to unlock Fuel, and enable Extended Card Pack D, which itself is unlocked by winning the game 5 times, so that the Perilous Parable of the Peculiar Painting mystery becomes available.
- Playing as Moriko, you need to get a Flashlight before the Painting mystery; one can be easily bought at Hardware Store or Shop. Don’t forget to grab Fuel from the Hardware Store, too.
- Technically any light source will work, but the Flashlight is easiest to get.
- Go to the Painting mystery and play through it until you get the option to enter the Workshed; go there and choose the ‘Use your own light source’ option to obtain Chainsaw (No Fuel).
- Use the Fuel to merge the two items into Chainsaw, equip it, and then defeat an enemy with it.
- Good Old Times (Equip Carpenter Hammer with both Expel Evil and Regeneration learned)
- Carpenter Hammer can be bought at Hardware Store at Seaside.
- Expel Evil and Regeneration can be obtained by repeated use of Library Notes and the School Library, although it may require many attempts to get them both.
- Primum Non Nocere (Defeat Dream Devourer without killing a single patient)
- Start the Curious Case of a Contagious Coma mystery and do the side quest to get Dust of Seeing. Proceed to the final event and select the «Use Dust of Seeing» option. Then defeat Dream Devourer normally, without selecting the «Unplug Life Support» action. Beware, it is a very tough boss.
- Sweater Girl (Find the missing girl)
- This requires Extended B card pack to be unlocked (by winning at least 4 times) and enabled in «Customize your playthrough» settings.
- First, watch TV at home and refresh until you find the report of a missing girl.
- Then, get the Outdoorsman perk from leveling up or the History Club, then investigate the Forest until you find the Bloody Sweater event.
- Finally, select the option ‘wait a minute’ to resolve the event and unlock the achievement and new character.
- Eldritch Backstory VII (Win a playthrough using Scars backstory)
- Scars needs first to be unlocked with the Eldritch Backstory VI achievement.
- Eldritch Backstory VIII (Win a playthrough using Curious Birthmark backstory)
- Curious Birthmark needs first to be unlocked with the Eldritch Backstory VII achievement.
- Eldritch Backstory IX (Win a playthrough using Eldritch Parasite backstory)
- Eldritch Parasite needs first to be unlocked with the Eldritch Backstory VIII achievement.
- Eldritch Backstory X (Win a playthrough using Exquisite Taste backstory)
- Exquisite Taste needs first to be unlocked with the Eldritch Backstory IX achievement.
- Eldritch Backstory XXX (Win a playthrough using Fatalist backstory)
- Fatalist needs first to be unlocked with the Eldritch Backstory X achievement.
- Real Nightmare (Encounter three DREAM enemies in one playthrough)
- Encounter Dream Devourer, Dream Eater and Dream Salesman in the same playthrough. Note that Dream Devourer is exclusive to the Curious Case of a Contagious Coma mystery, and that you need to complete its sidequest (investigate the Village twice). After that, you can just investigate the Forest over and over in order to find the other two.
- Kick-box Cutter (Deal 10 damage with a single Kick)
- The easiest way to do this is with Toshiaki Wakamatsu and the History Club. Start a playthrough, then visit the History Club until you get Rage of Ragh-Zull. Once acquired, use it 9 times. Then, find an enemy and kick the hell out of it.
- Welcome to the Family (Let the real JURI in)
- With Juri Okusawa, get your HORROR to 100%, which can be done by getting your Doom above 50%. This can be done by playing normally, although you could enter a store and just reroll over and over if you want to get it faster.
- Steel Box (Break the blade)
- This achievement requires the Box Cutter, meaning it also requires you to have done the Kick-box Cutter achievement.
- Investigate the school repeatedly until you find the Young Witch. Upon defeating her, she should drop a Box Cutter. Equip it, then use it to hit some other enemy. It will become a Box Cutter (Broken), unlocking the achievement.
- Can You Trust Them? (Hire two allies in one playthrough and win)
- The Illegal Den needs first to be unlocked with the Shiokawa History III achievement (unlock 25 achievements).
- Go to the Illegal Den and pick the ‘HIRE AN ALLY’ option twice. Note that this, alone, will increase DOOM by 16%, meaning you should probably find some way to reduce it as quickly as possible.
- (H)experimental Therapy (Complete the Mimi’s Little Project challenge)
- Despite seemingly difficult, this challenge is actually quite simple. Just don’t pick the [FORCIBLY REWIRE YOUR VESTIBULAR SYSTEM] (-1 LUCK, fail all event checks) or [STAB AN ICEPICK THROUGH THE NOSE TO DISABLE THE PAIN RECEPTORS IN YOUR BRAIN] (-2 KNOWLEDGE, -1 INCOMING DAMAGE) projects, as they significantly hinder your performance.
- Catch Me If You Can (Handcuff the Ultimate Opportunist)
- This achievement requires you to use the Handcuffs on Takashi-san. You can acquire the Handcuffs by either investigating the Downtown area repeatedly until you find and defeat the Lumpy Officer, or by clicking the drawer below the plant at the Police Station (press Z if you can’t find it). Then, go to the Lighthouse and get Takashi-san to 12 or less Health, and defeat him with the Handcuffs.
- Rain of Spiders (As YASHIRO, complete a TRUE BELIEVER playthrough with CTHAC-ATORASU as the Old God)
- Yashiro Kawaji needs first to be unlocked with the Otherworldly Thirst achievement.
A collection of spoiler-free advice on how to play effectively. Aimed at new players, but hopefully useful to everyone. Tips 1. Take your time. Rushing through the game will only end with you dead. WoH is about resource management, and planning for the long term. 2. This applies double in combat, trying to race…

A guide trying to be the most complete possible about all the references hidden in World of Horror. Of course, for now, it surely must be incomplete. you can also check out this references guide. Introduction World of Horror, as we know, is strongly inspired by a lot of horror medias, like for example…
A small guide about the references i found in the game, if you’re interested Intro If you’re seeing this guide you’ll probably think this guide suck, i can tell that for 2 reasons, 1, i’m not a native english speaker and 2 the guide will be hard to complete because of the rogue like…
Here is a list of perks, allies, spells, and assorted status you’ll encounter in the game. Not important stuff [dog] higher chance of finding items after combat woof If that’s what you were trying to squint at A list of all the other side things I wrote down while working on the codex and…
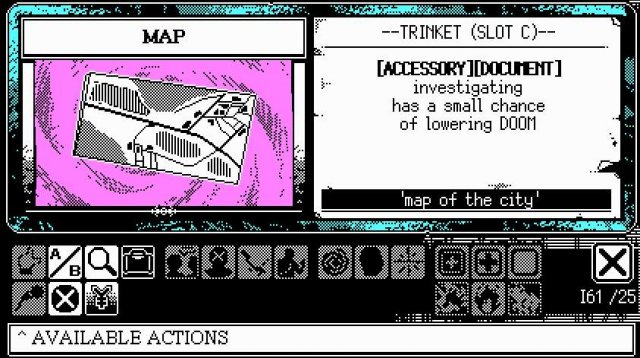
Here is a list and description of all the items, weapons, accessories, and other assorted knick knacks that show up in your inventory. Includes a list of all the shops. Item list currently incomplete. we will update later. Blah blah blah Due to the sheer number of items in this game I’m dumping all…
To be addedThere are nearly 60 enemies in the game, here is all the enemys in the game with their stats and locations. however this guide still miss 8. we will update later. 001 – Ribcage Woman Beast 14 HP -1 STA dmg 7 PWR +10 EXP Location: Hospital, Forest 002 – Rioter Human…
World of Horror is an game inspired by the body horror of Junji Ito and the cosmic unknown of HP Lovecraft. here is a guide about the save game. How to Sve the Game? You can save the game only between mysteries by clicking Save and Exit. By doing so, you will lose all spells,…
Here is a guide to the multiple Endings, with a hint before the reveal. this guide is still work in progress, we will complete it as soon as possible. Warning: this guide contains serious spoiler. Note Whenever you see ” Additional Investigation Goal” It means stuff like this Also, endings were haphazardly labled 1,…
Here is a complete guide for World of Horror game, this guide contains the characters, combats, easter eggs and so on. we will update as soon as possible. So, you’ve just hit new game and now you have a few options. What are they? Spine-Chilling Story of School Scissors This is a single one-off investigation from…
World of Horror, a “1-bit horror game” that enters Steam Early Access tomorrow, blends nods to Ito and Lovecraft with the look of a 1980s HyperCard game. Here is a A list of the achievements in World of Horror, including tips on how to get them. Achievements Guide Chain Smoker Achievement Have 30 Cigarettes in…
World of Horror is the latest horrific game pubulished by Ysbryd Games. if you are new to the game. you may wonder that how long is the game. here is the answer for you. The game doesn’t have a fixed length, because it’s about doing different ‘runs’ with different characters and scenario settings and with…

Contents
- Basic Guide
- Intro and Gamemodes
- Character UI
- Home and Investigation
- Combat
- Characters
- Personal Tips
Basic Guide
Intro and Gamemodes
This game is a blast and and I hope with the help of this guide you can all enjoy it as much as I do.
So, you’ve just hit new game and now you have a few options. What are they?
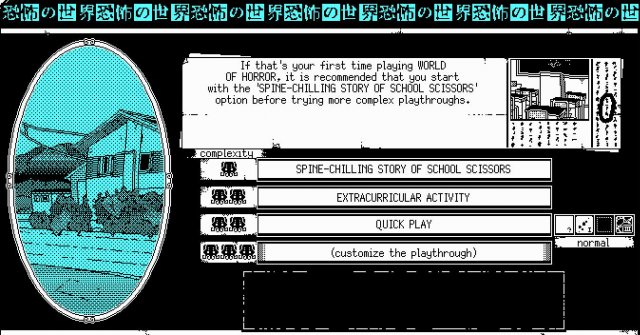
- Spine-Chilling Story of School Scissors. This is a single one-off investigation from the main game. It effectively acts as a tutorial for events and combat. Some of you might recognize this as the game’s demo.
- Extracurricular Activity. This is basically the “Main Story” as of now. You’ll be given the same character and settings every time and I’d highly recommend starting with this for your first real run. The goal is to complete the 5 randomly chosen investigations to obtain keys and then enter and climb the lighthouse… or die trying.
- Quick Play. This and Custom are the main replay value in the game. This will give you a completely random setup from Custom. I wouldn’t recommend this until you’re more comfortable with the game as it can give you confusing effects like randomizing all items stats and costs.
- Custom Playthrough. This allows you to fully setup your own run, choosing character, settings, card sets and god. I’ll have a segment going more in depth on this further down the guide. I recommend this when you’re bored of Extracurricular but don’t feel like the complete randomness of quick play.
Character UI
Once you’ve started the game you’ll have a lot more on your screen. On the right hand side here you’ll find the majority of the UI relating to your character. This is where a ton of the important information is and you’ll want too keep track of it easily.
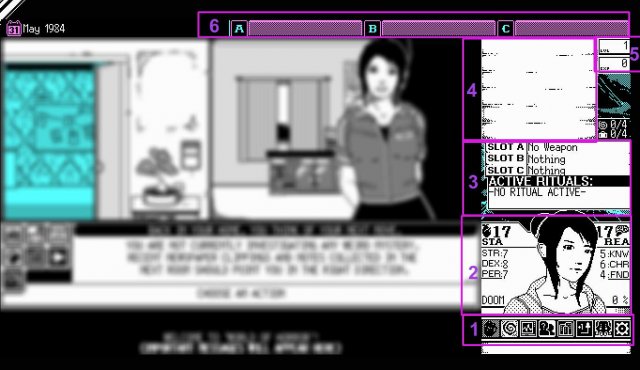
The things over here are:
1. The different modes for the side panel. From left to right these are:
- Items. This is where you’ll see your inventory, equipment and active ritual. You can only hold 4 items at a time, the rest will be sent to your storage.
- Spells. Where your memorized spells are held and another place for your active ritual
- Status. This is where any status effects you gain will be
- Allies and Perks. Here you’ll find your stock of cigarettes, bullets, any allies you make and perks you obtain via leveling up.
- Town Status. Here will be any negative effects added to the run at the end of an investigation.
- You. This just has an alternate exp bar, time in the current run and the seed.
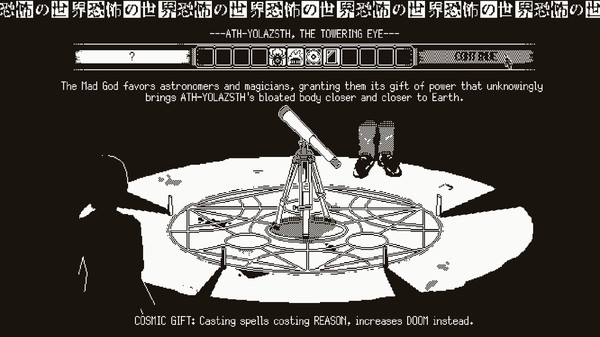
- Old God. This will show the Old God present in your run, it’s unique penalty and another location for doom buildup.
- Options. Self explanatory.
2. Your character, their stats and the current doom level. All stats are used for skill checks and each has a secondary effect:
- STA is stamina. This is effectively your health, if it hits 0 it’s game over. this along with reason is often a cost to cast spells.
- REA is reason. This is effectively your sanity and like health it’s all over when it drops. this along with stamina is often a cost to cast spells.
- STR is strength. Used for heavy weapons typically.
- DEX is dexterity. Used for lighter weapons.
- PER is perception. Useful for firearms.
- KNW is knowledge and as far as I can tell is used for weapon needing precision.
- CHR is charisma and I believe this affects allies.
- FND is funds. This is your money used for buying items and treatment.
- Doom is somewhat like another health and represents the Old God’s power, and once again if it hits 100% the game is over.
3. Your equipment and active ritual (Continuous spell) Slot A is reserved for weapons while B and C are for accessories.
4. Your inventory.
5. Your EXP and level. Once EXP hits 100 or higher you can click the EXP button to level up.
6. The 3 assignable item or spell shortcuts in case you need easy access.
Other than this you also have cards.
This is an item card
These typically have either a one time use effect or can be accessories. Though there are others which give effects just from being in your inventory or on being discarded. These use the far left set of buttons in the card UI with the exception of medical items which use the far right.
This is a weapon
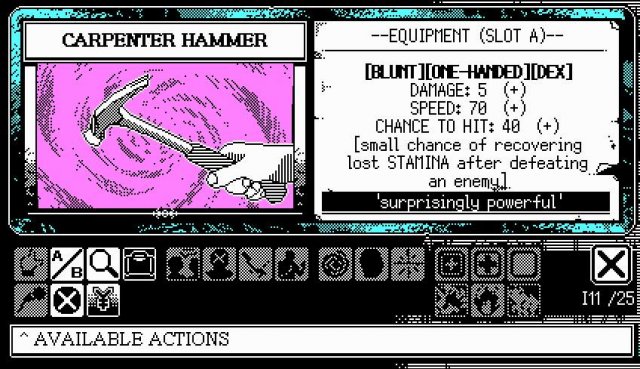
Like Items these use the far left set of buttons however these are all equipped to slot A of your equipment. These augment your attacks in combat changing your damage, attack speed, hit chance and occasional bonus effects like this amazing carpenter hammer. As a side note it seems like the lower the speed the better.
And this is a spell
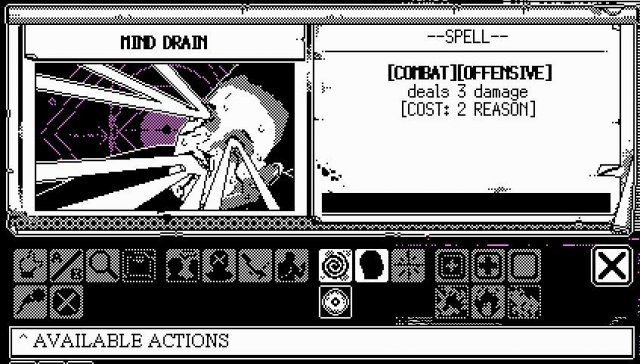
These usually cost either Stamina, Reason or both but can also cost doom. Spells use the set of buttons to the left of the medical ones and provide an instant effect with no time cost. There is utility spells for investigations and combat spells.
Not pictured here are allies which use the set between items and spells. These usually give you +1 to a stat but there are unique allies which provide different effects either while with you or upon dismissing them.
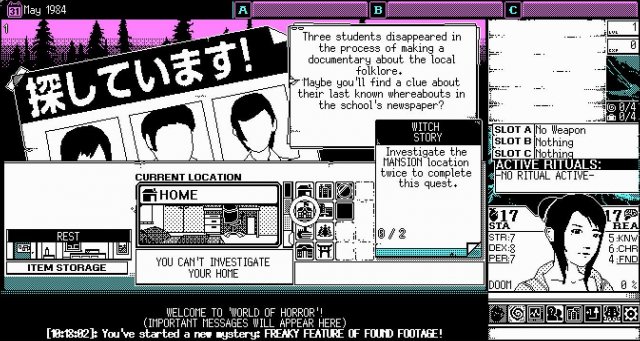
Home and Investigation
Home
Now that we’ve got that over with, lets take a look at the rest of the game. Assuming you’ve gone ahead and entered your home this is what you’ll see.
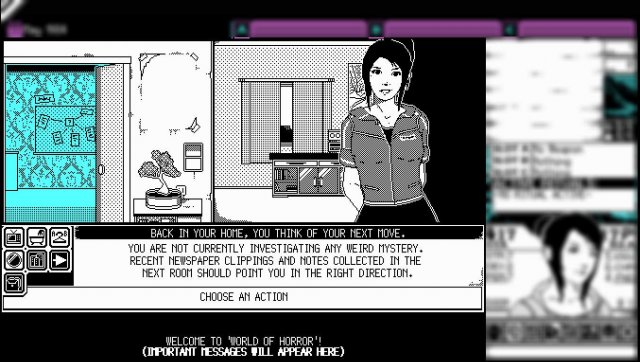
A lot of the things here are just flavour. You can interact with the window, cupboard, light switch and socket. You can watch TV, change clothes and look out the peephole.
However the important buttons are the bath, storage and investigations.
The bath will let you once between investigations recover either 1 STA, 1 REA or gain 5% exp. There is no reason to not take the exp before your first investigation so bathe away.
The storage is where any extra items will be sent and where you can choose to store or take anything.
The investigations screen is where you can move on from your home and get into your next mystery and is where the game really begins.
You’ll be brought back home between every investigation so make use of this time to take a bath assuming the gods are nice this run.
The City
After picking your investigation you’ll leave for the city.
Here is where a lot of the game takes place. You’ll have the current story event at the top and below that you have the side quest and a map of the city where you can investigate various areas each with their own events. Some locations even have unique areas you can enter for various reasons but note that this usually comes at the cost of increased doom. By default these are:
- Home. While you can’t return to the previous screen, you can take a rest here to recover 2 stamina and 2 reason for 4 doom.
- Downtown. Here you’ll find the police station which will augment combat encounters and the shop which you can enter for 4 doom to buy items with your funds. This store has general items like a compass, maps, dog food and cigarettes among others.
- Apartments. you can spend doom to visit here for a chance to recruit your neighbor as an ally.
- School. You can spend doom to hear rumours from students and attempt to recruit them as allies. you can also spend 5% exp to make a student who won’t join you willing to.
- Hospital. Here you can spend funds to treat any injuries you’ve gained or buy medical items for the future.
- Seaside. There’ll be another shop here, the hardware store. This place is more tools and weapons than the general store but you can still find items like the compass.
Some investigations will have their own unique area instead of the city so be aware when picking your investigation that you cannot come back here if it takes place in a unique location.
Events
After investigating a location you’ll more likely than not run into an event.
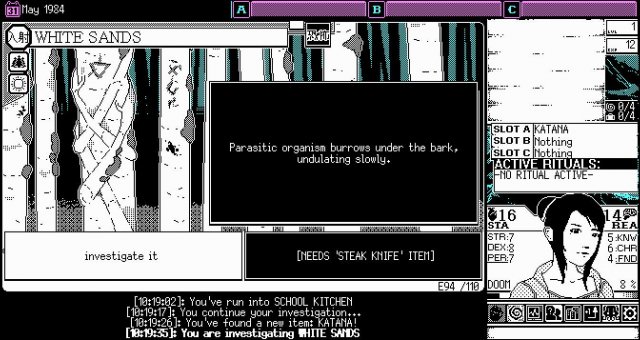
These are things that happen based on the location you choose and occasionally the old god in play. They usually have a choice to make and occasionally one or more choices will require an item, ally, spell or perk. Upon choosing either the set result will happen or a virtual dice will be rolled and checked against your stats to see if you pass a check. if you do one result will happen, if not something else. Do note that a pass does not always mean something positive.
Combat
So you investigated a location and all of a sudden the screen went dark. You’ve just found yourself in a combat encounter. When you click the screen you may be presented with something like this.
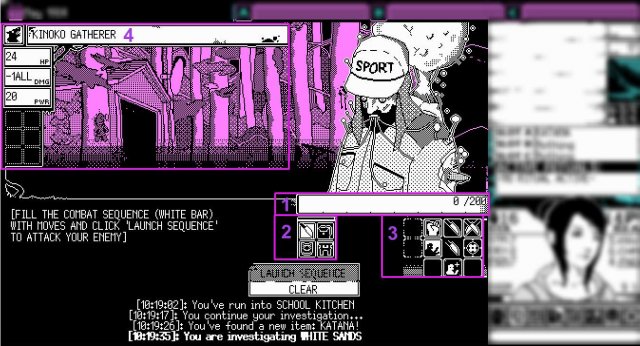
Another UI rundown here:
- The Combat Sequence. This is your allotment of time in your turn. You may use actions equaling up to 200 units before you can’t fit any more.
- Action Categories. There are four sets of actions consisting of Offensive Actions, Support Actions, Defensive Actions and Spiritual Actions.
- Actions. The actual things you can do in a turn. These vary from various attacks, preparing yourself for a guaranteed hit, dodging and more.
- Enemy Stats. Here you’ll see the name and title of the enemy, the type of enemy it belongs to, its health, damage and power.
To go into more detail on enemy stats, they can have different types of damage. These being stamina (STA) reason (REA) both (ALL) or doom. Power is essentially the enemy’s dodge, a higher power lowering your chance to hit.
Characters
Kirie Saito
Could the ghosts following her be the reason behind all the weird events in this town?
Stats
- 5 STR
- 7 DEX
- 7 PER
- 8 KNW
- 6 CHR
Starts with a Random Spell.
Overview
Kirie is technically the first character in the game, despite not being the one used for Extracurricular Activity. She’s supposed to be a spell focused character with her high knowledge, unique perks and the fact she starts with a random spell. I wouldn’t recommend messing around with spells as a beginner (except a certain combination) but if you are going to she’s the best for it.
Aiko Takahashi
Barely surviving when a ghost of a drowned man kept her underwater, she is determined to solve this mystery.
Stats
- 7 STR
- 8 DEX
- 7 PER
- 5 KNW
- 6 CHR
Overview
Aiko, the second character, is by far the most basic character in the game, there’s a reason she’s the main character in Extracurricular Activity. As captain of the swim team she has solid physical stats and some amazing unique perks for combat letting her get tons of high damage hits off in a single round. I highly recommend her for beginners and for anybody trying to unlock generic achievements as she’s the most simple and easy to play.
Haru
Robbing that old abandoned manor was a mistake. With his friends dead and mutilated, and a vengeful horror chasing him no speed is too high.
Stats
- 8 STR
- 6 DEX
- 7 PER
- 5 KNW
- 7 CHR
Starts with cigarettes.
Mizuki Hamasaki
What a strange world we live in, where defeating an ancient evil is the easiest way of boosting your career.
Stats
- 5 STR
- 7 DEX
- 7 PER
- 6 KNW
- 8 CHR
Starts with a random ally.
Kouji Tagawa
A picture is worth a thousand words. The government won’t sweep this under a rug.
Stats
- 7 STR
- 5 DEX
- 8 PER
- 7 KNW
- 6 CHR
Starts with a camera.
Mimi
Unlock Method: Win your second playthrough to unlock Mimi.
Finally a way to put to practice everything she’s learned so far.
Stats
- 6 STR
- 5 DEX
- 7 PER
- 8 KNW
- 7 CHR
Starts with a scalpel and -20% max reason.
Miku
Unlock method: Explore downtown until you encounter a fight with the rioter, beat her and take the prescription to the hospital, use it in the pharmacy for 4 funds and then head to the illegal den (requires 25 achievements) to unlock Miku.
Rebellious teenager keen on spreading chaos. She will protect her hometown, even if only for her own selfish reasons.
Stats
- 5 STR
- 4 DEX
- 3 PER
- 4 KNW
- 3 CHR
Increasing doom grants various bonuses.
Personal Tips
Blue Gem Secret
Have the Blue Gem in your inventory, obtained from the random item at the store. After this start exploring either the seaside or the school until you get a message about the gem vibrating. Then do the same thing at the other location until the gem vibrates harder. Finally, keep exploring the forest and you should encounter an event and a unique ending.
Contents
- Basic Guide
- Intro and Gamemodes
- Character UI
- Home and Investigation
- Combat
- Characters
- Personal Tips
Basic Guide
Intro and Gamemodes
This game is a blast and and I hope with the help of this guide you can all enjoy it as much as I do.
So, you’ve just hit new game and now you have a few options. What are they?
- Spine-Chilling Story of School Scissors. This is a single one-off investigation from the main game. It effectively acts as a tutorial for events and combat. Some of you might recognize this as the game’s demo.
- Extracurricular Activity. This is basically the “Main Story” as of now. You’ll be given the same character and settings every time and I’d highly recommend starting with this for your first real run. The goal is to complete the 5 randomly chosen investigations to obtain keys and then enter and climb the lighthouse… or die trying.
- Quick Play. This and Custom are the main replay value in the game. This will give you a completely random setup from Custom. I wouldn’t recommend this until you’re more comfortable with the game as it can give you confusing effects like randomizing all items stats and costs.
- Custom Playthrough. This allows you to fully setup your own run, choosing character, settings, card sets and god. I’ll have a segment going more in depth on this further down the guide. I recommend this when you’re bored of Extracurricular but don’t feel like the complete randomness of quick play.
Character UI
Once you’ve started the game you’ll have a lot more on your screen. On the right hand side here you’ll find the majority of the UI relating to your character. This is where a ton of the important information is and you’ll want too keep track of it easily.
The things over here are:
1. The different modes for the side panel. From left to right these are:
- Items. This is where you’ll see your inventory, equipment and active ritual. You can only hold 4 items at a time, the rest will be sent to your storage.
- Spells. Where your memorized spells are held and another place for your active ritual
- Status. This is where any status effects you gain will be
- Allies and Perks. Here you’ll find your stock of cigarettes, bullets, any allies you make and perks you obtain via leveling up.
- Town Status. Here will be any negative effects added to the run at the end of an investigation.
- You. This just has an alternate exp bar, time in the current run and the seed.
- Old God. This will show the Old God present in your run, it’s unique penalty and another location for doom buildup.
- Options. Self explanatory.
2. Your character, their stats and the current doom level. All stats are used for skill checks and each has a secondary effect:
- STA is stamina. This is effectively your health, if it hits 0 it’s game over. this along with reason is often a cost to cast spells.
- REA is reason. This is effectively your sanity and like health it’s all over when it drops. this along with stamina is often a cost to cast spells.
- STR is strength. Used for heavy weapons typically.
- DEX is dexterity. Used for lighter weapons.
- PER is perception. Useful for firearms.
- KNW is knowledge and as far as I can tell is used for weapon needing precision.
- CHR is charisma and I believe this affects allies.
- FND is funds. This is your money used for buying items and treatment.
- Doom is somewhat like another health and represents the Old God’s power, and once again if it hits 100% the game is over.
3. Your equipment and active ritual (Continuous spell) Slot A is reserved for weapons while B and C are for accessories.
4. Your inventory.
5. Your EXP and level. Once EXP hits 100 or higher you can click the EXP button to level up.
6. The 3 assignable item or spell shortcuts in case you need easy access.
Other than this you also have cards.
This is an item card
These typically have either a one time use effect or can be accessories. Though there are others which give effects just from being in your inventory or on being discarded. These use the far left set of buttons in the card UI with the exception of medical items which use the far right.
This is a weapon
Like Items these use the far left set of buttons however these are all equipped to slot A of your equipment. These augment your attacks in combat changing your damage, attack speed, hit chance and occasional bonus effects like this amazing carpenter hammer. As a side note it seems like the lower the speed the better.
And this is a spell
These usually cost either Stamina, Reason or both but can also cost doom. Spells use the set of buttons to the left of the medical ones and provide an instant effect with no time cost. There is utility spells for investigations and combat spells.
Not pictured here are allies which use the set between items and spells. These usually give you +1 to a stat but there are unique allies which provide different effects either while with you or upon dismissing them.
Home and Investigation
Home
Now that we’ve got that over with, lets take a look at the rest of the game. Assuming you’ve gone ahead and entered your home this is what you’ll see.
A lot of the things here are just flavour. You can interact with the window, cupboard, light switch and socket. You can watch TV, change clothes and look out the peephole.
However the important buttons are the bath, storage and investigations.
The bath will let you once between investigations recover either 1 STA, 1 REA or gain 5% exp. There is no reason to not take the exp before your first investigation so bathe away.
The storage is where any extra items will be sent and where you can choose to store or take anything.
The investigations screen is where you can move on from your home and get into your next mystery and is where the game really begins.
You’ll be brought back home between every investigation so make use of this time to take a bath assuming the gods are nice this run.
The City
After picking your investigation you’ll leave for the city.
Here is where a lot of the game takes place. You’ll have the current story event at the top and below that you have the side quest and a map of the city where you can investigate various areas each with their own events. Some locations even have unique areas you can enter for various reasons but note that this usually comes at the cost of increased doom. By default these are:
- Home. While you can’t return to the previous screen, you can take a rest here to recover 2 stamina and 2 reason for 4 doom.
- Downtown. Here you’ll find the police station which will augment combat encounters and the shop which you can enter for 4 doom to buy items with your funds. This store has general items like a compass, maps, dog food and cigarettes among others.
- Apartments. you can spend doom to visit here for a chance to recruit your neighbor as an ally.
- School. You can spend doom to hear rumours from students and attempt to recruit them as allies. you can also spend 5% exp to make a student who won’t join you willing to.
- Hospital. Here you can spend funds to treat any injuries you’ve gained or buy medical items for the future.
- Seaside. There’ll be another shop here, the hardware store. This place is more tools and weapons than the general store but you can still find items like the compass.
Some investigations will have their own unique area instead of the city so be aware when picking your investigation that you cannot come back here if it takes place in a unique location.
Events
After investigating a location you’ll more likely than not run into an event.
These are things that happen based on the location you choose and occasionally the old god in play. They usually have a choice to make and occasionally one or more choices will require an item, ally, spell or perk. Upon choosing either the set result will happen or a virtual dice will be rolled and checked against your stats to see if you pass a check. if you do one result will happen, if not something else. Do note that a pass does not always mean something positive.
Combat
So you investigated a location and all of a sudden the screen went dark. You’ve just found yourself in a combat encounter. When you click the screen you may be presented with something like this.
Another UI rundown here:
- The Combat Sequence. This is your allotment of time in your turn. You may use actions equaling up to 200 units before you can’t fit any more.
- Action Categories. There are four sets of actions consisting of Offensive Actions, Support Actions, Defensive Actions and Spiritual Actions.
- Actions. The actual things you can do in a turn. These vary from various attacks, preparing yourself for a guaranteed hit, dodging and more.
- Enemy Stats. Here you’ll see the name and title of the enemy, the type of enemy it belongs to, its health, damage and power.
To go into more detail on enemy stats, they can have different types of damage. These being stamina (STA) reason (REA) both (ALL) or doom. Power is essentially the enemy’s dodge, a higher power lowering your chance to hit.
Characters
Kirie Saito
Could the ghosts following her be the reason behind all the weird events in this town?
Stats
- 5 STR
- 7 DEX
- 7 PER
- 8 KNW
- 6 CHR
Starts with a Random Spell.
Overview
Kirie is technically the first character in the game, despite not being the one used for Extracurricular Activity. She’s supposed to be a spell focused character with her high knowledge, unique perks and the fact she starts with a random spell. I wouldn’t recommend messing around with spells as a beginner (except a certain combination) but if you are going to she’s the best for it.
Aiko Takahashi
Barely surviving when a ghost of a drowned man kept her underwater, she is determined to solve this mystery.
Stats
- 7 STR
- 8 DEX
- 7 PER
- 5 KNW
- 6 CHR
Overview
Aiko, the second character, is by far the most basic character in the game, there’s a reason she’s the main character in Extracurricular Activity. As captain of the swim team she has solid physical stats and some amazing unique perks for combat letting her get tons of high damage hits off in a single round. I highly recommend her for beginners and for anybody trying to unlock generic achievements as she’s the most simple and easy to play.
Haru
Robbing that old abandoned manor was a mistake. With his friends dead and mutilated, and a vengeful horror chasing him no speed is too high.
Stats
- 8 STR
- 6 DEX
- 7 PER
- 5 KNW
- 7 CHR
Starts with cigarettes.
Mizuki Hamasaki
What a strange world we live in, where defeating an ancient evil is the easiest way of boosting your career.
Stats
- 5 STR
- 7 DEX
- 7 PER
- 6 KNW
- 8 CHR
Starts with a random ally.
Kouji Tagawa
A picture is worth a thousand words. The government won’t sweep this under a rug.
Stats
- 7 STR
- 5 DEX
- 8 PER
- 7 KNW
- 6 CHR
Starts with a camera.
Mimi
Unlock Method: Win your second playthrough to unlock Mimi.
Finally a way to put to practice everything she’s learned so far.
Stats
- 6 STR
- 5 DEX
- 7 PER
- 8 KNW
- 7 CHR
Starts with a scalpel and -20% max reason.
Miku
Unlock method: Explore downtown until you encounter a fight with the rioter, beat her and take the prescription to the hospital, use it in the pharmacy for 4 funds and then head to the illegal den (requires 25 achievements) to unlock Miku.
Rebellious teenager keen on spreading chaos. She will protect her hometown, even if only for her own selfish reasons.
Stats
- 5 STR
- 4 DEX
- 3 PER
- 4 KNW
- 3 CHR
Increasing doom grants various bonuses.
Personal Tips
Blue Gem Secret
Have the Blue Gem in your inventory, obtained from the random item at the store. After this start exploring either the seaside or the school until you get a message about the gem vibrating. Then do the same thing at the other location until the gem vibrates harder. Finally, keep exploring the forest and you should encounter an event and a unique ending.
Предлагаем ознакомиться с гайдом, в котором мы рассказываем о том, как получить каждую концовку в World of Horror.
Необычный проект World of Horror насчитывает несколько безвыигрышных сценариев, в которых вы можете самостоятельно выбрать собственную кошмарную участь. Каждый из эпизодов имеет несколько финалов, и по мере продвижения ваша задача постепенно усложняется. Помните, что игра все еще находится на стадии «Раннего доступа Steam», поэтому впоследствии количество сценариев (эпизодов) будет только увеличиваться. Если у вас есть, чем поделиться с нашими читателями, обязательно оставьте свои комментарии в конце статьи.
Впрочем, в зависимости от принятых решений вы все-таки можете выжить в каждом из доступных сценариев. И вот подробная информация по ним…
Сценарий 1. Alarming Account of Abnormal Arms
У этого сценария есть только одна концовка.
Сценарий 2. Chilling Chronicle of a Crimson Cape
- Концовка №1. Красной пальто (вещь). Завершите побочное задание и поделитесь сплетнями в школе. Во время встречи с Ака Манто выберите фразу «Мне ничего от вас не нужно».
- Концовка №2. Красное пальто (человек). Проходите эпизод и выберите красную или синюю бумагу. Сразитесь и победите Ака Манто.
Сценарий 3. Curious Case of a Contagious Coma
- Концовка №1. Пожиратель снов. Завершите побочное задание, чтобы открыть пыль видения. Примените ее в карантинном крыле, чтобы сразиться с Пожирателем Снов.
- Концовка №2. Проходите эпизод в обычном режиме и, когда окажетесь в карантинном крыле, выберите функцию «Исследовать».
Сценарий 4. Eerie Episode of Evolving Eels
- Концовка 1. Глазная хирургия. Проходите игру в обычном режиме, а когда столкнетесь с Каной, то тыкайте в ее глаз.
- Концовка 2. Пропавший друг. Проходите игру в обычном режиме, а когда столкнетесь с Каной, то отвезите ее в больницу.
- Концовка 3. Секретный, бонусный финал. Когда пойдете в квартиру Каны, то немедленно оттуда уходите.
Сценарий 5. Far-Out Fable of a Fear Festival
- Концовка 1. Полицейский рейд. Когда будет шанс, посетите лес. Оказавшись в лесу, немедленно идите на завод.
- Концовка 2. Слишком поздно. Проходите эпизод в обычном режиме, вместо леса идите в таверну. Когда вас заставят идти в лес, передохните, пока не окажетесь на заводе.
Сценарий 6. Freak Feature of Found Footage
- Концовка 1. Возьмите банку с кислотой из магазина Seaside Hardware. В конце, когда заглянете в колодец, примените на него эту банку.
- Концовка 2. Проходите игру в обычном режиме, не берите банку с кислотой. В конце загляните в колодец.
- Концовка 3. Играйте в обычном режиме, в конце возьмите ленты вместо того, чтобы смотреть в колодец.
Сценарий 7. Horrible History of Household Hell
- Концовка 1. Выполните побочное задание, чтобы получить журнал архитектора и Shiokawa Herald. Осмотрите вестник и найдите подсказку 430 Hz. Позже, когда доберетесь до подземной камеры, вам нужны будут компаньон и источник света. Введите 430 Hz, чтобы сразиться с Отару. Выберите «Пожертвовать компаньоном», чтобы увидеть данный финал.
- Концовка 2. Пробуждение зверя. Выполните те же действия, что и в первом пункте. Когда столкнетесь с Отару, никем не жертвуйте, а бегите.
- Концовка 3. Проходите игру как обычно, не ищите подсказки и не встречайтесь с Отару.
Сценарий 8. Macabre Memoir of Morbid Mermaids
- Концовка 1. Играйте в обычном режиме, пока не встретите безумного дворника. Победите его.
- Концовка 2. Подберите монтировку в магазине Seaside Hardware, откройте крышку люка в битве против безумного дворника.
- Концовка 3. Во время битвы с безумным дворником выберите вариант «Опрокинуть лампу», чтобы завершить сражение. Это также повлияет на школу в деле о школьных ножницах.
- Концовка 4. Завершите побочный квест, чтобы получить проклятие Инмасу. Во время битвы с безумным дворником выберите вариант с отвлечением.
Сценарий 9. Rotten Report of Rancid Ramen
- Концовка 1. Завершите побочное задание, чтобы получить предмет вонючее мясо. В конце эпизода объедините его с флаконом рамена.
- Концовка 2. Проходите игру как обычно и дайте флакон рамена в конце сценария.
Сценарий 10. Sorrowful Sage of Moonlight Sailors
- Концовка 1. Завершите побочное задание и выбросите сеть/крючки в море. Затем продолжите сценарий как обычно.
- Концовка 2. Завершите сценарий обычным способом, не выполняя побочную миссию.
Сценарий 11. Spine-Chilling Story of School Scissors
- Концовка 1. Проходите сценарий в обычном режиме и в конце нарисуйте мелом правильный символ.
- Концовка 2. В конце эпизода нарисуйте мелом неправильный символ, чтобы сразиться с женщиной-ножницами. Победите ее, чтобы увидеть этот финал.
Сценарий 12. Vicious Verses of Violent Vigil
- Концовка 1. В 10 вечера, когда окажетесь в главной спальне, идите в обветшалый коридор и заберите брошюру с дежурством. Вернитесь в спальню и помолитесь. Изучите ногу. Дождитесь 02:00, накормите растение в кабинете и ждите, пока не окажетесь в ветхой коридоре из альтернативной вселенной. Вы получите два варианта: вырезать странный символ или пожертвовать гостями. Вырежьте символ, чтобы начать битву со стариком. Победите его, чтобы увидеть данный финал.
- Концовка 2. Выполните те же действия, что и в первом случае, но во время битвы со стариком пожертвуйте одним гостем, а затем победите его.
- Концовка 3. Проходите игру в обычном режиме, убив гостей или пожертвовав ими в конце эпизода.
Наверняка многие любители хорроров задавались мыслью: что было бы, если Говард Лавкрафт в конце 19 века родился не в Америке, а в Японии? Учитывая любовь японцев к странным и жутким монстрам, то мы бы получили ядрёную смесь из классической готики и традиционного японского колорита. В этот раз Древние боги решили пробудиться не во времена «ревущих 20х», а в середине японских 80-х, с началом расцвета цифровой эры. Противостоянию различным монстрам и прислужникам Древних как раз и посвящена игра World of Horror. Сейчас она находится в раннем доступе, но уже содержит приличное количество контента, не имея при этом кучи багов в анамнезе.
Восьмидесятые здесь представляют собой не только сеттинг игры: вся стилистика заставляет почувствовать себя геймером тех лет, который случайно купил дискету с игрой в магазине. World of Horror намеренно сделана в однобитной стилистике, чтобы увеличить эффект присутствия. Даже игровой интерфейс подан так, словно лично вы — тот самый пользователь, который сидит за большим ламповым монитором. В игре есть поддержка двухбитного изображения, но ощущения оно уже так хорошо не передают, как чисто монохромная картинка. Ну и, чтобы окончательно свести олдскулы, даже саундтрек у игры стилизован под чиптюн. Жаль, что мелодий в игре немного и они довольно быстро приедаются, хоть и исправно создают нужную атмосферу.
Игра принадлежит к традиционному для того времени жанру – текстовой RPG. Все взаимодействие осуществляется при помощи нескольких небольших разделов меню и основного экрана. В основном, мы занимаемся тем, что читаем тексты, наслаждаемся очередным портретным гуро какого-нибудь монстра и совершаем выборы из доступных вариантов, которых бывает обычно не больше трех. К тому же, наличие многих опций зависят от того есть ли у героя те или иные предметы или перки.
Вкладки интерфейса у игры весьма разнообразные: тут и классический инвентарь, панель состояний, доступные заклинания, информация о влиянии древнего бога… Разделов столько, что по началу немного разбегаются глаза. И, судя по их названиям, создается стойкое впечатление, что автор вдохновлялся настольной игрой «Ужас Аркхэма». Персонаж игрока – обычный человек, который пытается в одиночку (ну, почти) противостоять неописуемым в своей мощи созданиям. Однако у него есть возможность призвать по ходу игры союзников, дающие различные приятные бонусы, выучить парочку заклинаний, за применение которых придется платить собственным рассудком, как и в упомянутой выше настолке… Увы, но это же делает интерфейс громоздким и не интуитивным. Из-за особенностей стилизации разобраться во всём с ходу будет не просто, особенно с учётом того что в игре мало подсказок и, в целом — внятного обучения.
Опасностей в игре — несметное множество: от различных событий и знамений, медленно сводящих персонажа с ума, до монстров, желающих покромсать вас на куски и совершить прочие жуткие непотребства. И тут в дело вступает боевая система, не менее комплексная и громоздкая, чем интерфейс. Бой состоит из раундов, которые длятся до тех пор, пока игрок или монстр не истощат своё здоровье или рассудок и не отправят друг друга на досрочную встречу с Древним. Основной ресурс в бою – время, которое тратится на совершение тех или иных действий. При этом, варианты поведения не исчерпываются разными видами атак. Герой так же может совершать защитные, поддерживающие и «оккультные» действия, по-разному влияющие на ход боя. Например, он может встать в стойку, чтобы увеличить вероятность попадания следующего удара или отыскать под рукой импровизированное оружие. В ход во время сражения идет всё: кулаки, ножи, огнестрел, заклинания… Иногда игра подкидывает таких противников, против которых обычное оружие бесполезно. Например, вы наткнулись на призрака. В этом случае, вы, например, можете потратить… деньги, чтобы нанести урон. Если вам кажется, что силы далеко не в вашу пользу, из боя можно банально сбежать. И в этом, зачастую, гораздо больше смысла, поскольку здоровье и рассудок после боя не восстанавливаются сами по себе, а расходных материалов или возможности перевести дух может просто не быть.
Но трусость в игре наказуема, поскольку избегание сражений, как правило, повышает глобальный счетчик «безысходности».(Doom) Если он дойдет до 100%, то Древний вернется на бренную Землю и всему человечеству настанет неиллюзорный… конец. Чтобы этого не допустить, нужно найти пять «ключей», которые открывают дверь, ведущую на вершину таинственного маяка, где предположительно, кроется источник всех сверхъестественных и прочих бед. Чтобы отыскать ключи, необходимо вплотную заняться решениями местных проблем, которые собраны в виде пяти «дел»(Mystery).
Увы, в игре нет никакого общего, сквозного сюжета, кроме поиска ключей. В начале каждого прохождения случайным образом выбираются пять дел , которые необходимо завершить прежде, чем накопится счетчик безысходности. Каждое дело, в свою очередь, представляет собой небольшую историю с собственной завязкой, развитием и концовкой. Решать дела можно в любом порядке, но исход каждого из них может немного повлиять на оставшиеся.
Во время расследований ваш персонаж будет путешествовать по различным районам города: центру, побережью, больнице и т.д, где с ним будут происходить те или иные события, которые будут медленно, но неумолимо вести сюжет дела к определенной развязке. В некоторых районах обитают торговцы, у которых можно приобрести полезные для расследования предметы или оружие. Однако, каждый раз отвлекаясь от расследований на шоппинг, игрок немножко повышает счетчик безысходности, поэтому действия стоит планировать заранее. Также игра в начале каждого дела подбрасывает вам небольшой сайдквест с определенными требованиями, выполнив которые можно обзавестись чем-нибудь полезным или узнать информацию, которая может пригодится в ходе расследования.
Завершив дело, победив очередного противника или успешно пройдя случайное событие, ваш персонаж получает очки опыта. Заработав достаточное их количество, герой получает новый уровень, который можно потратить на перки, дающие прибавку к навыкам и открывающие новые пути решение тех или иных ситуаций. Также можно повысить одну из пяти основных характеристик: силу, ловкость, восприятие, знания, харизму или удачу, которые используются для проверки успешности разных действий. Если же вам они по какой-то причине не нужны, то вместо них можно частично восстановить запас выносливости или рассудка. Смысла в этом немало, поскольку обычно они восполняются либо за счет определенных вещей, которые можно купить в магазинах за деньги (Funds), либо определенных событий. При этом рассудок и выносливость надо беречь, поскольку сохранение в игре одно, а каждое расследование по ходу забега может здорово подорвать здоровье и психику персонажа.
Так как игра находится в раннем доступе, то различных дел пока что не много, и они часто повторяются во время новых прохождений. Остается надеется, что разработчик игры, Panstasz, будет почаще выпускать новый контент для игры, но надежды на это не очень много, поскольку у создателя World of Horror получается нагонять на своих фанатов хтонического ужаса не хуже, чем у Древних богов, за счет внезапных исчезновений и радиомолчания по многу недель и даже месяцев. Последнее обновление (02.12) и вовсе вышло спустя почти год после объявленной даты, когда уже начали сдаваться самые стойкие из фанатов. Сейчас разработчик делится новой информацией чаще, но кто знает, долго ли это продлиться…
Но у World of Horror пока что хватает собственного контента: после прохождений можно заработать различные достижения, открывающие новых персонажей, предыстории (backgrounds), предметы, союзников и игровые режимы, при помощи которых можно настраивать новый забег против хтонических сущностей. Игра, в целом, позволяет тонко настроить своё будущее прохождение, вместе с уровнями сложности и выбором одного из древних богов, каждый из которых по-своему влияет на всю игру. Например, заставляя увеличивать счетчик безысходности за каждое используемое заклинание.
Игра в текущей версии не переведена русский, однако английский в игре достаточно простой, чтобы не приходилось постоянно обращаться к словарям. Текст в игре встречается постоянно, но выдается всегда дозировано, не перегружая простынями описаний. Когда вы откроете дверь маяка помните – это ещё не конец истории. Ведь ещё нужно забраться на вершину. И кто знает, что вас там поджидает на каждом этаже…
This page is under construction and may be missing some information or may contain outdated information.
Gameplay in World of Horror consists of three phases: Planning, Investigation, and Combat. In Endless playthroughs, the Planning phase happens only at the very start, before the player is sent straight to the Investigation phase.
Planning[]
Main article: Planning
The Planning phase takes place at the player’s Home, where they can do things such as take a bath, choose the next Mystery to investigate, or go to the Lighthouse. Once the player chooses a mystery, the game proceeds to the Investigation phase.
The player is free to access their storage and may use items and spells in preparation before selecting a Mystery to investigate.
Investigation[]
Main article: Investigation
During the Investigation phase, the player is either free to select a location in Shiokawa, or taken to a special Mystery-specific screen. In either case, selecting a location will investigate the area and trigger either a random Event or initiate Combat.
In Shiokawa, the player may also go to special locations such as the Shop or Schoolyard instead of investigating to do certain actions such as buying items or recruiting allies.
Combat[]
Main article: Combat
If Combat is initiated, the player will find themselves face to face with an enemy in the combat screen. Combat is turn-based, and the player can take multiple actions per turn, provided that the actions done don’t take up the sequence bar.
There are four types of actions in combat: Offensive, Defensive, Support, and Spiritual. Each type of action has eight general slots, and two special slots for enemy-specific actions. Not all of the slots will be filled at any given time, but certain types of enemies or situations (e.g. Ghost enemies) can alter what actions are available.
See Also[]
- Basic gameplay guide
- Math Guide