Sennheiser’s Wireless Systems Manager is a professional software solution for remotely monitoring and controlling wireless systems. Its intelligent features make the WSM the ideal choice for TV studios, live events, as well as musical productions. Wireless Systems Manager for Mac and Windows assists users in setting up and coordinating the frequencies of wireless microphones and personal monitors by having the most important parameters like charging levels handily displayed on a single screen.
Set up your personal wireless environment even without your active devices and without being on location. WSM allows you to plan every show virtually. While you have access to the same WSM data from up to six computers, you can be sure that your show runs smoothly with the spectrum analyzer. Groupable scenes allow for a better overview.

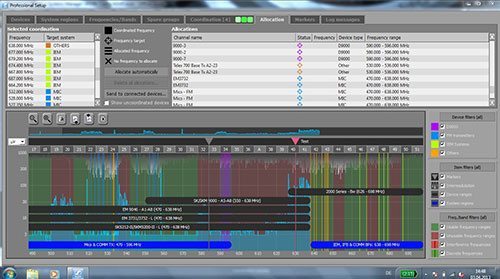
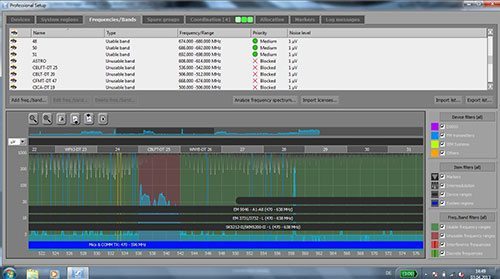
The Wireless Systems Manager displays the entire data of all controlled devices as well as a spectrum scan on one screen which can be amended as desired. Within the spectrum scan, users can define system regions and control in-ear monitoring systems and wireless microphones on a single screen. And you’ll see all your hardware in one place: WSM is compatible with the majority of the Sennheiser wireless portfolio.

Frequencies can be assigned manually or automatically. Users with licensed frequencies are covered as well. After import, the software will use your frequencies for planning. With imported spectrum scans from various third parties, RF engineers can plan off-site in advance of any event.
Additionally, firmware updates for all transmitters and receivers can be easily made through the WSM software.

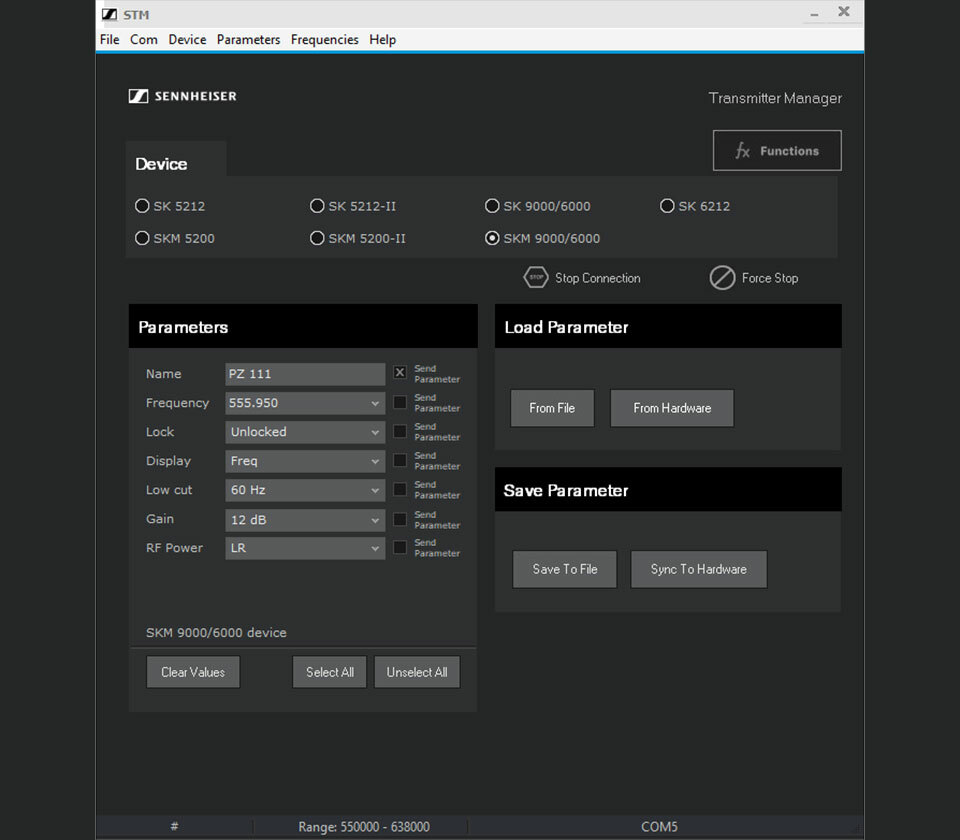
Sennheiser Transmitter Manager (STM)
Our Sennheiser Transmitter Manager is the perfect addition to your existing setup and for people with limited access to their receiver rack. You can sync your transmitters using an Infrared dongle, store and recall transmitter settings as well as import and apply frequency lists from WSM.
Read our customer stories
Stage Entertainment Nederland
David Bowie’s musical legacy was brought to DeLaMar theatre in Amsterdam following successful runs in New York and London. Dutch rental company Events Light worked with production company Stage Entertainment Nederland to deliver state-of-the-art audio equipment from Sennheiser for the show.
Learn more
FAQ
-
Which Sennheiser hardware is compatible to WSM Software?
-
WSM supports Sennheiser Digital 9000, Digital 6000, 2000 Series, 2000 IEM, EM 373x (COM), EM373x-II (COM), EW-DX EM 2, ew 300 G4, ew 500 G4, ew IEM G4, ew 300 G3, ew 500 G3 as well as ew 300 IEM G3.
-
-
Which third party spectrum scans are supported?
-
WSM supports the following frequency scans:
• Rohde & Schwarz FSH/FPH (*.csv)
• RF Explorer (*.csv)
• Tektronix RSA (*.csv)
• Aim TTi (*.csv)
• Shure Wireless Workbench (*.sdb2)
• Anritsu (*.csv, *.spa)
-
-
Why is my master scene changing from time to time?
-
Our master scene contains automatisms. New devices will be added automatically. For individual configuration, we recommend setting up your own scenes.
-
-
Why can I not use the monitoring while being in Professional Setup?
-
Professional setup was originally developed as an independent software. With the integration into WSM, it is unfortunately not possible to use other parts of the software at the same time.
-
-
Why can’t WSM discover all my devices?
-
Some of our devices use Multicast Domain Name System (mDNS) to be recognized. If you have setup an IP address manually und MDNS is turned off, WSM will not find those devices. Alternatively, you can add those by manually typing in the IP address with the “Add device” feature.
-
Данная программа предназначена для управления и контроля беспроводных микрофонов и студийных персональных мониторов. Производить настройку всех необходимых параметров можно с помощью этой программы, все основные опции доступны в одном окне, в том числе частотный менеджмент.
ПО показывает детальную информацию о всех подключенных, активных и заблокированных устройствах. Стоит отметить, что Sennheiser Wireless Systems Manager 4.0 довольно проста в управлении. Для профессионалов это и вовсе необходимый студийный инструмент.
Еще одна удобная функция — импорт и экспорт заготовок, причем это могут быть целые программы и заранее записанные сценарии. А полученные с помощью программы данные могут быть высланы по электронной почте, а также переброшены на другой портативный девайс.
Программа работает со всеми беспроводными устройствами Sennheiser, начиная с 300 G3 и выше. Скачать приложение можно бесплатно.
-
Contents
-
Table of Contents
-
Bookmarks
Quick Links
Wireless System Manager for Windows
®
95
OWNERS MANUAL
®
Windows and Windows logo are registered trademarks of Microsoft Corp.
Related Manuals for Samson WSM Wireless System Manager for Windows 95
Summary of Contents for Samson WSM Wireless System Manager for Windows 95
-
Page 1
Wireless System Manager for Windows ® OWNERS MANUAL ® Windows and Windows logo are registered trademarks of Microsoft Corp. -
Page 2: Table Of Contents
Monitor Mode Tool Bar 12 Monitor Mode Menus 13 Time Domain Mode 14 Spectrum Analyze Mode 15 Produced by On The Right Wavelength for Samson Technologies Corp. Copyright 1998, Samson Technologies Corp. Printed April, 1998 Samson Technologies Corp. 575 Underhill Blvd.
-
Page 3: Introduction
Samson Synth Series 6 UHF Wireless System includes Windows 95-compatible software and all required hardware for complete computer control and remote monitoring of up to eight Samson UR6D (or UR6DX) dual receivers (for up to sixteen-channel operation). The WSM application also includes advanced features such as RF spectrum analysis and automated channel planning.
-
Page 4
Hardware Interconnections All required cabling is included in the WSM package: one PC connector cable, four long 8-pin mini-DIN connector cables, and seven short 8-pin mini-DIN connector cables: WSM PC connector cable WSM 8 pin mini-DIN connector cables As shown in the illustration on the left, begin by connecting one end of the PC connector cable to the joystick/MIDI port of your computer’s Sound Blaster 16 card and the other end to the “PC”… -
Page 5
As shown in the illustration on the right, if you are using multiple UR6D or UR6DX receivers (WSM can control up to eight of them), use short 8-pin mini-DIN cables to connect the “Remote Out” of the first receiver to the “Remote In” of the next one, daisy-chain fashion. -
Page 6
IF6R to “3.” If you encounter difficulties with any aspect of setting up your Wireless System Manager, you can call Samson Technical Support at 1-800-372-6766) between 9 AM and 5 PM EST. If you need to remote your receivers at a distance from the computer, you need to use the IF6R interface as well as the IF6P. -
Page 7: Software Installation
Before installing your WSM software, you need to make sure that the external MIDI port on your Sound Blaster 16 card is enabled. To do so, click on the Start button and go to Settings -> Control Panel. Once the Windows Control Panel is open, select the “Multimedia”…
-
Page 8
Software Installation If all is working correctly, when you click on the “Settings” button, a dialog similar to the one shown on the left will appear. At this point, you have enabled the Joystick/MIDI port on your Sound Blaster 16 card and have verified that the required Creative Labs software driver is installed and operating correctly. -
Page 9: Launching Wireless System Manager
Before launching WSM, make sure all receivers are interconnected correctly (as per the instructions given on the preceding pages) and powered on. Then boot up your computer and double-click on the “Shortcut to WSM” icon to launch the program. Because WSM uses all driver resources of the Sound Blaster 16 card’s Joystick/MIDI port, it is not possible to launch multiple instances of the program.
-
Page 10: Quick Start
Quick Start To Monitor Conditions In Connected Receivers From Monitor Mode, click on the Play icon (the far left icon) in the Transport Tool Bar. All RF and AF Level meters in the Monitor screen are now active and show continuous changes in RF and AF levels.
-
Page 11
To Perform An RF Spectrum Analysis Go to Spectrum Analyze Mode, either by selecting it from the Window menu, or by clicking on the Spectrum Analyze icon in the Tool Bar. If you are using both UR6D and UR6DX receivers simultaneous- ly, call up the Group Select dialog either by opening the Setting menu or by clicking on the Group Select icon in the Tool Bar, then choose the frequency range (standard UR6D frequencies or “X”… -
Page 12: Monitor Mode
Monitor Mode In Monitor mode, you can remotely monitor and control up to eight connected UR6D or UR6DX UHF wireless receivers. The main areas of the Monitor Mode screen (as shown on page 7 of this manual) are as follows: 1: Menus — The Monitor Mode screen provides seven menus (File, Monitor, Timer, Setup, Display, Window, and Help) that provide numerous options.
-
Page 13: The Simple Monitor Screen
The Simple Monitor Screen When in Monitor Mode, the WSM screen shows a lot of information—so much, in fact, that there may be times when you want a simpler screen display with less data and larger meters (for example, when your computer monitor is a distance away from your working position).
-
Page 14: Monitor Mode Tool Bar
Monitor Mode Tool Bar WSM’s Tool Bar provides graphic icons that allow you to carry out various operations with a single mouse click. Though available in all screens and in all modes of operation, you can opt to turn it on or off by checking or unchecking the Tool Bar option in the Display menu (see page 13 for more information).
-
Page 15: Monitor Mode Menus
Each screen and mode of operation also provides a number of menus. Here is a description of the various menu titles and options available when in Monitor Mode (the same menu items are available in both the main Monitor screen and the Simple Monitor screen): File — Options here allow you to create a New file;…
-
Page 16: Time Domain Mode
Time Domain Mode Time Domain Mode allows you to view data that has been recorded in Monitor Mode. To enter Time Domain Mode, either select it from the Window menu, or click on the Time Domain Time Domain icon in the Tool Bar. Mode icon To determine which parameters you wish to see graphed out, select “Drawing Condition”…
-
Page 17: Spectrum Analyze Mode
Time Domain Mode / Spectrum Analyze Mode At any time, you can opt to graph different parameters for the selected receiver, or to view the data for a different receiver altogether, simply by calling up the Time Domain Configuration dialog again. To determine the actual time of any point in the graph, simply move the cursor to that point and click.
-
Page 18
Spectrum Analyze Mode You can opt to perform the analysis one time only or to loop it continuously. To perform the analysis once only, choose “1 Time” from the Analyze menu, or click on the Analyze Once icon (the left-most icon) in the Spectrum Analyze Tool Bar. -
Page 19
FCC Rules and Regulations Samson wireless systems are type accepted under FCC rules parts 90, 74 and 15. Licensing of Samson equipment is the user’s responsibility and licensability depends on the user’s classification, application and frequency selected. This device complies with RSS-210 of Industry &…
This manual is also suitable for:
Wsm

23
Повседневная работа
Сортировка каналов посредством программы
«Wireless Systems Manager»
С помощью функции сортировки «Wireless Systems Manager» в любой
момент можно заново определить распределение каналов и сохранить ее
в виде сцены.
̈
Активируйте функцию сортировки, как описано в инструкции по исполь-
зованию программы «Wireless Systems Manger».
̈
Нажмите на приемнике, которому Вы хотите распределить канал 1,
кнопку
sync
9
и удерживайте ее нажатой не менее 1,5 секунды.
Программа «Wireless Systems Manager» распределяет этому прием-
нику канал 1 и представляет его на 1-м месте в новой сцене.
На индикаторе состояния приемника появляется сообщение «
Sorted
».
̈
Выполните аналогичные действия с остальными приемниками.
Каждому следующему приемнику, на котором Вы нажимаете кнопку
sync
9
не менее, чем на 1,5 секунды, распределяется следующий
канал. На индикаторе состояния приемников появляется сообщение
«
Sorted
».
Приемники распределяются программой «Wireless Systems Manager»
на последующие места.
После того, как Вы рассортировали приемники, Вы можете этую последо-
вательность сортировки в программе «Wireless Systems Manager» сущес-
твующей сцене или создать новую сцену. Информация об этом приведена
в инструкции по использованию программы «Wireless Systems Manger».
Кнопку
sync
9
можно также использовать для синхронизации пере-
датчиков и приемников.
Информацию об этом Вы найдете на
стр. 21.
Во время выполнения сортировки синхронизация деактивируется.
Индикация «
Sorted
»
автоматически исчезает через 1 секунду.
Уже рассортированные каналы не могут быть отсортированы зано-
во. Если Вы пытаетесь изменить последовательности сортировки,
то появляется сообщение «
Already Sorted
».
̈
При необходимости, начните новую процедуру сортировки
с помощью программы WSM.
Sorted
Already
Sorted
EM3732-II_535301_0909_Sp7.book Seite 23 Mittwoch, 10. November 2010 3:32 15