Find below the manual for the Primaris Redemptor Dreadnought miniatures of the game Warhammer 40k from Games Workshop, lost manual or looking for details on the Primaris Redemptor Dreadnought bitz, the plan of the miniatures is at your disposal. Also find all the assembly instructions for the Space marines.
If the assembly instructions you are looking for are not yet online or if you have a PDF file not yet listed above or in better quality, please do not hesitate to contact us to help us keep our list up to date.
£0.00
Download a Free PDF copy of the Instructions Booklet for How To Build Primaris Redemptor Dreadnought – Warhammer 40’000 (40K). Full Assembly Instructions, available in PDF format as a Free Digital Download sent straight to your inbox. Step-by-step user guide for how to build Primaris Redemptor Dreadnought.
-
Description
-
Additional information
Description
Assembly Instructions for Primaris Redemptor Dreadnought – Warhammer 40’000 (40K).
Space Marines.
Download a free copy of the Build Instructions (Assembly Instructions) for Primaris Redemptor Dreadnought.
Full assembly instructions, available in PDF format as a free digital download sent straight to your inbox.
Includes a step-by-step user guide for how to build Primaris Redemptor Dreadnought, from plastic sprue, through to a completed model which is fully assembled and ready to paint.
This download contains 2 PDF file(s): Redemptor Dreadnought.pdf, Primaris Space Marine Easy-to-Build Redemptor Dreadnought.pdf.
Keywords: Warhammer 40’000 (40K), Space Marines, Adeptus Astartes.
For more product information and technical specification, you can find the original product page for Primaris Redemptor Dreadnought, on the official Games Workshop online store here: Primaris Redemptor Dreadnought.
All original product images are © Copyright Games Workshop Limited 2022.
Additional information
| FREE DOWNLOADS |
Free Downloads on all Build Instructions, Assembly Instructions and How To Guides. |
|---|---|
| Instant Delivery |
Just add the items you want to your basket, and at Checkout – tell us the email address you want the PDF files to be sent to, and they’ll be sent to you straight away! |
| File Sizes & Formats |
All digital downloads are in high quality PDF format, compressed for quick and easy downloads. |
| Support The Community |
Share a link to our Product Pages, mention us on Social Media, or tell your friends! |
| Missing Build Instructions? |
Do you have digital copies of some Build Instructions which aren’t in our Catalogue yet? – Please get in touch via the Contact Us page and send them over |
| Got a Question? |
We’d love to hear from you. You can get in touch with us via the Contact Us page. |
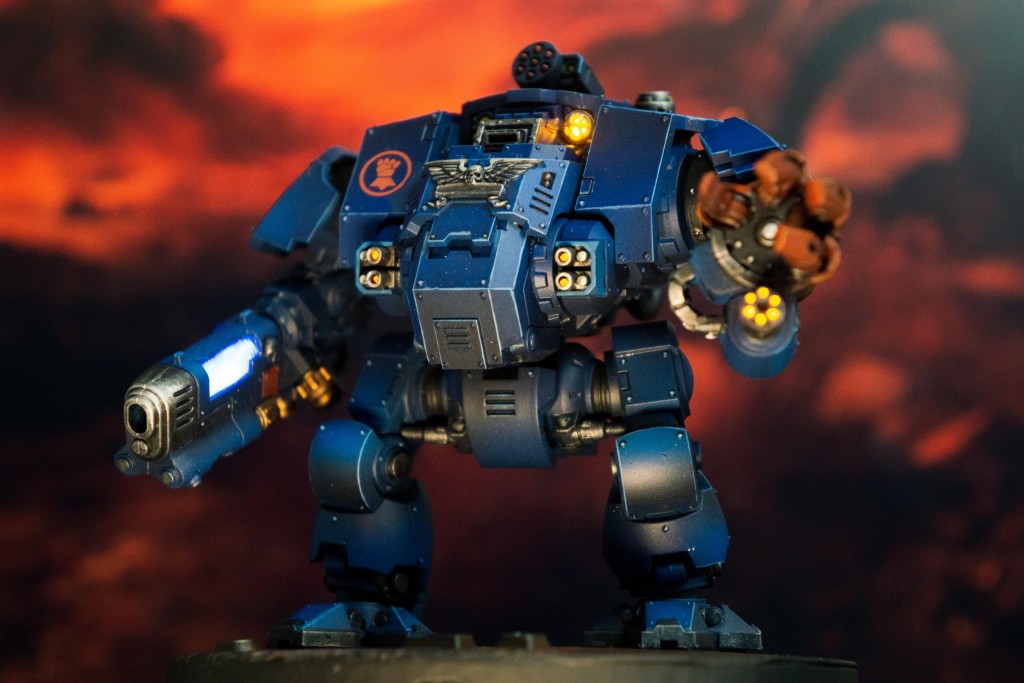
Aren’t we all a fan of LED Space Marines? I know I am. Previously we looked at how Bob Hunk made his marines glow and now we have a guide from Sean at Omnissious Gaming.
Sean:
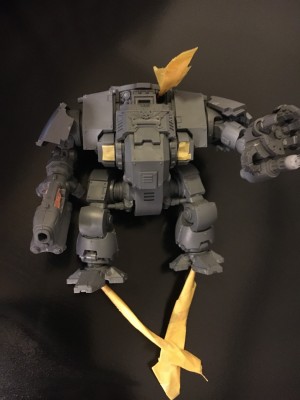
Here is the process I used to make the LED enhanced Redemptor Dreadnought. It was actually pretty easy because the model is so large and has lots of hollow pieces. There were a couple choke points that needed some finessing but overall it was a fun build!
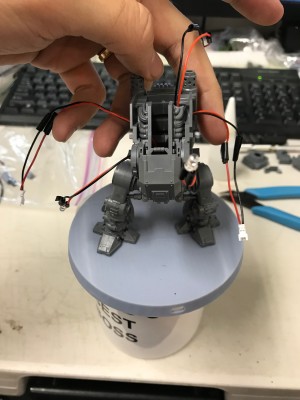
I really love the idea of instilling a sense of realism into models so I wanted to make sure the wires were hidden well. The goal for this build was to get the wires from a power source in the base, through the legs, and distributed to all the end points in the chest.

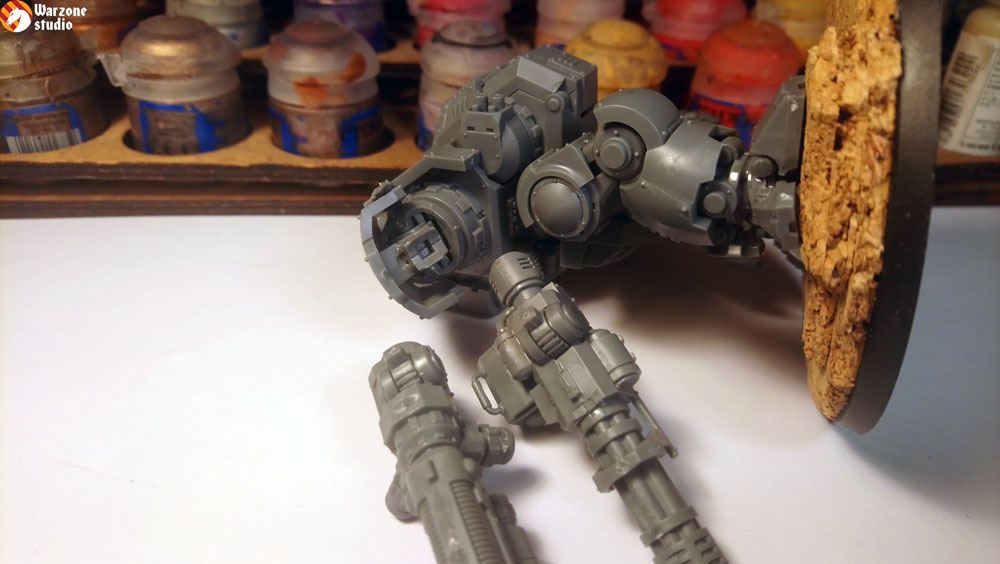
I started from the bottom and built my way up. The feet had a nice pocket to drill into and the main leg part was split into two half pieces on each side. This made it easy to carve out a channel and then put the pieces together around the wires. The legs are very forgiving because there are armor plates that go over most of the front section.
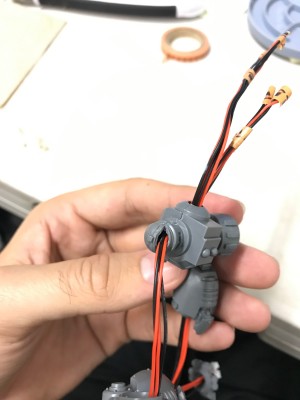
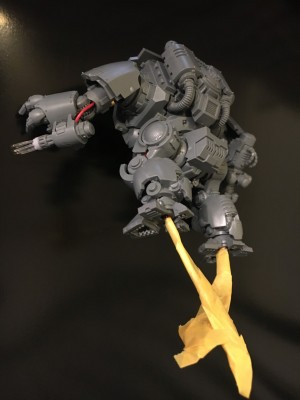
The hip joint was one of the trickiest parts because there was no clear way to get to it. I found a clever way to go up the side of the leg and then coil in through this hole on the joint part of the hip piece. Its offset because the legs come out at a slight angle. This part was also relatively forgiving because there is a piece that goes over all the wires and jenky cuts.
Once in the hip piece things were super easy! The whole thing is hollow and in two pieces so you can snap it around the wire cluster. The top joint has a lot of surface area so it’s easy to bore through with wiggle room.
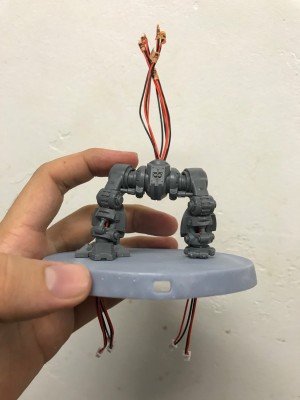
Here’s all the leg pieces put together with the base.

The wires coming through the bottom. The two circular recesses are where the battery packs will go to power all the lights.
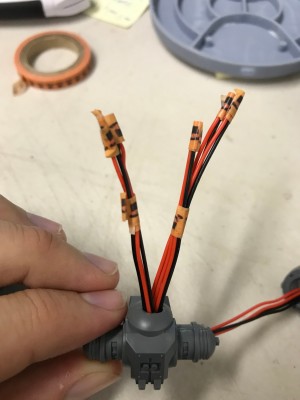
I assembled part of the chest piece and started fitting the wires through to their designated places. This part required a little fiddling with and at times felt like wrestling with an octopus.
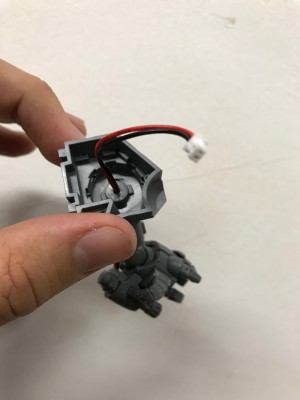
I kept the arm pieces detachable by fitting them with male plugs that attach to female plugs in the chest.
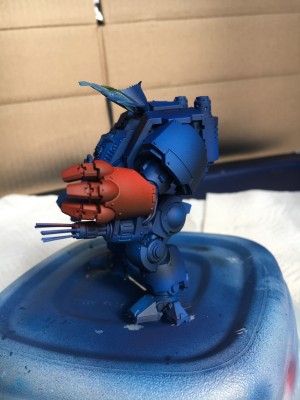
It’s coming together! For the chest bolters I used a single LED on each side that splits to each turret by fiber optics! Fiber optics are a great way to get more light features out of a single LED. I used fiber optics for the gatling gun on the fist as well!
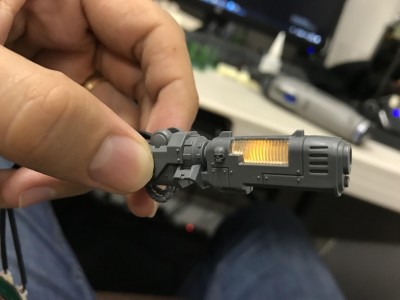
For the plasma gun, I cut out the plastic part that is supposed to be glowing and 3D printed a replica in transparent resin. (Here is a link to some STL files for this) There was plenty of room in the gun for the LED and it was in two pieces which made it very convenient!
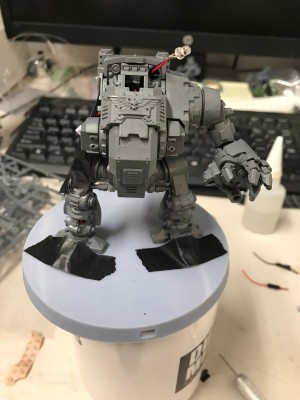
I masked all the exposed LEDs and any places where paint could get into where it shouldn’t get into.
Robots and machines work out great when trying to rig models with LEDs because if it’s impossible to fit a wire inside, you can just make it look like the wire is part of the model! For the gatling gun LED, I made the wire come out from the gun and go back into the model just after the joint so I can still pose it! You can also see the fiber optics on the gatling gun. Another great feature for fiber optics is that you only need the cross section to be exposed. I like to leave them long when I paint the model, then just cut them when it’s finished. You get a real crisp light that comes through and its completely flush.
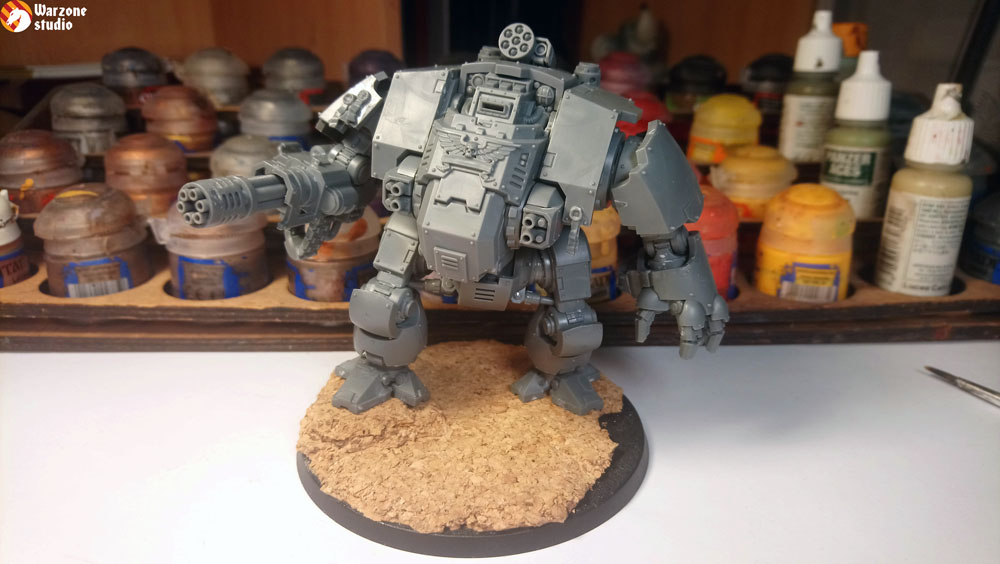
Painted the main colors with an airbrush to get some nice color transitions and shading/highlights.
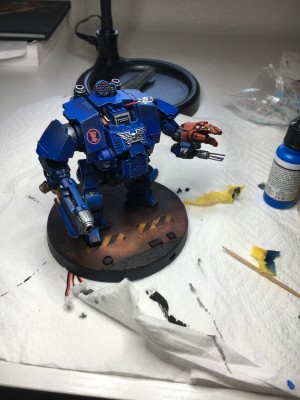
Then finished up the detail by hand! The base was made with some textured plastics for the metal grate and cork board for the asphalt. Thin cork sheets painted black make for a really nice to-scale asphalt. To get the weathered and rusted look, I hit it with many layers of nuln oil and agrax earthshade and then after it was dry scraped it up with various abrasive objects. It gave a really cool chipped paint look.
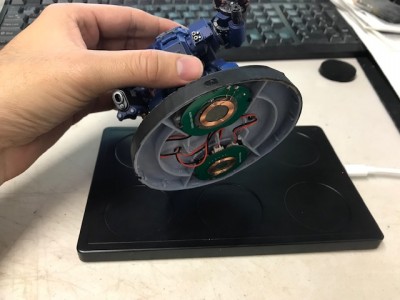
When all the modeling and painting was finished, I was able to plug in the power packs for the LEDs in the base. These ones are induction charged so I don’t have to change out the batteries!

Took a very professional photoshoot for good measure! All jokes aside, this was actually super effective and a cheap way to make your models look good! I used a proper camera and toyed with the lighting a bit but I would highly recommend this for action shots!
This was a super fun build! I used a dremel tool for a lot of the cuts and bores which saved a lot of time but everything I did here could be done with a small hand drill, a hobby knife, and wire cutters!
If you liked this build, check out more of my work at facebook.com/omnissious
If you liked the induction charged LED packs check out my Kickstarter
Go to WarhammerInstructions
r/WarhammerInstructions
A place for collecting assembly instructions for Warhammer Fantasy and Warhammer 40K. Please be courteous and follow the rules.
Online

While everyone is waiting for Ork rules, it’s time to work with other armies. Space marines, for example. Finally got Redemptor dreadnaught and today will tell you about how to better assemble it and use on the table.

The model is really great. Still, many collectors don’t like Primaris miniatures. But the fact that they are more complicated, detailed and dynamic than usual marines is undoubtful. The assembly process is almost as interesting, as Imperial Knight has. There are a lot of small details in the set – may be a bit too much.
Many criticize this model for chicken legs, but in fact, this is how dreadnaughts were initially imaged 0 20 years ago no one had such a complicated manufacturing process and couldn’t make it. The dreadnaughts we all know and like also look like a box on the chicken legs. Redemptor Is designed the way you can pose it almost anyway. Each arm moves in 2 dimensions and bends in the elbow. And the hands really move if you glue it right. Legs bend in feet, knees and thigs. You can adjust the fingers on one foot and on the arm. And this all is supposed to work this way – you don’t have to do anything special.
In fact, legs cause some trouble. You have to mark the place of each detail if you want to make a pose, different from a standard one. It’s better to assemble the base, legs (2 parts separately), and paws, and only then try to connect them the way you want, without glue. The connections from base to legs should be assembled only after you glued the whole construction – they will work with almost any pose but will prevent you from placing the legs into it. You can remove the pins inside the knees so that you could bend them as you like. It won’t be visible anyway. Sure, legs are not supposed to move after you assemble them – nobody likes volatile miniatures.
It’s easier with the arms – they can easily be made movable and even can be taken off for better painting. Or, sure, you can glue them in the pose you like. It’s important to use plastic glue here – it leaves you enough time to correct the position. The main weapon is truly a gift – there are two connection parts, so you can easily make both guns and change them even without magnetizing – the construction is quite solid.
It’s also a good idea to magnetize chest weapons. It’s easy – there is pretty flat surface and you won’t find problems drilling the holes. Bolters are more effective at a short distance, while rockets can deliver the same damage at a long range. However, the difference in range is not so big, so it’s better to rely on bolters rather than on random D6. Support weapon in the left hand is a bit more different to magnetize, but, in fact, the Gatling is much more effective than the flamer. So, there’s no use in changing it.
The front armor can open – it’s definitely a good idea since it’s easier to paint it this way. By the way, there are 2 armor plates in the set – choose whichever you like. FAQ made Icarus rocket pod optional, so if you don’t want to pay extra 6 points, just turn it back and down so that you could say it’s switched off.
Now, let’s answer the main question – how to use this guy in battle. It’s great that easy change of the main weapon gives you options. But, in fact, the Gatling looks much more effective. First, it has guaranteed 12 shots instead of D6. Second, all other weapons are supposed to kill light infantry, so it’s a good idea to maximize the impact. And third, there are enough plasma guns and heavy weapons in any space marines roster even without this guy. By the way, with all the wargear we recommended, it costs 196 pts. More expensive than any other dreadnaught.
And here are the problems of this unit, typical for all machines like this in the 8th edition. In contrast to the usual dreadnaughts, this one has a degradation table. And it downgrades in the most useful parameters – Move, BS and WS. Since it has both close combat and range potential, it’s logical to move forward slowly – so, you’ll also have a penalty for carrying a heavy weapon. And you can’t just stay in one place since all the weapons are middle-ranged. The price for this is 13 wounds which are definitely not enough to survive long – the enemy will definitely focus this dangerous guy who even doesn’t have an invuln. So, our dreadnaught is likely to deploy straight on the shelf until the edition change.
However, if you still want to take this Dreadnaught, there are some ways for you. First, sure, Raven Guard with their -1 to hit. But Iron Hands a bit more interesting — they have a stratagem, which lets you ignore the shooting penalty after you move — a great thing indeed. Also, they have 6+ FNP, which will make you a bit more durable. And it surely would be nice to add some re-rolls here — WIsdom of the Ancients stratagem or some characters, mey be Techmarine… So, if you truly want to field this guy…
Отличное качество литья, ни в одном из двух заказанных дредноутах не пришлось ничего греть и выпрямлять, лучше разве что оригинал)
Обращаем ваше внимание, что подставки в комплекте не идут, рекомендуем к покупке, вместе с данным набором, следующие подставки:
- 90mm Round Bases
Дредноут Искупитель – новейшая модификация боевого саркофага. Благодаря улучшенным нейроподключениям, пилот этого дредноута способен двигаться с удивительной ловкостью и быстротой. При этом он сохраняет мощнейшее бронирование и могучее вооружение, присущее предыдущим модификациям.
Инструкция (Primaris_Redemptor_Dreadnought.pdf, 8,441 Kb) [Скачать]
Отличная миниатюра с простой и в то же время оставляющей простор для детализации сборкой
Очень доволен. Есть некоторые моменты, но если быть честным, лучше только оригинал и то не намного
Качество радует! Все детали на литниках на месте и целые. А собирать одно удовольствие!
Отличное качество литья, приходят с инструкцией и подставками на литниках прямо как у ГВ =) очень рекомендую берите больше=)))))
While everyone is waiting for Ork rules, it’s time to work with other armies. Space marines, for example. Finally got Redemptor dreadnaught and today will tell you about how to better assemble it and use on the table.
The model is really great. Still, many collectors don’t like Primaris miniatures. But the fact that they are more complicated, detailed and dynamic than usual marines is undoubtful. The assembly process is almost as interesting, as Imperial Knight has. There are a lot of small details in the set – may be a bit too much.
Many criticize this model for chicken legs, but in fact, this is how dreadnaughts were initially imaged 0 20 years ago no one had such a complicated manufacturing process and couldn’t make it. The dreadnaughts we all know and like also look like a box on the chicken legs. Redemptor Is designed the way you can pose it almost anyway. Each arm moves in 2 dimensions and bends in the elbow. And the hands really move if you glue it right. Legs bend in feet, knees and thigs. You can adjust the fingers on one foot and on the arm. And this all is supposed to work this way – you don’t have to do anything special.
In fact, legs cause some trouble. You have to mark the place of each detail if you want to make a pose, different from a standard one. It’s better to assemble the base, legs (2 parts separately), and paws, and only then try to connect them the way you want, without glue. The connections from base to legs should be assembled only after you glued the whole construction – they will work with almost any pose but will prevent you from placing the legs into it. You can remove the pins inside the knees so that you could bend them as you like. It won’t be visible anyway. Sure, legs are not supposed to move after you assemble them – nobody likes volatile miniatures.
It’s easier with the arms – they can easily be made movable and even can be taken off for better painting. Or, sure, you can glue them in the pose you like. It’s important to use plastic glue here – it leaves you enough time to correct the position. The main weapon is truly a gift – there are two connection parts, so you can easily make both guns and change them even without magnetizing – the construction is quite solid.
It’s also a good idea to magnetize chest weapons. It’s easy – there is pretty flat surface and you won’t find problems drilling the holes. Bolters are more effective at a short distance, while rockets can deliver the same damage at a long range. However, the difference in range is not so big, so it’s better to rely on bolters rather than on random D6. Support weapon in the left hand is a bit more different to magnetize, but, in fact, the Gatling is much more effective than the flamer. So, there’s no use in changing it.
The front armor can open – it’s definitely a good idea since it’s easier to paint it this way. By the way, there are 2 armor plates in the set – choose whichever you like. FAQ made Icarus rocket pod optional, so if you don’t want to pay extra 6 points, just turn it back and down so that you could say it’s switched off.
Now, let’s answer the main question – how to use this guy in battle. It’s great that easy change of the main weapon gives you options. But, in fact, the Gatling looks much more effective. First, it has guaranteed 12 shots instead of D6. Second, all other weapons are supposed to kill light infantry, so it’s a good idea to maximize the impact. And third, there are enough plasma guns and heavy weapons in any space marines roster even without this guy. By the way, with all the wargear we recommended, it costs 196 pts. More expensive than any other dreadnaught.
And here are the problems of this unit, typical for all machines like this in the 8th edition. In contrast to the usual dreadnaughts, this one has a degradation table. And it downgrades in the most useful parameters – Move, BS and WS. Since it has both close combat and range potential, it’s logical to move forward slowly – so, you’ll also have a penalty for carrying a heavy weapon. And you can’t just stay in one place since all the weapons are middle-ranged. The price for this is 13 wounds which are definitely not enough to survive long – the enemy will definitely focus this dangerous guy who even doesn’t have an invuln. So, our dreadnaught is likely to deploy straight on the shelf until the edition change.
However, if you still want to take this Dreadnaught, there are some ways for you. First, sure, Raven Guard with their -1 to hit. But Iron Hands a bit more interesting — they have a stratagem, which lets you ignore the shooting penalty after you move — a great thing indeed. Also, they have 6+ FNP, which will make you a bit more durable. And it surely would be nice to add some re-rolls here — WIsdom of the Ancients stratagem or some characters, mey be Techmarine… So, if you truly want to field this guy…
- Home
-
Games
- Mecha
- Papermodel

Are you a fan of Warhammer 40k and looking for a fun new project? Then you need to check out this amazing papercraft model of the Primaris Redemptor Dreadnought!
The Primaris Redemptor Dreadnought is one of the most iconic and powerful units in the Warhammer 40k universe. And now you can build your own model of this impressive machine using just paper and glue! This papercraft model is perfect for fans of the game who want to show off their love of the lore in a unique way.
Building a papercraft model is a great way to exercise your creativity and improve your manual dexterity. And with this model, you’ll be able to hone your skills while creating a stunning replica of one of the most fearsome machines in the Warhammer 40k universe.
The papercraft model is designed with attention to detail and accuracy, ensuring that the finished product looks just like the real thing. The templates are easy to follow, and the finished model stands at an impressive size, making it a great addition to your collection of Warhammer 40k memorabilia.
So why not download the template for the Primaris Redemptor Dreadnought papercraft model now? Whether you’re a seasoned papercraft enthusiast or a newcomer to the hobby, this model is sure to provide you with hours of fun and a stunning finished product to display with pride. Head over to the link and start building your own Primaris Redemptor Dreadnought today!
This incredible model is available for free download at this link below:
Primaris Redemptor Dreadnought Papercraft
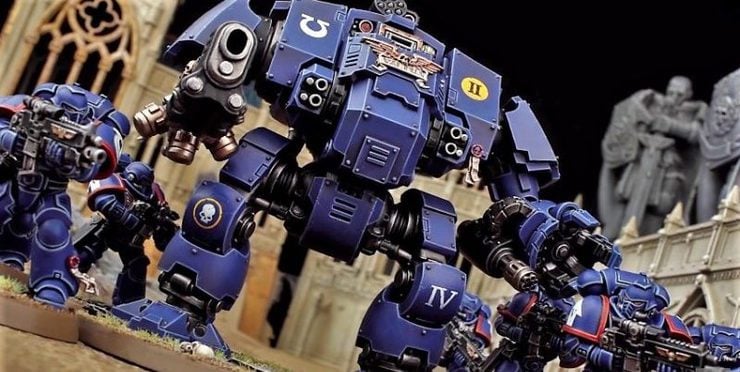
You may have wondered how a Primaris Marine will fit in a Dreadnought? Simple. Give him his very own Primaris-scale Redemptor Dreadnought!
It’s the biggest Dreadnought EVER! Come see our thoughts on the highly articulated Primaris Redemptor Dreadnought beast of a kit!
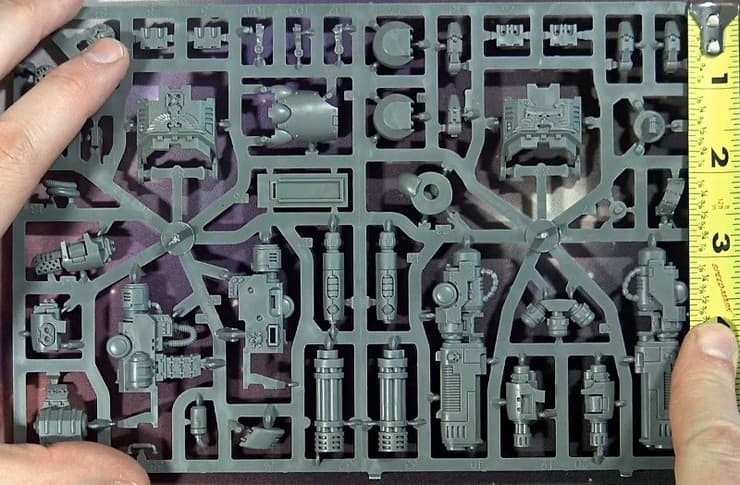
Having been teased since Warhammer Fest, the wait is finally over and we have our hands on this bad boy. Coming in at $65 retail, the Redemptor Dreadnought boasts more detail than the even the Contemptor Dreadnought and is a multi-part sprue kit as well. It is one of the largest Dreadnoughts we have seen thus far. It towers over the Leviathan from Forge World. it has a few moving parts and several different weapon loadouts to choose from. Here is a quick and dirty review to give you the lowdown on what you can expect to get from this kit.
For our complete review, be sure to scroll down and press play on the full video below.
You will definitely want to take your time building this kit, as it has several moving parts with a lot of small, detailed pieces. The faceplate armor does open up and the legs have the same piston and swivel design that we have seen before on Titan models. The legs and arms have the capability of being customized into various positions, with the legs fitting into sockets on the footpads that aid in posing and stability. It comes with a 90mm base and is comprised of 109 components.

This is a mulit-part sprue kit and has an amazing level of detail. The faceplate armor does have two variants to choose from and all the weapons needed to load out your Redemptor as you see fit.
Yes, we did measure the Redemptor’s Power Fist fingers to give you an idea of the scale of this badboy.
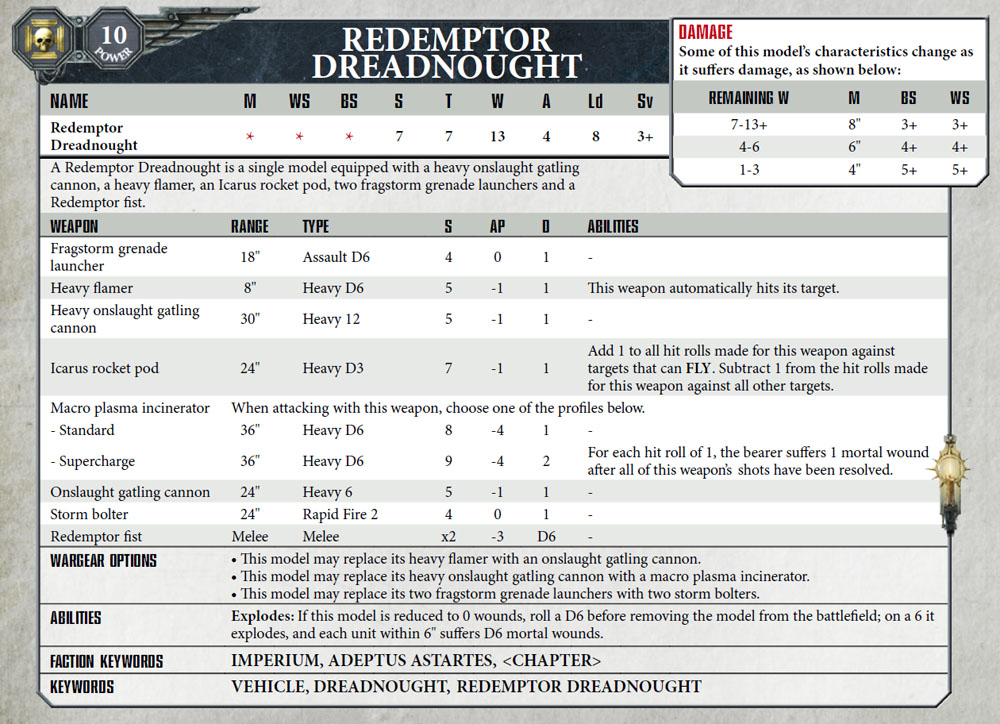
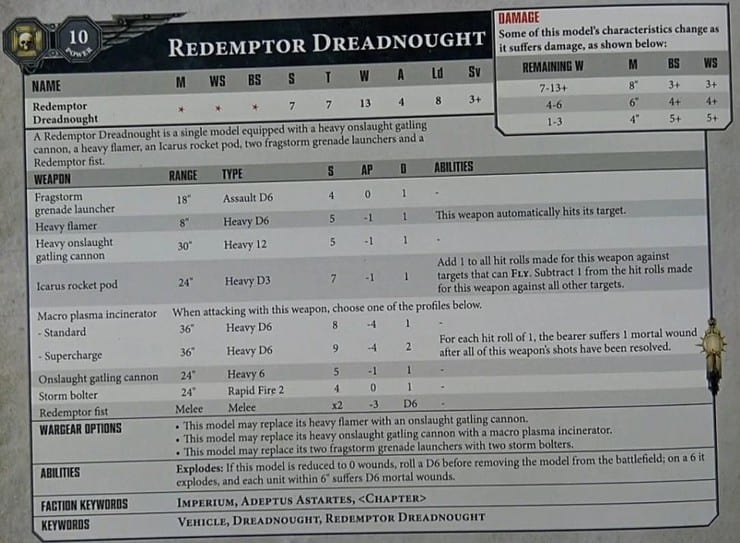
Datasheet-wise, the Redemptor clocks in at W13, S7, T7, Sv+3. It has a base movement of 8″ that will decrease with the amount of wounds sustained. It’s standard configuration is a heavy onslaught gattling cannon, heavy flamer, Icarus rocket pod, two fragstorm launchers and a Redemptor Fist. It comes in at 140 points at base and 207 points once all gear has been tallied. Some wargear options include replace the onslaught cannon with a macro plasma incinerator, which is Heavy D6, S8, AP-4 and costs 31 points to equip. The two fragstorm grenade launchers can be swapped for two storm bolters and cost 4 points total to equip.
Primaris Redemptor Dreadnought: $65
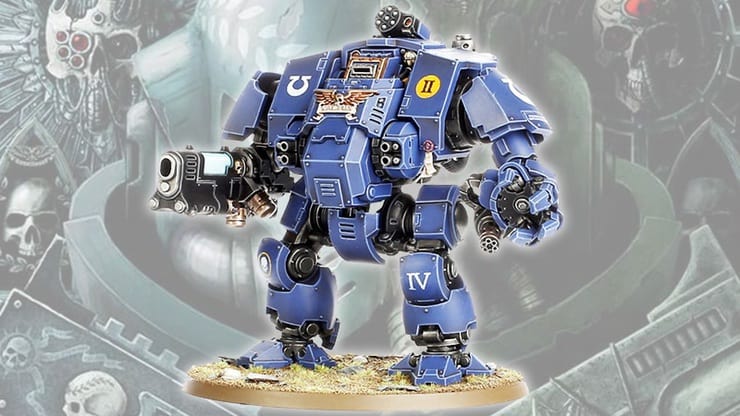
Redemptor Dreadnoughts are giant war machines that crush bone and splinter skulls as they bludgeon through enemy ranks. Taller, broader and more cunningly wrought than the Dreadnoughts of traditional design, these goliaths of battle are powered by hyper-dense reactors and sophisticated fibre bundles. They can accelerate from a thudding stomp to a loping, thunderous gait that shakes the ground, barrelling through hails of fire in glorious defiance. Such is the miraculous design of the Redemptor’s neural links that its inhabitant, despite being entombed in the sarcophagus within the Dreadnought’s chest, can exercise control with surprising dexterity and speed.
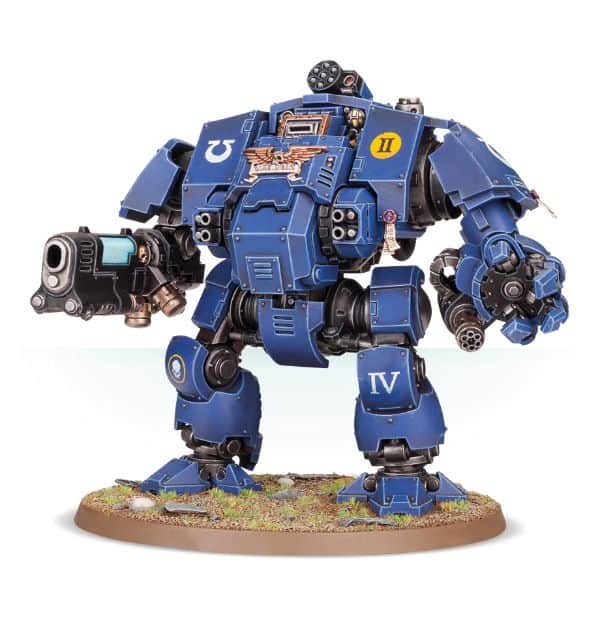
This multi-part plastic kit contains the components necessary to assemble a Primaris Redemptor Dreadnought. Standing twice the height of the already-tall Primaris Space Marines – and taller and broader than the standard Dreadnought – this is an exceptionally aggressive-looking model that befits its status as a powerhouse on the gaming table. It comes with a choice of gatling cannon or plasma incinerator on the right arm, with a Redemptor fist and heavy flamer support weapon or gatling cannon on the left, 2 chest-mounted fragstorm grenade launchers or storm bolters and a carapace-mounted Icarus rocket pod for aerial denial.
The heavy armour on the chest – replete with flat surfaces and sharp lines, perfect for adding transfers and detail – of the Redemptor Dreadnought can be modelled to pivot open, showing the sarcophagus interred within. The adventurous hobbyist can remove the pegs from the waist, arms and legs of the model too, allowing for a greater range of posing options.
The Primaris Redemptor Dreadnought comes as 109 components, and is supplied with a Citadel 90mm Round base and a transfer sheet.
The Primaris Redemptor Dreadnought is available now online and in local Games Workshop stores. Be sure to press play on our quick and dirty unboxing and review video below for the full review.
For more on the Primaris Redemptor Dreadnought and all things Warhammer 40k, visit Games Workshop!
If you buy something from a link on our site, we may earn a commision. See our ethics statement.