Введение
Vue CLI — полноценная система для быстрой разработки на Vue.js, предоставляющая:
- Интерактивное создание проекта через
@vue/cli. - Быстрое прототипирование через
@vue/cli+@vue/cli-service-globalбез конфигурации. - Runtime-зависимость (
@vue/cli-service) предоставляющая:- Возможность обновления;
- Создана поверх webpack, с оптимальными настройками по умолчанию;
- Настройка с помощью конфигурационного файла в проекте;
- Расширяемость плагинами
- Большая коллекция официальных плагинов, интегрирующих лучшие инструменты экосистемы фронтенда.
- Полноценный графический пользовательский интерфейс для создания и управления проектами Vue.js.
Vue CLI стремится стать стандартным инструментарием для экосистемы Vue. Он обеспечивает бесперебойную работу различных инструментов сборки, устанавливает разумные значения по умолчанию, поэтому вы сможете сосредоточиться на разработке приложения, а не проводить дни за его настройкой. В то же время, остаётся гибкость настройки конфигурации каждого инструмента без необходимости извлечения конфигурации в отдельный файл.
Компоненты системы
Vue CLI состоит из нескольких составных частей — если вы посмотрите на исходный код, то обнаружите, что это монорепозиторий, в котором несколько отдельно опубликованных пакетов.
CLI
CLI (@vue/cli) — это npm-пакет, устанавливаемый глобально и предоставляющий команду vue в терминале. Он позволяет быстро создать новый проект командой vue create, или мгновенно прототипировать ваши новые идеи через vue serve. Также можно управлять проектами в графическом интерфейсе через vue ui. Мы рассмотрим, что он может делать, в следующих разделах руководства.
Сервис CLI
Сервис CLI (@vue/cli-service) — это зависимость для разработки. Это npm-пакет, устанавливаемый локально в каждый проект, создаваемый с помощью @vue/cli.
Сервис CLI построен на основе webpack и webpack-dev-server. Он содержит:
- Ядро сервиса, которое загружает другие плагины для CLI;
- Внутреннюю конфигурацию webpack, оптимизированную для большинства приложений;
- Бинарный файл
vue-cli-serviceвнутри проекта, который позволяет использовать командыserve,buildиinspect.
Если вы знакомы с create-react-app, то @vue/cli-service похож на react-scripts, хотя набор возможностей и отличается.
В разделе Сервис CLI всё это разбирается подробнее.
Плагины для CLI
Плагины для CLI — это npm-пакеты, которые предоставляют дополнительные возможности для ваших проектов, создаваемых через Vue CLI, такие как транспиляция Babel / TypeScript, интеграция ESLint, модульное тестирование, и E2E-тестирование. Легко определять плагины для Vue CLI, поскольку их имена начинаются с @vue/cli-plugin- (для встроенных плагинов) или vue-cli-plugin- (для плагинов сообщества).
Когда вы запускаете бинарный файл vue-cli-service внутри проекта, он автоматически определяет и загружает все плагины CLI, указанные в файле package.json проекта.
Плагины могут добавляться как часть проекта на этапе его создания или их можно добавить в проект позднее. Они могут быть также сгруппированы в переиспользуемые пресеты настроек. Мы обсудим их подробнее в разделе плагины и пресеты.
На чтение 6 мин. Просмотров 47 Опубликовано
Vue CLI – это полноценная система для быстрой разработки Vue.js. Она предоставляет следующее:
- Интерактивный проект с помощью @vue/cli.
- Зависимость времени выполнения (@vue/cli-service), которая является:
- Возможность обновления;
- Построен поверх webpack, с разумными настройками по умолчанию;
- Настраивается через конфигурационный файл в проекте;
- Расширяемый с помощью плагинов
- Богатая коллекция официальных плагинов, объединяющая лучшие инструменты в экосистеме фронтенда.
- Полный графический пользовательский интерфейс для создания и управления проектами Vue.js.
Vue CLI стремится стать стандартным инструментарием для экосистемы Vue. Он обеспечивает слаженную работу различных инструментов сборки с разумными настройками по умолчанию, чтобы вы могли сосредоточиться на написании приложения, а не тратить дни на возню с конфигурациями. В то же время, он предлагает гибкость в настройке конфигурации каждого инструмента без необходимости извлечения.
Содержание
- Установка
- Создание проекта
- Использование графического интерфейса пользователя
- Плагины
- Установка плагинов в существующий проект
- Служба CLI
- Совместимость с браузерами
- Работа с CSS
- Ссылки на активы
- Препроцессоры
Установка
Чтобы установить новый пакет, используйте одну из следующих команд. Для их выполнения необходимы права администратора, если только npm не был установлен в вашей системе через менеджер версий Node.js (например, n или nvm).
npm install -g @vue/cli
# OR
yarn global add @vue/cli
Войти в полноэкранный режим Выход из полноэкранного режима
После установки вы получите доступ к бинарному файлу vue в вашей командной строке. Вы можете убедиться, что он правильно установлен, просто запустив vue, который должен выдать вам справочное сообщение со списком всех доступных команд.
 ~ $ vue
Usage: vue <command> [options]

Options:
  -V, --version                              output the version number
  -h, --help                                 display help for command

Commands:
  create [options] <app-name>                create a new project powered by vue-cli-service
  add [options] <plugin> [pluginOptions]     install a plugin and invoke its generator in an already created project
  invoke [options] <plugin> [pluginOptions]  invoke the generator of a plugin in an already created project
  inspect [options] [paths...]               inspect the webpack config in a project with vue-cli-service
  serve                                      alias of "npm run serve" in the current project
  build                                      alias of "npm run build" in the current project
  ui [options]                               start and open the vue-cli ui
  init [options] <template> <app-name>       generate a project from a remote template (legacy API, requires @vue/cli-init)
  config [options] [value]                   inspect and modify the config
  outdated [options]                         (experimental) check for outdated vue cli service / plugins
  upgrade [options] [plugin-name]            (experimental) upgrade vue cli service / plugins
  migrate [options] [plugin-name]            (experimental) run migrator for an already-installed cli plugin
  info                                       print debugging information about your environment
  help [command]                             display help for command

  Run vue <command> --help for detailed usage of given command.
Вход в полноэкранный режим Выйти из полноэкранного режима
Вы можете проверить, что у вас установлена правильная версия, с помощью этой команды:
vue --version
Enter fullscreen mode Выйти из полноэкранного режима
Создание проекта
Чтобы создать новый проект, выполните команду:
vue create hello-world
Enter fullscreen mode Выйти из полноэкранного режима
Вам будет предложено выбрать предустановку. Вы можете выбрать предустановку по умолчанию, которая поставляется с базовой установкой Babel + ESLint, или выбрать “Manually select features”, чтобы выбрать нужные вам функции.

Настройка по умолчанию отлично подходит для быстрого создания прототипа нового проекта, в то время как ручная настройка предоставляет больше возможностей, которые, вероятно, необходимы для проектов, ориентированных на производство.

Если вы выбрали ручной выбор функций, в конце подсказок у вас также есть возможность сохранить выбранные вами функции в качестве предустановки, чтобы вы могли использовать их в будущем.
Использование графического интерфейса пользователя
Вы также можете создавать и управлять проектами с помощью графического интерфейса с помощью команды vue ui:
vue ui
Войти в полноэкранный режим Выйти из полноэкранного режима
Приведенная выше команда откроет окно браузера с графическим интерфейсом, который проведет вас через процесс создания проекта.
@ui новый проект
Плагины
Vue CLI использует архитектуру, основанную на плагинах. Если вы просмотрите package.json только что созданного проекта, вы найдете зависимости, начинающиеся с @vue/cli-plugin-. Плагины могут изменять внутреннюю конфигурацию webpack и вводить команды в vue-cli-service. Большинство функций, перечисленных в процессе создания проекта, реализованы в виде плагинов.
Установка плагинов в существующий проект
Каждый плагин CLI поставляется с генератором (который создает файлы) и плагином времени выполнения (который настраивает основной конфиг webpack и вводит команды). Когда вы используете vue create для создания нового проекта, некоторые плагины будут предварительно установлены для вас на основе вашего выбора функций. Если вы хотите установить плагин в уже созданный проект, вы можете сделать это с помощью команды vue add:
vue add eslint
# OR
vue add apollo
Вход в полноэкранный режим Выйти из полноэкранного режима
Служба CLI
Внутри проекта Vue CLI, @vue/cli-service устанавливает двоичный файл с именем vue-cli-service. Вы можете получить доступ к бинарнику непосредственно как vue-cli-service в скриптах npm, или как ./node_modules/.bin/vue-cli-service из терминала.
Вот что вы увидите в package.json проекта, использующего предустановку по умолчанию:
{
  "scripts": {
    "serve": "vue-cli-service serve",
    "build": "vue-cli-service build"
  }
}
Вход в полноэкранный режим Выход из полноэкранного режима
Вы можете вызвать эти скрипты с помощью npm или Yarn:
npm run serve
# OR
yarn serve
Войти в полноэкранный режим Выйти из полноэкранного режима
Если у вас есть npx (должен быть в комплекте с актуальной версией npm), вы также можете вызвать бинарник напрямую с помощью:
npx vue-cli-service serve
Войти в полноэкранный режим Выйти из полноэкранного режима
Совместимость с браузерами
Вы заметите поле browserslist в package.json (или отдельный файл .browserslistrc), определяющее диапазон браузеров, на которые ориентирован проект. Это значение будет использоваться @babel/preset-env и autoprefixer для автоматического определения функций JavaScript, которые необходимо транспонировать, и необходимых префиксов CSS.
Работа с CSS
Проекты Vue CLI имеют поддержку PostCSS, CSS-модулей и препроцессоров, включая Sass, Less и Stylus.
Ссылки на активы
Все скомпилированные CSS обрабатываются css-loader, который анализирует url() и разрешает их как запросы модуля. Это означает, что вы можете ссылаться на активы, используя относительные пути, основанные на локальной файловой структуре. Обратите внимание, если вы хотите сослаться на файл внутри npm-зависимости или через webpack alias, путь должен иметь префикс ~, чтобы избежать двусмысленности.
Препроцессоры
Вы можете выбрать препроцессоры (Sass/Less/Stylus) при создании проекта. Если вы этого не сделали, внутренний конфиг webpack все равно будет предварительно настроен для работы со всеми из них. Вам просто нужно вручную установить соответствующие загрузчики webpack:
# Sass
npm install -D sass-loader sass

# Less
npm install -D less-loader less

# Stylus
npm install -D stylus-loader stylus
Войти в полноэкранный режим Выйти из полноэкранного режима
Introduction
VueJS is a progressive JavaScript framework used to create user interfaces and Single-Page Applications (SPAs), and the best way to get started quickly is to create a VueJS project using the Vue CLI (Command-Line Interface).
In this guide, you will learn how to install the Vue CLI, how to create a Vue project with the Vue CLI, how to serve and build them for production, and how to use the Vue UI. Building a project with the CLI will scaffold out a project, providing us with a pre-configured starting point on which we can build rather than starting from scratch.
Prerequisites
Node.js version 8.9 or higher is required to use Vue CLI on our terminal (v10+ is recommended). With nvm, we can manage multiple versions of Node on the same machine!
What is Vue CLI?
Vue CLI is an NPM package that is installed on a specific device to allow developers/users to access the vue command through their terminal. This CLI, which can be installed globally or in a specific directory on our PC, allows us to quickly scaffold a new project and build an app with a single command.
It gives Vue developers a new experience and allows them to start developing Vue apps without having to deal with complex configuration of tools like webpack. Simultaneously, it can be configured and extended with plugins for more advanced use cases. It is made up of several parts, including the:
- CLI service which provides multiple scripts for working with Vue projects, such as the
serve,buildandinspectscripts. - CLI plugins which are NPM packages that provide additional features to our Vue project, some of these plugins include typescript, PWA, VueX, etc.
If we don’t want to handle everything through our terminal, the Vue CLI allows developers to perform tasks through an easy-to-use interface, which we will explore very soon.
Installing Vue CLI
It is always a good idea to check if a package has already been installed on our PC before installing it, and we can do this for Vue CLI by looking at its version:
$ vue --version
$ vue -V
If we see a version, it means that the Vue CLI has already been installed on our computer; otherwise, an error indicates that it has not been installed. We can install the Vue CLI by running the following command:
$ npm install -g @vue/cli
// Or
$ yarn global add @vue/cli
Typically, the CLI is installed globally, rather than locally, so it’s accessible throughout the system.
Note: Even if the CLI is already installed, it’s worth updating it in case it’s not already updated to the latest version.
$ npm update -g @vue/cli
// Or
$ yarn global upgrade --latest @vue/cli
After successfully installing Vue CLI on our PC, we should now be able to access the Vue executable in our terminal to display a list of possible commands and their functions. This can be accomplished by running the following command:
$ vue
Which displays the starting page:
Usage: vue <command> [options]

Options:
  -V, --version                              output the version number
  -h, --help                                 display help for command

Commands:
  create [options] <app-name>                create a new project powered by vue-cli-service
  add [options] <plugin> [pluginOptions]     install a plugin and invoke its generator in an already created project
  invoke [options] <plugin> [pluginOptions]  invoke the generator of a plugin in an already created project
  inspect [options] [paths...]               inspect the webpack config in a project with vue-cli-service
  serve                                      alias of "npm run serve" in the current project
  build                                      alias of "npm run build" in the current project
  ui [options]                               start and open the vue-cli ui
  init [options] <template> <app-name>       generate a project from a remote template (legacy API, requires
                                             @vue/cli-init)
  config [options] [value]                   inspect and modify the config
  outdated [options]                         (experimental) check for outdated vue cli service / plugins
  upgrade [options] [plugin-name]            (experimental) upgrade vue cli service / plugins
  migrate [options] [plugin-name]            (experimental) run migrator for an already-installed cli plugin
  info                                       print debugging information about your environment
  help [command]                             display help for command

  Run vue <command> --help for detailed usage of given command.
Creating a Vue Project With Vue CLI
Once the Vue CLI has been successfully installed — let’s create a Vue project! Using the tool, we can easily scaffold a project and create a skeleton to go from, including importing all of the necessary dependencies and additional ones you may already know you’ll want. The create command, followed by the name of the project is used to create a skeleton project:
$ vue create my-cli-project
Note: my-cli-project is the name of the project. Be weary of spaces! Any space will break the name.
Once you run the command — you’ll be prompted with three presets:
Vue CLI v5.0.4
? Please pick a preset: (Use arrow keys)
> Default ([Vue 3] babel, eslint)
  Default ([Vue 2] babel, eslint)
  Manually select features
In the first two — you get to choose the Vue version, alongside Babel and ESLint. Only these will be packaged. If you want to include other useful dependencies such as the Vue Router, Vuex, and so on, you’ll want to select the «Manually select features» preset.
Here, you can traverse the list of available dependencies, pressing Space to select each option you’d like to enable:
Vue CLI v5.0.4
? Please pick a preset: Manually select features
? Check the features needed for your project: (Press <space> to select, <a> to toggle all, <i> to invert selection, and
<enter> to proceed)
>(*) Babel
 ( ) TypeScript
 ( ) Progressive Web App (PWA) Support
 ( ) Router
 ( ) Vuex
 ( ) CSS Pre-processors
 (*) Linter / Formatter
 ( ) Unit Testing
 ( ) E2E Testing
It’ll proceed with several configuration questions, starting with the version of Vue:
Vue CLI v5.0.4
? Please pick a preset: Manually select features
? Check the features needed for your project: Babel, PWA, Router, Vuex, Linter
? Choose a version of Vue.js that you want to start the project with (Use arrow keys)
> 3.x
  2.x
Followed by the questions of each module you’ve selected that can be configured:
Vue CLI v5.0.4
? Please pick a preset: Manually select features
? Check the features needed for your project: Babel, PWA, Router, Vuex, Linter
? Choose a version of Vue.js that you want to start the project with 3.x
? Use history mode for the router? (Requires proper server setup for index fallback in production) (Y/n)
In the end — the CLI will ask you whether you want to save these options as a Preset! If you do, next time you create a new application, you can pick from this preset besides the two default ones:
Vue CLI v5.0.4
? Please pick a preset: Manually select features
? Check the features needed for your project: Babel, PWA, Router, Vuex, Linter
? Choose a version of Vue.js that you want to start the project with 3.x
? Use history mode for the router? (Requires proper server setup for index fallback in production) Yes
? Pick a linter / formatter config: Prettier
? Pick additional lint features: Lint on save
? Where do you prefer placing config for Babel, ESLint, etc.? In package.json
? Save this as a preset for future projects? (y/N) y
Once you supply a name for the preset, it’ll show up after calling the create command:
$ vue create my-app

Vue CLI v5.0.4
? Please pick a preset: (Use arrow keys)
> my-preset ([Vue 3] babel, pwa, router, vuex, eslint)
  Default ([Vue 3] babel, eslint)
  Default ([Vue 2] babel, eslint)
  Manually select features
Or you can directly call it during the creation:
Check out our hands-on, practical guide to learning Git, with best-practices, industry-accepted standards, and included cheat sheet. Stop Googling Git commands and actually learn it!
$ vue create --preset my-preset my-app
Note: If we forget to install some built-in plugins while scaffolding our project, we can easily add them using the vue add my-plugin command at any point later.
Once the creation process is completed, we can run the app in the development server directly from the CLI using the following command:
$ cd my-new-app
$ npm run serve
The directory of the project is easily verified through the file system or a command such as ls (dir for Windows users):
$ ls
README.md        jsconfig.json  package-lock.json  public/  vue.config.js
babel.config.js  node_modules/  package.json       src/
Then our browser will open up localhost:8080 where we will see the app is running:
Now, the development begins! You can proceed with your standard development pipeline with the directories and files created by the tool. When you’re finished development, or are ready to push changes to a production stage, use the following command to create a production bundle:
$ npm run build
This will output everything to a dist folder within our project, which can be deployed on various hosting platforms. Let’s take a look at another method for creating a Vue app, but instead use the Graphical User Interface (GUI)!
Vue UI
Using the Vue CLI, you can also start up another project — a GUI for creating applications:
$ vue ui
This will start the GUI on http://localhost:8000/:
We can start a new project by going to the «Create» tab, which will allow you to choose the path for your project:
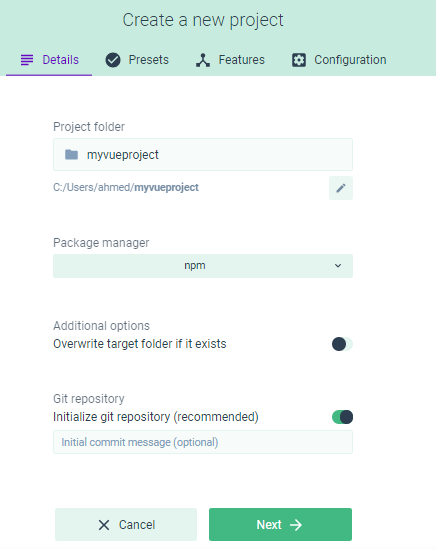
Once the location has been chosen for the project, in a new page, you can enter the name and select your preferred package manager:
The process of creating skeleton projects is much the same, and the same code runs in the background. It’s just a matter of taste — whether you prefer the CLI or the UI. In the same vein, we’ll be asked to select our preferred preset, but if we click «Manual,» we will be redirected to a page where we can manually select our preferred plugins, as shown below:
Again, after setting up the configurations for the different dependencies, you can save your selected options as a preset.
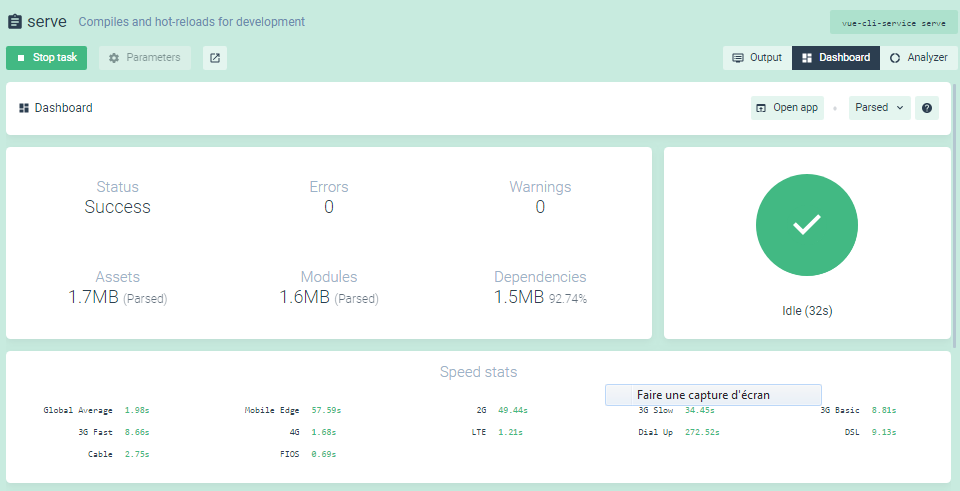
Once the creation process is done, we will be taken to the project dashboard, where we can view all of our plugins, add plugins, manage configuration, and assign tasks:
These tasks include, serving our app on our browser, building it for production, etc.
Conclusion
In this short guide, you’ve learned how the Vue CLI works, and how to create new skeleton Vue projects with it. We’ve taken a look at manual setups and saving presets, as well as serving and building projects. Finally, we’ve taken a look at the UI as an alternative to the CLI.
When building a new Vue app, the best way to get up and running quickly is to use Vue CLI. This is a command-line utility that allows you to choose from a range of build tools, which it will then install and configure for you. It will also scaffold out your project, providing you with a pre-configured starting point that you can build on, rather than starting everything from scratch.
The most recent version of Vue CLI is version 3. It provides a new experience for Vue developers and helps them start developing Vue apps without dealing with the complex configuration of tools like webpack. At the same time, it can be configured and extended with plugins for advanced use cases.
Vue CLI v3 is a complete system for rapid Vue.js development and prototyping. It’s composed of different components, such as the CLI service, CLI plugins and recently a web UI that allows developers to perform tasks via an easy-to-use interface.
Throughout this article, I’ll introduce the latest version of Vue CLI and its new features. I’ll demonstrate how to install the latest version of Vue CLI and how to create, serve and build an example project.
Want to learn Vue.js from the ground up? This article is an extract from our Premium library. Get an entire collection of Vue books covering fundamentals, projects, tips and tools & more with SitePoint Premium. Join now for just $9/month.
Vue CLI v3 Installation and Requirements
In this section, we’ll look at the requirements needed for Vue CLI v3 and how to install it.
Requirements
Let’s start with the requirements. Vue CLI v3 requires Node.js 8.9+, but v8.11.0+ is recommended.
You can install the latest version of Node.js in various ways:
- By downloading the binaries for your system from the official website.
- By using the official package manager for your system.
- Using a version manager. This is probably the easiest way, as it allows you to manage multiple versions of Node on the same machine. If you’d like to find out more about this approach, please see our quick tip Installing Multiple Versions of Node.js Using nvm.
Vue creator, Evan You, described version 3 of the CLI as a “completely different beast” from its predecessor. As such, it’s important to uninstall any previous version of the CLI (that is, 2.x.x) before preceding with this tutorial.
If the vue-cli package is installed globally on your system, you can remove it by running the following command:
npm uninstall vue-cli -g
Installing Vue CLI v3
You can now install Vue CLI v3 by simply running the following command from your terminal:
npm install -g @vue/cli
Note: if you find yourself needing to add sudo before your command in macOS or Debian-based systems, or to use an administrator CMD prompt in Windows in order to install packages globally, then you should fix your permissions. The npm site has a guide on how to do this, or just use a version manager and you avoid the problem completely.
After successfully installing the CLI, you’ll be able to access the vue executable in your terminal.
For example, you can list all the available commands by executing the vue command:
vue
You can check the version you have installed by running:
vue --version
$ 3.2.1
Creating a Vue Project
After installing Vue CLI, let’s now look at how we can use it to quickly scaffold complete Vue projects with a modern front-end toolset.
Using Vue CLI, you can create or generate a new Vue app by running the following command in your terminal:
vue create example-vue-project
Tip: example-vue-project is the name of the project. You can obviously choose any valid name for your project.
The CLI will prompt you for the preset you want to use for your project. One option is to select the default preset which installs two plugins: Babel for transpiling modern JavaScript, and ESLint for ensuring code quality. Or you can manually select the features needed for your project from a set of official plugins. These include:
- Babel
- TypeScript
- Progressive Web App support
- Vue Router
- Vuex (Vue’s official state management library)
- CSS Pre-processors (PostCSS, CSS modules, Sass, Less & Stylus)
- Linter/ Formatter using ESLint and Prettier
- Unit Testing using Mocha or Jest
- E2E Testing using Cypress or Nightwatch
Whatever you choose, the CLI will download the appropriate libraries and configure the project to use them. And if you choose to manually select features, at the end of the prompts you’ll also have the option to save your selections as a preset so that you can reuse it in future projects.
Now let’s look at the other scripts for serving the project (using a webpack development server and hot module reloading) and building the project for production.
Navigate inside your project’s folder:
cd example-vue-project
Next, run the following command to serve your project locally:
npm run serve
The command will allow you to run a local development server from the http://localhost:8080 address. If you use your web browser to navigate to this address, you should see the following page:
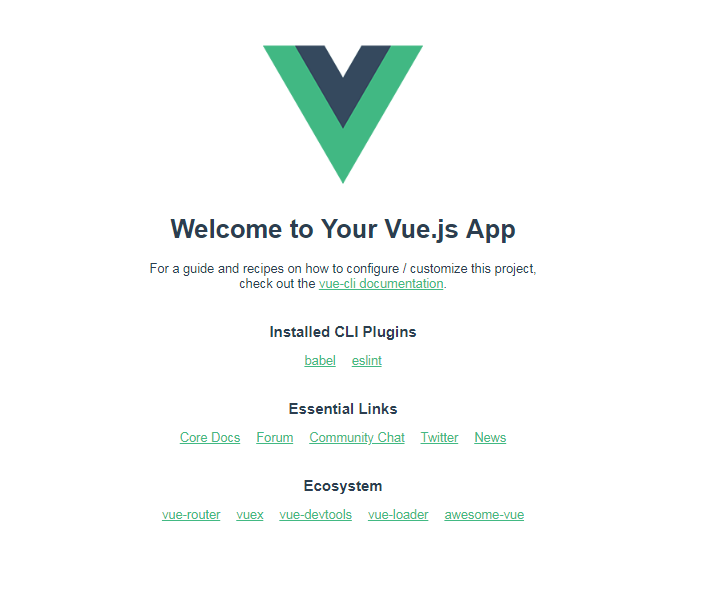
The development server supports features like hot code reloading, which means you don’t need to stop and start your server every time you make any changes to your project’s source code. It will even preserve the state of your app!
And when you’ve finished developing your project, you can use the following command to build a production bundle:
npm run build
This will output everything to a dist folder within your project. You can read more about deployment here.
What is the Vue CLI Service?
The Vue CLI Service is a run-time dependency (@vue/cli-service) that abstracts webpack and provides default configurations. It can be upgraded, configured and extended with plugins.
It provides multiple scripts for working with Vue projects, such as the serve, build and inspect scripts.
We’ve seen the serve and build scripts in action already. The inspect script allows you to inspect the webpack config in a project with vue-cli-service. Try it out:
vue inspect
As you can see, that produces a lot of output. Later on we’ll see how to tweak the webpack config in a Vue CLI project.
The Project Anatomy
A Vue project generated with the CLI has a predefined structure that adheres to best practices. If you choose to install any extra plugins (such as the Vue router), the CLI will also create the files necessary to use and configure these libraries.
Let’s take a look at the important files and folders in a Vue project when using the default preset.
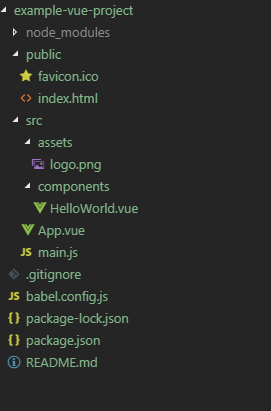
public. This folder contains public files likeindex.htmlandfavicon.ico. Any static assets placed here will simply be copied and not go through webpack.src. This folder contains the source files for your project. Most work will be done here.src/assets. This folder contains the project’s assets such aslogo.png.src/components. This folder contains the Vue components.src/App.vue. This is the main Vue component of the project.src/main.js. This is the main project file which bootstraps the Vue application.babel.config.js. This is a configuration file for Babel.package.json. This file contains a list of the project’s dependencies, as well as the configuration options for ESLint, PostCSS and supported browsers.node_modules. This folder contains the installed npm packages.
This is a screenshot of the project’s anatomy:
Vue CLI Plugins
Vue CLI v3 is designed with a plugin architecture in mind. In this section, we’ll look at what plugins are and how to install them in your projects. We’ll also look at some popular plugins that can help add advanced features by automatically installing the required libraries and making various settings—all of which would otherwise have to be done manually.
What a Vue Plugin Is
CLI Plugins are just npm packages that provide additional features to your Vue project. The vue-cli-service binary automatically resolves and loads all plugins listed in the package.json file.
The base configuration for a Vue CLI 3 project is webpack and Babel. All the other features can be added via plugins.
There are official plugins provided by the Vue team and community plugins developed by the community. Official plugin names start with @vue/cli-plugin-, and community plugin names start with vue-cli-plugin-.
Official Vue CLI 3 plugins include:
- Typescript
- PWA
- Vuex
- Vue Router
- ESLint
- Unit testing etc.
How to Add a Vue Plugin
Plugins are either automatically installed when creating the project or explicitly installed later by the developer.
You can install many built-in plugins in a project when initializing your project, and install any other additional plugins in the project using the vue add my-plugin command at any point of your project.
You can also install plugins with presets, and group your favorite plugins as reusable presets that you can use later as the base for other projects.
Some Useful Vue Plugins
There are many Vue CLI plugins that you might find useful for your next projects. For example, the Vuetify UI library is available as a plugin, as is Storybook. You can also use the Electron Builder plugin to quickly scaffold out a Vue project based on Electron.
I’ve also written a couple of plugins which you can make use of:
- vue-cli-plugin-nuxt: a Vue CLI plugin for quickly creating a universal Vue application with Nuxt.js
- vue-cli-plugin-bootstrap: a Vue CLI plugin for adding Bootstrap 4 to your project
If you’d like to find out more about plugins, check out this great article on Vue Mastery: 5 Vue CLI 3 plugins for your Vue project.
What About webpack?
webpack is abstracted away by the Vue CLI and the different APIs it provides to access and mutate the webpack configuration.
Most project configuration for Vue CLI is abstracted into plugins and is merged into the base configuration at runtime. But in some situations you might want to manually tweak the webpack configuration for your project. In that case, you can either:
-
Create a
vue.config.jsfile in your project root and then make any configuration within aconfigureWebpackoption:module.exports = { configureWebpack: { // custom config here } } - Mutate the webpack configuration using tools like webpack-chain
You can find out more about working with Vue CLI and webpack here.
Vue CLI UI
Let’s now look at the Vue CLI UI, covering how to launch it and the different views used to create and manage projects a graphical user interface.
Vue CLI v3 provides a modern web interface that allows you to create and manage projects without using terminal commands. You can launch the UI as follows:
vue ui
The UI should be available from the http://localhost:8000 address.
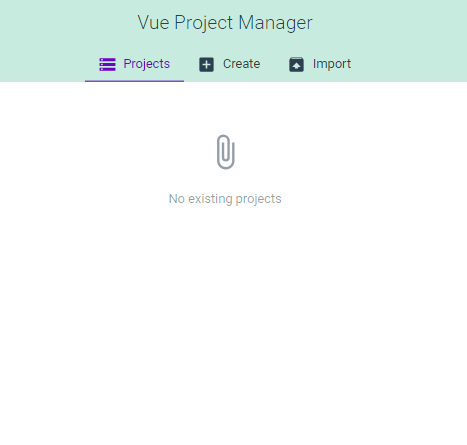
You create a new project from the Create tab. Browse for the location where you want to create your project, then click on the + Create a new project here button.
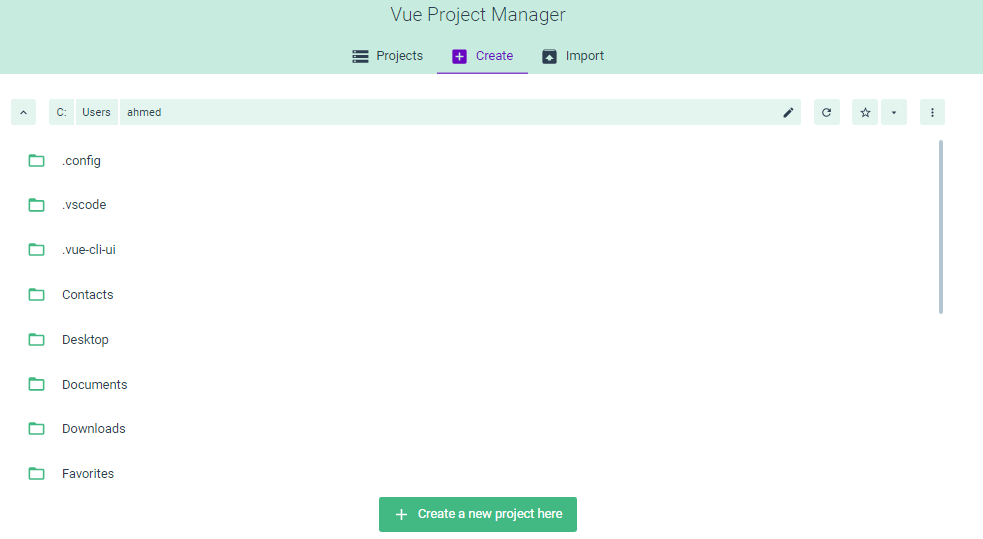
You’ll be taken to a new interface where you need to enter different details about your project such as the name, the project’s location, the package manager and whether or not you want to initialize a Git repository.
Enter the details and click on the Next button. You’ll be taken to the Presets tab where you can specify the preset for your project.
You can choose:
- Default preset for a default preset with Babel and ESLint plugins
- Manual for manually selecting plugins
- Remote preset for using a remote preset from a Git repository
Let’s continue with the default preset:
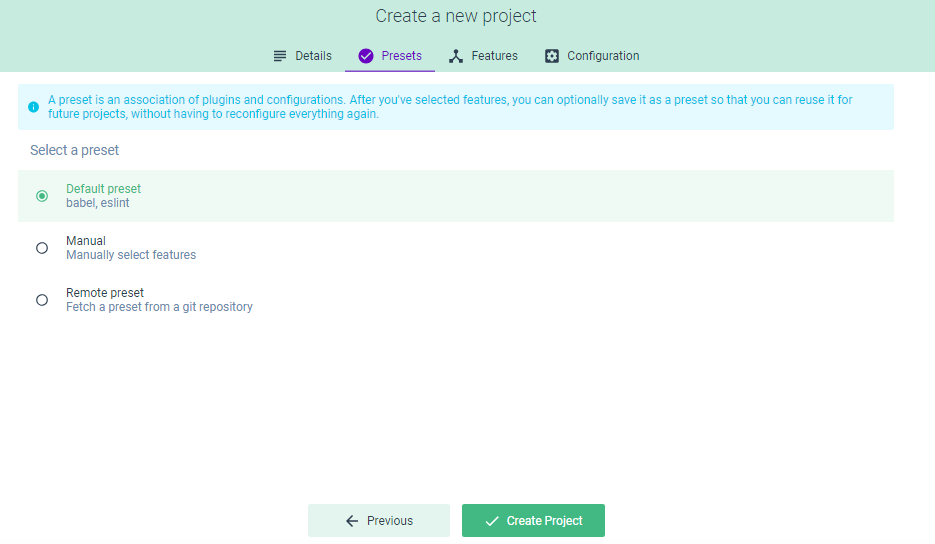
Tip: a preset is an association of plugins and configurations.
Next, you can click on the Create Project button to start generating your project. You’ll be taken to a new interface that shows you the progress of your project generation.
Next, you’ll be taken to the project dashboard—where your can put widgets, which you can add using the Customize button at the top right of the page, after which they’ll be automatically saved.
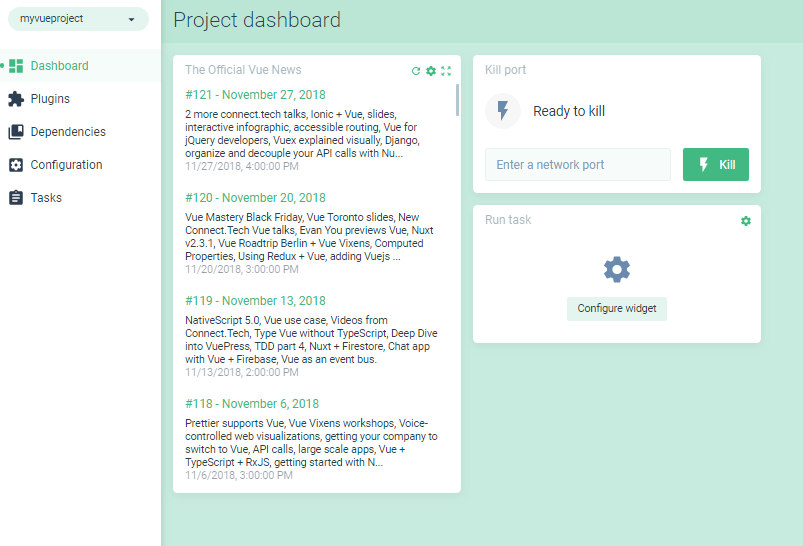
On the left of the dashboard you can find different pages:
- Plugins for adding new Vue CLI plugins
- Dependencies for managing the packages
- Configuration for configuring the tools
- Tasks for running scripts
Switch to the Tasks page.
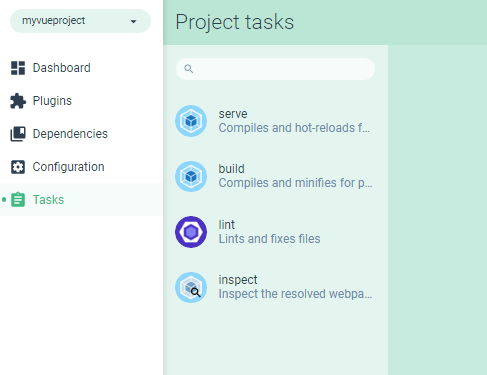
Next, click on the serve button and then on the Run task button to serve your project.

You can stop serving the project using the Stop task button. You can also open the application from this interface and see information about the project, such as the size of assets, modules and dependencies, speed statistics and so on.
Conclusion
In this article we’ve seen an overview of the new Vue CLI version, which provides a whole host of developer-friendly features such interactive project scaffolding, a rich collection of official plugins integrating the best tools in the front-end ecosystem, and a full graphical user interface to create and manage Vue.js projects.
The CLI is a powerful tool in the hands of Vue developers, but in cases when you don’t need all of its features, it might be preferable to use Vue.js in your project without the CLI. You can see how to do this in our tutorial Getting up and Running with the Vue.js 2.0 Framework.
На чтение 4 мин. Просмотров 23 Опубликовано
Учебное пособие по Vue cli с примерами с нуля — это тема, которую мы обсудим сегодня. На момент написания этой публикации у вас должны быть установлены Node.js и version> = 8 , потому что я использую @ vue/ cli 3.0. Иначе не получится. Vue также отлично подходит для сложных одностраничных приложений . Vue предоставляет реактивные и составные компоненты представления. Он использует виртуальную модель DOM . Он сохраняет фокус в основной библиотеке, включая такие задачи, как маршрутизация и глобальное управление состоянием, которые обрабатываются сопутствующими библиотеками.
Содержание
- Vue cli Tutorial
- Шаг 1. Установите Vue cli.
- Шаг 2: Структура папки .
- Шаг 3. Создайте один компонент.
- {{msg}}
- Привязка событий в Vue.
- {{price}}
- Обработка пользовательского ввода.
- Добавить пользователя
- Вычисляемые свойства.
Vue cli Tutorial
Сначала мы установим vue cli , а затем начнем работать над этим.
Шаг 1. Установите Vue cli.
Перейдите в свой терминал и нажмите следующую команду.
Примечание. Я используя @ vue/cli 3.0. Сейчас он находится в альфа-версии.
npm install -g @ vue/cli oryarn global add @ vue/cli
Он установит Vue cli во всем мире. Теперь, чтобы сгенерировать проект vue, введите следующую команду.
vue create vuepro
Он установит необходимые файлы и зависимости. После этого вам нужно запустить сервер с помощью следующей команды.
npm serve oryarn serve
Переключитесь на этот URL-адрес браузера: http://localhost: 8080/ Вы можете видеть, что наш проект Vue.js запущен и работает.
Шаг 2: Структура папки .
Ниже представлена структура папок проекта. Помните здесь; Мы используем компоненты во Vue. Таким образом, синтаксис свойства данных отличается. В простом проекте vue мы определяем свойство данных для доступа к значениям свойств, но в этом сценарии мы используем данные как функцию, и она возвращает объект, содержащий значение.

Нашей основной проблемой является папка src. В этой папке два файла и одна папка.
- App.vue
- main.js
- папка компонентов

 В App.vue , все компоненты включены в этот файл. Прямо сейчас в этом файле есть один компонент под названием HelloWorld.vue. Файл HelloWorld.vue находится в папке components . Таким образом, все остальные компоненты создаются внутри папки components и включаются в файл App.vue . Инициализация Vue выполняется внутри файла main.js .
//main.jsimport Vue из 'vue'import App from' ./App.vue'Vue .config.productionTip = falsenew Vue ({render: h => h (App)}). $ mount ('# app')
Теперь перейдите в общую папку. В нем находится файл index.html .
vuepro
Здесь наше приложение Vue работает внутри тега div идентификатора app . Экземпляр Vue связан с этим тегом div.
Шаг 3. Создайте один компонент.
Внутри компонентов , создайте один компонент под названием
//Ether.vue
{{msg}}
экспорт по умолчанию {name: 'Ethereum', props: {msg: String}}
Выше двухсторонний — это отдельный компонент. У него есть собственные свойства и методы. Если мы хотим увидеть результат работы этого компонента, импортируйте этот компонент в файл App.vue .
//App.vuetemplate> импортировать HelloWorld из './components/HelloWorld.vue'; импортировать эфир из './components/Ether.vue';export default {name:' app ', components: {HelloWorld, Ether}}
Здесь я передал имя свойства сообщение. Таким образом, мы можем отобразить это свойство внутри нашего компонента. Таким образом, необходимый поток идет сверху вниз. Родитель может передать свойство своему дочернему компоненту.
Привязка событий в Vue.
Если мы хотим изменить значение свойства при нажатии кнопки, вы можете написать для этого следующий код.
//Ether.vueэкспорт по умолчанию {data () {return {price: 200}; }, методы: {click () {this.price = 300; }}}{{price}}
Итак, теперь, когда мы нажимаем кнопку, запускается событие щелчка . Событие Click вызывает функцию click () . Эта функция изменяет значение цены. Vue является реактивным, поэтому при изменении свойства оно немедленно отражает значение в dom и обновляется.
Обработка пользовательского ввода.
В папке компонентов сделайте один вызов файла
//Form.vueexport default {data () {return {name: '', email: ''}}}
Добавить пользователя
Меня зовут: {{name}} Мой адрес электронной почты: {{email}}
Здесь у нас есть используется концепция двусторонней привязки данных.
Теперь импортируйте этот файл в A pp.vue .
//App.vue import Форма из './components/Form.vue';export default {components: {Form}}
Теперь перейдите в браузер, когда вы вводите текст в текстовое поле имени, его значение обновляется на панели ниже. Таким образом, существует двусторонняя привязка данных.
Вычисляемые свойства.
В компонентах , создайте один новый файл с именем
//Computed.vue экспорт по умолчанию {data () {return {counter: 0}}, вычислено: {view: function () {return this.counter <0? 0: this.counter; }}}
Здесь мы взяли две кнопки.
- Увеличение
- Уменьшение
Когда значение счетчика
Импортируйте этот файл в файл App.vue .
//App.vue import Computed from './components/Computed.vue';export default {components: {Computed}}
Vue.js имеет множество других функций. Мы обсудим это в следующих уроках.
Учебное пособие по Vue cli с примером с нуля окончено.