-
Contents
-
Table of Contents
-
Bookmarks
Quick Links
Related Manuals for Pittasoft BlackVue DR500GW-HD
Summary of Contents for Pittasoft BlackVue DR500GW-HD
-
Page 1
Car Dashcam Manual… -
Page 3: Table Of Contents
Table of Contents Introduction to the Manual Getting Started Cautions for Safety Checks for GPS Checks for the microSD Card Product Features 11 Package Components 12 Names of Each Part 13 How to Attach & Detach the Mounting Bracket How to Install the BlackVue 14 Checking Installation Position 14 How to Insert &…
-
Page 4
In accordance with Personal Information Security Law & related legislation, Pittasoft Co., Ltd. will not be held responsible for any problem due to illegal use of this product. -
Page 5: Cautions For Safety
Getting Started Cautions for Safety The purpose of these cautions is to maintain user safety and avoid damage to property. Please make sure to read through this manual so as to use the product in the correct way. Death or property damage can be caused for users if DANGER the following directions are not followed: y Do not disassemble, repair, or modify the product yourself.
-
Page 6
Death or serious injury can be caused for users if the WARNING following directions are not followed: y Do not leave the product where infants, children, or pets can reach it. They might swallow small components, or their saliva could get into it and cause an explosion due to a short circuit. -
Page 7
Injury or property damage can be caused for users if CAUTION the following directions are not followed: y Do not spray cleaning products directly onto the outside of the prod- uct. It can cause discoloration, cracks, or malfunction. y Do not press the RESET button with a sharp object such as an awl. It can cause damage or malfunction. -
Page 8: Checks For Gps
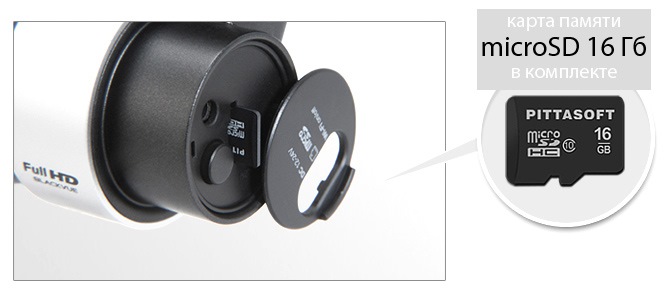
Insert or remove the microSD card only when the product is turned off. y microSD cards are a consumables and they are guaranteed for 6 months. y Other manufacturer’s microSD cards can cause compatibility problems so it is recommended to use a Pittasoft microSD card.
-
Page 9: Product Features
Product Features Ultra-high quality and smooth video Full HD (1920×1080) 30-frame ultra-high quality video High-class design with functionality Simple, luxurious design in pearl black Dedicated app support for BlackVue Support for the BlackVue app for Android, iPhone, and tablets with diverse configurations. (Smartphone resolution support tablets) Megapixel lens &…
-
Page 10
Diverse recording options (Normal/Event/Parking) Event recording and automatic conversion & deactivation of parking mode High-compression recording mode to extend SD-card life Efficient memory usage with high-compression storage method Support of viewer programs for Windows PC and Mac BlackVue software with convenient configurations such as power video search, resolution change, voice direction, and parking mode… -
Page 11: Package Components
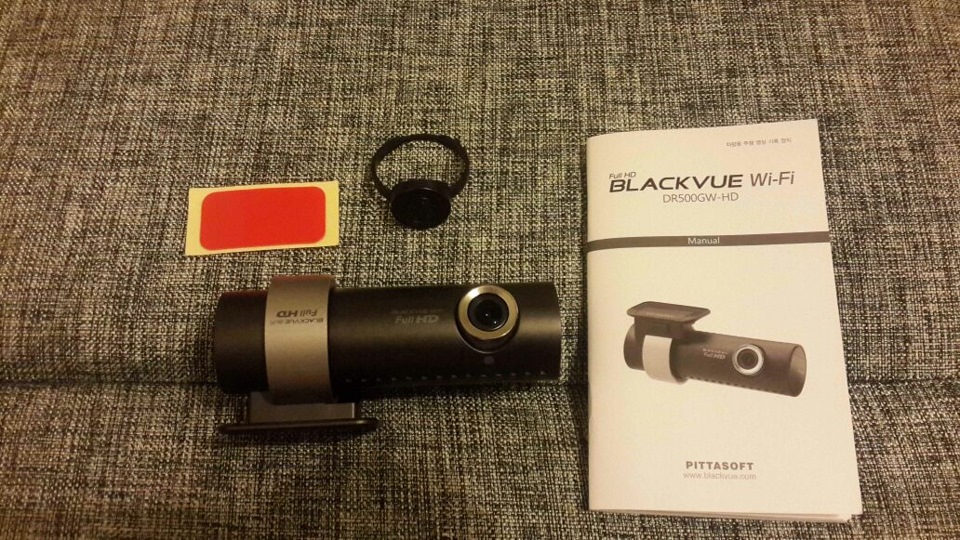
Package Components BlackVue Manual Power Cord Cable Clips (5 EA) Double-sided Tape for the Mounting microSD Card Bracket (Including BlackVue Software) microSD Card Reader Note y Pictures of the components may differ from the actual ones. y To enhance the performance of the product, components may be changed without prior notice.
-
Page 12: Names Of Each Part
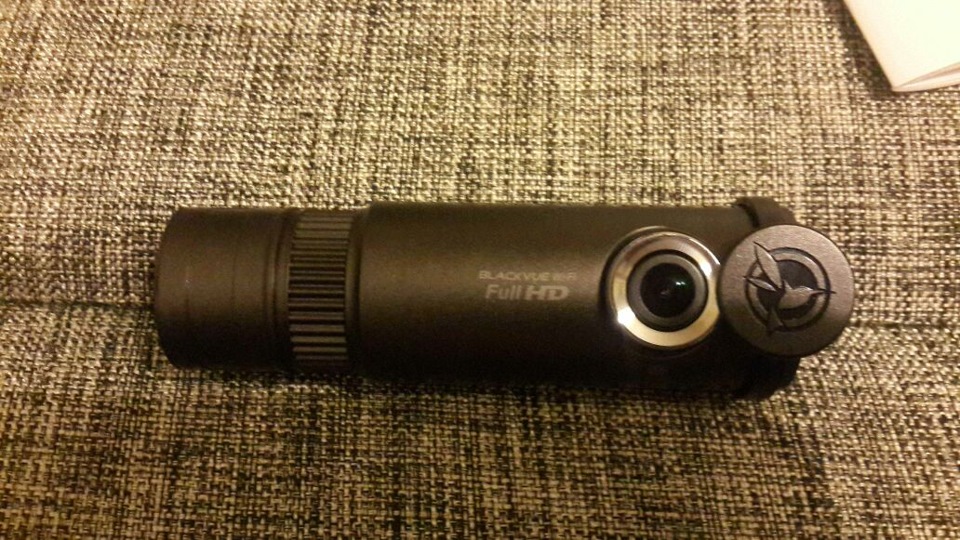
Names of Each Part Lock Button Camera Lens Mounting Bracket Security LED Recording LED GPS LED Speaker Wi-Fi LED Power Socket microSD Card Slot Cover Reset Button Voice on/off Button Wi-Fi Button (Format Button: Press for 10 seconds for Formatting)
-
Page 13: How To Attach & Detach The
Note y Tap the Voice on/off button to turn the voice recording function on or off. y Press the Wi-Fi button on the side for 10 seconds to format the mi- croSD card without using a PC. y If you need to reset BlackVue, press the Reset button. It is recommended for emergency use only.
-
Page 14: Checking Installation Position
How to Install the BlackVue Checking Installation Position It is recommended to install it at the back of rear view mirror. Clean any foreign matter and moisture from the place where the product will be installed. Note y Do not install the product where it can interfere with the driver’s vi- sion.
-
Page 15: Installation
Do not remove the microSD card while it is saving or reading data. The data may be damaged or malfunction caused. y Copy important data to other storage media to store. Pittasoft Co., Ltd. will not be held responsible for data loss due to user negligence.
-
Page 16
Use the cable clip to organize the power cord so that it doesn’t interfere with the driver’s vision. Adjust the lens angle of the camera. Note y After adjusting the angle of the camera lens, remember the angle of the mounting bracket so that it can be installed at the same angle next time. -
Page 17: Normal Recording
Video Recording Normal Recording When the engine is started, the BlackVue is turned on automatically. When the BlackVue is turned on, normal recording is automatically started. Note y If Power Magic (the Battery Discharge Prevention Device) is connected, the BlackVue is not turned off. y The normal recording function can be disabled in the BlackVue soft- ware configuration.
-
Page 18: Event Recording
Event Recording If an impact is detected in normal or parking mode recording, event recording is started. It records video for 5 seconds before and 55 seconds after the impact. Note y Sensitivity to impact can be adjusted in the BlackVue software con- figuration.
-
Page 19: How To Playback Using A Microsd
Simple Video Playback How to Playback using a microSD Card Playback Using a Smartphone With a smartphone that supports microSD cards video can be played back. Turn off the BlackVue and remove the microSD card. Note y For the details on how to remove the microSD card, refer to How to Insert &…
-
Page 20
Watching with a GPS navigation Recorded videos can be played back using a GPS navigation. Insert the provided microSD card into a microSD card reader. Connect the microSD card reader to the GPS navigation. Open an application to play back recorded videos and select the movie you want to play back from the removable drive. -
Page 21
How to Playback using a PC Recorded videos can be played back with a PC. Insert the provided microSD card into a microSD card reader. Connect the microSD card reader to the PC. Open an application to play back recorded videos and select the movie you want to play back from the removable drive. -
Page 22: How To Playback Using The Blackvue
How to Playback using the BlackVue Application Install the BlackVue application and open it in the smartphone. The BlackVue application can be downloaded from the Google Play store, Apple App Store, and Windows store. Note y The BlackVue application can be used with Android 2.3 or later, iOS 5.0 or later, and Windows 8.0.
-
Page 23: Application
Note y If you save the connection information when connecting using Wi-Fi, you can tap the Wi-Fi button in the BlackVue application to connect it without turning on the Wi-Fi function of the smartphone. y For the Live View function, Wi-Fi can be used within a 10m range, although the range may vary in some circumstances.
-
Page 24: Installation & Execution
How to use the BlackVue Software Installation & Execution How to Install Dedicated BlackVue software can be installed in a PC. Insert the provided microSD card into a microSD card reader. Connect the microSD card reader to the PC. Execute the ‘BlackVueSetup(HD).exe’ file in the ‘BlackVue\Software’ folder.
-
Page 25
How to Execute Without Installation It is possible to execute the dedicated BlackVue program without installation. Insert the provided microSD card into a microSD card reader. Connect the microSD card reader to the PC. Double-click ‘BlackVue.exe’ in the ‘BlackVue\Application’ folder. DR500GW-HD 25… -
Page 26: Screen Description
Screen Description Name Description Playback Screen Videos can be played back using this screen. The for Recorded mouse can be used to zoom in/out. Videos If you change the language on playback screen, the lan- Language guage for BlackVue Viewer can be changed. For details Setting about language configuration for BlackVue, refer to the Basic Configuration.
-
Page 27
Name Description Using the file list and map tab, the recorded video list, and where a video was recorded can be checked. : This is an normal recording file and marked Recorded Video with green in the timeline. List : This is an event recording file and marked with orange in the timeline. -
Page 28: Video Playback
Video Playback How to Control the Playback of Recorded Video The recorded video can be played back in full screen mode and be reversed upside down. The playback speed can be adjusted. Frame Move (Previous) Frame Move (Next) Play Previous File Play Next File View Upside-Down Playback Speed Control…
-
Page 29
Magnifying Glass Some parts of a recorded video can be zoomed in while playing back. Left-click the screen while a recorded video is being played back to see a partial zoom-in window and to use it to identify the number plate of a car while moving it. Note y You can use the Magnifier function only in BlackVue Viewer for Windows. -
Page 30
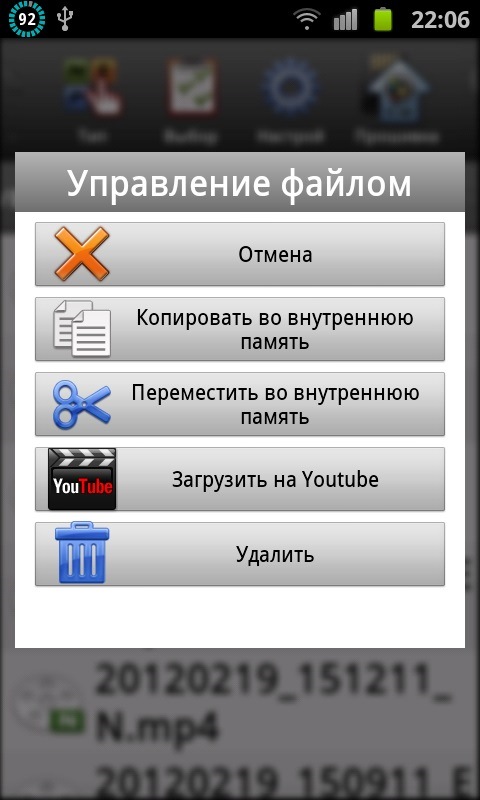
How to Manage Files With the recorded video list, a file can be deleted or saved with a different name. Select a file from the recorded video list and right-click it. To delete a file, click Delete. To save it with different name, click Export and select the option you want. -
Page 31
How to Check the Map Where a video was recorded can be checked with the map. Select a file from the recorded video list and play it back. Press the Map tab. With the +/- button or mouse wheel, the map can be zoomed in/out. Speed Unit Change Map Type Map Zoom-… -
Page 32
How to Check MyWay Viewer The driving route of a recorded video can be checked. Select a file from the recorded video list and play it back. Press the button. The driving route will be displayed on the map. Double-click the map to play back the recorded video of the nearest driving route from the clicked point. -
Page 33
How to Save as an Image While playing back a recorded video, some parts can be saved as images if you want. Select a file from the recorded video list and play it back. From the image to be saved, press the button. -
Page 34: Configuration
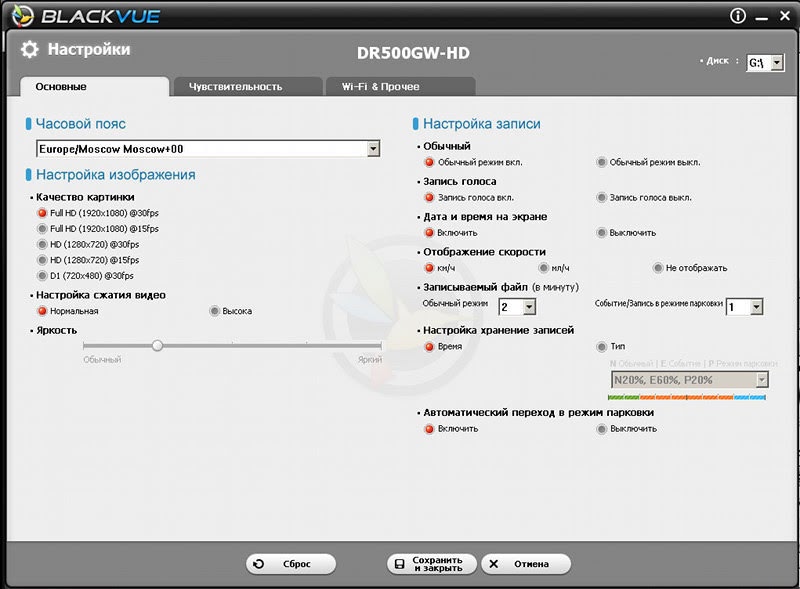
Configuration Basic Configuration Time, video, and recording configurations can be changed. button and click the Basic tab. Click the After changing the configuration, click Save & Close. Function Description Time Zone The time zone can be configured for where it is (Timezone used.
-
Page 35
Note y With the normal recording function disabled, only event and parking mode recording videos are saved. y With the speed display unit disabled, the vehicle speed is not dis- played when the recorded videos are played back. y On microSD cards, older files are deleted first to mark space for newly-recorded videos. -
Page 36
Function Description Sensitivity It is possible to configure the G-sensor sensitivity to for Normal start event recording during normal recording. Recording It is possible to configure the G-sensor and motion Sensitivity for detection sensitivity to start event recording during Parking Mode parking mode recording. -
Page 37
Move the control bar up/down to adjust the sensitivity range. If the range is wide, it is less sensitive, and if the range is narrow, it is more sen- sitive. It is recorded as an event. It is not recorded as an event. Note y If an event recording is started due to the sensitivity configured while a recorded video is being played back, the edge of the play-… -
Page 38
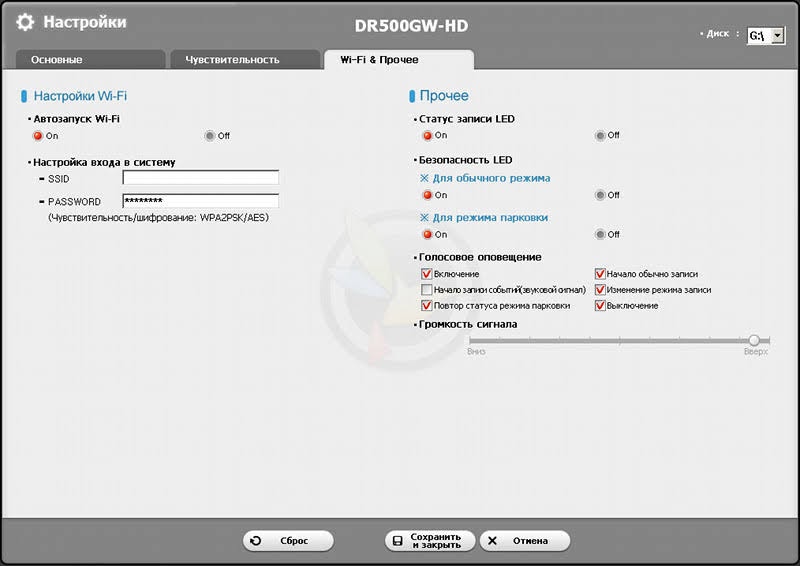
Function Description With Login Setting, Wi-Fi access privilege can be configured. SSID and password may be changed by Wi-Fi Setting the user. The BlackVue application can be accessed with the SSID and password chosen by the user. For video recording status, normal recording mode, and parking mode recording, the LED indicators can Etc. -
Page 39
Firmware Upgrade Existing products can be upgraded by downloading a new version of the firm- ware. Connect the microSD card to the PC. For details on how to connect, refer to How to Playback using a PC. (21 Page) Access the BlackVue website (www.blackvue.com) and download the firmware upgrade file. -
Page 40
After the firmware upgrade is finished, insert the microSD card into the BlackVue. Note y For detailes on how to insert the microSD card, refer to How to Insert & Remove the microSD Card. (14 Page) y Insert the microSD card only when the product is turned off. When the power is turned on, it is automatically upgraded. -
Page 41: Product Specifications
Product Specifications & Standards Product Specifications Model Name DR500GW-HD Color/Size/Weight Pearl Black / Length 118.5mm x Diameter 36mm / 114g Memory microSD Card (16GB / 32GB) Normal Recording, Event Recording (Impact Detection), and Parking Mode Recording (Motion+Impact Detection) Recording Mode ❈…
-
Page 42: Led Indicators
LED Indicators Recording Wi-Fi Security State (REC) Boot-up Blinking Orange Normal White Blinking Blinking cord- Event Red Blinking Fast White Blinking Parking Green Blinking White Blinking Wi-Fi ON Light White Blinking Wi-Fi ON/OFF Blinking Change GPS ON Blue Light White Blinking Software Control Available Unavailable Unavailable…
-
Page 43
Before Requesting A/S Service It is required for users to back up important data regularly from the storage device (to other separate media). Depending on the situation, it will be necessary to delete the data from the internal storage device (component). It might be necessary to delete all the data from the product for A/S Service. -
Page 44
FCC Compliance Information THIS DEVICE COMPLIES WITH PART 15 OF THE FCC RULES. Operation is subject to the following two conditions; (1) This device may not cause harmful interference, and (2) This device must accept any interference received, including interference that may cause undesired operation. CAUTION : Changes or modifications not expressly approved by the party responsible for compliance could void the user’s au- thority to operate the equipment. -
Page 45: Product Warranty
The term of this product warranty is 2 year from the purchase date. (Accessories such as Battery/microSD Card : 6 Months) We, Pittasoft Co., Ltd., provide the product warranty according to Consumer Dispute Settlement Regulations (drawn up by the Fair Trade Commission). Pittasoft or designated partners will provide the service upon request.
-
Page 46
Name Manufacturer Car Dashcam Pittasoft Co., Ltd. / Korea Address (Gasan-dong, BYC HIGHCITY), A-7th floor, 131, Gasan digital 1-ro, Geumcheon-gu, Seoul, 153-718, Republic of Korea Sales Headquater Tel: +82-2-6947-4670(#3) Fax: +82-2-6947-4699 e-mail sales@pittasoft.com…
Если у вас есть видеорегистратор BlackVue с поддержкой Wi-Fi или вы заинтересованы в его покупке, вам может быть интересно, как раскрыть весь потенциал видеорегистратора. От обновления прошивки до изменения настроек, управления видеофайлами и многого другого, как обычно, мы вам поможем!
Вы можете выбрать из широкого ассортимента видеорегистраторов BlackVue в разных ценовых категориях и с различными включенными функциями — все в соответствии с вашими потребностями. Хотите знать, какие из текущих видеорегистраторов BlackVue поддерживают Wi-Fi? Вот список:
- DR750-2CH LTE
- DR900S серии
- DR750S серии
- Серия DR590W
Это обучающее видео шаг за шагом проведет вас через весь процесс, так что просто следуйте инструкциям, и вы получите плавный и безболезненный опыт!
Если вы заинтересованы в Cloud опции в BlackVue Cloud-совместимые видеорегистраторы, вы можете отправиться в этой статье это поможет вам лучше понять видеорегистратор.
Наконец, в самом приложении BlackVue вы можете проверить, как выполнить более конкретную задачу, с помощью пошаговых руководств.
Вы также можете получить доступ к этим видео в этом YouTube плейлист.
Устройство предоставлено для теста компанией ЮДЖИКС и магазином UGIX-ON.RU.

Автомобильный видеорегистратор BlackVue Wi-Fi DR500GW-HD значительно отличается от DR400G-HD II, а также от его более ранней версии DR400G-HD. Общие у них только форм-фактор, алгоритмы обработки видео/аудио и фирменное внешнее программное обеспечение для просмотра записей и работы с настройками.
✔ Подобно предыдущим FullHD-моделям от Pittasoft, DR500GW-HD хорош прежде всего круглосуточно хорошим качеством изображения.
Выберите видео
▼ в плейлисте
Установите соответствующее разрешение видео
Формат mp4, кодеки H.264/AAC, максимальное разрешение 1920×1080 и максимальный битрейт 7500Kbps остались теми же, что у «четырёхсотых».
Но значительно увеличился угол обзора : 125° по горизонтали * . Это один из самых больших углов при FullHD среди всех автомобильных видеорегистраторов. (Обычный, самый распространённый угол 98° по горизонтали — это то, что обычно называется в характеристиках «120°» по диагонали).
* Отметим, что в официальном руководстве пользователя эта характеристика даже слегка занижена : 123° по горизонтали. Редкий случай, поскольку гораздо чаще производители привирают, разумеется в пользу увеличения. Что ж, такое серьёзное отношение к потребителю безусловно приятно.
Многие давние фанаты BlackVue негативно отнеслись к столь солидному увеличению угла, посчитав, что видео при этом потеряло в чёткости. Но на наш взгляд это не так: даже на самых краях кадров объектив не «мутит», сохраняя ту же резкость, что и в центре.
Однако проблема с качеством всё же есть.
Несмотря на значительное снижение цен на карты памяти разработчики BlackVue по-прежнему стараются экономить на объёме и не желают отказываться от чрезмерного сжатия видео. Поэтому при переходе к сценам с высокой частотой смены картинки (например — с мелькающими тенями от деревьев) изображение значительно портится: появляются блочность и прочие артефакты.
Для хорошего качества при разрешении 1920×1080 желателен битрейт не менее 10000Kbps, — даже при таком совершенном алгоритме сжатия как H.264.
А ведь в настройке «сжатие» есть ещё и вариант «высокое» (5000Kbps) вместо «нормальное» (7500Kbps). Вряд ли, покупая такой дорогой аппарат кто-то намеренно захочет использовать его на 60% и получать запись среднего качества. Это же недоумение относится и к присутствию в настройке «Качество картинки» вариантов с частотой кадров 15 и разрешением 720×480…
Микрофон BlackVue Wi-Fi DR500GW-HD пишет звук в основном без посторонних шумов и треска, но при потряхиваниях на неровностях и других резких увеличениях громкости возникают небольшие перегрузы.
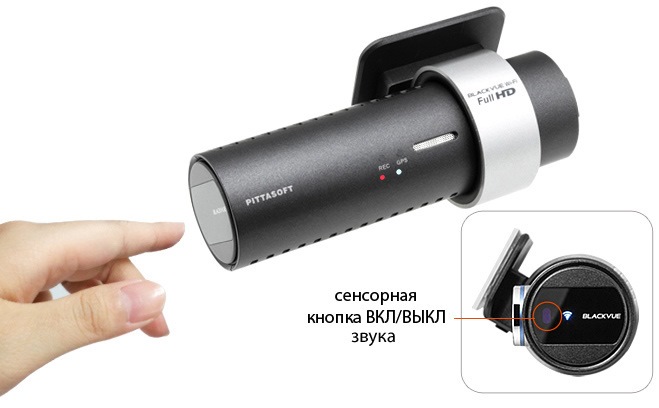
Запись звука можно оперативно отключать касанием левого торца корпуса-цилиндра — там, где находится синий индикатор работы Wi-Fi.
А вот индикатора отключения самого микрофона нет! Об отключении / включении сообщается лишь голосом (1 раз).
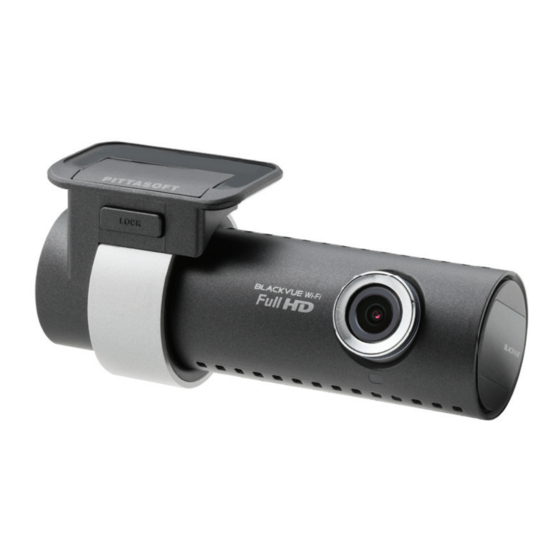
Корпус BlackVue Wi-Fi DR500GW-HD выполнен в виде цилиндра, который фиксируется в кольцеобразном кронштейне, клеящемся к лобовому стеклу.
Весь цилиндр можно вращать в этом кронштейне на 360° в продольно-вертикальной плоскости — таким образом здесь регулируется направление объектива: только выше, ниже или в салон.
При развороте в салон записываемое изображение автоматически не переворачивается, поэтому придётся вручную переворачивать его при просмотре в плеере.
По сравнению с «четырёхсотым», DR500GW имеет значительно бóльшие габариты.
Устройство предназначено для работы в полностью автоматическом режиме, поэтому у него нет кнопок «включение» и «запись».
Кнопкой на правом торце цилиндра отключается / включается Wi-Fi, а если удерживать её в течении 10 секунд, произойдёт форматирование карты памяти. При этом все «системные» папки и файлы будут восстановлены на ней из внутренней памяти устройства, то есть, в результате удалятся только видеозаписи вместе с сопутствующими им GPS-логами и показаниями G-сенсора.
Под крышкой рядом со слотом microSDHC-карты памяти есть ещё кнопка RESET — перезагрузка.
У BlackVue Wi-Fi DR500GW-HD нет дисплея, а также аналогового проводного видео-выхода на внешний экран как у DR400, но «живое» изображение можно вывести по Wi-Fi на смартфон или планшет, установив на них соответствующее бесплатное ПО. Просмотр в реальном времени может оказаться полезным для правильной ориентации объектива. Нужно иметь в виду, что при передаче данных по Wi-Fi видео будет отображаться на экране и записываться с некоторым снижением частоты кадров, хотя в характеристиках файла останется 30к/с.
О том, в каком режиме работает видеорегистратор, сигнализируют три светодиода-индикатора:
1-й — запись.
обычная — мигает оранжевым;
по G-сенсору — мигает красным;
по детектору движения — мигает зелёным.
2-й — GPS.
при работающем — горит голубым.
3-й, на торце — Wi-Fi.
при работающем — горит синим, при выключении / включении мигает.
О смене режимов, а также о начале и завершении работы устройство может информировать и голосом — через встроенный динамик.
Работа
После подачи внешнего питания аппарат включается сразу, но запись начинается только примерно через пол-минуты.
За это время, как правило, успевает поймать спутники встроенный модуль GPS, который в дальнейшем при движении вполне уверенно держит сигнал.
Запись ведётся в цикличном режиме роликами по 1, 2 или 3 минуты, разрывов между ними нет.
Вместе с видеофайлами на microSDHC-карту памяти в папку «Record» записываются координаты и показания G-сенсора.
G-sensor (он же акселерометр) — устройство, фиксирующее относительные ускорения тела, и в случае с автомобилем реагирующее, например, на замедление или изменение курса. В аварийной ситуации, когда такие ускорения достигают больших значений, показания g-сенсора становятся сигналом либо для защиты текущего видеофайла от стирания при круговой (цикличной) записи, либо для копирования небольшой части видео в отдельный, также защищённый файл.
У BlackVue Wi-Fi DR500GW-HD это происходит следующим образом: в момент срабатывания G-сенсора в нормальном режиме прекращается запись «нормального» файла («N» в конце названия) и начинается запись «аварийного» файла («E» в конце названия), который состоит из 5-ти секунд предыдущего и 55-ти секунд собственных (если установлена длина «нормальных» роликов 2 минуты и «аварийных» роликов 1 минута) . То есть получается защищённый от перезаписи следующий файл длиной 1 минута с пятисекундным перекрытием (копированием конца) предыдущего ролика.
Ручной защиты видеофрагмента от перезаписи у этого аппарата к сожалению нет.
Режим парковки у BlackVue Wi-Fi DR500GW-HD — просто работа либо по детектору движения, либо по G-сенсору.
При соответствующей настройке аппарат автоматически переходит в этот режим, если в течении 10 минут G-сенсором не фиксируется никаких перемещений.
После непрерывных изменений положения в пространстве в течении 30 секунд (например — после начала движения автомобиля) видеорегистратор возвращается в нормальный режим.
✔ Вполне продуманная и выверенная система, не требующая ручного вмешательства и экономящая место на карте памяти.
Разумеется, для работы в режиме парковки требуется постоянное подключение к источнику питания, то есть на розетке прикуривателя всё время должен быть ток — даже при выключенном двигателе.
В настройках BlackVue Wi-Fi DR500GW-HD можно отключить «Нормальный режим», — тогда запись будет активироваться только по срабатыванию либо детектора движения, либо G-сенсора.
Во время работы аппарат довольно ощутимо нагревается, но для данного видеорегистратора это считается нормальным.
Встроенный источник автономного питания предназначен только для корректного завершения записи видеофайла при отключении внешнего питания и завершения работы, которое происходит в течении примерно 5-ти секунд.
МЕНЮ настроек (инструкция с пояснениями)
Установки BlackVue Wi-Fi DR500GW-HD производятся либо на компьютере под Windows с помощью весьма толкового фирменного программного обеспечения, находящегося прямо на microSDHC-карте видеорегистратора, либо (частично) на телефоне или планшете под Android, для чего нужно скачать соответствующее бесплатное ПО для BlackVue из Play Market .
В первом случае необходимо переставить microSDHC-карту памяти в картридер компьютера, во втором это делать необязательно, если устройства можно соединить по Wi-Fi (точкой доступа выступает видеорегистратор).
Все установки сохраняются на карте памяти.
• «Качество картинки» — варианты разрешения и частоты кадров:
1920×1080 30fps, 1920×1080 15fps, 1280×720 30fps, 1280×720 15fps, 720×480 30fps.
Конечно же, данный очень недешёвый аппарат есть смысл использовать только с первым вариантом.
• Дата и время устанавливаются автоматически при работе GPS, но в настройках нужно проверить часовой пояс.
• Штамп даты, времени и скорости на кадрах можно отключить.
• Длина файлов при цикличной записи (1, 2 или 3 минуты) регулируется раздельно:
— для обычных роликов «N»;
— для роликов, записанных по срабатыванию G-сенсора «E» или детектора движения «P».
• Также раздельно для каждого вида роликов («N» — нормальные, «E» — по G-сенсору, «P» — паркинг) можно задать доступные объёмы на карте памяти или общую продолжительность по времени.
У каждого вида роликов происходит своя отдельная цикличная запись.
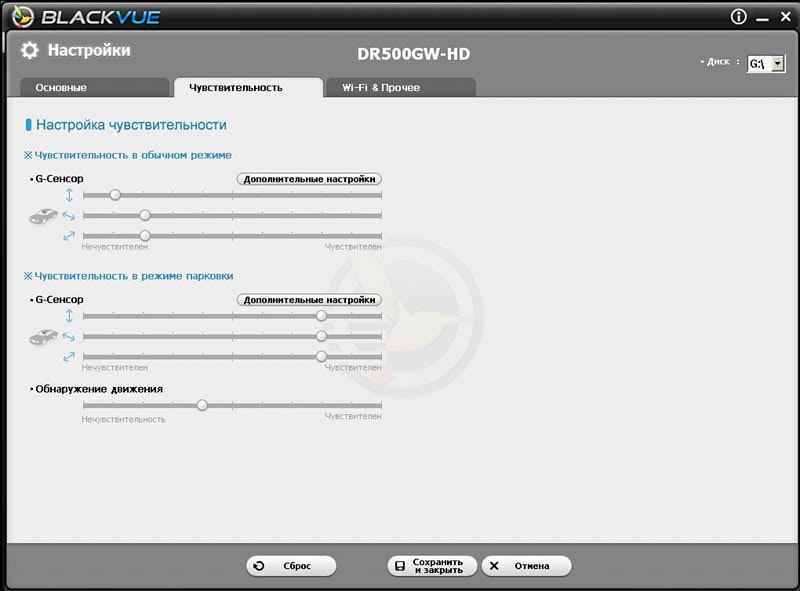
• Многоступенчатая регулировка G-сенсора и детектора движения.
✔ G-сенсор можно регулировать по трём осям, в том числе и опытным путём — через «дополнительные настройки», ориентируясь на уже зафиксированные в прежних записях срабатывания с помощью очень удобных графиков с ползунками.
Можно устанавливать различную чувствительность G-сенсора для «Нормального» и для «Парковочного» режимов.
• Можно отключить автозапуск Wi-Fi.
• Для голосовых оповещений можно задавать повод и громкость.
Система просмотра
✔ Наряду с высоким качеством видео, вторым основным достоинством BlackVue Wi-Fi DR500GW-HD является система поиска, сортировки и просмотра записей.
Здесь это можно делать как на обычном компьютере (потребуется перестановка microSDHC-карты памяти в его картридер), так и оперативно — посредством Wi-Fi на смартфоне или планшете, для чего не нужно ни отключать видеорегистратор, ни извлекать карту памяти.
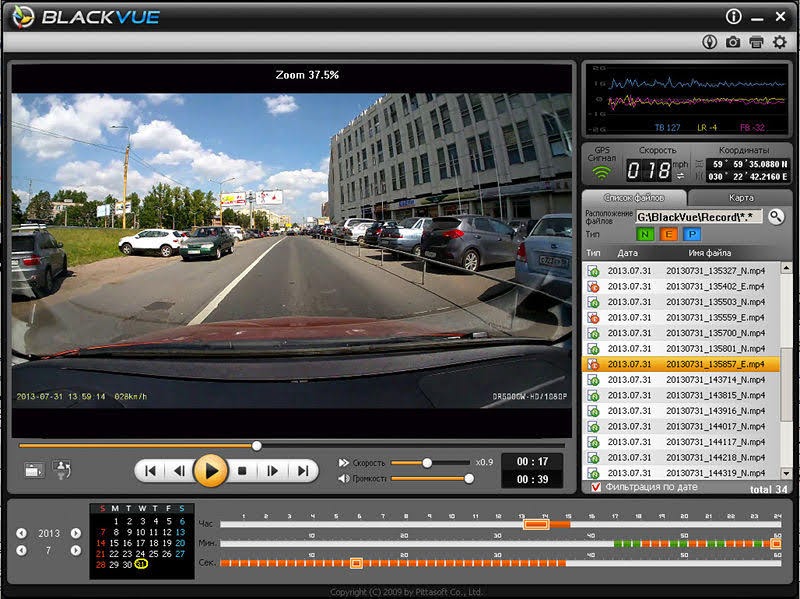
В принципе, записанные видеофайлы могут воспроизводиться на компьютере или смартфоне почти любым программным плеером — для этого нужно просто найти их в папке «Record» на карте памяти (после её установки в катридер или подсоединения по Wi-Fi она определится файловым менеджером как внешний диск).
Но лучше воспользоваться специально разработанным очень продуманным и удобным фирменным программным обеспечением от BlackVue.
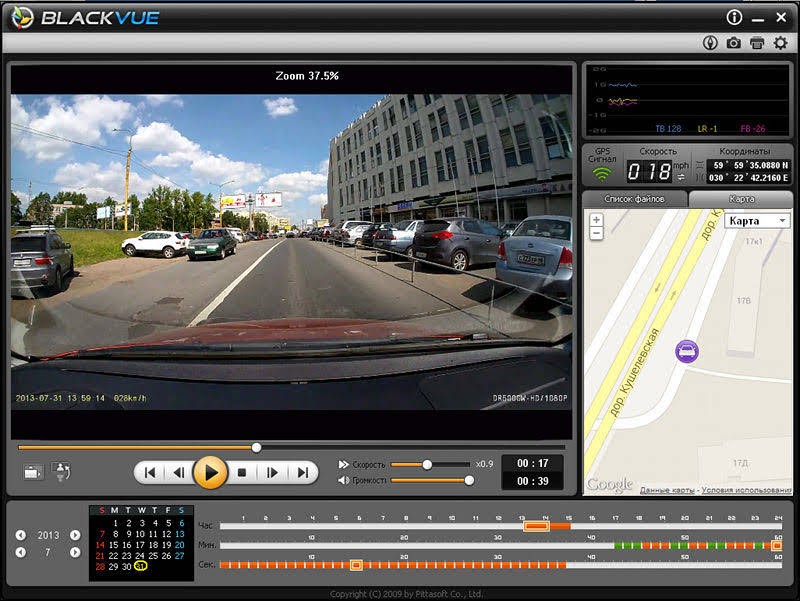
Наиболее полное представление о дорожных событиях можно получить на компьютере.
После запуска фирменного ПО, рядом с окном специального плеера будут отображаться координаты, местоположение на карте (при подключении к интернету), время, скорость, а также продольные / поперечные / вертикальные ускорения, зафиксированные G-сенсором.
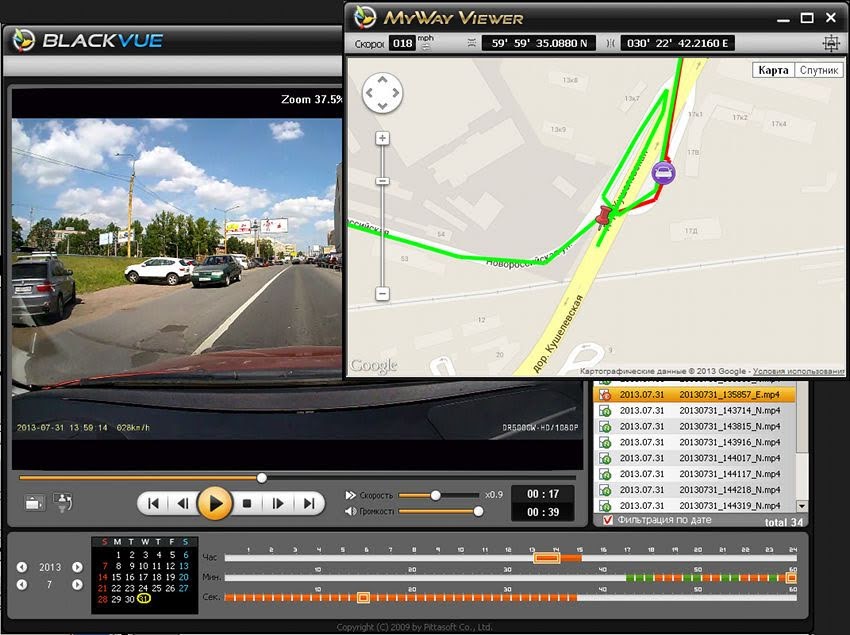
А если нажать на значок с компасом, появится отдельная Google-карта с интерактивным отображением пройденного маршрута, имеющего разбивку соответственно записанным файлам. С её помощью можно найти и запустить нужное видео, ориентируясь на место съёмки.
Также легко обнаружить необходимую запись и по времени.
В этом поможет графический календарь и три наглядных временных шкалы.
Ролики можно отсортировать и по виду записи:
обычная цикличная «N», события по G-сенсору «E», парковочная по детектору движения «P».
✔ Сам плеер тоже оснащён всеми возможностями для поиска нужного видеофрагмента:
▶ есть перемотка ползунком и покадровый просмотр вперёд и назад кнопкой;
▶ воспроизведение можно ускорить или замедлить;
▶ имеется переворот изображения;
▶ любую часть кадра можно увеличить, кликнув соответствующее место.
Любой отрезок видео при необходимости экспортируется в новый файл, — для этого нужно задать время его начала и конца.
Есть также сохранение стоп-кадров.
Программное обеспечение для мобильных девайсов под Android предоставляет несколько меньше возможностей:
просмотр и копирование распределённых по видам записи видеофайлов (плюс почти все настройки).
✔ Зато оно позволяет делать это не только путём перестановки карты памяти, но и по Wi-Fi, а удобство и быстрота этого последнего способа может превосходить даже просмотр непосредственно на автомобильных видеорегистраторах, — ведь у планшетов и смартфонов экраны значительно больше.
Комплектация
- видеорегистратор и кронштейн с монтажной клейкой лентой;
- запасная монтажная клейкая лента;
- 5 креплений для кабеля также на клею;
- питающий кабель длиной 4,5 метра со штекером в прикуриватель;
- microSDHC-карта памяти 16GB 10class;
- картридер под USB;
- инструкция;
- гарантийный талон.
Сайт производителя: www.blackvue.ru
↑ наверх ↑
-
Contents
-
Table of Contents
-
Bookmarks
Quick Links
Related Manuals for Pittasoft BlackVue DR500GW-HD
Summary of Contents for Pittasoft BlackVue DR500GW-HD
-
Page 1
Car Dashcam Manual… -
Page 3: Table Of Contents
Table of Contents Introduction to the Manual Getting Started Cautions for Safety Checks for GPS Checks for the microSD Card Product Features 11 Package Components 12 Names of Each Part 13 How to Attach & Detach the Mounting Bracket How to Install the BlackVue 14 Checking Installation Position 14 How to Insert &…
-
Page 4
In accordance with Personal Information Security Law & related legislation, Pittasoft Co., Ltd. will not be held responsible for any problem due to illegal use of this product. -
Page 5: Cautions For Safety
Getting Started Cautions for Safety The purpose of these cautions is to maintain user safety and avoid damage to property. Please make sure to read through this manual so as to use the product in the correct way. Death or property damage can be caused for users if DANGER the following directions are not followed: y Do not disassemble, repair, or modify the product yourself.
-
Page 6
Death or serious injury can be caused for users if the WARNING following directions are not followed: y Do not leave the product where infants, children, or pets can reach it. They might swallow small components, or their saliva could get into it and cause an explosion due to a short circuit. -
Page 7
Injury or property damage can be caused for users if CAUTION the following directions are not followed: y Do not spray cleaning products directly onto the outside of the prod- uct. It can cause discoloration, cracks, or malfunction. y Do not press the RESET button with a sharp object such as an awl. It can cause damage or malfunction. -
Page 8: Checks For Gps
Insert or remove the microSD card only when the product is turned off. y microSD cards are a consumables and they are guaranteed for 6 months. y Other manufacturer’s microSD cards can cause compatibility problems so it is recommended to use a Pittasoft microSD card.
-
Page 9: Product Features
Product Features Ultra-high quality and smooth video Full HD (1920×1080) 30-frame ultra-high quality video High-class design with functionality Simple, luxurious design in pearl black Dedicated app support for BlackVue Support for the BlackVue app for Android, iPhone, and tablets with diverse configurations. (Smartphone resolution support tablets) Megapixel lens &…
-
Page 10
Diverse recording options (Normal/Event/Parking) Event recording and automatic conversion & deactivation of parking mode High-compression recording mode to extend SD-card life Efficient memory usage with high-compression storage method Support of viewer programs for Windows PC and Mac BlackVue software with convenient configurations such as power video search, resolution change, voice direction, and parking mode… -
Page 11: Package Components
Package Components BlackVue Manual Power Cord Cable Clips (5 EA) Double-sided Tape for the Mounting microSD Card Bracket (Including BlackVue Software) microSD Card Reader Note y Pictures of the components may differ from the actual ones. y To enhance the performance of the product, components may be changed without prior notice.
-
Page 12: Names Of Each Part
Names of Each Part Lock Button Camera Lens Mounting Bracket Security LED Recording LED GPS LED Speaker Wi-Fi LED Power Socket microSD Card Slot Cover Reset Button Voice on/off Button Wi-Fi Button (Format Button: Press for 10 seconds for Formatting)
-
Page 13: How To Attach & Detach The
Note y Tap the Voice on/off button to turn the voice recording function on or off. y Press the Wi-Fi button on the side for 10 seconds to format the mi- croSD card without using a PC. y If you need to reset BlackVue, press the Reset button. It is recommended for emergency use only.
-
Page 14: Checking Installation Position
How to Install the BlackVue Checking Installation Position It is recommended to install it at the back of rear view mirror. Clean any foreign matter and moisture from the place where the product will be installed. Note y Do not install the product where it can interfere with the driver’s vi- sion.
-
Page 15: Installation
Do not remove the microSD card while it is saving or reading data. The data may be damaged or malfunction caused. y Copy important data to other storage media to store. Pittasoft Co., Ltd. will not be held responsible for data loss due to user negligence.
-
Page 16
Use the cable clip to organize the power cord so that it doesn’t interfere with the driver’s vision. Adjust the lens angle of the camera. Note y After adjusting the angle of the camera lens, remember the angle of the mounting bracket so that it can be installed at the same angle next time. -
Page 17: Normal Recording
Video Recording Normal Recording When the engine is started, the BlackVue is turned on automatically. When the BlackVue is turned on, normal recording is automatically started. Note y If Power Magic (the Battery Discharge Prevention Device) is connected, the BlackVue is not turned off. y The normal recording function can be disabled in the BlackVue soft- ware configuration.
-
Page 18: Event Recording
Event Recording If an impact is detected in normal or parking mode recording, event recording is started. It records video for 5 seconds before and 55 seconds after the impact. Note y Sensitivity to impact can be adjusted in the BlackVue software con- figuration.
-
Page 19: How To Playback Using A Microsd
Simple Video Playback How to Playback using a microSD Card Playback Using a Smartphone With a smartphone that supports microSD cards video can be played back. Turn off the BlackVue and remove the microSD card. Note y For the details on how to remove the microSD card, refer to How to Insert &…
-
Page 20
Watching with a GPS navigation Recorded videos can be played back using a GPS navigation. Insert the provided microSD card into a microSD card reader. Connect the microSD card reader to the GPS navigation. Open an application to play back recorded videos and select the movie you want to play back from the removable drive. -
Page 21
How to Playback using a PC Recorded videos can be played back with a PC. Insert the provided microSD card into a microSD card reader. Connect the microSD card reader to the PC. Open an application to play back recorded videos and select the movie you want to play back from the removable drive. -
Page 22: How To Playback Using The Blackvue
How to Playback using the BlackVue Application Install the BlackVue application and open it in the smartphone. The BlackVue application can be downloaded from the Google Play store, Apple App Store, and Windows store. Note y The BlackVue application can be used with Android 2.3 or later, iOS 5.0 or later, and Windows 8.0.
-
Page 23: Application
Note y If you save the connection information when connecting using Wi-Fi, you can tap the Wi-Fi button in the BlackVue application to connect it without turning on the Wi-Fi function of the smartphone. y For the Live View function, Wi-Fi can be used within a 10m range, although the range may vary in some circumstances.
-
Page 24: Installation & Execution
How to use the BlackVue Software Installation & Execution How to Install Dedicated BlackVue software can be installed in a PC. Insert the provided microSD card into a microSD card reader. Connect the microSD card reader to the PC. Execute the ‘BlackVueSetup(HD).exe’ file in the ‘BlackVueSoftware’ folder.
-
Page 25
How to Execute Without Installation It is possible to execute the dedicated BlackVue program without installation. Insert the provided microSD card into a microSD card reader. Connect the microSD card reader to the PC. Double-click ‘BlackVue.exe’ in the ‘BlackVueApplication’ folder. DR500GW-HD 25… -
Page 26: Screen Description
Screen Description Name Description Playback Screen Videos can be played back using this screen. The for Recorded mouse can be used to zoom in/out. Videos If you change the language on playback screen, the lan- Language guage for BlackVue Viewer can be changed. For details Setting about language configuration for BlackVue, refer to the Basic Configuration.
-
Page 27
Name Description Using the file list and map tab, the recorded video list, and where a video was recorded can be checked. : This is an normal recording file and marked Recorded Video with green in the timeline. List : This is an event recording file and marked with orange in the timeline. -
Page 28: Video Playback
Video Playback How to Control the Playback of Recorded Video The recorded video can be played back in full screen mode and be reversed upside down. The playback speed can be adjusted. Frame Move (Previous) Frame Move (Next) Play Previous File Play Next File View Upside-Down Playback Speed Control…
-
Page 29
Magnifying Glass Some parts of a recorded video can be zoomed in while playing back. Left-click the screen while a recorded video is being played back to see a partial zoom-in window and to use it to identify the number plate of a car while moving it. Note y You can use the Magnifier function only in BlackVue Viewer for Windows. -
Page 30
How to Manage Files With the recorded video list, a file can be deleted or saved with a different name. Select a file from the recorded video list and right-click it. To delete a file, click Delete. To save it with different name, click Export and select the option you want. -
Page 31
How to Check the Map Where a video was recorded can be checked with the map. Select a file from the recorded video list and play it back. Press the Map tab. With the +/- button or mouse wheel, the map can be zoomed in/out. Speed Unit Change Map Type Map Zoom-… -
Page 32
How to Check MyWay Viewer The driving route of a recorded video can be checked. Select a file from the recorded video list and play it back. Press the button. The driving route will be displayed on the map. Double-click the map to play back the recorded video of the nearest driving route from the clicked point. -
Page 33
How to Save as an Image While playing back a recorded video, some parts can be saved as images if you want. Select a file from the recorded video list and play it back. From the image to be saved, press the button. -
Page 34: Configuration
Configuration Basic Configuration Time, video, and recording configurations can be changed. button and click the Basic tab. Click the After changing the configuration, click Save & Close. Function Description Time Zone The time zone can be configured for where it is (Timezone used.
-
Page 35
Note y With the normal recording function disabled, only event and parking mode recording videos are saved. y With the speed display unit disabled, the vehicle speed is not dis- played when the recorded videos are played back. y On microSD cards, older files are deleted first to mark space for newly-recorded videos. -
Page 36
Function Description Sensitivity It is possible to configure the G-sensor sensitivity to for Normal start event recording during normal recording. Recording It is possible to configure the G-sensor and motion Sensitivity for detection sensitivity to start event recording during Parking Mode parking mode recording. -
Page 37
Move the control bar up/down to adjust the sensitivity range. If the range is wide, it is less sensitive, and if the range is narrow, it is more sen- sitive. It is recorded as an event. It is not recorded as an event. Note y If an event recording is started due to the sensitivity configured while a recorded video is being played back, the edge of the play-… -
Page 38
Function Description With Login Setting, Wi-Fi access privilege can be configured. SSID and password may be changed by Wi-Fi Setting the user. The BlackVue application can be accessed with the SSID and password chosen by the user. For video recording status, normal recording mode, and parking mode recording, the LED indicators can Etc. -
Page 39
Firmware Upgrade Existing products can be upgraded by downloading a new version of the firm- ware. Connect the microSD card to the PC. For details on how to connect, refer to How to Playback using a PC. (21 Page) Access the BlackVue website (www.blackvue.com) and download the firmware upgrade file. -
Page 40
After the firmware upgrade is finished, insert the microSD card into the BlackVue. Note y For detailes on how to insert the microSD card, refer to How to Insert & Remove the microSD Card. (14 Page) y Insert the microSD card only when the product is turned off. When the power is turned on, it is automatically upgraded. -
Page 41: Product Specifications
Product Specifications & Standards Product Specifications Model Name DR500GW-HD Color/Size/Weight Pearl Black / Length 118.5mm x Diameter 36mm / 114g Memory microSD Card (16GB / 32GB) Normal Recording, Event Recording (Impact Detection), and Parking Mode Recording (Motion+Impact Detection) Recording Mode ❈…
-
Page 42: Led Indicators
LED Indicators Recording Wi-Fi Security State (REC) Boot-up Blinking Orange Normal White Blinking Blinking cord- Event Red Blinking Fast White Blinking Parking Green Blinking White Blinking Wi-Fi ON Light White Blinking Wi-Fi ON/OFF Blinking Change GPS ON Blue Light White Blinking Software Control Available Unavailable Unavailable…
-
Page 43
Before Requesting A/S Service It is required for users to back up important data regularly from the storage device (to other separate media). Depending on the situation, it will be necessary to delete the data from the internal storage device (component). It might be necessary to delete all the data from the product for A/S Service. -
Page 44
FCC Compliance Information THIS DEVICE COMPLIES WITH PART 15 OF THE FCC RULES. Operation is subject to the following two conditions; (1) This device may not cause harmful interference, and (2) This device must accept any interference received, including interference that may cause undesired operation. CAUTION : Changes or modifications not expressly approved by the party responsible for compliance could void the user’s au- thority to operate the equipment. -
Page 45: Product Warranty
The term of this product warranty is 2 year from the purchase date. (Accessories such as Battery/microSD Card : 6 Months) We, Pittasoft Co., Ltd., provide the product warranty according to Consumer Dispute Settlement Regulations (drawn up by the Fair Trade Commission). Pittasoft or designated partners will provide the service upon request.
-
Page 46
Name Manufacturer Car Dashcam Pittasoft Co., Ltd. / Korea Address (Gasan-dong, BYC HIGHCITY), A-7th floor, 131, Gasan digital 1-ro, Geumcheon-gu, Seoul, 153-718, Republic of Korea Sales Headquater Tel: +82-2-6947-4670(#3) Fax: +82-2-6947-4699 e-mail sales@pittasoft.com…
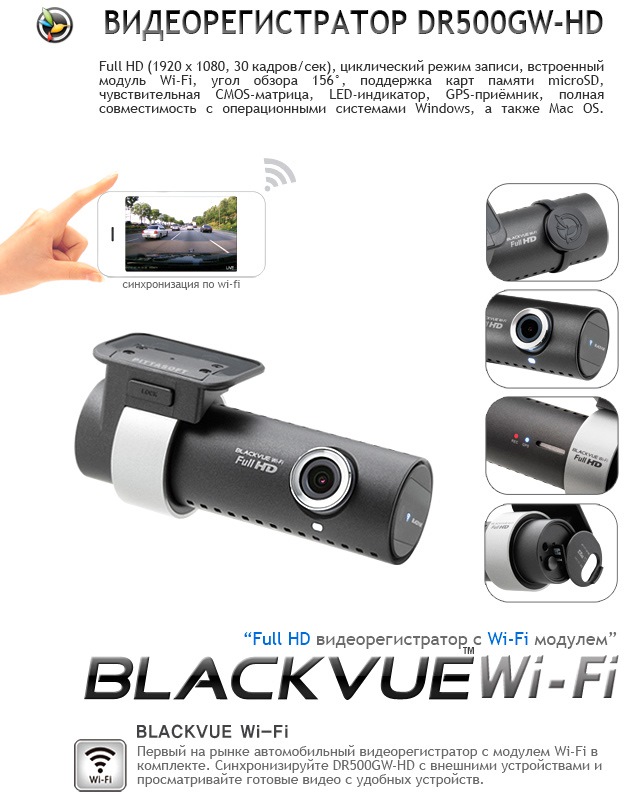
Всем привет. Купил видеорегистратор BlackVue DR500GW-HD Wi-Fi
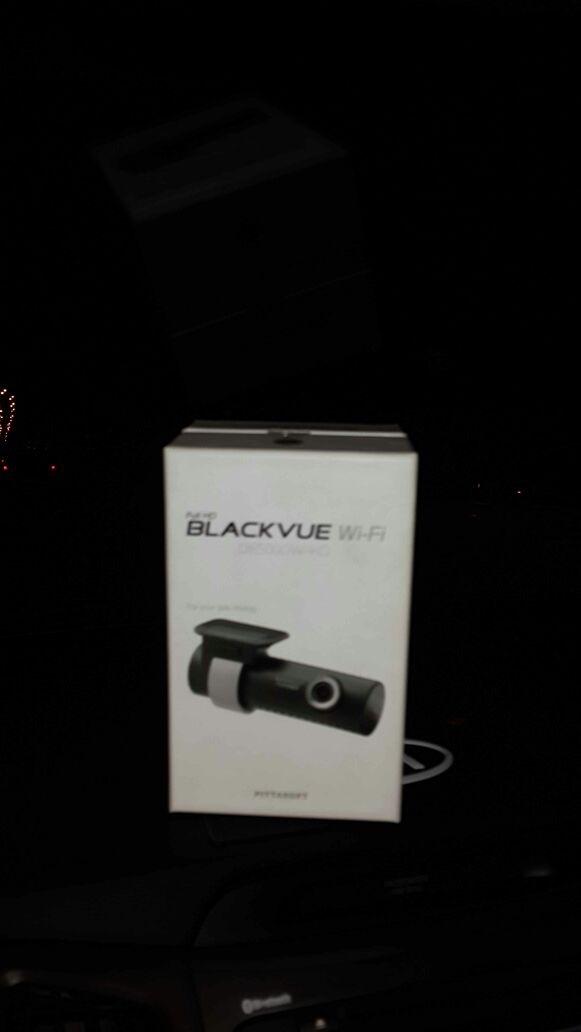

Производитель: PittaSoft (Ю.Корея)
Модель: DR500GW-HD
Камера: 2Mpx CMOS матрица, инфракрасная линза
Разрешение: Full HD (1920×1080) 30fps, HD (1280×720) 30fps, кодек H.264
Модули, датчики: GPS, Wi-FI, парковочный режим, G-sensor, микрофон, спикер
Угол обзора: 156˚(диагональ), 123˚(горизонталь), 90˚(вертикаль)
Карта памяти: MicroSD, 16 GB в комплекте, поддержка до 32 GB
Видео выход: нет, только Wi-Fi
Индикация: LED светодиодная
Питание: 12v-24v, от автомобильной. сети
Батарея: конденсатор 300mA
Цвет/Габариты: матовый темно-серый, 118.5×36.0, 114 гр.
Для работы с отснятыми материалами у нас есть две возможности — первая это подключится к работающему регистратору по Wi-Fi используя соответствующую программу из Google Play или AppStore
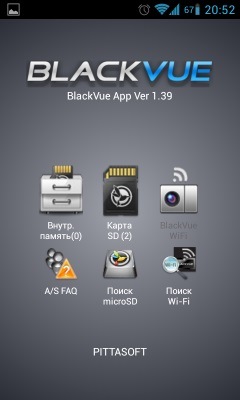
Программа полностью на русском языке.
Регистратор BlackVue DR500GW-HD WI-FI не оборудован экраном, что позволило сделать его достаточно миниатюрным и незаметным для посторонних. Как правило, встроенный дисплей слишком мал, чтобы разглядеть необходимые детали видеоряда. Прибор снимает в Full HD без видимых артефактов и пауз между роликами.
Встроенный Wi-Fi
Наиболее отличительное и заметное отличие DR500 WiFi от конкурентов — встроенный модуль Wi-Fi. Благодаря беспроводной передаче данных Вы можете синхронизировать регистратор с каким угодно числом внешних источников и просматривать готовые видео как с большого HD-телевизора, так и со своего смартфона.

Файлы для BlackVue:
Инструкция на русском языке — СКАЧАТЬ
Проигрыватель для Windows v2.032 (RUS) — СКАЧАТЬ
Альтернативный проигрыватель для Windows (RegistratorViewer) — СКАЧАТЬ
Проигрыватель для Mac OS — СКАЧАТЬ
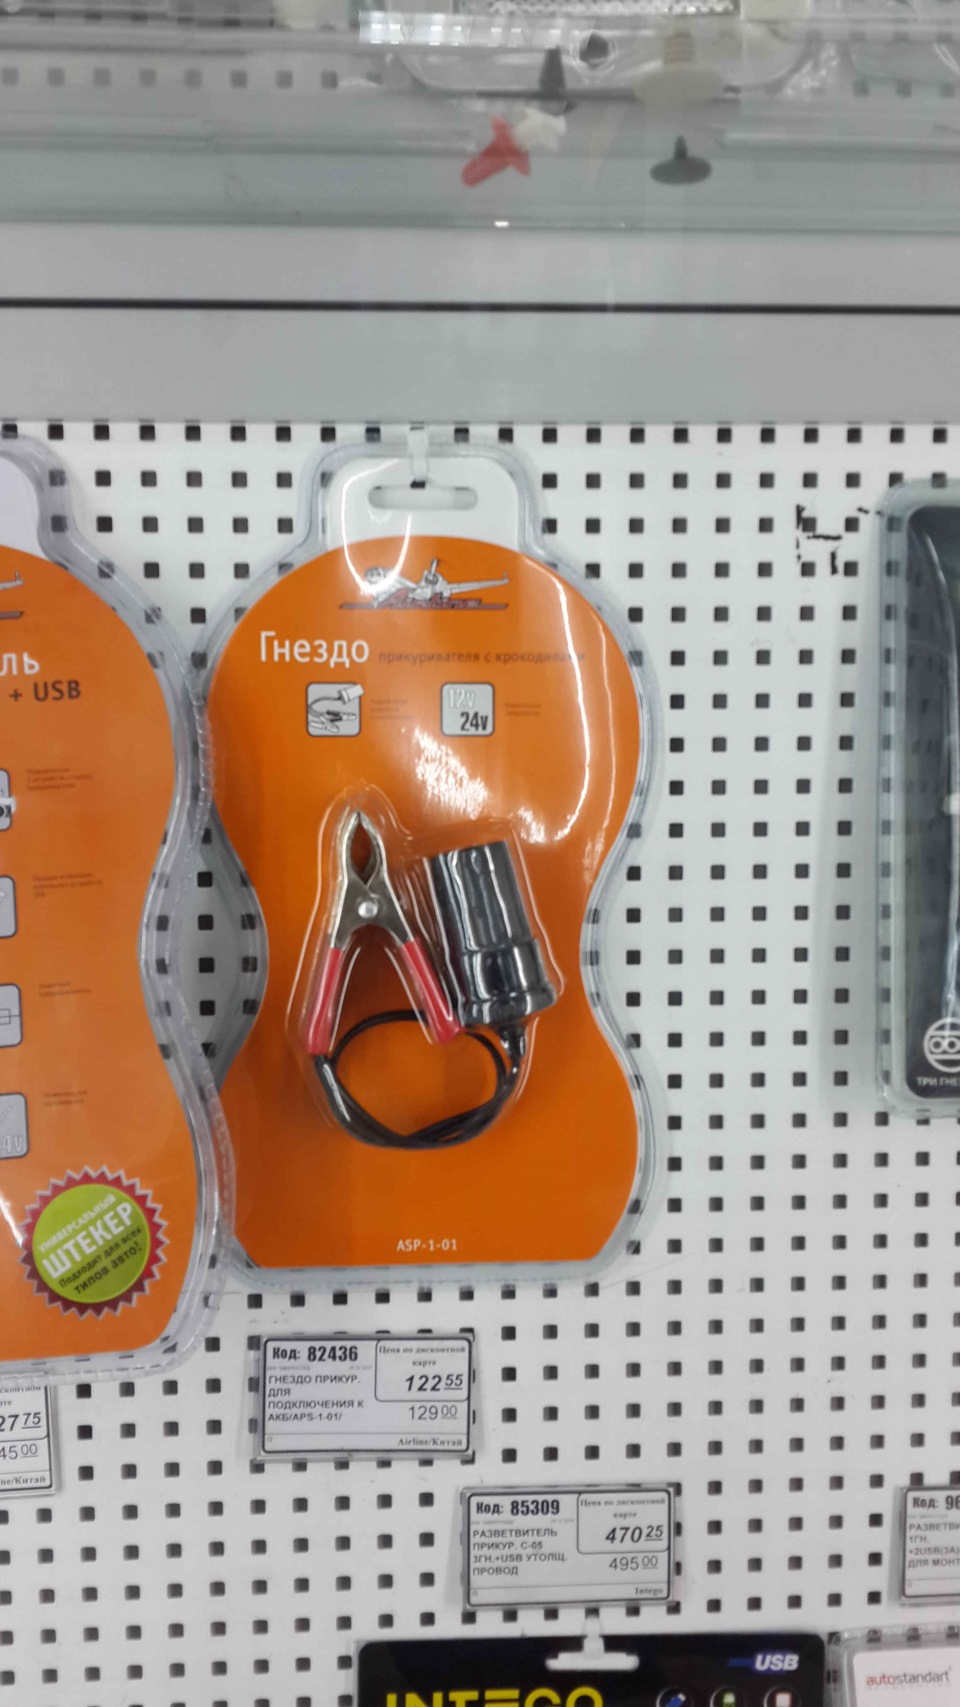
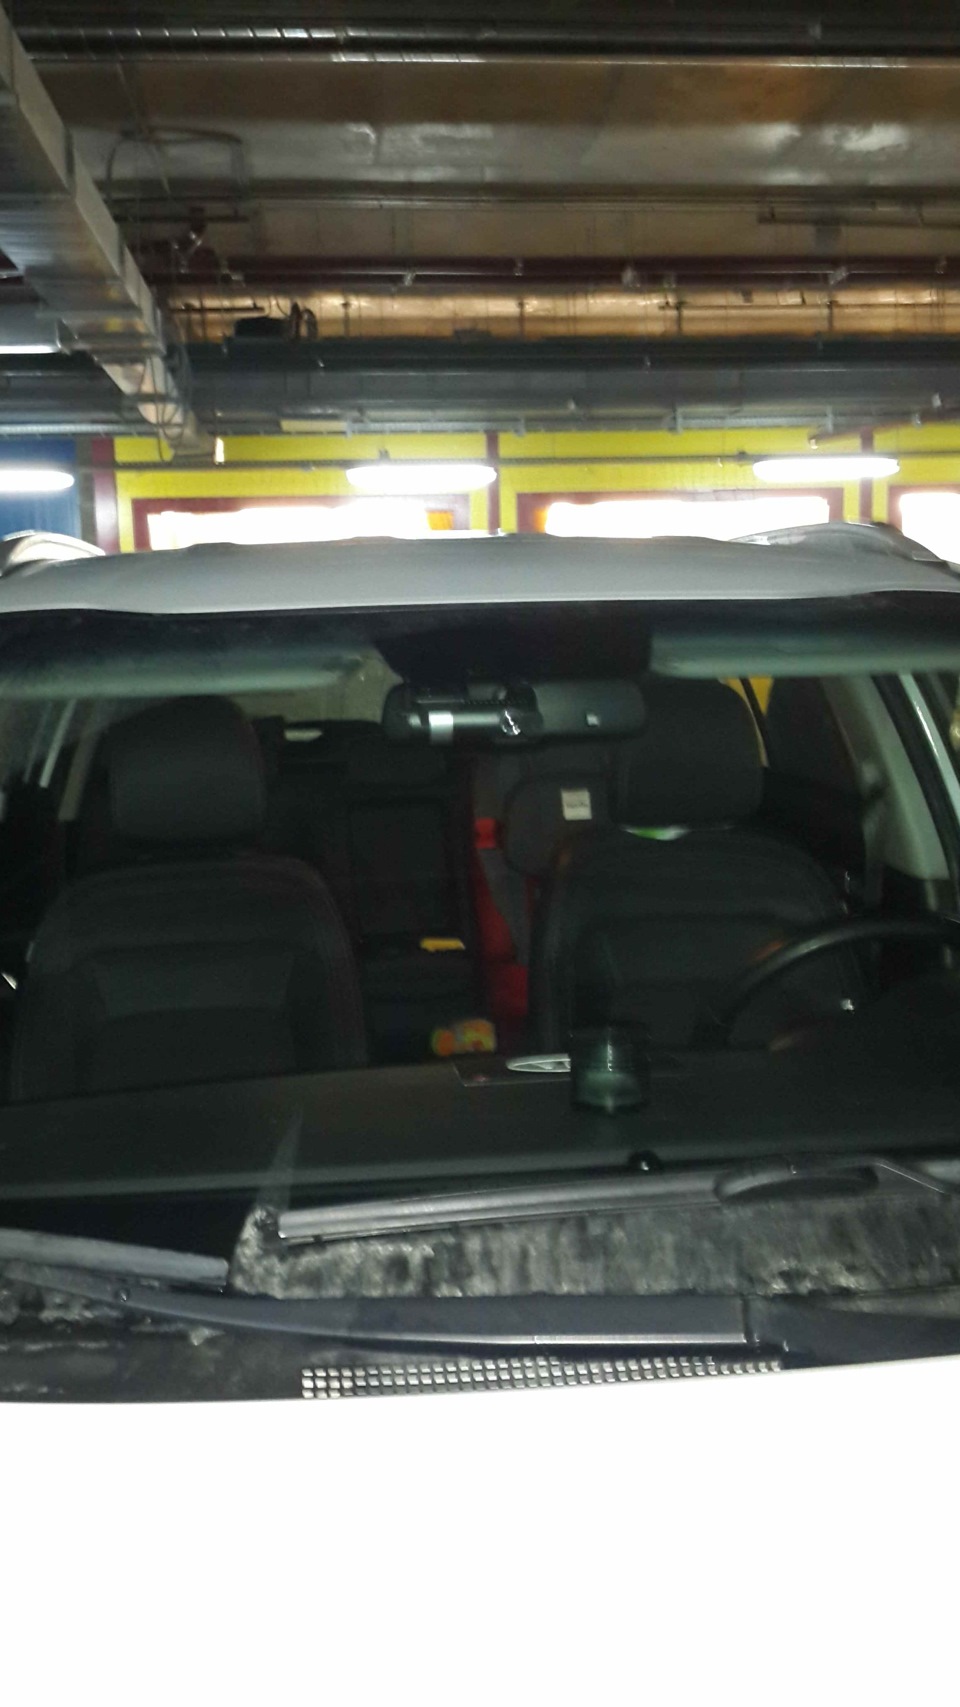
Подключал к проводке центрального плафона, подцепляясь в зеленому и черному кабелю
использовал такое гнездо
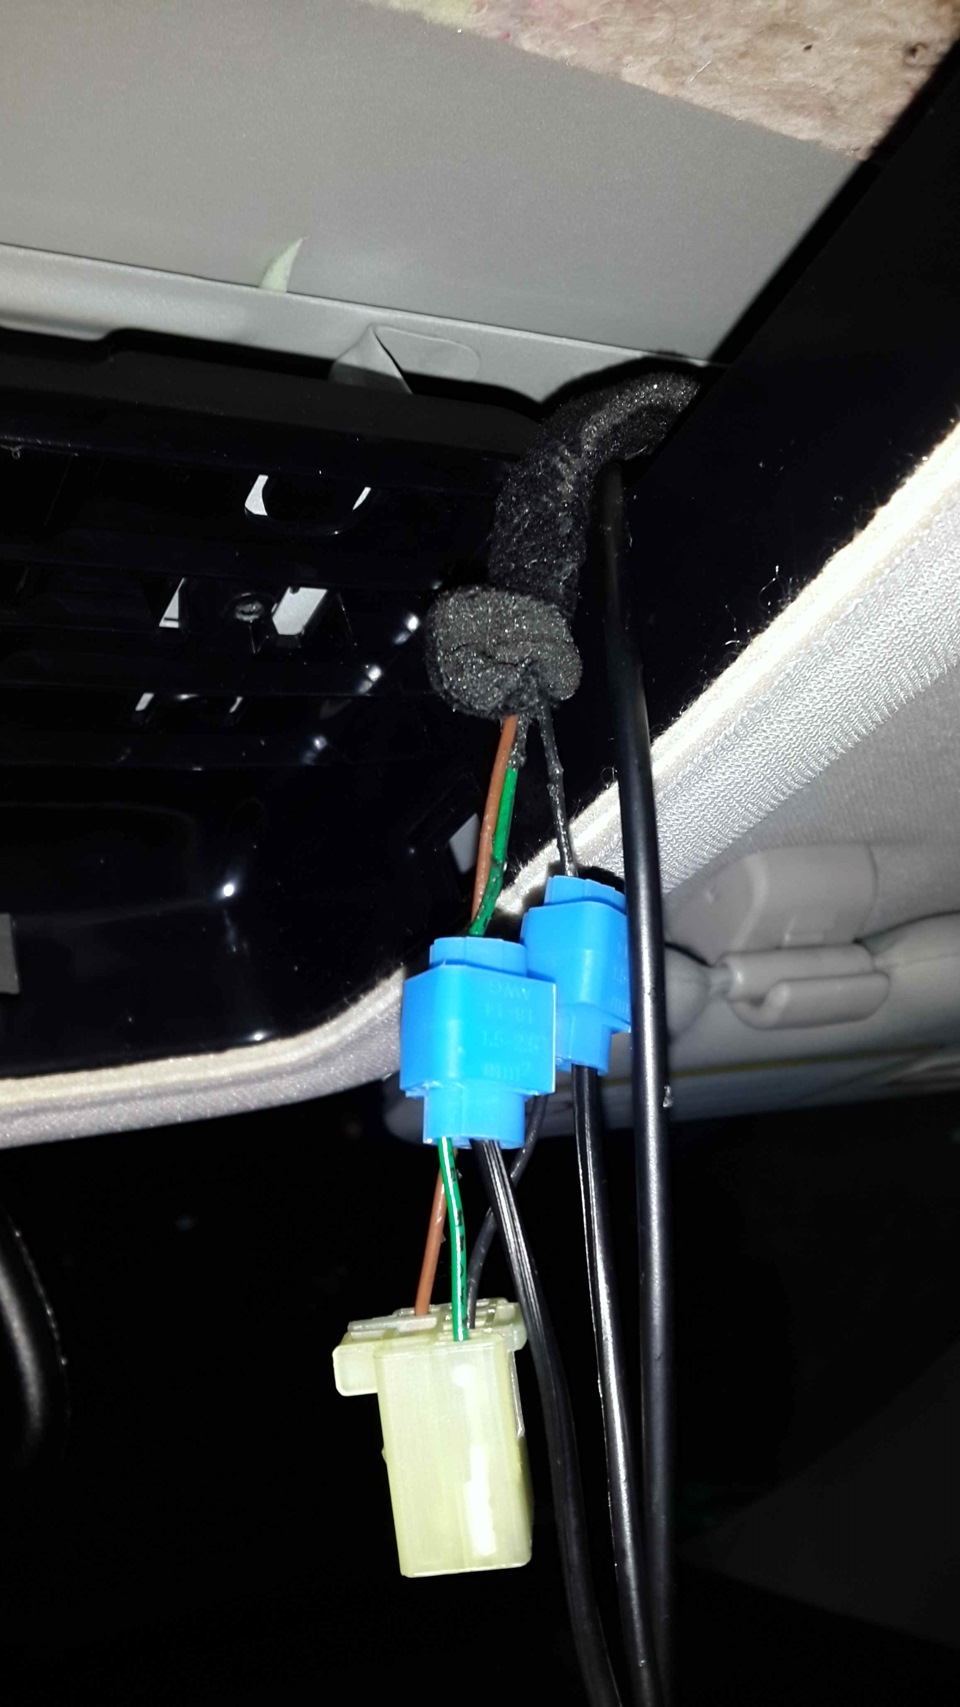
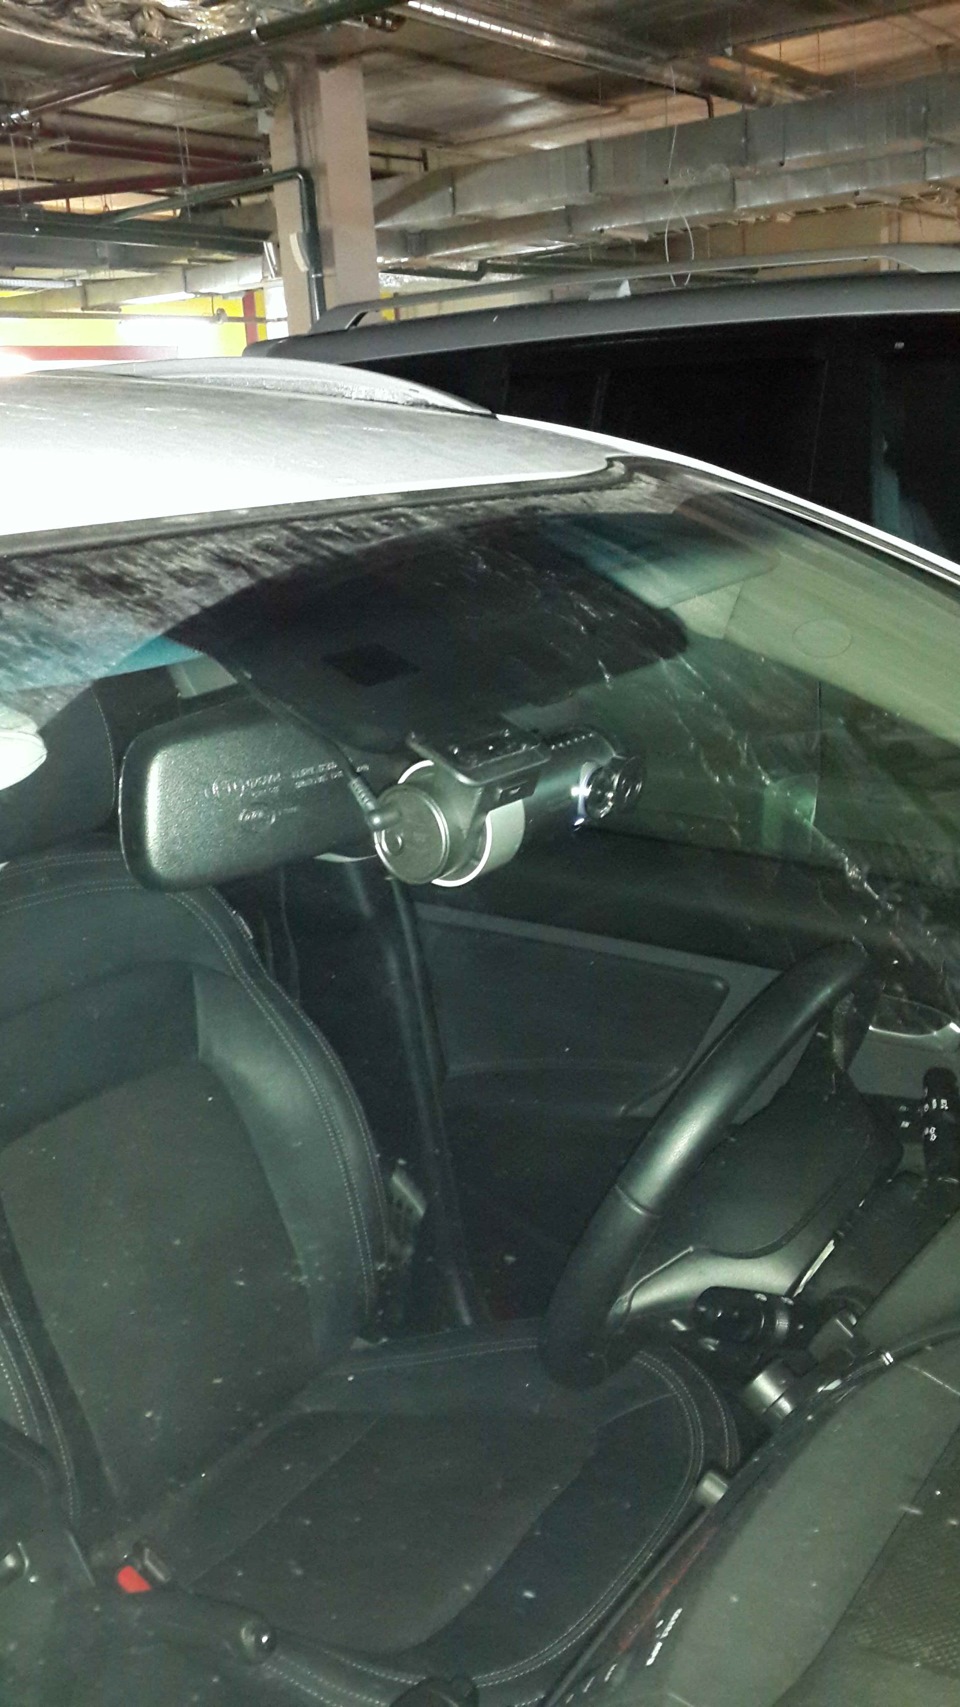
В итоге получается вот так
![]()
![]()
подписка
О новостной рассылке BlackVue по электронной почте
Информация, которую вы предоставляете в этой форме, будет использоваться только для предоставления вам обновлений и персонализированного маркетинга. Ваша конфиденциальность важна для нас! Мы делаем все возможное, чтобы свести к минимуму переписку по электронной почте. Содержимое может включать: — Последние сведения об обновлении прошивки / программного обеспечения. — Анонсы продуктов. — Новости и учебные пособия, связанные с BlackVue. — Другой контент, связанный с BlackVue.
Мы используем MailerLite в качестве нашей платформы автоматизации маркетинга. Нажимая ниже, чтобы отправить эту форму, вы подтверждаете, что предоставленная вами информация будет передана в MailerLite для обработки в соответствии с их Персональные данные и Условия Предоставления Услуг.
подписка
О новостной рассылке BlackVue по электронной почте
Информация, которую вы предоставляете в этой форме, будет использоваться только для предоставления вам обновлений и персонализированного маркетинга. Ваша конфиденциальность важна для нас! Мы делаем все возможное, чтобы свести к минимуму переписку по электронной почте. Контент может включать:
— Информация об обновлении последней прошивки / программного обеспечения.
— Анонсы продуктов.
— Новости и учебные пособия, связанные с BlackVue.
— Другой контент, связанный с BlackVue.
Мы используем MailerLite в качестве нашей платформы автоматизации маркетинга. Нажимая ниже, чтобы отправить эту форму, вы подтверждаете, что предоставленная вами информация будет передана в MailerLite для обработки в соответствии с их Персональные данные и Условия Предоставления Услуг.
Поддержка
НАШИ ОФИСЫ
ГЛАВНЫЙ ОФИС
Питтасофт Ко., Лтд.
4F ABN Tower, 331, Pangyo-ro, Bundang-gu, Seongnam-si, Кенги-до, Республика Корея, 13488
Телефон: + 82-31-8039-7789
Факс: + 82-31-8039-5253
AS (корейский): 1599-2772
Информация о BlackVue Korea AS ![]()
Филиал в Японии
Pittasoft ЯПОНИЯ
S-07, Kasumigaseki Bld. 5F, Kasumigaseki 3-2-5,
Тиёда, Токио, 100-6005, Япония
Установка и настройка
Многие спрашивают — как правильно установить в автомобиль видеорегистратор BlackVue с комплектом Wi-Fi. Спрашивали – отвечаем.
Последовательность процесса установки проста: подключаемся к видеорегистратору BlackVue DR770X-1CH с помощью мобильного приложения, производим установку авторегистратора на лобовое стекло, ну и конечно же скрытый монтаж кабелей.
В комплект WI-FI комплект проводов, USB модем 4G WI-FI.
В комплект автомобильного видеорегистратора BlackVue DR770X-1CH входит сам видеорегистратор, кабель питания в прикуриватель, кабель питания к бортовой сети, карта памяти, дополнительные скотчи, монтажная лопатка и инструкция по эксплуатации.
Начнём с подключения питания.Нас интересуют три провода помеченные стикерами (жёлтый, красный, чёрный). Открываем салонный блок предохранителей и:
1) Находим предохранитель источника питания, не отключающийся по зажиганию, как правило это либо салонный свет, либо аварийная сигнализация. Вынимаем этот предохранитель и берём в руки жёлтый провод со стикером «BATT+», наматываем на усик предохранителя зачищенный конец провода и вставляем предохранитель в своё штатное место.
2) Находим предохранитель источника питания включающий по зажиганию — например стеклоочистители и производим аналогичную операцию, вынимаем предохранитель, берём в руки красный провод со стикером «ACC», наматываем на усик предохранителя и вставляем его в штатное место.
3) Теперь берём в руки чёрный кабель со стикером «GND» это провод массы(-), он имеет специальный клеммник, который нужно закрутить под любой крепёжный винт/болт сопрягаемый с кузовом автомобиля, как правило это крепёжный винт блока предохранителей.
4) Подключаем кабель из комплекта WiFi. Далее подключаем модем и аккуратно укладываем кабель. Все, комплект Wi-Fi установлен.
Перед тем как установить сам видеорегистратор, нам необходимо скачать мобильное приложение BlackVue на телефон, с помощью которого мы сможем правильно настроить камеру нашего видеорегистратора. Извлекаем из коробки BlackVue DR770X-1CH, вставляем в него карту памяти, и подключаем кабель питания. Далее нам нужно скачать мобильное приложение «BlackVue» из Google Play или App Store. Пока скачивается приложение заходим в настройки Wi-Fi на своём смартфоне и находим в списке сетей свой авторегистратор – например «Blackvue750X-C009A1» и подключаемся к ней. Система запросит пароль, его вы сможете найти в двух местах: на наклейке которая находится внутри коробки на чёрной вставке из под регистратора PW:………………, или на самом авторегистраторе сняв его с крепёжного кольца.
После подключения заходим в мобильное приложение и нажимаем на значок Wi-Fi , вам выгрузится список роликов записанных на карту памяти автомобильного видеорегистратора, в нижнем правом углу нажимаем на символ камеры, регистратор перейдёт в режим прямой трансляции. Берём авторегистратор и прикладываем его к лобовому стеклу, наблюдая на смартфоне за изображением. Выбрав оптимальное положение регистратора, приклеиваем его на лобовое стекло.


Далее извлекаем кабель питания из прикуривателя и приступаем к его скрытому монтажу с помощью монтажной лопатки из комплекта видеорегистратора BlackVue DR770X-1CH. Аккуратно отгибая обшивку потолка, подкладываем кабель в сторону дверной стойки, далее отгибаем панель стойки и прокладываем кабель под уплотнительной резинкой двери вниз к блоку предохранителей, заводим кабель со штекером за обшивку блока предохранителей.
Теперь наш видеорегистратор BlackVue включён и работает. Осталось настроить облако — Cloud. Заходим в мобильное приложение и создаём учётную запись. Принимаем условия соглашения и подтверждаем адрес электронной почты. У нас появился аккаунт в Blackvue Over the Cloud. Переходим в главное меню и нажимаем на значок Облака, приложение предложит зарегистрировать новую камеру. Нажимаем зарегистрировать, и наводим камеру смартфона на QR код, который находится на наклейке из чёрной вставки для регистратора, камера добавлена и горит серым (нет доступа в интернет). Подключаемся к регистратору по Wi-Fi напрямую с телефона, заходим в BlackVue Wi-Fi, нажимаем на символ шестерёнки в правом верхнем углу, затем заходим в настройки прошивки, выбираем настройки Cloud, далее заходим в настройки точки доступа из списка доступных сетей свой Wi-Fi роутер, далее вводим заранее сфотографированный пароль, нажимаем ОК.
Затем пошагово выходим из настроек, путём нажатия кнопки назад, до появления сообщения «сохранить и закрыть», нажимаем на «сохранить и закрыть» — регистратор выполнит перезагрузку. После перезагрузки отключаемся от видеорегистратора путём выключения Wi-Fi на смартфоне и ждём пару минут пока авторегистратор BlackVue подключится к интернету. После подключения будет дана голосовая команда «доступ к облачному хранилищу включён». Заходим в меню Cloud, значок машины будет гореть синим светом, это значит что у камеры есть доступ к интернету. Нажимаем на машину и выходим в меню облачного сервиса, теперь мы удалённо сможем просматривать как прямые трансляции так и уже записанные на карту памяти ролики.
Видео-инструкцию установки видеорегистратора BlackVue с облачным хранилищем DR750X-1CH PLUS с комплектом WI-FI, а также другие инструкции вы можете посмотреть на нашем канале:
https://www.youtube.com/channel/UCs15240kgFYb4hZz7LAf8HQ