Краткое содержание страницы № 1
3-066-521-11 (1)
Digital
Video Camera
Recorder
Operating Instructions
Before operating the unit, please read this manual thoroughly,
and retain it for future reference.
Owner’s Record
The model and serial numbers are located on the bottom. Record the
serial number in the space provided below. Refer to these numbers
whenever you call upon your Sony dealer regarding this product.
Model No. DCR-TRV Model No. AC-
Serial No. Serial No.
TM
SERIES
DCR-TRV830
DCR-TRV730/TRV828/TRV830
©2001 Sony Corpora
Краткое содержание страницы № 2
Welcome! Congratulations on your purchase of this Sony Digital Handycam camcorder. With your Digital Handycam, you can capture life’s precious moments with superior picture and sound quality. Your Digital Handycam is loaded with advanced features, but at the same time it is very easy to use. You will soon be producing home video that you can enjoy for years to come. For the customers in the WARNING U.S.A. and CANADA To prevent fire or shock hazard, do DISPOSAL OF LITHIUM ION not expose the unit
Краткое содержание страницы № 3
CAUTION For customers in CANADA You are cautioned that any changes or modifications not expressly approved in this CAUTION manual could void your authority to operate TO PREVENT ELECTRIC SHOCK, MATCH this equipment. WIDE BLADE OF PLUG TO WIDE SLOT, FULLY INSERT. “Memory Stick” This device complies with Part15 of the FCC “Memory Stick” Rules. Operation is subject to the following This Class B digital apparatus complies with two conditions: (1) This device may not cause Canadian ICES-003. harmful
Краткое содержание страницы № 4
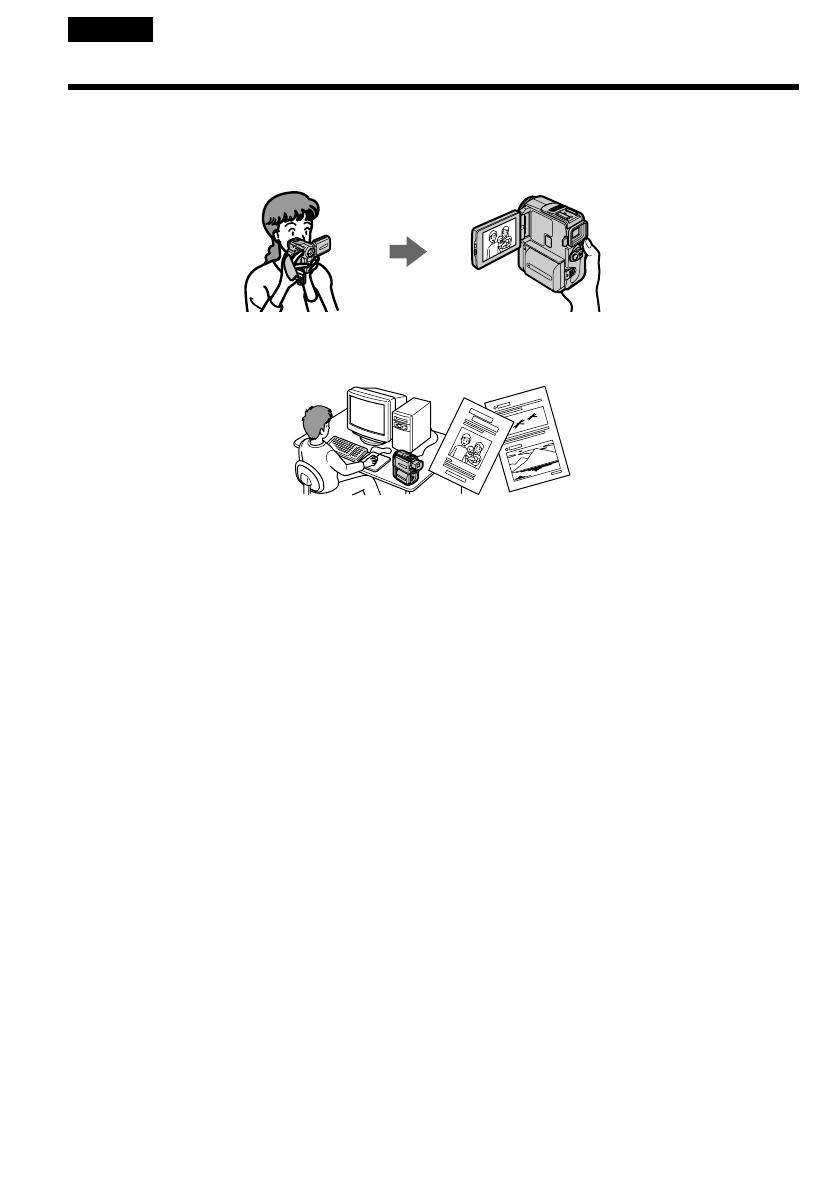
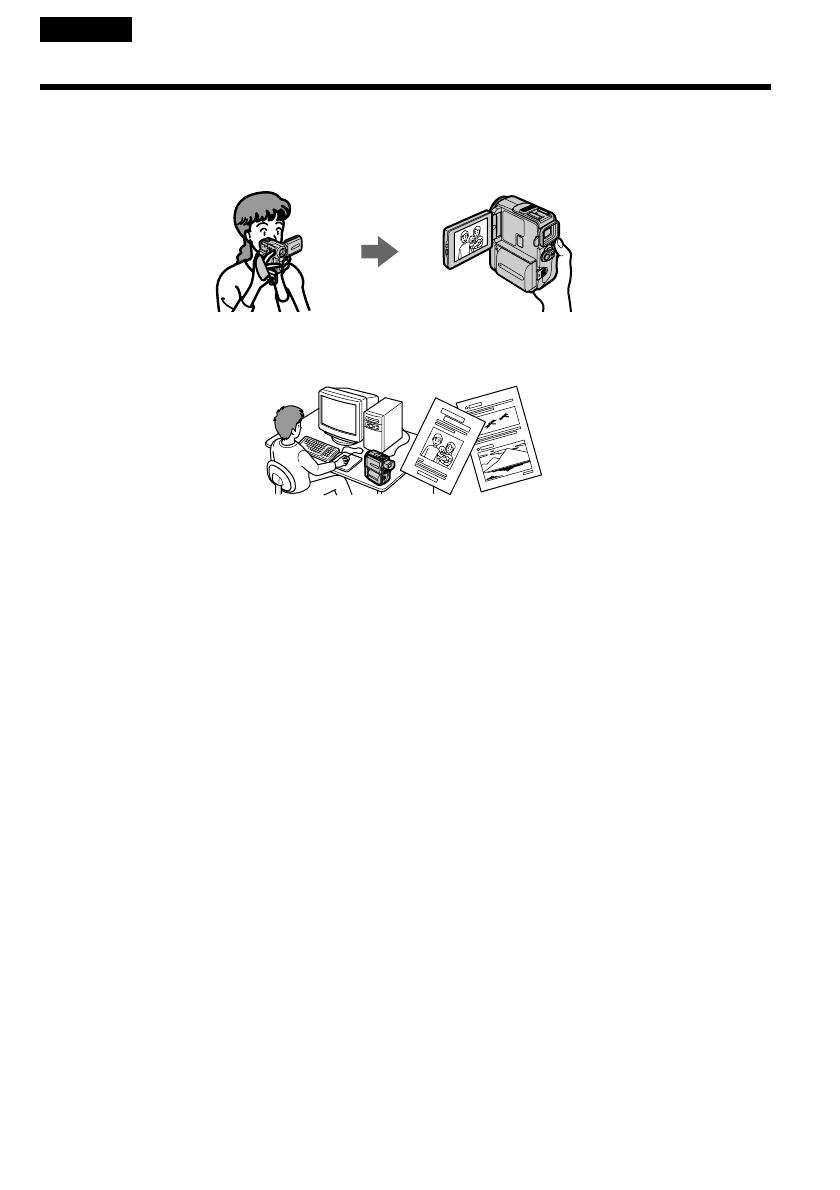
Main Features Taking moving or still images, and playing them back •Recording a picture (p. 19) •Recording a still image on a tape (p. 33) •Playing back a tape (p. 27) •Recording still images or moving pictures on “Memory Stick” (p. 97, 104) •Viewing a still image or a moving picture recorded on “Memory Stick” (p. 117, 120) Capturing images on your computer •Using with analog video unit and your computer (p. 73) •Viewing still images or moving pictures recorded on “Memory Stick” using USB cable
Краткое содержание страницы № 5
Getting started Table of contents Dubbing only desired scenes Main Features …………………………………………… 4 – Digital program editing …………………. 62 Using with analog video unit and your Quick Start Guide …………………………… 6 computer – Signal convert function ….. 73 Recording video or TV programs ……………. 74 Inserting a scene from a VCR Getting started – Insert Editing …………………………………. 76 Using this manual …….
Краткое содержание страницы № 6
Quick Start Guide Quick Start Guide This chapter introduces you to the basic features of your camcorder. See the page in parentheses “( )” for more information. Connecting the power cord (p. 16) Use the battery pack when using your camcorder outdoors (p. 11). Open the DC IN jack cover. Connect the plug with its v mark facing up. AC power adaptor (supplied) Inserting a cassette (p. 18) 1 Slide OPEN/EJECT 2 Insert the cassette in 3 Close the cassette in the direction of the a straight line deeply
Краткое содержание страницы № 7
Y Y R R A A O O R R M M E E E E M M M M A A C C ) ) G G Quick Start Guide H H C C ( ( F F R R F F C C O O V V POWER Recording a picture (p. 19) 1 Remove the lens cap. 2 Set the POWER switch to CAMERA while pressing the small green button. 4 Press START/STOP. Your camcorder starts recording. To stop recording, press START/STOP button again. 3 Open the LCD panel Viewfinder while pressing OPEN. When the LCD panel is closed, use the viewfinder placing your The picture appears eye against its eyecup
Краткое содержание страницы № 8
— Getting started — Using this manual The instructions in this manual are for the three models listed in the table below. Before you start reading this manual and operating your camcorder, check the model number by looking at the bottom of your camcorder. The DCR-TRV830 is the model used for illustration purposes. Otherwise, the model name is indicated in the illustrations. Any differences in operation are clearly indicated in the text, for example, “DCR-TRV830 only.” As you read through this ma
Краткое содержание страницы № 9
Getting started Using this manual Precautions on camcorder care Lens and LCD screen/finder (on mounted models only) •The LCD screen and the finder are manufactured using extremely high-precision technology so over 99.99% of the pixels are operational for effective use. However, there may be some tiny black points and/or bright points (white, red, blue or green in color) that constantly appear on the LCD screen and the finder. These points are normal in the manufacturing process and do not affect
Краткое содержание страницы № 10
Checking supplied accessories Make sure that the following accessories are supplied with your camcorder. 12 3 45 6 7 89 0 qa qs qd qf qg 1 Wireless Remote Commander (1) 9 “Memory Stick” (1) (p. 88) (p. 165) 0 CD-ROM (SPVD-004 USB Driver) (1) 2 AC-L10A/L10B/L10C AC power (p. 123) adaptor (1), Power cord (1) (p. 12) qa Printer (PVP-MSH)* (1) (p. 137) 3 NP-FM50 battery pack (1) (p. 11, 12) qs Print paper* 4 Size AA (R6) battery for Remote Standard type (10 sheets · 1), Commander (2) (p. 165) Stick
Краткое содержание страницы № 11
Getting started Step 1 Preparing the power supply Installing the battery pack We recommend using the battery pack when you use your camcorder outdoors. (1) Lift up the viewfinder. (2) Slide the battery pack down until it clicks. 1 2 To remove the battery pack (1) Lift up the viewfinder. (2) Slide the battery pack out in the direction of the arrow while pressing BATT (battery) release lever down. BATT (battery) release lever If you install the large capacity battery pack If you install the NP-FM
Краткое содержание страницы № 12
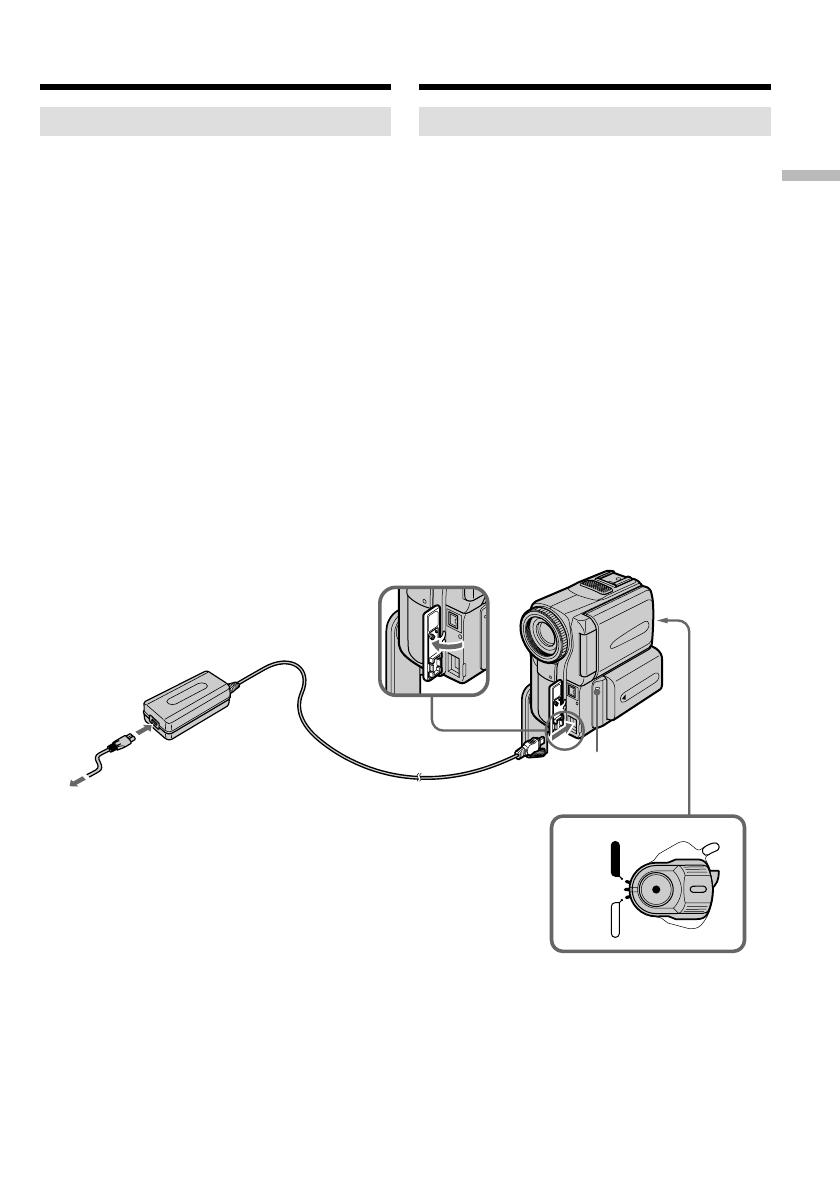
Y R A O R M E E M M A C ) G H C ( F R F C O V Step 1 Preparing the power supply Charging the battery pack Use the battery pack after charging it for your camcorder. Your camcorder operates only with the “InfoLITHIUM” battery pack (M series). See page 148 for details of “InfoLITHIUM” battery pack. (1) Open the DC IN jack cover and connect the AC power adaptor supplied with your camcorder to the DC IN jack with the plug’s v mark facing up. (2) Connect the power cord to the AC power adaptor. (3) C
Краткое содержание страницы № 13
Getting started Step 1 Preparing the power supply Note Prevent metallic objects from coming into contact with the metal parts of the DC plug of the AC power adaptor. This may cause a short-circuit, damaging the AC power adaptor. When the battery pack is charged fully The LCD backlight of the display window is turned off. Remaining battery time indicator The remaining battery time indicator in the display window roughly indicates the recording time with the viewfinder. Until your camcorder calcu
Краткое содержание страницы № 14
Step 1 Preparing the power supply Charging time Battery pack Full charge (Normal charge) NP-FM50 (supplied) 150 (90) NP-FM30 145 (85) NP-FM70 240 (180) NP-FM90 330 (270) NP-FM91 360 (300) The charging time may increase if the battery’s temperature is extremly high or low because of the ambient temperature. Approximate number of minutes to charge an empty battery pack at 25 ˚C (77 ˚F) Recording time DCR-TRV730 Recording with Recording with Battery pack the viewfinder the LCD screen Continuous* T
Краткое содержание страницы № 15
Getting started Step 1 Preparing the power supply Playing time DCR-TRV730 Playing time Playing time Battery pack on LCD screen with LCD closed NP-FM50 (supplied) 120 155 NP-FM30 75 95 NP-FM70 255 320 NP-FM90 390 490 NP-FM91 455 565 DCR-TRV828/TRV830 Playing time Playing time Battery pack on LCD screen with LCD closed NP-FM50 (supplied) 110 155 NP-FM30 70 95 NP-FM70 240 320 NP-FM90 360 490 NP-FM91 420 565 Approximate number of minutes when you use a fully charged battery Approximate continuous p
Краткое содержание страницы № 16
Step 1 Preparing the power supply Connecting to a wall outlet When you use your camcorder for a long time, we recommend that you power it from a wall outlet using the AC power adaptor. (1) Open the DC IN jack cover, and connect the AC power adaptor to the DC IN jack on your camcorder with the plug’s v mark facing up. (2) Connect the power cord to the AC power adaptor. (3) Connect the power cord to a wall outlet. 2, 3 1 PRECAUTION The set is not disconnected from the AC power source (house curre
Краткое содержание страницы № 17
Getting started Step 2 Setting the date and time Set the date and time settings when you use your camcorder for the first time. “CLOCK SET” will be displayed each time that you set the POWER switch to CAMERA or MEMORY unless you set the date and time settings. If you do not use your camcorder for about half a year, the date and time settings may be released (bars may appear) because the built-in rechargeable battery will have been discharged (p. 154). First, set the year, then the month, the da
Краткое содержание страницы № 18
Step 3 Inserting a cassette We recommend using Hi8 /Digital8 video cassettes. (1) Prepare the power supply (p. 11). (2) Slide OPEN/EJECT in the direction of the arrow and open the lid. The cassette compartment automatically lifts up and opens. (3) Insert the cassette in a straight line deeply into the cassette compartment with the window facing out. Push the middle portion of the back of the cassette to insert. (4) Close the cassette compartment by pressing the mark on the cassette compartmen
Краткое содержание страницы № 19
Y R A O R M E E M M A C ) G Recording – Basics H C ( F R F C O V POWER — Recording – Basics — Recording a picture Your camcorder automatically focuses for you. (1) Remove the lens cap by pressing both knobs on its sides and attach the lens cap to the grip strap. (2) Install the power source and insert a cassette. See “Step 1” to “Step 3” for more information (p. 11 to 18). (3) Set the POWER switch to CAMERA while pressing the small green button. Your camcorder is set to the standby mode. (4) Ope
Краткое содержание страницы № 20
Recording a picture Note on LOCK When you slide LOCK to the right, the POWER switch can no longer be set to MEMORY accidentally. The LOCK is released as a default setting. To enable smooth transition You can make the transition between the last scene you recorded and the next scene smooth as long as you do not eject the cassette if you turn off your camcorder. When you change the battery pack, set the POWER switch to OFF (CHG). If you leave your camcorder in the standby mode for 3 minutes Your c
-
Contents
-
Table of Contents
-
Bookmarks
Quick Links
3-856-784-21 (1)
Video Camera
Recorder H
Operating Instructions
Before operating the unit, please read this manual thoroughly,
and retain it for future reference.
Manual de instrucciones
Antes de utilizar la unidad, lea este manual por completo y
consérvelo para consultar.
CCD-TR555
©1996 by Sony Corporation
CCD-TR555.3-856-784-21(E,S)
Related Manuals for Sony video Hi8 Handycam CCD-TR555
Summary of Contents for Sony video Hi8 Handycam CCD-TR555
-
Page 1
Operating Instructions Before operating the unit, please read this manual thoroughly, and retain it for future reference. Manual de instrucciones Antes de utilizar la unidad, lea este manual por completo y consérvelo para consultar. CCD-TR555 ©1996 by Sony Corporation CCD-TR555.3-856-784-21(E,S) -
Page 2
For the Sony Service Center nearest you call 1-800-222-SONY (United States only). For the SONY Factory Service Center nearest you call 416-499-SONY (Canada only). Caution: Do not handle damaged or leaking lithium ion batteries and vanadium-lithium batteries. -
Page 3: Table Of Contents
Consejos para usar el paquete de baterías 72 Información y precauciones de mantenimiento 76 Uso de la videocámara en el extranjero 80 Comprobación de errores 85 Especificaciones 90 Identificación de componentes 91 Indicadores de aviso 102 Indice Tapa posterior CCD-TR555.3-856-784-21(E,S)
-
Page 4: Before You Begin
You will soon be producing home video that you can enjoy for years to come. As you read through this manual, buttons and settings on the camcorder are shown in capital letters. e.g., Set the POWER switch to CAMERA.
-
Page 5: Precautions On Camcorder Care
Sand or dust may cause the unit to malfunction, and sometimes this malfunction cannot be repaired [a]. • Do not let the camcorder get wet. Keep the camcorder away from rain and sea water. Letting the camcorder get wet may cause the unit to malfunction, and sometimes this malfunction cannot be repaired [b].
-
Page 6: Checking Supplied Accessories
6 Cable de conexión A/V (1) (p. 21) 7 Adaptador ETA-26 Handycam Station (1) (p. 95) 8 Cable de conexión DK-626 (1) (p. 29) 9 Anillo de aumento (1) (p. 17) 0 Adaptador de zapata accesoria (1) (p. 17) !¡ Protector MC (1) (p. 17) !¡ CCD-TR555.3-856-784-21(E,S)
-
Page 7: Getting Started
“InfoLITHIUM” es una marca comercial de Sony Corporation. Carga del paquete de baterías (1) Conecte el cable de alimentación al adaptador de alimentación de CA.
-
Page 8
Nota sobre la indicación de tiempo restante de batería durante la grabación Cuando se use el paquete de baterías NP-F530, el tiempo restante de batería aparece en el visor electrónico. Sin embargo, la indicación puede ser incorrecta según las condiciones y circunstancias de uso. CCD-TR555.3-856-784-21(E,S) -
Page 9
After about one minute, reconnect the power cord again. •You cannot charge the battery pack while operating the camcorder using the AC power adaptor. •When a fully charged battery pack is installed, the CHARGE lamp will light once, then go out. -
Page 10
Abra la tapa del compartimiento de la batería. Suelte la palanca de liberación BATT y retire el paquete de baterías. Al retirarlo, mantenga la tapa del compartimiento de la batería en posición vertical para evitar que se caiga el paquete de baterías. CCD-TR555.3-856-784-21(E,S) -
Page 11: Inserting A Cassette
Hi8 video cassette H. (1) Set the POWER switch to OFF. (2) Slide OPEN/EJECT on the bottom of the camcorder in the direction of the arrow. The cassette compartment automatically lifts up and opens. (3) Insert a cassette with the window facing out.
-
Page 12: Basic Operations
Camera recording Make sure that the power source is installed and a cassette is inserted. When you use the camcorder for the first time, power on it and reset the date and time before you start recording (p. 69). Before you record one-time events, you may want to make a trial recording to make sure that the camcorder is working correctly.
-
Page 13
Note on Standby mode If you leave the camcorder in Standby mode for 5 minutes while the cassette is inserted, the camcorder turns off automatically. This prevents wearing down the battery and wearing out the tape. -
Page 14
•La grabación seguirá realizándose aunque la imagen del visor electrónico desaparezca durante la grabación. •Si ajusta VF PW-SAVE en OFF en el sistema de menús, la imagen del visor electrónico no desaparecerá aunque retire el rostro de dicho visor. CCD-TR555.3-856-784-21 (E,S) -
Page 15: Selecting The Start/Stop Mode
5SEC: Cuando se pulsa START/STOP, la videocámara graba durante 5 segundos y se detiene. (p. 41) Si selecciona o 5SEC, no podrá utilizar la función de aparición y desaparición gradual. Si selecciona 5SEC, el indicador de cinta restante no aparecerá. CCD-TR555.3-856-784-21 (E,S)
-
Page 16: Using The Zoom Feature
“W” de la palanca de alimentación del zoom hasta que el enfoque sea nítido. Pueden videofilmarse sujetos situados al menos a unos 80 cm de la superficie del objetivo en posición de telefoto, o a 1 cm en posición de gran angular. CCD-TR555.3-856-784-21 (E,S)
-
Page 17
(no suministrado). Fijación de un accesorio (1)Afloje el tornillo de la cubierta utilizando la parte saliente del adaptador de zapata accesoria suministrado, y retire la cubierta. (2)Fije el adaptador de zapata accesoria. (3)Fije el accesorio (no suministrado). CCD-TR555.3-856-784-21 (E,S) -
Page 18: Hints For Better Shooting
For hand-held shots, you will get better results by holding the camcorder according to the following suggestions: •Hold the camcorder firmly and secure it with the grip strap so that you can easily manipulate the controls with your thumb. [a] •Place your elbows against your side.
-
Page 19
Si dispone de un trípode para una cámara fija, también puede usarlo con la videocámara. Cuando utilice trípodes que no sean Sony, cerciórese de que la longitud del tornillo del trípode es inferior a 6,5 mm, pues en caso contrario el tornillo puede dañar los componentes internos de la videocámara. -
Page 20: Checking The Recorded Picture
(Rec Review). Hold down the – side of EDITSEARCH until the camcorder goes back to the scene you want. The last recorded portion is played back. To go forward, hold down the + side (Edit Search).
-
Page 21: Connections For Playback
VCR to LINE. Set the TV/VCR selector on the TV to VCR. If you are going to connect the camcorder using S video cable (not supplied) [a], you do not need to connect the yellow (video) plug of the A/V connecting cable [b].
-
Page 22
Connections for playback If you connect directly to TV Open the jack cover and connect the camcorder to the inputs on the TV by using the supplied A/ V connecting cable. Set the TV/VCR selector on the TV to VCR. -
Page 23: Playing Back A Tape
You can monitor the playback picture in the viewfinder. You can also monitor a picture on a TV screen, after connecting the camcorder to a TV or VCR. (1) Insert the recorded tape with the window facing out. (2) While pressing the small green button on the POWER switch, set it to VTR.
-
Page 24
Pulse ‘ o 7 en el mando a distancia en el modo de pausa de reproducción. Si continúa pulsando el botón, podrá ver la imagen a una velocidad de 1/30. Para reanudar la reproducción normal, pulse ·. CCD-TR555.3-856-784-21 (E,S) -
Page 25
5 minutos, la videocámara entra automáticamente en modo de parada. •Cuando se reproducen cintas hacia atrás, aparece ruido horizontal en el centro de la pantalla si ésta muestra el código de tiempos RC o el código de datos. Es normal. CCD-TR555.3-856-784-21 (E,S) -
Page 26: Displaying The Date Or Time When You Recorded — Data Code Function
To make the date disappear, press DATE again or DATA CODE twice. To display the time when you recorded Press TIME on the camcorder [a], or press DATA CODE on the Remote Commander twice [b]. To make the time disappear, press it again. DATE JUL.
-
Page 27
When bars (––:– –:––) appear •A blank portion of the tape is being played back. •The tape was recorded by a camcorder without the Data Code function. •The tape was recorded by a camcorder without having date and time set. -
Page 28: Searching For The End Of The Picture
Nota sobre la función de búsqueda de imágenes finales Si vuelve a realizar grabaciones de forma continua después de emplear esta función, es posible que no pueda obtener una transición uniforme entre la última escena y la siguiente. CCD-TR555.3-856-784-21 (E,S)
-
Page 29: Advanced Operations
Using the house current To use the supplied AC power adaptor: (1) Connect the connecting plug on the camcorder to the DC OUT jack on the AC power adaptor using the supplied connecting cord. (2) Connect the AC power cord to the AC power adaptor.
-
Page 30
Install one battery pack in the camcorder and another one on the AC power adaptor. The CHARGE lamps on the camcorder and on the AC power adaptor light up, and go out when normal charge is completed. For a full charge, leave the battery pack in place for approximately one hour. -
Page 31: Using A Car Battery
DK-626. Esta marca indica que este producto es un accesorio genuino para un producto de vídeo Sony. Cuando se adquieren productos de vídeo Sony, se recomienda que los accesorios adquiridos lleven la marca “GENUINE VIDEO ACCESSORIES”.
-
Page 32: Changing The Mode Settings
(4) Pulse MENU para que el menú desaparezca de la pantalla. MENU WIND COMMANDER COUNTER MENU WIND COMMANDER COUNTER MENU WIND COMMANDER SEL/ COUNTER NORMAL PUSH EXEC MENU COMMANDER MENU COMMANDER MENU COMMANDER SEL/ PUSH EXEC MENU WIND COMMANDER COUNTER CCD-TR555.3-856-784-21 (E,S)
-
Page 33: Selecting The Mode Setting Of Each Item
Con respecto a los elementos que no llevan asterisco, recuperan los ajustes por omisión transcurridos 5 minutos o más después de retirar la batería. Continúa en la página siguiente CCD-TR555.3-856-784-21 (E,S)
-
Page 34
•Normally select ON to activate the auto shutter. •Select OFF to disactivate the auto shutter. Note on auto shutter When AUTO SHTR is set to ON, the camcorder automatically adjusts the shutter speed of the electronic shutter according to the quantity of light. -
Page 35
* Estos ajustes se conservan aunque se extraiga la batería, siempre que la pila de vanadio-litio esté cargada. Con respecto a los elementos que no llevan asterisco, recuperan los ajustes por omisión transcurridos 5 minutos o más después de retirar la batería. CCD-TR555.3-856-784-21 (E,S) -
Page 36: Recording With The Date Or Time
Para detener la grabación con fecha u hora Vuelva a pulsar DATE o TIME. Desaparecerá el indicador de fecha u hora y la grabación continuará. CCD-TR555.3-856-784-21 (E,S)
-
Page 37: Fade-In And Fade-Out
When fading out, the picture gradually fades to black or mosaic while the sound decreases. When fading in [a] (1) While the camcorder is in Standby mode, press FADER. The fade indicator starts flashing. (2) Press START/STOP to start recording. The fade indicator stops flashing.
-
Page 38
Cuando aparece el indicador de fecha u hora El indicador de fecha u hora no aparece ni desaparece gradualmente. Cuando el control START/STOP MODE está ajustado en o 5SEC No se puede utilizar la función de aparición/ desaparición gradual. CCD-TR555.3-856-784-21 (E,S) -
Page 39: Using The Wide Mode Function
[c]. 16:9FULL La imagen del visor electrónico [d] o de un televisor normal [e] se comprime horizontalmente. La imagen puede verse con normalidad en televisores de pantalla panorámica [f]. Continúa en la página siguiente CCD-TR555.3-856-784-21 (E,S)
-
Page 40
Using the wide mode function Using the wide mode function While the camcorder is in Standby mode, press 16:9 WIDE repeatedly so that the desired mode indicator appears in the viewfinder. To cancel wide mode Press 16:9 WIDE repeatedly until the wide mode indicator disappears. -
Page 41: Shooting Scenery In Several Short Takes
With 5SEC. REC (5-second recording) mode, the camcorder records for only 5 seconds and then switches to Standby mode, so that you will automatically take a series of quick shots resulting in a lively video.
-
Page 42: Using The Program Ae Function
/SUNSETMOON: Modo ocaso y luna Grabación de puestas de sol, vistas nocturnas, fuegos artificiales y señales de neón /LANDSCAPE: Modo paisaje Grabación de paisajes a través de una ventana o una red CCD-TR555.3-856-784-21 (E,S)
-
Page 43
Notes on focus setting •In the Spotlight, Sports lesson and Beach & Ski modes, you cannot take close-ups because the camcorder is set to focus only on subjects in the middle to far distance. •In the Sunset & Moon and Landscape modes, the camcorder is set to focus only on distant subjects. -
Page 44: Focusing Manually
•Sujetos con poco contraste, como muros, el cielo, etc. [b] •Demasiado brillo detrás del sujeto [c] •Rayas horizontales [d] •Sujetos detrás de vidrios escarchados •Sujetos detrás de redes, etc. •Sujetos brillantes o que reflejen luz •Videofilmación de objetos estacionarios al utilizar un trípode CCD-TR555.3-856-784-21 (E,S)
-
Page 45
Pulse FOCUS para desactivar el indicador deslice AUTO LOCK hacia arriba. Videofilmación en lugares relativamente oscuros Videofilme en modo de gran angular después de enfocar en la posición de telefoto. Nota sobre el dial CONTROL Este dial no dispone de posición de parada. CCD-TR555.3-856-784-21 (E,S) -
Page 46: Adjusting The Exposure
•La iluminación es insuficiente y, por tanto, la mayor parte de la imagen está oscura [b] Gire el dial CONTROL hacia abajo (–) si: •El sujeto es brillante y el fondo es oscuro •Desea grabar la oscuridad fielmente CCD-TR555.3-856-784-21 (E,S)
-
Page 47
Se recomienda emplear una lámpara de vídeo (no suministrada). Con el fin de obtener la mejor calidad posible de color, es necesario mantener un nivel de iluminación adecuado. Nota sobre el dial CONTROL Este dial no dispone de posición de parada. CCD-TR555.3-856-784-21 (E,S) -
Page 48: Shooting With Backlighting
•Sujetos blancos con un fondo blanco. En especial, cuando se videofilma a una persona que lleva un atuendo brillante de seda o fibra sintética, su rostro tiende a oscurecerse si no se usa esta función. CCD-TR555.3-856-784-21 (E,S)
-
Page 49: Using The Nd Filter
[b] Ajuste ND FILTER en OFF. ND FILTER Nota sobre el filtro ND La videocámara detecta e indica automáticamente si es necesario el filtro ND. Si aparece “ND ON” o “ND OFF”, ajuste correspondientemente el interruptor ND FILTER. CCD-TR555.3-856-784-21 (E,S)
-
Page 50: Optimizing The Tape Condition Before Recording
Si ya ha realizado esta función, “ORC ON” aparece cuando se selecciona ORC TO SET en el sistema de menús. SEL/ PUSH MENU EXEC WIND START / STOP COMMANDER COUNTER AUTO SHTR ORC TO SET BEEP VF BRIGHT MENU : END CCD-TR555.3-856-784-21 (E,S) STBY…
-
Page 51
When you set ORC TO SET, the recording on the tape is erased for about 0.1 second so that the camcorder can check the tape condition. Be careful when you use a recorded tape. The 0.1 second blank is erased if you record… -
Page 52: Searching The Boundaries Of Recorded Date
[a] o pulse ) para buscar hacia [c]. Para explorar el principio de todos los días (1) Ajuste el interruptor POWER en VTR. (2) Pulse DATE SEARCH dos veces. (3) Pulse 0 o ). Empezará la exploración de fecha. JUL.5.1996 DEC.31.1996 PLAY CCD-TR555.3-856-784-21 (E,S)
-
Page 53
•Date Search and Date Scan do not function on a tape recorded by a camcorder without the Data Code function. Para detener la búsqueda o la exploración Pulse uno de los siguientes botones de transporte de cinta: ·, p, 0 o ). -
Page 54: Returning To A Pre-Registered Position
(4) Pulse 0 para rebobinar o ) para que la cinta avance rápidamente hasta el punto cero del contador. La cinta se detendrá automáticamente cuando el contador se ponga aproximadamente a cero. ZERO MEM 0:12:34 ZERO MEM CCD-TR555.3-856-784-21 (E,S)
-
Page 55
•Esta función se cancela automáticamente después de rebobinar o avanzar la cinta rápidamente al punto registrado de antemano. •ZERO MEM no funciona durante la reproducción. •ZERO MEM no funciona si COUNTER está ajustado en TIME CODE en el sistema de menús. CCD-TR555.3-856-784-21 (E,S) -
Page 56: Locating The Marking Position
Esto significa que la señal de índice ya está marcada. A continuación desaparecerá el indicador INDEX MARK. Cuando se marca durante la grabación o reproducción Pulse INDEX MARK en el mando a distancia en el punto que desee localizar más tarde. MARK INDEX MARK CCD-TR555.3-856-784-21 (E,S)
-
Page 57
índice. •No es posible marcar señales de índice en cintas con la marca roja del videocassette al descubierto. •No es posible insertar un índice cuando START/STOP MODE se ajusta en o 5SEC. CCD-TR555.3-856-784-21 (E,S) -
Page 58
índice. Pulse · si desea continuar la reproducción. Si no pulsa ningún botón, la cinta se explora automáticamente hasta el siguiente programa. INDEX INDEX 00 SCAN Para cancelar el modo de exploración de índice Pulse ·. Se reanudará la reproducción normal. CCD-TR555.3-856-784-21 (E,S) -
Page 59
Pulse · . Se reanudará la reproducción normal. Nota sobre el número de índice El número de índice (1, 2, etc.) indica la distancia con respecto al punto que se está visualizando en ese momento [a], independientemente de la dirección. CCD-TR555.3-856-784-21 (E,S) -
Page 60: Erasing An Index Signal
índice pueden detectar señales de índice marcadas con esta videocámara, pero no borrarlas. •Es posible borrar señales de índice durante reproducciones PCM después de grabar en otra videograbadora en la porción donde se ha marcado la señal de índice. CCD-TR555.3-856-784-21 (E,S)
-
Page 61
Aparecerán barras (-) en lugar del código de tiempos RC al reproducir dicha parte. Si desea emplear esta cinta para editar mediante un controlador de edición (no suministrado), vuelva a escribir el código de tiempos RC. CCD-TR555.3-856-784-21 (E,S) -
Page 62: Writing The Rc Time Code On A Recorded Tape
0:00:00:00. MENU CONTROL MENU COUNTER NORMAL TIME CODE 0:00:00:01 PLAY PLAY PAUSE TIMECODE WRITE Para detener la escritura del código de tiempos RC Pulse p (o cualquier botón de transporte de cinta). CCD-TR555.3-856-784-21 (E,S) SEL/ PUSH EXEC PAUSE…
-
Page 63
RC time code recorded portion Rewind the tape to the portion on which the RC time code has been written and set the camcorder to playback pause mode. Then follow steps 4 and 5 on the previous page. The RC time code is written continuously. -
Page 64: Editing Onto Another Tape
Betamax or ¬ ED Betamax VCR that has audio/video inputs. Before editing Connect the camcorder to the VCR using the supplied A/V connecting cable. Set the TV/VCR selector on the TV to VCR. Set the input selector on the VCR to LINE, if available.
-
Page 65: Starting Editing
(1) Insert a blank tape (or a tape you want to record over) into the VCR, and insert your recorded tape into the camcorder. (2) Play back the recorded tape on the camcorder until you locate the point where you want to start editing, then press P to set the camcorder in playback pause mode.
-
Page 66: Recording From A Vcr Or Tv
(1) While pressing the small green button on the POWER switch, set it to VTR. (2) Press the two r REC buttons at the same time, then press P to set the camcorder to recording pause mode. (3) Start playing back a tape on the VCR or tune in the TV program you want to record.
-
Page 67: Replacing Recording On A Tape
(2) On the VCR, locate the start point to be inserted and set it to playback pause mode. (3) On the camcorder, press · to set it to playback mode, and then locate the point where the insert should end by pressing 0 or ).
-
Page 68: Additional Information
It will be completely discharged in about 1 year if you do not use the camcorder at all. Even if the vanadium-lithium battery is not charged, it will not affect the camcorder operation.
-
Page 69: Resetting The Date And Time
The date and time are set at the factory. Set the time according to the local time in your country. If you do not use the camcorder for about a year, the date and time settings may be released (bars…
-
Page 70
1996 1997 … 2000 … 2029 Note on the time indicator The internal clock of this camcorder operates on a 12-hour cycle. •12:00 AM stands for midnight. •12:00 PM stands for noon. Reajuste de fecha y hora Para corregir los ajustes de fecha y hora Repita los pasos 2 a 5. -
Page 71: Usable Cassettes And Playback Modes
TV color system. Because the TV color systems differ from country to country, you may not be able to play back foreign pre-recorded tapes. Refer to the list of “Using your camcorder abroad” to check the TV color system of foreign countries.
-
Page 72: Tips For Using The Battery Pack
To save battery power Do not leave the camcorder in Standby mode when not recording to save the battery power. A smooth transition between scenes can be made even if recording is stopped and started again.
-
Page 73
POWER switch to OFF on the camcorder and replace the battery pack. Leave the tape in the camcorder to obtain a smooth transition between scenes after the battery pack has been replaced. -
Page 74
éste. Sony recomienda que se utilice el paquete de baterías InfoLITHIUM con equipos de vídeo que tengan la marca Cuando se usa este paquete de baterías con equipos de vídeo que llevan la marca… -
Page 75
The life of the battery pack If the battery indicator flashes rapidly just after turning on the camcorder with a fully charged battery pack, the battery pack should be replaced with a new fully charged one. Charging temperature You should charge batteries at temperatures from 50°F to 86°F (from 10°C to 30°C). -
Page 76: Maintenance Information And Precautions
How to prevent moisture condensation When bringing the camcorder from a cold place to a warm place, put the camcorder in a plastic bag and allow it to adapt to room conditions over a period of time. (1) Be sure to tightly seal the plastic bag containing the camcorder.
-
Page 77: Video Head Cleaning
It may damage the video heads. Note If the V8-25CLH cleaning cassette is not available in your area, consult your nearest Sony dealer. Limpieza de los cabezales de vídeo Limpie los cabezales de vídeo para garantizar una grabación normal e imágenes claras. Si el indicador v y el mensaje “…
-
Page 78: Maintenance Information And Precautions
8.4 V (AC power adaptor). •Should any solid object or liquid get inside the casing, unplug the camcorder and have it checked by Sony dealer before operating it any further. •Avoid rough handling or mechanical shock. Be particularly careful of the lens.
-
Page 79
•No coloque la unidad en lugares que sean: – Extremadamente cálidos o fríos – Polvorientos o sucios – Muy húmedos – Que vibren Si surge alguna dificultad, desenchufe la unidad y póngase en contacto con el proveedor Sony más cercano. CCD-TR555.3-856-784-21 (E,S) -
Page 80: Using Your Camcorder Abroad
Before using your camcorder abroad, check the following points. Power sources You can use your camcorder in any country with the supplied AC power adaptor within 100 V to 240 V AC, 50/60 Hz. Use a commercially available AC plug adaptor [a], if necessary, depending on the design of the wall outlet [b].
-
Page 81: Trouble Check
English Trouble check If you run into any problem using the camcorder, use the following table to troubleshoot the problem. Should the difficulty persist, disconnect the power source and contact your Sony dealer or local authorized Sony service facility. Camcorder…
-
Page 82
• EDIT is set to ON in the menu system. m Set it to OFF. (p. 32) • The video heads may be dirty. m Clean the heads using the Sony V8-25CLH cleaning cassette. (p. 77) • VF BRIGHT is set in the menu system. -
Page 83
(If you press the RESET button, all the settings including the date and time return to the default.) Corrective actions • Disconnect the power cord. After about 1 minute, reconnect the power cord. (p. 7) • See the chart on the next page. CCD-TR555.3-856-784-21 (E,S) -
Page 84
The problem is with the AC power adaptor. Please contact your nearest Sony dealer in connection with the product with the problem. * If you use a battery pack which you have just bought or which has been left unused for a long time, the CHARGE lamp may flash at the first charging. -
Page 85: Comprobación De Errores
Comprobación de errores Si surge algún problema con la videocámara, consulte la tabla siguiente para solucionarlo. Si la dificultad persiste, desconecte la fuente de alimentación y póngase en contacto con el proveedor Sony o el servicio técnico Sony local autorizado.
-
Page 86
• EDIT está ajustado en ON en el sistema de menús. m Ajústelo en OFF. (p. 32) • Es posible que los cabezales de vídeo estén sucios. m Limpie los cabezales con el cassette limpiador Sony V8-25CLH (p. 77) • Ha ajustado VF BRIGHT en el sistema de menús. -
Page 87
RESET, se restablecen todos los ajustes por omisión, incluidos fecha y hora.) Medidas correctivas • Desconecte el cable de alimentación. Vuelva a conectarlo al cabo de aproximadamente 1 minuto. (p. 7) • Consulte la tabla de la página siguiente. CCD-TR555.3-856-784-21 (E,S) -
Page 88
CA. Póngase en contacto con el proveedor Sony más cercano en relación al problema con el producto. * Si utiliza un paquete de baterías recién comprado o no utilizado durante mucho tiempo, es posible que el indicador CHARGE parpadee durante la primera carga. -
Page 89: Specifications
DC OUT: 8.4 V, 1.8 A in operating mode Battery charge terminal: 8.4 V, 1.4 A in charge mode Application Sony battery pack NP-F530 lithium ion type Operating temperature 32°F to 104°F (0°C to 40°C) Storage temperature –4°F to +140°F (–20°C to +60°C) Dimensions Approx.
-
Page 90: Especificaciones
DC OUT: 8,4 V, 1,8 A en modo de funcionamiento Terminal de carga de batería: 8,4 V, 1,4 A en modo de carga Aplicación Paquete de baterías Sony NP-F530 tipo ion de litio Temperatura de funcionamiento 32°F a 104°F (0°C a 40°C) Temperatura de almacenamiento –4°F to +140°F (–20°C a +60°C)
-
Page 91: Identifying The Parts
7 Ocular (p. 19) 8 Visor electrónico (p. 99) 9 Palanca de ajuste del objetivo del visor electrónico (p. 13) 0 Interruptor START/STOP MODE (p. 15, 41) !¡ Interruptor POWER (p. 12, 23) !™ Botón START/STOP (p. 12) CCD-TR555.3-856-784-21 (E,S) !º !¡ !™…
-
Page 92
!ª Botón 16:9 WIDE (p. 40) @º Botón END SEARCH (p. 28) @¡ Botón COUNTER RESET (p. 14) @™ Dial PROGRAM AE (p. 43) @£ Conector de 26 pines (p. 29) @¢ Botones EDITSEARCH (p. 20) CCD-TR555.3-856-784-21 (E,S) !ª @º @¡ @™ @£… -
Page 93
él. Esta toma tiene la misma función que la indicada como CONTROL L o REMOTE. #£ Toma AUDIO/VIDEO (p. 21) #¢ Palanca de liberación OPEN (BATT) (p. 10) #∞ Correa de sujeción (p. 18) CCD-TR555.3-856-784-21 (E,S) @ª #º #¡ #™… -
Page 94
#• Toma de salida DC OUT #ª Receptáculo para trípode (p. 19) $º Palanca OPEN/EJECT (p. 11) $¡ Objetivo $™ Sensor remoto Oriente aquí el mando a distancia de control remoto. $£ Indicador de grabación $¢ Micrófono CCD-TR555.3-856-784-21 (E,S) $¡ $™ $£ $¢… -
Page 95
ETA-26 Handycam Station adaptor. (1) Match the screw on the adaptor with the screw hole for a tripod on the camcorder, then tighten the screw. You can slide the plate including the screw to the left or right until the camcorder is in the desired position. -
Page 96: Index
7 Botón DATA CODE (p. 26) 8 Botón ZERO MEM (p. 54) 9 Botón START/STOP (p. 12) !º Botón de alimentación del zoom (p. 16) !¡ Botones de transporte de cinta (p. 23, 24) !™ Botón REC (p. 66) CCD-TR555.3-856-784-21 (E,S) !º !¡ !™…
-
Page 97
Retire las pilas cuando no vaya a utilizar el mando a distancia durante un largo período. Para usar el mando a distancia Cerciórese de que COMMANDER está ajustado en ON en el sistema de menús de la videocámara. MENU COMMANDER MENU : END CCD-TR555.3-856-784-21 (E,S) -
Page 98: Attaching The Shoulder Strap
VTR 2. The commander modes (1, 2 and 3) are used to distinguish this camcorder from other Sony VCRs to avoid remote control misoperation. If you use another Sony VCR at commander mode VTR 2, we recommend you change the commander mode or cover the remote sensor of the VCR with black paper.
-
Page 99
7 Indicador 16:9 WIDE (p. 39) 8 Indicador de código de datos (p. 26) 9 Reproducción o grabación en formato Hi8 !º Aparece al reproducir una cinta grabada en el modo LP. Continúa en la página siguiente CCD-TR555.3-856-784-21 (E,S) !º !¡ !™ !£ !¢… -
Page 100
!∞ Indicador de aviso (p. 102) !§Indicador de batería restante (p. 73) El indicador de tiempo (en minutos) restante aparece sólo si se emplea el paquete de baterías InfoLITHIUM, como el NP-F530. !¶ Indicador de fecha u hora (p. 36) CCD-TR555.3-856-784-21 (E,S) 5min 0min… -
Page 101
Indicador de modo de programa AE (p. 42)/ Indicador ORC (p. 50)/ Indicador de aviso (p. 102) 5 Indicador de código de tiempos (p. 62) 6 Indicador de código de datos (p. 26) 7 Indicador de batería restante (p. 73) CCD-TR555.3-856-784-21 (E,S) -
Page 102: Warning Indicators
La batería está descargada. Sustitúyala por otra cargada. 2 La cinta se acerca al final. El parpadeo es lento. 3 Se ha terminado la cinta. [a] En el visor electrónico El parpadeo es más rápido. [b] En el visor principal CCD-TR555.3-856-784-21 (E,S)
-
Page 103
6 Hay condensación de humedad. (p. 76) 7 Es posible que los cabezales de vídeo estén contaminados. (p. 77) 8 Ha surgido algún otro problema. Desconecte la fuente de alimentación y póngase en contacto con el proveedor Sony o un servicio técnico autorizado local. CCD-TR555.3-856-784-21 (E,S) -
Page 104
Indice … 56 COUNTER RESET … 14 InfoLITHIUM … 73 Interruptor START/STOP Limpieza de los cabezales de Sony Corporation Printed in Japan RC time code … 62 Remaining battery indicator … 73 Remaining tape indicator … 99 Remote control jack (LANC) … 93 Shoulder strap …
3-075-064-11 (1)
©2002 Sony Corporation
Operating Instructions
Before operating the unit, please read this manual thoroughly, and retain
it for future reference.
ИНСТРУКЦИЯ ПО ЭКСПЛУАТАЦИИ
Перед эксплуатацией аппарата внимательно
прочтите, пожалуйста, данное руководство
и сохраняйте его для дальнейших справок.
DCR-PC8E
Digital
Video Camera
Recorder
SERIES
TM
2
Congratulations on your purchase of this Sony
Digital Handycam. With your Digital Handycam
you can capture life’s precious moments with
superior picture and sound quality.
Your Digital Handycam is loaded with advanced
features, but at the same time it is very easy to
use. You will soon be producing home video that
you can enjoy for years to come.
WARNING
To prevent fire or shock hazard, do not expose
the unit to rain or moisture.
To avoid electrical shock, do not open the
cabinet.
Refer servicing to qualified personnel only.
NOTICE ON THE SUPPLIED AC POWER
ADAPTOR FOR CUSTOMERS IN THE
UNITED KINGDOM
A moulded plug complying with BS1363 is fitted
to this equipment for your safety and
convenience.
Should the fuse in the plug supplied need to
be replaced, a 5 AMP fuse approved by ASTA
or BSI to BS1362 (i.e., marked with or
mark) must be used.
If the plug supplied with this equipment has a
detachable fuse cover, be sure to attach the
fuse cover after you change the fuse. Never
use the plug without the fuse cover. If you
should lose the fuse cover, please contact
your nearest Sony service station.
For the customers in Europe
ATTENTION
The electromagnetic fields at the specific
frequencies may influence the picture and sound
of this digital camcorder.
This product has been tested and found
compliant with the limits set out in the EMC
Directive for using connection cables shorter than
3 meters. (9.8 feet)
English
Welcome!
Русский
Добро пожаловать!
Поздравляем Вас с приобретением данной
видеокамеры Digital Handycam фирмы Sony.
С помощью Вашей видеокамеры Digital
Handycam Вы сможете запечатлеть дорогие
Вам мгновения жизни с превосходным
качеством изображения и звука.
Ваша видеокамера Digital Handycam
оснащена усовершенствованными
функциями, но в то же время ее очень легко
использовать. Вскоре Вы будете создавать
семейные видеопрограммы, которыми
можете наслаждаться последующие годы.
ПРЕДУПРЕЖДЕНИЕ
Для предотвращения возгорания или
опасности электрического удара не
выставляйте аппарат на дождь или влагу.
Во избежание поражения электрическим
током не открывайте корпус.
За обслуживанием обращаться только к
квалифицированному обслуживающему
персоналу.
Для покупателей в Европе
ВНИМАНИЕ
Электромагнитные поля на определенных
частотах могут влиять на изображение и
звук, воспроизводимое данной цифровой
видеокамеры.
Изделие проверено на соответствие
требованиям Директивы EMC относительно
использования кабелей короче 3 метров.

3
For the customers in Germany
Directive: EMC Directive 89/336/EEC.
92/31/EEC
This equipment complies with the EMC
regulations when used under the following
circumstances:
•Residential area
•Business district
•Light-industry district
(This equipment complies with the EMC
standard regulations EN55022 Class B.)
4
English
Main Features
Taking moving or still images, and playing them back
•Recording a picture on a tape (p. 29)
•Recording a still image on a tape (p. 54)
•Playing back a tape (p. 45)
Capturing images on your computer
•Using with an analog video unit and your computer (p. 111)
Other uses
Functions to adjust exposure in the recording mode
•Back light (p. 39)
•NightShot/Super NightShot (p. 40)
•PROGRAM AE (p. 66)
•White balance (p. 69)
•Adjusting the exposure manually (p. 71)
•Flexible Spot Meter (p. 72)
Functions to give images more impact
•Digital zoom [MENU] (p. 132)
The default setting is set to OFF. (To zoom greater than 10×, select the digital zoom power in D ZOOM
in the menu settings.)
•Fader (p. 58)
•Picture effect (p. 61)
•Digital effect (p. 63)
•Digital program editing (p. 99)
•Title (p. 123, 127)
Functions to give a natural appearance to your recordings
•Manual focus (p. 74)
•Sports lesson mode (p. 66)
•Landscape mode (p. 66)
Functions to use after recording
•END SEARCH/EDITSEARCH/Rec Review (p. 43)
•DATA CODE (p. 47)
•Photo search (p. 92)
•Photo scan (p. 94)
•Tape PB ZOOM (p. 85)
•Zero set memory (p. 87)
•Title search (p. 88)
5
Русский
Основные функции
Съемка движущихся или неподвижных изображений и их воспроизведение
• Запись изображения на ленту (стр. 29)
• Запись неподвижного изображения на ленту (стр. 54)
• Воспроизведение ленты (стр. 45)
Запись изображений на Вашем компьютере
• Использование с аналоговым видеоаппаратом и Вашим персональным компьютером
(стр. 111)
Прочие применения
Функции для регулировки экспозиции в режиме записи
• Задняя подсветка (стр. 39)
• Ночная съемка/Ночная Суперсъемка (стр. 40)
• PROGRAM AE (стр. 66)
• Баланс белого (стр. 69)
• Ручная регулировка экспозиции (стр. 71)
• Универсальный точечный фотоэкспонометр (стр. 72)
Функции для придания изображениям большего эффекта
• Цифровой вариообъектив (стр. 132)
Установке по умолчанию соответствует положение OFF. (Для увеличения более, чем 10×,
выберите степень цифрового увеличения в пункте D ZOOM в установках меню.)
• Фейдер (стр. 58)
• Эффект изображения (стр. 61)
• Цифровой эффект (стр. 63)
• Цифровой монтаж программы (стр. 99)
• Титр (стр. 123, 127)
Функции для придания Вашим записям естественного вида
• Ручная фокусировка (стр. 74)
• Режим спортивных состязаний (стр. 66)
• Ландшафтный режим (стр. 66)
Функции, используемые после записи
• END SEARCH/EDITSEARCH/просмотр записи (стр. 43)
• DATA CODE (стр. 47)
• Фотопоиск (стр. 92)
• Фотосканирование (стр. 94)
• PB ZOOM ленты (стр. 85)
• Память установки нулевой отметки (стр. 87)
• Поиск титра (стр. 88)

6
English
Table of contents
Main Features ………………………………………….. 4
Quick Start Guide …………………………… 10
Getting started
Using this manual ………………………………….. 14
Checking supplied accessories ……………….. 17
Step 1 Preparing the power supply ……….. 18
Installing the battery pack ………………… 18
Charging the battery pack ………………… 19
Connecting to a wall socket ……………… 23
Step 2 Setting the date and time …………….. 24
Step 3 Inserting a cassette ………………………. 26
Step 4 Using the touch panel …………………. 27
Recording – Basics
Recording a picture ………………………………… 29
Shooting backlit subjects
– BACK LIGHT ………………………….. 39
Shooting in the dark
– NightShot/Super NightShot …… 40
Self-timer recording …………………………. 42
Checking the recording – END SEARCH/
EDITSEARCH/Rec Review ……………… 43
Playback – Basics
Playing back a tape …………………………………. 45
To display the screen indicators
– Display function ……………………… 47
Viewing the recording on TV …………………. 52
Advanced Recording Operations
Recording a still image on a tape
– Tape Photo recording ……………………. 54
Using the wide mode ……………………………… 57
Using the fader function …………………………. 58
Using special effects – Picture effect ……….. 61
Using special effects – Digital effect ……….. 63
Using the PROGRAM AE function …………. 66
Adjusting the white balance manually …… 69
Adjusting the exposure manually …………… 71
Using the spot light-metering mode
– Flexible Spot Meter………………………… 72
Focusing manually …………………………………. 74
Interval recording …………………………………… 76
Frame by frame recording
– Frame recording ……………………………. 79
Using the viewfinder ……………………………… 80
Advanced Playback Operations
Playing back a tape with picture effects ….. 82
Playing back a tape with digital effects …… 83
Enlarging images recorded on tapes
– Tape PB ZOOM …………………………….. 85
Quickly locating a scene using the zero set
memory function ……………………………… 87
Searching the boundaries of recorded tape
by title – Title search ………………………… 88
Searching a recording by date
– Date search ……………………………………. 90
Searching for a photo
– Photo search/Photo scan ………………. 92
Editing
Dubbing a tape ……………………………………….. 95
Dubbing only desired scenes
– Digital program editing …………………. 99
Using with an analog video unit and your
computer – Signal convert function … 111
Recording video or TV programmes …….. 113
Inserting a scene from a VCR
– Insert editing ……………………………….. 117
Audio dubbing ……………………………………… 119
Superimposing a title ……………………………. 123
Making your own titles ………………………… 127
Labelling a cassette ……………………………….. 129
Customizing Your Camcorder
Changing the menu settings …………………. 132
Troubleshooting
Types of trouble and how to correct
trouble ……………………………………………. 143
Self-diagnosis display …………………………… 149
Warning indicators and messages ………… 150

7
Table of contents
Additional Information
Usable cassettes…………………………………….. 161
About the “InfoLITHIUM” battery pack
……………………………………………………….. 164
About i.LINK………………………………………… 166
Using your camcorder abroad ………………. 168
Maintenance information and
precautions …………………………………….. 169
Specifications ………………………………………… 177
Quick Reference
Identifying the parts and controls …………. 181
Index …………………………………………………….. 190

8
Русский
Оглавление
Основные функции …………………………….. 5
Руководство по быстрому
запуску
…………………………………………….. 12
Подготовка к эксплуатации
Использование данного руководства
………………………………………………….. 14
Проверка прилагаемых
принадлежностей ……………………….. 17
Пункт 1
Подготовка источника питания
………………………………………………….. 18
Установка батарейного блока …….. 18
Зарядка батарейного блока ………… 19
Подсоединение к сетевой розетке
… 23
Пункт 2 Установка даты и времени …. 24
Пункт 3 Установка кассеты …………….. 26
Пункт 4 Использование сенсорной
панели ……………………………………….. 27
Запись – Основные положения
Запись изображения ………………………… 29
Съемка объектов с задней
подсветкой – BACK LIGHT …….. 39
Съемка в темноте – NightShot/Super
NightShot ………………………………. 40
Запись по таймеру самозапуска ….. 42
Проверка записи – END SEARCH/
EDITSEARCH/Просмотр записи …… 43
Воспроизведение – Основные
положения
Воспроизведение ленты …………………… 45
Для отображения экранных
индикаторов
– Функция индикации ……………. 47
Просмотр записи на экране телевизора
………………………………………………….. 52
Усовершенствованные операции
съемки
Запись неподвижного изображения на
ленту – Фотосъемка на ленту ……… 54
Использование широкоэкранного
режима ………………………………………. 57
Использование функции фейдера …….. 58
Использование специальных эффектов
– Эффект изображения ……………… 61
Использование специальных эффектов
– Цифровой эффект …………………… 63
Использование функции PROGRAM AE
…. 66
Регулировка баланса белого вручную
………………………………………………….. 69
Регулировка экспозиции вручную …….. 71
Использование режима точечной
фотоэкспонометрии – Универсальный
точечный фотоэкспонометр ……….. 72
Фокусировка вручную ………………………. 74
Запись с интервалами ………………………. 76
Покадровая запись
– Запись монтажного кадра ………… 79
Использование видоискателя …………… 80
Усовершенствованные операции
воспроизведения
Воспроизведение ленты с эффектами
изображения ………………………………. 82
Воспроизведение ленты с цифровыми
эффектами ………………………………… 83
Увеличение изображений, записанных
на ленте – Функция PB ZOOM ленты
………………………………………………….. 85
Быстрое отыскание эпизода с помощью
функции памяти нулевой отметки
………………………………………………….. 87
Поиск границ записи на записанной ленте
по титру – Поиск титра ……………….. 88
Поиск записи по дате – Поиск даты ….. 90
Поиск фото
– Фотопоиск/Фотосканирование ….. 92
Монтаж
Перезапись ленты ……………………………. 95
Перезапись только желаемых эпизодов
– Цифровой монтаж программы ….. 99
Использование с аналоговым
видеоаппаратом и персональным
компьютером – Функция
преобразования сигнала …………… 111
Запись видео или телевизионных
программ ………………………………….. 113
Вставка эпизода с КВМ
– Монтаж вставки …………………….. 117
Аудиоперезапись ……………………………. 119
Наложение титра ……………………………. 123
Создание Ваших собственных титров
… 127
Маркировка кассеты ………………………. 129
Выполнение индивидуальных
установок на видеокамере
Изменение установок меню ……………. 132

9
Оглавление
Поиск и устранение
неисправностей
Разновидности неисправностей и
методы их устранения ………………. 152
Индикация самодиагностики ………….. 158
Предупреждающие индикаторы и
сообщения ………………………………… 159
Дополнительная информация
Используемые кассеты …………………… 161
О батарейном блоке “InfoLITHIUM” …. 164
Относительно i.LINK ……………………….. 166
Использование Вашей видеокамеры за
границей …………………………………… 168
Информация по уходу за аппаратом и
меры предосторожности …………… 169
Технические характеристики ………….. 179
Оперативный справочник
Обозначение частей и регуляторов…. 181
Алфавитный указатель …………………… 191
10
English
Quick Start Guide
This chapter introduces you to the basic
features of your camcorder. See the page in
parentheses “( )” for more information.
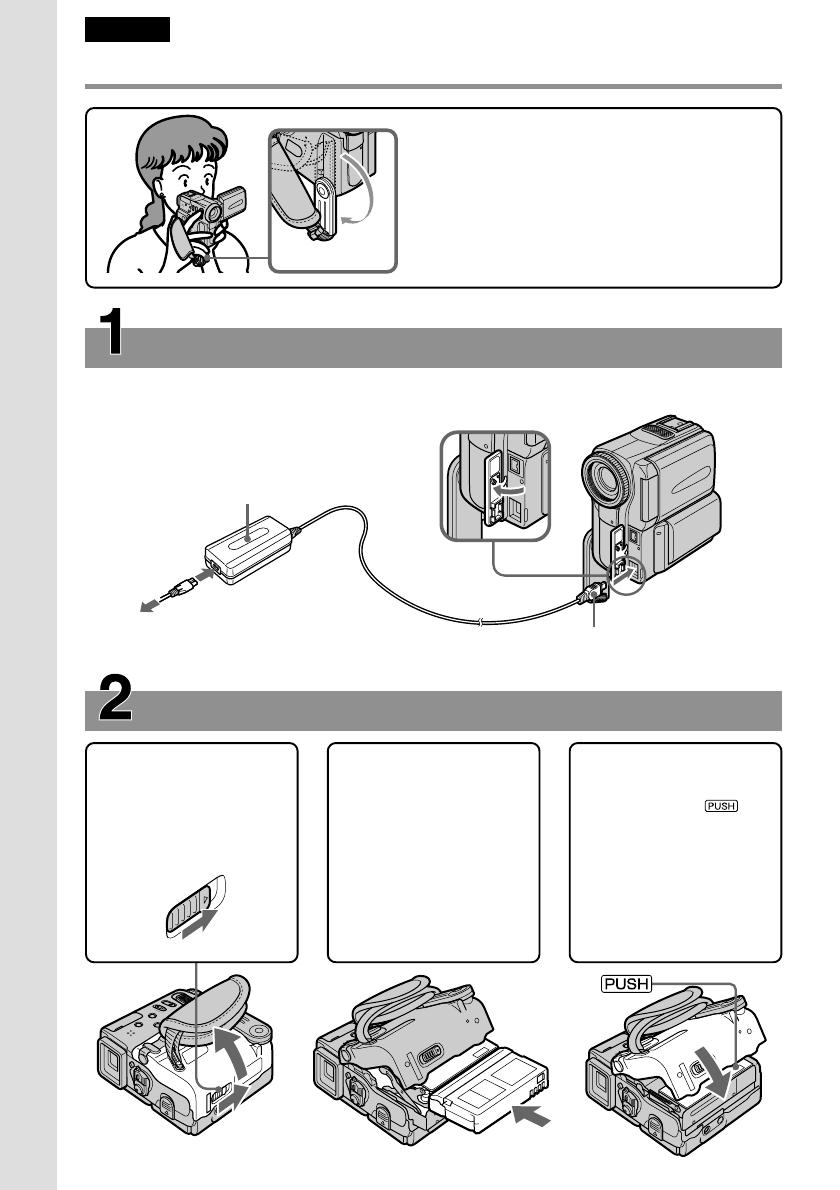
Pull down the Holding Grip to hold your
camcorder as illustrated.
Inserting a cassette (p. 26)
Connecting the mains lead (p. 23)
Use the battery pack when using your camcorder outdoors (p. 18).
1Slide OPEN/ZEJECT
in the direction of the
arrow and open the
lid.
2Push the middle
portion of the back of
the cassette to insert.
Insert the cassette in a
straight line deeply
into the cassette
compartment with
the window facing
out.
3Close the cassette
compartment by
pressing the
mark on the cassette
compartment.
After the cassette
compartment goes
down completely,
close the lid until it
clicks.
Quick Start Guide
Holding Grip
AC power adaptor (supplied)
Connect the plug with its v
mark facing the Holding
Grip.
Open the DC IN
jack cover.
11
Quick Start Guide
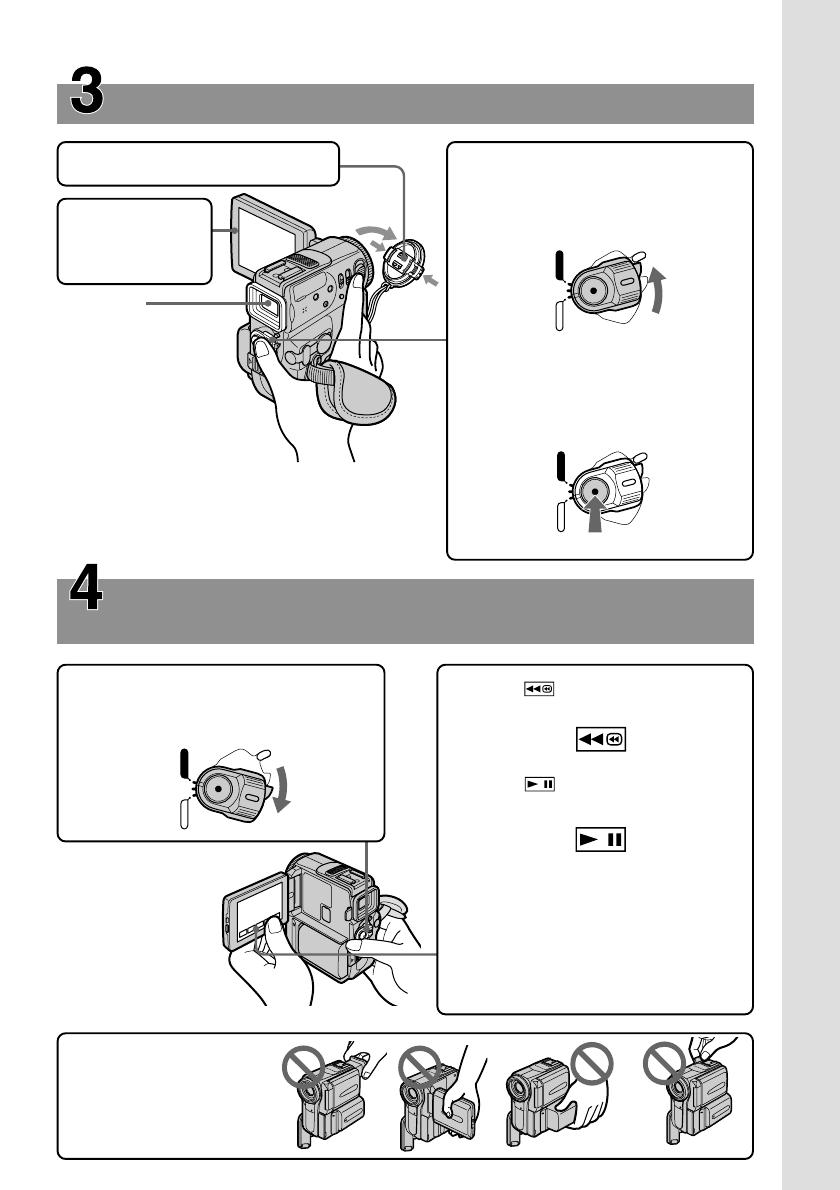
Recording a picture (p. 29)
Monitoring the playback picture on the LCD
screen (p. 45)
NOTE
Do not pick up your
camcorder by holding the
viewfinder, the LCD panel,
the battery pack or the jack
cover.
1Set the POWER switch to VCR while
pressing the small green button.
2Press of the touch panel to
rewind the tape.
3Press of the touch panel to
start playback.
NOTE
When using the touch panel, press
operation buttons lightly with your
thumb supporting the LCD screen from
the backside of it. Do not press the LCD
screen with sharp-pointed objects such
as pens.
1Remove the lens cap.
3Set the POWER switch to CAMERA
while pressing the small green
button.
POWER
VCR
CAMERA
OFF
(CHARGE)
POWER
VCR
CAMERA
OFF
(CHARGE)
POWER
VCR
CAMERA
OFF
(CHARGE)
4Press START/STOP. Your
camcorder starts recording. To stop
recording, press START/STOP
again.
2Press OPEN to
open the LCD
panel.
When you purchase your camcorder, the clock
setting is set to off. If you want to record the date
and time for a picture, set the clock setting before
recording (p. 24).
Viewfinder
When the LCD panel is
closed, pull out the
viewfinder untill its click
to focus on the subject.
Adjust the viewfinder
lens to your eyesight (p.
35).
12
Русский
Руководство по быстрому запуску
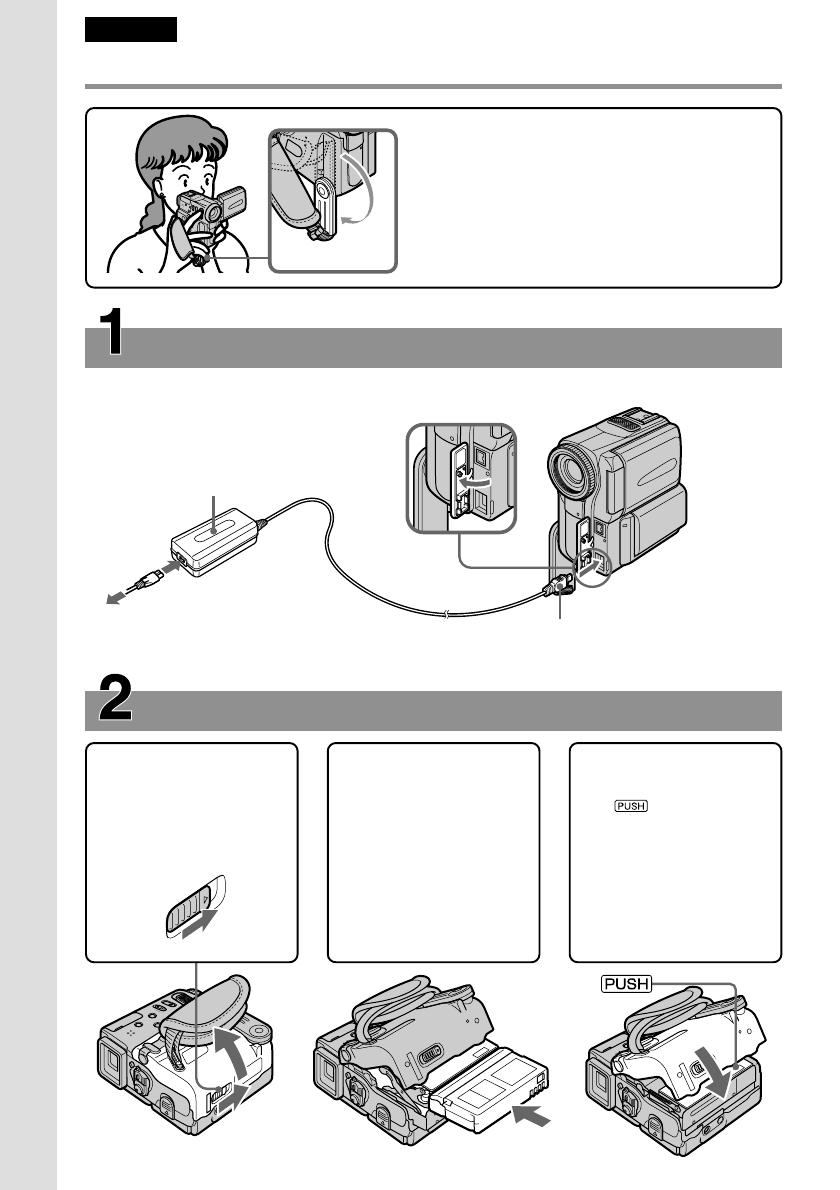
Установка кассеты (стр. 26)
Подсоединение провода электропитания (стр. 23)
При пользовании видеокамерой вне помещения используйте батарейный блок
(стр. 18).
1Передвиньте OPEN/
Z EJECT в
направлении
стрелки и откройте
крышку.
2Нажмите посредине
задней стороны
кассеты для ее
установки. Всавьте
кассету по прямой
линии глубоко в
кассетный отсек с
окошком,
обращенным
наружу.
3Закройте кассетный
отсек, нажав метку
на кассетном
отсеке.
После того, как
кассетный отсек
полностью опустится
вниз, закройте
крышку так, чтобы
она защелкнулась.
Руководство по быстрому запуску
В данной главе приведены основные
функции Вашей видеокамеры. Подробные
сведения приведены на странице в круглых
скобках “( )”.
Притяните вниз рукоятку поддержки для
поддерживания Вашей видеокамеры, как
показано на рисунке.
Рукоятка поддержки
Сетевой адаптер питания
переменного тока (прилагается)
Подсоедините штекер так, чтобы его
знак v был направлен в сторону
рукоятки поддержки.
Откройте крышку
гнезда DC IN.
13
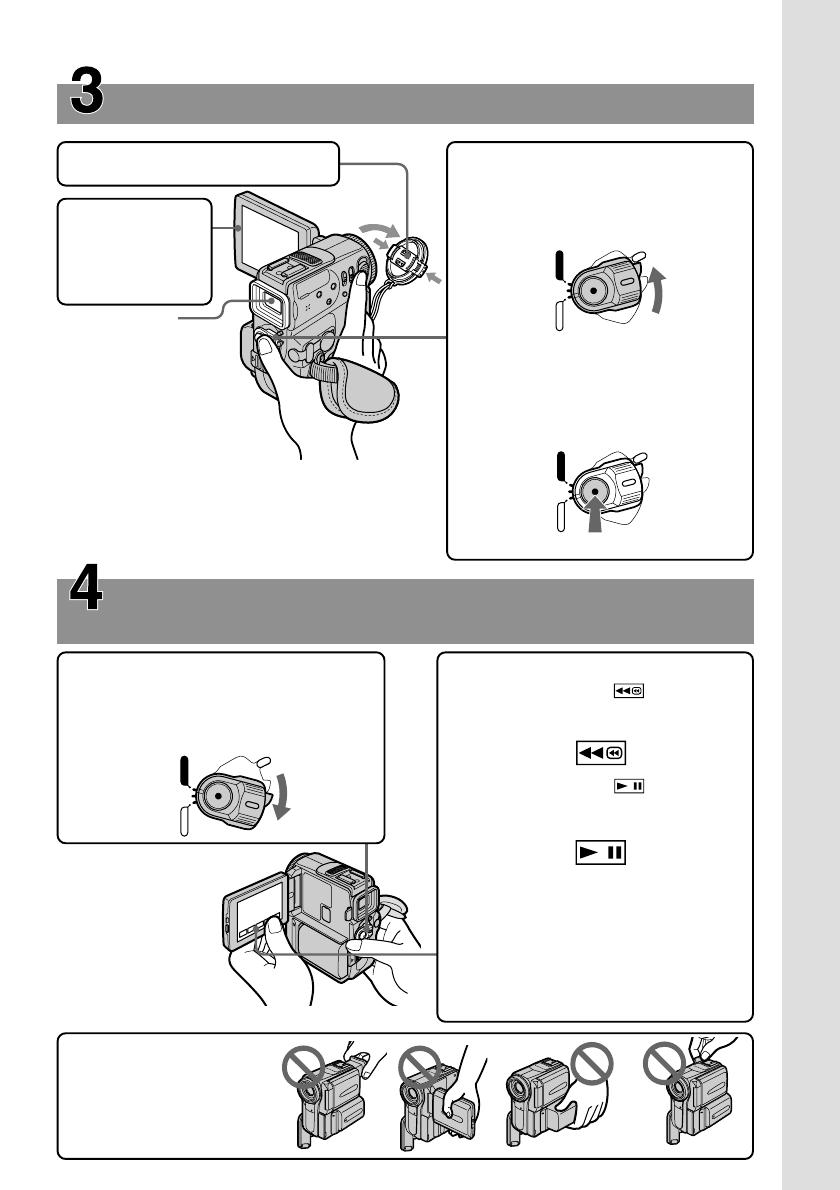
POWER
VCR
CAMERA
OFF
(CHARGE)
POWER
VCR
CAMERA
OFF
(CHARGE)
POWER
VCR
CAMERA
OFF
(CHARGE)
Запись изображения (стр. 29)
Контроль воспроизводимого изображения на
экране ЖКД (стр. 45)
ПРИМЕЧАНИЕ
Не поднимайте Вашу
видеокамеру, держа ее за
видоискатель, панель ЖКД,
батарейный блок или
крышку гнезда.
1Установите переключатель
POWER в положение VCR, нажав
маленькую зеленую кнопку.
2Нажмите кнопку сенсорной
панели для перемотки ленты
назад.
3Нажмите кнопку сенсорной
панели для начала
воспроизведения.
ПРИМЕЧАНИЕ
При использовании сенсорной
панели нажимайте кнопки слегка
большим пальцем поддерживая
экран ЖКД с задней стороны. Не
нажимайте экран ЖКД
заостренными предметами, как
например ручкой.
1Снимите крышку объектива.
3Установите переключатель
POWER в положение CAMERA,
нажав маленькую зеленую
кнопку.
4Нажмите кнопку START/STOP.
Ваша видеокамера начнет
запись. Для остановки записи
нажмите кнопку START/STOP
еще раз.
2
Нажмите
кнопку OPEN,
чтобы
открыть
панель ЖКД.
При покупке Вашей видеокамеры установка
часов выключена. Если Вы хотите выполнить
запись даты и времени для изображения,
установите часы перед записью (стр. 24).
Руководство по быстрому запуску
Видоискатель
Если панель ЖКД
закрыта, потяните
видоискатель до тех пор,
пока он не защелкнится.
Отрегулируйте объектив
видоискателя под Ваше
зрение (стр. 35).
14
— Getting started —
Using this manual
As you read through this manual, buttons and
settings on your camcorder are shown in capital
letters.
e.g. Set the POWER switch to CAMERA.
When you carry out an operation, you can hear a
beep sound to indicate that the operation is being
carried out.
Note on Cassette Memory
Your camcorder is based on the DV format. You
can only use mini DV cassettes with your
camcorder. We recommend that you use a tape
with cassette memory .
The functions which require different operations
depending on whether the tape has the cassette
memory or not are:
– End search (p. 43, 50)
– Date search (p. 90)
– Photo search (p. 92)
The functions you can operate only with the
cassette memory are:
– Title search (p. 88)
– Superimposing a title (p. 123)
– Labelling a cassette (p. 129)
For details, see page 161.
You see this mark in the introduction of
the features that operate only with
cassette memory.
Tapes with cassette memory are marked by
(Cassette Memory).
— Подготовка к эксплуатации —
Использование
данного руководства
При чтении данного руководства учитывайте,
что кнопки и установки на видеокамере
показаны заглавными буквами.
Прим. Установите выключатель POWER в
положение CAMERA.
При выполнении операции на видеокамере
Вы сможете услышать зуммерный сигнал,
подтверждающий выполнение операции.
Примечание по кассетной
памяти
Ваша видеокамера основана на формате DV.
Вы можете использовать для Вашей
видеокамеры только кассеты mini DV.
Рекомендуется использовать ленту с
кассетной памятью .
Функции, для которых требуются разные
операции в зависимости имеет ли лента
кассетную память или нет:
– Поиск конца (стр. 43, 50)
– Поиск даты (стр. 90)
– Фотопоиск (стр. 92)
Функции, которыми Вы можете управлять
только с помощью кассетной памяти,
следующие:
– Поиск титра (стр. 88)
– Наложение титра (стр. 123)
– Маркировка кассеты (стр. 129)
Подробные сведения приведены на стр. 161.
Вы можете увидеть этот знак при
описании функций, которыми можно
управлять только с помощью
кассетной памяти.
Ленты с кассетной памятью маркируются с
помощью знака (кассетная память).

15
Getting started Подготовка к эксплуатации
Note on TV colour systems
TV colour systems differ from country to
country. To view your recordings on a TV, you
need a PAL system-based TV.
Copyright precautions
Television programmes, films, video tapes, and
other materials may be copyrighted.
Unauthorized recording of such materials may
be contrary to the provision of the copyright
laws.
Using this manual
Примечание по системам
цветного телевидения
Системы цветного телевидения отличаются в
зави-симости от страны. Для просмотра
Ваших записей на экране телевизора Вам
необходимо использовать телевизор,
основанный на системе PAL.
Предостережения об авторском
праве
Телевизионные программы, кинофильмы,
видеоленты и другие материалы могут быть
защищены авторским правом.
Нелицензированная запись таких материалов
может противоречить положениям закона об
авторском праве.
Использование данного
руководства
16
Using this manual
Precautions on camcorder care
Lens and LCD screen/finder (on
mounted models only)
•The LCD screen and the finder are
manufactured using extremely high-
precision technology, so over 99.99 % of the
pixels are operational for effective use.
However, there may be some tiny black
points and/or bright points (white, red, blue
or green in colour) that constantly appear on
the LCD screen and the finder. These points
are normal in the manufacturing process and
do not affect the recording in any way.
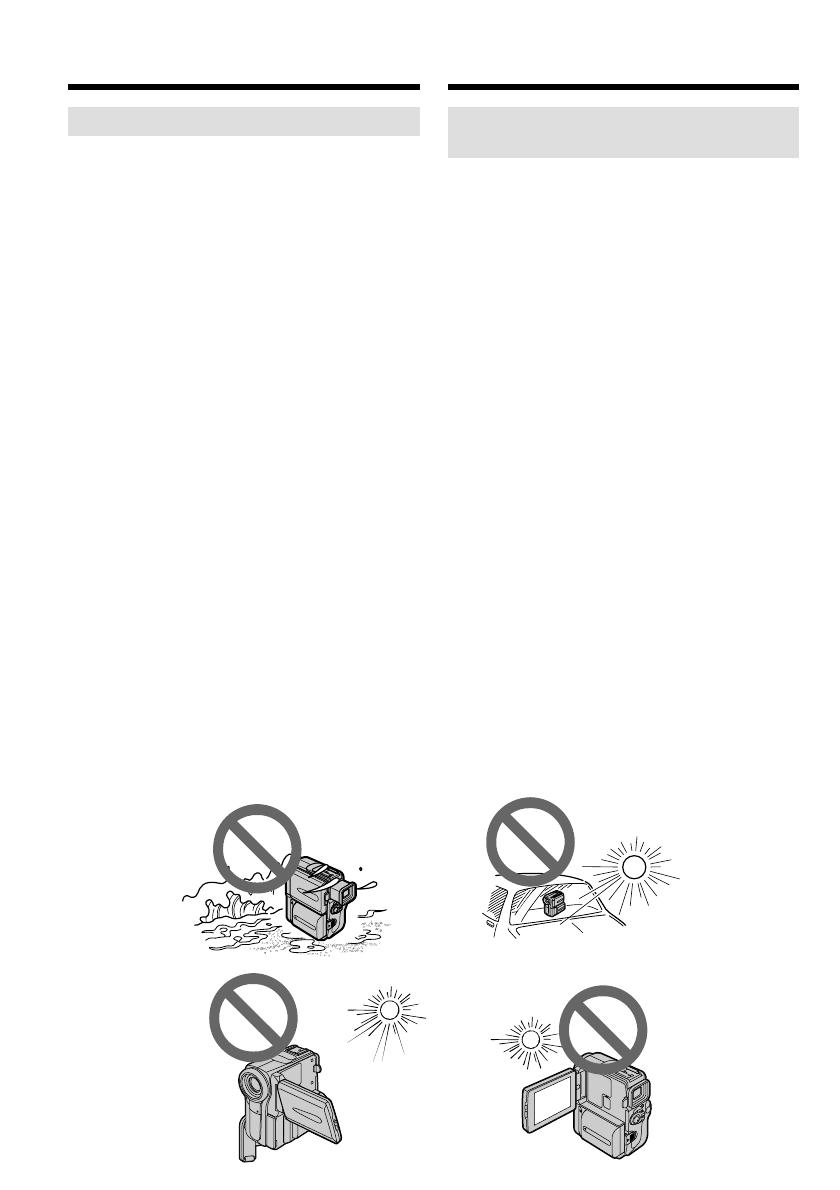
•Do not let your camcorder get wet. Keep your
camcorder away from rain and sea water.
Letting your camcorder get wet may cause your
camcorder to malfunction. Sometimes this
malfunction cannot be repaired [a].
•Never leave your camcorder exposed to
temperatures above 60 °C (140 °F), such as in a
car parked in the sun or under direct sunlight
[b].
•Be careful when placing the camera near a
window or outdoors. Exposing the LCD screen,
the finder or the lens to direct sunlight for long
periods may cause malfunctions [c].
•Do not directly shoot the sun. Doing so might
cause your camcorder to malfunction. Take
pictures of the sun in low light conditions such
as dusk [d].
[a] [b]
[c]
[d]
Меры предосторожности при
уходе за видеокамерой
Объектив и экран ЖКД/видоискатель
(только для установленных моделей)
• Экран ЖКД и видоискательизготовлены
с помощью высокопрецизионной
технологии, так что свыше 99,99 %
элементов изображения предназначены
для эффективного использования.
Однако на экране ЖКД и в видоискателе
могут постоянно появляться черные и/
или яркие цветные точки (красные,
синие или зеленые). Появление этих
точек вполне нормально для процесса
изготовления и никоим образом не
влияет на записываемое изображение.
•
Не допускайте, чтобы видеокамера станови-
лась влажной. Предохраняйте видеокамеру
от дождя и морской воды. Если Вы намочите
видеокамеру, то это может привести к
неисправности аппарата, которая не всегда
может быть устранена [a].
•
Никогда не оставляйте видеокамеру в месте с
температурой выше 60°C (140°F), как,
например, в автомобиле, оставленном на
солнце или под прямым солнечным светом [b].
• Будьте внимательны, когда оставляете
видеокамеру вблизи окна или вне
помещения. Действие прямого солнечного
света на экран ЖКД, видоискатель или
объектив в течение длительных
промежутков времени может вызвать
неисправности [c].
• Не снимайте солнце непосредственно. Это
может привести к неисправности
видеокамеры. Выполняйте съемку солнца в
условиях низкой освещенности, например, в
сумерках [d].
Использование данного
руководства
17
Getting started Подготовка к эксплуатации
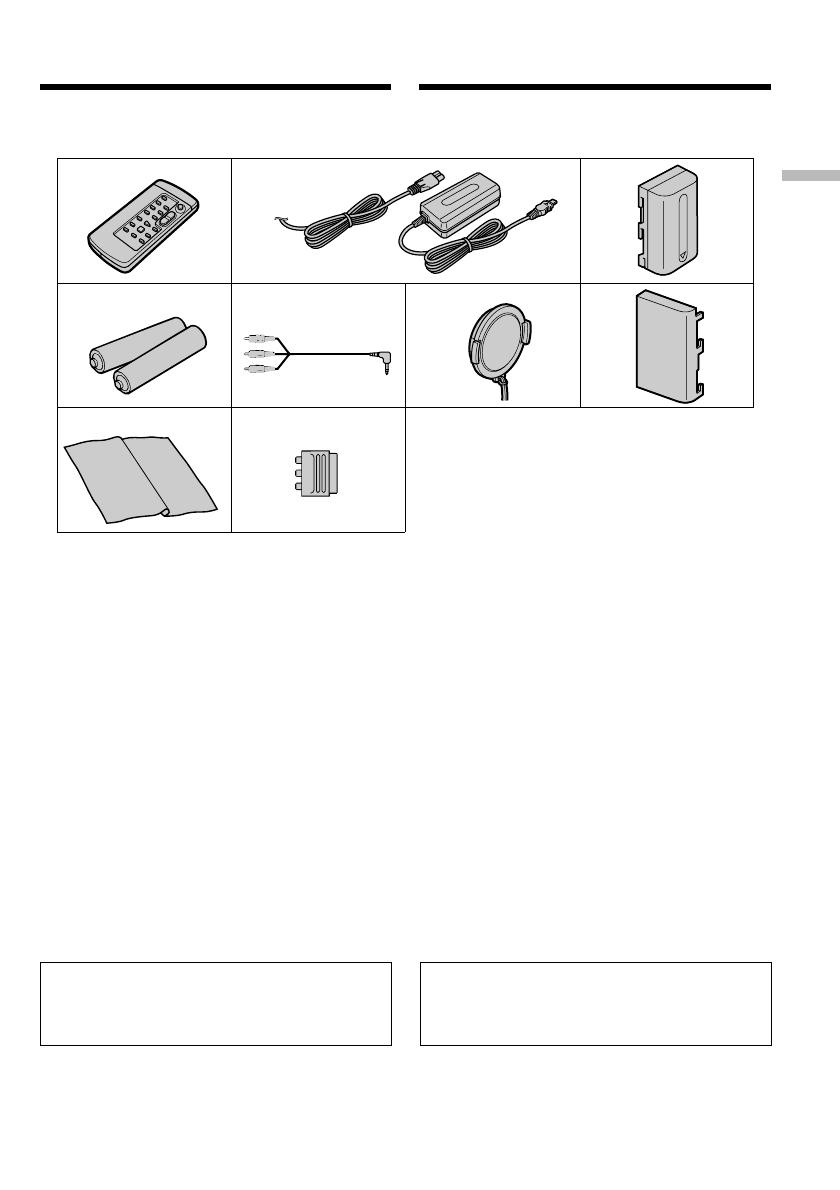
Checking supplied
accessories
7
1 Wireless Remote Commander (1) (p. 186)
2 AC-L10A/L10B/L10C AC power adaptor
(1), Mains lead (1) (p. 23)
3 NP-FM30 battery pack (1) (p. 18, 19)
4 R6 (size AA) battery for Remote
Commander (2) (p. 187)
5 A/V connecting cable (1) (p. 52)
6 Lens cap (1) (p. 29)
7 Battery terminal cover (1) (p. 18)
8 Cleaning cloth (1) (p. 170)
9 21-pin adaptor (1) (p. 53)
European models only
1
5
3
4 6
Make sure that the following accessories are
supplied with your camcorder.
89
2
Contents of the recording cannot be
compensated if recording or playback is not
made due to a malfunction of the camcorder,
storage media, etc.
1
Беспроводный пульт дистанционного
управления (1) (стр. 186)
2 Сетевой адаптер AC-L10A/L10B/L10C AC
(1), провод электропитания (1) (стр. 23)
3
Батарейный блок NP-FM30 (1) (стр. 18, 19)
4
Батарейка R6 (размера АА) для пульта
дистанционного управления (2) (стр. 187)
5 Соединительный кабель аудио/видео
(1) (стр. 52)
6 Крышка объектива (1) (стр. 29)
7 Крышка батарейных контактов (1)
(стр. 18)
8 Очистительная ткань (1) (стр. 170)
9 21-штырьковый адаптер (1) (стр. 53)
Толькодля европейских моделей
Содержание записи не может быть
компенсировано в случае, если запись или
воспроизведение не выполнены из-за
неисправности видеокамеры, носителя и т.п.
Проверка прилагаемых
принадлежностей
Убедитесь, что следующие принадлежности
прилагаются к Вашей видеокамере.
18
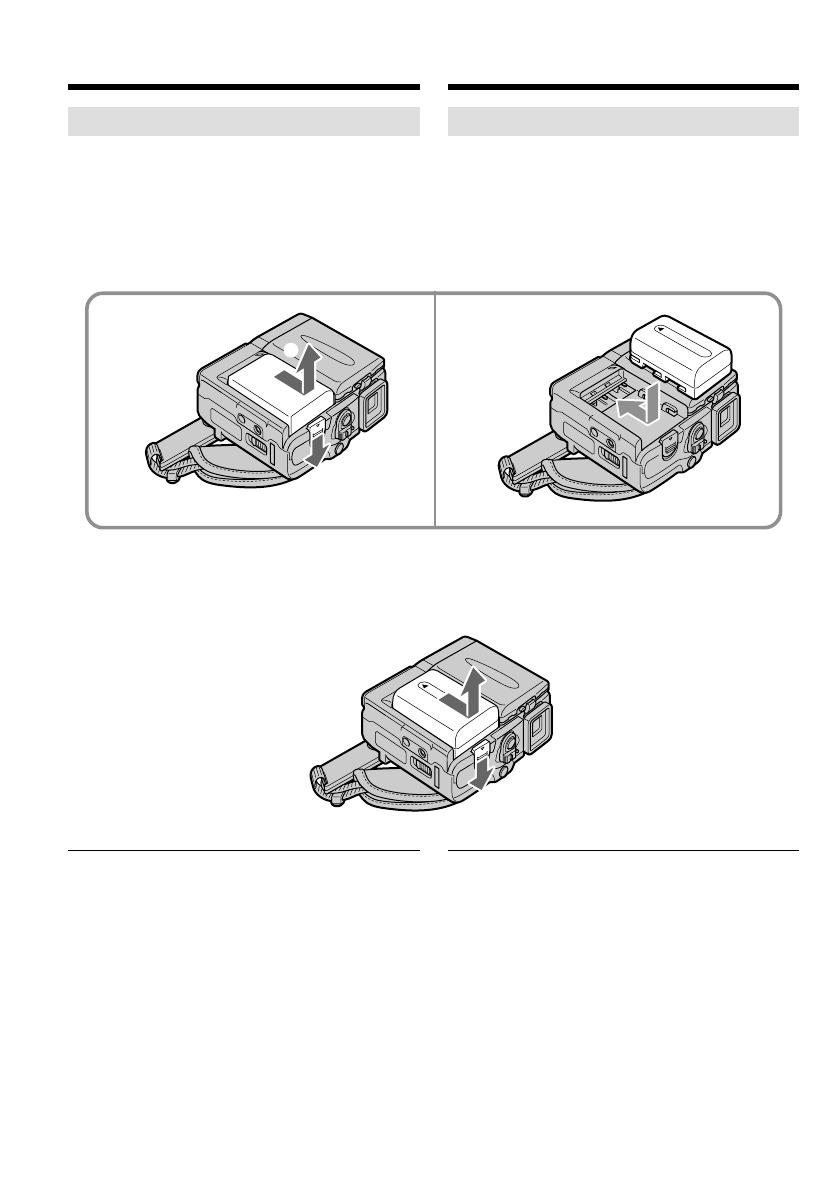
To remove the battery pack
The battery pack is removed in the same way as
the battery terminal cover.
Note on the battery terminal cover
To protect the battery terminals, install the
battery terminal cover after the battery pack is
removed.
Для снятия батарейного блока
Батарейный блок снимается таким образом,
как и крышка батарейных контактов.
Примечание к крышке батарейных
контактов
Для защиты батарейных контактов
установите крышку батарейных контактов
после удаления батарейного блока.
Installing the battery pack
(1) While sliding BATT (battery) release lever in
the direction of the arrow 1, slide the battery
terminal cover in the direction of the arrow
2.
(2) Insert the battery pack in the direction of the
arrow until it clicks.
Step 1 Preparing the
power supply
1 2
2
1
Установка батарейного блока
(1) При передвижении BATT (рычага
освобождения батарейного блока) в
направлении стрелки 1, передвиньте
крышку полюсов батарейного блока в
направлении стрелки 2.
(2) Вставьте батарейный блок в направлении
стрелки так,чтобы он защелкнулся.
Пункт 1 Подготовка
источника питания
19
Getting started Подготовка к эксплуатации
Charging the battery pack
Use the battery pack after charging it for your
camcorder.
Your camcorder operates only with the
“InfoLITHIUM” battery pack (M series).
See page 164 for details of “InfoLITHIUM”
battery pack.
(1) Open the DC IN jack cover and connect the
AC power adaptor supplied with your
camcorder to the DC IN jack with the plug’s v
mark facing the Holding Grip.
(2) Connect the mains lead to the AC power
adaptor.
(3) Connect the mains lead to a wall socket.
(4) Set the POWER switch to OFF (CHARGE).
The CHARGE lamp lights up when the charge
begins. After the charge is completed, the
CHARGE lamp goes off. (full charge)
After charging the battery pack
Disconnect the AC power adaptor from the DC
IN jack on your camcorder.
Step 1 Preparing the power
supply
Пункт 1 Подготовка источника
питания
Зарядка батарейного блока
Используйте батарейный блок для Вашей
видеокамеры после его зарядки.
Ваша видеокамера работает только с
батарейным блоком “InfoLITHIUM” (серии M).
Более подробные сведения о “InfoLITHIUM”
приведены на стр. 164.
(1) Откройте крышку гнезда DC IN и
подсоедините сетевой адаптер питания
переменного тока, прилагаемый к Вашей
видеокамере, к гнезду DC IN, так чтобы
знак v штекера был направлен в сторону
рукоятки поддержки.
(2) Подсоедините провод электропитания к
сетевому адаптеру переменного тока.
(3) Подсоедините провод электропитания к
сетевой розетке.
(4) Установите переключатель POWER в
положение OFF (CHARGE).
Когда начнется зарядка, высветится
лампочка CHARGE (полная зарядка).
После зарядки батарейного блока
Отсоедините сетевой адаптер переменного
тока от гнезда DC IN на Вашей видеокамере.
2
1
4
POWER
VCR
CAMERA
OFF
(CHARGE)
CHARGE lamp/
Лампочка
CHARGE

20
Note
Prevent metallic objects from coming into contact
with the metal parts of the DC plug of the AC
power adaptor. This may cause a short-circuit,
damaging the AC power adaptor.
While charging the battery pack, the CHARGE
lamp flashes in the following cases:
– The battery pack is not installed correctly.
– Something is wrong with the battery pack.
When you use the AC power adaptor
Place the AC power adaptor near a wall socket. If
any trouble occurs with this unit, disconnect the
plug from a wall socket as soon as possible to cut
off the power.
The charging time may increase if the battery’s
temperature is extremely high or low because of
the ambient temperature.
Approximate minutes at 25 °C (77 °F) to charge
an empty battery pack
Step 1 Preparing the power
supply
Charging time/Vereiste oplaadtijd
Battery pack/
Full charge/
Батарейный блок
Полная зарядка
(нормальная зарядка)
NP-FM30 (supplied)/(прилагается) 145
NP-FM50 150
NP-FM70 240
NP-QM71 260
NP-FM90 330
NP-FM91/QM91 360
Пункт 1 Подготовка источника
питания
Примечание
Не допускайте контакта металлических
предметов с металлическими частями
штекера постоянного тока сетевого адаптера
переменного тока. Это может привести к
короткому замыканию и повреждению
сетевого адаптера переменного тока.
Во время зарядки батарейного блока
лампочка CHARGE будет мигать в
следующих случаях:
– Батарейный блок установлен неправильно.
– Батарейный блок неисправен.
При использовании сетевого адаптера
Расположите сетевой адаптер переменного
тока возле штепсельной розетки. В случае
каких-либо проблем с аппаратом,
отсоедините штекер от сетевой розетки как
можно быстрее для отключения питания.
Время зарядки может увеличиться, если
температура батарейного блока чрезмерно
высокая или низкая вследствие окружающей
температуры.
Приблизительное время в минутах при
температуре 25°C для зарядки полностью
разряженного батарейного блока
Русский
Руководство по быстрому запуску
Подсоединение провода электропитания
При пользовании видеокамерой вне помещения используйте батарейный блок
(стр. 12).
Установка кассеты
1
Передвиньте
переключатель
EJECT в направлении
стрелки, нажав
маленькую синюю
кнопку.
8
В данной главе приведены основные функции Вашей
видеокамеры. Подробные сведения содержатся на
странице в круглых скобках «( )».
Сетевой адаптер переменного тока (прилагается)
(стр. 19)
2
Вставьте
кассету в
кассетный отсек
так, чтобы
окошко было
обращено
наружу.
(стр. 17)
Откройте
крышку гнезда
DC IN.
Подсоедините штекер так,
чтобы его знак 4 был
направлен вверх.
3
Закройте кассетный
отсек, нажав метку
«PUSH» на кассетном
отсеке. Кассетный
отсек автоматически
опустится.
Download Sony CCD-TR350E Service Manual (Repair Manual)
Here you can read online and download Sony CCD-TR350E Service Manual in PDF.
CCD-TR350E service manual will guide through the process and help you recover, restore, fix, disassemble and repair Sony CCD-TR350E Movie.
Information contained in service manuals typically includes schematics / circuit diagrams, wiring diagrams, block diagrams, printed wiring boards, exploded views, parts list, disassembly / assembly, pcb.
Посмотреть инструкция для Sony CCD-TR503E бесплатно. Руководство относится к категории видеокамеры, 1 человек(а) дали ему среднюю оценку 6.8. Руководство доступно на следующих языках: русский, английский. У вас есть вопрос о Sony CCD-TR503E или вам нужна помощь? Задайте свой вопрос здесь
Не можете найти ответ на свой вопрос в руководстве? Вы можете найти ответ на свой вопрос ниже, в разделе часто задаваемых вопросов о Sony CCD-TR503E.
Что означает аббревиатура MП?
Инструкция Sony CCD-TR503E доступно в русский?
Не нашли свой вопрос? Задайте свой вопрос здесь
- Manuals
- Brands
- SONY Manuals
- Camcorder
- Handycam CCD-TR350 Service
Manuals and User Guides for SONY Handycam CCD-TR350 Service. We have 1 SONY Handycam CCD-TR350 Service manual available for free PDF download: Service Manual
-
Contents
-
Table of Contents
-
Bookmarks
Quick Links
3-859-173-14 (1)
Video Camera
Recorder
Operating Instructions
Before operating the unit, please read this manual thoroughly,
and retain it for future reference.
Инструкция по эксплуатации
Перед началом эксплуатации данного аппарата просим внимательно
прочесть настоящее руководство и оставить его для будущих справок.
CCD-TR740E
CCD-TR501E/TR502E/TR503E/
TR506E/TR720E/TR740E
© 1997 by Sony Corporation
Related Manuals for Sony Handycam CCD-TR502E
Summary of Contents for Sony Handycam CCD-TR502E

2-103-201-61(1)
©
2004 Sony Corporation
Рук
о
в
о
дст
в
о п
о
эк
сп
л
уатац
и
и
в
и
деок
амер
ы [RU]
Руководство по
эксплуатации
видеокамеры
Прочтите перед началом работы
Цифровая видеокамера
DCR-PC350E