-
Page 1: User Manual
High Definition Digital Camcorder user manual imagine the possibilities Thank you for purchasing this Samsung product. To receive a more complete service, please register your product at www.samsung.com/global/register VP-HMX20C…
-
Page 2
key features of your HD camcorder The HD camcorder is capable of recording and playing back both Full HD (high definition: 1920×1080) and Standard Definition (SD) image quality. Select the recording image quality, Full HD (high definition) or SD (standard definition), before recording. -
Page 3
• This HD camcorder supports Anynet+. Anynet+ is an AV network system that enables you to control all connected Samsung AV devices with an Anynet+ supported Samsung TV remote control. Refer to the corresponding TV’s user manual for more details. -
Page 4: Safety Warnings
safety warnings What the icons and signs in this user manual mean; Means that death or serious personal injury is a risk. WARNING Means that there is a potential risk for personal injury or material damage. CAUTION To reduce the risk of fire, explosion, electric shock, or personal injury when using your HD camcorder, follow these basic safety precautions: CAUTION Means hints or referential pages that may be helpful when operating the HD camcorder.
-
Page 5: Important Information On Use
Play back your trial recording to make sure the video and audio have been recorded properly. • The recorded contents cannot be compensated for: — Samsung cannot compensate for any damage caused when a recording cannot be played back because of a defect in the HD camcorder or memory card.
-
Page 6
• All the trade names and registered trademarks mentioned in this manual or other documentation provided with your Samsung product are trademarks or registered trademarks of their respective holders. • Windows® is registered trademark or trademark of Microsoft Corporation, registered in the United States and other countries. -
Page 7: Precautions When Using
precautions when using IMPORTANT NOTE • Handle the liquid crystal display (LCD) with care: The LCD is a very delicate display device: Do not press its surface with force, hit it or prick it with a sharp object. If you push the LCD surface, unevenness in display may occur. If unevenness does not disappear, turn the camcorder off, wait for a few moments, and then turn it on again.
-
Page 8
precautions when using • Do not point directly at the sun: — If direct sunlight strikes the lens, the HD camcorder could malfunction or a fire could occur. — Do not leave the HD camcorder with the LCD screen exposed to direct sunlight: This could cause a malfunction. -
Page 9: Table Of Contents
contents INTRODUCTION TO BASIC FEATURES GETTING TO KNOW YOUR HD CAMCORDER PREPARATION BEFORE RECORDING What’s included with your HD camcorder Front & left view Right & top view Rear & bottom view Using the remote control Installing the button type battery Using the cradle Holding the HD camcorder Charging the battery pack…
-
Page 10
contents RECORDING PLAYBACK CONNECTION 02_ English Recording movie images Taking photo images Recording with ease for beginners (EASY Q mode) Capturing still images in movie record mode (dual recording) Capturing still images during movie images playback Using the external microphone Zooming Self record using the remote control Using the built-in flash… -
Page 11
USING THE MENU ITEMS EDITING MOVIE IMAGES IMAGE MANAGEMENT PRINTING PHOTO IMAGES Handling menus and quick menus Menu items Quick menu items Recording menu items Playback menu items Setting menu items Deleting a section of a movie image Dividing a movie image Combining two movie images Playlist Protection from accidental erasure… -
Page 12
contents CONNECTING TO A PC MAINTENANCE & ADDITIONAL INFORMATION TROUBLESHOOTING SPECIFICATIONS WARRANTY 04_ English System requirements Installing the Cyberlink DVD Suite Connecting the USB cable Viewing the contents of storage media 100 Transferring files from the HD camcorder to your PC 101 Playing back the video files on your PC 103 Maintenance 104 Additional information… -
Page 13
introduction to basic features This chapter introduces you to the basic features of your HD camcorder. See the reference pages below for more information. Step 1 Preparation • Charging the battery pack page 13 • Setting the date/time and the OSD language.pages 24-25 •… -
Page 14
HD camcorder WHAT’S INCLUDED WITH YOUR HD CAMCORDER Your new HD camcorder comes with the following accessories. If any of these items is missing from your box, call Samsung’ s Customer Care Centre. ✪ The exact appearance of each item may vary by model. -
Page 15
FRONT & LEFT VIEW Recording indicator Lens Built-in speaker Display ( ) / iCHECK button Flash ( ) button EASY Q button Jack cover When using the remote control, open the LCD screen and point directly at the remote sensor. CAUTION The HDMI jack is on the Cradle. -
Page 16: Right & Top View
getting to know your HD camcorder RIGHT & TOP VIEW PHOTO button Zoom (W/T) lever Swivel handle 08_ English Built-in flash Grip belt hook Grip belt…
-
Page 17: Rear & Bottom View
REAR & BOTTOM VIEW ⓐ ⓑ ⓒ MODE button/Mode indicator (Movie ( ) / Photo ( ) / Play ( OPEN switch Recording start/stop button POWER switch CHG (charging) indicator MIC (external microphone) jack DC IN jack Battery pack/Memory card cover ⓐ…
-
Page 18: Using The Remote Control
preparation This section provides information on using this HD camcorder; such as how to use the provided accessories, how to charge the battery, how to setup the operation mode and initial setup. USING THE REMOTE CONTROL 10_ English REC button Display ( ) button Skip (…
-
Page 19: Installing The Button Type Battery
INSTALLING THE BUTTON TYPE BATTERY Installing the button type battery in the remote control 1. Turn the battery holder counterclockwise (as indicated with () mark) using your fingernail or a coin to open it. The battery holder opens. 2. Insert the battery into the battery holder with the positive (+) terminal facing down and press it firmly until you hear a locking sound.
-
Page 20: Holding The Hd Camcorder
preparation HOLDING THE HD CAMCORDER Attaching the grip belt Insert your right hand from the bottom of the HD camcorder up to the base of your thumb. Put your hand in a position where you can easily operate the Recording start/stop button, PHOTO button, and the Zoom lever.
-
Page 21: Charging The Battery Pack
2. Insert the battery pack into the battery pack slot until it softly clicks. • Make sure that word mark (SAMSUNG) is facing left while the camcorder is placed as shown in the figure. 3. Close the battery pack cover.
-
Page 22: Charging Indicator
Charging time Recording format • The time is only for reference. Figures shown above are measured under Samsung’s test environment, and may differ from your actual use. • The recording time shortens dramatically in a cold environment. The continuous recording times in the operating instructions are measured using a fully charged battery pack at 25 °C (77 °F).
-
Page 23
• Gently slide the Battery pack release switch in the direction as shown in the figure. 3. Close the battery pack cover. • Additional battery packs are available at your local Samsung dealer. • If the HD camcorder will not be in use for a while, remove the battery pack from the HD camcorder. -
Page 24: Maintaining The Battery Pack
The recording time is affected by temperature and environmental conditions. • We recommend only using the original battery pack that is available from your Samsung retailer. When the battery reaches the end of its life, please contact your local dealer.
-
Page 25: Basic Hd Camcorder Operation
BASIC HD CAMCORDER OPERATION Set the appropriate operation mode according to your preference using the POWER switch and MODE button. Turning the HD camcorder on and off You can turn the camcorder on or off by sliding the POWER switch downward. The lens opens automatically with HD camcorder on.
-
Page 26: Screen Indicators
preparation SCREEN INDICATORS STBY 00:00:00 [70Min] Memory Full 1/50 01/JAN/2008 00:00 • The OSD indicators are based on memory capacity of 8GB (built-in memory). • The above screen is an example for explanation: It is different from the actual display. •…
-
Page 27
00:00:20 / 00:10:00 100-0001 01/JAN/2008 Memory Full The play related tabs disappear on the screen a few seconds (about 3 seconds) after the image plays back. They reappear when you touch any point on the screen. Movie play mode Movie play mode Operating status (Play/Pause)/Highlight view File name (file number) Time code (elapsed time / recorded time) -
Page 28: Photo Record Mode
preparation 3958 Memory Full 1/50 01/JAN/2008 00:00 ( ) The maximum number of recordable images displayed is 99,999 even though the actual number of recordable images may exceed 99,999. 20_ English Photo record mode Photo record mode Self timer* Face detect Warning indicators and messages Image counter ( …
-
Page 29: Photo Play Mode
1 / 12 100-0001 01/JAN/2008 00:00 X 1.1 Photo play mode Photo play mode Music slide show / Playback zoom File name (file number) Image counter (current image / total number of recorded images) Storage media (built-in memory or memory card) Battery info.
-
Page 30: Switching The Information Display Mode
preparation USING THE DISPLAY ( )/iCHECK BUTTON Switching the information display mode You can switch between the on-screen information display modes: Press the Display ( )/iCHECK button. The full and minimum display modes will alternate. • Full display mode: All information will appear. •…
-
Page 31: Using The Lcd Screen
USING THE LCD SCREEN Adjusting the LCD screen 1. Open up the LCD screen 90 degrees with your finger. 2. Rotate it to the best angle to record or play. Do not lift the HD camcorder by holding the LCD screen. WARNING •…
-
Page 32: Initial Setting: Osd Language & Date And Time
preparation INITIAL SETTING: OSD LANGUAGE & DATE AND TIME To read the menus or messages in your desired language, set the OSD language. To store the date and time during recording, set the date/time. Selecting the OSD language You can select the desired language to display the menu screen and the messages. 1.
-
Page 33: Setting The Date And Time
Setting the date and time Set the date and time when using this HD camcorder for the first time. 1. Touch Menu ( ) tab. 2. Touch Settings ( ) tab. 3. Touch up ( )/down ( ) tab until “Date/Time Set” is displayed. 4.
-
Page 34: Before Recording
before recording SELECTING THE STORAGE MEDIA • You can record movie and photo images on the built-in memory or a memory card, so you should select the desired storage media before starting recording or playback. • You can use SDHC and MMCplus cards on your HD camcorder. (Some cards are not compatible depending on the memory card manufacturer and memory card type.) •…
-
Page 35: Inserting/Ejecting A Memory Card
INSERTING/EJECTING A MEMORY CARD Inserting a memory card 1. Open the memory card cover by sliding the OPEN switch upward as shown in the figure. 2. Insert the memory card into the slot until it softly clicks. • Make sure that the terminal portion is facing left and the camcorder is placed as shown in the figure.
-
Page 36: Recordable Time And Number Of Images
Approx. 1802 640×480 Approx. 5106 • The above figures are measured under Samsung’s standard recording test conditions and may differ depending on actual use. • The higher the resolution and quality settings, the more memory is used. • The compression rate increases when choosing lower resolution and quality settings. The higher the compression rate is, the longer the recording time will be.
-
Page 37: Selecting A Suitable Memory Card
SELECTING A SUITABLE MEMORY CARD • You can use a SDHC memory card and MMCplus cards. You can also use a SD memory card, but it is recommended that you use a SDHC memory card and MMCplus with your HD camcorder. (SD card supports upto 2GB.) •…
-
Page 38
• Be careful to keep memory card out of the reach of children, who might swallow it. Note on use • Samsung is not responsible for data loss due to misuse. • We recommend using a memory card case to avoid losing data from moving and static electricity. -
Page 39: Recording Movie Images
recording Basic procedures to record a movie or photo image are described below and on the following pages. RECORDING MOVIE IMAGES • You can record movie images in Movie mode only. page 17 • This HD camcorder provides two Recording start/stop buttons. One is on the rear side of the camcorder and the other is on the LCD panel.
-
Page 40
recording • Movie images are compressed in H.264 (MPEG-4.AVC) format. • Eject the battery pack when you have finished recording to prevent unnecessary battery power consumption. • For on-screen information display, see page 18. • For approximate recording time, see page 28. •… -
Page 41: Taking Photo Images
TAKING PHOTO IMAGES You can take photo images in Photo mode only. page 17 1. Slide the POWER switch downward to turn on the power and press the MODE button to set Photo ( ). page 17 • The lens opens automatically with HD camcorder on. •…
-
Page 42: Recording With Ease For Beginners (Easy Q Mode
recording RECORDING WITH EASE FOR BEGINNERS (EASY Q MODE) • The EASY Q function is only available with the Movie and Photo modes. page 17 • With the EASY Q function, most of the HD camcorder settings are automatically adjusted, which frees you from making detailed adjustments. 1.
-
Page 43: Capturing Still Images In Movie Record Mode
CAPTURING STILL IMAGES IN MOVIE RECORD MODE (DUAL RECORDING) • This function works only in Movie mode. page 17 • Your HD camcorder allows the choice to capture digital still images without interrupting video capture; even in STBY mode. • You can record still images on the storage media during recording movie image. 1.
-
Page 44: Capturing Still Images During Movie Images Playback
recording CAPTURING STILL IMAGES DURING MOVIE IMAGES PLAYBACK • This function works only in Play mode. page 17 • If you press the PHOTO button during playback, the camcorder stops playing and saves one image of the current movie scene that is paused. •…
-
Page 45: Using The External Microphone
USING THE EXTERNAL MICROPHONE Connect external microphone (optional-user provided) to the external microphone jack of this HD camcorder for clearer audio recordings. Turn on the switch on microphone and start recording. • This HD camcorder cannot use a plug-in power type microphone (power supplied from camcorder).
-
Page 46: Self Record Using The Remote Control
recording SELF RECORD USING THE REMOTE CONTROL • The SELF TIMER function works only in Movie and Photo modes. page 17 • When you use the SELF TIMER function on the remote control, recording begins automatically in 10 seconds. 1. Press the SELF TIMER button. •…
-
Page 47: Using The Built-In Flash
USING THE BUILT-IN FLASH • This function works only in Photo mode. page 17 • You can take natural looking flash photo images with appropriate illumination using the built-in flash, whether they are night scenes, indoors or in other dark places. Press the Flash ( ) button.
-
Page 48: Changing The Playback Mode
playback You can view recorded movie and photo images in thumbnail index view and play them in various ways. CHANGING THE PLAYBACK MODE • You can set the movie recording, the photo recording and the play mode in turn with the MODE button. •…
-
Page 49: Playing Movie Images
PLAYING MOVIE IMAGES • This function works only in Play mode. page 17 • You can find a desired movie image quickly using thumbnail index views. • You can also use the playback related buttons on the remote control. page 42 1.
-
Page 50: Various Playback Operations
playback Various playback operations Playback / Pause / Stop • Play and Pause functions alternate when you touch Playback ( during playback. Touch Return ( • You can perform the same operation by using the remote control. ( Search playback •…
-
Page 51: Viewing Photo Images
VIEWING PHOTO IMAGES • This function works only in Play mode. page 17 • You can play back and view photo images recorded on the storage media. 1. Slide the POWER switch downward to turn on the power and press the MODE button to set Play ( •…
-
Page 52: Zooming During Playback
playback • Music slide show is available also in the quick menu. page 54 • HD camcorder provides background music files from its built-in memory as a basic offer on your purchase. When you display saved photos from the built-in memory as Music Slide Show, the saved background music files (SONG0001.M4A) will be played automatically.
-
Page 53: Connecting To A Tv
The HDMI jack on your HD camcorder is for output use only. • You can use the Anynet+ function by connecting the HD camcorder to a Samsung Anynet+ supported TV with the HDMI cable. Refer to the corresponding TV user manual for more details.
-
Page 54
connection Connecting to a normal TV (16:9/4:3) • This connection type is used when downconverting recorded HD images to SD for playback. • When playing back HD-quality (1920×1080) movie images on a SDTV, the images are down-converted to 720×576. • The multi-AV cable does not support HD-quality images so it down-converts them to SD-quality images. •… -
Page 55: Viewing On Tv Screen
Viewing on TV screen 1. Slide the POWER switch downward to turn on the power and press the MODE button to set Play ( page 17 2. Turn on the TV and set the input source on the TV to the input connection the HD camcorder is connected to. •…
-
Page 56
connection • Adjust the sound volume on the TV. • The remote control is useful when operating the HD camcorder while viewing an image on a TV screen. • Information that the HD camcorder is recording will appear on the TV screen: You can switch between the on-screen information display modes. -
Page 57: Handling Menus And Quick Menus
using the menu items You can operate the HD camcorder more usefully by setting menus related to recording, playback and setting. HANDLING MENUS AND QUICK MENUS • You can change the menu settings to customise your HD camcorder. Access the desired menu screen by following the steps below and change the various settings.
-
Page 58: Using The Menu Items
using the menu items ✪ Follow the instruction below to use each of the menu items listed after this page. For example: setting the White Balance in movie mode When using Menu ( ) tab: 1. Touch Menu ( ) tab. 2.
-
Page 59: Menu Items
MENU ITEMS • Accessible items in menu vary depending on the operation mode. • For operation details, see the corresponding page. Recording menu items ( Operating mode Movie ( Scene Mode (AE) White Balance Exposure Super C.Nite …
-
Page 60
using the menu items Playback menu items ( Operating mode Play Option Highlight Playlist Delete Protect Copy Partial Delete Edit Divide Combine Cont. Capture File Info Music Slide Show Slide Show Interval Resize Print Mark (DPOF) (memory card only) Setting menu items ( Operating mode Date/Time Set Date/Time… -
Page 61: Setting Menu Items
Setting menu items ( Operating mode Format Beep Sound Shutter Sound Auto Power Off REC Lamp Remote USB Connect TV Type Component Out TV Display Default Set Language Demo Anynet+ (HDMI-CEC) • Some items will not appear depending on the storage media type. •…
-
Page 62: Quick Menu Items
using the menu items QUICK MENU ITEMS • Accessible items in quick menu vary depending on the operation mode. • For operation details, see the corresponding page. Recording menu items Operating mode Movie ( Storage Resolution Focus …
-
Page 63: Recording Menu Items
RECORDING MENU ITEMS You can setup the menu items for movie and photo images recording. Scene Mode (AE) This HD camcorder automatically sets the shutter speed and aperture according to the subject brightness for optimum recording. You can also specify one of six modes depending on subject conditions, recording environment or purpose of filming.
-
Page 64: White Balance
using the menu items White Balance This HD camcorder automatically adjusts the colour of subject. Change the white balance setting depending on the recording conditions. Settings Auto This option is generally used to control the white balance automatically. This controls the white balance according to the outdoor ambience, especially for Daylight close up and when the subject is of one dominant colour.
-
Page 65
Exposure The HD camcorder usually adjusts the exposure automatically. You can also manually adjust the exposure depending on the recording conditions. Settings This option automatically adjusts image brightness according to the environmental Auto light conditions. You can adjust the brightness of an image manually. Adjust the brightness when the Manual subject is too bright or too dark. -
Page 66
using the menu items Super C.Nite You can make the subject recorded appear to be in slow motion by controlling the shutter speed, or a brighter image in dark places without a compromise in colours. Settings Disables the function. Record a brighter image. Normal Super Record a brighter image even in a dark location. -
Page 67: Digital Effect
Digital Effect The digital effect enables you to give a creative look to your recording. Select the appropriate digital effect for the type of picture that you wish to record and the effect you wish to create. There are 5 different digital effect options. Settings Disables the function.
-
Page 68
using the menu items Focussing manually during recording This HD camcorder automatically focuses a subject from close-up to infinity. However, the correct focus may not be obtained depending on the recording condition. In this case, use the manual focus mode. 1. -
Page 69
Shutter The HD camcorder automatically sets the shutter speed depending on the subject brightness. You can also manually adjust the shutter speed according to the scene conditions. Settings Auto The HD camcorder automatically sets the appropriate aperture value. — In movie record mode, shutter speed can be set to 1/25, 1/50, 1/120, 1/250, 1/500, 1/1000, 1/2000, 1/4000, or 1/10000. -
Page 70
using the menu items • The image may not seem smooth when a high shutter speed is set. • This function will be set to “Auto” in the EASY Q mode. • When recording with a shutter speed of 1/1000 or higher, make sure the sun is not directly shining into the lens. -
Page 71
Resolution (Movie images) • You can select the resolution of movie image to be recorded. • Regarding detailed image capacity, see page 28. Settings [HD] 1080/25p Records in the HD (1920×1080 25p) format. [HD] 1080/50i Records in the Full HD (1920×1080 50i) format. [SD] 576/50p Records in the SD (720×576 50p) format. -
Page 72: Wind Cut
using the menu items Quality • You can select the quality of a movie to be recorded. • Regarding detailed image capacity, see page 28. Settings Super Fine Records in the highest quality. Records in the high quality. Fine Normal Records in the normal quality.
-
Page 73: Self Timer
Self Timer • When you use the self timer function, recording begins automatically in 10 seconds. • You can do the same operation by using the remote control. page 38 Settings Disable the function. Recording begins automatically in 10 seconds by pressing the Recording start/stop 10 Sec or PHOTO button.
-
Page 74: Face Detect
using the menu items Fader You can give your recording a professional look by using special effects such as fade in at the beginning of a sequence or fade out at the end of a sequence. Settings Disables the function. Fader is executed.
-
Page 75: Digital Zoom
Guideline • Guideline displays certain patterns on the LCD screen so that you can easily set the image composition when recording movie or photo images. • The HD camcorder provides 3 types of guidelines. Settings Disable the function. Enables you to center the subject for proper recording. Enables you to place the subject within a safety zone which prevents it being cut when editing in 4:3 for left and right and 2.35:1 for top and bottom.
-
Page 76
using the menu items Sharpness This function allows the user to obtain sharper photo images by processing the image after it is shot. Settings Normal The photo images appear with sharp edges and are suitable for printing. Soft Smoothes the edges of photo images. Sharp Enhances to sharpen the edges of photo images. -
Page 77: Play Option
• ISO sensitivity is a measure of how rapidly the HD camcorder reacts to a light source. The higher the sensitivity, the brighter the image is under the same exposure condition. Settings Auto Automatically sets the ISO to compensate for various lighting conditions (up to 3200). This mode is recommended for bright lighting conditions.
-
Page 78: Cont. Capture
using the menu items Highlight Shows a section of recorded movie images at random according to the total play time and number of files. Settings Shows a section of a movie image(s) that was created within 24 hours of the Recent most recent one.
-
Page 79: File Info
Slide Show Interval You can set the slide show interval between 1 second and 3 seconds. Settings Photo images play back in 1 second intervals. 1Sec 3Sec Photo images play back in 3 second intervals. • Loading time may vary depending on the photo image size. •…
-
Page 80: Date/Time Set
using the menu items SETTING MENU ITEMS You can setup the date/time, OSD language, video output, and display settings of the HD camcorder. Date/Time Set Set the current date and time so they can be recorded correctly. page 25 Date/Time You can set the date and time to display on the LCD screen.
-
Page 81: Lcd Enhancer
File No. File numbers are assigned to images in the order they were recorded. Settings Assigns file numbers in sequence even if the memory card is replaced with Series another one or after formatting or deleting all files. The file number is reset when a new folder is created. Resets the file number to 0001 even after formatting or deleting all files or Reset inserting a new memory card.
-
Page 82: Storage Info
using the menu items Storage Type You can record movie and photo images on the built-in memory or a memory card, so you should select the desired storage media before starting recording or playback. Settings Records or play backs images in built-in memory. Memory Card Records or play backs images in memory card.
-
Page 83: Beep Sound
Beep Sound You can turn the beep sound on or off. Settings Cancels the beep sound. When on, a beep will sound every time a button is pressed. • The beep sound is off when recording movie. • When beep sound is set to off, the power on/off sound is off. Shutter Sound You can turn the shutter sound on or off.
-
Page 84: Rec Lamp
using the menu items REC Lamp You can turn the recording indicator on the front of the camcorder on or off during movie or photo recording. Settings Recording indicator is off. Recording indicator is on during recording. Remote This function allows you to enable or disable the remote control for use with the HD camcorder. Settings Disable the function.
-
Page 85
TV Type You can select the aspect ratio during playback on TV. Settings 16:9 Select 16:9 to use the wide screen TV mode. Select to use the standard 4:3 display aspect ratio. This function is available when the HD camcorder is connected to a TV. •… -
Page 86: Default Set
using the menu items TV Display You can select the output path of the OSD (On-Screen Display). This allows you to set the OSD for viewing on the TV. Settings The OSD appears in the LCD screen only. The OSD appears in the LCD screen and a TV. Default Set You can restore menu settings to default (initial settings at the factory) pages 51-54 Initializing the HD camcorder settings to factory defaults does not affect recorded images.
-
Page 87
Demo function. If you execute Demo function, release the Auto Power Off function. page 75 Anynet+ (HDMI-CEC) Anynet+ is an AV network system that enables you to control all connected Samsung AV devices with an Anynet+ supported Samsung TV’s remote control. You can use the Anynet+ function by connecting the HD camcorder to an Anynet+ supported TV with an HDMI cable and by setting “Anynet+ (HDMI-CEC)”… -
Page 88: Deleting A Section Of A Movie Image
editing movie images You can edit recorded movie images in various ways. Movie image editing cannot be performed when the battery is low. DELETING A SECTION OF A MOVIE IMAGE • This function works only in Play mode. page 17 •…
-
Page 89: Dividing A Movie Image
• You can not delete the protected images. You must first release the protect function to delete it. page 88 • A deleted part of the movie image can not be recovered. • If you want to edit from the first, touch Return ( •…
-
Page 90
editing movie images 4. Search the point of division by touching playback related ( • You can jump directly to the division point by touching the desired point on the progress bar. 5. Touch pause ( ) tab at the point of division, then touch Cutting ( •… -
Page 91
Example: You can divide a movie image into two in order to delete a section you no longer need. 1. Before dividing 0~60 seconds 2. After image is divided at 30 second point. 0~30 seconds • The movie image is divided into two movie images. 3. -
Page 92: Combining Two Movie Images
editing movie images COMBINING TWO MOVIE IMAGES • This function works only in Play mode. page 17 • You can combine two different movie images. 1. Touch HD Movie ( HD) tab or SD Movie ( SD) tab. • The thumbnail index view appears accordingly. 2.
-
Page 93
PLAYLIST What’s the “Playlist?” The playlist is created by gathering your favorite recorded movie images. Since the playlist is not created by copying data, it will consume little of the storage capacity. When creating or deleting a playlist, the original movie image will not be erased. -
Page 94: Creating The Playlist
editing movie images Creating the playlist • This function works only in Play mode. page 17 • You can create a playlist on this HD camcorder by gathering your favorites from the recorded movie images. Since the playlist is not created by copying data, you will consume less storage capacity.
-
Page 95
Arranging the order of movie images within a playlist You can arrange movie images within a playlist by moving them to the desired positions. 1. Touch “Playlist” “1080/25P,” “1080/50i,” “576/50P,” or “Slow Motion” (arranging playlist according to movie resolution) Menu ( 2. -
Page 96: Protection From Accidental Erasure
image management This chapter describes information about movie or photo file management tools such as protection, deletion, and copy. Image management cannot be performed when the battery is low. PROTECTION FROM ACCIDENTAL ERASURE • This function works only in Play mode. page 17 •…
-
Page 97: Deleting Images
DELETING IMAGES • This function works only in Play mode. page 17 • You can erase the images recorded on the storage media. • An image that has been deleted cannot be recovered. 1. Touch HD Movie ( HD) tab, SD Movie ( SD) tab, or Photo ( 2.
-
Page 98: Copying Images
image management COPYING IMAGES • This function works only in Play mode. page 17 • You can copy images between the built-in memory and a memory card. • Images are copied to the destination storage while leaving original images in the source storage.
-
Page 99: Dpof Print Setting
printing photo images You can print photo images by inserting the DPOF setting card to a DPOF-compatible printer or connecting the HD camcorder to the PictBridge printer. DPOF PRINT SETTING • Print Mark (DPOF) can be set only on photo images stored in the memory card. •…
-
Page 100: Direct Printing With A Pictbridge Printer
printing photo images DIRECT PRINTING WITH A PICTBRIDGE PRINTER If your printer is compatible with PictBridge, photo images can be printed easily by connecting the camcorder with the USB cable directly to the printer. DPOF setting can also be used. page 91 NOTICE: After selecting “PictBridge”…
-
Page 101: Pictbridge Menu
PictBridge menu Setting the date/time imprint option Touch Menu ( ) tab “Date/Time” “Off,” “Date,” “Time,” or “Date & Time” Return ) tab. To print using the DPOF setting If the printer is compatible with DPOF, you can use the DPOF setting. page 91 •…
-
Page 102: Connecting To A Pc
connecting to a PC This chapter explains how to connect the camcorder to a PC using the USB cable for various functions. ✪ When connecting a USB cable to a PC, refer to the software installation instructions and PC specifications below. SYSTEM REQUIREMENTS CyberLink DVD Suite The following requirements must be satisfied to use CyberLink DVD Suite.
-
Page 103: Installing The Cyberlink Dvd Suite
INSTALLING THE CyberLink DVD Suite DVD Suite is software for easily editing MPEG, AVI, and other video files, still images, and other contents for creating a movie. Before you begin: Quit any other software you are using. (Check that there are no other application icons on the status bar.) 1.
-
Page 104
5. “Customer Information” screen appears. • Click “Next.” 6. “Choose Destination Location” screen appears. • Choose the destination location which you want to install. • Click “Next.” 7. “Setup status” screen appears. • The installation progresses in order as follows “Power Starter” “Power DVD” “Power Director”… -
Page 105: Connecting The Usb Cable
CONNECTING THE USB CABLE To copy the movie files and photo files to your PC, connect your HD camcorder to the PC with a USB cable. 1. Set the “USB Connect” to “Mass Storage.” page 76 2. Connect the HD camcorder to the PC with a USB cable. •…
-
Page 106: Viewing The Contents Of Storage Media
(If you want to record on a memory card, insert the memory card.) 2. Connect the HD camcorder to the PC with a USB cable. page 97 • The “Removable Disk” or “Samsung” window appears on the PC’s screen after a moment.
-
Page 107
Structure of folders and files on the storage media • The folder and file structure for storage media is as follows: • Don’t arbitrarily change or remove the folder or file name. It may not be playable. • The file naming follows DCF (Design rule for Camera File System). Image configuration file … -
Page 108: Image Format
connecting to a PC Image format Movie image • Movie images are compressed in H.264 format. The file extension is “.MP4.” • The image size is 1920X1080(HD), 720×576(SD) or 448×336(SD). page 63 • Movie images set with [SD] 576/50p resolution and Normal image quality is supported by the 640×576, 25p (VGA) ratio of 4:3. Photo image •…
-
Page 109: Playing Back The Video Files On Your Pc
PLAYING BACK THE VIDEO FILES ON YOUR PC Installing the CyberLink DVD Suite (pages 95-96) allows your PC to simply back up and playback your video files. Enjoy the high quality of graphics and sound of the videos on your PC screen. Programs in the DVD Suite Package You can playback, edit, and burn a DVD by using the following programs in the DVD Suite software: •…
-
Page 110
connecting to a PC Drag & Drop for easy playback Drag and drop a video file directly onto the PowerDVD main screen and the program will play the file right away! You can play all video files with a file format supported by the PowerDVD and playlist. 1. -
Page 111: Cautions When Storing
maintenance & additional information MAINTENANCE Your HD camcorder is a product of superior design and craftsmanship and should be treated with care. The suggestions below will help you fulfill any warranty obligations and allow you to enjoy this product for many years. •…
-
Page 112: Additional Information
— Do not touch the metal parts. • Copy the recorded files to your PC. Samsung shall not be responsible for any lost data. (It is recommended that you copy the data from your PC to other media for storage.) •…
-
Page 113
Remove from charger or powered unit when not in use, as these components may use current even when switched off. • It is recommended that only genuine Samsung batteries are used in this camcorder. Using generic non-Samsung batteries can cause damage to the internal charging circuitry. •… -
Page 114: Using Your Hd Camcorder Abroad
maintenance & additional information USING YOUR HD CAMCORDER ABROAD • Each country or region has its own electric and colour systems. • Before using your HD camcorder abroad, check the following items. • Power sources The provided AC adaptor features automatic voltage selection in the AC range from 100 V to 240 V. You can use your camcorder in any countries/regions using the AC power adaptor supplied with your camcorder within the AC 100 V to 240 V, 50/60 Hz range.
-
Page 115: Troubleshooting
TROUBLESHOOTING Before contacting a Samsung authorized service centre, perform the following simple checks. They may save you the time and expense of an unnecessary call. Warning indicators and messages Battery pack Message Icon Low Battery Low Battery Connect AC adaptor and…
-
Page 116
troubleshooting Message Icon Card Locked Unknown Card Error Not Formatted Not Supported Format Not Supported Card Low Speed Card. Please record a Lower quality. Recording Message Icon Write Error Release the EASY Q 108_ English Informs that… The write protection tab on an SD or SDHC card has been set to lock. -
Page 117
Message Icon Activate remote control. Number of video files is full. Cannot record video. Number of photo files is full. Cannot take a photo. Playback Message Icon Not enough free space in Memory. Not enough free space in Card. Different format Read Error Message Icon… -
Page 118
Note before sending your camcorder for repair. • If these instructions do not solve your problem, contact your nearest Samsung authorized service centre. • Depending on the problem, the built-in memory may need to be initialized or replaced and the data will be deleted. -
Page 119: Symptoms And Solutions
✪ If these instructions do not solve your problem, contact your nearest Samsung authorized service centre. Symptoms and solutions Power Symptom The HD camcorder does not turn on. The power turns off automatically. Power cannot be turned off. The battery pack is quickly discharged.
-
Page 120
troubleshooting Displays Symptom The TV screen or LCD display has distorted images or has stripes at the top/ bottom or on the left/right. Unknown image appears on the LCD screen. Unknown indicator appears on the screen. The afterimage remains on the LCD screen. -
Page 121
Symptom The recording stops automatically. When recording a subject illuminated by bright light, a vertical line appears. When the screen is exposed to direct sunlight during recording, the screen becomes red or black for an instant. During recording, the date/time does not display. -
Page 122
troubleshooting Storage Media Symptom Memory card functions are not operable. Image cannot be deleted. You cannot format the memory card. The data file name is not indicated correctly. 114_ English Explanation/Solution • Insert a memory card into your camcorder properly. page 27 •… -
Page 123
Adjusting the image during recording Symptom Focus does not adjust automatically. The image appears too bright or flickering, or changes in colour. Image’s colour balance is not natural. The subject passing by the frame very quickly appears Playback on your HD camcorder Symptom Using the playback (Play/Pause) function would not start playing. -
Page 124
troubleshooting Symptom Photo images stored on a storage media are not displayed in the actual size. Playback is interrupted unexpectedly. Playback on other devices (TV, etc) Symptom You cannot view the image or hear the sound from the connected device. 116_ English Explanation/Solution •… -
Page 125
Symptom The image appears distorted on a You cannot view the image or hear the sound from a TV connected using the HDMI cable. Connecting/Dubbing with other devices (Recorder, PC, Printer, etc) Symptom You cannot dub correctly using the HDMI cable. You cannot dub correctly using the Multi-AV cable. -
Page 126
troubleshooting Connecting to a computer Symptom The computer does not recognise your HD camcorder. Cannot play a movie file properly on a PC. Cannot use the provided software (DVD Suite) on a Macintosh computer. DVD Suite does not function properly. The image or sound on your camcorder is not played on your computer properly. -
Page 127
Overall operations Symptom The date and time are incorrect. The camcorder does not turn on, or does not operate by pressing any button. Lens cover is not closed even when the power is off. Menu Symptom Menu items are grayed out. Explanation/Solution •… -
Page 128
Menu Symptom Menu items are grayed out. 120_ English Explanation/Solution Cannot use “Exposure” “Anti-Shake(EIS)” “Focus: Touch Point” “Shutter” “Face Detect” “Quality” “Fader” “Cont. Shot” “ISO” “Digital Effect: Cinema Tone” Because of the following settings “ Shutter: Manual,” “Super C.Nite,” “ISO,” Built-in Flash “Resolution: [SD]Slow Motion,”… -
Page 129: Specifications
specifications Model name: VP-HMX20C System Video signal H.264 (MPEG-4.AVC) Picture compression format AAC (Advanced Audio Coding) Audio compression format Image device 1/1.8” CMOS (Complementary Metal-Oxide Semiconductor) (Max: 6.4M pixels/Effective: 4M pixels) Lens F1.8 10x (Optical), 10x (Digital) Electronic zoom lens Focal length 6.3 ~ 63mm Filter diameter…
-
Page 130
The mains lead on the power adapter is supplied with a moulded plug incorporating a fuse. The value of the fuse is indicated on the pin face of the plug and, if it requires replacing, a fuse approved to BS1362 of the same rating must be used. -
Page 131
If you have any questions or comments relating to Samsung products, please contact the SAMSUNG customer care centre. Region Country CANADA North America MEXICO U.S.A ARGENTINE BRAZIL CHILE NICARAGUA HONDURAS COSTA RICA ECUADOR EL SALVADOR Latin America GUATEMALA JAMAICA PANAMA PUERTO RICO REP. -
Page 132
RoHS compliant Our product complies with “The Restriction Of the use of certain Hazardous Substances in electrical and electronic equipment”, and we do not use the 6 hazardous materials- Cadmium(Cd), Lead (Pb), Mercury (Hg), Hexavalent Chromium (Cr +6), Poly Brominated Biphenyls (PBBs), Poly Brominated Diphenyl Ethers(PBDEs)- in our products.
-
Contents
-
Table of Contents
-
Troubleshooting
-
Bookmarks
Quick Links
High Definition Digital Camcorder
user manual
imagine
the possibilities
Thank you for purchasing this Samsung product.
To receive a more complete service, please register
your product at
www.samsung.com/global/register
VP-HMX20C
Related Manuals for Samsung VP-HMX20C
Summary of Contents for Samsung VP-HMX20C
-
Page 1: User Manual
High Definition Digital Camcorder user manual imagine the possibilities Thank you for purchasing this Samsung product. To receive a more complete service, please register your product at www.samsung.com/global/register VP-HMX20C…
-
Page 2
key features of your HD camcorder The HD camcorder is capable of recording and playing back both Full HD (high definition: 1920×1080) and Standard Definition (SD) image quality. Select the recording image quality, Full HD (high definition) or SD (standard definition), before recording. -
Page 3
• This HD camcorder supports Anynet+. Anynet+ is an AV network system that enables you to control all connected Samsung AV devices with an Anynet+ supported Samsung TV remote control. Refer to the corresponding TV’s user manual for more details. -
Page 4: Safety Warnings
safety warnings What the icons and signs in this user manual mean; Means that death or serious personal injury is a risk. WARNING Means that there is a potential risk for personal injury or material damage. CAUTION To reduce the risk of fire, explosion, electric shock, or personal injury when using your HD camcorder, follow these basic safety precautions: CAUTION Means hints or referential pages that may be helpful when operating the HD camcorder.
-
Page 5: Important Information On Use
Play back your trial recording to make sure the video and audio have been recorded properly. • The recorded contents cannot be compensated for: — Samsung cannot compensate for any damage caused when a recording cannot be played back because of a defect in the HD camcorder or memory card.
-
Page 6
• All the trade names and registered trademarks mentioned in this manual or other documentation provided with your Samsung product are trademarks or registered trademarks of their respective holders. • Windows® is registered trademark or trademark of Microsoft Corporation, registered in the United States and other countries. -
Page 7: Precautions When Using
precautions when using IMPORTANT NOTE • Handle the liquid crystal display (LCD) with care: The LCD is a very delicate display device: Do not press its surface with force, hit it or prick it with a sharp object. If you push the LCD surface, unevenness in display may occur. If unevenness does not disappear, turn the camcorder off, wait for a few moments, and then turn it on again.
-
Page 8
precautions when using • Do not point directly at the sun: — If direct sunlight strikes the lens, the HD camcorder could malfunction or a fire could occur. — Do not leave the HD camcorder with the LCD screen exposed to direct sunlight: This could cause a malfunction. -
Page 9: Table Of Contents
contents INTRODUCTION TO BASIC FEATURES GETTING TO KNOW YOUR HD CAMCORDER PREPARATION BEFORE RECORDING What’s included with your HD camcorder Front & left view Right & top view Rear & bottom view Using the remote control Installing the button type battery Using the cradle Holding the HD camcorder Charging the battery pack…
-
Page 10
contents RECORDING PLAYBACK CONNECTION 02_ English Recording movie images Taking photo images Recording with ease for beginners (EASY Q mode) Capturing still images in movie record mode (dual recording) Capturing still images during movie images playback Using the external microphone Zooming Self record using the remote control Using the built-in flash… -
Page 11
USING THE MENU ITEMS EDITING MOVIE IMAGES IMAGE MANAGEMENT PRINTING PHOTO IMAGES Handling menus and quick menus Menu items Quick menu items Recording menu items Playback menu items Setting menu items Deleting a section of a movie image Dividing a movie image Combining two movie images Playlist Protection from accidental erasure… -
Page 12
contents CONNECTING TO A PC MAINTENANCE & ADDITIONAL INFORMATION TROUBLESHOOTING SPECIFICATIONS WARRANTY 04_ English System requirements Installing the Cyberlink DVD Suite Connecting the USB cable Viewing the contents of storage media 100 Transferring files from the HD camcorder to your PC 101 Playing back the video files on your PC 103 Maintenance 104 Additional information… -
Page 13
introduction to basic features This chapter introduces you to the basic features of your HD camcorder. See the reference pages below for more information. Step 1 Preparation • Charging the battery pack page 13 • Setting the date/time and the OSD language.pages 24-25 •… -
Page 14
HD camcorder WHAT’S INCLUDED WITH YOUR HD CAMCORDER Your new HD camcorder comes with the following accessories. If any of these items is missing from your box, call Samsung’ s Customer Care Centre. ✪ The exact appearance of each item may vary by model. -
Page 15
FRONT & LEFT VIEW Recording indicator Lens Built-in speaker Display ( ) / iCHECK button Flash ( ) button EASY Q button Jack cover When using the remote control, open the LCD screen and point directly at the remote sensor. CAUTION The HDMI jack is on the Cradle. -
Page 16: Right & Top View
getting to know your HD camcorder RIGHT & TOP VIEW PHOTO button Zoom (W/T) lever Swivel handle 08_ English Built-in flash Grip belt hook Grip belt…
-
Page 17: Rear & Bottom View
REAR & BOTTOM VIEW ⓐ ⓑ ⓒ MODE button/Mode indicator (Movie ( ) / Photo ( ) / Play ( OPEN switch Recording start/stop button POWER switch CHG (charging) indicator MIC (external microphone) jack DC IN jack Battery pack/Memory card cover ⓐ…
-
Page 18: Using The Remote Control
preparation This section provides information on using this HD camcorder; such as how to use the provided accessories, how to charge the battery, how to setup the operation mode and initial setup. USING THE REMOTE CONTROL 10_ English REC button Display ( ) button Skip (…
-
Page 19: Installing The Button Type Battery
INSTALLING THE BUTTON TYPE BATTERY Installing the button type battery in the remote control 1. Turn the battery holder counterclockwise (as indicated with () mark) using your fingernail or a coin to open it. The battery holder opens. 2. Insert the battery into the battery holder with the positive (+) terminal facing down and press it firmly until you hear a locking sound.
-
Page 20: Holding The Hd Camcorder
preparation HOLDING THE HD CAMCORDER Attaching the grip belt Insert your right hand from the bottom of the HD camcorder up to the base of your thumb. Put your hand in a position where you can easily operate the Recording start/stop button, PHOTO button, and the Zoom lever.
-
Page 21: Charging The Battery Pack
2. Insert the battery pack into the battery pack slot until it softly clicks. • Make sure that word mark (SAMSUNG) is facing left while the camcorder is placed as shown in the figure. 3. Close the battery pack cover.
-
Page 22: Charging Indicator
Charging time Recording format • The time is only for reference. Figures shown above are measured under Samsung’s test environment, and may differ from your actual use. • The recording time shortens dramatically in a cold environment. The continuous recording times in the operating instructions are measured using a fully charged battery pack at 25 °C (77 °F).
-
Page 23
• Gently slide the Battery pack release switch in the direction as shown in the figure. 3. Close the battery pack cover. • Additional battery packs are available at your local Samsung dealer. • If the HD camcorder will not be in use for a while, remove the battery pack from the HD camcorder. -
Page 24: Maintaining The Battery Pack
The recording time is affected by temperature and environmental conditions. • We recommend only using the original battery pack that is available from your Samsung retailer. When the battery reaches the end of its life, please contact your local dealer.
-
Page 25: Basic Hd Camcorder Operation
BASIC HD CAMCORDER OPERATION Set the appropriate operation mode according to your preference using the POWER switch and MODE button. Turning the HD camcorder on and off You can turn the camcorder on or off by sliding the POWER switch downward. The lens opens automatically with HD camcorder on.
-
Page 26: Screen Indicators
preparation SCREEN INDICATORS STBY 00:00:00 [70Min] Memory Full 1/50 01/JAN/2008 00:00 • The OSD indicators are based on memory capacity of 8GB (built-in memory). • The above screen is an example for explanation: It is different from the actual display. •…
-
Page 27
00:00:20 / 00:10:00 100-0001 01/JAN/2008 Memory Full The play related tabs disappear on the screen a few seconds (about 3 seconds) after the image plays back. They reappear when you touch any point on the screen. Movie play mode Movie play mode Operating status (Play/Pause)/Highlight view File name (file number) Time code (elapsed time / recorded time) -
Page 28: Photo Record Mode
preparation 3958 Memory Full 1/50 01/JAN/2008 00:00 ( ) The maximum number of recordable images displayed is 99,999 even though the actual number of recordable images may exceed 99,999. 20_ English Photo record mode Photo record mode Self timer* Face detect Warning indicators and messages Image counter ( …
-
Page 29: Photo Play Mode
1 / 12 100-0001 01/JAN/2008 00:00 X 1.1 Photo play mode Photo play mode Music slide show / Playback zoom File name (file number) Image counter (current image / total number of recorded images) Storage media (built-in memory or memory card) Battery info.
-
Page 30: Switching The Information Display Mode
preparation USING THE DISPLAY ( )/iCHECK BUTTON Switching the information display mode You can switch between the on-screen information display modes: Press the Display ( )/iCHECK button. The full and minimum display modes will alternate. • Full display mode: All information will appear. •…
-
Page 31: Using The Lcd Screen
USING THE LCD SCREEN Adjusting the LCD screen 1. Open up the LCD screen 90 degrees with your finger. 2. Rotate it to the best angle to record or play. Do not lift the HD camcorder by holding the LCD screen. WARNING •…
-
Page 32: Initial Setting: Osd Language & Date And Time
preparation INITIAL SETTING: OSD LANGUAGE & DATE AND TIME To read the menus or messages in your desired language, set the OSD language. To store the date and time during recording, set the date/time. Selecting the OSD language You can select the desired language to display the menu screen and the messages. 1.
-
Page 33: Setting The Date And Time
Setting the date and time Set the date and time when using this HD camcorder for the first time. 1. Touch Menu ( ) tab. 2. Touch Settings ( ) tab. 3. Touch up ( )/down ( ) tab until “Date/Time Set” is displayed. 4.
-
Page 34: Before Recording
before recording SELECTING THE STORAGE MEDIA • You can record movie and photo images on the built-in memory or a memory card, so you should select the desired storage media before starting recording or playback. • You can use SDHC and MMCplus cards on your HD camcorder. (Some cards are not compatible depending on the memory card manufacturer and memory card type.) •…
-
Page 35: Inserting/Ejecting A Memory Card
INSERTING/EJECTING A MEMORY CARD Inserting a memory card 1. Open the memory card cover by sliding the OPEN switch upward as shown in the figure. 2. Insert the memory card into the slot until it softly clicks. • Make sure that the terminal portion is facing left and the camcorder is placed as shown in the figure.
-
Page 36: Recordable Time And Number Of Images
Approx. 1802 640×480 Approx. 5106 • The above figures are measured under Samsung’s standard recording test conditions and may differ depending on actual use. • The higher the resolution and quality settings, the more memory is used. • The compression rate increases when choosing lower resolution and quality settings. The higher the compression rate is, the longer the recording time will be.
-
Page 37: Selecting A Suitable Memory Card
SELECTING A SUITABLE MEMORY CARD • You can use a SDHC memory card and MMCplus cards. You can also use a SD memory card, but it is recommended that you use a SDHC memory card and MMCplus with your HD camcorder. (SD card supports upto 2GB.) •…
-
Page 38
• Be careful to keep memory card out of the reach of children, who might swallow it. Note on use • Samsung is not responsible for data loss due to misuse. • We recommend using a memory card case to avoid losing data from moving and static electricity. -
Page 39: Recording Movie Images
recording Basic procedures to record a movie or photo image are described below and on the following pages. RECORDING MOVIE IMAGES • You can record movie images in Movie mode only. page 17 • This HD camcorder provides two Recording start/stop buttons. One is on the rear side of the camcorder and the other is on the LCD panel.
-
Page 40
recording • Movie images are compressed in H.264 (MPEG-4.AVC) format. • Eject the battery pack when you have finished recording to prevent unnecessary battery power consumption. • For on-screen information display, see page 18. • For approximate recording time, see page 28. •… -
Page 41: Taking Photo Images
TAKING PHOTO IMAGES You can take photo images in Photo mode only. page 17 1. Slide the POWER switch downward to turn on the power and press the MODE button to set Photo ( ). page 17 • The lens opens automatically with HD camcorder on. •…
-
Page 42: Recording With Ease For Beginners (Easy Q Mode
recording RECORDING WITH EASE FOR BEGINNERS (EASY Q MODE) • The EASY Q function is only available with the Movie and Photo modes. page 17 • With the EASY Q function, most of the HD camcorder settings are automatically adjusted, which frees you from making detailed adjustments. 1.
-
Page 43: Capturing Still Images In Movie Record Mode
CAPTURING STILL IMAGES IN MOVIE RECORD MODE (DUAL RECORDING) • This function works only in Movie mode. page 17 • Your HD camcorder allows the choice to capture digital still images without interrupting video capture; even in STBY mode. • You can record still images on the storage media during recording movie image. 1.
-
Page 44: Capturing Still Images During Movie Images Playback
recording CAPTURING STILL IMAGES DURING MOVIE IMAGES PLAYBACK • This function works only in Play mode. page 17 • If you press the PHOTO button during playback, the camcorder stops playing and saves one image of the current movie scene that is paused. •…
-
Page 45: Using The External Microphone
USING THE EXTERNAL MICROPHONE Connect external microphone (optional-user provided) to the external microphone jack of this HD camcorder for clearer audio recordings. Turn on the switch on microphone and start recording. • This HD camcorder cannot use a plug-in power type microphone (power supplied from camcorder).
-
Page 46: Self Record Using The Remote Control
recording SELF RECORD USING THE REMOTE CONTROL • The SELF TIMER function works only in Movie and Photo modes. page 17 • When you use the SELF TIMER function on the remote control, recording begins automatically in 10 seconds. 1. Press the SELF TIMER button. •…
-
Page 47: Using The Built-In Flash
USING THE BUILT-IN FLASH • This function works only in Photo mode. page 17 • You can take natural looking flash photo images with appropriate illumination using the built-in flash, whether they are night scenes, indoors or in other dark places. Press the Flash ( ) button.
-
Page 48: Changing The Playback Mode
playback You can view recorded movie and photo images in thumbnail index view and play them in various ways. CHANGING THE PLAYBACK MODE • You can set the movie recording, the photo recording and the play mode in turn with the MODE button. •…
-
Page 49: Playing Movie Images
PLAYING MOVIE IMAGES • This function works only in Play mode. page 17 • You can find a desired movie image quickly using thumbnail index views. • You can also use the playback related buttons on the remote control. page 42 1.
-
Page 50: Various Playback Operations
playback Various playback operations Playback / Pause / Stop • Play and Pause functions alternate when you touch Playback ( during playback. Touch Return ( • You can perform the same operation by using the remote control. ( Search playback •…
-
Page 51: Viewing Photo Images
VIEWING PHOTO IMAGES • This function works only in Play mode. page 17 • You can play back and view photo images recorded on the storage media. 1. Slide the POWER switch downward to turn on the power and press the MODE button to set Play ( •…
-
Page 52: Zooming During Playback
playback • Music slide show is available also in the quick menu. page 54 • HD camcorder provides background music files from its built-in memory as a basic offer on your purchase. When you display saved photos from the built-in memory as Music Slide Show, the saved background music files (SONG0001.M4A) will be played automatically.
-
Page 53: Connecting To A Tv
The HDMI jack on your HD camcorder is for output use only. • You can use the Anynet+ function by connecting the HD camcorder to a Samsung Anynet+ supported TV with the HDMI cable. Refer to the corresponding TV user manual for more details.
-
Page 54
connection Connecting to a normal TV (16:9/4:3) • This connection type is used when downconverting recorded HD images to SD for playback. • When playing back HD-quality (1920×1080) movie images on a SDTV, the images are down-converted to 720×576. • The multi-AV cable does not support HD-quality images so it down-converts them to SD-quality images. •… -
Page 55: Viewing On Tv Screen
Viewing on TV screen 1. Slide the POWER switch downward to turn on the power and press the MODE button to set Play ( page 17 2. Turn on the TV and set the input source on the TV to the input connection the HD camcorder is connected to. •…
-
Page 56
connection • Adjust the sound volume on the TV. • The remote control is useful when operating the HD camcorder while viewing an image on a TV screen. • Information that the HD camcorder is recording will appear on the TV screen: You can switch between the on-screen information display modes. -
Page 57: Handling Menus And Quick Menus
using the menu items You can operate the HD camcorder more usefully by setting menus related to recording, playback and setting. HANDLING MENUS AND QUICK MENUS • You can change the menu settings to customise your HD camcorder. Access the desired menu screen by following the steps below and change the various settings.
-
Page 58: Using The Menu Items
using the menu items ✪ Follow the instruction below to use each of the menu items listed after this page. For example: setting the White Balance in movie mode When using Menu ( ) tab: 1. Touch Menu ( ) tab. 2.
-
Page 59: Menu Items
MENU ITEMS • Accessible items in menu vary depending on the operation mode. • For operation details, see the corresponding page. Recording menu items ( Operating mode Movie ( Scene Mode (AE) White Balance Exposure Super C.Nite …
-
Page 60
using the menu items Playback menu items ( Operating mode Play Option Highlight Playlist Delete Protect Copy Partial Delete Edit Divide Combine Cont. Capture File Info Music Slide Show Slide Show Interval Resize Print Mark (DPOF) (memory card only) Setting menu items ( Operating mode Date/Time Set Date/Time… -
Page 61: Setting Menu Items
Setting menu items ( Operating mode Format Beep Sound Shutter Sound Auto Power Off REC Lamp Remote USB Connect TV Type Component Out TV Display Default Set Language Demo Anynet+ (HDMI-CEC) • Some items will not appear depending on the storage media type. •…
-
Page 62: Quick Menu Items
using the menu items QUICK MENU ITEMS • Accessible items in quick menu vary depending on the operation mode. • For operation details, see the corresponding page. Recording menu items Operating mode Movie ( Storage Resolution Focus …
-
Page 63: Recording Menu Items
RECORDING MENU ITEMS You can setup the menu items for movie and photo images recording. Scene Mode (AE) This HD camcorder automatically sets the shutter speed and aperture according to the subject brightness for optimum recording. You can also specify one of six modes depending on subject conditions, recording environment or purpose of filming.
-
Page 64: White Balance
using the menu items White Balance This HD camcorder automatically adjusts the colour of subject. Change the white balance setting depending on the recording conditions. Settings Auto This option is generally used to control the white balance automatically. This controls the white balance according to the outdoor ambience, especially for Daylight close up and when the subject is of one dominant colour.
-
Page 65
Exposure The HD camcorder usually adjusts the exposure automatically. You can also manually adjust the exposure depending on the recording conditions. Settings This option automatically adjusts image brightness according to the environmental Auto light conditions. You can adjust the brightness of an image manually. Adjust the brightness when the Manual subject is too bright or too dark. -
Page 66
using the menu items Super C.Nite You can make the subject recorded appear to be in slow motion by controlling the shutter speed, or a brighter image in dark places without a compromise in colours. Settings Disables the function. Record a brighter image. Normal Super Record a brighter image even in a dark location. -
Page 67: Digital Effect
Digital Effect The digital effect enables you to give a creative look to your recording. Select the appropriate digital effect for the type of picture that you wish to record and the effect you wish to create. There are 5 different digital effect options. Settings Disables the function.
-
Page 68
using the menu items Focussing manually during recording This HD camcorder automatically focuses a subject from close-up to infinity. However, the correct focus may not be obtained depending on the recording condition. In this case, use the manual focus mode. 1. -
Page 69
Shutter The HD camcorder automatically sets the shutter speed depending on the subject brightness. You can also manually adjust the shutter speed according to the scene conditions. Settings Auto The HD camcorder automatically sets the appropriate aperture value. — In movie record mode, shutter speed can be set to 1/25, 1/50, 1/120, 1/250, 1/500, 1/1000, 1/2000, 1/4000, or 1/10000. -
Page 70
using the menu items • The image may not seem smooth when a high shutter speed is set. • This function will be set to “Auto” in the EASY Q mode. • When recording with a shutter speed of 1/1000 or higher, make sure the sun is not directly shining into the lens. -
Page 71
Resolution (Movie images) • You can select the resolution of movie image to be recorded. • Regarding detailed image capacity, see page 28. Settings [HD] 1080/25p Records in the HD (1920×1080 25p) format. [HD] 1080/50i Records in the Full HD (1920×1080 50i) format. [SD] 576/50p Records in the SD (720×576 50p) format. -
Page 72: Wind Cut
using the menu items Quality • You can select the quality of a movie to be recorded. • Regarding detailed image capacity, see page 28. Settings Super Fine Records in the highest quality. Records in the high quality. Fine Normal Records in the normal quality.
-
Page 73: Self Timer
Self Timer • When you use the self timer function, recording begins automatically in 10 seconds. • You can do the same operation by using the remote control. page 38 Settings Disable the function. Recording begins automatically in 10 seconds by pressing the Recording start/stop 10 Sec or PHOTO button.
-
Page 74: Face Detect
using the menu items Fader You can give your recording a professional look by using special effects such as fade in at the beginning of a sequence or fade out at the end of a sequence. Settings Disables the function. Fader is executed.
-
Page 75: Digital Zoom
Guideline • Guideline displays certain patterns on the LCD screen so that you can easily set the image composition when recording movie or photo images. • The HD camcorder provides 3 types of guidelines. Settings Disable the function. Enables you to center the subject for proper recording. Enables you to place the subject within a safety zone which prevents it being cut when editing in 4:3 for left and right and 2.35:1 for top and bottom.
-
Page 76
using the menu items Sharpness This function allows the user to obtain sharper photo images by processing the image after it is shot. Settings Normal The photo images appear with sharp edges and are suitable for printing. Soft Smoothes the edges of photo images. Sharp Enhances to sharpen the edges of photo images. -
Page 77: Play Option
• ISO sensitivity is a measure of how rapidly the HD camcorder reacts to a light source. The higher the sensitivity, the brighter the image is under the same exposure condition. Settings Auto Automatically sets the ISO to compensate for various lighting conditions (up to 3200). This mode is recommended for bright lighting conditions.
-
Page 78: Cont. Capture
using the menu items Highlight Shows a section of recorded movie images at random according to the total play time and number of files. Settings Shows a section of a movie image(s) that was created within 24 hours of the Recent most recent one.
-
Page 79: File Info
Slide Show Interval You can set the slide show interval between 1 second and 3 seconds. Settings Photo images play back in 1 second intervals. 1Sec 3Sec Photo images play back in 3 second intervals. • Loading time may vary depending on the photo image size. •…
-
Page 80: Date/Time Set
using the menu items SETTING MENU ITEMS You can setup the date/time, OSD language, video output, and display settings of the HD camcorder. Date/Time Set Set the current date and time so they can be recorded correctly. page 25 Date/Time You can set the date and time to display on the LCD screen.
-
Page 81: Lcd Enhancer
File No. File numbers are assigned to images in the order they were recorded. Settings Assigns file numbers in sequence even if the memory card is replaced with Series another one or after formatting or deleting all files. The file number is reset when a new folder is created. Resets the file number to 0001 even after formatting or deleting all files or Reset inserting a new memory card.
-
Page 82: Storage Info
using the menu items Storage Type You can record movie and photo images on the built-in memory or a memory card, so you should select the desired storage media before starting recording or playback. Settings Records or play backs images in built-in memory. Memory Card Records or play backs images in memory card.
-
Page 83: Beep Sound
Beep Sound You can turn the beep sound on or off. Settings Cancels the beep sound. When on, a beep will sound every time a button is pressed. • The beep sound is off when recording movie. • When beep sound is set to off, the power on/off sound is off. Shutter Sound You can turn the shutter sound on or off.
-
Page 84: Rec Lamp
using the menu items REC Lamp You can turn the recording indicator on the front of the camcorder on or off during movie or photo recording. Settings Recording indicator is off. Recording indicator is on during recording. Remote This function allows you to enable or disable the remote control for use with the HD camcorder. Settings Disable the function.
-
Page 85
TV Type You can select the aspect ratio during playback on TV. Settings 16:9 Select 16:9 to use the wide screen TV mode. Select to use the standard 4:3 display aspect ratio. This function is available when the HD camcorder is connected to a TV. •… -
Page 86: Default Set
using the menu items TV Display You can select the output path of the OSD (On-Screen Display). This allows you to set the OSD for viewing on the TV. Settings The OSD appears in the LCD screen only. The OSD appears in the LCD screen and a TV. Default Set You can restore menu settings to default (initial settings at the factory) pages 51-54 Initializing the HD camcorder settings to factory defaults does not affect recorded images.
-
Page 87
Demo function. If you execute Demo function, release the Auto Power Off function. page 75 Anynet+ (HDMI-CEC) Anynet+ is an AV network system that enables you to control all connected Samsung AV devices with an Anynet+ supported Samsung TV’s remote control. You can use the Anynet+ function by connecting the HD camcorder to an Anynet+ supported TV with an HDMI cable and by setting “Anynet+ (HDMI-CEC)”… -
Page 88: Deleting A Section Of A Movie Image
editing movie images You can edit recorded movie images in various ways. Movie image editing cannot be performed when the battery is low. DELETING A SECTION OF A MOVIE IMAGE • This function works only in Play mode. page 17 •…
-
Page 89: Dividing A Movie Image
• You can not delete the protected images. You must first release the protect function to delete it. page 88 • A deleted part of the movie image can not be recovered. • If you want to edit from the first, touch Return ( •…
-
Page 90
editing movie images 4. Search the point of division by touching playback related ( • You can jump directly to the division point by touching the desired point on the progress bar. 5. Touch pause ( ) tab at the point of division, then touch Cutting ( •… -
Page 91
Example: You can divide a movie image into two in order to delete a section you no longer need. 1. Before dividing 0~60 seconds 2. After image is divided at 30 second point. 0~30 seconds • The movie image is divided into two movie images. 3. -
Page 92: Combining Two Movie Images
editing movie images COMBINING TWO MOVIE IMAGES • This function works only in Play mode. page 17 • You can combine two different movie images. 1. Touch HD Movie ( HD) tab or SD Movie ( SD) tab. • The thumbnail index view appears accordingly. 2.
-
Page 93
PLAYLIST What’s the “Playlist?” The playlist is created by gathering your favorite recorded movie images. Since the playlist is not created by copying data, it will consume little of the storage capacity. When creating or deleting a playlist, the original movie image will not be erased. -
Page 94: Creating The Playlist
editing movie images Creating the playlist • This function works only in Play mode. page 17 • You can create a playlist on this HD camcorder by gathering your favorites from the recorded movie images. Since the playlist is not created by copying data, you will consume less storage capacity.
-
Page 95
Arranging the order of movie images within a playlist You can arrange movie images within a playlist by moving them to the desired positions. 1. Touch “Playlist” “1080/25P,” “1080/50i,” “576/50P,” or “Slow Motion” (arranging playlist according to movie resolution) Menu ( 2. -
Page 96: Protection From Accidental Erasure
image management This chapter describes information about movie or photo file management tools such as protection, deletion, and copy. Image management cannot be performed when the battery is low. PROTECTION FROM ACCIDENTAL ERASURE • This function works only in Play mode. page 17 •…
-
Page 97: Deleting Images
DELETING IMAGES • This function works only in Play mode. page 17 • You can erase the images recorded on the storage media. • An image that has been deleted cannot be recovered. 1. Touch HD Movie ( HD) tab, SD Movie ( SD) tab, or Photo ( 2.
-
Page 98: Copying Images
image management COPYING IMAGES • This function works only in Play mode. page 17 • You can copy images between the built-in memory and a memory card. • Images are copied to the destination storage while leaving original images in the source storage.
-
Page 99: Dpof Print Setting
printing photo images You can print photo images by inserting the DPOF setting card to a DPOF-compatible printer or connecting the HD camcorder to the PictBridge printer. DPOF PRINT SETTING • Print Mark (DPOF) can be set only on photo images stored in the memory card. •…
-
Page 100: Direct Printing With A Pictbridge Printer
printing photo images DIRECT PRINTING WITH A PICTBRIDGE PRINTER If your printer is compatible with PictBridge, photo images can be printed easily by connecting the camcorder with the USB cable directly to the printer. DPOF setting can also be used. page 91 NOTICE: After selecting “PictBridge”…
-
Page 101: Pictbridge Menu
PictBridge menu Setting the date/time imprint option Touch Menu ( ) tab “Date/Time” “Off,” “Date,” “Time,” or “Date & Time” Return ) tab. To print using the DPOF setting If the printer is compatible with DPOF, you can use the DPOF setting. page 91 •…
-
Page 102: Connecting To A Pc
connecting to a PC This chapter explains how to connect the camcorder to a PC using the USB cable for various functions. ✪ When connecting a USB cable to a PC, refer to the software installation instructions and PC specifications below. SYSTEM REQUIREMENTS CyberLink DVD Suite The following requirements must be satisfied to use CyberLink DVD Suite.
-
Page 103: Installing The Cyberlink Dvd Suite
INSTALLING THE CyberLink DVD Suite DVD Suite is software for easily editing MPEG, AVI, and other video files, still images, and other contents for creating a movie. Before you begin: Quit any other software you are using. (Check that there are no other application icons on the status bar.) 1.
-
Page 104
5. “Customer Information” screen appears. • Click “Next.” 6. “Choose Destination Location” screen appears. • Choose the destination location which you want to install. • Click “Next.” 7. “Setup status” screen appears. • The installation progresses in order as follows “Power Starter” “Power DVD” “Power Director”… -
Page 105: Connecting The Usb Cable
CONNECTING THE USB CABLE To copy the movie files and photo files to your PC, connect your HD camcorder to the PC with a USB cable. 1. Set the “USB Connect” to “Mass Storage.” page 76 2. Connect the HD camcorder to the PC with a USB cable. •…
-
Page 106: Viewing The Contents Of Storage Media
(If you want to record on a memory card, insert the memory card.) 2. Connect the HD camcorder to the PC with a USB cable. page 97 • The “Removable Disk” or “Samsung” window appears on the PC’s screen after a moment.
-
Page 107
Structure of folders and files on the storage media • The folder and file structure for storage media is as follows: • Don’t arbitrarily change or remove the folder or file name. It may not be playable. • The file naming follows DCF (Design rule for Camera File System). Image configuration file … -
Page 108: Image Format
connecting to a PC Image format Movie image • Movie images are compressed in H.264 format. The file extension is “.MP4.” • The image size is 1920X1080(HD), 720×576(SD) or 448×336(SD). page 63 • Movie images set with [SD] 576/50p resolution and Normal image quality is supported by the 640×576, 25p (VGA) ratio of 4:3. Photo image •…
-
Page 109: Playing Back The Video Files On Your Pc
PLAYING BACK THE VIDEO FILES ON YOUR PC Installing the CyberLink DVD Suite (pages 95-96) allows your PC to simply back up and playback your video files. Enjoy the high quality of graphics and sound of the videos on your PC screen. Programs in the DVD Suite Package You can playback, edit, and burn a DVD by using the following programs in the DVD Suite software: •…
-
Page 110
connecting to a PC Drag & Drop for easy playback Drag and drop a video file directly onto the PowerDVD main screen and the program will play the file right away! You can play all video files with a file format supported by the PowerDVD and playlist. 1. -
Page 111: Cautions When Storing
maintenance & additional information MAINTENANCE Your HD camcorder is a product of superior design and craftsmanship and should be treated with care. The suggestions below will help you fulfill any warranty obligations and allow you to enjoy this product for many years. •…
-
Page 112: Additional Information
— Do not touch the metal parts. • Copy the recorded files to your PC. Samsung shall not be responsible for any lost data. (It is recommended that you copy the data from your PC to other media for storage.) •…
-
Page 113
Remove from charger or powered unit when not in use, as these components may use current even when switched off. • It is recommended that only genuine Samsung batteries are used in this camcorder. Using generic non-Samsung batteries can cause damage to the internal charging circuitry. •… -
Page 114: Using Your Hd Camcorder Abroad
maintenance & additional information USING YOUR HD CAMCORDER ABROAD • Each country or region has its own electric and colour systems. • Before using your HD camcorder abroad, check the following items. • Power sources The provided AC adaptor features automatic voltage selection in the AC range from 100 V to 240 V. You can use your camcorder in any countries/regions using the AC power adaptor supplied with your camcorder within the AC 100 V to 240 V, 50/60 Hz range.
-
Page 115: Troubleshooting
TROUBLESHOOTING Before contacting a Samsung authorized service centre, perform the following simple checks. They may save you the time and expense of an unnecessary call. Warning indicators and messages Battery pack Message Icon Low Battery Low Battery Connect AC adaptor and…
-
Page 116
troubleshooting Message Icon Card Locked Unknown Card Error Not Formatted Not Supported Format Not Supported Card Low Speed Card. Please record a Lower quality. Recording Message Icon Write Error Release the EASY Q 108_ English Informs that… The write protection tab on an SD or SDHC card has been set to lock. -
Page 117
Message Icon Activate remote control. Number of video files is full. Cannot record video. Number of photo files is full. Cannot take a photo. Playback Message Icon Not enough free space in Memory. Not enough free space in Card. Different format Read Error Message Icon… -
Page 118
Note before sending your camcorder for repair. • If these instructions do not solve your problem, contact your nearest Samsung authorized service centre. • Depending on the problem, the built-in memory may need to be initialized or replaced and the data will be deleted. -
Page 119: Symptoms And Solutions
✪ If these instructions do not solve your problem, contact your nearest Samsung authorized service centre. Symptoms and solutions Power Symptom The HD camcorder does not turn on. The power turns off automatically. Power cannot be turned off. The battery pack is quickly discharged.
-
Page 120
troubleshooting Displays Symptom The TV screen or LCD display has distorted images or has stripes at the top/ bottom or on the left/right. Unknown image appears on the LCD screen. Unknown indicator appears on the screen. The afterimage remains on the LCD screen. -
Page 121
Symptom The recording stops automatically. When recording a subject illuminated by bright light, a vertical line appears. When the screen is exposed to direct sunlight during recording, the screen becomes red or black for an instant. During recording, the date/time does not display. -
Page 122
troubleshooting Storage Media Symptom Memory card functions are not operable. Image cannot be deleted. You cannot format the memory card. The data file name is not indicated correctly. 114_ English Explanation/Solution • Insert a memory card into your camcorder properly. page 27 •… -
Page 123
Adjusting the image during recording Symptom Focus does not adjust automatically. The image appears too bright or flickering, or changes in colour. Image’s colour balance is not natural. The subject passing by the frame very quickly appears Playback on your HD camcorder Symptom Using the playback (Play/Pause) function would not start playing. -
Page 124
troubleshooting Symptom Photo images stored on a storage media are not displayed in the actual size. Playback is interrupted unexpectedly. Playback on other devices (TV, etc) Symptom You cannot view the image or hear the sound from the connected device. 116_ English Explanation/Solution •… -
Page 125
Symptom The image appears distorted on a You cannot view the image or hear the sound from a TV connected using the HDMI cable. Connecting/Dubbing with other devices (Recorder, PC, Printer, etc) Symptom You cannot dub correctly using the HDMI cable. You cannot dub correctly using the Multi-AV cable. -
Page 126
troubleshooting Connecting to a computer Symptom The computer does not recognise your HD camcorder. Cannot play a movie file properly on a PC. Cannot use the provided software (DVD Suite) on a Macintosh computer. DVD Suite does not function properly. The image or sound on your camcorder is not played on your computer properly. -
Page 127
Overall operations Symptom The date and time are incorrect. The camcorder does not turn on, or does not operate by pressing any button. Lens cover is not closed even when the power is off. Menu Symptom Menu items are grayed out. Explanation/Solution •… -
Page 128
Menu Symptom Menu items are grayed out. 120_ English Explanation/Solution Cannot use “Exposure” “Anti-Shake(EIS)” “Focus: Touch Point” “Shutter” “Face Detect” “Quality” “Fader” “Cont. Shot” “ISO” “Digital Effect: Cinema Tone” Because of the following settings “ Shutter: Manual,” “Super C.Nite,” “ISO,” Built-in Flash “Resolution: [SD]Slow Motion,”… -
Page 129: Specifications
specifications Model name: VP-HMX20C System Video signal H.264 (MPEG-4.AVC) Picture compression format AAC (Advanced Audio Coding) Audio compression format Image device 1/1.8” CMOS (Complementary Metal-Oxide Semiconductor) (Max: 6.4M pixels/Effective: 4M pixels) Lens F1.8 10x (Optical), 10x (Digital) Electronic zoom lens Focal length 6.3 ~ 63mm Filter diameter…
-
Page 130
The mains lead on the power adapter is supplied with a moulded plug incorporating a fuse. The value of the fuse is indicated on the pin face of the plug and, if it requires replacing, a fuse approved to BS1362 of the same rating must be used. -
Page 131
If you have any questions or comments relating to Samsung products, please contact the SAMSUNG customer care centre. Region Country CANADA North America MEXICO U.S.A ARGENTINE BRAZIL CHILE NICARAGUA HONDURAS COSTA RICA ECUADOR EL SALVADOR Latin America GUATEMALA JAMAICA PANAMA PUERTO RICO REP. -
Page 132
RoHS compliant Our product complies with “The Restriction Of the use of certain Hazardous Substances in electrical and electronic equipment”, and we do not use the 6 hazardous materials- Cadmium(Cd), Lead (Pb), Mercury (Hg), Hexavalent Chromium (Cr +6), Poly Brominated Biphenyls (PBBs), Poly Brominated Diphenyl Ethers(PBDEs)- in our products.
Samsung и Cookies
На этом сайте используются файлы cookie. Нажимая ПРИНЯТЬ или продолжая просмотр сайта, вы разрешаете их использование.
Подробнее
В настоящий момент товары недоступны для заказа на samsung.com/ru
В настоящий момент товары недоступны для заказа на samsung.com/ru
Выберите свое местоположение и язык.
 04:59
04:59
Unboxing: Samsung HMX-H200 HD Camcorder
 15:57
15:57
Как разобрать видеокамеру samsung hmx h-200 bp
 02:04
02:04
Samsung HMX h200 Оптическая стабилизация тест
 00:38
00:38
Видеокамера samsung hmx-h200sp/xer — формат видео HDV — сцена свадьбы
 01:22
01:22
Luna ripresa con videocamera Samsung HMX-H200SP full HD 1920 x 1080 zoom
 02:07
02:07
2 micini si puliscono a vicenda, bellissimo! Samsung HMX-H200SP full HD 1920 x 1080
 12:30
12:30
Samsung HMX-W300 (test video)
 11:57
11:57
Samsung HMX-H205 unboxing and review — H203, H204, H200, HD Camcorder
НАСТРОЙКА РЕЖИМОВ РАБОТЫ
Режим работы можно изменять в
следующем порядке каждый раз при
нажатии кнопки MODE.
Режим записи (
)
↕
Режим
воспроизведения ( ).
•
Каждый раз при изменении режима
работы загорается индикатор
соответствующего режима.
•
Если нажать вкладку
воспроизведения (
)
в
режиме записи видео или
фотосъемки, включается режим
воспроизведения видео или
фотографий.
Режим
Индикатор режима
Функции
Режим записи
Запись и воспроизведение видео
Режим
воспроизведения
Съемка и просмотр фотографий
Эта камера предоставляет один режим записи, который сочетает в себе режимы записи
видео и фото. Благодаря этому вы можете легко записывать видеофайлы и фотографии в
одном режиме без необходимости изменять режим записи.
23
Индикатор режима
Кнопка MODE
STBY
00:00:00 [307Min]
MENU
9999
Вкладка
воспроизведения

Использование кнопки дисплея(), Использование сенсорной панели, Основные операции с видеокамерой
Использование кнопки дисплея( ), Переключение режима отображения информации
- Изображение
- Текст
ИСПОЛЬЗОВАНИЕ СЕНСОРНОЙ ПАНЕЛИ
С помощью сенсорной панели можно
записывать и воспроизводить файлы
одним нажатием пальца.
Придерживая рукой заднюю часть
ЖК-панели, прикасайтесь к
элементам, отображающимся на
экране.
•
Не размещайте защитную экранную пленку (не прилагается) на ЖК-экране.
•
Если пленка используется продолжительное время, на поверхности экрана возникает
сильное сцепление, которое может привести к неисправности сенсорной панели.
•
Будьте осторожны при использовании сенсорной панели и не нажимайте кнопки,
расположенные рядом с ЖК-панелью.
•
Отображение на ЖК-панели вкладок и индикаторов зависит от состояния записи/
воспроизведения в этот момент.
•
Предупреждающие индикаторы и сообщения могут отображаться в зависимости от
условий записи.
•
Кнопка дисплея (
)
не работает в меню или на экране быстрого меню.
Можно переключить режим отображения экранной информации.
Нажмите кнопку дисплея (
).
•
Режимы полного и минимального отображения будут
переключаться.
ИСПОЛЬЗОВАНИЕ КНОПКИ ДИСПЛЕЯ(
)
Переключение режима отображения информации
основные операции с видеокамерой
24
STBY
00:00:00 [307Min]
MENU
9999
Сенсорная панель
<
Режим минимального отображения>
STBY
<
Режим полного отображения>
STBY
00:00:00 [307Min]
9999
MENU

Начальные настройки, Начальная установка часового пояса и даты/времени, Встроенная аккумуляторная батарея
Зарядка встроенной аккумуляторной батареи
- Изображение
- Текст
начальные настройки
Встроенная аккумуляторная батарея
•
В комплект поставки видеокамеры входит встроенная аккумуляторная батарея, которая
сохраняет настройки времени и даты даже после отключения питания.
•
Когда батарея полностью разряжена, предыдущие настройки даты и времени сбрасываются
и устанавливаются настройки по умолчанию. В этом случае необходимо зарядить встроенную
аккумуляторную батарею. Затем необходимо снова установить дату/время.
Зарядка встроенной аккумуляторной батареи
•
Встроенная батарея всегда заряжается, когда видеокамера подключена к переменному току,
а также при подсоединении батарейного блока.
•
Если видеокамера не используется в течении двух недель без подключения к переменному
току или присоединения батарейного блока, встроенная батарея полностью разряжается.
В таком случае необходимо зарядить встроенную батарею, подключив ее к прилагаемому
адаптеру переменного тока на 24 часа.
НАЧАЛЬНАЯ УСТАНОВКА ЧАСОВОГО ПОЯСА И
ДАТЫ/ВРЕМЕНИ
При включении видеокамеры впервые установите дату и время для своего региона.
1. Откройте ЖК-экран, чтобы включить видеокамеру.
•
Питание включается при открытии ЖК-панели.
•
Отобразится экран часового пояса («Дом«) с настройкой
для Лиссабона и Лондона.
•
Также можно установить текущий часовой пояс в меню
«
Настройка«.
¬
стр. 76
2. Выберите свой регион на карте, касаясь левой (
)
или
правой (
)
вкладки на ЖК-экране, затем нажмите вкладку
(
).
•
Отобразится экран «Настр. часов«.
3. Выберите информацию о дате и времени, затем измените
настройки с помощью вкладок перехода вверх ( ) или
вниз ( ).
4. Убедитесь, что часы настроены правильно, затем выберите
вкладку ( ).
•
Отобразится сообщение «Настр. часов«.
•
Согласно элементу «Дом» для года можно задать значение не больше 2037.
•
Установите для дисплея «Отобр. дат/врем» параметр «Вкл.» ¬стр. 78
•
После выбора значка ( ) время будет переведено на час вперед.
25
OK
Дом
[GMT 00:00] 01/01/2010 00:00
Лондон, Лиссабон
OK
1 / 1
Настр. часов
2009
Year
01
Month
06
Day
11
Hr
55
Min
AM
Уст.дата/вр.
01/01/2010 00:00
OK
Настр. часов
Month
00
Hr
00
Min
Day
Year
/
/
:
01
01
2010

Элементы подменю
“English”
“한국어” “Français” “Deutsch”
“Italiano”
“Español” “Português” “Nederlands”
“Svenska”
“Suomi” “Norsk”
“Dansk”
“Polski”
“
Čeština” “Slovensky” “Magyar”
“Român
ă” “Български” “Ελληνικά” “Srpski”
“Hrvatski”
“
Українська” “Русский” “፩ၭ”
“
瀌煓铅” “ไทย”
“Türkçe” “
”
“
”
“
”
ВЫБОР ЯЗЫКА
Можно выбрать язык для отображения меню экрана или сообщений.
Настройки языка сохраняются при выключении видеокамеры.
1. Нажмите вкладку мен (
)
настройки ( ).
2. Используйте вкладку перехода вверх (
)/
вниз ( ), пока
не отобразится параметр «Language«.
3. Нажмите параметр «Language«, затем выберите
необходимый язык экранного меню.
4. Нажмите вкладку выхода ( ) или возврата (
),
чтобы
завершить настройку.
•
Экран меню и сообщения отображаются на выбранном
языке.
•
Параметр «Language» может быть изменен без предварительного уведомления.
•
Выбранный язык сохраняется даже без батарейного блока или адаптера переменного тока.
•
Формат даты и времени может изменяться в зависимости от выбранного языка.
начальные настройки
26
English
한국어
1/8
Language
Français
Deutsch
6/6
Демо
Language
Anynet+ (HDMI-CEC)
По умолчанию

ВЫБОР НОСИТЕЛЯ
(ТОЛЬКО ДЛЯ МОДЕЛИ HMX-H203/H204/H205)
Видеоизображения и фотографии можно сохранять на встроенной памяти или карте
памяти, поэтому перед началом записи или воспроизведения необходимо выбрать
нужный носитель.
ПРЕДВАРИТЕЛЬНАЯ ПРОВЕРКА!
•
На данной видеокамере можно использовать карты памяти SDHC и SD.
(
Карты памяти некоторых производителей и типов не поддерживаются.)
•
Перед вставкой или извлечением карты памяти выключите видеокамеру.
1. Нажмите вкладку мен (
)
настройки ( ).
2. Используйте вкладку перехода вверх (
)/
вниз ( ), пока не
отобразится параметр “Тип носителя.”
3. Выберите параметр “Тип носителя”, а затем выберите
нужный носитель.
подготовка к началу записи
•
Никогда не форматируйте встроенную память или карту памяти, используя ПК.
•
При вставке карты памяти отображается экран настройки носителя. Нажмите “Да”, если
необходимо использовать карту памяти, в противном случае нажмите “Нет”.
•
Во время записи, воспроизведения, форматирования, удаления или при выполнении других
операций с носителем не извлекайте батарейный модуль и не отключайте адаптер переменного
тока. Это может привести к повреждению носителя или имеющихся на нем данных.
•
Не извлекайте карту памяти, когда она используется в видеокамере. Это может привести к
повреждению карты памяти и данных, хранящихся на ней.
•
Доступ можно также получить с помощью кнопки Q.MENU.
• SSD-
диск, основой которого является флэш-память, используется в видеокамере в
качестве встроенной памяти.
Элементы подменю
•
Память (
):
при использовании встроенной памяти (SSD, Solid State Drive).
•
Карта (
):
при использовании карты памяти (карта памяти SDHC или SD).
27
1/ 7
Ииф. o накoпителe
Форматировать
Номер файла
Тип носителя
Память
Карта
1/1
Тип носителя

Подготовка к началу записи, Установка карты памяти, Для извлечения карты памяти
Страница 36
- Изображение
- Текст
Установка карты памяти
1. Откройте крышку гнезда карты памяти.
2. Вставьте карту памяти в гнездо до
легкого щелчка.
•
Убедитесь, что логотоп карты
SD/SDHC
направлен вверх, а
видеокамера расположена так, как
показано на рисунке.
3. Закройте крышку отсека для карты
памяти.
Для извлечения карты памяти
1. Откройте крышку гнезда карты памяти.
2. Осторожно нажмите карту памяти,
чтобы извлечь ее.
3. Закройте крышку отсека для карты
памяти.
ВСТАВКА / ИЗВЛЕЧЕНИЕ КАРТЫ ПАМЯТИ
(НЕ ВХОДИТ В КОМПЛЕКТ ПОСТАВКИ)
•
Чтобы избежать потери данных, выключите видеокамеру, удерживая кнопку питания ( )
на протяжении секунды, прежде чем вставить или извлечь карту памяти.
•
Не нажимайте сильно на карту памяти. Карта памяти может выскочить.
Видеокамера поддерживает только карты SD (Secure Digital) и SDHC (Secure Digital High
Capacity).
Совместимость карт памяти с видеокамерой зависит от изготовителя и их типов.
подготовка к началу записи
28
Место наклейки

Совместимые карты памяти
•
Видеокамера поддерживает карты
SD(Secure Digital)
и SDHC(Secure
Digital High Capacity).
Рекомендуется
использовать карту SDHC (Secure Digital
High Capacity).
Камера поддерживает
карты SD объемом до 2 ГБ. Карты SD
объемом более 2 ГБ не гарантируют
нормальную работу видеокамеры.
•
Карты памяти MMC (Multi Media Card)
и MMC Plus не поддерживаются.
•
Объем совместимых карт памяти:
SD 1 – 2
ГБ, SDHC 4 – 32 ГБ
•
Используйте торговые марки
совместимых карт памяти. Работа
других не гарантируется. Проверьте
совместимость при покупке карты памяти.
—
Карты SDHC/SD: Panasonic, SanDisk,
TOSHIBA
•
Для записи видео используйте карту
памяти, поддерживающую высокие
скорости записи (карты более поздних
версий, чем SDHC класса 6).
•
Карты памяти SD/SDHC оснащены
механическим переключателем защиты
от записи. Установка переключателя
предотвращает случайное стирание
файлов, записанных на карту. Чтобы
разрешить запись, передвиньте
переключатель вверх по направлению к
контактам. Чтобы установить защиту от
записи, передвиньте переключатель вниз.
Карты SDHC (Secure Digital High Capacity)
•
Карта памяти SDHC (Secure Digital
High Capacity)
—
Карта SDHC является более новой
версией (Ver.2.00) карты SD и
поддерживает объем памяти более
2
ГБ.
—
Не может использоваться с
текущими устройствами узла,
которые поддерживают SD.
Основные меры предосторожности
при использовании карты памяти
•
Поврежденные данные могут быть
утеряны. Рекомендуется сохранять
резервные копии важных данных на
жестком диске ПК.
•
Отключение питания или извлечение
карты памяти при выполнении
операций форматирования, удаления,
записи и воспроизведения может
привести к потере данных.
•
После изменения на ПК имени
файла или папки, хранящейся на
карте памяти, видеокамера может не
распознать измененный файл.
Использование карты памяти
•
Во избежание потери данных рекомендуется
выключать питание перед установкой карты
памяти или ее извлечением.
•
Использование карт памяти,
отформатированных на других
устройствах, не гарантируется.
Необходимо отформатировать карту
памяти с помощью этой видеокамеры.
•
Следует отформатировать новые карты
памяти, а также карты памяти с данными,
не распознаваемыми этой видеокамерой
или сохраненными с помощью других
устройств. Обратите внимание, что при
форматировании удаляются все данные,
хранящиеся на карте памяти.
ВЫБОР ПОДХОДЯЩЕЙ КАРТЫ ПАМЯТИ
(НЕ ВХОДИТ В КОМПЛЕКТ ПОСТАВКИ)
29
Контакты
Защита от записи
<SD/SDHC>
Используемые карты памяти
(1 ГБ~32 ГБ)

•
Если не удается использовать карту
памяти, которая ранее использовалась
на другом устройстве, отформатируйте
ее на данной камере ВЧ. Обратите
внимание, что при форматировании
удаляется вся информация,
хранящаяся на карте памяти.
•
Карта памяти имеет ограниченный
срок службы. Если не удается
записать новые данные, необходимо
приобрести новую карту памяти.
•
Карту памяти не следует сгибать,
ронять или ударять.
•
Не кладите посторонние предметы
на контакты карты памяти. При
необходимости используйте мягкую
сухую ткань для очистки разъемов.
•
На месте наклейки не должно быть
ничего постороннего, только сама
наклейка.
•
Храните карту памяти в недоступном
для детей месте, чтобы они не могли
проглотить ее.
Примечание по использованию
•
Компания Samsung не несет
ответственности за потерю
данных вследствие неправильного
использования.
•
Во избежание потери данных
вследствие перемещения и
статического электричества
рекомендуется использовать футляр
для карты памяти.
•
При длительном использовании карта
памяти может нагреваться.
Это нормальное явление и не является
признаком неисправности.
Видеокамера поддерживает карты
памяти SD и SDHC для хранения данных.
Скорость передачи данных может
различаться в зависимости от
производителя и системы производства
карт.
•
Система SLC (одноуровневая
ячейка): включена более высокая
скорость записи.
•
Система MLC (многоуровневая
ячейка): поддерживается только
малая скорость записи.
Для обеспечения наилучших результатов
рекомендуется использовать карту
памяти, поддерживающую более
высокую скорость записи.
При записи видео на карту памяти
с меньшей скоростью записи могут
возникнуть некоторые трудности с
хранением видео на карте памяти.
Возможна даже потеря видеоданных во
время записи.
В целях сохранения каждого бита
записываемого видео видеокамера
принудительно записывает видео
на карту памяти и отображает такое
предупреждение:
“
Низкоскоростная карта. Уменьшите
качество записи.”
При использовании карты памяти
с более низкой скоростью записи
разрешение и качество записи может
быть ниже установленного значения.
¬
стр. 54
Однако чем выше разрешение и
качество записи, тем больше памяти
используется.
подготовка к началу записи
30

Разрешение
Качество
Носитель (объем)
1
ГБ
2
ГБ
4
ГБ
8
ГБ
16
ГБ
32
ГБ
[HD]1080/50i*
Оч. выс.
8
мин
15
мин
30
мин
61
мин
125
мин
253
мин
Высокое*
9
мин
18
мин
36
мин
74
мин
152
мин
307
мин
Нормал.
12
мин
23
мин
46
мин
94
мин
193
мин
390
мин
[HD]720/50p
Оч. выс.
11
мин
21
мин
42
мин
86
мин
177
мин
357
мин
Высокое*
14
мин
28
мин
57
мин
115
мин
235
мин
475
мин
Нормал.
21
мин
42
мин
84
мин
171
мин
351
мин
708
мин
[SD]576/50p
Оч. выс.
32
мин
63
мин
126
мин
254
мин
521
мин
1051
мин
Высокое*
42
мин
83
мин
166
мин
336
мин
688
мин
1387
мин
Нормал.
62
мин
123
мин
244
мин
494
мин
1011
мин
2039
мин
(
Единица измерения: приблизительная продолжительность записи в минутах)
Разрешение фото
Носитель (объем)
1
ГБ
2
ГБ
4
ГБ
8
ГБ
16
ГБ
32
ГБ
2880×1620*
656
1251
2482
5014
9999
9999
1920×1080
1173
2346
4654
9402
9999
9999
(
Единица измерения: приблизительное количество изображений)
ВРЕМЯ ЗАПИСИ И КОЛИЧЕСТВО ИЗОБРАЖЕНИЙ
1 ГБ ⴊ 1000 000 000 байт. : Реальная емкость может быть меньше, поскольку часть памяти
используется внутренней микропрограммой.
Время для записи видео
Количество фотографий для записи
•
Цифры в таблице могут отличатся в зависимости от объекта и условий записи.
•
Чем выше качество и разрешение записи, тем больше памяти используется.
•
Низкое разрешение и качество увеличивают коэффициент сжатия и время записи, но
качество изображения может снизиться.
•
Скорость передачи автоматически настраивается согласно записываемому изображению.
Соответственно время записи может отличаться.
•
Карты памяти объемом более 32 ГБ могут работать ненадлежащим образом.
•
Максимальный размер видео, который можно записать за один раз – 1,8 ГБ.
•
Максимальное количество записываемых фотографий и видеофайлов – 9999.
•
Указанные выше пункты со значком * обозначают настройки по умолчанию.
•
Продолжительность съемки в режиме длительной записи может отличаться в зависимости
от настроек.
31

Прикрепление ремня для захвата, Настройка жк-экрана, Подготовка к началу записи
Страница 40
- Изображение
- Текст
ПРИКРЕПЛЕНИЕ РЕМНЯ ДЛЯ ЗАХВАТА
Отрегулируйте длину ремня для захвата так, чтобы камера ВЧ находилась в
стабильном положении при нажатии кнопки Начало/остановка записи.
НАСТРОЙКА ЖК-ЭКРАНА
Широкий ЖК-экран видеокамеры предлагает высокое качество просмотра изображений.
1. Откройте ЖК-экран.
•
Экран открывается на 90°.
2. Поверните ЖК-экран по направлению к
объективу.
•
Можно поворачивать экран до 180° в
направлении объектива и до 90° в
обратном направлении. Для более
удобного просмотра записей поверните
экран на 180° в направлении объектива
и прижмите его к корпусу видеокамеры.
Чрезмерное вращение может привести к повреждению петли, соединяющей экран и
видеокамеру.
Снимайте отпечатки и пыль с экрана мягкой тканью.
Обратите внимание на то, что в случае применения излишнего усилия при попытке вставить
руку под ремешок тогда, когда он затянут слишком туго, возможно повреждение крючка
видеокамеры.
подготовка к началу записи
32

Комментарии
Словно из рога изобилия сыплет Samsung новыми разработками на бедные головы пользователей. Купивший два-три месяца назад «свеженькую» видеокамеру озадаченно чешет затылок, наблюдая нахальное появление ещё более новой модели. Вот и гадай: не поспешил ли?
Трагические обстоятельства сложились так, что на коробке с видеокамерой чья-то инженерная рука вывела вот такую фразу: «H300 60% working sample». А потому не будем слишком суровы в оценке характеристик камеры, представим настоящий обзор как знакомство с основными, ключевыми особенностями нового аппарата.
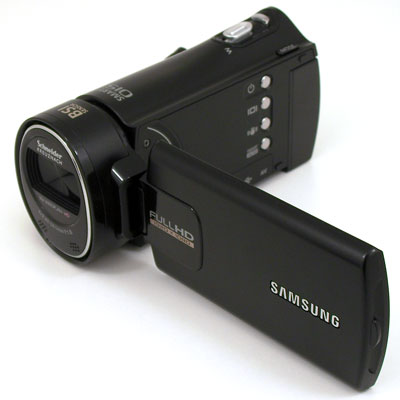
Конструкция, технические характеристики
Перечислим лишь те аксессуары, которые оказались в коробке с этим инженерным экземпляром. Сетевой адаптер, кабель USB и аудио/видеокабель для композитного подключения к ТВ. Это всё, никаких излишеств. Вполне может быть, что в магазинах вы встретите более щедрый ассортимент дополнений. Хотя, если подумать, из существующего комплекта вполне можно даже кое-что и выкинуть. Например, USB-шнурок — ну у кого сейчас нет этого добра?
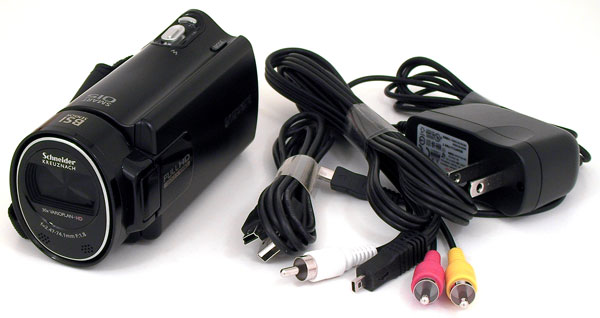
Корпус камеры выполнен целиком из пластика, никаких металлических вставок не имеется. Фотовспышки у аппарата нет, как нет и системы автоматического открывания шторок, защищающих объектив. Под объективом расположены отверстия, за которыми прячется стереомикрофон — вот и вся примечательность лица камеры.
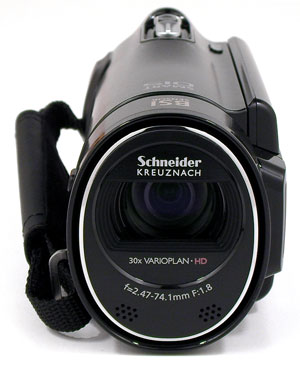
Органы управления имеют стандартную для подобных любительских камер раскладку. В верхней части корпуса размещён рычажок зуммирования, рядом с ним — кнопка Photo. С торца, под большим пальцем правой руки, имеется кнопка Rec. Ход её составляет 2 миллиметра, нажатие ощущается вполне отчётливо. Над ЖК-экраном находится кнопка Mode, переводящая видеокамеру из режима камкордера в режим плеера и обратно.
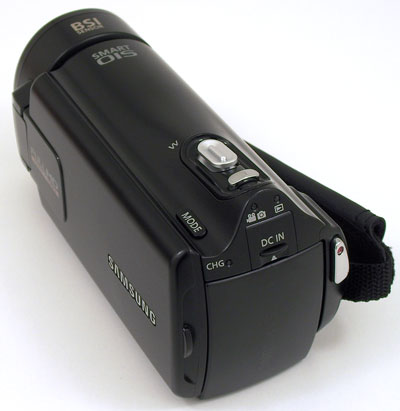
Та сторона корпуса, к которой прикасается ладонь оператора, имеет вставку из шероховатой пластмассы, а ближе к торцу можно видеть несколько узких прорезей — это встроенный довольно громкий динамик. На объективе имеется рычажок, которым вручную открываются и закрываются шторки объектива. На морозе эти шторки закрываются не до конца. Скорее всего, тут сыграл роль тот факт, что камера эта — наполовину работающий экземпляр.
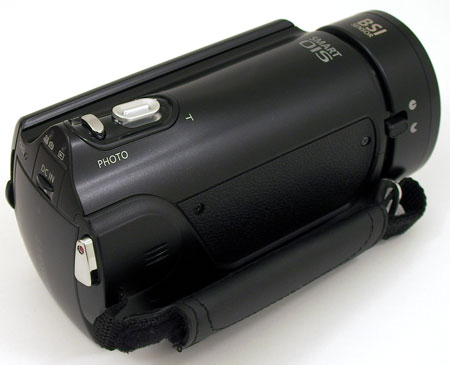
Под ЖК-экраном виден вертикальный ряд кнопок: принудительное выключение аппарата, кнопка скрытия/отображения служебной информации на ЖК-экране, кнопка изменения режимов работы оптического стабилизатора и, наконец, волшебная кнопка Smart Auto, переводящая камеру в режим автоматической съёмки.
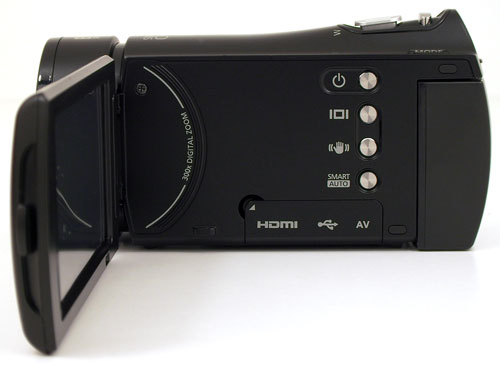
Чуть ниже имеется откидная подпружиненная крышечка, под которой встроены HDMI-выход, порт USB 2.0 и композитный аудио/видеовыход.
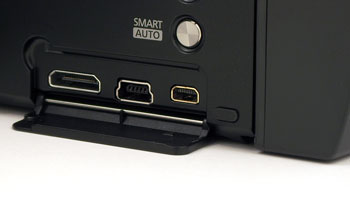
ЖК-экран в камере сенсорный, глянцевый. Соответственно, и пачкается так, как пачкаются все сенсорные глянцевые экраны. Только и знай, протирай от противных пальцевых отпечатков. Программный интерфейс вполне устраивает, неплохо продуман: до основных параметров можно добраться буквально в два-три нажатия.
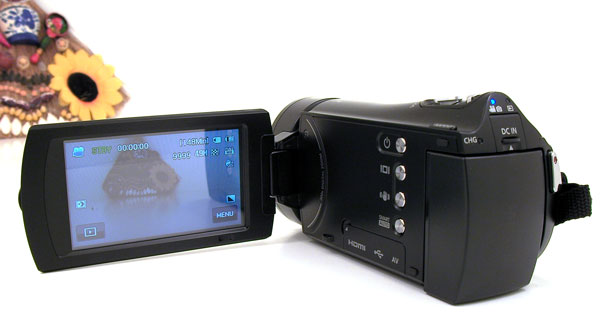
Карта памяти — единственный в данной модели носитель информации — вставляется в слот, расположенный под откидной крышкой почти в дне камеры.
Аппарат комплектуется литиево-ионным аккумулятором IA-BP210R ёмкостью 2060 мА·ч. С полностью заряженным аккумулятором камера в состоянии вести непрерывную запись в течение двухсот (200!) минут с закрытым ЖК-экраном. Если ЖК-экран открыт, то время работы остаётся практически неизменным: 197 минут. Тестирование проводилось при комнатной температуре, запись велась в режиме 1280×720 60p. Очень и очень неплохой результат для HD-видеокамеры. А фактическое отсутствие разницы в энергопотреблении с открытым и закрытым экраном, мягко скажем, обескураживает.
Краткие технические характеристики видеокамеры приведены в таблице:
| Параметр | Значение |
Объектив
|
|
- 200 мин с закрытым ЖК-экраном
- 197 мин с открытым ЖК экраном
- композитный выход аудио/видео
- HDMI
- USB
- сенсорный LCD-монитор 3,0″
- оптический стабилизатор изображения + электронный (OIS Duo)
- запись с закрытым ЖК-экраном
- зарядка аккумулятора при подключении к ПК по USB
- Smart Record Pause
Более подробные сведения в скором времени можно будет увидеть на сайте компании.
Видео/фотосъёмка
Разумеется, первое, что интересует — это тридцатикратный оптический зум камеры. Нешуточная кратность для такой малышки.
Да, зум хорош, ничего не скажешь! Просто шпионский инструмент какой-то. Кстати, при максимальном зуме можно заметить намёк на эффект с названием «роллинг шаттер», а точнее, на одно из проявлений такого эффекта. Оно выражается в наличии постоянного искажения картинки, так, словно съёмка ведётся сквозь прозрачное колышущееся желе. Что поделать, таков результат применения MOS-матрицы с большим количеством пикселей. Похоже, все видеокамеры в скором времени будут иметь этот эффект, а пользователям нужно будет всерьёз поменять мировоззрение, дабы не замечать постоянное колыхание кадра. Ну а тем, кто не желает переучиваться с правой на левую, можно посоветовать качественный штатив. И забыть о съёмке с руки.
Имеющаяся в камере двойная система стабилизации изображения называется OIS-Duo и состоит из оптического стабилизатора, «усиленного» электронным. Отдельная кнопка, расположенная на корпусе камеры, позволяет переключаться между режимами: съёмка без стабилизатора, съёмка только с оптическим стабилизатором (OIS) и съёмка с оптическим и электронным стабилизатором (OIS Duo). Впрочем, словами — это одно; лучше всё-таки просмотреть ролик, где эти режимы показаны в действии:
Похоже, при активном движении лучше всего использовать один OIS, без электронного помощника. А вот OIS-Duo имеет смысл включать, когда оператор неподвижен, а съёмка ведётся с руки и на большом зуме. Кстати, вы обратили внимание на звук? Точнее, на дребезжание, возникающее, когда камера записывает низкочастотный шум, исходящий от двигателя автомобиля. Скорее всего, мы слышим последствия той самой 60%-й надписи на коробке камеры. То же относится и к звуку, который сопровождает работу трансфокатора (в тишине хорошо слышны жужжание и кваканье привода зума). Надеемся, что экземпляры, которые поступят в продажу, будут лишены этих недостатков.
Автоматика неплохо работает даже при ночной съёмке. Автофокус довольно быстро схватывает объекты, несмотря на плохое освещение. Ну а зум. Луна — как на ладони.
Различие в детализации видео при использовании разных видеорежимов можно оценить по следующим стоп-кадрам и прилагаемым роликам:


1920×1080 50i 18 Мбит/с (ролик)
1280×720 50p 16 Мбит/с (ролик)
720×576 50p 6 Мбит/с (ролик)
И снова, точно как в случае с рассмотренной ранее видеокамерой Samsung HMX-Q10, после внимательного рассмотрения стоп-кадров и роликов может показаться, что наиболее предпочтительным вариантом съёмки в данном аппарате является 1280×720. Что-ж, вполне возможно, это будет справедливым решением. Режим с наибольшим размером кадра выглядит недостаточно чётко, оставляя устойчивое ощущение обычного апскейла. К тому же режим Full HD не имеет прогрессивной развёртки, записывая видео в допотопном интерлейсе.
Фотоспособности видеокамеры не впечатляют. Не покидает ощущение, что с некоторых пор разработчики всех без исключения видеокамер и всех без исключения компаний дружно отказались от мысли, что их видеокамеры могут делать неплохие фотоснимки, на которые можно смотреть без раздражения. Но ведь делали же. Так что же мешает делать теперь, когда видеокамеры стали оснащать ещё и фотоматрицами?


Прилагаемое ПО
Прилагаемое программное обеспечение записано во встроенную память аппарата, недоступную для пользователя — все нынешние камеры Samsung снабжены таким решением. Ознакомиться с этим ПО можно, прочитав предыдущие обзоры видеокамер Samsung.
Тестирование в Imatest
Тестирование проводилось при естественном освещении, боковой свет.
Верхний график представляет собой краевой профиль, для которого приведено значение 10—90% rise distance в пикселях, а нижний график представляет собой MTF (Modular Transfer Function — функция передачи модуляции), для которой приведен параметр MTF50 в циклах на пиксель. Краевой профиль и MTF камеры показаны черной линией. Красной пунктирной линией обозначен краевой профиль и MTF, которые программа Imatest считает близкими к оптимальным. 10—90% rise distance и MTF50 также являются расчетными величинами Imatest.
График хроматической аберрации (на самом деле, это тот же краевой профиль, только построенный по каждому цвету в отдельности). При значении параметра CA (area) равного 0—0,5 хроматическая аберрация незаметна.
Тестирование в Colorcheck
Данная таблица хороша для визуальной оценки правильности цветопередачи.
Цвет внешнего квадрата представляет собой цвет, полученный с камеры, цвет внутреннего квадрата — цвет данного поля в эталонной таблице, приведенный к цвету, полученному с тестируемой камеры по яркости и контрастности. Если камера не ошиблась в цветопередаче на данном поле, то внутреннего квадрата просто не должно быть видно. Маленький прямоугольник в правой части внутреннего квадрата представляет собой цвет данного поля эталонной таблицы безо всяких преобразований.
Средняя строчка цифр показывает нам численную оценку ошибки баланса белого в единицах цветового пространства HSV. Так, цифры красного цвета обозначают ошибку по координате S — saturation (насыщенность), цифры синего цвета — в градусах Кельвина [Миредах (Mireds)]. При значении S 0,10 она видна, особенно на нейтральных полях большой яркости.
Нижняя линейка — это изображение шести нейтральных полей таблицы, на которых ошибка цветового баланса специально увеличена так, чтобы стать заметной (внешний квадрат), особенно в сравнении с эталонным цветом (внутренние квадраты — с коррекцией на яркость и контрастность без коррекции).

На следующей диаграмме в графической форме представлены отклонения зарегистрированных камерой цветов от идеала в цветовом пространстве CIE LAB. Данная диаграмма отклонения в Lab показывает на сколько камера дает ошибку при передаче цвета.
Фильтр
Решения и советы
Не удается найти нужные сведения? Мы поможем вам.
Онлайн
Задавайте вопросы и получайте ответы прямо в социальной сети
Проконсультируйтесь с техническим специалистом онлайн с 9 до 20 по МСК
Ответим на общие и технические вопросы в течение 24 часов
Оставьте жалобу или предложение
Телефонный звонок
Россия, бесплатно с городских и мобильных телефонов местных сотовых операторов
24 часа / 7 дней в неделю поддержка по мобильной технике
ПН — ВС, с 07 до 22 часов по Москве по другим продуктам
Азербайджан, бесплатно с городских и мобильных телефонов для абонентов Aze, Azercell, Azerfon, BakcelL, Catel
ПН — ВС, с 08 до 23 часов на русском языке
ПН — ВС, с 09 до 21 часа на азербайджанском языке
Армения, бесплатно: с городских и мобильных телефонов для абонентов Билайн и Юком; с мобильных телефонов для абонентов МТС; с городских телефонов для абонентов Ростелеком.
ПН — ВС, с 08 до 23 часов на русском языке
ПН — ВС, с 10 до 21 часов на армянском языке
Беларусь, бесплатно с городских и мобильных телефонов для абонентов МТС
ПН — ВС, с 07 до 22 часов
Грузия, бесплатно с городских и мобильных телефонов местных сотовых операторов
ПН — ВС, с 08 до 23 часов на русском языке
ПН — ПТ, с 09 до 21 часа на грузинском языке
Казахстан, бесплатно с мобильных телефонов для абонентов Activ, Beeline, Kcell, Altel, Tele2
ПН — ВС, с 10 до 01 часа на русском языке
ПН — ВС, с 10 до 22 часов на казахском языке
Казахстан, бесплатно с городских телефонов
ПН — ВС, с 10 до 01 часа на русском языке
ПН — ВС, с 10 до 22 часов на казахском языке
Кыргызстан, бесплатно с мобильных телефонов для абонентов Beeline, MegaСom, О!
ПН — ВС, с 10 до 01 часа на русском языке
ПН — ВС, с 10 до 22 часов на киргизском языке
Кыргызстан, бесплатно с городских телефонов
ПН — ВС, с 10 до 01 часа на русском языке
ПН — ВС, с 10 до 22 часов на киргизском языке
Молдова, оплата по тарифам оператора
ПН — ВС, с 07 до 22 часов на русском языке
ПН — ПТ, с 08 до 17 часов на румынском языке
Монголия, бесплатно с городских телефонов местных сотовых операторов
ПН — ПТ, с 09 до 18 часов
Таджикистан, бесплатно с мобильных телефонов для абонентов МегаФон, Tcell, Zet-Mobile
ПН — ПТ, с 09 до 24 часов на русском языке
ПН — ПТ, с 09 до 21 часа на таджикском языке
Таджикистан, бесплатно с городских телефонов
ПН — ПТ, с 09 до 24 часов на русском языке
ПН — ПТ, с 09 до 21 часа на таджикском языке
Узбекистан, бесплатно с мобильных телефонов для абонентов Beeline, Ucell
ПН — ВС, с 09 до 24 часов на русском языке
ПН — ВС, с 09 до 21 часа на узбекском языке
Узбекистан, бесплатно с городских телефонов
ПН — ВС, с 09 до 24 часов на русском языке
ПН — ПТ, с 9 до 22 часов; СБ — ВС, с 10 до 22 часов на узбекском языке
Украина, бесплатно с городских телефонов и мобильных телефонов местных сотовых операторов
24 часа / 7 дней в неделю
*Для получения информации по принтерам посетите веб-сайт HP .
Индивидуальная поддержка
Нужен ремонт или комплектующие? Приходите в сервисные центры Samsung
Бесплатная доставка вашего смартфона в сервисный центр и обратно курьером
Настроим, перенесем данные, обновим прошивку и обучим пользоваться смартфоном или планшетом
Нужна помощь?
Если нужна быстрая консультация, выберите вариант «Начать чат». Также можно отправить нам сообщение электронной почты, и мы свяжемся с вами в ближайшее время.
Закрыть всплывающее окно
Где указан номер модели?
Не удается найти номер модели? Выберите продукт
в меню ниже, чтобы узнать, где найти его номер.

- Тип носителя : перезаписываемая память (Flash)
- Поддержка видео высокого разрешения : Full HD 1080p
- Максимальное разрешение видеосъемки : 1920×1080
- Широкоформатный режим видео : есть
- Тип матрицы : CMOS
- Количество матриц : 1
- Матрица : 5 Мпикс
- Физический размер матрицы : 1/4″
- Фокусное расстояние объектива : 37.7 — 1128.9 мм
- Zoom оптический / цифровой : 30x / 45x
Купить
Здесь вы можете посмотреть видео обзор Samsung HMX-H430. Узнать характеристики, прочитать отзывы о Samsung HMX-H430.
Магазины, в которых можно купить этот товар и его аналоги
Видео обзоры Samsung HMX-H430
- Все 3
- Тесты 1
 Всякоразно изКитая теперь в HD качестве Samsung HMX H430BP
 Всякоразно изКитая теперь в HD качестве Samsung HMX H430BP
Характеристики Samsung HMX-H430
* Точные характеристики уточняйте у продавца.
Основные характеристики
| Тип носителя | перезаписываемая память (Flash) |
| Поддержка видео высокого разрешения | Full HD 1080p |
| Максимальное разрешение видеосъемки | 1920×1080 |
| Широкоформатный режим видео | есть |
Матрица
| Тип матрицы | CMOS |
| Количество матриц | 1 |
| Матрица | 5 Мпикс |
| Физический размер матрицы | 1/4″ |
Объектив
| Фокусное расстояние объектива | 37.7 — 1128.9 мм |
| Zoom оптический / цифровой | 30x / 45x |
| Выдержка | 1/10000 — 1/50 сек |
| Диафрагма | F1.8 — F3.8 |
| Ручная фокусировка | есть |
Возможности
| Стабилизатор изображения | есть |
| ЖК-экран | есть (3″, 230000 пикс.) |
| Видоискатель | нет |
| Баланс белого | авто, предустановки, ручная установка |
| Форматы записи | 576p, 720p, 1080i |
| Максимальная частота кадров при съемке HD-видео | 50 кадров/с при разрешениях 1280×720 и 1920×1080 |
| Дополнительные возможности | поддержка PictBridge, запись в H.264 |
Фоторежим
| Фоторежим | есть |
| Максимальное разрешение фотосъемки | 2944×1656 пикс |
| Широкоформатный режим фото | есть |
Носители и интерфейсы
| Интерфейсы | AV-выход, HDMI-выход, USB-интерфейс |
| Запись на карту памяти | есть |
| Поддержка карт памяти | SD, SDHC |
Дополнительные характеристики
| Минимальная освещенность | 3 люкс |
| Размеры (ШхВхГ) | 120x57x50 мм |
| Вес | 228 г |
* Точные характеристики уточняйте у продавца.
Плюсы и минусы Samsung HMX-H430
Отзывы о Samsung HMX-H430
Спасибо, ваш отзыв скоро появится на сайте.
Форум Samsung HMX-H430
Вопросы пользователей:
![]()
Добрый день, подскажите, нигде не могу информацию, поддерживает ли моя камера внешний микрофон,
Новые ответы на вопросы
Такой инструкции не будет. Смотрите разбор стиральной машины, а подшипники меняются примерно одинаково на всех, ни чего сложного.
Ремонт машинки
11 месяцев 2 дня назад
Гость
Проблема со сливом или не видит тен
Посудомойка индезит dif16 перед сушкой загораются 4 индикатора первых из 6
1 год 6 месяцев назад
manualsman
Проверьте провод питания. Если провод исправен, но так и не включается — несите в сервис!
Што может быть не включаеца
1 год 6 месяцев назад
manualsbot
болты сзади выкрутить. См инструкцию, траница 12
Убрать подставку
1 год 6 месяцев назад
manualsbot