Перейти к содержанию
На чтение 3 мин Просмотров 1.7к.
Роутер TP-Link TL-WR743ND, настройку которого мы сейчас разберем, может работать и как беспроводная точка доступа, и как клиент-маршрутизатор. Он позволяет подключаться к сети в районах, где отсутствует проводная инфраструктура Интернет. Может также функционировать как обычный wi-fi роутер. Маршрутизатор уже снят с производства, но его еще можно купить, например, с рук.
Содержание
- Характеристики
- Подготовка
- Настройка PPPoE
- Настройка PPtP
- Настройка Wi-Fi
- Проброс портов
- Обновление прошивки
- Сброс настроек
Характеристики
- 1xWan 100Mbit/s
- 4xLan 100Mbit/s
- Wi-Fi 11bgn 150Mbit/s
Подготовка
- Один конец патчкорда подключаем в любой желтый порт, второй конец – в ноутбук;
- Переходим на сайт 192.168.0.1 либо 192.168.1.1 нажимаем Enter; (не открывается?)
- В окне авторизации вводим логин – “admin“, пароль – “admin“.
Настройка PPPoE
- Слева в меню выбираем Сеть (Network) -> WAN
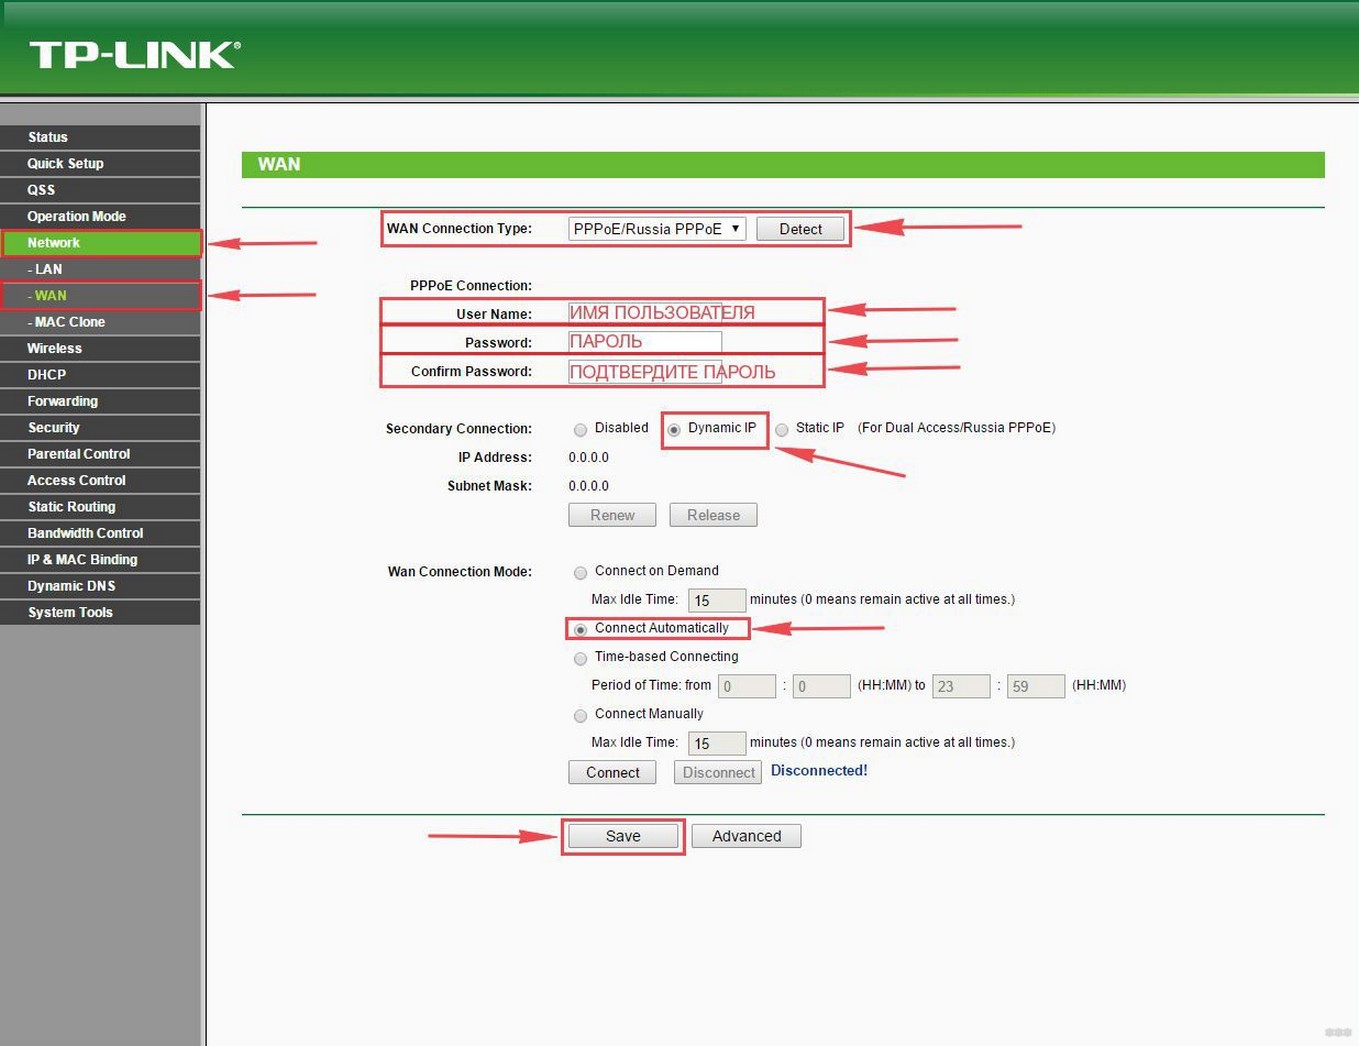
- Тип подключения WAN (WAN connection type): PPPoE/Russia PPPoE
- Набираем логин и пароль от Вашего провайдера
- Вторичное подключение (Secondary connection): Динамический IP (Dynamic IP)
- Режим подключения: подключить автоматически
- Нажать Сохранить (Save)
Подключение готово к использованию.

Настройка PPtP
- Слева в меню выбираем Сеть (Network) -> WAN
- Тип подключения WAN (WAN connection type): PPtP/Russia PPtP
- Набираем логин и пароль от Вашего провайдера
- Динамический IP (Dynamic IP) и заполняем IP-адрес сервера (выдается провайдером)
- Режим подключения: подключить автоматически
- Нажать Сохранить (Save)
Подключение готово к использованию.

Настройка Wi-Fi
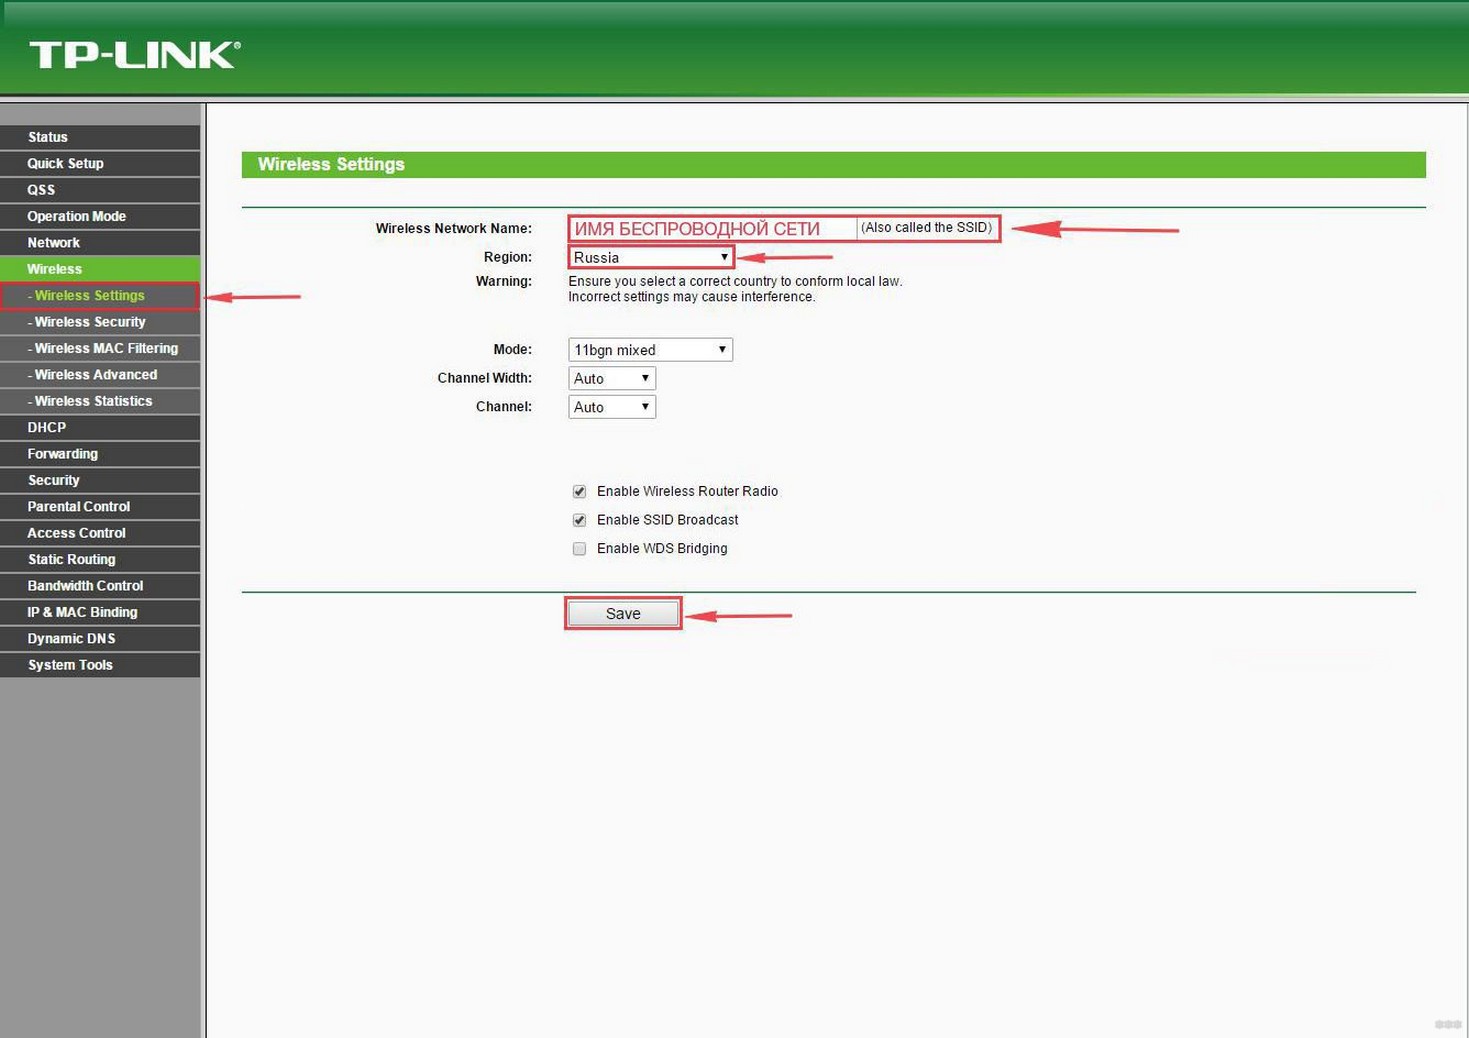
- Слева выбираем Беспроводной режим (Wireless)
- Заполняем поле Имя сети (Wireless Network Name). Латиницей! Это будет имя Вашей сети Wi-FI
- Сохраняем. Предложение перезагрузки пока игнорируем.
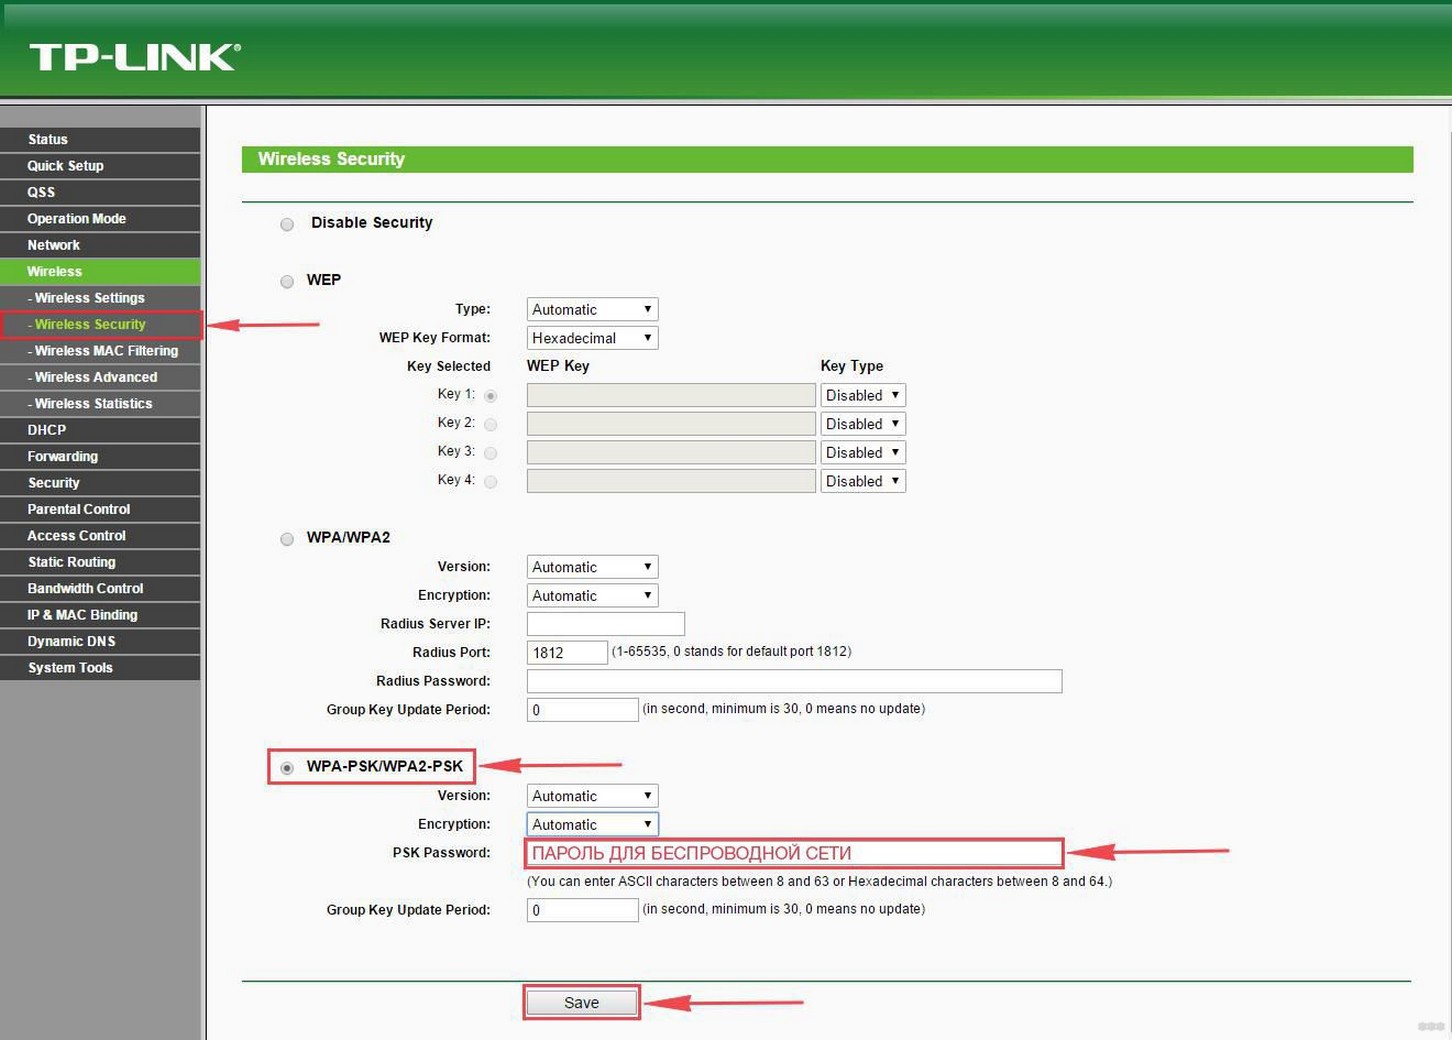
- Слева выбираем Защита беспр.режима (Wireless Security)
- Выбираем WPA/WPA2 – Personal
- Устанавливаем пароль, не менее 8 символов
- Сохранить
- Перезагружаем роутер, чтобы изменения вступили в силу.


Проброс портов
Если Вы желаете получить доступ из интернета к определенному устройству, серверу в Вашей локальной сети необходимо настроить проброс портов (перенаправление портов). Порты пробрасываются на определенный IP, т.е. сначала необходимо установить статичный IP-адрес устройству. А для этого нужен MAC адрес устройства. Итак.
- Запускаем командную строку
- Набираем команду ipconfig /all и нажимаем Enter
- Нам нужен физический адрес. Это и есть MAC-адрес сетевого адаптера.

- Заходим в настройки роутера, слева пункт DHCP – > Резервирование адресов (Address Reservation)
- Нажимаем кнопку Добавить новую (Add new)
- Вставляем MAC-адрес и заполняем IP-адрес
- Сохранить
Теперь роутер всегда будет выдавать устройству с данным MAC-ом статичный IP-адрес.

Настраиваем переадресацию портов:
Если желаете настроить переадресацию 80 порта, то предварительно необходимо поменять порт управления интерфейсом роутера:
- Слева выбираем раздел Безопасность (Security)
- Подраздел Удаленное управление (Remote Management)
- Установить другой порт
- Сохранить
- Перезагрузить роутер

Собственно и проброс портов:
- Слева выбираем раздел Переадресация (Forwarding)
- Нажимаем Добавить (Add new)
- Указываем порты и указываем IP-адрес компьютера
- Сохранить

Обновление прошивки
Как бы громко не звучало слово “прошивка”, процесс прошивки роутера очень простой. Предварительно необходимо скачать файл прошивки на компьютер (рекомендуем скачивать с официальных сайтов).
Есть вероятность того, что роутер перестанет работать (вероятность очень маленькая, но есть)
- Слева выбираем Системный инструменты (System Tools)
- Подпункт Обновление встроенного ПО (Firmware Upgrade)
- Нажимаем кнопку Выберите файл
- Указываем путь к файлу с прошивкой
- Нажимаем Обновить (Upgrade)

Сброс настроек
- Слева выбираем Системные инструменты (System tools)
- Выбираем Заводские настройки (Factory Defaults)
- Нажимаем кнопку Восстановить (Restore)

-
Contents
-
Table of Contents
-
Bookmarks
Quick Links
TL-WR743ND
150Mbps Wireless AP/Client Router
Rev: 2.0.0
1910010644
Related Manuals for TP-Link TL-WR743ND
Summary of Contents for TP-Link TL-WR743ND
-
Page 1
TL-WR743ND 150Mbps Wireless AP/Client Router Rev: 2.0.0 1910010644… -
Page 2: Fcc Statement
Specifications are subject to change without notice. is a registered trademark of TP-LINK TECHNOLOGIES CO., LTD. Other brands and product names are trademarks or registered trademarks of their respective holders. No part of the specifications may be reproduced in any form or by any means or used to make any derivative such as translation, transformation, or adaptation without permission from TP-LINK TECHNOLOGIES CO., LTD.
-
Page 3: Ce Mark Warning
FCC RF Radiation Exposure Statement This equipment complies with FCC RF radiation exposure limits set forth for an uncontrolled environment. This device and its antenna must not be co-located or operating in conjunction with any other antenna or transmitter. “To comply with FCC RF exposure compliance requirements, this grant is applicable to only Mobile Configurations.
-
Page 4: Industry Canada Statement
This device has been designed to operate with the antennas listed below, and having a maximum gain of 5 dBi. Antennas not included in this list or having a gain greater than 5 dBi are strictly prohibited for use with this device. The required antenna impedance is 50 ohms. To reduce potential radio interference to other users, the antenna type and its gain should be so chosen that the equivalent isotropically radiated power (e.i.r.p.) is not more than that permitted for successful communication.
-
Page 5
NCC Notice: 經型式認證合格之低功率射頻電機,非經許可,公司、商號或使用者均不得擅自變更頻率、加大功 率或變更原設計之特性及功能。 低功率射頻電機之使用不得影響飛航安全及干擾合法通信;經發現有干擾現象時,應立即停用,並 改善至無干擾時方得繼續使用。前項合法通信,指依電信法規定作業之無線電通信。低功率射頻電 機須忍受合法通信或工業、科學及醫療用電波輻射性電機設備之干擾。 Продукт сертифіковано згідно с правилами системи УкрСЕПРО на відповідність вимогам нормативних документів та вимогам, що передбачені чинними законодавчими актами України. — IV -… -
Page 6: Declaration Of Conformity
Person is responsible for marking this declaration: Yang Hongliang Product Manager of International Business Date of issue: 2012 TP-LINK TECHNOLOGIES CO., LTD . Building 24 (floors 1, 3, 4, 5), and 28 (floors 1-4) Central Science and Technology Park, Shennan Rd, Nanshan, Shenzhen, China…
-
Page 7: Table Of Contents
CONTENTS Package Contents……………………..1 Chapter 1. Introduction……………………2 Overview of the Router …………………..2 Conventions ……………………3 Main Features ……………………3 Panel Layout ……………………4 1.4.1 The Front Panel………………….4 1.4.2 The Rear Panel ………………….5 Chapter 2. Connecting the Router …………………7 System Requirements………………….7 Installation Environment Requirements …………….7 Connecting the Router ………………….7 Chapter 3.
-
Page 8
4.6.3 LAN……………………56 Wireless ……………………… 57 4.7.1 Wireless Settings………………..57 4.7.2 Wireless Security ………………..69 4.7.3 Wireless MAC Filtering ………………72 4.7.4 Wireless Advanced ………………..74 4.7.5 Wireless Statistics………………..75 DHCP ……………………..76 4.8.1 DHCP Settings………………… 76 4.8.2 DHCP Clients List ………………..78 4.8.3 Address Reservation ………………. -
Page 9
4.14 Bandwidth Control………………….105 4.14.1 Control Settings ………………..105 4.14.2 Rules List ………………….106 4.15 IP& MAC Bing Setting………………..107 4.15.1 Binding Settings………………..107 4.15.2 ARP List………………….109 4.16 Dynamic DNS……………………110 4.16.1 No-IP.com DDNS ………………..110 4.16.2 Dyndns.org DDNS ………………..111 4.16.3 Comexe.cn DDNS ………………..112 4.17 System Tools……………………113 4.17.1 Time Settings………………….113… -
Page 10: Package Contents
TL-WR743ND 150Mbps Wireless AP/Client Router Package Contents The following items should be found in your package: TL-WR743ND 150Mbps Wireless AP/Client Router DC Power Adapter for TL-WR743ND 150Mbps Wireless AP/Client Router One Power Injector Quick Installation Guide …
-
Page 11: Chapter 1. Introduction
The TL-WR743ND 150Mbps Wireless AP/Client Router supports five operation modes. The Client Router mode allows the TL-WR743ND to connect to the WISP and create a local area network via wireless connection. The Router mode enables the TL-WR743ND to work as a router for network sharing with high speed.
-
Page 12: Conventions
Before installing the Router, please look through this guide to know all the Router’s functions. 1.2 Conventions The Router or TL-WR743ND mentioned in this guide stands for TL-WR743ND 150Mbps Wireless AP/Client Router without any explanation. 1.3 Main Features Make use of IEEE 802.11n wireless technology to provide a wireless data rate of up to…
-
Page 13: Panel Layout
TL-WR743ND 150Mbps Wireless AP/Client Router 1.4 Panel Layout 1.4.1 The Front Panel Figure 1-1 Front Panel sketch The Router’s LEDs are located on the front panel (View from left to right). Name Status Indication Power is off. (Power) Power is on.
-
Page 14: The Rear Panel
And then release the button and wait the Router to reboot to its factory default settings. POWER: The Power socket is where you will connect the power adapter. Please use the power adapter provided with this TL-WR743ND 150Mbps Wireless AP/Client Router. ON/OFF: The switch for the power. …
-
Page 15
TL-WR743ND 150Mbps Wireless AP/Client Router INTERNET: This INTERNET port is where you will connect the DSL/cable Modem, or Ethernet. WPS: If you have client devices, such as wireless adapters, that support Wi-Fi Protected Setup, then you can press this button to quickly establish a connection between the Router and client devices and automatically configure wireless security for your wireless network. -
Page 16: Chapter 2. Connecting The Router
TL-WR743ND 150Mbps Wireless AP/Client Router Chapter 2. Connecting the Router 2.1 System Requirements Each PC in the LAN needs a working Ethernet Adapter and an Ethernet cable with RJ45 connectors TCP/IP protocol must be installed on each PC …
-
Page 17
Figure 2-1 Hardware Installation of the TL-WR743ND in Client Router mode Connect the notebook/PC to the LAN port of TL-WR743ND router with an Ethernet cable. Plug one end of the provided power adapter into the POWER jack of the router, and the other end to a standard electrical wall socket. -
Page 18
Router from the PC/notebook to set the Router in Repeater mode. Bridge with AP Mode Figure 2-4 Hardware Installation of the TL-WR743ND in Bridge with AP mode Plug one end of the provided power adapter into the POWER jack of the router, and the other end to a standard electrical wall socket. -
Page 19
Figure 2-5 Hardware Installation of the TL-WR743ND in Client mode Connect the PC to the LAN port of TL-WR743ND router with an Ethernet cable. Plug one end of the provided power adapter into the POWER jack of the router, and the other end to a standard electrical wall socket. -
Page 20: Chapter 3. Quick Installation Guide
TL-WR743ND 150Mbps Wireless AP/Client Router Chapter 3. Quick Installation Guide This chapter will show you how to configure the basic functions of your TL-WR743ND 150Mbps Wireless AP/Client Router using Quick Setup Wizard within minutes. 3.1 TCP/IP Configuration The default domain name of the TL-WR743ND 150Mbps Wireless AP/Client Router is http://tplinklogin.net, the default IP address is 192.168.0.1, and the default Subnet Mask is…
-
Page 21
TL-WR743ND 150Mbps Wireless AP/Client Router Figure 3-1 Success result of Ping command If the result displayed is similar to the Figure 3-2, it means the connection between your PC and the Router is failed. Figure 3-2 Failure result of Ping command… -
Page 22: Quick Installation Guide
192.168.0.2 ~ 192.168.0.254. 3.2 Quick Installation Guide With a Web-based utility, it is easy to configure and manage the TL-WR743ND 150Mbps Wireless AP/Client Router. The Web-based utility can be used on any Windows, Macintosh or UNIX OS with a Web browser, such as Microsoft Internet Explorer, Mozilla Firefox or Apple Safari.
-
Page 23: Configuration For Client Router Mode
TL-WR743ND 150Mbps Wireless AP/Client Router After a successfully login, you can click the Quick Setup menu to quickly configure your Router. Figure 3-5 Quick Setup Click Next, and then Operation Mode page will appear, as shown in Figure 3-6. Figure 3-6 Operation Mode …
-
Page 24
TL-WR743ND 150Mbps Wireless AP/Client Router Figure 3-7 WAN Connection Type The router in Client Router mode supports three popular ways to connect to the Internet. Please select the one compatible with your ISP. Click Next to enter the necessary network parameters. -
Page 25
TL-WR743ND 150Mbps Wireless AP/Client Router Figure 3-9 Static IP Note: The IP parameters should have been provided by your ISP. IP Address — This is the WAN IP address as seen by external users on the Internet (including … -
Page 26
TL-WR743ND 150Mbps Wireless AP/Client Router Wireless Name of WISP Station (SSID) — The SSID of the AP your Router is going to connect to as a client. You can also use the search function to select the SSID to join. -
Page 27
Local Wireless Name — Enter a string of up to 32 characters. The same Name (SSID) must be assigned to all wireless devices in your network. The default SSID is set to be TP-LINK _xxxxxx(xxxxxx indicates the last unique six characters of each Device’s MAC address), which can ensure your wireless network security. -
Page 28: Configuration For Router Mode
TL-WR743ND 150Mbps Wireless AP/Client Router Figure 3-14 Finish Note: You may click the Save button to save these settings as a text file for future reference. 3.2.2 Configuration for Router Mode When you choose Router on Operation Mode page as shown in Figure 3-6 , take the following steps: Click Next, and then WAN Connection Type page will appear as shown in Figure 3-15.
-
Page 29
TL-WR743ND 150Mbps Wireless AP/Client Router The Router provides Auto-Detect function and supports three popular ways Dynamic IP, PPPoE and Static IP to connect to the Internet. It’s recommended that you make use of the Auto-Detect function. If you are sure of what kind of connection type your ISP provides, you can select the very type and click Next to continue configuring. -
Page 30
TL-WR743ND 150Mbps Wireless AP/Client Router Figure 3-18 Quick Setup — Static IP Click Next to continue, the Wireless settings page will appear as shown in Figure 3-19. Figure 3-19 Quick Setup – Wireless Wireless Network Name (SSID) — Enter a value of up to 32 characters. The same … -
Page 31: Configuration For Repeater Mode
TL-WR743ND 150Mbps Wireless AP/Client Router Figure 3-20 Quick Setup – Finish Note: You may click the Save button to save these settings as a text file for future reference. 3.2.3 Configuration for Repeater Mode When you choose Repeater on Operation Mode page as shown in Figure 3-6 , take the following steps: Click Next, and then Wireless page will appear as shown in Figure 3-21.
-
Page 32
TL-WR743ND 150Mbps Wireless AP/Client Router Repeater Mode — Choosing WDS Repeater is to enable WDS, while choosing Universal Repeater is to disable WDS. If WDS is enabled, all traffic from wired networks will be forwarded in the format of WDS frames consisting of four address fields. If WDS is disabled, three address frames are used. -
Page 33
TL-WR743ND 150Mbps Wireless AP/Client Router Connect in the corresponding row. For example, the first item is selected. The target network’s SSID will be automatically filled into the corresponding box which is shown as the Figure 3-23. Figure 3-22 AP List Figure 3-23 … -
Page 34
TL-WR743ND 150Mbps Wireless AP/Client Router Figure 3-24 Quick Setup – Network DHCP Server — Enable or Disable the server. If you disable the Server, you must have another DHCP server within your network or else you must configure the IP address of the computer manually. -
Page 35: Configuration For Bridge With Ap Mode
TL-WR743ND 150Mbps Wireless AP/Client Router Figure 3-25 Quick Setup – Finish Note: You may click the Save button to save these settings as a text file for future reference. 3.2.4 Configuration for Bridge with AP Mode When you choose Bridge with AP on Operation Mode page in Figure 3-6 , the following steps: Click Next, and then Wireless Bridge Setting page will appear as shown in Figure 3-26.
-
Page 36
TL-WR743ND 150Mbps Wireless AP/Client Router Figure 3-26 Quick Setup – Wireless Bridge Setting Wireless Name of Remote AP — The SSID of the AP your Router is going to connect to as a client. You can also use the search function to select the SSID to join. -
Page 37
TL-WR743ND 150Mbps Wireless AP/Client Router Channel — This field determines which operating frequency will be used. The default channel is set to 6. It is not necessary to change the wireless channel unless you notice interference problems with another nearby access point. -
Page 38
Local Wireless Name — Enter a string of up to 32 characters. The same Name (SSID) must be assigned to all wireless devices in your network. The default SSID is set to be TP-LINK _xxxxxx(xxxxxx indicates the last unique six characters of each Device’s MAC address), which can ensure your wireless network security. -
Page 39
TL-WR743ND 150Mbps Wireless AP/Client Router Figure 3-30 Quick Setup – Network DHCP Server — Enable or Disable the server. If you disable the Server, you must have another DHCP server within your network or else you must configure the IP address of the computer manually. -
Page 40: Configuration For Client Mode
TL-WR743ND 150Mbps Wireless AP/Client Router Figure 3-31 Quick Setup – Finish Note: You may click the Save button to save these settings as a text file for future reference. 3.2.5 Configuration for Client Mode When you choose Client on Operation Mode page in Figure 3-6 , the following steps: Click Next, and then Wireless page will appear as shown in Figure 3-32.
-
Page 41
TL-WR743ND 150Mbps Wireless AP/Client Router Figure 3-32 Wireless Wireless Name of WISP Station (SSID) — The SSID of the AP your Router is going to connect to as a client. You can also use the search function to select the SSID to join. -
Page 42
TL-WR743ND 150Mbps Wireless AP/Client Router Click Survey button on the Wireless page as shown in Figure 3-32, and then AP List page will appear as shown in Figure 3-33. Find the SSID of the Access Point you want to access, and click Connect in the corresponding row. -
Page 43
TL-WR743ND 150Mbps Wireless AP/Client Router Figure 3-35 Quick Setup – Network DHCP Server — Enable or Disable the server. If you disable the Server, you must have another DHCP server within your network or else you must configure the IP address of the computer manually. -
Page 44
TL-WR743ND 150Mbps Wireless AP/Client Router Figure 3-36 Quick Setup – Finish Note: You may click the Save button to save these settings as a text file for future reference. — 35 -… -
Page 45: Chapter 4. Configuring The Router
TL-WR743ND 150Mbps Wireless AP/Client Router Chapter 4. Configuring the Router This chapter will show each Web page’s key functions and the configuration way. 4.1 Login After your successful login, you will see the sixteen main menus on the left of the Web-based utility.
-
Page 46: Quick Setup
TL-WR743ND 150Mbps Wireless AP/Client Router Figure 4-2 Router Status 4.3 Quick Setup Please refer to Section 3.2: «Quick Installation Guide.» 4.4 WPS This section will guide you to add a new wireless device to an existing network quickly by WPS Wi-Fi Protected Setup) function.
-
Page 47
TL-WR743ND 150Mbps Wireless AP/Client Router Figure 4-3 WPS WPS Status — Enable or disable the WPS function here. Current PIN — The current value of the Router’s PIN is displayed here. The default PIN of the Router can be found in the label or User Guide. -
Page 48
TL-WR743ND 150Mbps Wireless AP/Client Router Step 2: Press and hold the WPS/QSS button of the adapter directly for 2 or 3 seconds. Step 3: Wait for a while until the next screen appears. Click OK to complete the WPS configuration. -
Page 49
TL-WR743ND 150Mbps Wireless AP/Client Router The WPS Configuration Screen of Wireless Adapter Step 3: Wait for a while until the next screen appears. Click Finish to complete the WPS configuration. The WPS Configuration Screen of Wireless Adapter Method Three: Step 1: Keep the default WPS Status as Enabled and click the Add Device button in Figure 4-3, then the following screen will appear. -
Page 50
TL-WR743ND 150Mbps Wireless AP/Client Router Figure 4-4 Add A New Device Step 2: Choose “Press the button of the new device in two minutes” and click Connect. Step 3: For the configuration of the wireless adapter, please choose “Push the button on my access point or wireless router”… -
Page 51
TL-WR743ND 150Mbps Wireless AP/Client Router The WPS Configuration Screen of Wireless Adapter II. By PIN If the new device supports Wi-Fi Protected Setup and the PIN method, you can add it to the network by PIN with the following two methods. -
Page 52
TL-WR743ND 150Mbps Wireless AP/Client Router The WPS Configuration Screen of Wireless Adapter Note: In this example, the default PIN code of this adapter is 13492564 as the above figure shown. Method Two: Enter the PIN from my Router Step 1: Get the Current PIN code of the Router in Figure 4-3 (each Router has its unique PIN code. -
Page 53: Operation Mode
TL-WR743ND 150Mbps Wireless AP/Client Router Note: The default PIN code of the Router can be found in its label or the WPS configuration screen as Figure 4-3. You will see the following screen when the new device successfully connected to the network.
-
Page 54: Network
TL-WR743ND 150Mbps Wireless AP/Client Router WISP, the Wireless port works as a WAN port at Client Router mode. The Ethernet port acts as a LAN port. Router — In this mode, the device enables multi-users to share Internet via ADSL/Cable …
-
Page 55
TL-WR743ND 150Mbps Wireless AP/Client Router Figure 4-7 WAN – Dynamic IP This page displays the WAN IP parameters assigned dynamically by your ISP, including IP address, Subnet Mask, Default Gateway, etc. Click the Renew button to renew the IP parameters from your ISP. Click the Release button to release the IP parameters. -
Page 56
TL-WR743ND 150Mbps Wireless AP/Client Router Get IP with Unicast DHCP — A few ISPs’ DHCP servers do not support the broadcast applications. If you cannot get the IP Address normally, you can choose this option. (It is rarely required.) Click the Save button to save your settings. -
Page 57
TL-WR743ND 150Mbps Wireless AP/Client Router If your ISP provides a PPPoE connection, select PPPoE/Russia PPPoE option. Then you should enter the following parameters (Figure 4-9): Figure 4-9 WAN – PPPoE/Russia PPPoE User Name/Password — Enter the User Name and Password provided by your ISP. -
Page 58
TL-WR743ND 150Mbps Wireless AP/Client Router Connect on Demand — In this mode, the Internet connection can be terminated automatically after a specified inactivity period (Max Idle Time) and be re-established when you attempt to access the Internet again. If you want your Internet connection keeps active all the time, please enter “0”… -
Page 59
TL-WR743ND 150Mbps Wireless AP/Client Router Figure 4-10 PPPoE Advanced Settings MTU Size — The default MTU size is “1480” bytes, which is usually fine. It is not recommended that you change the default MTU Size unless required by your ISP. -
Page 60
TL-WR743ND 150Mbps Wireless AP/Client Router Figure 4-11 WAN – L2TP/Russia L2TP User Name/Password — Enter the User Name and Password provided by your ISP. These fields are case-sensitive. Dynamic IP/ Static IP — Choose either as you are given by your ISP. Click the Connect … -
Page 61
TL-WR743ND 150Mbps Wireless AP/Client Router disconnect from your Internet connection, and you will not be able to re-establish your connection automatically as soon as you attempt to access the Internet again. To use this option, check the radio button. If you want your Internet connection to remain active at all times, enter «0»… -
Page 62
TL-WR743ND 150Mbps Wireless AP/Client Router If you choose static IP and enter the domain name, you should also enter the DNS assigned by your ISP. And click the Save button. Click the Connect button to connect immediately. Click the Disconnect button to disconnect immediately. -
Page 63
TL-WR743ND 150Mbps Wireless AP/Client Router Figure 4-13 User Name/Password — Enter the User Name and Password provided by your ISP. These fields are case-sensitive. Auth Server — Enter the authenticating server IP address or host name. Auth Domain — Type in the domain suffix server name based on your location. -
Page 64: Mac Clone
TL-WR743ND 150Mbps Wireless AP/Client Router the number of minutes you want to have elapsed before your Internet access disconnects. Connect Automatically — The connection can be re-established automatically when it was down. Connect Manually click Connect/Disconnect button connect/disconnect immediately. This mode also supports the Max Idle Time function as Connect on Demand mode.
-
Page 65: Lan
TL-WR743ND 150Mbps Wireless AP/Client Router Figure 4-14 MAC Address Clone Some ISPs require that you register the MAC Address of your adapter. Changes are rarely needed here. WAN MAC Address — This field displays the current MAC address of the WAN port. If your …
-
Page 66: Wireless
TL-WR743ND 150Mbps Wireless AP/Client Router MAC Address — The physical address of the LAN ports, as seen from the LAN. The value can’t be changed. IP Address — Enter the IP address of your Router in dotted-decimal notation (factory default: …
-
Page 67
TL-WR743ND 150Mbps Wireless AP/Client Router Figure 4-17 Wireless Settings Wireless Name of WISP Station(SSID) — The SSID of the AP your Router is going to connect to as a client. You can also use the search function to select the SSID to join. -
Page 68
TL-WR743ND 150Mbps Wireless AP/Client Router Local Wireless Name — Enter a value of up to 32 characters. The same Name (SSID) must be assigned to all wireless devices in your network. Enable Wireless Router Radio — The wireless radio of the Router can be enabled or disabled … -
Page 69
TL-WR743ND 150Mbps Wireless AP/Client Router Figure 4-18 AP List — 60 -… -
Page 70
TL-WR743ND 150Mbps Wireless AP/Client Router Figure 4-19 Note: If you know the SSID of the desired AP, you can also input it into the field » Wireless Name of WISP Station» manually. Be sure to click the Save button to save your settings on this page. -
Page 71
TL-WR743ND 150Mbps Wireless AP/Client Router Figure 4-20 Wireless Settings Wireless Network Name (also called the SSID) — Enter a value of up to 32 characters. The same name of SSID (Service Set Identification) must be assigned to all wireless devices in your network. -
Page 72
TL-WR743ND 150Mbps Wireless AP/Client Router 11g only — Select if all of your wireless clients are 802.11g. 11n only- Select only if all of your wireless clients are 802.11n. 11bg mixed — Select if you are using both 802.11b and 802.11g wireless clients. -
Page 73
TL-WR743ND 150Mbps Wireless AP/Client Router MAC Address of Remote AP (BSSID) — The BSSID of the AP your Router is going to connect to as a client. You can also use the search function to select the BSSID to join. -
Page 74
TL-WR743ND 150Mbps Wireless AP/Client Router Figure 4-21 Wireless Settings Repeater Mode — Choosing WDS Repeater is to enable WDS, while choosing Universal Repeater is to disable WDS. Wireless Name of Root AP — The SSID of the AP your Router is going to connect to as a … -
Page 75
TL-WR743ND 150Mbps Wireless AP/Client Router 2. Failure to follow these guidelines can result in significant performance degradation or inability to wirelessly connect to the Router. 4.7.1.4 Wireless Settings in Bridge with AP Mode If you select Bridge with AP mode in Figure 3-6 or Bridge with AP mode in Figure 4-5, the Wireless Settings page will display as Figure 4-22. -
Page 76
TL-WR743ND 150Mbps Wireless AP/Client Router Key Format — Hexadecimal and ASCII formats are provided here Hexadecimal format stands for any combination of hexadecimal digits (0-9, a-f, A-F) in the specified length. ASCII format stands for any combination of keyboard characters in the specified length. -
Page 77
TL-WR743ND 150Mbps Wireless AP/Client Router In an elevated location such as a high shelf. Away from the potential sources of interference, such as PCs, microwaves, and cordless phones. With the Antenna in the upright position. Away from large metal surfaces. -
Page 78: Wireless Security
TL-WR743ND 150Mbps Wireless AP/Client Router Near the center of the area in which your wireless stations will operate. In an elevated location such as a high shelf. Away from the potential sources of interference, such as PCs, microwaves, and cordless …
-
Page 79
TL-WR743ND 150Mbps Wireless AP/Client Router Disable Security — If you do not want to use wireless security, check this radio button. But it’s strongly recommended to choose one of the following modes to enable security. WPA/WPA2 — Personal(Recommended) — It’s the WPA/WPA2 authentication type based … -
Page 80
TL-WR743ND 150Mbps Wireless AP/Client Router Figure 4-26 Radius Server IP — Enter the IP address of the Radius server. Radius Port — Enter the port number of the Radius server. Radius Password — Enter the password for the Radius server. -
Page 81: Wireless Mac Filtering
TL-WR743ND 150Mbps Wireless AP/Client Router 64-bit — You can enter 10 hexadecimal digits (any combination of 0-9, a-f, A-F, zero key is not promoted) or 5 ASCII characters. 128-bit — You can enter 26 hexadecimal digits (any combination of 0-9, a-f, A-F, zero key is not promoted) or 13 ASCII characters.
-
Page 82
TL-WR743ND 150Mbps Wireless AP/Client Router Figure 4-29 Add or Modify Wireless MAC Address Filtering entry To add or modify a MAC Address Filtering entry, follow these instructions: Enter the appropriate MAC Address into the MAC Address field. The format of the MAC… -
Page 83: Wireless Advanced
TL-WR743ND 150Mbps Wireless AP/Client Router 3. Delete all or disable all entries if there are any entries already. 4. Click the Add New… button. Enter the MAC address 00-0A-EB-B0-00-0B/00-0A-EB-00-07-5F in the MAC Address field. Enter wireless station A/B in the Description field.
-
Page 84: Wireless Statistics
TL-WR743ND 150Mbps Wireless AP/Client Router particular receiving station and negotiate the sending of a data frame. The default value is 2346. Fragmentation Threshold — This value is the maximum size determining whether packets will be fragmented. Setting the Fragmentation Threshold too low may result in poor network performance because of excessive packets.
-
Page 85: Dhcp
TL-WR743ND 150Mbps Wireless AP/Client Router Current Status — The connected wireless station’s running status, one of STA-AUTH/ STA-ASSOC/ STA-JOINED/ WPA/ WPA-PSK/ WPA2/ WPA2-PSK/ AP-UP/ AP-DOWN/ Disconnected Received Packets — Packets received by the station Sent Packets — Packets sent by the station …
-
Page 86
TL-WR743ND 150Mbps Wireless AP/Client Router Figure 4-33 DHCP Settings DHCP Server — Enable or Disable the DHCP server. If you disable the Server, you must have another DHCP server within your network or else you must configure the computer manually. -
Page 87: Dhcp Clients List
TL-WR743ND 150Mbps Wireless AP/Client Router 4.8.2 DHCP Clients List Choose menu “DHCP → DHCP Clients List”, and then you can view the information about the clients attached to the Router in the screen as shown in Figure 4-34. Figure 4-34 DHCP Clients List Client Name — The name of the DHCP client …
-
Page 88: Forwarding
TL-WR743ND 150Mbps Wireless AP/Client Router Reserved IP Address — The IP address reserved for the PC by the Router. Status — The status of this entry, either Enabled or Disabled. To Reserve an IP address: Click the Add New… button. Then Figure 4-36 will pop-up.
-
Page 89: Virtual Servers
TL-WR743ND 150Mbps Wireless AP/Client Router There are four submenus under the Forwarding menu (shown in Figure 4-37): Virtual Servers, Port Triggering, DMZ and UPnP. Click any of them, and you will be able to configure the corresponding function. 4.9.1 Virtual Servers Choose menu “Forwarding →…
-
Page 90
TL-WR743ND 150Mbps Wireless AP/Client Router Type the IP Address of the computer in the IP Address box. Select the protocol used for this application, either TCP, UDP, or All. Select the Enable to enable the virtual server. Click the Save button. -
Page 91: Port Triggering
TL-WR743ND 150Mbps Wireless AP/Client Router 4.9.2 Port Triggering Choose menu “Forwarding → Port Triggering”, and then you can view and add port triggering in the screen as shown in Figure 4-40. Some applications require multiple connections, like Internet games, video conferencing, Internet calling and so on. These applications cannot work with a pure NAT Router.
-
Page 92
TL-WR743ND 150Mbps Wireless AP/Client Router Click the Add New… button, the next screen will pop-up as shown in Figure 4-41. Select a common application from the Common Applications drop-down list, then the Trigger Port field and the Incoming Ports field will be automatically filled. If the Common Applications do not have the application you need, enter the Trigger Port and the Incoming Ports manually. -
Page 93: Dmz
TL-WR743ND 150Mbps Wireless AP/Client Router Incoming Port Range cannot overlap each other. 4.9.3 Choose menu “Forwarding → DMZ”, and then you can view and configure DMZ host in the screen as shown in Figure 4-42. The DMZ host feature allows one local host to be exposed to the Internet for a special-purpose service such as Internet gaming or videoconferencing.
-
Page 94: Security
TL-WR743ND 150Mbps Wireless AP/Client Router Figure 4-43 UPnP Current UPnP Status — UPnP can be enabled or disabled by clicking the Enable or Disable button. Current UPnP Settings List — This table displays the current UPnP information. App Description — The description provided by the application in the UPnP request.
-
Page 95: Basic Security
TL-WR743ND 150Mbps Wireless AP/Client Router 4.10.1 Basic Security Choose menu “Security → Basic Security”, and then you can configure the basic security in the screen as shown in Figure 4-45. Figure 4-45 Basic Security Firewall — A firewall protects your network from the outside world. Here you can enable or …
-
Page 96: Advanced Security
TL-WR743ND 150Mbps Wireless AP/Client Router L2TP Passthrough — Layer 2 Tunneling Protocol (L2TP) is the method used to enable Point-to-Point sessions via the Internet on the Layer 2 level. To allow L2TP tunnels to pass through the Router, keep the default, Enabled.
-
Page 97
TL-WR743ND 150Mbps Wireless AP/Client Router Figure 4-46 Advanced Security Packets Statistics Interval (5~60) — The default value is 10. Select a value between 5 and 60 seconds from the drop-down list. The Packets Statistics Interval value indicates the time section of the packets statistics. -
Page 98: Local Management
TL-WR743ND 150Mbps Wireless AP/Client Router UDP-FLOOD Packets Threshold (5~3600) — The default value is 500. Enter a value between 5 ~ 3600. When the current UPD-FLOOD Packets number is beyond the set value, the Router will startup the blocking function immediately.
-
Page 99: Remote Management
TL-WR743ND 150Mbps Wireless AP/Client Router the Setup page of the Router’s Web-Based Utility locally from inside the network, check the radio button “Only the PCs listed can browse the built-in web pages to perform Administrator tasks”, and then enter each MAC Address in a separate field. The format for the MAC Address is XX-XX-XX-XX-XX-XX (X is any hexadecimal digit).
-
Page 100: Parental Control
TL-WR743ND 150Mbps Wireless AP/Client Router please enter http://202.96.12.8:8080 in your browser. Later, you may be asked for the Router’s password. After successfully entering the username and password, you will be able to access the Router’s web-based utility. 2. Be sure to change the Router’s default password to a very secure password.
-
Page 101
TL-WR743ND 150Mbps Wireless AP/Client Router Enter the MAC address of the PC (e.g. 00-11-22-33-44-AA) you’d like to control in the MAC Address of Child PC field. Or you can choose the MAC address from the All Address in Current LAN drop-down list. -
Page 102
TL-WR743ND 150Mbps Wireless AP/Client Router Figure 4-50 Add or Modify Parental Control Entry For example: If you desire that the child PC with MAC address 00-11-22-33-44-AA can access www.google.com on Saturday only while the parent PC with MAC address 00-11-22-33-44-BB is without any restriction, you should follow the settings below. -
Page 103: Access Control
TL-WR743ND 150Mbps Wireless AP/Client Router In Status field, select Enable. 4. Click Save to complete the settings. Then you will go back to the Parental Control Settings page and see the following list, as shown in Figure 4-51. Figure 4-51 Parental Control Settings 4.12 Access Control…
-
Page 104
TL-WR743ND 150Mbps Wireless AP/Client Router Figure 4-53 Access Control Rule Management Enable Internet Access Control — Select the check box to enable the Internet Access Control function, so the Default Filter Policy can take effect. Rule Name — Here displays the name of the rule and this name is unique. -
Page 105
TL-WR743ND 150Mbps Wireless AP/Client Router 5. Select a schedule from the Schedule drop-down list or choose “Click Here To Add New Schedule”. 6. In the Action field, select Deny or Allow. 7. In the Status field, select Enabled or Disabled to enable or disable your entry. -
Page 106: Host
TL-WR743ND 150Mbps Wireless AP/Client Router 3. Click “Access Control → Schedule” in the left to enter the Schedule Settings page. Add a new entry with the Schedule Description is Schedule_1, Day is Sat and Sun, Start Time is 1800 and Stop Time is 2000.
-
Page 107
TL-WR743ND 150Mbps Wireless AP/Client Router To add a new entry, please follow the steps below. Click the Add New… button. In the Mode field, select IP Address or MAC Address. If you select IP Address, the screen shown is Figure 4-56. -
Page 108: Target
TL-WR743ND 150Mbps Wireless AP/Client Router In Host Description field, create a unique description for the host (e.g. Host_1). In MAC Address field, enter 00-11-22-33-44-AA. Click Save to complete the settings. Then you will go back to the Host Settings page and see the following list.
-
Page 109
TL-WR743ND 150Mbps Wireless AP/Client Router 1) In Target Description field, create a unique description for the target (e.g. Target_1). 2) In Domain Name field, enter the domain name in the blank. You can enter 4 domain names. Click the Save button. -
Page 110: Schedule
TL-WR743ND 150Mbps Wireless AP/Client Router 1. Click Add New… button in Figure 4-58 to enter the Add or Modify an Access Target Entry page. 2. In Mode field, select Domain Name from the drop-down list. 3. In Target Description field, create a unique description for the target (e.g. Target_1).
-
Page 111
TL-WR743ND 150Mbps Wireless AP/Client Router 4. In Time field, you can select all day-24 hours or you may enter the Start Time and Stop Time in the corresponding field. 5. Click Save to complete the settings. Click the Delete All button to delete all the entries in the table. -
Page 112: Advanced Routing
TL-WR743ND 150Mbps Wireless AP/Client Router 4.13 Advanced Routing Figure 4-63 Advanced Routing There are two submenus under the Advanced Routing menu as shown in Figure 4-63: Static Routing List and System Routing Table. Click any of them, and you will be able to configure the corresponding function.
-
Page 113: System Routing Table
TL-WR743ND 150Mbps Wireless AP/Client Router Enter the following data: Destination Network — The Destination Network is the address of the network or host that you want to assign to a static route. Subnet Mask — The Subnet Mask determines which portion of an IP Address is the …
-
Page 114: Bandwidth Control
TL-WR743ND 150Mbps Wireless AP/Client Router Subnet Mask — The Subnet Mask determines which portion of an IP address is the network portion, and which portion is the host portion. Gateway — This is the IP address of the gateway device that allows for contact between the …
-
Page 115: Rules List
TL-WR743ND 150Mbps Wireless AP/Client Router Note: For optimal control of the bandwidth, please select the right bandwidth type and ask your ISP for the total bandwidth of the egress and ingress. 4.14.2 Rules List Choose menu “Bandwidth Control → Rules List”, and then you can view and configure the Bandwidth Control rules in the screen below.
-
Page 116: Ip& Mac Bing Setting
TL-WR743ND 150Mbps Wireless AP/Client Router Figure 4-70 Bandwidth Control Rule Settings Step 3: Click the Save button. 4.15 IP& MAC Bing Setting Figure 4-71 the IP & MAC Binding menu There are two submenus under the IP &MAC Binding menu (shown in Figure 4-71): Binding Settings and ARP List.
-
Page 117
TL-WR743ND 150Mbps Wireless AP/Client Router IP Address — The assigned IP address of the controlled computer in the LAN. Bind — Check this option to enable ARP binding for a specific device. Modify — To modify or delete an existing entry. -
Page 118: Arp List
TL-WR743ND 150Mbps Wireless AP/Client Router Figure 4-74 Find IP & MAC Binding Entry Click the Enable All button to make all entries enabled. Click the Delete All button to delete all entries. 4.15.2 ARP List To manage the computer, you could observe the computers in the LAN by checking the relationship of MAC address and IP address on the ARP list, and you could configure the items on the ARP list also.
-
Page 119: Dynamic Dns
TL-WR743ND 150Mbps Wireless AP/Client Router Click the Load All button to load all items to the IP & MAC Binding list. Click the Refresh button to refresh all items. Note: An item could not be loaded to the IP & MAC Binding list if the IP address of the item has been loaded before.
-
Page 120: Dyndns.org Ddns
TL-WR743ND 150Mbps Wireless AP/Client Router Type the Password for your DDNS account. Type the Domain Name you received from dynamic DNS service provider. Click the Login button to log in the DDNS service. Connection Status — The status of the DDNS service connection is displayed here.
-
Page 121: Comexe.cn Ddns
TL-WR743ND 150Mbps Wireless AP/Client Router 4.16.3 Comexe.cn DDNS If the dynamic DNS Service Provider you select is www.comexe.cn, the page will appear as shown in Figure 4-78. Figure 4-78 Comexe.cn DDNS Settings To set up for DDNS, follow these instructions: Type the Domain Name received from your dynamic DNS service provider.
-
Page 122: System Tools
TL-WR743ND 150Mbps Wireless AP/Client Router 4.17 System Tools Figure 4-79 The System Tools menu Choose menu “System Tools”, and then you can see the submenus under the main menu: Time Settings, Diagnostic, Firmware Upgrade, Factory Defaults, Backup & Restore, Reboot, Password, System Log and Statistics.
-
Page 123
TL-WR743ND 150Mbps Wireless AP/Client Router Time Zone — Select your local time zone from this pull down list. Date — Enter your local date in MM/DD/YY into the right blanks. Time — Enter your local time in HH/MM/SS into the right blanks. -
Page 124: Diagnostic
TL-WR743ND 150Mbps Wireless AP/Client Router Note: This setting will be used for some time-based functions such as firewall. You must specify your time zone once you login to the router successfully, otherwise, these functions will not take effect. The time will be lost if the router is turned off.
-
Page 125: Firmware Upgrade
Domain Name System (DNS) queries. IP Address/Domain Name — Type the destination IP address (e.g. 202.108.22.5) or Domain name (e.g. http://www.tp-link.com). Pings Count — The number of Ping packets for a Ping connection.
-
Page 126: Factory Defaults
Note: New firmware versions are posted at http://www.tp-link.com and can be downloaded for free. There is no need to upgrade the firmware unless the new firmware has a new feature you want to use. However, when experiencing problems caused by the Router rather than the configuration, you can try to upgrade the firmware.
-
Page 127: Backup & Restore
TL-WR743ND 150Mbps Wireless AP/Client Router Figure 4-85 Restore Factory Default Click the Restore button to reset all configuration settings to their default values. The default User Name: admin The default Password: admin The default IP Address: 192.168.0.1 …
-
Page 128: Reboot
TL-WR743ND 150Mbps Wireless AP/Client Router 4.17.6 Reboot Choose menu “System Tools → Reboot”, and then you can click the Reboot button to reboot the Router via the next screen. Figure 4-87 Reboot the Router Some settings of the Router will take effect only after rebooting, which include: …
-
Page 129: System Log
TL-WR743ND 150Mbps Wireless AP/Client Router It is strongly recommended that you should change the factory default user name and password of the Router, because all users who try to access the Router’s Web-based utility or Quick Setup will be prompted for the Router’s default user name and password.
-
Page 130
TL-WR743ND 150Mbps Wireless AP/Client Router Figure 4-90 Mail Account Settings From — Your mail box address. The Router would connect it to send logs. To — Recipient’s address. The destination mailbox where the logs would be received. SMTP Server — Your smtp server. It corresponds with the mailbox filled in the From … -
Page 131: Statistics
TL-WR743ND 150Mbps Wireless AP/Client Router Log Level — By selecting the log level, only logs of this level will be shown. Refresh — Refresh the page to show the latest log list. Save Log — Click to save all the logs in a txt file.
-
Page 132
TL-WR743ND 150Mbps Wireless AP/Client Router Click Delete All to delete all entries in the table. Statistics Table: The IP Address and MAC address are displayed with related IP Address/MAC Address statistics Packets The number of packets received and transmitted by the Router. -
Page 133: Appendix A: Faq
TL-WR743ND 150Mbps Wireless AP/Client Router Appendix A: FAQ How do I configure the Router to access the Internet by ADSL users? First, configure the ADSL Modem configured in RFC1483 bridge model. Connect the Ethernet cable from your ADSL Modem to the WAN port on the Router. The telephone cord plugs into the Line port of the ADSL Modem.
-
Page 134
TL-WR743ND 150Mbps Wireless AP/Client Router How do I configure the Router to access the Internet by Ethernet users? Log in to the Router, click the “Network” menu on the left of your browser, and click «WAN» submenu. On the WAN page, select “Dynamic IP” for «WAN Connection Type», finish by clicking Save. -
Page 135
TL-WR743ND 150Mbps Wireless AP/Client Router Figure A-4 Virtual Servers Figure A-5 Add or Modify a Virtual server Entry Note: Your opposite side should call your WAN IP, which is displayed on the “Status” page. How to enable DMZ Host: Log in to the Router, click the “Forwarding” menu on the left of your browser, and click «DMZ»… -
Page 136
TL-WR743ND 150Mbps Wireless AP/Client Router Figure A-7 Basic Security I want to build a WEB Server on the LAN, what should I do? Because the WEB Server port 80 will interfere with the WEB management port 80 on the Router, you must change the WEB management port number to avoid interference. -
Page 137
TL-WR743ND 150Mbps Wireless AP/Client Router Figure A-8 Remote Management Note: If the above configuration takes effect, configure to the Router by typing 192.168.0.1:88 (the Router’s LAN IP address: Web Management Port) in the address field of the Web browser. -
Page 138
TL-WR743ND 150Mbps Wireless AP/Client Router Figure A-10 Add or Modify a Virtual server Entry The wireless stations cannot connect to the Router. Make sure the «Enable Wireless Router Radio» is checked. Make sure that the wireless stations’ SSID accord with the Router’s SSID. -
Page 139: Appendix B: Configuring The Pc
TL-WR743ND 150Mbps Wireless AP/Client Router Appendix B: Configuring the PC In this section, we’ll introduce how to install and configure the TCP/IP correctly in Windows XP. First make sure your Ethernet Adapter is working, refer to the adapter’s manual if necessary.
-
Page 140
TL-WR743ND 150Mbps Wireless AP/Client Router Figure B-2 The following TCP/IP Properties window will display and the IP Address tab is open on this window by default. Now you have two ways to configure the TCP/IP protocol below: Setting IP address automatically… -
Page 141
TL-WR743ND 150Mbps Wireless AP/Client Router Figure B-3 Note: For Windows 98 OS or before, the PC and Router may need to be restarted. Setting IP address manually Select Use the following IP address radio button. And the following items available If the Router’s LAN IP address is 192.168.0.1, specify the IP address as 192.168.0.x (x is… -
Page 142
TL-WR743ND 150Mbps Wireless AP/Client Router Figure B-4 Now: Click OK to keep your settings. — 133 -… -
Page 143: Appendix C: Specifications
TL-WR743ND 150Mbps Wireless AP/Client Router Appendix C: Specifications General IEEE 802.3, 802.3u, 802.3x, 802.1x, 802.11n, 802.11b, 802.11g, Standards 802.11e, 802.11i Protocols TCP/IP, PPPoE, DHCP, ICMP, NAT, SNTP One 10/100M Auto-Negotiation INTERNET RJ45 port supporting Ports passive POE at AP Client Router mode; Four 10/100M…
-
Page 144: Appendix D: Glossary
TL-WR743ND 150Mbps Wireless AP/Client Router Appendix D: Glossary 802.11n — 802.11n builds upon previous 802.11 standards by adding MIMO (multiple-input multiple-output). MIMO uses multiple transmitter and receiver antennas to allow for increased data throughput via spatial multiplexing and increased range by exploiting the spatial diversity, perhaps through coding schemes like Alamouti coding.
-
Page 145
TL-WR743ND 150Mbps Wireless AP/Client Router PPPoE (Point to Point Protocol over Ethernet) — PPPoE is a protocol for connecting remote hosts to the Internet over an always-on connection by simulating a dial-up connection. SSID — A Service Set Identification is a thirty-two character (maximum) alphanumeric key …
Устройство TP-Link TL-WR743ND совмещает в себе возможности беспроводной точки доступа и клиента-маршрутизатора. Поддерживает протокол радиосвязи 802.11n. Этот роутер мы сегодня и рассмотрим. А начнем по традиции с его функционала.
Содержание
- Возможности и характеристики
- Соединение с ПК
- Авторизация
- Настройка основных параметров
- Установка пароля беспроводного соединения
- Прошивка
- Смена пароля web-интерфейса
- Настройка параметров подключения
- Установка PPTP подключения
- L2TP подключение
- PPPOE подключение
- Задать вопрос автору статьи
Возможности и характеристики
Особенности модели:
- Может передавать пакеты на скорости до 150 Мбит/с.
- Вариант, одинаково хороший как для организации проводной локальной сети, так и для подключения «по воздуху».
- Простой процесс налаживания системы безопасности типа WPA (для активации достаточно один раз нажать кнопку WPS).
- В конструкции предусмотрен разъем WAN, работающий с технологией Passive PoE (питание осуществляется посредством Ethernet-соединения) на удалении до 30 м (то есть, не требуется наличие розеток рядом).
- Имеется мост WDS, функционирующий без проводов – позволяет увеличить покрытие сети.
- Поддерживает IGMP Proxy для IPTV Multicast.
Параметры оборудования:
- Интерфейс – 1 основной разъем WAN (синий) и 4 дополнительных разъема LAN (желтые).
- Кнопки – WPS, Reset и On/Off.
- Параметры электропитания – 9В постоянного тока, 0,85А.
- Габариты – 174x118x33 мм.
- Антенна – направленная во все стороны, демонтируемая, с усилителем до 5 дБи.
Характеристики беспроводного блока:
- Рабочие частоты – 2400-2483 ГГц.
- Скорость передачи – до 150 Мбит/с.
- EIRP (сила сигнала) – до 20 дБм или до 100 мВт.
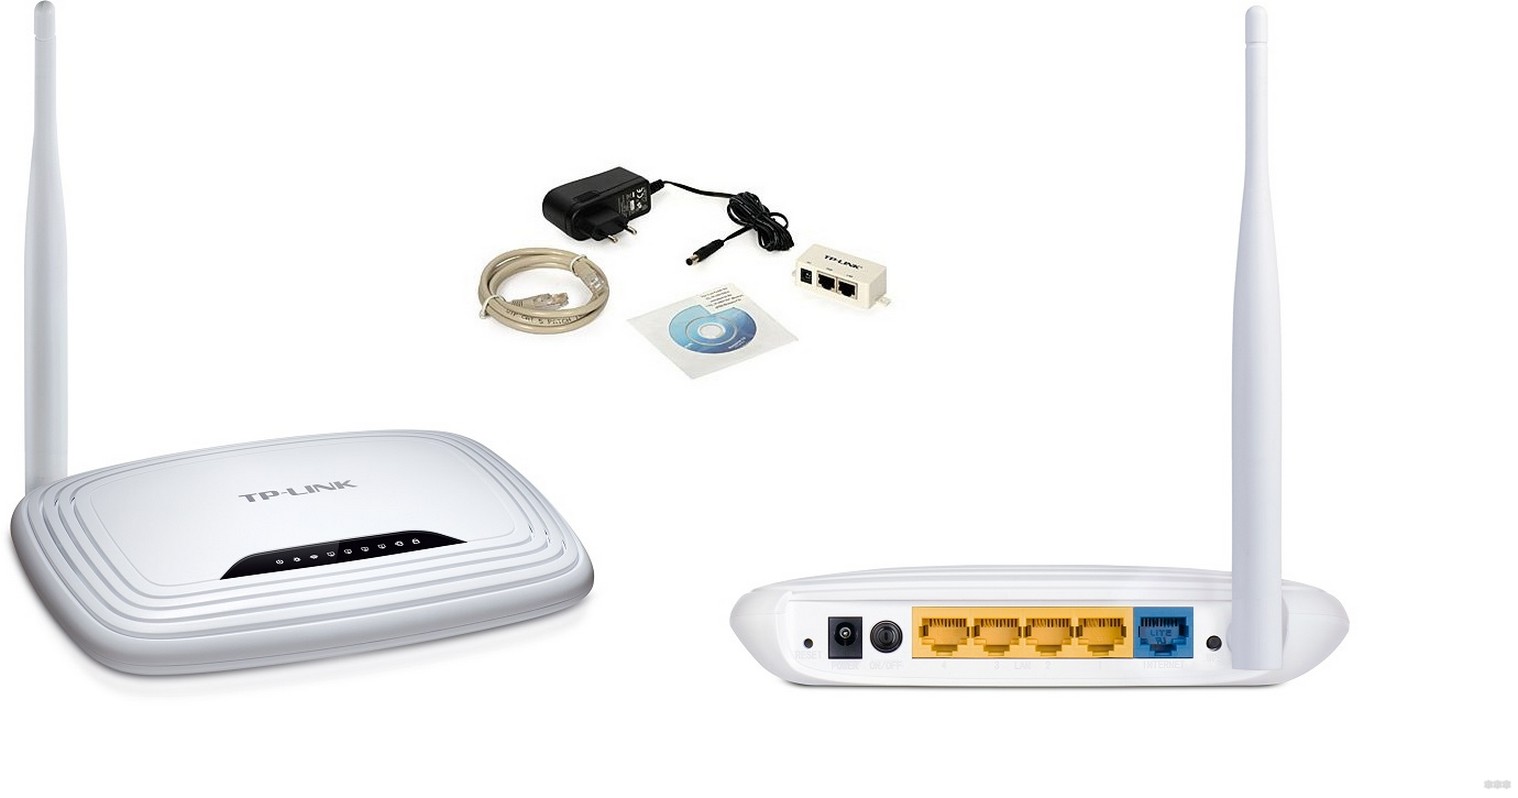
В комплектацию, кроме основного оборудования TP-Link TL-WR743ND, входит одна антенна, провод для подсоединения к электросети, кабель Ethernet и руководство-инструкция пользователя на русском.
Роутер может работать под управлением любой ОС Windows, может подключаться к устройствам на MAC OS, NetWare, UNIX, Linux.
Соединение с ПК
Произведите такие действия:
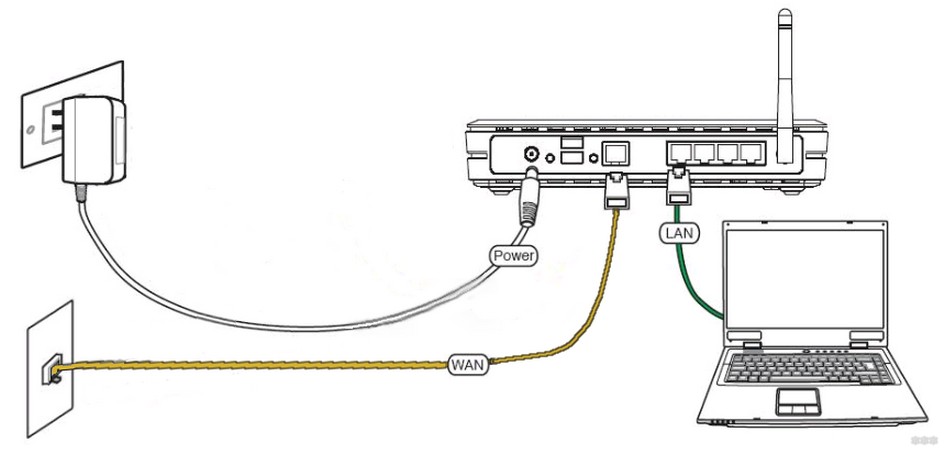
- Подсоедините кабель питания к роутеру, а затем к электросети (вставьте в розетку).
- Подсоедините основной кабель (по которому «идет» интернет) к разъему на задней панели (он имеет синюю раскраску).
- Кабель, входящий в комплектацию модели, вставьте в один из желтых разъемов (всего их четыре).
- Второй отрезок кабеля подсоедините к ПК или портативному устройству (в сетевую карту).
Авторизация
Зайдите в любой браузер и в строке адреса укажите:
- 192.168.1.1 (для модели устройства версии 1).
- 192.168.0.1 (для модели устройства версии 2).
Перейдите по адресу, откроется окно авторизации, где нужно ввести имя пользователя и пароль. Обычно для входа достаточно набрать в обоих строчках «admin» (без кавычек) и нажать «OK».
Версию можно посмотреть на фирменной наклейке, находящейся в нижней части корпуса (после названия модели будет указано V1 или V2).
Настройка основных параметров
Общие инструкции для роутеров TP-Link тут:
После ввода имени пользователя и пароля откроется окно основного интерфейса настройки оборудования. Здесь нужно будет выполнить такие операции:
- Защитить сеть, введя пароль для беспроводной сети.
- Настроить подключение (сначала уточните у провайдера тип подключения вашей сети – PPTP, L2TP или PPPOE).
Установка пароля беспроводного соединения
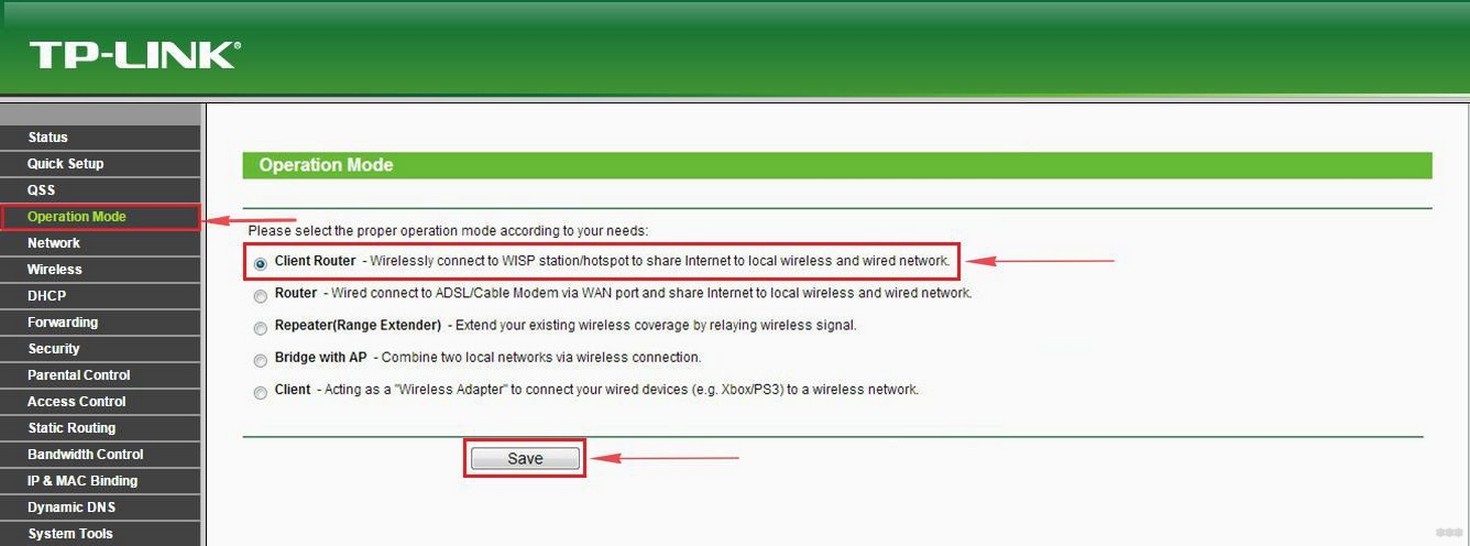
Откройте раздел «Operation Mode», укажите «Client Router» и щелкните клавишу «Save». Если бы требовалось использовать устройство как самостоятельный роутер, а не точку доступа (как в случае с Wi-Fi соединением), нужно было бы выбрать «Router» (для подобного подключения нужен ADSL-модем).
В окне «Wireless», в разделе настроек и производится установка ключевых параметров беспроводного соединения. В соответствующей строчке укажите имя сети (можно придумать любое). В строчке региона укажите «Russia» и сохраните настройки (кнопка «Save»).
Откройте раздел безопасности и укажите вариант защиты «WPA-PSK/WPA2-PSK». В строчке пароля придумайте и введите его, нажмите «Save».
Далее на экране появится строка о том, что параметры сохранены и требуется перезагрузка устройства. Подтвердить ее можно нажатием клавиши «click here». После включения оборудования имя сети появится в списке доступных сетей на ПК. Нужно ввести пароль и подключиться к ней.
Прошивка
Выполните следующие действия:
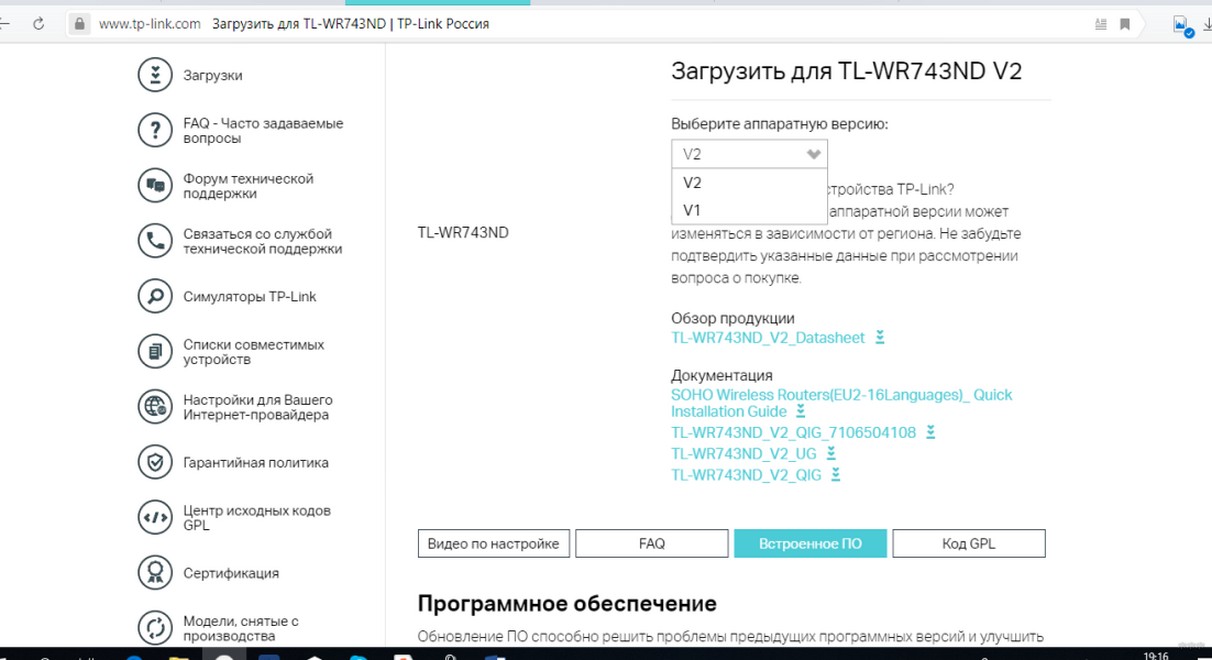
- Посмотрите, какая у оборудования версия (1 или 2), на фирменной наклейке, которая обычно расположена внизу устройства.
- Перейдите на сайт tp-link.com и найдите TP-Link TL-WR743ND через поиск.
- Выберите версию роутера.
- Зайдите в раздел «Встроенное ПО» и скачайте дистрибутив на ПК.
- Выполните извлечение файла из архива.
- В параметрах TL-WR743ND откройте раздел «System Tools» – «Firmware Upgrade».
- Выберите прошивку, указав ее расположение на компьютере, и нажмите «Upgrade».
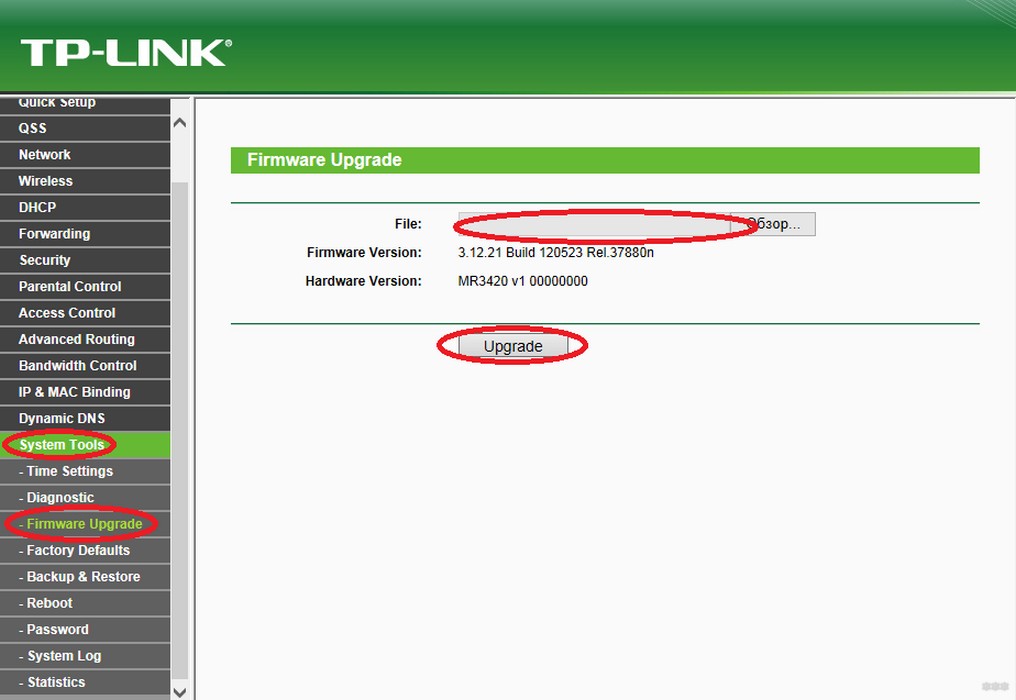
- После установки не нужно ничего закрывать и перезагружать, новая прошивка будет уже готова к работе.
Важные моменты:
- Многие хотят установить русифицированную прошивку, однако на официальном сайте производителя ее нет, а скачивать сторонние программы не рекомендуется.
- Для обновления используется сетевой кабель, то есть по Wi-Fi прошивка не выполняется.
Смена пароля web-интерфейса
Для изменения пароля выполните следующие шаги:
- Введите в адресной строке 192.168.1.1 и перейдите на страницу.
- Вбейте имя пользователя, пароль и нажмите Enter.
- Зайдите в системные инструменты.
- Откройте блок с паролем.
- Введите старую информацию, которая использовалась для входа на сайт.
- Ниже добавьте новые данные и сохраните их.
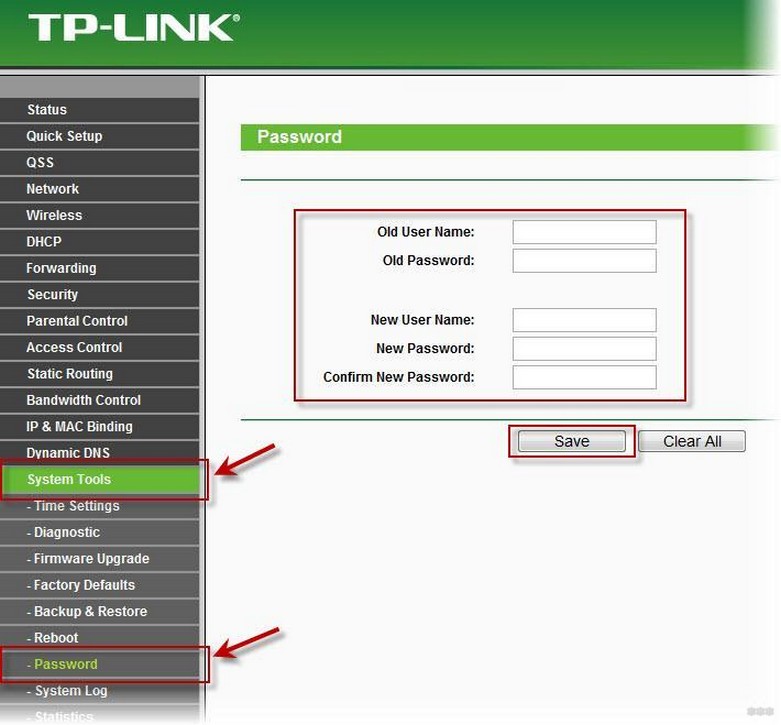
- Далее откроется окно, где нужно вписать уже измененные имя и пароль.
- После ввода будет доступен интерфейс с уже обновленными данными для авторизации.
Настройка параметров подключения
Вкратце опишем настройки роутера TP-Link TL-WR743ND для разных типов подключения.
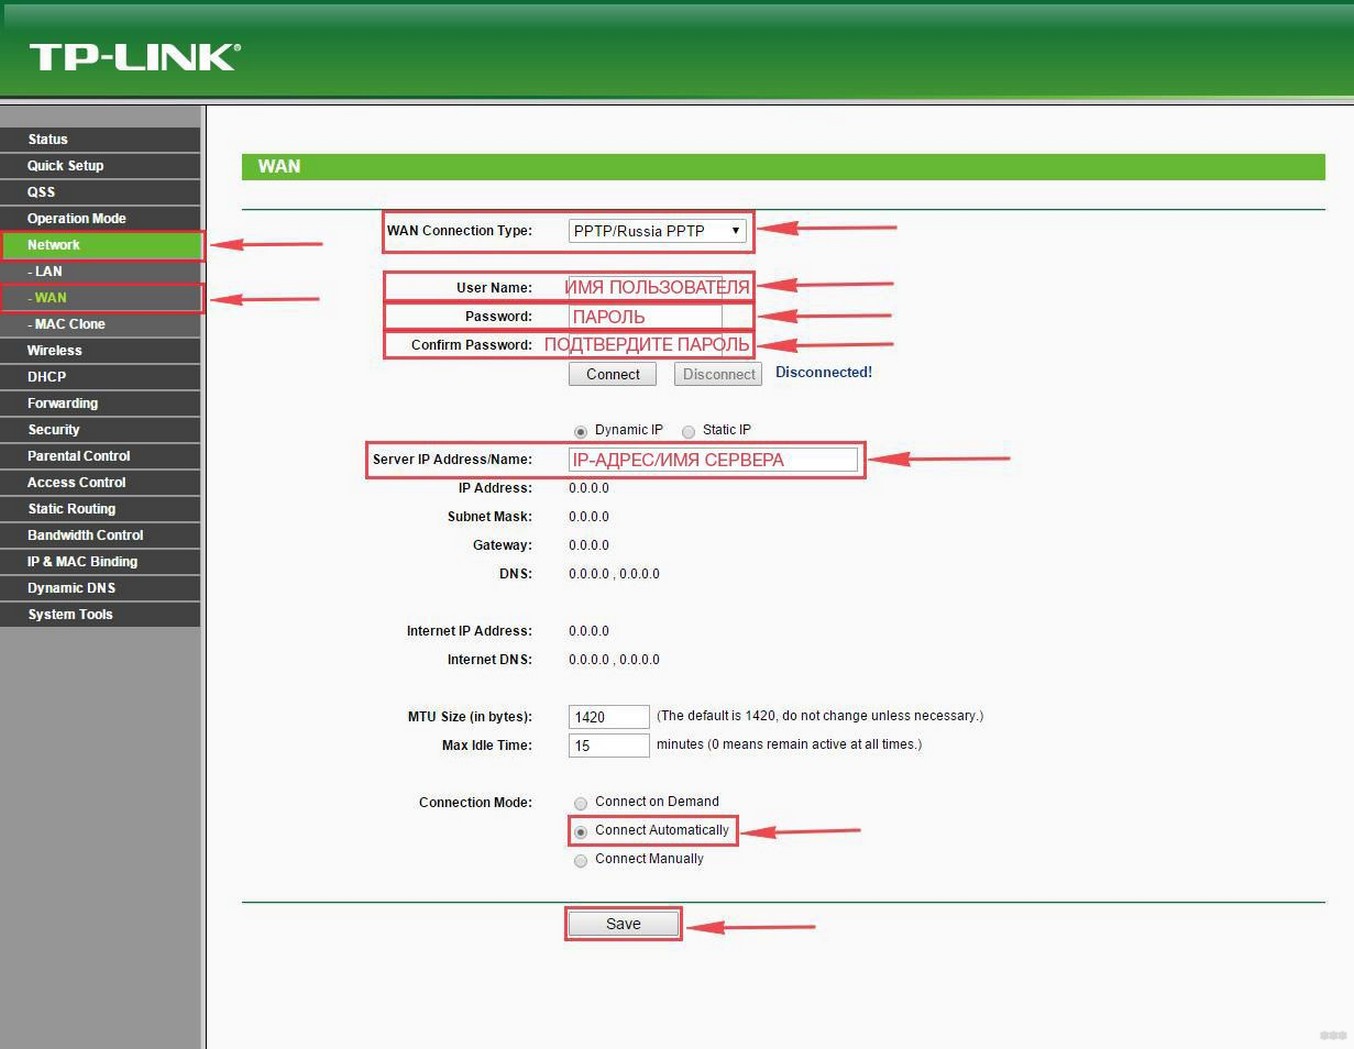
Установка PPTP подключения
- В закладке «Network» выберите «WAN».
- Укажите «PPTP/Russia PPTP», потом введите имя и пароль.
- Далее впишите адрес сервера (эти данные можно уточнить у провайдера).
- Отметьте надпись «Connect Automatically» при наличии безлимитного интернета (для сохранения непрерывного подключения к сети).
- Или отметьте «Connect on Demand», если к интернету требуется подключаться непосредственно перед его использованием.
- Нажмите клавишу «Save».
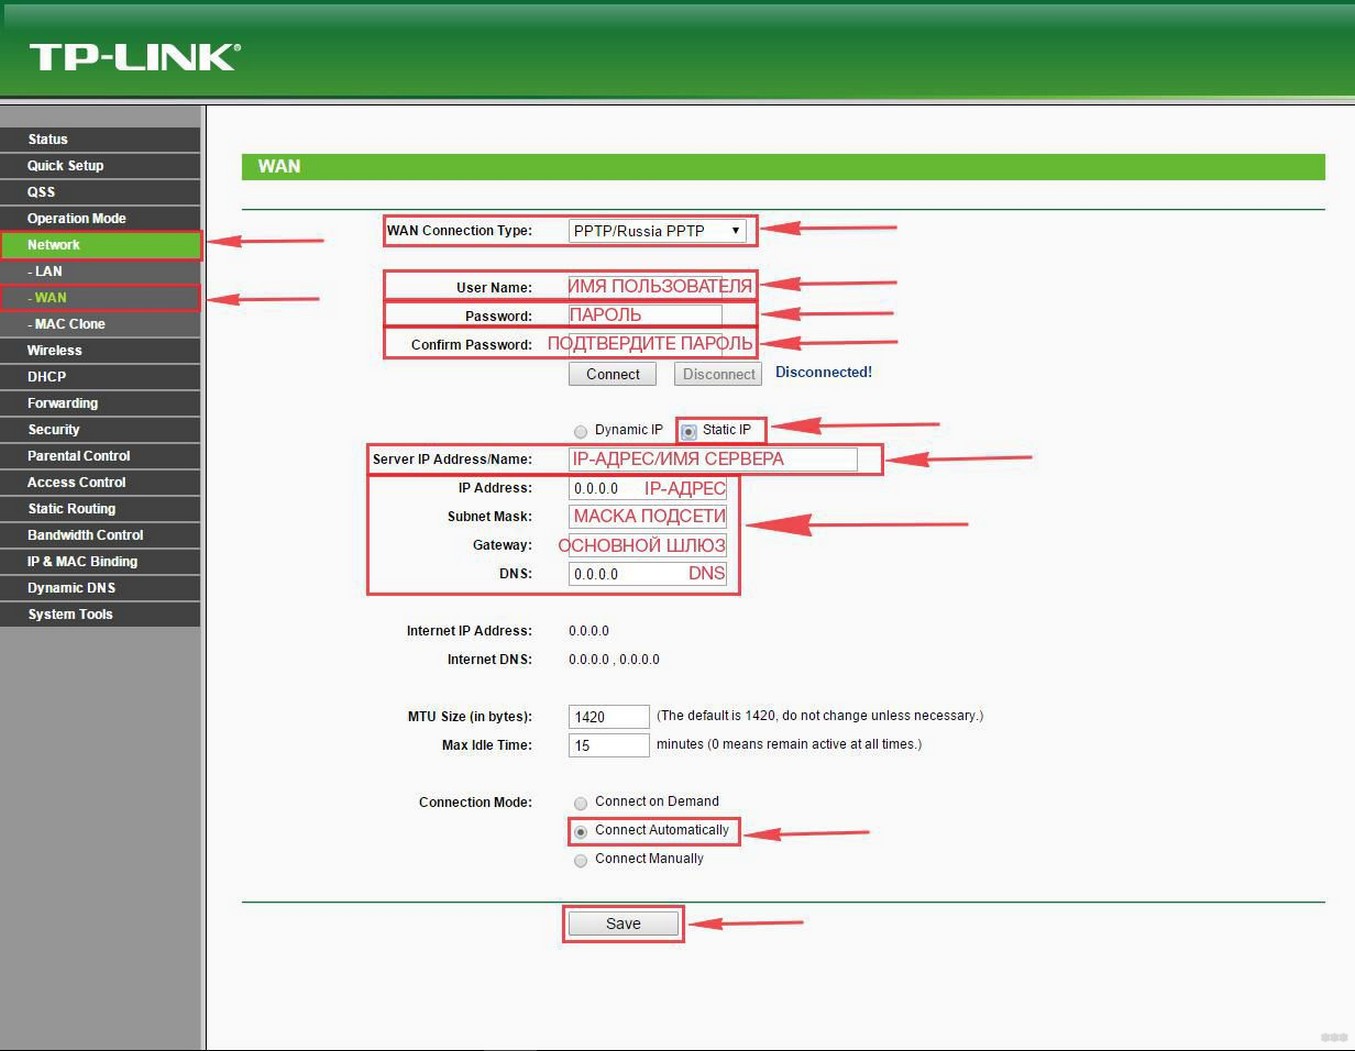
При статическом IP:
- В окне «Network» укажите «WAN».
- В строке выбора типа подключения укажите «PPTP/Russia PPTP», затем вставьте имя и пароль.
- Установите галочку напротив «Static IP» и введите адрес сервера, маску подсети, шлюз и DNS (эту информацию уточняйте у провайдера).
- Выберите тип соединения (постоянно или по требованию), как было описано в примере выше.
- Нажмите клавишу «Save».
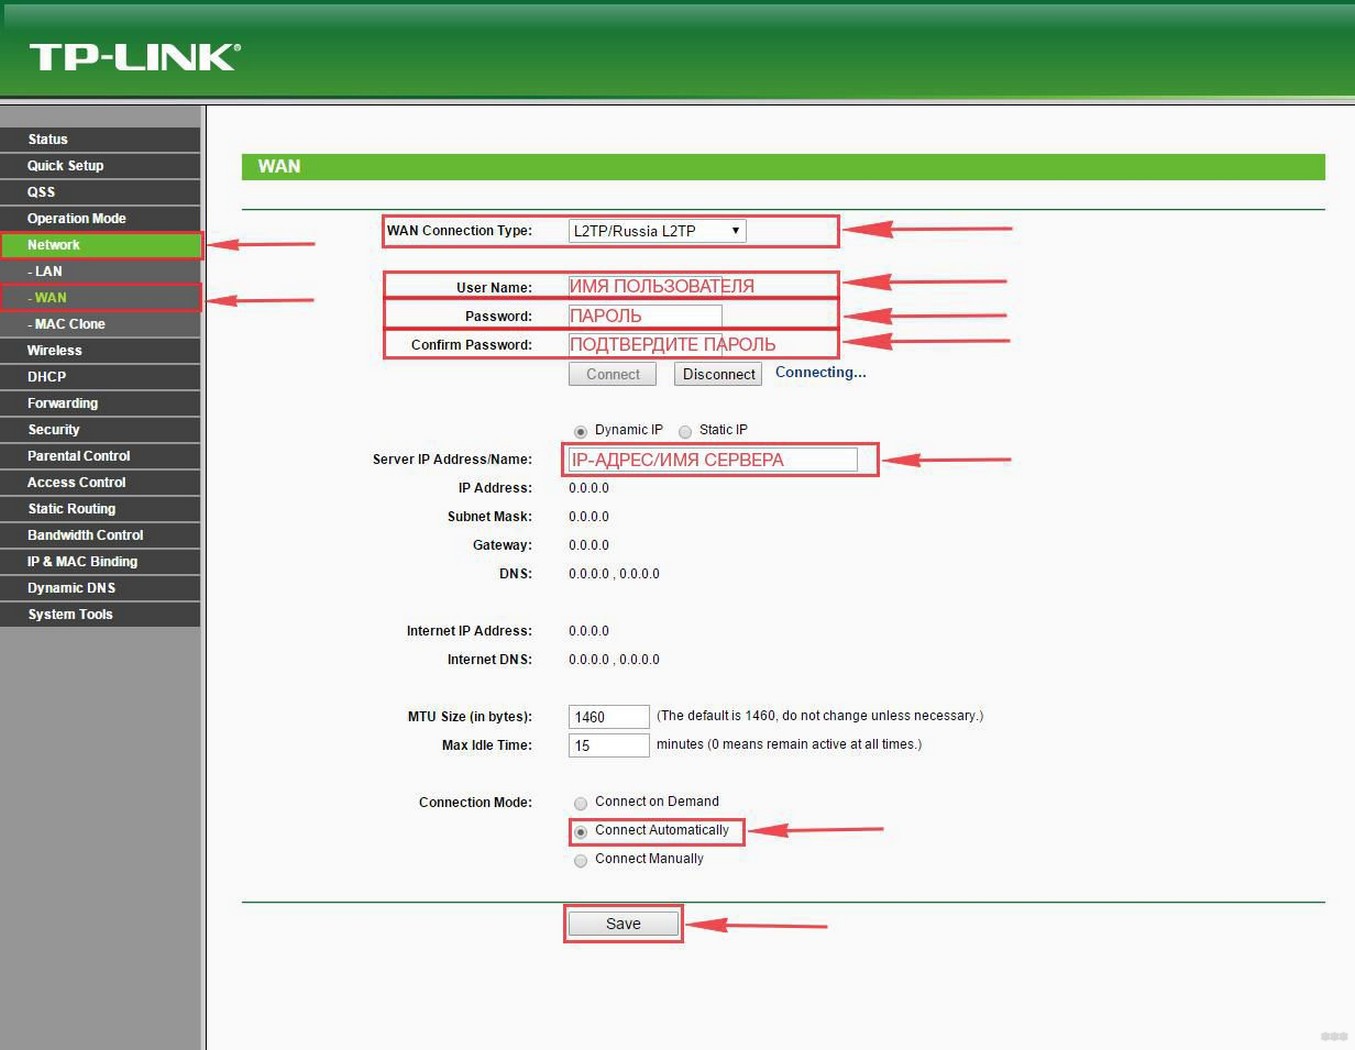
L2TP подключение
Инструкция для подключения к провайдеру Билайн в следующем видео:
- В окошке «Network» нажмите «WAN».
- Укажите «L2TP/Russia L2TP», потом имя и пароль.
- Вбейте адрес сервера (если не знаете его, уточните у провайдера).
- Отметьте надпись «Connect Automatically» при наличии безлимитного интернета.
- Или «Connect on Demand», если к интернету нужно подключаться прямо перед его использованием.
- Нажмите клавишу «Save».
Установка параметров L2TP при статическом IP:
- В закладке «Network» укажите «WAN».
- Далее «L2TP/Russia L2TP», потом пропишите имя и пароль.
- Отметьте строчку «Static IP» и введите адрес сервера, маску подсети, шлюз и DNS (данную информацию, если не знаете, уточняйте у провайдера).
- Выберите способ соединения (постоянно или по требованию), как было описано в примере выше.
- Нажмите клавишу «Save».
PPPOE подключение
- В закладке «Network» выберите «WAN».
- Укажите тип подключения «PPPOE/Russia PPPOE», затем вставьте имя и пароль.
- Отметьте галочкой пункт «Dinamic IP».
- Выберите надпись «Connect Automatically» при наличии безлимитного интернета (чтобы сохранилось стабильное подключение к сети).
- Или отметьте «Connect on Demand», если к сети нужно подключаться перед использованием.
- Нажмите клавишу «Save».
Установка параметров PPPOE при статическом IP:
- В закладке «Network» выберите «WAN».
- Укажите «PPPOE/Russia PPPOE», далее пропишите имя и пароль.
- Отметьте строчку «Static IP» и введите адрес сервера, маску подсети, шлюз и DNS.
- Выберите тип соединения (постоянно или по требованию), как было описано в примере выше.
- Нажмите клавишу «Save».
В целом, настройка маршрутизатора TP-Link TL-WR743ND не очень сложная, если руководствоваться пошаговой инструкцией. При необходимости тонкости установки оборудования можно уточнить у провайдера (обычно настройку можно выполнить со специалистом прямо по телефону).
Если остались вопросы, или что-то не получилось, смело пишите в комментарии! Обязательно постараемся подсказать и решить проблему совместными усилиями!
Я писал уже о разных маршрутизаторах и других сетевых устройствах от компании TP-Link. И сегодня у нас на обзоре еще один роутер, который может работать в режиме клиента (WISP). Модель TP-Link TL-WR743ND. На сайте производителя написано, что это беспроводная точка доступа с функцией маршрутизатора и клиента. Сейчас поясню, что это значит.
TP-Link TL-WR743ND можно использовать как обычный маршрутизатор, подключив к нему кабель от интернет-провайдера. Он будет раздавать интернет по кабелю и по Wi-Fi сети. Так же, переключив режим работы на «WISP Client Router» в настройках данного устройства, можно подключатся к интернету по Wi-Fi. Роутер будет как клиент подключатся к беспроводной сети провайдера, и раздавать интернет на ваши устройства по кабелю и по воздуху. Так же есть еще режим усилителя Wi-Fi сети, и беспроводного адаптера для ПК, телевизора и т. д.
По других характеристикам, TL-WR743ND это обычный, недорогой роутер, который подойдет для небольшой квартиры. Скорость Wi-Fi до 150 Мбит/с. Можно подключить максимум 15 Wi-Fi клиентов. Если у вас устройства будут создавать большую нагрузку на сеть, одновременно на нескольких устройствах будете смотреть видео в высоком качестве, играть в оналйн игры, качать большие файлы и т. д., то лучше обратить внимание на более дорогие и мощные маршрутизаторы.
Сам маршрутизатор выполнен в классном, популярном (я бы даже сказал легендарном) корпусе, что и модель TP-link TL-WR741ND. Только антенна в нашем случае белая, и съемная. Так же есть кнопка для отключения питания и отдельная кнопка Reset. Что очень хорошо.

Еще один плюс данного устройства в том, что есть поддержка подключения питания по PoE. В комплекте идет пассивный PoE переходник, к которому мы подключаем интернет-кабель и питание. На выходе из переходника получаем только один сетевой кабель, который подключаем к TP-Link TL-WR743ND. По этому кабелю «идет» интернет и питание. Максимум на 30 метров. Благодаря этой фишке, данное устройство можно установить в таком месте, где нет возможности подключить питание напрямую.
Настройка TP-Link TL-WR743ND в режиме клиента (WISP)
Подключитесь к маршрутизатору по кабелю, или по Wi-Fi. В браузере перейдите по адресу tplinklogin.net, или по IP-адресу 192.168.0.1. Введите заводские имя и логин: admin и admin. Если вы, или кто-то другой их не сменили. Если пароль не подходит, не удается зайти в настройки, то сделайте сброс настроек к заводским. Нужно нажать и секунд 10 подержать кнопку Reset.

В разделе «Operation Mode» выберите режим «Client Router» и сохраните настройки.

Перейдите в раздел «Wireless Settings», нажмите на кнопку «Search», выберите из списка необходимую сеть, укажите от нее пароль. Ниже укажите название своей Wi-Fi сети и выберите регион. Сохраните настройки.

Так же в разделе Wireless Security не забудьте сменить пароль своей Wi-Fi сети.
Если вы правильно задали параметры для подключения к беспроводной сети провайдера в режиме WISP, то роутер подключится к интернету и будет раздавать его на другие устройства.
Настройка в режиме Wi-Fi роутера
Подключаемся, заходим в настройки по адресу tplinklogin.net (логин/пароль: admin) и в разделе «Operation Mode» выбираем режим «Router». Сохраните настройки. Роутер перезагрузится.

Подключаем интернет в WAN-порт TP-Link TL-WR743ND.

Задаем настройки для подключения к провайдеру в разделе WAN, в настройках маршрутизатора. Так же нужно настроить Wi-Fi сеть в разделе «Wireless Settings». Не буду подробно расписывать процесс настройки. Он практически ничем не отличается от настройки TP-Link TL-WR740N. Можете посмотреть на примере этой статьи.
Прошивка TP-Link TL-WR743ND
Сначала нужно определить аппаратную версию вашего устройства. Она указана на наклейке, на корпусе самого роутера. У меня, например, Ver: 2.0.

Многие ищут русскую прошивку для TP-Link TL-WR743ND (чтобы настройки были на русском языке). На сайте TP-Link все версии на английском языке. На русском языке прошивки я не видел. С других сайтов скачивать настоятельно не рекомендую.
Обновлять ПО можно только по сетевому кабелю! Роутер должен быть подключен к компьютеру по кабелю, а Wi-Fi нужно отключить.
Дальше по пунктам:
На этом все. Интересное и многофункциональное устройство. Точка доступа, репитер, роутер, беспроводной клиент. Таких устройств на рынке не много.
Если остались вопросы, то пишите в комментариях. С радостью отвечу!

1
Установка оборудования
Конфигурация ПК
2
Содержимое коробки
Поддержка операционных систем:
· Windows 7 · Windows Vista · Windows XP
· Windows 2003
· Windows 2000 · Windows 98
· Windows Me · Mac · Linux
МОДЕЛЬ №
TL-WR743ND
150Mbps Wireless AP/Client Router
TL-WR743ND
1
2
TL-WR743ND
QIG
Адаптер PoE
Блок питания
Установочный CD-диск
Беспроводной маршрутизатор с Точкой
доступа / Клиентом, 150Мбит/с
Руководство по быстрой установке
Для ОС Windows Vista/7
Для ОС Windows XP/2000
Кабель Ethernet
Pекомендуется разместить маршрутизатор вдали от
электроприборов вроде потолочных вентиляторов,
домашних систем безопасности, микроволновых
печей или баз беспроводных телефонов.
Руководство по быстрой установке
Беспроводной маршрутизатор сТочкой
доступа / Клиентом, 150Мбит/с
МОДЕЛЬ № TL-WR743ND
Сигнал WISP (беспроводной Интернет-провайдер)
Маршрутизатор TL-WR743ND
Ноутбук
Примечание:
1
2
Выберите ‘Протокол интернета (TCP/IP)’
и нажмите ‘Свойства’.
3
4
Нажмите ‘Пуск’ > ’Панель управления’, появится
следующие страницы:
Нажмите ‘Сеть и подключение Интернет’ и
затем выберите ‘Сетевые подключения’.
2
1
Нажмите ‘Просмотр состояния сети и задач’ и затем
выберите ‘Управление сетевыми
подключениями’.
3
4
Выберите ‘Получить IP-адрес автоматически’ и
‘Получить адрес DNS-сервера автоматически’.
Затем нажмите ‘OK’.
Для использования в режиме клиента беспроводной сети Интернет-провайдера
3
Маршрутизатор TL-WR743ND
Ноутбук
Кабельный/DSL-модем
Интернет
4
1
2
3
Для использования в режиме беспроводного широкополосного маршрутизатора
С помощью кабеля Ethernet соедините порт
WAN маршрутизатора с портом LAN модема.
С помощью кабеля Ethernet соедините компьютер
с любым портом 1~4 маршрутизатора.
Подключите предоставляемый адаптер питания
одним концом в разъем Питание на задней панели
маршрутизатора, а другим концом в стандартную
электрическую розетку. Затем для включения
питания нажмите кнопку ON/OFFВкл./Выкл).
С помощью кабеля Ethernet соедините компьютер
с любым портом 1~4 маршрутизатора.
Подключите предоставляемый адаптер питания
одним концом в разъем Питание на задней
панели маршрутизатора, а другим концом в
стандартную электрическую розетку. Затем для
включения питания нажмите кнопку ON/OFF
Вкл./Выкл).
1
Откройте веб-браузер. Введите в адресной строке
‘192.168.1.1’ и нажмите клавишу Enter.
2
7
Выберите SSID необходимой вам сети и нажмите ‘Connect’.
Введите имя пользователя и пароль (admin / admin)
и нажмите ‘OK’.
2
После успешного входа в систему выберите пункт меню
‘Quick Setup’ и затем нажмите ‘Next’ для продолжения.
3
4
Выберите режим ‘AP Client Router’ и нажмите ‘Next’.
Если выбран пункт ‘Static IP’, то вам необходимо ввести
IP-адрес ‘IP Address’ и маску подсети ‘Subnet Mask’,
предоставленные вашим беспроводным
Интернет-провайдером WISP. Затем нажмите ‘Next’.
c)
6
Нажмите кнопку ‘Search’ для поиска доступных
беспроводных сетей.
Для использования в режиме клиента беспроводной сети Интернет-провайдера
Настройка маршрутизатора
3
Розетка
5
Выберите ваш тип WAN-соединения и нажмите ‘Next’
для продолжения.
Если выбран пункт ‘PPPoE’, то вам необходимо
ввести имя пользователя ‘User Name’ и пароль
‘Password’, предоставленные вашим
беспроводным Интернет-провайдером WISP. Затем
нажмите ‘Next’.
a)
.
Если выбран пункт ‘Dynamic IP’, то маршрутизатор
будет автоматически получать параметры IP от
вашего беспроводного Интернет-провайдера без
b)
необходимости вводить какие-либо параметры.
7106503730
(Перевернуть)
Выберите ‘Пуск’ > ‘Панель управления’, и затем вы
увидите следующие страницы:
Щелкните правой кнопкой мыши на ‘Подключение
по
локальной сети’ и затем нажмите ‘Свойства’.
Выберите ‘Протокол интернета версии 4
(TCP/IPv4)’
Щелкните правой кнопкой мыши на
‘Подключение по локальной сети’ и затем
выберите ‘Свойства’.
Выберите ‘Получить IP-адрес автоматически’
и
‘Получить
адрес
DNS-сервера
автоматически’. И затем нажмите ‘OK’.