На чтение 11 мин Просмотров 59.6к.

Виталий Леонидович Черкасов
Системный администратор, инженер компьютерных систем.
Задать вопрос
Технология ADSL, которая позволяет подключаться к интернету по телефонной линии, получила достаточно широкое распространение. Особенно популярна она в сельской местности, где другую разумную альтернативу найти трудно. Кроме того, стоит учитывать, что сейчас в доме находится не одно устройство, которое подключается к всемирной сети, а несколько. К тому же некоторые из них, например, смартфон или планшет, можно подключить только по Wi-Fi. Чтобы получать интернет по телефонной линии и раздавать его на стационарный компьютер и несколько мобильных устройств, можно воспользоваться ADSL маршрутизатором TP-LINK TD-W8961N или его аналогом TP-LINK TD-W8961ND.
Содержание
- Особенности и технические характеристики
- Индикаторы и разъемы
- Подключение
- Вход в настройки роутера
- Быстрая автоматическая настройка
- Ручная настройка
- Настройка для Ростелеком
- Подключение и параметры Wi-Fi
- Подключение IP TV
- Смена пароля
- Режим повторителя
- Обновление прошивки
- Сброс настроек
- Отзывы
Особенности и технические характеристики
Приведем основные характеристики TP-LINK TD-W8961N
- стандарты Wi-Fi: 802.11 b/a/g/n;
- макс. скорость Wi-Fi: 300 Мбит/с;
- скорость портов LAN: 100 Мбит/сек;
- количество портов: 4xLAN (RJ45), 1хDSL (RJ11);
- макс. скорость DSL: прием 24 Мбит/с, передача 3 Мбит/с;
- количество антенн и их тип: 2 несъемные с усилением 5 дБ;
- цена: 1400 до 1600 рублей по данным Яндекс-маркет.
ADSL маршрутизатор TP-LINK TD-W8961ND отличается от W8961N, только тем, что антенны у него съемные. Все остальные характеристики и настройка абсолютно одинаковые. Другой аналог той же марки с похожими техническими характристиками — TP-LINK TD-W8960N.

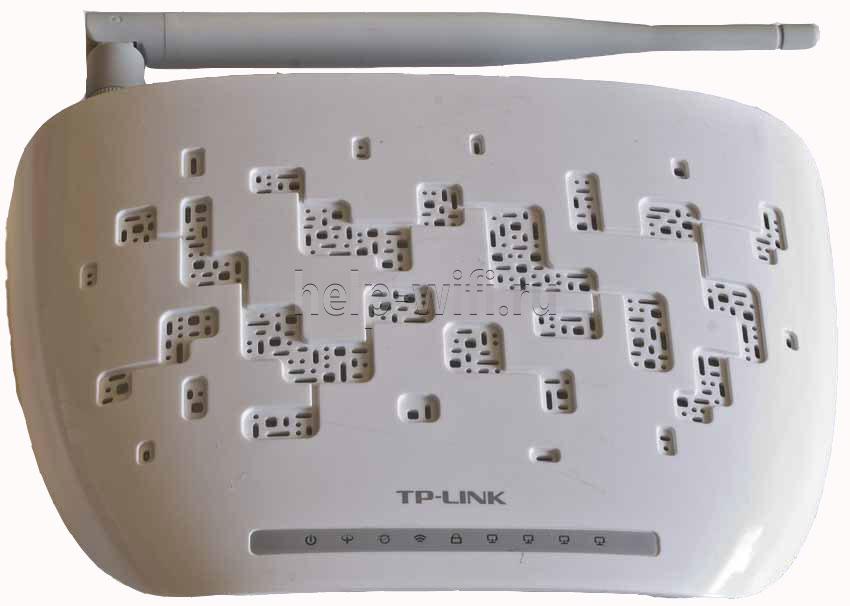
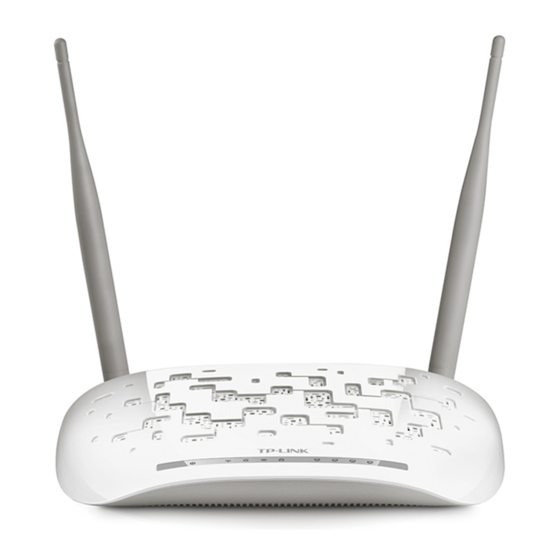
Оба гаджета могут функционировать как скоростной ADSL2+ модем, точка доступа и маршрутизатор. Благодаря современному дизайну они приятно выглядят. Кроме этого корпус, благодаря наличию вентиляционных отверстий, гарантирует стабильную работу даже при больших нагрузках.
На корпусе находится кнопка включения сети Wi-Fi, благодаря которой не нужно заходить в настройки роутера, чтобы отключить беспроводную сеть.
Работает в одном диапазоне 2,4 ГГц. Скорость соединения по Wi-Fi средняя. Это роутер из бюджетной ценовой категории, который решает базовые задачи. Для игр вряд ли подойдет.
Удобство и простота настройки
8
Индикаторы и разъемы
На передней панели ADSL роутера, слева направо, находятся такие индикаторы:
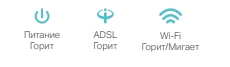
- Питание. Если индикатор горит, значит, маршрутизатор включен в электрическую сеть;
- ADSL. Включенный индикатор говорит о том, что соединение установлено, если он мигает, значит идет подключение роутера к ADSL;
- Internet. Этот индикатор загорается при подключении к всемирной сети;
- WLAN. Горит, когда Wi-Fi включен, но данные не передаются, мигающий индикатор говорит, что в данный момент происходит передача данных;
- WPS, данный индикатор загорается после подключения к нему другого устройства с помощью WPS, через 5 минут он погаснет. Мигающий индикатор сигнализирует о том, что сейчас происходит подключение мобильного гаджета к маршрутизатору;
- четыре индикатора, которые показывают состояние LAN портов.
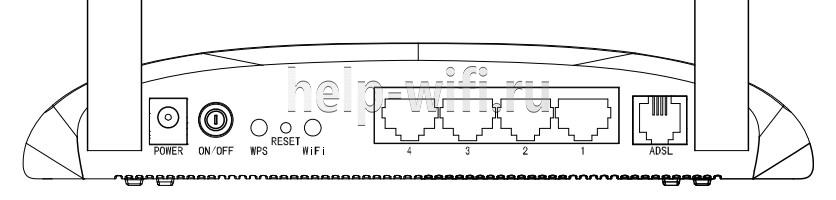
На задней панели ADSL роутера находится:
- разъем «POWER», который предназначен для подключения источника питания;
- кнопка ON/OFF включает и отключает питание;
- кнопка WPS используется для настройки WPS;
- кнопка RESET отвечает за сброс настроек к стандартным. Чтобы вернуться к исходным параметрам, нужно при включенном маршрутизаторе удерживать эту кнопку в течение 5 секунд;
- с помощью переключателя Wi-Fi можно включить или выключить беспроводную сеть;
- порты LAN 1, 2, 3, 4 используются для подключения роутера к ПК и другим устройствам;
- порт ADSL используется для подключения гаджета к телефону.
Подключение
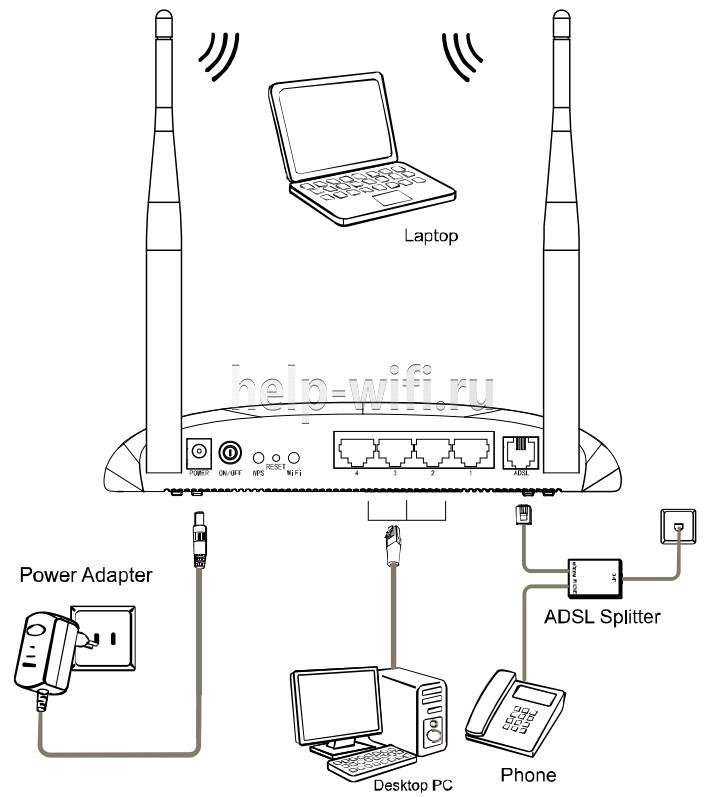
Подключение TP-LINK TD-W8961ND можно производить в таком порядке:
- подключаем маршрутизатор к телефонной линии. Для этого соединяем порт ADSL, расположенный на задней панели устройства, с разъемом MODEM сплиттера;
- соединяем один конец кабеля Ethernet к сетевому разъему компьютера, а другой к одному из 4 разъемов LAN роутера;
- включите ПК;
- воткните адаптер питания в разъем POWER и включите его в розетку;
- после этого нажмите кнопку ON/OFF.
Вход в настройки роутера
Для того зайти в настройки роутера, нужно ввести в адресной строке браузера http://tplinkmodem.net. Можно также использовать адрес IP 192.168.1.1. После этого откроется окно, в котором нужно ввести логин и пароль. По умолчанию имя пользователя и пароль совпадают и состоят из слова admin. Эти данные находятся на этикетке, которая наклеена на дне маршрутизатора.
Если пароль не подходит, значит, он был изменен, и настройки TP-LINK TD-W8961ND нужно сбросить до заводских. Для этого нужно при включенном роутере нажать кнопку RESET и подождать 5 секунд. После этого можно войти в админ-панель маршрутизатора с паролем по умолчанию.
Быстрая автоматическая настройка
В модели ADSL роутера TP-LINK TD-W8961ND настройка может быть произведена автоматически.
- Для того, чтобы ее запустить, нужно выбрать пункт меню «Быстрый старт» и кликнуть по нему, чтобы открылось начальное окно;
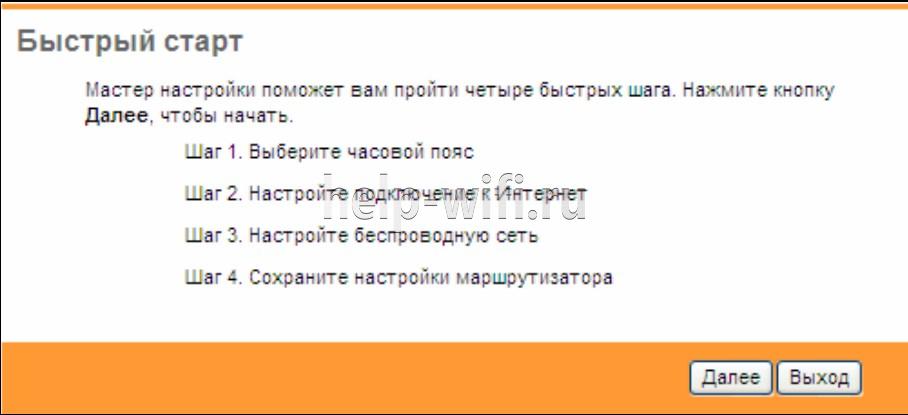
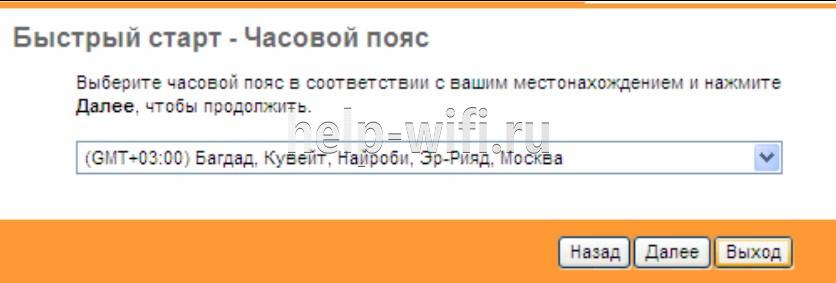
- В окне «Часовой пояс» можно установить свой часовой пояс;
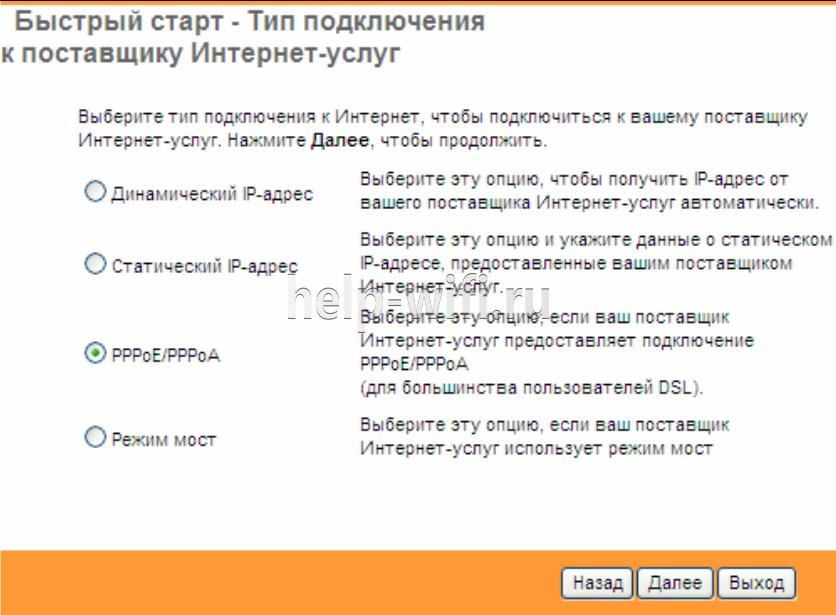
- В следующем окне выбирается тип подключения к провайдеру. Чаще всего это РРРоЕ/РРРоА. В договоре с провайдером можно узнать тип подключения.
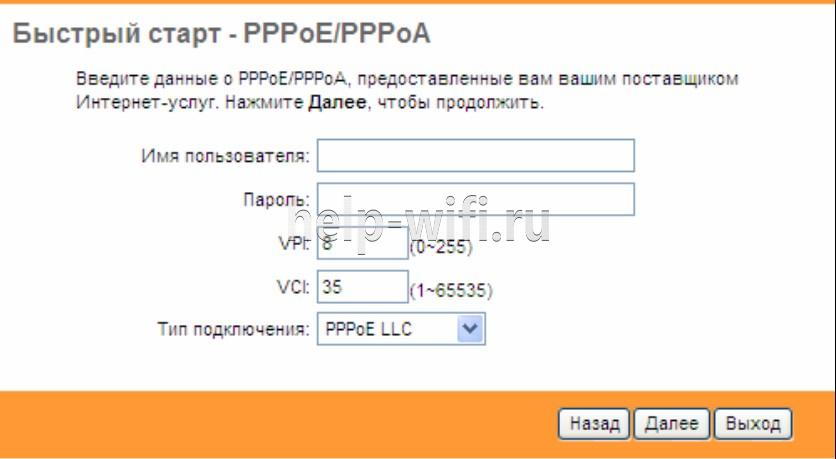
- В новом окне нужно ввести сведения об интернет-соединении, которые можно узнать у своего провайдера, посмотрев в договоре;
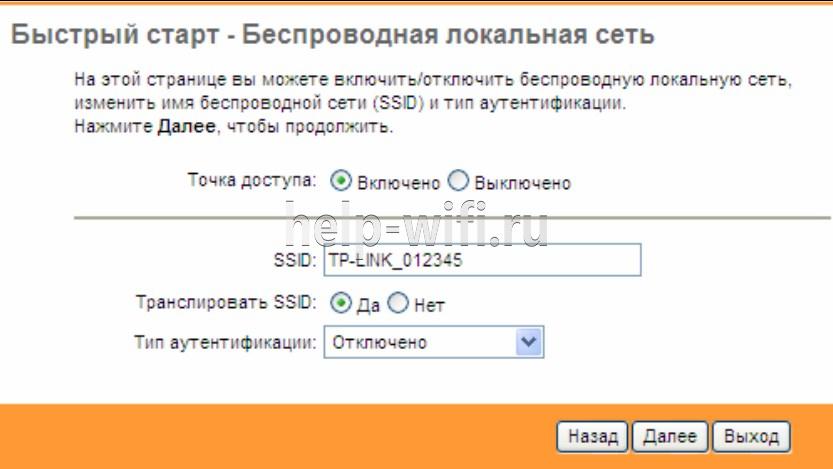
- В появившемся окне вводятся сведения о параметрах сети Wi-Fi.
- Следующее окно является конечным. Чтобы закончить настройку, нажмите кнопку «Далее».

Ручная настройка
Ручная настройка TP-LINK TD-W8961ND состоит из ввода параметров интернет-соединения и Wi-Fi.
Чтобы настроить Internet, требуется:
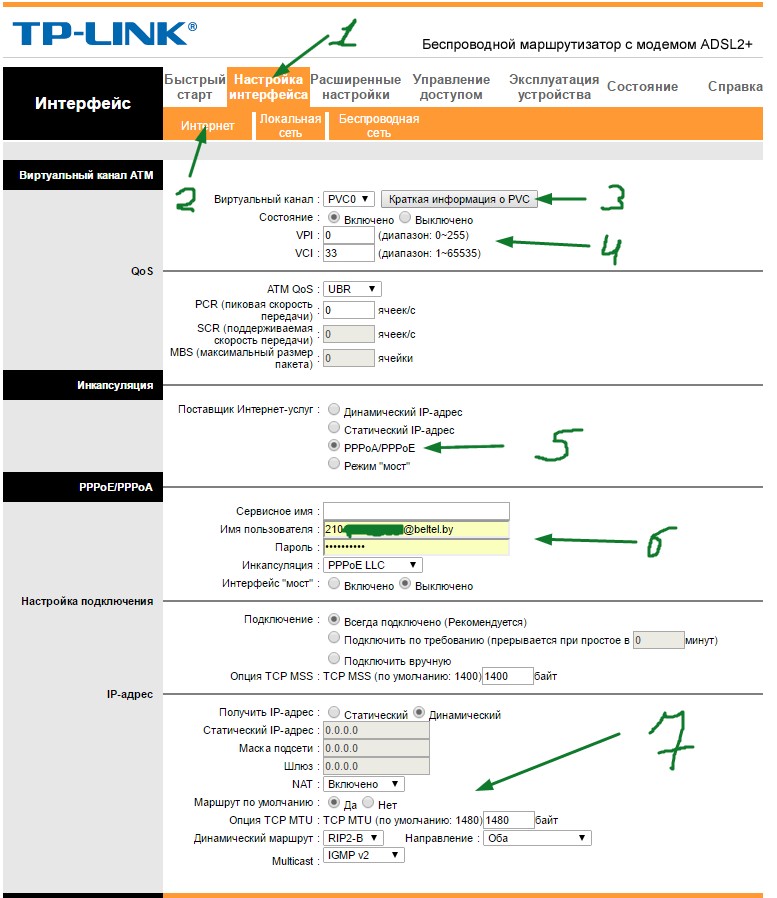
- Войти в меню «Настройка интерфейса»;
- Зайти в подменю «Интернет»;
- Выберите канал PCV0;
- Укажите значение параметров VPI и VCI, предоставленное поставщиком интернет;
- Устанавливаем режим PPPoA/PPPoE или другой;
- Вводим имя пользователя и пароль, указанные провайдером.

Настройка для Ростелеком
Настройка роутера TP-LINK TD-W8961ND для Ростелекома происходит так же, как было описано выше. При настройке параметр VPI равен 0, а VCI – 35. Пароль у каждого индивидуальный. Все остальные значения такие же, как и в предыдущем пункте.
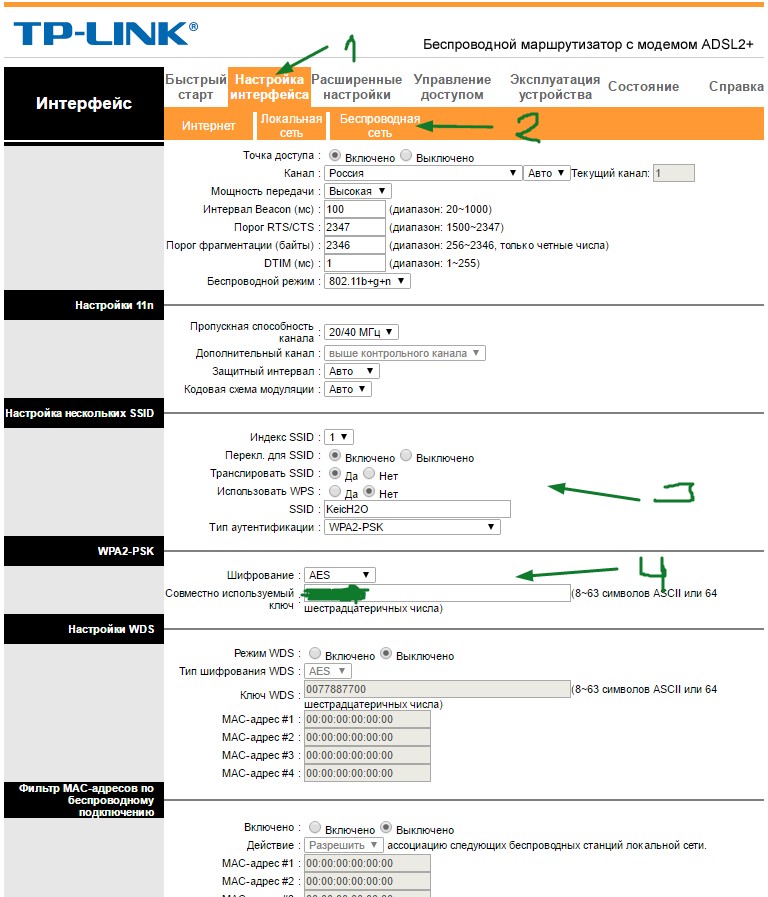
Подключение и параметры Wi-Fi
Для настройки беспроводной сети на маршрутизаторе TP-LINK TD-W8961ND нужно:
- Заходим в меню «Настройка интерфейса»;
- Выбираем подменю «Беспроводная сеть»;
- В поле SSID вводим имя сети;
- Водим пароль в поле «Совместно используемый ключ».

Подключение IP TV
Роутер поддерживает технологию IPTV. Для того, чтобы ее подключить, нужно:
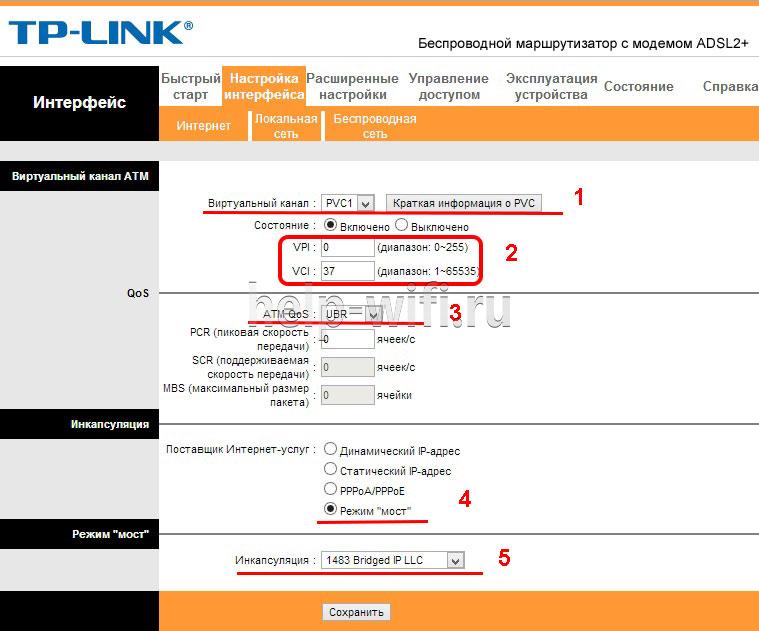
- Зайти в меню «Настройка интерфейса» подменю «Беспроводная сеть» и в строке «Виртуальный канал» выбрать PVC1;
- Установить значения VPI/VCI, которые необходимо уточнить у поставщика услуг Internet;
- В строке «ATM QoS» выбираем значение UBR;
- Выбираем тип соединения – мост;
- В строке инкапсуляция выбираем значение 1483 Bridged IP LLC.
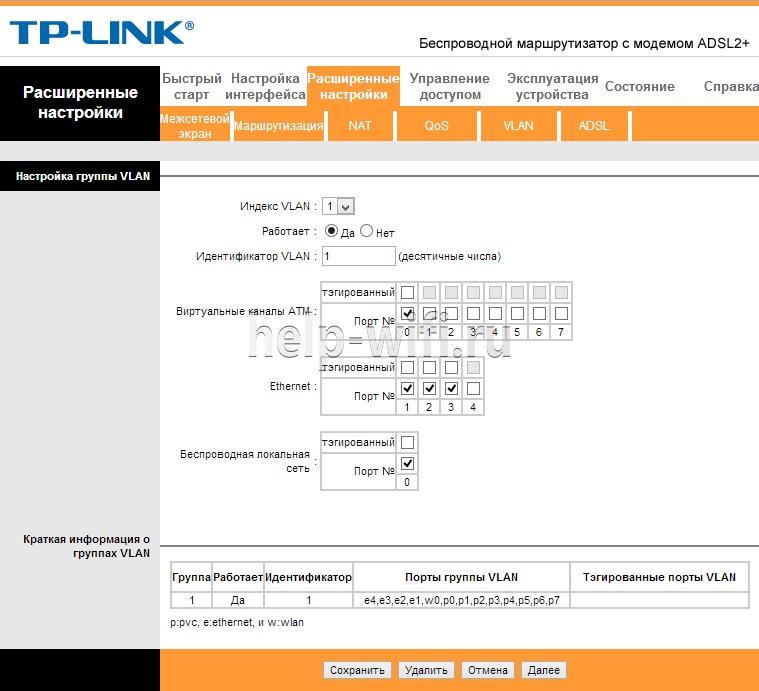
Теперь нужно настроить LAN порты. Для этого:
- Заходим в меню «Расширенные настройки», подменю «VLAN». Проверяем, чтобы функция VLAN была включена;
- Выбираем строку «Определить группу VLAN»;

- В новом окне выставляем параметры, как на рисунке. После этого нажимаем кнопку «Сохранить» и «Далее»;
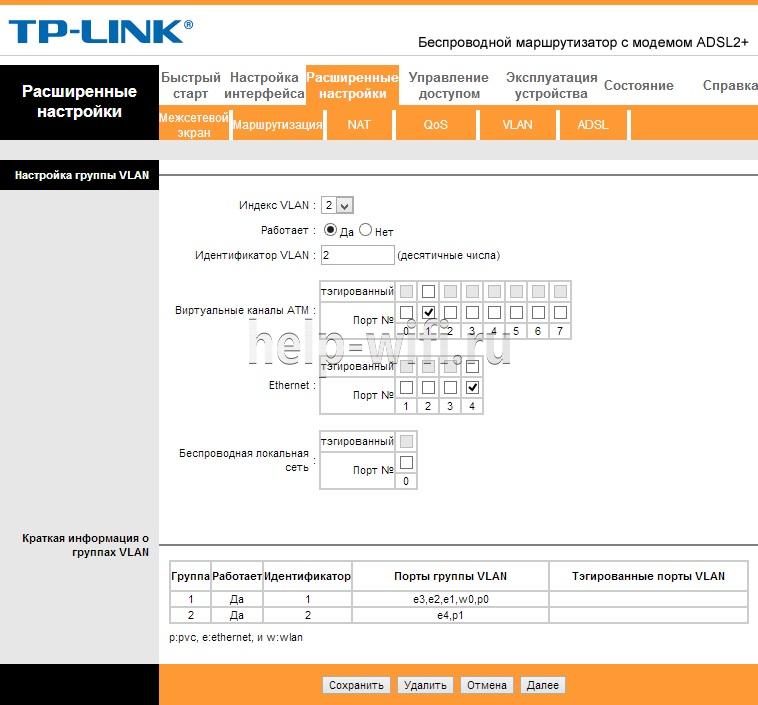
В появившемся окне снова устанавливаем параметры с картинки и жмем «Сохранить», «Далее»;
- В следующем окне в строке «Виртуальный канал №1» меняем значение на 2, в строке «Порт 4» устанавливаем то же значение;
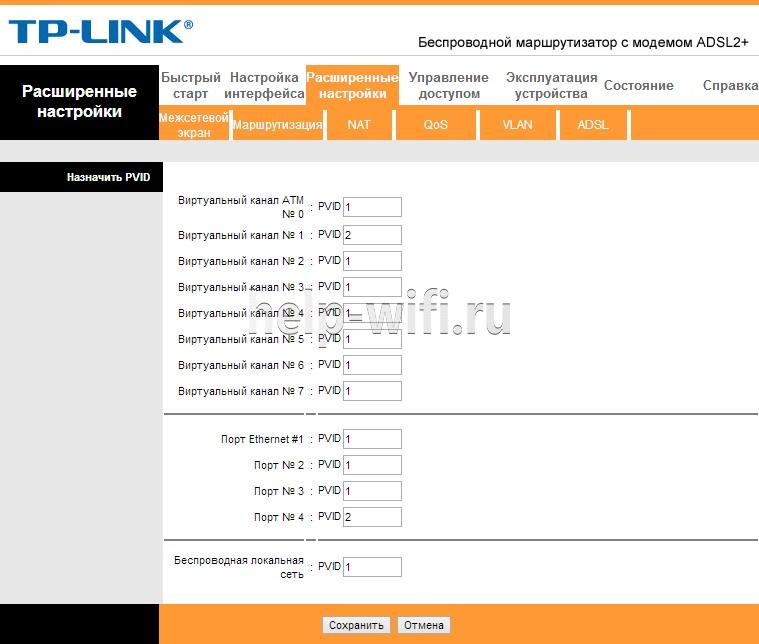
Теперь через 4й порт LAN можно подключать интерактивное телевидение.
Смена пароля
Установить другой пароль можно, зайдя в меню «Эксплуатация устройств», подменю «администрирование». Для этого нужно его ввести дважды и нажать кнопку «Сохранить».
Режим повторителя
Бывает, что для покрытия площади квартиры или дома недостаточно мощности обычного роутера. На помощь приходят репитеры — усилители беспроводного сигнала. Подключив такой гаджет, пользователь получает мощный хороший сигнал, там, где стандартный роутер «не тянет». Например, к классу повторителей относится устройство Tp-Link TL WA850RE.
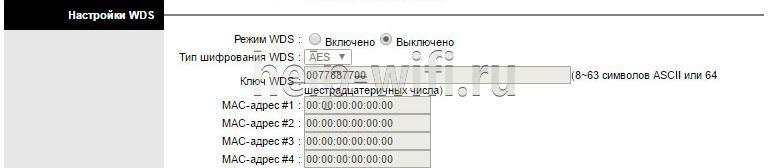
Но в качестве усилителя можно использовать и обычный роутер. Для работы TP-LINK TD-W8961ND в режиме репитера нужно в настройках Wi-Fi («Настройка интерфейса» -> «Беспроводная сеть») включить WDS и ввести MAC адрес точки доступа, к которой будет подключаться ваш маршрутизатор.
Обновление прошивки
Прежде чем менять прошивку, нужно скачать последнюю версию с официального сайта и сохранить его на свой компьютер. После этого зайдите в меню «Эксплуатация устройства» -> «Встроенное ПО». Откроется такое окно:
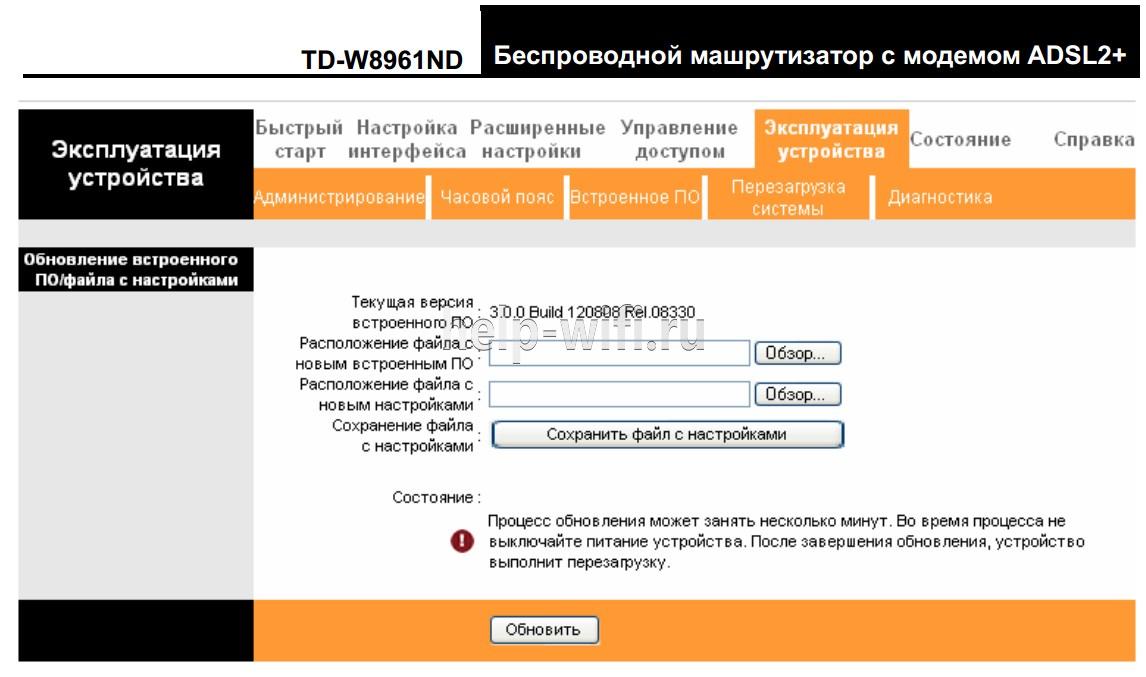
Перед тем, как выполнять обновление ПО, рекомендуется сделать копию текущего состояния роутера. Для этого нажмите кнопку «Сохранить файл с настройками» и сохраните файл на жесткий диск.
После этого можно приступать к обновлению. В строке «Расположение файла с новым встроенным ПО» есть кнопка «Обзор». Нажмите ее и выберите скачанный с официального сайта файл с последней версией прошивки. После этого загрузите старые настройки.
Сброс настроек
Существуют два способа сброса:
- Нажмите на кнопку RESET при включенном роутере и удерживайте ее в течение 5 секунд, пока маршрутизатор не перегрузится;
- В меню «Эксплуатация устройства» выбрать «Перезагрузка системы».
Отзывы
Мы проанализировали отзывы пользователей о роутере и выявили основные достоинства и недостатки модели.
меню на русском языке;
надежность, работает без глюков и подвисаний;
хорошая скорость Wi-Fi.
иногда может перегреваться;
небольшой радиус действия.
-
Contents
-
Table of Contents
-
Troubleshooting
-
Bookmarks
Quick Links
TD-W8961N
300Mbps Wireless N ADSL2+ Modem Router
Rev: 1.0.1
1910011217
Related Manuals for TP-Link TD-W8961N
Summary of Contents for TP-Link TD-W8961N
-
Page 1
TD-W8961N 300Mbps Wireless N ADSL2+ Modem Router Rev: 1.0.1 1910011217… -
Page 2
Specifications are subject to change without notice. is a registered trademark of TP-LINK TECHNOLOGIES CO., LTD. Other brands and product names are trademarks or registered trademarks of their respective holders. No part of the specifications may be reproduced in any form or by any means or used to make any derivative such as translation, transformation, or adaptation without permission from TP-LINK TECHNOLOGIES CO., LTD. -
Page 3: Fcc Statement
FCC STATEMENT This equipment has been tested and found to comply with the limits for a Class B digital device, pursuant to part 15 of the FCC Rules. These limits are designed to pro-vide reasonable protection against harmful interference in a residential installation. This equipment generates, uses and can radiate radio frequency energy and, if not in-stalled and used in accordance with the instructions, may cause harmful interference to radio communications.
-
Page 4: Ce Mark Warning
CE Mark Warning This is a class B product. In a domestic environment, this product may cause radio interference, in which case the user may be required to take adequate measures. Canadian Compliance Statement This device complies with Industry Canada license-exempt RSS standard(s). Operation is subject to the following two conditions: (1) This device may not cause interference, and (2)This device must accept any interference, including interference that may cause undesired…
-
Page 5: Safety Information
射頻電機需忍受合法通信或工業、科學以及醫療用電波輻射性電機設備之干擾。 安全諮詢及注意事項 ●請使用原裝電源供應器或只能按照本產品注明的電源類型使用本產品。 ●清潔本產品之前請先拔掉電源線。請勿使用液體、噴霧清潔劑或濕布進行清潔。 ●注意防潮,請勿將水或其他液體潑灑到本產品上。 ●插槽與開口供通風使用,以確保本產品的操作可靠並防止過熱,請勿堵塞或覆蓋開口。 ●請勿將本產品置放於靠近熱源的地方。除非有正常的通風,否則不可放在密閉位置中。 ●請不要私自打開機殼,不要嘗試自行維修本產品,請由授權的專業人士進行此項工作。 UkrSEPRO Продукт сертифіковано згідно с правилами системи УкрСЕПРО на відповідність вимогам нормативних документів та вимогам, що передбачені чинними законодавчими актами України. Safety Information When product has power button, the power button is one of the way to shut off the product; …
-
Page 6: Declaration Of Conformity
DECLARATION OF CONFORMITY For the following equipment: Product Description: 300Mbps Wireless N ADSL2+ Modem Router Model No.: TD-W8961N Trademark: TP-LINK We declare under our own responsibility that the above products satisfy all the technical regulations applicable to the product within the scope of Council Directives:…
-
Page 7: Table Of Contents
CONTENTS Package Contents ………………..1 Chapter 1 Introduction ………………2 Product Overview ……………… 2 Main Features ………………2 Conventions ………………3 Chapter 2 Hardware Installation …………….4 The Front Panel ………………4 The Back Panel ………………6 Installation Environment ……………. 7 Connecting the Modem Router ………….
-
Page 8
4.5.2 Filter ………………….48 4.5.3 SNMP …………………. 56 4.5.4 UPnP ………………….. 56 4.5.5 DDNS …………………. 57 4.5.6 CWMP ………………… 57 Maintenance ………………58 4.6.1 Administration ………………59 4.6.2 Time Zone ………………..59 4.6.3 Firmware………………..61 4.6.4 SysRestart ………………..63 4.6.5 Diagnostics ………………..63 Help ………………… -
Page 9: Package Contents
300Mbps Wireless N ADSL2+ Modem Router User Guide Package Contents The following contents should be found in your package: One TD-W8961N 300Mbps Wireless N ADSL2+ Modem Router One Power Adapter for TD-W8961N 300Mbps Wireless N ADSL2+ Modem Router Quick Installation Guide One RJ45 cable …
-
Page 10: Chapter 1 Introduction
The device is designed to provide a simple and cost-effective ADSL Internet connection for a private Ethernet or IEEE 802.11n/ IEEE 802.11g/ IEEE 802.11b wireless network. The TD-W8961N connects to an Ethernet LAN or computers via standard Ethernet ports. The ADSL connection is made using ordinary telephone line with standard connectors. Multiple workstations can be networked and connected to the Internet using a single Wide Area Network (WAN) interface and single global IP address.
-
Page 11: Conventions
Provides 64/128-bit WEP encryption security and wireless LAN ACL (Access Control List). 1.3 Conventions The modem router or device mentioned in this User Guide stands for TD-W8961N without any explanations. Parameters provided in the pictures are just references for setting up the product, which may…
-
Page 12: Chapter 2 Hardware Installation
TD-W8961N 300Mbps Wireless N ADSL2+ Modem Router User Guide Chapter 2 Hardware Installation 2.1 The Front Panel Figure 2-1 The LEDs locate on the front panel. They indicate the device’s working status. For details, please refer to LED Explanation. LED Explanation:…
-
Page 13
TD-W8961N 300Mbps Wireless N ADSL2+ Modem Router User Guide enabled. Please refer to 4.3.3.1 WPS Settings for more information. There is a device connected to this LAN port. The modem router is sending or receiving data over this LAN (LAN1-4) Flash port. -
Page 14: The Back Panel
TD-W8961N 300Mbps Wireless N ADSL2+ Modem Router User Guide 2.2 The Back Panel Figure 2-2 POWER: The Power plug is where you will connect the power adapter. ON/OFF: The switch for the power. WPS: The switch for the WPS function. For details, please refer to 4.3.3.1 Wireless-WPS…
-
Page 15: Installation Environment
Keep away from the strong electromagnetic radiation and the device of electromagnetic sensitive. Generally,TD-W8961N is placed on a horizontal surface. The device also can be mounted on the wall as shown in Figure 2-3 Wall-mount Install. Figure 2-3 Wall-mount Install …
-
Page 16
Plug one end of the twisted-pair ADSL cable into the ADSL port on the rear panel of TD-W8961N. Connect the other end to the MODEM port of the external splitter. Step 2: Connect the Ethernet cable. Attach one end of a network cable to your computer’s Ethernet port or a regular hub/switch port, and the other end to the LAN port on the TD-W8961N. -
Page 17: Chapter 3 Quick Installation Guide
Chapter 3 Quick Installation Guide 3.1 TCP/IP Configuration The default IP address of the TD-W8961N 300Mbps Wireless N ADSL2+ Modem Router is 192.168.1.1. And the default Subnet Mask is 255.255.255.0. These values can be changed as you desire. In this guide, we use all the default values for description.
-
Page 18: Login
TD-W8961N 300Mbps Wireless N ADSL2+ Modem Router User Guide Figure 3-2 You can check it following the steps below: Is the connection between your PC and the router correct? The LEDs of LAN port which you link to the device and the LEDs on your PC’s adapter should be lit.
-
Page 19
TD-W8961N 300Mbps Wireless N ADSL2+ Modem Router User Guide Step 1: Select the Quick Start tab, then click RUN WIZARD, and you will see the next screen. Click the NEXT button. Figure 3-4 Step 2: Configure the time for the modem router, and then click the NEXT button. -
Page 20
TD-W8961N 300Mbps Wireless N ADSL2+ Modem Router User Guide Figure 3-7 Step 5: Configure the rules for the WLAN, and click NEXT. Figure 3-8 Note: If the Access Point is activated, the wireless function will be available even without the external antenna because of an additional printed antenna. -
Page 21: Chapter 4 Software Configuration
TD-W8961N 300Mbps Wireless N ADSL2+ Modem Router User Guide Chapter 4 Software Configuration This User Guide recommends using the “Quick Installation Guide” for first-time installation. For advanced users, if you want to know more about this device and make use of its functions adequately, maybe you will get help from this chapter to configure the advanced settings through the Web-based Utility.
-
Page 22: System Log
TD-W8961N 300Mbps Wireless N ADSL2+ Modem Router User Guide Figure 4-2 Note: Click the other submenus System Log or Statistics in Figure 4-2, and you will be able to view the system log and traffic statistics about the modem router.
-
Page 23: Statistics
TD-W8961N 300Mbps Wireless N ADSL2+ Modem Router User Guide Figure 4-3 The modem router can keep logs of all traffic. You can query the logs to find what happened to the modem router. Click the CLEAR LOG button to clear the logs.
-
Page 24
TD-W8961N 300Mbps Wireless N ADSL2+ Modem Router User Guide Figure 4-4 Interface: You can select Ethernet, ADSL and WLAN to view the corresponding network traffic over different ports. Select Ethernet, and you will see the statistics table as below. -
Page 25: Quick Start
TD-W8961N 300Mbps Wireless N ADSL2+ Modem Router User Guide Select ADSL, and you will see the statistics table as below. Statistics Table: Transmit total PDUs The total PDUs transmitted over the ADSL port. Transmit The total errors occurred over the ADSL port when data…
-
Page 26: Interface Setup
TD-W8961N 300Mbps Wireless N ADSL2+ Modem Router User Guide 4.3 Interface Setup Choose “Interface Setup”, you can see the next submenus: Figure 4-5 Click any of them, and you will be able to configure the corresponding function. 4.3.1 Internet Choose “Interface Setup→Internet” menu, you can configure the parameters for WAN ports in the next screen (shown in Figure 4-6).
-
Page 27
TD-W8961N 300Mbps Wireless N ADSL2+ Modem Router User Guide Status: If you want to use a designed VC, you should activate it. • • VPI: Identifies the virtual path between endpoints in an ATM network. The valid range is from 0 to 255. Please input the value provided by your ISP. -
Page 28
TD-W8961N 300Mbps Wireless N ADSL2+ Modem Router User Guide RIP2 format, the difference is that RIP2-M using Multicast, while RIP2-B using Broadcast format. Direction: Select this option to specify the RIP direction. None is for disabling the RIP • function. Both means the ADSL modem router will periodically send routing information and accept routing information, and then incorporate them into routing table. -
Page 29
TD-W8961N 300Mbps Wireless N ADSL2+ Modem Router User Guide PPPoE connection. Select Static PPPoE to use a static IP address for your PPPoE connection. Please enter the information accordingly. Figure 4-9 Servicename: Enter a name to mark current connection, or you can leave it blank. -
Page 30: Lan
TD-W8961N 300Mbps Wireless N ADSL2+ Modem Router User Guide Static/Dynamic IP Address: For PPPoA/PPPoE connection, you need to specify the public IP address for this ADSL modem router. The IP address can be either dynamically (via DHCP) or given IP address provided by your ISP. For Static IP, you need to specify the IP address, Subnet Mask and Gateway IP address.
-
Page 31
TD-W8961N 300Mbps Wireless N ADSL2+ Modem Router User Guide Figure 4-11 Router Local IP: These are the IP settings of the LAN interface for the device. These settings may be referred to as Private settings. You may change the LAN IP address if needed. -
Page 32
TD-W8961N 300Mbps Wireless N ADSL2+ Modem Router User Guide means the ADSL modem router will only accept but will not send RIP packet. OUT only means the ADSL modem router will only send but will not accept RIP packet. Multicast: Select IGMP version, or disable the function. IGMP (Internet Group Multicast •… -
Page 33
TD-W8961N 300Mbps Wireless N ADSL2+ Modem Router User Guide Physical Ports: If a physical port is unchecked, the client connected to that port will not • be able to obtain IP address automatically although the DHCP function is enabled. All the ports are checked by default. -
Page 34: Wireless
TD-W8961N 300Mbps Wireless N ADSL2+ Modem Router User Guide Figure 4-13 DHCP Server IP for Relay Agent: Enter the DHCP server IP Address runs on WAN • side. Note: If you select Disabled, the DHCP function will not take effect.
-
Page 35
TD-W8961N 300Mbps Wireless N ADSL2+ Modem Router User Guide Figure 4-14… -
Page 36: 11N Settings
TD-W8961N 300Mbps Wireless N ADSL2+ Modem Router User Guide Access point Settings: These are the settings of the access point. You can configure the rules to allow wireless-equipped computers and other devices to communicate with a wireless network. Access point: Select Activated to allow wireless station to associate with the access •…
-
Page 37: Multiple Ssids Settings
TD-W8961N 300Mbps Wireless N ADSL2+ Modem Router User Guide Extension Channel: If “20/40 MHz” is selected, this option will be displayed. • • Guard Interval: Select the guard interval you want from the drop-down list. MCS: Select the wireless transmission rate from the drop-down list. By default, the •…
-
Page 38
TD-W8961N 300Mbps Wireless N ADSL2+ Modem Router User Guide Figure 4-16 WEP-128Bits To configure WEP-128Bits settings, select the WEP-128Bits option from the drop-down list. The menu will change to offer the appropriate settings. 128-bit is stronger than 64-bit. Figure 4-17 WPA-PSK To configure WPA-PSK settings, select the WPA-PSK option from the drop-down list. -
Page 39
TD-W8961N 300Mbps Wireless N ADSL2+ Modem Router User Guide Figure 4-18 Encryption: Select the encryption you want to use: TKIP/AES, TKIP or AES (AES is an encryption method stronger than TKIP). • TKIP (Temporal Key Integrity Protocol) — a wireless encryption protocol that provides dynamic encryption keys for each packet transmitted. -
Page 40
TD-W8961N 300Mbps Wireless N ADSL2+ Modem Router User Guide Figure 4-20 WPS Settings: WPS can help you to add a new wireless device to an existing network quickly. This section will guide you how to use WPS function. WPS state: Display the current WPS state. -
Page 41
TD-W8961N 300Mbps Wireless N ADSL2+ Modem Router User Guide Step 2: Press and hold the WPS button of the adapter directly for 2 or 3 seconds. Step 3: Wait for a while until the next screen appears. Click Finish to complete the WPS configuration. -
Page 42
TD-W8961N 300Mbps Wireless N ADSL2+ Modem Router User Guide The WPS Configuration Screen of Wireless Adapter Step 3: Wait for a while until the next screen appears. Click Finish to complete the WPS configuration. The WPS Configuration Screen of Wireless Adapter… -
Page 43
TD-W8961N 300Mbps Wireless N ADSL2+ Modem Router User Guide Figure 4-22 Method One: Enter the PIN into my modem router Step 1: For the configuration of the wireless adapter, please choose “Enter a PIN into my access point or a registrar” in the configuration utility of the WPS, and get the PIN code on the screen as below, then click Next. -
Page 44
TD-W8961N 300Mbps Wireless N ADSL2+ Modem Router User Guide Figure 4-23 Method Two: Enter the PIN from my modem router Step 1: Get the Current PIN code of the modem router from AP self PIN code in Figure 4-23 (each modem router has its unique PIN code. Here takes the PIN code 55924054 of this modem router for example). -
Page 45: Advanced Setup
TD-W8961N 300Mbps Wireless N ADSL2+ Modem Router User Guide SSID: Wireless network name shared among all points in a wireless network. The SSID • must be identical for all devices in the wireless network. It is case-sensitive and must not exceed 32 characters (use any of the characters on the keyboard).
-
Page 46: Routing
TD-W8961N 300Mbps Wireless N ADSL2+ Modem Router User Guide Figure 4-25 Firewall: Select this option can automatically detect and block Denial of Service (DoS) attacks, such as Ping of Death, SYN Flood, Port Scan and Land Attack. SPI: If you enable SPI, all traffics initiated from WAN would be blocked, including DMZ, …
-
Page 47: Nat
TD-W8961N 300Mbps Wireless N ADSL2+ Modem Router User Guide Gateway IP Address: Enter the IP address of the gateway. The gateway is an immediate neighbor of your ADSL modem router that will forward the packet to the destination. On the LAN, the gateway must be a modem router on the same segment as your modem router;…
-
Page 48
TD-W8961N 300Mbps Wireless N ADSL2+ Modem Router User Guide 4.4.3.1 DMZ Choose “Advanced Setup→NAT→DMZ” in Figure 4-28, you can configure the DMZ host in the next screen. A DMZ (demilitarized zone) is a host between a private local network and the outside public network. -
Page 49
TD-W8961N 300Mbps Wireless N ADSL2+ Modem Router User Guide example, if you want to set the FTP Virtual server, you can set the start and end port number to 21. Local IP Address: Enter the IP Address for the Virtual Server in LAN side. -
Page 50: Qos
TD-W8961N 300Mbps Wireless N ADSL2+ Modem Router User Guide Local Start & End IP: Enter the local IP Address you plan to map to. Local Start IP is the starting local IP address and Local End IP is the ending local IP address. If the rule is for all local IPs, then the Start IP is 0.0.0.0 and the End IP is 255.255.255.255.
-
Page 51
TD-W8961N 300Mbps Wireless N ADSL2+ Modem Router User Guide Figure 4-32 QoS: Select this option to Activate/Deactivate the IP QoS on different types (IP ToS and DiffServ). Summary: Click the button to view the configurations of QoS. Rule: Configure the rules for QoS. If the traffic complies with the rule, then the modem router … -
Page 52: Vlan
TD-W8961N 300Mbps Wireless N ADSL2+ Modem Router User Guide Source MAC & IP & Mask & Port Range: Enter the IP information about the Source • host for the rule. Protocol ID: Select one among TCP/UDP, TCP, UDP or ICMP protocols for the •…
-
Page 53
TD-W8961N 300Mbps Wireless N ADSL2+ Modem Router User Guide Figure 4-33 Assign VLAN PVID for each Interface Click Assign VLAN PVID for each Interface in Figure 4-33, you can assign the PVID for each interface in the next screen (shown in Figure 4-34). -
Page 54: Adsl
TD-W8961N 300Mbps Wireless N ADSL2+ Modem Router User Guide Figure 4-35 VLAN Index: Select the VLAN index for this VC. You can specify 8 groups in maximum. VLAN ID: This indicates the VLAN group. ATM VCs: Select the ATM VCs as members of VLAN, and if you leave the Tagged blank, the …
-
Page 55: Access Management
TD-W8961N 300Mbps Wireless N ADSL2+ Modem Router User Guide Figure 4-36 ADSL Mode: Select the ADSL operation mode which your ADSL connection uses. ADSL Type: Select the ADSL operation type which your ADSL connection uses. 4.5 Access Management Choose “Access Management”, you can see the next submenus:…
-
Page 56: Filter
TD-W8961N 300Mbps Wireless N ADSL2+ Modem Router User Guide Figure 4-38 ACL: If Activated, the IP addresses which are contained in the Access Control List can access to the modem router. If Deactivated, all IP addresses can access to the modem router.
-
Page 57
TD-W8961N 300Mbps Wireless N ADSL2+ Modem Router User Guide Figure 4-39 Filter Type Selection: Select the filter type for the configuration below. IP/MAC Filter Set Index: Select the Set index for the IP Filter entry. This index can match … -
Page 58
TD-W8961N 300Mbps Wireless N ADSL2+ Modem Router User Guide Note: Incoming means that IP traffic which is coming into the modem router, and the Outgoing means that IP traffic which is going out the modem router. IP/MAC Filter Rule Index: Select the Rule index for the IP Filter entry. -
Page 59
TD-W8961N 300Mbps Wireless N ADSL2+ Modem Router User Guide Note: If you want to make the rule take effect, please select Yes to active the rule. Step 3: Enter the “Source IP Address”, “Destination IP Address”, “Subnet Mask” and “Port Number”… -
Page 60
TD-W8961N 300Mbps Wireless N ADSL2+ Modem Router User Guide 4.5.2.2 MAC Filter Select IP/MAC Filter as the Filter type, and select MAC as the Rule type (shown in Figure 4-40), and then you can configure the filter rules based on MAC address. -
Page 61
TD-W8961N 300Mbps Wireless N ADSL2+ Modem Router User Guide Select the “MAC” as the Rule Type on the Filter screen (show in Figure 4-40). , Then you can configure the specific rule for the example. Step 2: Select the IP/MAC Filter Set Index and IP/MAC Filter Rule Index for the rule, then select the Interface “PVC0”, and select the Direction “Outgoing”… -
Page 62
TD-W8961N 300Mbps Wireless N ADSL2+ Modem Router User Guide Figure 4-41 Filter Type Selection: Select the Application Filter for the next configuration. Application Filter: Activate or deactivate the function. ICQ & MSN & YMSG & Real Audio/Video: Select Allow or Deny for these applications. If … -
Page 63
TD-W8961N 300Mbps Wireless N ADSL2+ Modem Router User Guide Figure 4-42 Filter Type Selection: Select the URL Filter for the next configuration. Active: Select “Yes” to make the rule to take effect. URL Index: Select the index for the URL Filter entry. -
Page 64: Snmp
TD-W8961N 300Mbps Wireless N ADSL2+ Modem Router User Guide 4.5.3 SNMP Choose “Access Management→SNMP”, you can see the SNMP screen. The Simple Network Management Protocol (SNMP) is used for exchanging information between network devices. Figure 4-43 Get Community: Set the password for the incoming Get and Get next requests from the …
-
Page 65: Ddns
TD-W8961N 300Mbps Wireless N ADSL2+ Modem Router User Guide Auto-configured: If you activate the function, then the UPnP network devices can automatically configure network addressing, announce their presence in the network to other UPnP devices and enable exchange of simple product and service descriptions.
-
Page 66: Maintenance
TD-W8961N 300Mbps Wireless N ADSL2+ Modem Router User Guide Figure 4-46 CWMP: Select activate the CWMP function. URL: Enter the website of ACS which is provided by your ISP. User Name/Password: Enter the User Name and password to login the ACS server.
-
Page 67: Administration
TD-W8961N 300Mbps Wireless N ADSL2+ Modem Router User Guide 4.6.1 Administration Choose “Maintenance→Administration”, you can set new password for admin in the screen (shown in Figure 4-48). Figure 4-48 Note: There is only one account that can access Web-Management interface. The default account is «admin», and the password is «admin».
-
Page 68
TD-W8961N 300Mbps Wireless N ADSL2+ Modem Router User Guide Figure 4-49 Note: The ADSL modem router built-in some NTP Servers, when the modem router connects to the Internet, the modem router will get the system time automatically from the NTP Server. You can also configure the NTP Server address manually, and then the modem router will get the time from the specific Server firstly. -
Page 69: Firmware
TD-W8961N 300Mbps Wireless N ADSL2+ Modem Router User Guide Figure 4-51 4.6.3 Firmware Choose “Maintenance→Firmware”, you can upgrade the firmware of the modem router in the screen (shown in Figure 4-52). Make sure the firmware or romfile you want to use is on the local hard drive of the computer.
-
Page 70
TD-W8961N 300Mbps Wireless N ADSL2+ Modem Router User Guide The modem router will reboot after the upgrading has been finished. To back up the modem router’s current settings: Step 1: Click the ROMFILE SAVE button (shown in Figure 4-52), click Save button in the next screen (shown in Figure 4-53) to proceed. -
Page 71: Sysrestart
TD-W8961N 300Mbps Wireless N ADSL2+ Modem Router User Guide 4.6.4 SysRestart Choose “Maintenance→SysRestart”, you can select to restart the device with current settings or restore to factory default settings in the screen (shown in Figure 4-55). Figure 4-55 4.6.5 Diagnostics Choose “Maintenance→Diagnostics”, you can view the test results for the connectivity of the…
-
Page 72: Help
TD-W8961N 300Mbps Wireless N ADSL2+ Modem Router User Guide Figure 4-56 4.7 Help Choose “Help”, you can view the help information for configuration of any function.
-
Page 73
TD-W8961N 300Mbps Wireless N ADSL2+ Modem Router User Guide Figure 4-57 Note: Click the tab, and you will be able to get the corresponding information. -
Page 74: Appendix A: Specifications
TD-W8961N 300Mbps Wireless N ADSL2+ Modem Router User Guide Appendix A: Specifications General ANSI T1.413, ITU G.992.1, ITU G.992.2, ITU G.992.3, ITU G.992.5, Standards and Protocols IEEE 802.11b, IEEE 802.11g, IEEE 802.11n, IEEE 802.3, IEEE 802.3u, TCP/IP, PPPoA, PPPoE, SNTP, HTTP, DHCP, ICMP, NAT Safety &…
-
Page 75: Appendix B: Troubleshooting
TD-W8961N 300Mbps Wireless N ADSL2+ Modem Router User Guide Appendix B: Troubleshooting T1. How do I restore my Modem Router’s configuration to its factory default settings? With the modem router powered on, press and hold the RESET button on the rear panel for 8 to 10 seconds before releasing it.
-
Page 76
TD-W8961N 300Mbps Wireless N ADSL2+ Modem Router User Guide For Windows XP Click “Start -> Control Panel -> Network and Internet Connections -> Network Connections”. Right-click Wireless Network Connection (or Local Area Connection), and then click Properties. Select Internet Protocol (TCP/IP), and then click Properties. -
Page 77
TD-W8961N 300Mbps Wireless N ADSL2+ Modem Router User Guide Select Never dial a connection Click OK Now, try to log on to the Web-based configuration page again after the above settings have been configured. If you still cannot access the configuration page, please restore your modem router’s factory default settings and reconfigure your modem router following the instructions in Login. -
Page 78: Appendix C: Technical Support
Tel: NZ 0800 87 5465 (Toll Free) *Except French Bank holidays AU 1300 87 5465 (Depending on 1300 policy.) Switzerland E-mail: support.au@tp-link.com (Australia) support.nz@tp-link.com (New Zealand) Tel: +41 (0) 848 800 998 (German Service) Service time: 24hrs, 7 days a week Fee: 4-8 Rp/min, depending on rate of different time.
Manuals Directory
Manualsdir.ru — Онлайн поиск инструкций и руководств
Td-w8961nd
- Текст
- Оригинал
Cодержание
Document Outline
- Комплект поставки
- Глава 1. Введение
- 1.1 Обзор
- 1.2 Основные характеристики
- 1.3 Допущения
- Глава 2. Установка аппаратной части
- 2.1 Передняя панель
- 2.2 Задняя панель
- 2.3 Требования к среде инсталляции
- 2.4 Подключение маршрутизатора
- Глава 3 Руководство по быстрой настройке
- 3.1 Настройка компьютера
- 3.2 Вход
- Глава 4. Настройка программного обеспечения
- 4.1 Состояние
- 4.1.1 Информация об устройстве
- 4.1.2 Системный журнал
- 4.1.3 Статистика
- 4.2 Быстрый старт
- 4.3 Настройка интерфейса
- 4.3.1 Интернет
- 4.3.2 Локальная сеть
- 4.3.3 Беспроводная сеть
- 4.4 Расширенные настройки
- 4.4.1 Межсетевой экран
- 4.4.2 Маршрутизация
- 4.4.3 NAT
- 4.4.3.1 DMZ
- 4.4.3.2 Виртуальный сервер
- 4.4.3.3 Переназначение IP-адреса
- 4.4.4 QoS
- 4.4.5 VLAN
- 4.4.6 ADSL
- 4.5 Управление доступом
- 4.5.1 Таблица ACL
- 4.5.2 Фильтр
- 4.5.2.1 Фильтр по IP/МАС-адресу
- 4.5.2.2 Фильтр по MAC-адресу
- 4.5.2.3 Фильтр по приложению
- 4.5.2.4 Фильтр по URL-адресу
- 4.5.3 SNMP
- 4.5.4 UPnP
- 4.5.5 DDNS
- 4.5.6 CWMP
- 4.6 Эксплуатация устройства
- 4.6.1 Администрирование
- 4.6.2 Часовой пояс
- 4.6.3 Встроенное ПО
- 4.6.4 Перезагрузка системы
- 4.6.5 Диагностика
- 4.7 Справка
- 4.1 Состояние
- Приложение A: Спецификация
- Приложение B: Устранение неисправностей
- Приложение C: Как настроить цифровое телевидение (IPTV)
- Приложение D: ТЕХНИЧЕСКАЯ ПОДДЕРЖКА
Всем привет, товарищи! Сегодня мы будем производить настройку TP-Link TD W8961n. К слову, у маршрутизатора есть несколько аппаратных версий, который настраиваются также: W8961ND, W8961NB и W8961N. Для начала давайте его правильно подключим, если вы пока этого не сделали. Вытащите все из коробки, если он новый и установите рядом с телефонным кабелем или розетку, которую установил провайдер.

Посмотрите внимательно на заднюю панель, где установлены все порта. В самый первый вход, нужно вставить блок питания. Можете сделать это. После, идёт кнопка включения и выключения. После этого кнопка WPS – для быстрого подключения по Wi-Fi по PIN коду, а не по паролю. Далее едёт дырочка «Reset». На самом деле это кнопка сброса до заводских конфигураций – пока не трогаем её, после я расскажу для чего она нужна. После этого кнопка Wi-Fi, которая включает и выключает беспроводную сеть.
4 желтых LAN порта – для локального подключения, компьютера и самый последний порт aDSL. Возьмите кабель от провайдера и вставьте в «аДСЛ» вход, находящийся справа. Включите интернет-центр. Теперь мы посмотрим, как сконфигурировать этот aDSL модем и WiFi роутер.
Содержание
- Подключение и вход в конфигуратор
- Настройка
- Более детальная конфигурация интернета
- Новая прошивка
- Старая прошивка
- Детальная настройка Wi-Fi
- Новая прошивка
- Старая прошивка
- Задать вопрос автору статьи
Подключение и вход в конфигуратор
Для подключения я буду использовать LAN порт, я просто возьму сетевой кабель и вставлю его в один из LAN портов (4 желтых). Но можно подключиться к сети аппарата через Wi-Fi. Посмотрите на индикаторы. Должны гореть все три этих лампочки.
Если Wi-Fi не горит, то нажмите на туже кнопку на задней панели, чтобы включить беспроводную сеть. Если не горит ADSL лампочка, то посмотрите, чтобы кабель был подключен правильно и плотно сидел в порту.
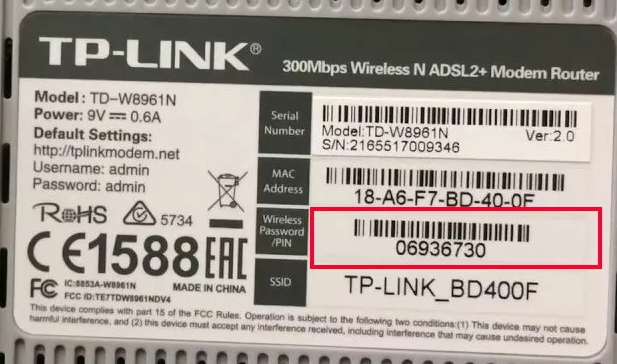
Чтобы подключиться с телефона, планшета или ноутбука по вай-фай, нужно перевернуть его кверху пузом и посмотреть на этикетку. Там должно быть имя беспроводной сети и пароль от неё. Имя сети должно повторять наименование модели. А пароль может быть цифирным и состоять из 8 цифр (ищем эти цифры). Далее просто подключаемся к этой сети.
ВНИМАНИЕ! Если пароль не подойдет – нужно будет сбросить его до заводских настроек. Для этого находим дырочку «reset» и зажимаем её на 10 секунд.
После удачного подключения нужно открыть любой браузер и вписать в адресную строку один из двух адресов:
- http://tplinkmodem.net
- 192.168.1.1
Настройка
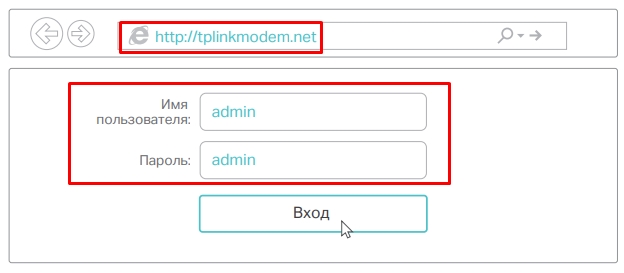
- Теперь вас должны попросить ввести логин и пароль. По умолчанию это: «admin» – без кавычек, нужно будет ввести в обе строки.
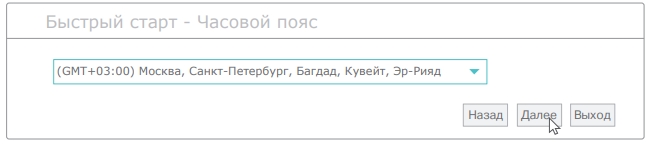
- Нужно выбрать правильный часовой пояс. Можете посмотреть его на компьютере в параметрах времени или на телефоне.
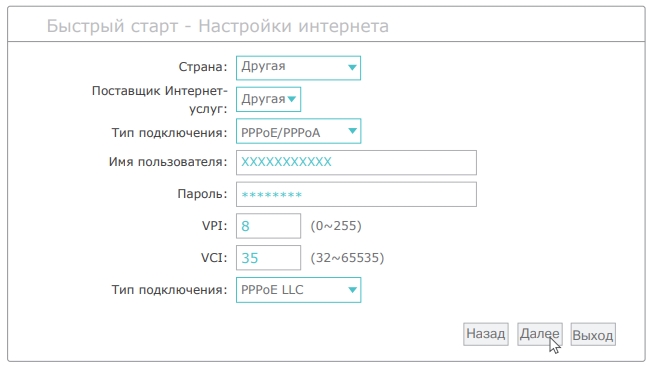
- Вам нужно выбрать тип подключения, а также ввести дополнительные настройки. Для этого нужно посмотреть в договор от провайдера. Если его нет, то можно позвонить по телефону горячей линии. Чаще всего используется PPPoE подключения, который я и выбрал. После надо будет ввести имя пользователя и пароль из договора. А также обязательно указать VPI и VCI. Вроде если мне память не изменяет для Ростелеком значения VPI – 0, а для VCI – 35, но лучше уточнить. Нажимаем «Далее».
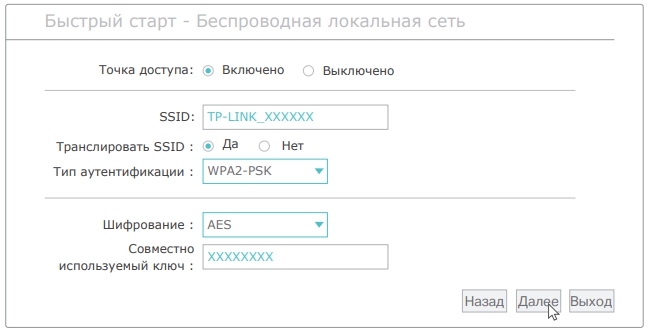
- Теперь останется ввести имя беспроводной сети в строку «SSID». Также указываем тип аутентификации как WPA2-PSK, так как он самый надежный. И в самом низу вписываем пароль от Wi-Fi.
Более детальная конфигурация интернета
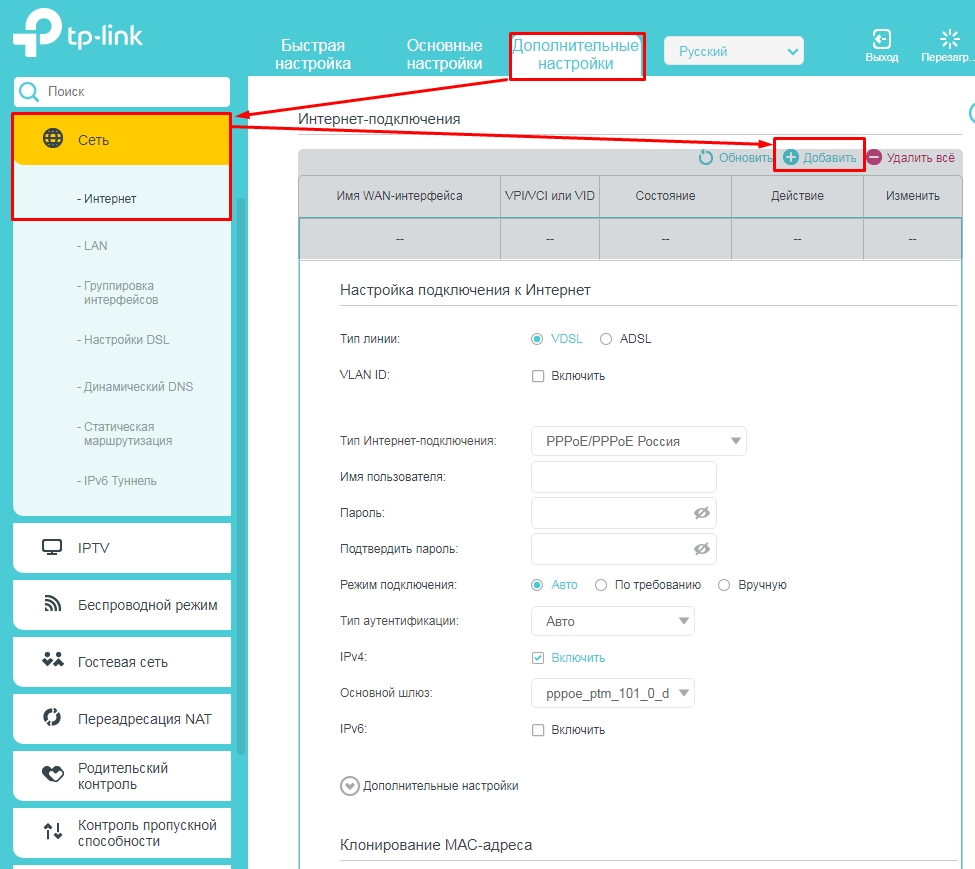
Более детально настроить интернет можно через обычный конфигуратор. Для этого заходим в «Дополнительные настройки» – «Сеть» – «Интернет». Там уже будет старое подключение, его можно будет удалить и добавить новое. Далее просто вводим необходимые данные и сохраняемся.
Новая прошивка
Старая прошивка
Переходим в «Настройки интерфейса» и далее выбираем «Интернет». После, аналогично выбираем нужные данные и вводим дополнительную информацию из договора. Если какой-то информации нет, то просто пропускаете и оставляйте поля со значениями по умолчанию.
Новая прошивка
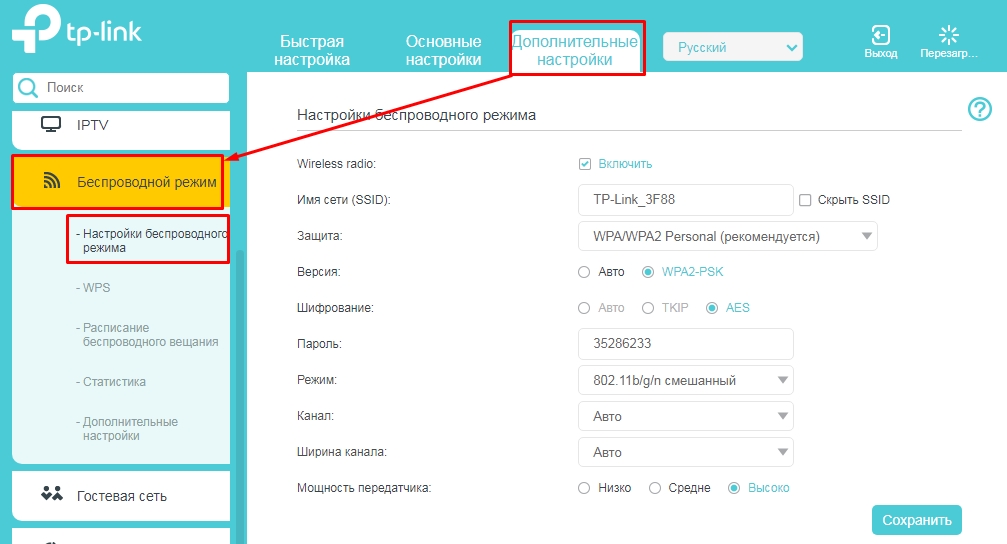
Переходим в «Дополнительные настройки» – «Беспроводной режим». Теперь просто переходим по вкладкам. WPS – если он вам не нужен, советую выключить. Также тут можно поменять имя сети и пароль.
Старая прошивка
«Настройка интерфейса» – «Беспроводная сеть». Останется ввести имя, и пароль, для новой сети.
-
Инструкции по эксплуатации
1

TP-LINK TD-W8961N инструкция по эксплуатации
(93 страницы)
- Языки:Русский
-
Тип:
PDF -
Размер:
3.15 MB -
Описание:
Wi-Fi ADSL маршрутизатор
Просмотр
На NoDevice можно скачать инструкцию по эксплуатации для TP-LINK TD-W8961N. Руководство пользователя необходимо для ознакомления с правилами установки и эксплуатации TP-LINK TD-W8961N. Инструкции по использованию помогут правильно настроить TP-LINK TD-W8961N, исправить ошибки и выявить неполадки.