- Manuals
- Brands
- Toyota Manuals
- Automobile
- HIGHLANDER 2014
Manuals and User Guides for Toyota HIGHLANDER 2014. We have 6 Toyota HIGHLANDER 2014 manuals available for free PDF download: Instruction Manual, Manual, Owner’s Manual, Warranty & Maintenance Manual, Quick Reference Manual, Accessories Manual
Keys to Quality Maintenance
Toyota Owner manuals and warranty information are the keys to quality maintenance for your vehicle. No need to hunt down a separate Toyota repair manual or Toyota service manual. From warranties on Toyota replacement parts to details on features, Toyota Owners manuals help you find everything you need to know about your vehicle, all in one place.
Detailed Toyota manuals and Toyota warranty information help with questions about your vehicle specifications and maintenance schedules. Plus, learn more about what your Toyota warranty coverage includes. What’s more, Toyota warranty information helps you identify your unique vehicle needs as well as plan future service visits. Select your Toyota model to learn more about the Toyota Warranty for your car, truck or SUV. Or, get the Toyota Manual for your Toyota ride free of charge using our Toyota Owners manual free download option.
Read More
Read Less
инструкцияToyota Highlander (2014)

HIGHLANDER_U (OM48A12U)
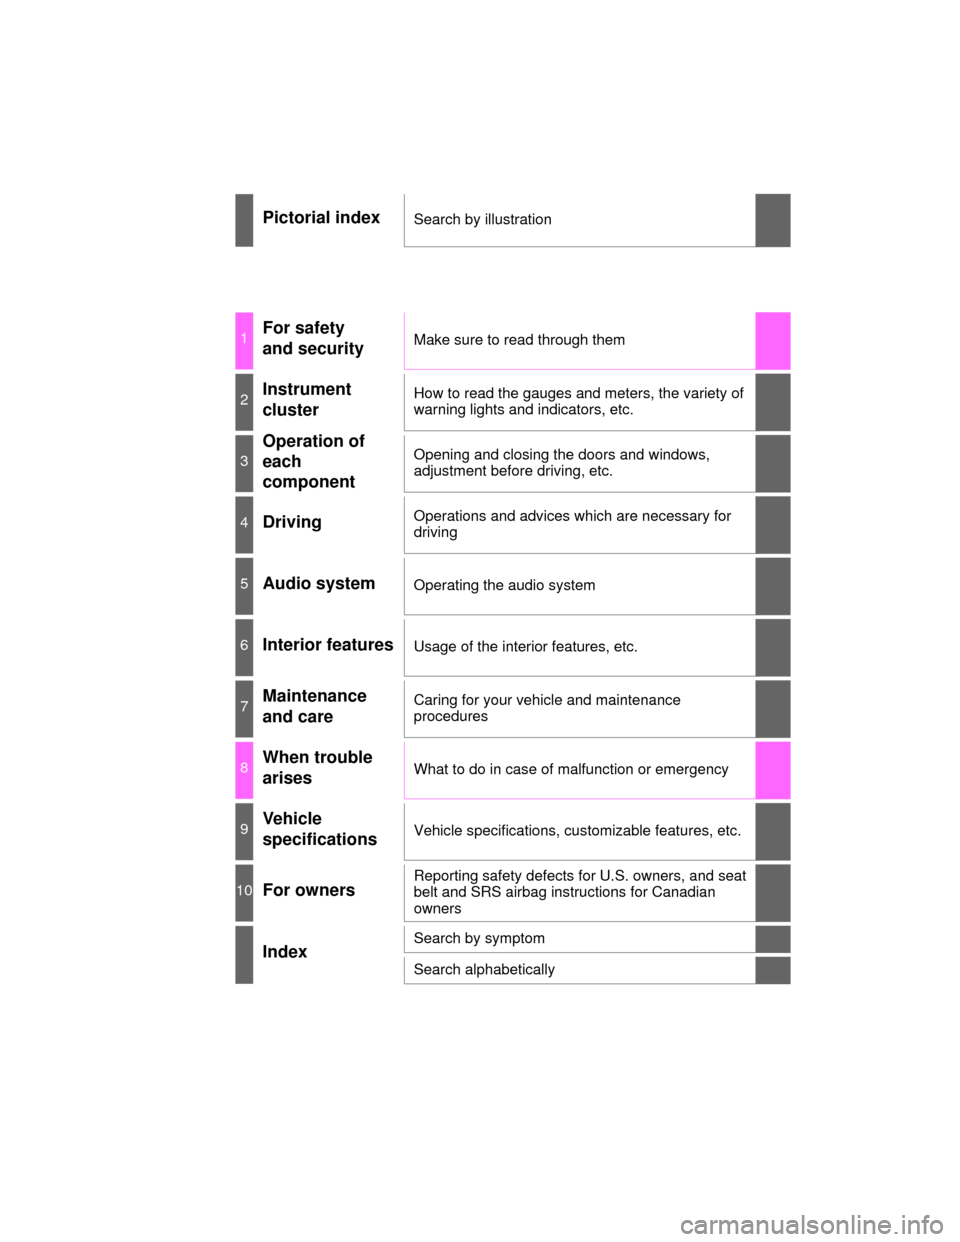
Pictorial index
Search by illustration
1
For safety
and security
Make sure to read through them
2
Instrument
cluster
How to read the gauges and meters, the variety of
warning lights and indicators, etc.
3
Operation of
each
component
Opening and closing the doors and windows,
adjustment before driving, etc.
4
Driving
Operations and advices which are necessary for
driving
5
Audio system
Operating the audio system
6
Interior features
Usage of the interior features, etc.
7
Maintenance
and care
Caring for your vehicle and maintenance
procedures
8
When trouble
arises
What to do in case of malfunction or emergency
9
Vehicle
specifications
Vehicle specifications, customizable features, etc.
10
For owners
Reporting safety defects for U.S. owners, and seat
belt and SRS airbag instructions for Canadian
owners
Index
Search by symptom
Search alphabetically
Посмотреть инструкция для Toyota Highlander (2014) бесплатно. Руководство относится к категории автомобили, 1 человек(а) дали ему среднюю оценку 5.6. Руководство доступно на следующих языках: английский. У вас есть вопрос о Toyota Highlander (2014) или вам нужна помощь? Задайте свой вопрос здесь
Главная
Не можете найти ответ на свой вопрос в руководстве? Вы можете найти ответ на свой вопрос ниже, в разделе часто задаваемых вопросов о Toyota Highlander (2014).
Как перевести мили в километры?
1 миля равна 1,609344 километрам, а 1 километр — 0,62137119 милям.
Где я могу узнать идентификационный номер транспортного средства Toyota?
Место размещения идентификационного номера транспортного средства зависит от марки и типа транспортного средства. Номер может быть выбит на раме транспортного средства или указан на номерном знаке. Чтобы узнать место расположения идентификационного номера транспортного средства лучше всего ознакомиться с руководством по эксплуатации Toyota Highlander (2014).
Что такое идентификационный номер транспортного средства (VIN)?
Идентификационный номер транспортного средства — уникальный для каждого транспортного средства идентификационный номер. Аббревиатура VIN расшифровывается как «Vehicle Identification Number» (Идентификационный номер транспортного средства).
Когда транспортному средству Toyota требуется техническое обслуживание?
Регулярное техническое обслуживание необходимо всем транспортным средствам. С информацией о том, как часто необходимо проходить техническое обслуживание и чему именно стоит уделять особое внимание можно ознакомиться в инструкции по техническому обслуживанию. Как правило, транспортное средство требует технического обслуживания каждые 2 года или 30 000 километров пробега.
Когда следует заменять тормозную жидкость на Toyota?
Тормозную жидкость рекомендуется менять каждые два года.
В чем разница между топливом E10 и E5?
В топливе E10 содержится до десяти процентов этанола, в то время как в E5 содержится менее пяти процентов. Соответственно, топливо E10 менее вредит окружающей среде.
Одна или несколько дверей не открываются изнутри. Что мне делать?
Скорее всего, замок оснащен защитой от детей и поэтому не может быть открыт изнутри. Процедура открытия замка с защитой от детей зависит от марки и типа замка.
Автомобильный радиоприемник не включается, что делать?
Если автомобильный радиоприемник не включен, на него не будет подаваться питание. Убедитесь, что красный провод подключен к контактному источнику питания, а желтый провод — к источнику питания постоянной мощности.
Инструкция Toyota Highlander (2014) доступно в русский?
К сожалению, у нас нет руководства для Toyota Highlander (2014), доступного в русский. Это руководство доступно в английский.
Не нашли свой вопрос? Задайте свой вопрос здесь
Manufacturer: TOYOTA, Model Year: 2014,
Model line: HIGHLANDER,
Model: TOYOTA HIGHLANDER 2014 XU50 / 3.G
Pages: 712, PDF Size: 11.43 MB
Trending: radiator, diagram, maintenance schedule, weight, headlight washer, towing, steering
Page 1 of 712
Page 2 of 712
Page 3 of 712
Page 4 of 712
Page 5 of 712
Page 6 of 712
Page 7 of 712
Page 8 of 712
Page 9 of 712
Page 10 of 712
- Load next 10 pages
Trending: fuse, brake pads, maintenance schedule, fuel, cooling, towing, steering
View, print and download for free: TOYOTA HIGHLANDER 2014 XU50 / 3.G Owners Manual, 712 Pages, PDF Size: 11.43 MB. Search in TOYOTA HIGHLANDER 2014 XU50 / 3.G Owners Manual online. CarManualsOnline.info is the largest online database of car user manuals. TOYOTA HIGHLANDER 2014 XU50 / 3.G Owners Manual PDF Download.
All product names, logos, and brands are property of their respective owners.
Privacy Policy | About Us & Contact

TABLE OF CONTENTS
|
1 |
QUICK GUIDE |
11 |
|
|
2 |
BASIC FUNCTION |
31 |
|
|
3 |
AUDIO/VISUAL SYSTEM |
69 |
|
|
4 |
VOICE COMMAND SYSTEM |
169 |
|
|
5 |
INFORMATION |
179 |
|
|
6 |
PERIPHERAL MONITORING SYSTEM |
6 |
|
|
18 |
|||
|
7 |
PHONE |
219 |
|
|
8 |
NAVIGATION SYSTEM |
258 |
|
|
9 |
Entune App Suite |
327 |
|
|
INDEX |
341 |
1

Introduction
NAVIGATION AND MULTIMEDIA SYSTEM OWNER’S MANUAL
This manual explains the operation of this system. Please read this manual carefully to ensure proper use. Keep this manual in your vehicle at all times.
The screen shots in this document and the actual screens of this system differ depending on whether the functions and/or a contract existed and the map data available at the time of producing this document.
Please be aware that the content of this manual may be different from this system in some cases, such as when the system’s software is updated.
NAVIGATION AND MULTIMEDIA SYSTEM (WITH NAVIGATION FUNCTION)
The Navigation System is one of the most technologically advanced vehicle accessories ever developed. The system receives satellite signals from the Global Positioning System (GPS) operated by the U.S. Department of Defense. Using these signals and other vehicle sensors, the system indicates your present position and assists in locating a desired destination.
The navigation system is designed to select efficient routes from your present starting location to your destination. The system is also designed to direct you to a destination that is unfamiliar to you in an efficient manner. The system uses AISIN AW maps. The calculated routes may not be the shortest nor the least traffic congested. Your own personal local knowledge or “short cut” may at times be faster than the calculated routes.
The navigation system’s database includes Point of Interest categories to allow you to easily select destinations such as restaurants and hotels. If a destination is not in the database, you can enter the street address or a major intersection close to it and the system will guide you there.
The system will provide both a visual map and audio instructions. The audio instructions will announce the distance remaining and the direction to turn in when approaching an intersection. These voice instructions will help you keep your eyes on the road and are timed to provide enough time to allow you to maneuver, change lanes or slow down.
Please be aware that all current vehicle navigation systems have certain limitations that may affect their ability to perform properly. The accuracy of the vehicle’s position depends on satellite conditions, road configuration, vehicle condition or other circumstances. For more information on the limitations of the system, refer to page 322.
2

IMPORTANT INFORMATION ABOUT THIS MANUAL
For safety reasons, this manual indicates items requiring particular attention with the following marks.

●This is a warning against anything which may cause injury to people if the warning is ignored. You are informed about what you must or must not do in order to reduce the risk of injury to yourself and others.

●This is a warning against anything which may cause damage to the vehicle or its equipment if the warning is ignored. You are informed about what you must or must not do in order to avoid or reduce the risk of damage to your vehicle and its equipment.
SYMBOLS USED IN ILLUSTRATIONS
Safety symbol
The symbol of a circle with a slash through it means “Do not”, “Do not do this” or “Do not let this happen”.
Arrows indicating operations
Indicates the action (pushing, turning, etc.) used to operate switches and other devices.
3

HOW TO READ THIS MANUAL
|
No. |
Name |
Description |
|||||||||||
|
Operational |
An outline of the operation is explained. |
||||||||||||
|
Outlines |
|||||||||||||
|
Main Operations |
The steps of an operation are explained. |
||||||||||||
|
Related Operations |
A main operation’s supplementary operations are described. |
||||||||||||
|
Information |
Useful information for the user is described. |
||||||||||||
4

|
SAFETY INSTRUCTION |
SAFETY INSTRUCTION (WITH |
|||
|
(WITHOUT NAVIGATION |
NAVIGATION FUNCTION) |
|||
|
FUNCTION) |
To use this system in the safest possible manner, follow all the safety tips shown below.
Do not use any feature of this system to the extent it becomes a distraction and prevents safe driving. The first priority while driving should always be the safe operation of the vehicle. While driving, be sure to observe all traffic regulations.
Prior to the actual use of this system, learn how to use it and become thoroughly familiar with it. Read the entire manual to make sure you understand the system. Do not allow other people to use this system until they have read and understood the instructions in this manual.
For your safety, some functions may become inoperable when driving. Unavailable screen buttons are dimmed.

●For safety, the driver should not operate the system while he/she is driving. Insufficient attention to the road and traffic may cause an accident.
To use this system in the safest possible manner, follow all the safety tips shown below.
This system is intended to assist in reaching the destination and, if used properly, can do so. The driver is solely responsible for the safe operation of your vehicle and the safety of your passengers.
Do not use any feature of this system to the extent it becomes a distraction and prevents safe driving. The first priority while driving should always be the safe operation of the vehicle. While driving, be sure to observe all traffic regulations.
Prior to the actual use of this system, learn how to use it and become thoroughly familiar with it. Read the entire manual to make sure you understand the system. Do not allow other people to use this system until they have read and understood the instructions in this manual.
For your safety, some functions may become inoperable when driving. Unavailable screen buttons are dimmed. Only when the vehicle is not moving, can the destination and route selection be done.
5


●For safety, the driver should not operate the system while he/she is driving. Insufficient attention to the road and traffic may cause an accident.
●While driving, be sure to obey the traffic regulations and maintain awareness of the road conditions. If a traffic sign on the road has been changed, route guidance may not have the updated information such as the direction of a one way street.
While driving, listen to the voice instructions as much as possible and glance at the screen briefly and only when it is safe. However, do not totally rely on voice guidance. Use it just for reference. If the system cannot determine the current position correctly, there is a possibility of incorrect, late, or non-voice guidance.
The data in the system may occasionally be incomplete. Road conditions, including driving restrictions (no left turns, street closures, etc.) frequently change. Therefore, before following any instructions from the system, look to see whether the instruction can be done safely and legally.
This system cannot warn about such things as the safety of an area, condition of streets, and availability of emergency services. If unsure about the safety of an area, do not drive into it. Under no circumstances is this system a substitute for the driver’s personal judgement.
Use this system only in locations where it is legal to do so. Some states/provinces may have laws prohibiting the use of video and navigation screens next to the driver.
6
7

TABLE OF CONTENTS |
|
|
1 QUICK GUIDE |
|
|
1. BASIC FUNCTION……………………… |
12 |
|
OVERVIEW BUTTONS ……………………. |
12 |
|
“Apps” SCREEN ……………………………… |
14 |
|
HOME SCREEN ……………………………… |
16 |
|
“Setup” SCREEN …………………………….. |
20 |
|
2. QUICK REFERENCE………………….. |
20 |
|
REGISTERING HOME …………………….. |
22 |
|
3. NAVIGATION OPERATION ………… |
22 |
|
REGISTERING PRESET |
|
|
DESTINATIONS……………………………. |
24 |
|
OPERATION FLOW: |
|
|
GUIDING THE ROUTE ………………….. |
26 |
|
SETTING HOME AS THE |
|
|
DESTINATION ……………………………… |
27 |
|
4. FUNCTION INDEX……………………… |
28 |
|
FUNCTION INDEX ………………………….. |
28 |
|
2 |
BASIC FUNCTION |
|
|
1. BASIC INFORMATION |
||
|
BEFORE OPERATION……………… |
32 |
|
|
INITIAL SCREEN …………………………….. |
32 |
|
|
CAPACITIVE TOUCH SWITCHES …….. |
34 |
|
|
TOUCH SCREEN GESTURES………….. |
35 |
|
|
TOUCH SCREEN OPERATION ………… |
36 |
|
|
HOME SCREEN OPERATION ………….. |
37 |
|
|
ENTERING LETTERS AND NUMBERS/ |
||
|
LIST SCREEN OPERATION …………… |
38 |
|
|
SCREEN ADJUSTMENT ………………….. |
41 |
|
|
2. Bluetooth® SETTINGS………………. |
43 |
|
|
REGISTERING/CONNECTING |
||
|
Bluetooth® DEVICE ……………………….. |
43 |
|
|
SETTING Bluetooth® DETAILS …………. |
49 |
|
|
3. OTHER SETTINGS ……………………. |
57 |
|
|
GENERAL SETTINGS ……………………… |
57 |
|
|
VOICE SETTINGS …………………………… |
63 |
|
|
DRIVER SETTINGS…………………………. |
64 |
|
|
MAINTENANCE ………………………………. |
65 |
|
|
3 |
AUDIO/VISUAL SYSTEM |
|
|
1. BASIC OPERATION ………………….. |
72 |
|
|
QUICK REFERENCE……………………….. |
72 |
|
|
SOME BASICS………………………………… |
74 |
|
|
2. RADIO OPERATION………………….. |
81 |
|
|
AM/FM RADIO ………………………………… |
81 |
|
|
XM Satellite Radio……………………………. |
91 |
|
|
INTERNET RADIO …………………………… |
97 |
|
|
3. MEDIA OPERATION………………….. |
98 |
|
|
CD …………………………………………………. |
98 |
|
|
USB MEMORY………………………………. |
101 |
|
|
iPod ……………………………………………… |
105 |
|
|
Bluetooth® AUDIO………………………….. |
109 |
|
|
AUX……………………………………………… |
114 |
|
|
VTR ……………………………………………… |
116 |
8

|
4. AUDIO/VISUAL REMOTE |
||
|
CONTROLS …………………………… |
118 |
|
|
STEERING SWITCHES …………………. |
118 |
|
|
5. SETUP ……………………………………. |
121 |
|
|
AUDIO SETTINGS ………………………… |
121 |
|
|
6. TIPS FOR OPERATING THE |
||
|
AUDIO/VISUAL SYSTEM ………… |
123 |
|
|
OPERATING INFORMATION …………. |
123 |
|
|
7. REAR SEAT ENTERTAINMENT |
||
|
SYSTEM OPERATION ……………. |
132 |
|
|
REAR SEAT ENTERTAINMENT |
||
|
SYSTEM FEATURES ………………….. |
132 |
|
|
PLAYING A Blu-ray Disc™ (BD) AND |
||
|
DVD DISCS………………………………… |
145 |
|
|
PLAYING AN AUDIO CD AND |
||
|
MP3/WMA DISCS……………………….. |
160 |
|
|
PLAYING AN SD CARD…………………. |
163 |
|
|
USING THE VIDEO MODE …………….. |
168 |
|
|
4 |
VOICE COMMAND SYSTEM |
|
|
1. VOICE COMMAND SYSTEM |
||
|
OPERATION ………………………….. |
170 |
|
|
VOICE COMMAND SYSTEM………….. |
170 |
|
|
CASUAL SPEECH |
||
|
RECOGNIZATION ………………………. |
176 |
|
|
COMMAND LIST …………………………… |
177 |
|
|
5 |
INFORMATION |
|
|
1. USEFUL INFORMATION…………… |
180 |
|
|
RECEIVING WEATHER |
||
|
INFORMATION…………………………… |
180 |
|
|
RECEIVING TRAFFIC MAP |
||
|
INFORMATION…………………………… |
182 |
|
|
DATA SERVICES SETTINGS…………. |
183 |
|
|
Driver Easy Speak…………………………. |
184 |
|
6 |
PERIPHERAL MONITORING |
||
|
SYSTEM |
|||
|
1. REAR VIEW MONITOR |
1 |
||
|
SYSTEM ……………………………….. |
188 |
||
|
REAR VIEW MONITOR SYSTEM ……. |
188 |
||
|
REAR VIEW MONITOR SYSTEM |
2 |
||
|
PRECAUTIONS ………………………….. |
190 |
||
|
THINGS YOU SHOULD KNOW ………. |
195 |
||
|
2. TOYOTA PARKING ASSIST |
|||
|
MONITOR ……………………………… |
196 |
3 |
|
|
TOYOTA PARKING ASSIST |
|||
|
MONITOR ………………………………….. |
196 |
||
|
ESTIMATED COURSE LINE |
4 |
||
|
DISPLAY MODE |
201 |
||
|
PARKING ASSIST GUIDE LINE |
|||
|
DISPLAY MODE …………………………. |
203 |
||
|
TOYOTA PARKING ASSIST |
5 |
||
|
MONITOR PRECAUTIONS…………… |
205 |
||
|
THINGS YOU SHOULD KNOW ………. |
210 |
||
|
3. INTUITIVE PARKING |
6 |
||
|
ASSIST …………………………………. |
212 |
||
|
INTUITIVE PARKING ASSIST…………. |
212 |
||
|
INTUITIVE PARKING ASSIST |
7 |
||
|
SETTING |
217 |
||
|
8 |
|||
|
9 |
9

TABLE OF CONTENTS
7 
1.PHONE OPERATION (HANDS-FREE SYSTEM FOR
|
CELLULAR PHONES) …………….. |
220 |
|
QUICK REFERENCE …………………….. |
220 |
|
SOME BASICS ……………………………… |
221 |
|
CALLING ON THE |
|
|
Bluetooth® PHONE ……………………… |
224 |
|
RECEIVING ON THE |
|
|
Bluetooth® PHONE ……………………… |
229 |
|
TALKING ON THE |
|
|
Bluetooth® PHONE ……………………… |
230 |
|
Bluetooth® PHONE MESSAGE |
|
|
FUNCTION…………………………………. |
233 |
|
2. SETUP ……………………………………. |
238 |
|
PHONE/MESSAGE SETTINGS ………. |
238 |
|
3. WHAT TO DO IF… ……………………. |
250 |
|
TROUBLESHOOTING……………………. |
250 |
|
8 NAVIGATION SYSTEM |
|
|
1. BASIC OPERATION…………………. |
260 |
|
QUICK REFERENCE …………………….. |
260 |
|
MAP SCREEN OPERATION …………… |
263 |
|
MAP SCREEN INFORMATION ……….. |
269 |
|
TRAFFIC INFORMATION……………….. |
273 |
|
2. DESTINATION SEARCH…………… |
276 |
|
DESTINATION SEARCH SCREEN….. |
276 |
|
SEARCH OPERATION…………………… |
278 |
|
STARTING ROUTE GUIDANCE ……… |
288 |
|
3. ROUTE GUIDANCE………………….. |
292 |
|
ROUTE GUIDANCE SCREEN ………… |
292 |
|
TYPICAL VOICE GUIDANCE |
|
|
PROMPTS………………………………….. |
297 |
|
EDITING ROUTE…………………………… |
298 |
|
4. MEMORY POINTS …………………… |
303 |
|
MEMORY POINTS SETTINGS………… |
303 |
|
5. SETUP……………………………………. |
312 |
|
DETAILED NAVIGATION |
|
|
SETTINGS………………………………….. |
312 |
|
TRAFFIC SETTINGS ……………………… |
316 |
|
6. TIPS FOR THE NAVIGATION |
|
|
SYSTEM ……………………………….. |
322 |
|
GPS (GLOBAL POSITIONING |
|
|
SYSTEM)……………………………………. |
322 |
|
MAP DATABASE VERSION AND |
|
|
COVERED AREA ………………………… |
324 |
|
9 Entune App Suite |
|
|
1. Entune App Suite OVERVIEW …. |
328 |
|
Entune App Suite SERVICE…………….. |
328 |
|
2. Entune App Suite |
|
|
OPERATION………………………….. |
333 |
|
Entune App Suite …………………………… |
333 |
|
3. SETUP……………………………………. |
340 |
|
Entune App Suite SETTINGS ………….. |
340 |
|
INDEX |
|
|
ALPHABETICAL INDEX………………. |
342 |
10

|
1 |
BASIC FUNCTION |
|
|
1. |
OVERVIEW BUTTONS …………….. |
12 |
|
2. |
“Apps” SCREEN …………………….. |
14 |
|
3. |
HOME SCREEN ………………………. |
16 |
|
STATUS DISPLAY…………………………… |
18 |
|
|
2 |
QUICK REFERENCE |
|
|
1. |
“Setup” SCREEN ……………………. |
20 |
|
3 |
NAVIGATION OPERATION |
|
|
1. |
REGISTERING HOME ……………… |
22 |
|
2. |
REGISTERING PRESET |
|
|
DESTINATIONS …………………….. |
24 |
|
|
3. |
OPERATION FLOW: |
|
|
GUIDING THE ROUTE……………. |
26 |
|
|
4. |
SETTING HOME AS THE |
|
|
DESTINATION ………………………. |
27 |
|
|
4 |
FUNCTION INDEX |
|
|
1. |
FUNCTION INDEX …………………… |
28 |
11

1. BASIC FUNCTION
1. OVERVIEW BUTTONS
12

1. BASIC FUNCTION
|
No. |
Function |
Page |
||
|
By touching the screen with your finger, you can control the selected |
35, 36 |
|||
|
functions. |
||||
|
Insert a disc into this slot. The CD player turns on immediately. |
76 |
|||
|
81, 98, 101, |
||||
|
Press to play/pause. |
105, 109, |
|||
|
114, 116 |
||||
|
Turn the tune/scroll knob to select a radio station or skip to the next or |
81, 91, 98, |
|||
|
101, 105, |
||||
|
previous track/file. |
||||
|
109 |
||||
|
Press to access the Bluetooth® hands-free system. |
220 |
|||
|
Press the “ ” or “ ” button to seek up or down for a radio station or to |
81, 91, 98, |
|||
|
101, 105, |
||||
|
access a desired track/file. |
||||
|
109 |
||||
|
MAP card slot |
||||
|
* |
Do not eject the SD card, as doing so may deactivate the navigation |
325 |
||
|
system. |
||||
|
Press to display the “Apps” screen. |
14 |
|||
|
Press to display the home screen. |
16, 37 |
|||
|
Press to access the audio/visual system. The audio/visual system |
72, 74, 75 |
|||
|
turns on in the last mode used. |
||||
|
Press the “PWR/VOL” knob to turn the system on and off, and turn it |
74 |
|||
|
to adjust the volume. |
||||
|
Press to eject a disc. |
76 |
|||
*: With Navigation function
1 QUICKGUIDE
13

1.BASIC FUNCTION
2.“Apps” SCREEN
Press the “APPS” button to display the “Apps” screen.
14

1. BASIC FUNCTION
|
No. |
Function |
Page |
||||||||
|
* |
Select to display the map screen. |
260 |
||||||||
|
Select to display the audio control screen. |
72 |
|||||||||
|
Select to display the hands-free operation screen. |
220 |
|||||||||
|
Select to display the “Message Inbox” screen. |
233 |
|||||||||
|
Select to turn the Driver Easy Speak on/off. |
184 |
|||||||||
|
* |
||||||||||
|
Select to reorder the applications. |
335 |
|||||||||
|
Select the desired application then |
or |
to reorder. |
||||||||
|
Select to display traffic information. |
182, 273 |
|||||||||
|
Select to display the “Setup” screen. |
20 |
|||||||||
|
Select to update the applications. |
334 |
|||||||||
|
* |
||||||||||
|
Select to display the fuel consumption screen. |
“Owner’s |
|||||||||
|
Manual” |
||||||||||
|
Select to display weather information. |
180 |
|||||||||
|
Select to display the “Maintenance” screen. |
65 |
|||||||||
|
* |
||||||||||
|
* |
Select to display the application screen. |
328 |
||||||||
*: With navigation function
INFORMATION
● When there are two pages, select 

1 QUICKGUIDE
15
1. BASIC FUNCTION
3. HOME SCREEN
Press the “HOME” button to display the home screen.
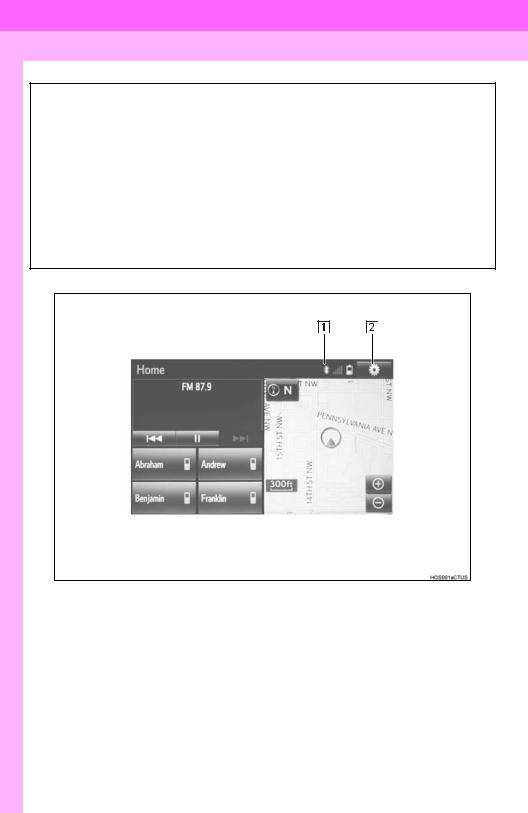
The home screen can display multiple information screens, such as the audio system screen, hands-free screen and navigation screen, simultaneously. When hands-free mode is selected, it is possible to make a call on the home screen if the desired telephone number is registered to one of the 4 displayed buttons. In order to register the contact, select and hold the desired button and register the desired contact by obey displayed messages on the screen. ( P.228)
When a screen is selected, the selected screen is switched to a full-screen display. The home screen can be set to either a three-way split screen or a two-way split screen.
For details about setting the home screen: P.37
Three-way split screen
16

1. BASIC FUNCTION
Two-way split screen
1 QUICKGUIDE
|
No. |
Function |
Page |
||
|
Displays the condition of the Bluetooth® connection |
18 |
|||
|
Select to display the “Setup” screen. |
20 |
|||
17
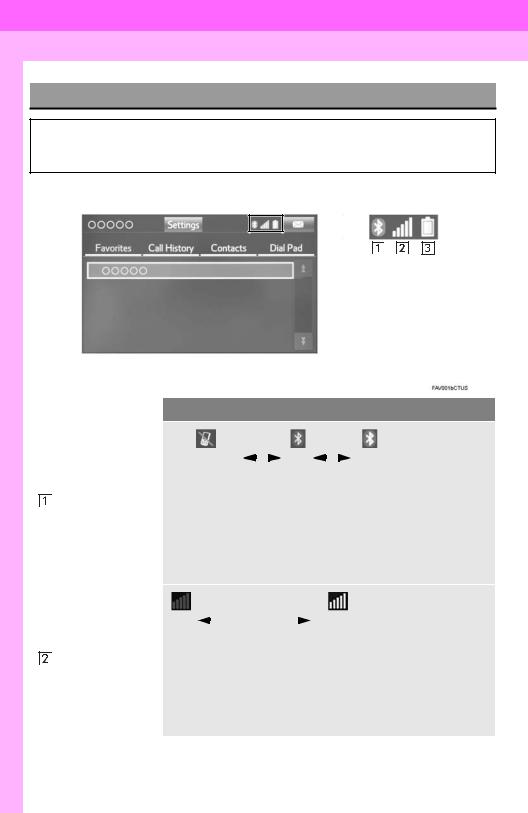
1. BASIC FUNCTION
STATUS DISPLAY
The condition of the Bluetooth® connection, as well as the level of reception and the amount of cellular phone battery charge left, are displayed on the status display.
|
No. |
Indicators |
Conditions |
|||||||||||||||||||||||||||
|
(Gray) |
(Blue) |
||||||||||||||||||||||||||||
|
No connection |
Poor |
Good |
|||||||||||||||||||||||||||
|
An antenna for the Bluetooth® connection is built into the instru- |
|||||||||||||||||||||||||||||
|
The |
condition |
of |
ment panel. The condition of the Bluetooth® connection may dete- |
||||||||||||||||||||||||||
|
the |
Bluetooth® |
riorate and the system may not function when a Bluetooth® phone |
|||||||||||||||||||||||||||
|
connection |
is used in the following conditions and/or places: |
||||||||||||||||||||||||||||
|
The cellular phone is obstructed by certain objects (such as when |
|||||||||||||||||||||||||||||
|
it is behind the seat or in the glove box or console box). |
|||||||||||||||||||||||||||||
|
The cellular phone is touching or is covered with metal materials. |
|||||||||||||||||||||||||||||
|
Leave the Bluetooth® phone in a place where the condition of the |
|||||||||||||||||||||||||||||
|
Bluetooth® connection is good. |
|||||||||||||||||||||||||||||
|
Poor |
Excellent |
||||||||||||||||||||||||||||
|
The level of reception does not always correspond with the level |
|||||||||||||||||||||||||||||
|
The |
level of |
re- |
displayed on the cellular phone. The level of reception may not be |
||||||||||||||||||||||||||
|
displayed depending on the phone you have. |
|||||||||||||||||||||||||||||
|
ception |
|||||||||||||||||||||||||||||
|
When the cellular phone is out of the service area or in a place |
|||||||||||||||||||||||||||||
|
inaccessible by radio waves, “No Service” is displayed. |
|||||||||||||||||||||||||||||
|
“Rm” is displayed when receiving in a roaming area. While roam- |
|||||||||||||||||||||||||||||
|
ing, display “Rm” top-left on the icon. |
|||||||||||||||||||||||||||||
|
The receiving area may not be displayed depending on the type of |
|||||||||||||||||||||||||||||
|
phone you have. |
|||||||||||||||||||||||||||||
18

1. BASIC FUNCTION
|
No. |
Indicators |
Conditions |
||||||||
|
The amount of |
Empty |
Full |
||||||||
|
battery charge |
The amount displayed does not always correspond with the |
|||||||||
|
left |
amount displayed on the Bluetooth® device. |
|||||||||
|
The amount of battery charge left may not be displayed depend- |
||||||||||
|
ing on the type of the Bluetooth® device connected. |
||||||||||
|
This system does not have a charging function. |
||||||||||
1 QUICKGUIDE
19

2. QUICK REFERENCE
1. “Setup” SCREEN
The items shown on the “Setup” screen can be set. Press the “APPS” button, then select “Setup” to display the “Setup” screen.
20

2. QUICK REFERENCE
|
No. |
Function |
Page |
||
|
Select to change the selected language, operation sound, automatic |
57 |
|||
|
screen change settings, etc. |
||||
|
Select to customize the home screen. |
37 |
|||
|
Select to set the voice settings. |
63 |
|||
|
Select to adjust the contrast and brightness of the screens. |
41 |
|||
|
Select to set memory points (home, preset destinations, address book |
||||
|
* |
entries, areas to avoid), navigation details or to delete previous desti- |
303, 312 |
||
|
nations. |
||||
|
Select to set audio settings. |
121 |
|||
|
Select to set the phone sound, contacts, message settings, etc. |
238 |
|||
|
Select to set Bluetooth® phones and Bluetooth® audio devices. |
49 |
|||
|
Select to turn the screen off. |
||||
|
Select to set Entune App Suite settings. |
340 |
|||
|
* |
||||
|
* |
Select to set data services settings. |
183 |
||
|
Select to link the driver’s cellular phone settings. (audio presets, lan- |
64 |
|||
|
guage, etc.) |
||||
|
Select to set vehicle settings. Customizable features, refer to Owner’s |
200, 217 |
|||
|
Manual. |
||||
|
* |
Select to set traffic information. |
316 |
||
|
Select to set Driver Easy Speak settings. |
184 |
|||
*: With navigation function
1 QUICKGUIDE
21
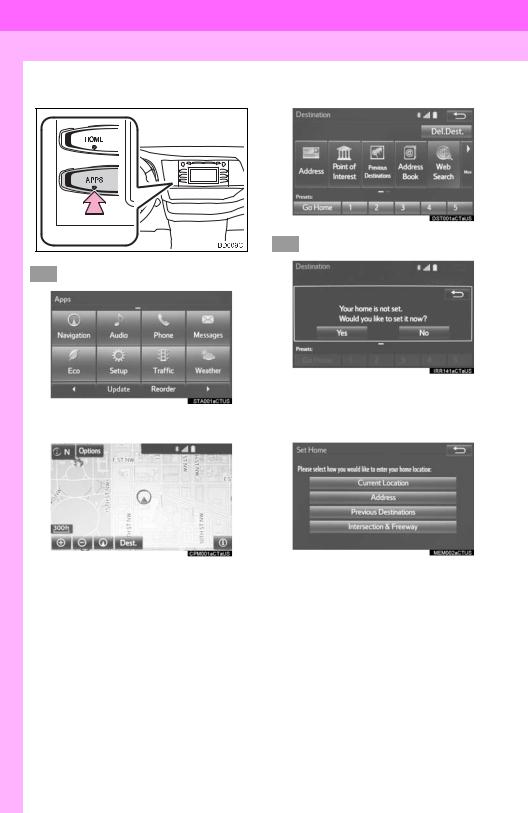
3. NAVIGATION OPERATION
1. REGISTERING HOME*
|
1 |
Press the “APPS” button. |
4 |
Select “Go Home”. |
5 Select “Yes”.
2 Select “Navigation”.
|
6 |
There are different kinds of meth- |
||
|
ods to search for your home. |
|||
|
3 |
Select “Dest.”. |
( P.276) |
*: With navigation function
22

7 Select “Enter”.
8 Select “OK”.
Registration of home is complete.
Registering home in a different wayP.304
Editing the name, location, phone number and icon
P.304
Setting home as the destinationP.279
3. NAVIGATION OPERATION
1 QUICKGUIDE
23

3. NAVIGATION OPERATION
2. REGISTERING PRESET DESTINATIONS*
1 Press the “APPS” button.
4Select one of the preset destination buttons.
5 Select “Yes”.
2 Select “Navigation”.
6 There are different kinds of methods to search for a destination. ( P.276)
3 Select “Dest.”.
*: With navigation function
24

3. NAVIGATION OPERATION
7Select “Enter”.
8Select a position for this preset destination.
1 QUICKGUIDE
9 Select “OK”.
Registration of preset destinations is complete.
Registering preset destinations in a different way
P.305
Editing the name, location, phone number and icon
P.306
Setting preset destinations as the destination
P.279
25

3. NAVIGATION OPERATION
3. OPERATION FLOW: GUIDING THE ROUTE*
|
1 Press the “APPS” button. |
5 Select “Go”. |
|
6 Select “OK”. |
|
|
2 Select “Navigation”. |
Selecting routes other than the one recom- |
|
mended. ( P.288) |
Guidance to the destination is displayed on the screen and can be heard via voice guidance.
3 Select “Dest.”.
4There are different kinds of methods to search for a destination. ( P.276)
*: With navigation function
26

3.NAVIGATION OPERATION
4.SETTING HOME AS THE DESTINATION*
|
1 Press the “APPS” button. |
5 Select “OK”. |
|
Selecting routes other than the one recom- |
|
|
mended. ( P.288) |
|
|
Guidance to the destination is displayed |
|
|
on the screen and can be heard via |
|
|
voice guidance. |
2 Select “Navigation”.
3 Select “Dest.”.
4 Select “Go Home”.
*: With navigation function
1 QUICKGUIDE
27

4. FUNCTION INDEX
1. FUNCTION INDEX
Map*
|
Displaying maps |
Page |
|
Viewing the map screen |
260 |
|
Displaying the current position |
263 |
|
Viewing the current position vicinity map |
267 |
|
Changing the scale |
263 |
|
Changing the map orientation |
264 |
|
Displaying map information |
269 |
|
Displaying the estimated travel/arrival time to the destination |
292 |
|
Selecting the map mode |
265 |
|
Displaying traffic information |
273 |
|
Searching for destinations |
Page |
|
Searching for the destination |
278 |
|
Changing the search area |
279 |
|
Route guidance* |
|
|
Before starting or during route guidance |
Page |
|
Starting route guide |
288 |
|
Editing the route |
298 |
|
Viewing the entire route map |
293 |
|
Pausing guidance |
291 |
|
Adjusting route guidance volume |
63 |
|
Deleting the destination |
299 |
|
Address book |
Page |
|
Registering address book entries |
307 |
|
Marking icons on the map |
308 |
|
*: With navigation function |
28

4. FUNCTION INDEX
Useful functions
|
Information |
Page |
|
Displaying vehicle maintenance* |
65 |
|
Hands-free system (for cellular phone) |
Page |
|
Registering/connecting Bluetooth® phone |
43 |
|
Making a call on a Bluetooth® phone |
224 |
|
Receiving a call on the Bluetooth® phone |
229 |
|
Voice command system |
Page |
|
Operating the system with your voice |
170 |
|
Peripheral monitoring system |
Page |
|
Viewing behind the rear of the vehicle |
188 |
|
*: With navigation function |
1 QUICKGUIDE
29
30

1BASIC INFORMATION BEFORE OPERATION
|
1. |
INITIAL SCREEN ……………………… |
32 |
|
2. |
CAPACITIVE TOUCH |
|
|
SWITCHES ……………………………. |
34 |
|
|
3. |
TOUCH SCREEN GESTURES …… |
35 |
|
4. |
TOUCH SCREEN OPERATION …. |
36 |
|
5. |
HOME SCREEN OPERATION …… |
37 |
|
6. |
ENTERING LETTERS AND |
|
|
NUMBERS/LIST SCREEN |
||
|
OPERATION ………………………….. |
38 |
|
|
ENTERING LETTERS AND |
||
|
NUMBERS …………………………………… |
38 |
|
|
LIST SCREEN ………………………………… |
38 |
|
|
7. |
SCREEN ADJUSTMENT …………… |
41 |
2Bluetooth® SETTINGS
1.REGISTERING/CONNECTING
|
Bluetooth® DEVICE ……………….. |
43 |
|
REGISTERING A Bluetooth® |
|
|
PHONE FOR THE FIRST TIME………. |
43 |
|
REGISTERING A Bluetooth® AUDIO |
|
|
PLAYER FOR THE FIRST TIME …….. |
44 |
|
PROFILES……………………………………… |
45 |
|
CERTIFICATION …………………………….. |
46 |
|
2. |
SETTING Bluetooth® DETAILS … 49 |
|
|
“Bluetooth* Setup” SCREEN……………… |
49 |
|
|
REGISTERING A |
||
|
Bluetooth® DEVICE……………………….. |
50 |
|
|
DELETING A Bluetooth® DEVICE ……… |
51 |
|
|
CONNECTING A |
||
|
Bluetooth® DEVICE……………………….. |
52 |
|
|
EDITING THE Bluetooth® DEVICE |
||
|
INFORMATION …………………………….. |
54 |
|
|
“System Settings” SCREEN………………. |
55 |
|
|
3 |
OTHER SETTINGS |
|
|
1. |
GENERAL SETTINGS ……………… |
57 |
|
GENERAL SETTINGS SCREEN……….. |
57 |
|
|
2. |
VOICE SETTINGS……………………. |
63 |
|
VOICE SETTINGS SCREEN…………….. |
63 |
|
|
3. |
DRIVER SETTINGS …………………. |
64 |
|
MANUALLY SELECT LINKED |
||
|
SETTINGS …………………………………… |
64 |
|
|
4. |
MAINTENANCE ………………………. |
65 |
*: Bluetooth is a registered trademark of Bluetooth SIG, Inc.
31

1. BASIC INFORMATION BEFORE OPERATION
1. INITIAL SCREEN
1When the engine switch is in the “ACC”
or “ON” position, the initial screen will be displayed and the system will begin operating. (Vehicles without a smart key system)
When the engine <power> switch is in ACCESSORY or IGNITION ON <ON> mode, the initial screen will be displayed and the system will begin operating. (Vehicles with a smart key system)
MAINTENANCE
INFORMATION*
This system reminds users when to replace certain parts or components and shows dealer information (if registered) on the screen.
When the vehicle reaches a previously set driving distance or date specified for a scheduled maintenance check, the “Maintenance Reminder” screen will be displayed when the system is turned on.
Images shown on the initial screen can be changed to suit individual preferences. ( P.60.)
After a few seconds, the “Caution” screen will be displayed.
After about 5 seconds, the “Caution” screen automatically switches to the next screen.

●When the vehicle is stopped with the engine running <the hybrid system operating>, always apply the parking brake for safety.
The screen goes off if the screen is not operated for several seconds.
To prevent the screen from being displayed again, select “Do Not Tell Me Again”.
To register maintenance information:P.65
If 
*: With navigation function
32

1. BASIC INFORMATION BEFORE OPERATION
RESTARTING THE SYSTEM
When system response is extremely slow, the system can be restarted.
1Press and hold the “PWR/VOL” knob for 3 seconds or more.
2 BASICFUNCTION
33

1.BASIC INFORMATION BEFORE OPERATION
2.CAPACITIVE TOUCH SWITCHES
The control panel uses capacitive touch sensors.
INFORMATION
●Please do not reach your hand to the part of button when the system turn on. Because the button may become unresponsive for a while.
But it will be back to normal for a given time even if the system turned on under the condition.
Capacitive touch switch sensor sensitivity can be adjusted. ( P.57)
■HANDLING OF THE CONTROL
PANEL
In the following cases, incorrect operation or non-response may occur.
If the operating section is dirty or has liquid attached to it, incorrect operation or non-response may occur.
If the operating section receives electromagnetic waves, incorrect operation or non-response may occur.
If wearing gloves during operation, nonresponse may occur.
If fingernails are used to operate the system, non-response may occur.
If a touch pen is used to operate the system, non-response may occur.
If the palm of your hand touches the operating section during operation, incorrect operation may occur.
If the palm of your hand touches the operating section, incorrect operation may occur.
If operations are performed quickly, nonresponse may occur.
34

1. BASIC INFORMATION BEFORE OPERATION
3. TOUCH SCREEN GESTURES
Operations are performed by touching the touch screen directly with your finger.
|
Operation method |
Outline |
Main use |
|
|
Touch |
Changing and selecting various set- |
||
|
Quickly touch and release |
|||
|
tings |
|||
|
once. |
|||
|
Drag*1 |
Scrolling the lists |
||
|
Touch |
the screen with |
Scrolling the map screen*2 |
|
|
your finger, and move the |
|||
|
screen to the desired posi- |
|||
|
tion. |
|||
|
Flick*1 |
Scrolling the main screen page |
||
|
Scrolling the map screen*2 |
|||
|
Quickly move the screen |
|||
|
by flicking with your finger. |
*1: The above operations may not be performed on all screens. *2: With navigation function
INFORMATION
● Flick operations may not be performed smoothly in high altitudes.
2 BASICFUNCTION
35

1. BASIC INFORMATION BEFORE OPERATION
4. TOUCH SCREEN OPERATION
This system is operated mainly by the buttons on the screen. (Referred to as screen buttons in this manual.)
When a screen button is touched, a beep sounds. (To set the beep sound, see page 57.)

●To prevent damaging the screen, lightly touch the screen buttons with your finger.
●Do not use objects other than your finger to touch the screen.
●Wipe off fingerprints using a glass cleaning cloth. Do not use chemical cleaners to clean the screen, as they may damage the touch screen.
INFORMATION
●If the system does not respond to touching a screen button, move your finger away from the screen and then touch it again.
●Dimmed screen buttons cannot be operated.
●The displayed image may become darker and moving images may be slightly distorted when the screen is cold.
●In extremely cold conditions, the map may not be displayed and the data input by a user may be deleted. Also, the screen buttons may be harder than usual to depress.
●When you look at the screen through polarized material such as polarized sunglasses, the screen may be dark and hard to see. If so, look at the screen from different angles, adjust the screen settings on the “Display Settings” screen or take off your sunglasses.
36

1. BASIC INFORMATION BEFORE OPERATION
5. HOME SCREEN OPERATION
The home screen can display multiple information screens, such as the audio system screen and hands-free screen, simultaneously.
1Press the “HOME” button.
2“Home” screen is displayed.
When a screen is selected, the selected screen will change to a full-screen display.
CUSTOMIZING THE HOME
SCREEN
The display items/area on the home screen can be changed.
1 Select 
2 Select “Home Screen”.
Select “Two Panel” or “Three Panel”.
3Select the desired area.
4Select the desired item.
5Select “OK”.
INFORMATION
●When the selected item is already being displayed and another area is selected for that item, the item that it is replacing will be displayed in the original item’s location.
2 BASICFUNCTION
37

1. BASIC INFORMATION BEFORE OPERATION
6. ENTERING LETTERS AND NUMBERS/LIST SCREEN OPERATION
When searching by an address, name, etc., or entering data, letters and numbers can be entered via the screen.
ENTERING LETTERS AND NUMBERS
LIST SCREEN
The list screen may be displayed after entering characters.
DISPLAYING THE LIST
1 Enter characters and select “OK”.
No. Function
Select to enter desired characters.
Text field. Entered character(s) will be displayed.
During entering character(s), when there is only one available option for the next character(s), the next character(s) will be displayed in gray text in the text field automatically. Gray text is entered by selecting this button.
Select to erase one character. Select and hold to continue erasing characters.
Select to display the alphabet keys.
Select to display other symbols.
On certain letter entry screens, letters can be entered in upper or lower case.


Keyboard layout can be changed. ( P.57)
Matching items from the database are listed even if the entered address or name is incomplete.
The list will be displayed automatically if the maximum number of characters is entered or matching items can be displayed on a single list screen.
INFORMATION
●The number of matching items is shown on the right side of the screen. If the number of matching items is more than 999, the system displays “ ” on the screen.
38

1. BASIC INFORMATION BEFORE OPERATION
■SELECTING ALL ITEMS
Some lists contain “Select All”. If “Select All” is selected, it is possible to select all items.
1 Select “Select All”.
“Unselect All”: Unselect all items in the list.
LIST SCREEN OPERATION
When a list is displayed, use the appropriate screen button to scroll through the list.
|
2 |
||||||||||
|
BASIC |
||||||||||
|
FUNCTION |
||||||||||
|
Icon |
Function |
|||||||||
|
Select to skip to the next or previ- |
||||||||||
|
ous page. |
||||||||||
|
Select |
and hold |
or |
to |
|||||||
|
scroll through the displayed |
||||||||||
|
list. |
||||||||||
|
This |
indicates the |
displayed |
||||||||
|
screen’s position. |
||||||||||
If 
item name, the complete name is too long to display.
Select 
the name.
Select 
ning of the name.
39

1. BASIC INFORMATION BEFORE OPERATION
SORTING
The order of a list displayed on the screen can be sorted in the order of distance from the current location, date, category, etc.
1 Select “Sort”.
2 Select the desired sorting criteria.
CHARACTER JUMP BUTTONS IN LISTS
Some lists contain character screen buttons, “ABC”, “DEF” etc., which allow a direct jump to list entries that begin with the same letter as the character screen button.
1Select the desired character jump buttons.
INFORMATION
●Every time the same character screen button is selected, the list starting with the subsequent character is displayed.
40

1. BASIC INFORMATION BEFORE OPERATION
7. SCREEN ADJUSTMENT
The contrast and brightness of the screen display and the image of the camera display can be adjusted. The screen can also be changed to either day or night mode.
For information regarding audio/visual screen adjustment: P.78
1 Press the “APPS” button.
2Select “Setup”.
3Select “Display”.
4Select the items to be set.
INFORMATION
●When the screen is viewed through polarized sunglasses, a rainbow pattern may appear on the screen due to optical characteristics of the screen. If this is disturbing, please operate the screen without polarized sunglasses.
CHANGING BETWEEN DAY AND NIGHT MODE
Depending on the position of the headlight switch, the screen changes to day or night mode. This feature is available when the headlight is switched on.
1 Select “Day Mode”.
INFORMATION
●If the screen is set to day mode with the headlight switch turned on, this condition is memorized even with the engine <hybrid system> turned off.
2 BASICFUNCTION
|
No. |
Function |
Page |
||||||
|
Select to adjust the screen |
||||||||
|
display. |
42 |
|||||||
|
Select to adjust the camera |
||||||||
|
display. |
||||||||
|
Select to adjust the video |
78 |
|||||||
|
display. |
||||||||
|
Select to turn day mode on/ |
41 |
|||||||
|
off. |
||||||||
41

1. BASIC INFORMATION BEFORE OPERATION
ADJUSTING THE CONTRAST/ BRIGHTNESS
The contrast and brightness of the screen can be adjusted according to the brightness of your surroundings.
1Select “General” or “Camera”.
2Select the desired item.
General
Camera
|
Screen button |
Function |
||||
|
“Brightness” “+” |
Select |
to |
brighten |
the |
|
|
screen. |
|||||
|
“Brightness” “-” |
Select |
to |
darken |
the |
|
|
screen. |
|||||
|
“Contrast” “+” |
Select to strengthen the |
||||
|
contrast of the screen. |
|||||
“Contrast” “-” Select to weaken the contrast of the screen.
3 Select “OK”.
42

2. Bluetooth® SETTINGS
1. REGISTERING/CONNECTING Bluetooth® DEVICE
REGISTERING A Bluetooth®
PHONE FOR THE FIRST TIME
To use the hands-free system, it is
necessary to register a Bluetooth® phone with the system.
Once the phone has been registered, it is possible to use the hands-free system.
This operation cannot be performed while driving.
For details about registering a Bluetooth® device: P.50
1Turn the Bluetooth® connection setting of your cellular phone on.
This function is not available when Bluetooth® connection setting of your cellular phone is set to off.
2 Press the “APPS” button.
3 Select “Phone”.
Operations up to this point can also be
performed by pressing the 
the steering wheel or 
4 Select “Yes” to register a phone.
5When this screen is displayed, search
for the device name displayed on this screen on the screen of your Bluetooth® device.
|
2 |
||
|
For details about operating the Bluetooth® |
BASIC |
|
|
device, see the manual that comes with it. |
FUNCTION |
|
|
To cancel the registration, select “Can- |
||
|
cel”. |
||
|
6 Register the Bluetooth® device using |
||
|
your Bluetooth® device. |
A PIN-code is not required for SSP (Secure Simple Pairing) compatible Bluetooth® devices. Depending on the type of Bluetooth® device being connected, a message confirming registra-
tion may be displayed on the Bluetooth® device’s screen. Respond and operate the Bluetooth® device according to the confirmation message.
43

2. Bluetooth® SETTINGS
7Check that the screen is displayed when registration is complete.
The system waits for connection requests coming from the registered device.
At this stage, the Bluetooth® functions are not yet available.
8Select “OK” when the connection sta-
tus changes from “Connection waiting…” to “Connected”.
If an error message is displayed, follow the guidance on the screen to try again.
REGISTERING A Bluetooth® AUDIO PLAYER FOR THE FIRST TIME
To use the Bluetooth® Audio, it is necessary to register an audio player with the system.
Once the player has been registered, it
is possible to use the Bluetooth® Audio.
This operation cannot be performed while driving.
For details about registering a Bluetooth® device: P.50
1Turn the Bluetooth® connection setting of your audio player on.
This function is not available when the
Bluetooth® connection setting of your audio player is set to off.
2 Press the “AUDIO” button.
3Select “Source” on the audio screen or press “AUDIO” button again.
4Select “
5Select “Yes” to register an audio player.
6Follow the steps in “REGISTERING A
Bluetooth® DEVICE” from “STEP 2”. ( P.50)
44

2. Bluetooth® SETTINGS
PROFILES
This system supports the following services.
|
Bluetooth® |
Spec. |
Function |
Require- |
Recommen- |
||||
|
Device |
ments |
dations |
||||||
|
Bluetooth® |
Registering |
a |
||||||
|
Phone/ |
Ver. 3.0 |
|||||||
|
Bluetooth® |
Bluetooth® Specification |
Bluetooth® |
de- |
Ver. 2.0 |
||||
|
+EDR |
||||||||
|
Audio |
vice |
|||||||
|
Player |
||||||||
|
Bluetooth® |
Profile |
Function |
Require- |
Recommen- |
||||
|
Device |
ments |
dations |
||||||
|
HFP (Hands-Free Profile) |
Hands-free |
Ver. 1.0 |
Ver. 1.6 |
|||||
|
system |
||||||||
|
OPP (Object Push Profile) |
Transferring |
the |
Ver. 1.1 |
Ver. 1.2 |
||||
|
PBAP (Phone Book Ac- |
||||||||
|
Bluetooth® |
contacts |
Ver. 1.0 |
Ver. 1.1 |
|||||
|
Phone |
cess profile) |
|||||||
|
Bluetooth® |
||||||||
|
MAP |
(Message |
Access |
Ver. 1.0 |
|||||
|
Profile) |
phone message |
|||||||
|
SPP (Serial Port Profile) |
Entune |
App |
Ver. 1.1 |
|||||
|
Suite* |
||||||||
|
Bluetooth® |
A2DP |
(Advanced |
Audio |
Ver. 1.0 |
Ver. 1.2 |
|||
|
Distribution Profile) |
Bluetooth® audio |
|||||||
|
Audio |
AVRCP (Audio/Video Re- |
system |
||||||
|
Player |
Ver. 1.0 |
Ver. 1.4 |
||||||
|
mote Control Profile) |
||||||||
|
*: With navigation function |
INFORMATION
●If your cellular phone does not support HFP, registering the Bluetooth® phone or using OPP, PBAP, MAP or SPP profiles individually will not be possible.
●If the connected Bluetooth® device version is older than recommended or incompatible, the Bluetooth® device function may not work properly.
●Refer to http://www.toyota.com/entune/ to find approved Bluetooth® phones for this system.
Bluetooth is a registered trademark of Bluetooth SIG, Inc.
2 BASICFUNCTION
45

2. Bluetooth® SETTINGS
CERTIFICATION
U.S.A. (Without navigation function)
FCC ID: AJDK066
This device complies with part 15 of the FCC Rules. Operation is subject to the following two conditions: (1) This device may not cause harmful interference, and (2) this device must accept any interference received, including interference that may cause undesired operation.
CAUTION:
FCC WARNING: Changes or modifications not expressly approved by the party responsible for compliance could void the user’s authority to operate the equipment.
CAUTION: Radio Frequency Radiation Exposure
This equipment complies with FCC radiation exposure limits set forth for an uncontrolled environment and meets the FCC radio frequency (RF) Exposure Guidelines in Supplement C to OET65. This equipment should be installed and operated keeping the radiator at least 20cm or more away from person’s body (excluding extremities: hands, wrists, feet and ankles).
Co-location: This transmitter must not be co-located or operated in conjunction with any other antenna or transmitter.
Canada (Without navigation function)
IC: 775E-K066
This device complies with Part 15 of FCC Rules and Industry Canada licence-exempt RSS standard(s). Operation is subject to the following two conditions: (1) this device may not cause interference, and (2) this device must accept any interference, including interference that may cause undesired operation of this device.
Le présent appareil est conforme aux la partie 15 des règles de la FCC et CNR d’Industrie Canada applicables aux appareils radio exempts de licence. L’exploitation est autorisée aux deux conditions suivantes: (1) l’appareil ne doit pas produire de brouillage, et (2) l’utilisateur de l’appareil doit accepter tout brouillage radioélectrique subi, même si le brouillage est susceptible d’en compromettre le fonctionnement.
46

2. Bluetooth® SETTINGS
CAUTION:
CAUTION: Radio Frequency Radiation Exposure
This equipment complies with FCC/IC radiation exposure limits set forth for an uncontrolled environment and meets the FCC radio frequency (RF) Exposure Guidelines in Supplement C to OET65 and RSS-102 of the IC radio frequency (RF) Exposure rules. This equipment should be installed and operated keeping the radiator at least 20cm or more away from person’s body (excluding extremities: hands, wrists, feet and ankles).
Cet équipement est conforme aux limites d’exposition aux rayonnements énoncées pour un environnement non contrôlé et respecte les règles les radioélectriques (RF) de la FCC lignes directrices d’exposition dans le Supplément C à OET65 et d’exposition aux fréquences radioélectriques (RF) CNR102 de l’IC. Cet équipement doit être installé et utilisé en gardant une distance de 20 cm ou plus entre le dispositif rayonnant et le corps (à l’exception des extrémités : mains, poignets, pieds et chevilles).
The Bluetooth® antenna cannot be removed (or replaced) by user.
L’antenne Bluetooth® ne peut pas être supprimé (ou remplacé) par l’utilisateur.
U.S.A. (With navigation function)
FCC ID: ACJ932YEAP01A473W
This device complies with Part 15 of the FCC Rules. Operation is subject to the following two conditions: (1) this device may not cause harmful interference, and (2) this device must accept any interference received, including interference that may cause undesired operation.
CAUTION:
FCC WARNING: Changes or modifications not expressly approved by the party responsible for compliance could void the user’s authority to operate the equipment.
Radiofrequency radiation exposure information:
This equipment complies with FCC radiation exposure limits set forth for an uncontrolled environment. This equipment should be installed and operated with minimum distance of 20cm between the radiator and your body. This transmitter must not be co-located or operating in conjunction with any other antenna or transmitter.
2 BASICFUNCTION
47

2. Bluetooth® SETTINGS
Canada (With navigation function)
IC: 216J-YEAP01A473W
This device complies with Industry Canada license-exempt RSS standard(s). Operation is subject to the following two conditions: (1) this device may not cause interference, and (2)this device must accept any interference, including interference that may cause undesired operation of the device.
Le présent appareil est conforme aux CNR d’Industrie Canada applicables aux appareils radio exempts de licence. L’exploitation est autorisée aux deux conditions suivantes: (1)l’appareil ne doit pas produire de brouillage, et (2) l’utilisateur de l’appareil doit accepter tout brouillage radioélectrique subi, même si le brouillage est susceptible d’en compromettre le fonctionnement.
CAUTION:
This radio transmitter (identify the device by certification number, or model number if Category II) has been approved by Industry Canada to operate with the antenna types listed below with the maximum permissible gain and required antenna impedance for each antenna type indicated. Antenna types not included in this list, having a gain greater than the maximum gain indicated for that type, are strictly prohibited for use with this device.
Le présent émetteur radio (identifier le dispositif par son numéro de certification ou son numéro de modèle s’il fait partie du matériel de catégorie I) a été approuvé par Industrie Canada pour fonctionner avec les types d’antenne énumérés ci-dessous et ayant un gain admissible maximal et
l’impédance requise pour chaque type d’antenne. Les types d’antenne non inclus dans cette liste, ou dont le gain est supérieur au gain maximal indiqué, sont strictement interdits pour l’exploitation de l’émetteur.
Mexico
La operación de este equipo esta sujeta a las siguientes des condiciones:
(1)es posible que este equipo o dispositivo no cause interferencia peljudicial y
(2)este equipo o dispositive debe aceptar cualquier interferencia, incluyendo Ia que pueda causar su operaclón no deseada.
48

2. Bluetooth® SETTINGS
2. SETTING Bluetooth® DETAILS
|
1 Press the “APPS” button. |
“Bluetooth* Setup” SCREEN |
2Select “Setup”.
3Select “Bluetooth*”.
4Select the desired item to be set.
|
Function |
Page |
|
|
Registering a Bluetooth® device |
50 |
|
|
Deleting a Bluetooth® device |
51 |
|
|
Connecting a Bluetooth® device |
52 |
|
|
Editing the Bluetooth® device infor- |
54 |
|
|
mation |
||
|
Bluetooth® system settings |
55 |
*: Bluetooth is a registered trademark of Bluetooth SIG, Inc.
2 BASICFUNCTION
49

2. Bluetooth® SETTINGS
DISPLAYING THE “Bluetooth*
Setup” SCREEN IN A
DIFFERENT WAY
From the phone/message settings screen
1Press the “APPS” button.
2Select “Setup”.
3Select “Phone”.
4Select “Connect Phone”.
From the status display
1 Select status display area on the screen.
REGISTERING A Bluetooth®
DEVICE
Up to 5 Bluetooth® devices can be registered.
Bluetooth® compatible phones (HFP) and audio players (AVP) can be registered simultaneously.
This operation cannot be performed while driving.
1Display the “Bluetooth* Setup” screen. ( P.49)
2Select “Add”.
When another Bluetooth® device is connected
To disconnect the Bluetooth® device, select “Yes”.
When 5 Bluetooth® devices have already been registered
A registered device needs to be replaced. Select “Yes”, and select the device to be replaced.
3When this screen is displayed, search
for the device name displayed on this screen on the screen of your Bluetooth® device.
*: Bluetooth is a registered trademark of Bluetooth SIG, Inc.
50


