Toyota Prius Plug-in (PHV, XW30/Серия ZVW35, Mark III, New MC Platform) с гибридной установкой Hybrid Synergy Drive: бензиновыми двигателями 2ZR-FXE 1.8 л (1798 см³) 99 л.с./73 кВт и электрическими мотор-генераторами 3JM 82 л.с./60 кВт; Руководство по разборке и техническому обслуживанию, характеристики, устройство, диагностика, особенности конструкции. Производственно-практическое издание гибридный легковой автомобиль компактного «Ц» класса Тойота Приус подзаряжаемый от внешнего источника питания с цельнометаллическими несущими кузовами пятидверный хэтчбек (лифтбек) переднеприводные модели Plug-in первого (на основе Prius третьего) поколения выпуска с 2010 по 2016 год
ЕСЛИ ВЫ ВИДИТЕ ОШИБКУ 406 Not Acceptable и не видите документ, то скорей всего у Вас IP РФ и его надо сменить, на любой другой страны, с помощью VPN ( Scribd и SlideShare блокируют посетителей с Российским IP).
Видео Toyota Prius PHV XW35 замена ECU инвертора/ Change ECU Inverter with Converter и как зарядить ВВ батарею от внешнего источника питания/ How-to Charging (Тойота Приус 10-16)
Toyota Prius Plug-in общая информация (Тойота Приус подзаряжаемый от внешнего источника питания 2010-2016)
О гибридных автомобилях Prius Plug-in (модель 2012 г.)
Гибридные автомобили Prius Plug-in отличаются наличием бензинового и электрического двигателя, а также новой АКБ Li-ion большой емкости. Это — первый гибридный автомобиль Toyota, в котором предусмотрено подключение и зарядка высоковольтной АКБ от внешнего источника электроэнергии.
В автомобиле предусмотрено два гибридных источника энергии.
1. Бензиновый — хранится в топливном баке и предназначен для бензинового двигателя.
2. Электрический — хранится в высоковольтной АКБ гибридного автомобиля (HV) большой емкости в сборе с возможностью подзарядки от внешнего источника электроэнергии. Он предназначен для электрического двигателя.
В зависимости от условий движения привод автомобиля осуществляется от одного или обоих источников энергии. На следующей иллюстрации представлено, как работает гибридный автомобиль Prius Plug-in в различных режимах движения.
Режим Plug-in EV (электромобиль):
● Зарядка высоковольтной АКБ автомобиля от розетки с напряжением 120 В через специальный кабель зарядки в сборе может занять до 3 часов.
● После достаточно полной зарядки высоковольтной АКБ привод автомобиля будет осуществляться в основном от электродвигателя.
● Если при движении в режиме электромобиля скорость автомобиля превысит 62 мили в час (100 км/ч) или будет выполнено резкое ускорение, привод автомобиля будет осуществляться как от электродвигателя, так и от бензинового двигателя.
Режим HV (гибридный автомобиль):
● При небольшом ускорении на низкой скорости привод автомобиля осуществляется от электродвигателя. Бензиновый двигатель выключен.
● В нормальном режиме движения привод автомобиля осуществляется преимущественно от бензинового двигателя. Кроме того, бензиновый двигатель приводит в действие генератор для перезарядки АКБ в сборе, а также обеспечивает привод электродвигателя.
● В режиме максимальной нагрузки, например, при движении вверх по склону, привод автомобиля осуществляется и от бензинового, и от электрического двигателя.
● В режиме замедления, например, при торможении, автомобиль преобразовывает кинетическую энергию передних колес в электричество, которое и обеспечивает зарядку АКБ в сборе.
● Когда автомобиль останавливается, бензиновый и электрический двигатели выключаются, однако автомобиль продолжает оставаться в рабочем состоянии.
| № | Спецификация / Specs | Данные |
| Габариты (мм/mm) и масса (кг/kg) / Dimensions and Weight | ||
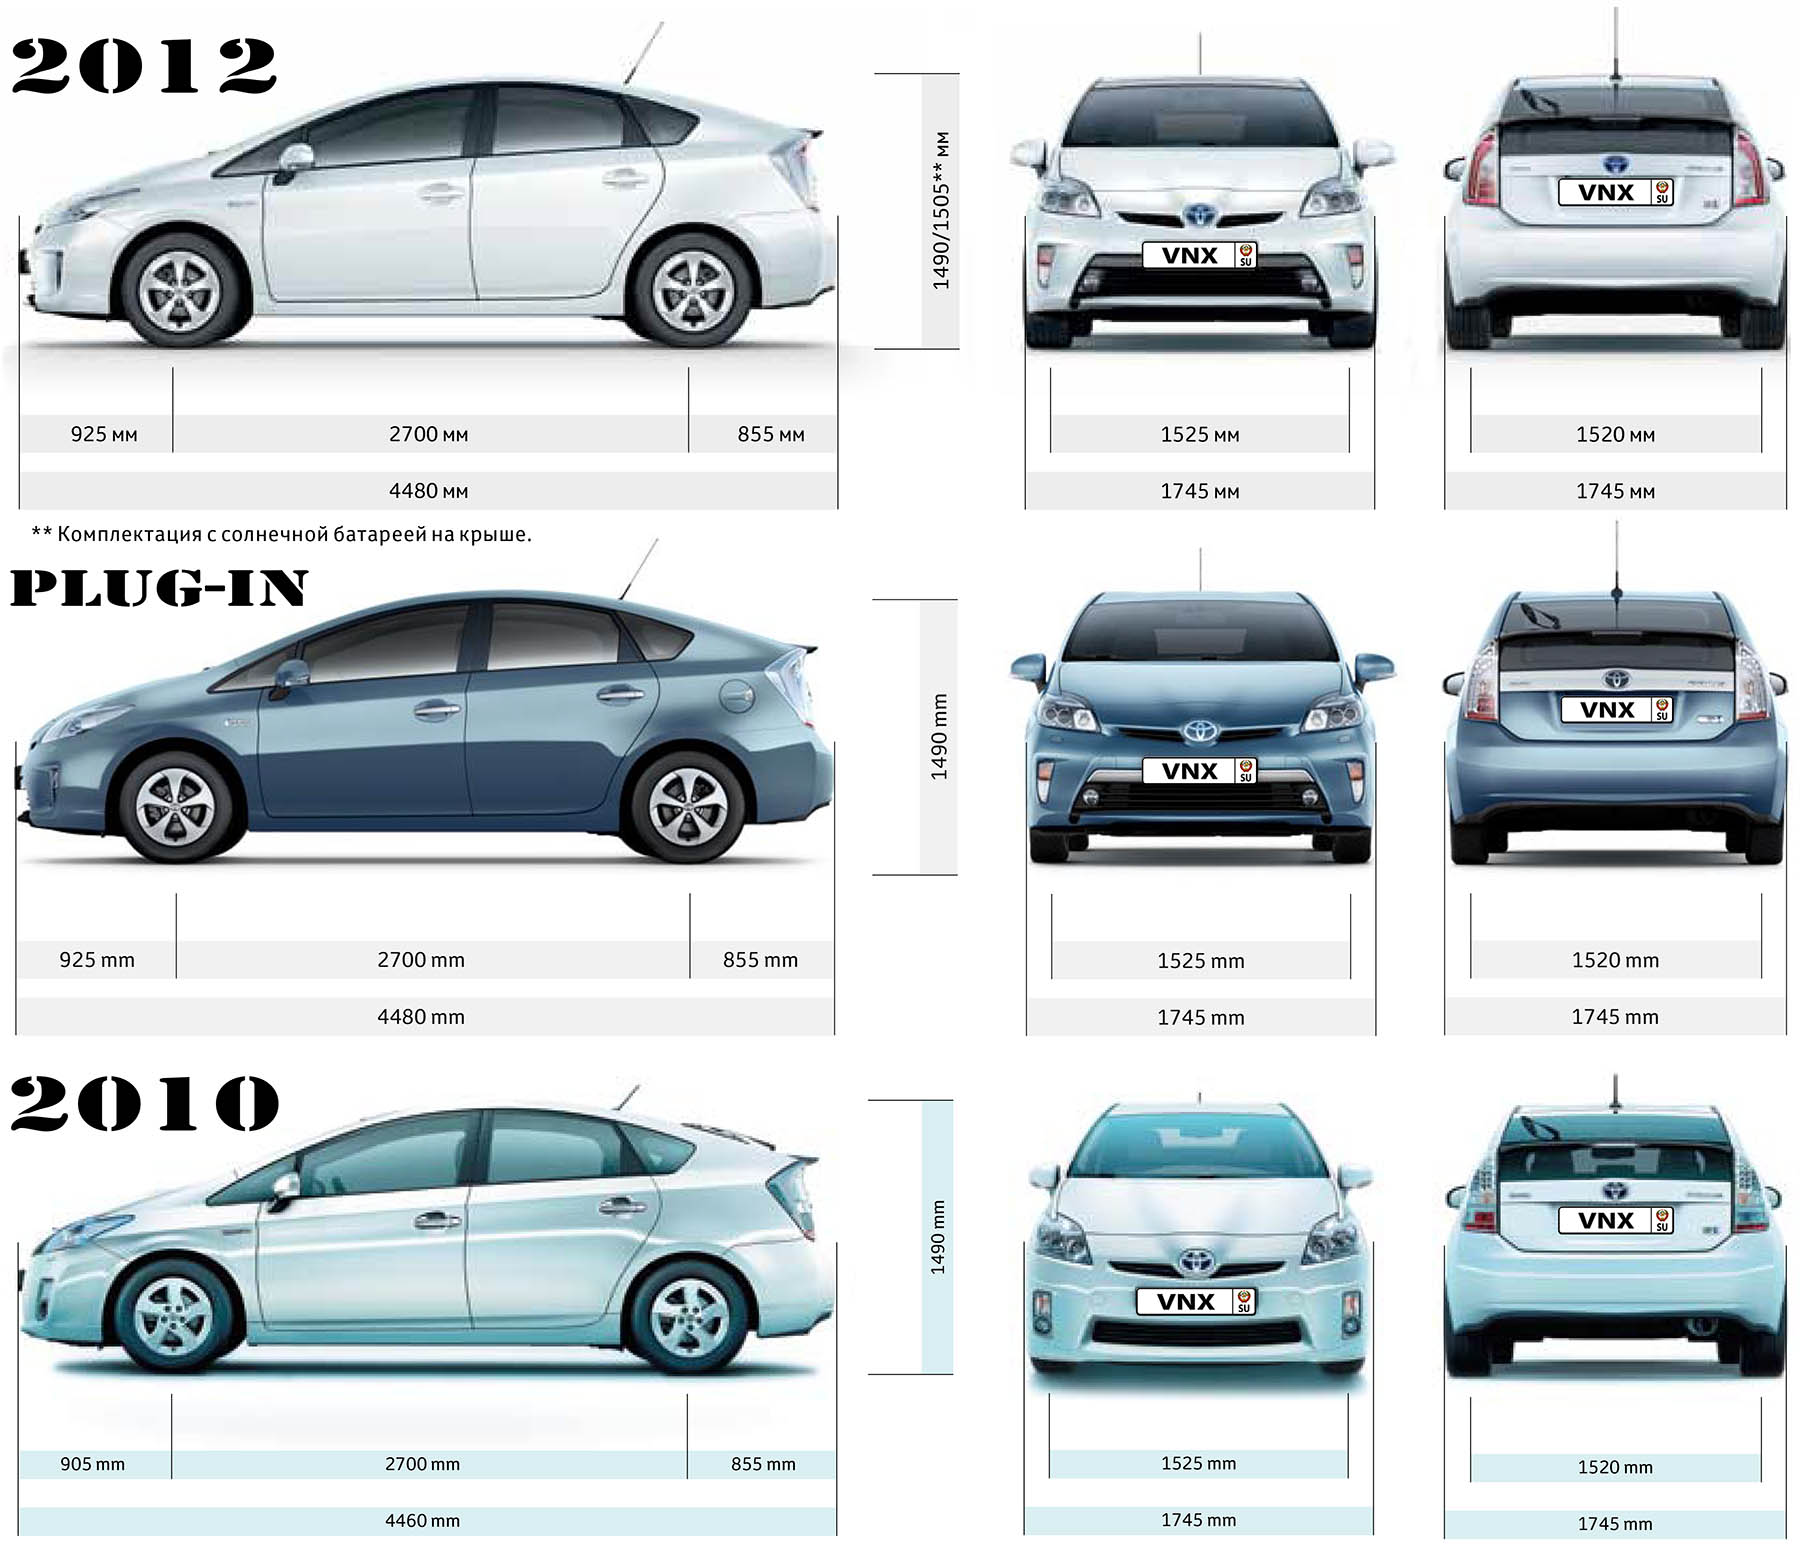
| 1 | Длина / Length | 4480 (4460 до 2011 года) |
| 2 | Ширина (без/с зеркалами) / Width | 1745 |
| 3 | Высота (загружен/пустой) / Height | 1490 |
| 4 | Колёсная база / Wheelbase | 2700 |
| 5 | Дорожный просвет (клиренс) / Ground clearance | 140 |
| 6 | Снаряжённая масса / Total (curb) weight | 1425–1450 |
| Полная масса / Gross (max.) weight | 1840 | |
|
Двигатель / Engine |
||
| 7 | Тип / Engine Type, Code | Гибридный, бензиновый, жидкостного охлаждения, четырехтактный, 2ZR-FXE VVT-i (Atkinson cycle) и электрический 3JM |
| 8 | Количество цилиндров / Cylinder arrangement: Total number of cylinders, of valves | 4-цилиндровый, рядный, 16V, DOHC с верхним расположением двух распределительных валов |
| 9 | Диаметр цилиндра / Bore | 80.5 мм |
| 10 | Ход поршня / Stroke | 88.3 мм |
| 11 | Объём / Engine displacement | 1798 см³ |
| 12 | Система питания / Fuel supply, Aspiration | Распределенный впрыск топлива EFI |
| Атмосферный | ||
| 13 | Степень сжатия / Compression ratio | 13.0:1 |
| 14 | Максимальная мощность / Max. output power kW (HP) at rpm | 73 кВт (99 л.с.) при 5200 об/мин, электрический 82 л.с./60 кВт, Синергетический режим: 136 л.с./100 кВт |
| 15 | Максимальный крутящий момент / Max. torque N·m at rpm | 142 Нм при 4000 об/мин, электрический 207 Нм |
|
Трансмиссия / Transmission |
||
| 16 | Сцепление / Clutch type | Устройство распределения мощности PSD (Power Split Device) |
| 17 | КПП / Transmission type | Гибридная трансмиссия (e-CVT бесступенчатая трансмиссия с электронным управлением) |
О Книге
- Название: Toyota Prius серии Plug-in ZVW35 Бензиново-электрический Hybrid Synergy Drive Руководство по разборке гибридного автомобиля
- Бензиновые двигатели: 2ZR-FXE 1.8 л (1798 см³) 99 л.с./73 кВт и электрическими мотор-генераторами 3JM 82 л.с./60 кВт
- Выпуск с 2010 года
- Серия: «Workshop Manual»
- Год издания: 2011
- Автор: Коллектив авторов
- Издательство: «Toyota Motors Corporation»
- Формат: PDF
- Страниц в книге: 78
- Размер: 58.08 МБ
- Язык: Русский
- Количество электросхем: 2

Toyota Prius Plug-in (PHV, XW30/Серия ZVW35, Mark III, New MC Platform) с гибридной установкой Hybrid Synergy Drive: бензиновыми двигателями 2ZR-FXE 1.8 л (1798 см³) 99 л.с./73 кВт и электрическими мотор-генераторами 3JM 82 л.с./60 кВт; Руководство по разборке и техническому обслуживанию, характеристики, устройство, диагностика, особенности конструкции. Производственно-практическое издание гибридный легковой автомобиль компактного «Ц» класса Тойота Приус подзаряжаемый от внешнего источника питания с цельнометаллическими несущими кузовами пятидверный хэтчбек (лифтбек) переднеприводные модели Plug-in первого (на основе Prius третьего) поколения выпуска с 2010 по 2016 год
ЕСЛИ ВЫ ВИДИТЕ ОШИБКУ 406 Not Acceptable и не видите документ, то скорей всего у Вас IP РФ и его надо сменить, на любой другой страны, с помощью VPN ( Scribd и SlideShare блокируют посетителей с Российским IP).
Видео Toyota Prius PHV XW35 замена ECU инвертора/ Change ECU Inverter with Converter и как зарядить ВВ батарею от внешнего источника питания/ How-to Charging (Тойота Приус 10-16)
Toyota Prius Plug-in общая информация (Тойота Приус подзаряжаемый от внешнего источника питания 2010-2016)
О гибридных автомобилях Prius Plug-in (модель 2012 г.)
Гибридные автомобили Prius Plug-in отличаются наличием бензинового и электрического двигателя, а также новой АКБ Li-ion большой емкости. Это — первый гибридный автомобиль Toyota, в котором предусмотрено подключение и зарядка высоковольтной АКБ от внешнего источника электроэнергии.
В автомобиле предусмотрено два гибридных источника энергии.
1. Бензиновый — хранится в топливном баке и предназначен для бензинового двигателя.
2. Электрический — хранится в высоковольтной АКБ гибридного автомобиля (HV) большой емкости в сборе с возможностью подзарядки от внешнего источника электроэнергии. Он предназначен для электрического двигателя.
В зависимости от условий движения привод автомобиля осуществляется от одного или обоих источников энергии. На следующей иллюстрации представлено, как работает гибридный автомобиль Prius Plug-in в различных режимах движения.
Режим Plug-in EV (электромобиль):
● Зарядка высоковольтной АКБ автомобиля от розетки с напряжением 120 В через специальный кабель зарядки в сборе может занять до 3 часов.
● После достаточно полной зарядки высоковольтной АКБ привод автомобиля будет осуществляться в основном от электродвигателя.
● Если при движении в режиме электромобиля скорость автомобиля превысит 62 мили в час (100 км/ч) или будет выполнено резкое ускорение, привод автомобиля будет осуществляться как от электродвигателя, так и от бензинового двигателя.
Режим HV (гибридный автомобиль):
● При небольшом ускорении на низкой скорости привод автомобиля осуществляется от электродвигателя. Бензиновый двигатель выключен.
● В нормальном режиме движения привод автомобиля осуществляется преимущественно от бензинового двигателя. Кроме того, бензиновый двигатель приводит в действие генератор для перезарядки АКБ в сборе, а также обеспечивает привод электродвигателя.
● В режиме максимальной нагрузки, например, при движении вверх по склону, привод автомобиля осуществляется и от бензинового, и от электрического двигателя.
● В режиме замедления, например, при торможении, автомобиль преобразовывает кинетическую энергию передних колес в электричество, которое и обеспечивает зарядку АКБ в сборе.
● Когда автомобиль останавливается, бензиновый и электрический двигатели выключаются, однако автомобиль продолжает оставаться в рабочем состоянии.
Основные технические характеристики (General technical specifications) Toyota Prius Plug-in 2014 «Premium» с мотором 1.8 литра
| № | Спецификация / Specs | Данные |
| Габариты (мм/mm) и масса (кг/kg) / Dimensions and Weight | ||
| 1 | Длина / Length | 4480 (4460 до 2011 года) |
| 2 | Ширина (без/с зеркалами) / Width | 1745 |
| 3 | Высота (загружен/пустой) / Height | 1490 |
| 4 | Колёсная база / Wheelbase | 2700 |
| 5 | Дорожный просвет (клиренс) / Ground clearance | 140 |
| 6 | Снаряжённая масса / Total (curb) weight | 1425–1450 |
| Полная масса / Gross (max.) weight | 1840 | |
|
Двигатель / Engine |
||
| 7 | Тип / Engine Type, Code | Гибридный, бензиновый, жидкостного охлаждения, четырехтактный, 2ZR-FXE VVT-i (Atkinson cycle) и электрический 3JM |
| 8 | Количество цилиндров / Cylinder arrangement: Total number of cylinders, of valves | 4-цилиндровый, рядный, 16V, DOHC с верхним расположением двух распределительных валов |
| 9 | Диаметр цилиндра / Bore | 80.5 мм |
| 10 | Ход поршня / Stroke | 88.3 мм |
| 11 | Объём / Engine displacement | 1798 см³ |
| 12 | Система питания / Fuel supply, Aspiration | Распределенный впрыск топлива EFI |
| Атмосферный | ||
| 13 | Степень сжатия / Compression ratio | 13.0:1 |
| 14 | Максимальная мощность / Max. output power kW (HP) at rpm | 73 кВт (99 л.с.) при 5200 об/мин, электрический 82 л.с./60 кВт, Синергетический режим: 136 л.с./100 кВт |
| 15 | Максимальный крутящий момент / Max. torque N·m at rpm | 142 Нм при 4000 об/мин, электрический 207 Нм |
|
Трансмиссия / Transmission |
||
| 16 | Сцепление / Clutch type | Устройство распределения мощности PSD (Power Split Device) |
| 17 | КПП / Transmission type | Гибридная трансмиссия (e-CVT бесступенчатая трансмиссия с электронным управлением) |
О Книге
- Название: Toyota Prius серии Plug-in ZVW35 Бензиново-электрический Hybrid Synergy Drive Руководство по разборке гибридного автомобиля
- Бензиновые двигатели: 2ZR-FXE 1.8 л (1798 см³) 99 л.с./73 кВт и электрическими мотор-генераторами 3JM 82 л.с./60 кВт
- Выпуск с 2010 года
- Серия: «Workshop Manual»
- Год издания: 2011
- Автор: Коллектив авторов
- Издательство: «Toyota Motors Corporation»
- Формат: PDF
- Страниц в книге: 78
- Размер: 58.08 МБ
- Язык: Русский
- Количество электросхем: 2

-
Contents
-
Table of Contents
-
Bookmarks
Quick Links
Plug-in Hybrid
Gasoline-Electric
Hybrid Synergy Drive
ZVW35 Series
Related Manuals for Toyota Prius ZVW35 Series
Summary of Contents for Toyota Prius ZVW35 Series
-
Page 1
Plug-in Hybrid Gasoline-Electric Hybrid Synergy Drive ZVW35 Series… -
Page 2
Foreword This guide was developed to educate and assist dismantlers in the safe handling of Toyota Prius Plug-in gasoline-electric hybrid vehicles. Prius Plug-in hybrid dismantling procedures are similar to other non-hybrid Toyota vehicles with the exception of the high voltage electrical system. It is important to recognize and understand the high voltage electrical system features and specifications of the Toyota Prius Plug-in hybrid, as they may not be familiar to dismantlers. -
Page 3
Exterior Rear and Left Side View 2010 Model 2012 Model Exterior Front and Left Side View © 2011 Toyota Motor Corporation All rights reserved. This book may not be reproduced or copied, in whole or in part, without the written permission of Toyota Motor Corporation. -
Page 4: Table Of Contents
Table of Contents About the Prius Plug-in hybrid (2010 Model)………………..1 Prius Plug-in hybrid Identification (2010 Model)………………2 Exterior ……………………………3 Interior…………………………..4 Engine Compartment ……………………….5 Hybrid Component Locations & Descriptions (2010 Model) …………..6 Specifications …………………………7 Hybrid Synergy Drive Operation (2010 Model) ………………8 Vehicle Operation……………………….8 Hybrid Vehicle (HV) Battery Pack and Auxiliary Battery (2010 Model) ……….9 HV Battery Pack……………………….9 Components Powered by the HV Battery Pack…………………9…
-
Page 5
High Voltage Safety (2012 Model) ………………….46 High Voltage Safety System……………………46 Service Plug Grip ……………………….47 Precaution to be observed when dismantling the vehicle (2012 Model)……….48 Necessary Items ……………………….48 Spills (2012 Model) ………………………..49 Dismantling the vehicle (2012 Model)…………………..50 Removal of HV battery (2012 Model) …………………..55 HV Battery Caution Label (2012 Model) ………………..69… -
Page 6: About The Prius Plug-In Hybrid (2010 Model)
The Prius Plug-in hybrid contains a gasoline engine, an electric motor, and a newly developed large capacity Li-ion battery. It is the first Toyota hybrid that allows the HV battery to be plugged-in and charged by an external power source. Two power sources are stored on board the vehicle: 1.
-
Page 7: Prius Plug-In Hybrid Identification (2010 Model)
Prius Plug-in hybrid Identification (2010 Model) In appearance, the 2010 model year Prius Plug-in hybrid is a 5-door hatchback. Exterior, interior, and engine compartment illustrations are provided to assist in identification. The alphanumeric 17 character Vehicle Identification Number (VIN) is provided in the front windshield cowl and on the left side door pillar.
-
Page 8: Exterior
Prius Plug-in hybrid Identification (2010 Model — Continued) Exterior logo on the front right fender. Charge inlet door with logo, located on left side front fender. Plug-in Hybrid decals located on the sides of the vehicle. Exterior Left Side View Exterior Front and Rear View Exterior Rear and Left Side View…
-
Page 9: Interior
Prius Plug-in hybrid Identification (2010 Model — Continued) Interior Instrument cluster (speedometer, READY light, shift position indicators, warning lights) located in center of the dash and near the base of the windshield. Hint: If the vehicle is shut off, the instrument cluster gauges will be “blacked out”, not illuminated. Interior View Instrument Cluster View…
-
Page 10: Engine Compartment
Prius Plug-in hybrid Identification (2010 Model — Continued) Engine Compartment 1.8-liter aluminum alloy gasoline engine. Logo on the plastic engine cover. Orange colored high voltage power cables. Engine Compartment View Power Cables…
-
Page 11: Hybrid Component Locations & Descriptions (2010 Model)
Hybrid Component Locations & Descriptions (2010 Model) Component Location Description 12 Volt Auxiliary Right Side of A lead-acid battery that supplies power to the low voltage Battery Cargo Area devices. Hybrid Vehicle (HV) Cargo Area 346 Volt Lithium-ion (Li-ion) battery pack consisting of Battery Assembly 3.6 Volt cells connected in a series-parallel circuit.
-
Page 12: Specifications
Hybrid Component Locations & Descriptions (2010 Model — Continued) Specifications Gasoline Engine: 98 hp (73 kW), 1.8-liter Aluminum Alloy Engine Electric Motors 80 hp (60 kW), Permanent Magnet Motor Transmission: Automatic Only (electrically controlled continuously variable transaxle) HV Battery: 346 Volt Sealed Li-ion Battery Curb Weight: 3,362 lbs/1,525 kg Fuel Tank: 11.9 gals/45.0 liters Frame Material: Steel Unibody…
-
Page 13: Hybrid Synergy Drive Operation (2010 Model)
Hybrid Synergy Drive Operation (2010 Model) Once the READY indicator is illuminated in the instrument cluster, the vehicle may be driven. However, the gasoline engine does not idle like a typical automobile and will start and stop automatically. It is important to recognize and understand the READY indicator provided in the instrument cluster.
-
Page 14: Hybrid Vehicle (Hv) Battery Pack And Auxiliary Battery (2010 Model)
Hybrid Vehicle (HV) Battery Pack and Auxiliary Battery (2010 Model) The Prius Plug-in hybrid features a high voltage Hybrid Vehicle (HV) battery pack that contains sealed Lithium-ion (Li-ion) battery cells. HV Battery Pack • The HV battery pack is enclosed in a metal case and is rigidly mounted to the cargo area floor pan cross member behind the rear seat.
-
Page 15: Hv Battery Pack Recycling
Hybrid Vehicle (HV) Battery Pack and Auxiliary Battery (2010 Model — Continued) HV Battery Pack Recycling • The HV battery pack is recyclable. Contact either your Toyota Distributor as mentioned on HV battery Caution Label (see page 35) or the nearest Toyota dealer. Auxiliary Battery •…
-
Page 16: High Voltage Safety (2010 Model)
High Voltage Safety (2010 Model) The HV battery pack powers the high voltage electrical system with DC electricity. Positive and negative orange colored high voltage power cables are routed from the battery pack, under the vehicle floor pan, to the inverter/converter. The inverter/converter contains a circuit that boosts the HV battery voltage from 346 to 650 Volts DC.
-
Page 17: Service Plug Grip
High Voltage Safety (2010 Model — Continued) Service Plug Grip • The high-voltage circuit is cut by removing the service plug grip (see page 16). 12 Volts Volts DC Hybrid Vehicle Computer Auxiliary Battery Compressor Electric Inverter/ Generator Converter Electric Volts DC Motor HV Battery Pack…
-
Page 18: Precaution To Be Observed When Dismantling The Vehicle (2010 Model)
Precaution to be observed when dismantling the vehicle (2010 Model) WARNING: The high voltage system may remain powered for up to 10 minutes after the vehicle is shut off or disabled. To prevent serious injury or death from severe burns or electric shock, avoid touching, cutting, or opening any orange high voltage power cable or high voltage component.
-
Page 19: Spills (2010 Model)
Spills (2010 Model) The Prius Plug-in hybrid contains the same common automotive fluids used in other non-hybrid Toyota vehicles, with the exception of the Li-ion electrolyte used in the HV battery assembly. The electrolyte used in the Li-ion battery cells is a flammable organic electrolyte. The electrolyte is absorbed into the battery cell separators, even if the battery cells are crushed or cracked, it is unlikely that liquid electrolyte will leak.
-
Page 20: Dismantling The Vehicle (2010 Model)
Dismantling the vehicle (2010 Model) The following 2 pages contain general instructions for use when working on a Prius Plug-in hybrid. Read these instructions before proceeding to the HV battery removal instructions on page 19. WARNING: The high voltage system may remain powered for up to 10 minutes after the vehicle is shut off or disabled.
-
Page 21
3. Remove the 3 service plug grips. Caution: Wear insulated gloves for the following 3 steps. (1) Slide the handle of the service plug grip to the left. (2) Raise the release handle of the service plug grip (3) Remove the service plug grip. (4) Apply insulating tape to the socket of the service plug grip to insulate it. -
Page 22
Instead, wash the eye(s) with a dilute boric acid solution or a large amount of water and seek medical care. 9. With the exception of the HV battery, remove parts by following procedures which are similar to conventional Toyota vehicles. For the removal of the HV battery, refer to the following pages. -
Page 24: Removal Of Hv Battery (2010 Model)
Removal of HV battery (2010 Model) WARNING: Be sure to wear insulated gloves when handling high-voltage parts. Even if the vehicle is shut off and the relays are off, be sure to remove the service plug grip before performing any further work. Power remains in the high voltage electrical system for 10 minutes even after the HV battery pack is shut off because the circuit has a condenser that stores power.
-
Page 25
4. Remove the rear No. 4 floor board. (1) Using a clip remover, disengage the 3 clips and remove the rear No. 4 floor board. 5. Remove the rear No. 1 floor board. (1) Using a clip remover, disengage the 8 clips. (2) Disangage the 3 fasteners and disconnect the rear No. -
Page 26
6. Remove the rear deck trim cover. (1) Remove the bolt. (2) Using a clip remover, disengage the 4 clips. (3) Disengage the 4 claws and 4 guides, and remove the rear deck trim cover. 7. Remove the hybrid battery carrier bracket. (1) Remove the bolt. -
Page 27
8. Remove the 3 service plug grips. Caution: • Wear insulated gloves. • Before inspecting or servicing the high-voltage system or disconnecting the low voltage connector of the inverter with converter assembly, be sure to follow all safety measures, such as wearing insulated gloves and removing the 3 service plug grips to prevent electrocution. -
Page 28
9. Remove the 9 bolts and inverter terminal cover. Caution: Wear insulated gloves. 10. Check the voltage at the terminals in the inspection point in the power control unit. Caution: Wear insulated gloves. To prevent serious injury or death, do not proceed with dismantling of the HV system until the voltage at the terminals in the inspection point is 0 V. -
Page 29
13. Remove the rear side seatback assembly RH. (4) Remove the bolt. (5) Disengage the 2 guides and remove the rear side seatback assembly RH. 14. Remove the rear side seatback assembly LH. (1) Remove the bolt. -
Page 30
(2) Disengage the 2 guides and remove the rear side seatback assembly LH. 15. Disconnect the rear center seat belt assembly. Remove the bolt and disconnect the anchor part of the rear center seat belt assembly. 16. Remove the rear seatback assembly LH. (1) Remove the 2 bolts and rear seatback assembly 17. -
Page 31
18. Remove the battery cooling blower bracket. Notice: • Be sure not to touch the fan part of the battery cooling blower assemblies. • Do not lift the battery cooling blower assemblies using the wire harness. Disconnect the battery cooling blower assembly connectors. -
Page 32
Remove the 2 clips and No. 5 hybrid battery intake duct (main). 20. Remove the battery cooling blower assembly. Notice: • Be sure not to touch the fan part of the battery cooling blower assemblies. • Do not lift the battery cooling blower assemblies using the wire harness. (1) Remove the 9 nuts and 3 battery cooling blower assemblies. -
Page 33
22. Remove converter cooling blower bracket. Remove the 2 bolts and converter cooling blower bracket. 23. Remove the No. 2 converter cooling exhaust duct. Remove the 4 clips and No. 2 converter cooling exhaust duct. 24. Remove the No. 3 converter cooling exhaust duct. -
Page 34
26. Remove the child restraint seat anchor bracket assembly RH. Remove the 2 bolts and child restraint seat anchor bracket sub-assembly RH. 27. Remove the No. 1 hybrid battery intake duct. Remove the clip and No. 1 hybrid battery intake duct (main). -
Page 35
29. Remove the HV battery cover sub-assembly. Caution: Be sure to wear insulated gloves and protective goggles. Separate the 2 claws and 3 clamps, and remove the indoor electrical key oscillator. Remove the 18 nuts and HV battery cover Front sub-assembly. -
Page 36
31. Remove the hybrid vehicle converter. Caution: Be sure to wear insulated gloves and protective goggles. Notice: Insulate the terminals of the removed frame wire with insulating tape. Disengage the clamp and disconnect the connector. (2) Disconnect the 2 connectors. (3) Remove the 4 nuts and hybrid vehicle converter. -
Page 37
33. Install HV battery cover sub-assembly. Front Caution: Be sure to wear insulated gloves and protective goggles. Temporarily install the HV battery cover sub-assembly with the 18 nuts to prevent any foreign objects or water from entering the HV battery. 34. -
Page 38
Disconnect the 4 connectors and 2 clamps. Install the 4 eyebolts in the locations shown in the illustration. Front Hint: Make sure to use the eyebolts supplied with the HV battery. Set the hooks and straps as shown in the illustration. -
Page 39
Remove the 6 bolts and 2 nuts. Hint: • Attach tape to the feet and edges of the battery to protect tools and the vehicle body. • Use cardboard or other similar material to protect the HV battery and vehicle body from damage. -
Page 40: Hv Battery Caution Label (2010 Model)
HV Battery Caution Label (2010 Model) For U.S.A. For CANADA For Europe…
-
Page 41: About The Prius Plug-In Hybrid (2012 Model)
The Prius Plug-in hybrid contains a gasoline engine, an electric motor, and a newly developed large capacity Li-ion battery. It is the first Toyota hybrid that allows the HV battery to be plugged-in and charged by an external power source. Two power sources are stored on board the vehicle: 3.
-
Page 42: Prius Plug-In Hybrid Identification (2012 Model)
Prius Plug-in hybrid Identification (2012 Model) In appearance, the 2012 model year Prius Plug-in hybrid is a 5-door hatchback. Exterior, interior, and engine compartment illustrations are provided to assist in identification. The alphanumeric 17 character Vehicle Identification Number (VIN) is provided in the front windshield cowl and on the driver door pillar.
-
Page 43: Exterior
Prius Plug-in hybrid Identification (2012 Model — Continued) Exterior logos on the hatch. logo on the each front fender. Charge inlet door located on right side rear quarter panel. Exterior Left Side View Exterior Front and Rear View Exterior Rear and Right Side View…
-
Page 44: Interior
Prius Plug-in hybrid Identification (2012 Model — Continued) Interior An instrument cluster (speedometer, READY light, shift position indicators, warning lights) located in center of the dash and near the base of the windshield. logo located on the passenger side of the dash. Hint: If the vehicle is shut off, the instrument cluster gauges will be “blacked out”, not illuminated.
-
Page 45: Engine Compartment
Prius Plug-in hybrid Identification (2012 Model — Continued) Engine Compartment 1.8-liter aluminum alloy gasoline engine. Logo on the plastic engine cover. Orange colored high voltage power cables. Engine Compartment View Power Cables…
-
Page 46: Hybrid Component Locations & Descriptions (2012 Model)
Hybrid Component Locations & Descriptions (2012 Model) Component Location Description 12 Volt Auxiliary Right Side of A lead-acid battery that supplies power to the Battery Cargo Area low voltage devices. Hybrid Vehicle Cargo Area 207.2 Volt Lithium-ion (Li-ion) battery pack (HV) Battery consisting of 3.7 Volt cells connected in a series Assembly…
-
Page 47: Specifications
Hybrid Component Locations & Descriptions (2012 Model — Continued) Specifications Gasoline Engine: 98 hp (73 kW), 1.8-liter Aluminum Alloy Engine Electric Motors 80 hp (60 kW), Permanent Magnet Motor Transmission: Automatic Only (electrically controlled continuously variable transaxle) HV Battery: 207.2 Volt Sealed Li-ion Battery Curb Weight: 3,186 lbs/1,445 kg Fuel Tank: 11.9 gals/45.0 liters 10.6 gals/40.0 liters…
-
Page 48: Hybrid Synergy Drive Operation (2012 Model)
Hybrid Synergy Drive Operation (2012 Model) Once the READY indicator is illuminated in the instrument cluster, the vehicle may be driven. However, the gasoline engine does not idle like a typical automobile and will start and stop automatically. It is important to recognize and understand the READY indicator provided in the instrument cluster.
-
Page 49: Hybrid Vehicle (Hv) Battery Pack And Auxiliary Battery (2012 Model)
Hybrid Vehicle (HV) Battery Pack and Auxiliary Battery (2012 Model) The Prius Plug-in hybrid features a high voltage Hybrid Vehicle (HV) battery pack that contains sealed Lithium-ion (Li-ion) battery cells. HV Battery Pack • The HV battery pack is enclosed in a metal case and is rigidly mounted to the cargo area floor pan cross member behind the rear seat.
-
Page 50: Hv Battery Pack Recycling
Hybrid Vehicle (HV) Battery Pack and Auxiliary Battery (2012 Model — Continued) HV Battery Pack Recycling • The HV battery pack is recyclable. Contact either your Toyota Distributor as mentioned on HV battery Caution Label (see page 35) or the nearest Toyota dealer. Auxiliary Battery •…
-
Page 51: High Voltage Safety (2012 Model)
High Voltage Safety (2012 Model) The HV battery assembly powers the high voltage electrical system with DC electricity. Positive and negative orange colored high voltage power cables are routed from the HV battery assembly, under the vehicle floor pan, to the inverter/converter. The inverter/converter contains a circuit that boosts the HV battery voltage from 207.2 to 650 Volts DC.
-
Page 52: Service Plug Grip
High Voltage Safety (2012 Model — Continued) Service Plug Grip • The high-voltage circuit is cut by removing the service plug grip (see page 16). 12 Volt Auxiliary Hybrid Vehicle Computer Battery Volt DC Volt DC Volt AC Volt DC Compressor Electric Inverter/…
-
Page 53: Precaution To Be Observed When Dismantling The Vehicle (2012 Model)
Precaution to be observed when dismantling the vehicle (2012 Model) WARNING: The high voltage system may remain powered for up to 10 minutes after the vehicle is shut off or disabled. To prevent serious injury or death from severe burns or electric shock, avoid touching, cutting, or opening any orange high voltage power cable or high voltage component.
-
Page 54: Spills (2012 Model)
Spills (2012 Model) The Prius Plug-in hybrid contains the same common automotive fluids used in other non-hybrid Toyota vehicles, with the exception of the Li-ion electrolyte used in the HV battery assembly. The electrolyte used in the Li-ion battery cells is a flammable organic electrolyte. The electrolyte is absorbed into the battery cell separators, even if the battery cells are crushed or cracked, it is unlikely that liquid electrolyte will leak.
-
Page 55: Dismantling The Vehicle (2012 Model)
Dismantling the vehicle (2012 Model) The following 2 pages contain general instructions for use when working on a Prius Plug-in hybrid. Read these instructions before proceeding to the HV battery removal instructions on page 19. WARNING: The high voltage system may remain powered for up to 10 minutes after the vehicle is shut off or disabled.
-
Page 56
3. Remove the service plug grip. Caution: Wear insulated gloves for the following 5 steps. (1) Remove service hole cover. (2) Slide the handle of the service plug grip to the left. (3) Raise the release handle of the service plug grip. -
Page 57
4. Carry the removed service plug grip in your pocket to prevent other staff from accidentally reinstalling it while you are dismantling the vehicle. 5. Make other staff aware that a high-voltage system is being dismantled by using the following sign: CAUTION: HIGH-VOLTAGE. DO NOT TOUCH (see page 18). 6. -
Page 58
Instead, wash the eye(s) with a dilute boric acid solution or a large amount of water and seek medical care. 10. With the exception of the HV battery, remove parts by following procedures which are similar to conventional Toyota vehicles. For the removal of the HV battery, refer to the following pages. -
Page 59
54 54… -
Page 60: Removal Of Hv Battery (2012 Model)
Removal of HV battery (2012 Model) WARNING: Be sure to wear insulated gloves when handling high-voltage parts. Even if the vehicle is shut off and the relays are off, be sure to remove the service plug grip before performing any further work. Power remains in the high voltage electrical system for 10 minutes even after the HV battery pack is shut off because the circuit has a condenser that stores power.
-
Page 61
4. Remove the service plug grip. Caution: • Wear insulated gloves. • Before inspecting or servicing the high-voltage system or disconnecting the low voltage connector of the inverter with converter assembly, be sure to follow all safety measures, such as wearing insulated gloves and removing the 3 service plug grips to prevent electrocution. -
Page 62
5. Remove the 9 bolts and inverter terminal cover. 6. Check the voltage at the terminals in the inspection point in the power control unit. Caution: Wear insulated gloves. To prevent serious injury or death, do not proceed with dismantling of the HV system until the voltage at the terminals in the inspection point is 0 V. -
Page 63
11. Remove the rear No. 1 floor board sub-assembly. (1) Disengage the claw and 3 clips, and remove the rear No. 1 floor board sub-assembly. 12. Remove the rear No. 1 floor board. (1) Fold the rear seatback assembly LH forward. (2) Disengage the fastener. -
Page 64
Using a clip remover, remove the clip. (6) Disengage the 3 fasteners and remove the rear No. 1 floor board. 13. Remove the deck trim service hole cover. (1) Disengage the 4 claws. (2) Disengage the 4 guides and remove the deck trim service hole cover. -
Page 65
16. Remove the rear door opening trim weatherstrip LH and RH. (1) Remove the rear door opening trim weatherstrip LH and RH. 17. Remove the rear seat cushion assembly. (1) Disengage the front hook of the rear seat cushion assembly from the vehicle body as shown in the illustration. -
Page 66
(7) Disengage the 2 guides and remove the rear side seatback assembly RH. 16. Remove the rear side seatback assembly LH. (3) Remove the bolt. (4) Disengage the 2 guides and remove the rear side seatback assembly LH. -
Page 67
17. Remove the luggage hold belt striker (for LH and RH). Remove the 4 bolts. (2) Disengage each guide and remove the 2 luggage hold belt striker assemblies. 18. Remove the tonneau cover holder cap (for LH and RH). (1) Using a screwdriver, disengage the claw and remove the tonneau cover holder cap. -
Page 68
20. Remove deck trim side panel assembly RH. (1) Remove the screw. (2) Disengage the 7 claws and 2 clips and remove the deck trim side panel assembly RH. 21. Remove the battery cooling blower assembly. Notice: • Be sure not to touch the fan part of the battery cooling blower assemblies. •… -
Page 69
22. Remove the hybrid battery hose assembly. (1) Disconnect the clip. (2) Disengage the claw. (3) Disconnect the grommet and remove the hybrid battery hose assembly. 23. Remove No. 4 hybrid vehicle battery carrier bracket. (1) Remove the bolt and No. 4 hybrid vehicle battery carrier bracket. -
Page 70
25. Remove No. 1 hybrid vehicle battery shield panel. Caution: Be sure to wear insulated gloves and protective goggles. (1) Disengage the 2 claws and remove the 3 clamps and electrical key oscillator. (2) Disconnect the connector and clamp. (3) Remove the 7 nuts and No. 1 hybrid vehicle battery shield panel. -
Page 71
29. Remove the No. 2 hybrid battery intake duct (1) Remove the clip and No. 1 hybrid battery intake duct. 30. Remove the HV battery. Caution: Be sure to wear insulated gloves and protective goggles. Notice: Insulate the terminals of the removed frame wire with insulating tape. Remove the 2 bolts from each back door damper stay bracket UPR. -
Page 72
Disconnect the clamp. Disconnect the connector and 2 clamps. Remove the 2 bolts. Install the 2 engine hangers (12281-28010) with the 2 bolts as shown in the illustration. -
Page 73
Remove the 8 bolts and 2 nuts. Set the hooks and straps as shown in the illustration. (9) Using a suitable adaptor such as straps, remove the HV battery. Caution: To prevent any accidents and injuries due to Hook the weight of the HV battery, follow all specified procedures and be careful to balance the HV battery when removing or installing it. -
Page 74: Hv Battery Caution Label (2012 Model)
HV Battery Caution Label (2012 Model) For U.S.A. For CANADA…
Надоело рыться в разных местах при обслуживании гибрида? Представляю библиотеку официальных документов для образовательных целей. Источники: сайты Тойоты, NHTSA, priuschat.com, prius-club.su и др.
_______________________________________
Брошюры для покупателя с комплектациями для разных стран и модельных годов вы можете найти здесь.
_______________________________________
Инструкции для владельца:
Owner’s Manual (Руководство для Владельца),
Quick Reference Guide (Краткое руководство),
Emergency Response Guide (Инструкция, как действовать в аварийных ситуациях),
Dismantling Manual (Руководство по безопасной разборке),
руководства к навигационной и мультимедийной системе,
инструкции по установке дополнительного оборудования:
— Европа (включая Россию и Великобританию) (выбрать общий поиск по критериям) и тут,
— ZVW30 EU 04/2009—>12/2011 OM RU скан,
— ZVW30 EU 12/2011—>10/2015 OM RU (ищу),
— ZVW30 EU 12/2011—>10/2015 OM UA,
— CT200h ZWA10 EU 12/2010—> OM UA,
— Австралия,
— Япония,
— США или тут,
— Канада.
_______________________________________
График ТО для Prius 3#.
_______________________________________
Информацию для ремонта и обслуживания можно получить из 3 источников. Эти документы делятся на несколько категорий:
1) RM Repair Manual (Руководство по ремонту),
2) NCF New Car Features (Новые возможности автомобиля),
3) EWD Electrical Wiring Diagram (Электросхемы),
4) BRM Body Repair Manual (Руководство по ремонту кузова, поврежденного в результате столкновения),
5) SDS Service Data Sheet (Сервисная карта).
Буква в конце версии документа — язык или регион: E или CA — английский, RU или CS — русский, U — Сев. Америка на англ. Мои сокращения: EU — Europe, NA — North America.
1️⃣ Toyota Service Information — платные разделы европейского портала:
— ZVW50 EU 11/2015—> Service Information 3210E 03.08.2016,
— ZVW50 EU 11/2015—> EWD EM3212E.V.1,
— ZVW52 EU 01/2017—> Service Information 32E3E 11.04.2019.
— Service Information без SDS к большинству европейских моделей Тойоты-Лексус на рус. и англ. языках на сайте Андрея Федорковского.
2️⃣ SIL Service Information Library (Сборник руководств по техническому обслуживанию и ремонту) — копия документов с портала GSIC Global Service Information Center или Techdoc, записанная на компакт-диск. Для последних TNGA-моделей диски уже не выпускаются. По мере появления новой информации появляются CB Correction Bulletins (Бюллетени с исправлениями), дабы не покупать новый диск:
— NHW20 NA SIL
2006MY — RM01R0U,
2008MY — RM07X0U.
— ZVW30 NA SIL
2010MY — RM1290U,
2011MY — RM16P0U,
2012MY — RM1990U,
2013MY — RM23E0U,
2014MY — RM25A0U,
2015MY — RM25M0U.
— ZVW30 EU 04/2009—>10/2015 SIL копия CD со всеми главами есть на англ. PZ471-Z12A0-CA и датском PZ471-Z12A0-CJ, диск на русском PZ471-Z12A0-CS можно купить, например, в Emex. Отдельные документы:
1) RM12A6E-1 2015-03-17, RM12A6RU-1 2015-05-06;
2) NM12A6E-2 2015-03-10, NM12A6RU-2 2015-03-26;
3) EM12A6E.V.1 2014-05-13, EM12A4RU 2013-01-08;
4) BM1290E 2012-08-02, BM1290RU 2012-09-27;
5) SM12A6E 2014-05-23, SM12A6RU 2014-05-23. .
— ZVW35 EU 05/2012—>12/2016 SIL CD существует только на английском PZ471-Z2220-CA (его также можно купить), на русском нет — в ЕАЭС PHV не поставлялись. Отдельные документы:
1) RM2223E-1 2017-02-02,
2) NM2223E 2015-06-03,
3) EM2222E 2014-04-22,
4) BM2220E 2012-05-04,
5) SM2223E 2015-06-30.
— ZVW35 EU 12/2009—>04/2012 SIL образ CD PZ471-Z14D0-CA 2011-01-22 (нужно еще скачать CB позже 2012-05-03).
— CT200h ZWA10 EU SIL копия CD 25K0E.
CB к европейским SIL:
G-01121T-TME Бюллетени поправок TOYOTA (дек. 2021)
G-00819T-TME Бюллетени поправок TOYOTA (сен 2019)
G-0011T-0518 Бюллетени поправок Toyota (март 2018 г.)
G-0008T-0318 Бюллетени поправок Toyota (январь 2018 г.)
G-0094T-1017 Бюллетени поправок Toyota (сентябрь 2017 г.)
G-0049T-0417 Бюллетени поправок Toyota (март 2017 г.)
G-0054T-0515 Бюллетени поправок Toyota (апрель 2015 г.)
G-0051T-0415 Бюллетени поправок Toyota (март 2015 г.)
G-0102T-0714 Бюллетени поправок
G-0084T-0614 Бюллетени поправок
G-0072T-0514 Бюллетени поправок
G-0058T-0414 Бюллетени поправок
G-0057T-0414 Бюллетени поправок
G-0050T-0314 Бюллетени поправок
3️⃣ TIS Technical Information System — платные разделы североамериканского портала.
_______________________________________
TSB Technical Service Bulletin (Бюллетени технического обслуживания):
EU,
USA, Canada.
_______________________________________
Европейские SSC Special Service Campaign (специальные сервисные кампании) для 30:
— ZKBA-011 ЭБУ привода АБС
— 3KB2-012 Насос усилителя тормозной системы (гидроаккумулятор) на модели Prius
— 4KET-024 Перепрограммирование ЭБУ мотора-генератора и ЭБУ распределения питания на модели Toyota Prius
— 16OSD-052 Подушка безопасности занавесочного типа
— 16OSD-054 Угольный адсорбер
— 18SMD-088 Перепрограммирование ЭБУ распределения питания
— 20SMD-058 ЭБУ распределения питания/интеллектуальный силовой модуль на некоторых автомобилях Prius, Prius+ и Auris HV
_______________________________________
Американские Safety Recalls (отзывы безопасности), Safety (Noncompliance) Recalls, SSCs Special Service Campaign, LSCs Limited Service Campaigns, WEPs Warranty Enhancement Programs для 30:
— Safety Recall A0B Certain 2010 Prius ABS Actuator ECU Update,
— Safety Recall D0H 2010 Prius Brake Booster Pump Assembly (Accumulator),
— Safety Recall E0E 2010-2014 Prius Software Update for Motor Generator ECU & Power Management ECU,
— Safety Recall G0U 2010 — 2012 Prius & Prius Plug-In Curtain Shield Airbag,
— Safety Recall J0V Certain 2010-2014 Prius, 2012-2014 Prius V Hybrid System Software Update,
— WEP ZE3 Certain 2010 – 2014 Prius Extension of Warranty Coverage to the IPM,
— WEP ZF3 Certain 2010-2012 Prius, 2012 Prius V, 2010-2012 Prius Plug-In Sticking EGR Valve,
— LSC K0P / CSP 19TE12 Certain 2013-2019 4Runner, 2011-2017 Land Cruiser, 2013-2017 Prius, 2012-2017 Prius V, 2016-2017 Mirai Safety Connect System — Vehicle Location Inaccurate,
— Safety Recall 20TA10 Certain 2013‐2015 Prius, 2014‐2017 Prius V Hybrid System Software Update.
Список по всем моделям, актуально на 17.03.2021.
В США есть еще CSPs Customer Support Programs (программы поддержки клиентов), Non-Compliance (Voluntary) Safety Recalls by Southeast Toyota, и Non-Compliance Recalls by Gulf States Toyota для 30:
— CSP ZJB Coverage for Brake Booster and Brake Booster Pump Assemblies,
— CSP 20TE10 Certain 2013‐2015 Prius, 2014‐2017 Prius V Hybrid System Software Update Extension of Coverage to the IPM,
— Non-Compliance (Voluntary) Safety Recalls by Southeast Toyota 14V-743 Seat Heater Electrical Wiring,
— Non-Compliance (Voluntary) Safety Recalls by Southeast Toyota 13V-014 Airbag Sensor Calibration.
Если интересно, то документы по всем кампаниям можно найти тут: 2010MY Prius (можно поменять на другую модель).
_______________________________________
Каталоги деталей:
1. EPC Electronic Parts Catalog (официальный оффлайн каталог) — последнюю сборку от Autokent можно найти на торрентах. Это программа с устаревшим интерфейсом, занимающая 25GB на диске, поэтому иногда удобнее искать в онлайн-каталогах на базе EPC:
🆕ToyoDIY (шустрый, есть поиск применимости одной и той же детали во всех моделях всех регионов),
Официальный каталог моделей Сев. Америки,
JapanCars.ru (поиск применимости по всем регионам (но не показывает весь список), корректно отображает замены (Substitution),
www.megazip.net/ (попроще применимость, замены),
www.catcar.info/ (свежий каталог, но без поиска по PN)
www.artemid-gr.ru/ (использует CatCar, есть применимость),
partsouq.com/ (глючащая применимость, есть Substitution, реальные фото),
afyal.com/
2. Официальный европейский каталог, использующий технологии Microcat (платный).
_______________________________________
Прочие схемы, фото, PDF и др. файлы, которые я собираю.
За помощь в предоставлении информации спасибо AndrewHrenov, Igor-PV, 3est, щедрым дилерам из Коста Рики и Индонезии.
© Max Kaminsky. При копировании указывайте ссылку на автора.
Сборник руководств на английском языке по техническому обслуживанию и ремонту автомобиля Toyota Prius 2001-2003 годов выпуска.
- Автор: —
- Издательство: Toyota Motor Corporation
- Год издания: —
- Страниц: —
- Формат: PDF
- Размер: 33,7 Mb

Сборник руководств на английском языке по техническому обслуживанию и ремонту автомобиля Toyota Prius 2003-2007 годов выпуска.
- Автор: —
- Издательство: Toyota Motor Corporation
- Год издания: —
- Страниц: —
- Формат: PDF
- Размер: 249,2 Mb

Схемы на английском языке электрооборудования автомобиля Toyota Prius с 2002 года выпуска.
- Автор: —
- Издательство: Motorist
- Год издания: —
- Страниц: 266
- Формат: —
- Размер: —
Руководство по эксплуатации, техническому обслуживанию и ремонту + каталог расходных запчастей автомобиля Toyota Prius 2003-2009 годов выпуска.
- Автор: —
- Издательство: Легион-Автодата
- Год издания: —
- Страниц: 592
- Формат: —
- Размер: —
Руководство по эксплуатации, техническому обслуживанию и ремонту + каталог расходных запчастей автомобиля Toyota Prius с 2009 года выпуска.
- Автор: —
- Издательство: Легион-Автодата
- Год издания: —
- Страниц: 592
- Формат: —
- Размер: —

- Автор: —
- Издательство: Монолит
- Год издания: —
- Страниц: 425
- Формат: —
- Размер: —

-
Bookmarks
Quick Links
PRECAUTION
1. PRECAUTIONS
(a) Before inspecting and repairing the fuel system, disconnect the cable from the negative (-) battery terminal.
(b) Do not smoke or work near fire when handling the fuel system.
(c) Keep gasoline away from rubber or leather parts.
2. DISCHARGE FUEL SYSTEM PRESSURE
CAUTION:
Perform the following procedure to prevent fuel from spilling out before removing any fuel system
parts.
Pressure will still remain in the fuel lines even after performing the following procedure. When
disconnecting a fuel line, cover it with a piece of cloth to prevent fuel from spraying or coming out.
(a) Remove the rear seat cushion assembly
(d) Put the vehicle in the «inspection mode»
(e) Start the engine.
(f) After the engine has stopped on its own, turn the power switch off.
HINT:
DTCs P0171/25 may be detected.
2010 Toyota Prius
.
(b) Remove the rear floor service hole cover.
(c) Disconnect the fuel pump connector.
.
Repair Manual
Summary of Contents for Toyota Prius 2010
Toyota Prius (XW20/NHW20, Mark II, MC Platform) с гибридной установкой: бензиновыми двигателями 1NZ-FXE 1.5 л (1496/1497 см³) 76-77 л.с./56-57 кВт и электрическими мотор-генераторами MG1 25 л.с./18 кВт, 3CM MG2 68 л.с./50 кВт; Руководство по эксплуатации, техническому обслуживанию и ремонту, технические характеристики, электросхемы, устройство, диагностика, особенности конструкции. Иллюстрированное практическое пособие гибридный легковой автомобиль компактного «Ц» класса Тойота Приус с цельнометаллическими несущими кузовами пятидверный хэтчбек (лифтбек) переднеприводные модели второго поколения выпуска с августа 2003 по 2009 год
ЕСЛИ ВЫ ВИДИТЕ ОШИБКУ 406 Not Acceptable и не видите документ, то скорей всего у Вас IP РФ и его надо сменить, на любой другой страны, с помощью VPN ( Scribd и SlideShare блокируют посетителей с Российским IP).
Видео Toyota Prius XW20 замена подшипника передней ступицы и высоковольтной батареи (Тойота Приус 03-09)
Toyota Prius Mark II общая информация (Тойота Приус 2003-2009)
Высоковольтная батарея
Проверка
Проверка ответной части сервисной перемычки
1. Снимите ответную часть сервисной перемычки и убедитесь в отсутствии проводимости между выводами.
2. Подсоедините к ответной части сервисную перемычку и убедитесь в наличии проводимости между выводами.
Проверка датчика тока высоковольтной батареи
1. Используя диагностический тестер, измерьте сопротивление между выводами «1» и «2».
Номинальное сопротивление:
Щуп «+» тестера к выводу «1» …………. 3,5-4,5 кОм
Щуп тестера к выводу «2» …………. 5,0-7,0 кОм
2. Используя диагностический тестер, измерьте сопротивление между выводами «1» и «3»
Номинальное сопротивление:
Щуп «+» тестера к выводу «1» …………. 3,5-4,5 кОм
Щуп «+» тестера к выводу «3» …………. 5,0-7,0 кОм
3. Измерьте сопротивление между выводами «2» и «3».
Номинальное сопротивление …………. менее 0,2 кОм
Снятие и установка
Примечание: установка производится в порядке, обратном снятию.
Моменты затяжки указаны в тексте.
1. Ознакомьтесь с мерами предосторожности перед проведением работ.
2. Снимите крышку пола №2 багажного отделения.
3. Снимите поддон для хранения инструментов.
4. Снимите боковую крышку пола багажного отделения.
5. Отсоедините провод от отрицательной клеммы аккумуляторной батареи.
Момент затяжки …………. 6,0 Нм
6. Снимите сервисную перемычку.
7. Отсоедините четыре пистона и снимите отделку порога багажного отделения.
8. Снимите шторку багажного отделения.
9. Снимите подушку заднего сиденья.
10. Снимите крышку пола №1 багажного отделения.
11. Снимите боковую отделку заднего сиденья с левой и правой стороны.
12. Снимите боковую крышку пола багажного отделения.
13. Снимите боковой поддон для хранения инструментов.
14. Снимите боковые отделки багажного отделения.
15. Отверните семь болтов и снимите кронштейн высоковольтной батареи.
Момент затяжки …………. 28 Нм
16. Снимите воздуховод №2.
а) Отсоедините фиксатор и реле №1 вентилятора батареи.
б) Отсоедините два держателя.
в) Снимите воздуховод №2.
17. Отверните семь болтов и снимите боковой кронштейн.
Момент затяжки …………. 28 Нм
18. Снимите воздуховод №3.
а) Отсоедините разъем.
б) Снимите фиксатор и отсоедините жгут проводов.
в) Отверните болт, отсоедините пистон и снимите воздуховод №3.
Момент затяжки …………. 4,0 Нм
19. Отверните три болта, две гайки и снимите крышку высоковольтной батареи.
Момент затяжки …………. 7,5 Нм
22. Снимите соединитель.
21. Отсоедините высоковольтные провода от батареи.
Момент затяжки …………. 5,6 Нм
22. Снимите высоковольтную батарею.
Примечание: используйте изоляционные перчатки.
а) Отверните четыре болта и отсоедините провод массы от высоковольтной батареи.
Момент затяжки …………. 19 Нм
б) Отсоедините разъем главного реле.
в) Отсоедините разъем выключателя блокировки.
г) Отсоедините фиксатор и разъем блока управления вентилятором батареи.
д) Отсоедините шланг высоковольтной батареи от панели пола.
е) Снимите высоковольтную батарею.
Основные технические характеристики (General technical specifications) Toyota Prius G 2004 Япония (ZA-NHW20-AHEGB) с мотором 1.5 литра
| № | Спецификация / Specs | Данные |
| Габариты (мм/mm) и масса (кг/kg) / Dimensions and Weight | ||
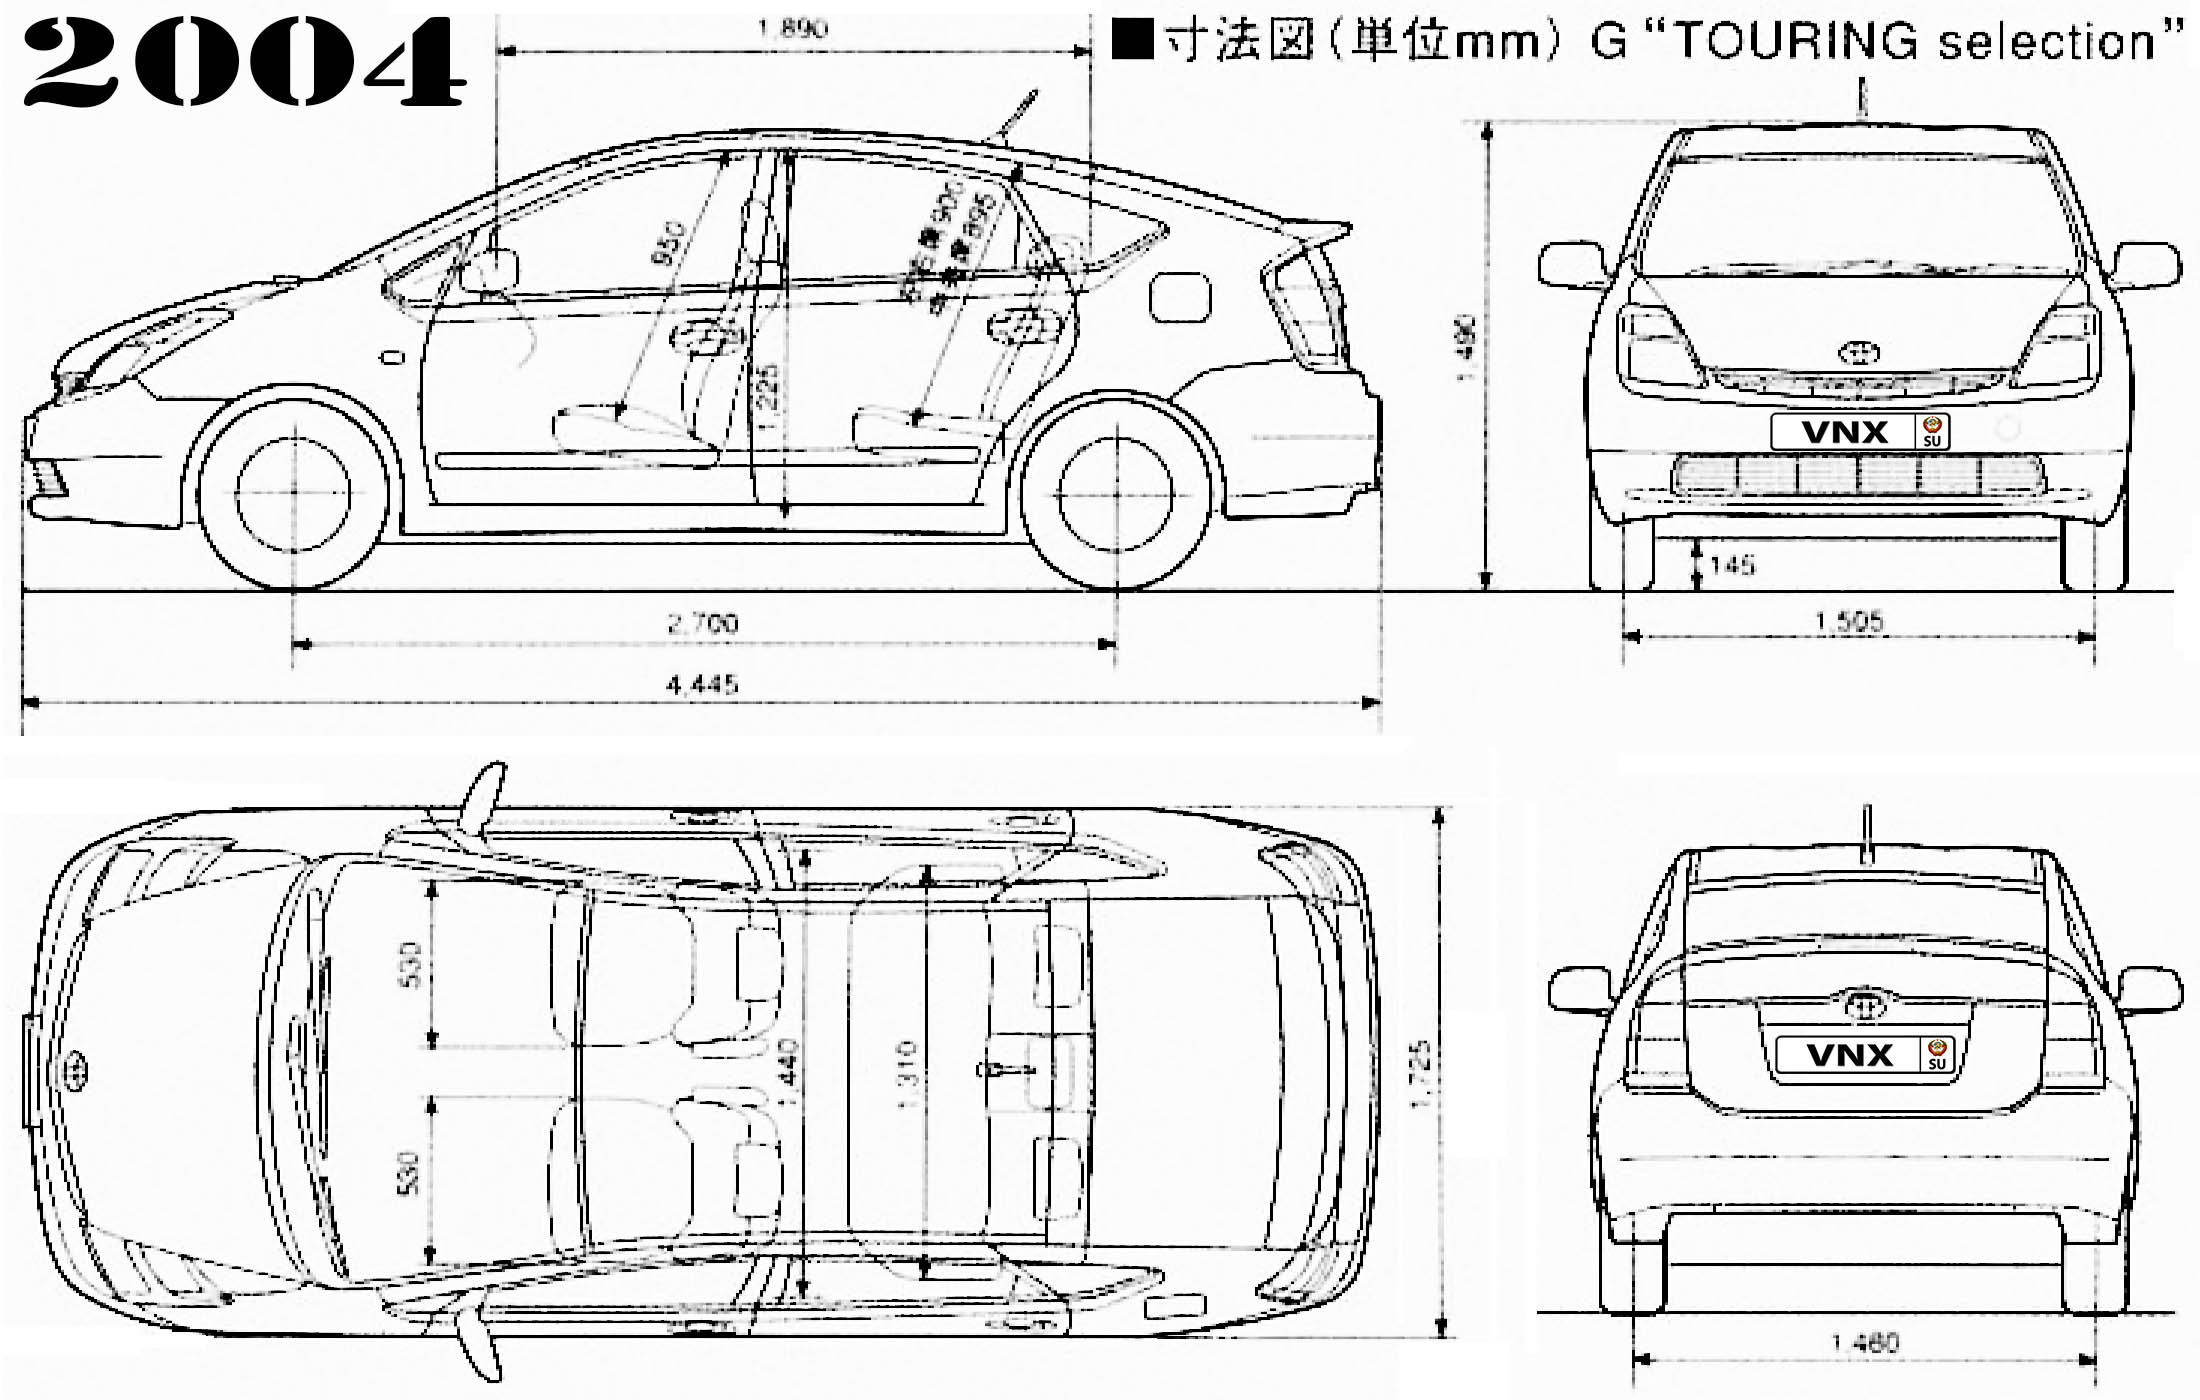
| 1 | Длина / Length | 4445 |
| 2 | Ширина (без/с зеркалами) / Width | 1725 |
| 3 | Высота (загружен/пустой) / Height | 1490 |
| 4 | Колёсная база / Wheelbase | 2700 |
| 5 | Дорожный просвет (клиренс) / Ground clearance | 145 |
| 6 | Снаряжённая масса / Total (curb) weight | 1270 |
| Полная масса / Gross (max.) weight | 1545 | |
|
Двигатель / Engine |
||
| 7 | Тип / Engine Type, Code | Гибридный, бензиновый, жидкостного охлаждения, четырехтактный, 1NZ-FXE и электрический 3CM MG2 |
| 8 | Количество цилиндров / Cylinder arrangement: Total number of cylinders, of valves | 4-цилиндровый, рядный, 16V, DOHC с верхним расположением двух распределительных валов |
| 9 | Диаметр цилиндра / Bore | 75.0 мм |
| 10 | Ход поршня / Stroke | 84.7 мм |
| 11 | Объём / Engine displacement | 1496 см³ |
| 12 | Система питания / Fuel supply, Aspiration | Распределенный впрыск топлива EFI |
| Атмосферный | ||
| 13 | Степень сжатия / Compression ratio | 13.0:1 |
| 14 | Максимальная мощность / Max. output power kW (HP) at rpm | 57 кВт (77 л.с.) при 5000 об/мин, электрический 68 л.с./50 кВт при 1200-1540 об/мин, Синергетический режим: 111.5 л.с./82 кВт |
| 15 | Максимальный крутящий момент / Max. torque N·m at rpm | 115 Нм при 4200 об/мин, электрический 400 Нм при 0-1200 об/мин |
|
Трансмиссия / Transmission |
||
| 16 | Сцепление / Clutch type | Устройство распределения мощности PSD (Power Split Device) |
| 17 | КПП / Transmission type | P112 Планетарная передача (Continuously Variable Transmission CVT — Бесступенчатый Вариатор) |
О Книге
- Название: Toyota Prius Устройство, техническое обслуживание и ремонт
- Бензиновые двигатели: 1NZ-FXE 1.5 л (1496/1497 см³) 76-77 л.с./56-57 кВт и электрическими мотор-генераторами MG1 25 л.с./18 кВт, 3CM MG2 68 л.с./50 кВт
- Выпуск с 2003 года
- Серия: «Ремонт Автомобилей»
- Год издания: 2009
- Автор: Коллектив авторов
- Издательство: «Ассоциация независимых издателей»
- Формат: PDF
- Страниц в книге: 572
- Размер: 423.66 МБ
- Язык: Русский
- Количество электросхем: более 50
![]()
![]()
Скачивать документы могут только зарегистрированные пользователи! Регистрация
Документы

Электрические схемы Prius NHW-11 USA
популярный!
| Дата добавления: | 01/27/2014 |
| Дата изменения: | 01/31/2014 |
| Размер файла: | 4.3 Мбайт |
| Скачиваний: | 836 |
Электрические схемы Тойота Приус в 11 кузове для леворульных модификаций, поставляемых для американского рынка. Будут полезны владельцам 10 и 11 кузовов.
Схема подключения ТВ-тюнера PRIUS NHW-10
популярный!
| Дата добавления: | 01/27/2014 |
| Дата изменения: | 01/31/2014 |
| Размер файла: | 51.08 Кбайт |
| Скачиваний: | 522 |
Схема подключения секамовского ТВ-тюнера к приусу в 10 кузове
Ремонтный мануал (Repair Manual) PRIUS NHW-11 USA
популярный!
| Дата добавления: | 01/27/2014 |
| Дата изменения: | 01/31/2014 |
| Размер файла: | 19.52 Мбайт |
| Скачиваний: | 845 |
Официальный сервисный мануал по ремонту Тойота Приус в 11 кузове, поставляемых на американский рынок. На английском языке. Будет полезен владельцам 10 и 11 кузовов.
Распиновка разъемов ТВ тюнеров TN-2000 & 2001
популярный!
| Дата добавления: | 01/27/2014 |
| Дата изменения: | 01/31/2014 |
| Размер файла: | 27.34 Кбайт |
| Скачиваний: | 311 |
Распиновка разъемов ТВ тюнеров Noritsu Denki TN-2000 & 2001
Мануал по ремонту Prius NHW-11 USA
популярный!
| Дата добавления: | 01/29/2014 |
| Дата изменения: | 01/31/2014 |
| Размер файла: | 27.69 Мбайт |
| Скачиваний: | 1072 |
Мануал по ремонту Тойота Приус в 11 кузове. Поможет владельцам 10 и 11 кузовов.
Требуется руководство для вашей Toyota Prius (2016)? Ниже вы можете просмотреть и загрузить бесплатно руководство в формате PDF. Кроме того, приведены часто задаваемые вопросы, рейтинг изделия и отзывы пользователей, что позволит оптимально использовать ваше изделие. Если это не то руководство, которое вы искали, – свяжитесь с нами.
Ваше устройство неисправно, и в руководстве отсутствует решение? Перейдите в Repair Café для получения бесплатных ремонтных услуг.
Руководство

Рейтинг
Сообщите нам, что вы думаете о Toyota Prius (2016), оставив оценку продукта. Хотите поделиться вашими впечатлениями от данного изделия или задать вопрос? Вы можете оставить комментарий в нижней части страницы.
Довольны ли вы данным изделием Toyota?
Да Нет
Будьте первым, кто оценит это изделие
0 голоса
Часто задаваемые вопросы
Наша служба поддержки выполняет поиск полезной информации по изделиям и отвечает на часто задаваемые вопросы. Если вы заметили неточность в наших часто задаваемых вопросах, сообщите нам об этом с помощью нашей контактной формы.
В моей машине есть цепь ГРМ. С каким интервалом ее нужно менять? Проверенный
При нормальной эксплуатации цепь ГРМ должна прослужить весь срок службы автомобиля и не нуждается в замене.
Это было полезно (2216)
Почему я не могу открыть одну или несколько дверей изнутри? Проверенный
Вероятно, в машине активирован детский замок. Обычно его можно разблокировать с помощью механизма в двери.
Это было полезно (669)
Как часто следует менять масло? Проверенный
Практически для каждого автомобиля есть свои точные рекомендации, однако в целом масло разумно менять каждые 10 000–15 000 км пробега или один раз в год. Загрязненное масло может со временем серьезно повредить двигатель.
Это было полезно (568)
Когда следует отключать подушку безопасности сбоку от пассажирского сиденья? Проверенный
При движении с ребенком в автокресле на пассажирском сиденье необходимо выключить подушку безопасности с этой стороны. Это также рекомендуется для детей до 12 лет, которые размещаются на пассажирском сиденье. Это необходимо для предотвращения травм в случае аварии.
Это было полезно (536)
Ключи от машины больше не будут открывать машину на расстоянии, почему? Проверенный
Автомобильные ключи, которые можно разблокировать на расстоянии, обычно работают от аккумулятора. Когда он закончится, ключ перестанет работать. Замените аккумулятор и попробуйте еще раз.
Это было полезно (497)
Приведет ли более низкое давление в шинах к большему сцеплению с дорожным покрытием при езде по снегу? Проверенный
Нет, несмотря на то что при снижении давления пятно контакта шин с дорогой увеличивается, автомобиль становится менее устойчивым. Садитесь за руль, только если в шинах правильное давление!
Это было полезно (299)
Я залил в машину не то топливо, что мне делать? Проверенный
Не садитесь за руль! Неважно, заливаете ли вы дизельное топливо в автомобиль с бензиновым двигателем или бензин в автомобиль с дизельным двигателем. В обоих случаях это может привести к повреждению машины и / или других частей автомобиля. Обратитесь в службу технической поддержки на дорогах.
Это было полезно (195)
Где я могу найти VIN-номер моей машины? Проверенный
Это может варьироваться в зависимости от марки и модели, но на многих автомобилях номер VIN можно найти на дверном косяке, под капотом или на металлическом полу переднего сиденья.
Это было полезно (163)
Как часто нужно менять щетки дворников? Проверенный
Желательно заменять щетки стеклоочистителя не реже одного раза в год. Признаками необходимости замены лезвий являются полосы, дымка, шум или отслоение резины.
Это было полезно (148)
Какой номер VIN? Проверенный
VIN означает идентификационный номер автомобиля и является уникальным номером, который есть у каждого автомобиля. Это делает автомобиль не идентифицируемым, например, после аварии или в случае отзыва. Это также позволяет идентифицировать автомобиль в случае отсутствия номерных знаков.
Это было полезно (118)
Сколько миль в одном километре? Проверенный
1 километр равен 0,621 мили. 10 километров равны 6,21 мили. 1 миля равна 1,609 километра. 10 миль равны 16,09 километра.
Это было полезно (117)
Могу ли я использовать дворники, когда на лобовом стекле обледенел? Проверенный
Нет, это не рекомендуется. Лед острый и может повредить резину на щетках стеклоочистителя.
Это было полезно (115)
Где я могу найти VIN для моей Toyota? Проверенный
VIN можно найти на металлической табличке, расположенной на приборной панели возле лобового стекла или в дверном косяке со стороны водителя.
Это было полезно (9)

-
Contents
-
Table of Contents
-
Bookmarks
Quick Links
Plug-in Hybrid
Gasoline-Electric
Hybrid Synergy Drive
ZVW35 Series
Related Manuals for Toyota Prius ZVW35 Series
Summary of Contents for Toyota Prius ZVW35 Series
-
Page 1
Plug-in Hybrid Gasoline-Electric Hybrid Synergy Drive ZVW35 Series… -
Page 2
Foreword This guide was developed to educate and assist dismantlers in the safe handling of Toyota Prius Plug-in gasoline-electric hybrid vehicles. Prius Plug-in hybrid dismantling procedures are similar to other non-hybrid Toyota vehicles with the exception of the high voltage electrical system. It is important to recognize and understand the high voltage electrical system features and specifications of the Toyota Prius Plug-in hybrid, as they may not be familiar to dismantlers. -
Page 3
Exterior Rear and Left Side View 2010 Model 2012 Model Exterior Front and Left Side View © 2011 Toyota Motor Corporation All rights reserved. This book may not be reproduced or copied, in whole or in part, without the written permission of Toyota Motor Corporation. -
Page 4: Table Of Contents
Table of Contents About the Prius Plug-in hybrid (2010 Model)………………..1 Prius Plug-in hybrid Identification (2010 Model)………………2 Exterior ……………………………3 Interior…………………………..4 Engine Compartment ……………………….5 Hybrid Component Locations & Descriptions (2010 Model) …………..6 Specifications …………………………7 Hybrid Synergy Drive Operation (2010 Model) ………………8 Vehicle Operation……………………….8 Hybrid Vehicle (HV) Battery Pack and Auxiliary Battery (2010 Model) ……….9 HV Battery Pack……………………….9 Components Powered by the HV Battery Pack…………………9…
-
Page 5
High Voltage Safety (2012 Model) ………………….46 High Voltage Safety System……………………46 Service Plug Grip ……………………….47 Precaution to be observed when dismantling the vehicle (2012 Model)……….48 Necessary Items ……………………….48 Spills (2012 Model) ………………………..49 Dismantling the vehicle (2012 Model)…………………..50 Removal of HV battery (2012 Model) …………………..55 HV Battery Caution Label (2012 Model) ………………..69… -
Page 6: About The Prius Plug-In Hybrid (2010 Model)
The Prius Plug-in hybrid contains a gasoline engine, an electric motor, and a newly developed large capacity Li-ion battery. It is the first Toyota hybrid that allows the HV battery to be plugged-in and charged by an external power source. Two power sources are stored on board the vehicle: 1.
-
Page 7: Prius Plug-In Hybrid Identification (2010 Model)
Prius Plug-in hybrid Identification (2010 Model) In appearance, the 2010 model year Prius Plug-in hybrid is a 5-door hatchback. Exterior, interior, and engine compartment illustrations are provided to assist in identification. The alphanumeric 17 character Vehicle Identification Number (VIN) is provided in the front windshield cowl and on the left side door pillar.
-
Page 8: Exterior
Prius Plug-in hybrid Identification (2010 Model — Continued) Exterior logo on the front right fender. Charge inlet door with logo, located on left side front fender. Plug-in Hybrid decals located on the sides of the vehicle. Exterior Left Side View Exterior Front and Rear View Exterior Rear and Left Side View…
-
Page 9: Interior
Prius Plug-in hybrid Identification (2010 Model — Continued) Interior Instrument cluster (speedometer, READY light, shift position indicators, warning lights) located in center of the dash and near the base of the windshield. Hint: If the vehicle is shut off, the instrument cluster gauges will be “blacked out”, not illuminated. Interior View Instrument Cluster View…
-
Page 10: Engine Compartment
Prius Plug-in hybrid Identification (2010 Model — Continued) Engine Compartment 1.8-liter aluminum alloy gasoline engine. Logo on the plastic engine cover. Orange colored high voltage power cables. Engine Compartment View Power Cables…
-
Page 11: Hybrid Component Locations & Descriptions (2010 Model)
Hybrid Component Locations & Descriptions (2010 Model) Component Location Description 12 Volt Auxiliary Right Side of A lead-acid battery that supplies power to the low voltage Battery Cargo Area devices. Hybrid Vehicle (HV) Cargo Area 346 Volt Lithium-ion (Li-ion) battery pack consisting of Battery Assembly 3.6 Volt cells connected in a series-parallel circuit.
-
Page 12: Specifications
Hybrid Component Locations & Descriptions (2010 Model — Continued) Specifications Gasoline Engine: 98 hp (73 kW), 1.8-liter Aluminum Alloy Engine Electric Motors 80 hp (60 kW), Permanent Magnet Motor Transmission: Automatic Only (electrically controlled continuously variable transaxle) HV Battery: 346 Volt Sealed Li-ion Battery Curb Weight: 3,362 lbs/1,525 kg Fuel Tank: 11.9 gals/45.0 liters Frame Material: Steel Unibody…
-
Page 13: Hybrid Synergy Drive Operation (2010 Model)
Hybrid Synergy Drive Operation (2010 Model) Once the READY indicator is illuminated in the instrument cluster, the vehicle may be driven. However, the gasoline engine does not idle like a typical automobile and will start and stop automatically. It is important to recognize and understand the READY indicator provided in the instrument cluster.
-
Page 14: Hybrid Vehicle (Hv) Battery Pack And Auxiliary Battery (2010 Model)
Hybrid Vehicle (HV) Battery Pack and Auxiliary Battery (2010 Model) The Prius Plug-in hybrid features a high voltage Hybrid Vehicle (HV) battery pack that contains sealed Lithium-ion (Li-ion) battery cells. HV Battery Pack • The HV battery pack is enclosed in a metal case and is rigidly mounted to the cargo area floor pan cross member behind the rear seat.
-
Page 15: Hv Battery Pack Recycling
Hybrid Vehicle (HV) Battery Pack and Auxiliary Battery (2010 Model — Continued) HV Battery Pack Recycling • The HV battery pack is recyclable. Contact either your Toyota Distributor as mentioned on HV battery Caution Label (see page 35) or the nearest Toyota dealer. Auxiliary Battery •…
-
Page 16: High Voltage Safety (2010 Model)
High Voltage Safety (2010 Model) The HV battery pack powers the high voltage electrical system with DC electricity. Positive and negative orange colored high voltage power cables are routed from the battery pack, under the vehicle floor pan, to the inverter/converter. The inverter/converter contains a circuit that boosts the HV battery voltage from 346 to 650 Volts DC.
-
Page 17: Service Plug Grip
High Voltage Safety (2010 Model — Continued) Service Plug Grip • The high-voltage circuit is cut by removing the service plug grip (see page 16). 12 Volts Volts DC Hybrid Vehicle Computer Auxiliary Battery Compressor Electric Inverter/ Generator Converter Electric Volts DC Motor HV Battery Pack…
-
Page 18: Precaution To Be Observed When Dismantling The Vehicle (2010 Model)
Precaution to be observed when dismantling the vehicle (2010 Model) WARNING: The high voltage system may remain powered for up to 10 minutes after the vehicle is shut off or disabled. To prevent serious injury or death from severe burns or electric shock, avoid touching, cutting, or opening any orange high voltage power cable or high voltage component.
-
Page 19: Spills (2010 Model)
Spills (2010 Model) The Prius Plug-in hybrid contains the same common automotive fluids used in other non-hybrid Toyota vehicles, with the exception of the Li-ion electrolyte used in the HV battery assembly. The electrolyte used in the Li-ion battery cells is a flammable organic electrolyte. The electrolyte is absorbed into the battery cell separators, even if the battery cells are crushed or cracked, it is unlikely that liquid electrolyte will leak.
-
Page 20: Dismantling The Vehicle (2010 Model)
Dismantling the vehicle (2010 Model) The following 2 pages contain general instructions for use when working on a Prius Plug-in hybrid. Read these instructions before proceeding to the HV battery removal instructions on page 19. WARNING: The high voltage system may remain powered for up to 10 minutes after the vehicle is shut off or disabled.
-
Page 21
3. Remove the 3 service plug grips. Caution: Wear insulated gloves for the following 3 steps. (1) Slide the handle of the service plug grip to the left. (2) Raise the release handle of the service plug grip (3) Remove the service plug grip. (4) Apply insulating tape to the socket of the service plug grip to insulate it. -
Page 22
Instead, wash the eye(s) with a dilute boric acid solution or a large amount of water and seek medical care. 9. With the exception of the HV battery, remove parts by following procedures which are similar to conventional Toyota vehicles. For the removal of the HV battery, refer to the following pages. -
Page 24: Removal Of Hv Battery (2010 Model)
Removal of HV battery (2010 Model) WARNING: Be sure to wear insulated gloves when handling high-voltage parts. Even if the vehicle is shut off and the relays are off, be sure to remove the service plug grip before performing any further work. Power remains in the high voltage electrical system for 10 minutes even after the HV battery pack is shut off because the circuit has a condenser that stores power.
-
Page 25
4. Remove the rear No. 4 floor board. (1) Using a clip remover, disengage the 3 clips and remove the rear No. 4 floor board. 5. Remove the rear No. 1 floor board. (1) Using a clip remover, disengage the 8 clips. (2) Disangage the 3 fasteners and disconnect the rear No. -
Page 26
6. Remove the rear deck trim cover. (1) Remove the bolt. (2) Using a clip remover, disengage the 4 clips. (3) Disengage the 4 claws and 4 guides, and remove the rear deck trim cover. 7. Remove the hybrid battery carrier bracket. (1) Remove the bolt. -
Page 27
8. Remove the 3 service plug grips. Caution: • Wear insulated gloves. • Before inspecting or servicing the high-voltage system or disconnecting the low voltage connector of the inverter with converter assembly, be sure to follow all safety measures, such as wearing insulated gloves and removing the 3 service plug grips to prevent electrocution. -
Page 28
9. Remove the 9 bolts and inverter terminal cover. Caution: Wear insulated gloves. 10. Check the voltage at the terminals in the inspection point in the power control unit. Caution: Wear insulated gloves. To prevent serious injury or death, do not proceed with dismantling of the HV system until the voltage at the terminals in the inspection point is 0 V. -
Page 29
13. Remove the rear side seatback assembly RH. (4) Remove the bolt. (5) Disengage the 2 guides and remove the rear side seatback assembly RH. 14. Remove the rear side seatback assembly LH. (1) Remove the bolt. -
Page 30
(2) Disengage the 2 guides and remove the rear side seatback assembly LH. 15. Disconnect the rear center seat belt assembly. Remove the bolt and disconnect the anchor part of the rear center seat belt assembly. 16. Remove the rear seatback assembly LH. (1) Remove the 2 bolts and rear seatback assembly 17. -
Page 31
18. Remove the battery cooling blower bracket. Notice: • Be sure not to touch the fan part of the battery cooling blower assemblies. • Do not lift the battery cooling blower assemblies using the wire harness. Disconnect the battery cooling blower assembly connectors. -
Page 32
Remove the 2 clips and No. 5 hybrid battery intake duct (main). 20. Remove the battery cooling blower assembly. Notice: • Be sure not to touch the fan part of the battery cooling blower assemblies. • Do not lift the battery cooling blower assemblies using the wire harness. (1) Remove the 9 nuts and 3 battery cooling blower assemblies. -
Page 33
22. Remove converter cooling blower bracket. Remove the 2 bolts and converter cooling blower bracket. 23. Remove the No. 2 converter cooling exhaust duct. Remove the 4 clips and No. 2 converter cooling exhaust duct. 24. Remove the No. 3 converter cooling exhaust duct. -
Page 34
26. Remove the child restraint seat anchor bracket assembly RH. Remove the 2 bolts and child restraint seat anchor bracket sub-assembly RH. 27. Remove the No. 1 hybrid battery intake duct. Remove the clip and No. 1 hybrid battery intake duct (main). -
Page 35
29. Remove the HV battery cover sub-assembly. Caution: Be sure to wear insulated gloves and protective goggles. Separate the 2 claws and 3 clamps, and remove the indoor electrical key oscillator. Remove the 18 nuts and HV battery cover Front sub-assembly. -
Page 36
31. Remove the hybrid vehicle converter. Caution: Be sure to wear insulated gloves and protective goggles. Notice: Insulate the terminals of the removed frame wire with insulating tape. Disengage the clamp and disconnect the connector. (2) Disconnect the 2 connectors. (3) Remove the 4 nuts and hybrid vehicle converter. -
Page 37
33. Install HV battery cover sub-assembly. Front Caution: Be sure to wear insulated gloves and protective goggles. Temporarily install the HV battery cover sub-assembly with the 18 nuts to prevent any foreign objects or water from entering the HV battery. 34. -
Page 38
Disconnect the 4 connectors and 2 clamps. Install the 4 eyebolts in the locations shown in the illustration. Front Hint: Make sure to use the eyebolts supplied with the HV battery. Set the hooks and straps as shown in the illustration. -
Page 39
Remove the 6 bolts and 2 nuts. Hint: • Attach tape to the feet and edges of the battery to protect tools and the vehicle body. • Use cardboard or other similar material to protect the HV battery and vehicle body from damage. -
Page 40: Hv Battery Caution Label (2010 Model)
HV Battery Caution Label (2010 Model) For U.S.A. For CANADA For Europe…
-
Page 41: About The Prius Plug-In Hybrid (2012 Model)
The Prius Plug-in hybrid contains a gasoline engine, an electric motor, and a newly developed large capacity Li-ion battery. It is the first Toyota hybrid that allows the HV battery to be plugged-in and charged by an external power source. Two power sources are stored on board the vehicle: 3.
-
Page 42: Prius Plug-In Hybrid Identification (2012 Model)
Prius Plug-in hybrid Identification (2012 Model) In appearance, the 2012 model year Prius Plug-in hybrid is a 5-door hatchback. Exterior, interior, and engine compartment illustrations are provided to assist in identification. The alphanumeric 17 character Vehicle Identification Number (VIN) is provided in the front windshield cowl and on the driver door pillar.
-
Page 43: Exterior
Prius Plug-in hybrid Identification (2012 Model — Continued) Exterior logos on the hatch. logo on the each front fender. Charge inlet door located on right side rear quarter panel. Exterior Left Side View Exterior Front and Rear View Exterior Rear and Right Side View…
-
Page 44: Interior
Prius Plug-in hybrid Identification (2012 Model — Continued) Interior An instrument cluster (speedometer, READY light, shift position indicators, warning lights) located in center of the dash and near the base of the windshield. logo located on the passenger side of the dash. Hint: If the vehicle is shut off, the instrument cluster gauges will be “blacked out”, not illuminated.
-
Page 45: Engine Compartment
Prius Plug-in hybrid Identification (2012 Model — Continued) Engine Compartment 1.8-liter aluminum alloy gasoline engine. Logo on the plastic engine cover. Orange colored high voltage power cables. Engine Compartment View Power Cables…
-
Page 46: Hybrid Component Locations & Descriptions (2012 Model)
Hybrid Component Locations & Descriptions (2012 Model) Component Location Description 12 Volt Auxiliary Right Side of A lead-acid battery that supplies power to the Battery Cargo Area low voltage devices. Hybrid Vehicle Cargo Area 207.2 Volt Lithium-ion (Li-ion) battery pack (HV) Battery consisting of 3.7 Volt cells connected in a series Assembly…
-
Page 47: Specifications
Hybrid Component Locations & Descriptions (2012 Model — Continued) Specifications Gasoline Engine: 98 hp (73 kW), 1.8-liter Aluminum Alloy Engine Electric Motors 80 hp (60 kW), Permanent Magnet Motor Transmission: Automatic Only (electrically controlled continuously variable transaxle) HV Battery: 207.2 Volt Sealed Li-ion Battery Curb Weight: 3,186 lbs/1,445 kg Fuel Tank: 11.9 gals/45.0 liters 10.6 gals/40.0 liters…
-
Page 48: Hybrid Synergy Drive Operation (2012 Model)
Hybrid Synergy Drive Operation (2012 Model) Once the READY indicator is illuminated in the instrument cluster, the vehicle may be driven. However, the gasoline engine does not idle like a typical automobile and will start and stop automatically. It is important to recognize and understand the READY indicator provided in the instrument cluster.
-
Page 49: Hybrid Vehicle (Hv) Battery Pack And Auxiliary Battery (2012 Model)
Hybrid Vehicle (HV) Battery Pack and Auxiliary Battery (2012 Model) The Prius Plug-in hybrid features a high voltage Hybrid Vehicle (HV) battery pack that contains sealed Lithium-ion (Li-ion) battery cells. HV Battery Pack • The HV battery pack is enclosed in a metal case and is rigidly mounted to the cargo area floor pan cross member behind the rear seat.
-
Page 50: Hv Battery Pack Recycling
Hybrid Vehicle (HV) Battery Pack and Auxiliary Battery (2012 Model — Continued) HV Battery Pack Recycling • The HV battery pack is recyclable. Contact either your Toyota Distributor as mentioned on HV battery Caution Label (see page 35) or the nearest Toyota dealer. Auxiliary Battery •…
-
Page 51: High Voltage Safety (2012 Model)
High Voltage Safety (2012 Model) The HV battery assembly powers the high voltage electrical system with DC electricity. Positive and negative orange colored high voltage power cables are routed from the HV battery assembly, under the vehicle floor pan, to the inverter/converter. The inverter/converter contains a circuit that boosts the HV battery voltage from 207.2 to 650 Volts DC.
-
Page 52: Service Plug Grip
High Voltage Safety (2012 Model — Continued) Service Plug Grip • The high-voltage circuit is cut by removing the service plug grip (see page 16). 12 Volt Auxiliary Hybrid Vehicle Computer Battery Volt DC Volt DC Volt AC Volt DC Compressor Electric Inverter/…
-
Page 53: Precaution To Be Observed When Dismantling The Vehicle (2012 Model)
Precaution to be observed when dismantling the vehicle (2012 Model) WARNING: The high voltage system may remain powered for up to 10 minutes after the vehicle is shut off or disabled. To prevent serious injury or death from severe burns or electric shock, avoid touching, cutting, or opening any orange high voltage power cable or high voltage component.
-
Page 54: Spills (2012 Model)
Spills (2012 Model) The Prius Plug-in hybrid contains the same common automotive fluids used in other non-hybrid Toyota vehicles, with the exception of the Li-ion electrolyte used in the HV battery assembly. The electrolyte used in the Li-ion battery cells is a flammable organic electrolyte. The electrolyte is absorbed into the battery cell separators, even if the battery cells are crushed or cracked, it is unlikely that liquid electrolyte will leak.
-
Page 55: Dismantling The Vehicle (2012 Model)
Dismantling the vehicle (2012 Model) The following 2 pages contain general instructions for use when working on a Prius Plug-in hybrid. Read these instructions before proceeding to the HV battery removal instructions on page 19. WARNING: The high voltage system may remain powered for up to 10 minutes after the vehicle is shut off or disabled.
-
Page 56
3. Remove the service plug grip. Caution: Wear insulated gloves for the following 5 steps. (1) Remove service hole cover. (2) Slide the handle of the service plug grip to the left. (3) Raise the release handle of the service plug grip. -
Page 57
4. Carry the removed service plug grip in your pocket to prevent other staff from accidentally reinstalling it while you are dismantling the vehicle. 5. Make other staff aware that a high-voltage system is being dismantled by using the following sign: CAUTION: HIGH-VOLTAGE. DO NOT TOUCH (see page 18). 6. -
Page 58
Instead, wash the eye(s) with a dilute boric acid solution or a large amount of water and seek medical care. 10. With the exception of the HV battery, remove parts by following procedures which are similar to conventional Toyota vehicles. For the removal of the HV battery, refer to the following pages. -
Page 59
54 54… -
Page 60: Removal Of Hv Battery (2012 Model)
Removal of HV battery (2012 Model) WARNING: Be sure to wear insulated gloves when handling high-voltage parts. Even if the vehicle is shut off and the relays are off, be sure to remove the service plug grip before performing any further work. Power remains in the high voltage electrical system for 10 minutes even after the HV battery pack is shut off because the circuit has a condenser that stores power.
-
Page 61
4. Remove the service plug grip. Caution: • Wear insulated gloves. • Before inspecting or servicing the high-voltage system or disconnecting the low voltage connector of the inverter with converter assembly, be sure to follow all safety measures, such as wearing insulated gloves and removing the 3 service plug grips to prevent electrocution. -
Page 62
5. Remove the 9 bolts and inverter terminal cover. 6. Check the voltage at the terminals in the inspection point in the power control unit. Caution: Wear insulated gloves. To prevent serious injury or death, do not proceed with dismantling of the HV system until the voltage at the terminals in the inspection point is 0 V. -
Page 63
11. Remove the rear No. 1 floor board sub-assembly. (1) Disengage the claw and 3 clips, and remove the rear No. 1 floor board sub-assembly. 12. Remove the rear No. 1 floor board. (1) Fold the rear seatback assembly LH forward. (2) Disengage the fastener. -
Page 64
Using a clip remover, remove the clip. (6) Disengage the 3 fasteners and remove the rear No. 1 floor board. 13. Remove the deck trim service hole cover. (1) Disengage the 4 claws. (2) Disengage the 4 guides and remove the deck trim service hole cover. -
Page 65
16. Remove the rear door opening trim weatherstrip LH and RH. (1) Remove the rear door opening trim weatherstrip LH and RH. 17. Remove the rear seat cushion assembly. (1) Disengage the front hook of the rear seat cushion assembly from the vehicle body as shown in the illustration. -
Page 66
(7) Disengage the 2 guides and remove the rear side seatback assembly RH. 16. Remove the rear side seatback assembly LH. (3) Remove the bolt. (4) Disengage the 2 guides and remove the rear side seatback assembly LH. -
Page 67
17. Remove the luggage hold belt striker (for LH and RH). Remove the 4 bolts. (2) Disengage each guide and remove the 2 luggage hold belt striker assemblies. 18. Remove the tonneau cover holder cap (for LH and RH). (1) Using a screwdriver, disengage the claw and remove the tonneau cover holder cap. -
Page 68
20. Remove deck trim side panel assembly RH. (1) Remove the screw. (2) Disengage the 7 claws and 2 clips and remove the deck trim side panel assembly RH. 21. Remove the battery cooling blower assembly. Notice: • Be sure not to touch the fan part of the battery cooling blower assemblies. •… -
Page 69
22. Remove the hybrid battery hose assembly. (1) Disconnect the clip. (2) Disengage the claw. (3) Disconnect the grommet and remove the hybrid battery hose assembly. 23. Remove No. 4 hybrid vehicle battery carrier bracket. (1) Remove the bolt and No. 4 hybrid vehicle battery carrier bracket. -
Page 70
25. Remove No. 1 hybrid vehicle battery shield panel. Caution: Be sure to wear insulated gloves and protective goggles. (1) Disengage the 2 claws and remove the 3 clamps and electrical key oscillator. (2) Disconnect the connector and clamp. (3) Remove the 7 nuts and No. 1 hybrid vehicle battery shield panel. -
Page 71
29. Remove the No. 2 hybrid battery intake duct (1) Remove the clip and No. 1 hybrid battery intake duct. 30. Remove the HV battery. Caution: Be sure to wear insulated gloves and protective goggles. Notice: Insulate the terminals of the removed frame wire with insulating tape. Remove the 2 bolts from each back door damper stay bracket UPR. -
Page 72
Disconnect the clamp. Disconnect the connector and 2 clamps. Remove the 2 bolts. Install the 2 engine hangers (12281-28010) with the 2 bolts as shown in the illustration. -
Page 73
Remove the 8 bolts and 2 nuts. Set the hooks and straps as shown in the illustration. (9) Using a suitable adaptor such as straps, remove the HV battery. Caution: To prevent any accidents and injuries due to Hook the weight of the HV battery, follow all specified procedures and be careful to balance the HV battery when removing or installing it. -
Page 74: Hv Battery Caution Label (2012 Model)
HV Battery Caution Label (2012 Model) For U.S.A. For CANADA…
Надоело рыться в разных местах при обслуживании гибрида? Представляю библиотеку официальных документов для образовательных целей. Источники: сайты Тойоты, NHTSA, priuschat.com, prius-club.su и др.
_______________________________________
Брошюры для покупателя с комплектациями для разных стран и модельных годов вы можете найти здесь.
_______________________________________
Инструкции для владельца:
Owner’s Manual (Руководство для Владельца),
Quick Reference Guide (Краткое руководство),
Emergency Response Guide (Инструкция, как действовать в аварийных ситуациях),
Dismantling Manual (Руководство по безопасной разборке),
руководства к навигационной и мультимедийной системе,
инструкции по установке дополнительного оборудования:
— Европа (включая Россию и Великобританию) (выбрать общий поиск по критериям) и тут,
— ZVW30 EU 04/2009—>12/2011 OM RU скан,
— ZVW30 EU 12/2011—>10/2015 OM RU (ищу),
— ZVW30 EU 12/2011—>10/2015 OM UA,
— CT200h ZWA10 EU 12/2010—> OM UA,
— Австралия,
— Япония,
— США или тут,
— Канада.
_______________________________________
График ТО для Prius 3#.
_______________________________________
Информацию для ремонта и обслуживания можно получить из 3 источников. Эти документы делятся на несколько категорий:
1) RM Repair Manual (Руководство по ремонту),
2) NCF New Car Features (Новые возможности автомобиля),
3) EWD Electrical Wiring Diagram (Электросхемы),
4) BRM Body Repair Manual (Руководство по ремонту кузова, поврежденного в результате столкновения),
5) SDS Service Data Sheet (Сервисная карта).
Буква в конце версии документа — язык или регион: E или CA — английский, RU или CS — русский, U — Сев. Америка на англ. Мои сокращения: EU — Europe, NA — North America.
1️⃣ Toyota Service Information — платные разделы европейского портала:
— ZVW50 EU 11/2015—> Service Information 3210E 03.08.2016,
— ZVW50 EU 11/2015—> EWD EM3212E.V.1,
— ZVW52 EU 01/2017—> Service Information 32E3E 11.04.2019.
— Service Information без SDS к большинству европейских моделей Тойоты-Лексус на рус. и англ. языках на сайте Андрея Федорковского.
2️⃣ SIL Service Information Library (Сборник руководств по техническому обслуживанию и ремонту) — копия документов с портала GSIC Global Service Information Center или Techdoc, записанная на компакт-диск. Для последних TNGA-моделей диски уже не выпускаются. По мере появления новой информации появляются CB Correction Bulletins (Бюллетени с исправлениями), дабы не покупать новый диск:
— NHW20 NA SIL
2006MY — RM01R0U,
2008MY — RM07X0U.
— ZVW30 NA SIL
2010MY — RM1290U,
2011MY — RM16P0U,
2012MY — RM1990U,
2013MY — RM23E0U,
2014MY — RM25A0U,
2015MY — RM25M0U.
— ZVW30 EU 04/2009—>10/2015 SIL копия CD со всеми главами есть на англ. PZ471-Z12A0-CA и датском PZ471-Z12A0-CJ, диск на русском PZ471-Z12A0-CS можно купить, например, в Emex. Отдельные документы:
1) RM12A6E-1 2015-03-17, RM12A6RU-1 2015-05-06;
2) NM12A6E-2 2015-03-10, NM12A6RU-2 2015-03-26;
3) EM12A6E.V.1 2014-05-13, EM12A4RU 2013-01-08;
4) BM1290E 2012-08-02, BM1290RU 2012-09-27;
5) SM12A6E 2014-05-23, SM12A6RU 2014-05-23. .
— ZVW35 EU 05/2012—>12/2016 SIL CD существует только на английском PZ471-Z2220-CA (его также можно купить), на русском нет — в ЕАЭС PHV не поставлялись. Отдельные документы:
1) RM2223E-1 2017-02-02,
2) NM2223E 2015-06-03,
3) EM2222E 2014-04-22,
4) BM2220E 2012-05-04,
5) SM2223E 2015-06-30.
— ZVW35 EU 12/2009—>04/2012 SIL образ CD PZ471-Z14D0-CA 2011-01-22 (нужно еще скачать CB позже 2012-05-03).
— CT200h ZWA10 EU SIL копия CD 25K0E.
CB к европейским SIL:
G-01121T-TME Бюллетени поправок TOYOTA (дек. 2021)
G-00819T-TME Бюллетени поправок TOYOTA (сен 2019)
G-0011T-0518 Бюллетени поправок Toyota (март 2018 г.)
G-0008T-0318 Бюллетени поправок Toyota (январь 2018 г.)
G-0094T-1017 Бюллетени поправок Toyota (сентябрь 2017 г.)
G-0049T-0417 Бюллетени поправок Toyota (март 2017 г.)
G-0054T-0515 Бюллетени поправок Toyota (апрель 2015 г.)
G-0051T-0415 Бюллетени поправок Toyota (март 2015 г.)
G-0102T-0714 Бюллетени поправок
G-0084T-0614 Бюллетени поправок
G-0072T-0514 Бюллетени поправок
G-0058T-0414 Бюллетени поправок
G-0057T-0414 Бюллетени поправок
G-0050T-0314 Бюллетени поправок
3️⃣ TIS Technical Information System — платные разделы североамериканского портала.
_______________________________________
TSB Technical Service Bulletin (Бюллетени технического обслуживания):
EU,
USA, Canada.
_______________________________________
Европейские SSC Special Service Campaign (специальные сервисные кампании) для 30:
— ZKBA-011 ЭБУ привода АБС
— 3KB2-012 Насос усилителя тормозной системы (гидроаккумулятор) на модели Prius
— 4KET-024 Перепрограммирование ЭБУ мотора-генератора и ЭБУ распределения питания на модели Toyota Prius
— 16OSD-052 Подушка безопасности занавесочного типа
— 16OSD-054 Угольный адсорбер
— 18SMD-088 Перепрограммирование ЭБУ распределения питания
— 20SMD-058 ЭБУ распределения питания/интеллектуальный силовой модуль на некоторых автомобилях Prius, Prius+ и Auris HV
_______________________________________
Американские Safety Recalls (отзывы безопасности), Safety (Noncompliance) Recalls, SSCs Special Service Campaign, LSCs Limited Service Campaigns, WEPs Warranty Enhancement Programs для 30:
— Safety Recall A0B Certain 2010 Prius ABS Actuator ECU Update,
— Safety Recall D0H 2010 Prius Brake Booster Pump Assembly (Accumulator),
— Safety Recall E0E 2010-2014 Prius Software Update for Motor Generator ECU & Power Management ECU,
— Safety Recall G0U 2010 — 2012 Prius & Prius Plug-In Curtain Shield Airbag,
— Safety Recall J0V Certain 2010-2014 Prius, 2012-2014 Prius V Hybrid System Software Update,
— WEP ZE3 Certain 2010 – 2014 Prius Extension of Warranty Coverage to the IPM,
— WEP ZF3 Certain 2010-2012 Prius, 2012 Prius V, 2010-2012 Prius Plug-In Sticking EGR Valve,
— LSC K0P / CSP 19TE12 Certain 2013-2019 4Runner, 2011-2017 Land Cruiser, 2013-2017 Prius, 2012-2017 Prius V, 2016-2017 Mirai Safety Connect System — Vehicle Location Inaccurate,
— Safety Recall 20TA10 Certain 2013‐2015 Prius, 2014‐2017 Prius V Hybrid System Software Update.
Список по всем моделям, актуально на 17.03.2021.
В США есть еще CSPs Customer Support Programs (программы поддержки клиентов), Non-Compliance (Voluntary) Safety Recalls by Southeast Toyota, и Non-Compliance Recalls by Gulf States Toyota для 30:
— CSP ZJB Coverage for Brake Booster and Brake Booster Pump Assemblies,
— CSP 20TE10 Certain 2013‐2015 Prius, 2014‐2017 Prius V Hybrid System Software Update Extension of Coverage to the IPM,
— Non-Compliance (Voluntary) Safety Recalls by Southeast Toyota 14V-743 Seat Heater Electrical Wiring,
— Non-Compliance (Voluntary) Safety Recalls by Southeast Toyota 13V-014 Airbag Sensor Calibration.
Если интересно, то документы по всем кампаниям можно найти тут: 2010MY Prius (можно поменять на другую модель).
_______________________________________
Каталоги деталей:
1. EPC Electronic Parts Catalog (официальный оффлайн каталог) — последнюю сборку от Autokent можно найти на торрентах. Это программа с устаревшим интерфейсом, занимающая 25GB на диске, поэтому иногда удобнее искать в онлайн-каталогах на базе EPC:
🆕ToyoDIY (шустрый, есть поиск применимости одной и той же детали во всех моделях всех регионов),
Официальный каталог моделей Сев. Америки,
JapanCars.ru (поиск применимости по всем регионам (но не показывает весь список), корректно отображает замены (Substitution),
www.megazip.net/ (попроще применимость, замены),
www.catcar.info/ (свежий каталог, но без поиска по PN)
www.artemid-gr.ru/ (использует CatCar, есть применимость),
partsouq.com/ (глючащая применимость, есть Substitution, реальные фото),
afyal.com/
2. Официальный европейский каталог, использующий технологии Microcat (платный).
_______________________________________
За помощь в предоставлении информации спасибо AndrewHrenov, Igor-PV, 3est, щедрым дилерам из Коста Рики и Индонезии.
© Max Kaminsky. При копировании указывайте ссылку на автора.
Toyota Prius ZVW35 Series Automobile PDF User Guides and Manuals for Free Download: Found (1) Manuals for Toyota Prius ZVW35 Series Device Model (Dismantling Manual)
More Automobile Device Models:
-
Chevrolet
2007 HHR
Congratulations on your purchase of a Chevrolet HHR. Please read this information about your vehicle’s fea-tures and your Owner Manual to ensure an outstanding ownership experience. Note that your vehicle may notinclude all the features described in this booklet. Keep this booklet with your Owner Manual for easy refe …
2007 HHR Automobile, 20
-
Volvo
S70
1999 S70 & V70VOLVO S70 & V70 1 9 9 9 VOLVO This manual deals with the operation and care of your Volvo. Welcome to the world-wide family of Volvo owners. We trust that you will enjoy many years of safe driving in your Volvo, an automobile designed with your safety and comfort in mind. To help ensure your s …
S70 Automobile, 304
-
Hyundai
SONATA
*NP150_-_F8001*� …
SONATA Automobile, 9
-
Chevrolet
2008 Uplander
Congratulations on your purchase of a Chevrolet Uplander. Please read this information and your OwnerManual to ensure an outstanding ownership experience. Note that your vehicle may not include all thefeatures described in this booklet. Keep this booklet with your Owner Manual for easy reference.DRIVER INFORMATION Inst …
2008 Uplander Automobile, 20
Recommended Documentation: