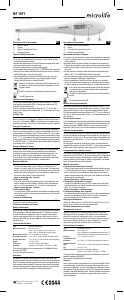
Цифровой термометр micro life MT 16F1

Описание этого термометра
- Кнопка включения / выключения
- Блок с механическими кнопками
- Крышка батарейного отсека
- Измерительный датчик / измерительный наконечник
- Зона очистки и дезинфекции (только датчик термометра)
Важные инструкции по безопасности
- Следуйте инструкциям по применению. В этом документе содержится важная информация по эксплуатации и безопасности, касающаяся этого устройства. Пожалуйста, внимательно прочтите этот документ перед использованием устройства и сохраните его для использования в будущем.
- Это устройство можно использовать только для измерения температуры человеческого тела через ротовую, ректальную или подмышечную область. Не пытайтесь измерять температуру в других местах, например, в ухе, так как это может привести к неверным показаниям и может привести к травмам.
- Не используйте это устройство, если считаете, что оно повреждено, или заметили что-то необычное.
- Мы рекомендуем очистить это устройство в соответствии с инструкциями по очистке перед первым использованием в целях личной гигиены.
- Необходимо без исключения выдерживать минимальное время измерения до звукового сигнала!
- Учтите, что в другом месте измерения может потребоваться продолжение измерения даже после звукового сигнала, см. Раздел «Методы измерения / Нормальная температура тела».
- По соображениям безопасности (риск перфорации прямой кишки) ректальное измерение у детей младше 3 лет должно выполняться только обученным медицинским персоналом (профессиональным пользователем). Вместо этого используйте другой метод измерения. Для измерения ректальной лихорадки у маленьких детей младше 3 лет доступны термометры с гибким наконечником.
- Не пытайтесь выполнить ректальные измерения у людей с заболеваниями прямой кишки. Это может усугубить или усугубить заболевание.
- Следите за тем, чтобы дети не использовали это устройство без присмотра; некоторые части достаточно малы, чтобы их можно было проглотить. Помните об опасности удушения, если это устройство поставляется с кабелями или трубками.
- Не используйте это устройство вблизи сильных электромагнитных полей, таких как мобильные телефоны или радиоустановки. При использовании этого устройства соблюдайте минимальное расстояние 3.3 м от таких устройств.
- Берегите устройство от ударов и падений!
- Избегайте температуры окружающей среды выше 60 ° C. НИКОГДА не кипятите это устройство!
- Для очистки устройства используйте только коммерческие дезинфицирующие средства, перечисленные в разделе «Очистка и дезинфекция», чтобы избежать повреждения устройства.
- Мы рекомендуем проверять это устройство на точность каждые два года или после механического удара (например, падения). Пожалуйста, свяжитесь с местной службой Microlife для организации теста.
ПРЕДУПРЕЖДЕНИЕ: Результат измерения данным прибором не является диагнозом! Не полагайтесь только на результат измерения. Аккумуляторы и электронные устройства должны утилизироваться в соответствии с местным законодательством, а не вместе с бытовыми отходами. Внимательно прочтите инструкции перед использованием этого устройства. Рабочая часть типа BF
Включение термометра
Чтобы включить термометр, нажмите кнопку ВКЛ / ВЫКЛ 1; короткий звуковой сигнал сигнализирует «термометр включен». Выполняется тест дисплея. Должны отображаться все сегменты. Затем при температуре окружающей среды менее 32 ° C в поле дисплея 2 появляются «L» и мигающий «° C». Теперь термометр готов к использованию.
Функциональный тест
Правильное функционирование термометра проверяется автоматически при каждом включении. При обнаружении неисправности (неточности измерения) на дисплее отображается «ERR», и измерение становится невозможным. В этом случае термометр необходимо заменить.
Использование термометра
Выберите предпочтительный метод измерения. Во время измерения постоянно отображается текущая температура, а символ «°C» мигает. Если раздастся 10-кратный звуковой сигнал и перестанет мигать «°C», это означает, что измеренное повышение температуры составляет менее 0.1 °C за 16 секунд. Чтобы продлить срок службы батареи, выключите термометр, кратковременно нажав кнопку ВКЛ/ВЫКЛ 1. В противном случае термометр автоматически выключится примерно через 10 минут.
Хранение измеренных значений
Если кнопка ВКЛ/ВЫКЛ 1 нажата более 3 секунд при включении термометра, будет отображаться автоматически сохраненная максимальная температура во время последнего измерения. При этом на дисплее появится буква «М» для памяти. Примерно через 2 секунды после отпускания кнопки значение температуры исчезнет, и термометр готов к измерению. Методы измерения / Нормальная температура тела.
В подмышечной впадине (подмышечные) / 34.7 — 37.3 ° C
Вытрите подмышки сухим полотенцем. Поместите измерительный датчик 4 под руку в центр подмышечной впадины так, чтобы кончик касался кожи, и поместите руку пациента рядом с телом пациента. Это гарантирует, что воздух в помещении не повлияет на показания. Поскольку подмышечной впадине требуется больше времени для достижения стабильной температуры, подождите не менее 5 минут, независимо от звукового сигнала.
Во рту (орально) / 35.5 — 37.5 ° C
Не ешьте и не пейте ничего горячего или холодного за 10 минут до измерения. Рот должен оставаться закрытым до 2 минут перед началом чтения. Поместите термометр в один из двух карманов под языком, слева или справа от корня языка. Измерительный датчик 4 должен иметь хороший контакт с тканью. Закройте рот и равномерно дышите через нос, чтобы предотвратить влияние вдыхаемого/выдыхаемого воздуха на измерение. Если это невозможно из-за закупорки дыхательных путей, следует использовать другой метод измерения.
Прибл. время измерения: 1 минута! В анусе (ректально) / 36.6 — 38.0 ° C
Внимание: Для профилактики перфорации прямой кишки у детей (младше 3 лет) рекомендуется использовать другой метод измерения или использование термометра с гибким наконечником. Осторожно введите измерительный датчик 4 термометра на 2-3 см в анальное отверстие. Рекомендуется использовать крышку зонда и смазку. Если вы не уверены в правильности этого метода измерения, обратитесь к специалисту за руководством/обучением.
Прибл. время измерения: 1 минута!
Очистка и дезинфекция
Для дезинфекции в домашних условиях используйте тампон с 70% изопропиловым спиртом или хлопчатобумажную ткань, смоченную 70% изопропиловым спиртом, чтобы стереть загрязняющие вещества с поверхности зонда термометра (примечание: учитывайте применение и инструкции по технике безопасности производителя дезинфицирующего средства). Всегда начинайте протирать от конца щупа термометра (примерно в середине термометра) к наконечнику термометра. После этого весь зонд термометра (см. номер 5 на чертеже) следует погрузить в 70% изопропиловый спирт не менее чем на 5 минут (максимум на 24 часа). После погружения дайте дезинфицирующему средству высохнуть в течение 1 минуты перед следующим использованием. Не погружайте и не протирайте дисплей, чтобы защитить его от выцветания. Термометр не предназначен для профессионального использования.
Замена батареи
Когда на дисплее появляется символ (перевернутый треугольник), это означает, что батарея разряжена и нуждается в замене. Для замены батареи снимите крышку батарейного отсека 3 с термометра. Вставьте новую батарею так, чтобы + был вверху. Убедитесь, что у вас есть аккумулятор того же типа. Батарейки можно купить в любом магазине электротоваров.
Технические спецификации
- Модель: Максимальный термометр
- Диапазон измерений: 32.0 ° C до 43.9 ° C
- Темп. < 32.0 °С: отображение «L» для низкого (слишком низкого)
- Темп. > 43.9 °С: отображение «H» для высокого (слишком высокого)
- Точность измерения: ± 0.1 ° С; 34 ° С — 42 ° С ± 0.2 ° С; 32.0 — 33.9 ° C и 42.1 — 43.9 ° C
- Условия эксплуатации: 10-40 ° С; Относительная максимальная влажность 15-95%
- Условия хранения: -25 — +60 ° С; Относительная максимальная влажность 15-95%
- Батарея: LR41 (1.5 В) / SR41 (1.55 В)
- Срок службы батареи: ок. 4500 измерений (с новым аккумулятором)
- Класс IP: IP22
- Ссылка на стандарты: EN 12470-3, клинические термометры;
- АСТМ Е1112; МЭК 60601-1;
- IEC 60601-1-2 (ЭМС)
- IEC 60601-1-11
- Ожидаемый срок службы: 5 лет или 10000 измерений
Это устройство соответствует требованиям Директивы по медицинскому оборудованию 93/42 / EEC. Возможны технические изменения.
Гарантия
На это устройство распространяется 2-летняя гарантия со дня покупки. В течение этого гарантийного периода, по нашему усмотрению, Microlife бесплатно отремонтирует или заменит дефектный продукт. Открытие или изменение устройства аннулирует гарантию.
Гарантия не распространяется на следующие позиции:
- Транспортные расходы и риски транспорта.
- Повреждения, вызванные неправильным применением или несоблюдением инструкции по применению.
- Повреждения, вызванные протекающими батареями.
- Повреждения, вызванные несчастным случаем или неправильным использованием.
- Материал упаковки / хранения и инструкция по применению.
- Регулярные проверки и обслуживание (калибровка).
- Аксессуары и быстроизнашивающиеся детали: Аккумулятор.
Если требуется гарантийное обслуживание, обратитесь к дилеру, у которого было приобретено изделие, или в местный сервисный центр Microlife. Вы можете связаться с местным Сервис Microlife через нашу webсайт: www.microlife.com/support Компенсация ограничена стоимостью продукта. Гарантия будет предоставлена, если весь продукт будет возвращен вместе с оригинальным счетом-фактурой. Ремонт или замена в рамках гарантии не продлевают и не продлевают гарантийный срок. Настоящая гарантия не ограничивает юридические претензии и права потребителей.
Документы / Ресурсы
Рекомендации
DESCRIPTION OF THIS PRODUCT
DESCRIPTION DU PRODUIT
Measuring sensor
Embout thermosensible
Read the instructions carefully before using this device.
Veuillez lire attentivement les instructions avant d’utiliser ce produit.
Lees alvorens deze instrumenten te gebruiken de instructies aandachtig door.
Vor Verwendung Bedieungsanleitung genau studieren.
IMPORTANT SAFETY INSTRUCTIONS
• The thermometer is suitable exclusively for measurement of the
body temperature.
• The minimum measurement time until the signalling tone [beep] must be main-
tained without exception.
• The thermometer contains small parts (battery, etc.) that can be swallowed by
children. Therefore never leave the thermometer unattended to children.
• Protect the thermometer from hitting and striking.
• Avoid ambient temperatures above 60 °C. NEVER boil the thermometer.
• Use only the commercial disinfectants listed in the section «cleaning and disin-
fecting» to clean the thermometer.
• The manufacturer recommends to verify the accuracy by an authorised labora-
tory every 2 years.
Batteries and electronic instruments must be disposed of in accor-
dance with the locally applicable regulations, not with domestic
waste.
TURNING ON THE THERMOMETER
To turn on the thermometer, press the ON/OFF button; a short beep signals «ther-
mometer ON». A display test is performed. All segments should be displayed. Then
at an ambient temperature of less than 32 °C, an «L» appears and a «°C» flashes
at the upper right of the display field. The thermometer is now ready for use.
USING THE THERMOMETER
Choose the preferred measuring method. During a measurement, the current tem-
perature is displayed continuously. The «°C» symbol flashes during this period of
time. If the signalling tone sounds (beep-beep-beep 10 times) and the «°C» is no
longer flashing, this means that the measured increase in temperature is now
less than 0.1 °C in 16 seconds and that the thermometer is ready for reading.
To prolong the life of the battery, turn it off after use by pressing the operating
button briefly. Otherwise the thermometer will automatically turn off after about
9 minutes.
STORAGE OF MEASURED VALUES
If you hold the button down for more than 3 seconds when turning the thermome-
ter on, the maximum temperature stored automatically at the last measurement
will be displayed. At the same time, a small «M» for memory will appear at the
right of the display. After 3 more seconds, this value will disappear and the ther-
mometer will switch to the normal measurement mode. Then the stored value is
erased.
MEASURING METHODS
In the mouth (oral)
Position the thermometer in one of the two pockets under the tongue, to the left
or right of the root of the tongue. The measuring sensor must be in good contact
with the tissue. Close your mouth and breathe evenly through the nose to prevent
the measurement from being influenced by inhaled/exhaled air.
Approx. measuring time: 1 minute!
In the anus (rectal)
This is the most reliable measuring method, and is especially suitable for infants
and small children. Carefully insert the measuring sensor of the thermometer 2 to
3 cm into the anal aperture. Approx. measuring time: 1 minute!
In the armpit (axillary)
To receive more reliable results we recommend to measure temperature orally or
rectally. A minimum measurement time of 3 — 5 minutes is recommended regard-
less of the beep sound. Approx. measuring time: 1 minute!
CLEANING AND DISINFECTING
Name: Isopropyl alcohol 70%.
Use a cotton swab moistened with alcohol (70% Isopropyl) to clean and disinfect
the thermometer casing and the measuring probe. Never use abrasive cleaning
agents, thinners or benzene for cleaning and never immerse the instrument in
water or other cleaning liquids.
BATTERY REPLACEMENT
When the «▼» symbol (upside-down triangle) appears in the lower right of the dis-
play, the battery is exhausted and needs replacing. For the battery replacement
please remove the compartment lid of the thermometer. Replace the exhausted
battery by positioning the + at the top. Make sure a battery of the same type is on
hand. Batteries can be purchased at any electrical goods shops. For battery dispos-
al please refer to «safety instructions».
Type / Type:
Measurement range /
Etendue de mesure:
Measurement accuracy / Précision:
Operating temperature /
Température de fonctionnement:
Self-test / Dispositif d’autocontrôle:
Display / Affichage:
Signalling tone / Signal sonore:
Memory / Mémoire:
Storage temperature /
Température de stockage:
Battery / Pile:
Reference to standards /
Référence aux normes:
This device complies with the requirements of the Medical Device Directive
93/42/EEC.Technical alterations reserved.
GUARANTEE
We grant you a lifetime guarantee after the date of purchase. Any damage caused
by improper handling shall not be covered by the guarantee. Batteries and packag-
ing are also excluded from the guarantee. All other damage claims excluded. A
guarantee claim must be submitted with the purchase receipt. Please pack your
defective thermometer well and send with sufficient postage to:
Date of purchase:
Display Field
Ecran d’affichage
TECHNICAL SPECIFICATIONS
Maximum thermometer
32.0 °C to 43.9 °C
Temp. < 32.0 °C: display «L» for low (too low)
Temp. > 43.9 °C: display «H» for high (too high)
± 0.1 °C between 34 °C and 42 °C
10 °C to 40 °C;
15 — 95 % relative maximum humidity
Automatic internal check at a test value of 37.0 °C;
if there is a deviation of > 0.1 °C, «ERR» (error) is displayed.
Liquid crystal display (LCD) with 3 digits. Smallest unit of display: 0.1 °C
For signalling that the thermometer is ready to use and that the temperature
increase is less than 0.1 °C / 16 seconds.
For storing the last measured value.
-25 °C to +60 °C;
15 — 95 % relative maximum humidity
1.5 / 1.55 V; LR 41
EN 12470-3; ASTM E1112;
IEC 60601-1; IEC 60601-1-2 (EMC)
DIGITAL PEN-TYPE THERMOMETER
MT 16F1
ON/OFF button
Interrupteur marche/arrêt
IMPORTANTES PRECAUTIONS D’EMPLOI
EN
• N’utiliser le thermomètre que pour la mesure des températures
corporelles.
• Toujours respecter la durée de mesure minimale en attendant que le signal
sonore se déclenche.
• Le thermomètre contient de petites pièces (pile, etc.) qui peuvent être avalées
par les enfants. Aussi, ne jamais laisser le thermomètre aux enfants sans
surveillance.
• Veiller à ne pas faire tomber le thermomètre et à ne pas le cogner.
• Ne pas exposer le thermomètre à des températures ambiantes supérieures à
60 °C. Ne jamais le mettre à bouillir.
• Pour procéder au nettoyage, n’utiliser que l’un des produits répertoriés dans le
paragraphe «Nettoyage et désinfection du thermomètre».
• Le fabricant recommande de faire contrôler la précision du thermomètre par un
laboratoire agréé tous les 2 ans.
Les piles et instruments électroniques doivent être éliminés en confor-
mité avec les prescriptions locales, séparément des ordures
ménagères.
MISE EN MARCHE DU THERMOMETRE
Pour mettre le thermomètre en marche, appuyer sur l’interrupteur situé au-dessus
de la fenêtre d’affichage. Un bref signal sonore (bip) indique que le «thermomètre
est en marche». Un test d’affichage est alors réalisé. Tous les symboles apparais-
sent à l’écran. Pour une température ambiante inférieure à 32 °C, un «L» s’af-
fiche et un «°C» se met à clignoter dans le coin supérieur droit de l’écran d’af-
fichage. Le thermomètre est alors prêt à l’emploi.
UTILISATION DU THERMOMETRE
Choisir la méthode de mesure. Pendant la mesure, la température en cours est
affichée en permanence. Le symbole «°C» clignote pendant ce temps. Si le signal
sonore (10 bips consécutifs) se déclenche et si le symbole «°C» ne clignote plus,
cela indique que l’augmentation de la température est désormais inférieure à
0,1°C en 16 secondes, la mesure peut alors être lue sur l’écran. Pour prolonger la
durée de vie de la pile, arrêter le thermomètre après utilisation en appuyant
brièvement sur l’interrupteur marche/arrêt. Certes, le thermomètre s’arrête aussi
automatiquement, mais après environ 9 minutes.
ENREGISTREMENT DE LA DERNIERE MESURE
Pour obtenir le rappel de la dernière température mesurée, maintenir la pression
sur l’interrupteur pendant plus de 3 secondes lors de la mise en marche. Simulta-
nément, le petit symbole «M» de mémoire s’affiche à droite de l’écran. Cette
valeur ne s’affiche que pendant 3 secondes avant de disparaître. Le thermomètre
passe ensuite en mode de mesure normal. La valeur enregistrée précédemment
est alors effacée.
METHODES DE MESURE
Température buccale (dans la bouche)
Placer le thermomètre dans l’une des deux cavités situées à gauche ou à droite
du frein de la langue. L’embout thermosensible doit être en contact avec les
muqueuses. Bien refermer la bouche et respirer très doucement par le nez pour
éviter d’affecter la prise de mesure par l’air aspiré/expiré.
Mesure effectuée en 1 minute environ!
Température rectale (dans le rectum)
Il s’agit de la méthode la plus sûre. Elle convient plus particulièrement aux bébés
et aux enfants. Introduire doucement l’embout d’env. 2 à 3 cm dans le rectum.
Mesure effectuée en 1 minute environ!
Température axillaire (sous l’aisselle)
Pour obtenir des résultats plus fiables, nous vous recommandons de mesurer la
température de façon orale ou rectale. Un temps de mesure minimum de
3 — 5 minutes est recommandé même si le bip sonore a retentit.
Mesure effectuée en 1 minute environ!
NETTOYAGE ET DÉSINFECTION DU THERMOMÈTRE
Nom: Isopropyl alcohol 70%.
Utiliser un tampon de coton imbibé d’alcool (70% Isopropyl) pour nettoyer et dés-
infecter la surface du thermomètre et la sonde. Ne jamais utiliser d’agent
abrasif, diluant ou benzène et ne jamais plonger le thermomètre dans l’eau
ou autre liquide.
REMPLACEMENT DE LA PILE
Lorsque le symbole «▼» (triangle inversé) s’affiche dans le coin inférieur droit de
l’écran, la pile est usée et doit être changée. Pour effectuer son remplacement,
enlever le couvercle du logement de la pile du thermomètre. Remplacer la pile
usée par une nouvelle pile du même type en veillant à bien orienter la borne pos-
itive (+) vers le haut. Les piles appropriées peuvent être achetées chez tout élec-
tricien. Pour jeter les piles usées, se reporter aux «Précautions d’emploi».
CARACTÉRISTIQUES TECHNIQUES
Thermomètre à maxima
De 32,0 °C à 43,9 °C
un «L» s’affiche pour les températures inférieures à 32,0 °C
un «H» s’affiche pour les températures supérieures à 43,9 °C
± 0.1 °C entre 34 °C et 42 °C
10 °C et 40 °C;
15 à 95 % d’humidité relative maximum
Contrôle interne automatique à la valeur test de 37 °C.
Pour tout écart supérieur à 0,1 °C le symbole «ERR» (erreur) s’affiche
Écran à cristaux liquides avec 3 chiffres unité d’affichage minimale 0,1 °C
Pour indiquer que le thermomètre est prêt à l’emploi ou que l’augmentation de tem-
pérature est inférieure à 0,1 °C en 16 secondes
Pour enregistrer la dernière mesure.
Entre -25 °C et +60 °C;
15 à 95% d’humidité relative maximum
1,5 / 1,55 V; LR 41
EN 12470-3; ASTM E1112;
IEC 60601-1; IEC 60601-1-2 (EMC)
Cet appareil est conforme aux exigences de la directive relative aux appareils
médicaux 93/42/CEE. Sous réserve de modifications techniques.
GARANTIE
Nous vous accordons une garantie à vie à compter de la date d’achat. Aucun
dommage occasionné par une mauvaise manipulation n’est couvert par la
garantie. Les piles et l’emballage sont également exclus de la garantie. Tout
autre sinistre exclu. Toujours joindre la preuve d’achat à toute déclaration de sin-
istre. Veuillez emballer correctement votre thermomètre défectueux et adresser
le paquet affranchi au tarif en vigueur à:
Date d’achat:
Battery compartment cover
Couvercle du logement de la pile
Type BF applied part
Partie appliquée du type BF
Geleverd onderdeel type BF
Anwendungsteil des Typs BF
FR
File Specifications:1712/1712805-mt_16f1.pdf file (05 Jul 2023) |
Accompanying Data:
Microlife MT 16F1 Thermometer PDF Manual (Updated: Wednesday 5th of July 2023 12:54:23 PM)
Rating: 4.1 (rated by 98 users)
Compatible devices: FR1MF1, as easy as 123, MT1P21-PRO, IR1DA1, MT 18F1, IR200, Non Contact Plus NC 200, IR 120.
Recommended Documentation:
Manual (Text Version):
(Ocr-Read Summary of Contents of some pages of the Microlife MT 16F1 Document (Main Content), UPD: 05 July 2023)
-
1, IMPORTANT SAFETY INSTRUCTIONS • The thermometer is suitable exclusively for measurement of the body temperature. • The minimum measurement time until the signalling tone [beep] must be main- tained without exception. • The thermometer contains small parts (battery, etc.) that can be swallowed by children. Therefore never leave the thermometer unattended to children. • Protect the thermometer from hitting and striking. • Avoid ambient tem…
-
2, BELANGRIJKE VEILIGHEIDS INSTRUCTIES • Deze thermometer is alleen geschikt voor het meten van de lichaam stemperatuur. • De minimale meettijd totdat het signaal afgaat (beep), moet altijd aange- houden worden. • Bescherm de thermometer tegen beschadigingen door vallen en slaan. • De thermometer bevat kleine onderdelen (batterij, etc) die ingeslikt kunnen worden door kinderen. Laat daarom de thermometer nooit alleen bij kind…
-
Microlife MT 16F1 User Manual
-
Microlife MT 16F1 User Guide
-
Microlife MT 16F1 PDF Manual
-
Microlife MT 16F1 Owner’s Manuals
Recommended: C750 — Advantix — Camera, Living LV2 e, Elan 90 Ceramic, VEGADIF 65, AirAlert 96d
Links & Tools
Operating Impressions, Questions and Answers:
Посмотреть инструкция для Microlife MT 16F1 бесплатно. Руководство относится к категории термометры, 10 человек(а) дали ему среднюю оценку 8.2. Руководство доступно на следующих языках: русский, английский. У вас есть вопрос о Microlife MT 16F1 или вам нужна помощь? Задайте свой вопрос здесь
Не можете найти ответ на свой вопрос в руководстве? Вы можете найти ответ на свой вопрос ниже, в разделе часто задаваемых вопросов о Microlife MT 16F1.
Как понять есть ли у вас жар?
У вас жар, если температура тела выше 38 градусов по Цельсию.
Что такое повышенная температура тела?
Повышенной температурой тела считается температура между 37,5 и 38 градусами по Цельсию.
Какая температура тела считается нормальной?
Температура тела считается нормальной, если находится в пределах 36,5-37,5 градусов по Цельсию.
Аккумулятор в моем устройстве термометр начал ржаветь. Безопасно ли пользоваться устройством?
Продукт безопасен для использования после надлежащей очистки. Извлеките аккумулятор, надев перчатки, и очистите аккумуляторный отсек зубной щеткой, смоченной уксусом. После высыхания установите в устройство новые аккумуляторы.
Инструкция Microlife MT 16F1 доступно в русский?
Да, руководствоMicrolife MT 16F1 доступно врусский .
Не нашли свой вопрос? Задайте свой вопрос здесь
Need a manual for your Microlife MT 16F1 Thermometer? Below you can view and download the PDF manual for free. There are also frequently asked questions, a product rating and feedback from users to enable you to optimally use your product. If this is not the manual you want, please contact us.
Is your product defective and the manual offers no solution? Go to a Repair Café for free repair services.
Manual

Rating
Let us know what you think about the Microlife MT 16F1 Thermometer by leaving a product rating. Want to share your experiences with this product or ask a question? Please leave a comment at the bottom of the page.
Are you satisfied with this Microlife product?
Yes No
Be the first to rate this product
0 votes
Frequently Asked Questions
Our support team searches for useful product information and answers to frequently asked questions. If you find an inaccuracy in our frequently asked questions, please let us know by using our contact form.
I just took my temperature but what is actually considered a ‘healthy’ body temperature? Verified
This partially depends on the body part where the temperature was taken. The following can be considered healthy: Forehead 35,8 to 37,6 °C, Ear 36 to 37,8°C, rectally 36,3 to 37,8°C and orally 36 to 37,4°C.
This was helpful (921)
What parts of the body are best to measure body temperature? Verified
This depends on the thermometer. Some thermometers are designed for use on specific parts of the body. With a regular thermometer, rectal usage is the fastest and most accurate way to measure body temperature.
This was helpful (302)
From what temperature does a person officially have a fever? Verified
A temperature above 38°C is officially considered a fever.
This was helpful (215)