1 Общая информация о пос-устройстве
Кассовое оборудование IWL220 Ingenico и IWL250 Ingenico подходит для выполнения разных платежей, так как у них предусмотрен сканер смарт-карт, магнитный сканер, бесконтактный считыватель, а также множество других функциональных особенностей. Кассиры смогут пользоваться GPRS или Bluetooth. Отметим, что в моделях IWL280 предусмотрены оба варианта.
1.1 Отличительные параметры
Пос-терминал Инженико IWL250 имеет следующий функционал:
- Клавиатура, в котором 15 кнопок для смены опций и передвижения по меню;
- Экран с подсветкой;
- Считыватель карт магнитного типа;
- Сканер смарт карт (2 ридера);
- Отдел для распечатки чека;
- Считыватель карт с поддержкой бесконтактной связи;
- Слоты для сим-карт;
- Гнездо для карты памяти;
- Порт RS232.
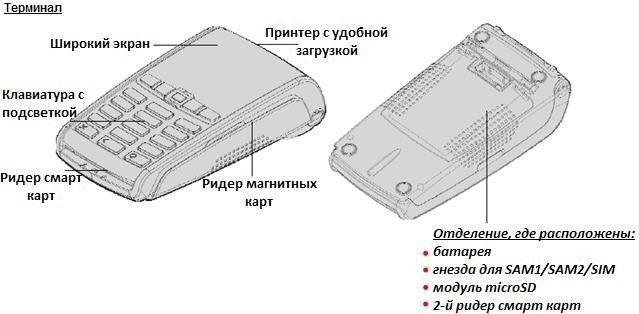
На базовой части терминала распределены дополнительные внешние разъемы.
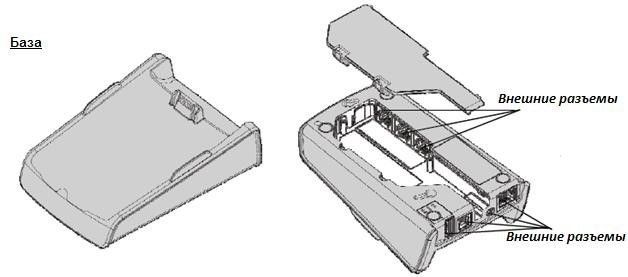
Модуль подзарядки пос-устройств адаптированы для моделей Инженико.
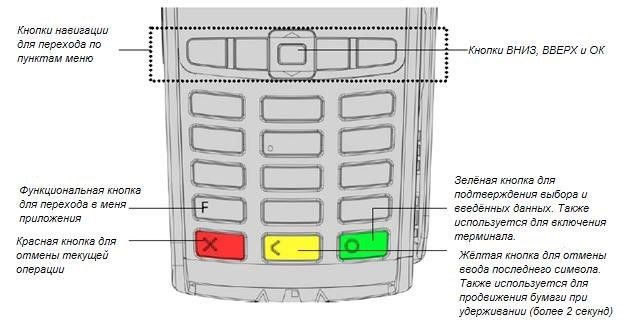
1.2 Основные кнопки и их обозначение
2. Особенности функционирования пос-терминала Ingenico IWL250
2.1 Правильное расположение устройства
Пос-терминал должен находиться на ровной, чистой и сухой поверхности, вдали от попадания солнечных лучей, воздействия перепада температур, вибраций, пыли и электромагнитного излучения. Важно обеспечить простоту и удобство соединения провода устройства к розетке. В случаях, когда применяется модем, важен легкий доступ к телефонной линии.
2.2 Условия работы
|
Допустимый диапазон температурного режима |
от +5°C до +45°C |
|
Максимальный уровень влажности |
85% при t +40°C |
|
Хранение в режиме ожидания |
|
|
Температурный режим окружающей среды |
-20°C, +55°C |
|
Максимально допустимая влажность воздуха |
85% при t +55°C |
2.3 Особенности подключения пос-терминала к базе
Безналичный терминал Ingenico нужно распределить между зажимами на основе таким образом, чтобы контакты pos-терминала и базы состыковались между собой.
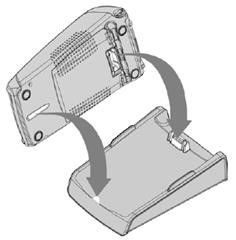
2.4 Применение модемной базы (если модем адаптирован к базе)
Применение устройства начинается с того, что модемную базу нужно подключить к автономной телефонной линии.
Возвращение устройства на базу возможно после совершения любой транзакции. Если применяется телефонная линия, то pos-терминал должен находиться на базе.
3 Слоты для соединений
USB разъем распределен на левой стороне устройства. Благодаря этому порту можно подключаться к Host или Slave.
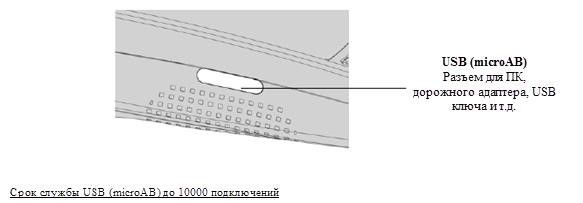
Пос-терминал отлично синхронизируется с USB, который представлен с FAT16 или FAT32. При работе с USB обязательно применяется адаптер.
3.1 Применение карт SAM, SAM2, SIM
|
Перед открытием корпуса, следует отключить пос-терминал от сети. Далее выполнить следующие действия. |
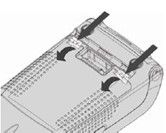
Разъемы SAM/SIM находятся внутри корпусной части терминала. Вставить туда карту можно следующим образом:
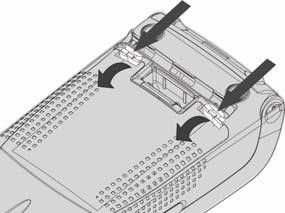
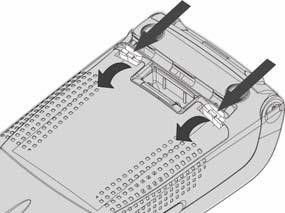
- Перевернуть pos-терминал и открыть крышку. Сделать это можно надавив на зажимы.
-
Отделы для SAM1, SAM2 и SIM имеют соответствующие отметки. Нужно выбрать подходящий для Вас.
- При установке SAM/SIM в гнездо нужно убедиться в правильном расположении угла среза. Нужный вариант размещения SIM представлен на рисунке.
- Осталось закрыть крышку.
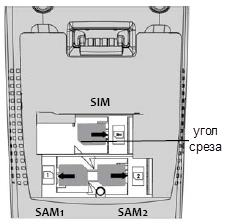
Для извлечения карты SAM, нужно применить самоклеющий материал, который расположен с обеих сторон карты.
3.2 Карта памяти MicroSD
Перед тем как открыть корпусную часть пос-терминала, нужно отключить устройство.
Разъем MicroSD нужно размещать внутри корпусной части, в закрытом отделении.
Размещение карты памяти MicroSD на пос-терминалах IWL250 осуществляется следующим образом:
- Нужно перевернуть пос-устройство и открыть крышку (смотрите пример на картинке).
-
Нужно извлечь батарею (отсоединять необязательно).
- Теперь следует вставить карту памяти MicroSD в гнездо. При этом, контакты MicroSD должны располагаться лицевой частью вниз. Также правильно распределите угол среза (пример на картинке).
- Осталось закрыть отделение.
- Терминал может работать с MicroSD, объем которого не превышает 32 Гб.
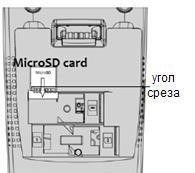
Извлечь карту памяти Ingenico IWL250 можно, следуя алгоритму действий:
- Нужно повернуть устройство лицевой стороной вниз и извлечь крышку для карты.
- Разверните пос-устройство лицевой частью вниз и извлеките крышку.
- Аккуратно вытащите батарею.
- Снимите карту памяти.
- Верните крышку слота на место.
Штепсельные соединения, расположенные сзади терминала:

|
А = разъем Ethernet |
В = отдел для блока питания |
|
С = «линия для проводов» |
D = штепсель USB Slave (подходит для CDC) |
|
Е = слот для USB Host1 |
F = разъем USB Host1 |
Синхронизация модуля подзарядки с терминалом IWL220 осуществляется следующим образом:
- Нужно подключить все кабели, после чего модуль питания нужно подсоединить к гнезду В.
- Присоедините модуль к электросети.
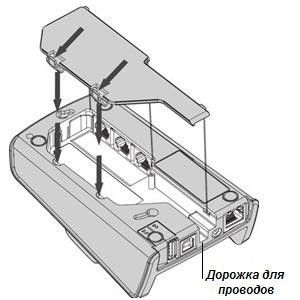
Отделы на нижней части базы
- Нужно снять крышку терминала.
- В нижнем отделе базы соединить разъемы.
- Вывести кабели с помощью специальной дорожки, предусмотренной производителем устройства.
- Вернуть крышку на место.
|
G |
H |
|
I – отдел для модема |
|
Подключение пос-терминала к телефонной линии осуществляется следующим образом:
- Нужно отсоединить модуль подзарядки (разъем В), чтобы отключить базу.
- Синхронизовать телефонный кабель и линию. Важно: провод должен оснащаться подходящим штепселем.
- Присоединить одно начало провода к базе, а разъем под номером 1.
- Подключить модуль подзарядки в разъем В.
- Подсоединить модуль к сети.
Важно! Разъем 1 ( TNV‐3 circuit ) передает усилие согласно установленному стандарту EN 60950-1.
4 Закрепление базы Ingenico IWL
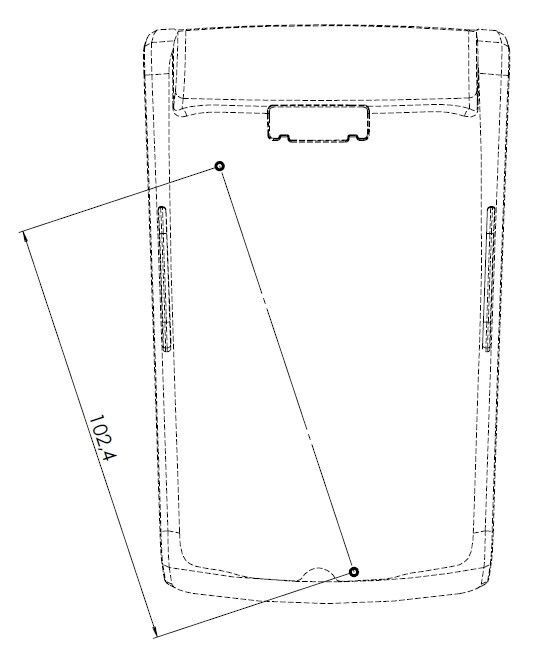
База пос-терминала фиксируется на столе благодаря специальным петлям, расположенным в нижней части базы. Посмотреть расположение можно на рисунке.
База должна быть распределена в горизонтальном положении. Это необходимо для ее бесперебойной деятельности. Если Вы планируете установить базу на стене, следует воспользоваться петлями и креплениями, позволяющих добиться горизонтального положения.
5 Чековая бумага
Бумага для терминала IWL250 изготавливается в нескольких вариантах:
|
Характерные особенности |
Значения |
|
Цветовая гамма |
Белый |
|
Ширина |
5,8 см |
|
Диаметр рулона |
4 см максимум |
|
Длина |
~ 18 м |
|
Характерные особенности |
Значения |
|
Цветовая гамма |
Белый |
|
Ширина |
5,8 см |
|
Диаметр рулона |
2,5 см максимум |
|
Длина |
~ 9 м |
Для сохранения первоначальных свойств термобумаги, важно соблюдать рекомендации:
- Хранить бумагу в хорошо проветриваемых помещениях.
- Исключать воздействия ультрафиолетового излучения.
- Исключать контакты с органическими растворителями и клеями.
- Исключать контакты с изделиями, в которых содержатся пластификаторы.
- Исключать попадание воды, пыли, грязи на изделие.
- Избегать трения или другого физического воздействия на бумагу.
Качество напечатанного чека напрямую зависит от свойств термобумаги, поэтому выбирайте только высококлассный продукт, одобренный производителем терминала. Применение некачественной бумаги может привести к поломке принтера терминала.
5.1 Как заправить терминал Ingenico IWL250 бумагой
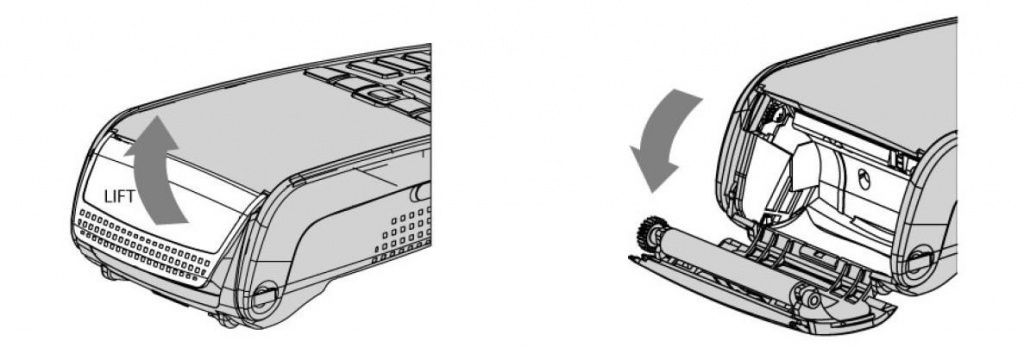
В pos-терминале применяется только 1 рулон для чека. Когда он заканчивается, на бумаге печатается красная линия. Это означает, что нужно заменить чековый рулон. Процесс достаточно простой, если следовать алгоритму действий:
-
Открыть отдел, подняв фиксатор на задней панели пос-терминала. Далее потяните крышку назад.
- Поместите рулон в специальный отдел.
- Вытяните часть бумаги на поверхность терминала и удерживайте ее в таком положении.
- Установите рулон бумаги и заприте крышку.
- Удерживайте крышку, пока она не защелкнет.
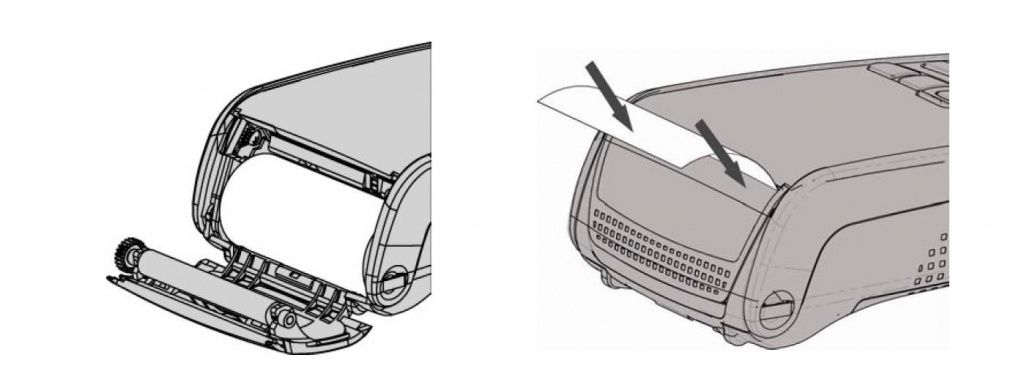
Перед применением новой чековой бумаги, оторвите небольшую часть рулона, чтобы остался полный оборот.
6 Батарейка pos-терминала
|
Характерные особенности |
Значения |
|
Вид устройства |
Li-on |
|
Емкость батареи |
2050mah |
|
Заряжение батареи |
Половину емкости можно набрать за 1,5 часа, а полная зарядка займет 4 часа. |
|
Функционирование в автономном режиме |
500 обычных операций 250 часов в режиме ожидания |
Установить батарею на Ingenico IWL250 можно следующим образом:
- Переверните устройство и откройте отделение. Сделать это можно надавив на зажимы кончиками пальцев.
-
Подключите поставляемую в комплекте батарею показанным на картинке способом.
- Проверьте надежное подключение провода.
- Закройте крышку.
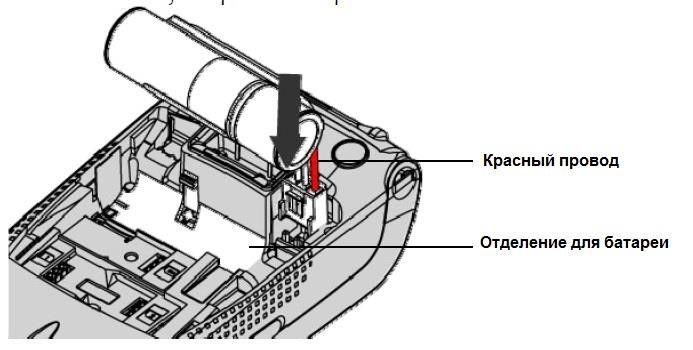
Сменить батарею можно вышеуказанным способом, только сначала нужно извлечь старую батарею.
Заряжать батарею нужно в соответствии с определенными рекомендациями:
- Первая подзарядка батареи осуществляется в течении 16 часов. При этом соблюдайте оптимальный температурный режим воздуха в помещении, в котором расположено устройство (+15° +25° с).
- Подзарядка батареи осуществляется каждый раз, когда Вы его устанавливаете на базу или подключаете к блоку питания через разъем АВ.
7 Рекомендации по применению
7.1 Чистка пос-устройства
Перед чисткой пос-терминала, нужно отсоединить все кабели от устройства. Далее следовать определенным правилам:
- Для чистки терминала применять только мягкий материал, слегка смоченный теплой водой. Можно применять слабый мыльный раствор.
- Не стоит трогать электрические провода мокрой тряпкой.
- Исключайте применения растворов и средств, в которых есть абразивные частички. Они приведут к повреждению пластиковых и электрических контактов.
- Не допускайте попадания прямых ультрафиолетовых лучей.
- Не вставляйте посторонние предметы в слот для смарт-элементов.
7.2 Правила транспортировки пос-устройств
- Перевозить терминал и его части следует лишь в оригинальной упаковке, которая защитит установку от поломок.
- Перед перевозкой отсоедините провода кассового устройства.
7.3 Рекомендации по применению
Смена уровня контраста (настройки актуальны только для черно-белых экранов):
Чтобы поменять уровень контраста, нужно надавить на клавишу и клавишу «Вверх» . Увеличить контраст можно клавишей , а для снижения уровня контраста, жмите клавишу «Вниз». Нужно удерживать кнопки в таком положении до получения нужной Вам настройки.
8 Чтение карт
Инструкция как пользоваться pos-терминалом Ingenico IWL250 зависит от того, какой картой производится оплата. Разберем каждый случай.
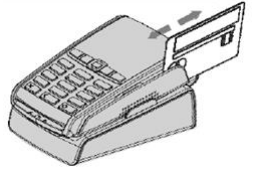
8.1 Чтение карт магнитного типа
Распознавание карты может осуществляться в любом направлении. Нужно провести карту через ридер таким образом, чтобы магнитная сторона осталась справа. Движения должны быть не торопливые, чтобы обеспечить верное считывание данных.
8.2 Распознавание смарт-карт
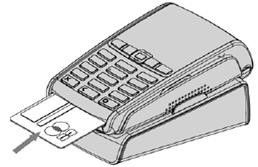
Разместите карту чиповой стороной вверх и не убирайте ее до того момента, пока оплата не будет пройдена.
Второй ридер расположен внутри корпусной части (с обратной стороны пос-терминала). Нужно вставить карту лицевой частью вниз, чтобы магнитная полоса была хорошо видна.
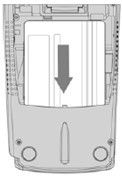
Перед открытием корпуса, нужно отсоединить терминал из сети.
8.3 Бесконтактная оплата с помощью IWL250
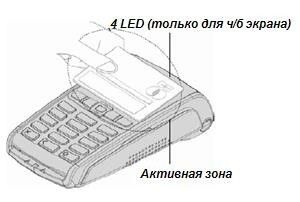
Нужно приложить карту к активной зоне над экраном, чтобы оставалось расстояние в 1 см. Держать карту нужно в течение нескольких секунд, пока транзакция успешно не завершится.
На терминале есть 4 светодиода, которые отражают выполнение транзакции.
Рабочие характеристики устройства могут измениться в зависимости от количества проводимых операций, от локальных настроек и сферы эксплуатации.
9 Особенности функционирования пос-устройства
9.1 Как отключить терминал
Сейчас разберем, как отключить терминал Ingenico IWL250.
Если батарея устройства разряжена, а терминал убран с базы, то он автоматически отключится. Если нет, то можно одновременно нажать на клавиши и удерживать в таком положении, пока экран не погаснет. Если потребуется перезагрузка устройства, следует нажать на зеленую кнопку и удерживать ее в течение нескольких секунд.
9.2 Соединение терминала с базой (для IWL bluetooth)
Перед началом применения терминала IWL2xx (bluetooth), нужно провести инициализацию связи с базой. После этого устройство подойдет для работы с ethernet, COM и dial-up, при условии, что будет находиться в радиусе действия базы.
Соединение с базой может осуществляться с применением ОС версии 8.х.х. В более старых моделях ОС, применение базы не допустимо. При необходимости, вы можете запросить новый набор ОС через службу поддержки.
Соединение терминала с базой проходит в несколько этапов:
- Нужно снять терминал с базы.
- Зайти в Telium manager (Initialization -> Hardware -> Cradle Setup -> Association -> New Base). На экране выйдет «Put on cradle».
- Вернуть терминал на базу, после чего на экране возникнет сообщение «Association successful».
- Выйдет надпись «Base Update», после которой нужно нажать на красную клавишу.
- Нажать на красную кнопку еще раз, пока не выйдете в главное меню «Telium manager».
- В правой верней части экрана должен показываться уровень доступности bluetooth;
- Если ничего не получилось, перезагрузите устройство с помощью зеленой клавиши.
- Далее переключите базу и повторите вышеуказанные действия сначала.
После прохождения инициализации можно применять скрипты для подключения СОМ-портов, dial-up модема и ethernet.
Настройки устройства можно проверить следующим образом:
Telium manager -> Initialization -> Hardware -> Cradle Setup -> Select Base ->. Убедитесь, что номер нужной Вам базы находиться в списке. Выберите нужный пункт и нажмите на зеленую клавишу, чтобы подтвердить решение.
9.3 Перезагрузка терминала
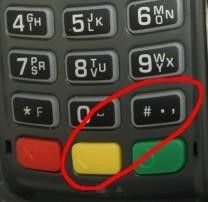
Теперь посмотрим, как перезагрузить терминал IWL250. Действие достаточно простое: нужно одновременно нажать на клавишу «.» и желтую клавишу «Исправления». Удерживайте в таком положении до того, как начнется перезагрузка.
9.4 Как перейти в раздел меню
Выйти в меню пос-устройства можно после окончания перезагрузки. На экране должны появиться линии «—», после чего нажмите на клавишу «2».
9.5 Сброс приложений из устройства
Удалить ненужные приложения в пос-терминале и вернуть первоначальные настройки можно применив комбинацию клавиш: F1, кнопка вниз, стрелка вверх, F4.
9.6 Загрузка ПО
Загрузить ПО можно тремя способами:
- Включив/перезагрузив терминал. После появления на экране знака «:-)», следует нажать и удерживать кнопку «↑», пока не возникнет надпись «LLT». На стрелку можно нажимать уже после включения терминала.
- Воспользовавшись разделом «Меню». Загрузку можно начать, выбрав в меню «Download menu» -> «Local download». Возникнет надпись «LLT».
- Воспользовавшись опцией Telium manager.
Последние модели ПО дают возможность перейти в «Telium manager», при этом не удалив прикладное ПО. Для этого перейдите в меню и выберите надпись «Telium manager»с помощью клавиши «F». После окончания работы с ПО, нажмите на красную кнопку и выйдете в основное меню. Далее снова жмите на «F» и вернитесь в ПО, далее выберите нужное Вам название прикладного решения. Также можете перезагрузить терминал.
9.7 Загрузка ОС и ПО на пос-терминал
Установить ОС И ПО на терминалах IWL2xx можно с помощью загрузки данных с flash карты. При этом можно применить 2 способа:
- Применить USB разъем, расположенный на базе.
- Применить переходник micro USB-A USB.
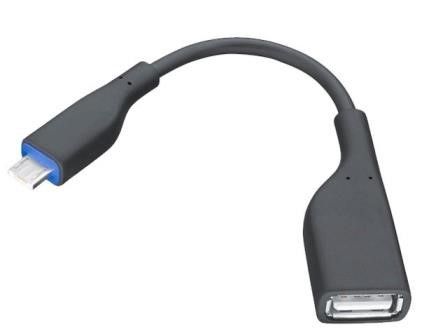
Применить такой функционал можно только после подготовки флэш-карты. Процедура выглядит следующим образом:
- Провести форматирование карты.
- Создать папку «telium».
- Загрузить нужную информацию в данную папку. Остальные папки не будут показываться, поэтому не помешают работе устройства.
- В папке «telium» следует создать вложенные папки.
- Готовую флэш-карту нужно подключить к порту «USB host», далее провести перезагрузку терминала.
-
Как только появится знак «
», нужно нажать и удерживать клавишу «F4». На экране возникнет сообщение «USB MASS STORAGE», но не нужно отпускать кнопку до тех пор, пока на экран не будут выведены списки папок.
После окончания инициализации карты, на экране будут высвечиваться списки вложенных папок внутри файла «telium». Остается выбрать необходимую папку с помощью стрелок и начать загрузку данных с помощью зеленой клавишу «Ок». ПО загрузится, после чего начнется автоматическое обновление настроек устройства. Благодаря такому способу, можно загружать на новый терминал ОС или прикладное ПО.
Важно! В случаях, когда в папке Telium находится всего один вложенный файл, то загрузка начнется без лишних диалогов, что удобно при работе с большим количеством терминалов.
Иногда, во время загрузки ПО, экран терминала может начать моргать. Это означает, что началось обновление процессора.
Определенные ОС поддерживают связь с флэш-картами. В таких ситуациях, терминал не будет показывать названия папок. Для обновления ОС придется воспользоваться LLT.
10 Ошибки и их устранение
Терминал не реагирует, или нет сигнала с телефонной линией
- Нужно проверить соединение кабелей и исправность телефонных проводов.
- Следует проверить работу электросетей.
Отсутствует телефонное подключение
- Нужно проверить, свободна ли линия.
- Убедиться в том, что настроена телефонная линия и введен правильный номер вызова.
- Обратиться в службу техподдержки.
Не считывается карта
- Проверить правильное расположение карты, магнитной стороной к терминалу.
- Провести карту по считывателю.
- Посмотрите, нет ли на магнитной полосе царапин и повреждений.
- Убедиться в правильном вставлении смарт-карты в ридер.
Нет чека
- Проверьте наличие чековой бумаги и ее правильное расположение.
- Убедитесь в том, что применяете именно термобумагу, так как другие варианты чекового рулона не подходят для пос-терминалов.
-
Contents
-
Table of Contents
-
Bookmarks
Quick Links
Merchant Solutions
AutoLink User Manual
Related Manuals for Ingenico iWL250
Summary of Contents for Ingenico iWL250
-
Page 1
Merchant Solutions AutoLink User Manual… -
Page 2
AutoLink User Manual iWL250 Point-of-sale (POS) device supplied and supported by Standard Bank… -
Page 3: Table Of Contents
Contents iWL250 Package Contents POS Device Functions Card Information Overview Retail Transactions Operator Functions Restaurant Transactions Operator Functions 4.3. Forecourt Transactions Operator Functions Workshop Transactions Operator Functions Usage and Maintenance of the POS Device Refund Transactions Accepting Chip and PIN Cards…
-
Page 4: Iwl250 Package Contents
Package Contents • iWL250 portable POS device • Power supply unit • Application user and manager manual • Thermal paper roll X2 • Imprinter booklet iWL250…
-
Page 5: Pos Device Functions
POS Device Functions iWL250 Magnetic Strip Paper Clip Pull paper clip up and forward to open the paper housing Scroll up and down Scroll up and down a Menu menu list Enter a function menu list Enter Press enter to confirm messages…
-
Page 6: Card Information Overview
Card Information Overview Issuing bank The responsible bank who issued the card to the member. Tap to Pay Tap to Pay™ functionality available. Card association logos All POS devices accept VISA, MasterCard® and Union Pay International. American Express, Diners Club, RCS, Fleet and other card types can only be accepted if the merchant has signed a separate merchant agreement with these issuers.
-
Page 8: Transactions
Transactions The POS device main screen will give you the option to press ‘F’ for menu or the green button to pay. If you press the green button, the following transactions (if enabled) will appear: TRANSACTION SELECTION 1. Sale 2. Refund 3.
-
Page 9
1. Sale STEP 1 Press the green button and select ‘sale’ STEP 2 Enter the sale amount and press enter Pass the POS device to the customer who can STEP 3 either Tap to Pay™, insert or swipe his or her card If prompted, the customer must enter his or her STEP 4 PIN followed by enter… -
Page 10
2. Refund STEP 1 Press the green button and select ‘refund’ STEP 2 Enter the refund amount and press enter STEP 3 Enter refund PIN Pass the POS device to the customer who can STEP 4 either Tap to Pay™, insert or swipe his or her card If prompted, the customer must enter his or her PIN STEP 5 followed by enter… -
Page 11
3. Correction STEP 1 Press the green button and select ‘correction’ STEP 2 Enter the amount and press enter STEP 3 Enter supervisor PIN Pass the POS device to the customer who can either insert or swipe his STEP 4 or her card (the card must be the same card as the original transaction) STEP 5 If prompted, the customer must enter his or her PIN followed by enter… -
Page 12
4. Balance Enquiry STEP 1 Press the green button and select ‘balance enquiry’ Pass the POS device to the customer who can either insert STEP 2 or swipe his or her card STEP 3 Select ‘cheque’ or ‘savings’ If prompted, the customer must enter his or her STEP 4 PIN followed by enter STEP 5… -
Page 13
5. Cash Withdrawal STEP 1 Press the green button and select ‘cash withdrawal’ STEP 2 Enter the cash amount and press enter STEP 3 Enter supervisor PIN Pass the POS device to the customer who can either insert or swipe his STEP 4 or her card If prompted, the customer must enter his or her PIN… -
Page 14
6. Sale & Cash STEP 1 Press the green button and select ‘sale & cash’ STEP 2 Enter the sale amount and press enter STEP 3 Enter the cash amount and press enter STEP 4 Enter supervisor PIN Pass the POS device to the customer who can either insert STEP 5 or swipe his or her card STEP 6… -
Page 15
7. Voice Override STEP 1 Press the green button and select ‘voice override’ STEP 2 Enter the sale amount and press enter Enter supervisor PIN STEP 3 Enter the authorisation code obtained from Standard Bank telephonically; STEP 4 this code cannot contain any special characters (,.+#*) or blanks Pass the POS device to the customer who can either STEP 5 insert or swipe his or her card… -
Page 16: Operator Functions
Operator Functions The POS device main screen will give you the option to press ‘F’ for menu or the green button to pay. If you press ‘F’ and select ‘SBSA’ , the following will appear: 1. Operator Options 2. Reports 3.
-
Page 17
1. Manual Card Entry (if enabled) STEP 1 Select ‘operator options’ and then ‘manual card entry sale’ STEP 2 Enter supervisor PIN Select 1 for ‘sale’ STEP 3 STEP 4 Enter the amount and press enter Enter the card’s card number, expiry date (MM/YY) STEP 5 and CVC/CVV number STEP 6… -
Page 18
2. Reprint Receipt STEP 1 Select ‘operator options’ and then ‘reprint receipt’ STEP 2 Enter supervisor PIN STEP 3 Select 1 for ‘last transaction’ or 2 for ‘specific receipt’ If 1, the last successful transaction will print (both a merchant and STEP 4 customer copy);… -
Page 20: Transactions
Transactions The POS device main screen will give you the option to press ‘F’ for menu or the green button to pay. If you press the green button, the following transactions (if enabled) will appear: TRANSACTION SELECTION 1. Sale 2. Refund 3.
-
Page 21
1. Sale STEP 1 Press the green button and select ‘sale’ STEP 2 Enter the purchase amount and press enter Enter the tip amount and press enter STEP 3 Pass the POS device to the customer who can either Tap to Pay™, STEP 4 insert or swipe his or her card STEP 5… -
Page 22
2. Refund STEP 1 Press the green button and select ‘refund’ Enter the refund amount and press enter STEP 2 STEP 3 Enter the tip amount and press enter STEP 4 Enter refund PIN Pass the POS device to the customer who can either STEP 5 Tap to Pay™, insert or swipe his or her card If prompted, the customer must enter his or her PIN… -
Page 23
3. Correction STEP 1 Press the green button and select ‘correction’ STEP 2 Enter the amount and press enter STEP 3 Enter the tip amount and press enter STEP 4 Enter supervisor PIN Pass the POS device to the customer who can either insert or swipe his or her STEP 5 card (the card must be the same card as the original transaction) STEP 6… -
Page 24
4. Balance Enquiry STEP 1 STEP 1 Press the green button and select ‘balance enquiry’ Pass the POS device to the customer who can either insert STEP 2 or swipe his or her card STEP 3 Select ‘cheque’ or ‘savings’ If prompted, the customer must enter his or her STEP 4 PIN followed by enter… -
Page 25
5. Cash Withdrawal STEP 1 Press the green button and select ‘cash withdrawal’ STEP 2 Enter the cash amount and press enter STEP 3 Enter supervisor PIN Pass the POS device to the customer who can either insert or swipe his STEP 4 or her card If prompted, the customer must enter his or her PIN… -
Page 26
6. Sale & Cash STEP 1 STEP 1 Press the green button and select ‘sale & cash’ STEP 2 Enter the sale amount and press enter STEP 3 Enter the tip amount and press enter STEP 4 Enter the cash amount and press enter STEP 5 Enter supervisor PIN Pass the POS device to the customer who can either insert or swipe… -
Page 27
7. Voice Override STEP 1 STEP 1 Press the green button and select ‘voice override’ STEP 2 Enter the sale amount and press enter STEP 3 Enter the tip amount and press enter STEP 4 Enter supervisor PIN Enter the authorisation code obtained from Standard Bank telephonically; STEP 5 this code cannot contain any special characters (,.+#*) or blanks Pass the POS device to the customer who can either… -
Page 28: Operator Functions
Operator Functions The POS device main screen will give you the option to press ‘F’ for menu or the green button to pay. If you press ‘F’ and select ‘SBSA’ , the following will appear: 1. Operator Options 2. Reports 3.
-
Page 29
1. Manual Card Entry (if enabled) STEP 1 Select ‘operator options’ and then ‘manual card entry sale’ STEP 2 Enter supervisor PIN STEP 3 Select 1 for ‘sale’ STEP 4 Enter the amount and press enter STEP 5 Enter the tip amount and press enter Enter the card’s card number, expiry date (MM/YY) STEP 6 and CVC/CVV number… -
Page 30
2. Reprint Receipt STEP 1 Select ‘operator options’ and then ‘reprint receipt’ STEP 2 Enter supervisor PIN STEP 3 Select 1 for ‘last transaction’ or 2 for ‘specific receipt’ If 1, the last successful transaction will print (both a merchant and STEP 4 customer copy);… -
Page 32: Transactions
Transactions The POS device main screen will give you the option to press ‘F’ for menu or the green button to pay. If you press the green button, the following transactions (if enabled) will appear: TRANSACTION SELECTION 1. Sale 2. Refund 3.
-
Page 33
1. Sale STEP 1 Press the green button and select ‘sale’ STEP 2 Enter the purchase amount and press enter STEP 3 Select 1 for ‘petrol’ , 2 for ‘diesel’ or 3 for ‘oil’ STEP 4 Select the product type (i.e. LRP93, LRP95, Diesel 50ppm etc.) STEP 5 Confirm the amount and litres STEP 6… -
Page 34
2. Refund STEP 1 Press the green button and select ‘refund’ STEP 2 Enter the purchase amount and press enter STEP 3 Enter refund PIN STEP 4 Select 1 for ‘petrol’ , 2 for ‘diesel’ or 3 for ‘oil’ STEP 5 Select the product type (i.e. -
Page 35
STEP 14 The POS device will print a merchant copy of the receipt STEP 15 The POS device will return to the main screen 3. Correction STEP 1 Press the green button and select ‘correction’ Enter the amount and press enter (this amount needs to correspond to STEP 2 the original sale amount in the batch) STEP 3… -
Page 36: Operator Functions
Operator Functions The POS device main screen will give you the option to press ‘F’ for menu or the green button to pay. If you press ‘F’ and select ‘SBSA’ , the following will appear: TRANSACTION SELECTION 1. Operator Options 2.
-
Page 37
1. Manual Card Entry (if enabled) STEP 1 Select ‘operator options’ and then ‘manual card entry sale’ STEP 2 Enter supervisor PIN STEP 3 Select 1 for ‘sale’ and enter the amount followed by enter STEP 4 Enter the card’s card number, expiry date (MM/YY) and CVC/CVV number STEP 5 Once the transaction is approved, press the green button for a receipt STEP 6… -
Page 38
2. Reprint Receipt STEP 1 Select ‘operator options’ and then ‘reprint receipt’ STEP 2 Enter supervisor PIN STEP 3 Select 1 for ‘last transaction’ or 2 for ‘specific receipt’ If 1, the last successful transaction will print (both a merchant and STEP 4 customer copy);… -
Page 39
3. Cash Up STEP 1 Select ‘reports’ and then ‘perform cash up’ STEP 2 Press enter to confirm cash up STEP 3 Enter supervisor PIN STEP 4 The cash-up will print STEP 5 The POS device will return to the main screen… -
Page 40
Adjust Fleet Card STEP 1 STEP 1 From the main screen, press ‘F’ and then ‘SBSA’ STEP 2 Press 2 for ‘forecourt’ STEP 3 Enter supervisor PIN STEP 4 Enter the receipt number STEP 5 Select either ‘set odometer reading’ or ‘set usage code’ STEP 6 Update values and select done STEP 7… -
Page 42: Transactions
Transactions The POS device main screen will give you the option to press ‘F’ for menu or the green button to pay. If you press the green button, the following transactions (if enabled) will appear: TRANSACTION SELECTION 1. Sale 2. Refund 3.
-
Page 43
1. Sale STEP 1 Press the green button and select ‘sale’ STEP 2 Enter the purchase amount and press enter Pass the POS device to the customer who can either Tap to Pay™, STEP 3 insert or swipe his or her card STEP 4 Enter the odometer reading and press enter* STEP 5… -
Page 44
2. Refund STEP 1 STEP 1 Press the green button and select ‘refund’ STEP 2 Enter the refund amount and press enter STEP 3 Enter refund PIN Pass the POS device to the customer who can either Tap to Pay™, STEP 4 insert or swipe his or her card If prompted, the customer must enter his or her PIN… -
Page 45
Correction STEP 1 STEP 1 Press the green button and select ‘correction’ Enter the amount and press enter (this amount needs to correspond to the STEP 2 original sale amount in the batch) STEP 3 Enter supervisor PIN Pass the POS device to the customer who can either insert or swipe his or STEP 4 her card (the card must be the same card as the original transaction) STEP 5… -
Page 46: Operator Functions
Operator Functions The POS device main screen will give you the option to press ‘F’ for menu or the green button to pay. If you press ‘F’ and select ‘SBSA’ , the following will appear: TRANSACTION SELECTION 1. Operator Options 2.
-
Page 47
1. Manual Card Entry (if enabled) STEP 1 Select ‘operator options’ and then ‘manual card entry sale’ STEP 2 Enter supervisor PIN STEP 3 Select 1 for ‘sale’ STEP 4 Enter the amount and press enter STEP 5 Enter the card’s card number, expiry date (MM/YY) and CVC/CVV number STEP 6 Once the transaction is approved, press the green button for a receipt STEP 7… -
Page 48
2. Reprint Receipt STEP 1 STEP 1 Select ‘operator options’ and then ‘reprint receipt’ STEP 2 Enter supervisor PIN STEP 3 Select 1 for ‘last transaction’ or 2 for ‘specific receipt’ If 1, the last successful transaction will print (both a merchant and STEP 4 customer copy);… -
Page 49
3. Cash Up STEP 1 STEP 1 Select ‘reports’ and then ‘perform cash up’ STEP 2 Press enter to confirm cash up STEP 3 Enter supervisor PIN STEP 4 The cash-up will print STEP 5 The POS device will return to the main screen… -
Page 50: Usage And Maintenance Of The Pos Device
Usage and Maintenance of the POS Device The POS device is a sensitive electronic device, similar to a cellular phone. Any physical operational abuse or dropping of the POS device can damage the device, resulting in unpredictable operational behaviour. The POS device must be kept clean and free of any dust, dirt or grime that can penetrate and damage the keyboard, thermal print head, chip reader and magnetic strip reader.
-
Page 51: Accepting Chip And Pin Cards
Accepting Chip and PIN Cards FOLLOW THESE FOUR STEPS TO PROCESS A CHIP TRANSACTION: 1. CHECK Identify whether the card has a chip. It looks like this: CHIP CARD 2. INSERT Insert the chip card into the POS device and follow the prompts. The POS device will tell you how to complete the transaction and whether the customer needs to enter his or her PIN or sign the receipt.
-
Page 52: General Information
General Information DATA SECURITY Cardholder privacy Only the cardholder should enter his or her PIN (the cashier may not ask the cardholder for his or her PIN). When performing a PIN authorised transaction, ensure the cardholder’s privacy: Staff members should look away when a customer is entering his or her PIN Other customers in the queue should leave enough room to allow for sufficient privacy Ideally, PIN pads should have a privacy shield Security cameras should not point at the PIN pad…
-
Page 53
Ensure that you raise any reliability issues with Standard Bank. When performing a magnetic strip card transaction, ensure that the customer signs the merchant receipt copy. This receipt must be kept as proof of purchase to refute any chargebacks from the cardholder. All merchants must retain receipts for at least six months in the event of chargebacks. -
Page 54: Avoiding Fraud
CHARGEBACKS TO MERCHANT ACCOUNTS WILL OCCUR UNDER THE FOLLOWING CIRCUMSTANCES: The card account number submitted is invalid Authorisation was not obtained for manual transactions or transactions above the floor limit The authorisation was denied The authorisation code provided by you is invalid The card account number or the amount of the sale is missing or illegible on the imprint voucher The transaction amount is duplicated…
-
Page 55
If the card is swiped through the POS device and the POS device prompts that the card must be inserted into the chip reader, do so immediately. If the POS device prompts you to insert the card into the chip reader but there is no chip on the card, do not proceed with the transaction. -
Page 56: Card Security Features
Card Security Features 0000 0000 0000 0000 Credit card security features The embossed account number must be clear and uniform in size and spacing 2. A four-digit number will always be pre-printed on the card; it must match the first four digits of the embossed account number The valid date lists the last date on which the card is valid;…
-
Page 57
IMPORTANT THINGS TO REMEMBER WHEN ACCEPTING A CREDIT CARD A credit card is never transferable, and only the person whose name is embossed on the front of the credit card is authorised by the said bank to use the credit card No other person can be authorised to use the credit card on his or her behalf or sign any sales voucher Always check that the credit card has not expired and that the card is signed;… -
Page 58
If you’re not sure what the signature panel should look like, call your bank if you’re suspicious of the presenter or the credit card being presented (you’ll receive a R500 reward for any stolen credit card you recover and a further R500 reward for the presenter of such a stolen or counterfeit credit card or any positive information that leads to the arrest and conviction of the said presenter, but remember: your safety is our main concern, so always follow our instructions when phoning the bank for a… -
Page 59: Sim Card Usage And Replacement
SIM Card Usage and Replacement SIM CARD INFORMATION The POS device makes use of a data-only SIM card, provided either by MTN or Vodacom. This SIM card is provisioned for banking data transactions only and cannot be used in a standard cellular phone. Should the SIM card be removed from the POS device and placed in another device, the SIM card will automatically be blocked by the network operator.
-
Page 60: Frequently Asked Questions
Frequently Asked Questions 1. WHAT DO I DO WHEN I HAVE TO REPLACE A FAULTY POS DEVICE? If a POS device stops working, call the Call Centre to have it swapped out. A replacement POS device will be delivered to your store, and the faulty POS device will be collected. Ensure that you batch the faulty POS device before handing it over to the collection personnel.
-
Page 61
You’ll know that a transaction has gone through successfully if the POS device prints You’ll know that a transaction has gone through successfully if the POS device prints out a merchant copy. The transaction will reflect in the current batch. If a customer has a double debit on his or her account but only a single transaction shows in your batch or in your account, the cardholder has to dispute the transaction with his or her bank. -
Page 62
7. IMPRINTER BOOKLET The imprinter booklet is used when conducting manual transactions. You need to ensure that you populate all the details correctly on the slip. The imprint voucher is your proof that the card was present during the transaction. To obtain additional manual imprinter booklets, please call the Standard Bank Merchant Solutions helpdesk on 086 100 1200. -
Page 63
Hold the POS device in your one hand. Use two fingers from your other hand to lift the printer cover release (as shown above) Unstick the end of the new roll. Carefully place the paper roll into the printer compartment Holding the free end of the paper and your POS device, close the printer cover carefully and push it down firmly until it locks While your POS device is displaying the idle screen, press and hold the yellow… -
Page 64: Contact Details, Hours Of Operation And Support
11. WHAT IS A FALLBACK TRANSACTION? A fallback transaction is processing of a POS device transaction by magnetic strip technology where chip technology is not available or working. Unless this functionality has been enabled on your POS device, avoid processing fallback transactions. If you do, you accept the increased risk that such POS transactions can be charged back to you and that you shall be fully liable for such chargeback transactions.
Ingenico IWL250 GPRS — надежный переносной POS-терминал предыдущего поколения компании Ingenico. Это один из наиболее распространенных в мире переносных POS-терминалов с емким аккумулятором и продуманным режимом энергосбережения. Соблюдайте инструкцию по эксплуатации POS-терминала, и он будет работать без сбоев и без поломок долгое время.
Настоящая Инструкция относится к POS-терминалу Ingenico IWL250 с подключением к ПАО «Промсвязьбанк» (ПСБ)
POS-терминал Ingenico IWL250 является переносным и может работать от встроенного аккумулятора. Держать POS-терминал постоянно подключенным к сети 220В — вредно для аккумулятора. Используйте разъем питания только чтобы зарядить аккумулятор POS-терминала.
1. Подключение к сети питания 220В
На левой стороне POS-терминала под небольшой крышкой расположен разъем для зарядного устройства. Используйте блок питания из комплекта или любое другое зарядное устройство Micro-USB с выходным током не менее 1А. Внимание! Гарантия на POS-терминал не распространяется в случае выхода из строя из-за использования нестандартного блока питания!
SIM-карта уже вставлена в Ваш POS-терминал инженерами ДК-ГРУПП. Она оплачена пожизненно, заменять ее не следует.
Если Ваш POS-терминал работает по WI-FI, воспользуйтесь специальной Инструкцией по настройке WI-FI в терминале Ingenico IWL.
Нажмите и удерживайте 2-3 секунды клавишу . Терминал издаст звуковой сигнал, включится и через несколько секунд выведет экран Вставьте карту.
2. Начало работы, операция ОПЛАТА
Дождитесь появления экрана Вставьте карту (Рис.2).
3. Ввод карты в терминал
4. Результаты операции (внимание!)
Всегда проверяйте результат операции по терминалу! В случае отказа Ваша организация не получит возмещения за товар или услугу!
- В случае если операция одобрена — терминал распечатает чек с надписью ОДОБРЕНО
- Если операция не одобрена — терминал пропищит дважды и выдаст надпись ОТКАЗ на экране. В этом случае отдавать товар покупателю нельзя, тк он не оплачен!
- В случае отказа на чеке будет указана причина (Рис.3(а)), которую можно сообщить покупателю
5. Закрытие смены
Ежедневно закрывайте смену на терминале! В противном случае деньги по эквайрингу могут не поступить на расчетный счет, а память терминала переполнится, и он перестанет работать!
Не получается разобраться с POS-терминалом? Не расстраивайтесь!
Звоните 8-800-555-31-90 или пишите на sales@dk-group.ru и наши специалисты помогут вам разобраться с устройством и даже проведут небольшое обучение для Вашего персонала!
File Specifications:1073/1073703-iwl250_3g.pdf file (01 Mar 2023) |
Accompanying Data:
Ingenico iWL250 3G Cash Register, Handhelds PDF Quick User Manual (Updated: Wednesday 1st of March 2023 05:19:02 AM)
Rating: 4.2 (rated by 21 users)
Compatible devices: APOS A8, iSelf Series, EFT930G, i9500, iWL220 BT Series, Tetra, icm122-01T2263A, Telium Series.
Recommended Documentation:
Quick User Manual (Text Version):
(Ocr-Read Summary of Contents of some pages of the Ingenico iWL250 3G Document (Main Content), UPD: 01 March 2023)
-
1, Purchase 1. Pressing the green button switches the terminal on. 2. The <F> button opens the main menu. 3. Pressing <1> opens the transaction menu. 1: Transactions 4. Push the <1> button. “Purchase” is activated. 1: Purchase 5. Enter the amount and confirm with . When you press 1, the amount is 1 EURO. Amounts less than “1” have to be preceded by the decimal mark, comma via the “.” key. <Amount> 6…
-
2, 2 Reversal (Cancellation) With this function, the last transaction that was carried out is cancelled. 1. Pressing the green button switches the terminal on. 2. The <F> button opens the main menu. 3. Pressing <1> opens the transaction menu. 1: Transactions 4. Push the <3> button. “Reversal” is activated. 3: Reversal 5. Enter the terminal’s password and confirm with . (For the password, see the configuration sheet.) <Password> 6.…
-
3, 3 Reservation In addition to the transactions described above, terminal allows dedicated transaction type for amount reservation used e.g. by hotel, rental car, ight ticket, other check in services etc. The operation of these additional functions corresponds to the same logic as that used for the standard functions. Terminal allows following reservation transactions: A <5> Reservation Transaction type to book amount on the Cardhol…
-
4, 4 Additional reference text The terminal supports additional functionality to transport additional merchant data (e.g. a bill/ invoice number, a sale reference etc.) with the transaction data. This additional merchant data is returned to the merchant in the reimbursement notice of this transaction. Up to 50 alphanumeric characters can be entered by the merchant manually on the terminal. Cashier handling: 1. Push …
-
5, 5 Daily closing During the daily closing, all processed transactions are delivered for crediting and closed. After the daily closing, all amounts are credited. A daily closing should be performed at least once a day – the best time is after the store has closed. The daily and shift counters are set to “0”. During the shift handover, you can determine which transactions were carried out during this period (shift). The shift handover is provided strictly for informatio…
-
6, 6 Eco-mode for power saving Eco-mode allows to save battery life by shortening standby delay time. By default your terminal is precongured with default standard values for Eco-mode. You can change Eco-mode setting by pressing the dot button , terminal will display Power Management screen. You can chose from two options: Backlight Parameter setup in seconds. When setup, after e.g 5 seconds terminal display and keyboard switch off backligh…
-
7, Ingenico iWL250 3G 110.0372.02 INT_EN_BNPPF/02.2017 Your local point of contact can be found at: www.six-payment-services.com/contact SIX Payment Services Ltd Hardturmstrasse 201 P. O. Box CH-8021 Zurich SIX Payment Services (Europe) S.A. 10, rue Gabriel Lippmann 5365 Munsbach Luxembourg SIX Payment Services (Austria) GmbH Marxergasse 1B 1030 Vienna Austria Further information Are you looking for detailed information about your payment terminal? Videos and pr…
-
Ingenico iWL250 3G User Manual
-
Ingenico iWL250 3G User Guide
-
Ingenico iWL250 3G PDF Manual
-
Ingenico iWL250 3G Owner’s Manuals
Recommended: 141.16688800, the Essential VH04WW1, TH6033, HI 93749
Links & Tools
Operating Impressions, Questions and Answers:

 », нужно нажать и удерживать клавишу «F4». На экране возникнет сообщение «USB MASS STORAGE», но не нужно отпускать кнопку до тех пор, пока на экран не будут выведены списки папок.