
-
Contents
-
Table of Contents
-
Bookmarks
Quick Links
testo 882 · Thermal imager
Instruction manual
Related Manuals for TESTO 882
Summary of Contents for TESTO 882
-
Page 1
882 · Thermal imager Instruction manual… -
Page 3: Table Of Contents
1 Contents Contents Contents ………………..3 Safety and the environment…………..4 2.1. About this document …………….4 2.2. Ensure safety……………….5 2.3. Protecting the environment…………..6 Specifications ………………7 3.1. Use ………………..7 3.2. Technical data ……………..8 Product description…………….12 4.1. Overview………………12 4.2. Basic properties…………….13 First steps ………………..15 5.1.
-
Page 4: Safety And The Environment
2 Safety and the environment Safety and the environment 2.1. About this document > Please read this documentation through carefully and familiarize yourself with the product before putting it to use. Pay particular attention to the safety instructions and warning advice in order to prevent injuries and damage to the products.
-
Page 5: Ensure Safety
> Carry out only the maintenance and repair work on this instrument that is described in the documentation. Follow the prescribed steps exactly. Use only original spare parts from Testo. > Improper use of rechargeable batteries can lead to destruction or injuries by means of current surges, fire or escaping chemicals.
-
Page 6: Protecting The Environment
> Dispose of faulty rechargeable batteries/spent batteries in accordance with the valid legal specifications. > At the end of its useful life, send the product to the separate collection for electric and electronic devices (observe local regulations) or return the product to Testo for disposal.
-
Page 7: Specifications
3 Specifications Specifications 3.1. The testo 882 is a handy and robust thermal imager. It opens the door to contactless determination and illustration of the temperature distribution on surfaces for you. Typical areas of application are: • Building inspection (heating, ventilation and air conditioning…
-
Page 8: Technical Data
3 Specifications 3.2. Technical data Infrared image output Characteristic Values Field of vision/min. Standard lens: 32° x 23°/0.2 m (0.66 ft) focusing distance Thermal sensitivity <60 mK at 30 °C (86 °F) (NETD) Geometric resolution Standard lens: 1.7 mrad Refresh rate 33 Hz within EU, 9 Hz outside of EU Focus manual + motorized…
-
Page 9
3 Specifications Measuring Characteristic Values Temperature range Measuring range 1: (can be changed) -20 — 100 °C (-4 — 212 °F) Measuring range 2: 0 — 350 °C (32 — 662 °F) Measuring range 3: 350 — 550 °C (662 — 1022 °F) Accuracy With measuring range 1 activated, for readings within the range of -20 — 100 °C… -
Page 10
3 Specifications Image storage Characteristic Values File format .bmt Export options in .bmp, .jpg, .csv Removable memory SD card Memory capacity Scope of delivery: 2 GB (approx. 1000 images) Lens Characteristic Values Wide-angle lens 32° x 23° Aperture 0.95 Laser measuring spot marking Characteristic Values Classification of the… -
Page 11
PC software Characteristic Values System Operating system Windows XP Service requirements Pack 3, Windows Vista or Windows 7 USB 2.0 interface Standards, tests, warranty Characteristic Values EU Directive 2004/108/EC Vibration IEC 60068-2-6 2 years, warranty conditions: see website Warranty www.testo.com/warranty… -
Page 12: Product Description
4 Product description Product description 4.1. Overview Product components 1 Display. 2 Control keys: Functions Switch the imager on/off. [OK] Joystick • Press [OK]: Open menu, confirm selection/setting. • Move [OK] up/down/right/left = Joystick function: Select functions, navigate [Esc] Cancel action. Left/right [«xy»] Call up a function.
-
Page 13: Basic Properties
4 Product description 3 Instrument rechargeable battery lock release button. 4 Metric thread: For fastening the included tripod adapter. Do not use desktop tripods, danger of tilting! 5 Right interface terminal: Not assigned. [Motor focus switch]: To switch the motor focus on/off. 7 2 LEDs: For illumination for the visual image.
-
Page 14
4 Product description File formats and file names The images are saved according to the following pattern: XX_YYYYY.ZZZ for infrared image and surface moisture image with attached real image, for real image. YYYYY: 5-digit consecutive number ZZZ (file extension): for infrared image and surface moisture image without/with attached real image, for real image. -
Page 15: First Steps
5 First steps First steps 5.1. Commissioning Connect rechargeable battery The thermal imager is delivered with a rechargeable battery that is inserted in the rechargeable battery slot but not connected. > Push the battery all the way into the rechargeable battery slot until this is flush with the bottom of the handle.
-
Page 16
5 First steps Initial charging of rechargeable battery The thermal imager is delivered with a partially charged battery. Completely charge the battery before use. > Connect the country-specific adapter required for the existing mains to the mains unit. 1. Open the cover on the left side of the thermal imager (1). 2. -
Page 17: Getting To Know The Product
5 First steps 5.2. Getting to know the product Insert the memory card 1. Open the cover on the left side of the thermal imager. 2. Insert memory card (SD card) into the card slot (SD) (1). > To remove the memory card: Press on the memory card to release the lock.
-
Page 18
1. Place the tripod adapter on the lower end of the handle and screw on using the included Allen key (ISO 2936, size 4). 2. Slide thermal imager into the fastening plate of the testo tripod and lock or fasten it to the commercially available standard tripod (screw-type fastening). -
Page 19
5 First steps Mounting Softcase The Softcase combines the functions of instrument protection, Sun Shield and carrying function (strap). 1. Set the Softcase on the imager from above (1) and pull both sides of the Softcase down around the display (2). 2. -
Page 20
5 First steps Focus image using motor focus > Slide [Motor focus switch] towards the display (position: ). > Move [Motor focus control] until the image is in focus. Manually focusing the image CAUTION Possible damage to the auto mechanism! >… -
Page 21
5 First steps WARNING Eye damage due to laser beam! > Do not look into the laser beam. > Do not point the laser beam at people. Changing assignment of the quick select buttons 1. Move Joystick left or right to open the Configure key function list for the left or right quick select button. -
Page 22
5 First steps • Press [OK] to confirm the selection. Or for menu items that are marked with an arrow (►): Move Joystick to the right. • Move Joystick to the left to return to the previous menu level. • Press [OK] to select the function. -
Page 23: Using The Product
6 Using the product Using the product 6.1. Menu functions 6.1.1. Measuring functions 1-point measurement 1-point measurement is the standard measuring function. If this is activated ( ), all available options can be selected via the quick select buttons. > [OK] Measurement [OK]…
-
Page 24
6 Using the product With frozen images, the crosshairs can be moved and the min./max. point is visible. The min./max. point is not saved. With saved images, Cold-/Hotspot must be activated for the respective opened image. > [OK] Measurement Cold-/Hotspot | [OK]. -
Page 25
6 Using the product The changes are saved. Moisture The surface humidity is calculated using the manually entered dewpoint temperature and the measured surface temperatures. In the display, the areas that are at risk of developing mould are shown using a special colour palette: Colour Surface moisture Assessment… -
Page 26: Image Gallery
6 Using the product For measuring range 350 — 550 °C (662 — 1022 °F): • The high-temperature filter must be installed, see Mounting/removing high-temperature filter page 18. • With temperature differences larger than 350 K the use of the Ironbow HT palette is recommended as it enables lower temperatures to be shown with higher…
-
Page 27: Scale
6 Using the product Create new folder 1. In the Folder dialogue: Select New Folder with the joystick and confirm with[OK]. Folder name dialogue is opened. 2. Name folders: Use the Joystick to select the desired letters and confirm with[OK]. The folder name can consist of up to 8 characters.
-
Page 28: Display
6 Using the product The changes are saved. 6.1.4. Display… Select display options The presentation can be adapted by means of showing/hiding the following elements: Crosshairs, temperature scale and quick select buttons. Hidden function keys can be shown again by pressing a quick select button: The first press of the button shows the function keys again.
-
Page 29
6 Using the product Material (material temperature) Emissivity Aluminium, bright rolled (170 °C) 0.04 Cotton (20 °C) 0.77 Concrete (25 °C) 0.93 Ice, smooth (0 °C) 0.97 Iron, emery ground (20 °C) 0.24 Iron with casting skin (100 °C) 0.80 Iron with rolling skin (20 °C) 0.77 Gypsum (20 °C) -
Page 30
6 Using the product as ovens or machines) are in the proximity of the object being measured should the radiation temperature of theses heat sources be determined and used (e.g. using a globe thermometer). The reflected temperature has only little effect on objects with high emissivity. -
Page 31: Palette
6 Using the product 6.1.6. Palette Change colour palette for the infrared image You can choose between 9 existing palettes. The Ironbow HT palette is intended specifically for measurements in the high- temperature measuring range (low temperatures are shown with higher contrast).
-
Page 32
6 Using the product The selected setting is highlighted orange ( ). 4. Move Joystick up/down to change the setting. 5. Confirm the entry with [OK]. 6. Confirm the settings with Apply. Optics… The lenses adjusted to the instrument are shown. Only the lenses that are shown may be used. -
Page 33
6 Using the product > Move Joystick to the right and press [OK]. Move Joystick up/down to change the setting. Confirm the entry with [OK]. 4. Confirm the settings with [Apply]. Audio settings… The volume of the audio playback and recording can be set. [OK] Configuration…… -
Page 34: Measuring
6 Using the product 6.2. Measuring CAUTION Damage to the infrared detector by measuring high scene temperatures. > Without high-temperature filter: Do not perform any measurements at scene temperatures > 500 °C/932 °F. > With high-temperature filter: Do not perform any measurements at scene temperatures >…
-
Page 35
6 Using the product focusing the image page 20. Images that are not in focus cannot be corrected retroactively! To obtain precise readings, the emissivity and reflected temperature must be set correctly, see Set emissivity/reflected temperature page 30. A subsequent adjustment is possible via the PC software as required. -
Page 36
6 Using the product > Continue recording: Press again. • Play recording: 1. Select beginning of recording: Press again. 2. Start playback: Press 3. Stop playback: Press > Continue playback: Press again. • Change audio comment: 1. Selection position from which the recording should be overwritten: Begin playback with and stop at the desired point… -
Page 37: Maintaining The Product
7 Maintaining the product Maintaining the product Changing the battery To prevent losing the instrument settings: Only change the rechargeable battery when a buffer battery is inserted in the instrument or the mains unit is connected. 1. Press lock release button. The rechargeable battery is released and sticks out a little from the rechargeable battery slot.
-
Page 38
7 Maintaining the product NOTICE Incorrectly inserted batteries can lead to damage of the product! > When inserting the batteries, observe the polarity (label on the battery holder). 4. Insert battery holder into the battery slot. -
Page 39: Tips And Assistance
Reading cannot be calculated. reading. > Check parameter settings for plausibility. If we could not answer your question, please contact your dealer or Testo Customer Service. For contact details see the rear side of this document or the web page www.testo.com/service-contact…
-
Page 40: Accessories And Spare Parts
0520 0490 • Calibration points at 0 °C, 100 °C, 200 °C in measuring range 0 °C to 350 °C For further accessories and spare parts, please refer to the product catalogues and brochures or look up our website: www.testo.com…
-
Page 42
0970 8820 en 01 V01.00 en-GB…
-
Contents
-
Table of Contents
-
Bookmarks
Quick Links
testo 882 · Thermal imager
Instruction manual
Testo-Direct
info@Testo-Direct.ca
1.800.561.8187
www.
.ca
Related Manuals for TESTO 882
Summary of Contents for TESTO 882
-
Page 1
882 · Thermal imager Instruction manual Testo-Direct info@Testo-Direct.ca 1.800.561.8187 www. -
Page 2: Table Of Contents
Display………………….30 6.1.5. Emissivity………………….30 6.1.6. Palette …………………..33 6.1.7. Configuration …………………33 6.2. Measuring ………………38 Maintaining the product ……………. 42 Tips and assistance…………….44 8.1. Questions and answers …………..44 8.2. Accessories and spare parts …………45 Testo-Direct info@Testo-Direct.ca 1.800.561.8187 www.
-
Page 3: Safety And The Environment
1..Action: more steps, the sequence must be followed. 2..> … Action: a step or an optional step. Result of an action. Menu Elements of the instrument, the instrument displays or the program interface. Testo-Direct info@Testo-Direct.ca 1.800.561.8187 www.
-
Page 4: Ensure Safety
> Carry out only the maintenance and repair work on this instrument that is described in the documentation. Follow the prescribed steps exactly. Use only original spare parts from Testo. > Improper use of rechargeable batteries can lead to destruction or injuries by means of current surges, fire or escaping chemicals.
-
Page 5: Protecting The Environment
> Dispose of faulty rechargeable batteries/spent batteries in accordance with the valid legal specifications. > At the end of its useful life, send the product to the separate collection for electric and electronic devices (observe local regulations) Testo-Direct info@Testo-Direct.ca 1.800.561.8187 www.
-
Page 6: Specifications
3 Specifications Specifications 3.1. The testo 882 is a handy and robust thermal imager. It opens the door to contactless determination and illustration of the temperature distribution on surfaces for you. Typical areas of application are: • Building inspection (heating, ventilation and air conditioning…
-
Page 7: Technical Data
640 x 480 pixels Refresh rate 8 to 15 Hz Image presentation Characteristic Values Image display 3.5″ LCD with 320 x 240 pixels Display options Infrared image/real image/infrared and real image Video stream 25 Hz Colour palettes 9 options Testo-Direct info@Testo-Direct.ca 1.800.561.8187 www.
-
Page 8
Measuring functions Standard measurement (1-point), 2-point measurement, Cold-/Hotspot, isotherm, min./max. on area, Display of humidity image via manual entry of the ambient humidity/temperature (real-time display with optional radio humidity probe), solar (manual entry of the radiation intensity) Testo-Direct info@Testo-Direct.ca 1.800.561.8187 www. -
Page 9
32° x 23° Aperture 0.95 Laser measuring spot marking Characteristic Values Classification of the 635 nm, Class 2 laser Audio functions Characteristic Values Sound via headset (included in delivery) recording/playback Recording period max. 30 s per image Testo-Direct info@Testo-Direct.ca 1.800.561.8187 www. -
Page 10
152 x 108 x 262 mm (5.98 x 4.17 x 10.31″) Tripod mounting Yes, with adapter (included in delivery) Housing Enclosure rating of IP54 (Interface terminals closed, battery the housing connected, lens mounted, softcase mounted) Vibration max. 2 G Testo-Direct info@Testo-Direct.ca 1.800.561.8187 www. -
Page 11
3 Specifications Standards, tests, warranty Characteristic Values EU Directive 2014/30/EC Vibration IEC 60068-2-6 Warranty 2 years, warranty conditions: Testo-Direct info@Testo-Direct.ca 1.800.561.8187 www. -
Page 12: Product Description
Move up/down/right/left = function: Select functions, navigate [Esc] Cancel action. Left/right [«xy»] Call up a function. The function assigned to quick select button the quick select button at any one time is shown in the display. Testo-Direct info@Testo-Direct.ca 1.800.561.8187 www.
-
Page 13: Basic Properties
Charging the battery is also possible using a desktop charging station (accessory). The instrument is equipped with a buffer battery (type CR 1632) to maintain the system data during an interruption in the power supply (e.g. when the battery is changed). Testo-Direct info@Testo-Direct.ca 1.800.561.8187 www.
-
Page 14
The images are saved according to the following pattern: XX_YYYYY.ZZZ for IR/humidity image with relevant real image, for real image. YYYYY: 5-digit consecutive number ZZZ (file extension): for IR/humidity image with relevant real image, for real image. Testo-Direct info@Testo-Direct.ca 1.800.561.8187 www. -
Page 15: First Steps
3. Move Joystick up/down to change the setting. 4. Confirm the entry with [OK]. 5. Confirm the settings with Übernehmen (Apply). 6. Press to switch off the thermal imager. Testo-Direct info@Testo-Direct.ca 1.800.561.8187 www.
-
Page 16
4. Charge the battery fully, then disconnect the instrument from the mains unit. After the initial charging of the battery, the thermal imager is ready for operation. Charging the battery is also possible using a desktop charging station (accessory). Testo-Direct info@Testo-Direct.ca 1.800.561.8187 www. -
Page 17: Getting To Know The Product
> Switch off instrument before inserting the radio module. 1. Open the cover on the right side of the thermal imager. 2. Release the lock (1) and open the retaining clip (2). 3. Insert radio module into the module slot (3). Testo-Direct info@Testo-Direct.ca 1.800.561.8187 www.
-
Page 18
2. Turn the mounting ring anticlockwise and remove the protection glass. After mounting/removing the protection glass, activate or deactivate Protection glass option, see Optics…, page 34. If this option is set incorrectly, the specified measuring accuracy is not ensured. Testo-Direct info@Testo-Direct.ca 1.800.561.8187 www. -
Page 19
1. Place the tripod adapter on the lower end of the handle and screw on using the included Allen key (ISO 2936, size 4). 2. Slide thermal imager into the fastening plate of the testo tripod and lock or fasten it to the commercially available standard tripod (screw-type fastening). -
Page 20
Possible damage to the auto mechanism! Rotating ring > Only use with the motor focus switched off. > Slide [Motor focus switch] towards the lens (position: Rotating ring > Turn of the lens until the image is in focus. Testo-Direct info@Testo-Direct.ca 1.800.561.8187 www. -
Page 21
Configure key function list for the left or right quick select button. 2. Move Joystick up/down to select the desired function. All saved images are shown in picture-in-picture mode in the gallery. Testo-Direct info@Testo-Direct.ca 1.800.561.8187 www. -
Page 22
The image areas therefore do not correspond completely (parallax error). Laser and lens have a different angle of view due to the spacial separation. The laser sighting and the centre of the image thus do not correspond completely (parallax error). Testo-Direct info@Testo-Direct.ca 1.800.561.8187 www. -
Page 23: Using The Product
Temperature 1 Temperature 2 quick select button to activate one of the two crosshairs. The activated crosshairs are shown red. 3. Use the Joystick to move the activated crosshairs in order to read off the individual temperatures. Testo-Direct info@Testo-Direct.ca 1.800.561.8187 www.
-
Page 24
With frozen images, the crosshairs can be moved. > [OK] Measurement Isotherm | [OK]. To set the isotherm colour and range: [Isotherm] Isotherm dialogue is opened. Testo-Direct info@Testo-Direct.ca 1.800.561.8187 www. -
Page 25
The values for the ambient temperature and humidity can be entered. 2. Move Joystick up/down to select the desired option. The selected option has an orange border. 3. Confirm the selection with [OK]. The selected number is highlighted orange. Testo-Direct info@Testo-Direct.ca 1.800.561.8187 www. -
Page 26
The high-temperature filter must be installed, see Optics… page 34. • With temperature differences larger than 350 K the use Ironbow HT of the palette is recommended as it enables lower temperatures to be shown with higher contrast, see Palette page 33. Testo-Direct info@Testo-Direct.ca 1.800.561.8187 www. -
Page 27: Image Gallery
Create new folder 1. In the Folder dialogue: Select New Folder with the joystick and confirm with[OK]. Folder name dialogue is opened. 2. Name folders: Use the Joystick to select the desired letters and confirm with[OK]. Testo-Direct info@Testo-Direct.ca 1.800.561.8187 www.
-
Page 28: Scale
Joystick up/down to change the value(s). Changes are applied immediately so that the effects on the display of the infrared image can be checked directly. [OK] or [Esc]. 4. Close dialogue with The changes are saved. Testo-Direct info@Testo-Direct.ca 1.800.561.8187 www.
-
Page 29: Display
You must anticipate highly inaccurate measurements. A remedy for this is coatings that increase the emissivity, e.g. paint or emission adhesive (art. no. 0554 0051) which must be applied to the object being measured. Testo-Direct info@Testo-Direct.ca 1.800.561.8187 www.
-
Page 30
Porcelain (20 °C) 0.92 Black paint, matt (80 °C) 0.97 Steel, heat-treated surface (200 °C) 0.52 Steel, oxidized (200℃) 0.79 Clay, burnt (70 °C) 0.91 Transformer paint (70 °C) 0.94 Brick, mortar, plaster (20 °C) 0.93 Testo-Direct info@Testo-Direct.ca 1.800.561.8187 www. -
Page 31
4. Confirm the selection with [OK]. The selected number is highlighted orange ( ). Joystick 5. Move up/down to set the desired value. Move Joystick right/left to change between the numbers. 6. Confirm the entry with [OK]. Testo-Direct info@Testo-Direct.ca 1.800.561.8187 www. -
Page 32: Palette
The selected number is highlighted orange ( ). 4. Move Joystick up/down to set the value. Move Joystick right/left to change between the numbers. 5. Confirm the entry with [OK]. 6. Confirm the settings with Apply. Testo-Direct info@Testo-Direct.ca 1.800.561.8187 www.
-
Page 33
[OK] Protection > Press to activate ( ) or deactivate ( ) the glass option. With the option activated, the protection glass symbol ( ) is shown in the bottom right of the display. Testo-Direct info@Testo-Direct.ca 1.800.561.8187 www. -
Page 34
Activate/deactivate function: > [OK] Configuration… [OK] SuperResolution | [OK]. When you save an image, an information window with the image file name is displayed. If SuperResolution is activated ( SuperResolution is also displayed after the file name. Testo-Direct info@Testo-Direct.ca 1.800.561.8187 www. -
Page 35
The probe-IDs of the radio probes found are displayed. If no radio probe was found, this may be because of the following: • The radio probe is not switched on or the battery of the radio probe is spent. Testo-Direct info@Testo-Direct.ca 1.800.561.8187 www. -
Page 36
SD card is lost. [OK] Configuration… [OK] Format… | [OK]. A confirmation request appears as to whether the memory card should really be formatted. 2. Confirm with [OK] or cancel process with [Esc]. Testo-Direct info@Testo-Direct.ca 1.800.561.8187 www. -
Page 37: Measuring
Please observe the following framework conditions in order to obtain significant measurement results. Humidity measurement: • Pivot radio humidity probe or separate humidity measuring instrument slightly to shorten the adjustment time: Avoid sources of interference (e.g. breathed air). Testo-Direct info@Testo-Direct.ca 1.800.561.8187 www.
-
Page 38
To create a new folder, see Create new folder page 28. 2. Select the desired folder with the joystick and open with [OK]. The folder name of the opened folder is displayed in the header. Testo-Direct info@Testo-Direct.ca 1.800.561.8187 www. -
Page 39
• Delete recording: > Press The complete recording is deleted. • Exit Audio dialogue: > Press [ESC]. Aiming at the measuring surface Using the laser, the measuring surface can be aimed at. Testo-Direct info@Testo-Direct.ca 1.800.561.8187 www. -
Page 40
The laser sighting and the centre of the image thus do not correspond completely (parallax error). The laser dot is therefore not suitable for marking locations that were aimed at using the crosshairs. Testo-Direct info@Testo-Direct.ca 1.800.561.8187 www. -
Page 41: Maintaining The Product
Cleaning lens/ protection glass/high-temperature filter > Large dust particles can be removed with a clean optical cleaning brush (available in specialized photography shops). > Use a lens cleaning cloth for slight contamination. Do not use rubbing alcohol! Testo-Direct info@Testo-Direct.ca 1.800.561.8187 www.
-
Page 42
3. Remove empty battery from the holder and insert new battery (type CR 1632). NOTICE Incorrectly inserted batteries can lead to damage of the product! > When inserting the batteries, observe the polarity (label on the battery holder). 4. Insert battery holder into the battery slot. Testo-Direct info@Testo-Direct.ca 1.800.561.8187 www. -
Page 43: Tips And Assistance
Reading is outside of the measuring of the reading. range. > Change measuring range. is shown instead of the Reading cannot be calculated. reading. > Check parameter settings for plausibility. Testo-Direct info@Testo-Direct.ca 1.800.561.8187 www.
-
Page 44: Accessories And Spare Parts
Calibration points at 0 °C, 100 °C, 200 0520 0490 °C in measuring range 0 °C to 350 °C For further accessories and spare parts, please refer to the product catalogues and brochures or look up our website: Testo-Direct info@Testo-Direct.ca 1.800.561.8187 www.
Цена по запросу
Нужны дополнительные вводные для просчета цены, закажите звонок или напишите менеджеру в WhatsApp:
Спасибо за заявку
Наш менеджер свяжется с вами в ближайшее время
Узнать цену в WhatsApp
- Наличие
- уточняйте
- Гарантия
- 12
- Самовывоз
-
Тюмень
- Возможна доставка до адреса
-
Способы оплаты
Описание
Характеристики
Комплектация
-
Комплектация: Testo 882, прочный кейс, ПО, чехол Soft Case, ремень для переноски, SD-карта, USB-кабель, ткань для очистки объектива, блок питания, литиево – ионный аккумулятор, адаптер для крепления к штативу,гарнитура.
Файлы

Оформить заказ
Экспертные мнения
Экспертные мнения
Купить Testo 882 в Тюмени легко — просто позвоните по телефону:: 8-800-551-11-01
Намедни, по долгу службы, довелось мне поработать с одним интересным девайсом. В связи с этим решил записать небольшой мануал. Речь пойдет о тепловизоре testo 882.
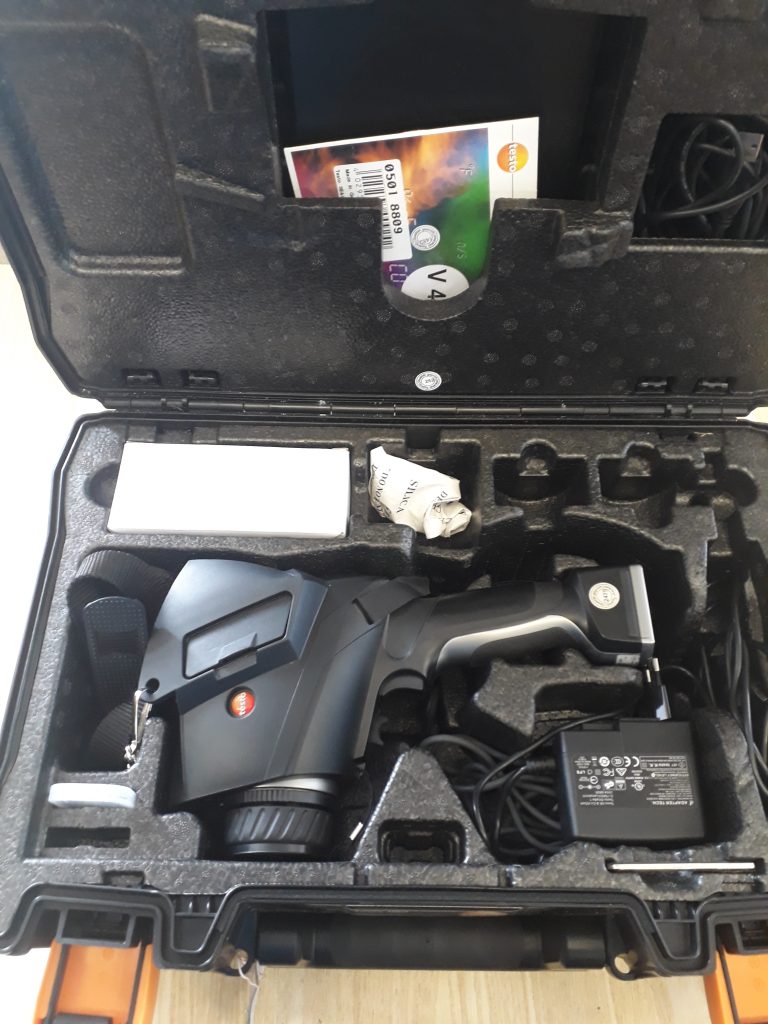
Данный прибор предназначен для бесконтактного определения и визуализации распределения температуры поверхностей. Тепловизор имеет довольно широкое применение: определение скрытых дефектов зданий, систем кондиционирования, отопления, вентиляции, механических устройств и устройств электроснабжения. Для личного использования этот прибор явно не применим, так как мало кто отважится выложить полмиллиона, чтобы посмотреть, где у него в доме греется контакт автоматического выключателя или уходит тепло под подоконником. В моем случае тепловизор нашел применение при инспектировании электрооборудования подстанций. Перед использованием устройства логичным является изучение руководств пользователя по работе с самим тепловизором и программным обеспечением. Процесс установки программного обеспечения происходит по инструкции легко, рассматривать его не будем.
Руководство пользователя
IMG
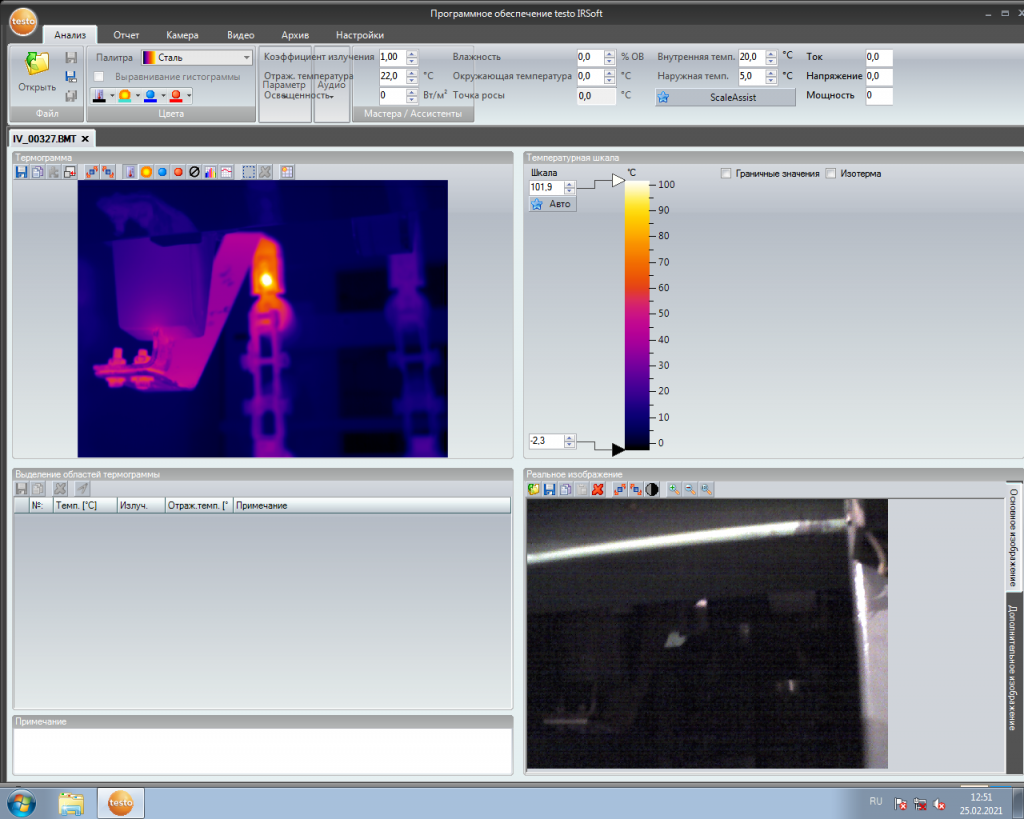
Программное обеспечение
IMG_0001
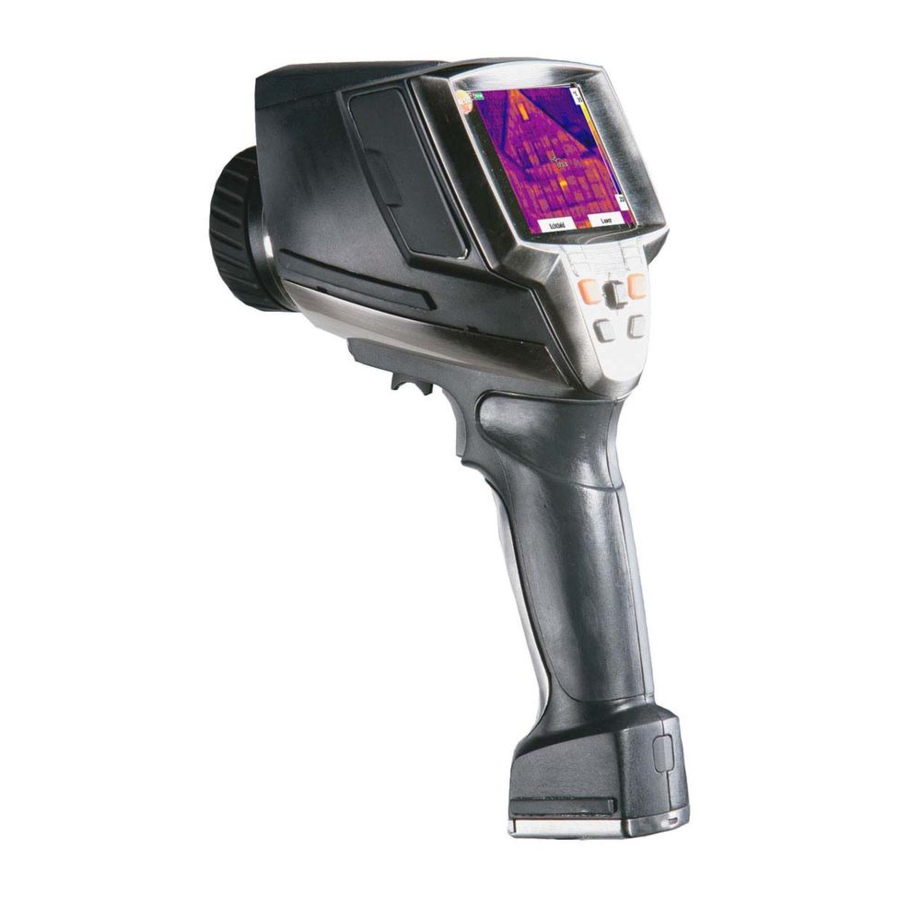
Тепловизор выглядит таким вот образом
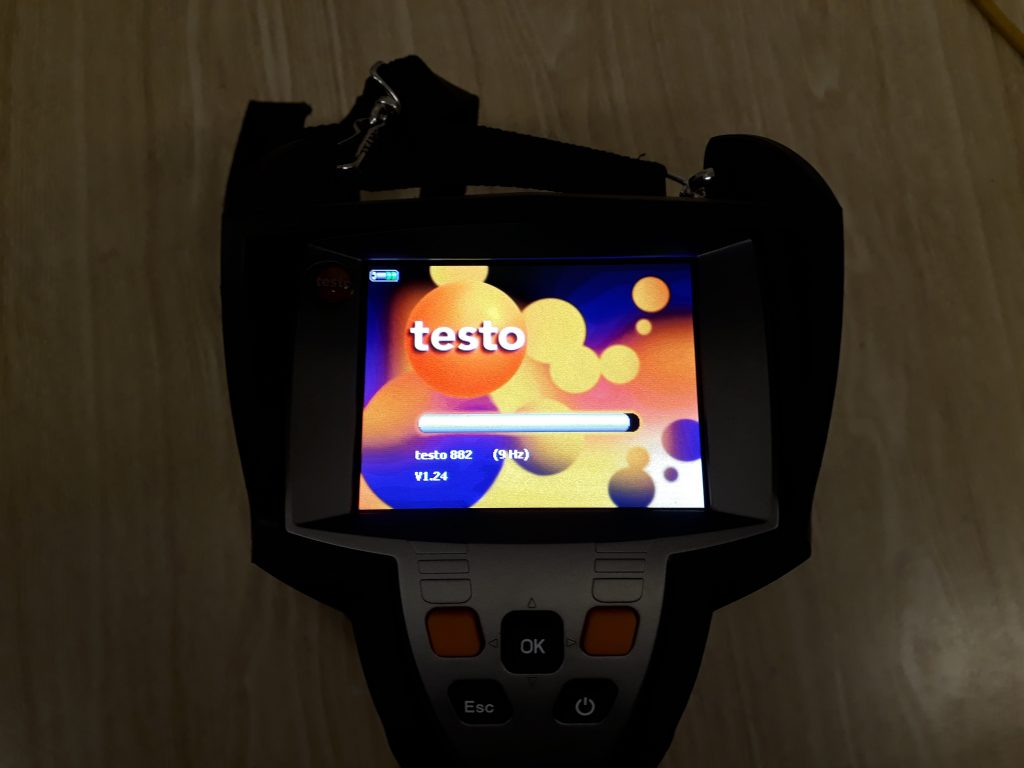
Управление прибором осуществляется при помощи следующих компонентов: кнопка включения, кнопка «ОК» выбора действия с функцией джойстика, «Esc» — для отмены действия и 2 кнопки быстрого выбора, вправо-влево (оранжевые). После включения прибор загружается порядка минуты.
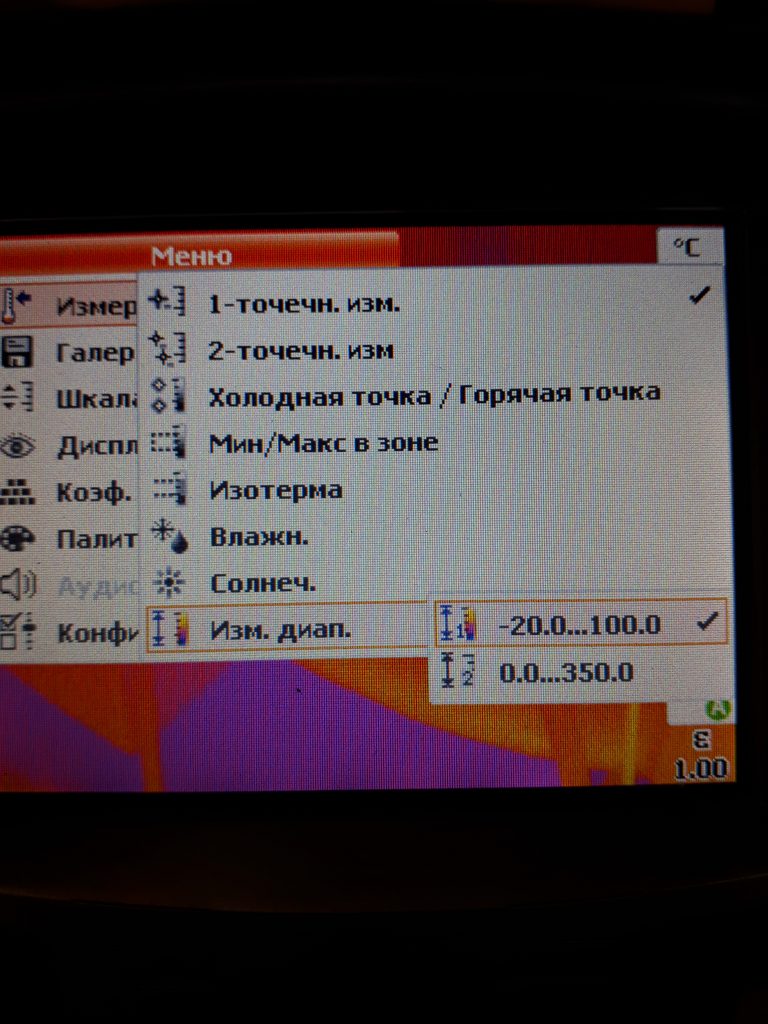
Чтобы посмотреть меню, необходимо нажать кнопку «ОК». В целом, меню является интуитивно понятным. Есть один нюанс — в приборе по умолчанию стоит предел измерения температуры от -20 до +100 градусов, поэтому при замере заведомо более высоких температур (ну или прибор не показывает температуру ввиду того, что она не вписывается в данные рамки), необходимо переключится на другой предел.
В приборе осуществлена ручная и моторизованная фокусировка. Пользоваться ручной можно только при отключенной моторизованной.
В тепловизоре присутствуют различные функции измерений, при его использовании моя задача состояла в выявлении повышенного нагрева элементов электроустановки (горячие точки), на этом остановимся более подробно.
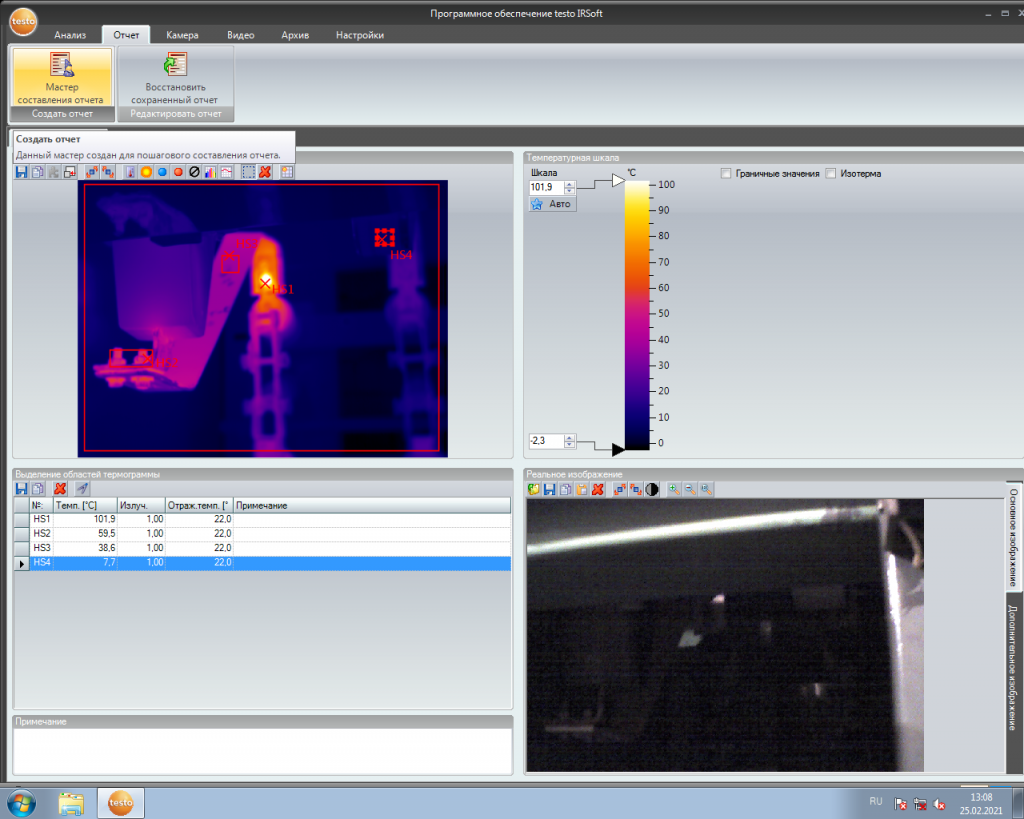
Внимательно проводим тепловизионное обследование интересующего участка электроустановки. После того, как был выявлен дефект измеряемой поверхности, необходимо сфокусироваться, нажать кнопку записи изображения и сохранить его при помощи кнопки «ОК». Далее подключаем прибор при помощи кабеля USB к компьютеру с установленным на него программным обеспечением. Получившаяся теплограмма электрооборудования (в моем случае это ячейка КСО-272 6 кВ) имеет следующий вид:
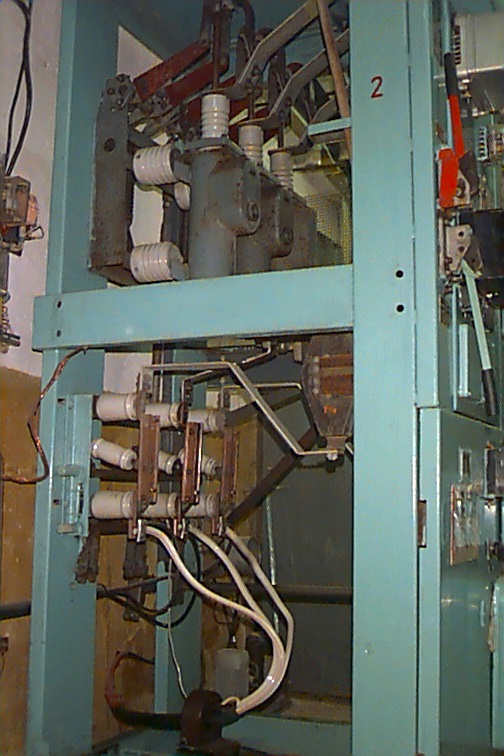
Вот так выглядит подобная ячейка сбоку в реальной жизни.
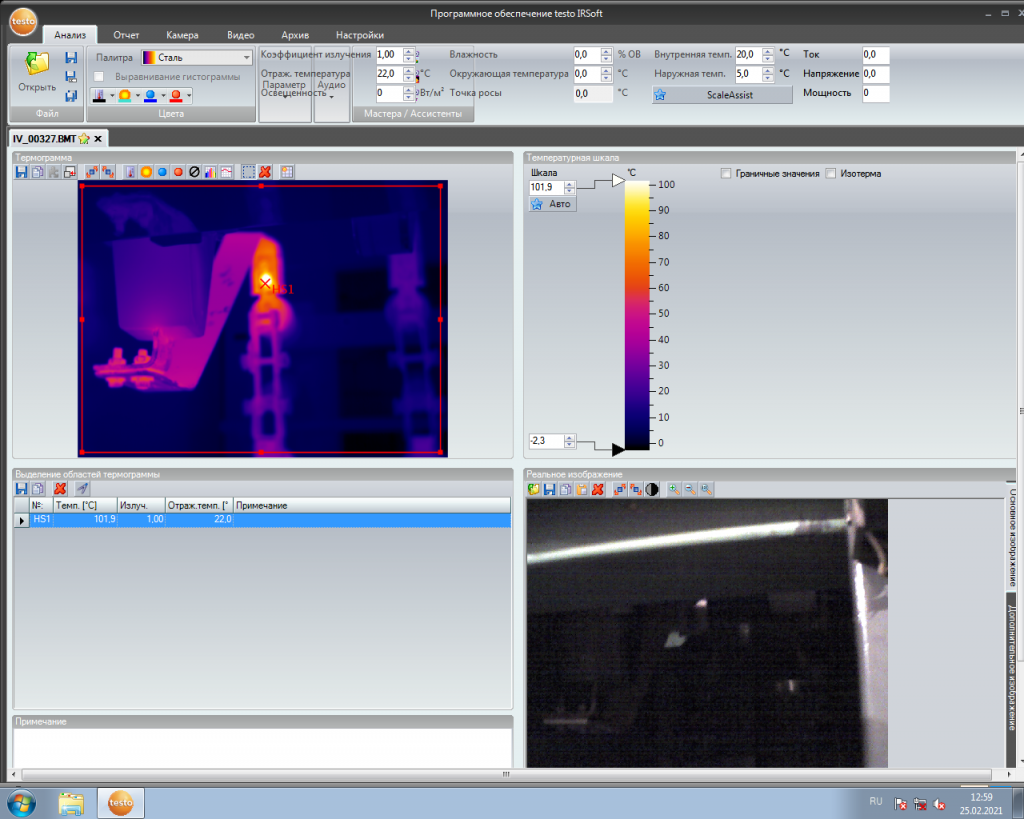
Далее на нашей теплограмме необходимо определить точку с максимальной температурой, для чего в меню нажатием на кнопку «теплые точки» выбираем прямоугольную область или иную другую и выделяем интересующий нас участок.

Если выбрать всю область, то будет автоматически отмечена точка с наибольшей температурой. Таким же образом определяются и холодные точки при нажатии на соответствующую кнопку меню. Внизу, под теплограммой также идет составление таблицы.
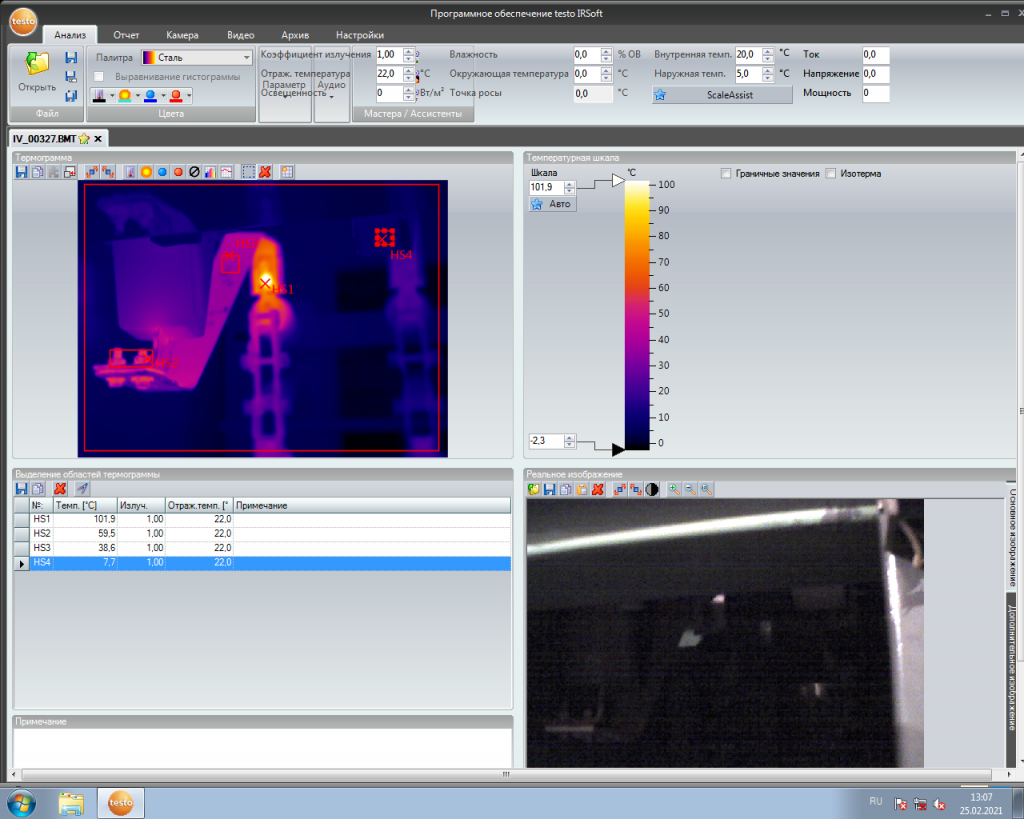
Чтобы узнать точки, где нагрев происходит в меньшей степени, но все же имеет место быть, повторим вышеописанные действия на других участках.
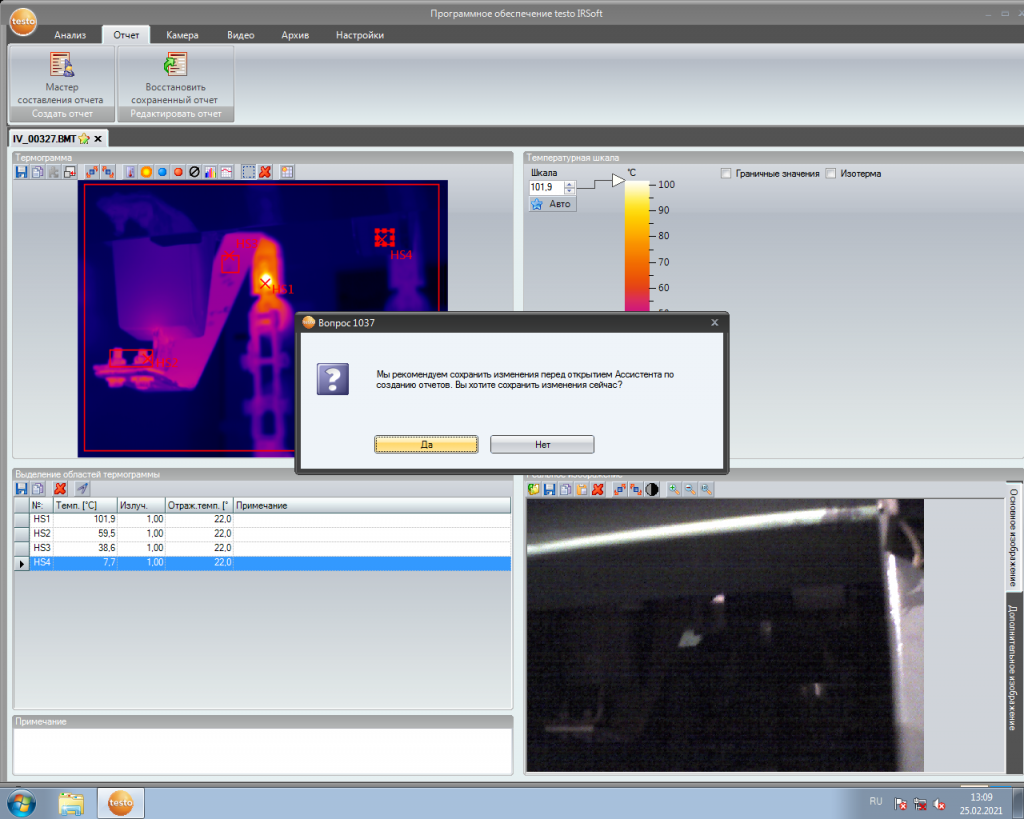
После чего переходим во вкладку «Отчет» и выбираем «Мастер составления отчета».
Далее сохраняем изменения.
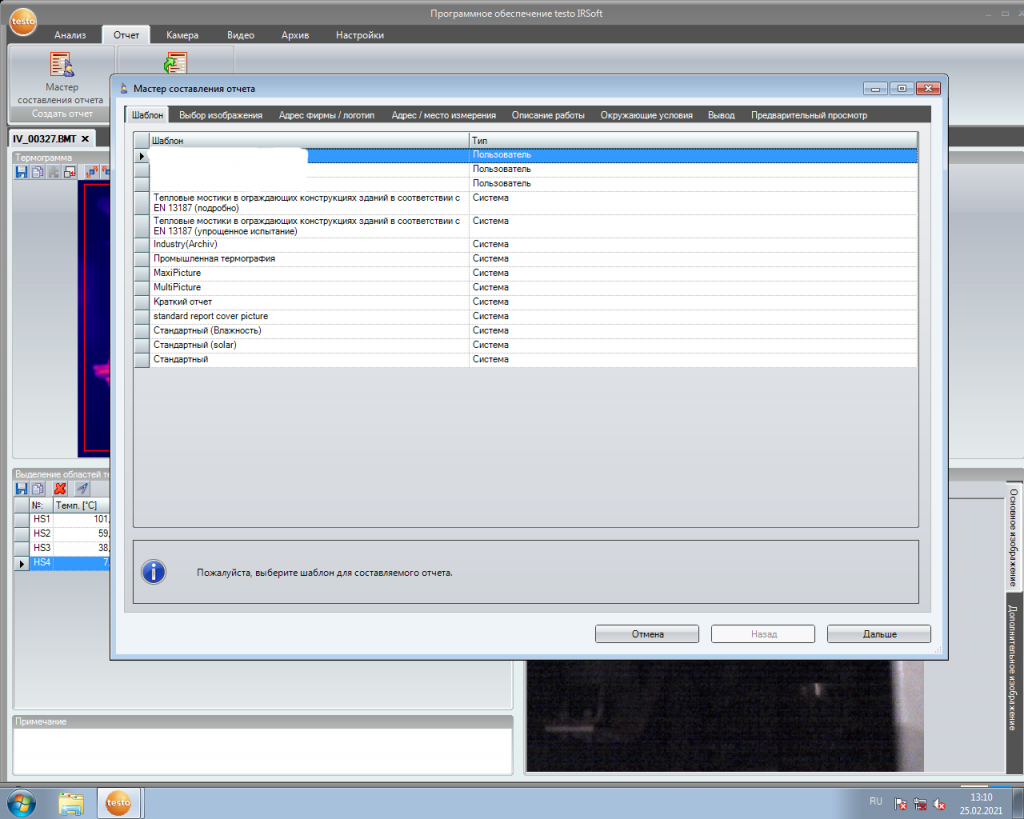
Выбираем один из предложенных шаблонов, допустим «Краткий отчет» (чтобы каждый раз не заносить однотипные данные, есть возможность сохранения своего шаблона).
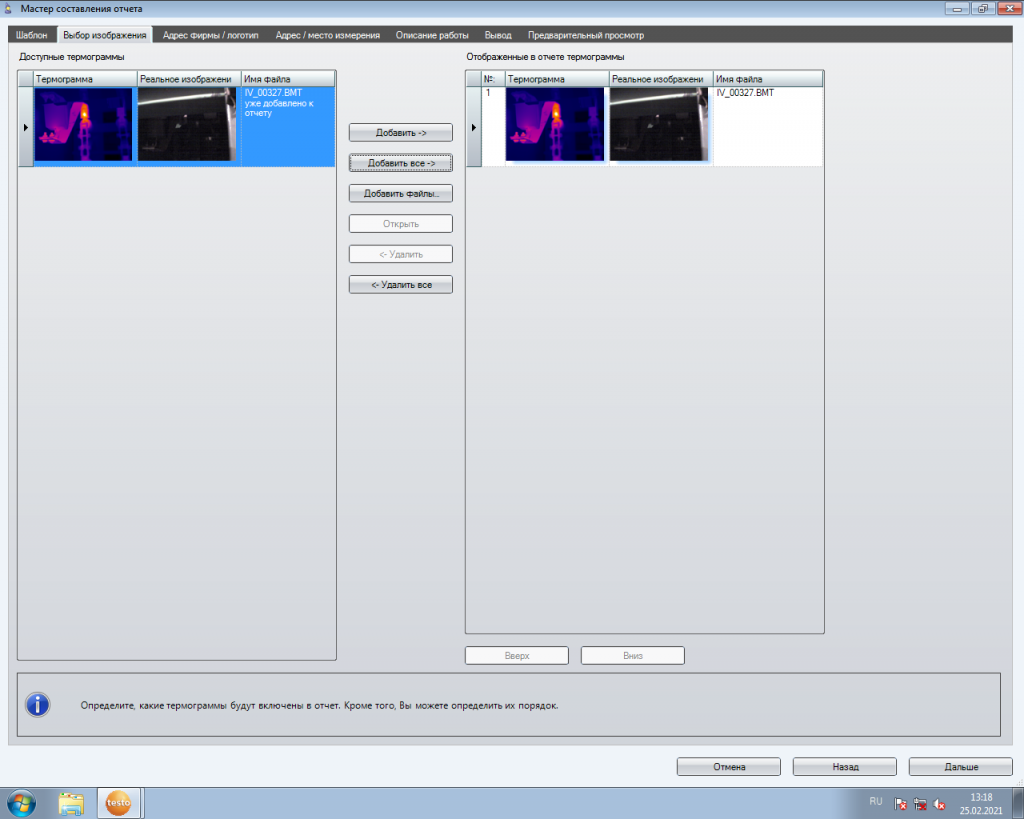
Добавляем изображения для занесения в отчет.
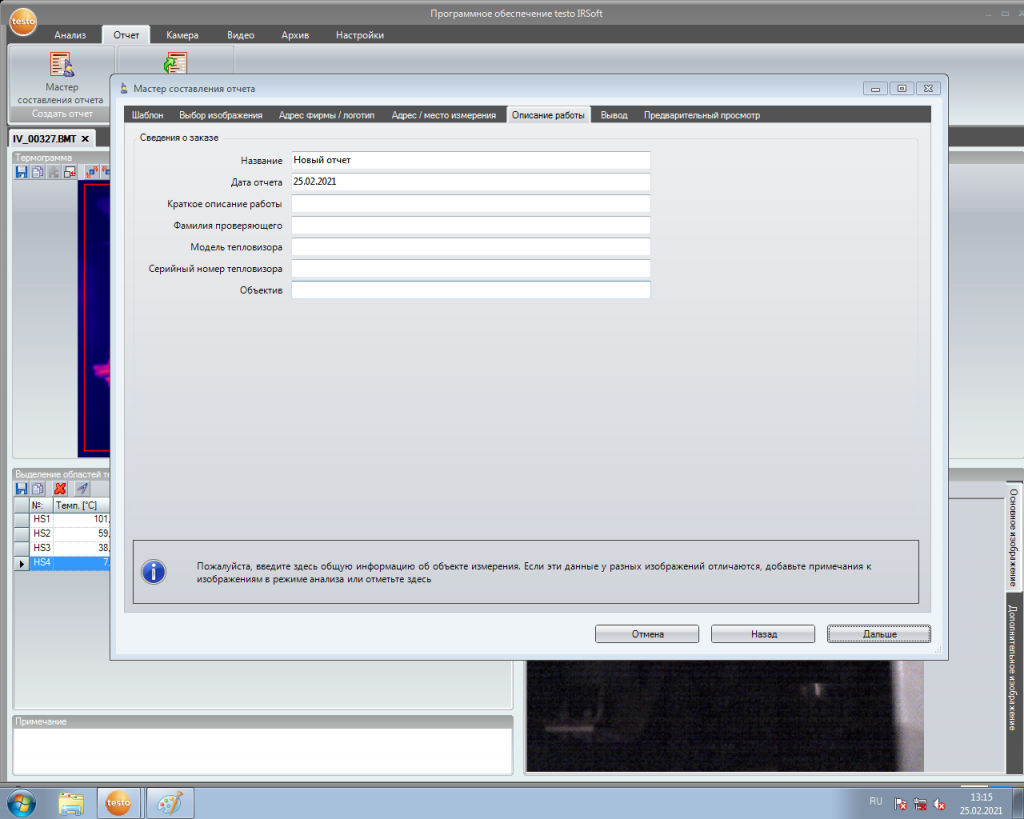
Теперь заносим данные организации и по необходимости удаляем логотип testo.

По аналогии заполняем данные заказчика.

Составляем описание работы.
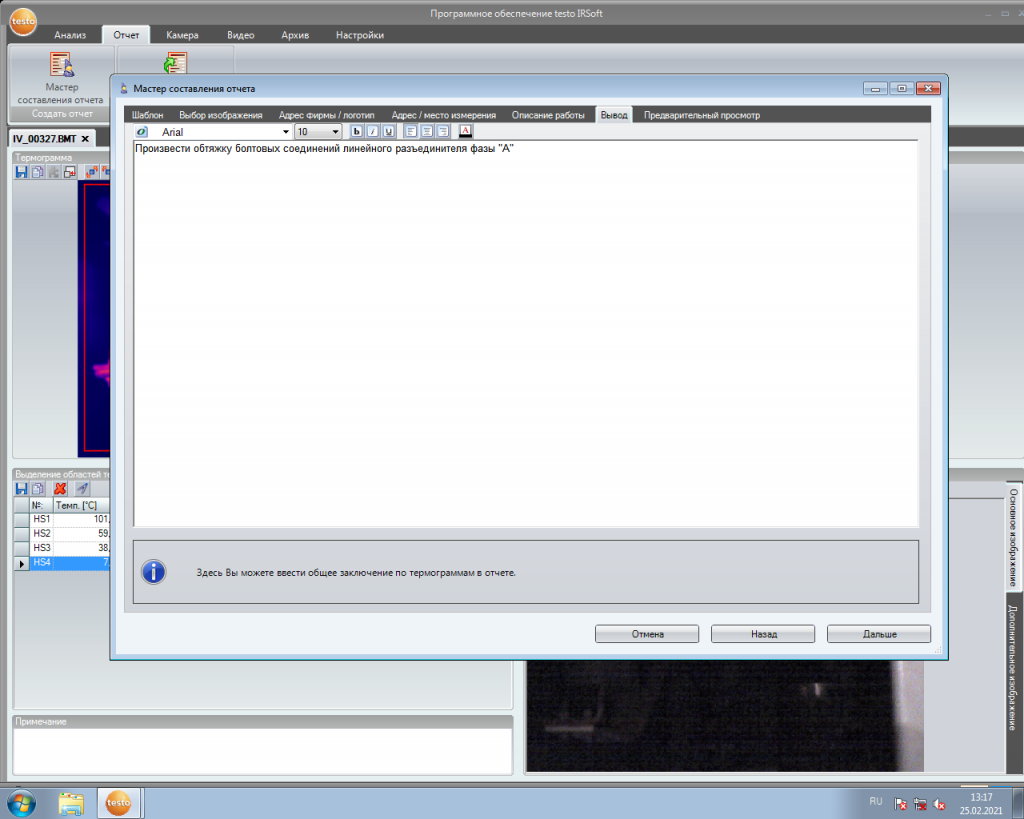
Пишем вывод.
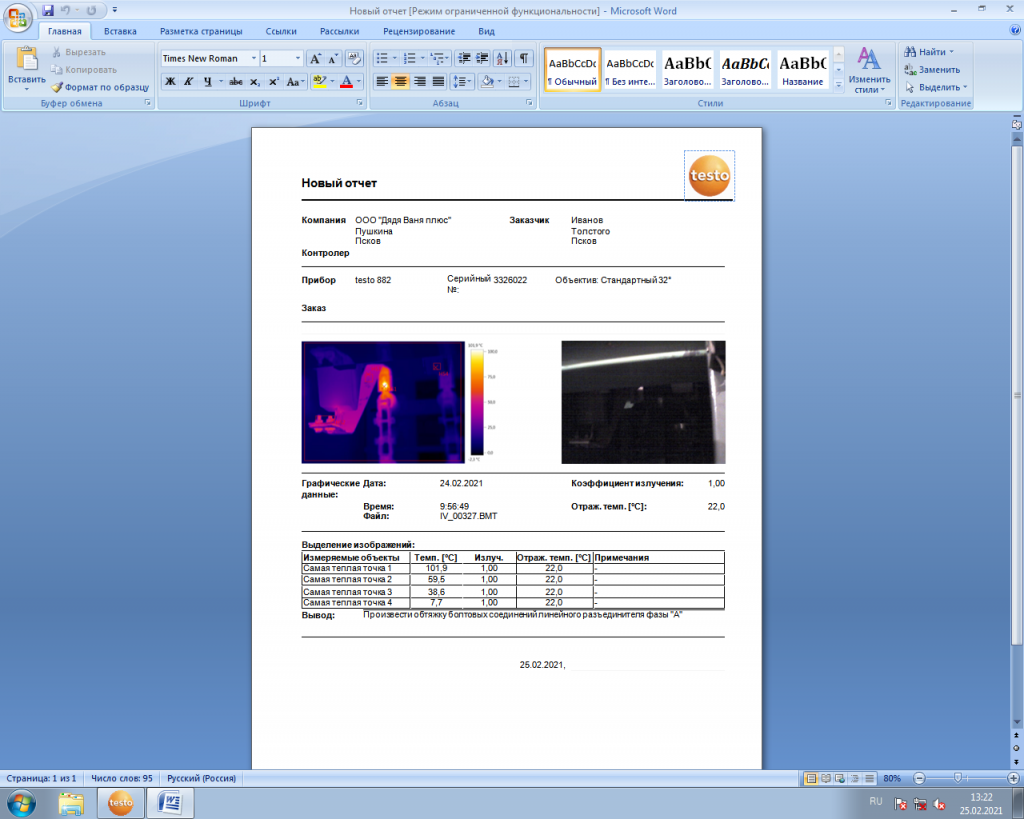
Сохраняем в нужном формате (удобнее выбрать формат RTF для возможности дальнейшего редактирования в word).
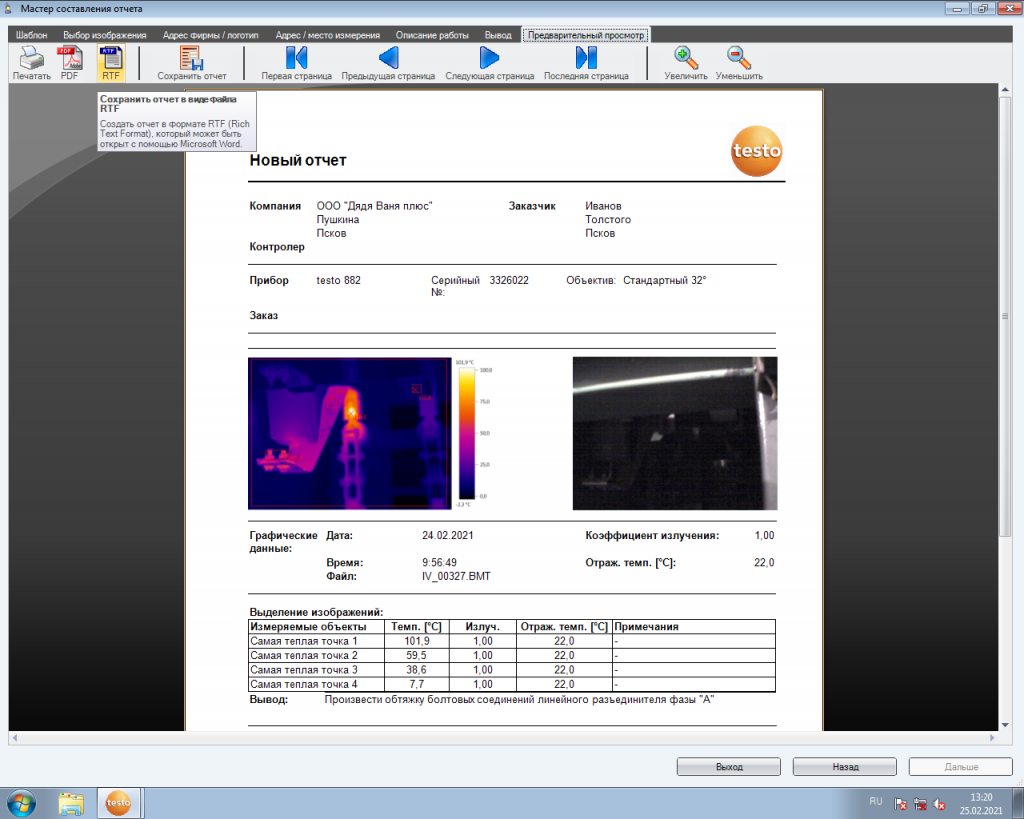
Вот, собственно и все, наш отчет готов.
Цель данного описания — показать принцип проведения измерений и составления отчета. Функционал программного обеспечения, естественно, на этом не исчерпывается, поэтому каждый, в своем конкретном случае должен будет определить объем использования программного обеспечения самостоятельно.
-
На Главную
-
testo 882
-
Внесен в Государственный реестр средств измерений РФ ФГИС «АРШИН»
-
Высокое качество изображений благодаря NETD < 60 мК
-
Детектор с разрешением 320 x 240 пикселей
-
Более широкое поле зрения благодаря стандартному объективу с углом зрения 32°
-
Специальный режим измерения для локализации участков, подверженных риску образования плесени
Тепловизор снят с производства и больше не поставляется, возможная замена — testo 883. По всем вопросам обращайтесь в Отдел продаж.
Тепловизор с разрешением 320 x 240 пикселей и NETD < 60 мК, с предустановленной опцией SuperResolution, стандартным объективом 32°, опциональной функцией измерения высоких температур и функцией записи голосовых комментариев для профессиональной термографии
Подробнее
Описание продукта
Тепловизор testo 882 с эргономичным дизайном в виде рукоятки-пистолета отличается еще более четкими и детальными снимками.
Благодаря высокому разрешению (76 800 температурных точек) на изображении измеряемого объекта будут отчетливо видны мельчайшие детали, что позволяет с еще большей легкостью выявить дефекты и потенциально проблемные участки даже на значительных расстояниях.
Для вас это означает: еще более качественные изображения и еще больше надежности при проведении тепловизионной съемки!
С подтвержденными метрологическими характеристиками и расширенными техническими данными можно ознакомиться в описании типа в Центре загрузки.
Комплект поставки
- Тепловизор testo 882 в прочном кейсе
- Профессиональное ПО IR-Soft (скачать бесплатно)
- Чехол Soft Case
- Ремень для переноски
- SD-карта
- USB-кабель
- Блоком питания
- Литиево-ионный аккумулятор
- Адаптер для штатива
- Ткань для очистки объектива и гарнитурой
Технические данные
| Стандарты/ гарантия | |
|---|---|
|
Директивы ЕС |
2004/108/EG |
| Инфракрасное изображение | |
|---|---|
|
Поле зрения |
32° x 23° |
|
Фокус |
ручная и моторизированная фокусировка |
|
Минимальное фокусное расстояние |
0.2 м |
|
Пространственное разрешение (IFOV) |
1,7 мрад |
|
Частота обновления кадра |
9 Гц |
|
Инфракрасное разрешение |
320 x 240 пикселей |
|
SuperResolution (IFOV) |
1,1 мрад |
|
SuperResolution (пиксели) |
640 x 480 пикселей |
|
Температурная чувствительность |
< 60 мК при 30°C |
| Реальное изображение | |
|---|---|
|
Минимальное фокусное расстояние |
0.4 м |
|
Размер изображения |
640 x 480 пикселей |
| Представление изображения | |
|---|---|
|
Цветовая палитра |
10 (iron, rainbow, rainbow HC, cold-hot, blue-red, grey, inverted grey, sepia, Testo, iron HT) |
|
Опция дисплея |
только ИК-изображение; только реальное изображение; ИК/реальное изображение |
|
Тип дисплея |
ж/к дисплей 3.5”; 320 x 240 пикселей |
|
Видеовыход |
USB 2.0 |
| Измерение | |
|---|---|
|
Погрешность |
±2°C, ±2% от измер. знач. ±3% от измер. знач. (+350°C … +550°C) |
|
Измерение высоких температур |
+350°C … +550°C |
|
Диапазон измерений |
-20°C … 100°C; 0°C … 350°C |
|
Отраженная температура |
ручная |
|
Измерение |
| Функция измерения | |
|---|---|
|
Функция анализа |
До 2-х точек замера, распознавание горячей/холодной точек, функция изотермы, расчет мин./макс. значений участка |
|
Измерение влажности |
Опция |
|
Режим измерения «Солнечная энергия» |
Входит в комплект поставки |
|
Отображение распределения поверхностной влажности |
Входит в комплект поставки |
| Оснащение тепловизора | |
|---|---|
|
Запись голосовых комментариев |
проводная гарнитура |
|
Передача видеоданных |
Входит в комплект поставки |
|
Стандартный объектив |
32° x 23° |
|
Питание (LED) |
Входит в комплект поставки |
|
Цифровая камера |
Входит в комплект поставки |
|
Лазер |
Входит в комплект поставки |
| Хранение | |
|---|---|
|
Формат файла: изображения |
.bmt; Опция экспорта изображений в формат .bmp; .jpg; .png; .csv; .xls |
|
Устройство хранения данных |
SD-карта 2 Гб (приблиз. 1,000 изображений) |
| Питание | |
|---|---|
|
Тип батареи |
Быстрозаряжаемый литиево-ионный аккумулятор (возможна замена на объекте замера) |
|
Варианты зарядки |
В приборе/зарядном устройстве (опция) |
|
Работа от сети |
да |
|
Время работы |
4.0 ч. |
| Условия окружающей среды | |
|---|---|
|
Влажность воздуха |
20% … 80% без конденсации |
|
Класс защиты корпуса |
IP54 |
|
Рабочая температура |
-15 °C; 40 °C |
|
Температура хранения |
-30 °C; 60 °C |
|
Вибрация |
2G |
| Физические характеристики | |
|---|---|
|
Корпус |
Пластик (АБС) |
|
Штатив-тренога |
M6 |
|
Вес |
900 г |
|
Размеры |
152 x 108 x 262 |
| Программное обеспечение для ПК | |
|---|---|
|
Системные требования |
Windows XP (Service Pack 3); Windows Vista; Windows 7 (Service Pack 1); Windows 8; Интерфейс USB 2.0 |
Принадлежности
Принадлежности
Применение
Надежная диагностика в условиях высоких температур
В некоторых сферах требует измерение высоких температур, тепловизоры Testo отвечают данному требованию благодаря наличию специальной опциональной функции. Функция измерения высоких температур позволяет расширить диапазон измерения тепловизоров Testo до 1200°. Посредством цветовой палитры “iron HT” или сравнительной гистограммы, температуры будут представлены на термограмме в резком контрасте.

Обнаружение дефектов ограждающих конструкций и гарантия качества строительства
Диагностика с помощью testo 875i – быстрый и эффективный метод обнаружения предполагаемых дефектов ограждающих конструкций. Более того, благодаря тепловизорам Testo Вы сможете получить детализированные термограммы, которые позволят наглядно подтвердить качество строительства и надлежащее выполнение соответствующих работ. На термограмме все обнаруженные участки потерь энергии, повышенной влажности или некачественной изоляции будут, как на ладони. Тепловизоры в полной мере раскроют Вам возможности выявления слабых участков бесконтактным способом!

Регулярные проверки электрооборудования в рамках техобслуживания
Тепловизоры Testo позволяют с легкостью оценить уровень нагрева в системах низкого, среднего и высокого напряжения. С помощью термограмм Вы сможете своевременно выявить аномальный нагрев электрических компонентов и соединений и предпринять необходимые меры. Таким образом, Вам удастся предотвратить дорогостоящие простои в работе и снизить риск возгорания.

Помощь при техобслуживании механического оборудования
Превентивное обслуживание и выявление риска повреждений механических компонентов промышленного оборудования позволяют гарантировать безопасность и надежность эксплуатации систем в целом. Аномальный нагрев механических компонентов может указывать на повышенный уровень нагрузки, который, в свою очередь, может быть обусловлен силой трения, некорректной настройкой, чрезмерным отклонением или же недостаточной смазкой. Высокое температурное разрешение тепловизоров Testo позволяет проводить точную диагностику. Функция изотермы дает возможность с легкостью выявить участки критического нагрева и принять соответствующие меры.

Предотвращение плесневых образований
Тепловые мостики – причина потерь энергии. Конденсация, вызванная повышенной влажностью воздуха, ведет к образованию плесени, что представляет опасность для здоровья находящихся в здании людей. Тепловизоры Testo на основе данных температуры и влажности окружающей среды, а также измеренных значений поверхностной температуры, позволяют рассчитать относительную поверхностную влажность для каждой отдельной точки. Таким образом, Вы можете выявить каждый участок с повышенной влажностью и обнаружить первые признаки образования плесени до того, как они станут видны невооруженным глазом. Цветовая индикация палитры служит для визуализации различных уровней риска: красный цвет – риск образования плесени, зеленый цвет – риск отсутствует. Следовательно, Вы получаете возможность на ранней стадии предотвратить рост плесени – даже в углах и нишах.

Комплексная консультация по энергоэффективности
В сфере строительной термографии, инфракрасная технология идеально подходит для быстрого и эффективного анализа потерь энергии в системах ОВКВ зданий. Высокое температурное разрешение тепловизоров Testo позволяет получить детализированные термограммы тепловых мостиков и участков с некачественной изоляцией. Тепловизоры идеально подходят для регистрации и документирования данных по потерям энергии через наружные стены, двери, рольставни, ниши под батареи, крыши и ограждающие конструкции здания в целом. Они станут незаменимыми помощниками при решении задач в ходе диагностики и техобслуживания, а также в рамках комплексной консультации по энергоэффективности.

Центр загрузки
Брошюры по продукту
-
Технический обзор. Технология SuperResolution
(application/pdf, 364 KB) -
Свидетельство testo 882
(application/pdf, 353 KB)
Инструкции по применению
-
Инструкция testo 882
(application/pdf, 963 KB)
Программное обеспечение
-
Testo thermal imagers download instrument firmware for testo 882
( v1.28, EXE, 931 KB)
In order to be able to use the PC software optimally, the instrument should also be updated with the latest version of the instrument firmware. Please observe the instruction for the Instruction Firmware update.
-
Программное обеспечение (IRSoft) для тепловизоров всех моделей
(font/x-font-fon, 252.293 KB)
Програмнное обеспечение IRSoft позволит Вам с легкостью проводить анализ термограмм. 4агрузите последнюю версию ПО IRSoft на свой компьютер и запустите файл, чтобы начать установку. Если у Вас установлено программное обеспечение IRSoft более ранней версии, оно будет автоматически обновлено. При работе с программным обеспечением IRSoft следуйте инструкциям соответствующего Руководства пользователя.
-
Инструкция testo IRSoft
(application/pdf, 1.769 KB)