-
Contents
-
Table of Contents
-
Troubleshooting
-
Bookmarks
Quick Links
Trinitron Color
Video CD TV
Operating Instructions
####
####
####
f
KVD-C21MF1
©1996 by Sony Corporation
®
3-858-251-12 (1)
EN
C##
RF
A
Related Manuals for Sony Trinitron
Summary of Contents for Sony Trinitron
-
Page 1
3-858-251-12 (1) ® Trinitron Color Video CD TV Operating Instructions #### #### #### KVD-C21MF1 ©1996 by Sony Corporation… -
Page 2
WARNING To prevent fire or shock hazard, do not expose the unit to rain or moisture. To avoid electrical shock, do not open the cabinet. Refer servicing to qualified personnel only. The following caution label is located inside of the unit. This unit can play following discs: CD-G Audio CDs… -
Page 3
MENU MENU VISUAL MODE PROGRAM PRESET ENTER LANGUAGE / DISC COLOR SYSTEM POWER Select and press ENTER PROGRAM PRESET AUTO PROGRAM ENTER MANUAL PROGRAM Select and press ENTER AUTO PROGRAM ENTER SYSTEM PROG B / G – – – – – –… -
Page 4
ill005 9 Getting Started… -
Page 5: Table Of Contents
Precautions Table of Contents • Operate the TV only at 110-240 V AC. Getting Started • Do not operate the TV if any liquid or solid object falls into it. Have it checked immediately by 6 Connections qualified personnel only. 8 Presetting channels •…
-
Page 6: Getting Started
Getting Started Connections Connecting a VHF antenna or a combination VHF/UHF antenna — 75-ohm coaxial cable (round) Attach an optional IEC antenna connector to the 75-ohm coaxial cable. Plug the connector into the ˘ (antenna) socket at the rear of the TV. Rear of TV On a wall Rear of TV…
-
Page 7
Front of TV VIDEO 2 IN Camcorder VIDEO L(MONO)-AUDIO-R to video and audio outputs : Signal flow Connecting audio/video equipment using VIDEO OUT jacks to antenna socket Rear of TV AUDIO VIDEO L(MONO) to antenna output VIDEO 1 IN VIDEO OUT to video and VIDEO OUT audio inputs… -
Page 8: Presetting Channels
Press › or ¢ to select “PROGRAM PRESET” Presetting channels and press ENTER. The PROGRAM PRESET menu appears. PROGRAM PRESET AUTO PROGRAM MANUAL PROGRAM Select and press ENTER Press › or ¢ to select “AUTO PROGRAM” Presetting channels automatically and press ENTER. The AUTO PROGRAM menu appears.
-
Page 9
Repeat steps 4 to 6 to preset other Presetting channels manually channels. To change the channel for a particular program After you finish presetting, press MENU to position or to receive a channel with a weak signal, go back to the original screen. preset the channel manually. -
Page 10
Manual fine-tuning Captioning a station name Normally, the automatic fine-tuning (AFT) is already You can name a channel using up to five characters working. However, if the picture of a program is (letters or numbers) to be displayed on the TV screen distorted, you can use the manual fine-tuning function (e.g. -
Page 11: Tv Operations
TV Operations Select the TV channel you want to watch. Watching the TV To select a channel directly Press a number button. – /– – To select a two-digit channel, press “ -/- -, ” before the number buttons. For example: to select channel 25, press “…
-
Page 12
Switching off the TV Using the on-screen display (TV mode) To switch off the main power, press POWER on the Press DISPLAY. remote commander. The station name, program position, and CH number The TV enters standby mode and the STANDBY lamp are displayed on the screen. -
Page 13: Cd Operations
CD Operations Press SELECT z on the remote commander Playing CDs or SELECT ^ on the TV. SELECT Press VOL +/– on the remote commander or VOLUME +/– on the TV to adjust the volume. Playing a VIDEO CD without PBC To stop playback Press p.
-
Page 14
Select the desired item in the menu screen Playing a Video CD with PBC with the number buttons. on the remote commander on the TV VCD MENU S E L E C T ^ DISC STOP p SELECT VCD MENU +/– OPEN/CLOSE 6 –… -
Page 15: Playing An Audio Cd
Playing a CD-G Playing an audio CD Press POWER. Press POWER. When the TV is in standby mode after pressing When the TV is in standby mode after pressing POWER, press POWER on the remote commander. POWER, press POWER on the remote commander. Press DISC.
-
Page 16
Selecting the disc color system Playing repeatedly You can select the color system for the disc you want to You can play tracks repeatedly in any play mode. play back. Press MENU. REPEAT The main menu appears. MENU VISUAL MODE PROGRAM PRESET LANGUAGE / DISC COLOR SYSTEM… -
Page 17: Karaoke Operations
Karaoke Operations Press OPEN/CLOSE 6, and place the disc on Karaoke sing-along the disc tray. Press SELECT ”. SELECT Turn the MIC VOL 1/2 control to adjust the You can play karaoke (sing along) with CDs. microphone volume. MIN MAX MIN MAX MIC VOL Turn the ECHO VOL control to adjust the…
-
Page 18
Changing the pitch (Key Control) Singing along with non-karaoke discs (Karaoke Pon) While you are singing, you can change the pitch of the song in half tone pitch. You can enjoy karaoke with a stereo recorded disc, even if it is a non-karaoke disc, by reducing the singer’s voice. -
Page 19: Additional Operations
Additional Operations Using the Sleep Using the Wake Up Timer Timer You can set the TV to turn on automatically after the You can set the TV to turn off automatically after the period of time you want. period of time you want. Press SLEEP.
-
Page 20: Adjusting The Picture Mode
Adjusting the Adjusting the picture mode settings picture mode Press MENU. The main menu appears. MENU VISUAL MODE MENU PROGRAM PRESET LANGUAGE / DISC COLOR SYSTEM Select and press ENTER Press › or ¢ to select “VISUAL MODE” and press ENTER. VISUAL MODE ›…
-
Page 21: Muting The Sound
Muting the sound Listening with headphones Press MUTING. Plug the headphones (not supplied) to the 2 (headphones) jack inside the front panel on the TV. The sound from the speaker is shut off. MUTING MUTING Additional Operations…
-
Page 22: Additional Information
Additional Information Good picture Troubleshooting Noisy sound Check the TV SYSTEM setting. No picture No sound If you have any problems, read this manual again and check the countermeasure for each of the symptoms listed below. If the problem persists, contact your nearest authorized Press POWER.
-
Page 23: Notes On Cds
The CD doesn’t play Notes on CDs There’s no disc inside (“Please load a disc” appears). Insert the disc with the label side up on the disc tray correctly. Clean the disc. Be sure that the disc can be played with this unit.
-
Page 24: Receivable Channels And Channel Display
C21 to C69 Channel coverage See “Receivable channels and Indonesia channel display” 2 to 11 C03 to C12 Picture tube Trinitron M-4 to M-7 Morocco C70 to C73 21 inches (approx. 54.5 cm M-8 to M-10 C08 to C10 measured diagonally)
-
Page 25: Index To Parts And Controls
! ¢ VOLUME +/– buttons Index to parts and PROGR (program) +/– buttons controls ! § PREV (previous) = button ! ¶ NEXT + button ! • OPEN/CLOSE 6 button ! ª STOP p button @º SELECT ^ button Front panel Rear panel Function buttons Disc tray…
-
Page 26
Remote Commander MUTING button SLEEP button WAKE UP button PIC (picture) MODE button KARAOKE PON button DISPLAY button – /– – POWER switch Function buttons Number buttons PROGR (program) +/– buttons ! ¡ VOL (volume) +/– buttons !™ Menu operation buttons ! £… -
Page 27
Sony Corporation Printed in Malaysia…
Sony KV-HW212M95 Group H4 (GB, RU)_2-177-672-12 (1)
Operating Instructions
• Before operating the unit, please read this manual thoroughly and retain
it for future reference.
Инструкция по эксплуатации
• Перед работой с устройством внимательно прочтайте инструкцию
и сохраните её для дальнейшего использования.
Trinitron Color TV
KV-HW212
© 2004 Sony Corporation
2-177-672-12 (1)
M95
M91
GB
RU
01GB01COV-Rus.p65 20/9/04, 3:21 PM1
Black
Sony KV-HW212M95 Group H4 (GB, RU)_2-177-672-12 (1)
2
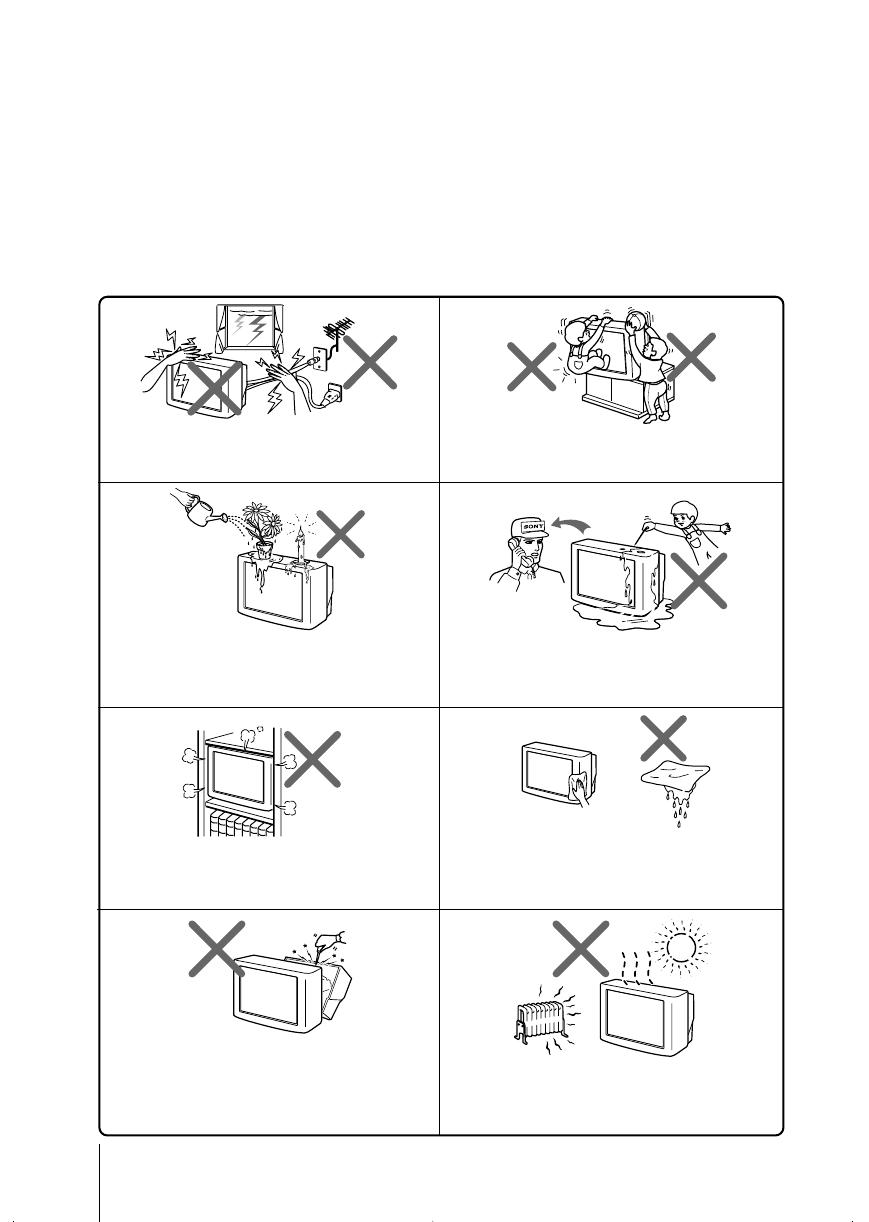
Do not place any objects on the TV. The apparatus
shall not be exposed to dripping or splashing and
that no objects filled with liquids, such as vases,
shall be placed on the apparatus.
WARNING
• Dangerously high voltages are present inside the TV.
• TV operating voltage: 110 – 240 V AC.
• Do not plug in the power cord until you have completed making all other
connections; otherwise a minimum leakage current might flow through the antenna
and other terminals to ground.
• To avoid battery leakage and damage to the remote, remove the batteries from the
remote if you are not going to use it for several days. If any liquid leaks from the
batteries and touches your skin, immediately wash it away with water.
Do not open the cabinet and the rear cover of the
TV as high voltages and other hazards are present
inside the TV. Refer servicing and disposal of the
TV to qualified personnel.
Your TV is recommended for home use only.
Do not use the TV in any vehicle or where it may be
subject to excessive dust, heat, moisture or
vibrations.
Do not operate the TV if any liquid or solid object
falls into it. Have it checked immediately by
qualified personnel only.
Do not block the ventilation openings of the TV.
Do not install the TV in a confined space, such as a
bookcase or built-in cabinet.
For children’s safety, do not leave children alone
with the TV. Do not allow children to climb onto it.
Clean the TV with a dry and soft cloth.
Do not use benzine, thinner, or any other chemicals to
clean the TV. Do not attach anything (e.g., adhesive
tape, cellophane tape, glue) on the painted cabinet of
the TV. Do not scratch the picture tube.
For your own safety, do not touch any part of the
TV, the power cord and the antenna cable during
lightning storms.
01GB02WAR-Rus.p65 20/9/04, 3:22 PM2
Black
Sony KV-HW212M95 Group H4 (GB, RU)_2-177-672-12 (1)
3
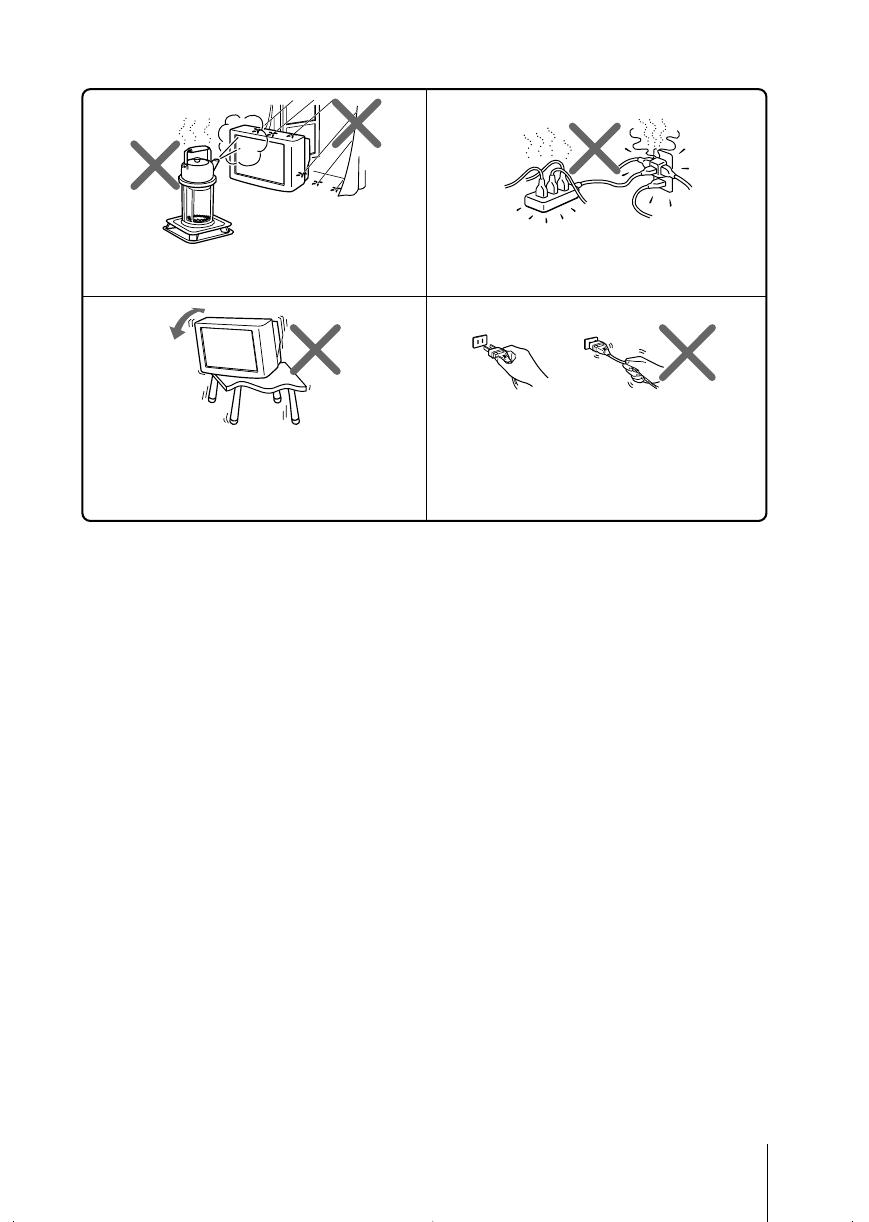
Install the TV on a stable TV stand and floor which
can support the TV set weight. Ensure that the TV
stand surface is flat and its area is larger than the
bottom area of the TV.
Do not plug in too many appliances to the same
power socket. Do not damage the power cord.
Pull the power cord out by the plug. Do not pull
the power cord itself. Even if your TV is turned off,
it is still connected to the AC power source (mains)
as long as the power cord is plugged in. Unplug
the TV before moving it or if you are not going to
use it for several days.
To prevent fire or shock hazard, do not expose the
TV to rain or moisture.
Made in Malaysia.
Sony Corporation
6-7-35 Kitashinagawa,
Shinagawa-ku, Tokyo, 141-0001 Japan.
01GB02WAR-Rus.p65 20/9/04, 3:22 PM3
Black
4
Sony KV-HW212M95 Group H4 (GB, RU)_2-177-672-12 (1)
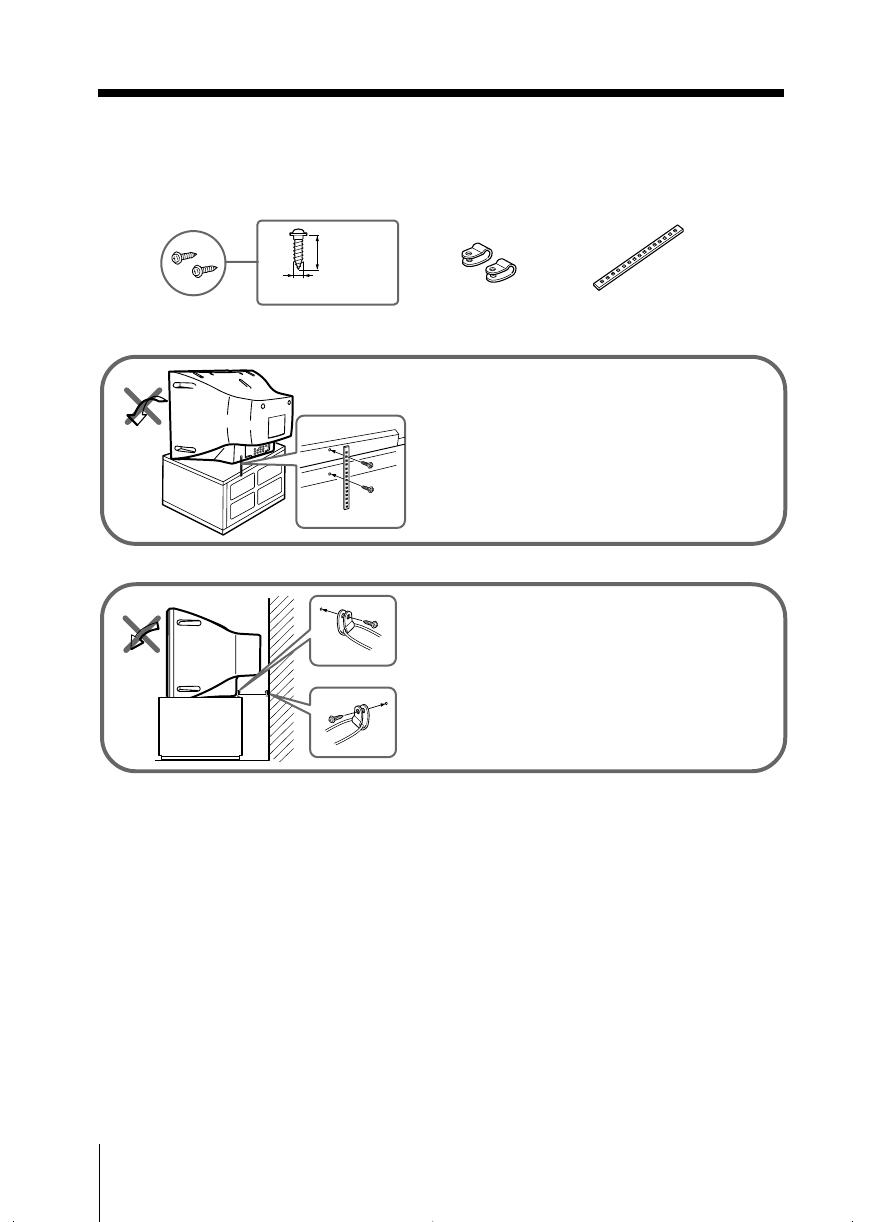
x Securing the TV
To prevent the TV from falling, use the supplied screws, clamps and band to
secure the TV.
20 mm
3.8 mm
screws clamps band
Screw the band to the TV stand and to the
provided hole at the rear of your TV.
(1) Put a cord or chain through the clamps.
(2) Screw one clamp to a wall or pillar and
the other clamp to the provided hole at
the rear of your TV.
or
Note
• Use only the supplied screws. Use of other screws may damage the TV.
01GB02WAR-Rus.p65 20/9/04, 3:22 PM4
Black

5
Sony KV-HW212M95 Group H4 (GB, RU)_2-177-672-12 (1)
Additional Information
Connecting the 3D WOOFER
(KV-HW212M95 only)………………….. 25
Connecting optional components … 25
Troubleshooting …………………………… 27
Specifications ……………………………….. 31
Table of Contents
Installation
Getting Started ………………………………. 6
Setting up your TV
(“Initial Setup”) ……………………………… 7
Overview of Controls
TV top control, front and
rear panels……………………………………… 9
Using the remote control and
basic functions ……………………………… 10
Advanced Operations
Selecting the picture and sound
modes ………………………………………….. 12
Enjoying stereo or bilingual
programs ……………………………………… 13
Viewing Teletext …………………………… 14
Menu Adjustment
Introducing the menu system ………. 15
Changing the “Picture” setting…….. 18
Changing the “Sound” setting……… 19
Changing the “Timer” setting ………. 21
Changing the “Channel Setup”
setting ………………………………………….. 22
Changing the “Setup” setting ………. 24
GB
01GB03TOC-Rus.p65 20/9/04, 3:22 PM5
Black
6 Installation
Sony KV-HW212M95 Group H4 (GB, RU)_2-177-672-12 (1)
Installation
x Getting Started
b
b
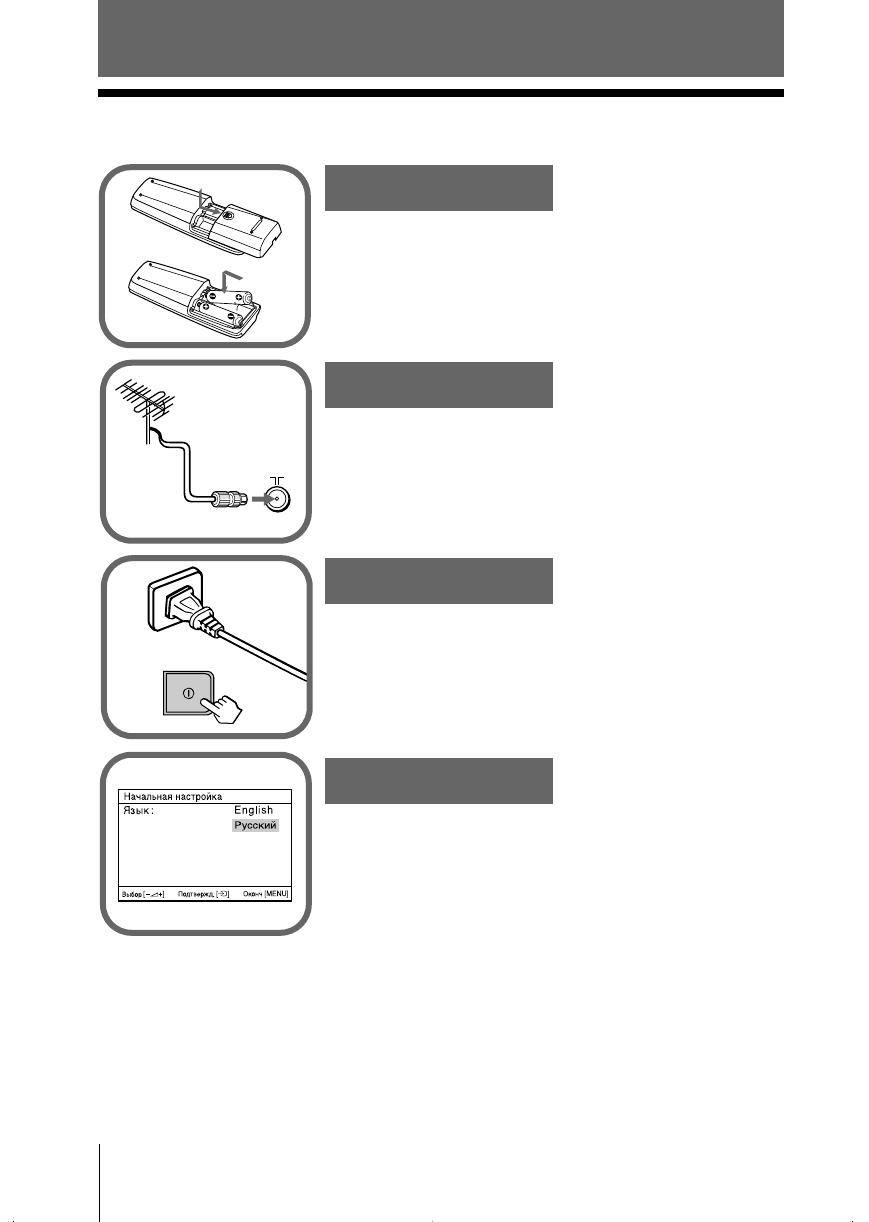
1
Step 1
Insert the batteries (supplied) into the remote.
Note
• Do not use old or different types of batteries together.
Step 2
Step 3
Step 4
Set up the TV by following the instructions of the
“Начальная настройкa” (“Initial Setup”) menu
(see page 7).
Plug in the power cord, then press ! on the TV to
turn it on.
Note
• The 1 (standby) indicator flashes green for a few seconds
when turning on the TV. This does not indicate a
malfunction.
Connect the antenna cable (not supplied) to 8
(antenna input) at the rear of the TV.
Tip
• You can also connect your TV to other optional components
(see page 25).
01GB04INS-Rus.p65 20/9/04, 3:24 PM6
Black
7
Installation
Installation
Sony KV-HW212M95 Group H4 (GB, RU)_2-177-672-12 (1)
x
Setting up your TV
(“Initial Setup”)
When you turn on your TV for the first time, the “Начальная настройкa” (“Initial
Setup”) menu will appear. You may change the menu language, preset the TV
channels automatically, change the order of TV channels that appear on the screen
and adjust the picture position using the buttons on the top control panel.
Tip
• The MENU, and V/v/B/b buttons on the remote control can also be used for the
operations below.
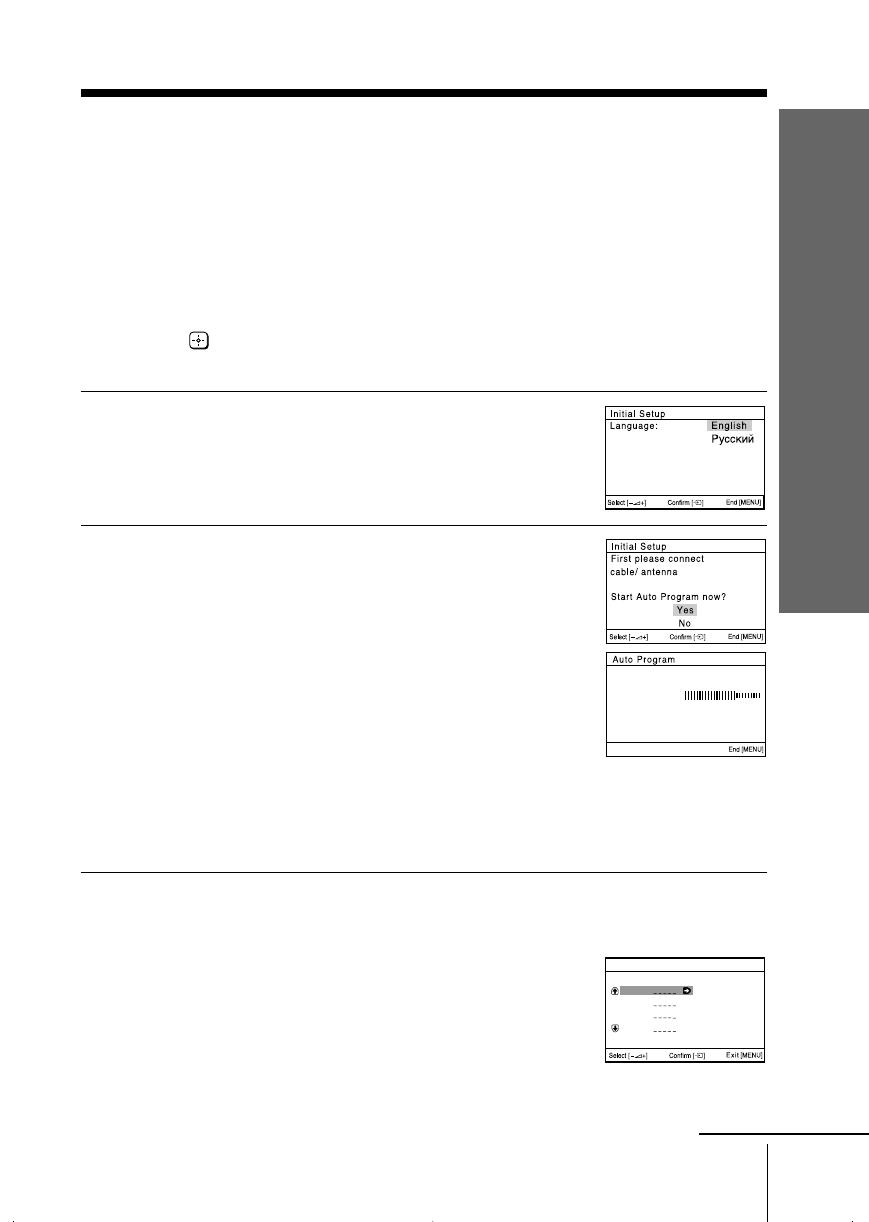
1
Press 2 +/– to select the desired menu
language, then press t.
The selected menu language appears.
2
Press 2 +/– to select “Yes”, then press t
to preset the channels automatically.
The screen will indicate automatic
presetting is in progress.
After all available channels have been tuned
and stored, the “Program Sorting” menu
appears automatically on the screen.
To skip automatic channel presetting, select
“No”, then press t.
If the message “No channel found. Please
connect cable/antenna” appears, check your
TV connections, then press t.
3
The “Program Sorting” menu enables you
to change the order in which the channels
appear on the screen.
a) If you wish to keep the channels in the
tuned order, press MENU.
b) If you wish to store the channels in a
different order:
1) Press 2 +/– to select the program
number with the channel you wish to
rearrange, then press t.
Program Sorting
Program:
01
02
03
04
Select channel
continue
Program:
TV System: Auto
01
VHF Low
01GB04INS-Rus.p65 20/9/04, 3:24 PM7
Black
8 Installation
Sony KV-HW212M95 Group H4 (GB, RU)_2-177-672-12 (1)
The selected channel will appear on
the screen.
2) Press 2 +/– to select the new
program number position for your
selected channel, then press t.
3) Repeat steps b) 1) and 2) if you wish
to change the order of the other
channels.
c) Press MENU to go to the next menu.
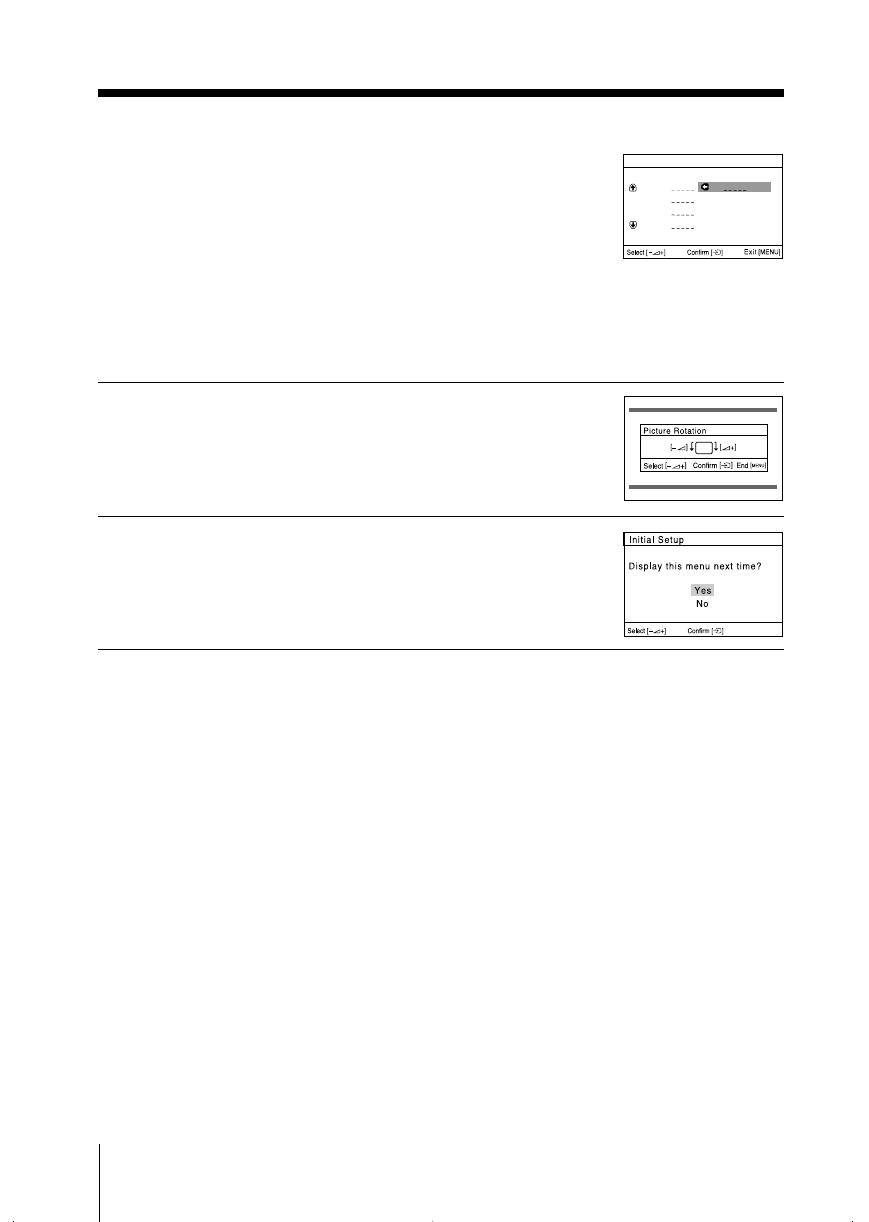
4
Press 2 +/– to adjust the bars on the
top and bottom of the menu if they are
slanted, then press t.
If no adjustment is necessary, then press t.
5
Press 2 +/– to select “No”, then press t.
This menu will not appear again the next
time you turn on the TV by pressing !.
To allow this menu to appear again, select
“Yes”, then press t.
Tips
• You can immediately go to the end of the ”Initial Setup” menu by pressing MENU.
• You can also set up your TV by using the menu system (see page 5) or by pressing the MENU
button on the top control panel for about five seconds to reset your TV to the factory setting.
01
Program Sorting
Program:
01
02
03
04
Select new position
continued
01GB04INS-Rus.p65 20/9/04, 3:24 PM8
Black

9
Overview of Controls
Overview of Controls
Sony KV-HW212M95 Group H4 (GB, RU)_2-177-672-12 (1)
Overview of Controls
x TV top control, front and rear panels
Button/Terminal Function Page
1 ! Turn off or turn on the TV. 6
2 Remote control sensor. –
3 Wake Up indicator. 21
3 1 Standby indicator. 6
4 i Headphone jack. –
5 t2 Video input terminal 2. 25
6 PROG +/– Select program number. –
7 2 +/– Adjust volume. –
8 t Select TV or video input. 25
Menu operations
7 2 +/– Select and adjust items. –
8 t Confirm selected items. –
9 MENU Display or cancel the menu. –
0 SOUND MODE Select sound mode options with a 5-Band Graphic 12
Equalizer display.
qa 8 Antenna input terminal. 25
qs T Monitor output terminal. 26
qd Component video input terminal. 26
qf t1 Video input terminal 1. 25
qg WOOFER Enjoy high quality sound. 25
(KV-HW212M95 only)
PROG
MENUSOUND MODE
098 7 6
L
R
2
3
4
2
5
(MONO)
1
qh
L
R
R
1
L
Y
C
B
C
R
(MONO) (MONO)
qf qd
qs
qa
qg
TV front panel
TV rear panel
TV top control panel
01GB04INS-Rus.p65 20/9/04, 3:24 PM9
Black
10 Overview of Controls
Sony KV-HW212M95 Group H4 (GB, RU)_2-177-672-12 (1)
x Using the remote control and basic
functions
TV
1
2
3
4
6
7
8
9
0
5
MENU
PROG
A/B
1
2
3
6
8
7
4
5
qk
qf
qa
qg
qh
qj
0
qs
qd
ql
w;
wa
9
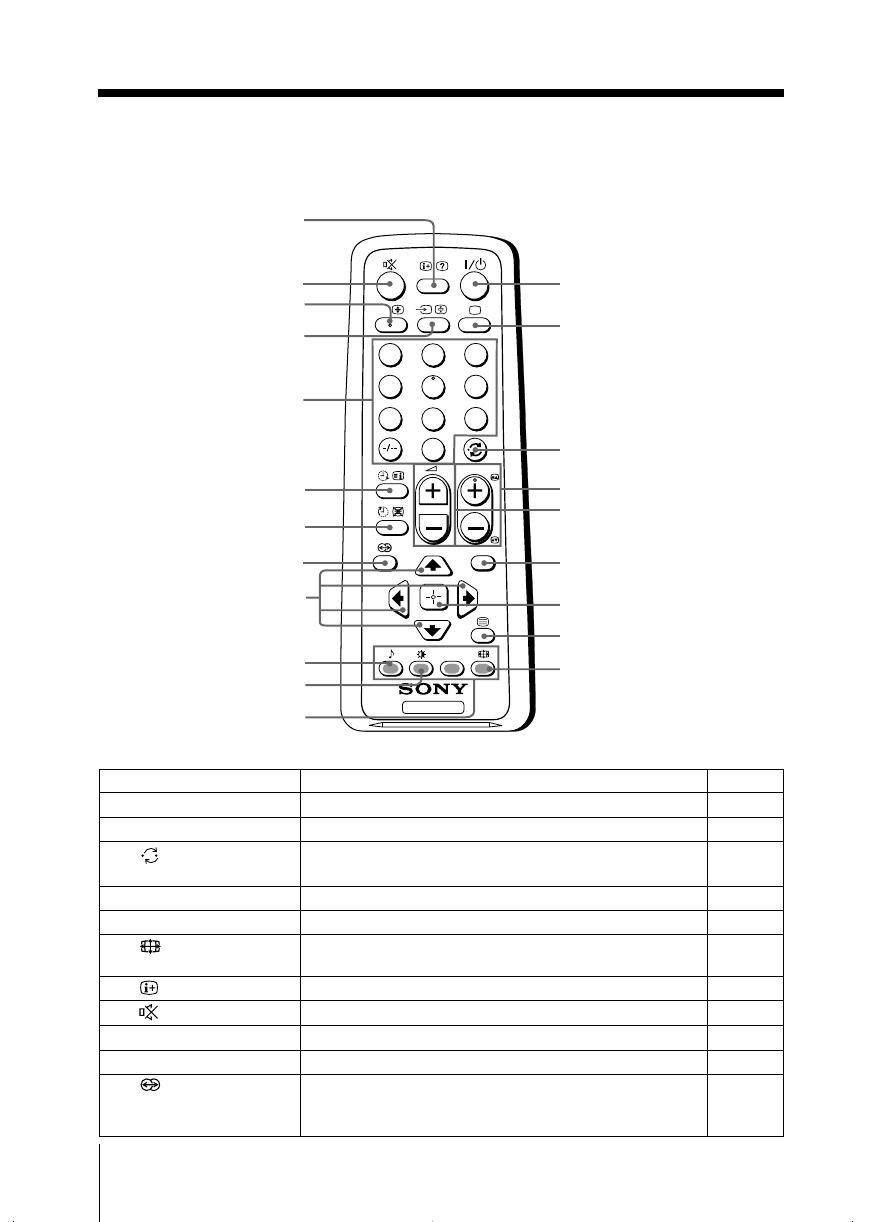
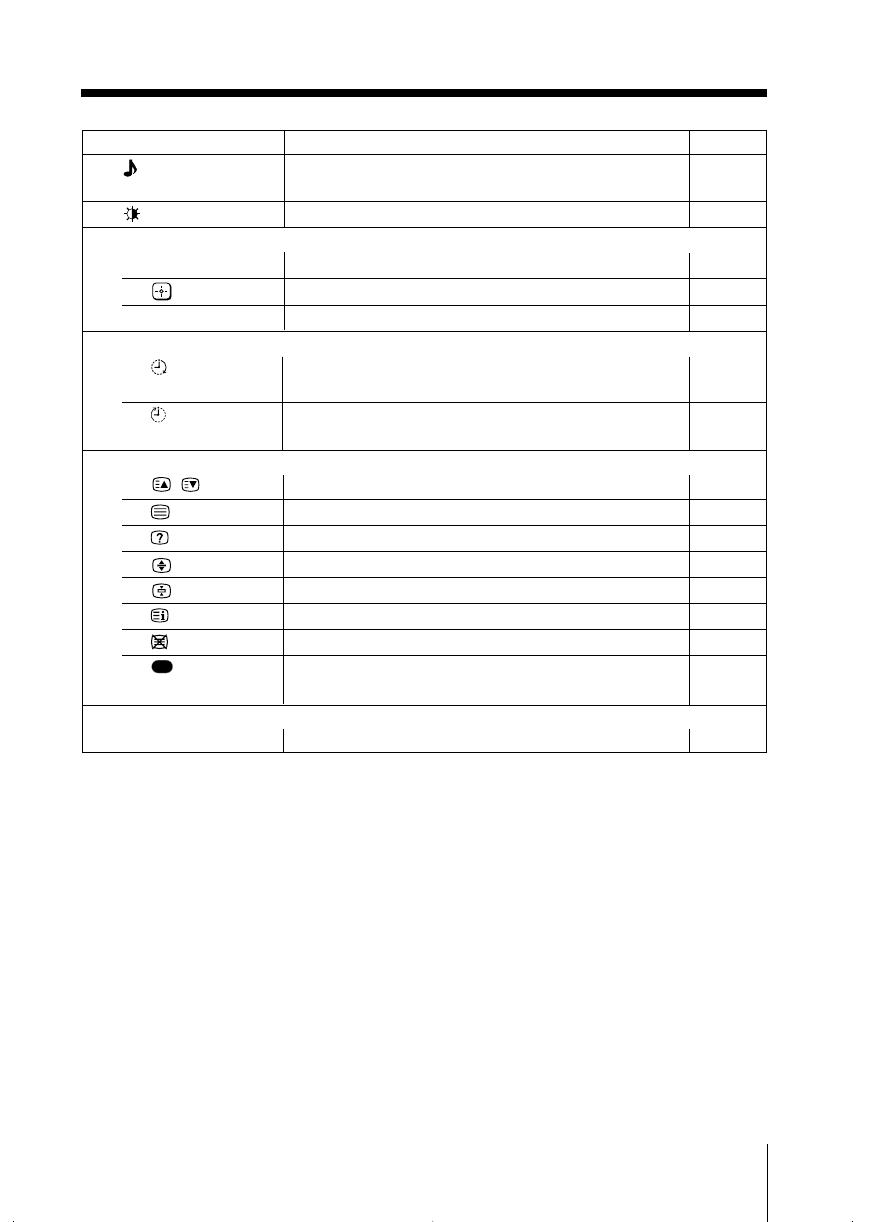
Button Description Page
1 ?/1 Turn off temporarily or turn on the TV. –
2 a Display the TV program. –
3 Jump to last program number that has been –
watched for at least five seconds.
4 PROG +/– Select program number. –
5 2 +/– Adjust volume. –
9 Change the picture size:
–
“On” (16:9 wide-mode), “Off”.
0
Display on-screen information. –
qa Mute the sound. –
qd t Select TV or video input. 25
qf 0 – 9, ÷ Input numbers. –
qj Select surround mode options:
“On” (surround), “Simulated” (stereo-like monaural –
sound), “Off”.
01GB04INS-Rus.p65 20/9/04, 3:24 PM10
Black
11
Overview of Controls
Overview of Controls
Sony KV-HW212M95 Group H4 (GB, RU)_2-177-672-12 (1)
Button Description Page
ql Select sound mode options with a 5-Band Graphic 12
Equalizer display.
w; Select picture mode options. 12
Menu operations
6 MENU Display or cancel the menu. 17
7 Confirm selected items. 17
qk V, v, B, b Select and adjust items. 17
Timer operations
qg Set TV to turn on automatically according to the –
desired period of time.
qh Set TV to turn off automatically according to the –
desired period of time.
Teletext operations (green label)
4 , Display the next or previous page. 14
8 Display Teletext broadcast. 14
0 Reveal concealed information. 14
qs Enlarge the Teletext display. 14
qd Stop Teletext display from scrolling. 14
qg Display Teletext service contents. 14
qh Show TV screen while waiting for Teletext page. 14
wa
(red, green,
Access a FASTEXT menu. 14
yellow, blue)
Stereo/bilingual operations
qs A/B Select stereo/bilingual mode. 13
Licensed by BBE Sound, Inc. under USP4638258, 4482866.
“BBE” and BBE symbol are trademarks of BBE Sound, Inc.
01GB04INS-Rus.p65 20/9/04, 3:24 PM11
Black
12 Advanced Operations
Sony KV-HW212M95 Group H4 (GB, RU)_2-177-672-12 (1)
Advanced Operations
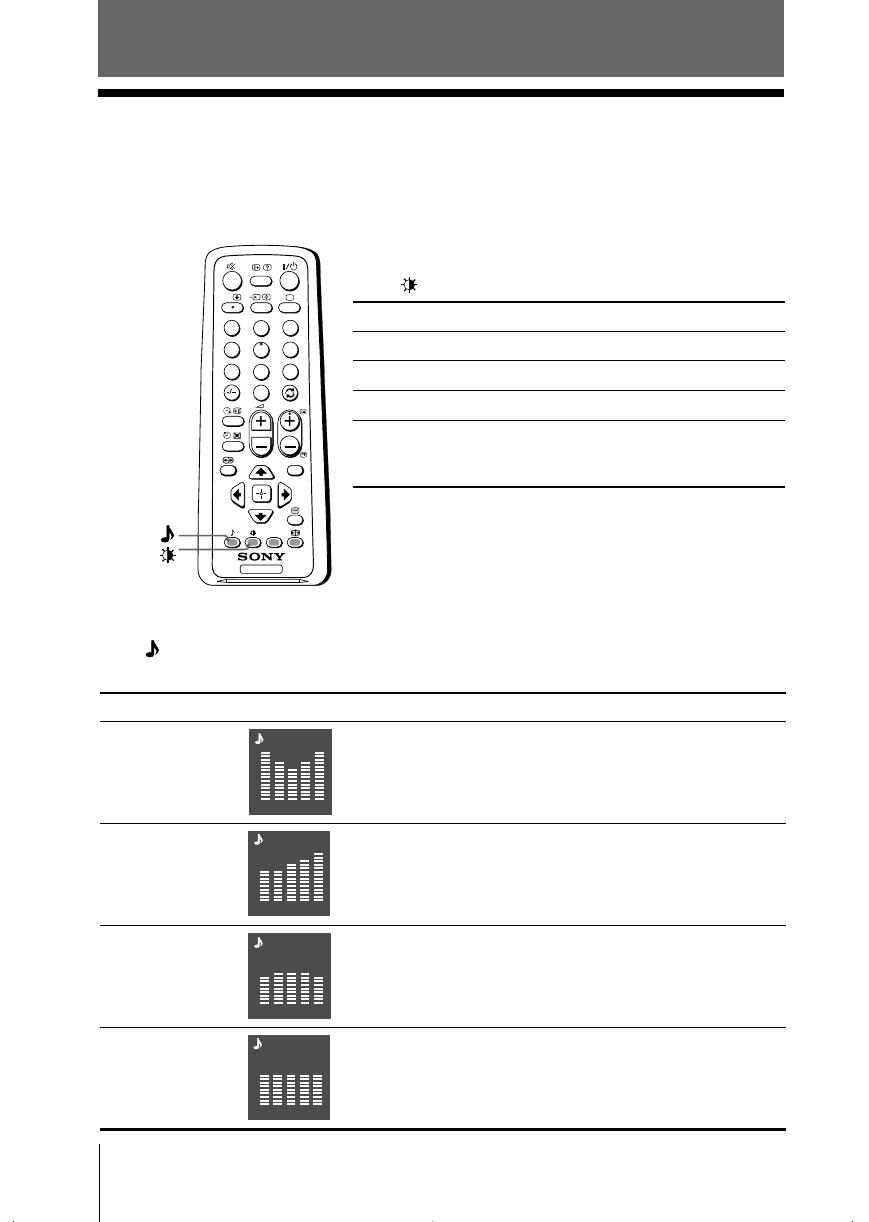
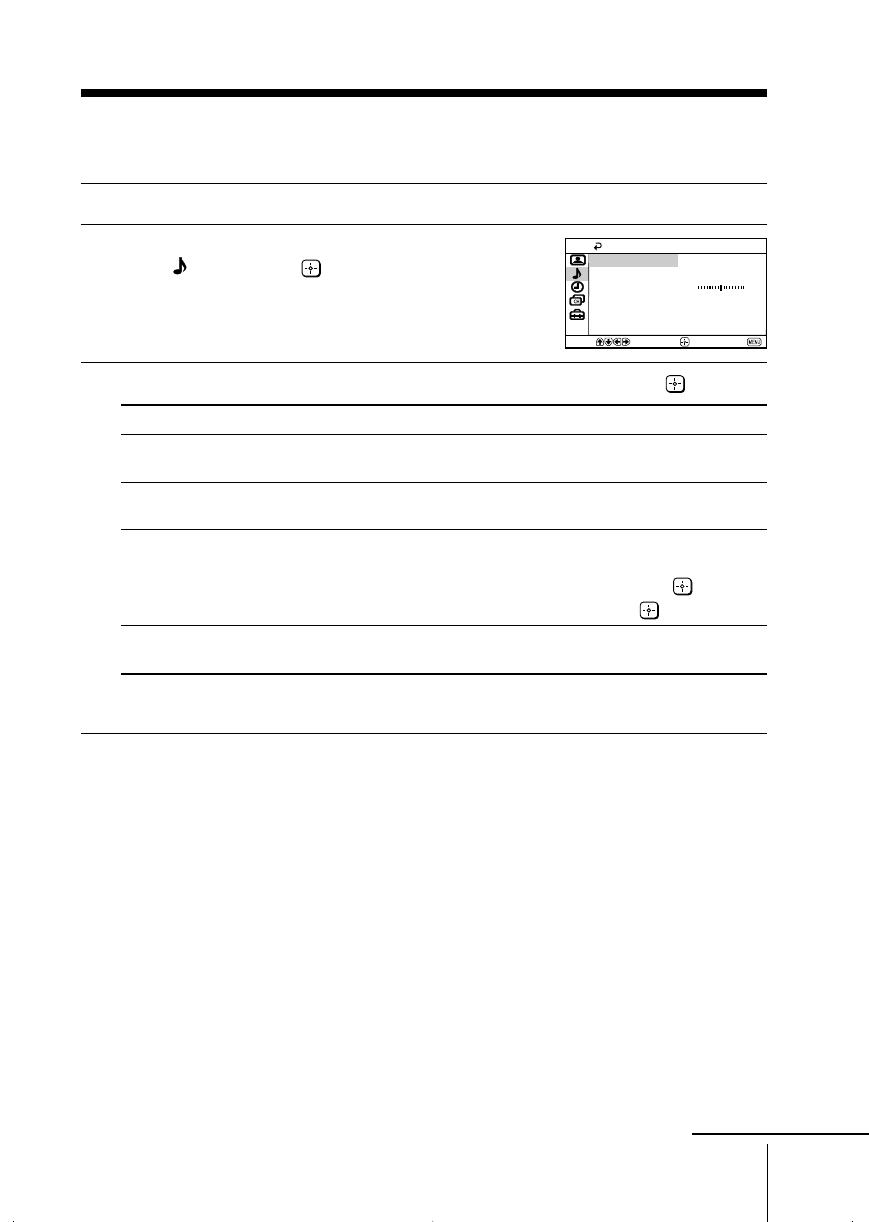
Selecting the sound mode
Press (or SOUND MODE on the top control panel) to select the desired sound
mode with a 5-Band Graphic Equalizer display.
Select To listen to
“Dynamic” dynamic and clear sound that emphasizes both the low
and high tones.
“Drama” sound that emphasizes voice and high tones.
“Soft” soft, natural and relaxing sounds.
“Personal” the last adjusted sound setting from the
“Sound Adjustment” option in the menu (see page 20).
x Selecting the picture and sound
modes
You can select picture and sound modes and adjust the setting to your
preference in the “Personal” option.
Selecting the picture mode
Press to select the desired picture mode.
Select To view
“Dynamic” high contrast pictures.
“Standard” normal pictures.
“Soft” mild pictures.
“Personal” the last adjusted picture setting
from the “Picture Adjustment”
option in the menu (see page 18).
Dynamic
100 300 1k 3k 8k
100 300 1k 3k 8k
Drama
100 300 1k 3k 8k
Soft
100 300 1k 3k 8k
Personal
TV
1
2
3
4
6
7
8
9
0
5
MENU
PROG
A/B
01GB05AVD-Rus.p65 20/9/04, 3:26 PM12
Black
13
Sony KV-HW212M95 Group H4 (GB, RU)_2-177-672-12 (1)
Advanced Operations
NICAM
(Stereo sound)
Mono
(Regular sound)
t
t
NICAM Main
(Main sound)
NICAM Sub
(Sub sound)
Mono
(Regular sound)
tt
t
NICAM Main
(Main sound)
Mono
(Regular sound)
t
t
TV
1
2
3
4
6
7
8
9
0
5
MENU
PROG
A/B
A/B
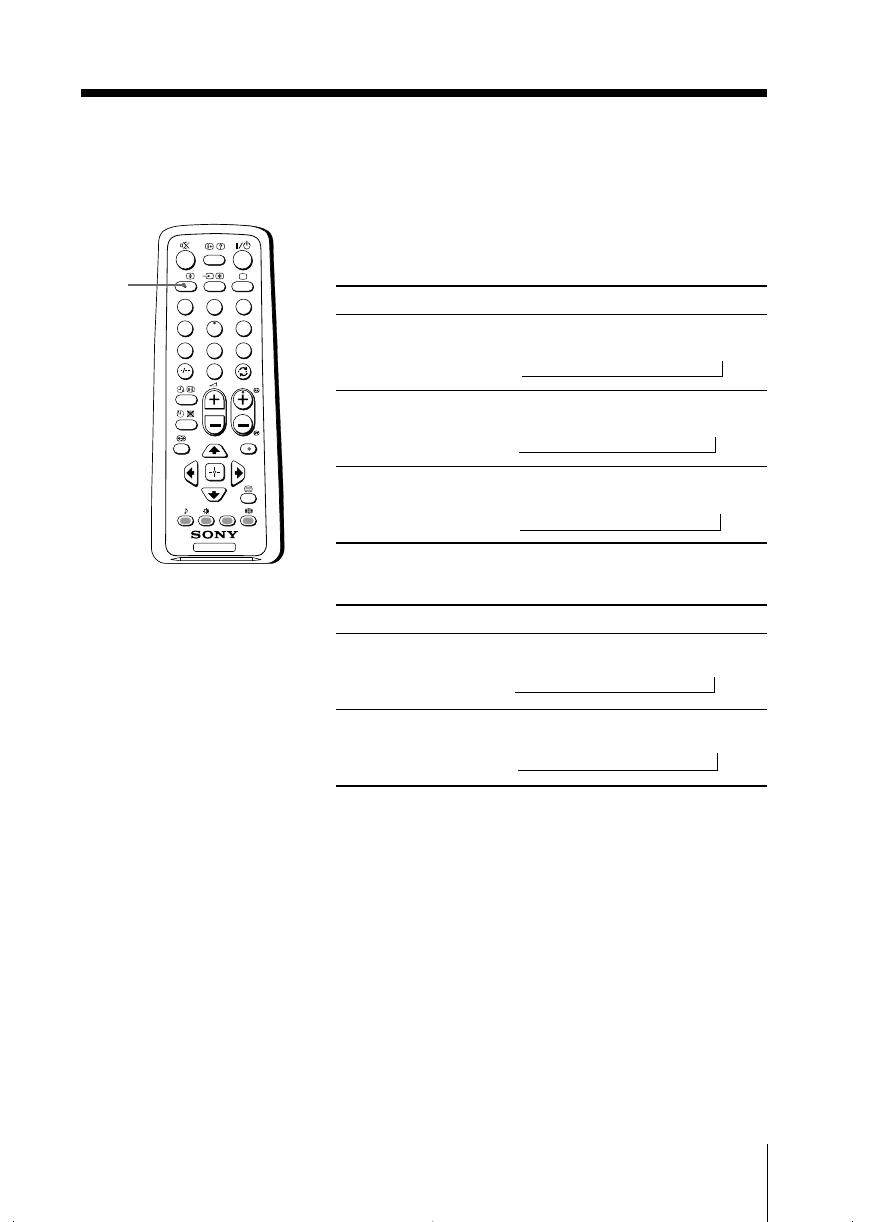
x
Enjoying stereo or bilingual programs
You can enjoy stereo sound or bilingual programs of NICAM and A2 stereo
systems by using the A/B button.
Note
• If the stereo sound is noisy when receiving a stereo program, select “Mono”. The sound
becomes monaural but the noise is reduced.
Viewing a stereo or bilingual program
When receiving a NICAM program
Broadcasting On-screen display (Selected sound)
NICAM
stereo
NICAM
bilingual
NICAM
monaural
When receiving an A2 program
Broadcasting On-screen display (Selected sound)
A2
stereo
A2
bilingual
Mono
(Regular sound)
Stereo
(Stereo sound)
t
t
Main
(Main sound)
Sub
(Sub sound)
t
t
01GB05AVD-Rus.p65 20/9/04, 3:26 PM13
Black
14 Advanced Operations
Sony KV-HW212M95 Group H4 (GB, RU)_2-177-672-12 (1)
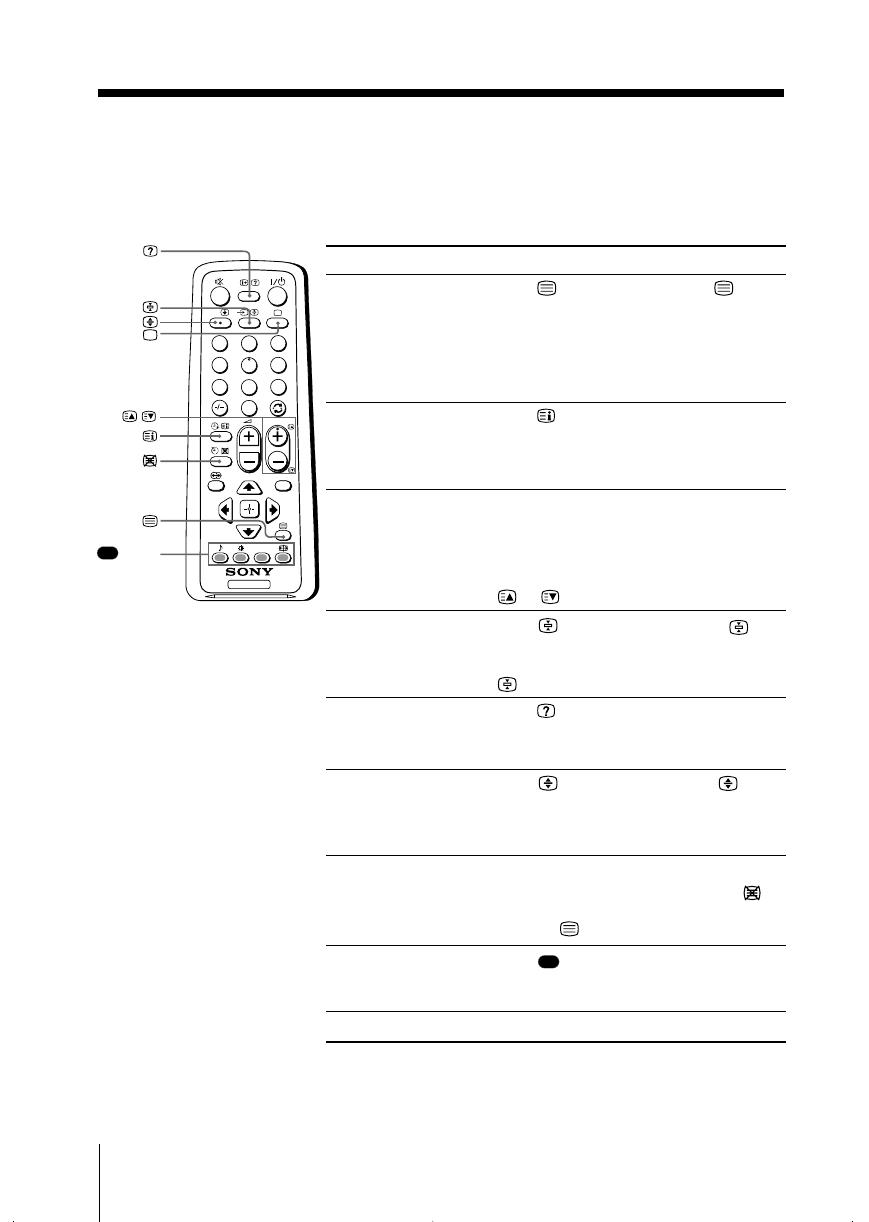
x Viewing Teletext
Some TV stations broadcast an information service called Teletext which allows
you to receive various information, such as stock market reports and news.
You can use the buttons on the remote to view Teletext.
To Do this
display a Teletext Press . Each time you press , the
page on the screen changes as follows:
TV picture Teletext t Teletext and TV t TV.
If there is no Teletext broadcast, “100” is
displayed at the top left corner of the
screen.
check the contents Press .
of a Teletext service An overview of the Teletext contents,
including page numbers, appears on the
screen.
select a Teletext page Press the number buttons to enter the
three-digit page number of the desired
Teletext page. If you make a mistake,
reenter the correct page number. To
access the next or previous page, press
or .
hold (pause) a Press to display the symbol “ ” at
Teletext display the top left corner of the screen. To
resume normal Teletext viewing, press
.
reveal concealed Press .
information (e.g., To conceal the information, press the
an answer to a quiz) button again.
enlarge the Teletext Press . Each time you press , the
display Teletext display changes as follows:
Enlarge upper half t Enlarge lower
half t Normal size.
stand by for a Teletext (1) Enter the Teletext page number that
page while watching you want to refer to, then press .
a TV program (2) When the page number is displayed,
press to show the text.
select a FASTEXT Press (red, green, yellow and blue)
menu or the colored that corresponds to the desired menu or
boxes page number.
turn off Teletext Press a.
Note
• The FASTEXT feature can be used only when the FASTEXT broadcast is available.
(red,
green,
yellow,
blue)
TV
1
2
3
4
6
7
8
9
0
5
MENU
PROG
A/B
,
01GB05AVD-Rus.p65 20/9/04, 3:27 PM14
Black
15
Sony KV-HW212M95 Group H4 (GB, RU)_2-177-672-12 (1)
Menu Adjustment
Menu Adjustment
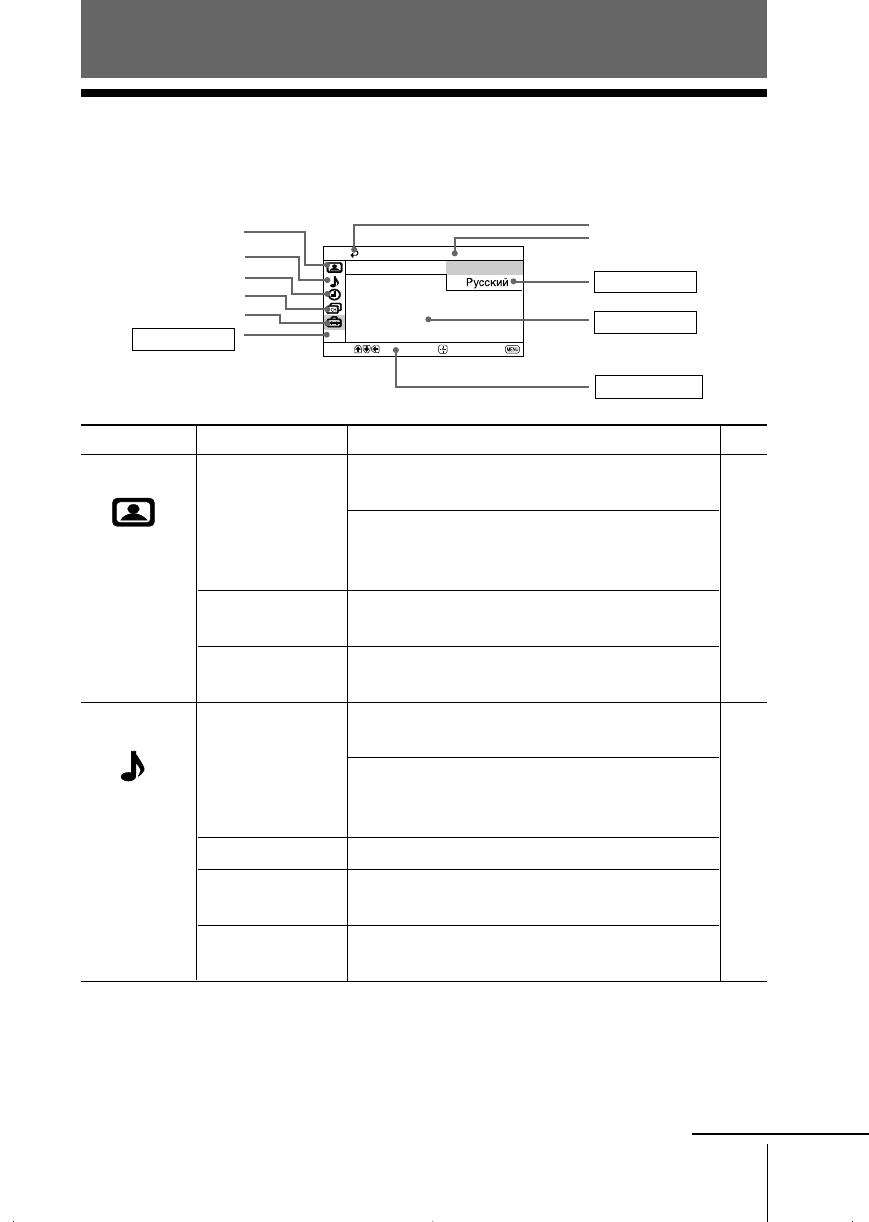
x Introducing the menu system
The MENU button lets you open a menu and change the settings of your TV.
The following is an overview of the menu system.
Return icon
Setup icon
Channel Setup icon
Timer icon
Name of the current
menu
Picture icon
Menu level 3
Menu level 2
User Guidance
Menu level 1
Level 1
“Picture”
“Sound”
Level 2
“Mode”
“Picture Adjustment”
“Color Temperature”
“Intelligent Picture”
“Mode”
“Sound Adjustment”
“Balance”
“Intelligent Volume”
“Surround”
Level 3/Function
Select the picture mode:
“Dynamic” t “Standard” t “Soft” t “Personal”
Adjust the “Personal” option:
“Picture” t “Brightness” t “Color” t
“Hue” t “Sharpness” t “Reset”
Adjust white color tint:
“Cool” t “Neutral” t “Warm”
Optimize picture quality:
“On” t “Off”
Select the sound mode:
“Dynamic” t “Drama” t “Soft” t “Personal”
Adjust sound frequency settings of “Personal”
option:
“Adjust” t “Reset”
Select to emphasize the left and right speakers.
Adjust volume automatically:
“On” t “Off”
Select the surround mode:
“On” t “Simulated” t “Off”
Page
18
19
Confirm
End
Setup
Wide Mode:
Video Label
Picture Rotation
Language: English
Color System:
Portable Audio Mode:
Select
Sound icon
continue
01GB05AVD-Rus.p65 20/9/04, 3:27 PM15
Black
16 Menu Adjustment
Sony KV-HW212M95 Group H4 (GB, RU)_2-177-672-12 (1)
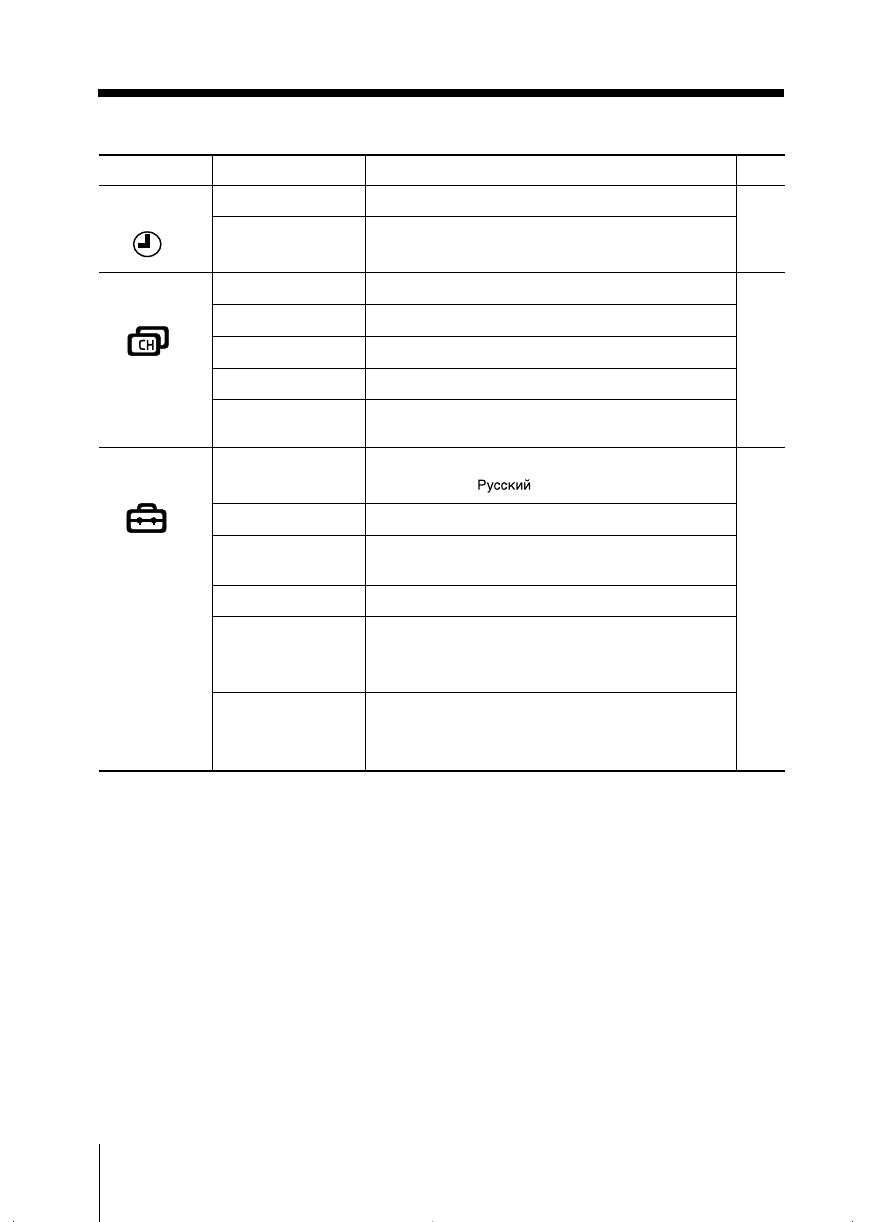
Level 1
“Timer”
“Channel Setup”
“Setup”
Level 2
“Sleep Timer”
“Wake Up Timer”
“Auto Program”
“Manual Program”
“Program Label”
“Program Block”
“Program Sorting”
“Language”
“Picture Rotation”
“Wide Mode”
“Video Label”
“Color System”
“Portable Audio
Mode”
Level 3/Function
Set TV to turn off automatically.
Set TV to turn on automatically.
Preset channels automatically.
Preset channels manually.
Label the program number.
Block unwanted programs.
Change the order in which the channels appear
on the screen.
Change the menu language:
“English” t “ ”(Russian)
Adjust the picture position.
Change the picture size:
“On” (16:9 wide-mode) t “Off”
Label the connected equipment.
Select the color system:
“Auto” t “PAL” t “SECAM” t “NTSC3.58”
t “NTSC4.43”
Select the input connected to your audio
equipment:
“Video1” t “Video2” t “Off”
Page
21
22
24
continued
01GB05AVD-Rus.p65 20/9/04, 3:27 PM16
Black
17
Sony KV-HW212M95 Group H4 (GB, RU)_2-177-672-12 (1)
Menu Adjustment
Select
End
Channel Setup
Program Block
Program Label
Manual Program
Auto Program
Confirm
Program Sorting
Select
End
Channel Setup
Program Block
Manual Program
Program Label
Program Sorting
Confirm
Auto Program
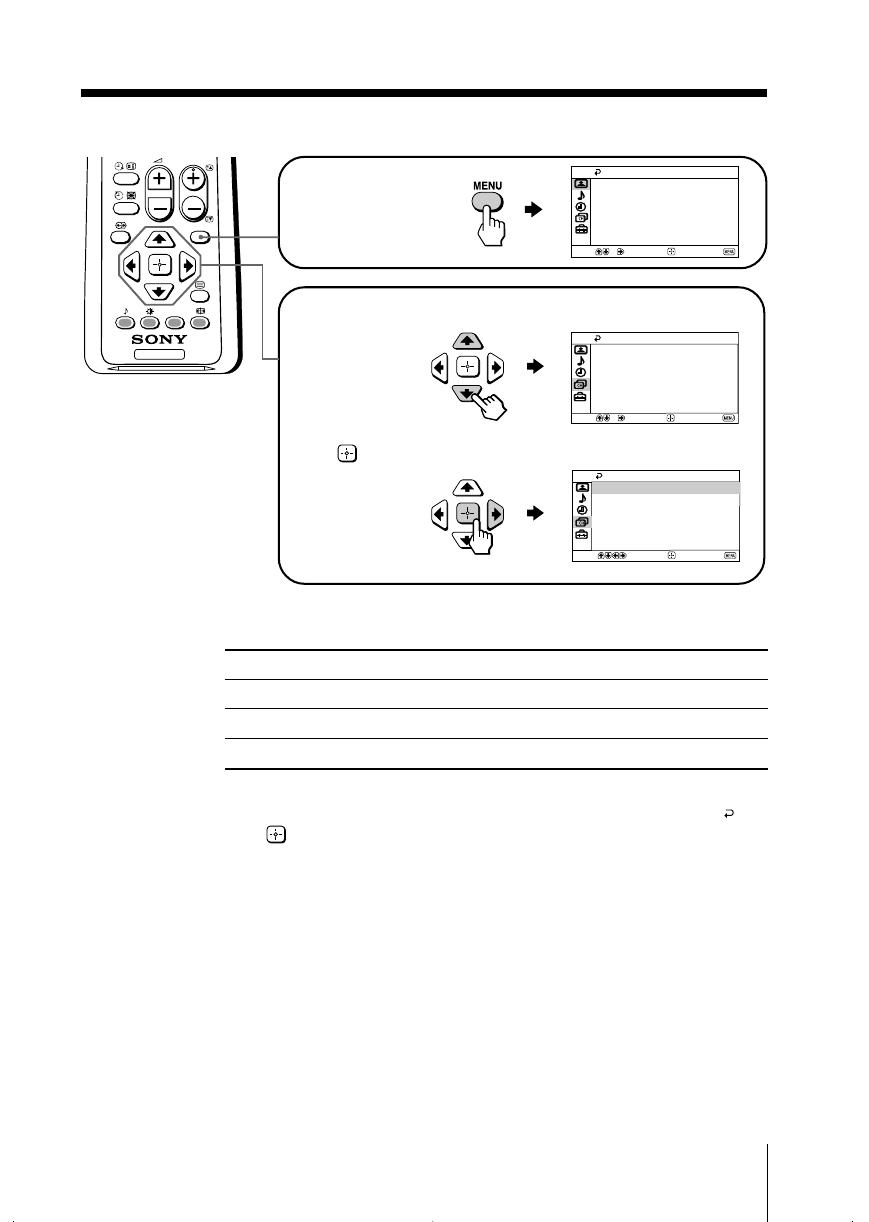
How to use the menu
Other menu operations
Tips
• If you want to exit from Menu level 2 to Menu level 1, press V or v until the return icon ( ) is
highlighted, then press .
• The MENU, t and 2 +/– buttons on the top control panel can also be used for the
operations above (see page 9).
Note
• When a feature is dimmed in the menu, it is not selectable.
To
Adjust the setting value
Move to the next/previous menu level
Cancel the menu
Press
V, v, B or b.
B or b.
MENU.
Press V or v to select
the desired item.
Press (or b) to
confirm your
selection and
go to the next
level.
Press MENU to
display the menu.
TV
MENU
PROG
Select
Confirm
End
Picture
Color Temperature: Cool
Picture Adjustment
Mode: Dynamic
Intelligent Picture: On
01GB05AVD-Rus.p65 20/9/04, 3:27 PM17
Black
18 Menu Adjustment
Sony KV-HW212M95 Group H4 (GB, RU)_2-177-672-12 (1)
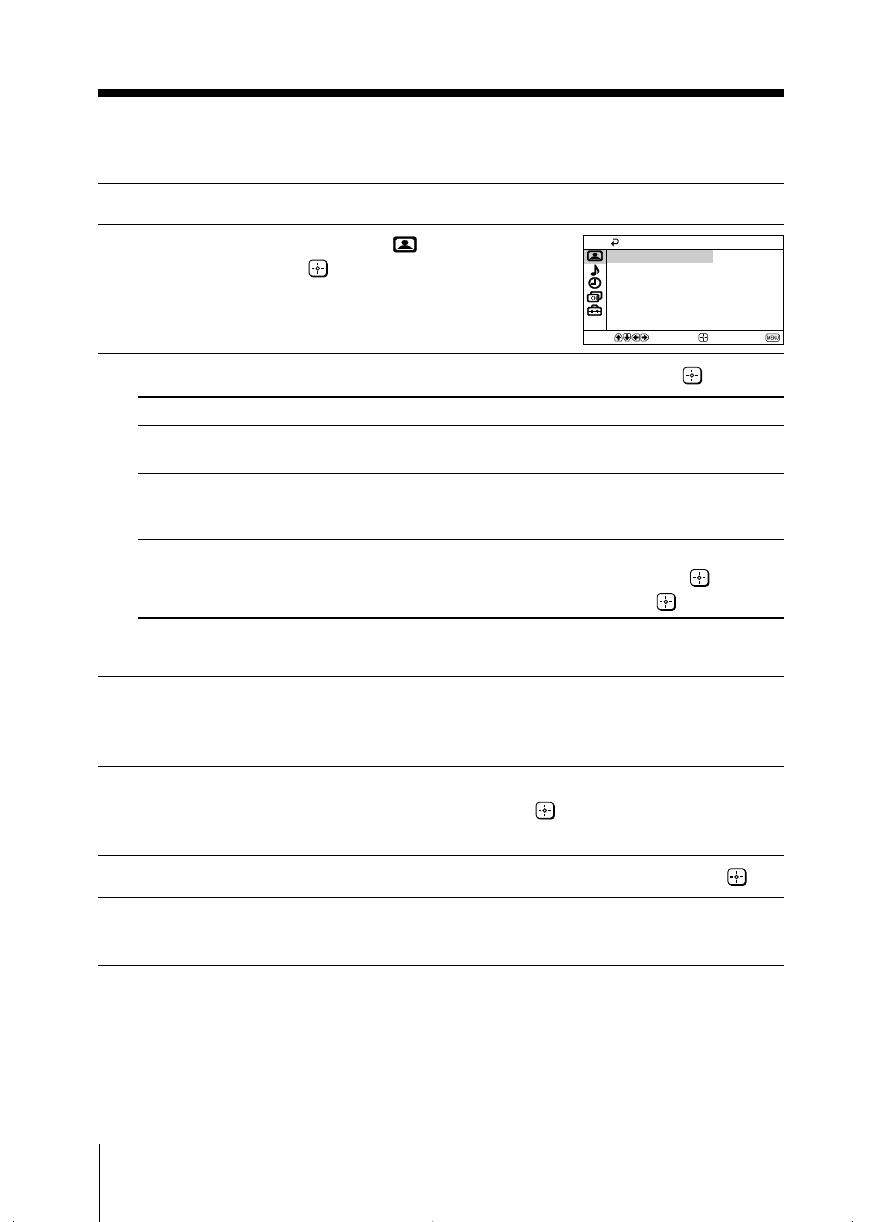
x Changing the “Picture” setting
The “Picture” menu allows you to adjust the picture settings.
1
Press MENU.
2
Make sure the “Picture” icon ( ) is
selected, then press
.
3
Press V or v to select the desired item (e.g., “Mode”), then press .
Select To
“Mode” choose either “Dynamic”, “Standard”, “Soft” or
“Personal”* (see page 12).
“Color Temperature” adjust white color tint.
Choose either “Cool” (blue tint), “Neutral” (neutral
tint) or “Warm” (red tint).
“Intelligent Picture” optimize picture quality.
Press V or v to select “On”, then press .
To cancel, select “Off”, then press .
* You can adjust the setting to your personal preference in the “Picture Adjustment” and
“Color Temperature” options only when the “Personal” mode is selected.
Adjusting the “Picture Adjustment” items under
“Personal” mode
1
Press V or v to select either “Picture” (contrast), “Brightness”, “Color”,
“Hue” (color tones) or “Sharpness”, then press
.
Selecting “Reset” will set your TV to the factory setting.
2
Press V,v,B or b to adjust the setting of your selected item, then press .
3
Repeat the above steps to adjust other items.
The adjusted settings will be received when you select “Personal”.
Notes
• “Hue” can be adjusted for the NTSC color system only.
• Reducing “Sharpness” can also reduce picture noise.
Confirm
End
Picture
Color Temperature: Cool
Picture Adjustment
Mode: Dynamic
Intelligent Picture: On
Select
01GB05AVD-Rus.p65 20/9/04, 3:27 PM18
Black
19
Menu Adjustment
Sony KV-HW212M95 Group H4 (GB, RU)_2-177-672-12 (1)
x Changing the “Sound” setting
The “Sound” menu allows you to adjust the sound settings.
1
Press MENU.
2
Press V or v to select the “Sound”
icon (
), then press .
3
Press V or v to select the desired item (e.g., “Mode”), then press .
Select To
“Mode” choose either “Dynamic”, “Drama”, “Soft” or
“Personal”* (see page 12).
“Balance” Press v or B to emphasize the left speaker.
Press V or b to emphasize the right speaker.
“Intelligent Volume” adjust the volume of all program numbers and
video inputs automatically.
Press V or v to select “On”, then press .
To cancel, select “Off”, then press .
“Surround” choose either “On”, “Simulated” or “Off”
(see page 10).
* You can adjust the setting to your personal preference in the “Sound Adjustment”
option only when the “Personal” mode is selected (see page 20).
Balance
Intelligent Volume:
Surround: Off
Off
Sound Adjustment
Dynamic
Mode:
Sound
Confirm
End
Select
continue
01GB06ADJ-Rus.p65 20/9/04, 3:27 PM19
Black
20 Menu Adjustment
Sony KV-HW212M95 Group H4 (GB, RU)_2-177-672-12(1)
Reset
100 300 1k 3k 8k
Adjust
Adjustment: Personal
Confirm
End
Select
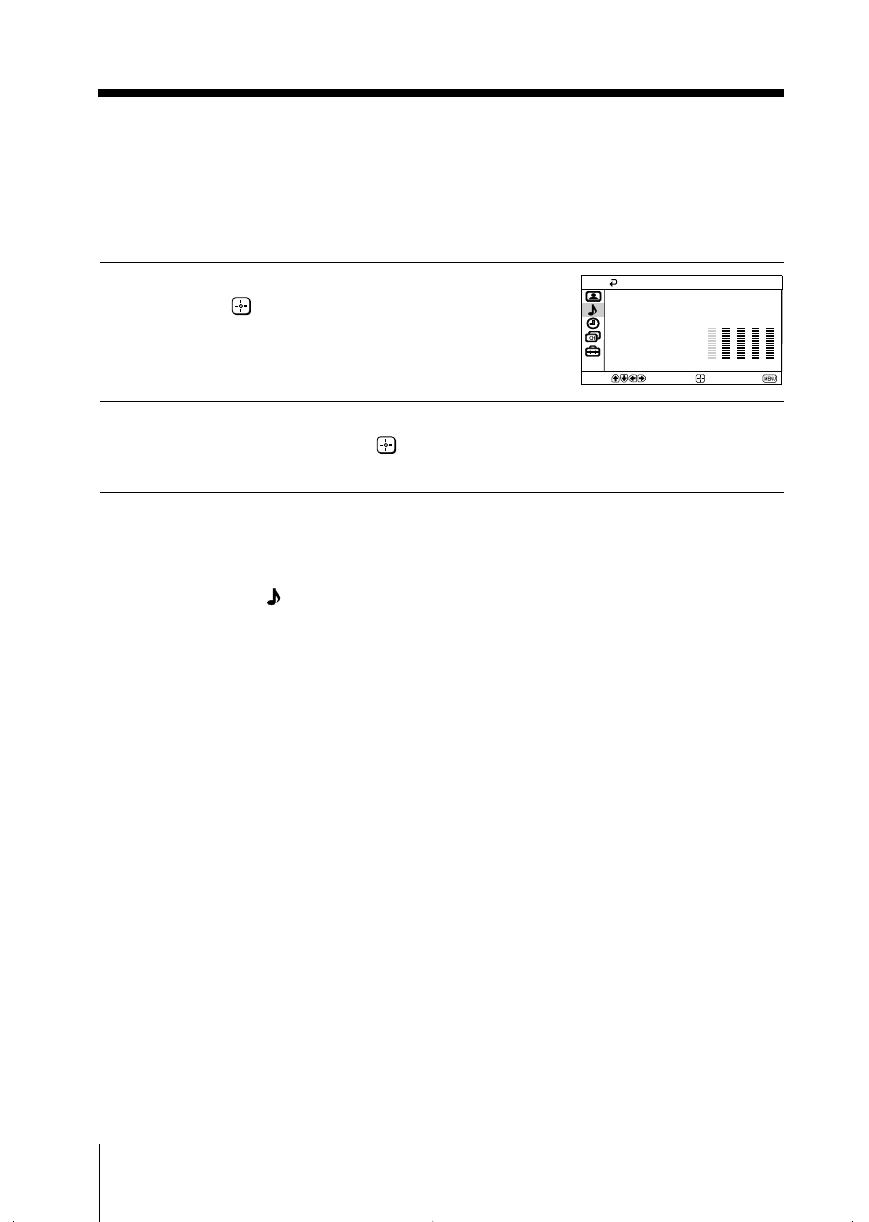
Adjusting the “Sound Adjustment” item under
“Personal” mode
The 5-Band Graphic Equalizer feature allows you to adjust sound frequency settings
of “Personal” mode in the menu.
1
Make sure that “Adjust” is selected,
then press
.
Selecting “Reset” will set your TV to
the factory setting.
2
Press B or b to select the desired sound frequency, then press V or v to
adjust the setting and press .
The adjusted settings will be received when you select “Personal”.
Notes
• Adjusting higher frequency will affect higher pitched sound and adjusting lower frequency
will affect lower pitched sound.
• You may display the settings directly using the SOUND MODE button on the top control
panel (see page 9) or button on the remote control (see page 11).
continued
01GB06ADJ-Rus.p65 20/9/04, 3:27 PM20
Black

6
Общее описание кнопок телевизора
Общее описание -Установка
Установка батареек в пульт дистанционного управления
Убедитесь в том, что батарейки вставлены в соответствии с обозначенными полюсами.
Бережно относитесь к окружающей среде и выбрасывайте отработанные батарейки в специально
установленные для этого контейнеры.
SO
NY
CO
RPO
RA
TION
JA
PA
N/4
SO
NY
C
OR
PO
RA
TIO
N J
AP
AN
/4
Подключение антенны и видеомагнитофона
Провода для подключения не входят в комплект поставки.
OUT
IN
или
Для получения более подробной информации о
подключении видеомагнитофона обратитесь к
Разделу «Подключение дополнительных
устройств» данной Инструкции по Эксплуатации.
видеомагнитофон
Нажмите на
отметку
крышки, чтобы
увидеть разъемы
Индикатор
режима
временного
выключения
(standby)
Переключатель
включение /
выключение
Гнeздo для
наушников
Кнопки выбора
последующей или
предыдущей
программы (выбор
телевизионных
станций)
Кнопки регулировки
громкости
Кнопка нaчaльнoй
aвтoнacтpoйки
телевизора
Кнопка
выбора
источника
входа
Вход для видео
сигнала S
Вход для аудио
сигнала
Вход для видео
сигнала
Подключение через Евроразъем (SCART)
(пoстaвляeтcя дoпoлнитeльнo).
KV29LS40K RU.fm Page 6 Monday, February 2, 2004 10:19 AM
-
Contents
-
Table of Contents
-
Troubleshooting
-
Bookmarks
Quick Links
Trinitron Color
Video CD TV
Operating Instructions
####
####
####
f
KVD-C21MF1
©1996 by Sony Corporation
®
3-858-251-12 (1)
EN
C##
RF
A
Related Manuals for Sony Trinitron
Summary of Contents for Sony Trinitron
-
Page 1
3-858-251-12 (1) ® Trinitron Color Video CD TV Operating Instructions #### #### #### KVD-C21MF1 ©1996 by Sony Corporation… -
Page 2
WARNING To prevent fire or shock hazard, do not expose the unit to rain or moisture. To avoid electrical shock, do not open the cabinet. Refer servicing to qualified personnel only. The following caution label is located inside of the unit. This unit can play following discs: CD-G Audio CDs… -
Page 3
MENU MENU VISUAL MODE PROGRAM PRESET ENTER LANGUAGE / DISC COLOR SYSTEM POWER Select and press ENTER PROGRAM PRESET AUTO PROGRAM ENTER MANUAL PROGRAM Select and press ENTER AUTO PROGRAM ENTER SYSTEM PROG B / G – – – – – –… -
Page 4
ill005 9 Getting Started… -
Page 5: Table Of Contents
Precautions Table of Contents • Operate the TV only at 110-240 V AC. Getting Started • Do not operate the TV if any liquid or solid object falls into it. Have it checked immediately by 6 Connections qualified personnel only. 8 Presetting channels •…
-
Page 6: Getting Started
Getting Started Connections Connecting a VHF antenna or a combination VHF/UHF antenna — 75-ohm coaxial cable (round) Attach an optional IEC antenna connector to the 75-ohm coaxial cable. Plug the connector into the ˘ (antenna) socket at the rear of the TV. Rear of TV On a wall Rear of TV…
-
Page 7
Front of TV VIDEO 2 IN Camcorder VIDEO L(MONO)-AUDIO-R to video and audio outputs : Signal flow Connecting audio/video equipment using VIDEO OUT jacks to antenna socket Rear of TV AUDIO VIDEO L(MONO) to antenna output VIDEO 1 IN VIDEO OUT to video and VIDEO OUT audio inputs… -
Page 8: Presetting Channels
Press › or ¢ to select “PROGRAM PRESET” Presetting channels and press ENTER. The PROGRAM PRESET menu appears. PROGRAM PRESET AUTO PROGRAM MANUAL PROGRAM Select and press ENTER Press › or ¢ to select “AUTO PROGRAM” Presetting channels automatically and press ENTER. The AUTO PROGRAM menu appears.
-
Page 9
Repeat steps 4 to 6 to preset other Presetting channels manually channels. To change the channel for a particular program After you finish presetting, press MENU to position or to receive a channel with a weak signal, go back to the original screen. preset the channel manually. -
Page 10
Manual fine-tuning Captioning a station name Normally, the automatic fine-tuning (AFT) is already You can name a channel using up to five characters working. However, if the picture of a program is (letters or numbers) to be displayed on the TV screen distorted, you can use the manual fine-tuning function (e.g. -
Page 11: Tv Operations
TV Operations Select the TV channel you want to watch. Watching the TV To select a channel directly Press a number button. – /– – To select a two-digit channel, press “ -/- -, ” before the number buttons. For example: to select channel 25, press “…
-
Page 12
Switching off the TV Using the on-screen display (TV mode) To switch off the main power, press POWER on the Press DISPLAY. remote commander. The station name, program position, and CH number The TV enters standby mode and the STANDBY lamp are displayed on the screen. -
Page 13: Cd Operations
CD Operations Press SELECT z on the remote commander Playing CDs or SELECT ^ on the TV. SELECT Press VOL +/– on the remote commander or VOLUME +/– on the TV to adjust the volume. Playing a VIDEO CD without PBC To stop playback Press p.
-
Page 14
Select the desired item in the menu screen Playing a Video CD with PBC with the number buttons. on the remote commander on the TV VCD MENU S E L E C T ^ DISC STOP p SELECT VCD MENU +/– OPEN/CLOSE 6 –… -
Page 15: Playing An Audio Cd
Playing a CD-G Playing an audio CD Press POWER. Press POWER. When the TV is in standby mode after pressing When the TV is in standby mode after pressing POWER, press POWER on the remote commander. POWER, press POWER on the remote commander. Press DISC.
-
Page 16
Selecting the disc color system Playing repeatedly You can select the color system for the disc you want to You can play tracks repeatedly in any play mode. play back. Press MENU. REPEAT The main menu appears. MENU VISUAL MODE PROGRAM PRESET LANGUAGE / DISC COLOR SYSTEM… -
Page 17: Karaoke Operations
Karaoke Operations Press OPEN/CLOSE 6, and place the disc on Karaoke sing-along the disc tray. Press SELECT ”. SELECT Turn the MIC VOL 1/2 control to adjust the You can play karaoke (sing along) with CDs. microphone volume. MIN MAX MIN MAX MIC VOL Turn the ECHO VOL control to adjust the…
-
Page 18
Changing the pitch (Key Control) Singing along with non-karaoke discs (Karaoke Pon) While you are singing, you can change the pitch of the song in half tone pitch. You can enjoy karaoke with a stereo recorded disc, even if it is a non-karaoke disc, by reducing the singer’s voice. -
Page 19: Additional Operations
Additional Operations Using the Sleep Using the Wake Up Timer Timer You can set the TV to turn on automatically after the You can set the TV to turn off automatically after the period of time you want. period of time you want. Press SLEEP.
-
Page 20: Adjusting The Picture Mode
Adjusting the Adjusting the picture mode settings picture mode Press MENU. The main menu appears. MENU VISUAL MODE MENU PROGRAM PRESET LANGUAGE / DISC COLOR SYSTEM Select and press ENTER Press › or ¢ to select “VISUAL MODE” and press ENTER. VISUAL MODE ›…
-
Page 21: Muting The Sound
Muting the sound Listening with headphones Press MUTING. Plug the headphones (not supplied) to the 2 (headphones) jack inside the front panel on the TV. The sound from the speaker is shut off. MUTING MUTING Additional Operations…
-
Page 22: Additional Information
Additional Information Good picture Troubleshooting Noisy sound Check the TV SYSTEM setting. No picture No sound If you have any problems, read this manual again and check the countermeasure for each of the symptoms listed below. If the problem persists, contact your nearest authorized Press POWER.
-
Page 23: Notes On Cds
The CD doesn’t play Notes on CDs There’s no disc inside (“Please load a disc” appears). Insert the disc with the label side up on the disc tray correctly. Clean the disc. Be sure that the disc can be played with this unit.
-
Page 24: Receivable Channels And Channel Display
C21 to C69 Channel coverage See “Receivable channels and Indonesia channel display” 2 to 11 C03 to C12 Picture tube Trinitron M-4 to M-7 Morocco C70 to C73 21 inches (approx. 54.5 cm M-8 to M-10 C08 to C10 measured diagonally)
-
Page 25: Index To Parts And Controls
! ¢ VOLUME +/– buttons Index to parts and PROGR (program) +/– buttons controls ! § PREV (previous) = button ! ¶ NEXT + button ! • OPEN/CLOSE 6 button ! ª STOP p button @º SELECT ^ button Front panel Rear panel Function buttons Disc tray…
-
Page 26
Remote Commander MUTING button SLEEP button WAKE UP button PIC (picture) MODE button KARAOKE PON button DISPLAY button – /– – POWER switch Function buttons Number buttons PROGR (program) +/– buttons ! ¡ VOL (volume) +/– buttons !™ Menu operation buttons ! £… -
Page 27
Sony Corporation Printed in Malaysia…
 17:47
17:47
Ремонт телевизора Sony KV-21LT1K. Не светится экран. Светодиод отмигивает 5 раз. Курсы телемастеров.
 09:18
09:18
Ремонт телевизора «Sony KV-G14M2»
 05:33
05:33
Телевизор SONY KV-2165MTJ — Made in Japan, и SONY KV-14DK1 — Made in ???
 14:49
14:49
Ремонт телевизора Sony Trinitron
 35:35
35:35
TV SONY за 5 $ или мечты сбываются =)
 05:26
05:26
Ремонт телевизора «Sony KV-29CS60K».
 13:41
13:41
Ремонт телевизора Sony KV-21FT1K. Отмигивает 11 раз. Курсы телемастеров.
 10:12
10:12
How to Calibrate a Sony KV CRT Consumer TV
‘b
it ^
|U
-iff.
D
C
*/✓ i i ^V**
SONY
Trinitron Color TV
MiicrpvK’UH« no oKCfLiyaiauMH
KV-G14
KV-02}
KV-G25
KV-RU
KV-R2i
1995
by Sony Corporadon
M. MO

Цветной телевизор Trinitron Color TV Инструкция по эксплуата…
Страница 2
- Изображение
- Текст
Цветной телевизор Trinitron Color TV
Инструкция по эксплуатации
ПоЗлотоФя к рш6ош9
Подкятч«ни«
Подключвни« аит«ммы очень высокой частоты (VHF) или
ко
1
лб
1
«
1
ации аитанн очень высокой и упьтрхвысокой 4acrror(VHFyiiHF}
— 75-ОМНЫЙ
коаксиальный ка6ояь<ки^ь1й)
Подсоедините допопннтельный антенный разъемстакдарга IEC к7&-
омномукхвксмальномукабелю.
Вставьтервтьемерасгюложенноеназадней
панели телевизора антенное гнездо с обозначением
Задняя панель телевизора
Заднйя панель телевизора
Подключение комнатной антенны
Лоомоуйкое-
• Для более качественного приема рекомендуется использовать
комнатную антенну.
2
Подключение дополнительного оборудования
Вы можете подключить к вашему те]юеизору дополнительной аудио./
видео оборудование, например, аидеоматнитафон, проигрыватель компакт
дисков, Buv^eoKaMepy или игровую приотанку.
/То^ключение аодео обооудоевния к аивхдлм WOCO1Ы («ибво
вход}
Задняя панель телевизора
к актенко*/^ гнезду
к антеммому выходу
видеомагнитофон
направление
перех|ачи сигнала
Передним панель телевизора
При использовании гнезд видео входа не подключайте видео
оборудование одноерьмонно к гнездам видео входа на передней м
задней панелях телевизора. В противном случае изо^ажение на
зкран будет выводиться некачьствешю.

видбо оборудования к гмоздам MONÌTOR OUT Задняя панельтелеви…
Страница 3
- Изображение
- Текст
Подключвии« аудио/видбо оборудования к гмоздам MONÌTOR
OUT
Задняя
панель
телевизора
к антенному гнезду
Задняя ланель телевизора
к антенно»«1у выходу
еидвомагнигофон
Сг
||
II
!
f
<=
1 i
к видео и аудио
выходам
капраепенид
передачи сигнала
При выполнении записи через гнезда MONITOR OUT если вы
меняете канал или видео вход в процессе выполнения записи на
видеомагнитофон, го канал или в>шео вход, сигнал с которого вы
записываете, таюке поменяется.
Подключение источника постоянного тока
— Только для модели KV-G14MD1
Вь( мажете также залитать ваш телевизор от источника постоянного
тока, подключив входящий а комплекг поставки кабель (DC power card) к
аккумуляторной батарее автомобиля.
1. Соедините кабель красного цвета о положительным полюсом
(обозначен
красным
знаком
+),
а
кабель
черного
цвета
•
с
отрицательным
полюсом
(обозначен
черным
знаком
•)
аккумуляторной батареи автомобиля.
2. Соедините кабель (DC power cord) с гнездом ОС INPUT и
нажмите кнопку ОС POWER (ON). Указанные гнездо и кнопка находятся
на задней панели телевизора.
3. Для отключения телевизора от источника переменного тока и
подключения к источнику постоянного тока нажмите кнопку POWER
на передней панели телевизора.
Переключатель DC POWER
к гнезду ОС INPUT
Кабель “ОС power cord’
(входит в комплект
поставки)
12Г24 V ur Ьзпиу
Автомобильная
аккумуляторная батарел
12/24 В
Примечания;
*
Если вы не пользуетесь телевизором, то отожмите кнопку DC
POWER (Положение OFF) и отсоадините кабель «DC pow« cord’ or
аккумуляторном батареи.
*
В качестве источника гтостоянного гака мажет использоваться
только автомобильная аккумуляторная батарея (12/24 (с заземленным
отрицательным полюсом).
*
Пользуйтесь только кабелем, входящим в комплект поставки. Ис
пользование другого каболя с отличающейся полярностью может
привести к выходу телевизора из строя.

са каналов Првдмрнтбпьивя мастройка каналов а аатоиатичаоком…
Страница 4
- Изображение
- Текст
Прешзрит^льндй настрой1са каналов
Првдмрнтбпьивя мастройка каналов а аатоиатичаоком
режиме
6ымо)«01Л*ОйОСП)о>пьдо 80 тв-»сднд/и)9 еарнфгаа1нчес1СОЙ последовав
тельности, наминая с 1.
i
Я, S
7^
Передняя панель телевизора
1. Нажмите киот^ POWER.
О
Когда после накагия нкопки POWER телевизор находится в
дежурном режиме, нажмите кнопку POWER на пульте
дистанционного управления.
2.
Нажимайте кнопку TV SYSTEM до появления обозначения
системы
телевидения,
используемой
в
вашей
местности
(за
»1сключением моделей KV«B14L1/B21L1).
<зР
rrtVSIlK
3. Нажмите кнопку AUTO PROGR.
/jO
п
Чтобы
начать
предварительную
настройку
каналов
в
автоматическом режиме, начиная с заданного номера программы:
1. Наж»д>те кнопку MANUAL PROGR.
2. HdxuHTSKHonicyTVSYSTEM. чтобы выбрать системутелевидения.
кслользуемух> в вашей местности (за исключением моделей KV-B14L1/
021Lt),
3. Нажмите кнопку PROGR чтобы выбрать номер программы.
4. Нажните кнопку AUTO PROGR.
Предварительная настройка каналов в ручном режиме.
Чтобы изменить канал для определенного номера лрофаммы или
для обеспечения приема канала, излучающего слабый сигнал, выполните
настройку в ручном pcxeiuo.
1.
Нажмите кнопку MANUAL PROGR.
2.
Нажимайте xHontor PROGR *h до появления на экране
необходимого номера протраммы.
3.
Нажимайте кнот^ TV SYSTEM
ДО
появления обозначения
системы телевидения, используемой в вашей иестноетн (аа
исключением моделей KV-B14LirB21L1).
4.
Нажимайте кнопку VOLUME *f- до появления на экране
изображения, передаваемого по нужному вам каналу.
5.
Нажмите кнопку MANUAL PROGR.
При неправильном выборе системы гелевидеиня (за
исключением моделей KV«B14L1/821L1) ияетя изображения могут
быть бсднь1ми ю’ипи звук с шумовой гкнхехой. Б этом случае выберите
соответствующую систему телевидения.
1. Нажмите кнопку RROGR для выбора номера программы.
2. Нажимайте кнопку TV SYSTEM, пока изображение и звук не
станут исфмальлыми.
Примечания (кроме моделей KV>B14L1/821L1):
•
Если 8ы не знаете, какая система телевидения используется в
ваш^ местности, получите гюнсупмацию в бггижайшем сервисном
центре или у дилера.
•
Выбор системы тепевидения TV SYSTEM сохроиястся в ломяти
для каждого номера программы.
Исключение номеров программ
Исключив неиспользуемые или н«ну)Ю(ые сам программы, вы можете
пропустить их. когда нажимаете кнолгу PROGR +;-.
1.
Нажимайте кнопку PROQR -W-, пока из экрана на появится
неиспользуемый или ненужный вам номер программы.
2.
Нажмите ккотог MANUAL PROGR.
3.
Нажмите кнош^ РЮ MODE на пульте дистанционного
управления.
4.
Нажмите кнопку MANUAL PROGR.
Для отказа от задания пропуска каналов вновь настройте
хвнэпы в ручном или автоматическом режиме.

П|>оемотр гвл&п&рбдэч
1. Для включения телевизора нажмите кнопсу POWER.
Q
О
№)гда посла нажатия кношм POWER телевизор находится в дожурном
рюкиме, нажмите кнопку POWER на пульте дистанционного управления.
2. выберите для просмотра желаемый ТВ-канал.
Для выбора канала напрямую на>шите юют^ с цифрой.
Ф ©
;
® Ф ‘2$ ■
О
Для выбора канала, номер которого состоит из двух цифр, сначала
нажмите кнопку
а затем * кнопки с цифрами,
Нш1(жм«р: для выборе канала 25 нажмите затем ‘2’ и *5″.
О 6 й
Для последо8ательно1ч> просмотра каналав нвжимай1в «копку
PR06R V* до появления нужного вам канала.
•V’,
Э. Для настройки уровня громкости нажмите кнопку VOL *>/•
0ь
Выключение телевизора
Для временного отключения телавизора нажмите кнопку POWER на
пульте дистанционного управления.
Для полного выключения гелеви.тора нажмите кнопку POWER на
самом телевизоре.
При выключении питания тет1е(»13ора в дежурном режитле индикатор
STANDBY может еще некоторое время юреть.
9
Просмотр изображения с видео бХОАд
Нажмите кнопку V1DEO/HOUD.
т
Для просмотра ТВчтвредзч нажмите кнопчг TV.
Отключение звука
Нажмите кнопку MUTING

Вывод информации на экран
Нажмите кнопку СН$РиА¥тЕУЕАи.
На зкране поввягся номер Программы, тип системы телевиаения и
настройки телевиаора.
не
шт
Настройка будильника
8ы можете настроить гелеемэор на aeroMaruviecKoe включение через
определенный нужный вам промежуток времени.
1. Для настройки таймере будильника несколько раэ
нажммите кнопку WAKE UP/1N0EX.
На охране появится дисплей и заторится индикагсч) WAKE UP.
tu
itH
w
)
)
примечания:
» Работа таймера будилытка начинается немедленно после
пропадания изображения зфанкого ^Ст1пея.
» При включении телевизора по юмаиде таймера будильника
телевизор нвстраивается на прием последней п^д самым его
г№реключением в дежурный режим ТВ-протраммы или видео сипчала.
• Если после включения телевизора по команде таймера
будильника ни одна кнопка или другс^ орган управления в течение более
2 часов ке нажимаются, то телевизор автоматически переходит в
дежурный режим Если вы хотите продолжать просмотр телевизионных
передач, нажмите любую кнопку или другой орган управления на самом
телевизоре или на пульте дистанционного управления.
Настройка таймера автоматического выключения телевизора
(Sleep Timer)
Вы можете настроить телевизор на автоматическое откпюч1жие по
истечении нужною вам периода Времени.
Нажмите кнопку SLEEP.
L
k
UE5BS2«—
I Ианмвр
6
удиг
1
у
1
и<а черв»
10
минут)
L I
4
ПДМ/Г
{Тд^МК) будкоьн«<кэ выключен}
Оудупьнкка через
12
чеос
«1
2. Если вы хотите, чтобы при включении по сигналу от таймера
будильника телевизор был настроен на прием определенной ТВ-
программы или просмотр изображения с видео входа, выберите ТВ*
программу или видео режим.
i. Нажмите кнопку POWER на пульте дистанционного управления
или настройте таймер автоматического выключения (Sleep Timer) на
переключение телевизора в деасурный режим.
Для отказа от Macrpowai rsilMcpa будильника несшльюз раз нахеиигс
кнопку WAKE UP/INDEX ДО появления надшей ‘WAKE UP TIMER:OFF»
либо отключите основное элекгрелнтание телевизора.
10
С
L
(ОГ1СГМЧ€Н1*^
чер«$ 30
(Таимео
отАпкчаииА
аиклкыбн)
Ота10ч&лт
60
мин}
%ЛЯ9РГщт*:Ш
(От1Л10ЧСИИА
чсж ОО ыт)
О
Для отказа ог настройки гаймере явтамлгического отключения теле
визора несколько роз нажмите кнопку SLEEP до появления надписи ‘SLEEP
TIMER:OFF’. либо отцпючите телевизор.
11

Настройка характеркстик изображаиий
1. Нажимайте кнопку SELECT до появпания ианманования
нужной вам характаристики.
Ъ
Примечаниа:
♦ При нормальной работе для параметра COLOR SYSTEM
выбирайте зкачоние AUTO.
Если звук искажен или с шумовой помехой (за исключением
моделей KV>B14Ll/B21L1>
При приеме программ на гиеэдоПГ:
Нажимайте кнопку TV SYSTEM, пока звук не станет чистым.
При каждом нажатии топки SELECT информация на экране
изменяется в следуккдей послеаовательнссги:
лспм
ШЖ|….
СПСР
ИИ………
Г’^ОСТЬ
!
ЯрпМь
МдНГ
iiV’……
ф
|^POrk#»/fitCS
NTSC
UfKTCCilM кж
иие
UHlMlirU
о а а о О
HepeiiHBn панель телевизора.
2. Для настройки характеристики пользуйтесь кнопками * или •.
г*-
3. Для настройки других хараггеристик повторите шаги 1 и 2.
Примечание:
• Для настройки характеристик изображения вь< можете теюке
пользоваться кнопками VOLUME
на телевизоре.
При ненормапьном цвете изображения при приеме программ
на гнездо 1Г :
Нажмите кнопку TV SYSTEM {за исклгочением моделей KV-814L1/
B21L1) или COLOK SYSTEM ИЛИ регулируйте цвет, тюка он не С1знвт
нормальным
14
15

Дополнительная информация. Возможные неисправности. При возн…
Страница 8
- Изображение
- Текст
Дополнительная информация.
Возможные неисправности.
При возникновении проблем еще раз прочитайте насгоящее руководс
тво и примите меры, перечисленные ниже для каждой из кеислревностей.
Если ото ие пок^ожет, то свяжитесь с ближайшим сервисным центром
или дилером.
Изображение со “снегом». Звук с шумовой помехой.
Проверьте антенну.
=3 Проворьте подключение антенны к телевмзору и к гнезду на
стене.
=> Проверьте правильносгь выбора сис1емы толсвидения (XV ЗУЗ-
ТЕМ)(за исключением моделей Ю/-В1411^821И).
Пунктирные ЛИНИН или полосы
» Причиной зтого могут оказаться местные истачникн помех (напри
мер. автомобили, неоновые лампы, фены. гд.). Настройте ан1внну для
миними.1аций воздействия этих источников помех.
Двойное изображение мпи “лризрякн» на экране
рядом гор или зданий. Изображение можно улучшить, используя
остронаправленну» антенну,
Скрипы корпуса телевизора
Даже при нормальном изображении или звуке изменения
температуры в комнате приводят к расширению или сжатию корпуса
телевизсфд. создавая шум. Это ие означает, что телевизор неисправен.
Хорошее изображение
Звук с шумовой помехой
гг» Проверьте правильность выбора системы телевидения (TV SYS-
ТЕМ)(за исключением моделей KV-B14L1®21L1).
Отсутствие изображения и звука
X
Нажмите кнопку POWER.
Проверьте подключение антенны.
Проверьте подключение видеомагнитофона.
Проверьте подключение шнурз питания.
Проверьте, не находится ли толевизс^ я
abxqiphow
режиме.
» Проверьте положение переключателя DC POWER (только для
модели KV-G14MD1).
^ Проверьте подключение кабеля ‘ОС pcAvei согс1″(только для
модели KV-G14MD1).
9 Причиной этого амжет быть отражение сигнала от находящихся
16
17

Хорошев изображение. Заук отсутствует. оОХ Нажмите кнопку…
Страница 9
- Изображение
- Текст
Хорошев изображение.
Заук отсутствует.
оОХ
Нажмите кнопку ‘/OLUME.
Нажмите кноп)^ MUTING.
Изображение не цветное
Настрой 16 уровень цяетностм ^COLOR) яо экранному дисплею.
Проаерьте настройку COLOR SYSTEM
Примечание о пульте дистанционного управления:
•
Входкщий в комги]бкг ппс1ааки пулы дисташ^ионного управления
используется для кесхолькнх моделей юпевизороо. Если вы не нашли
описания некогорых органов управяония, расположенных на пульте, то
ото означает, ‘гга в вашем телевизоре эти функции отсутстеуют.
HatipMMeo TEXT.
Примечание о системе телевидения:
•
1бюлка TV SYSTEM в моделях KV-B14Lt/B2lL1 не исполь-туется.
t3
Техничеекме характеристики
KV
4
M
4
C
1
KV.
KV-
621
lt
KV-
В
214
И
KV-OI
4
MI
KV-
014
М
01
KV^mt KV-
KV<I
2
IMU
035
М
1
Пршнчя
питиоинму
МГМкмш
110*240
В ntpe««Kno^o roM. $<V
$0
Гц
•М
4
Ч
0
СТ^
1
БТ
1
yojaia и* гинфпя т«л«вп>зо
9
1
«лееклмомтм
сшаттк
В/а
(гопъкр ДОЙ KV*ei
4
Lt/e
2
U
1
)
ею.
1
. [Ж. М Ся HCtiWWiW мадАМЙ KV«
6
t
4
LlJe
21
l 11
и**то«й
11
«кеТША
РА
1
, РА
1
60
. S
6
CAW, тЭС
4
.
40
. AJTSC
0
.
58
: AV
1
N <ть»» АПв
KV^t
4
L
1
/
82
an
—
РА
1
. PAL tQ. S
4
CAM. NT
3
C
4
43
. »JT
3
C
3.58
(я исьгючанИМй
U
0
A*A«fi KV
4
Bl
4
Li;B
2
lLn
Диапддон
КвНАПОБ
B/Q
VHF:c.£
2
fio£U^UHF.ce?lA
0
€
0
g;CArv:€S
01
да
З<»
с
S
1
ao
S
41
)
UHF.
с
Ю
1
АО
660
; CATV;
с
sot
$
00
. с SI ДО д
4
<{я
мто^иви iiM>iMAKV*ei
4
U/B
21
Ln
OIH
VHP:
001
fiOCU.cRI AoR
12
/UHF:oCt
3
A
0067
,«R
21
До
R
6
O^CA
7
V:c
501
A»S
03
.oSlAi>
641
.oZ
1
Дог
39
(а»
кашочонном момло
4
KV-B
14
LVB
21
Ln
м
»
1
1
VHP: сА
2
доА
15
/ UHP.c А
14
до А
7
Э
f
CATV: оА-бдо A>
2
. сАдо Wt
4
. c (Л
1
^до W*C
4
[
m
w^no^enuam
модемЯ KV-ei
4
L
1
^B
2
lin
BwxoAM««
шещуюсть
шток
68
r
6
6
г
68
т
1
эег
1
J
&Вт
вкОЛЫ
Аженнй.
7
S O
m
Гиеддо VIDEO
j
H; гнеад
4
д/>я г>ддкгиоч«имя
ткт port^ Mrm
6
»Uloo: ПолиыЯ рзмяжсягнвло
16
.
750
^
А)СйМо: СраАно»
8
бДА«Гкмйоо>
1
ач»мио
500
нВ.
мтам ш»м ctnpomuMMi
ВЫМАЛМ
голэамог^тич^»««: liwxKAvaw
cmvM
5
С
0
Гмад* UONrrOA OUT; гнбад« А»«
SrWponpCHipuMT
4
jy
^«о: ПмммЯ р*ашм е^ттега
1
В.
76
Ом
А^»о:
СрААмМАОР^^^ре »«гчегме квпр«
Тру<о MWI
14
дюОмой
7
ЧДЮЙМ
ЫДМОййМ
21
Д
0
«и
ААЯМГЛи
Разийр
T>T«e
IS!i____________
$7
$4
17
54
$4
Иэаа^ет
ЛОДкЯГОН
«СИ)
>а
51
34
1
1
1
51
60
ttnf
046
T
Фирма оставляет за собой право изменять технические данные и
внешний 8Ц4 без дололнительнмо уведомления.
19

Комментарии
Sony KV-HW212M95 Group H4 (GB, RU)_2-177-672-12 (1)
Operating Instructions
• Before operating the unit, please read this manual thoroughly and retain
it for future reference.
Инструкция по эксплуатации
• Перед работой с устройством внимательно прочтайте инструкцию
и сохраните её для дальнейшего использования.
Trinitron Color TV
KV-HW212
© 2004 Sony Corporation
2-177-672-12 (1)
M95
M91
GB
RU
01GB01COV-Rus.p65 20/9/04, 3:21 PM1
Black
Sony KV-HW212M95 Group H4 (GB, RU)_2-177-672-12 (1)
2
Do not place any objects on the TV. The apparatus
shall not be exposed to dripping or splashing and
that no objects filled with liquids, such as vases,
shall be placed on the apparatus.
WARNING
• Dangerously high voltages are present inside the TV.
• TV operating voltage: 110 – 240 V AC.
• Do not plug in the power cord until you have completed making all other
connections; otherwise a minimum leakage current might flow through the antenna
and other terminals to ground.
• To avoid battery leakage and damage to the remote, remove the batteries from the
remote if you are not going to use it for several days. If any liquid leaks from the
batteries and touches your skin, immediately wash it away with water.
Do not open the cabinet and the rear cover of the
TV as high voltages and other hazards are present
inside the TV. Refer servicing and disposal of the
TV to qualified personnel.
Your TV is recommended for home use only.
Do not use the TV in any vehicle or where it may be
subject to excessive dust, heat, moisture or
vibrations.
Do not operate the TV if any liquid or solid object
falls into it. Have it checked immediately by
qualified personnel only.
Do not block the ventilation openings of the TV.
Do not install the TV in a confined space, such as a
bookcase or built-in cabinet.
For children’s safety, do not leave children alone
with the TV. Do not allow children to climb onto it.
Clean the TV with a dry and soft cloth.
Do not use benzine, thinner, or any other chemicals to
clean the TV. Do not attach anything (e.g., adhesive
tape, cellophane tape, glue) on the painted cabinet of
the TV. Do not scratch the picture tube.
For your own safety, do not touch any part of the
TV, the power cord and the antenna cable during
lightning storms.
01GB02WAR-Rus.p65 20/9/04, 3:22 PM2
Black
Sony KV-HW212M95 Group H4 (GB, RU)_2-177-672-12 (1)
3
Install the TV on a stable TV stand and floor which
can support the TV set weight. Ensure that the TV
stand surface is flat and its area is larger than the
bottom area of the TV.
Do not plug in too many appliances to the same
power socket. Do not damage the power cord.
Pull the power cord out by the plug. Do not pull
the power cord itself. Even if your TV is turned off,
it is still connected to the AC power source (mains)
as long as the power cord is plugged in. Unplug
the TV before moving it or if you are not going to
use it for several days.
To prevent fire or shock hazard, do not expose the
TV to rain or moisture.
Made in Malaysia.
Sony Corporation
6-7-35 Kitashinagawa,
Shinagawa-ku, Tokyo, 141-0001 Japan.
01GB02WAR-Rus.p65 20/9/04, 3:22 PM3
Black
4
Sony KV-HW212M95 Group H4 (GB, RU)_2-177-672-12 (1)
x Securing the TV
To prevent the TV from falling, use the supplied screws, clamps and band to
secure the TV.
20 mm
3.8 mm
screws clamps band
Screw the band to the TV stand and to the
provided hole at the rear of your TV.
(1) Put a cord or chain through the clamps.
(2) Screw one clamp to a wall or pillar and
the other clamp to the provided hole at
the rear of your TV.
or
Note
• Use only the supplied screws. Use of other screws may damage the TV.
01GB02WAR-Rus.p65 20/9/04, 3:22 PM4
Black
5
Sony KV-HW212M95 Group H4 (GB, RU)_2-177-672-12 (1)
Additional Information
Connecting the 3D WOOFER
(KV-HW212M95 only)………………….. 25
Connecting optional components … 25
Troubleshooting …………………………… 27
Specifications ……………………………….. 31
Table of Contents
Installation
Getting Started ………………………………. 6
Setting up your TV
(“Initial Setup”) ……………………………… 7
Overview of Controls
TV top control, front and
rear panels……………………………………… 9
Using the remote control and
basic functions ……………………………… 10
Advanced Operations
Selecting the picture and sound
modes ………………………………………….. 12
Enjoying stereo or bilingual
programs ……………………………………… 13
Viewing Teletext …………………………… 14
Menu Adjustment
Introducing the menu system ………. 15
Changing the “Picture” setting…….. 18
Changing the “Sound” setting……… 19
Changing the “Timer” setting ………. 21
Changing the “Channel Setup”
setting ………………………………………….. 22
Changing the “Setup” setting ………. 24
GB
01GB03TOC-Rus.p65 20/9/04, 3:22 PM5
Black
6 Installation
Sony KV-HW212M95 Group H4 (GB, RU)_2-177-672-12 (1)
Installation
x Getting Started
b
b
1
Step 1
Insert the batteries (supplied) into the remote.
Note
• Do not use old or different types of batteries together.
Step 2
Step 3
Step 4
Set up the TV by following the instructions of the
“Начальная настройкa” (“Initial Setup”) menu
(see page 7).
Plug in the power cord, then press ! on the TV to
turn it on.
Note
• The 1 (standby) indicator flashes green for a few seconds
when turning on the TV. This does not indicate a
malfunction.
Connect the antenna cable (not supplied) to 8
(antenna input) at the rear of the TV.
Tip
• You can also connect your TV to other optional components
(see page 25).
01GB04INS-Rus.p65 20/9/04, 3:24 PM6
Black
7
Installation
Installation
Sony KV-HW212M95 Group H4 (GB, RU)_2-177-672-12 (1)
x
Setting up your TV
(“Initial Setup”)
When you turn on your TV for the first time, the “Начальная настройкa” (“Initial
Setup”) menu will appear. You may change the menu language, preset the TV
channels automatically, change the order of TV channels that appear on the screen
and adjust the picture position using the buttons on the top control panel.
Tip
• The MENU, and V/v/B/b buttons on the remote control can also be used for the
operations below.
1
Press 2 +/– to select the desired menu
language, then press t.
The selected menu language appears.
2
Press 2 +/– to select “Yes”, then press t
to preset the channels automatically.
The screen will indicate automatic
presetting is in progress.
After all available channels have been tuned
and stored, the “Program Sorting” menu
appears automatically on the screen.
To skip automatic channel presetting, select
“No”, then press t.
If the message “No channel found. Please
connect cable/antenna” appears, check your
TV connections, then press t.
3
The “Program Sorting” menu enables you
to change the order in which the channels
appear on the screen.
a) If you wish to keep the channels in the
tuned order, press MENU.
b) If you wish to store the channels in a
different order:
1) Press 2 +/– to select the program
number with the channel you wish to
rearrange, then press t.
Program Sorting
Program:
01
02
03
04
Select channel
continue
Program:
TV System: Auto
01
VHF Low
01GB04INS-Rus.p65 20/9/04, 3:24 PM7
Black
8 Installation
Sony KV-HW212M95 Group H4 (GB, RU)_2-177-672-12 (1)
The selected channel will appear on
the screen.
2) Press 2 +/– to select the new
program number position for your
selected channel, then press t.
3) Repeat steps b) 1) and 2) if you wish
to change the order of the other
channels.
c) Press MENU to go to the next menu.
4
Press 2 +/– to adjust the bars on the
top and bottom of the menu if they are
slanted, then press t.
If no adjustment is necessary, then press t.
5
Press 2 +/– to select “No”, then press t.
This menu will not appear again the next
time you turn on the TV by pressing !.
To allow this menu to appear again, select
“Yes”, then press t.
Tips
• You can immediately go to the end of the ”Initial Setup” menu by pressing MENU.
• You can also set up your TV by using the menu system (see page 5) or by pressing the MENU
button on the top control panel for about five seconds to reset your TV to the factory setting.
01
Program Sorting
Program:
01
02
03
04
Select new position
continued
01GB04INS-Rus.p65 20/9/04, 3:24 PM8
Black
9
Overview of Controls
Overview of Controls
Sony KV-HW212M95 Group H4 (GB, RU)_2-177-672-12 (1)
Overview of Controls
x TV top control, front and rear panels
Button/Terminal Function Page
1 ! Turn off or turn on the TV. 6
2 Remote control sensor. –
3 Wake Up indicator. 21
3 1 Standby indicator. 6
4 i Headphone jack. –
5 t2 Video input terminal 2. 25
6 PROG +/– Select program number. –
7 2 +/– Adjust volume. –
8 t Select TV or video input. 25
Menu operations
7 2 +/– Select and adjust items. –
8 t Confirm selected items. –
9 MENU Display or cancel the menu. –
0 SOUND MODE Select sound mode options with a 5-Band Graphic 12
Equalizer display.
qa 8 Antenna input terminal. 25
qs T Monitor output terminal. 26
qd Component video input terminal. 26
qf t1 Video input terminal 1. 25
qg WOOFER Enjoy high quality sound. 25
(KV-HW212M95 only)
PROG
MENUSOUND MODE
098 7 6
L
R
2
3
4
2
5
(MONO)
1
qh
L
R
R
1
L
Y
C
B
C
R
(MONO) (MONO)
qf qd
qs
qa
qg
TV front panel
TV rear panel
TV top control panel
01GB04INS-Rus.p65 20/9/04, 3:24 PM9
Black
10 Overview of Controls
Sony KV-HW212M95 Group H4 (GB, RU)_2-177-672-12 (1)
x Using the remote control and basic
functions
TV
1
2
3
4
6
7
8
9
0
5
MENU
PROG
A/B
1
2
3
6
8
7
4
5
qk
qf
qa
qg
qh
qj
0
qs
qd
ql
w;
wa
9
Button Description Page
1 ?/1 Turn off temporarily or turn on the TV. –
2 a Display the TV program. –
3 Jump to last program number that has been –
watched for at least five seconds.
4 PROG +/– Select program number. –
5 2 +/– Adjust volume. –
9 Change the picture size:
–
“On” (16:9 wide-mode), “Off”.
0
Display on-screen information. –
qa Mute the sound. –
qd t Select TV or video input. 25
qf 0 – 9, ÷ Input numbers. –
qj Select surround mode options:
“On” (surround), “Simulated” (stereo-like monaural –
sound), “Off”.
01GB04INS-Rus.p65 20/9/04, 3:24 PM10
Black
11
Overview of Controls
Overview of Controls
Sony KV-HW212M95 Group H4 (GB, RU)_2-177-672-12 (1)
Button Description Page
ql Select sound mode options with a 5-Band Graphic 12
Equalizer display.
w; Select picture mode options. 12
Menu operations
6 MENU Display or cancel the menu. 17
7 Confirm selected items. 17
qk V, v, B, b Select and adjust items. 17
Timer operations
qg Set TV to turn on automatically according to the –
desired period of time.
qh Set TV to turn off automatically according to the –
desired period of time.
Teletext operations (green label)
4 , Display the next or previous page. 14
8 Display Teletext broadcast. 14
0 Reveal concealed information. 14
qs Enlarge the Teletext display. 14
qd Stop Teletext display from scrolling. 14
qg Display Teletext service contents. 14
qh Show TV screen while waiting for Teletext page. 14
wa
(red, green,
Access a FASTEXT menu. 14
yellow, blue)
Stereo/bilingual operations
qs A/B Select stereo/bilingual mode. 13
Licensed by BBE Sound, Inc. under USP4638258, 4482866.
“BBE” and BBE symbol are trademarks of BBE Sound, Inc.
01GB04INS-Rus.p65 20/9/04, 3:24 PM11
Black
12 Advanced Operations
Sony KV-HW212M95 Group H4 (GB, RU)_2-177-672-12 (1)
Advanced Operations
Selecting the sound mode
Press (or SOUND MODE on the top control panel) to select the desired sound
mode with a 5-Band Graphic Equalizer display.
Select To listen to
“Dynamic” dynamic and clear sound that emphasizes both the low
and high tones.
“Drama” sound that emphasizes voice and high tones.
“Soft” soft, natural and relaxing sounds.
“Personal” the last adjusted sound setting from the
“Sound Adjustment” option in the menu (see page 20).
x Selecting the picture and sound
modes
You can select picture and sound modes and adjust the setting to your
preference in the “Personal” option.
Selecting the picture mode
Press to select the desired picture mode.
Select To view
“Dynamic” high contrast pictures.
“Standard” normal pictures.
“Soft” mild pictures.
“Personal” the last adjusted picture setting
from the “Picture Adjustment”
option in the menu (see page 18).
Dynamic
100 300 1k 3k 8k
100 300 1k 3k 8k
Drama
100 300 1k 3k 8k
Soft
100 300 1k 3k 8k
Personal
TV
1
2
3
4
6
7
8
9
0
5
MENU
PROG
A/B
01GB05AVD-Rus.p65 20/9/04, 3:26 PM12
Black
13
Sony KV-HW212M95 Group H4 (GB, RU)_2-177-672-12 (1)
Advanced Operations
NICAM
(Stereo sound)
Mono
(Regular sound)
t
t
NICAM Main
(Main sound)
NICAM Sub
(Sub sound)
Mono
(Regular sound)
tt
t
NICAM Main
(Main sound)
Mono
(Regular sound)
t
t
TV
1
2
3
4
6
7
8
9
0
5
MENU
PROG
A/B
A/B
x
Enjoying stereo or bilingual programs
You can enjoy stereo sound or bilingual programs of NICAM and A2 stereo
systems by using the A/B button.
Note
• If the stereo sound is noisy when receiving a stereo program, select “Mono”. The sound
becomes monaural but the noise is reduced.
Viewing a stereo or bilingual program
When receiving a NICAM program
Broadcasting On-screen display (Selected sound)
NICAM
stereo
NICAM
bilingual
NICAM
monaural
When receiving an A2 program
Broadcasting On-screen display (Selected sound)
A2
stereo
A2
bilingual
Mono
(Regular sound)
Stereo
(Stereo sound)
t
t
Main
(Main sound)
Sub
(Sub sound)
t
t
01GB05AVD-Rus.p65 20/9/04, 3:26 PM13
Black
14 Advanced Operations
Sony KV-HW212M95 Group H4 (GB, RU)_2-177-672-12 (1)
x Viewing Teletext
Some TV stations broadcast an information service called Teletext which allows
you to receive various information, such as stock market reports and news.
You can use the buttons on the remote to view Teletext.
To Do this
display a Teletext Press . Each time you press , the
page on the screen changes as follows:
TV picture Teletext t Teletext and TV t TV.
If there is no Teletext broadcast, “100” is
displayed at the top left corner of the
screen.
check the contents Press .
of a Teletext service An overview of the Teletext contents,
including page numbers, appears on the
screen.
select a Teletext page Press the number buttons to enter the
three-digit page number of the desired
Teletext page. If you make a mistake,
reenter the correct page number. To
access the next or previous page, press
or .
hold (pause) a Press to display the symbol “ ” at
Teletext display the top left corner of the screen. To
resume normal Teletext viewing, press
.
reveal concealed Press .
information (e.g., To conceal the information, press the
an answer to a quiz) button again.
enlarge the Teletext Press . Each time you press , the
display Teletext display changes as follows:
Enlarge upper half t Enlarge lower
half t Normal size.
stand by for a Teletext (1) Enter the Teletext page number that
page while watching you want to refer to, then press .
a TV program (2) When the page number is displayed,
press to show the text.
select a FASTEXT Press (red, green, yellow and blue)
menu or the colored that corresponds to the desired menu or
boxes page number.
turn off Teletext Press a.
Note
• The FASTEXT feature can be used only when the FASTEXT broadcast is available.
(red,
green,
yellow,
blue)
TV
1
2
3
4
6
7
8
9
0
5
MENU
PROG
A/B
,
01GB05AVD-Rus.p65 20/9/04, 3:27 PM14
Black
15
Sony KV-HW212M95 Group H4 (GB, RU)_2-177-672-12 (1)
Menu Adjustment
Menu Adjustment
x Introducing the menu system
The MENU button lets you open a menu and change the settings of your TV.
The following is an overview of the menu system.
Return icon
Setup icon
Channel Setup icon
Timer icon
Name of the current
menu
Picture icon
Menu level 3
Menu level 2
User Guidance
Menu level 1
Level 1
“Picture”
“Sound”
Level 2
“Mode”
“Picture Adjustment”
“Color Temperature”
“Intelligent Picture”
“Mode”
“Sound Adjustment”
“Balance”
“Intelligent Volume”
“Surround”
Level 3/Function
Select the picture mode:
“Dynamic” t “Standard” t “Soft” t “Personal”
Adjust the “Personal” option:
“Picture” t “Brightness” t “Color” t
“Hue” t “Sharpness” t “Reset”
Adjust white color tint:
“Cool” t “Neutral” t “Warm”
Optimize picture quality:
“On” t “Off”
Select the sound mode:
“Dynamic” t “Drama” t “Soft” t “Personal”
Adjust sound frequency settings of “Personal”
option:
“Adjust” t “Reset”
Select to emphasize the left and right speakers.
Adjust volume automatically:
“On” t “Off”
Select the surround mode:
“On” t “Simulated” t “Off”
Page
18
19
Confirm
End
Setup
Wide Mode:
Video Label
Picture Rotation
Language: English
Color System:
Portable Audio Mode:
Select
Sound icon
continue
01GB05AVD-Rus.p65 20/9/04, 3:27 PM15
Black
16 Menu Adjustment
Sony KV-HW212M95 Group H4 (GB, RU)_2-177-672-12 (1)
Level 1
“Timer”
“Channel Setup”
“Setup”
Level 2
“Sleep Timer”
“Wake Up Timer”
“Auto Program”
“Manual Program”
“Program Label”
“Program Block”
“Program Sorting”
“Language”
“Picture Rotation”
“Wide Mode”
“Video Label”
“Color System”
“Portable Audio
Mode”
Level 3/Function
Set TV to turn off automatically.
Set TV to turn on automatically.
Preset channels automatically.
Preset channels manually.
Label the program number.
Block unwanted programs.
Change the order in which the channels appear
on the screen.
Change the menu language:
“English” t “ ”(Russian)
Adjust the picture position.
Change the picture size:
“On” (16:9 wide-mode) t “Off”
Label the connected equipment.
Select the color system:
“Auto” t “PAL” t “SECAM” t “NTSC3.58”
t “NTSC4.43”
Select the input connected to your audio
equipment:
“Video1” t “Video2” t “Off”
Page
21
22
24
continued
01GB05AVD-Rus.p65 20/9/04, 3:27 PM16
Black
17
Sony KV-HW212M95 Group H4 (GB, RU)_2-177-672-12 (1)
Menu Adjustment
Select
End
Channel Setup
Program Block
Program Label
Manual Program
Auto Program
Confirm
Program Sorting
Select
End
Channel Setup
Program Block
Manual Program
Program Label
Program Sorting
Confirm
Auto Program
How to use the menu
Other menu operations
Tips
• If you want to exit from Menu level 2 to Menu level 1, press V or v until the return icon ( ) is
highlighted, then press .
• The MENU, t and 2 +/– buttons on the top control panel can also be used for the
operations above (see page 9).
Note
• When a feature is dimmed in the menu, it is not selectable.
To
Adjust the setting value
Move to the next/previous menu level
Cancel the menu
Press
V, v, B or b.
B or b.
MENU.
Press V or v to select
the desired item.
Press (or b) to
confirm your
selection and
go to the next
level.
Press MENU to
display the menu.
TV
MENU
PROG
Select
Confirm
End
Picture
Color Temperature: Cool
Picture Adjustment
Mode: Dynamic
Intelligent Picture: On
01GB05AVD-Rus.p65 20/9/04, 3:27 PM17
Black
18 Menu Adjustment
Sony KV-HW212M95 Group H4 (GB, RU)_2-177-672-12 (1)
x Changing the “Picture” setting
The “Picture” menu allows you to adjust the picture settings.
1
Press MENU.
2
Make sure the “Picture” icon ( ) is
selected, then press
.
3
Press V or v to select the desired item (e.g., “Mode”), then press .
Select To
“Mode” choose either “Dynamic”, “Standard”, “Soft” or
“Personal”* (see page 12).
“Color Temperature” adjust white color tint.
Choose either “Cool” (blue tint), “Neutral” (neutral
tint) or “Warm” (red tint).
“Intelligent Picture” optimize picture quality.
Press V or v to select “On”, then press .
To cancel, select “Off”, then press .
* You can adjust the setting to your personal preference in the “Picture Adjustment” and
“Color Temperature” options only when the “Personal” mode is selected.
Adjusting the “Picture Adjustment” items under
“Personal” mode
1
Press V or v to select either “Picture” (contrast), “Brightness”, “Color”,
“Hue” (color tones) or “Sharpness”, then press
.
Selecting “Reset” will set your TV to the factory setting.
2
Press V,v,B or b to adjust the setting of your selected item, then press .
3
Repeat the above steps to adjust other items.
The adjusted settings will be received when you select “Personal”.
Notes
• “Hue” can be adjusted for the NTSC color system only.
• Reducing “Sharpness” can also reduce picture noise.
Confirm
End
Picture
Color Temperature: Cool
Picture Adjustment
Mode: Dynamic
Intelligent Picture: On
Select
01GB05AVD-Rus.p65 20/9/04, 3:27 PM18
Black
19
Menu Adjustment
Sony KV-HW212M95 Group H4 (GB, RU)_2-177-672-12 (1)
x Changing the “Sound” setting
The “Sound” menu allows you to adjust the sound settings.
1
Press MENU.
2
Press V or v to select the “Sound”
icon (
), then press .
3
Press V or v to select the desired item (e.g., “Mode”), then press .
Select To
“Mode” choose either “Dynamic”, “Drama”, “Soft” or
“Personal”* (see page 12).
“Balance” Press v or B to emphasize the left speaker.
Press V or b to emphasize the right speaker.
“Intelligent Volume” adjust the volume of all program numbers and
video inputs automatically.
Press V or v to select “On”, then press .
To cancel, select “Off”, then press .
“Surround” choose either “On”, “Simulated” or “Off”
(see page 10).
* You can adjust the setting to your personal preference in the “Sound Adjustment”
option only when the “Personal” mode is selected (see page 20).
Balance
Intelligent Volume:
Surround: Off
Off
Sound Adjustment
Dynamic
Mode:
Sound
Confirm
End
Select
continue
01GB06ADJ-Rus.p65 20/9/04, 3:27 PM19
Black
20 Menu Adjustment
Sony KV-HW212M95 Group H4 (GB, RU)_2-177-672-12(1)
Reset
100 300 1k 3k 8k
Adjust
Adjustment: Personal
Confirm
End
Select
Adjusting the “Sound Adjustment” item under
“Personal” mode
The 5-Band Graphic Equalizer feature allows you to adjust sound frequency settings
of “Personal” mode in the menu.
1
Make sure that “Adjust” is selected,
then press
.
Selecting “Reset” will set your TV to
the factory setting.
2
Press B or b to select the desired sound frequency, then press V or v to
adjust the setting and press .
The adjusted settings will be received when you select “Personal”.
Notes
• Adjusting higher frequency will affect higher pitched sound and adjusting lower frequency
will affect lower pitched sound.
• You may display the settings directly using the SOUND MODE button on the top control
panel (see page 9) or button on the remote control (see page 11).
continued
01GB06ADJ-Rus.p65 20/9/04, 3:27 PM20
Black
-
Инструкции по эксплуатации
1

SONY FD TRINITRON KV-21FT1K инструкция по эксплуатации
(132 страницы)
- Языки:Русский
-
Тип:
PDF -
Размер:
11.81 MB -
Описание:
Кинескопный телевизор
Просмотр
На NoDevice можно скачать инструкцию по эксплуатации для SONY FD TRINITRON KV-21FT1K. Руководство пользователя необходимо для ознакомления с правилами установки и эксплуатации SONY FD TRINITRON KV-21FT1K. Инструкции по использованию помогут правильно настроить SONY FD TRINITRON KV-21FT1K, исправить ошибки и выявить неполадки.
6
Общее описание кнопок телевизора
Общее описание -Установка
Установка батареек в пульт дистанционного управления
Убедитесь в том, что батарейки вставлены в соответствии с обозначенными полюсами.
Бережно относитесь к окружающей среде и выбрасывайте отработанные батарейки в специально
установленные для этого контейнеры.
SO
NY
CO
RPO
RA
TION
JA
PA
N/4
SO
NY
C
OR
PO
RA
TIO
N J
AP
AN
/4
Подключение антенны и видеомагнитофона
Провода для подключения не входят в комплект поставки.
OUT
IN
или
Для получения более подробной информации о
подключении видеомагнитофона обратитесь к
Разделу «Подключение дополнительных
устройств» данной Инструкции по Эксплуатации.
видеомагнитофон
Нажмите на
отметку
крышки, чтобы
увидеть разъемы
Индикатор
режима
временного
выключения
(standby)
Переключатель
включение /
выключение
Гнeздo для
наушников
Кнопки выбора
последующей или
предыдущей
программы (выбор
телевизионных
станций)
Кнопки регулировки
громкости
Кнопка нaчaльнoй
aвтoнacтpoйки
телевизора
Кнопка
выбора
источника
входа
Вход для видео
сигнала S
Вход для аудио
сигнала
Вход для видео
сигнала
Подключение через Евроразъем (SCART)
(пoстaвляeтcя дoпoлнитeльнo).
KV29LS40K RU.fm Page 6 Monday, February 2, 2004 10:19 AM
Введение и работа с системой меню: Sony FD TRINITRON KV-29LS40K
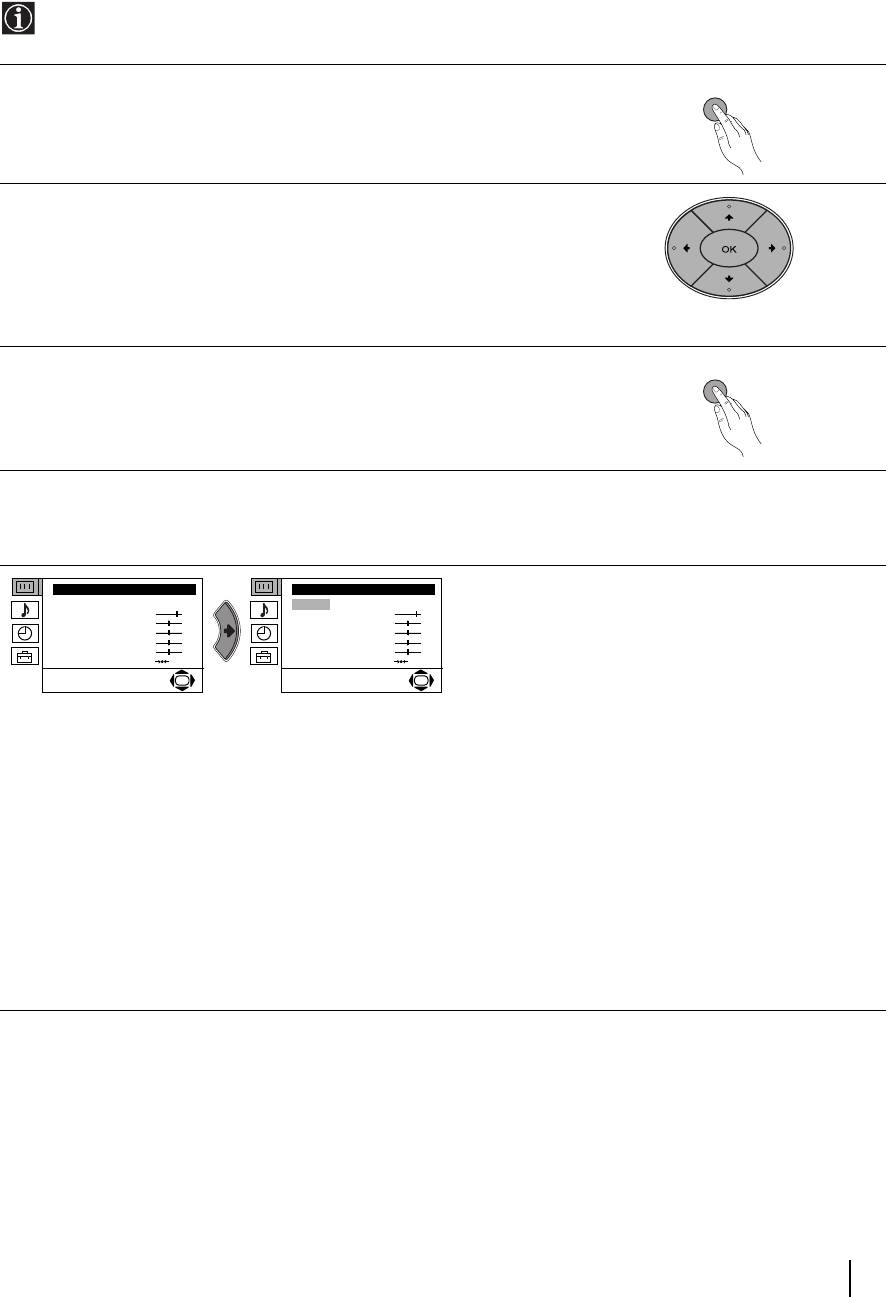
KV29LS40K RU.fm Page 9 Monday, February 2, 2004 10:19 AM
Введение и работа с системой меню
В данном телевизоре предусмотрена система вывода меню на экран для объяснения различных
операций. Пользуйтесь следующими кнопками пульта дистанционного управления для передвижения
по меню:
Нажмите на кнопку MENU для выхода на первый уровень меню на
1
MENU
экране.
• Для подчеркивания требуемого меню или пункта меню,нажмите
2
на v или V.
.
• Для входа в меню или в выбранный пункт меню,нажмите b.
• Для того,чтобы вернуться в предыдущее меню или пункт меню,
нажмите B.
• Для изменения параметров выбранного пункта меню нажмите
v/V/B или b.
•
Для подтверждения и запоминания Вашего выбора,нажмите OK.
Нажмите на кнопку MENU для возвращения к обычному экрану
3
MENU
телевизора.
Схема меню
Уровень 1 Уровень 2 Уровень 3 / Функция
Hacтpoйкa изoбpaжeния
Hacтpoйкa изoбpaжeния
НАСТРОЙКА ИЗОБРАЖЕНИЯ
Peжим: Персональный
Peжим: Персональный
Меню «Настройка изображения» дает
Koнтpacт
Koнтpacт
Яpкocть
Яpкocть
возможность изменить параметры регулировки
Цвeтность
Цвeтность
Pезкость
Pезкость
изображения.
Цвeтoвoй Toн
Цвeтoвoй Toн
Cброс
Cброс
Для этого:после выбора пункта, который Вы хотите
OK
OK
изменить, нажмите на b. После этого нажмите
несколько раз на v/V/B или b для изменения
параметров,а затем нажмите OK для запоминания.
Это меню также дает возможность изменить
режим изображения в соответствии с видом
программы,которую Вы смотрите:
v Персональный (по личному предпочтению)
v Peпopтaж (для прямых трансляций,a тaюкe
cигнaлoв c DVD и цифpoвыx дeкoдepoв)
v Kинo (для фильмов).
• Яркость, Цветность и Резкость можно изменить только в том случае, если Вы выбрали режим
изображения в «пepcoнальный».
• Цветовой Тон можно изменять только в системе цвета NTSC (например, видеопленки производства
США).
• Для возвращения к заводским параметрам настройки изображения выберите Сброс и нажмите на ОК.
продолжeниe
Вывод системы меню на экран
9
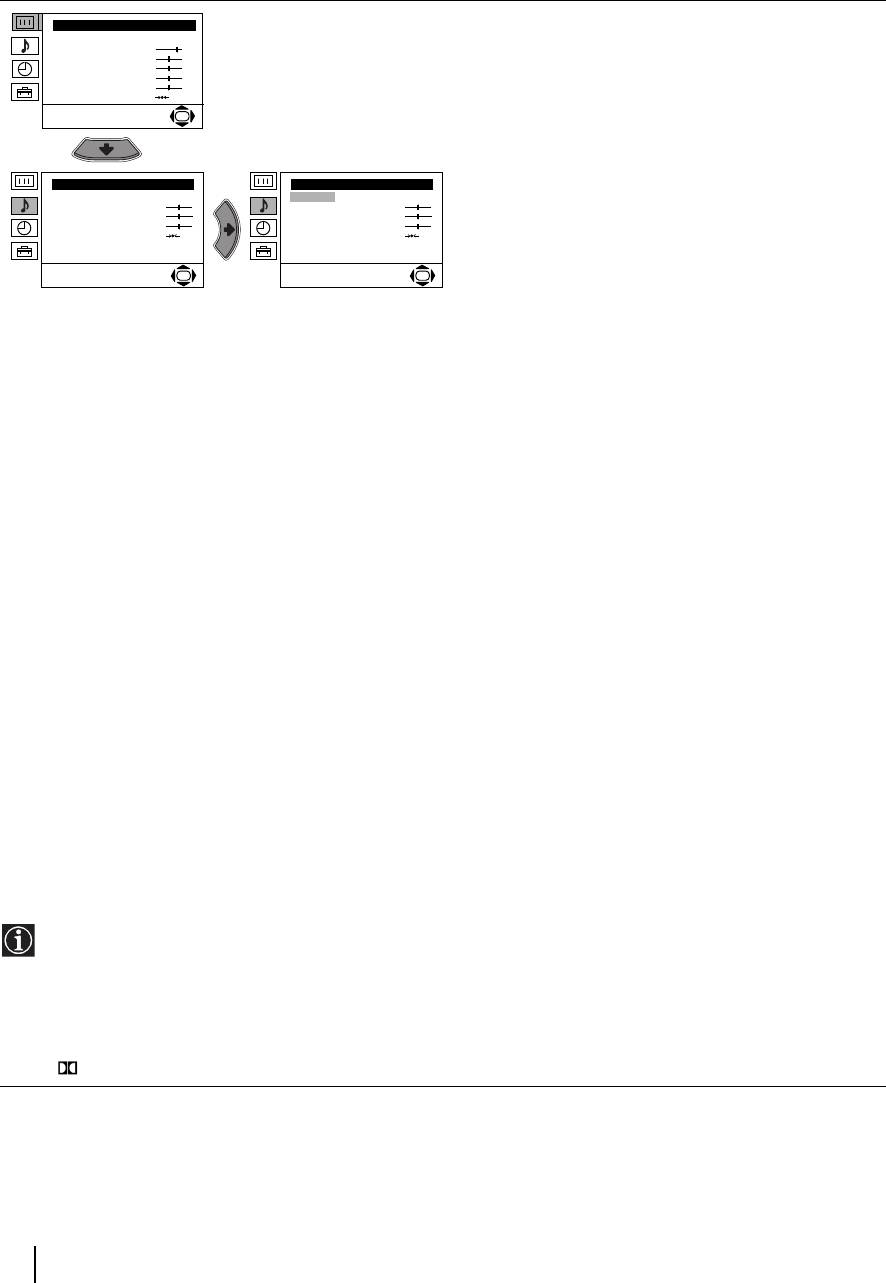
KV29LS40K RU.fm Page 10 Monday, February 2, 2004 10:19 AM
Уровень 1 Уровень 2 Уровень 3 / Функция
Hacтpoйкa изoбpaжeния
НАСТРОЙКА ЗВУКА
Peжим: Персональный
Вы можете изменить настройку режима звука в
Koнтpacт
Яpкocть
меню «Настройка звука».
Цвeтность
Pезкость
Цвeтoвoй Toн
Для зтого: выберите пункт меню, который Вы хотите
Cброс
изменить, и нажмите
b. После зтого нажмите
OK
несколько раз
v/V/B или b для изменения настройки,
после чего нажмите OK для запоминания.
Hacтpoйкa звyкa
Hacтpoйкa звyкa
Peжим: Персональный
Peжим: Персональный
Teмбp BЧ
Teмбp BЧ
Teмбp HЧ
Teмбp HЧ
Бaлaнc
Бaлaнc
Cбpoc
Cбpoc
Двoйнoй звyк: Moнo
Двoйнoй звyк: Moнo
Детальная настройка
Детальная настройка
OK
OK
В этом меню есть два второстепенных меню:
Peжим
bvПерсональный (по Вашему предпочтению).
Poк
Пoп
Джaз
Детальная настройка
bvDolby* Virtual: v Выкл.: Обычный.
v Вкл.: Симуляция звукового эффекта «Dolby Pro Logic
Surround».
v Авторег. громк.: v Выкл.: Громкость изменяется в зависимости от сигнала
канала радиовещания.
v Вкл.: Громкость поддерживается на одном и том же
уровне, вне зависимости от сигнала канала
радиовещания (например,в рекламе).
v Динамик. TB: v Выкл.: Звук идет от внешнегo ycилитeля,
подключенногo к выходу аудио сигнала на
задней панели телевизора.
v Вкл.: Звук идет от динaмикoв телевизора.
• Тембр BY и Тембр HY можно изменить только после выбора «иepcoМaОлМкИ» в режиме звука.
• Для возвращения к заданным параметрам настройки звука, выберите Сброс и нажмите OK.
• В случае двуязычных передач, выберите Двойной звук, после чего выберите A для канала звука 1, B для
канала звука 2 или Моно o для канала моно, если таковой имеется. Если звук передачи будет стерео,
можете выбрать Стерео или Моно.
• Eсли звук телeвизopa пocтyпaeт чepeз нayшники, тo «Dolby Virtual» aвтoмaтичecки пepeйдeт в пoлoжeниe
«Выкл.».
• При включении «Dolby Virtual» в положение «Bкл.», «Авторег. громк.» автоматически перейдет в
положение «Выкл» и наоборот.
* Дaнный тeлeвизop был coздaн для coздaния звyкoвoгo эффeктa «Dolby Surround» coздaвaя эффeкт
чeтыpex гpoмкoгoвоpитeлeй пocpeдcтвом тoлькo двуx гpoмкoгoвоpитeлeй тeлeвизopa, и тoлькo в том
cлyчae,ecли звyкoвoй cигнaл cтaнции бyдeт «Dolby Surround» .Пoмимo этoгo, можнo yлyчшить звyквoй
эффeкт пoсpeдcтвом пoдключeния внeшнегo гpoмкoгoвopитeля. Для пoлyчeния бoлee пoдpoбнoй
инфopмaции,oбpaтитecь к глaвe «Подключение внeшнeй звyкoвocпpoизвoдящeй aппapaтyры» нa
cтpaницe 18.
* Изготовлено по лицензии фирмы Dolby Laboratories. Долби, «Dolby», «Pro Logic» и символ с двойным D
товарныe знаки фирмы Dolby Laboratories.
продолжeниe
10
Вывод системы меню на экран

KV29LS40K RU.fm Page 11 Monday, February 2, 2004 10:19 AM
Уровень 1 Уровень 2 Уровень 3 / Функция
Hacтpoйкa изoбpaжeния
ТАЙМЕР ВЫКЛЮЧЕНИЯ
Peжим: Персональный
Пункт «Таймер выкл.» в меню «Таймер» дает
Koнтpacт
Яpкocть
возможность выбрать период времени, по
Цвeтность
Pезкость
истечении которого телевизор автоматически
Цвeтoвoй Toн
перейдет в режим временного отключеня (standby).
Cброс
OK
Для зтого: после выбора зтого пункта нажмите на
b
После зтого нажмите на
v или V для выбора
интервала времени (максимально 4 часа).
Taймep
Taймep
• Если, во время просмотра, Вы хотите увидеть,
Taймep Bыкл.:
Bыкл.
Taймep Bыкл.:
Bыкл.
сколько минут осталось до отключения, нажмите
на кнопку .
• За одну минуту до временного отключения
телевизора зто оставшееся время появится на
OK
OK
зкране.
Hacтpoйкa изoбpaжeния
ЯЗЫК/СТРАНА
Peжим: Персональный
Пункт «Язык/Страна» в меню «Установка» дает
Koнтpacт
Яpкocть
возможность выбратьћязык, который Вы
Цвeтность
Pезкость
предпочитаете для появления меню на зкране.
Цвeтoвoй Toн
Также Вы можете выбрать страну, где Вы будете
Cброс
пользоваться телевизором.
OK
Для зтого: после выбора зтого пункта меню,
нажмите на b, после чего выполняйте все,
указанное в Разделе «Включение и
Уcтaнoвкa
Уcтaнoвкa
Язык/Cтpaнa
Язык/Cтpaнa
автоматическая настройка телевизора», пункты 2
Aвтoнacтpoйкa
Aвтoнacтpoйкa
и 3.
Copтиpoвкa пpoгpaмм
Copтиpoвкa пpoгpaмм
Meтки пpoгpaмм
Meтки пpoгpaмм
Пpeдycтaнoвкa AV
Пpeдycтaнoвкa AV
Pyч. Hacтpoйкa Пpoгpамм
Pyч. Hacтpoйкa Пpoгpамм
Дeтaльнaя ycтaнoвкa
Дeтaльнaя ycтaнoвкa
OK
OK
Hacтpoйкa изoбpaжeния
АВТОНАСТРОЙКА
Peжим: Персональный
Пункт меню «Автонастройка» в меню «Установка»
Koнтpacт
Яpкocть
дает возможность поиска и запоминания всех
Цвeтность
Pезкость
доступных каналов (телевизионных станций).
Цвeтoвoй Toн
Cброс
Для зтого: после выбора зтого пункта меню,
OK
нажмите на b, а затем выполните указанное в
Разделе «Включение и автоматическая настройка
телевизора», пункты 5 и 6.
Уcтaнoвкa
Уcтaнoвкa
Язык/Cтpaнa
Язык/Cтpaнa
Aвтoнacтpoйкa
Aвтoнacтpoйкa
Copтиpoвкa пpoгpaмм
Copтиpoвкa пpoгpaмм
Meтки пpoгpaмм
Meтки пpoгpaмм
Пpeдycтaнoвкa AV
Пpeдycтaнoвкa AV
Pyч. Hacтpoйкa Пpoгpамм
Pyч. Hacтpoйкa Пpoгpамм
Дeтaльнaя ycтaнoвкa
Дeтaльнaя ycтaнoвкa
OK
OK
продолжeниe
Вывод системы меню на экран
11
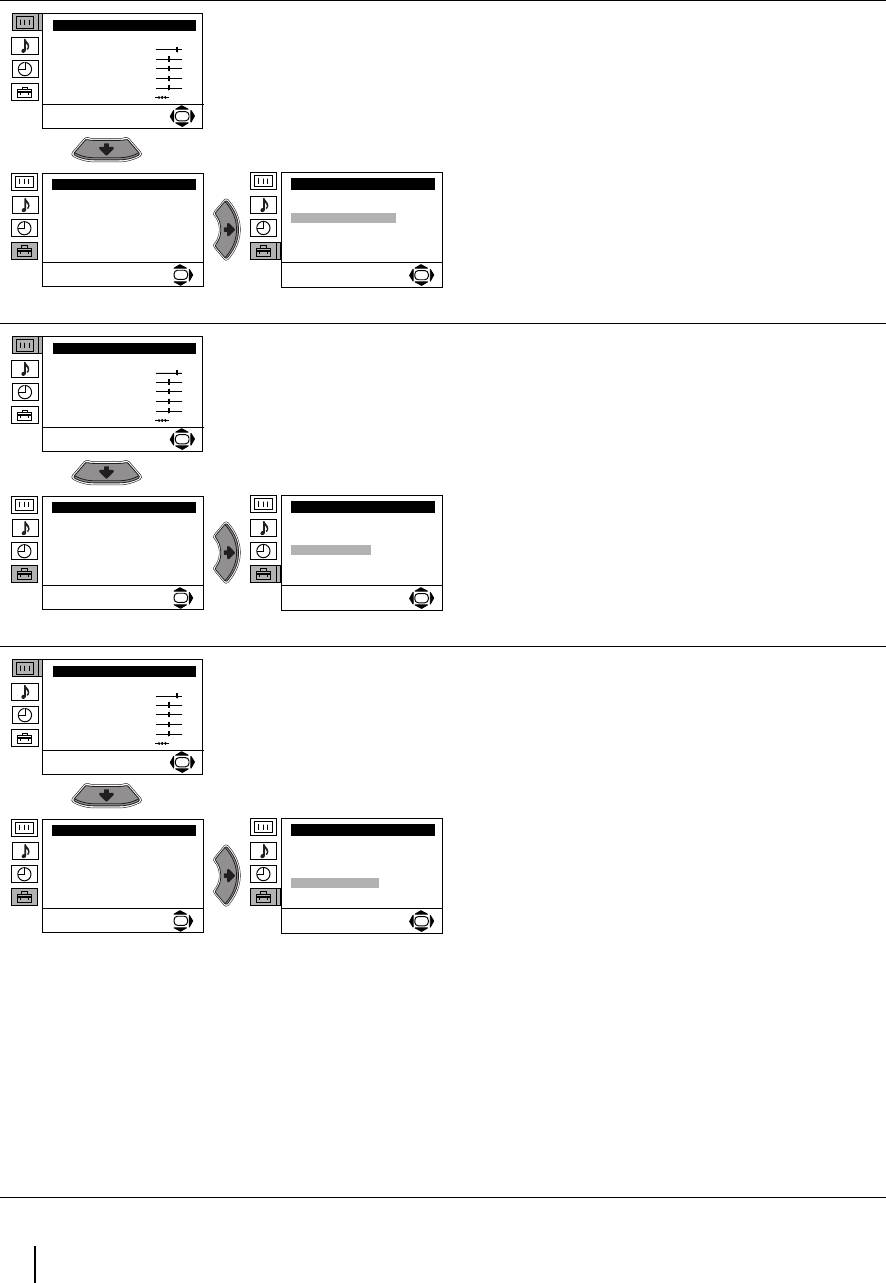
KV29LS40K RU.fm Page 12 Monday, February 2, 2004 10:19 AM
Уровень 1 Уровень 2 Уровень 3 / Функция
Hacтpoйкa изoбpaжeния
СОРТИРОВКА ПРОГРАММ
Peжим: Персональный
Пункт меню «Сортировка программ» в меню
Koнтpacт
Яpкocть
«Установка» дает возможность изменить порядок
Цвeтность
Pезкость
появления на зкране каналов (телевизионных
Цвeтoвoй Toн
станций).
Cброс
OK
Для зтого: после выбора зтого пункта меню,
нажмите на b, после чего выполните все указанное
в пункте 7б) Раздела «Включение и
автоматическая настройка телевизора».
Уcтaнoвкa
Уcтaнoвкa
Язык/Cтpaнa
Язык/Cтpaнa
Aвтoнacтpoйкa
Aвтoнacтpoйкa
Copтиpoвкa пpoгpaмм
Copтиpoвкa пpoгpaмм
Meтки пpoгpaмм
Meтки пpoгpaмм
Пpeдycтaнoвкa AV
Пpeдycтaнoвкa AV
Pyч. Hacтpoйкa Пpoгpамм
Pyч. Hacтpoйкa Пpoгpамм
Дeтaльнaя ycтaнoвкa
Дeтaльнaя ycтaнoвкa
OK
OK
Hacтpoйкa изoбpaжeния
МЕТКИ ПРОГРАММ
Peжим: Персональный
Пункт «Метки программ» в меню «Установка» дает
Koнтpacт
Яpкocть
возможность присвоить каналу название с
Цвeтность
Pезкость
максимальным количеством из пяти знаков.
Цвeтoвoй Toн
Cброс
Для зтого:
OK
1 После выбора зтого пункта, нажмите b, после
чего нажмите
v или V для выбора номера
программы, которой Вы хотите дать название.
Уcтaнoвкa
Уcтaнoвкa
2 Нажмите b. Выделив первый злемент столбика
Язык/Cтpaнa
Язык/Cтpaнa
Aвтoнacтpoйкa
Метка, нажмите
v или V для выбора буквы,
Aвтoнacтpoйкa
Copтиpoвкa пpoгpaмм
Copтиpoвкa пpoгpaмм
Meтки пpoгpaмм
цифры или «-» для пустого пробела, после чего
Meтки пpoгpaмм
Пpeдycтaнoвкa AV
Пpeдycтaнoвкa AV
нажмите
b для подтверждения выбранного
Pyч. Hacтpoйкa Пpoгpамм
Pyч. Hacтpoйкa Пpoгpамм
Дeтaльнaя ycтaнoвкa
Дeтaльнaя ycтaнoвкa
знака. Точно так же выберите остальные четыре
OK
OK
знака. После зтого нажмите OK для запоминания.
Hacтpoйкa изoбpaжeния
ПРЕДУСТАНОВКА AV
Peжим: Персональный
Пункт «Предустановка AV» в меню «Установка»
Koнтpacт
Яpкocть
дает возможность присвоить название
Цвeтность
Pезкость
дополительному устройству, подключенному к
Цвeтoвoй Toн
телевизору.
Cброс
OK
Для зтого:
1 После выбора зтого пункта, нажмите b, после
чего нажмите
v или V для выбора источника
входного сигнала, которому Вы хотите присвоить
Уcтaнoвкa
Уcтaнoвкa
Язык/Cтpaнa
Язык/Cтpaнa
название (AV1 и AV2 для дополнительных
Aвтoнacтpoйкa
Aвтoнacтpoйкa
Copтиpoвкa пpoгpaмм
устройств, подключенных с помощью
Copтиpoвкa пpoгpaмм
Meтки пpoгpaмм
Meтки пpoгpaмм
Евроразъемов на задней панели телевизора, и
Пpeдycтaнoвкa AV
Пpeдycтaнoвкa AV
Pyч. Hacтpoйкa Пpoгpамм
Pyч. Hacтpoйкa Пpoгpамм
AV3 для разъемов на передней панели). После
Дeтaльнaя ycтaнoвкa
Дeтaльнaя ycтaнoвкa
зтого нажмите
b.
OK
OK
2 Автоматически появится заданное название в
Метка.
a) Если Вы хотите воспользоваться одним из 6
заданных названий (CABLE, GAME, CAM,
DVD, VIDEO или SAT), нажмите
v или V для
выбора одного из них, после чего нажмите OK
для запоминания.
б) Если Вы хотите создать Ваше собственное
название, выберите Изм и нажмите
b. После
зтого, выделив первый злемент, нажмите v
или
V для выбора буквы, цифры или «-» для
пустого пробела, после чего нажмите
b для
подтверждения выбранного знака. Точно так
же выберите остальные четыре знака, после
чего нажмите OK для запоминания.
продолжeниe
12
Вывод системы меню на экран
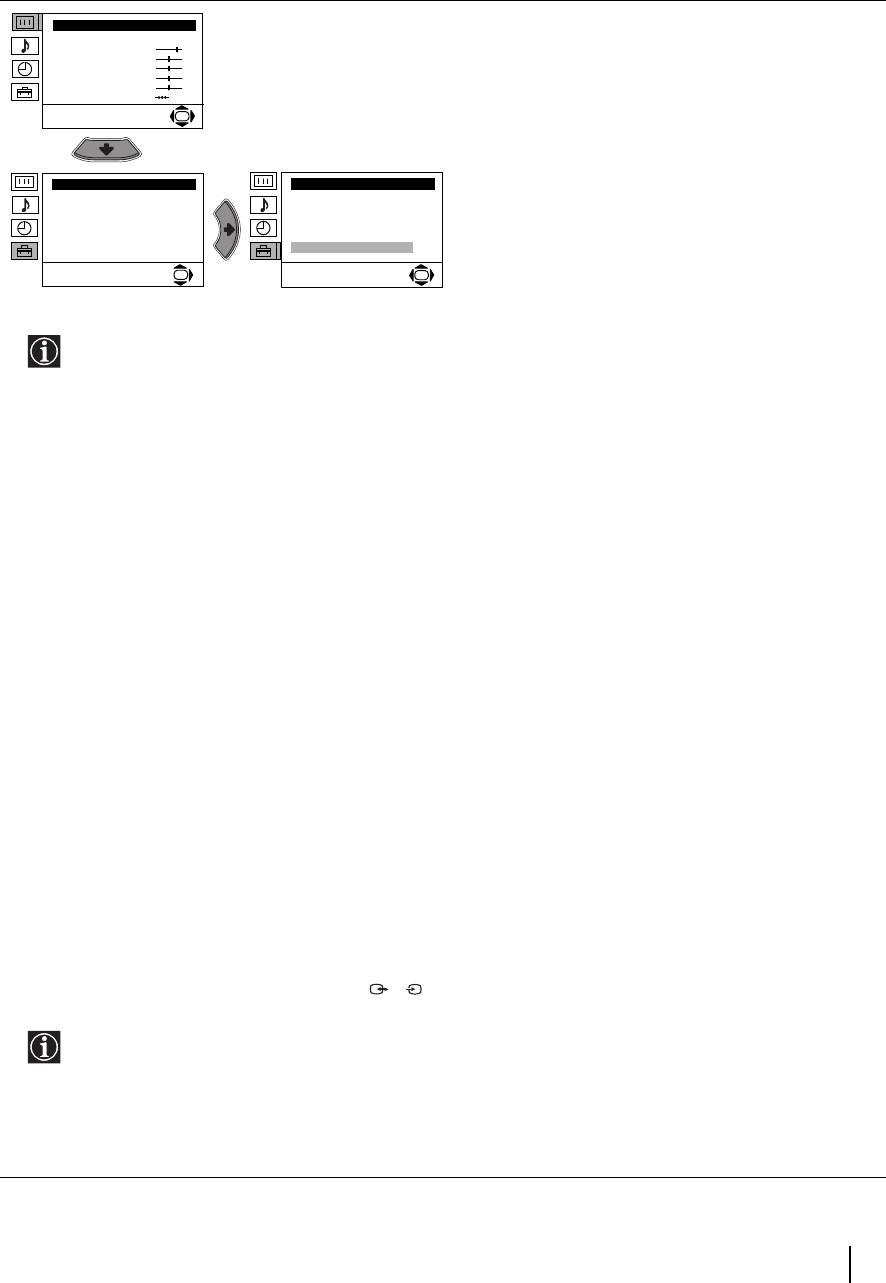
KV29LS40K RU.fm Page 13 Monday, February 2, 2004 10:19 AM
Уровень 1 Уровень 2 Уровень 3 / Функция
Hacтpoйкa изoбpaжeния
РУЧНАЯ НАСТРОЙКА ПРОГРАММ
Peжим: Персональный
Пункт меню «Руч. настройка программ» в меню
Koнтpacт
Яpкocть
«Установка» дает возможность:
Цвeтность
Pезкость
Цвeтoвoй Toн
Cброс
a) Настроить одну за одной и в определенном
порядке интересующие Вас программы, каналы
OK
(телевизионные станции) или вход
видеомагнитофона. Для зтого:
1 После выбора пункта меню «Ручная настройка
Уcтaнoвкa
Уcтaнoвкa
Язык/Cтpaнa
Язык/Cтpaнa
Прогр.» нажмите
b. Выделив пункт меню
Aвтoнacтpoйкa
Aвтoнacтpoйкa
Copтиpoвкa пpoгpaмм
Программа, нажмите на
b, после чего нажмите
Copтиpoвкa пpoгpaмм
Meтки пpoгpaмм
Meтки пpoгpaмм
на
v или V для выбора номера программы
Пpeдycтaнoвкa AV
Пpeдycтaнoвкa AV
Pyч. Hacтpoйкa Пpoгpамм
Pyч. Hacтpoйкa Пpoгpамм
(позиции), где Вы хотите настроить
Дeтaльнaя ycтaнoвкa
Дeтaльнaя ycтaнoвкa
телевизионную станцию (для канала видео мы
OK
OK
рекомендуем Вам выбрать номер программы
«0»). Нажмите
B.
2 Следующий пункт появится только в зависимости от страны, которую Вы выбрали в меню «Язык/
Страна».
После выбора пункта меню Система нажмите на b, после чего нажмите на v или V для выбора системы
телевизионной станции (B/G для Западной Евроры, или D/K для Восточной Европы). Нажмите B.
3 После выбора пункта меню Канал нажмите b, а затем нажмите v или V для выбора вида канала («С» для
широковещательных каналов или «S» для кабельных каналов). Нажмите
b. Затем нажмите на цифровые
кнопки для ввода номера канала телевизионной станции или сигнала канала видео. Если Вы не знаете
номер канала, нажмите
v или V для его поиска. Когда Вы найдете канал, который Вы хотите запомнить,
нажмите OK два раза.
Повторите все зти шаги для настройки и запоминания остальных каналов.
б) Обозначить канал меткой до пяти знаков.
Для зтого: выделите пункт меню Программа и нажмите PROG + или — до появления номера программы,
которой Вы хотите дать название. Когда он появится на зкране, выберите пункт меню Метка, после чего
нажмите
b. Нажмите v или V для выбора одной буквы, одной цифры или «-» для пропуска и нажмите b
для подтверждения зтого знака. Выберите остальные четыре знака точно так же. После того, как Вы
выбрали все знаки, нажмите OK два раза для запоминания.
в) Даже в том случае, если включена автоматическая подстройка каналов (АПЧ), можно осуществить
подстройку вручную для получения лучшего качества приема изображения в том случае, если оно
искажено.
Для зтого: в то время, когда Вы смотрите канал (телевизионную станцию), который Вы хотите
подстроить, выберите пункт меню АПЧ, после чего нажмите
b. Нажмите v или V для подстройки частоты
канала от -15 до +15. После чего нажмите OK два раза для запоминания.
г) Пропустить номера программ, которые Вам не нужны, при выборе их с помощью кнопок PROG+/-.
Для зтого: выделить пункт меню Программа и нажать PROG + или —, пока не появится номер программы,
который Вы хотите пропустить. Когда он появится на зкране, выберите пункт меню Пропуск, после чего
нажмите
b. Нажмите v или V для выбора Да, после чего нажмите OK два раза для запоминания.
Если Вы захотите отменить зту функцию в дальнейшем, выберите снова «Нет» вместо «Да».
е) Этот пункт меню дает возможность cмотреть и правильно записывать закодированный канал при помощи
декодера, подключенного к Евроразъему 2/ или через видеомагнитофон, подключенный к данному
S
Евроразъему.
Следующий пункт появится только в зависимости от страны, которую Вы выбрали в меню «Язык/
Страна».
Для зтого: выберите пункт меню декодер и нажмите
b. После зтого нажмите v или V для выбора Вкл.
После зтого нажмите два раза OK для запоминания.
Если в дальнейшем Вы захотите отказаться от зтой возможности, выберите снова «Выкл.» вместо
«Вкл.».
продолжeниe
Вывод системы меню на экран
13
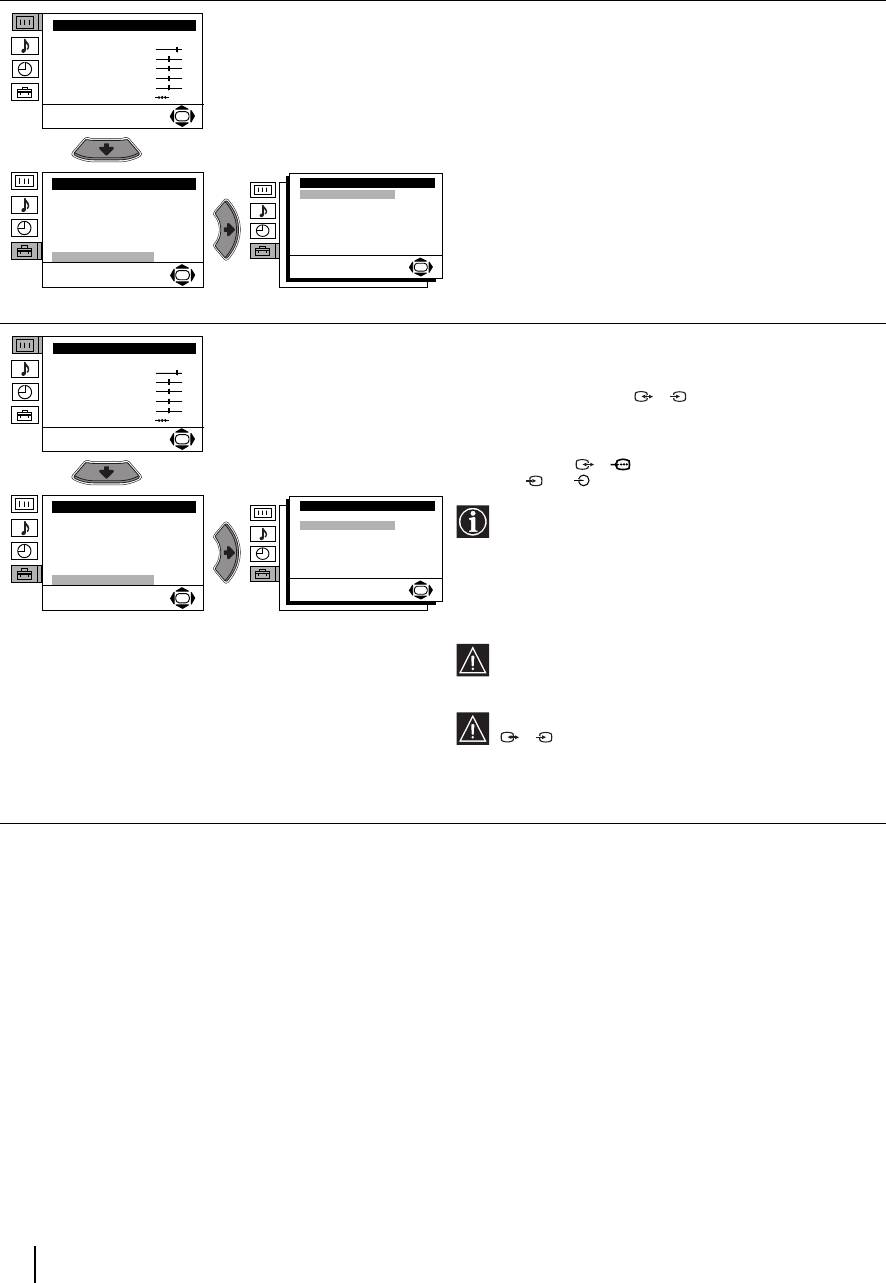
KV29LS40K RU.fm Page 14 Monday, February 2, 2004 10:19 AM
Уровень 1 Уровень 2 Уровень 3 / Функция
Hacтpoйкa изoбpaжeния
ШУМОПОНИЖЕНИЕ
Peжим: Персональный
Пункт «Шумопонижение» в меню «детальная
Koнтpacт
Яpкocть
установка» позволяет автоматически уменьшить
Цвeтность
Pезкость
шум изображения при слабом сигнале.
Цвeтoвoй Toн
Cброс
Для зтого: после выбора зтого пункта меню
OK
нажмите
b. После зтого нажмите v или V для
выбора Auto, после чего нажмите OK для
запоминания.
Уcтaнoвкa
Дeтaльнaя ycтaнoвкa
Шyмoпoнижeниe:
Auto
Если в дальнейшем Вы хотите отменить зту
Язык/Cтpaнa
Bыxoд AV2:
TV
Aвтoнacтpoйкa
RGB Чeнтpиpoвaниe:
0
функцию, выберите «Выкл.» вместо «Auto.».
Copтиpoвкa пpoгpaмм
Поворот Изoбpaж.:
0
Meтки пpoгpaмм
Пpeдycтaнoвкa AV
Pyч. Hacтpoйкa Пpoгpамм
Дeтaльнaя ycтaнoвкa
OK
OK
Hacтpoйкa изoбpaжeния
ВЫХОД AV2
Peжим: Персональный
Пункт меню «Выход AV2» в меню «Детальная
Koнтpacт
Яpкocть
установка» дает возможность выбрать выходной
Цвeтность
Pезкость
сигнал Евроразъема 2/ для записи через
S
Цвeтoвoй Toн
данный Евроразъем любого сигнала, поступающего
Cброс
от телевизора или от любого другого
OK
дополнительного устройства, подключенного к
Евроразъему 1/ или к разъемам на передней
панели 3 и 3.
Уcтaнoвкa
Дeтaльнaя ycтaнoвкa
Шyмoпoнижeниe:
Auto
Язык/Cтpaнa
Если у Вашего видеомагнитофона есть
Bыxoд AV2:
TV
Aвтoнacтpoйкa
RGB Чeнтpиpoвaниe:
0
Смартлинк, то в зтом нет необходимости.
Copтиpoвкa пpoгpaмм
Поворот Изoбpaж.:
0
Meтки пpoгpaмм
Пpeдycтaнoвкa AV
Pyч. Hacтpoйкa Пpoгpамм
Для зтого: после выбора данного пункта меню,
Дeтaльнaя ycтaнoвкa
OK
нажмите
b. После зтого нажмите v или V для
OK
выбора требуемого выходного сигнала TV, AV1,
AV3, YC3 или AUTO.
При выборе «AUTO», выходной сигнал При
выбудет всегда тем же, который появился на
зкране телевизора.
Если Вы подключили декодер к Евроразъему
2/ или к видеомагнитофону,
S
подключенному к данному Евроразъему, не
забудьте снова перевести «Выход AV2» в
«AUTO» или «TV» для правильного
декодирования сигнала.
продолжeниe
14
Вывод системы меню на экран
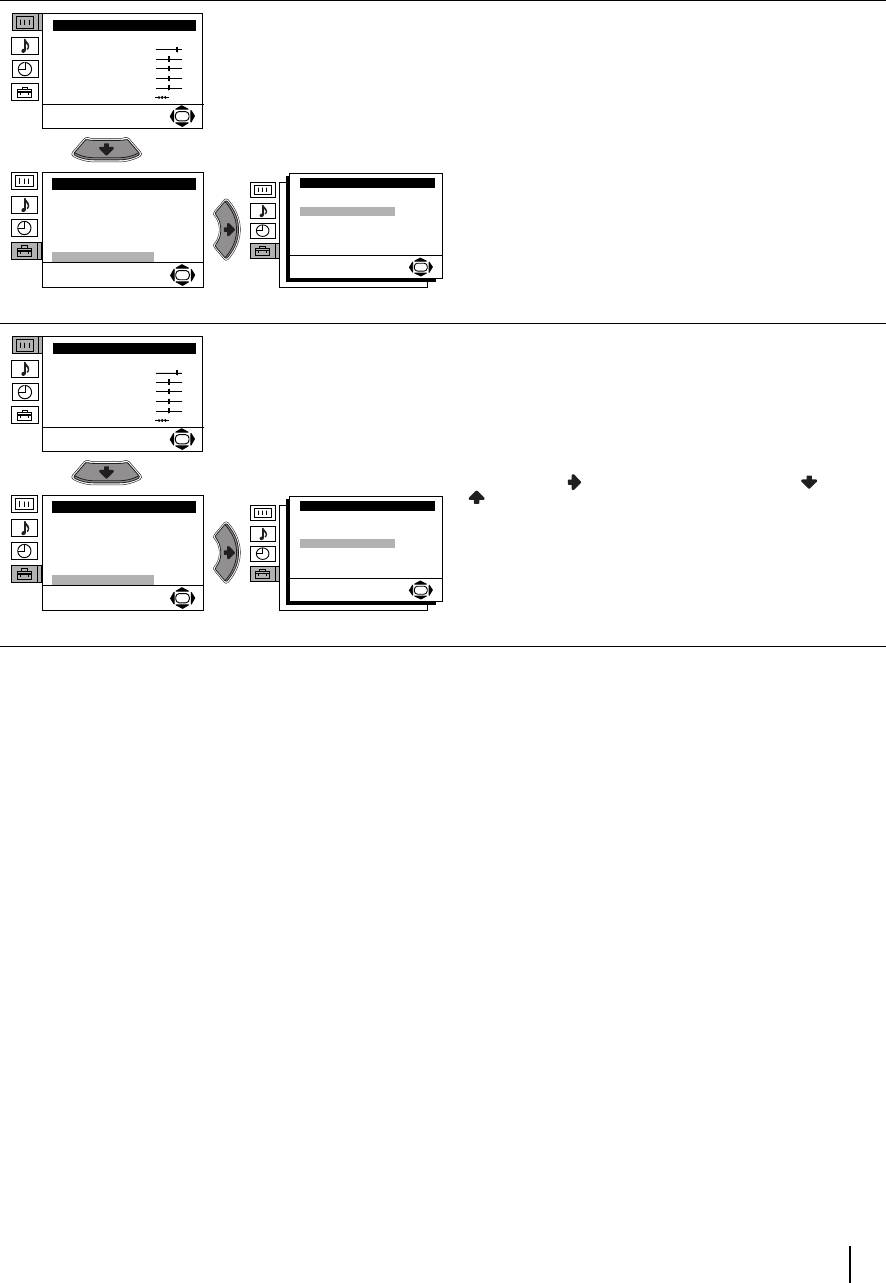
KV29LS40K RU.fm Page 15 Monday, February 2, 2004 10:19 AM
Уровень 1 Уровень 2 Уровень 3 / Функция
Hacтpoйкa изoбpaжeния
RGB ЦЕНТРИРОВАНИЕ
Peжим: Персональный
При подключении источника сигналов RGB, таких,
Koнтpacт
Яpкocть
как «Playstation», возможно, что потребуется
Цвeтность
Pезкость
отрегулировать положение изображения по
Цвeтoвoй Toн
горизонтали. В зтом случае Вам надо обратиться к
Cброс
пункту меню «RGB центрирование» в меню
OK
«Детальная установка».
Для зтого: в то время, как Вы видите входной
сигнал RGB, выберите пункт меню «RGB
Уcтaнoвкa
Дeтaльнaя ycтaнoвкa
Шyмoпoнижeниe:
Auto
центрирование» и нажмите b. После зтого нажмите
Язык/Cтpaнa
Bыxoд AV2:
TV
Aвтoнacтpoйкa
RGB Чeнтpиpoвaниe:
0
v или V для регулировки положения изображения
Copтиpoвкa пpoгpaмм
Поворот Изoбpaж.:
0
Meтки пpoгpaмм
от -10 до +10. После зтого нажмите на OK для
Пpeдycтaнoвкa AV
Pyч. Hacтpoйкa Пpoгpамм
запоминания.
Дeтaльнaя ycтaнoвкa
OK
OK
Hacтpoйкa изoбpaжeния
ПОВОРОТ ИЗОБРАЖЕНИЯ
Peжим: Персональный
Воздействие магнитного поля Земли может
Koнтpacт
Яpкocть
привести к наклону изображения. В зтом случае Вы
Цвeтность
Pезкость
можете отрегулировать его, используя пункт меню
Цвeтoвoй Toн
«Поворот Изображ.» в меню «Детальная
Cброс
установка».
OK
Для зтого: после выбора зтого пункта меню
нажмите на . После зтого нажмите на или
для регулировки наклона изображения от -5 до
Уcтaнoвкa
Дeтaльнaя ycтaнoвкa
Шyмoпoнижeниe:
Auto
+5. После зтого нажмите на OK для запоминания.
Язык/Cтpaнa
Bыxoд AV2:
TV
Aвтoнacтpoйкa
RGB Чeнтpиpoвaниe:
0
Copтиpoвкa пpoгpaмм
Поворот Изoбpaж.:
0
Meтки пpoгpaмм
Пpeдycтaнoвкa AV
Pyч. Hacтpoйкa Пpoгpамм
Дeтaльнaя ycтaнoвкa
OK
OK
Вывод системы меню на экран
15