Renault Clio Phase II оригинальное (77 11 304 233 Edition Russe) руководство по ремонту и техническому обслуживанию для СТО с бензиновыми двигателями: D7F 720 1.2 л (1149 см³) 60 л.с./43 кВт, E7J 780 1.4 л (1390 см³) 75 л.с./55 кВт, K7M 744 1.6 л (1598 см³) 90 л.с./66 кВт и дизельным F8Q 630 D/TDi 1.9 л (1870 см³) 64-80 л.с./47-59 кВт; полные технические характеристики, электросхемы, контрольные размеры кузова, диагностика, ремонт. Рено Клио второго поколения с кузовами пяти- и трехдверный хэтчбек модели выпуска с 1997 по 2008 год
Renault Clio Symbol Устройство, техническое обслуживание и ремонт здесь
Сборник принципиальных электросхем Clio Mercosur (CLIO II Phase 2) 2000 модельный год, Техническая нота 8166Е
Renault Clio II Workshop Repair Manual
Renault Clio II Phase 2 (Revue Technique automobile) руководство по эксплуатации, ремонту и техобслуживанию с дизелями K9K
Руководство по ремонту и техническому обслуживанию для СТО Рено Симбол, Клио, Талия
Renault Clio II руководство по эксплуатации
ЕСЛИ ВЫ ВИДИТЕ ОШИБКУ 406 Not Acceptable и не видите документ, то скорей всего у Вас IP РФ и его надо сменить, на любой другой страны, с помощью VPN ( Scribd и SlideShare блокируют посетителей с Российским IP).
Видео как заменить подшипник передней ступицы и подушку двигателя на Renault Clio II (Рено Клио 97-08)
Renault Clio Phase 2 общая информация (Рено Клио 1997-2008)
Подшипник поворотного кулака
МОМЕНТЫ ЗАТЯЖКИ
Гайка крепления хвостовика карданного вала — 28 даНм
Болты крепления колес — 9 даНм
Гайки крепления нижней части амортизатора — 18 даНм
Болты крепления суппорта тормозного механизма — 10 даНм
Гайка крепления шарового шарнира рулевого управления — 3,7 даНм
Гайка крепления пальца шарового шарнира на поворотном кулаке — 5,5 даНм
СНЯТИЕ
Отсоедините аккумуляторную батарею.
Снимите:
– колесо;
– суппорт тормозного механизма и прикрепите его к пружине подвески, чтобы не повредить шланг;
– шаровый шарнир в сборе при помощи приспособления T. Av. 476;
– гайку крепления хвостовика карданного вала.
Верните шлицевой хвостовик в исходное положение при помощи приспособления T. Av.1050-02.
Снимите:
– тормозной диск;
– гайку и палец нижнего шарового шарнира;
– два болта крепления нижней части амортизатора;
– узел ступицы/поворотного кулака/подшипника.
Извлеките ступицу при помощи пресса. Снимите со ступицы внутреннюю обойму подшипника при помощи съемника с зажимами и приспособления Rou. 15-01. Снимите пружинное стопорное кольцо из канавки на поворотном кулаке. Извлеките при помощи пресса оставшуюся часть подшипника, прилагая усилие к внутренней обойме подшипника при помощи трубки того же диаметра.
УСТАНОВКА
При помощи пресса вставьте подшипник в поворотный кулак, используя трубку с наружным диаметром 70 мм и внутренним диаметром 66 мм, прилагая усилие к наружной обойме.
ВНИМАНИЕ! Во избежание повреждения подшипника запрещается прилагать усилие к внутренней обойме, так как усилие запрессовки подшипника очень велико.
Установите новое пружинное стопорное кольцо. Смажьте универсальной смазкой все кромки уплотнительной манжеты подшипника. Установите при помощи пресса, используя трубку с наружным диаметром 48 мм и внутренним диаметром 42 мм и прилагая усилие к внутренней обойме подшипника. Установите на автомобиль узел ступицы/поворотного кулака/подшипника. Выполните установку в порядке, обратном снятию и соблюдая рекомендованные моменты затяжки.
| № | Спецификация / Specs | Данные |
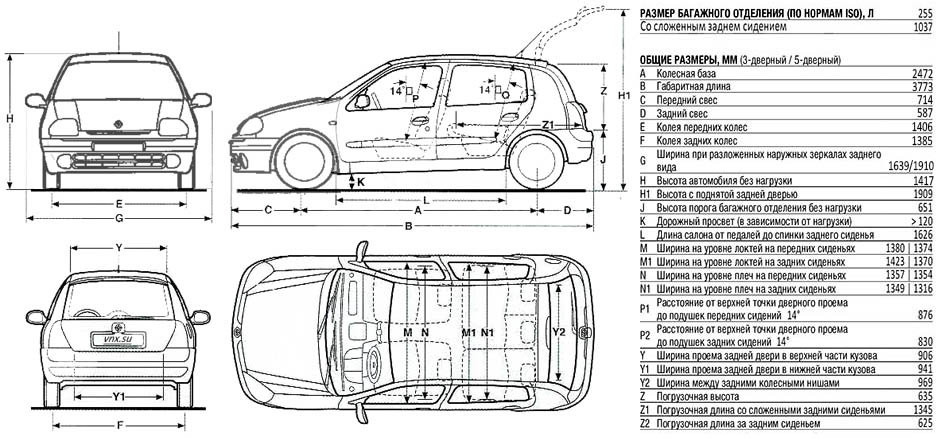
| Габариты (мм/mm) и масса (кг/kg) / Dimensions and Weight | ||
| 1 | Длина / Length | 3773 |
| 2 | Ширина (без/с зеркалами) / Width | 1639/1910 |
| 3 | Высота (загружен/пустой) / Height | 1417 |
| 4 | Колёсная база / Wheelbase | 2472 |
| 5 | Дорожный просвет (клиренс) / Ground clearance | 120 |
| 6 | Снаряжённая масса / Total (curb) weight | 875 |
| Полная масса / Gross (max.) weight | 1440 | |
|
Двигатель / Engine |
||
| 7 | Тип / Engine Type, Code | Бензиновый, жидкостного охлаждения, четырехтактный, D7F 720 |
| 8 | Количество цилиндров / Cylinder arrangement: Total number of cylinders, of valves | 4-цилиндровый, 8V, рядный, SOHC с верхним расположением одного распределительного вала |
| 9 | Диаметр цилиндра / Bore | 69.0 мм |
| 10 | Ход поршня / Stroke | 76.8 мм |
| 11 | Объём / Engine displacement | 1149 см³ |
| 12 | Система питания / Fuel supply, Aspiration | Многоточечный впрыск топлива SAGEM или MAGNETI MARELLI Multi-point with semi-sequential regulation |
| Атмосферный | ||
| 13 | Степень сжатия / Compression ratio | 9.65:1 |
| 14 | Максимальная мощность / Max. output power kW (HP) at rpm | 43 кВт (59 л.с.) при 5250 об/мин |
| 15 | Максимальный крутящий момент / Max. torque N·m at rpm | 93 Нм при 2500 об/мин |
|
Трансмиссия / Transmission |
||
| 16 | Сцепление / Clutch type | Однодисковое, сухое, с диафрагменной нажимной пружиной и гасителем крутильных колебаний, постоянно замкнутого типа |
| 17 | КПП / Transmission type | JB1 МКПП 5 пятиступенчатая механическая, двухвальная, с синхронизаторами на всех передачах переднего хода |
О Книге
- Название: RENAULT CLIO II руководство по ремонту и техническому обслуживанию для СТО
- Бензиновые двигатели: D7F 720 1.2 л (1149 см³) 60 л.с./43 кВт, E7J 780 1.4 л (1390 см³) 75 л.с./55 кВт, K7M 744 1.6 л (1598 см³) 90 л.с./66 кВт и дизельным F8Q 630 D/TDi 1.9 л (1870 см³) 64-80 л.с./47-59 кВт
- Выпуск с 1997 года
- Серия: «Workshop Manual»
- Год издания: Июнь 2001
- Автор: Коллектив авторов
- Издательство: «Renault s.a.s»
- Формат: PDF
- Страниц в книге: 1232
- Размер: 6.03 МБ
- Язык: Русский
- Количество электросхем: 65
Поиск по сайту
Остались вопросы или пожелания? Пишите на почту: support@vnx.su

RENAULT recommends

Welcome to your new RENAULT
This driver’s handbook contains all the information you will need:
•to get to know your Renault, to use it to the best advantage and to benefit from all the latest technical developments which are incorporated in it.
•to ensure that it is always running well by following the simple, but strict, advice concerning regular maintenance.
•to enable you to deal quickly with minor faults which do not require specialist attention.
The few minutes you spend reading this handbook will be amply rewarded by the information which it provides and the technical innovations it will bring to your attention. If certain points are still unclear, the technicians in our Network will be happy to provide you with any additional information you may require.
The following symbols are used in this handbook to help you while you are reading it:
To indicate a risk, danger or safety advice.
The description of the models given in this handbook is based on the technical specifications known at the date this
document was produced. The handbook covers all equipment (standard or optional) which is available for these
models, but their presence on the vehicle depends on the version, options selected and country of marketing.
Certain equipment which is due to be made available during the year may also be included in this handbook.
Enjoy driving your new Renault.
Copying or translation, in part or in full, is forbidden without written permission from Renault, 92100 Billancourt 2002.
0.01
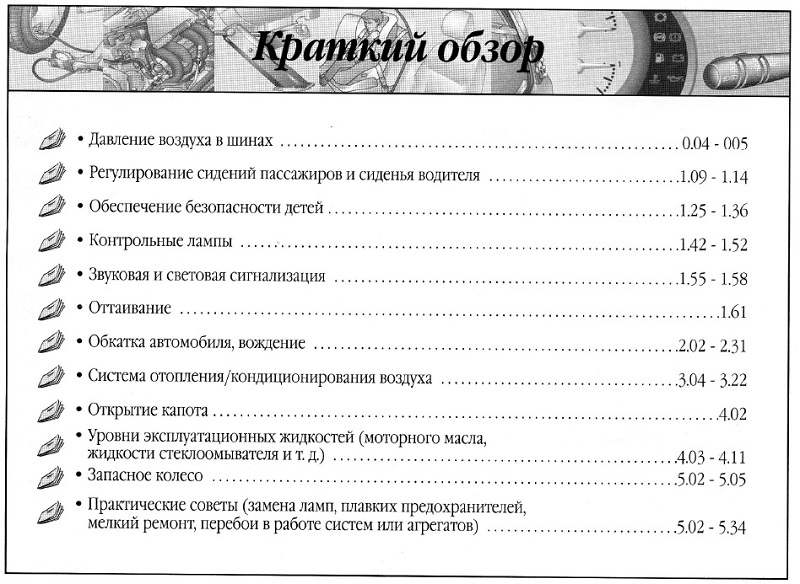
Brief overview
|
• Tyre pressures …………………………………………………………………………………. |
0.04 — 0.05 |
|
|
• Adjusting the seats and driving position ……………………………………….. |
1.11 ¬ 1.14 |
|
|
• Child restraints ………………………………………………………………………………. |
1.24 |
¬ 1.36 |
|
• Warning lights ……………………………………………………………………………….. |
1.42 |
¬ 1.52 |
|
• Horn and headlamp flash ……………………………………………………. |
1.55 ¬ 1.57 — 1.62 |
|
|
• De-icing …………………………………………………………………………………………………….. |
1.61 |
|
|
• Running in, driving ……………………………………………………………………….. |
2.02 |
¬ 2.30 |
|
• Heating/air conditioning ………………………………………………………………… |
3.04 |
¬ 3.22 |
|
• Opening the bonnet ………………………………………………………………………………….. |
4.02 |
|
|
• Levels (engine oil, windscreen washer, etc.) …………………………………… |
4.03 ¬ 4.11 |
|
|
• Emergency spare wheel …………………………………………………………………. |
5.02 |
¬ 5.05 |
|
• Practical advice (changing the bulbs, fuses, repairs, operating |
||
|
incidents) ………………………………………………………………………………………. |
5.02 ¬ 5.34 |
0.02
|
C |
O |
N |
T |
E |
N |
T |
S |
|
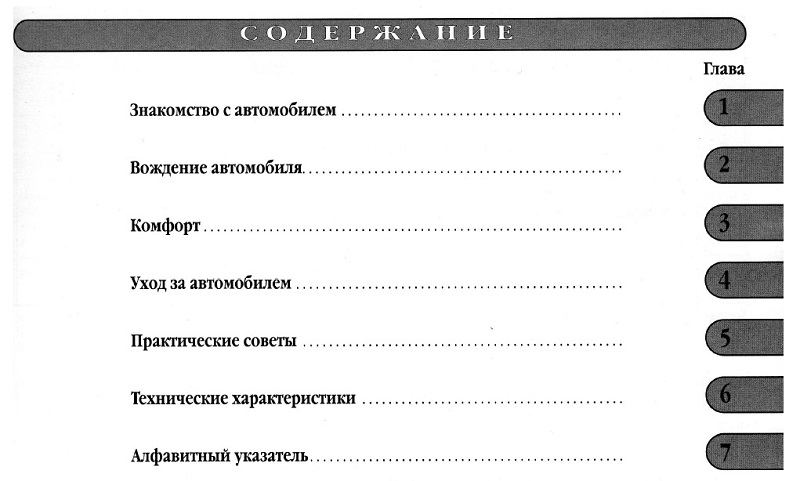
Sections |
|||||||
|
Getting to know your car …………………………………………………………… |
1 |
||||||
|
Driving |
………………………………………………………………………………………………… |
2 |
|||||
|
Your comfort ……………………………………………………………………………………. |
3 |
||||||
|
Maintenance …………………………………………………………………………………….. |
4 |
||||||
|
Practical advice |
………………………………………………………………………………. |
5 |
|||||
|
Technical specifications |
……………………………………………………………… |
6 |
|||||
|
Alphabetical index ………………………………………………………………………… |
7 |
0.03

Tyre inflation pressures when cold (in bar)
|
Versions |
1.2 |
1.4 16V |
2.0 16V |
1.5 dCi |
||
|
1.2 16V |
1.6 16V |
1.9 dCi |
||||
|
Tyre sizes |
175/65 R14 T |
175/65 R14 T |
195/45 R16 |
195/50 R15 |
175/65 R14 T |
|
|
185/55 R15 H |
185/55 R15 H |
185/55 R15 H |
||||
|
Normal use (2) |
||||||
|
• Front |
1.9 |
2.2 (1) |
2.3 |
2.3 |
2.2 |
|
|
• Rear |
1.8 |
2 |
2.1 |
2.1 |
2 |
|
|
Motorway use (2) |
||||||
|
• Front |
2 |
2.3 (1) |
2.7 |
2.5 |
2.3 |
|
|
• Rear |
2 |
2.1 (1) |
2.2 |
2.2 |
2.1 |
|
|
Wheel sizes |
5.5 J 14 |
7 J 16 |
7 J 16 |
5.5 J 14 |
||
|
6.0 J 15 |
6.0 J 15 |
|||||
Tyre safety and use of chains
Refer to the information on tyres in Section 5 for information on maintenance and, depending on the version, the conditions under which snow chains may be fitted to the vehicle.
Special features of the 2.0 16V version
The tyres on this vehicle cannot be fitted with chains. If you wish to fit snow chains, you must use special equipment. Consult your Renault Dealer.
(1)Vehicle with automatic transmission: add 0.1 bar.
(2)Special note concerning vehicles used under full load (maximum permissible all-up weight) and towing a trailer:
Maximum speed must be limited to 60 mph (100 km/h) and the tyre pressure increased by 0.2 bar (or 3 PSI). Refer to the information on weights in Section 6 for more details.
0.04
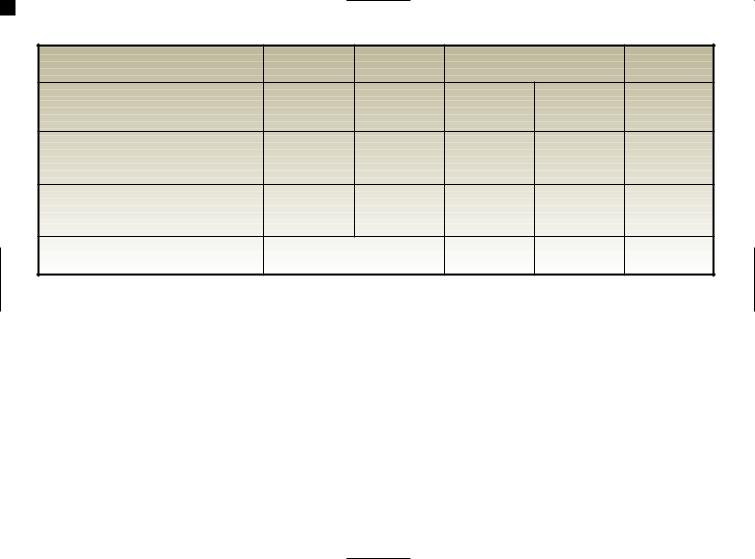
Tyre pressures when cold (in PSI) (continued)
|
Versions |
1.2 |
1.4 16V |
2.0 16V |
1.5 dCi |
||
|
1.2 16V |
1.6 16V |
1.9 dCi |
||||
|
Tyre sizes |
175/65 R14 T |
175/65 R14 T |
195/45 R16 |
195/50 R15 |
175/65 R14 T |
|
|
185/55 R15 H |
185/55 R15 H |
185/55 R15 H |
||||
|
Normal use |
||||||
|
• Front |
28 |
32 (1) |
33 |
33 |
32 |
|
|
• Rear |
26 |
29 |
30 |
30 |
29 |
|
|
Motorway use (2) |
||||||
|
• Front |
29 |
33 (1) |
39 |
36 |
33 |
|
|
• Rear |
28 |
30 (1) |
32 |
32 |
30 |
|
|
Wheel sizes |
5.5 J 14 |
7 J 16 |
7 J 16 |
5.5 J 14 |
||
|
6.0 J 15 |
6.0 J 15 |
|||||
Tyre safety and use of chains
Refer to the information on tyres in Section 5 for information on maintenance and, depending on the version, the conditions under which snow chains may be fitted to the vehicle.
Special features of the 2.0 16V version
The tyres on this vehicle cannot be fitted with chains. If you wish to fit snow chains, you must use special equipment. Consult your Renault Dealer.
(1)Vehicle with automatic transmission: add 3 PSI.
(2)Special note concerning vehicles used under full load (maximum permissible all-up weight) and towing a trailer:
Maximum speed must be limited to 60 mph (100 km/h) and the tyre pressure increased by 0.2 bar (or 3 PSI). Refer to the information on weights in Section 6 for more details.
0.05

0.06

Section 1: Getting to know your car
|
Keys — plip remote control unit ……………………………………………………………………………………………… |
1.02 — 1.03 |
|
|
Doors ……………………………………………………………………………………………………………………………………. |
1.04 — 1.05 |
|
|
Automatic locking of doors when driving ……………………………………………………………………………………….. |
1.06 |
|
|
Engine immobiliser system ……………………………………………………………………………………………………. |
1.07 — 1.08 |
|
|
Head restraints — Seats …………………………………………………………………………………………………………. |
1.09 |
¬ 1.12 |
|
Seat belts/Methods of restraint in addition to the front seat belts …………………………………………. |
1.13 |
¬ 1.23 |
|
Child safety …………………………………………………………………………………………………………………………. |
1.24 |
¬ 1.36 |
|
Clock and external temperature ………………………………………………………………………………………………………. |
1.37 |
|
|
Driving position ………………………………………………………………………………………………………………….. |
1.38 |
¬ 1.41 |
|
Instruments …………………………………………………………………………………………………………………………. |
1.42 |
¬ 1.49 |
|
On-board computer ………………………………………………………………………………………………………….. |
1.50 ¬ 1.52 |
|
|
Rear-view mirrors …………………………………………………………………………………………………………………. |
1.53 — 1.54 |
|
|
Steering wheel ……………………………………………………………………………………………………………………………….. |
1.54 |
|
|
Lighting and external signals ………………………………………………………………………………………………… |
1.55 — 1.56 |
|
|
Headlight beam adjustment …………………………………………………………………………………………………………….. |
1.57 |
|
|
Wipers ………………………………………………………………………………………………………………………………… |
1.58 ¬ 1.60 |
|
|
De-icing ………………………………………………………………………………………………………………………………………….. |
1.61 |
|
|
Visible and audible warning signals ………………………………………………………………………………………………… |
1.62 |
|
|
Fuel tank (filling with fuel) …………………………………………………………………………………………………… |
1.63 — 1.64 |
1.01
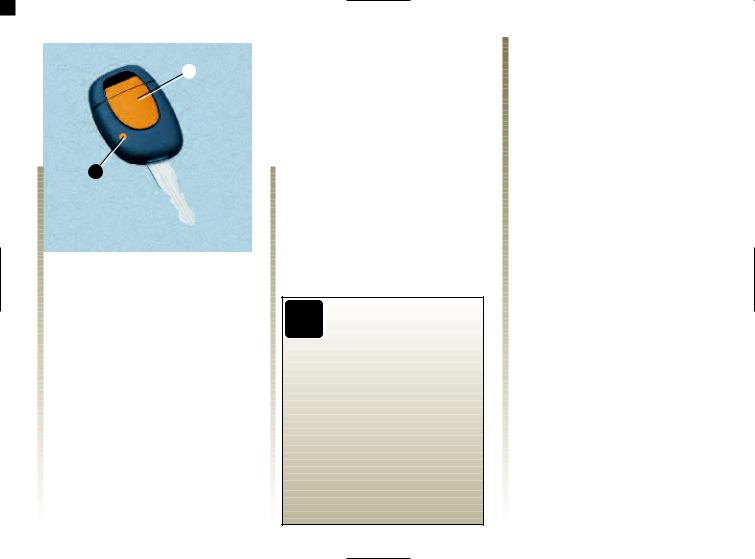
KEYS / RADIO FREQUENCY REMOTE CONTROL
|
The plip remote control 1 locks and |
|||||||
|
unlocks the doors. |
|||||||
|
1 |
It is supplied with power by a |
||||||
|
battery which has to be replaced |
|||||||
|
when the battery tell-tale light 2 no |
|||||||
|
longer comes on. (Refer to the |
|||||||
|
information on the radio frequency |
|||||||
|
remote control batteries.) |
|||||||
2
1 Remote control coded ignition key, key for doors and fuel filler cap.
If there is a child (or
animal) in the car, never
leave it unattended with
the key in the ignition.
With the key in the ignition it
would be possible to operate
electrical equipment such as the
window risers and there is a risk
that the child may be seriously
injured (by trapping his or her
neck, arm, hand, etc.).
Locking/unlocking the doors
Press the remote control for approximately one second to lock or unlock the doors. (Tell-tale light 2 will switch on.)
—The hazard warning lights flash twice to indicate that the doors have been locked.
Note: Depending on the vehicle, if either a door or tailgate is open or not properly closed or if a rear interior light remains in the “continuous lighting” position (see information on interior lights in section 3), the hazard warning lights will not flash.
—The hazard warning lights flash once to indicate that the doors have been unlocked.
1.02

RADIO FREQUENCY REMOTE CONTROL (continued)
The range within which the remote control will operate
This varies according to the environment: therefore take care when handling the remote control that you do not inadvertently lock or unlock the doors.
Note: On certain vehicles, if a door is not opened within approximately 30 seconds of unlocking the door using the remote control, the doors will lock again automatically.
Interference
Interference may be caused to the operation of the remote control by factors in the immediate vicinity (external installations or the use of equipment operating on the same frequency as the remote control).
If you lose your keys or need another set of keys (or a remote control), contact your RENAULT Dealer.
•If a remote control unit is replaced, it will be necessary to take the vehicle to your RENAULT Dealer because both the vehicle and all the remote control units are needed to initialise the system.
•No more than two remote controls can be used on one vehicle.
•Make sure that the batteries are always in good condition — they last for approximately two years.
1.03
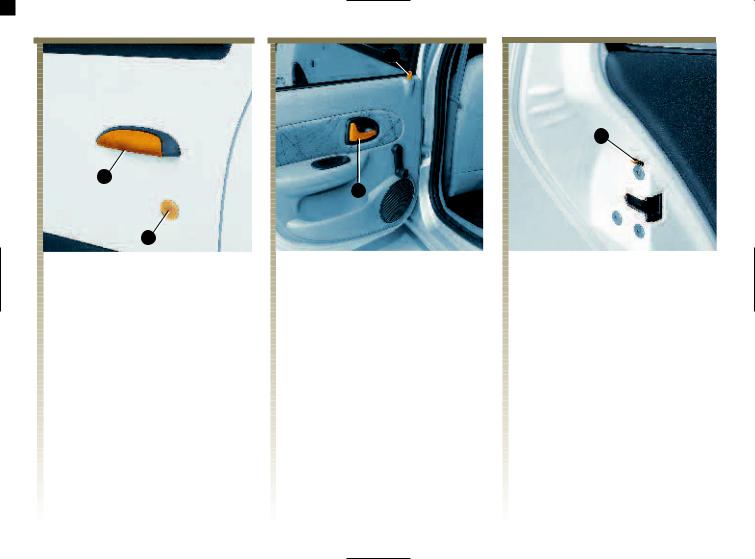
OPENING THE DOORS
1
2
Opening the doors from the outside
Front: Use the key to unlock the front door lock 2. Slip your hand under the handle 1 and pull it towards you.
Rear: When the front door is open, lift the unlocking knob 3 from inside and pull the door handle.
Opening the doors from inside the vehicle
Move handle 4.
Lights on warning buzzer
If you have left the lights switched on after turning off the ignition, a warning buzzer will sound when a door is opened (risk of battery discharge).
Childproof locks
To prevent the rear doors being opened from inside the vehicle, move lever 5 on each door and check from inside the car that both doors are securely locked.
1.04

|
Opening status warning light |
|||||||
|
The warning light on switch 2 |
|||||||
|
informs you of the closure status of |
|||||||
|
the doors and tailgate: |
|||||||
|
— the light comes on when the doors |
|||||||
|
are locked; |
|||||||
|
— when a door is opened (or |
|||||||
|
incorrectly closed) the indicator |
|||||||
|
2 |
light goes out. |
||||||
|
When you lock the doors using the |
plip remote control, the indicator light remains lit for approximately one minute then goes out.
Manual locking
Front: Use the key from the outside.
Rear: Press down knob 1 in each door.
Electric central locking
This enables the doors and
the luggage compartment to be locked or unlocked simultaneously.
Lock by pressing the indicator light on switch 2.
The front door mechanism cannot be locked if the door is open.
If you decide to keep the
doors locked when you
are driving, remember
that it may be more
difficult for those assisting you
to gain access to your vehicle in
the event of an emergency.
1.05

AUTOMATIC LOCKING OF DOORS, ETC. WHEN DRIVING
You must first decide if you want to activate this function.
To activate
With the ignition on, press the central door locking button 1 for approximately 5 seconds, until you hear the beep.
To deactivate
With the ignition on, press the central door locking button 1 for approximately 5 seconds, until you hear the beep.
If you decide to keep the
doors locked when you
are driving, remember
that it may be more
difficult for those assisting you
to gain access to your vehicle in
the event of an emergency.
1
Operating principle
When the vehicle moves off, the system automatically locks the doors, etc. as soon as a speed of 4 mph (6 km/h) is attained. The indicator light on button 1 light ups.
Unlocking occurs automatically:
—if a front door is opened.
Note: If a rear door is opened, this will be locked again automatically when the vehicle attains a speed of approximately 4 mph (6 km/h).
—by pressing the door unlocking button 1.
Operating incident
If you note that the system is not operating correctly (automatic locking does not take place, the indicator light on button 1 does not light up when the doors, etc. are locked), first of all check that all the doors, etc. are properly closed. However, if they are closed correctly, consult your Renault Dealer.
Also make sure that locking has not been deactivated inadvertently. If this occurs, switch the ignition off and on again and reactivate it as described above.
1.06
ENGINE IMMOBILISER
This prevents the engine being started by anyone who does not have the coded key for the vehicle.
|
Any |
operation |
on |
or |
|
|
modification |
to |
the |
||
|
immobiliser |
system |
|||
|
(computers, wiring, etc.) |
||||
|
may be dangerous. It must be |
||||
|
carried |
out |
by |
qualified |
|
|
RENAULT personnel. |
1
Operating principle
The vehicle is automatically protected a few seconds after the key has been removed from the ignition.
When the ignition is switched on, warning light 1 comes on for a few seconds then goes out.
The vehicle has recognised the code and the engine may be started.
If the code of the ignition key is not recognised by the vehicle, warning light 1 will flash continuously and the engine cannot be started.
Indicator light
System operational indicator light
When the ignition is switched on, indicator light 1 lights up continuously for approximately three seconds and then goes out. You can then start the engine.
Vehicle protection indicator light
A few seconds after the ignition has been switched off, indicator light 1 will flash continuously.
The vehicle will not be protected until the key has been taken out of the ignition.
1.07
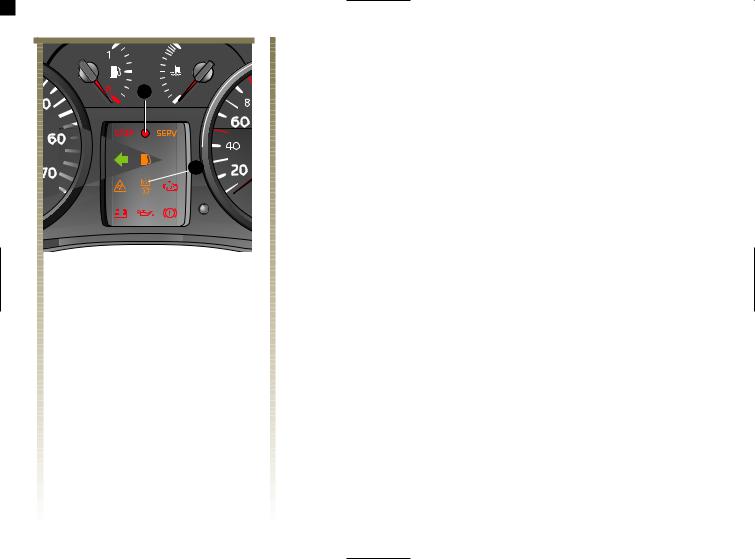
ENGINE IMMOBILISER (continued)
1

Warning light to indicate that the system is not operating correctly
When the ignition has been switched on, if warning light 1 continues to flash or remains on, it indicates that the system is not operating correctly.
In all instances, you must contact a RENAULT Dealer, who are the only people authorised to repair the engine immobiliser system.
If the coded ignition key is faulty, use the second key (supplied with the vehicle).
1.08
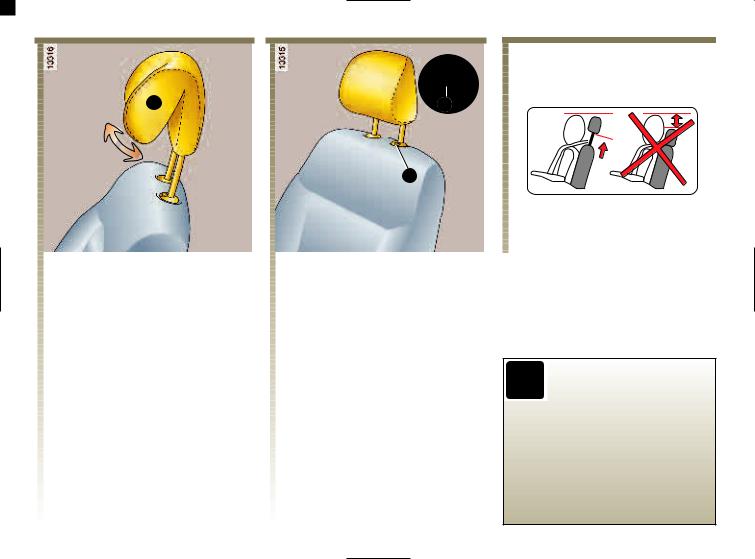
To raise or lower the headrest
Pull the headrest towards you (i.e. towards the front of the vehicle) and slide it up or down at the same time.
To adjust the angle of the headrest
On certain vehicles the angle of the headrest can be adjusted. To do this, move the front section A of the headrest forwards or backwards until it feels comfortable.
To remove the headrest
First incline the seatback towards the rear.
Raise the headrest until it is at the highest possible setting. Lift up tab 1 and then pull the headrest upwards until it is released.
To refit the headrest
Insert the rods into the sleeves, with the notches facing the front.
Lower the headrest until it locks in position.
|
The |
head |
restraint |
is |
|
|
important for safety: ensure |
||||
|
that |
it |
is |
positioned |
|
|
correctly. |
The |
distance |
||
|
between your head and the head |
||||
|
restraint should be as small as |
||||
|
possible, and the top of the head |
||||
|
restraint should be as close as |
||||
|
possible to the top of your head. |
||||
|
1.09 |

REAR HEAD RESTRAINTS
1
1
To adjust the height
Simply slide it up.
To remove it
Press tab 1.
To refit the headrest
Insert the rods into the sleeves, with the notches to the front, and lower the headrest to the desired height.
Storage position
When the headrest is fully lowered, it is in the storage position; do not use this position when someone is sitting in the rear seats.
|
The |
head |
restraint |
is |
|
|
important for safety: ensure |
||||
|
that |
it |
is |
positioned |
|
|
correctly. |
The |
distance |
||
|
between your head and the head |
||||
|
restraint should be as small as |
||||
|
possible, and the top of the head |
||||
|
restraint should be as close as |
||||
|
possible to the top of your head. |
1.10

FRONT SEATS
1
2
To move forwards or backwards:
Lift lever 2 to unlock the seat. Release the lever when the seat is in the required position and ensure it is locked in place.
To raise or lower the driver’s seat:
Lift lever 1.
3
4
To tilt the seatback:
Move handle 4 and tilt the seat to the required position.
To adjust the lumbar support on the driver’s seat:
Turn wheel 3.
So that the effectiveness of
the seat belts is not
reduced, we would advise
you not to recline the
seatbacks excessively.
Make sure the seatback is locked in
place correctly.
No objects should be placed on the
floor (area in front of driver) as
such objects may slide under the
pedal during braking manoeuvres,
thus obstructing its use.
For safety reasons, adjust
the seats only when the
vehicle is stationary.
1.11

FRONT SEATS (continued)
5
6
Access to the rear seats
(three-door versions)
Lift lever 5 and slide the seat forwards.
To return the seat to its original position (memorised position) on the driver’s side, slide the seat backwards until it locks.
Heated seats
With the ignition switched
on, press the switch located on the rail cover 6. An indicator light will light up on the instrument panel.
The system is not necessarily activated if the indicator light is lit up. The system has a thermostat and only operates when the passenger compartment temperature is less than 12°C (with a tolerance of plus or minus 4°C).
1.12

SEAT BELTS
Always wear your seat belt when travelling in your car. You must also comply with the local legislation in the particular country you are in.
Before driving off:
— First ensure that your driving position is correct.
— Then, to provide maximum safety, adjust your seat belt correctly.
Incorrectly adjusted seat
belts may cause injuries
in the event of an
accident.
Even pregnant women should
wear a seat belt. In this case,
ensure that the pressure of the
lap belt on the abdomen is not
excessive.
Adjusting your driving position
•Sit with your back firmly against the seatback.
This is essential to ensure your lumbar vertebrae are in the correct position.
•Adjust the distance between the seat and the pedals.
Your seat should be as far back as possible to allow you to press the clutch pedal fully down. The seatback should be adjusted so that your arms remain slightly bent.
•Adjust the position of the head restraint.
For maximum safety, your head should be as close as possible to the head restraint.
•Adjust the height of the seat.
This adjustment allows you to select the seat position which offers you the best possible vision.
•Adjust the position of the steering wheel
1
2
Adjusting the seat belts
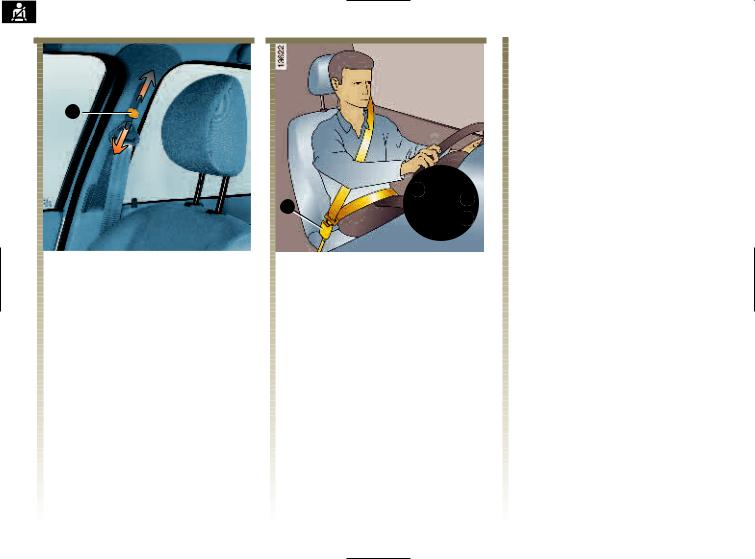
Sit with your back firmly against the seatback.
The shoulder strap 1 should be as close to the base of the neck as possible but not on it.
The lap strap 2 should be held firmly over the thighs and against the pelvis.
The belt should be worn so that it is as close to the body as possible, i.e. avoid wearing heavy clothing or having bulky objects under the belts.
1.13
SEAT BELTS (continued)
3
Adjusting the height of the front seat shoulder strap
Move button 3 to adjust the belt so that the shoulder strap 1 is positioned as described above.
After making the adjustment, ensure the belt is correctly locked.
4
6
Locking
Unwind the belt slowly and smoothly ensuring the buckle 4 clips correctly into housing 6 (check it is locked by pulling on buckle 4). If the belt jams, allow it to return slightly before unwinding it again
Locking (continued)
If the belt is jammed completely:
—pull slowly but firmly, to unwind just over an inch (approximately 3 cm);
—allow the belt to rewind by itself;
—unwind the belt once more;
—if the problem persists, consult your RENAULT Dealer.
Driver’s seat belt not fastened warning light
If the driver’s seat belt is unfastened this lights up, and, when the vehicle reaches a speed of approximately 6 mph (10 km/h), it will flash and a beep will sound for approximately 90 seconds before the light returns to being permanently lit.
Unlocking
Press button 5 on housing 6. The belt will rewind by itself.
Hold the buckle to help the action.
1.14

METHODS OF RESTRAINT IN ADDITION TO THE FRONT SEAT BELTS
These are:
OFront seat belt pretensioners.
OForce limiters.
ODriver’s and passenger airbags.
These airbags are adaptable in that they offer a small or large volume depending on the severity of the frontal impact.
These systems are provided to act independently or together when the vehicle is subjected to a frontal impact.
Depending on the force of the impact the system may engage:
—seat belt locking;
—the buckle pretensioner (which triggers to take up the slack in the seat belt);
—the lap belt pretensioner to keep the occupant in their seat, the low volume front airbag and the load limiters;
—the large volume front airbag.
O Side airbags are provided to activate in the event of severe side impacts.
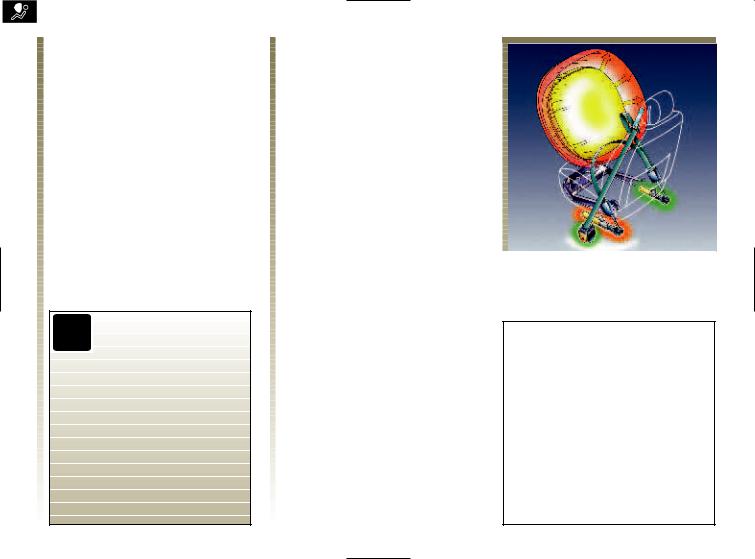
1
Front seat belt pretensioners
With the ignition switched on, if there is a severe frontal impact and depending on the force of the impact, the system may engage:
—the piston 1 which immediately retracts the seat belt.
The pretensioners pull the seat belt against the body, holding the occupant more securely against the seat, thus increasing the seat belt’s efficiency.
• Have the entire restraint system checked following
an accident.
• No operation whatsoever is permitted on any part of the
system (pretensioners, airbags, computers, wiring) and the system components must not be
re-used on any other vehicle,
even if identical.
•To avoid premature triggering of the system which may cause injury, only qualified RENAULT Network personnel may work on the pretensioner and airbag system.
•Testing of the electric trigger system may only be carried out by a specially trained technician using special equipment.
•When the vehicle is scrapped, contact your RENAULT Dealer for disposal of the pretensioner and airbag gas generators.
1.15
METHODS OF RESTRAINT IN ADDITION TO THE FRONT SEAT BELT (continued)
Force limiter
Above a certain severity of impact, this mechanism is used to limit the force of the belt against the body so that it is at an acceptable level.
Driver and passenger airbags
These are fitted to both the driver and the front passenger seats.
An “Airbag” marking on the steering wheel and dashboard and a label in the lower section of the windscreen inform you of the presence of additional means of restraint (airbags, pretensioners, etc.) in the passenger compartment.
Each airbag system consists of:
Warning relating to the
service life of airbags
and pretensioners
Pyrotechnic systems for
airbags and pretensioners have a
limited service life: refer to the
servicing booklet for your
vehicle for the replacement
frequency.
—an airbag and its two gas generators (for the small or large-volume bag depending on the severity of the frontal impact) mounted on the steering wheel for the driver and in the dashboard for the passenger;
—a computer for both systems, which includes the impact detector and the monitor controlling the electrical trigger system for each of the gas generators;
|
— A single warning light |
on |
|
the instrument panel. |


1.16

METHODS OF RESTRAINT IN ADDITION TO THE FRONT SEAT BELT (continued)
Operation
The system waits a few seconds after the ignition has been switched on before being operational.
If a severe frontal impact occurs, the airbag(s) inflate(s) rapidly, cushioning the impact of the driver’s head and chest against the steering wheel and the front passenger’s head against the dashboard. The airbag(s) then deflate(s) immediately so that the passengers are not impeded in any way when they get out of the vehicle.
The passenger airbag system is linked to a front passenger airbag deactivation warning light 2 on the instrument panel. This warning light is linked to the passenger airbag deactivation system through the ignition key.
It lights up to indicate that the passenger airbag will not be inflated in the event of an impact (refer to the section on Deactivating the front passenger airbag).
If it is still lit up after the ignition


fitted to the front passenger seat.


In both cases, consult your RENAULT Dealer as soon as possible.
Operational incidents
Warning light 1 lights up on the instrument panel when the ignition is turned on and then goes out after a few seconds.
If it does not light up when the ignition is turned on, there is a fault in the system.
If it lights up while you are driving, stop at once and switch off the ignition.
1.17

METHODS OF RESTRAINT IN ADDITION TO THE FRONT SEAT BELT (continued)
All the warnings below are given so that the airbag is not obstructed in any way when it is inflated and also to prevent the risk of serious injuries caused by items which may be dislodged when the airbag inflates.
The airbag is designed to complement the action of the seat belt. Both the airbags and seat belts are integral parts of the same protection system. It is therefore essential to wear the seat belt at all times. If the seat belt is not worn, it exposes the occupants to the risk of serious injury in the event of an accident. It may also increase the risk of minor, superficial injuries occurring when the airbag is deployed, although such minor injuries are always
possible with airbags.
The airbag does not offer protection against minor and moderately serious frontal impacts, side or rear impacts or if the
vehicle turns over.
Airbags for driver and passenger
•No work or modification whatsoever may be performed on the entire airbag system for the driver and passenger (computer, wiring, etc.) except by qualified RENAULT network personnel.
•To ensure that the system is in good working order and to avoid incorrect triggering of the system which may cause injury, only qualified RENAULT network personnel may work on the airbag system.
•As a safety precaution, have the airbag system checked if your vehicle has been involved in an accident, is stolen or broken into.
•When selling or lending the vehicle, inform the user of these points and hand over this handbook with the vehicle.
•When scrapping your vehicle, contact your RENAULT Dealer for disposal of the gas generator(s).
1.18

METHODS OF RESTRAINT IN ADDITION TO THE FRONT SEAT BELT (continued)
1
All the warnings given below are designed to ensure that the airbag can inflate correctly and to prevent serious injuries caused by items which may be dislodged when the airbag inflates.
Warnings concerning the driver’s airbag
• Do not adjust either the steering wheel or the airbag cushion.
•Do not cover the airbag cushion.
•Do not attach any objects (badge, logo, clock, telephone holder, etc.) to the airbag cushion.
•The steering wheel must not be removed (except by qualified personnel from the RENAULT network).
•Do not sit too close to the steering wheel. If you sit with your arms slightly bent (see the information on Adjusting your driving position in Section 1), you will ensure that there is sufficient space for the airbag to inflate properly and to be fully effective.
Warnings concerning the passenger airbag: location 1
•Do not attach or glue any objects (badges, logo, clock, telephone holder, etc.) onto the front passenger side of the dashboard.
•Nothing should be placed between the dashboard and the passenger (pet, umbrella, walking stick, parcels, etc.).
•The passenger must not put his or her feet on the dashboard or seat as there is a risk that serious injuries may be sustained. As a general rule, keep all parts of the body (knees, hands, head, etc.) well away from the dashboard.
•You should reactivate the airbag as soon as you remove the child seat from the front passenger seat to ensure the protection of the front passenger in the event of an impact.
IT IS FORBIDDEN TO FIT A REAR-FACING CHILD SEAT ON THE FRONT PASSENGER SEAT WHILE THE RESTRAINING METHODS ADDITIONAL
TO THE PASSENGER SEAT BELT ARE NOT DEACTIVATED.
(Refer to the information on Deactivation of front passenger airbags in Section 1).
1.19

METHODS OF RESTRAINT IN ADDITION TO THE FRONT SEAT BELT (continued)
|
Side airbags |
Warnings concerning the |
|||||||||
|
These airbags may be fitted to the |
||||||||||
|
side airbag |
||||||||||
|
front seats and are deployed at the |
||||||||||
|
• Fitting seat covers: Seats |
||||||||||
|
sides of the seats (door side) to |
||||||||||
|
equipped with an airbag |
||||||||||
|
protect the occupants in the event of |
||||||||||
|
require |
special |
covers |
||||||||
|
a severe side impact. |
||||||||||
|
specifically |
designed for your |
|||||||||
|
vehicle. Consult your RENAULT |
||||||||||
|
Dealer to see if appropriate |
||||||||||
|
covers are |
available |
from |
||||||||
|
RENAULT outlets. The use of any |
||||||||||
|
covers other than those designed |
||||||||||
|
for your vehicle (and including |
||||||||||
|
those |
designed |
for |
another |
|||||||
|
vehicle) may affect the operation |
||||||||||
|
of these airbags and reduce your |
||||||||||
|
protection. |
||||||||||
|
• Do not place any accessories, |
||||||||||
|
objects or pets between the |
||||||||||
|
seatback and the door. This may |
||||||||||
|
prevent the airbag from operating |
||||||||||
|
correctly or cause injury if the |
||||||||||
|
airbag is deployed. |
||||||||||
|
• No |
work |
or |
modification |
|||||||
|
The |
slits |
on |
the |
front |
whatsoever may be carried out |
|||||
|
seatbacks |
(door |
side) |
and |
on the seat, except by qualified |
||||||
|
the |
gap |
between the |
rear |
RENAULT Network personnel. |
||||||
|
bench |
seatback |
and |
the |
|||||||
|
interior fittings form the trigger |
||||||||||
|
area for the airbag, so it is |
||||||||||
|
forbidden to place any objects |
||||||||||
|
there. |
1.20

METHODS OF RESTRAINT IN ADDITION TO THE REAR SEAT BELTS
Force limiter
In the event of a frontal impact above a certain severity, this mechanism is used to limit the force of the belt against the body so that it is at an acceptable level.
Rear side seat belt pretensioners
This system is only operational when the ignition is switched on.
If the vehicle is subjected to a severe impact, a device retracts the seat belt, pulling the seat belt tight against the body and thereby improving its efficiency.
Warning relating to the
service life of airbags and
pretensioners
Pyrotechnic systems for
airbags and pretensioners have a
limited service life: refer to the
servicing booklet for your vehicle
for the replacement frequency.
1.21
REAR SEAT BELTS
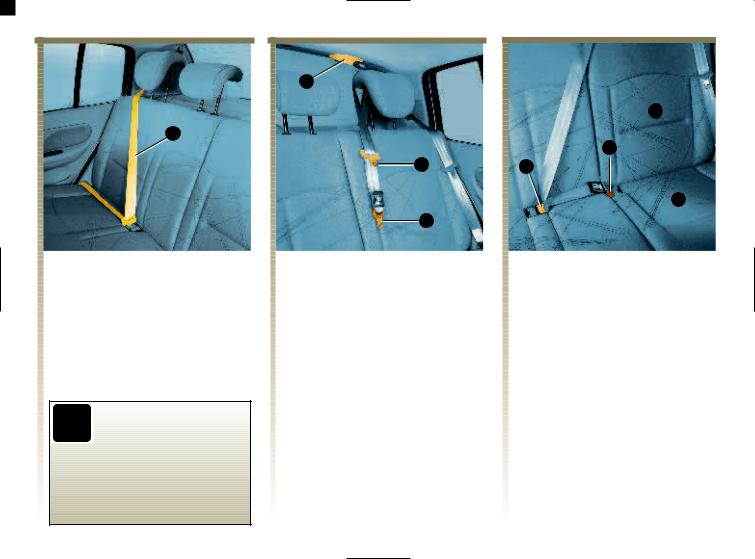
1
Rear side seat belts 1
The belts are locked, unlocked and adjusted in the same way as for the front seat belts.
The rear bench seat must
be correctly secured for
the seat belts to be
efficient.
Refer to the information on rear
bench seats in section 3.
2
4
Rear central belt
Unwind the belt slowly from position 2.
Fasten the black buckle 4 into the black housing 6.
Fasten the last sliding buckle 2 into the red housing 5.
A
6
5
B
Special point concerning vehicles with a two-part rear bench seat
If you have to fold down the part of the rear bench seat behind the front left-hand seat:
—lift the cushion B against the front seat;
—insert the black buckle 4 into the black housing 6;
—lower the seatback A (after removing the head restraint).
Then fasten the last sliding buckle 3 into the red housing 5.
1.22

SEAT BELTS
The following information applies to both the vehicle’s front and rear seat belts:
• No modifications may be made to the component parts of the original restraint systems: seat belts and
their mountings.
Consult your Renault Dealer for special applications (e.g. fitting a child seat).
•Do not use any devices which give any play in the belts (clothes pegs, clips for example).
•Never wear the shoulder strap under your arm or behind your back.
•Never use the same belt for more than one person and never hold a baby or child on your knees with the seat belt around them.
•The seat belt should never be twisted.
•Following a serious accident, replace all the belts which were in use at the time. Likewise, have the belts replaced if they show any signs of wear.
•When refitting the rear bench seat, check that the seat belts are repositioned correctly, to enable them to be used properly.
•If necessary, re-adjust the position and tension of the belt.
1.23

CHILD SAFETY (continued)
In all countries there are regulations governing the use of restraint systems for children and babies.
In Europe, children under 12 years of age, less than 1.50 m tall and weighing less than 36 kg(1) must be restrained with an approved restraint adapted to the child’s weight and height.
The driver is responsible for ensuring that this equipment is used correctly.
Child restraints for which type approval was obtained after January 1992 offer a level of safety much greater than for restraints with type approval before that date.
We therefore advise you to select an approved child restraint that complies with European regulation ECE 44.
Restraints that comply with this legislation must be marked with an orange label bearing the letter E followed by a number (which stands for the country where it is an approved type) and the year in which the type approval was granted.
(1) Always comply with the laws of the country in which you are travelling. They may be different to the guidelines in this handbook.
Remember that a collision at 30 mph (50 km/h) is the same as falling a distance of 10 metres. Expressed in other terms, transporting a child without a restraint is the equivalent of allowing him or her to play on a third-floor balcony which does not have any railings.
Under no circumstances
should babies or children
be allowed to travel sitting
on the knees of another
passenger in the vehicle.
If a head-on collision occurs at
30 mph (50 km/h) a child weighing
30 kg (66 lbs) will be transformed
into a missile equivalent to one
tonne: you will find it impossible
to hold the child, even if you
yourself are wearing a belt.
It is particularly dangerous to put
the belt round your child when he
or she is sitting on your knee.
Never use the same belt for more
than one person at the same time.
The tables on the following pages inform you of the types of seat that can be fitted in each of the vehicle seat positions on the vehicle in accordance with the European directive.
Before installing a child seat in the front seat (if fitting is permitted)
If the passenger seat is fitted with one, carry out the following adjustments:
—pull back the seat as far as possible,
—straighten the seatback as much as possible,
—raise the seat squab as far as possible,
—pull the headrest up to its maximum position,
—move the seat belt height control to the low position.
Refer to the Child safety equipment booklet available from the RENAULT Network to choose the seat suited to your child and recommended for your vehicle.
1.24

CHILD SAFETY (continued)
|
Age of child |
All versions (except utility version) |
|||
|
(weight of child) |
Front passenger seat |
Rear side |
Rear centre |
|
|
(2) |
seats |
seat |
||
|
Birth to approximately 9 months |
I (4) |
U — I |
X |
|
|
(weight below 13 kg) |
||||
|
From 9 months to approximately |
I (4) |
U — I (3) |
X |
|
|
3 years (weight from 9 to 18 kg) |
||||
|
From 3 years to approximately |
X |
U (3) |
X |
|
|
12 years (1) (weight from 15 to 36 kg) |
||||
X : seat not suitable for fitting a child seat for this age range.
U : seat suitable for fitting a belt-fitted child seat classed as universal for this age range, check that it can be fitted.
I: seat equipped with anchoring points for mounting a seat for this age range using Isofix locks, only RENAULT seats are approved.
(1)A child taller than 1.50 m or weighing more than 36 kg can be strapped in the same way as an adult, without a special seat.
(2)Only a rear-facing child seat may be installed in this seat.
(3)Place the back of the child seat against the vehicle seatback, adjust the headrest height or remove it if necessary.
(4) DANGER RISK OF DEATH OR SERIOUS INJURY: CHECK THAT THE FRONT PASSENGER AIRBAG HAS
BEEN DEACTIVATED BEFORE INSTALLING A REAR-FACING CHILD SEAT IN THIS SEAT.
(Refer to the Deactivating the front passenger Airbag information in Section 1 of the basic manual).
1.25

CHILD SAFETY (continued)
|
Age of child |
Utility version |
|
|
(weight of child) |
Front passenger seat |
|
|
Birth to approximately 9 months |
I (2) |
|
|
(weight below 13 kg) |
||
|
From 9 months to approximately |
I (2) |
|
|
3 years (weight from 9 to 18 kg) |
||
|
From 3 years to approximately |
X |
|
|
12 years (1) (weight from 15 to 36 kg) |
||
X : seat not suitable for fitting a child seat for this age range.
I: seat equipped with anchoring points for mounting a seat for this age range using Isofix locks, only RENAULT seats are approved.
(1)A child taller than 1.50 m or weighing more than 36 kg can be strapped in the same way as an adult, without a special seat.
(2) DANGER RISK OF DEATH OR SERIOUS INJURY: CHECK THAT THE FRONT PASSENGER AIRBAG HAS
BEEN DEACTIVATED BEFORE INSTALLING A REAR-FACING CHILD SEAT IN THIS SEAT.
(Refer to the Deactivating the front passenger Airbag information in Section 1 of the basic manual).
1.26

CHILD SAFETY (continued)
The right choice
The safety of your children is also your responsibility.
To give your children maximum protection, we recommend that you use seats obtained from a Renault Dealer.
If your vehicle is equipped with an Isofix system, it is preferable to use an Isofix seat. (Refer to the information in section 1 on the Isofix system of child seats.)
Restraint systems for all categories are available. These systems have been developed in consultation with the manufacturers and have been tested in Renault vehicles.
Take the advice of your Renault Dealer and ask him to help you to install it.
1
Category 0 and 0+
A child’s neck is very susceptible to injury up to the age of two. In a front-facing seat there is a risk that a child will sustain neck injuries in the event of a frontal collision. Renault therefore recommends a rear-facing seat with a harness that gives all-round protection (figure 1).
To avoid any risk to your safety, we recommend that you use
RENAULT approved accessories because they are suitable for your
car and are the only accessories for which RENAULT will provide a
warranty.
2
Category 1
Between the ages of 2 and 4, a child’s pelvis is not fully developed. Restraints using three-point belts are not adequate and there is a risk that the child will sustain abdominal injuries in the event of a frontal collision. It is therefore advisable to use rear-facing seats (figure 1), bucket type seats (figure 2) or seats with harnesses.
1.27

CHILD SAFETY (continued)
3
Category 2 (15 to 25 kg) and category 3 (22 to 36 kg)
To correctly secure the pelvis of a child of up to 12 years old, smaller than 1.50 m and weighing less than 36 kg, it is preferable to use child seats that can be combined with three-point seat belts. This is a booster seat (figure 3) with belt guides to ensure that the belt will be worn flat over the thighs of the child.
A booster seat with a height-adjustable seatback and a belt guide are recommended as this will allow the belt to be worn as close to the base of the neck as possible but not on it.
Place the head rest in the top position to allow you to press the seat back of the child seat firmly against the vehicle seatback.
If a booster seat without a seatback is used, the vehicle’s headrest will have to be adjusted to suit the child’s stature; the upper edge of the headrest must be at the same height as the top of the child’s head and should never be lower than in line with the child’s eyes.
The standard classifies the restraints in five categories:
Category 0 : from 0 to 10 kg (0 to 22 lbs) Category 0+: from 0 to 13 kg (0 to 28 lbs) Category 1 : from 9 to 18 kg (20 to 40 lbs) Category 2 : from 15 to 25 kg (33 to 55 lbs) Category 3 : from 22 to 36 kg (48 to 80 lbs)
We recommend that you remove the headrest and put it in the luggage compartment, to facilitate fitting certain types of child seat.
1.28

CHILD SAFETY (continued)
DANGER
Since front passenger airbag triggering and the position of a
rear-facing child seat are incompatible, it is not permitted to install
such a seat in this position unless the vehicle is fitted with an airbag
deactivation device. Refer to the information on deactivating the front
passenger airbag. The child may suffer very serious injuries if the airbag
inflates.
Label 4 (on the dashboard) and markings 5 (on the sun visors) remind you of
these instructions.
1.29

CHILD SAFETY (continued)
1
Deactivation of the front passenger airbag
You must deactivate the front left-hand airbag before fitting a rear-facing child seat on the front passenger seat.
To deactivate the airbag: switch off the ignition, insert the ignition key in the lock 1, push and turn the lock to the OFF position and remove the key while holding it in the OFF position. The airbag is deactivated.
2
With the ignition switched on, check that the warning light 2, AIRBAG OFF, is lit up on the dashboard.
This indicator light remains lit to confirm that you can fit a child seat, as the left-hand airbag has been deactivated.
1.30

CHILD SAFETY (continued)
Activation of the front
passenger airbag
You should reactivate the airbag as soon as you remove the child seat from the front passenger seat to ensure the protection of your front passenger in the event of an impact.
To reactivate the airbag: switch off the ignition and insert the ignition key into lock 1. The key then turns automatically to the ON position.
Switch the ignition back on, and then check that AIRBAG OFF indicator light 2 goes out. The airbag is activated.
Activation or deactivation
of the passenger airbag
must be done with the
ignition off.
Six seconds after the ignition has
been switched on, operating
lock 1 will deactivate the
supplementary methods of
restraint in addition to the seat
belt in the front passenger seat
and the indicator light
will come on to warn you.
Operational faults
It is FORBIDDEN to fit a rear-facing child seat to the front passenger seat if the air bag activation/deactivation system is faulty.
We do not recommend fitting any other kind of passenger seat device.
Consult your RENAULT Dealer as soon as possible.
1.31

CHILD SAFETY (continued)
Isofix — mounting system for
child seats
This is a new procedure for installing a child seat. This system equips the front passenger seat and the rear side seats of the vehicle.
It consists of the following components:
• Two anchoring rings 1 located between the seat and the seatback.
• A special RENAULT child seat fitted with two catches 3 which hook onto the two rings;
1
2

• Make sure that there is
nothing obstructing the
seat mounting mechanism
at the anchorage points
(gravel, rags, toys, etc.).
•Always remember to fasten the seat belt on child seats for all journeys.
Only RENAULT child seats are approved for this vehicle.
To purchase these seats, please contact your RENAULT Dealer.
They are fitted with locks which can be secured to the Isofix attachments in your vehicle.
They can also be secured in other vehicles using a three-point seat belt.
Use of this device on the
front passenger seat is only
authorized if the passenger
airbags have been
deactivated.
Refer to the information in the
section on deactivating the front
passenger airbag.
1.32

CHILD SAFETY (continued)
1
2

Fitting a child seat (continued)
•Slide the seat catches 3 in the guides 2 and push the seat hard to lock it on the rings;
•Check that the seat is correctly
locked by moving it from left to right and forwards and backwards.
Fitting a child seat
•Before fitting and using the seat, read the instructions provided carefully;
•Fix the fitting guides 2 on the rings 1 fitted to the rear seats and front passenger seat of the vehicle;
1.33

CHILD SAFETY (continued)
4
5
6
A front-facing Isofix seat fitted on the front passenger seat
Use the belt 4 delivered with the seat:
—pass the belt between the two head restraint rods;
—fix the hook 5 on the ring 6 located under the front passenger seat;
—tighten the belt.
Note: only fit the seat here if all other places are occupied.
4
A rear-facing Isofix seat fitted on the front passenger seat
The front passenger seat must be adjusted so that the back of the child seat is touching the dashboard.
Use the belt 4 delivered with the seat:
—remove the cover to access the ring 7;
—attach the belt catch 5 to the ring 7;
—tighten the belt.
1.34

CHILD SAFETY (continued)
A front-facing Isofix seat fitted on the rear side seat
When a front-facing child seat is installed, the front seat must not be moved back beyond the halfway point on the seat runners and the seatback must not be reclined too far.
Each of the rear seats is fitted with two rings for mounting the base of the seat.
4
5
8
Mounting ring for a front-facing seat
Use belt 4 supplied with the seat:
—pass the belt 4 between the two rear headrest rods;
—attach catch 5 to the ring 8 located inside the luggage compartment;
—tighten the belt.
4
5
6
A front-facing Isofix seat fitted on the rear side seat
When a rear-facing child seat is installed, the front seat must not be moved forward beyond the halfway point on the seat runners.
The front seat back must be close to or touching the shell of the child seat.
Use belt 4 supplied with the seat:
—fix the hook 5 on the ring 6 located under the front passenger seat;
—tighten the belt.
1.35

CHILD SAFETY (continued)
CHILD SAFETY
• No modifications may be made to the component parts of the restraint system (belts and seats and their
mountings) fitted originally.
•The fitting instructions provided by the manufacturer of the restraint system should be followed carefully.
•Avoid wearing bulky clothing and do not place any objects between the child and the restraint system.
•The seat belt on the vehicle must be taut so that the child’s seat is held in position securely. Check the tension regularly.
•Never wear the belt under the arm or behind the back.
•The harness or belt should be taut and fitted to suit the child’s stature.
•Never allow your child to stand or kneel on the seat when the vehicle is moving.
•Check that the child is in the correct position for the entire journey, particularly when he or she is asleep.
•Use the seat belts to hold the seat in position, even if it is not occupied. Otherwise, if an accident occurs, it may become dislodged and pose a risk to other vehicle occupants.
•Following a serious accident, have an inspection made of the seat belts and restraint systems fitted at the time.
•Never leave a child unsupervised in a vehicle, even if he or she is in a child seat.
•Activate the rear door locks (if your vehicle is equipped with these).
•Make sure the child does not get out of the vehicle at the side where there is traffic.
•Set your children a good example — always wear your seat belt.
1.36

CLOCK / EXTERNAL TEMPERATURE
1
If the electrical supply is cut (battery disconnected, feed wire broken, etc.), the clock must be reset.
H M
For your safety, we recommend
2 that you do not reset or alter the time while driving.
Clock 1 — setting the clock
With the ignition on, press button:
H For hours, M For minutes.
Clock 3, setting the time
With the engine switched on, display 3 set to total mileage recorder and clock function, press and hold button 2, to access time setting mode, then release the button.
There are two ways to set the time:
—one long press on button 2 allows you to scroll through the hours and minutes quickly;
—short presses on button 2 allow you to set the time minute by minute.
External temperature
display 1
The formation of ice is
related to exposure, local
hygrometry and temperature.
The external temperature alone is
not sufficient to detect ice.
1.37

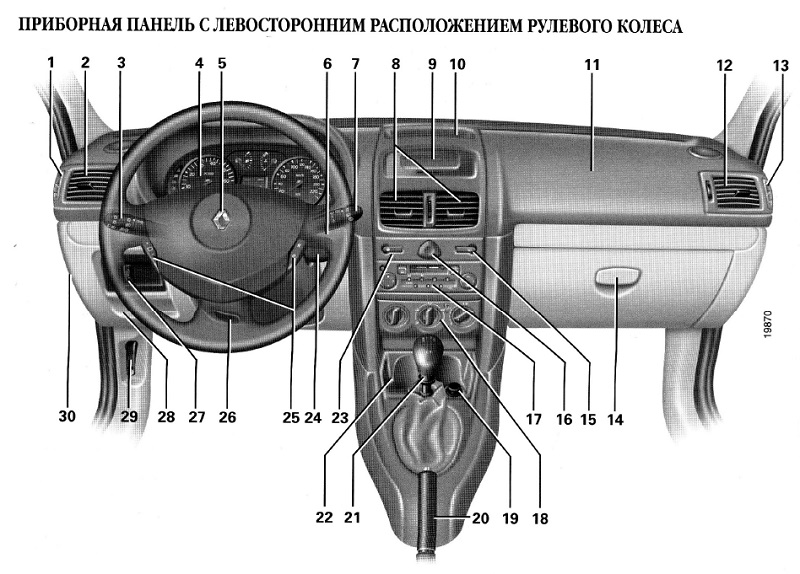
DRIVER’S LAYOUT, LEFT HAND DRIVE
|
1 |
2 |
3 |
4 |
5 |
6 |
7 |
8 |
9 |
10 |
11 |
12 |
13 |
|
30 |
29 |
28 |
27 |
26 |
25 24 |
23 |
17 |
16 15 |
14 |
|
22 |
21 |
20 |
19 |
18 |
1.38

DRIVER’S LAYOUT, LEFT HAND DRIVE (continued)
The equipment fitted, described below, depends on the version, option and country.
1Demister outlet for left-hand side window
2 Left-hand side vent
3Stalk for:
•direction indicators,
•exterior lights,
•front fog lights,
•rear fog lights,
•horn.
4 Instruments.
9Display:
•Clock and temperature,
•Radio, clock and temperature
•Radio, clock, external temperature and navigation system
10Storage compartment.
11Passenger airbag location.
12Right-hand side air vent.
13Demister outlet for right-hand side vent
19Ashtray and cigarette lighter
20Handbrake
21Gear lever
22Cup holder
23Electric door locking switch
24Ignition switch
25Cruise control/speed limiter controls
26Steering wheel height adjuster
5• Driver’s airbag location.
• Horn
6 Radio satellite controls.
7• Stalk for windscreen and rear screen wash/wipe.
•Trip computer information scrolling control.
14Glove box.
15Heated rear screen switch
16Hazard warning lights switch.
17Radio location or storage compartment
27 Controls for:
•Electric headlight beam adjustment
•Dimmer for control lighting
•Cruise control
•Electronic Stability Program (ESP)
28Storage compartment
29Bonnet release
|
8 Centre air vents. |
18 Air conditioning controls. |
30 Fuse box |
1.39

DRIVER’S LAYOUT, RIGHT-HAND DRIVE
|
1 |
2 |
3 |
4 |
5 |
6 |
7 |
8 |
9 |
10 |
11 |
12 |
13 |
|
30 |
29 |
28 |
27 |
26 |
25 |
24 |
21 |
20 |
19 |
18 |
17 16 |
15 |
14 |
|
23 |
22 |
1.40

DRIVER’S LAYOUT, RIGHT-HAND DRIVE (continued)
The equipment fitted, described below, depends on the version, option and country.
|
1 Demister outlet for left-hand |
10 Radio satellite controls |
19 Heated rear screen switch |
||
|
side window |
||||
2 Left-hand side vent
3 Passenger airbag location.
4 Storage compartment.
5Display:
•Clock and temperature,
•Radio, clock and temperature,
•Radio, clock, external temperature and navigation system
6 Centre air vents.
7Stalk for:
•direction indicators,
•exterior lights,
•front fog lights,
•rear fog lights,
•horn.
8 Instruments.
9• Driver’s airbag location.
• Horn
11• Stalk for windscreen and rear screen wash/wipe
•On-board computer information readout control
12Right-hand side vents
13Demister outlet for right-hand side vent
14Controls for:
•Electric headlight beam adjustment
•Instrument panel lighting dimmer
•Cruise control and speed limiter
•Electronic Stability Program (ESP)
15Storage compartment
16Ignition switch
17Cruise control/speed limiter controls
18Steering wheel height adjuster
20Hazard warning lights switch
21Cup holder
22Handbrake
23Gear lever
24Ashtray and cigarette lighter
25Heating and ventilation controls
26Radio location or storage compartment
27Electric door locking switch
28Glove box
29Bonnet release
30Fuse box
1.41

INSTRUMENT PANEL (continued)
The presence and operation of the warning lights described below depend on the vehicle equipment and country.
|
2 |
3 |
4a |
4 |
5 |
|
11 |
10 |
9 |
8 |
7 |
|
|
If the |
warning light comes on, you must stop as soon as traffic conditions allow. |
||||
|
If the |
warning light comes on, you should visit a Renault Dealer in the near future. |
1.42

- Manuals
- Brands
- Renault Manuals
- Automobile
- clio 2001
- Owner’s manual
-
Contents
-
Table of Contents
-
Troubleshooting
-
Bookmarks
Related Manuals for Renault clio 2001
Summary of Contents for Renault clio 2001
-
Page 2
RENAULT recommends… -
Page 3
Brief overview • Tyre pressures ………………….0.04 • Adjusting the seats and driving position ……….1.10 1.12 • Child restraints ………………1.22 1.26 • Warning lights ……………….. 1.30 1.45 • Horn and headlamp flash …………….. 1.46 1.50 • De-icing/Demisting ………………..1.52 •… -
Page 4: Table Of Contents
Sections Getting to know your car …………..Driving ………………….. Your comfort ………………..Maintenance ………………..Practical advice ………………. Technical specifications ……………. Alphabetical index ………………0.03…
-
Page 5
TYRE PRESSURES WHEN COLD (in bar) Versions 1.2 16V 1.4 16V 1.5 dCi Type LB0F LB11 LB0B LB0P — LB2A LB07 (see vehicle identification plate) LB03 — LB17 LB13 — LB2B Normal use • Front • Rear Full load (1) •… -
Page 6
Tyre pressures when cold (in bar) (continued) Tyre safety and use of chains Refer to the information on tyres in section 5 for advice on tyre maintenance and, depending on the version, the use of chains. (1) Special note concerning vehicles used at full load (maximum permissible all-up weight) and towing a trailer Under these circumstances, the maximum speed must be restricted to 60 mph (100 km/h) and the tyre pressure increased by 0.2 bar. -
Page 7
0.06… -
Page 8
Section 1: Getting to know your car Keys …………………………… 1.02 — 1.03 Doors …………………………1.04 1.06 Engine immobiliser system ……………………..1.07 Head restraint — Seats …………………….. 1.08 1.10 Seat belts/Methods of restraint in addition to the front seat belts ……….1.11 1.21 Child safety ………………………. -
Page 9
KEYS / RADIO FREQUENCY REMOTE CONTROL Remote control operating range» This varies according environment: therefore take care when handling the remote control that you do not inadvertently lock or unlock the doors. Locking/unlocking the doors Press remote control approximately one second to lock or unlock the doors. -
Page 10
• If a remote control unit is electronic circuit in the key cover replaced, it will be necessary to when replacing the battery. take the car to your Renault dealer as the car and the unit are needed together for initialisation. The batteries can be obtained •… -
Page 11: Opening The Doors
OPENING THE DOORS Opening the doors from the Opening the doors from inside Childproof locks outside the car These make it impossible for the rear doors to be opened from the Front: Use the key to unlock one of Move handle 4. inside.
-
Page 12: Driving
LOCKING THE DOORS Manual locking Electric central locking Front: From outside the car, use the This enables the four doors key, which will lock all four days and the luggage compartment (depending on the version), or from locked unlocked inside, push down door…
-
Page 13
(padlock side) for about the doors are properly closed. If 5 seconds, until you hear the beep. they are properly closed correctly, consult your Renault Dealer. To deactivate it Also make sure that locking has not With the ignition on, press the been inadvertently deactivated. -
Page 14: Engine Immobiliser System
If you do not have access to car’s coded ignition key. this, it is essential to call a Renault Dealer because only dealers in the • Light indicating that the engine Renault network are qualified to immobiliser is operational.
-
Page 15: Front Head Restraint
FRONT HEAD RESTRAINT head restraint important for safety. Ensure that it is in place and in the correct position. distance between your head and the head restraint should be as small as possible. The top of your head should be in line with the top of the head restraint.
-
Page 16: Head Restraint — Seats
REAR HEAD RESTRAINT Adjustment of the rear centre Storage position To adjust the height head restraint Simply slide it up. When completely lowered, the head restraint is in the storage • To adjust the height: To remove position: it must not be used when a Simply slide it up.
-
Page 17: Front Seats
FRONT SEATS To move forwards or backwards To tilt the seatback Lift lever 2 to unlock the seat. Turn the wheel 3 and tilt the Release the lever in the required seatback to the desired position. position and ensure the seat is locked in place.
-
Page 18: Seat Belts/Methods Of Restraint In Addition To The Front Seat Belts
SEAT BELTS Always wear your seat belt when •Adjust the position of your head travelling in your car. You must also restraint. comply with the local legislation in For maximum safety your head the particular country you are in. should be as close as possible to the head restraint.
-
Page 19
— Then allow the belt to rewind automatically. — Unwind it again. — If the problem persists, consult your Renault Dealer. Unlocking Press button 3 on catch 5. The belt will rewind itself. Guide the buckle to help the operation. -
Page 20
(computer, wiring, etc.). These systems are provided to act • Only qualified Renault Network independently or together when the personnel may work on the car is subjected to a frontal impact. pretensioner system to prevent… -
Page 21
10 years. This work steering wheel must always be undertaken by a dashboard, and a label on the base Renault Dealer. of the windscreen or on the sun The seat belt pretensioners and visor. the air bag operate together. If… -
Page 22
30 milliseconds, cushioning the there is a fault in the system. impact of the driver’s head against Consult your Renault Dealer as soon the steering wheel and the front as possible. Your protection will be passenger’s… -
Page 23
• As a safety precaution, have the air bag system checked if your car has been involved in an accident, is stolen or broken into. • When selling or lending the car, inform the user of these points and hand over this handbook with the car. • When scrapping your car, contact your Renault Dealer for disposal of the gas generator(s). 1.16… -
Page 24
• Do not affix any objects (badge, logo, clock, telephone bracket, etc.) to the steering wheel boss. • The steering wheel must not be removed (except by qualified Renault network personnel). • Do not sit too close to the steering wheel. If you sit with your arms slightly bent (see “Adjusting your driving position”… -
Page 25
Consult your Renault Dealer to find out if these covers may be purchased from Renault outlets. The use of any covers other than those designed for your car (and… -
Page 26: Rear Seat Belts
REAR SEAT BELTS Rear side seat belts 1 Manually adjusted lap belt The belts are locked, unlocked and The belts are locked and unlocked adjusted in the same way as the in the same way as the inertia-reel front belts. type belts.
-
Page 27
REAR SEAT BELTS (continued) Rear centre belt Special point concerning cars with a split rear seat Unwind the belt slowly from If you have to fold down the part of position 1. the rear seat behind the front Fasten the black buckle 2 into the left-hand seat: black housing 3. -
Page 28
• No modification may be made to the component parts of the restraint system (belts and seats and their mountings) fitted originally. Consult your Renault Dealer for special applications (e.g. fitting child seats). • Do not use any devices which give any play in the belts (clothes pegs, clips, for example). -
Page 29: Child Safety
CHILD SAFETY In all countries there are regulations Child restraints for which approval governing the use of restraint was obtained after January 1992 systems for children and babies. offer a much higher level of safety than those approved before that In Europe, children under 12 years date.
-
Page 30
(figure 2) or seats with harnesses. To avoid any risk to your safety, we recommend that you use RENAULT approved accessories because they are suitable for your car and are the only accessories for which RENAULT will provide a warranty. 1.23… -
Page 31
CHILD SAFETY (continued) Category 3 For children aged over seven, a booster seat with belt guides is recommended to ensure that the car’s three-point seat belt will be worn flat over the child’s thighs. booster seat with height-adjustable seatback and a belt guide are recommended as this will allow the belt to be worn as close to the base of the neck as… -
Page 32
CHILD SAFETY (continued) DANGER It is forbidden to install a rear-facing baby/child seat on the front passenger seat if the car is equipped with a passenger air bag. The child may suffer very serious injuries if the air bag inflates. You are reminded about these instructions by label 5 (on the dashboard), label 6 (on the front passenger window ) and label 7 (on the sun visor). -
Page 33
CHILD SAFETY (continued) CHILD SAFETY • No modifications may be made to the originally fitted parts of the restraint system (belts and seats and their mountings). • Follow carefully the fitting instructions provided by the manufacturer of the restraint system. •… -
Page 34: Clock
CLOCK Setting the clock Setting the clock With the ignition on, deselect the With the ignition on, select display radio function. 6 showing total mileage and clock. Press button 2 (DSP) and button 4 There are two methods for setting (SEL) simultaneously until you hear the time: a beep.
-
Page 35: Rear View Mirrors
REAR VIEW MIRRORS External rear view mirrors with Electrically operated external The driver’s side external manual adjustment rear view mirrors rear view mirror may have Move lever 1 to adjust the mirror. With the ignition on, turn knob 2: two clearly differentiated — Position C to adjust the left-hand zones.
-
Page 36
REAR-VIEW MIRRORS/STEERING WHEEL Interior rear-view mirror Adjusting the steering wheel This is adjustable. Lower the small On certain cars, the position of the lever 1 located behind the rear-view steering wheel is adjustable. mirror when driving at night to Raise lever 2 and place the steering avoid being dazzled… -
Page 37
DRIVER’S LAYOUT, LEFT-HAND DRIVE 28 27 15 14 21 20 19 18 17 16 1.30… -
Page 38
DRIVER’S LAYOUT, LEFT-HAND DRIVE (continued) The presence of the equipment described below depends on the car version, equipment option and country. 1 Demister outlet for left-hand 9 Stowage compartment 18 Hazard warning lights switch side window 19 Handbrake 10 Passenger air bag location 2 Left-hand side vent 20 Ashtray 21 Gear lever… -
Page 39
INSTRUMENT PANEL If these warning lights light up, you must stop as soon as traffic conditions allow. 1.32… -
Page 40
Headlight main beam and check the coolant level indicator light (having let the engine cool Not used down). Call for the assistance of a Renault Dealer if necessary. Headlight dipped beam indicator light Rear screen demisting indicator light Engine immobiliser… -
Page 41
INSTRUMENT PANEL (continued) If these warning lights light up, you must stop as soon as traffic conditions allow. 1.34… -
Page 42
• Preheating warning light (on driving, it indicates a fault in continue driving. Call for the diesel version) the anti-lock braking system. assistance of a Renault Dealer. When the ignition key is in Braking will then occur… -
Page 43
INSTRUMENT PANEL (continued) If these warning lights light up, you must stop as soon as traffic conditions allow. 1.36… -
Page 44
If this is It should go out when normal, call for the assistance Select display normal the engine starts. If it lights up of a Renault Dealer. mileometer or trip meter. while driving, indicates that the circuit is overcharging discharged. -
Page 45
INSTRUMENT PANEL The presence and operation of the warning and indicator lights described below depend on the car’s equipment and the country. If these lights light up, you must stop as soon as traffic conditions allow. 1.38… -
Page 46
If it does not illuminate when the ignition is turned on or if it flashes, there is a fault in the system. Consult your Renault 4 Coolant temperature indicator Dealer as soon as possible. In normal use, the needle should be below zone 4a. -
Page 47
INSTRUMENT PANEL The presence and operation of the warning and indicator lights described below depend on the car’s equipment and the country. If these lights light up, you must stop as soon as traffic conditions allow. 1.40… -
Page 48
Renault Dealer in the near The squares in the display future: flashes • Trip mileage zeroing button indicate level. -
Page 49
INSTRUMENT PANEL The presence and operation of the warning and indicator lights described below depend on the car’s equipment and the country. If these lights light up, you must stop as soon as traffic conditions allow. 1.42… -
Page 50
If this is normal, call for the incident. Consult your circuit overcharging assistance of a Renault Dealer. Renault Dealer as soon as discharged. Stop and have the possible. circuit checked. 1.43… -
Page 51
INSTRUMENT PANEL The presence and operation of the warning and indicator lights described below depend on the car’s equipment and the country. If these warning lights illuminate, you must stop as soon as traffic conditions allow. 1.44… -
Page 52
• If it flashes, reduce the continue driving. Call for the Consult your Renault Dealer as engine speed until the light assistance of a Renault Dealer. soon as possible. stops flashing. Consult your Renault Dealer as soon as possible. -
Page 53: External Lighting And Signals
EXTERNAL LIGHTING AND SIGNALS Main beam headlights With stalk 1 in the dipped beam position, pull stalk towards you. An indicator light on the instrument panel lights up when the main beam headlights are on. To return to the dipped headlight position, pull the stalk towards you again.
-
Page 54
EXTERNAL LIGHTING AND SIGNALS (continued) When the external car lights are extinguished, the rear fog light is extinguished or the equipment returns to the front fog lights position (if these are fitted). Front fog lights Rear fog lights Turn the central ring of Turn the central ring of stalk 4 until the symbol appears stalk 4 until the symbol appears… -
Page 55
ELECTRICAL ADJUSTMENT OF THE HEADLIGHTS Versions with single lenses Adjustment positions of button A Position 0: basic setting, luggage compartment empty and driver only or driver + one front passenger. Button A allows the height of the beams to be adjusted according to Position 2: car with 5 persons on the load. -
Page 56
ELECTRICAL ADJUSTMENT OF THE HEADLIGHTS Versions with double lenses Adjustment positions of button A Position 0 or 1: basic setting, luggage compartment empty with driver alone or with a front passenger. Position 2 or 3: car with 5 persons on board, luggage compartment empty. -
Page 57
HORN AND HAZARD LIGHTS Horn Hazard warning lights Direction indicators Press the end of the stalk 1. Press switch 2. Move the stalk 1 in the plane of the steering wheel in the direction in This switch illuminates all four which you are going to turn the direction indicators simultaneously. -
Page 58
WINDSCREEN WIPER/WASHER Windscreen wiper Windscreen In frosty weather, make sure that the washer wiper blades are not stuck by ice With the ignition on, (risk of motor overheating). move stalk 1 in the plane of the With the ignition switched on, pull steering wheel: the stalk 1 towards you. -
Page 59: De-Icing/Demisting
DE-ICING/DEMISTING Heated rear screen Demisting the windscreen With the engine running, Move control 2: set it to press button 1. (indicator light illuminates instrument position: panel.) For greater efficiency, close the This function demists the rear dashboard air vents. screen and the electric rear view All the air is directed to the mirrors (if these are fitted to the car).
-
Page 60: Fuel Tank
If this happens, the SERV warning light instrument panel will flash, and you should consult your Renault Useful capacity of fuel tank: Dealer immediately. The fuel filler This is of a special type. If cap and neck must be clean and Approx.
-
Page 61
(at the pump). checked by qualified Renault — Insert the nozzle as far as it will go network personnel. so as to open the valve. -
Page 62
Section 2: Driving (Advice on use relating to fuel economy and the environment) Running in / Ignition switch ……………………… 2.02 Starting the engine / Stopping the engine ………………… 2.03 Special features of petrol versions ……………………2.04 Special features of diesel versions ……………………2.05 Advice on anti-pollution and how to economise on fuel ………….. -
Page 63: Running In / Ignition Switch
RUNNING IN IGNITION SWITCH Petrol version Position M: “Ignition on” For the first 625 miles (1000 km) do Ignition is on. not exceed 70 mph (130 km/h) You are ready to start. in the highest gear or 3000 to 3500 rpm. Position D: “Start”…
-
Page 64: Starting The Engine / Stopping The Engine
STARTING/STOPPING THE ENGINE Starting the engine Diesel injection Special feature vehicles equipped with engine Cold or warm engine Hot engine immobiliser system Turn the ignition key to the Turn the ignition key directly to the very cold conditions ignition on position, M, and hold Start position.
-
Page 65: Special Features Of Petrol Versions
If the fault cannot be identified, do cause thermal damage to the car. not persist in attempting to start the engine and call a Renault Dealer. Do not park the car or run the engine in locations where combustible substances or…
-
Page 66: Special Features Of Diesel Versions
However, if after a few seconds and fuel heater several attempts the engine fails to This equipment enables diesel fuel start, contact a Renault Dealer. to be used without an additive down to –18°C or, if the vehicle is used regularly for short journeys (cold engine), down to –5°C.
-
Page 67
• Idling speed: this does not require adjustment. Your Renault Dealer has all the equipment necessary for ensuring • Air and fuel filters: a clogged that your car is maintained to its filter element reduces output and original standard. -
Page 68
ADVICE ON ANTI-POLLUTION AND HOW TO ECONOMISE ON FUEL, DRIVING (continued) • Study the road ahead so that you are able to brake as little as possible, it can be sufficient just to lift off the accelerator. • Avoid fierce acceleration. •… -
Page 69
ADVICE ON ANTI-POLLUTION AND HOW TO ECONOMISE ON FUEL, DRIVING (continued) • Air conditioning increases fuel consumption, especially in town driving. Switch off the system when it is not needed. • Never fill the fuel tank right to the brim as this is wasteful. •… -
Page 70: Environment
ENVIRONMENT Your vehicle has been designed addition, your meets with the aim of caring for the requirements European environment. legislation relating to environmental protection. • The majority of versions are equipped with a depollution Make your contribution towards system including catalytic protection of the environment too! converter, a lambda sensor and…
-
Page 71: Gear Lever
GEAR LEVER HANDBRAKE POWER STEERING To release: Never leave the steering wheel on full lock when the car is parked if Pull the lever up slightly, press you have power-assisted steering button 2, then lower the lever to the fitted, as this may damage the floor.
-
Page 72: Anti-Lock Braking System (Abs)
Contact at the same time. Also, this system that you must adapt your driving your Renault Dealer as a matter or allows you to optimise stopping style to suit the road conditions. urgency.
-
Page 73
2.12… -
Page 74: Your Comfort
Section 3: Your comfort Air vents …………………………3.02 — 3.03 Heating — Ventilation — Air conditioning ……………….. 3.04 3.09 Interior lighting …………………………3.10 Electric windows ………………………… 3.11 Sun visor …………………………..3.12 Glove box — Storage compartments …………………. 3.13 — 3.14 Ashtrays — cigarette lighters ……………………..
-
Page 75: Air Vents
AIR VENTS (air outlets) 1 — Left-hand front window demister 5 — Heating/ventilation control unit 6 — Right-hand side air vent 2 — Left-hand air vent 7 — Right-hand front window demister 3 — Windscreen demisting vents 8 — Footwell heater outlets for front 4 — Centre air vents and rear passengers 3.02…
-
Page 76
AIR VENTS (continued) Side air vents Centre air vents Air flow Air flow Move tumblewheel 2 (beyond the Move tumblewheel 4 (beyond the point where resistance is felt). point where resistance is felt). : maximum flow : maximum flow : closed : closed Direction Direction… -
Page 77
HEATING — VENTILATION Controls Adjusting the air temperature Distribution passenger compartment A Air temperature adjustment. Turn button A. Move control B. Turning the knob to the right B Distribution of air. increases the temperature. • Position C Air flow regulation. All the air flow is directed to the dashboard vents. -
Page 78
HEATING — VENTILATION (continued) Adjusting the amount of supplied passenger compartment • Normal use (ventilation) Move control C from 0 to 4. Passenger compartment ventilation is by “blown air”. The blower determines how much air enters but car speed has some effect on this. •… -
Page 79: Heating — Ventilation — Air Conditioning
HEATING — VENTILATION — AIR CONDITIONING Controls Adjusting the air temperature Distribution passenger compartment A Air temperature adjustment. Move control A. Move control B. B Distribution of air. To the right: maximum possible temperature • Position C Air flow regulation. To the left: minimum possible All the air flow is directed to the D Using the air conditioning.
-
Page 80
HEATING — VENTILATION — AIR CONDITIONING (continued) Adjusting the amount of blown into • Position • Position passenger compartment Ventilation The air flow is distributed between Close the dashboard vents for more Move control C from 0 to 4. dashboard vents effective demisting. -
Page 81
If there is an operating fault, consult control D to start the air conditioning may mist the windows slightly or your Renault Dealer. and move control C from 0 to 4. cause odours due to the air not being renewed. -
Page 82
HEATING — VENTILATION — AIR CONDITIONING (continued) Air conditioning controls Note: the air conditioning may be used in all conditions but does not Control D operates or stops Using the air conditioning system: operate when external the air conditioning system. •… -
Page 83: Interior Lighting
INTERIOR LIGHTS Automatic operation interior lights (for certain cars) • if the doors are unlocked using the plip remote control, the interior lighting is switched on for approximately 15 seconds. • if the doors are locked using the plip remote control, the interior lighting is immediately switched off.
-
Page 84: Electric Windows
ELECTRIC WINDOWS Front passenger’s side electric window With the ignition on, press switch 2 to open the window or raise switch 2 to close it. Front driver’s side electric Manual window controls window Operate handle 3. With the ignition on, press switch 1 to open the window or raise switch 1 to close it.
-
Page 85: Sun Visor
SUN VISOR Front sun visor Lower the sun visor 1. When the sun visor is fitted with a vanity mirror 2, this will be on the passenger side. 3.12…
-
Page 86: Storage Compartments
STORAGE COMPARTMENTS Passenger side glove box Centre console storage Driver’s side storage pockets 3 compartment 2 To open, lift control 1. Two cup holders are provided on the inside of the flap. 3.13…
-
Page 87
STORAGE COMPARTMENTS (continued) Front door storage pockets 1 Storage at the far end of the Luggage compartment storage luggage compartment 2 A storage space 3 is provided for various accessories (petrol can, toolkit …). 3.14… -
Page 88: Ashtrays — Cigarette Lighters
ASHTRAYS — CIGARETTE LIGHTERS Ashtray Cigarette lighter To open, lift cover 1. With the ignition on, press in the cigarette lighter 2. To empty, pull ashtray towards you and it will be released from its It will spring back with a click when housing.
-
Page 89
REAR SEAT (operation) To fold down the seatback Removing the seat cushion The seat and the seatback may be folded away to allow bulky objects Remove the rear head restraint (if Raise the seat cushion so that you to be carried. fitted). -
Page 90: Luggage Compartment
LUGGAGE COMPARTMENT versions with electric central door locking The tailgate is locked and unlocked at the same time as the doors. The tailgate may, however, be locked unlocked without affecting the doors by using the door key in the lock 1. To close Slam the tailgate and turn the ignition key to the right.
-
Page 91: Transporting Items In The Luggage Compartment
TRANSPORTING ITEMS IN THE LUGGAGE COMPARTMENT Always arrange the items to be carried so that their longest side is against the seatback of the rear bench seat (which will be the case with normal loads) or the folded bench seat (which will be the case with the bulkiest loads).
-
Page 92: Maintenance
Section 4: Maintenance Bonnet …………………………..4.02 Engine oil level ………………………. 4.03 4.05 Levels: Brake fluid ……………………….4.06 Coolant …………………………4.07 Power steering pump …………………….. 4.08 Screen washer reservoir ……………………4.09 Air filter — Battery ……………………….. 4.10 Bodywork maintenance ……………………. 4.11 — 4.12 Interior trim maintenance ……………………..
-
Page 93: Bonnet
(except own weight. Take care when working for qualified staff from the under the bonnet as the Renault network). Check that the bonnet is correctly engine cooling fan may locked. start up at any moment.
-
Page 94: Engine Oil Level
Message 2 every 625 miles (1000 km), consult Level It is vital to top up with oil as soon display your Renault Dealer. as possible. function Oil change frequency: check the oil level from time to time and certainly before any long journey,…
-
Page 95
ENGINE OIL LEVEL (continued) 1.4 l 1.4 l 16V Topping up/filling • Reading the oil level using the — Unscrew the filler cap 1. dipstick — Top level. (For The car must be parked on level — Take out the dipstick. information, capacity ground and the engine should be… -
Page 96
1.2 l 16V 1.5 l dCi Engine oil change Frequency of changing: Refer to the Consult your Renault Dealer at Servicing booklet for your vehicle. once if you notice an abnormal or Change the oil more often if the repeated drop in any of the fluid vehicle is used in harsh conditions. -
Page 97
MINIMUM warning mark. Take care when working under the bonnet as the engine cooling fan may Consult your Renault Dealer at start up at any moment. once if you notice an abnormal or repeated drop in the level. 4.06… -
Page 98: Coolant
Top up this when cold level before it reaches the MINI mark. No operations may be carried cooling circuit when the engine is hot. Consult your Renault Dealer at Risk of burns. once if you notice an abnormal or repeated drop in the level. 4.07…
-
Page 99
— visible between the Min and Max marks on the reservoir 1. For topping up or refilling with oil, use products approved by Renault’s Technical Department. Take care when working under the bonnet as the… -
Page 100: Screen Washer Reservoir
Take care when working under the bonnet as the engine cooling fan may Consult your Renault Dealer at start up at any moment. once if you notice an abnormal or repeated drop in the level.
-
Page 101
The battery does not need to be engine cooling fan may serviced: never open cover 2. start up at any moment. Consult your Renault Dealer at once if you notice an abnormal or repeated drop in any of the fluid levels. -
Page 102: Bodywork Maintenance
— Atmospheric pollution (built-up • Allow rust to form following Renault’s Technical Department. and industrial areas). minor impacts. If adequate precautions are not — Saline atmosphere (near the sea, •…
-
Page 103
Consult must be reapplied by spraying on and may even cause the paint to anti-corrosion booklet. products approved by Renault’s peel off): Technical Department. • Respect local regulations about must washed washing vehicles (e.g. do not… -
Page 104: Interior Trim Maintenance
Renault’s Technical Department passenger compartment: unless • washing up liquid (with one part (or Renault accessory outlets) or carefully used, such equipment of washing up liquid to 200 parts warm soapy water using a sponge could interfere with correct of water).
-
Page 105
4.14… -
Page 106: Practical Advice
Section 5: Practical advice Emergency spare wheel ………………………. 5.02 Toolkit (Jack — Wheelbrace — Tyre levers, etc.) ………………..5.03 Hubcaps …………………………..5.04 Changing a wheel ……………………….. 5.05 Tyres (tyre safety, wheels, winter use) ………………..5.06 5.08 Wiper blades …………………………5.09 Changing the bulbs: ……………………..
-
Page 107: Spare Wheel
SPARE WHEEL Spare wheel 2 This is located in the luggage • Release the retaining strap 3. compartment. To gain access to the • Take out the spare wheel 2. spare wheel: • Open the tailgate. • Lift up the luggage compartment carpet 1.
-
Page 108: Toolkit (Jack — Wheelbrace — Tyre Levers, Etc.)
TOOLKIT The toolkit is located inside the rear left wing. It contains: — the wheelbrace 1 — the jack 2 — the towing ring 3 The jack is designed for wheel changing purposes only. It must not be used under any circumstances to assist repair underneath the car.
-
Page 109: Hubcaps
HUBCAPS Hubcap with concealed wheel Central hubcap Aluminium wheel 4 bolts (example: hubcap 3) There is no need to remove this (example: hubcap 1) Remove using the hubcap spanner hubcap: the bolts are visible. A (stored in the toolkit). Remove it using a wheel hubcap spanner A (stored in the tool kit) or the end of the wheelbrace by inserting the hook into one of the…
-
Page 110: Changing A Wheel
CHANGING A WHEEL Park the car on flat, firm ground (if necessary, insert a solid support under the baseplate of the jack), and turn on the hazard warning lights. Apply the handbrake and put the car in gear (first or reverse, or position automatic transmission).
-
Page 111: Tyres (Tyre Safety, Wheels, Winter Use)
Maintaining the tyres affect safety. The tyres must be in good condition and the tread must have sufficient depth; tyres approved by Renault’s Technical Department have tread wear indicators 1 which are raised When they need to be pads moulded into the tread at replaced, only tyres of several points.
-
Page 112: Tyre Pressures
TYRES (continued) Tyre pressures Pressures should be checked when Fitting new tyres the tyres are cold; ignore higher Tyre pressures must be adhered to. pressures which may be reached in (Remember to check the spare hot weather or following a journey wheel at the same time.) Pressures For safety reasons, this at higher speeds.
-
Page 113
In all cases, we would recommend replace the punctured wheel and to that you consult your Renault fit the emergency spare wheel in Dealer who will be able to advise place of the rear wheel. -
Page 114: Wiper Blades
WINDSCREEN WIPER BLADES Refitting a wiper blade To refit the wiper blade, proceed in reverse order of removal. Make sure the blade is correctly locked in position. Replacing windscreen wiper blades 1 • Lift the wiper arm 3. • Move the blade into a horizontal position.
-
Page 115
SINGLE LENS FRONT LIGHTS: replacement of the bulbs Cleaning headlights As the headlights are made of plastic “glass”, use a soft cloth or cotton wool to clean them. If this does not clean them properly, use a soft cloth or cotton wool slightly moistened with soapy water and then wipe clean with a soft damp cloth. -
Page 116
FRONT DUAL HEADLIGHT: changing bulbs Cleaning headlights As the headlights are made of plastic “glass”, use a soft cloth or cotton wool to clean them. If this does not clean them properly, use a soft cloth or cotton wool slightly moistened with soapy water and then wipe clean with a soft damp cloth. -
Page 117: Front Fog Lights
Renault Dealer. Adjusting beam height • Remove the mounting screws 1. Please consult your Renault Dealer • Take out the lamp unit towards to adjust these lights. the front. • Disconnect the wires.
-
Page 118
REAR LIGHTS: replacing bulbs Remove the screw 1 and pull off the Unclip the bulb holder by moving 3 Tail light and stop light rear light cluster from the outside. the tab 2. Pear-shaped bulb, bayonet type with 2 filaments, P 21/5 W. 4 Reversing light (right-hand side) Pear-shaped bulb, bayonet type with 2 filaments P 21 W. -
Page 119
REAR LIGHTS: replacing bulbs (continued) Third brake light 1 Remove the cover by pressing Turn the bulb holder 2 a quarter of a simultaneously on the locking tabs turn, release it and take out the bulb. on both sides (arrows). Bulb type: P 21 W. -
Page 120
REAR LIGHTS: replacing bulbs (continued) Number plate light 1 Release it using a tool such as a flat To access the bulb 2, you must screwdriver. unclip the bulb holder lens. Bulb type: PH 5 W. 5.15… -
Page 121
SIDE-MOUNTED REPEATERS: changing the bulbs Unclip side-mounted repeater 1 Turn the bulb holder 2 a quarter of a (using a tool such as a flat turn and take out the bulb. screwdriver). Bulb type: W 5 W. 5.16… -
Page 122: Interior Lights
INTERIOR LIGHTS: changing the bulbs Interior light A Unclip cover 1 (using a tool such as a flat screwdriver) Release the bulb. Bulb type: W 5 W. 5.17…
-
Page 123
INTERIOR LIGHTS: replacing the bulb Luggage compartment light 1 Unclip the light 1 by pressing the Press tab 2 to release the lens and tabs on each side (using a tool such gain access to the bulb 3. as a flat screwdriver). Bulb type: double-ended tubular Disconnect the light. -
Page 124: Battery
In this case, it is advisable to have normally. your vehicle fitted with a battery which has an increased nominal To avoid all risk of sparks: The battery must be kept clean and capacity. Consult your Renault dry. — Ensure that the consumers are Dealer. disconnected before…
-
Page 125
Start the engine as you would Obtain suitable jump leads (with a normally. As soon as it starts, large cross section) from a Renault disconnect cables A and B in Dealer or, if you already have jump reverse order (4-3-2-1). -
Page 126
If a fuse is fitted where the rating is too high, it may cause the obtain a box of spare bulbs and electrical circuit to overheat (risk of fire) in the event of an item of fuses from your Renault Dealer. equipment using an excessive amount of current. 5.21… -
Page 127: Fuses
FUSES (continued) Allocation of fuses (depending on the car equipment level) Symbol Allocation Symbol Allocation Symbol Allocation Air bag/ Right-hand main beam Left-hand side light Delay timing unit headlight Right-hand side light Stop lights Left-hand main beam headlight Heated rear screen Engine immobiliser Dual headlight (dipped and main beam)
-
Page 128: System For Cutting Off The Fuel Supply In The Event Of A Severe Impact
Renault network personnel who must ensure that: • the car can be driven; • there is no smell of fuel; • and that the fuel system is not leaking.
-
Page 129: Towing (Breakdown — Trailer)
You must observe the towing Screw in towing ring 2 as far as it regulations which apply in the will go. country in which you are driving: do not exceed the towing weight for your car. Consult your Renault Dealer. 5.24…
-
Page 130
TOWING: breakdown TOWING: trailer • Renault recommends the use of a rigid towing bar. If a rope or cable is used (where the law allows this), the car being towed must be able to brake. • A car must not be towed if it is not fit to be driven. -
Page 131
Consult your Renault Dealer to find out the correct part numbers. • No work may be carried out on the electrical or radio circuits, except by Renault network engineers: an incorrectly connected system may result in damage being caused to the electrical system and/or the components connected to it. -
Page 132
RENAULT will provide a Also, for your own safety, we warranty. would advise you always to take account of traffic conditions and… -
Page 133
FAULTS Your car should not be affected by faults likely to keep it off the road for long if you have followed the Renault Servicing Programme regularly. The following troubleshooting tips will enable you to get going again quickly, even if only temporarily. For reasons of safety you should always consult a Renault Dealer as soon as you can. -
Page 134
Starting procedure incorrect. See “Starting engine” section. Poor fuel supply or ignition fault. If the car will not start, do not keep trying to start it. Consult a Renault Dealer. System for cutting off fuel supply Consult Renault Dealer. (See… -
Page 135
Oil level too low. Top up the oil. — at idling speed Oil pressure too low. Consult the nearest Renault Dealer. — is slow to go out or remains Loss of oil pressure. Stop: contact a Renault Dealer. illuminated on acceleration. -
Page 136
Reminder: only products approved by Renault’s Technical Department may be used for this purpose. -
Page 137
— Feed wire disconnected or connector Reconnect wire. out of position. — Faulty earth connection. Find earth wire and remake a good clean wire-to-earth connection. On both sides: — Fuse blown. Replace fuse. — Flasher unit defective. Replace: consult a Renault Dealer. 5.32… -
Page 138: Troubleshooting
TROUBLESHOOTING (continued) Electrical equipment CAUSES REMEDIAL ACTION • Headlights One headlight only: — Bulb blown. Replace bulb. not flashing. — Wire disconnected or connector out Check reconnect wire of position. connector. — Faulty earth connection. See above. Both headlights: — If circuit is protected by fuse Check fuse and change if necessary.
-
Page 139
5.34… -
Page 140: Technical Specifications
Section 6: Technical specifications Vehicle identification plates ……………………. 6.02 — 6.04 Engine specifications ……………………….6.05 Weights …………………………..6.06 Towing weights …………………………6.07 Dimensions ………………………….. 6.08 Replacement parts ……………………….6.09 6.01…
-
Page 141: Vehicle Identification Plates
VEHICLE IDENTIFICATION PLATES The information on the vehicle A — Vehicle identification plate identification plate A (right-hand 1 Vehicle type and chassis number 6 Technical specifications side) must be quoted when writing (The number also appears on the vehicle to us or ordering parts. dashboard, at the bottom of the 7 Vehicle paint reference windscreen).
-
Page 142
VEHICLE IDENTIFICATION PLATES (continued) The information on the vehicle B — Engine plate or engine label identification plate and the engine (Location varies depending plate B must be quoted when engine) writing or ordering parts. 1 Engine type 2 Engine suffix 3 Engine number 6.03… -
Page 143
VEHICLE IDENTIFICATION PLATES (continued) The information on the vehicle B — Engine plate or engine label identification plate and the engine (Location varies depending plate B must be quoted when engine) writing or ordering parts. 1 Engine type 2 Engine suffix 3 Engine number 6.04… -
Page 144: Engine Specifications
The type should be marked on a label stuck inside the engine compartment. – If it is not then contact your Renault Dealer. Fitting spark plugs which are not to specification may damage the engine. * If not available, unleaded fuel with an octane rating of 91 can be used.
-
Page 145: Weights
WEIGHTS (in kg) — basic car without options subject to change over the year: Consult your Renault Dealer. Versions 1.2 l 1.2 l 16V 1.4 l 1.4 l 16V 1.5 l dCi Vehicle type LB0F LB11 LB0B LB0P — LB2A…
-
Page 146
— It is important to comply with the towing weights governed by local legislation in each country and, in particular, those laid down in the Road Traffic Regulations. Consult your Renault Dealer about any attachments. Under no circumstances may the total train weight (= maximum permissible all-up weight and weight towed) be exceeded. -
Page 147: Dimensions
DIMENSIONS (in metres) 0,714 2,472 0,964 1,406 4,150 1,940 Turning circle • Between walls: 10.70 or 11.15 • between kerbs: 10.30 or 10.75 1,417 1,385 6.08…
-
Page 148: Replacement Parts And Repairs
If you always fit Renault genuine parts to your car, you will ensure that it performs well. Repairs carried out within the Renault network using original parts are guaranteed for one year.
-
Page 149
6.10… -
Page 150: Alphabetical Index
ALPHABETICAL INDEX A ABS …………….2.11 D Dashboard …………1.30 — 1.31 Accessories …………… 5.27 Dimensions …………… 6.08 Accessories — installation ……..5.27 Dipstick …………4.03 4.05 Additional driving lights ……..5.12 Direction indicators ….1.50 — 5.10 — 5.11 — 5.13 Adjusting the driving position ….
-
Page 151
ALPHABETICAL INDEX G Gear lever …………..2.10 L Lights: Adjustment ……..1.48 — 1.49 Dipped beam headlights ..1.46 — 5.10 — 5.11 Fog lights ………. 1.47 — 5.12 Hazard warning ……….. 1.50 H Handbrake …………..2.10 Indicators ….1.50 — 5.10 — 5.11 — 5.13 Hazard warning lights ………. -
Page 152
ALPHABETICAL INDEX S Seat belts …………. 1.11 1.21 V Vehicle identification plate ……6.02 — 6.04 Side repeaters …………5.16 Ventilation and heating ……3.02 3.09 Spare wheel ………….. 5.02 Speakers (location) ……….5.26 Starting the engine ……….2.03 Storage compartments/pockets ….3.13 — 3.14 W Warning lights ………. -
Page 155
C R É A T E U R D ‘ A U T O M O B I L E S The driver’s handbook – 82 00 197 291 – NU 665-3 – June 2001 – ÉDITION ANGLAISE…
Бесплатно скачать мануал с Сloud.Mail (Размер 247 Mb)
Заказать книги и руководства по ремонту Рено Клио в бумажном варианте Вы можете на сайте http://www.autopapyrus.ru/catalog/s/renault/clio/
Руководство (мануал) охватывает все виды оборудования (как серийного, так и дополнительного) устанавливаемого на автомобили данной модели, однако его наличие на Ваше автомобиле Рено Клио 2 зависит от комплектации и выбранных опций.
Информация в данном руководстве позволит Вам:
— ознакомиться с автомобилем Рено Клио 2, правильно его эксплуатировать с использованием всех возможностей
— обеспечить длительную эксплуатацию Рено Клио 2, соблюдая описанные рекомендации по техническому обслуживанию
— быстро устранить мелкие неисправности, не требующие вмешательство специалиста станции сервисного обслуживания
Примеры страниц мануала:
Комментариев об этом автофайле пока нет, оставьте первый.
Материал предоставляется исключительно в целях ознакомпления и стимулирования приобретения оригинального продукта.
Администрация Автофайлов отказывается от какой-либо ответственности за содержание и последующее использование скачанных файлов.
Для авторов и правообладателей. Если Вы не согласны с размещением своего материала на страницах ресурса, просто сообщите нам об этом посредством обратной связи, чтобы удалить его.
Информация об автофайле
Описание автофайла
- 0
| Дата: | 22 мая 2010 |
| В разделе: | Руководства ремонт |
| Загрузил: | KADKA |
| Скачиваний: | 4 742 |
| Теги: | |
| Рейтинг: |
|
Издательство:Renault
Год издания: 2002/Страниц: 1045/Язык: русский/Формат: PDF
Размер: 11 Mб
Заводской мануал по ремонту и обслуживанию автомобиля Renault Clio в Росийской Федерации и других странах продавался под названием Renault Symbol второго поколения или фазы, выпускающихся с 1998 года по настоящее время, с 2005 года под названиями Renault Symbol и Renault Clio Campus, в связи с пуском в производство автомобиля Renault Clio третьего поколения в 2005 году.
руководство состоит из многих разделов. В каждом разделе есть краткое описание устройства соответствующих систем, агрегатов и узлов автомобиля, приводятся рекомендации по разборке и сборке, регулировке и ремонту агрегатов и узлов. есть список возможных неисправностей и рекомендации по их ремонту.
Скачать с
Скачать Руководство по ремонту и обслуживанию Renault Clio 2: с облака / торрента
Скачать из облачного хранилища

