-
Contents
-
Table of Contents
-
Bookmarks
Quick Links
OP – 1
portable synthesizer
user guide
Related Manuals for teenage engineering OP-1 Field
Summary of Contents for teenage engineering OP-1 Field
-
Page 1
OP – 1 portable synthesizer user guide… -
Page 2
OP–1 field introduction to begin, we’d like to say thank you for choosing OP–1 field, and also for contributing to the OP–1 legacy. we launched the original back in 2011, so what better way to honor the tool that made us than by giving it some tlc. -
Page 3
field system care field system began as an idea to before getting started, make sure to create a series of products that carefully read these instructions. see function as part of a whole. with the section at the end on warnings aluminum casings and nylon bag and warranty for more information. -
Page 4
hardware OP–1 field highlights: OP–1 field is a precision tool, made • ultra portable synthesizer in natural anodized aluminum, with • usb-c audio interface encoders in the color palette of blue, • host and device for audio and midi ochre, gray and orange to keep •… -
Page 6: Left Side
overview left side the top left side holds the internal internal volume speaker and the main volume knob. speaker knob on the right you can find a 3.5 mm audio output jack, used for connecting a pair of headphones, a mixer or your speakers.
-
Page 7: Right Side
right side internal microphone level meter / audio audio charging indicator…
-
Page 8
power on to power on your unit, flip the power switch located on the right side of the device to the up position. the display will show the logo and the currently installed firmware version and then arrive at the tape screen. to power o , flip the switch to the down position. -
Page 9
charging OP–1 field is charged through the usb-c port located on the right side of the unit. the first thing you should do is connect it to a computer or a usb charger. keep it connected until the battery is fully charged, indicated by the charging led on the right side and the level meter. -
Page 10
start keyboard the OP–1 workflow is based around playing, recording and layering sounds on tape. the four main modes: synth, drum, tape and mixer are where you’ll spend the most time. press synth or drum to access the synth or drum modes and play notes on the keyboard to hear how they sound. -
Page 11
synth drum tape mixer tape is the heart the mixer is in synth mode drum mode you use the keys works similarly of OP–1, where where you on the keyboard to synth mode, you record and control levels to play notes. except the keys layer sounds. -
Page 12
shift help user guide when pressing help you’ll see a quick help overlay, explaining the most basic relevant information per screen. in addition to the help overlays, you can also press and hold shift and use shift with the help button other keys or will guide you then press help to access the built-in… -
Page 13: Track Keys
track keys T1-T4 finally T4, which press T1 while in T2 holds the T3 is where you synth or drum ‘envelope’ in access ‘FX’ for will show the mode to show synth and drum both synth and ‘lfo’ screen in the ‘synthesis modes, ‘track 2’…
-
Page 14: Guide Conventions
guide conventions press one key at sometimes you will need to press the time. keys in sequence, sometimes in combination. these illustrations and texts will help you to follow along in the guide. hold one key and press the to press a key, you tap it and then second key.
-
Page 15: Encoder Commands
encoder commands the four color coded encoders are rotate blue tap blue related to the graphical interface on rotate ochre tap ochre the display. by turning an encoder, rotate gray tap gray you control the parameter with the rotate orange tap orange corresponding color.
-
Page 16: Preset Sounds
preset sounds in synth and drum mode, the sound to load a di erent preset to any of selection keys 1-8 are your eight these slots, press shift + any key instant access preset keys. from 1 to 8. this will reveal a list of all available engines, as well as the press any key from 1 to 8 while in presets per engine.
-
Page 17: Changing Presets
changing presets engine preset…
-
Page 18: Synth Mode
synth mode OP–1 field has several original to change the synth engine press synthesis engines, each with its own shift + T1. this opens a synthesis characteristics. to enter synthesizer browser screen, with a list of mode, or synth mode, press the possible synthesis engine choices.
-
Page 19
OP–1 FIELD BLE MIDI CONTROLLER… -
Page 20
OP–1 FIELD MIDI KEYBOARD… -
Page 21: Audio Interface
GUITAR OP–1 FIELD AUDIO INTERFACE…
-
Page 22
accessories to prepare you for your journey into the field, we’ve created a collection of custom accessories, crafted from durable fabrics and designed with versatility and durability in mind. each piece has multiple uses and ways of wear, using adjustable straps and attachments. -
Page 24: Technical Specifications
technical specifications • 3.5 mm stereo input jack • 3.5 mm stereo output jack with headset microphone support • usb audio / midi host & device • bluetooth low energy radio • rechargeable battery • 24 h battery life • color display FREQUENCY BAND / Power: BLE: 2402 — 2480 MHZ / <10dBm FM transmitter: 87.5-108MHz /…
-
Page 25: Electrical Characteristics
electrical handling characteristics to keep the battery healthy, the unit audio input: should be charged at least every 6 months. if not used for a long time, it impedance: 13 kOhm may not charge again. analog gain: 0 — 31 dB max level: 8 dBu, 2 Vrms ambient working temperature: SNR: 98 dBA (typical)
-
Page 26: Firmware Update
te boot firmware update te boot is the bootloader in OP–1 to update the OP–1 field firmware: field. it loads and runs the firmware and is used for firmware updates • access te boot. and factory reset. • connect OP–1 field via usb-c to a computer.
-
Page 27: Factory Reset
factory reset to perform a factory reset: • access te boot. • press 7. • press the orange knob to confirm. note: all user data will be removed. • restart OP–1 field and wait for the factory reset to finish. factory reset allows you to erase all user settings and content, as well as recreate the original file structure…
-
Page 28
RISK OF EXPLOSION OR FIRE IF THE BATTERY TEENAGE ENGINEERING OP–1 FIELD MODEL NO: TE002AS002 IS REPLACED BY INCORRECT TYPE. ONLY A BATTERY SUPPLIED BY TEENAGE ENGINEERING INSTALLED BY QUALIFIED PERSONNEL SHOULD BE USED. TO PREVENT POSSIBLE HEARING DAMAGE, DO NOT LISTEN AT HIGH SOUND LEVELS FOR LONG PERIODS. -
Page 29
THIS DEVICE COMPLIES WITH PART 15 OF MODIFICATIONS NOT EXPRESSLY APPROVED THE FCC RULES AND ISED CANADA’S BY TEENAGE ENGINEERING COULD VOID THE LICENCEEXEMPT RSS(S). OPERATION IS USER’S AUTHORITY TO OPERATE THE SUBJECT TO THE FOLLOWING TWO EQUIPMENT. CONDITIONS: FCC ID: Z23002A… -
Page 30
RISQUE D’EXPLOSION OU DE FEU SI LA MODEL NO: TE002AS002 BATTERIE EST REMPLACÉE PAR UN TYPE DE BATTERIE INCORRECT. SEULE UNE BATTERIE FOURNIE PAR TEENAGE ENGINEERING ET INSTALLÉE PAR UN PERSONNEL QUALIFIÉ DOIT ÊTRE UTILISÉE. AFIN D’ÉVITER TOUT DOMMAGE LIÉS À VOTRE AUDITION, IL EST RECOMMANDÉ… -
Page 31
CET APPAREIL EST CONFORME À LA LES MODIFICATIONS NON EXPLICITEMENT PARTIE 15 DES RÈGLES DE LA FCC ET LE APPROUVÉES PAR TEENAGE ENGINEERING PERMIS D’ISED CANADA NORMES RSS PEUVENT CONDUIRE À ANNULER LES EXEMPTÉES. SON FONCTIONNEMENT EST DROITS DE L’UTILISATEUR À UTILISER SOUMIS AUX DEUX CONDITIONS L’ÉQUIPEMENT. -
Page 32
RF EXPOSURE COMPLIANCE THIS EQUIPMENT COMPLIES WITH FCC/ISED GRAM OF TISSUE. THE HIGHEST SAR VALUE RADIATION EXPOSURE LIMITS SET FORTH REPORTED UNDER THIS STANDARD DURING FOR AN UNCONTROLLED ENVIRONMENT. PRODUCT CERTIFICATION FOR USE WHEN END USER MUST FOLLOW THE SPECIFIC PROPERLY WORN ON THE BODY, WITH OPERATING INSTRUCTIONS FOR SATISFYING XXMM SEPARATION. -
Page 33
CONFORMITÉ D’EXPOSITION AUX RF CET ÉQUIPEMENT EST CONFORME AUX DÉVELOPPEMENT ÉNERGÉTIQUE DURABLE. LIMITES D’EXPOSITION AUX CES EXIGENCES UN SAR LIMITE DE 1,6 W/KG RAYONNEMENTS ISED ÉTABLIES POUR UN EN MOYENNE POUR UN GRAMME DE TISSU. ENVIRONNEMENT NON CONTRÔLÉ. LA VALEUR SAR LA PLUS ÉLEVÉE SIGNALÉE L’UTILISATEUR FINAL DOIT SUIVRE LES EN VERTU DE CETTE NORME LORS DE LA INSTRUCTIONS SPÉCIFIQUES POUR… -
Page 34
(1)L’APPAREIL NE DOIT PAS PRODUIRE DE L’ÉMETTEUR/RÉCEPTEUR EXEMPT DE BROUILLAGE; LICENCE CONTENU DANS LE PRÉSENT APPAREIL EST CONFORME AUX CNR (2)L’APPAREIL DOIT ACCEPTER TOUT D’INNOVATION, SCIENCES ET DÉVELOP- BROUILLAGE RADIOÉLECTRIQUE SUBI, PEMENT ÉCONOMIQUE CANADA MÊME SI LE BROUILLAGE EST SUSCEPTIBLE APPLICABLES AUX APPAREILS RADIO D’EN COMPROMETTRE LE EXEMPTS DE LICENCE. -
Page 35
CAUTION DO NOT TRY TO CHARGE OR USE A UNIT LEAVING A BATTERY IN AN EXTREMELY HIGH WITH A SEEMINGLY DAMAGED BATTERY. TEMPERATURE SURROUNDING ENVIRONMENT THAT CAN RESULT IN AN ONLY A BATTERY SUPPLIED BY TEENAGE EXPLOSION OR THE LEAKAGE OF ENGINEERING INSTALLED BY QUALIFIED FLAMMABLE LIQUID OR GAS. -
Page 36
EU / UK COMPLIANCE RECYCLING HEREBY, TEENAGE ENGINEERING DECLARES ELECTRICAL AND ELECTRONIC EQUIPMENT, THAT THE RADIO EQUIPMENT TYPE OP–1 PARTS AND BATTERIES MARKED WITH THIS FIELD IS IN COMPLIANCE WITH DIRECTIVE CROSSED-OUT WHEELIE BIN SYMBOL MUST 2014/53/EU. THE FULL TEXT OF THE EU… -
Page 37
MADE FOR APPLE BADGE USE OF THE MADE FOR APPLE BADGE MEANS THAT AN ACCESSORY HAS BEEN DESIGNED TO CONNECT SPECIFICALLY TO THE APPLE PRODUCT(S) IDENTIFIED IN THE BADGE AND HAS BEEN CERTIFIED BY THE DEVELOPER TO MEET APPLE PERFORMANCE STANDARDS. -
Page 39
TEENAGE ENGINEERING AB TEXTILGATAN 31 120 30 STOCKHOLM SWEDEN / SUÈDE… -
Page 40
designed and engineered by teenage engineering…

-
Contents
-
Table of Contents
-
Bookmarks
Quick Links
Related Manuals for teenage engineering OP-1
Summary of Contents for teenage engineering OP-1
-
Page 1
VERSION 1.2… -
Page 2
USB charger. Make sure you cause interference, and (2) this device must accept always have the OP-1 placed so it is level and sure to any interference, including interference that may remain stable. Never install or use the unit in any of cause undesired operation of the device. -
Page 3
Sequencers Sequencers — Introduction Selecting a Sequencer Type ENDLESS Sequencer Benutzerhandbuch ENDLESS Functionality Mode d’Emploi PATTERN Sequencer PATTERN Functionality ©2010-2012 Teenage Engineering. All rights TOMBOLA Sequencer reserved. TOMBOLA Functionality FINGER Sequencer Table of Contents 7.10 FINGER Functionality Hardware — Overview Tape Mode Power On/Off… -
Page 4
Sampling Using The Built in Microphone 12.5 Creating a Drum Kit From FM Radio Waves Hardware Song Rendering and Connectivity 13.1 Album 13.2 13.3 OP-1 Mode 13.4 CTRL (Controller) Mode 13.5 DISK Mode 13.6 OPT (Option) Mode 13.7 Sequencing External Equipment 13.8… -
Page 5
USB Cable playing around and exploring. You can always come back to this manual at a later stage. The OP-1 uses a standard USB to mini USB cable for charging the OP-1 and for transferring data between What’s in the Box? your OP-1 and your computer. -
Page 6: Quick Guide
USB cable into the USB port located on the tape. right side of your OP-1 and connect it to a computer or to a USB power adapter. Press the MIXER key to open up the Mixer view.
-
Page 7
3.5 mm Audio In Everything will still be there the next time you power on your OP-1 exactly the same as when you left it. NOTE: The more samples or other data you store on USB for Charging the your OP-1, the longer the start-up process will be. It’s… -
Page 8
Tape edits Tape Transport Rewind / Forward Shift Musical Keyboard Octave shift +/- Step Forward / Back 2.2 LEDs On the right side of your OP-1 you find the built in Microphone and VU/Battery LEDs Built in VU/Battery Microphone indicator… -
Page 9
Synthesizer or Drum key. PRO-TIP: Press and hold HELP while playing the musical keyboard to let your OP-1 display the current note. 3.2 Octave shift Use the Arrow keys to transpose octave while in Synthesizer or Drum mode. -
Page 10
4 Main Modes 4.1 The Four Main Modes 4.3 Main Modes Screen examples Your OP-1 is designed to be easy to use, so the most Synthesizer using String Engine. important functions are located on the first keys to the left on the upper row. The four keys are grouped together and are called Main Modes. -
Page 11
5.1 Synthesizer Mode – Introduction The first module of a sound is its engine. This is the OP-1 has several original synthesizer engines. Each heart of the sound and is the most important part. one has its own personality. When in Synthesizer Mode, the synthesizer engine’s visual is always… -
Page 12
Polyphonic, Monophonic, Legato or Unison. In play mode, you also have the portamento amount, destination and the destination parameter. MIDI – Route external MIDI CC to the OP-1. parameter setting. RANDOM – randomize all parameters in a module. Set the speed, amount, LFO envelope and destination TREMOLO –… -
Page 13
Synthesizer Mode (Continued) NOTE: Turn the ENCODERS all the way for all options 5.7 Changing Sounds under, for example, destination. The encoders click when turned, which doesn’t equal changing a value. Consider sound selection keys 1-8 as your instant Sometimes you need to turn a couple of clicks to access keys. -
Page 14
Synthesizer Mode (Continued) 5.9 Sound File structure The OP-1‘s storage allows you to add files for use for Synth and Drum sounds. It also lets you collect those files you have recorded in Tape and Album for use elsewhere. You may also manage your own presets, those which you have made in synth and saved. -
Page 15
Drum Mode 6 Drum Mode The basic concept here is to record all drums in a row 6.1 Drum Mode – Introduction and keep that recording to 12 seconds. Then set in and out points of that recording and dedicate it to a The Drum Mode — entered by certain key on the musical keyboard. -
Page 16
Drum folder. See chapters synthesizer, convenient for producing drum sounds. Blue encoder adjusts pitch, Green encoder adjusts 5.8-5.9 on how to transfer files to your OP-1. waveform, White encoder adjusts envelope. Hold SHIFT to access secondary oscillator. Orange 6.6 Using OP-1 standard layout… -
Page 17
Sequencers 7 Sequencers 7.1 Sequencers – Introduction OP-1 comes with four original sequencers that let you arrange notes in different ways. Both Synthesizer and Drum mode have 7.4 Endless Sequencer Functions: their own dedicated sequencer memory and can have separate… -
Page 18
Sequencers (Continued) CHANGE PLAYBACK DIRECTION OF A SEQUENCE NOTE: In Endless, you may use the arrow keys to You have three different options for how you want the change octave in playback mode. notes to be played back. Forward, Reverse or Random. -
Page 19
Sequencers (Continued) LIVE MODE 7.7 TOMBOLA Sequencer Turn the Orange Encoder until HOLD lights up. The sequencer starts, and the white horizontal cursor Use Tombola when you want to create a random moves across the sequence. Press SHIFT + any key sequence. -
Page 20
Sequencers (Continued) RELEASING NOTES 7.10 FINGER Functionality Turn the White Encoder to open the Tombola and release the notes. When Finger is activated for Synth, two keyboard players appear. When used with Drum, there are two gorillas. Each sequence, activated by pushing a white key on the Musical Keyboard, is populated by crosses by default. -
Page 21
8.1 Tape – Introduction 7. Press STOP when done. 8. Press Rewind (left arrow) to rewind the tape. Your OP-1 has a built in tape 9. Press Play to listen to your recording. feature with 6 minutes of recording time (in normal tape speed and 8.3 Overdubbing… -
Page 22
LIFT ALL – Hold down SHIFT + Lift to lift all tracks A nice option for additional recording control is using into memory. the OP-1 accessory Crank. This will give you music- box-style control over your Tape recording. JOIN – Press SHIFT + Split to join takes. This… -
Page 23
REVERSE – Change direction of the tape. CHOP – A tempo locked repeat type of effect. NOTE: Connect your OP-1 to your computer and MEMO 1 – Memorize any parameter in Tape transfer the Tape if you want a backup or need to free or Mixer for instant recall. -
Page 24
8.15 Backing up your Tape To backup your tape, connect your OP-1 to your computer and press SHIFT + COM. Select Disk Mode. The OP-1 will show up on your desktop as a disk. Locate the folder named “tape” and copy the files named “track_1.aif”, “track_2.aif”, “track_3.aif”,… -
Page 25
(T4). But as it is also the final Track 4 level – Orange encoder destination for all sound, it should be worth noting how the sound travels inside your OP-1. This is called To set the Pan Left/Right the Sound Path. -
Page 26
Mixer (Continued) 9.5 Master Effect RELEASE sets how quick the drive will narrow the difference between high and low audio levels, and at Master effects are the same effects found in mid to long release times, you’ll start to notice the Synthesizer and Drum mode, but modified for stereo. -
Page 27
To start the metronome, press Play. Sync mode means the OP-1 is listening to whatever external tempo you may be feeding it via USB. This lets you slave tempo lock the OP-1 to MIDI Time Code (MTC) sent from external sequencers. -
Page 28
Help & Tools 11 Help 11.1 The Help Button Your OP-1 has a built-in Help function. Pressing the Help Key at anytime brings up a Speech Bubble which tells you what mode you are in and what Sound is selected. By holding down the Help Key and pressing any key you get the Key name and function of that specific key. -
Page 29
Play the keyboard and adjust start/stop positions The Mic/Input key works quite similar in any mode on using encoders. the OP-1. Let us go through some of the Main Modes IN MIXER MODE 12.2 Mic/Input Key in Synthesizer and Drum Mode Same functionality as in Tape Mode. -
Page 30
Activating this mode is done from COM is useful when you want to record any Tape Tricks, mode. Here press the OP-1 Key (T1) for getting to the EQ, effects or live jamming. You may also play the standard OP-1 mode. -
Page 31
Your OP-1 is always sending MIDI data out, even if Remote Scripts. you’re not in controller mode. This way you may connect the OP-1 via USB and use any of its built in — Windows XP sequencers for controlling software synthesizers or C:Documents and SettingsAll UsersApplication other connected hardware, configured to receive… -
Page 32
Album/COM (Continued) 13.84 Ableton Live Key Assignments With the Ableton Live Script, your OP-1 is now Global Assignments integrated to run keys as numbered below. We are using four modes here as well, though very different [Key Name] Function as they correspond to Live’s functionality. -
Page 33
Following Reason 6.0.2 and Reason Essentials 1.0.2, the OP-1 has remote support built into Reason With the OP-1 plugged and in and in MIDI Mode (Press SHIFT + COM, then press T2), open Reason’s Preferences. Navigate to Control Surfaces, and click Auto-detect Surfaces. -
Page 34
Using SHIFT along with the Synthesizer or Drum good portion of the OP-1’s keys, it’s mode button will Recall the last saved version of a well worth a look in addition of Synth or Drum sound. -
Page 35
SHIFT Key (Continued) 14.4 SHIFT + Arrow Keys 14.5 SHIFT + Encoders In most modes the encoders have double functions. The Arrow keys functionality can be altered by SHIFT as follows: A couple of examples of the alternate encoder functions available with SHIFT include the following: While in Tape mode, SHIFT+ Green encoder lets you set the starting point of the loop, rather than the ending point which the Green encoder would control… -
Page 36
OP-1‘s display. To see the effect of some of the LFOs on a particular sound, consider looking at the details of the patch’s building blocks, using the T1-T3 buttons. -
Page 37
In this LFO Mode, the MIDI CC becomes manual control for oscillating. Orange encoder the LFO. Setting up your OP-1 to receive MIDI CC for controls the LFO, White encoder sets the amount. a particular sound is done by pressing SHIFT + T4 Green and Blue controls destination. -
Page 38
LFO Reference (Continued) 15.8 Additional Symbols Used in LFO Modes The LFO clock found in the Tremolo and the Value LFO Modes indicate a tempo locked clock with numbers and a free running clock with hand. 15.9 Free LFO In certain LFOs you’ll see the destination symbol followed by the letter “F”. -
Page 39
A great way to learn how to model a sound on the the Orange encoder counter clockwise to get a OP-1 is to try to create a specific sound from real life. mid- to long release. Set both the Green and the… -
Page 40
Exercises (Continued) 16.4 Singing Birds sound Synthesizer Engine: FM Envelope: Short attack, short decay, low sustain and long release Play Mode: Mono, Portamento: 60 FX: Spring Sequencer: Tombola To create a sound like singing birds, start with the FM engine which is good for metallic and distinct sounds but also clean sinus wave sounds when the FM level is turned down. -
Page 41
Reference 17 Reference 17.1 Synth engines Cluster Cluster Cluster Cluster Digital Digital Digital Digital TYPE Multi Layered Oscillator Cluster Multi Layered Oscillator Cluster Multi Layered Oscillator Cluster TYPE True Digital Synthesis True Digital Synthesis True Digital Synthesis Detune and Number of Wave Wave Spread… -
Page 42
Reference Synth Engines (Continued) Phase Phase Phase Phase TYPE Four Operator FM Synthesis Four Operator FM Synthesis Four Operator FM Synthesis TYPE Phase Distortion Phase Distortion Phase Distortion Phase Distortion Phase Phase Topology Freq. Detune Amount Shift Amount Filter Tilt Dr Wave Dr Wave Dr Wave… -
Page 43
Reference Synth Engines (Continued) Drum Sampler engine Drum Sampler engine Drum Sampler engine Drum Sampler engine Drum Sampler engine Drum Sampler engine Drum Sampler engine Drum Sampler engine TYPE Teenage Percussion Sample Player Teenage Percussion Sample Player Teenage Percussion Sample Player TYPE Teenage Percussion Sample Player Teenage Percussion Sample Player… -
Page 44
Reference Effects 17.2 Effects Reference Delay Delay Delay Delay Grid Grid Grid Grid TYPE Solid State Delay Solid State Delay Solid State Delay TYPE Three Dimensional Feedback Plate Three Dimensional Feedback Plate Three Dimensional Feedback Plate Size Speed Feedback X Size Y Size Z Feedback Nitro… -
Page 45
Reference Effects (Continued) Punch Punch Punch Punch Spring Spring Spring Spring TYPE Hard Hitting Low Pass Filter Hard Hitting Low Pass Filter Hard Hitting Low Pass Filter TYPE Mathematic Reverb Mathematic Reverb Mathematic Reverb Frequency Punch Rounds Power Tone Turns Damping Send PRO-TIP: Press and hold SHIFT while turning… -
Page 46
Hardware 18 Hardware Mechanical Body • Low profile keyboard module • Advanced CNC:d one-piece Aluminum • Scissor-switch ultra low profile design design. • 400 MHz Processor Core (800 MMACS • Expected lifespan of 10 million • 2 X M6 Mounting holes for accessories. performance) keystrokes per key •… -
Page 47
OP-1 with optional Studio System rig. -
Page 48
OP-1 with optional accessories.
Специально для вас, друзья, редакция MusicMag TV подготовила набор обучающих видеороликов по синтезатору Teenage Engineering OP-1 с русскими субтитрами! Ролики будут одинаково интересны как начинающим «наездникам» миниатюрного синтезатора, так и его опытным владельцам. Впрочем, тем кто интересуется этим инструментом и по какой-либо причине не может прийки к нам в салон и испытать его на себе наши видеоуроки тоже должны понравиться! Смотрим и наслаждаемся!
Ваш MusicMag.
Прочитано 3109 раз
Последнее изменение Суббота, 28 июня 2014 17:24
Добавить комментарий
Товар снят с производства!
Аналоги Teenage Engineering OP-1 Field, Teenage Engineering OP-Z
Teenage Engineering OP-1 сочетает в себе синтезатор, сэмплер и секвенсор. Он разработан и изготовлен стокгольмской компанией Teenage Engineering. OP-1 стал их первым продуктом и был выпущен в 2011 году. И сегодня он остается одним из самых популярных их продуктов.
OP-1 хорошо известен своей нетрадиционной конструкцией, дисплеем OLED и оснащенностью несколькими звуковыми движками.
OP-1 включает в себя восемь синтезаторных движков. Для каждого движка он предлагает четыре регулятора, которые действуют как различные макроконтроллеры. В дополнение к семплеру, OP-1 оснащен предзагруженными семплами ударных.
Драйверы:
Скачать с официального сайта производителя
- Teenage Engineering
- Клавиши Teenage Engineering
- Синтезаторы Teenage Engineering
Файлы для скачивания
- Инструкция для Teenage Engineering OP-1 (англ.) (PDF 2 Мб 213 Кб)
Нет клавиатуры, нет звука. Это так просто. Но не бойтесь, заменить его тоже очень легко.
Это руководство покажет вам, как заменить клавиатуру вашего OP-1.
Навигация
- Шаг 1: удаление ключа
- Шаг 2: Подключение клавиатуры
- Шаг 3: снятие ножничного механизма
- Шаг 4: откручиваем клавиатуру
Чтобы добраться до винтов под клавиатурой, вам нужно снять некоторые клавиши. Вы можете использовать либо открывающий инструмент, либо открывающий подбор. На первом рисунке показано, как это должно выглядеть при выключенных всех необходимых ключах (всего 12).
Четыре более длинные клавиши на грифе должны быть расположены с левой стороны, чтобы снять их.
Восемь меньших клавиш нужно выровнять снизу вверх.
Шаг 2 Подключение клавиатуры
Разблокируйте гибкие кабели, надавив на обе стороны каждого разъема два черных наконечника.
Теперь вы можете вынуть гибкие кабели и полностью снять клавиатуру.
При установке новой клавиатуры обязательно удалите защитную пленку под экраном.
OP-1 имеет режим для проверки определенных функций. Вы можете ввести его, удерживая кнопку «COM» при включении, затем выбрать функциональный тест (2). Вам не нужно завершать каждый тест, и вы можете отключиться после теста клавиатуры.

Шаг 3 снятие ножничного механизма
Ножничный механизм восьми маленьких клавиш блокирует нижележащие винты.
При повторном использовании открывающего инструмента или отмычки они могут быть легко сняты.
При сборке обязательно устанавливайте их правильной стороной вверх.
Шаг 4 откручиваем клавиатуру
Ослабьте эти 12 винтов с помощью отвертки Phillips # 00.
Затем просто снимите четыре поворотные ручки и ручку регулировки громкости.
Теперь можно слегка поднять клавиатуру и установить ее обратно.

Главная » Музыка » Обзор Teenage Engineering OP-1 – флагман среди портативных грувбоксов
КатегорииМузыка
Со временем в блоге будет появляться больше материалов на музыкальную тематику, поскольку такой запрос среди публики есть. Этот обзор Teenage Engineering OP-1 расскажет, кому подойдёт белоснежный портативный грувбокс и в каких ситуациях его использование оптимально.
Девайс появился около 10 лет назад, но аналогов на рынке практически нет. Ближайшая аналогия – это AKAI Pro MPC Live 2, стоящий аналогично. Но та машинка более громоздкая, работает от аккумуляторной батареи меньше (5-6 ч против 16) и имеет ряд других отличий. В идеальном варианте не помешает иметь в коллекции обе штуки, но на практике подобное мало кто себе позволит.
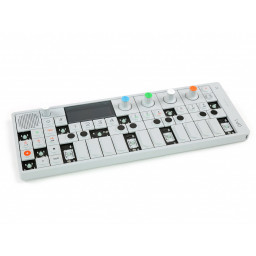
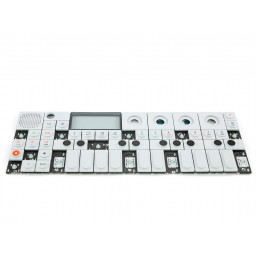
Форм-фактор школьного пенала позволяет носить такую штуку с собой в сумке постоянно. Речь о комплексном инструменте, сочетающем сэмплер, разнообразные синтезаторы, драм-машинку, MIDI-контроллер при подключении к ПК и т. д.
Присутствует множество неплохих эффектов, позволяющих настраивать каждый параметр, накладывать компрессор, реверберацию или эхо. Общее число видов синтеза – 10, а эффектов – 8, что здорово для продакшена вне дома.
Главный нюанс – это наличие всего четырёх дорожек, чего маловато в большинстве ситуаций. Но есть функция Loop-записи для живых выступлений, а один из треков может включать все партии ударных целиком. В качестве приятного бонуса предусмотрели FM-радио, которое можно прослушивать и сэмплировать для пополнения звуковой библиотеки.

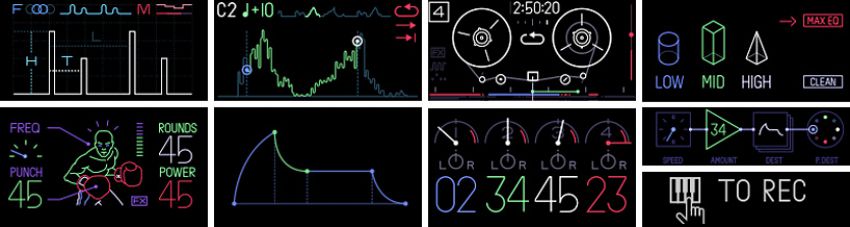
В отличие от OP-Z, экраном к которому выступает подключаемый смартфон или планшет, здесь присутствует высококачественный AMOLED-дисплей. Не каждый флагманский телефон может похвастаться подобным уровнем изображения. Управление интуитивно-понятное, навигация удобная, значение всех кнопок изучаешь буквально за день-два.
Запишу в минусы отсутствие чувствительности к нажатию на клавишах Piano Roll. Набивать на них мелодию допустимо, но параметр Sensitivity предстоит прописывать вручную. К счастью, подключение MIDI-клавиатуры работает на 100 %. Главный недостаток для большинства покупателей – это цена от 1500 до 1800 $ (зависит от страны и рынка) за новый экземпляр.
Едва ли получим замену ПК на все случаи жизни, но для Live-выступлений или музыкальных набросков лучшего варианта не найти. Компактность, эргономика и удачное сочетание функциональных элементов делают грувбокс качественным премиальным устройством для покупателей, способных себе это позволить. Владельцы могут делиться мнением в комментариях. Устраивают ли характеристики и качество сборки?
Подписывайтесь на наши каналы в Яндекс.Дзене и на YouTube! Копирование текстов с сайта GameNewsBlog.ru запрещено. Комментарии закрыты ввиду невозможности их модерации.

GNB-Gamer
Специально для вас, друзья, редакция MusicMag TV подготовила набор обучающих видеороликов по синтезатору Teenage Engineering OP-1 с русскими субтитрами! Ролики будут одинаково интересны как начинающим «наездникам» миниатюрного синтезатора, так и его опытным владельцам. Впрочем, тем кто интересуется этим инструментом и по какой-либо причине не может прийки к нам в салон и испытать его на себе наши видеоуроки тоже должны понравиться! Смотрим и наслаждаемся!
Ваш MusicMag.
Прочитано 3160 раз
Последнее изменение Суббота, 28 июня 2014 17:24
Добавить комментарий
Товар снят с производства!
Аналоги Teenage Engineering OP-1 Field, Teenage Engineering OP-Z
Teenage Engineering OP-1 сочетает в себе синтезатор, сэмплер и секвенсор. Он разработан и изготовлен стокгольмской компанией Teenage Engineering. OP-1 стал их первым продуктом и был выпущен в 2011 году. И сегодня он остается одним из самых популярных их продуктов.
OP-1 хорошо известен своей нетрадиционной конструкцией, дисплеем OLED и оснащенностью несколькими звуковыми движками.
OP-1 включает в себя восемь синтезаторных движков. Для каждого движка он предлагает четыре регулятора, которые действуют как различные макроконтроллеры. В дополнение к семплеру, OP-1 оснащен предзагруженными семплами ударных.
Драйверы:
Скачать с официального сайта производителя
- Teenage Engineering
- Клавиши Teenage Engineering
- Синтезаторы Teenage Engineering
Файлы для скачивания
- Инструкция для Teenage Engineering OP-1 (англ.) (PDF 2 Мб 213 Кб)