Руководство пользователя TC HELICON Play Accoustic
Play Acoustic Начало работы
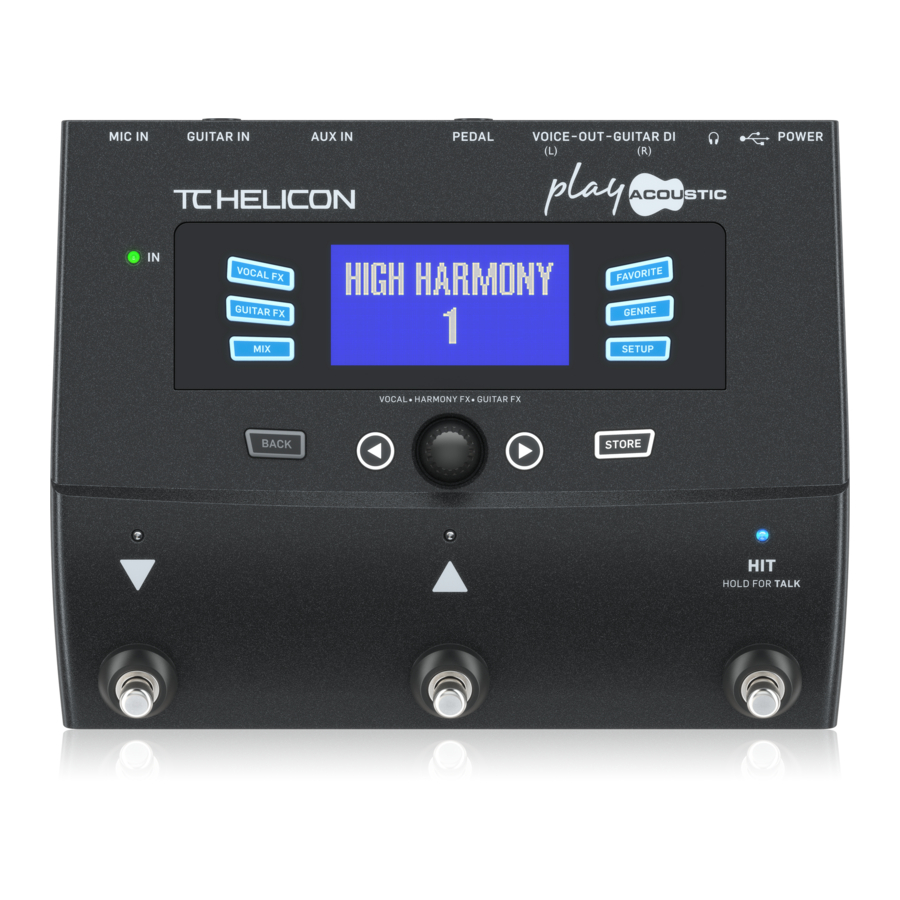
Шаг 1: Начиная


- Выбрать предустановки
- Нажмите Favorite, чтобы добавить ваш пресет в любимый жанр.
- Нажмите GENRE для сортировки по стилю, эффекту или избранному.
- Нажмите VOCAL FX, чтобы отредактировать предустановленный звук вокала.
- В меню FX эти кнопки выбирают параметр для редактирования.
- Дважды нажмите STORE, чтобы сохранить отредактированный пресет.
- Play Acoustic обнаружит ключевую информацию со встроенного микрофона, акустической гитары или входа Aux и выберет соответствующие гармонии.
- Подключитесь к компьютеру для обновления прошивки и поддержки
- Войти musictribe.com скачать полное руководство
Часто задаваемые вопросы
- Как выбрать микрофон MP-75 или конденсаторный?
Нажмите «Настройка» и используйте стрелки влево или вправо, чтобы перейти на экран ввода. Нажмите программную кнопку рядом с надписью «Вход» и с помощью ручки управления выберите микрофон. - Как переключаться между моно и стерео?
Нажмите «Настройка» и используйте стрелки влево или вправо, чтобы перейти к экрану вывода. Нажмите программную кнопку рядом с надписью «Выход» и с помощью ручки управления измените настройку выхода. - Могу ли я отменить вокал в смешанной песне?
Нажмите «Настройка» и используйте стрелки влево или вправо, чтобы перейти к экрану вывода.
Нажмите программную кнопку рядом с Vocal Cancel и используйте ручку управления, чтобы включить эту функцию. Эта настройка отлично подходит для того, чтобы подпевать! - Как сделать петли?
Найдите понравившийся пресет. Одновременно удерживайте педальные переключатели Up и Down в течение 1 секунды, чтобы войти в режим Loop. На дисплее отобразится переназначенное расположение педального переключателя. Нажмите педальный переключатель Record / Play на сильную долю и запишите короткую фразу. Коснитесь его еще раз, чтобы зациклить эту фразу. Нажмите еще раз, чтобы наложить на первую фразу. Нажмите и удерживайте педаль для отмены / возврата. Средний ножной переключатель предназначен для остановки воспроизведения и очистки. Вы можете использовать педальный переключатель Exit для поиска других пресетов во время воспроизведения или записи петли. - Могу я Заставить мое вокальное эхо приземлиться на битах песен?
Да! Удерживайте педальные переключатели Up и Hit в течение 1 секунды, чтобы войти в режим Tap Tempo. Нажмите педальный переключатель Hit на пару битов песни. Вы также можете использовать педальные переключатели Up и Down для обрезки
BPM (ударов в минуту) до точного числа. Экран Tap Tempo исчезнет автоматически. - Как установить тональность Harmony + Hardtune стоя?
Нажмите кнопку Setup, затем используйте стрелки влево или вправо, чтобы найти элемент управления функцией Up / Dn. Поверните ручку управления и измените ее на «Set Key». Нажмите Exit. Теперь вы можете удерживать педальные переключатели Up и Down, чтобы войти в режим настройки клавиш. Установите тональность и масштаб с помощью ножных переключателей, а затем дайте экрану выйти автоматически. - Могу ли я получить доступ к дополнительным параметрам эффектов?
Некоторые эффекты, такие как Delay и Harmony, имеют дополнительную страницу, которой вы можете управлять. Удерживайте любую из кнопок, когда вы находитесь на экране редактирования эффекта, чтобы получить доступ к дополнительным элементам управления. Если ничего не происходит, нет никаких дополнительных настроек для этого конкретного эффекта или стиля. Нажмите Назад, чтобы вернуться на исходную страницу редактирования. - Что мне помогает Roomsense?
VoiceLive Play имеет конденсаторные стереомикрофоны, встроенные по бокам корпуса, которые мы называем «RoomSense». Есть три функции, которые вы можете выбрать, нажав кнопку «Настройка» и отрегулировав параметр RoomSense:- Ambient: Микширует окружающий звук комнаты на наушники и USB-выход. Установите уровень RoomSense на экране Mix.
- Авто ключ: Любая музыка, которую может слышать RoomSense, используется для автоматической настройки параметров Harmony и HardTune. Убедитесь, что музыка звучит громче или ближе к RoomSense, чем вы, певец.
- Вокал: RoomSense заменяет микрофонный вход XLR. Это отлично подходит для прослушивания пресетов и тренировки без использования портативного микрофона. Эта функция работает только с выходами для наушников и USB.
Примечание: RoomSense недоступен, когда устройство подключено к входу Aux.
Опции
ОТКАЗ ОТ ОТВЕТСТВЕННОСТИ
Music Tribe не несет ответственности за любые убытки, которые может понести любое лицо, полностью или частично полагающееся на любое описание, фотографию или заявление, содержащееся в данном документе. Технические характеристики, внешний вид и другая информация могут быть изменены без предварительного уведомления. Все торговые марки являются собственностью их соответствующих владельцев. Midas, Klark Teknik, Lab Gruppen, Lake, Tannoy,
Turbosound, TC Electronic, TC Helicon, Behringer, Bugera, Oberheim, Auratone и Coolaudioare товарные знаки или зарегистрированные товарные знаки Music Tribe Global Brands Ltd. © Music Tribe Global Brands Ltd. 2021 Все права защищены.
ОГРАНИЧЕННАЯ ГАРАНТИЯ
Чтобы ознакомиться с применимыми условиями гарантии и дополнительной информацией об Ограниченной гарантии Music Tribe, пожалуйста, ознакомьтесь с подробной информацией на сайте musictribe.com/гарантия
ИНФОРМАЦИЯ О СОБЛЮДЕНИИ ФЕДЕРАЛЬНОЙ КОМИССИИ СВЯЗИ
ТЦ Геликон
Играть на акустике
Имя ответственной стороны: Music Tribe Commercial NV Inc.
Адрес: 5270 Procyon Street, Лас-Вегас, NV 89118, США
Номер телефона: + 1 702 800 8290
Играть на акустике
Это оборудование было протестировано и признано соответствующим ограничениям для цифровых устройств класса B в соответствии с частью 15 правил FCC. Эти ограничения разработаны для обеспечения разумной защиты от вредных помех при установке в жилых помещениях. Это оборудование генерирует, использует и может излучать радиочастотную энергию и, если оно установлено и используется не в соответствии с инструкциями, может создавать вредные помехи для радиосвязи. Однако нет гарантии, что помехи не возникнут при конкретной установке. Если это оборудование действительно создает недопустимые помехи для приема радио или телевидения, что можно определить путем включения и выключения оборудования, пользователю рекомендуется попытаться устранить помехи одним или несколькими из следующих способов:
- Изменить ориентацию или местоположение приемной антенны.
- Увеличьте расстояние между оборудованием и приемником.
- Подключить оборудование к розетке в цепи, отличной от той, к которой подключен приемник.
- Обратитесь за помощью к дилеру или опытному радио / телевизионному технику.
Это устройство соответствует части 15 правил FCC. Эксплуатация возможна при соблюдении следующих двух условий:
- это устройство не должно вызывать вредных помех, и
- это устройство должно принимать любые помехи, включая помехи, которые могут вызвать сбои в работе.
Важная информация:
Изменения или модификации оборудования, явно не одобренные Music Tribe
может лишить пользователя права использовать оборудование.
Рабочая температура окружающей среды до 45 ° C.
Настоящим Music Tribe заявляет, что этот продукт соответствует Директиве 2014/35 / EU, Директиве 2014/30 / EU, Директиве 2011/65 / EU и поправке 2015/863 / EU, Директиве 2012/19 / EU, Положению 519 /. 2012 REACH SVHC и Директива 1907/2006 / EC.
Полный текст DoC ЕС доступен по адресу https://community.musictribe.com/
Представитель в ЕС: Music Tribe Brands DK A / S
Адрес: Ib Spang Olsens Gade 17, DK — 8200 Aarhus N, Дания

Документы / Ресурсы
 |
TC HELICON Play Акустика [pdf] Руководство пользователя 3-кнопочный стомпбокс эффектов для вокала и акустической гитары с BodyRez и Looping, Play Accoustic |
Рекомендации
-
0 ₽ 0 товаров
Каталог инструкций по эксплуатации на русском языке
В нашем каталоге более 90.000 инструкций по эксплуатации и руководств пользователя на русском языке к бытовой технике и электронике. Чтобы скачать инструкцию по эксплуатации выберите интересую вас категорию или воспользуйтесь поиском в верхнем правом углу сайта.
-
Contents
-
Table of Contents
-
Troubleshooting
-
Bookmarks
Quick Links
Related Manuals for TC-Helicon Play Acoustic
Summary of Contents for TC-Helicon Play Acoustic
-
Page 1
English Manual… -
Page 2: Table Of Contents
Guitar Anti-Feedback page (7/7) to a PA Notch Filter section Stereo PA and TC-Helicon Simple steps for feedback reduction Guitar & Headphone cable Product Play Acoustic Product (firmware) version Document Reference manual Document version / date 2014-07-16 Play Acoustic – Reference manual (2014-07-16)
-
Page 3: Important Safety Instructions
Important safety instructions Important safety instructions Play Acoustic – Reference manual (2014-07-16)
-
Page 4
When a cart is used, use caution when moving the cart/apparatus combination to avoid injury from tip-over. 13. Unplug this apparatus during lightning storms or when unused for long periods of time. Play Acoustic – Reference manual (2014-07-16) -
Page 5
Connect the equipment into an outlet on a cir- ► cuit different from that to which the receiver is connected. Consult the dealer or an experienced ra- ► dio / TV technician for help. Play Acoustic – Reference manual (2014-07-16) -
Page 6: Before You Begin
Before you begin Before you begin Play Acoustic – Reference manual (2014-07-16)
-
Page 7: About This Manual
Please register your Play Acoustic This manual will help you understand and oper- If you still have questions after reading this ref- To register your Play Acoustic using the Voice- ate your Play Acoustic. erence manual, please read the FAQs, visit the…
-
Page 8: Introduction
Introduction Introduction Play Acoustic – Reference manual (2014-07-16)
-
Page 9: Diagram Legend
Read the… full manual. And if you ever find yourself without this manual: Power Input 1/8 inch jack GRND Lift On the bottom of your Play Acoustic , you will USB Type A Power Input 1/8 inch jack GRND Lift…
-
Page 10: Diagrams
There are a few things we would like you to keep in mind as you look at the diagrams: 1. Inputs to Play Acoustic will be to the left of the back panel image. 2. Outputs from Play Acoustic will be to the right of the back panel image.
-
Page 11: Basics
Basics Basics Play Acoustic – Reference manual (2014-07-16)
-
Page 12: Inputs And Outputs
Connectors are described from right to left. For setup examples, see “Connection diagrams”. Use a 1/8” cable to connect any music source you want to use to your Play Acoustic (especially that 8-Track from your 1974 Comet). When an in- MIC connector…
-
Page 13
Connect the included power supply. Your Play Acoustic will power up immediately. Always use a TC-Helicon power supply (12 V, 400 mA). Using any other power supply may damage the unit and will void your warranty. Play Acoustic – Reference manual (2014-07-16) -
Page 14: Gain Settings
Presets concept is explained in “What are pre- Level Meter Works you’ve got powerful lungs! sets?”. The LED on the top of your Play Acoustic is used Preset Number for both vocal and guitar level metering. The unique preset number – i.e., the number of When setting the level for your microphone the slot where the preset is stored.
-
Page 15
If you have set the Genre selector to any other value than “All”, the currently selected genre is shown in the upper left corner of the display. In the screen shot above, it is “Harmony“. Play Acoustic – Reference manual (2014-07-16) -
Page 16: Switches And Operation
If you have a guitar plugged into the GUITAR IN, following functions: you will enter TALK/Tuner mode, activating the STOP ► guitar tuner built into Play Acoustic. The guitar ERA (HOLD to erase) ► Play Acoustic – Reference manual (2014-07-16)
-
Page 17
TC-Helicon website: your music. If you connect a TC-Helicon Switch-3 (optional) support.tc-helicon.com/entries/ to the PEDAL connector of your Play Acoustic, 21051886-scale-chart-for-TC-helicon-products/ When you are finished, stop tapping, and the you can use it to control all Loop features. screen will “time out” back to the preset screen. -
Page 18: Control Knob And Arrow Buttons
Use the control knob to scroll through presets and to move through various settings in the Edit, What are presets? System or other menus. To use Play Acoustic effectively, you need to un- derstand the concept of Presets. Storing presets The arrow buttons act similarly, allowing you…
-
Page 19
Blue soft Button and use the control knob to select the destination number for the preset. Press store again to complete the process. If you change your mind and don’t want to save the changes, simply press BACK. Play Acoustic – Reference manual (2014-07-16) -
Page 20: Soft Buttons
To remove the current preset from your Favor- ► Vocal FX button There are six “soft” buttons on the Play Acoustic ites, press the FAVORITE button. – three on each side of the LC display. Press the Vocal FX button to open the Vocal FX To only browse your Favorite presets, press ►…
-
Page 21
Presets can be associated with multiple genres. Setup button Press the SETUP button to open the Setup menu, which controls the general functions of the device. This button is described in its own chapter: “Setup button/section” Play Acoustic – Reference manual (2014-07-16) -
Page 22: Connection Diagrams
Connection diagrams Connection diagrams Play Acoustic – Reference manual (2014-07-16)
-
Page 23: Mixer Setup
Connection diagrams Play Acoustic back panel inputs and outputs The following connection diagrams show you some common ways to hook up Play Acoustic. For basic information about audio inputs and outputs, see “Inputs and outputs”. Mixer setup For connection to your mixer or PA, check out this Craig’s Corner video:…
-
Page 24: Stereo (Or Mono) Vocals And Guitar
Stereo (or mono) vocals and guitar This diagram shows connections for both Stereo and Mono PA applications. If your Play Acoustic is set to Stereo, you’ll need to pan one channel left and the other channel right (or use a single Stereo channel) on your mixer.
-
Page 25: Mono Vocals And Guitar Amp
This configuration works well when you want to pass your guitar signals to an amplifier and your vocal signals to a mixer or powered PA speaker. PLAY ACOUSTIC Setup example: Mono vocals and acoustic guitar amp Play Acoustic – Reference manual (2014-07-16)
-
Page 26: Mono Vocal And Guitar With A Tc-Helicon Fx150
For additional control, you can opt to plug a mu- sic player into the Aux channel on the FX150, instead of Play Acoustic, giving you control of Vocals, Guitar and Aux independently. Signals will still be summed to mono at the output of the FX150.
-
Page 27: Mono Vocals Via Fx150 And A Guitar Amp
Mono vocals via FX150 and a guitar amp Here, you can send the vocal signals to an FX150 and guitar signals to an amplifier. FX150 Setup example: Mono vocals via FX150 and an acoustic guitar amp Play Acoustic – Reference manual (2014-07-16)
-
Page 28: Guitar And Vocals Via Fx150 And Stereo Out To A Pa
PA In this setup, you can use the Headphone Out from Play Acoustic to send Guitar, Vocal and Aux signals to your FX150 and send a stereo mix to the PA via the Play Acoustic XLR outputs.
-
Page 29: Stereo Pa And Tc-Helicon Guitar & Headphone Cable
Guitar & Headphone cable If you own our Guitar & Headphone cable (sold separately), you can use an external monitor send to the Aux in on Play Acoustic to create a headphone/IEM mix. PLAY ACOUSTIC Setup example: Stereo PA and guitar/headphone cable (not included)
-
Page 30: Setup Button/Section
Setup button/section Setup button/section Play Acoustic – Reference manual (2014-07-16)
-
Page 31: Input Page (1/7)
USB setting Sense microphones will also “listen” to musical available). Digital audio can be passed to Play Acoustic via information from the surrounding environment the USB port allowing you to send vocals from a (a single chord based instrument or even your HIT setting DAW to the unit for processing.
-
Page 32
The WARMTH NG setting is the same as due to you hearing both the corrected signal OFF setting NORM+WARMTH, but with the Gate function from Play Acoustic and your own voice (via bone No tone style is applied. removed. conduction in your noggin). The two sounds… -
Page 33: Output Page (2/7)
Setup button/section Output page (2/7) On setting Ear damage can occur quickly at high volumes, With the On setting, Play Acoustic will attempt to so be cautious when using headphones or in-ear remove lead vocals from a piece of music. monitors!
-
Page 34: System Page (3/7)
MP3 icon Switch-3 to the PEDAL connector of your crease the latency compensation amount. player. Play Acoustic, the default behavior of the UP/DN function changes from “Loop” to “Set Key.” Monitor setting Tune Reference parameter…
-
Page 35: System Page 2 (4/7)
Some artists sing more quietly than others, re- quiring the Mic Gain knob to be turned up quite far. To offset this, we have added a Mic Boost Play Acoustic – Reference manual (2014-07-16)
-
Page 36: Loop Page (5/7)
Most users find the default setting of 98% works well, but you may find a different setting that Off setting works best for you. Disables undo, freeing some memory for addi- tional looping. Play Acoustic – Reference manual (2014-07-16)
-
Page 37: Switch-3 Page (6/7)
Gtr Boost ► ► Button 2 stops recording/playback and can be Gtr Compressor Tip: If you prefer to have Play Acoustic up on a ► ► used to erase the loop (by holding). Gtr µMod music stand, you can use “Preset DN”, “Preset ►…
-
Page 38: Product Info Page (7/7)
The System Info page contains information about… the installed firmware version, ► serial number and ► manufacture date for your device. ► If you need to contact support, please have this information handy. See “Support resources”. Play Acoustic – Reference manual (2014-07-16)
-
Page 39: Vocal Fx Button/Section
Vocal FX button/section Vocal FX button/section Play Acoustic – Reference manual (2014-07-16)
-
Page 40
HIT button (or the button on a microphone supporting Mic Control) and will become active when the HIT button is lit. See the Setup section for instructions on how to activate Mic Control. Play Acoustic – Reference manual (2014-07-16) -
Page 41: Harmony Page (1/7)
GUITAR IN ► Oct Up & Lower and tracks playing via the Aux in, the system will ► +7 Semitones read key/scale information from the guitar. If the ► -5 Semitones ► Play Acoustic – Reference manual (2014-07-16)
-
Page 42: Harmony Advanced Page
“slide” between notes as you sing. The more Portamento you use, the more the Harmony voices will slide, instead of jump, from note to note. The 0 setting turns Portamento off. ► 100 is the maximum setting. ► Play Acoustic – Reference manual (2014-07-16)
-
Page 43: Double Page (2/7)
Loose tim- ing can feel “larger” or more effected. Level parameter Use the Level parameter to control the overall level of the doubling effect. Press the right upper Play Acoustic – Reference manual (2014-07-16)
-
Page 44: Delay Page (3/7)
Multitap 4 ► Multitap 5 ► Multitap 6 ► Classic Slap ► Set Time ► Level parameter Use the Level parameter to control the overall level of the delay effect. Press the right upper Play Acoustic – Reference manual (2014-07-16)
-
Page 45: Delay Advanced Page
“taps” sound the same. Some delay filter are cumulative – e.g. “analog” where processing is applied throughout the feedback loop, which changes the sound of the delay over time. Play Acoustic – Reference manual (2014-07-16)
-
Page 46: Reverb Page (4/7)
Snappy Room ► Library ► Dark Room ► Music Club ► Studio Room ► Warehouse ► Bouncy Room ► Cozy Corner ► Bright Chamber ► Wooden Chamber ► St. Joseph Church ► Dome Chapel ► Play Acoustic – Reference manual (2014-07-16)
-
Page 47: Hardtune Page (5/7)
Shift parameter Use the Shift parameter to shift the note you are singing up or down by one or more semi-tones. You can shift your voice up or down by up to 36 semitones. Play Acoustic – Reference manual (2014-07-16)
-
Page 48: Transducer Page (6/7)
Use the Filter parameter to apply an EQ filter that will make the Transducer sound “thinner” or more “muddy”, depending on the preset. Thinner filter settings sound more like a radio or walkie- talkie. Play Acoustic – Reference manual (2014-07-16)
-
Page 49: Transducer Advanced Page
Raising the threshold will cause the effect to “kick in” at a higher input volume, which can help avoid feedback while you are not singing. Play Acoustic – Reference manual (2014-07-16)
-
Page 50: Μmod Page (7/7)
Flange Feedback ► Flange Negative ► Mono Flange ► Soft Flange ► Tube ► Up Tube ► Down Tube ► Down & Up Tube ► Rise and Fall ► Auto Wah ► Underwater ► Play Acoustic – Reference manual (2014-07-16)
-
Page 51: Guitar Fx Button/Section
Guitar FX button/section Guitar FX button/section Play Acoustic – Reference manual (2014-07-16)
-
Page 52
Guitar effects are handled in the same way as vocal effects – see “Vocal FX button/section”. Guitar sounds in Play Acoustic are global – meaning you only need to adjust them once. As you change presets, your guitar sound will re- main the same. -
Page 53: Guitar Reverb Page (1/7)
Amsterdam Hall ► Broadway Hall ► Pre Delay parameter Snappy Room ► Library Use the Pre Dly (“Pre Delay”) parameter to define ► Dark Room the time until the reverb tail sets in. ► Play Acoustic – Reference manual (2014-07-16)
-
Page 54: Guitar Μmod Page (2/7)
Use the Mix parameter to controls the overall level of the µMod effect. Speed parameter Use the Speed parameter to adjust the speed at which “oscillation” or modulation occurs within the effect. Slower speeds often result in more noticeable effects. Play Acoustic – Reference manual (2014-07-16)
-
Page 55: Bodyrez Eq Page (3/7)
Guitar FX button/section BodyRez EQ page (3/7) Low Gain parameter Use the Low Gain parameter to control the Exclusive to Play Acoustic, BodyRez combines “bass” range of frequencies within the BodyRez equalization, compression and ambience to give style. your guitar mounted pickup a more natural “mic’d in a room”…
-
Page 56: Bodyrez Shelf Eq Page (4/7)
“make up” reduced gain to maintain your output signal level. Makeup gain allows you keep your signal levels consistent from the input of the Compressor to the output. Play Acoustic – Reference manual (2014-07-16)
-
Page 57
The Ambience section of the BodyRez effect block utilizes timing variances to emulate body resonance from your acoustic guitar. Use the Amount parameter to set the amount of Ambi- ence applied to the signal. Play Acoustic – Reference manual (2014-07-16) -
Page 58: Guitar Anti-Feedback Page (7/7)
“feeling” which string vibrates unusually under your finger. After you have selected that particular string/ note using the Freq parameter, you can use the Gain parameter to reduce feedback for that note. Play Acoustic – Reference manual (2014-07-16)
-
Page 59: Mix Button/Section
Mix button/section Mix button/section Play Acoustic – Reference manual (2014-07-16)
-
Page 60: Mix Page (1/2)
Use the Out Level parameter to control the over- If you prefer to only hear the Aux input over your all output level of your Play Acoustic. headphones, go to the Setup/Output menu and change “Aux to Main Out” to OFF.
-
Page 61: Mix Page (2/2)
DAW. The track controls within the DAW it- self will determine the output level (and therefore the Play Acoustic USB input level). USB Out Level parameter Use the USB Out Level parameter to control the level of the audio signal sent over USB.
-
Page 62: The Looper
The Looper The Looper Play Acoustic – Reference manual (2014-07-16)
-
Page 63: What Is Looping
► Basic looping concepts to record an overdub (another part) onto the Most loopers – including the one in Play Acoustic initial recording. You can overdub as many – are built around a few basic controls: Record, times as you want to.
-
Page 64: Looping Tips
4. At the end of the chord progression, press and do it again. You can also use Undo and REC again. Play Acoustic will immediately be- Redo creatively for a part/track that you would When it comes to looping, practice is the key!
-
Page 65: Using A Switch-3 For Looping
Play Acoustic. When the Switch-3 is unplugged, the DOWN and UP footswitches revert to whatever the UP/DN setting was prior to connecting the Switch-3. For more info on Switch-3, check out: tc-helicon.com/products/switch-3/ Play Acoustic – Reference manual (2014-07-16)
-
Page 66: Troubleshooting
Troubleshooting Troubleshooting Play Acoustic – Reference manual (2014-07-16)
-
Page 67: General Troubleshooting
Back up your custom presets and setup data ► If you are using an MP3 player to sing along via VoiceSupport. ► with tracks, set the AUX IN TYPE parameter in the Setup Menu to TRACKS. Some tracks Play Acoustic – Reference manual (2014-07-16)
-
Page 68: Appendix
Appendix Appendix Play Acoustic – Reference manual (2014-07-16)
-
Page 69: Tc-Helicon Scales Reference Chart
Min 1 3rd (High/Lower) Min 1 5th (Higher/Low) Min 2 3rd (High/Lower) Min 2 5th (Higher/Low) Min 3 3rd (High/Lower) Min 3 5th (Higher/Low) Highlighted cells show differences between scales. “nc” = no change Play Acoustic – Reference manual (2014-07-16)
-
Page 70: Links
Links Links Play Acoustic – Reference manual (2014-07-16)
-
Page 71
► answer. Twitter: ► TC-Helicon Support: twitter.com/tchelicon ► tc-helicon.com/support/ YouTube: ► TC-Helicon user forum: youtube.com/tchelicon ► support.tc-helicon.com/categories/ 20073491-User-Forum/ TC-Helicon Play Series forum: ► support.tc-helicon.com/forums/ 21577876-Play-Series/ TC-Helicon warranty information: ► tc-helicon.com/support/warranty/ Play Acoustic – Reference manual (2014-07-16) -
Page 72: Technical Specifications
Technical specifications Technical specifications Play Acoustic – Reference manual (2014-07-16)
-
Page 73
Mic Input Level @ 0 dBFS -42 dBu to +13 dBu EIN @ Max Mic Gain Rg = 150 Ohm -127 dBu Mic SNR > 104 dB Phantom Power +48 V (on/off via Setup menu) Aux Input Level @ 0 dBu +2 dBu Play Acoustic – Reference manual (2014-07-16) -
Page 74
Safety – certified to IEC 65, EN 60065, UL6500 and CSA IEC 65, EN 60065, UL6500 and CSA Operating Requirements Operating Temperature 32° F to 122° F (0° C to 50° C) Storage Temperature -22° F to 167° F (-30° C to 70° C) Humidity Max. 90 % non-condensing Play Acoustic – Reference manual (2014-07-16) -
Page 75
Technical specifications Play Acoustic – Reference manual (2014-07-16)
Посмотреть инструкция для TC Helicon Play Acoustic бесплатно. Руководство относится к категории hi-fi системы, 9 человек(а) дали ему среднюю оценку 8. Руководство доступно на следующих языках: английский. У вас есть вопрос о TC Helicon Play Acoustic или вам нужна помощь? Задайте свой вопрос здесь
TC Helicon Play Acoustic — это процессор эффектов, предназначенный для использования на концертах и в студиях. Он обеспечивает разрядность звука 24 бита, а также имеет такие эффекты, как задержка, плавание, панирование и транс. Кроме того, у него есть выход AUX и выход для наушников. Этот процессор потребляет 14 Вт энергии. Он имеет ширину в 200 мм, глубину в 156 мм и высоту в 45 мм, а его вес составляет 1000 грамм.
TC Helicon Play Acoustic – это надежный и долговечный процессор, изготовленный из качественных материалов. Он способен обеспечивать глубокий и мощный бас, что делает его идеальным для использования в автомобилях. Благодаря оптимальному местоположению каждой модели автомобиля, этот процессор обеспечивает высокую производительность в любых условиях. Он не только легко монтируется, но и предоставляет простую и удобную работу при использовании. С использованием широкой гаммы эффектов в настройках, TC Helicon Play Acoustic дает возможность настраивать звук под свои потребности, делая его незаменимым инструментом для профессиональных музыкантов и звукорежиссеров.
Главная
| TC Helicon | |
| Play Acoustic | TC-HELICON PLAY ACOUSTIC | |
| hi-fi система | |
| английский | |
| Руководство пользователя (PDF), Краткое руководство пользователя (PDF) |
Технические характеристики
| Тип | Процессор эффектов |
| Назначение | Концерт/студия |
| Цвет товара | Черный |
| Cкорость передачи данных | 24 бит |
| Диапазон частот | 20 — 20000 Hz |
| Эффекты | Delay, Flanger, Pan, Trans |
Порты и интерфейсы
| AUX выход | Да |
| Выход для наушников | Да |
Энергопитание
| Потребляемая мощность (в обычном режиме) | 14 W |
| Входящее напряжение сети | 100-240 V |
| Частота входящего переменного тока | 50 — 60 Hz |
Вес и размеры
| Ширина | 200 mm |
| Глубина | 156 mm |
| Высота | 45 mm |
| Вес | 1000 g |
Содержимое упаковки
| Поставляемые кабели | USB |
| Краткая инструкция пользователя | Да |
показать больше
Не можете найти ответ на свой вопрос в руководстве? Вы можете найти ответ на свой вопрос ниже, в разделе часто задаваемых вопросов о TC Helicon Play Acoustic.
Какой вес TC Helicon Play Acoustic?
TC Helicon Play Acoustic имеет вес 1000 g.
Когда звук считается слишком громким?
Уровень звука выше 80 децибел может нанести вред слуху. Уровень звука выше 120 децибел может нанести прямое повреждение слуху. Вероятность повреждения слуха зависит от частоты и продолжительности прослушивания.
Могут ли устройства разных марок подключаться друг к другу при помощи Bluetooth?
Да, Bluetooth — универсальный метод, позволяющий различным устройствам, оснащенным Bluetooth, подключаться друг к другу.
Что такое Bluetooth?
Bluetooth — это способ обмена данными по беспроводной сети между электронными устройствами с помощью радиоволн. Расстояние между двумя устройствами обменивающимися данными в большинстве случаев составляет не более десяти метров.
Что такое HDMI?
HDMI расшифровывается как «интерфейс для мультимедиа высокой четкости». Кабель HDMI используется для передачи аудио- и видеосигналов между устройствами.
Как лучше всего выполнять чистку hi-fi система?
Для удаления отпечатков пальцев лучше всего использовать слегка влажную салфетку для уборки или мягкую чистую ткань. Пыль в труднодоступных местах лучше всего удаляется потоком сжатого воздуха.
Что такое Dolby Atmos?
Dolby Atmos — это технология, которая обеспечивает отражение звука от потолка к месту нахождения слушателя. Это позволяет создать эффект 5.1 при помощи всего лишь одного динамика.
Какая высота TC Helicon Play Acoustic?
TC Helicon Play Acoustic имеет высоту 45 mm.
Какая ширина TC Helicon Play Acoustic?
TC Helicon Play Acoustic имеет ширину 200 mm.
Какая толщина TC Helicon Play Acoustic?
TC Helicon Play Acoustic имеет толщину 156 mm.
Инструкция TC Helicon Play Acoustic доступно в русский?
К сожалению, у нас нет руководства для TC Helicon Play Acoustic, доступного в русский. Это руководство доступно в английский.
Не нашли свой вопрос? Задайте свой вопрос здесь
-
TC Helicon Play Acoustic — page 1
…
-
TC Helicon Play Acoustic — page 2
…
-
TC Helicon Play Acoustic — page 3
…
-
TC Helicon Play Acoustic — page 4
…
-
TC Helicon Play Acoustic — page 5
…
-
TC Helicon Play Acoustic — page 6
…
-
TC Helicon Play Acoustic — page 7
…
-
TC Helicon Play Acoustic — page 8
…
-
TC Helicon Play Acoustic — page 9
…
-
TC Helicon Play Acoustic — page 10
…
-
TC Helicon Play Acoustic — page 11
…
-
TC Helicon Play Acoustic — page 12
…
-
TC Helicon Play Acoustic — page 13
…
-
TC Helicon Play Acoustic — page 14
…
-
TC Helicon Play Acoustic — page 15
…
-
TC Helicon Play Acoustic — page 16
…
-
TC Helicon Play Acoustic — page 17
…
-
TC Helicon Play Acoustic — page 18
…
-
TC Helicon Play Acoustic — page 19
…
-
TC Helicon Play Acoustic — page 20
…
-
TC Helicon Play Acoustic — page 21
…
-
TC Helicon Play Acoustic — page 22
…
-
TC Helicon Play Acoustic — page 23
…
-
TC Helicon Play Acoustic — page 24
…
-
TC Helicon Play Acoustic — page 25
…
-
TC Helicon Play Acoustic — page 26
…
-
TC Helicon Play Acoustic — page 27
…
-
TC Helicon Play Acoustic — page 28
…
-
TC Helicon Play Acoustic — page 29
…
-
TC Helicon Play Acoustic — page 30
…
-
TC Helicon Play Acoustic — page 31
…
-
TC Helicon Play Acoustic — page 32
…
-
TC Helicon Play Acoustic — page 33
…
-
TC Helicon Play Acoustic — page 34
…
-
TC Helicon Play Acoustic — page 35
…
-
TC Helicon Play Acoustic — page 36
…
-
TC Helicon Play Acoustic — page 37
…
-
TC Helicon Play Acoustic — page 38
…
-
TC Helicon Play Acoustic — page 39
…
-
TC Helicon Play Acoustic — page 40
…
-
TC Helicon Play Acoustic — page 41
…
-
TC Helicon Play Acoustic — page 42
…
-
TC Helicon Play Acoustic — page 43
…
-
TC Helicon Play Acoustic — page 44
…
-
TC Helicon Play Acoustic — page 45
…
-
TC Helicon Play Acoustic — page 46
…
-
TC Helicon Play Acoustic — page 47
…
-
TC Helicon Play Acoustic — page 48
…
-
TC Helicon Play Acoustic — page 49
…
-
TC Helicon Play Acoustic — page 50
…
-
TC Helicon Play Acoustic — page 51
…
-
TC Helicon Play Acoustic — page 52
…
-
TC Helicon Play Acoustic — page 53
…
-
TC Helicon Play Acoustic — page 54
…
-
TC Helicon Play Acoustic — page 55
…
-
TC Helicon Play Acoustic — page 56
…
-
TC Helicon Play Acoustic — page 57
…
-
TC Helicon Play Acoustic — page 58
…
-
TC Helicon Play Acoustic — page 59
…
-
TC Helicon Play Acoustic — page 60
…
-
TC Helicon Play Acoustic — page 61
…
-
TC Helicon Play Acoustic — page 62
…
-
TC Helicon Play Acoustic — page 63
…
-
TC Helicon Play Acoustic — page 64
…
-
TC Helicon Play Acoustic — page 65
…
-
TC Helicon Play Acoustic — page 66
…
-
TC Helicon Play Acoustic — page 67
…
-
TC Helicon Play Acoustic — page 68
…
-
TC Helicon Play Acoustic — page 69
…
-
TC Helicon Play Acoustic — page 70
…
-
TC Helicon Play Acoustic — page 71
…
-
TC Helicon Play Acoustic — page 72
…
-
TC Helicon Play Acoustic — page 73
…
-
TC Helicon Play Acoustic — page 74
…
-
TC Helicon Play Acoustic — page 75
…
-
TC Helicon Play Acoustic — page 76
…
-
TC Helicon Play Acoustic — page 77
…
-
TC Helicon Play Acoustic — page 78
…
-
TC Helicon Play Acoustic — page 79
…
-
TC Helicon Play Acoustic — page 80
…
-
TC Helicon Play Acoustic — page 81
…