- 2019
Android как экосистема и платформа продемонстрировали огромные возможности, и это одна из причин, по которой сотни приложений пытаются решить одну и ту же проблему уникальным способом. Эта открытость и универсальность открывают огромные возможности для разработчиков приложений. Но это не всегда так, обширный каталог приложений препятствует обнаружению приложений, и поэтому иногда мы можем оказаться в ситуации, когда мы не найдем решения в виде приложения. Это где приложения автоматизации, такие как Tasker, вступают в игру.
Не было бы ошибкой называть Tasker Зевсом всех приложений автоматизации в Play Store. Проще говоря, Tasker похож на приложение IFTT на стероидах с множеством дополнительных функций.
Почему специальный учебник по такому популярному приложению?
Ответ на этот вопрос « Сложность »; Хотя Tasker, безусловно, является лучшим приложением для изучения того, насколько умным может стать ваш смартфон, оно никогда не считается самым удобным и интуитивно понятным. Tasker печально известен своей сложностью, и да, требуется время, чтобы привыкнуть к его огромному интерфейсу. И большинство усыновителей уходят на полпути из-за того, насколько пугающим может быть его правильная настройка. Даже одна небольшая неправильная конфигурация может привести к неожиданным результатам. Кроме того, сам веб-сайт Tasker не очень помогает в обучении основам его использования. В этой статье мы рассмотрим все основные элементы Tasker и подробно объясним, что делает каждый компонент. Мы также рассмотрим некоторые причины, по которым иногда Tasker может не работать.
Tasker: распад
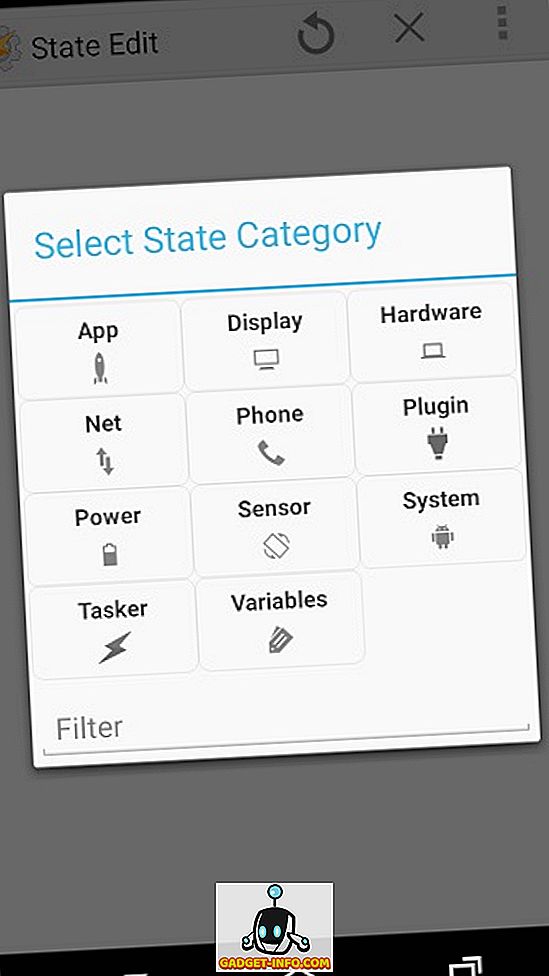
Приложение Tasker можно разбить на 6 основных компонентов
- Задачи — это можно назвать списком действий, которые устройство выполняет в определенный момент времени.
- Профили — это список задач, которые система выполняет в зависимости от контекста.
- Контексты –Контексы предоставляют данные (время, местоположение, связность) для запуска определенного профиля.
- Плагины — готовые решения других разработчиков для расширения функциональности Tasker, которые также могут быть объединены в цепочки с вашими собственными профилями.
- Рецепты — Рецепты — это профили или настройки автоматизации, которыми пользователи Tasker могут поделиться друг с другом, которые другие могут импортировать прямо в приложение.
- Сцены — Пользовательские элементы пользовательского интерфейса, с которыми вы можете взаимодействовать.
Tasker можно рассматривать как клей, который связывает возможности всех ваших приложений и аппаратное обеспечение вашего устройства для создания удивительных впечатлений. Есть бесконечные возможности, в которых вы можете экспериментировать с Tasker, чтобы создавать удивительные решения. Но для объяснения мы сосредоточимся на базовом и используем его, чтобы глубже погрузиться в приложение
Создание вашего первого профиля Tasker
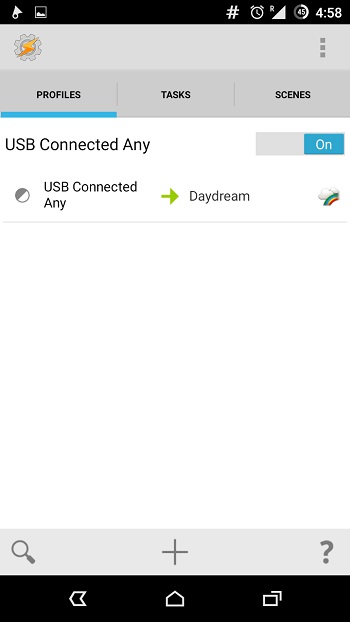
В этом разделе мы учтем все условия, с которыми мы столкнулись, чтобы создать наш собственный профиль, который запускает режим Daydream, когда вы переводите свой телефон на зарядку .
Для тех, кто не знает, режим Daydream позволяет вам устанавливать заставки, которые отображают фотографии, красочные фоны и многое другое, когда ваше устройство заряжается или пристыковано.
Если на вашем Android-устройстве еще нет приложения Tasker, установите его отсюда . Он предлагает 7-дневную пробную версию, которую вы можете попробовать, прежде чем выбрать платную версию приложения.
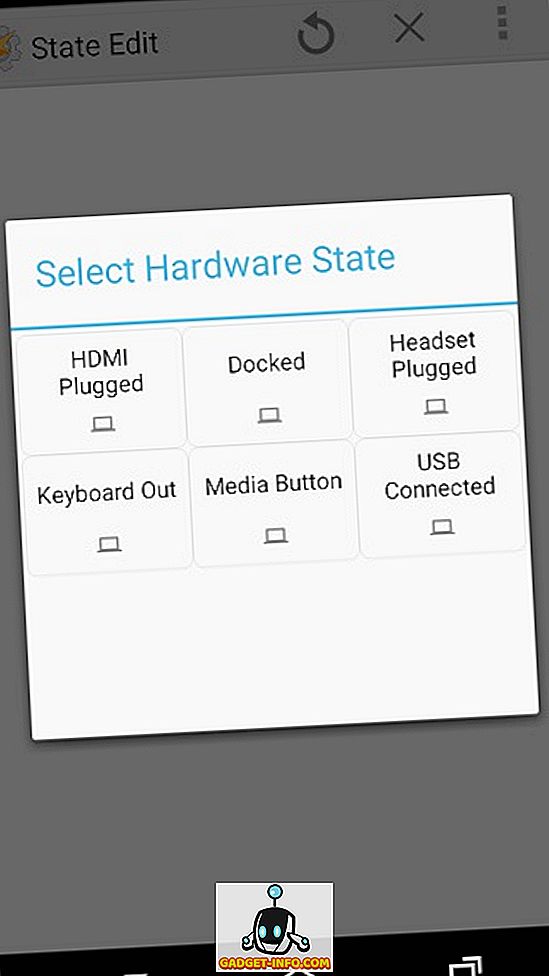
- Нажмите кнопку + в профилях

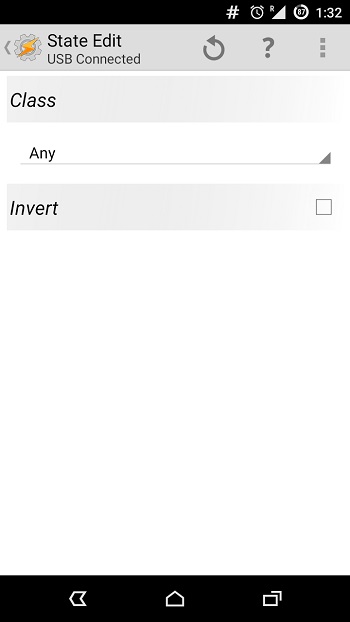
- Нажмите на состояние
Здесь мы определим наш контекст, который будет активировать профиль.
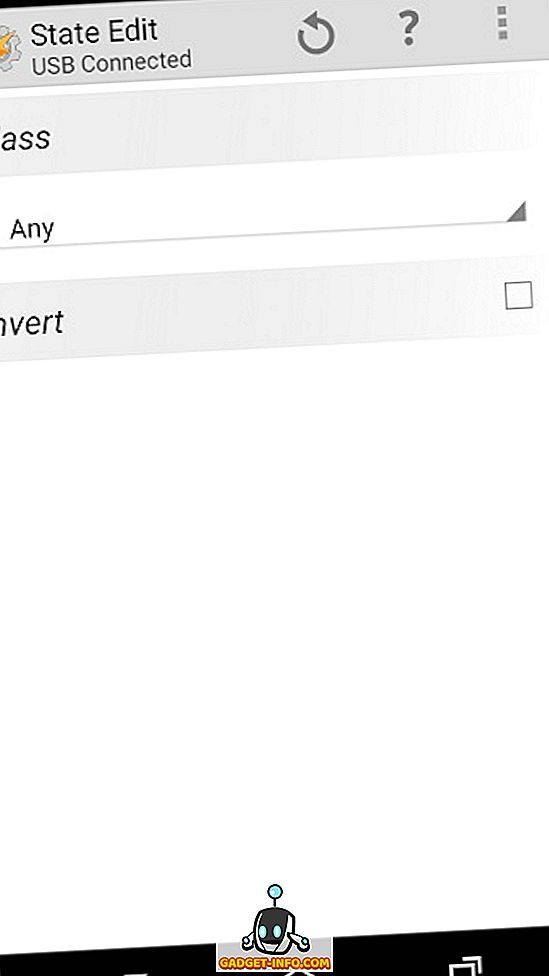
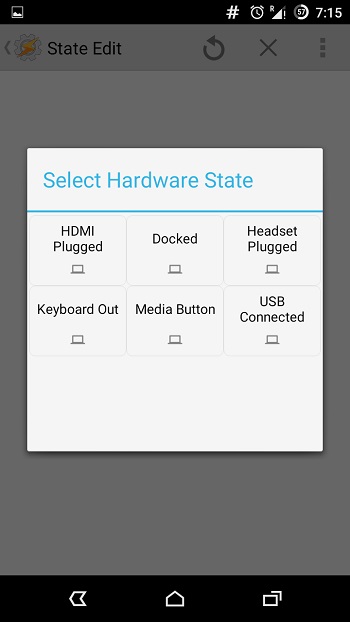
- Нажмите на оборудование, а затем нажмите на USB-подключение
- Вернитесь на главный экран приложения, нажав кнопку «Назад».
Теперь мы определим нашу задачу .
- Вам будет предложено создать новое задание, создать его и назвать его, здесь мы назовем его Daydream
- Нажмите кнопку +, чтобы добавить Действия
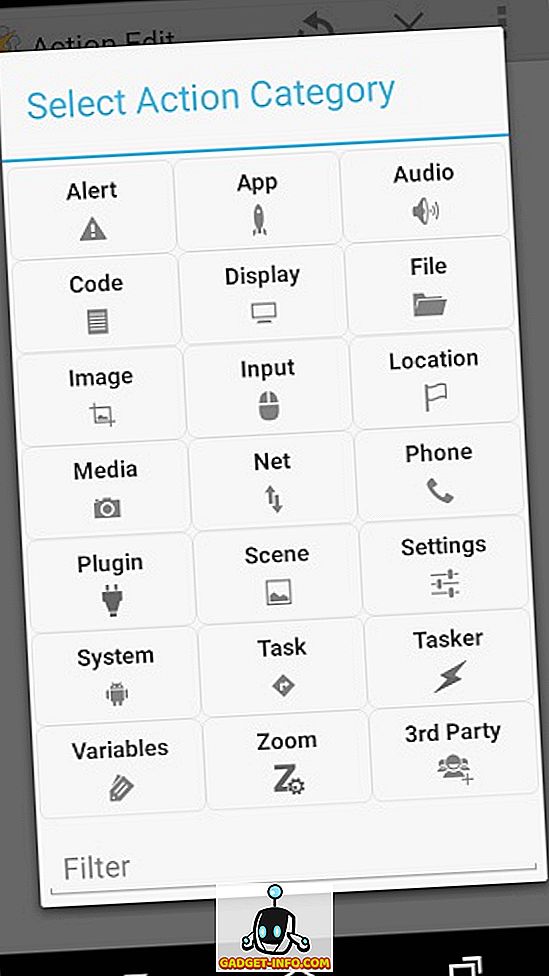
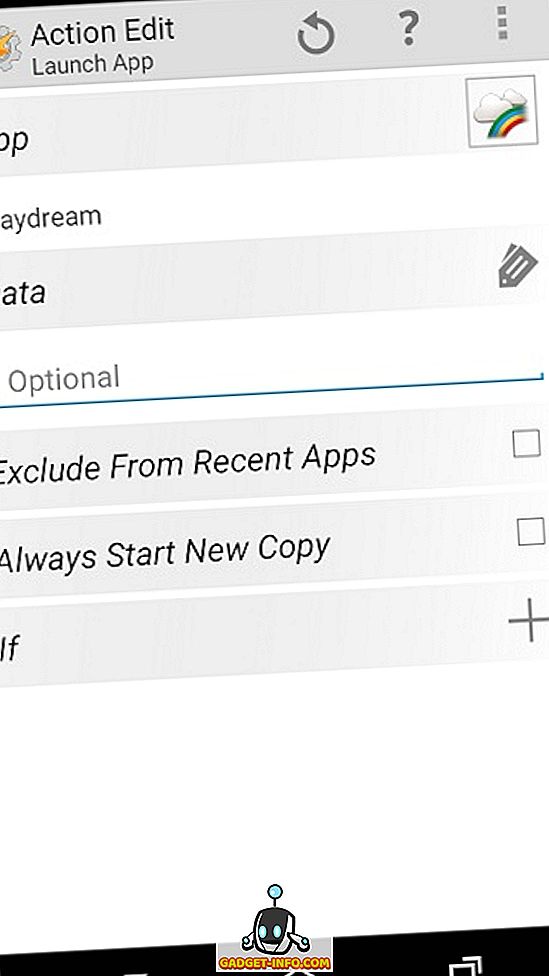
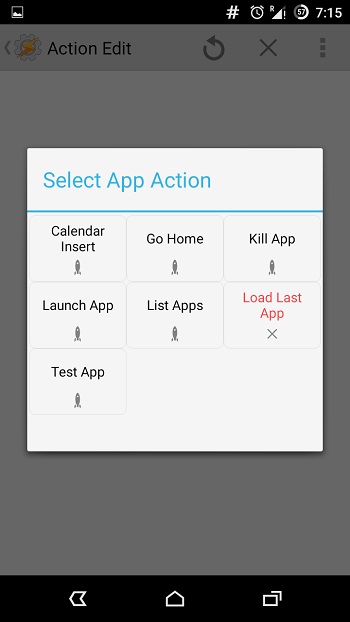
- Чтобы запустить приложение, нам нужно нажать на приложение, а затем нажать « Запустить приложение».
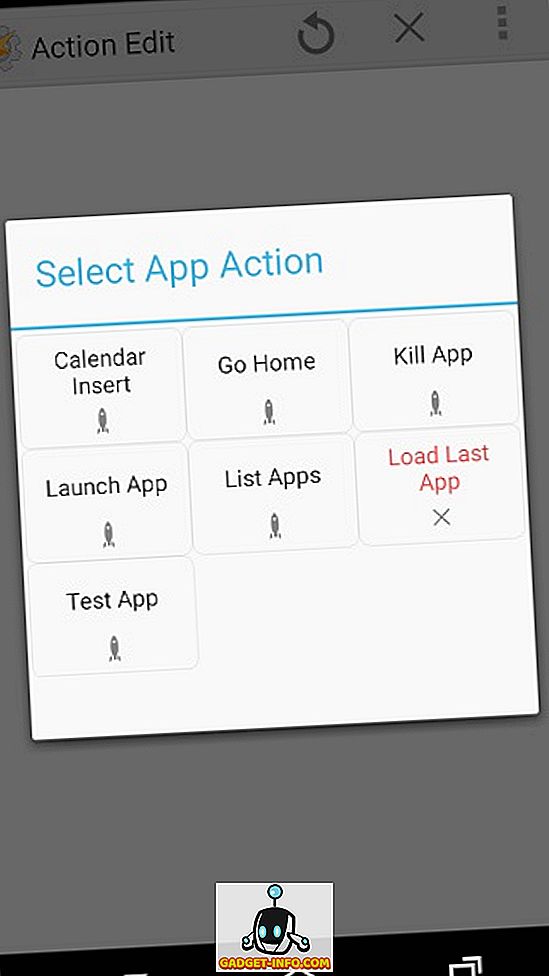
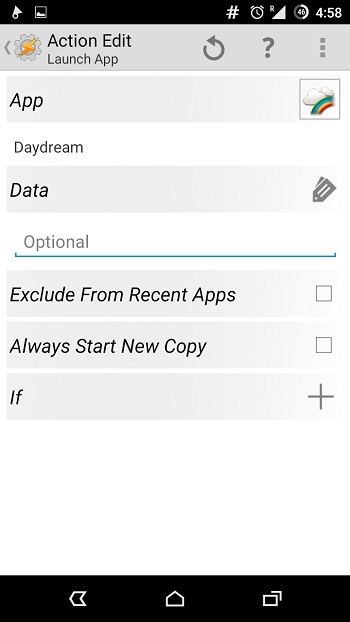
- Выберите приложение Daydream и оставьте другие параметры без изменений
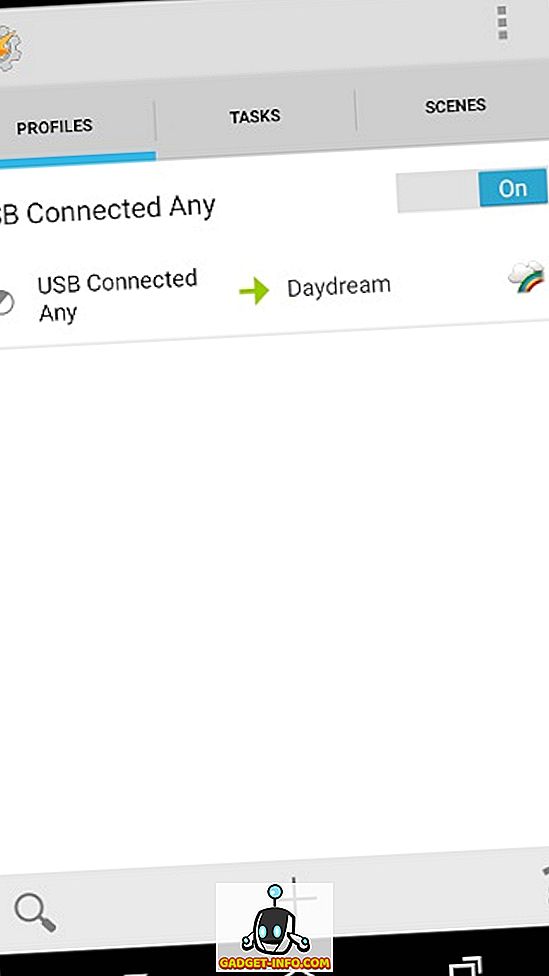
- Вернитесь, чтобы увидеть, что ваш профиль активен. Теперь при каждом подключении USB телефон будет переходить в режим Daydream.
И точно так же готов базовый профиль, который переведет ваш телефон в режим Daydream, когда вы подключите его / зарядите. Теперь вы можете сделать то же самое с настройками дисплея вашего телефона, без необходимости Tasker. Но тот факт, что мы можем использовать всю мощь системы, связывая одно приложение с контекстом, удивителен. Конечно, не всегда так просто создать профиль / рецепт, чем удивительнее становится ваша идея, тем сложнее становится ее настроить в Tasker. Вот некоторые из лучших и самых полезных списков профилей Tasker, на которые вы должны ссылаться.
Что происходит на заднем плане?
Давайте посмотрим, что делает этот профиль Tasker и что на самом деле происходит в фоновом режиме.
- Всякий раз, когда вы подключаете USB к телефону, запускается системный контекст, который в основном означает, что аппаратное обеспечение сообщает ОС Android: «Эй, USB подключен, выполните необходимые действия».
- Tasker выбирает тот же контекст, так что теперь Tasker знает, что телефон находится в подключенном состоянии, и поэтому он начинает поиск профиля, который соответствует этому контексту, после того, как он найден, Tasker ищет задачи, которые ему было предложено выполнить в этом состоянии, что приводит его к задаче Daydream.
- Он просматривает список действий, перечисленных под задачей, и выполняет действие «Запуск приложения», поэтому он знает, что теперь ему нужно запустить приложение, которое пользователь попросил запустить при подключении USB.
- Теперь он входит в действие и ищет приложение, которое должно было быть запущено.
- Согласно нашей конфигурации, Tasker запускает Daydream (системное приложение).
Таким образом, ясно, что Tasker выбирает системные контексты и проверяет их с помощью своего собственного списка контекстов, когда контекст совпадает, он выполняет задачу, указанную вместе с контекстом; который в этом случае запускал приложение.
Времена, когда Tasker не работает
Конечно, у каждой монеты есть две стороны, как и у Tasker. Есть много раз, когда Tasker просто не работает, хотя все, что вы сделали, было правильно. Давайте посмотрим пару возможных случаев, когда это не удается
- Когда возникает конфликт между системной задачей и Tasker; Вот лучшее объяснение: модель разрешений Android не позволяет приложениям или вторичным службам иметь более высокий приоритет, чем задачи системного уровня, поэтому всякий раз, когда системе Android нужно выбрать, какой приоритет ей выбрать, уведомление о входящем сообщении или триггер Tasker, очевидно, приоритизирует первое.
- На устройствах Samsung из-за интенсивного использования памяти Touch Whiz Launcher довольно часто Tasker убивается в фоновом режиме из-за нехватки памяти.
- В разных версиях Android; каждая итерация Android вводит новые функции и в результате исправляет некоторые недостатки безопасности, иногда один профиль может работать по-разному в двух разных версиях Android.
- Неправильная настройка плагина; иногда, даже если наши профили верны, задача может завершиться неудачей из-за плохо настроенного плагина.
- Корень; некоторые действия требуют привилегий root и не могут работать без них.
Заключение
В то время как Tasker обладает огромной мощью, ему все еще трудно преодолеть крутой курс обучения. Иногда неправильная конфигурация может привести к странному поведению устройства. И хотя иногда кажется, что все правильно, Tasker просто не работает. Это в основном хит и пробная техника, и терпение является ключом к автоматизации в этом контексте.

Edgar Cervantes / Android Authority
Most people describe Tasker as a task control and automation app. I see an Android programming app for the masses. Instead of scaring you with code lines, this tool lets you use a friendly interface to create mini Android apps that do your bidding.
Learning how to use this tool exhaustively is beyond the scope of this post. Instead, we’ll go over the basics of using it to program your Android device to do what you want according to the rules you specify. Let’s get started.
Also read: The 15 most useful apps for Android
QUICK ANSWER
Tasker is a complex app, but you can master it with a bit of guidance. We’ll help you understand the UI, permissions, profiles, tasks, scenes, and variables. Additionally, we can help you set up some fun Tasker apps, or guide you through the simplified Tasky mode the app now offers.
JUMP TO KEY SECTIONS
- Figuring out Tasker’s UI
- Set up permissions and grant access
- Profiles and tasks
- Scenes
- Variables
- Some awesome Tasker projects to try out
- Check out Tasky
Figuring out Tasker’s UI
Tabs

Edgar Cervantes / Android Authority
The app has been optimized for simple navigation, and the UI is very clean. There are four tabs at the top of the interface: Profiles, Tasks, Scenes, and Vars (short for variables).
- Profiles — Some sort of container or package for contexts and linked tasks. You can define several contexts for a single profile, and all those conditions must be true for the linked tasks to run.
- Tasks — A group of actions. Usually linked to a trigger or context, but can also be a free-floating, standalone task executed manually.
- Scenes — A custom-made user interface. You can create your layout of buttons, menus, pop-ups, and other UI elements.
- Variables — A name for an unknown value that can change over time, like the battery level or the date.
Projects
You can create Project tabs, which essentially work as folders for organizing profiles, tasks, scenes, and variables. These will be displayed along the bottom of the UI, next to that lonely home button icon.
These are simply a way to keep things in order within the app. You could create projects for email commands, location settings, vacation time, or whatever you wish.
Main menu
The main menu button is located in the top-right corner. Tap it to display all settings and options. It can get pretty confusing, so try not to play too much with it at first. We will use it briefly in the next section, so don’t go playing with it just yet.
Also: These are the best productivity apps
Set up permissions and grant access
Tasker has the power to control your phone extensively, but you must first give it permission. Make sure the app can do everything you want it to from the get-go, as the pop-ups and access requests can get annoying.
- Open Tasker.
- Hit the three-dot menu button.
- Select More.
- Tap on Android Settings.
- You will be presented with a list of settings. Go through each one and make sure the app has access to everything.
Of course, you can always choose not to give access to specific things, but that will affect the app’s functionality.
Profiles and tasks
In a nutshell, profiles determine when you want Tasker to do something, while tasks dictate what to do.
It may also help to think of a task as a sequenced list of things to do. For instance, you may want to set up a night mode. This could force the phone to go into Do Not Disturb, lower the brightness, and turn off unnecessary features (GPS, Bluetooth, and more) at a particular time.
In this situation, you would use a profile to tell the application when to activate this night mode. You can then set up actions in the tasks section.
Creating a profile and task
To illustrate the concept of tasks and actions more clearly, let’s try actually creating this night mode task.
Create a new profile:
- Open the Profiles tab.
- Tap on the + button.
- You’ll get to pick the trigger action. Pick Time and select the times you want Night Mode to start and end.
- Name your profile. I will call this one “Night Mode.” Just tap where it says New Task to enter a new name.
- Hit the Back button.
Create a new Action:
- You will enter the ‘Task Edit” page. Press the + button to create an action.
- Select Audio.
- Select Do Not Disturb.
- The ‘Mode’ section will allow you to set your specific preferences. You can let alarms or priority contacts come through, for example.
- Hit the back button. Now your first action has been created. On to the next one.
- Tap on the + button again.
- Select Display.
- Select Display Brightness.
- Under ‘Level,’ select your desired brightness. Then hit the back button again.
- For the following action, we will turn off GPS. Simply hit the + button again.
- Select Location, then select Stop Location.
- To turn off the Bluetooth, we simply press the + button, select Net, select Bluetooth, and set the option to Off.
- Hit the back button and your night mode is ready!
This is the basic way to automate actions on your phone using Tasker. It’s just the tip of the iceberg, though. You can tell the app to interact with other apps, show notifications with custom messages, use location to launch tasks, and much more.
Our idea is to show you how this application functions. For more advanced automation, you can always search the internet or simply come up with your own tasks and profiles! We have also provided links with custom tutorials at the end of this post.
More: How to track an Android phone
Importing and exporting
To import a saved task into Tasker, tap the Tasks tab, select Import Task from the menu, browse for the file, and tap on it. Importing profiles, scenes, and projects works the same way. To export a task, long-tap on the task name, tap on the menu button, and select Export. Again, exporting other elements works the same way.
How to delete a profile, task, or scene
To delete a profile, task, or scene, long-tap on the name, then tap the trash icon. For variables, the trash can is replaced with an X button.
Rearranging actions in a task
To move an action up or down a list of actions, just tap and hold on the action’s icon at the rightmost side of the action name, then drag and drop the action name to its new location.
Running a task manually
Open the ‘Tasks’ tab. Tap on the task. Tap the play button at the bottom of the screen. This is good for testing whether your tasks actually work.
Scenes
Edgar Cervantes / Android Authority
Scene creation is an advanced topic that deserves its own separate tutorial, but I’ll briefly talk about it here.
A scene is a custom user interface you build from scratch. It can use elements you usually find on UIs, including buttons, doodles, images, maps, menus, shapes, sliders, text boxes, text input fields, and web viewer boxes. Each element is customizable.
Next: How to use a Python function call
Variables
If you’ve ever done some programming before, you’ll be familiar with the concept of variables. They’re close kin to the variables you hear about in algebra class. To define it simply, a variable is a name for a value that changes over time.
Just like scene creation, variables are also complex topics that deserve their separate tutorials. I’ll talk briefly about them though, just so you know what immense power you’ll get if you just patiently climb the steep hill of learning how to use Tasker.
Variables always begin with the percent (%) symbol. Variables in all uppercase are built-in variables. They are usually derived from system information, device states, or events. Some common examples are %TIME (current time), %DATE (current date), %BATT (current battery level), and %WIFI (whether Wi-Fi is enabled or not).
Aside from built-in variables, there are two other variable types: local and global. Both are user-defined and user-created. The main difference between them is that local variables can be used only within the task or scene in which they are created, defined, or used; global variables are accessible to all of Tasker. Another main difference is in capitalization: local variables use all lowercase, but global variables have at least one uppercase letter in their name.
Some awesome Tasker projects to try out
- Android customization — Device security, intrusion detection
- Voice-activated camera control using Tasker and an Android Wear smartwatch
- Android customization — remote camera trigger with Android
- Backup your SMS, MMS, and call log automatically — Android customization
- How to create custom, actionable notification on your home screen — Android customization
- How to create an advanced battery log — Android customization
- Build real-time battery drain warnings — Android customization
- Selfie message board — Android customization
- Schedule a delayed SMS message — Android customization
- Create your voice-activated reminders — Android customization
Check out Tasky
Is all of this Tasker stuff way too complicated? We understand the feeling, and so does the developing team. This is why the publisher has created Tasky, an alternative simplified mode within the app. Tasky makes using Tasker Routines way easy. All you have to do is search for a filter or filter category, download the Routine, and enable it.
How to enable Tasky Routines:
- Open Tasker.
- Tap on the three-dot menu button.
- Tap on Switch To Tasky.
- Look through the available Routines or search for one.
- When you find your Routine of preference, tap on the Download icon.
- You might be asked to grant it permissions. Do so.
- You can now see your Routines. Toggle each on to enable it, or off to disable it. You can also tap on the Trash icon to delete it, or tap on the + button to add new ones.
FAQs
Tasker is not free. The application costs $3.49. This is a one-time purchase price, and you won’t need to spend any more on in-app purchases.
Since the purchase is made through the Google Play Store, you can re-download it to any Android device with your same Google account.
Tasker offers a seven-day free trial without the need to pay anything upfront. The only issue is that you can only get it if you’re willing to sideload the app. You can install the APK file manually, which can be downloaded here.
Tasky is a simplified, easy mode available from the Tasker app. Tasker is very useful, but setting it up can be very confusing and complex. Tasky is for those who are less tech-savvy and need an easy way to automate intelligent functions.
Android предлагает своим пользователям абсолютную свободу свободно настраивать и оптимизировать свое устройство. Вы можете изменить все, начиная от внешнего вида, его основных приложений, его зависимости от Google и всего остального. С этой целью Tasker – это приложение для Android, которое позволяет автоматизировать функции вашего телефона. Вот как вы можете настроить и использовать Tasker на Android для автоматизации своего телефона.
Таскер – платное приложение, которое стоит в Play Маркете жалкие 3,99 доллара. Однако вы можете скачать пробную сборку с Веб-сайт Tasker срок действия истекает через 15 дней. В пробном режиме при доступе к Tasker – даже при переключении между открытыми приложениями – спрашивается, хотите ли вы продолжить пробную версию или зарегистрироваться.
Начальный режим
Tasker довольно универсален, чтобы пользователи не перегружались, мы начинаем с режима для новичков. Тебе дали Профили, Задания и Сцены (доступ к каждой вкладке говорит вам, что она делает). Нажатие на каждый из них может дать вам возможность импортировать профиль / задачу / сцену.
Нажатие кнопки добавления (+) в правом нижнем углу создаст новую запись. Нажатие кнопки со стрелкой «Назад» в левом верхнем углу представления сохранит и выйдет. Нажатие крестообразной кнопки в правом верхнем углу отменяет операцию.
Важно отметить, что приложение не так просто, как IFTTT, где вы можете просто выбрать некоторые предварительно созданные настройки. Tasker позволяет вам пойти гораздо глубже и, следовательно, требует, чтобы вы создавали свои собственные профили и определяли, как ваше устройство Android должно себя вести.
Отключить режим новичка; Перейти к Меню (вверху справа)> Предпочтения > Снимите флажок Режим для начинающих
Мы не рекомендуем делать это, пока вы не разберетесь с Tasker немного лучше. При отключении режима новичка появится новая вкладка под названием Варс.
Шаг 1 – Создание задачи
Несмотря на то, что профиль – это первая вкладка, мы начинаем с задач, поскольку они являются основой этого приложения. Мы создадим задачи для списка вещей, которые мы хотим видеть, когда просыпаемся.
Поэтому нажмите кнопку + в правом нижнем углу и дайте ему имя, затем нажмите кнопку «Галочка». Теперь нажмите значок +, чтобы добавить действия, которые будут выполняться в рамках этой задачи.
Предполагая, что мы хотим, чтобы наш телефон отключал беззвучный режим и включал Wi-Fi, когда мы просыпаемся, мы делаем следующее:
+ > Аудио > Громкость звонка
+ > Сеть> вай-фай > На
Теперь у нас есть два действия для этой задачи.
Имейте в виду, что в настоящее время мы не сказали Tasker, когда мы хотим, чтобы это приложение запускалось, мы только научили его, что делать. Мы можем нажать кнопку «Воспроизвести» в левом нижнем углу, чтобы запустить его вручную, или даже добавить виджет на рабочий стол (он спросит вас, какой профиль вы хотите загрузить). При нажатии на этот виджет запускается указанная задача.
Однако это не так увлекательно, как обещание полной автоматизации. Итак, теперь мы должны связать его с триггером (или контекстом, как его называет Tasker). Что-то, что автоматически запускает эти события. Чтобы установить контекст, мы должны создать профиль.
Шаг 2 – Построение профиля
Tasker может иметь множество профилей в зависимости от того, что вы собираетесь делать. Перейдите на вкладку «Профиль» и выберите приложение / службу, над которой нужно выполнить операцию. Нажмите на значок + в правом нижнем углу и выберите свой контекст.
В дополнение к нашему примеру выше, мы создали действия, которые срабатывают, когда мы просыпаемся. Мы можем назначить конкретное время для запуска задач. Нажмите кнопку с плюсом + > Время > От до Диапазон (нажмите на каждое, если хотите, чтобы оно повторялось по расписанию).
В качестве альтернативы, если у вас есть переменное время пробуждения, вы хотите, чтобы эти действия запускались всякий раз, когда вы просыпаетесь, чтобы мы могли сделать наш контекст срабатыванием будильника. Нажмите +> Событие> Дата / Время> Сигнал готов
При появлении запроса выберите задачу, созданную на шаге 1.
Это означает, что эти события будут запускаться каждый раз, когда вы закончите с тревогой. Таким образом, вы можете каждый раз устанавливать время пробуждения и запускать одни и те же задачи каждый раз.
Шаг 3 – Создание сцен
Сцены в Tasker – это если вы хотите создать свой собственный пользовательский интерфейс или всплывающие диалоги. Вы можете научиться создавать их, даже если никогда раньше не создавали интерфейсы. Так что позвольте нам создать один, и с этого момента вы сможете запускать столько, сколько захотите.
Нажмите кнопку +, чтобы создать новую сцену. Мы создадим сцену, которая покажет нам, кто отправил нам электронное письмо с какой строкой темы.
Когда создается новая сцена, вы настраиваете размер всего экрана. После настройки вы можете изменить его цвет с помощью кнопки меню в правом верхнем углу, нажмите на значок + ниже, чтобы добавить элементы. Нам нужно два текстовых поля (одно для того, кто отправил это письмо, а другое для тела). Наконец, мы хотим добавить кнопку с надписью «Готово», чтобы мы могли закрыть сцену.
Так что нажимайте +> Текст
Под именем назовите все, что вам будет легче вспомнить позже.
Теперь под текстом вы можете написать фактический текст или вызвать из списка встроенных переменных. В нашем случае мы будем вызывать переменную «Text Sender» и другое текстовое поле для переменной «Text Body». Как только это будет сделано, создайте кнопку «Готово», которая будет «разрушаться» при нажатии.
Теперь это просто сцена, без триггера и задачи. Итак, создайте задачу «Показывает сцену» и профиль, запускающий эту задачу (как указано в шагах 1 и 2), и приложение будет готово.
Попробуйте сами
Самое приятное в Tasker – это то, что вы не можете повредить свой телефон, что бы вы ни делали. Так что не стесняйтесь экспериментировать с различными настройками и конфигурациями, чтобы увидеть, какая из них лучше всего оптимизирует ваше устройство для вас. Лучше всего, когда вы к этому привыкнете, вы даже сможете создавать приложения через Tasker, которые ваши друзья могут использовать в своих собственных сервисах Tasker, которые вы для них готовите.
Are you new to Tasker? This is how you should spend the first 10 min with the application. Tasker has a steep learning curve. I hope this Tasker Quick Start will get you up and running in no time. This is a setup guide, I’m not going to talk about creating any profiles just yet (I have plenty of tutorials for beginners for you to use) but setting up the Tasker so it would work with whatever you throw at it.
Tasker Quick Start
Don’t be surprised if Tasker won’t run in the background if you don’t have any running profiles. Before I show you how to create your own, we have some things to do.
Settings

To let Tasker do its own thing we have to enable few settings. These are Android level settings and placed all over your menus. Use the search icon to search the location of each option. Remember that custom ROMs and manufacturers can group these in different sub-menus.
- Disable battery optimisation – this means that Tasker won’t be closed due to battery saving actions. Don’t worry, the app is not using that much battery. You won’t even notice it.
- Grant Notification access – Tasker can see what notifications are present in your status bar but only if you allow the app to see it. Make sure this is enabled.
- Device Manager – enabling this (needs to be disabled before you can uninstall the Tasker) will allow Tasker to perform more low-level actions like locking your screen.
- Accessibility Settings – For now, Tasker still has access to this, but Google changes the policy on how these settings can be utilised by apps. It’s possible that future version of Tasker won’t have access to this menu. You can read more about the changes here.
- Access Control – which defines the Tasker’s internal file permissions.
Tasker Preferences
We have 10 min, and I want you to be as PRO in Tasker as possible! This means we will step up the game a little and change some preferences (3-dot menu) to suit the rest of our tutorial. Open the preferences menu in Tasker and change the following:
UI Tab
- Disable Icon Colour from the theme – otherwise, your project icons will have the same colour.
- List Item dragging – set to On Right, Visible – it will create a visible guideline to show you where to hold to move the tasks around.
Monitor Tab
- Enable Notification Action Buttons – It will add a Disable to the Tasker notification, it’s handy for toggling Tasker to check if profile triggers correctly.
Action Tab
The default settings here are fine, you can teak this later if needed. Main settings let you add custom Tasker Quick Tiles (from status bar) and define quick actions available when you long press the Tasker icon in your Home Screen or drawer.
Queued tasks at 10 should be more than enough for a long while.
Misc Tab
- Local Auto-backup Max age – I use 1 day, it will place an auto backup file in the Tasker folder.
- Google Drive Backup – yes! because backup in the cloud is good to have!
- Back-Up Vars/Prefs – also yes, just be mindful that your backup may store sensitive info from your Tasker projects
- Allow External Access – allow Tasker to do even more stuff. Won’t bore you with details, for now, we have plenty to do.
- Google API key – important for WaveNet voice – more natural Say action – follow setup instructions here.
New Tasker GUI
If you followed the previous chapter, you will see that Tasker looks slightly different, it has more tabs. You are in the PRO mode now so here is the explanation what’s what:
Profile Tab

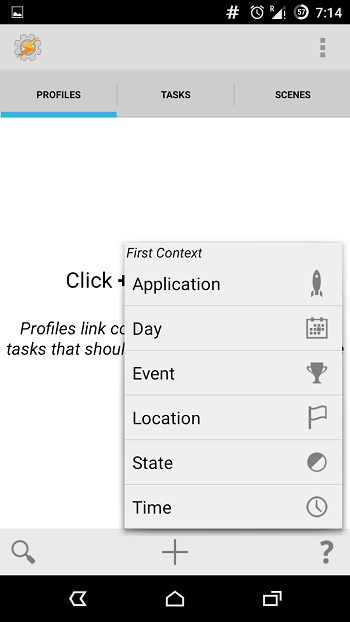
A profile is a tab for contexts (triggers). You can have multiple profiles, and each profile can have multiple contexts. These are conditions in which something has to be done. It could be a time condition like it’s 4 pm do something now. It could be hardware based: the screen just got turned on, do something now, or software based: the YouTube app is open – you need to make sure this is done when the app is opened.
Each profile can contain up to 4 contexts (4 state conditions or 3 state and 1 event condition):
- event condition – this is an instantaneous change in Android. It lasts a fraction of the time. A good example would be – I received a text message, it happens each time I get one text, it’s active for a fraction of the second.
- state condition – this context is a boolean (true/false) statement and is active if a condition is true. A good example is a notification for an unread text message. The message is unread until you read it, so profile would be active as long as the message is unread.
To recap, if you receive a message – this is an event, but if you have an unread message pending, this is a state condition.
Tasks Tab

Tasks are folders in which actions are placed. When a condition is met (see profile) a linked task will be executed by Tasker. Tasker will go through each action stored in a task in a specified order.
- Entry Task – this task is available for each profile by default.
- Exit Task – (optional) can be added to state profiles only (long press on task linked in Profile tab). Tasker runs this task if the condition is no longer met.
Actions

Actions are listed under Tasks. These are steps that Tasker goes through to do stuff. Each step is an action. So action could be turning on WiFi, enabling silent mode or saving a phone number to a variable. You can have an almost unlimited number of actions in a single task.
You can test the tasks manually by tapping the play button at the bottom.
Scenes Tab
In this tab, you can build your user interface. Tasker can create overlays which contain buttons toggles and switches. This UI can control Tasker values and variables. There are many alternatives, as the Tasker interface can be a bit cumbersome.
Variables Tab
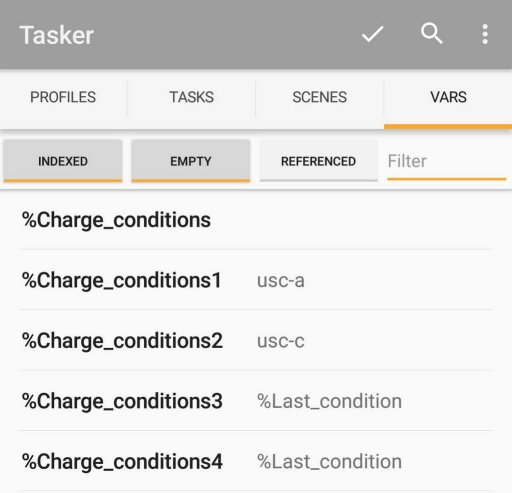
This tab stores all the variables that belong to the project. Variables are split into 3 groups
- System Variables (ie %TIMES)
- Global Variables (ie %HomeTime)
- Local Variables (ie %count )
System variables (spelt with caps) are created and updated by Tasker. You cannot change the value of these variables. These are ‘read-only’ variables. You can copy the value to a global variable and manipulate it further.
Global variables are user created. The variable must have at least one uppercase letter. You can create these at will and modify the data stored in that variable. You can also share the data between your projects or profiles.
Local variables are created by the user, but also some of them are provided by the system. These are spelt with all lower case letters and they hold the data for a short time. You cannot share the data stored outside of the task they run within. Once the task is completed the variable automatically clears the data stored.
If you want to know more about the variables – check out this tutorial and the Tasker reference page.
Projects Tabs

At the bottom, you will see a space for more tabs. This is how you organise your projects. You can name the projects, set icons and keep your projects organised. Think of the projects as folders. They have no impact on how Tasker works, but keeping things organised can help in keeping the law and order among your profiles.
Creating your first profile
The process can start from any tab really. You could start with a task, scene or profile – the best way to explain this one is this video:
Examples from internet

TaskerNet is a new system for sharing the project with others. It uses your Google account for authentication and it’s web-based. Each project/Profile/Task can be exported as URL available for anyone! The URL isn’t indexed, so unless you share this address, only you will have the access the link. To import, simply open the project link in the web browser and click the import button.
TaskerNet has the ability to store the values from your variables! Take care when sharing projects with personal info, API keys, credentials. Consider this system to deal with it.

Legacy (file share)
Apart from TaskerNet, Tasker has a legacy file style sharing. Tasker files come in 4 flavours.
- Tasker Project file (name.prj.xml)
- Tasker Profile file (name.prf.xml)
- Tasker Task file (name.tsk.xml)
- Tasker Scene file (name.scn.xml)

When importing files from the internet, pay attention to the file extension, and what menu you use to import the files over. If you try to import the project file via the profile import menu, you are not going to find the file in your directory. Only files specific to the import menu are visible to you. To access the import menu, long press on a correct tab.
Troubleshooting
I suspect you will run into issues sooner or later. There are a few things you can do to fix it. Before you run online and ask questions, check if the downloaded file is compatible with your phone and the Android version.

Run your task manually, when an action is performed successfully, you will see a small green circle confirming it. Otherwise, you will see a red circle indicating that this action is causing the issue.

Another way is to enable the log and check the orders of your tasks. This may look a little daunting at first, but it is worth learning how it looks like and how to learn it. The log is available via Tasker menu (More/Run Log). It will display the tasks and actions that are performed in the chronological order. Watch out for error messages which will point you to the task or action that causes the issues.
Still no luck?

Before you ask questions take a look at 10 most common Tasker mistakes. If you decide that the issue is more than you can bite on, get prepared. The community will ask you for your profile file or description, screenshots or error messages. Be descriptive, provide the Android version and the phone you are working on. Not all actions are available on the same devices, Android versions or ROMs.
To export the description – select the task or profile in question and use the Tasker menu. The Export section will give you an option to copy the task description to the clipboard/email.
More Questions?
I took a swing at answering the most popular questions listed by Google. Perhaps your question is there as well? You can add more suggestions in this Reddit post.

Android as an ecosystem and platform has proven to exhibit enormous possibilities, and this is one reason why there are hundreds of apps which try solving the same problem, in their own unique way. This openness and versatility fosters immense opportunities for app developers. But that isn’t the case all the time, the vast catalog of apps hinder app discover-ability and thus sometimes we may end up in a situation, where we don’t find a solution in form of an app. This is where automation apps like Tasker come into play.
It would not be wrong to crown Tasker as the Zeus of all automation apps on the Play Store. Putting it in simple words, Tasker is like the IFTT App on steroids with a ton of extra features.
Why a dedicated tutorial on such a popular app?
The answer to this question is “Complexity”; while Tasker certainly is the best app to explore how smart your smartphone can actually get, it’s never considered the most user-friendly or intuitive one. Tasker has been infamous for its complexity and yes, it does take a while to get used to its overwhelming UI. And most adopters leave midway because of how intimidating it can get to configure it to work correctly. Even one slight misconfiguration can end up showing unexpected results. Also, the Tasker website itself is not very helpful in providing a basic training on how to use it. In this article, we’ll cover all the basic elements of Tasker and explain you in adequate detail what each component does. We would also look at some of the reasons why sometimes Tasker may not work.
Tasker: The Breakdown
The Tasker app can be broken down to 6 main components
- Tasks – It can be called a list of Actions that the device performs at a certain point of time.
- Profiles – It’s a list of tasks that the system performs based on the Contexts.
- Contexts –Contexts provide the data (time, location, connectivity) to trigger the particular Profile.
- Plugins – Pre-built solutions by other developers to enhance the functionality of Tasker that can be chained together with your own profiles as well.
- Recipes – Recipes are the profiles or automation tweaks that users of Tasker can share with each other which others can import right into the app.
- Scenes– Custom UI elements that you can create to interact with.
Tasker can be considered as a glue which binds the capabilities of all your apps and your device’s hardware to create amazing experiences. There are infinite possibilities to the extent to which you can experiment with Tasker to create amazing solutions. But for the sake of explanation we will focus on a basic one and use it to dive deeper into the app
Creating Your First Tasker Profile
In this section we will take into account all the terms that we came across to create our very own profile that starts Daydream mode when you put your phone to charge.
For the people who don’t know, Daydream mode lets you set up screensavers that display photos, colorful backgrounds, and more when your device is charging or docked.
If you don’t have Tasker app on your Android device yet, install it from here. It offers 7 days trial, which you can try before opting for paid version of the app.
- Tap the + button in the Profiles
- Tap on State
Here, we will define our Context which will activate the profile.
- Tap on Hardware and then tap on USB Connected
- Go back to the App’s Home screen by tapping the back button
We will now define our Task.
- You will be prompted to create a New Task , create one and name it, here we will name it Daydream
- Tap the + button to add Actions
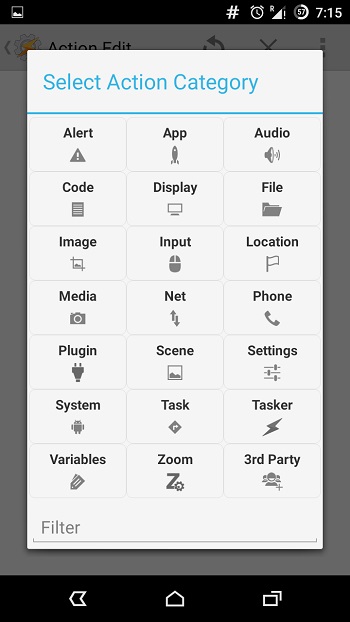
- To launch an app we need to tap on App and then hit Launch App
- Select the Daydream app and leave other options unchanged
- Go back to see your Profile is active. Now every-time you connect your USB, the phone will go to Daydream mode.
And just like that a basic profile is ready that will put your phone to Daydream mode when you dock it/ put it to charge. Now you can do the same thing from the display settings of your phone, without the need of Tasker. But the fact that we could harness the power of the system by linking one app to a context is amazing. Of course, it’s not always this easy to create a profile/recipe the more amazing your idea gets the more complex it becomes to get it configured on Tasker. Here are some of the best and most useful Tasker profiles list, you should refer.
What’s going on in the background?
Let’s see what this Tasker profile does and what actually happens in the background.
- Whenever you connect your USB to the phone, a system Context is triggered which basically means that the hardware is telling the Android OS, “Hey, the USB is connected perform your required actions”.
- The same context is picked by Tasker, so now Tasker knows that the phone is in the connected state and so it starts looking for the Profile which matches this context, once found, Tasker looks for the Tasks it was asked to perform in that state, which leads it to the Daydream task.
- It goes through the list of Actions listed under the task and hits the App Launch action, so it knows that now it needs to start the App user had asked it to launch when USB was connected.
- Now it drills into the action and looks for the app that was supposed to be launched.
- According to our configuration, Tasker launches Daydream (a system app).
So, it is clear that Tasker is picking up the system contexts and checking it with it’s own list of contexts, whenever a context matches, it performs the task specified along with the context; which, in this case was launching an app.
Times when Tasker fails to work
Of course, every coin has two sides and so does Tasker. There are numerous times when Tasker just fails to work even though everything you did was right. Let’s see a couple of possible cases where it fails
- When there is a conflict between a system task and Tasker; here’s a better explanation, Android permission model does not allow apps or secondary services to have more priority than the system level tasks, hence whenever the android system needs to choose as to what it should prioritize, your incoming message notification or a Tasker trigger, it obviously prioritizes the former.
- On Samsung devices due to the memory intensiveness of the Touch Whiz Launcher, quite often Tasker gets killed in the background due to low memory.
- Across different versions of Android; each iteration of Android introduces new features and patches some security flaws as a result, sometimes, one profile might work differently across 2 different Android releases.
- Improper Plugin configuration; sometimes even if our profiles is correct, the task might fail due to a poorly configured plugin.
- Root; some actions require root privileges and fail to work without them.
SEE ALSO: How To Block Texts On Android
Conclusion
While Tasker packs in a lot of power, it still remains hard to get past its steep learning curve. At times, a misconfiguration can lead to weird behavior of the device. And even though everything seems to be right at times, Tasker just doesn’t work. It’s mostly a hit and trial technique to get around with it and patience is the key to automation in this context.