Содержание:
- 1 Для чего нужна утилита Sysprep
- 2 Инструкция по работе с Sysprep
- 2.1 Сброс активации
- 2.2 Отвязка от аппаратных компонентов
- 2.3 Настройка образа Windows в режиме аудита
- 3 Ошибки при использовании Sysprep
Процедура установки и настройки операционной системы Windows 10 у большинства пользователей, как правило, проходит в несколько этапов. Сначала ставится сама ОС, затем создается учетная запись и только потом в систему устанавливаются необходимые программы. Но такой привычный для многих алгоритм может оказаться неприемлемым в корпоративной среде, когда администратору приходится ставить систему на несколько десятков компьютеров. Чтобы не выполнять одни и те же действия по настройке Windows, системными администраторами используются подготовленные образы. Собираются такие образы на основе уже настроенной Windows, а помогают сделать слепок специальные программы для создания бэкапа.
После сохранения на портативный накопитель образ переносится на другой компьютер и восстанавливается. Именуются такая процедура развертыванием. Вроде бы все просто, быстро и удобно, но, как это часто бывает, здесь имеются свои подводные камни. Дело в том, что помимо предустановленного ПО, файлов и настроек образ обычно содержит привязку к «железу» компьютера. Если ее не удалить, на ПК с развернутой Windows может возникнуть конфликт совместимости. Во избежание такого конфликта в процессе подготовки образа производится отвязка от аппаратных компонентов с помощью утилиты Sysprep.
Итак, повторим еще раз. Утилита Sysprep представляет собой встроенный в Windows инструмент с узкой областью применения. Используется он, в основном, для удаления из системы данных о привязке к аппаратным компонентам при создании эталонных образов, предназначенных для развертывания на ПК в корпоративных средах. На пользовательском уровне инструмент бывает полезен при замене комплектующих, когда нужно удалить драйвера старых устройств, а также при переносе настроенной операционной системы на другой компьютер с отличными характеристиками компонентов.
Применяется утилита и для сброса активации Windows, правда, удаление ключа таким способом может быть выполнено не более трех раз. Запуск Sysprep приводит к обнулению SID, очистке Журнала событий и временных файлов, удалению точек восстановления.
Инструкция по работе с Sysprep
Утилита наделена простейшим графическим интерфейсом, позволяющим выбрать нужный параметр в выпадающем списке. Системные администраторы предпочитают запускать инструмент через командную строку с использованием параметров. Sysprep в Windows 10 поддерживает запуск с такими основными ключами:
- /audit – режим аудита, позволяющий интегрировать в систему драйвера и приложения;
- /generalize – режим подготовки системы к созданию образа с удалением всех идентификаторов, журналов и точек восстановления;
- /oobe – перезагружает компьютер в режиме экрана приветствия, позволяя администратору создавать новые учетные записи, переименовывать ПК и так далее.
Теперь перейдем к практическому применению Sysprep в Windows 10. Ниже продемонстрированы основные возможности утилиты.
Сброс активации
Данная функция используется для продления срока работы Windows с пробными лицензиями, отвязки от текущей активации и удаления вшитого ключа. Алгоритм действий следующий:
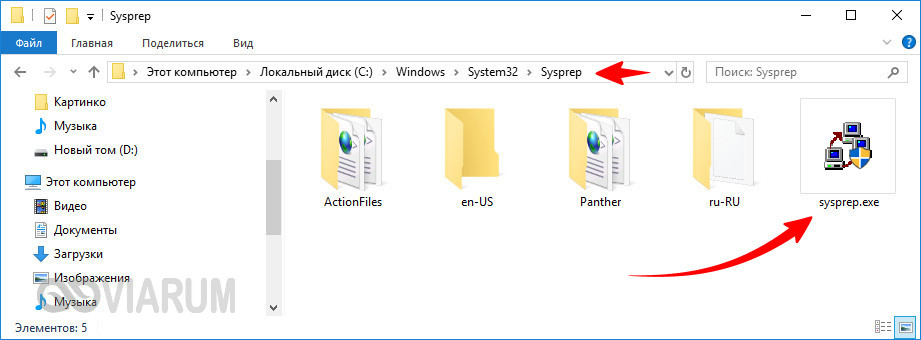
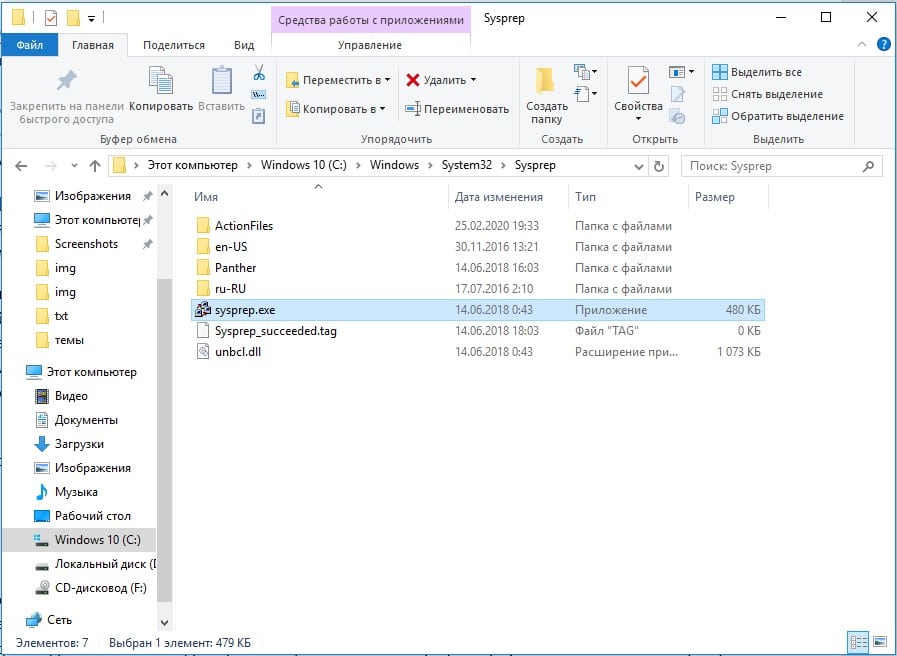
- Перейдите в расположение C:/Windows/System32/Sysprep;
- Запустите исполняемый файл sysprep.exe;
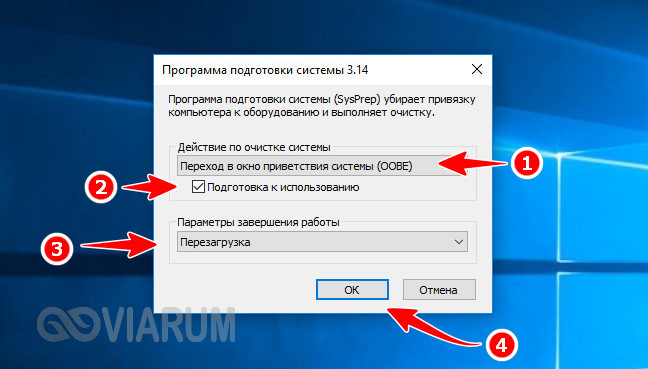
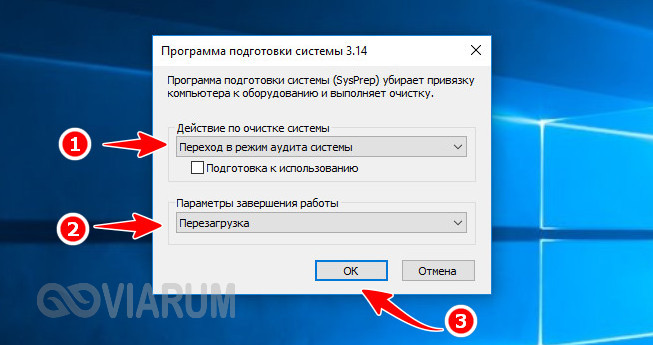
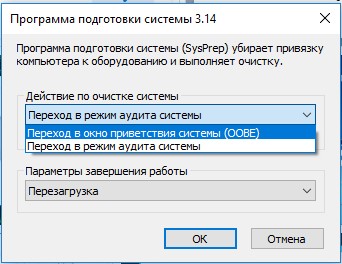
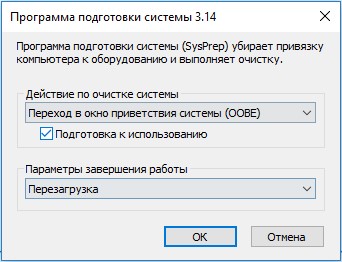
- В открывшемся окошке выберите переход в окно OOBE;
- Отметьте галочкой пункт «Подготовка к использованию»;
- В параметрах завершения работы укажите перезагрузку и нажмите «OK»;
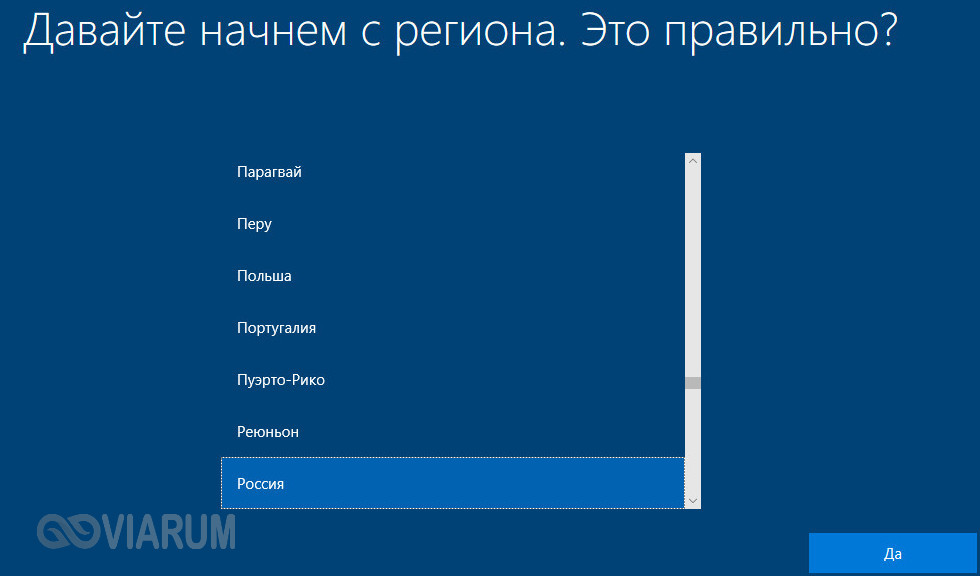
- Настройте в окне приветствия параметры Windows и создайте нового пользователя.


Отвязка от аппаратных компонентов
Применяется при создании эталонного образа для последующего развертывания на клиентских компьютерах, а также перед заменой комплектующих.
- Запустите утилиту из указанного выше расположения;
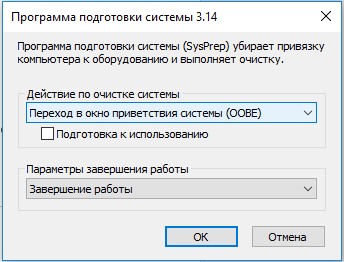
- Выберите переход в окно OOBE;
- В параметрах завершения работы укажите «Завершение работы». Чекбокс «Подготовка к использованию» оставьте не отмеченным и нажмите «OK»;
- После выключения компьютера выполните необходимые действия – замену комплектующих или захват Windows в образ с LiveCD;
- Загрузите ПК в обычном режиме и повторите действия, указанные в пункте 6 выше.

Если замена комплектующих была произведена без использования Sysprep, и это привело к конфликту старого драйвера с новым, запустите Sysprep в режиме отвязки от комплектующих, но вместо завершения работы выберите перезагрузку.
Настройка образа Windows в режиме аудита
Используется системными администраторами для создания образа системы, который затем будет развернут на корпоративных компьютерах с применением файла ответов, автоматизирующих процедуру развертывания. Рядовым юзерам режим аудита Sysprep может понадобиться для получения доступа к учетным записям и настройкам Windows из-под учетной записи встроенного Администратора.
- Запустите утилиту;
- Выберите в выпадающем списке переход в режим аудита системы;
- В параметрах завершения работы укажите перезагрузку и нажмите «OK»;
- После авторизации под учетной записью Администратора выполните необходимые вам действия;
- Если режим аудита выбирался с целью создания образа, не закрывайте автоматически запустившееся средство Sysprep, а произведите нужные вам настройки и выберите режим OOBE для отвязки от аппаратных компонентов.

Ошибки при использовании Sysprep
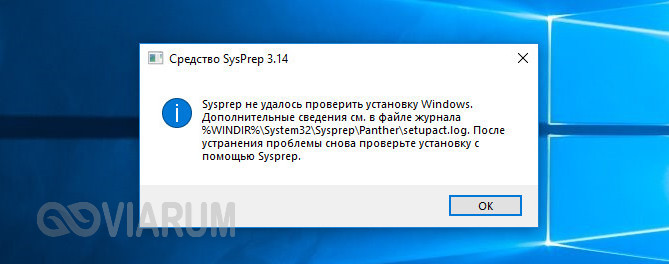
Как и у большинства штатных инструментов Windows, у Sysprep имеются свои ограничения. В ряде случаев вы можете столкнуться с ошибками выполнения. Например, часто появляется сообщение «Sysprep не удалось проверить установку Windows». Ошибка возникает при запуске Sysprep на обновленной или клонированной ОС.
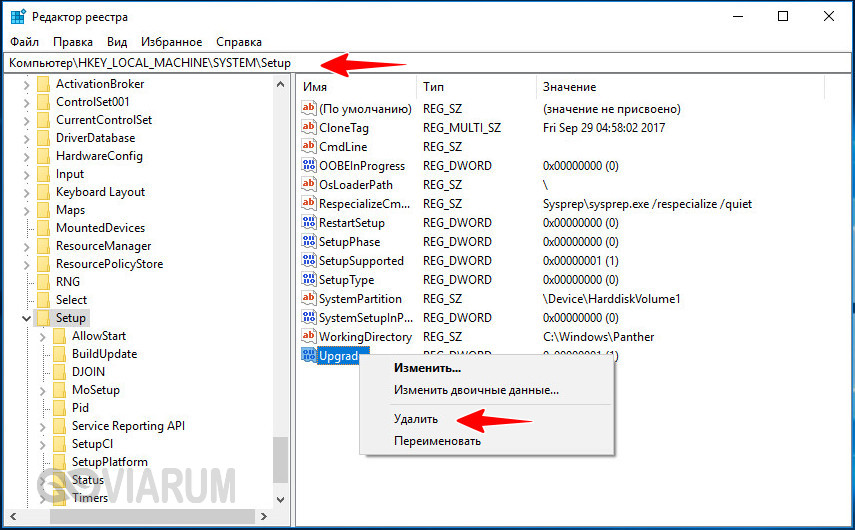
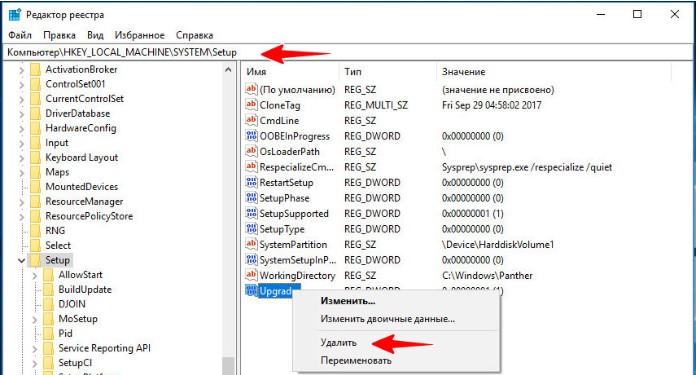
К счастью, устранение этой неполадки не представляет особой сложности. Откройте командой regedit редактор реестра, перейдите в расположение HKLM/SYSTEM/Setup и удалите оттуда параметр Upgrade.
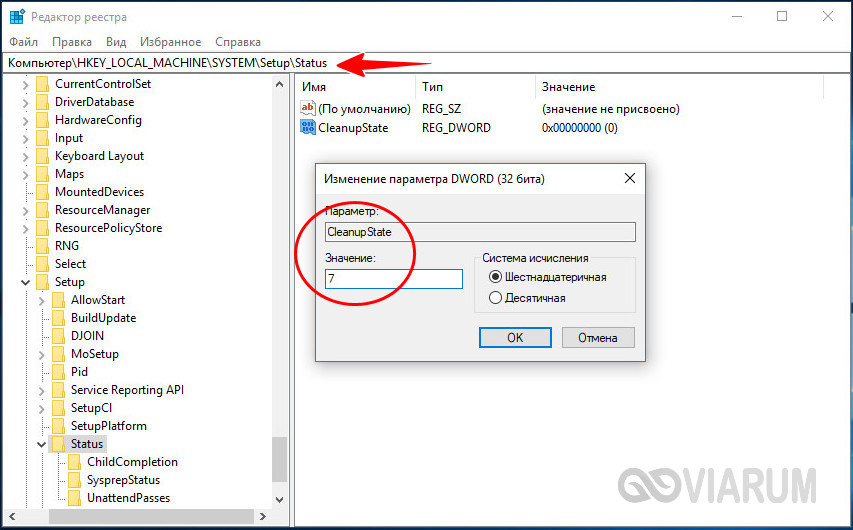
Затем перейдите в расположенный в этом же ключе подраздел Status, найдите в нём параметр CleanupState и установите в качестве его значения 7. Если параметр отсутствует, создайте его вручную, выбрав тип DWORD.
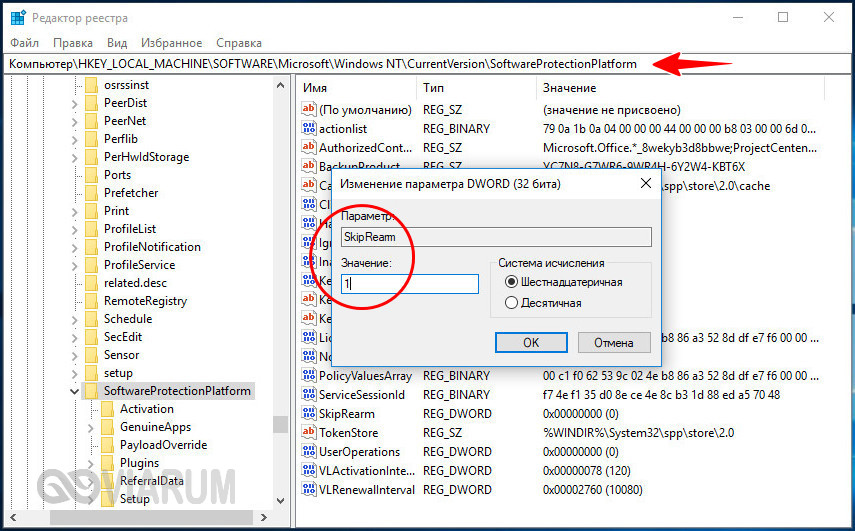
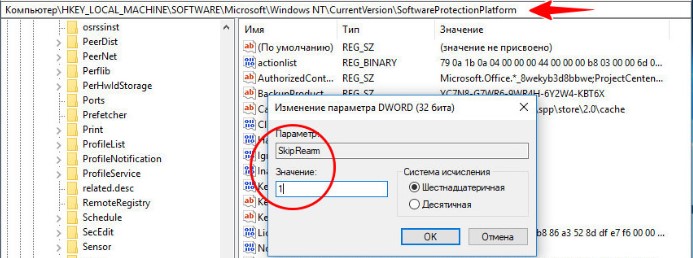
Иногда запуск средства Sysprep приводит к появлению сообщения «Произошла неустранимая ошибка при выполнении программы Sysprep». Данная ошибка возникает в результате превышения лимита использования утилиты. Чтобы продолжить работу, необходимо сбросить счетчик с помощью твика реестра. Откройте редактор реестра, перейдите в расположение HKLM/SOFTWARE/Microsoft/Windows NT/CurrentVersion/SoftwareProtectionPlatform и установите для параметра SkipRearm значение 1.
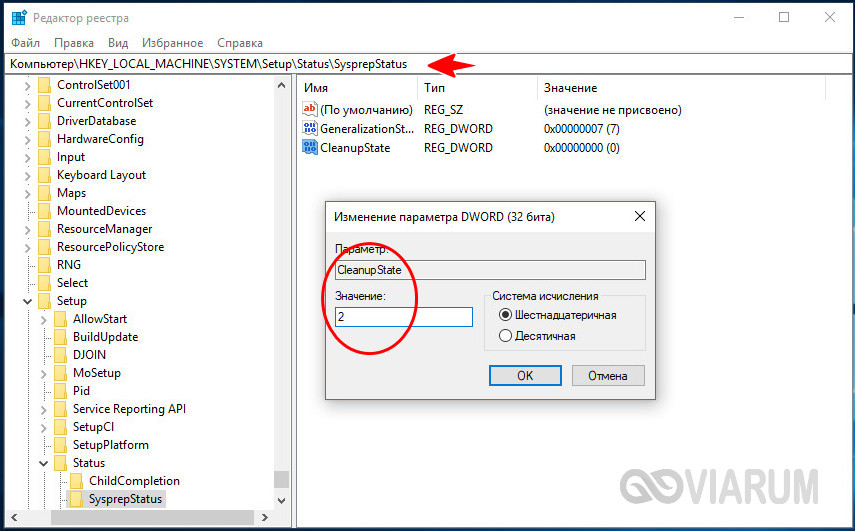
Если это не помогло, пройдите по пути HKLM/SYSTEM/Setup/Status/SysprepStatus. Далее для параметра GeneralizationState установите значение 7, а для параметра CleanupState значение 2.
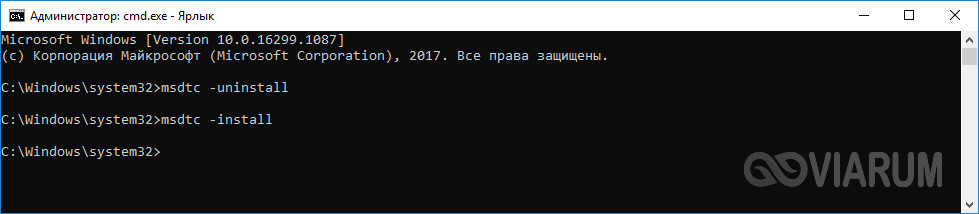
Более жестким, но и более эффективным методом устранения ошибки является переустановка службы координатора распределенных транзакций MSDTC. Для осуществления операции запускаем командную строку с правами администратора и выполняем эти две команды:
- msdtc -uninstall
- msdtc -install
Проблемы с Sysprep также могут быть вызваны конфликтом с некоторыми приложениями и службами. Избавиться от ряда ошибок позволяет удаление программ для создания виртуальных приводов, службы Windows Media и Internet Explorer 10. Если для защиты системного раздела используется BitLocker, перед применением Sysprep шифрование необходимо отключить.
With Windows System Preparation Tool (SysPrep), you can create customized Windows 10 or 11 reference images. You can install apps, drivers, and slipstream updates to a Windows installation image. After that, you can deploy your reference Windows image to users’ computers within your company.
[ez-toc]
In this guide, we’ll show how to use SysPrep to create the ready reference Windows image (we will use Windows 10 22H1 or Windows 11 22H2 builds in this example). You can use this image to deploy Windows on physical or virtual machine (VDI solutions).
What is SysPrep?
Before deploying a Windows image on users’ computers, you need to configure a reference computer. Download the latest Windows build (you can use the Media Creation tool to make Windows installation media) and perform a clean Windows installation on a reference computer or virtual machine. Install the necessary drivers, applications, and configure other Windows settings. The resulting image must be generalized by deleting computer-specific information (SID, GUID, etc.). You can generalize the Windows image with the SysPrep utility.
All the configuration of the operating system before you run Sysprep remains untouched. This includes the installed software, personalization and network settings, installed and pinned Microsoft Store (UWP/Modern) apps on the start screen, File Explorer, and other parameters.
In Windows 10/11 and Windows Server 2019/2022, the Sysprep.exe utility is located in folder C:\Windows\System32\sysprep.

After you installed and configured the reference Windows 10 image in the correct way (with certain installed software, operating system settings, and permissions), you can deploy it to all computers of the company using MDT, WDS, SCCM, or manually (take a look at Windows 10 deployment with MDT and WDS).
Benefits and Disadvantages of Using Sysprep
Syprep’s benefits:
- The customized reference Windows 10/11 image allows you to quickly deploy a ready-to-work environment on a user’s computer. You do not need to install drivers, programs, or security updates. Also, no need to configure custom Windows Settings on each computer;
- You can deploy the Windows image using the answer (unattended.xml) file. After the installation, you do not need to select the various options on the initial Windows Setup screen;
- At any time, you can extract the image, make changes to it, and update it with the deployment tool.
Disadvantages of Sysprep:
- The size of the Windows reference image can be significantly larger than the clean Windows 10 or 11 installation ISO image;
- Periodically you have to update the versions of programs and drivers injected into the reference image, and install the latest security updates;
- You cannot use the Sysprep tool on domain-joined computers. Sysprep will remove the computer from the AD domain;
- You can run Sysprep up to 1001 times on a single Windows image. After reaching this limit, you should recreate your Windows image.
How to Create a Windows 10 or 11 Reference Image?
You can create your reference WIM image of Windows 11 or 10 through the following steps:
- Perform a clean Windows 10/11 install from the ISO image or installation USB stick, then enter the Audit Mode;
- Install apps, drivers, and language packs. Then set the time zone, and configure other personalization settings;
- Prepare the operating system environment using the Sysprep utility;
- Boot into Windows PE and capture an image using the DISM tool.
Then, the resulting image WIM can be added to the installation disk or deployed using different tools such as MDT, WDS, DISM, or ImageX.
When using Sysprep on modern builds of Windows 11 and Windows 10, you need to ensure that your reference computer or the virtual machine does not have Internet access during the image build and capture process. The fact is that Windows will aggressively update the built-in Windows Store applications if you have Internet access. This may break your Sysprep routine.
In order to disable the automatic updating of Windows store apps:
- Unplug the Internet connection (Ethernet) or disable your Wi-Fi adapter;
- Run the Local Group Policy Editor (gpedit.msc) and navigate to Computer Configuration > Administrative Templates > Windows Components > Store;
- Enable the policy Automatic Download and Install of updates;


If you don’t want to completely block Internet access, set the following ImageState registry parameter:
reg add "HKLM\SOFTWARE\Microsoft\Windows\CurrentVersion\Setup\State" /v ImageState /t REG_SZ /d IMAGE_STATE_GENERALIZE_RESEAL_TO_OOBE /f
And then make changes to file C:\Windows\Setup\State\State.ini
[State]

ImageState=IMAGE_STATE_SPECIALIZE_RESEAL_TO_OOBE

This will stop Sysprep from failing while processing Microsoft Store apps.
Customizing Windows 11 and 10 in Audit Mode with Sysprep
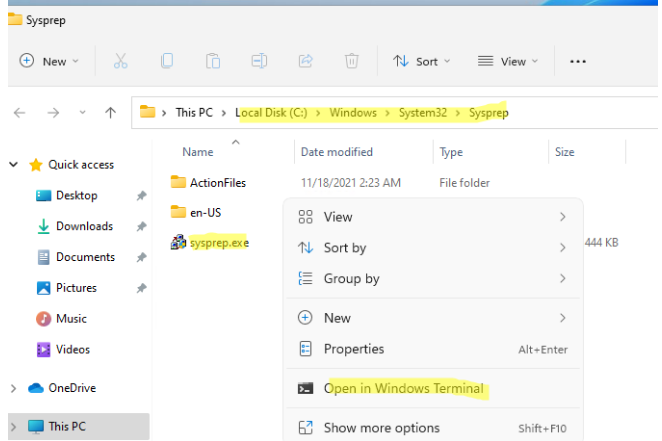
You need to customize your reference Windows Image in the Audit Mode. You can boot Windows to Audit Mode or OOBE by pressing Shift + Ctrl + F3 on the OOBE (out-of-box experience user experience), or the Windows Welcome screen. You can also enter Audit Mode using Sysprep. To do this, open the Sysprep folder with File Explorer, hold down Shift, right-click on an empty space and select the Open PowerShell windows here or Open in Windows Terminal option.
Then run the command:
C:\windows\system32\sysprep\sysprep.exe

In the System Preparation Tool window, select the options:
- System Cleanup Action: Enter System Audit mode;
- Shutdown Options: Reboot;
- Press the OK button.
Sysprep on Windows can be run from the command line with basic options:
sysprep.exe [/oobe | /audit] [/generalize] [/reboot | /shutdown | /quit] [/quiet] [/unattend:answer_file_name]
- /audit — starts Windows in audit mode. In this mode, you can install additional apps and drivers;
- /generalize — preparing Windows for image capture. All identifiers, logs, Event Viewer logs, and restore points are removed;
- /oobe — restarts the Windows in the Welcome screen mode. The Windows Welcome screen allows users to configure Windows operating system, create new accounts, rename the computer, and perform other tasks;
- /unattend:answer_file_name — allows you to apply the settings from the answer file to Windows during an unattended installation.

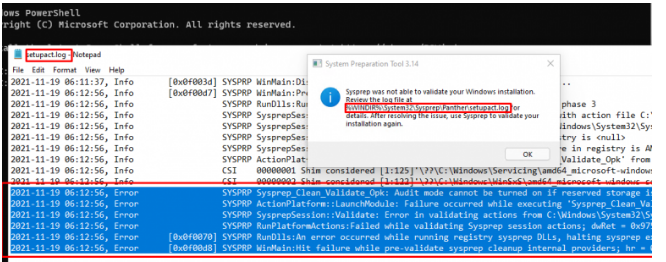
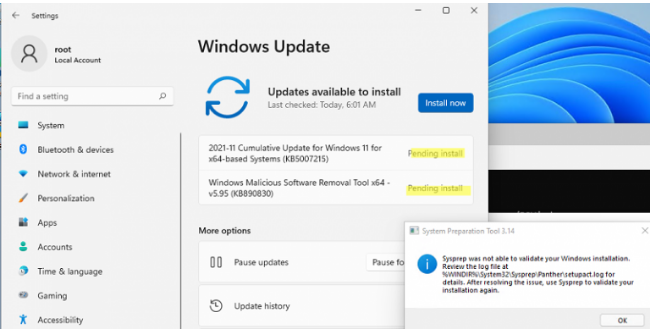
In our case, Sysprep returns the following error:
System Preparation Tool 3.14
Sysprep was not able to validate your Windows installation. Review the log file at %WINDIR%\System32\Sysprep\Panther\setupact.log for details. After resolving the issue, use Sysprep to validate your installation again.
To find out the reason why Sysprep cannot start on your computer, press Win + R and run the command:
%WINDIR%\System32\Sysprep\Panther\setupact.log
Look for the Error lines in the setupact.log file. In our case, the error looks like this:
2021-11-19 06:12:56, Error SYSPRP Sysprep_Clean_Validate_Opk: Audit mode cannot be turned on if reserved storage is in use. An update or servicing operation may be using reserved storage.; hr = 0x800F0975

2021-11-19 06:12:56, Error SYSPRP ActionPlatform::LaunchModule: Failure occurred while executing ‘Sysprep_Clean_Validate_Opk’ from C:\Windows\System32\spopk.dll; dwRet = 0x975

2021-11-19 06:12:56, Error SYSPRP SysprepSession::Validate: Error in validating actions from C:\Windows\System32\Sysprep\ActionFiles\Cleanup.xml; dwRet = 0x975

2021-11-19 06:12:56, Error SYSPRP RunPlatformActions:Failed while validating Sysprep session actions; dwRet = 0x975

2021-11-19 06:12:56, Error [0x0f0070] SYSPRP RunDlls:An error occurred while running registry sysprep DLLs, halting sysprep execution. dwRet = 0x975

2021-11-19 06:12:56, Error [0x0f00d8] SYSPRP WinMain:Hit failure while pre-validate sysprep cleanup internal providers; hr = 0x80070975

In our case, the reason for the Sysprep error is specified here: “An update or servicing operation may be using reserved storage”. This means you cannot use Sysprep at this time, because your Windows image is locked by some changes. This can be installed updates, installation of Windows features, system programs, antiviruses, etc.
Go to Settings > Windows Updates. As you can see, there are several Pending Updates. Finish installing security updates, restart your computer, and run Sysprep again.

Tip. Another error “Sysprep was not able to validate your Windows installation” was covered previously.
For other Sysprep errors, you can get detailed information from the log filex. Depending on the stage, Sysprep can write information to one of the directories:
- Generalize — %WINDIR%\System32\Sysprep\Panther.
- Specialize — %WINDIR%\Panther.
- Windows Unattended installation — %WINDIR%\Panther\UnattendGC.
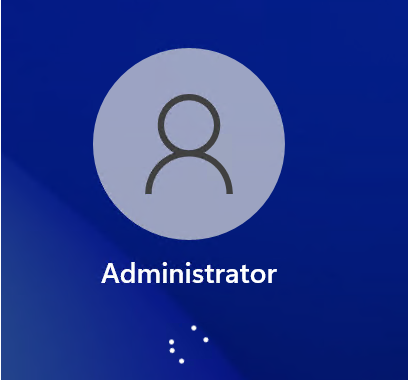
The computer will automatically restart and boot to Audit Mode. Windows automatically boots and logs in with the built-in administrator account when in Audit Mode. Further, this account will be disabled.

Windows 11/10 will boot in this mode no matter how many times you reboot your computer until the Sysprep is running.
There is only one visible sign to understand that you’ve entered the Windows Audit Mode desktop — the Sysprep dialog in the middle of the display. Do not close the Sysprep utility window — you will need it at the end of the configuration step. Minimize it.
Configure your Windows reference image in the Audit Mode. We will take a look at several popular steps that sysops configure most often in their reference image.
Step 1: Install OEM Information and Logo
You can set your company branded info in the computer properties windows. In this example, we will configure OEMLogo, Company name, tech support website, and working hours. The easiest way to configure these settings is through the registry. Create a text file oem.reg, and copy the following code into it:
Windows Registry Editor Version 5.00

[HKEY_LOCAL_MACHINE\SOFTWARE\Microsoft\Windows\CurrentVersion\OEMInformation]

“Logo”=”C:\\WINDOWS\\oem\\OEMlogo.bmp”

“Manufacturer”=”TheITBros, LLC”

“Model”=”Windows 10 Pro 21H1”

“SupportHours”=”9am to 5pm ET M-F”

“SupportURL”=”https://theitbros.com”
Note. First, create the graphic file C:\WINDOWS\oem\OEMlogo.bmp with your company logo.
To apply the REG file, double-click on it, and accept registry changes. As a result, these settings will be imported into the registry.

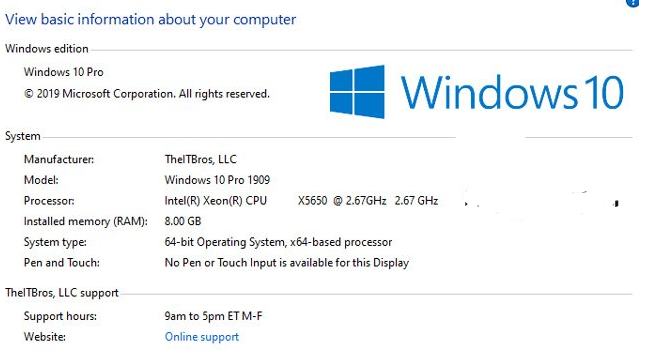
After rebooting in the System Properties, you can see the following branded info:

Step 2: Install the Drivers and Apps
You can install drivers and third-party programs you would like to see in your Windows 10/11 image.
You can install programs manually, or using the new built-in Windows package manager — WinGet. The WinGet Package Manager is available on current builds of Windows 10 and 11 and allows you to install the required software (about 4000 programs available in WinGet repo).
Let’s say, we want to install Opera, Google Chrome, VLC media player, Adobe Acrobat Reader DC, 7Zip, K-Lite Codec Pack Full, and Zoomit using winget. Open the elevated PowerShell prompt and run the command:
winget install --id=7zip.7zip -e && winget install --id=Opera.Opera -e && winget install --id=Google.Chrome -e && winget install --id=VideoLAN.VLC -e && winget install --id=Adobe.Acrobat.Reader.32-bit -e && winget install --id=CodecGuide.K-LiteCodecPack.Full -e && winget install --id=Zoom.Zoom –e

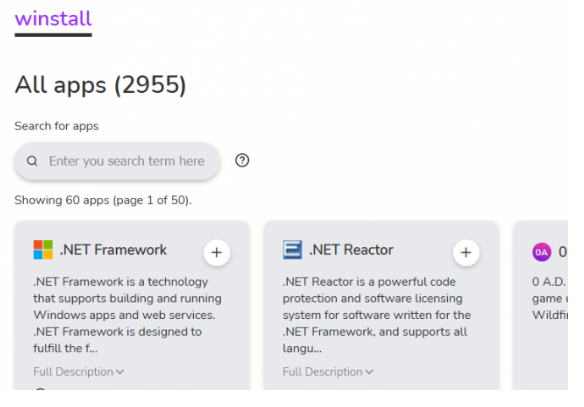
Tip. You can use the WinGet online repository browser (https://winstall.app/) to select the programs you want to install and generate the WinGet installation script.

Note. Don’t install or update any Microsoft Store apps on a reference computer.
You can also install drivers for all computers and laptops models on which you want to deploy this reference Windows 10/11 image. Download and extract the driver packages to a specific directory. Then search for all *.inf files, and inject all the drivers from the source folder to the Windows image with the PowerShell command:
Get-ChildItem "C:\Drivers\" -Recurse -Filter "*.inf" |

ForEach-Object {PNPUtil.exe /add-driver $_.FullName /install}
If you need to reboot Windows to install the application or update, you can do it. After reboot, the system will return to audit mode.
Step 3: Disable Telemetry and Data Collection in Windows 10/11
Windows 10 and 11 collect information about the operation of users on the computer. Examples of handwriting and voice samples, location information, error reports, calendar contents — all of these can be sent to Microsoft servers.
If you do not want the OS sending data to Microsoft’s telemetry servers, you can disable the Telemetry and Data Collection services. Run the elevated Command prompt, and execute the following commands:
sc delete DiagTrack

sc delete dmwappushservice

echo ““ > C:\ProgramData\Microsoft\Diagnosis\ETLLogs\AutoLogger\AutoLogger-DiagTrack-Listener.etl

REG ADD "HKLM\SOFTWARE\Policies\Microsoft\Windows\DataCollection" /v AllowTelemetry /t REG_DWORD /d 0 /f
Also, you can disable tracking in Windows 10 and 11 using the DisableWinTracking tool from GitHub.
Step 4: Install Windows Security Update in Audit Mode
Currently, you cannot install Windows updates in the audit mode using the Windows Update section in the Settings panel. The Windows Update checks if the system has completed the OOBE stage. If not, the update won’t be installed.
You can install the security updates from the command prompt using the PSWindowsUpdate Module from PowerShell Gallery. You can install online the PSWindowsUpdate in Windows using the command:
Install-Module -Name PSWindowsUpdate
To download and install all available Windows updates, run the commands:
PowerShell -ExecutionPolicy RemoteSigned -Command Import-Module PSWindowsUpdate;

Install-WindowsUpdate -MicrosoftUpdate -AcceptAll -AutoReboot
That’s all! Available updates will be downloaded from the Windows Update servers and installed automatically.
Step 5: Uninstall Built-in Microsoft Store Apps
Also, you can uninstall built-in Microsoft Store (UWP apps), but it’s really up to you. So, if you don’t want to uninstall built-in apps, just skip this step.
You can remove pre-installed Microsoft Store apps in Windows 10 21H2 and Windows 11 22H2 using the following PowerShell commands:
#AV1 Codec

Get-AppxPackage *AV1VideoExtension* | Remove-AppxPackage

#News app

Get-AppxPackage *BingNews* | Remove-AppxPackage

#Weather

Get-AppxPackage *BingWeather* | Remove-AppxPackage

#PowerShell

Get-AppxPackage *PowerShell* | Remove-AppxPackage

#WebP image support

Get-AppxPackage *WebpImageExtension* | Remove-AppxPackage

#HEIF image support

Get-AppxPackage *HEIFImageExtension* | Remove-AppxPackage

#Windows Terminal

Get-AppxPackage *WindowsTerminal* | Remove-AppxPackage

#Music app

Get-AppxPackage *ZuneMusic* | Remove-AppxPackage

#Movies and TV

Get-AppxPackage *ZuneVideo* | Remove-AppxPackage

#MS Office

Get-AppxPackage *MicrosoftOfficeHub* | Remove-AppxPackage

#People app

Get-AppxPackage *People* | Remove-AppxPackage

#Maps

Get-AppxPackage *WindowsMaps* | Remove-AppxPackage

#Help and tips

Get-AppxPackage *GetHelp* | Remove-AppxPackage

#Voice Recorder

Get-AppxPackage *WindowsSoundRecorder* | Remove-AppxPackage

#Notepad

Get-AppxPackage *WindowsNotepad* | Remove-AppxPackage

#MS Paint

Get-AppxPackage *Paint* | Remove-AppxPackage

#Sticky Notes

Get-AppxPackage *MicrosoftStickyNotes* | Remove-AppxPackage

#PowerAutomate

Get-AppxPackage *PowerAutomateDesktop* | Remove-AppxPackage

#Xbox and related apps

Get-AppxPackage *Xbox* | Remove-AppxPackage

#Feedback Hub

Get-AppxPackage *WindowsFeedbackHub* | Remove-AppxPackage

#Microsoft To-Do

Get-AppxPackage *Todos* | Remove-AppxPackage

#Calculator

Get-AppxPackage *WindowsCalculator* | Remove-AppxPackage

#Alarms and Clocks

Get-AppxPackage *WindowsAlarms* | Remove-AppxPackage

#Teams/Chat

Get-AppxPackage *Teams* | Remove-AppxPackage

#Microsoft Edge

Get-AppxPackage *MicrosoftEdge* | Remove-AppxPackage

#Your Phone

Get-AppxPackage *YourPhone* | Remove-AppxPackage

#Spotify

Get-AppxPackage *SpotifyAB.SpotifyMusic* | Remove-AppxPackage

#Screen & Sketch/Snipping tool

Get-AppxPackage *ScreenSketch* | Remove-AppxPackage

#Solitaire Collection

Get-AppxPackage *MicrosoftSolitaireCollection* | Remove-AppxPackage

#Photos

Get-AppxPackage *Windows.Photos* | Remove-AppxPackage

#OneDrive

Get-AppxPackage *OneDriveSync* | Remove-AppxPackage

#Skype

Get-AppxPackage *SkypeApp* | Remove-AppxPackage

#Xbox Console Companion

Get-AppxPackage *GamingApp* | Remove-AppxPackage
Note. An error may occur during Sysprep (check c:\Windows\Panther\setuperr.log):
Error SYSPRP Package <PackageFullName> was installed for a user, but not provisioned for all users. This package will not function properly in the sysprep image.
Error SYSPRP Failed to remove apps for the current user: 0x80073cf2.In this case, Sysprep fails after you removing one of the built-in Microsoft Store apps. This is a known Windows 10/11 issue and you can fix it according to the guide.
Generalizing Windows 10/11 Image Using Sysprep
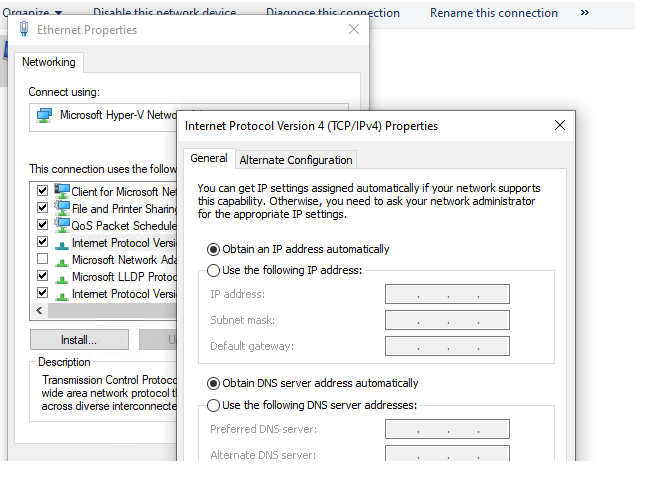
If your computer has a static IP address configured, specify that the address should be obtained automatically (from a DHCP server). You can do that in the network adapter settings.

Or, you can use the following PowerShell script to automatically get an IP address from a DHCP server:
$IPType = "IPv4"

$adapter = Get-NetAdapter | ? {$_.Status -eq "up"}

$interface = $adapter | Get-NetIPInterface -AddressFamily $IPType

If ($interface.Dhcp -eq "Disabled") {

If (($interface | Get-NetIPConfiguration).Ipv4DefaultGateway) {

$interface | Remove-NetRoute -Confirm:$false

}

$interface | Set-NetIPInterface -DHCP Enabled

$interface | Set-DnsClientServerAddress -ResetServerAddresses

}
Now cleanup your image:
- Use the Disk Clean-up tool (cleanmgr.exe) to remove junk and unnecessary files from your computer’s hard disk;

- Empty the Recycle Bin;
- Remove temporary files and folders (LocalAppData%\temp, C:\Windows\Temp, etc.);
- Before running Sysprep, delete all user profiles, except for the Administrator and Default profiles.

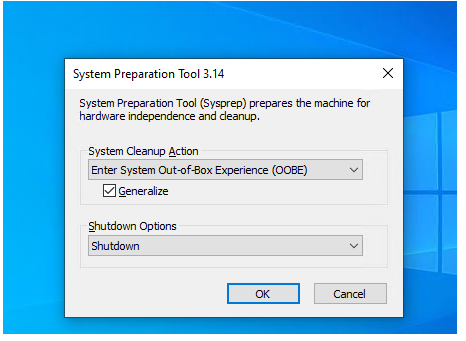
After everything is configured, you can run the Sysprep and select the options:
- System Cleanup Action: Enter System Out-of-Box Experience (OOBE);
- Shutdown Options: Shutdown;
- Check the Generalize option.

After generalizing the Windows image, it will start from Out-of-Box Experience (OOBE) mode and reassign unique SIDs during the first boot.
Using Answer Files with Sysprep for Unattended Windows 10/11 Installation
You can use an answer file together with the System Preparation (Sysprep) tool. It allows configuring unattended Windows Setup settings. This step is optional (used to specify various image deployment options). You can skip this step, and go straight to the step of capturing a Windows image.
The answer file may contain the answer to each question. This must be selected when installing Windows and choosing the initial settings (region, language, product key, keyboard, account, and privacy setting, etc.). Follow the steps during the out-of-box experience (OOBE).
Due to the answer file, the number of installer screens is significantly reduced.
How to Create Windows Answer File Using Windows System Image Manager?
You can create an answer file manually (this is simple XML file). But it’s more convenient to generate the correct answer file using the Windows System Image Manager (SIM) tool. You can do it from the Windows Assessment and Deployment Kit (ADK).
Download the Windows Assessment and Deployment Kit (ADK) for Windows 10 or ADK for Windows 11. Use the ADK version for the Windows version you want to deploy.
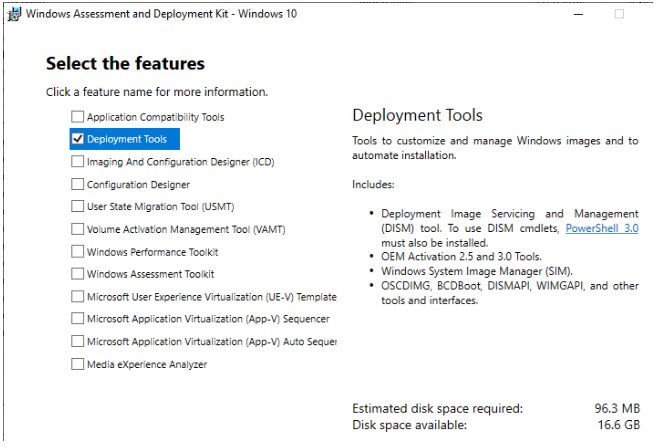
Run the adksetup.exe file as an administrator. Then select Deployment Tools to install (it includes the latest version of DISM and Windows System Image Manager).

You will need install.wim file with the Windows image you want to deploy. You can copy the install.wim file from the sources directory on the installation Windows ISO image. If only the install.esd file is available in the sources directory, you can convert ESD to WIM to get install.wim.
Let’s create an answer unattended file for Windows 10 22H1.
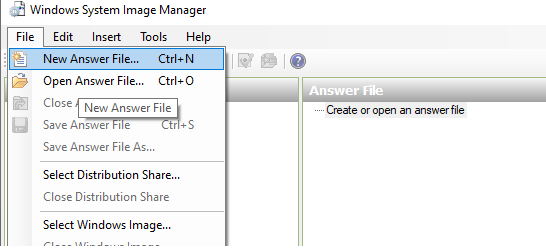
Run the Windows System Image Manager with administrator privileges (C:\Program Files (x86)\Windows Kits\10\Assessment and Deployment Kit\Deployment Tools\WSIM\imgmgr.exe). Select File > New Answer File.

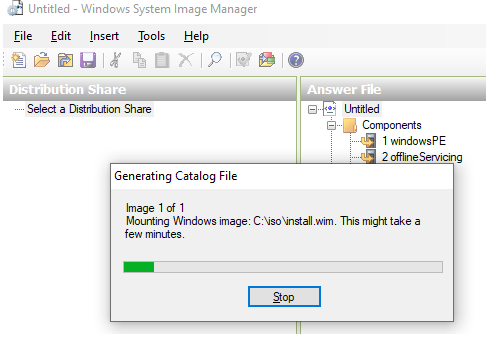
SIM will prompt you to specify a Windows image file for which you want to create an answer file. Specify the path to the before installed install.wim file.
Wait for the SIM to mount the Windows installation image and create the catalog file (.clg). This will take some time, after which the install_Windows 10 Pro.clg file will appear in the directory with the install.wim file.

Note. If you try to open the install.wim file of your Windows 10 build using WSIM from an older version of the ADK, you may receive an error message:
Windows SIM was unable to generate a catalog
In order to fix this error, you need to install the latest ADK and WSIM available for your Windows build.

Select your Windows 10 edition. If there is only one edition of Windows in your install.wim file, it will be selected automatically.
Using WSIM, you can configure various parameters for the answer file. For example, you can configure the Windows product key (if you are using KMS server or MAK keys), time zone, organization and owner info, default language and region settings, input locales, etc.
First of all, we need to do the most important thing: to tell Sysprep to copy all our customizations to the default user profile.
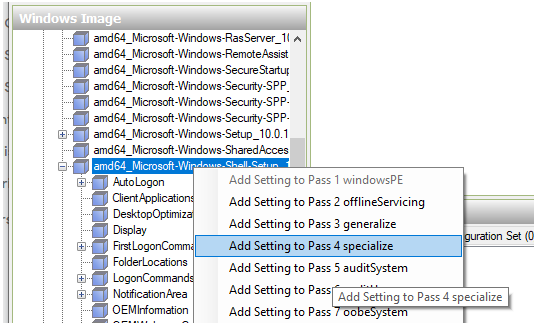
To do this, find the amd64_Microsoft-Windows-Shell-Setup__neutral in the Windows Image section. Right-click on it and select Add Setting to Pass 4 specialize.

Then, in the Answer File panel, expand section 4 Specialize > amd64_Microsoft-Windows-Shell-Setup__neutral. Set the CopyProfile value to TRUE.

Additionally, you can configure the following options in the Answer file.
Pass 1 Windows PE
Choosing an installation language in WinPE:
Microsoft-Windows-International-Core-WinPE

InputLocale: en-US;

SystemLocale: en-US

UILanguage: en-US

UserLocale: en-US
The Windows 10 Product key:
Microsoft-Windows-Setup -> UserData -> ProductKey -> Key = {specify your MAK or GVLK key}
To automatically accept user agreement:
Microsoft-Windows-Setup -> UserData -> AccepptEula = True
Pass 7 oobeSystem
Skip Microsoft account creation screen (MSA):
Microsoft-Windows-Shell-Setup –> OOBE -> HideOnlineAccountScreens = True
Do not ask 3 security questions for your local account:
Microsoft-Windows-Shell-Setup –> OOBE -> ProtectYourPC= 3
Create a local administrator account and set a password for it:
Microsoft-Windows-Shell-Setup –> UserAccounts –> LocalAccounts -> Insert New Local Account

Name: admin

Group: Administrators

All empty (blank) answer file parameters must be removed.
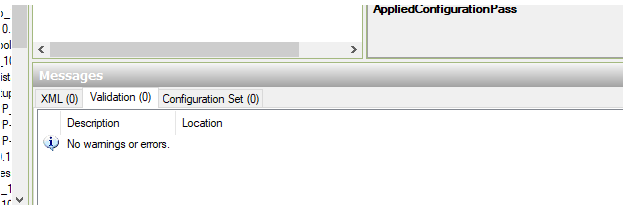
To check the settings in answer files, select in Tools > Validate Answer File option. If you configured everything correctly, a message should appear in the Messages console: No warning or errors.

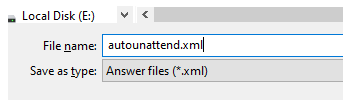
Save the answer file by choosing File > Save Answer File As > autounattend.xml.

Now you can close WSIM.
Generalize Windows Image Using Answer File
Now you can use your autounattend file to Sysprep your Windows image. Run the elevated command prompt, and execute the following command (replace the path to autounattend.xml with yours):
c:\windows\System32\Sysprep\sysprep.exe /generalize /oobe /shutdown /unattend:C:\ps\autounattend.xml

Hint. If you want to capture a Windows image running in a virtual machine, you can use the special Sysprep switch /mode:vm:
C:\windows\system32\sysprep\sysprep.exe /generalize /oobe /mode:vm /shutdown /unattend:C:\ps\autounattend.xml
This mode allows you to generalize the OS for deployment on other VMs. Virtual machine mode only works if you are running Sysprep on a Windows running in a virtual machine. Virtual machine mode generalizes a virtual hard disk (VHD) to be deployed as a VHD within the same virtual machine or hypervisor. The hypervisor and hardware profile must be identical to those on which the image was created.
With the /generalize option the Sysprep will remove unique computer data. This allows you to safely deploy this reference Windows 10 image on another workstation or laptop. After executing the command, the computer will shut down.
Capture Reference Windows 10/11 Using DISM after Generalize
After shutting down your computer, you can capture a customized Windows image using MDT. You can also use other special tools for capturing a Windows image or using DISM. Below we will consider the DISM option.
Note. In previous versions of Windows, the ImageX tool could be used to capture and deploy an image. In the latest Windows 10 and 11 builds, you can do all the things with DISM.
Boot the computer with the Windows reference image into Windows PE. You can do this by booting the computer from the Windows 10/11 installation disc, or recovery disc.
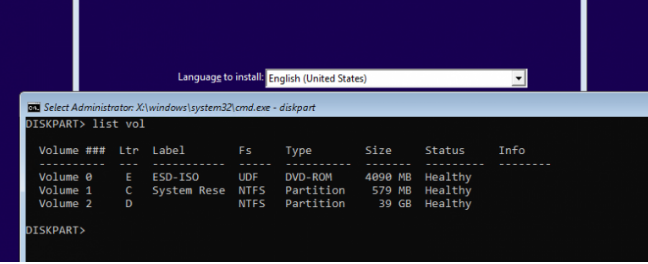
Press Shift + F10 on the first setup screen.
In the command window that opens, type Diskpart command. Use the list vol command to identify the drive letters. In our example, the installed Windows image is located on drive D.
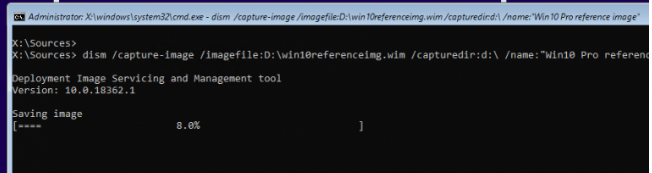
To capture the image, run the command:
dism /capture-image /imagefile:E:\win10referenceimg.wim /capturedir:d:\ /name:"Win10 Pro reference image"

- /Capturedir — the reference Windows folder.
- /imagefile — the wim image file that we need to create. Connect an additional disk or USB flash drive to the computer and save the image to it (do not specify the Windows partition here);
- /Compress — use the /compress:maximum option for best WIM image file reduction (this will increase the image capture time, but save a disk space).

Hint. You can capture your reference Windows image and immediately save it to a share network folder on your file server (or MDT host). To do this, you need to mount a network drive in WinPE before running the dism /capture-image command:
- Initialize network in WinPE and get IP address from DHCP server:
wpenit
- Map a shared network folder using the net use command:
Net use E: \\192.168.31.20\share

- Provide user credentials to access shared folder;
- Now you capture image over network to a shared folder.

Copy the reference WIM image to the installation drive media (copy and replace file ..\sources\install.wim), or put it into your deployment software (MDT, SCCM).
Sysprep является штатным средством, помогающим при развертывании новой Windows. В корпоративной среде неприемлемо вручную выполнять все настройки компьютеров в подчинении, которых может быть 100 или больше. Чтобы автоматизировать процесс, используются специальные программы, созданные на основе уже готовых операционных систем (ОС). Однако, слепок одного компьютера не может работать на другом устройстве без соответствующих корректив. Как раз и помогает сделать утилита Sysprep. Дальше представлена Sysprep Windows 10 пошаговая инструкция.
Sysprep — что это?
Большая часть программ по умолчанию имеют привязку к железу или конкретному дистрибутиву ОС. Если перенести утилиты в том виде, в котором они есть на другом ПК, скорее всего они не смогут работать и будут выдавать ошибки.
Sysprep нужен для того, чтобы удалить подобную привязку и обеспечить беспроблемную работу приложений с новой программной средой. Для этого средство проводит очистку драйверов отдельных комплектующих, обнуляет SID, очищает журнал системы, убирает содержимое временной папки Temp, форматирует точки восстановления и сбрасывает активацию (максимум 3 раза). Главная задача утилиты – позаботиться о том, чтобы операционная система была чистой, но с предустановленными параметрами.
Принципы работы утилиты
Если просто, то Sysprep помогает освободить Windows от привязки к конкретным комплектующим ПК. Все коррективы, вроде удаления драйверов, временных данных и прочих, проводятся без изменения пользовательских параметров. Утилита не воздействует на уже ранее установленные программы, ярлыки, персонализацию ОС и подобные сферы.
Изначально пользователь должен создать эталонную ОС Windows на одном компьютере. Затем формируется ее образ, в который входит программное обеспечение, глобальные системные настройки, права пользователей. И только сейчас нужна Sysprep для устранения привязок приложений к оборудованию. Последний этап – использование программы для создания бекапа. Когда образ готов, его можем быстро развернуть на любом компьютере практически без участия человека. Системному администратору потребуется только установить правильные драйвера на оборудование. По необходимости, можем добавлять дополнительный софт для конкретного устройства.
Sysprep Windows 10: инструкция по использованию
Утилита имеет базовый функционал и интерфейс, в котором есть несколько доступных параметров. Однако, более практичный способ для большинства специалистов – запуск через консоль с помощью дополнительных ключей.
Команды Sysprep:
- /audit – переход в режим аудита для интеграции программ и драйверов.
- /generalize – стадия подготовки системы, ее нужно использовать до формирования образа. Сейчас происходит удаление ID, точек отката и прочего.
- /oobe – перезапуск с моментальным переходом к экрану приветствия для создания и настройки профилей, названия ПК.
Сейчас на практике рассмотрим 2 основных действия с Sysprep: перезапуск активации и удаление аппаратной привязки.
Как сбросить активацию ОС:
- Идем по пути C:\Windows\System32\Sysprep и запускаем файл sysprep.exe.

- В следующем окне выбираем режим «OOBE».
- Активируем опцию «Подготовка к использованию» и выбираем вариант «Перезагрузка».

- Выставляем соответствующие параметры, а также можем создать юзера.
Создание независимого софта:
- Запускаем утилиту и выбираем вариант «OOBE».
- Ставим выделение в положение «Завершение работы» ничего дополнительно не отмечая.
- В выключенном состоянии ПК можем сменить комплектующее или создать бекап.

- Включаем компьютер и выполняем необходимые настройки.
Режим аудита Windows 10
Аудит – специальный режим, необходимый для системных администраторов во время генерирования эталонного образа системы. В будущем его сможем использовать для автоматического развертывания ОС. Обычным пользователям утилита пригодится для запуска системы с правами предустановленного Администратора.
Как это работает:
- Открываем утилиту по аналогии с инструкциями выше.
- Выбираем режим «Переход в режим аудита системы».
- Ставим вариант «Перезагрузка» и жмем на кнопку «Ок».
- Ждем завершения авторизации с правами Администратора и проводим желаемые процедуры.
Что делать при возникновении ошибки?
При выполнении Sysprep могут появляться неполадки. Самая частая из ошибок «Sysprep не удалось проверить установку Windows». Она отображается при попытке включения программы на клонированной или недавно обновленной системе. Хорошая новость – неисправность легко устраняется.
«Sysprep не удалось проверить установку Windows 10», как исправить:
- Вводим в поиск regedit и открываем исполняемый файл.
- Идем по пути HKLM/SYSTEM/Setup и очищаем каталог от параметра Upgrade.

- Переходим в подраздел «Status» и задаем значение 7 для элемента «CleanupState». Возможно, его придется создать вручную.

Непонимания особенностей функционирования программы, многие пользователи сталкиваются с проблемами. К примеру, часто жалуются на сообщение «произошла неустранимая ошибка при выполнении программы sysprep». Проблема только в использовании более 3 раз программы Windows Software Licensing Rearm в одном и том же образе. Избежать многих других неполадок поможет общее представление о принципе работы средства (описан выше). В данном случае помогает сброс счетчика.
Инструкция:
- Открываем файл regedit (можем найти через поиск).
- Идем по пути HKLM/SOFTWARE/Microsoft/Windows NT/CurrentVersion/SoftwareProtectionPlatform.
- Находим элемент «SkipRearm» и задаем ему значение 1. Этого должно быть достаточно, но иногда процедура не помогает. В таком случае продолжаем следовать инструкции.

- Переходим в каталог «HKLM/SYSTEM/Setup/Status/SysprepStatus».
- Параметру «GeneralizationState» задаем значение 7, а CleanupState – 2.
Существует и более радикальный и в то же время эффективный вариант исправления – переустановка службы MSDTC:
- Кликаем ПКМ по Пуску и выбираем «Командная строка (администратор)».
- Сначала вводим msdtc -uninstall и жмем Enter, а затем — msdtc -install.

Порой источник неполадки кроется в конфликтах, тогда рекомендуем удалить средства по генерации виртуальных приводов, а также службы Windows Media и Internet Explorer 10.
Это все необходимые сведения для комфортной работы с Sysprep. Нам удалось разобраться с особенностями утилиты, принципом использования и способами устранения основных неполадок.

Андрей
Остались вопросы по теме?
Задать вопрос
You can alter Windows 10 or 11 reference images with the Windows System Preparation Tool (Sysprep). A Windows installation image can be used to install programmes, drivers, and slipstream updates. After that, you can deploy the Windows image to your company’s machines.
We’ll teach you how to utilise Sysprep to produce the reference image for Windows 10 21H1 (19043.1320) and Windows 11 21H2 (22000.258) builds in this article. Use this guide to produce a ready-to-use Windows image that you can install on a physical or virtual system (VDI solutions).
What exactly is SysPrep?
You must configure a reference image before delivering a Windows image to users’ machines. Install required drivers and apps, as well as other Windows settings. By removing computer-specific information, the resulting image must be generic (SID, GUID, etc.). The Sysprep programme can be used to generalise the Windows image.
You can use Sysprep to remove all information associated with a given operating system instance. Unique identifiers (SID, GUID, etc. ), the Windows activation reset, and installing software and drivers in Audit mode are all examples of this.
All of the operating system’s settings are preserved before you execute Sysprep. Installed software, personalization and network settings, installed and pinned Metro apps on the start screen, File Explorer, and other characteristics are all included in this list.
The Sysprep.exe application is found in the C:WindowsSystem32sysprep folder in Windows 10/11 and Windows Server 2019/2022.
You can deploy a prepared reference Windows 10 image to all corporate PCs using MDT, WDS, SCCM, or manually after installing it and configuring it correctly (with certain installed software, operating system settings, and defined permissions and limits) (take a look at Deploying Windows 10 with MDT and WDS).
How can I make a reference image for Windows 10 or 11?
You can make a reference WIM image of Windows 11 or 10 by following the procedures below:
- Install Windows 10/11 from the ISO image cleanly, then activate Audit Mode.
- Install applications, drivers, and system settings;
- Using the Sysprep utility, prepare the operating system environment;
- Using the DISM tool, boot into Windows PE and capture an image.
The image WIM created can then be added to the installation disc or distributed using tools like MDT, WDS, DISM, or ImageX.
Using Sysprep to customise Windows 11 and 10 in Audit Mode
In Audit Mode, you must customise your reference Windows Image. By hitting Shift + Ctrl + F3 on the OOBE (out-of-box experience user experience) or the Windows Welcome screen on the installed Windows 10/11 OS, you can boot Windows to Audit Mode or OOBE. Sysprep can also be used to enter Audit Mode. To do so, open the Sysprep folder in File Explorer, press Shift, right-click on an empty area, and choose Open PowerShell windows here or Open in Windows Terminal from the context menu.
Then run the following command:
C:\windows\system32\sysprep\sysprep.exe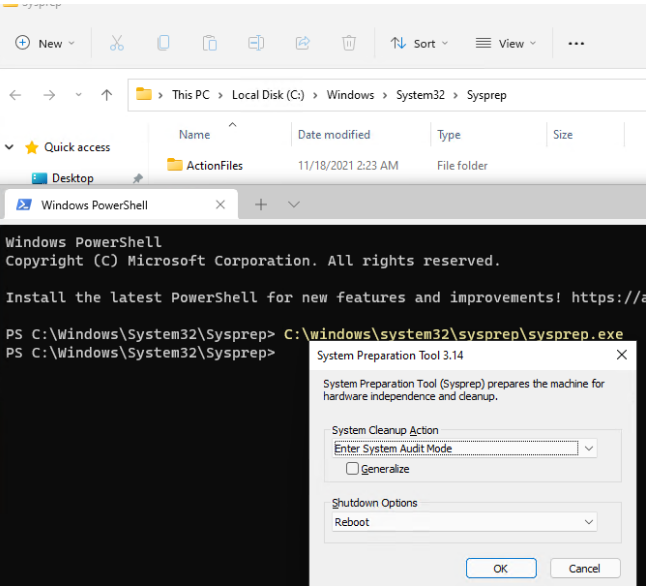
In the System Preparation Tool window, select the options:
- System Cleanup Action: Enter System Audit mode;
- Shutdown Options: Reboot;
- Press the OK button.
In our case, Sysprep is returning the following error:
System Preparation Tool 3.14
Sysprep was not able to validate your Windows installation. Review the log file at %WINDIR%\System32\Sysprep\Panther\setupact.log for details. After resolving the issue, use Sysprep to validate your installation again.
To find out the reason why Sysprep cannot start on your computer, press Win + R and run the command:
%WINDIR%\System32\Sysprep\Panther\setupact.logLook for the Error lines in the setupact.log file. In our case, the error looks like this:
2021-11-19 06:12:56, Error SYSPRP Sysprep_Clean_Validate_Opk: Audit mode cannot be turned on if reserved storage is in use. An update or servicing operation may be using reserved storage.; hr = 0x800F0975
2021-11-19 06:12:56, Error SYSPRP ActionPlatform::LaunchModule: Failure occurred while executing ‘Sysprep_Clean_Validate_Opk’ from C:\Windows\System32\spopk.dll; dwRet = 0x975
2021-11-19 06:12:56, Error SYSPRP SysprepSession::Validate: Error in validating actions from C:\Windows\System32\Sysprep\ActionFiles\Cleanup.xml; dwRet = 0x975
2021-11-19 06:12:56, Error SYSPRP RunPlatformActions:Failed while validating Sysprep session actions; dwRet = 0x975
2021-11-19 06:12:56, Error [0x0f0070] SYSPRP RunDlls:An error occurred while running registry sysprep DLLs, halting sysprep execution. dwRet = 0x975
2021-11-19 06:12:56, Error [0x0f00d8] SYSPRP WinMain:Hit failure while pre-validate sysprep cleanup internal providers; hr = 0x80070975
The cause of the Sysprep error in our instance is as follows: “An update or service activity may be consuming reserved storage.” This indicates you can’t use Sysprep right now because some changes have locked your Windows image. Updates, Windows features, system programmes, antiviruses, and other software can all be installed.
To access Windows Updates, go to Settings > Windows Updates. There are various Pending Updates as you can see. Complete the security update installation, restart your machine, and run Sysprep once again.
The computer will restart and boot into Audit Mode automatically. When Windows is in Audit Mode, it automatically boots and logs in with the built-in administrator account. This account will also be disabled.
Windows 11/10 will boot in this mode no matter how many times you reboot your computer until the Sysprep is running.
The Sysprep dialogue in the centre of the screen is the sole apparent indication that you’ve reached the Windows Audit Mode desktop. You’ll need the Sysprep utility window at the end of the configuration process, so don’t close it. Reduce it to a bare minimum.
You can configure your Windows reference image in Audit Mode. We’ll look at a few of the most common processes that sysops include in their reference picture.
Step 1: Install OEM Information and Logo
In the computer properties windows, you can customise your company’s branding. We’ll set up OEMLogo, Company name, tech support website, and working hours in this example. The registry is the simplest approach to change these values. Create an oem.reg text file and paste the following code into it:
Windows Registry Editor Version 5.00
[HKEY_LOCAL_MACHINE\SOFTWARE\Microsoft\Windows\CurrentVersion\OEMInformation]
“Logo”=”C:\\WINDOWS\\oem\\OEMlogo.bmp”
“Manufacturer”=”solutionviews, LLC”
“Model”=”Windows 10 Pro 21H1”
“SupportHours”=”9am to 5pm ET M-F”
“SupportURL”=”https://solutionviews.com”
Note. First, create the graphic file C:\WINDOWS\oem\OEMlogo.bmp with your company logo.To apply the reg file, double-click on it, and accept registry changes. As a result, these settings will be imported into the registry.

After rebooting in the System Properties, you can see the following branded info:
Step 2: Install the Drivers and Apps
You can install drivers and third-party programs you would like to see in your Windows 10/11 image.
You can install programs manually, or using the Windows 10 package manager — Chocolatey.
Now install the Chocolatey. To do this, run the PowerShell console with administrator privileges. Enter the following commands:
Set-ExecutionPolicy Bypass -Scope Process -Force; `

iex ((New-Object System.Net.WebClient).DownloadString('https://chocolatey.org/install.ps1'))
Restart the PowerShell console. Now you can install more programs with a single command.
Let’s say, we want to install Opera, Google Chrome, VLC media player, Adobe Acrobat Reader DC, 7Zip, K-Lite Codec Pack Full, and Zoomit using choco. Run the command:
choco install 7zip, Opera, googlechrome, vlc, adobereader, k-litecodecpackfull,zoomOn Windows 11, you can use the new built-in WinGet Package Manager to install the required software (about 3000 programs available in WinGet repo). To install the same set of programs, run the command:
winget install --id=7zip.7zip -e && winget install --id=Opera.Opera -e && winget install --id=Google.Chrome -e && winget install --id=VideoLAN.VLC -e && winget install --id=Adobe.Acrobat.Reader.32-bit -e && winget install --id=CodecGuide.K-LiteCodecPack.Full -e && winget install --id=Zoom.Zoom –e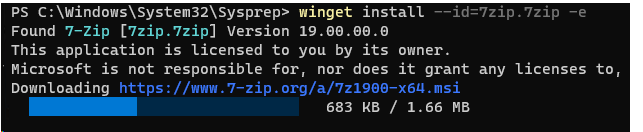
You can also install drivers for all PC and laptop models on which this reference Windows 10/11 image will be installed. Download the driver packages and extract them to a particular directory. Then, using the command: *.inf, look for all *.inf files and inject all the drivers mentioned there into the Windows image.
for /f %i in ('dir /b /s *.inf') do pnputil.exe -i -a %iStep 3: Disable Telemetry and Data Collection in Windows 10/11
Windows 10 and 11 capture data on how users interact with their computers. Handwriting and voice samples, location data, error reports, and calendar entries are all examples of data that can be transferred to Microsoft servers.
You can disable the Telemetry and Data Collection services if you don’t want the OS to submit data to Microsoft’s telemetry servers. Run the following commands from the elevated Command prompt:
sc delete DiagTrack

sc delete dmwappushservice

echo ““ > C:\ProgramData\Microsoft\Diagnosis\ETLLogs\AutoLogger\AutoLogger-DiagTrack-Listener.etl

REG ADD "HKLM\SOFTWARE\Policies\Microsoft\Windows\DataCollection" /v AllowTelemetry /t REG_DWORD /d 0 /f
Also, you can disable tracking in Windows 10 and 11 using the DisableWinTracking tool from GitHub.
Step 4: Install Windows Security Update in Audit Mode
Starting with Windows 8.1, you can’t use the Windows Update Center in the Settings panel in auditing mode to install updates. The Windows Update Center checks to see if the OOBE stage has been completed. The update will not be carried out if this is not the case.
You can download the PSWindowsUpdate Module from the TechNet Gallery to update the system from the console.
Save the PSWindowsUpdate.zip archive to a USB stick and right-click it > Properties > Unblock (this is critical!).
PSWindowsUpdate.zip should be extracted to both folders:
- %USERPROFILE%\Documents\Windows\PowerShell\Modules;
- %WINDIR%\System32\Windows\PowerShell\v1.0\Modules.
To download and install all available Windows updates, run the commands:
PowerShell -ExecutionPolicy RemoteSigned -Command Import-Module PSWindowsUpdate;

Get-WUInstall -AcceptAll -IgnoreReboot
That concludes our discussion. Updates will be downloaded and installed automatically from the Windows Update servers.
Step 5: Uninstall Built-in Microsoft Store Apps
You can also uninstall the built-in UWM programmes, but that is entirely up to you. If you don’t want to remove built-in apps, simply skip this step.
The pre-installed Microsoft programmes in Windows 10 21H1 are listed below.
Get-AppxPackage *3dbuilder* | Remove-AppxPackage

Get-AppxPackage *windowsalarms* | Remove-AppxPackage

Get-AppxPackage *windowscalculator* | Remove-AppxPackage

Get-AppxPackage *windowscommunicationsapps* | Remove-AppxPackage

Get-AppxPackage *windowscamera* | Remove-AppxPackage

Get-AppxPackage *officehub* | Remove-AppxPackage

Get-AppxPackage *skypeapp* | Remove-AppxPackage

Get-AppxPackage *getstarted* | Remove-AppxPackage

Get-AppxPackage *zunemusic* | Remove-AppxPackage

Get-AppxPackage *windowsmaps* | Remove-AppxPackage

Get-AppxPackage *solitairecollection* | Remove-AppxPackage

Get-AppxPackage *bingfinance* | Remove-AppxPackage

Get-AppxPackage *zunevideo* | Remove-AppxPackage

Get-AppxPackage *bingnews* | Remove-AppxPackage

Get-AppxPackage *onenote* | Remove-AppxPackage

Get-AppxPackage *people* | Remove-AppxPackage

Get-AppxPackage *windowsphone* | Remove-AppxPackage

Get-AppxPackage *photos* | Remove-AppxPackage

Get-AppxPackage *bingsports* | Remove-AppxPackage

Get-AppxPackage *soundrecorder* | Remove-AppxPackage

Get-AppxPackage *bingweather* | Remove-AppxPackage

Get-AppxPackage *xboxapp* | Remove-AppxPackage
The list of built-in MS Store Apps on Windows 11 21H2 has changed. Use the following PowerShell script to remove the preinstalled Windows 11 apps:
Remove built-in MS Store Apps on Windows 11 21H2:
#AV1 Codec

Get-AppxPackage *AV1VideoExtension* | Remove-AppxPackage

#News app

Get-AppxPackage *BingNews* | Remove-AppxPackage

#Weather

Get-AppxPackage *BingWeather* | Remove-AppxPackage

#PowerShell

Get-AppxPackage *PowerShell* | Remove-AppxPackage

#WebP image support

Get-AppxPackage *WebpImageExtension* | Remove-AppxPackage

#HEIF image support

Get-AppxPackage *HEIFImageExtension* | Remove-AppxPackage

#Windows Terminal

Get-AppxPackage *WindowsTerminal* | Remove-AppxPackage

#Music app

Get-AppxPackage *ZuneMusic* | Remove-AppxPackage

#Movies and TV

Get-AppxPackage *ZuneVideo* | Remove-AppxPackage

#MS Office

Get-AppxPackage *MicrosoftOfficeHub* | Remove-AppxPackage

#People app

Get-AppxPackage *People* | Remove-AppxPackage

#Maps

Get-AppxPackage *WindowsMaps* | Remove-AppxPackage

#Help and tips

Get-AppxPackage *GetHelp* | Remove-AppxPackage

#Voice Recorder

Get-AppxPackage *WindowsSoundRecorder* | Remove-AppxPackage

#Notepad

Get-AppxPackage *WindowsNotepad* | Remove-AppxPackage

#MS Paint

Get-AppxPackage *Paint* | Remove-AppxPackage

#Sticky Notes

Get-AppxPackage *MicrosoftStickyNotes* | Remove-AppxPackage

#PowerAutomate

Get-AppxPackage *PowerAutomateDesktop* | Remove-AppxPackage

#Xbox and related apps

Get-AppxPackage *Xbox* | Remove-AppxPackage

#Feedback Hub

Get-AppxPackage *WindowsFeedbackHub* | Remove-AppxPackage

#Microsoft To-Do

Get-AppxPackage *Todos* | Remove-AppxPackage

#Calculator

Get-AppxPackage *WindowsCalculator* | Remove-AppxPackage

#Alarms and Clocks

Get-AppxPackage *WindowsAlarms* | Remove-AppxPackage

#Teams/Chat

Get-AppxPackage *Teams* | Remove-AppxPackage

#Microsoft Edge

Get-AppxPackage *MicrosoftEdge* | Remove-AppxPackage

#Your Phone

Get-AppxPackage *YourPhone* | Remove-AppxPackage

#Spotify

Get-AppxPackage *SpotifyAB.SpotifyMusic* | Remove-AppxPackage

#Screen & Sketch/Snipping tool

Get-AppxPackage *ScreenSketch* | Remove-AppxPackage

#Solitaire Collection

Get-AppxPackage *MicrosoftSolitaireCollection* | Remove-AppxPackage

#Photos

Get-AppxPackage *Windows.Photos* | Remove-AppxPackage

#OneDrive

Get-AppxPackage *OneDriveSync* | Remove-AppxPackage

#Skype

Get-AppxPackage *SkypeApp* | Remove-AppxPackage

#Xbox Console Companion

Get-AppxPackage *GamingApp* | Remove-AppxPackage
Generalizing Windows 10/11 Image Using Sysprep
If your computer has a static IP address configured, specify that the address should be obtained automatically (from a DHCP server). You can do that in the network adapter settings.
Or, you can use the following PowerShell script to automatically get an IP address from a DHCP server:
$IPType = "IPv4"
$adapter = Get-NetAdapter | ? {$_.Status -eq "up"}
$interface = $adapter | Get-NetIPInterface -AddressFamily $IPType
If ($interface.Dhcp -eq "Disabled") {
If (($interface | Get-NetIPConfiguration).Ipv4DefaultGateway) {
$interface | Remove-NetRoute -Confirm:$false
}
$interface | Set-NetIPInterface -DHCP Enabled
$interface | Set-DnsClientServerAddress -ResetServerAddresses
}
After everything is configured, you can run the Sysprep and select the options:
- System Cleanup Action: Enter System Out-of-Box Experience (OOBE);
- Shutdown Options: Shutdown;
- Check the Generalize option.
It will start from Out-of-Box Experience (OOBE) mode after generalising the Windows image and reassign unique SIDs at the initial boot.
Using Sysprep and Answer Files for an Unattended Windows 10/11 Installation
With the System Preparation (Sysprep) programme, you can use an answer file. It allows you to configure Windows Setup settings without having to be present. This is an optional step (used to automatically specify various parameters that must be configured when the image is at first run). You can go ahead to the phase of capturing a Windows image by skipping this step.
How to Create Windows 10 Answer File Using Windows System Image Manager?
You can manually construct a response file (this is simple XML). However, utilising the Windows System Image Manager (SIM) application to generate the proper answer file is more convenient. It’s possible to do so using the Windows Assessment and Deployment Kit (ADK).
Download the Windows Assessment and Deployment Kit (ADK) for Windows 10 or the Windows Assessment and Deployment Kit (ADK) for Windows 11. For the Windows version you want to deploy, use the ADK version.
With administrator credentials, run the adksetup.exe file. Then, to install, choose Deployment Tools (it includes the latest version of DISM and Windows System Image Manager).
You will need install.wim file with the Windows 10 or image you want to deploy. You can copy the install.wim file from the sources directory on the installation Windows 10 ISO image. If only the install.esd file is available in the sources directory, you can convert it to the install.wim.
Let’s create an answer unattended file for Windows 10 21H1.
Run the Windows System Image Manager with administrator privileges (C:\Program Files (x86)\Windows Kits\10\Assessment and Deployment Kit\Deployment Tools\WSIM\imgmgr.exe). Select File > New Answer File.
SIM will ask you to select a Windows picture file for which an answer file should be created. Set the path to the install.wim file that was previously installed.
Wait for the SIM to produce the catalogue file and mount the Windows installation image (.clg). The install Windows 10 Pro.clg file will appear in the same location as the install.wim file after some time.

To resolve this issue, make sure you have the most recent versions of ADK and WSIM for your Windows build.
Choose a Windows 10 edition. If your install.wim file contains only one Windows edition, it will be selected automatically.
You can configure numerous parameters for the answer file using WSIM. You can customize the Windows product key (if you’re using KMS or MAK keys), the time zone, organization and owner information, default language and region settings, input locales, and so on.
First and foremost, we must instruct Sysprep to replicate all of our customized user profiles to the default user profile.
To do this, in the Windows Image section, find the amd64_Microsoft-Windows-Shell-Setup__neutral section. Right-click on it and select Add Setting to Pass 4 specialize.
Then, in the Answer File panel, expand section 4 Specialize > amd64_Microsoft-Windows-Shell-Setup__neutral. Set the CopyProfile value to TRUE.

Additionally, you can configure the following options in the Answer file.
Pass 1 Windows PE
Choosing an installation language in WinPE:
Microsoft-Windows-International-Core-WinPE

InputLocale: en-US;

SystemLocale: en-US

UILanguage: en-US

UserLocale: en-US
The Windows 10 Product key:
Microsoft-Windows-Setup -> UserData -> ProductKey -> Key = {specify your MAK or GVLK key}To automatically accept user agreement:
Microsoft-Windows-Setup -> UserData -> AccepptEula = TruePass 7 oobeSystem
Skip Microsoft account creation screen (MSA):
Microsoft-Windows-Shell-Setup –> OOBE -> HideOnlineAccountScreens = TrueDo not ask 3 security questions for your local account:
Microsoft-Windows-Shell-Setup –> OOBE -> ProtectYourPC= 3Create a local administrator account and set a password for it:
Microsoft-Windows-Shell-Setup –> UserAccounts –> LocalAccounts -> Insert New Local Account

Name: admin

Group: Administrators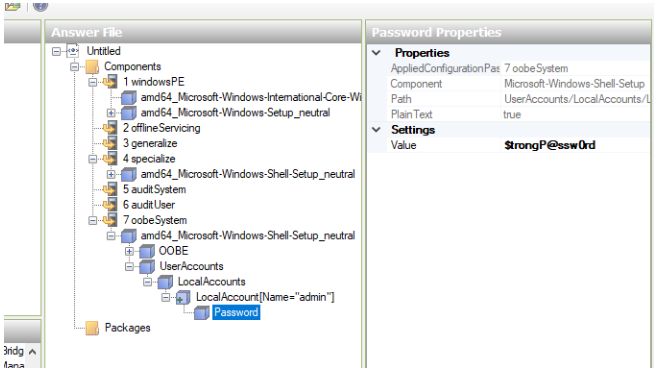
All empty (blank) answer file parameters must be removed.
To check the settings in answer files, select in Tools > Validate Answer File option. If you configured everything correctly, a message should appear in the Messages console: No warning or errors.
Save the answer file by choosing File > Save Answer File As > autounattend.xml.
Now you can close WSIM.
Generalize Windows Image Using Answer File
Now you can use your autounattend file to Sysprep your Windows 10 image. Run the elevated command prompt, and execute the following command (replace the path to autounattend.xml with yours):
c:\windows\System32\Sysprep\sysprep.exe /generalize /oobe /generalize /shutdown /unattend:C:\ps\autounattend.xml

With the /generalize option the Sysprep will remove unique computer data. This allows you to safely deploy this reference Windows 10 image on another workstation or laptop. After executing the command, the computer will shut down.
Capture Reference Windows 10/11 Using DISM after Generalize
After shutting down your computer, you can capture a customized Windows 10 image using MDT. You can also use other special tools for capturing a Windows image or using DISM. Below we will consider the DISM option.
Note that the ImageX tool may be used to capture and deliver an image in previous versions of Windows. All of this is possible with DISM in the current Windows 10 and 11 releases.
Boot the PC into Windows PE using the Windows reference image. This can be accomplished by booting the computer from the Windows 10/11 installation or recovery DVD.
Press Shift + F10 on the language selection screen.
Type Diskpart command in the command window that appears. To identify the drive letters, use the list vol command. The installed Windows image is on disc D in our case.
Run the following command to capture the image:
/imagefile — the wim image file that we need to create;
/Capturedir — the reference Windows installation folder.
Copy the wim Image file from a local disk. Import it into your deployment software (MDT, SCCM), or put it on the installation drive (rename the file to install.wim).
With Sysprep (System Preparation Tool), you can easily duplicate Windows systems. The computers with the same hardware in an environment can save time by replicating seamlessly by modifying the SID numbers of user accounts with Sysprep.

How to Use Sysprep in Windows Operating System
Using Sysprep on Win 10 operating system is quite easy. In the previous article, we discussed what is Sysprep in Microsoft Windows systems. In this article, we will change the user account SID numbers with Sysprep.
A computer cloned with Sysprep can be easily transferred to a computer / laptop with the same hardware.
If you have multiple computers with the same hardware, you can simply copy this image to other computers after generalizing your system using Sysprep after you have made all the necessary settings on one computer.
How to Change SID Number in Windows 10
First of all, check the SID numbers of the existing users and then verify the action you have taken after changing the SID of a computer using Sysprep.
Step 1
Let’s look at the SID numbers of user accounts in the operating system. This information will change after the Sysprep process.
To find user SID numbers in Windows 10, run the following command at the CMD command prompt.
wmic useraccount get name, sidPress Windows + R to open the Run.

Step 2
In the Run window, type Sysprep and press OK.

Step 3
After viewing the location of the program, run it as an administrator.

Step 4
After running the System Preparation Tool, select Generalize and click OK.

Step 5
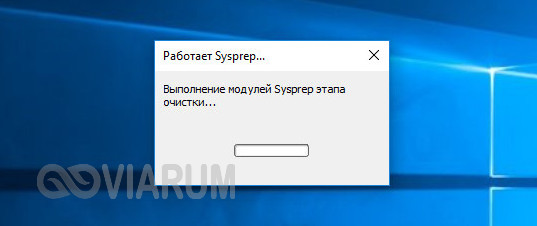
Sysprep is preparing the system…

Step 6
After the Sysprep process is complete, your computer will restart.

Step 7
Wait while preparing devices.

Step 8
After setting the Country, Language, Keyboard and Time zone, click on the Next button.

Step 9
Windows 10 gives us information about the license information. Click on the Accept button to continue.

Step 10
Continue by selecting Use Express Settings.

Step 11
Wait while preparing Windows 10.

Step 12
To open an account on a local domain, select the option below.

Step 13
In the Choose how you’ll connect window, click Next.

Step 14
Enter a new username for the Windows 10 operating system and click on the Next button.

Step 15
If you want to accept the Cortana feature, click on the Use Cortana button. Continue by clicking the Not Now button to bypass the Windows 10 Cortana feature.

Step 16
Windows 10 is preparing the operating system interface…

Step 17
If you compare SID numbers after your computer is turned on, you can see that they are different.

How to Use System Preparation Tool ⇒ Video
You can watch the video below for step-by-step use of the System Preparation Tool and subscribe to our YouTube channel to support us!
Final Word
In this article, we’ve examined how to configure Sysprep. With this feature, after you create a Windows 10 custom image, you can deploy it to other computers. Thanks for following us!
Related Articles
♦ How to Find Wifi Password in Windows 10
♦ How to Change System Language in Windows 10
♦ How to Install TFTP Server in Windows 10
♦ How to Enable DHCP in Windows 10
♦ How to Find Windows Installation Date using CMD

TolgaBagci
Hello, I’m Tolga! I am a computer specialist who has been specializing in computer technologies for about 20 years. I provide solutions to problems encountered in many areas such as hardware, system, network, virtualization, server systems, and operating systems, and create relevant content on my website by explaining how to solve these problems. My goal is to be a reliable source of expert, quality, and trustworthy solutions for your computer problems. By following innovations and using the latest technologies, I aim to be successful in my job and provide you with the best service. Don’t hesitate to contact me for any questions or curiosity about technology. Have a nice day, stay up to date 