![]()
|
Gebrauchsanweisung |
Brugsanvisning |
|
Instructions for use |
Bruksanvisning |
|
Mode d’emploi |
Käyttöohje |
|
Gebruiksaanwijzing |
Manual de utilização |
|
Istruzioni per l’uso |
Instrucciones para el uso |
|
Návod k použití |
|
|
Instrukcje użytkowania |
Návod na použitie |
|
Használati utasítás |
Instruc∑iuni de utilizare |
|
ИнструкциЯ за употреба |
Инструкции по эксплуатации |
|
Қолдану бойынша нұсқаулық |
Інструкція з експлуатації |

b c
|
7 |
|||
|
A |
12 |
||
|
d |
g |
||
|
g |
|||
|
e |
f |
||
|
2 |
8 |
||
|
B |
A |
13 |
|
3
4
C
15
A
 B
B
16

URČENÉ POUŽITÍ
Tato pračka je určena výhradně k praní a odstřeďování prádla vhodného pro praní v pračce v množství, které je v domácnosti obvyklé.
•Při používání pračky dodržujte pokyny uvedené v tomto návodu k použití a tabulce programů.
•Návod k použití i tabulku programů si dobře uschovejte; pokud budete pračku předávat jiné osobě, dejte jí také tento návod k použití a tabulku programů.
VŠEOBECNÉ POKYNY A UPOZORNĚNÍ
1.Bezpečnostní pokyny
•Pračka je určena pouze k používání ve vnitřních prostorách.
•V blízkosti spotřebiče neskladujte hořlavé látky.
•Na víko pračky nestavte žádné elektrické spotřebiče.
•Na děti je třeba dohlédnout, aby si se spotřebičem nehrály.
•Děti mladší 3 let by měly být v dostatečné vzdálenosti od pračky, pokud nejsou pod neustálým dohledem.
•Tuto pračku smějí používat dětí od 8 let, rovněž osoby se sníženými fyzickými, smyslovými nebo duševními schopnostmi a osoby bez patřičních zkušeností a znalostí, za předpokladu
že jsou pod dozorem, nebo poučené o bezpečném používání pračky a chápou nebezpečí plynoucí z jeji používání. Děti si nesí hrát s pračkou. Péči a údržbu pračky nesmí provádět děti bez dohledu.
•Víko neotvírejte silou.
•Je-li to nutné, je možné přívodní kabel vyměnit za stejný, který získáte v servisu. Přívodní kabel smí vyměňovat pouze kvali fikovaný elektrikář.
•Před čištěním nebo údržbou
vždy pračku vypněte a odpojte ji od sítě.
2.Obal
•Obalový materiál je 100 % recyklovatelný a je
označený recyklačním symbolem  . Při likvidaci obalového materiálu se řiďte místními předpisy.
3.Likvidace obalu a staré pračky
•Tento spotřebič je označen v souladu s evropskou směrnicí 2002/96/ES o likvidaci elektrického
a elektronického zařízení (WEEE).Zajištěním správné likvidace tohoto výrobku pomůžete zabránit případným negativním důsledkům na životní prostředí a lidské zdraví, které by jinak byly způsobeny nevhodnou likvidací tohoto výrobku.
•Symbol  na výrobku nebo na dokumentech přiložených k výrobku udává, že tento spotřebič nepatří do domácího odpadu. Je nutné odvézt ho do sběrného místa pro recyklaci elektrického a elektronického zařízení. Při jeho likvidaci se řiďte místními předpisy pro odstraňování odpadu. Podrobnější informace o zpracování, rekuperaci a
recyklaci tohoto výrobku zjistíte u příslušného místního úřadu, služby pro likvidaci domovního odpadu nebo v obchodě, kde jste výrobek zakoupili.
•Pračka je vyrobena z recyklovatelných materiálů. Pračku je nutné zlikvidovat v souladu s místními předpisy o likvidaci odpadu.
•Před likvidací odstraňte všechny zbytky pracího prášku a odřízněte přívodní kabel, aby pračku nebylo možné znovu používat.
4.Obecná doporučení
•Jestliže pračku nepoužíváte, nenechávejte ji připojenou k síti. Zavřete vodovodní kohoutek.
5. Prohlášení o souladu s předpisy EU
•Tato pračka byla navržena, vyrobena a dodána na trh v souladu s bezpečnostními požadavky směrnic EU: směrnice pro nízké napětí 2006/95/
ES, směrnice pro elektromagnetickou kompatibilitu 2004/108/ES
Výrobce není zodpovědný za jakékoliv poškození prádla zapříčiněné nevhodným nebo nesprávným dodržováním instrukcí k ošetřování prádla, které jsou uvedeny na jeho visačkách.
CS 1
PŘED POUŽITÍM PRAČKY
1. Odstranění obalu a kontrola
a.Rozřízněte a odstraňte ochranný obal.
b.Odstraňte ochranu horní plochy a ochrany rohů.
c.Ochranu spodní části odstraňte tak, že spotřebič nakloníte a otočíte na jednom zadním rohu. Přesvědčte se, že plastový dílec dolní ochrany (podle modelu) zůstal v balení a ne v dolní části spotřebiče. Je to velmi důležité, jinak by plastový dílec mohl při provozu poškodit pračku.
d.Otevřete víko lehkým stiskem směrem dolů a zatáhnutím za držadlo. Odstraňte polystyrénovou výplň (je-li u modelu).
e.Z panelu odstraňte modrou ochrannou fólii (je-li u modelu).
•Po vybalení se přesvědčte, zda není pračka poškozená. V případě pochybností pračku nepoužívejte. Zavolejte do servisu nebo svému prodejci.
•Obalový materiál (plastové sáčky, polystyrén, apod.) z dosahu dětí; může pro ně být nebezpečný.
•Pokud byl spotřebič před dodáním v chladu, nechte ho před použitím několik hodin stát při pokojové teplotě.
2. Odstranění přepravní lišty
•Pračka je vybavena přepravními šrouby a přepravní lištou, aby se nepoškodila při dopravě.
Před použitím pračky musíte odstranit přepravní lištu (viz “Instalace”/“Odstranění přepravní lišty”).
3. Instalace pračky
•Pračku umístěte na rovnou a pevnou podlahu.
•Seřiďte nožičky, aby byla pračka ve stabilní a vyrovnané poloze (viz “Instalace”/“Seřízení výšky nožiček”).
•V případě dřevěných nebo plovoucích podlah (jako jsou určité druhy parket nebo laminátové podlahy) umístěte pračku na překližkovou desku s rozměry minimálně 40 x 60 cm a tloušťkou minimálně 3 cm, která je přišroubovaná k podlaze.
•Zkontrolujte, zda nejsou větrací otvory v podstavci pračky (je-li u daného modelu) zakryté kobercem nebo jiným předmětem.
4. Přívod vody
•Přívodní hadici připojte v souladu s místními platnými předpisy vodárenského podniku (viz “Instalace”/” Připojení přívodní hadice”).
•Přívod vody: pouze studená voda
•Vodovodní kohout: přípojka k hadici se závitem 3/4”
•Tlak: 100-1000 kPa (1-10 bar).
•Pro připojení pračky k rozvodu vody používejte jen nové hadice. Použité hadice se nesmí znovu použít a je třeba je zlikvidovat.
5. Vypouštěcí hadice
•Vypouštěcí hadici pevně připojte k sifonu anebo na jiný odtok kanalizace (viz “Instalace”/“Připojení vypouštěcí hadice”).
•Jestliže je pračka připojena k vestavěnému vypouštěcímu systému, přesvědčte se, zda je vybaven odvzdušňovačem, který brání současnému plnění a vypouštění vody (sifonový efekt).
6. Připojení k elektrické síti
•Připojení k síti musí provést kvalifikovaný elektrikář v souladu s pokyny výrobce a běžnými platnými bezpečnostními předpisy.
•Technické údaje (napětí, výkon a pojistky) jsou uvedeny na typovém štítku umístěném na zadní straně spotřebiče.
•Nepoužívejte prodlužovací kabely nebo sdružené zásuvky.
•Po instalaci musí být vždy zajištěn přístup
k připojení do sítě přes zásuvku nebo k dvojpólovému vypínači přívodu proudu.
•Pokud byla pračka při převozu poškozena, nezapínejte ji. Zavolejte do servisu.
•Výměnu elektrického kabelu smí provádět pouze poprodejní servis.
•Pračka musí být připojena k účinnému uzemnění v souladu s platnými předpisy. Zejména spotřebiče umístěné na místech se sprchou nebo vanou musí být chráněny diferenciálním spínačem zbytkového proudu o hodnotě alespoň 30 mA. Uzemnění pračky je podle zákona povinné. Výrobce odmítá veškerou odpovědnost za zranění osob nebo zvířat a poškození majetku, ke kterým došlo přímo nebo nepřímo v důsledku nedodržení výše uvedených pokynů.
•Při používání proudového chrániče (RCCB), používejte pouze typ s označením  .
.
Přibližné rozměry:
|
Šířka: |
400 mm |
|
Výška: |
900 mm |
|
Hloubka: |
600 mm |
CS 2
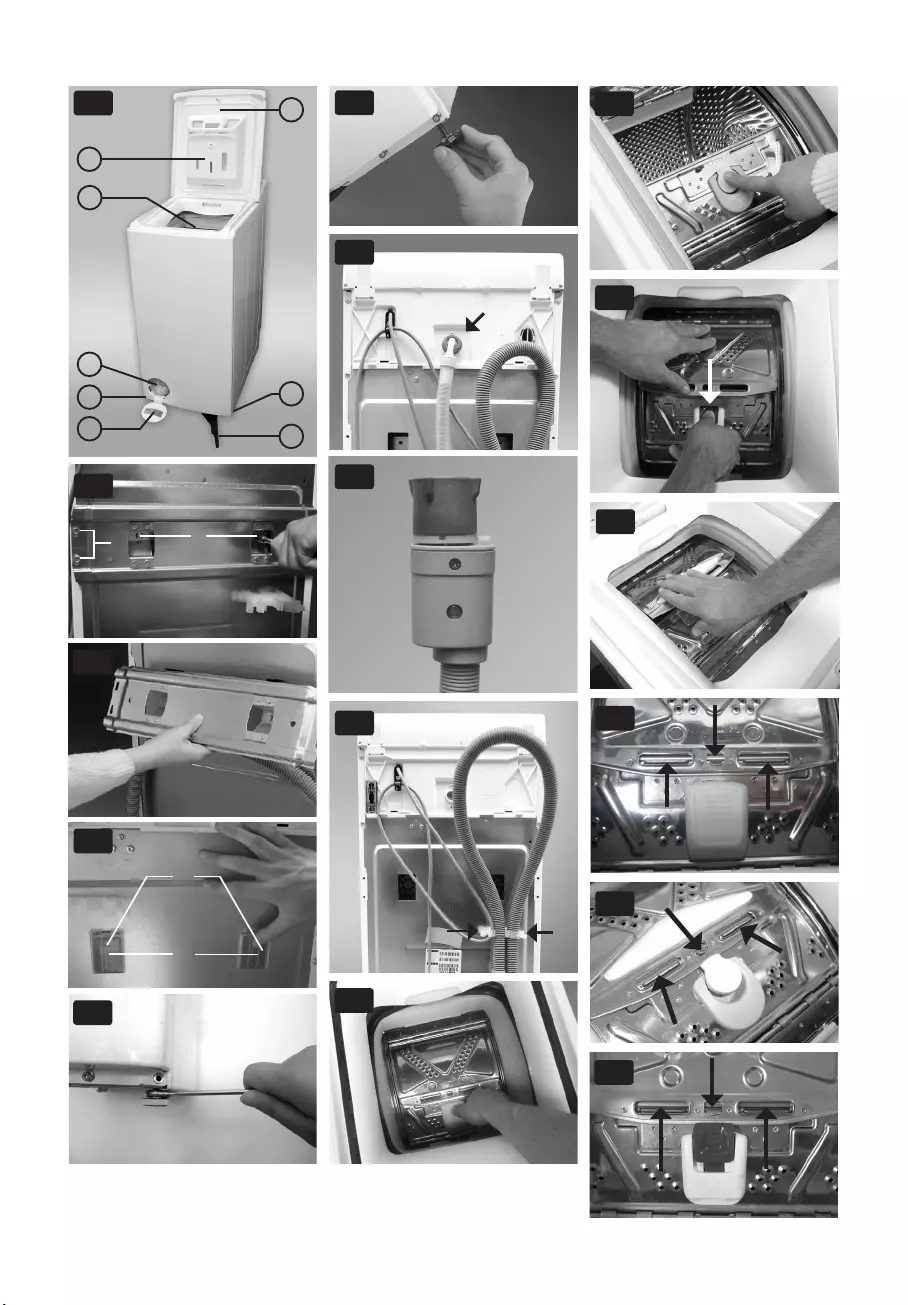
POPIS PRAČKY (obr.1)
a.Víko
b.Dávkovač pracího prostředku
c.Buben
d.Přístup k čerpadlu za krytem
e.Servisní štítek (za krytem filtru)
f.Přemist’ovací páka (podle modelu). Chcete-li spotřebič přemístit povytáhněte trochu páku rukou a pak ji nohou zasuňte do polohy stop.
g.Seřiditelné nožičky
INSTALACE
Odstranění přepravní lišty
Pračka je vybavena přepravní lištou, aby se nepoškodilapři dopravě.
DŮLEŽITÉ: před použitím pračky MUSÍ být tato přepravní lišta z její zadní části odstraněna..
1.Plochým šroubovákem nebo nástrčným klíčem č. 8 na šestihranné matice uvolněte dva šrouby “A” a čtyři šrouby “B” (obr. 2).
2.Sejměte přepravní lištu (obr. 3).
3.Čtyři vnější šrouby “B” vrat’te na původní místo na spotřebiči a utáhněte je (obr. 2).
4.Dvě přiložené krytky “C” zasuňte je do otvorů spotřebiče “D” (obr. 4).
Poznámka : čtyři vnější šrouby nezapomeňte vrátit na místo a utáhnout je.
Seřízení výšky nožiček (obr. 5, 6)
Pračku instalujte na rovném povrchu v blízkosti elektrické,vodovodní a odpadní přípojky.
Je-li podlaha nerovná, seřiďte vyrovnávací nožičky tak, aby pračka stála rovně (nedávejte pod nožičky kousky dřeva, lepenky apod.):
1.Odšroubujte nožičky pračky rukou, 2-3 otáčkami ve směru otáčení hodinových ručiček a potom uvolněte pojistnou matici za pomoci klíče.
2.Rukou seřiďte výšku nožičky.
3.Matici opět utáhněte proti směru otáčení hodinových ručiček ke spodku pračky.
Přesvědčte se, zda nožičky stojí stabilně na zemi a zkontrolujte, zda je spotřebič dokonale vyrovnaný (použijte vodováhu).
Pračku je možné instalovat do prostoru 40 cm širokého a 63 cm hlubokého.
Poznámka: jestliže pračku postavíte na silný koberec, seřiďte nožičky tak, aby byl pod spotřebičem dostatečný prostor k volnému proudění vzduchu.
Připojení přívodní hadice (obr.7)
1.Opatrně našroubujte přívodovou hadici k ventilu na zadní stěně pračky (A); druhý konec hadice našroubujte k přívodnímu ventilu vody rukou.
2.Dbejte na to, aby hadice nebyla nikde přehnutá.
3.Zkontrolujte vodotěsnost připojení pračky úplným otevřením vodovodního kohoutku.
•Jestliže je hadice přífiš krátká, nahraďte ji tlakovou hadicí dostatečné délky (min 1000 kPa, schválený typ EN 61770).
•Potřebujete-li delší hadici omezení vody, kontaktujte náš útvar služeb zákazníkům nebo svého prodejce.
•Pravidelně kontrolujte, zda přívodní hadice nepuchří nebo nepraská a v případě potřeby ji vyměňte.
•Pračku je možné připojit i bez zpětného ventilu.
Systém Aquastop proti vyplavení (obr. 8)
(je-li u modelu k dispozici)
•Přišroubujte hadici k vodovodnímu kohoutku. Otevřete kohoutek naplno a zkontrolujte vodotěsnost připojení.
•Pračka nesmí být připojena ke směšovacímu kohoutku tlakového ohřívače vody!
•Zařízení na zablokování přívodu vody neponořujte do vody, v opačném případě ztratí svou ochrannou funkci.
•Jestliže je hadice poškozená, okamžitě odpojte pračku od elektrické sítě a hadici vyměňte.
Je-li hadice příliš krátká, nahraďte ji hadicí “Aquastop” dlouhou 3 m (k dostání v servisu nebo u vašeho prodejce).
Připojení vypouštěcí hadice (obr. 9)
Uvolněte vypouštěcí hadici z levého uchycení hadic, viz šipku “A” na obrázku.
Důležité:
NEUVOLŇUJTE uchycení vypouštěcí hadice z pravé strany, viz šipku “B” na obrázku. Mohlo by dojít k úniku vody a opaření horkou vodou.
Vypouštěcí hadici pevně připojte k sifonu anebo na jiný odtok kanalizace.
Potřebujete-li hadici nastavit, použijte hadici stejného typu a spoj upevněte svorkami na hadice s utahovacími šrouby.
Max. celková délka vypouštěcí hadice: 2,50 m. Maximální výška odpadu: 100 cm
Minimální výška odpadu: 55 cm
Důležité:
Přesvědčte se, že vypouštěcí hadice není přehnutá, a zajistěte ji proti vypadnutí během chodu spotřebiče.
CS 3

PŘED PRVNÍM PRACÍM CYKLEM
Doporučujeme provést krátký prací cyklus bez prádla, aby se odstranily zbytky vody, které mohly zůstat v pračce po jejím testování ve výrobě.
1.Otevřete vodovodní kohoutek.
2.Zavřete uzávěry bubnu.
3.Nasypte malé množství pracího prostředku
(maximálně 1/3 množství, které výrobce doporučuje pro málo zašpiněné prádlo) do přihrádky pro hlavní praní  , do zásuvky na prací prostředky.
4.Zavřete víko.
5.Nastavte a zapněte program „Syntetika 60 °C“ (viz osobitně dodávaná Tabulka programů).
PŘÍPRAVA PRÁDLA K PRANÍ
Třídění prádla
1. Prádlo roztřiďte podle…
•Druhu látky / symbolu údržby na visačce
Bavlna, smíšená vlákna, snadná údržba/ syntetické materiály, vlna, ruční praní.
•Barvy
Oddělte bílé a barevné kusy. Nové barevné kusy perte zvlášt’.
•Rozměry
Perte dohromady prádlo různých rozměrů, zvýšíte tak prací účinek a prádlo se v bubnu lépe rozloží.
•Jemnosti látky
Jemné kousky perte zvlášt’: používejte zvláštní program pro čistou střižní vlnu  , záclony a jiné jemné kusy. Vždy ze záclon odstraňte háčky nebo záclony s háčky perte v bavlněném sáčku.
Používejte zvláštní program pro prádlo určené pro ruční praní. Perte punčochy, pásky nebo jiné malé kousky s háčky (např. podprsenky) ve speciálních bavlněných sáčcích pro pračky nebo v polštářovém povlaku se zipem.
2.Vyprázdněte kapsy
Mince, zavírací špendlíky nebo podobné předměty mohou poškodit prádlo stejně jako buben pračky i nádrž.
3.Uzávěry
Zatáhněte zipy a zapněte knoflíky nebo háčky;volné pásky a tkanice je třeba svázat.
Čištění skvrn
•Skvrny od krve, mléka, vajec a jiných organických látek se většinou odstraní během programu ve fázi působení enzymů.
•K odstranění skvrn od červeného vína, kávy, čaje, trávy, ovoce apod. je nutné přidat odstraňovač
skvrn do komory pro hlavní praní  dávkovače na prací prostředky.
•Zvlášt’ odolné skvrny je třeba odstranit před praním čističem skvrn.
Barvení a bělení
•Používejte pouze barviva a bělidla vhodná pro pračky.
•Řiďte se pokyny výrobce.
•Na plastových nebo gumových částech pračky mohou barviva a bělidla zanechat skvrny.
Vkládání prádla
1.Otevřete víko pračky zvednutím nahoru.
2.Otevřete buben
— zatlačením na pojistku dvířek bubnu (obr.10,11) (modely podle obr.10 mají pevnou pojistku dvířek bubnu, která se nestlačí, když na ni zatlačíte.
— přidržením zadních dvířek bubnu, posunutím pojistky dvířek vzad ve směru šipky a zatlačením předních dvířek směrem dovnitř bubnu, dokud se neuvolní zavírací mechanizmus (obr. 12).
3.Prádlo vkládejte do bubnu po jednotlivých kusech. Nepřekračujte maximální množství prádla pro programy uvedené v samostatné tabulce programů.
——Přetěžování pračky má za následek špatné prací výsledky a zmačkané prádlo.
——Zkontrolujte, zda prádlo nevisí z bubnu; zjistíte-li to, zasuňte prádlo zpět do bubnu tak, abyste mohli uzávěry bubnu řádně zavřít.
——Nepoužívejte uzávěry k napěchování prádla do bubnu..
4.Abyste buben zavřeli, znovu přidržte ve středu obě části dvířek bubnu (obr.13), zadní dvířka přes přední.
POZOR: přesvědčte se, že jsou klapkové uzávěry bubnu správně zajištěné — podle modelu:
——všechny kovové háčky musí být řádně zaháknuté v zadním klapkovém uzávěru dvířek — viz obr. 14.
——všechny kovové háčky musí být řádně zaháknuté v zadním klapkovém uzávěru dvířek a tlačítko musí přesahovat přes okraj zadního klapkového uzávěru — viz obr. 15.
——pojistka předních dvířek musí trochu přečnívat přes okraj zadních dvířek – viz obr. 16.
Zkontrolujte, zda se mezi klapkovými uzávěry nebo mezi uzávěry a bubnem nezachytilo žádné prádlo.
CS 4

PRACÍ PROSTŘEDKY A PŘÍSADY
 Prací prostředky a přísady uchovávejte na bezpečném a suchém místě mimo dosah dětí.
 Nepoužívejte žádná rozpouštědla (např. terpentýn, benzín); v pračce neperte látky, které byly ošetřeny rozpouštědly nebo hořlavými tekutinami.
Používejte pouze prací prostředky určené do automatických praček pro domácnosti. Dodržujte doporučení uvedená na štítcích prádla.
Druh pracího prostředku závisí na:
•druhu látky;
•barvě;
•prací teplotě;
•stupni a typu znečištění
|
Druh prádla |
Druh pracího prosředku |
|
Bílé hrubší prádlo |
vysoce účinný prací |
|
(studená — 95 °C): |
prostředek s bělidlem |
|
Bílé jemné prádlo |
jemné prací prostředky s |
|
(studená — 40 °C): |
bělidlem, případně s opticky |
|
zjasňujícím prostředkem |
|
|
Světlé/pastelové |
prací prostředky s bělidlem, |
|
odstíny barvy |
případně s opticky |
|
(studená — 60 °C): |
zjasňujícím prostředkem |
|
Intenzivní barvy |
prací prostředky pro barevné |
|
(studená — 60 °C): |
prádlo bez bělidla/opticky |
|
zjasňujícího prostředku |
|
|
Černé/tmavé barvy |
speciální prací prostředky |
|
(studená — 60 °C): |
pro černé/tmavé prádlo |
Pro prádlo vyžadující speciální zacházení (např. vlna nebo mikrovlákno) doporučujeme použít speciální prací prostředky, přísady nebo namáčecí prostředky dostupné na trhu.
Podrobnější informace naleznete na internetové stránce www.cleanright.eu.
Nepoužívejte tekutý prací prostředek pro hlavní praní, jestliže jste zvolili funkci “Předpírka” Nepoužívejte tekuté prací prostředky, pokud jste zvolili Odložený start/Ukončení cyklu (v závislosti na modelu).
Dávkování
Dodržujte výrobcem doporučené dávky na obalu pracích prostředků. Závisí to na:
•stupni a druhu znečištění prádla
•množství prádla
— plná náplň: řiďte se pokyny výrobce k dávkování pracích prostředků;
— poloviční náplň: 3/4 dávky pro plnou náplň;
— minimální náplň (asi 1 kg): 1/2 dávky pro plnou náplň;
Neni-li na obalu pracího prostředku uvedené určité množství prádla, výrobci pracích prostředků obvykle doporučují: 4,5 kg prádla pri použití koncentrovaného pracího prostředku a 2,5 kg prádla pro jemný prací prostředek
•tvrdosti vody v místě bydliště (stupeň tvrdosti zjistíte u místního vodárenského podniku). Měkká voda potřebuje ve srovnání s tvrdou
vodou menší množství pracího prostředku.
Poznámka:
Příliš mnoho pracího prostředku může způsobit nadbytečné množství pěny, které snižuje účinnost praní. Zjistí-li pračka nadbytečné množství pěny, může zablokovat odstřeďování, anebo prodloužit dobu pracího cyklu a zvýšit spotrěbu vody (viz poznámka o příliš velkém množství pěny v kapitole “Jak odstránit poruchu”). Příliš malé množství pracího prostředku má zase za následek zašedlé prádlo a na bubnu, hadicích a topném tělese se tvoří vápenité usazeniny.
Dávkování pracích prostředků a přísad
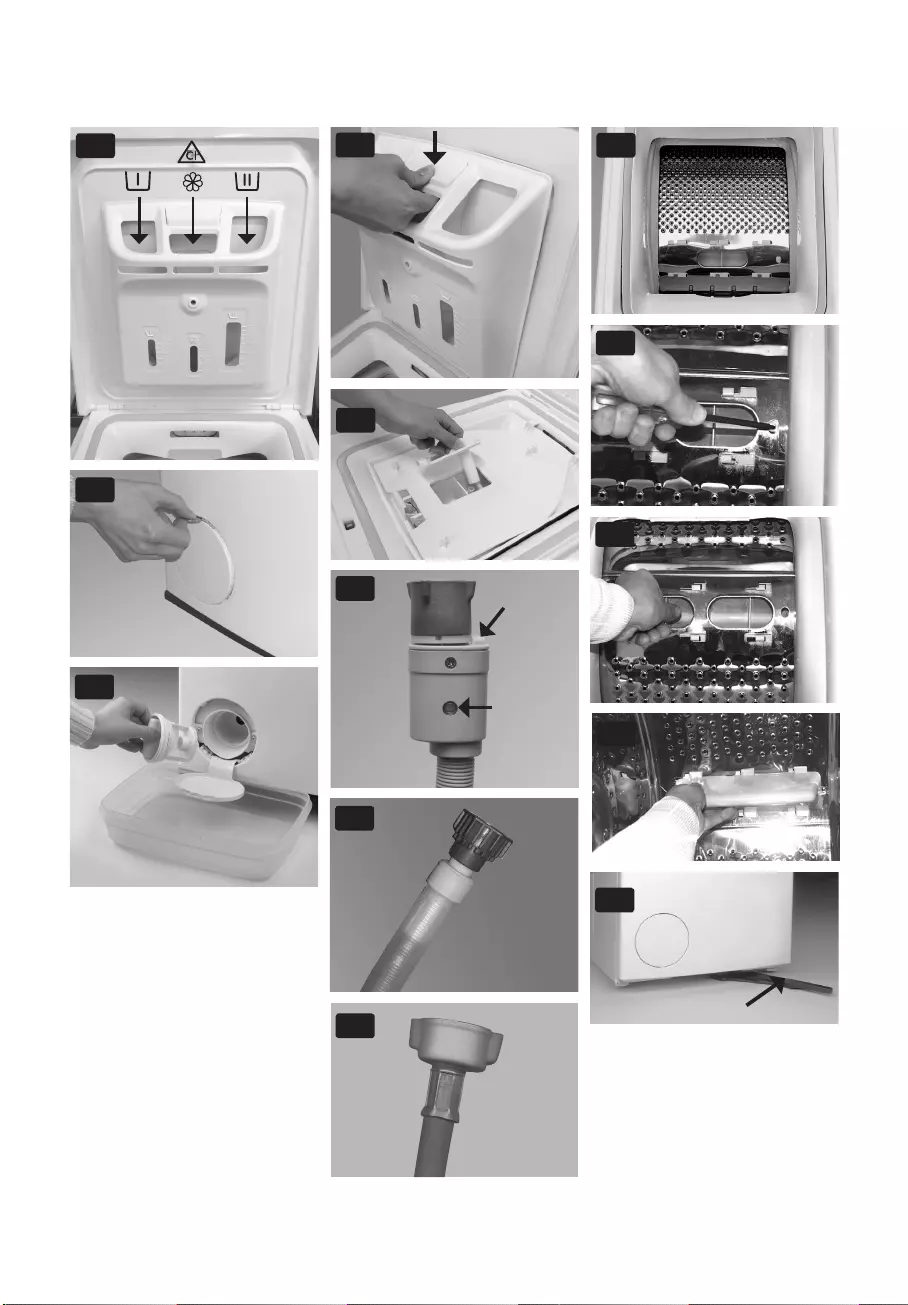
(obr. 17)
Komora pro předpírku
•Prací prostředek pro předpírku (jenom při aktivaci volby “Předpírka”)
Komora pro hlavní praní
•Prací prostředek pro hlavní praní (musí se přidávat pro všechny programy praní).
•Odstraňovače skvrn (libovolně).
•Prostředky ke změkčování vody (libovolně, doporučeně pro stupeň tvrdosti vody 4 nebo více)
 Komora pro změkčovadlo
•Avivážní prostředky (libovolně)
•Škrob rozpuštěný ve vodě (libovolně)
Nepřekračujte značku “MAX” při plnění pracího prášku, přísad, anebo změkčovadla.
Pro další informace týkajíci se dávkování prášku a změkčovadla v jednotlivých programech, nahledněte do samostatné tabulky programů.
Použití chlorového bělidla
•Vyperte prádlo požadovaným programem (Bavlna, Syntetické), do komory na ZMĚKČOVADLO přidejte vhodné množství chlorového bělidla (pečlivě zavřete víko).
•Okamžitě po ukončení programu spust’te program “Máchání a odstřeďování”, abyste odstranili případný pach bělidla; chcete-li, můžete přidat aviváž.
•Nikdy nedávejte chlorové bělidlo a aviváž do komory na změkčovadlo současně
Použití práškového škrobu
Používáte-li práškový škrob, postupujte následujícím způsobem:
•Vyperte prádlo požadovaným pracím programem.
•Potom smíchejte škrob podle pokynů výrobce škrobu.
•Připravený škrobový roztok (max. 100 ml) nalijte do komory na změkčovadlo dávkovače mycího prostředku.
•Pak zavřete víko a spust’te program “Máchání a odstředění”
CS 5
ČIŠTĚNÍ FILTRU/ VYPOUŠTĚNÍ ZBYLÉ VODY
Pračka je vybavena samočisticím čerpadlem. Filtr zachytí knoflíky, mince, zavírací špendlíky apod. které zůstaly v prádle.
Doporučujeme pravidelně filtr kontrolovat a čistit, nejméně dvakrát až třikrát ročně.
Především:
•Jestliže pračka správně nevypouští vodu nebo neodstřeďuje
•Jestliže svítí kontrolka “Vyčistěte čerpadlo”. DŮLEŽITÉ: před vypouštěním pračky si ověřte, zda voda už vychladla.
Zbylou vodu je také nutné vypustit před přepravou pračky.
1.Pračku odpojte od sítě.
2.Mincí otevřete kryt filtru (obr. 18).
3.Pod filtr umístěte misku.
4.Pomalu otáčejte filtrem proti směru chodu hodinových ručiček, až do té doby, kdy začne vytékat voda; filtr však ještě nevytahujte.
5.Počkejte, až vyteče všechna voda.
6.Teprve teď filtr úplně vyšroubujte a vytáhněte (obr. 19).
7.Vyčistěte filtr a jeho komoru.
8.Přesvědčte se, zda není oběžné kolo čerpadla (v krytu za filtrem) zablokované.
9.Filtr zasuňte zpět a zašroubujte ho úplně ve směru chodu hodinových ručiček. Ujistěte se, že je zašroubován správně a na doraz.
10.Do pračky vlijte bubnem přibližně jeden litr vody a zkontrolujte, zda voda nevytéká z filtru.
11.Zavřete kryt filtru.
12.Pračku opět připojte k síti.
PÉČE A ÚDRŽBA
Vždy odpojte pračku od elektrické sítě před provedením jakékoli údržby.
Dávkovač pracího prostředku
Zásuvku na prací prostředek pravidelně čistěte nejméně třikrát nebo čtyřikrát ročně tak, aby se v ní neusazoval pracíprostředek:
1.Stlačte tlačítko pro uvolnění dávkovače a vyjměte ho (obr.20).V dávkovači může zůstat malé množství vody, proto doporučujeme manipulovat s ním ve svislé poloze.
2.Dávkovač umyjte pod tekoucí vodou. Můžete také vyjmout a vyčistit sifon, který je umístěn ve zadní části dávkovče. (obr.21)
3.Sifon pak vrat’te na místo (pokud jste jej vyjmuli).
4.Dávkovač nainstalujte zpět tak, že dolní západky dávkovače zasunete do příslušních otvorů na víku pračky a zatlačíte jej k víku až pokud nezaklapne na své místo.
Ujistěte se, zda je dávkovač na prací prostředky umístěn správně.
Filtr přívodní hadice
Filtr kontrolujte a vyčistěte nejméně dvakrát až třikrát ročně.
1.Pračku odpojte od sítě.
2.Zavřete vodovodní kohoutek.
3.Odšroubujte hadici od vodovodního kohoutku.
4.Filtr na konci hadice pečlivě ho vyčistěte, např. zubním kartáčkem, ale nedemontujte ho. Poznámka: hadici neponořujte do vody.
5.Ohebnou hadici přišroubujte rukou zpět k vodovodnímu kohoutku. Nepoužívejte kleště (nebezpečí rozdrcení přípojky).
6.Otevřete vodovodní kohout a zkontrolujte vodotěsnost spojení.
7.Pračku opět zapojte.
Přívodová hadice
(obr. 22, 23 or 24, v závislosti na modelu)
Pravidelně kontrolujte, není-li hadice zalomena nebo nemá-li trhliny. Pokud je na přívodní hadici vidět poškození, nahraďte ji novou hadicí stejného typu.
Přívodová hadice na obrázku 22 je vybavená bezpečnostním ventilem (A) proti nekontrolovanému napouštění vody do pračky. Je-li okénko bezpečnostního ventilu červené, znamená to, že bezpečnostní funkce hadice pro zastavení vody byla aktivována, a hadice musí být nahrazena novou, již je k dostání v provozovně servisu nebo ve specializované prodejně. Při odšroubovaní přívodní hadice (obr.22) musíte zatlačit na uvolňovací poistku (B) (je-li k dispozici).
Pokud má vaše přívodová hadice průsvitnou povrchovou vrstvu (obr.23), pravidelně kontrolujte její barvu. Pokud barva průsvitného povrchu hadice ztmavla, je to znakem toho, že na hadici je trhlina a hadice by měla být vyměněna. Zavolejte servisní středisko nebo odborného technika, aby vám hadici vyměnili.
Vnější plochy a ovládací panel
•Vyčistěte je měkkým vlhkým hadříkem.
•Je-li to nutné, použijte mýdlovou vodu nebo mírny neutrálni čistíci prostředek (nepoužívejte čistící prostředky obsahující rozpouštědla, abrazivní prostředky, nebo všeobecní čisticí prostředky — mohou poškodit povrch).
Vnitřek pračky
•Po každém praní nechte víko nějakou dobu otevřené, dokud vnitřek pračky nevyschne.
•Jestliže nikdy nebo jen zřídka perete při 95°C, doporučujeme příležitostně spustit některý z programů při 95°C, bez prádla a s menším množstvím pracího prostředku, aby se vnitřek pračky vyčistil.
CS 6

Těsnění víka
•Pravidelně kontrolujte stav těsnění víka a občas je otřete vlhkým hadříkem.
Přívodní hadice
•Pravidelně kontrolujte, zda přívodní hadice nepuchří nebo nepraská. V případě potřeby ji vyměňte.
Filtr
•Filtr pravidelně kontrolujte a čistěte ho nejméně třikrát až čtyřikrát ročně (viz “Čištění filtru/ Vypouštění zbylé vody”).
K čištění spotřebiče nepoužívejte hořlavé tekuté prostředky.
Vyjmutí předmětu zapadlého mezi buben a nádrž
Jestliže Vám nějaký předmět spadne mezi buben a nádrž, můžete ho lehce najít díky vyjímatelnému žebru bubnu:
1.Pračku odpojte od sítě.
2.Vyjměte z bubnu prádlo.
3.Zavřete uzávěry bubnu a otočte bubnem o půl otáčky (obr. 25).
4.S použitím šroubováku stiskněte plastový konec a posunujte žebrem zleva doprava (obr. 26, 27).
5.Žebro spadne do bubnu.
6.Otevřete buben: otvorem v bubnu můžete zapadlý předmět vyjmout.
7.Vnitřkem bubnu žebro znovu nasaďte. Plastový výstupek je přitom nad otvorem na pravé straně bubnu (obr. 28).
8.Pak zasuňte plastové žebro doleva, až zapadne.
9.Opět zavřete uzávěry bubnu, otočte bubnem o půl otáčky a zkontrolujte polohu žebra a všechny upevňovací body.
10.Pračku opět zapojte.
ZBYTKOVÁ VLHKOST PRÁDLA PO ODSTŘEDĚNÍ
Míra zbytkové vlhkosti prádla po odstředění závisí zejména na typu textilu, zvoleném programu a rychlosti odstřeďování.
Nejnižší zbytkovou vlhkost lze dosáhnout výběrem pracího programu, na který odkazuje energetický štítek, s maximální rychlostí odstřeďování. Tento program je vyznačen v samostatné tabulce programů jako “Referenční program pro energetický štítek”. Níže je uveden přehled zbytkové vlhkosti (v %) vztahující se k různým třídám účinnosti odstřeďování — sušení:
|
Třída účinnosti |
Obsah zbytkové vlhkosti v% |
|
odstřeďování — |
|
|
sušení |
|
|
A (= nejúčinnější |
méně než 45 |
|
B |
45 nebo více, ale méně než 54 |
|
C |
54 nebo více, ale méně než 63 |
|
D |
63 nebo více, ale méně než 72 |
|
E |
72 nebo více, ale méně než 81 |
PŘEPRAVA A MANIPULACE (obr. 29)
1.Pračku odpojte od sítě.
2.Zavřete vodovodní kohoutek.
3.Odpojte přívodní a vypouštěcí hadici.
4.Vypust’te zbytky vody z hadic a z pračky (viz “Čištění filtru/Vypouštění zbylé vody”). Vždy počkejte, až voda vychladne, abyste se neopařili.
5.Aby šlo s pračkou lépe manipulovat, povytáhněte přemist’ovací páku umístěnou vpředu dole (jestliže
je jí zakoupený model vybaven) a nohou ji zasuňte do polohy stop. Pak zasuňte páku zpět do původní polohy.
6.Před převozem opět upevněte přepravní lištu.
7.Pračku přepravujte vždy ve svislé poloze.
DŮLEŽITÉ: nezapínejte pračku, je-li přemist’ovací páka vysunutá.
SERVIS
Než se obrátíte na servis:
1.Pokuste se problém vyřešit sami (viz “Jak odstranit poruchu”).
2.Znovu spust’te program, zda se závada opět projeví.
3.Jestliže pračka stále nefunguje správně, zavolejte do naše servisu.
Uveďte:
•Druh poruchy.
•Model pračky
•Servisní kód (číslo za slovem SERVICE
Servisní štítek se nachází uvnitř dvířek.
•Svoji úplnou adresu.
•Telefonní číslo i s předvolbou.
•Telefonní čísla a adresy servisů jsou uvedeny na záručním listu. Můžete se také obrátit na prodejce, u kterého jste pračku zakoupili.
Výrobce:
Whirlpool Europe s.r.l. Viale Guido Borghi 27 21025 Comerio (VA)
Italy
CS 7

JAK ODSTRANIT PORUCHU
Tato pračka je vybavena automatickými bezpečnostními funkcemi, které okamžitě zjistí a určí druh poruchy, a umožní vám vhodným způsobem reagovat. Většinou jde o malé poruchy, které odstraníte během několika minut..
|
Problém |
Příčiny — Řešení — Tipy |
||
|
Pračka nezačala prát, |
• Zástrčka není řádně zasunuta do sít’ové zásuvky. |
||
|
indikátory nesvítí |
• Zásuvka nebo pojistka nefunguje správně (vyzkoušejte je např. stolní |
||
|
lampou či jiným podobným zařízením). |
|||
|
• Pračka se automaticky vypne před spuštěním nebo po ukončení |
|||
|
programu z důvodu úspory energie. Chcete-li pračku zapnout, otočte |
|||
|
nejprve přepínač programů do polohy „Off/O“ (Vyp.) a potom znovu do |
|||
|
polohy požadovaného programu. |
|||
|
Pračka se nespustí, |
• Víko není správně zavřené. |
||
|
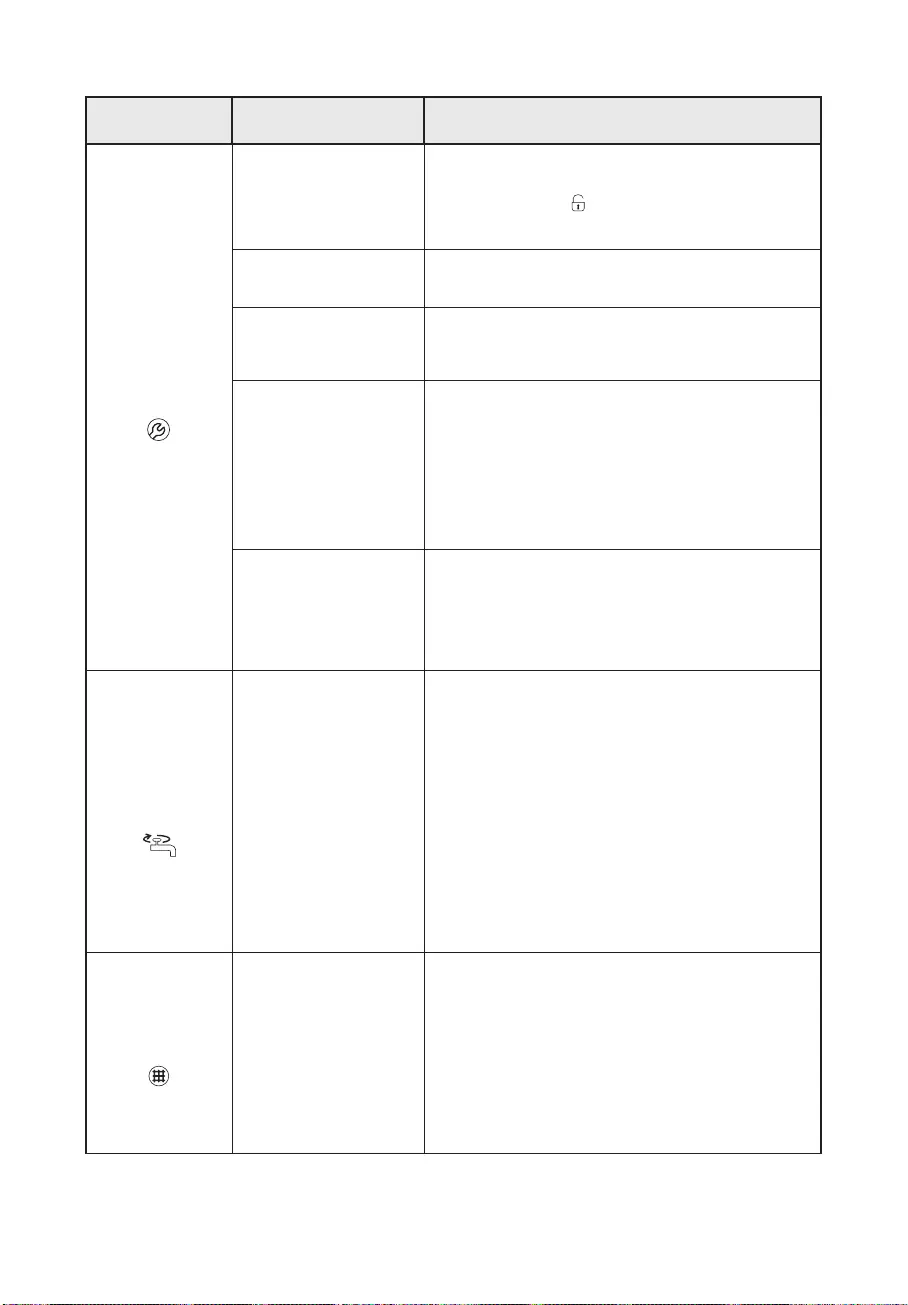
přestože jste stiskli tlačítko |
• Funkce “Dětská pojistka” je zapnutá |
(pokud je u modelu). K |
|
|
“Start (Pauza)” |
odemknutí tlačítek stiskněte současně tlačítko teploty a tlačítko rychlosti |
||
|
odstředění a podržte je na nejméně 3 vteřiny. Symbol klíče na displeji |
|||
|
zmizí a program může být spuštěn. |
|||
|
Pračka se zastavila během |
• Je zapnutá funkce “Zastavení máchání” (pokud je u pračky k dispozici) |
||
|
programu a indikátor “Start |
— funkci “Zastavení máchaní” ukončete stiskem tlačítka “Start (Pauza)”, |
||
|
(Pauza)” bliká” |
nebo volbou a spuštěním “Vypouštění”. |
||
|
• Program byl změněn — zvolte opět požadovaný program a stiskněte |
|||
|
tlačítko “Start (Pauza)”. |
|||
|
• Program byl přerušen a možná došlo i k otevření víka — zavřete víko a |
|||
|
restartujte program stisknutím tlačítka “Start (Pauza)”. |
|||
|
• Bezpečnostní systém pračky byl aktivován (viz “ Význam indikátorů |
|||
|
poruch”). |
|||
|
• Vodovodní kohout není otevřený nebo je přívodní hadice ohnutá (svítí |
|||
|
indikátor “Vodovodní kohoutek zavřený”). |
|||
|
Po praní zůstávají v násypce |
• Dávkovač na prací prostředky není správně umístěný, nebo je zanesený |
||
|
zbytky pracích prostředků |
(viz “Péče a údržba”). |
||
|
anebo přísad |
• Filtr v přívodní hadici je zanesený (viz “Péče a údržba”). |
||
|
Pračka při odstřeďování |
• Pračka není vyrovnaná; nožičky nejsou správně seřízené (viz |
||
|
vibruje |
“Instalace”). |
||
|
• Neodstranili jste přepravní lištu; před použitím pračky musí být tato |
|||
|
přepravní lišta odstraněna. |
|||
|
Závěrečné odstředění je |
• Nevyvážení během roztáčení spustilo ochranu pračky proti poškození v |
||
|
nedostatečné |
průběhu fáze odstřeďování (viz “Nevyvážení během odstřeďování). |
||
|
• Pračka nespustí odstřeďování také při nadbytečném množství pěny; |
|||
|
zvolte a spust’te program “Máchání a odstřeďování”. Nepoužívejte |
|||
|
nadměrné množství pracího prostředku (viz “Prací prostředky a |
|||
|
přísady”). |
|||
|
• Tlačítkem “Odstředění” byla nastavená nízka rychlost odstředění. |
|||
|
Nevyvážení během |
Nevyvážení náplně prádla během odstřeďování spustilo ochranu pračky |
||
|
odsřeďování” |
proti poškození v průběhu fáze odstřeďování. Z tohoto důvodu je prádlo |
||
|
Bliká kontrolka |
stále velmi mokré. |
||
|
“Odstřeďování/ Odčerpání |
Příčinou nevyvážení může být: malá náplň prádla (která obsahuje pouze |
||
|
vody“) na indikátoru postupu |
několik velkých nebo savých kusů prádla, např. ručníků) nebo velké/těžké |
||
|
programu, nebo bliká zo- |
kusy prádla. |
||
|
• Podle možnosti nevkládejte malé množství prádla. |
|||
|
brazení rychlosti na displeji, |
|||
|
• Při praní velkých nebo těžkých kusů prádla doporučujeme přidat ještě |
|||
|
nebo bliká indikátor rychlosti |
|||
|
prádlo jiné velikosti. |
|||
|
odstřeďování po skončení |
|||
|
Pokud chcete odstředit mokré prádlo, přidejte prádlo různých velikostí a |
|||
|
programu (v závislosti na |
|||
|
následně zvolte a spusťte program “Máchání a Odstřeďování”. |
|||
|
modelu). |
|||
|
Prádlo je stále velmi mokré. |
|||
|
Doba programu je značně |
Normální funkce pračky přizpůsobit se okolnostem, které mohou mít vliv |
||
|
delší nebo kratší než je |
na dobu trvání programu, např.: přílišné množství pěny, nevyváženost při |
||
|
doba uvedená v tabulce |
vložení těžkých kusů prádla, prodloužená doba ohřevu při snížené teplotě |
||
|
programů, nebo na |
přiváděné vody atd… Kromě toho snímací system pračky přizpůsobí délku |
||
|
displeji (pokud je u |
pracího programu danému množství prádla. |
||
|
modelu k dispozici) |
V závislosti na těchto faktorech, doba trvání je přepočítávana v průběhu |
||
|
programu a aktualizována podle potřeby. Na displeji (je-li k dispozici) se |
|||
|
během upravy doby objeví animace. Pro malé množství prádla může |
|||
|
být časový údaj v tabulce programů sníženy až na 50%. |
|||
|
CS 8 |
 Loading…
Gebrauchsanweisung
Instructions for use
Mode d’emploi
Gebruiksaanwijzing
Istruzioni per l’uso
Brugsanvisning
Bruksanvisning
Käyttöohje
Manual de utilização
Instrucciones para el uso
Instrukcje użytkowania
Használati utasítás
ИнструкциЯза употреба
Návod k použití
Návod na použitie
Instruc∑iuni de utilizare
Инструкции по эксплуатации
Қолдану бойынша нұсқаулық Інструкція з експлуатації
A
AB
A
B
2
3
C
D
4
5
6
7
8
914
a
1
b
c
d
g
ef
g
10
11
12
13
15
16

EN 1
INTENDED USE
This washing machine is exclusively destined to wash
and spin machine washable laundry in quantities
which are usual for private households.
• Observe the instructions given in these Instructions
for Use and the Programme Chart when using the
washing machine
• Keep these Instructions for Use and the
Programme Chart; if you pass on the washing
machine to another person, also give him/her
Instructions for Use and Programme Chart.
SAFETY AND GENERAL RECOMMENDATIONS
1. Safety instructions
• The washing machine is
appropriate for indoor use only.
• Do not store flammable fluids
near the appliance.
• Do not place electrical
appliances on the lid of your
washing machine.
• Children must be supervised to
ensure that they do not play with
the appliance.
• Children younger than 3 years
should be kept away from the
washing machine, unless they
are continuously supervised.
• The washing machine can
be operated by children from
the age of 8 years up, as well
as by people with reduced
physical, sensory or mental
capabilities or lack of experience
and knowledge, provided they
are supervised or instructed
regarding the safe use of the
washing machine and they
understand the dangers resulting
from the use. Children must not
play with the washing machine.
Care and maintenance works on
the washing machine must not
be carried out by children without
being supervised.
• Do not attempt to force the lid
open.
• If necessary, the power cable
may be replaced with an
identical one obtained from our
After-Sales Service. The power
cable must only be replaced by a
qualified technician.
• Before any cleaning or carrying
out maintenance switch off the
washing machine and disconnect
it from the mains supply.
• The ventilation openings in the
base of the washing machine
must not be obstructed by thick
carpet.
2. Packing
• The packaging materials are 100% recyclable
and bear the recycling symbol . Adhere to local
regulations when disposing of packaging material
3. Disposing of packaging and old
washing machines
• This appliance is marked according to the
European directive 2002/96/EC on Waste Electrical
and Electronic Equipment (WEEE). By ensuring
this product is disposed of correctly, you will help
prevent potential negative consquences for the
environment and human health, which could
otherwise be caused by inappropriate waste
handling of this product.
• The symbol on the product, or on the
documents accompanying the product, indicates
that this appliance may not be treated as
household waste. Instead it shall be handed over
to the applicable collection point for the recycling
of electrical and electronic equipment. Disposal
must be carried out in accordance with local
environmental regulations for waste disposal.
For more detailed information about treatment,
recovery and recycling of this product, please
contact your local city office, your household waste
disposal service or the shop where you purchased
the product.
• The washing machine is built from reusable
materials. It must be disposed of in compliance
with current local waste disposal regulations.
• Before scrapping, remove all detergent residues
and cut off the power cable so that the washing
machine is made unusable.
4. General recommendations
• Do not leave the washing machine connected
when not in use. Turn off the tap.

EN 2
5. EC Declaration of Conformity
• This washing machine has been designed,
constructed and distributed in compliance
with the safety requirements of EC Directives:
2006/95/EC Low Voltage Directive 2004/108/EC
Electromagnetic Compatibility Directive
The Manufacturer is not liable for any damage to
laundry resulting from inadequate or incorrect fabric
care instructions which have been provided with the
garment or article.
BEFORE USING THE WASHING MACHINE
1. Remove the packaging and check
a. Cut and remove the shrink-wrap.
b. Remove the top protection and the protective
corners.
c. Remove the bottom protection by tilting and
turning the washing machine on one rear
bottom corner. Make sure that the plastic part
of the bottom protection (if available on the
model) remains in the packing and not in the
machine bottom.
This is important, as otherwise the plastic part could
damage the washing machine during operation.
d. Open the lid by pressing it slightly down while
raising the handle. Remove the polystyrene
cushion (depending on model).
e. Remove the blue protective film from the panel
(depending on model).
• After unpacking, make sure that the washing
machine is undamaged. If in doubt, do not use the
washing machine. Contact After-Sales Service or
your local retailer.
• Keep the packaging materials (plastic bags,
polystyrene parts, etc.) out of reach of children;
they are potentially dangerous.
• If the appliance was exposed to the cold prior to
delivery, keep it at room temperature for a few
hours before operating.
2. Remove the transport bracket
• The washing machine is fitted with transport
screws and a transport bracket to prevent damage
during transport. Before using the washing
machine you must remove the transport
bracket (see “Installation”/“Removal of transport
bracket”).
3. Install the washing machine
• Place the washing machine on a flat and stable
floor surface.
• Adjust the feet to ensure that the machine is
stable and level (see “Installation”/“Adjust the
feet”).
• In case of wooden or so-called “floating floors” (for
instance certain parquet or laminate floors), place
the appliance on a sheet of plywood with a size of
at least 40 x 60 cm and thickness of at least 3 cm,
which is screwed to the floor.
• Make sure that the ventilation openings in the
base of your washing machine (if available on your
model) are not obstructed by a carpet or other
material.
4. Water supply
• Connect the water supply inlet hose in accordance
with the regulations of your local water company
(see “Installation”/“Connect the water inlet hose”).
• Water supply: Cold water only
• Tap: 3/4” threaded hose connection
• Pressure: 100-1000 kPa (1-10 bar).
• Only use new hoses for connecting the washing
machine to the water supply. Used hoses must not
be used anymore and should be discarded.
5. Drain hose
• Firmly connect the drain hose to the siphon or
another outlet for drain water. (see “Installation”/
Connect the water drain hose”).
• If the washing machine is connected to a built-in
drainage system, ensure the latter is equipped with
a vent to avoid simultaneous loading and draining
of water (siphoning effect).
6. Electrical connection
• Electrical connections must be carried out by a
qualified technician in compliance with the manu-
facturer’s instructions and the current standard
safety regulations.
• The technical data (voltage, power and fuses) are
given on the rating plate on the rear of the washing
machine.
• Do not use extension leads or multi sockets.
• Access to the mains plug or disconnection from
the mains supply via a double-pole switch must be
ensured at all times after the installation.
• Do not operate the washing machine if it has been
damaged during transport. Inform the After-Sales
Service.
• Mains cable replacement is only to be carried out
by After-Sales Service.
• The washing machine must be connected exclu-
sively by means of a socket with an earth connec-
tion, in compliance with the regulations in force. In
particular, washing machines installed in premises
containing a shower or a bath must be protected
by a differential residual current device of at least
30 mA. Earthing the washing machine is obliga-
tory under the law. The manufacturer declines all
liability for injury to persons or animals or damage
to property deriving either directly or indirectly from
failure to observe the directions in these Instruc-
tions for Use.
• When using a residual current circuit breaker
(RCCB), only use a model marked with .
Approximate dimensions:
Width: 400 mm
Height: 900 mm
Depth: 600 mm

EN 3
DESCRIPTION OF THE WASHING MACHINE (picture 1)
a. Lid
b. Detergent dispenser
c. Drum
d. Pump access behind filter
e. After-Sales Service sticker (behind the filter cover)
f. Mobility lever (depending on model). To move the
washing machine: pull the handle out a little bit by
hand and pull it out to the stop with the foot.
g. Adjustable feet
INSTALLATION
Removal of transport bracket
The washing machine is fitted with a transport bracket
to avoid any possible damage during transport.
IMPORTANT: Before using the washing machine,
the transport bracket at the back MUST be
removed.
1. Unscrew the two screws “A” and the four screws
“B” with a flat screwdriver or a No. 8 hex nut box
spanner (picture 2).
2. Remove the transport bracket (picture 3).
3. Replace the four outer screws “B” on the machine
and tighten them (picture 2).
4. Clip the two covers “C” supplied into the openings
“D” of the washing machine (picture 4).
Note: do not forget to replace and tighten the four
outer screws.
Adjust the feet (picture 5, 6)
Install the washing machine on a level surface, near
to electrical, water and drain connections.
If the floor is uneven, adjust the feet (do not insert
pieces of wood, cardboard etc. under the feet):
1. Screw out the washing machine´s feet by hand
with 2-3 clockwise turns and then slacken the
locknut by wrench.
2. Adjust the height of the feet by hand.
3. Retighten the locknut by turning it anti-clockwise
towards the washing machine’s bottom.
Make sure that the feet are resting correctly on the
floor and that the washing machine is perfectly
level and stable (use a spirit level).
The washing machine can be installed in an area 40
cm wide and 63 cm deep.
Note: if you install the machine on thick carpet, adjust
the feet to ensure that there is sufficient space under
the machine for the air to circulate.
Connect the water inlet hose (picture 7)
1. Carefully screw the water inlet hose to the valve
on the rear side of the washing machine (A); screw
the other end of the hose to the tap by hand.
2. Make sure there are no kinks in the hose.
3. Check water-tightness of tap and washing machine
connections by turning the tap completely on.
• If the hose is too short, replace it with a suitable
length of pressure resistant hose (1000 kPa min,
EN 61770 approved type).
• If you need a longer waterstop hose, contact our
After Sales Service or your dealer.
• Check the inlet hose regularly for brittleness and
cracks and replace if necessary.
• The washing machine can be connected without a
backflow valve.
Water stop anti-flooding system (picture 8)
(if available)
• Screw the hose to the water supply tap. Turn the
tap fully on and check the water-tightness of the
connection.
• The washing machine must not be connected to
the mixing tap of a non-pressurized water heater!
• Do not immerse the water stop device of the hose
into water; otherwise it will loose its protective
function.
• If the flexible hose is damaged, unplug the washing
machine from the mains immediately, turn off the
tap and replace the hose.
• If the flexible hose is too short, replace it with a 3
m Water Stop hose (available from After-Sales
Service or from your dealer).
Connect the water drain hose (picture 9)
Unhook the drain hose from the left clip, see arrow
“A” on picture.
Important:
Do NOT loosen the drain hose from the right con-
nection, see arrow “B” on picture. Otherwise, there
is the risk of leakage and of scalding with hot water.
Firmly connect the drain hose to the siphon or another
outlet for drain water.
If you need to add an extension, use a flexible hose
of the same size and secure the unions with screw-on
hose clips.
Maximum overall drain hose length: 2.50 m.
Maximum drain height: 100 cm.
Minimum drain height: 55 cm.
Important:
Make sure there are no kinks in the drain hose and
take precautions against it falling while the washing
machine is running.
EN 4
Do not use extension leads or multi sockets.
Electrical connections must be made in accordance with local regulations.
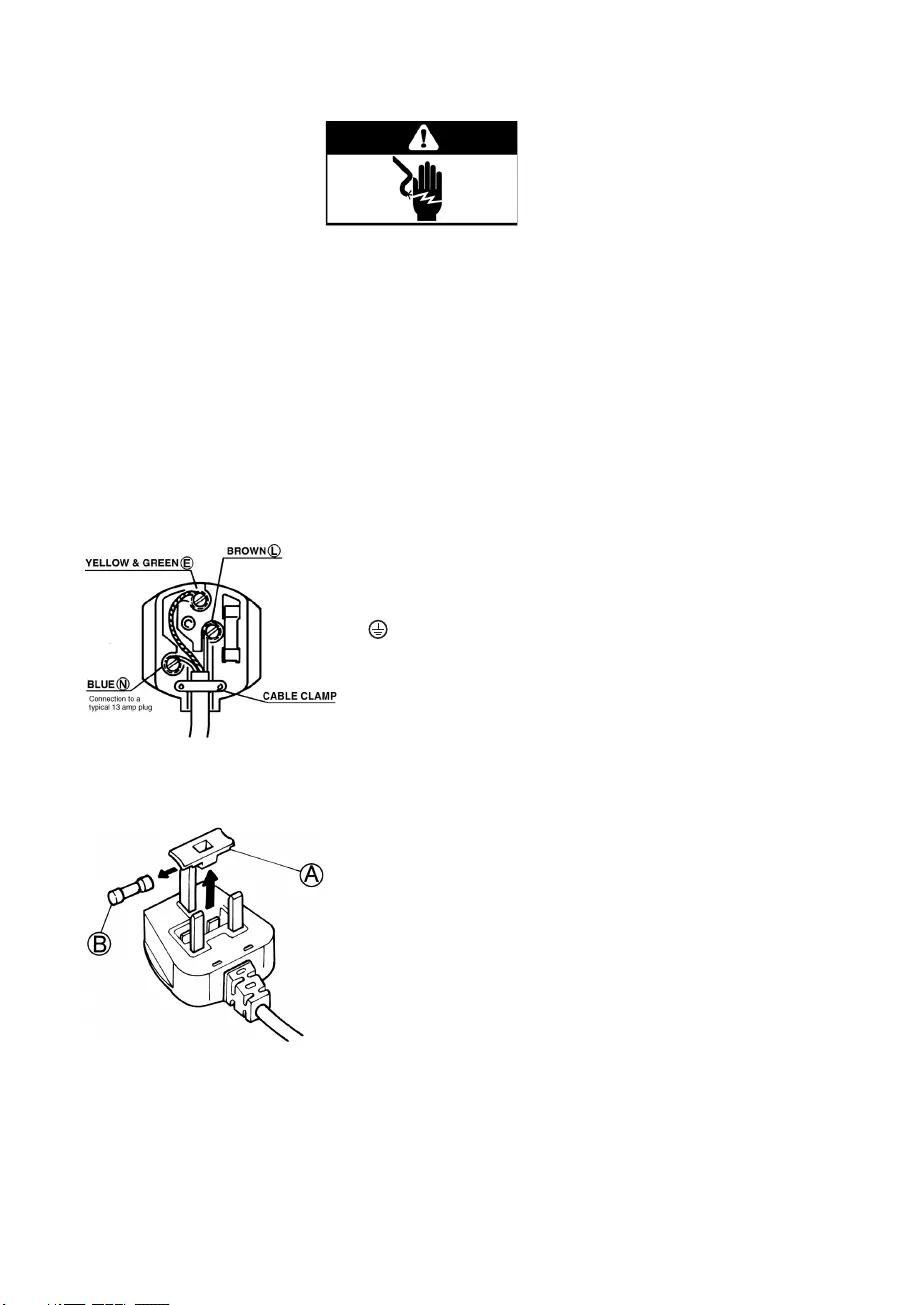
1) Warning — this washing machine must be earthed
This washing machine is normally supplied with a mains lead having a plug fitted in the factory which has
been checked for correct earth continuity.
If the fitted plug is not suitable for your socket outlet, or if the machine’s mains lead is not fitted with a plug,
you should fit a suitable new, good quality plug by following the instructions in (2) below.
Any unsuitable plug should be cut off and disposed of in order to avoid a possible shock hazard should it be
inserted into a socket.
2) CONNECTION TO A REWIRABLE PLUG — to be carried out only by a qualified electrician
The wires in the mains lead are coloured in accordance with the following code:
BLUE — “NEUTRAL” (“N”)
BROWN — “LIVE” (“L”)
GREEN AND YELLOW — “EARTH” (“E”)
To fit a new plug, proceed as follows:
2.1)Polarized Plugs (e.g. 3 pin, 13 amp plug conforming to BS
1363A)
a. The GREEN AND YELLOW wire must be connected to the terminal
in the plug which is marked with the letter “E” or by the Earth symbol
or coloured green and yellow.
b. The BLUE wire must be connected to the terminal which is marked
with the letter “N” or coloured blue.
c. The BROWN wire must be connected to the terminal which is
marked with the letter “L” or coloured brown.
2.2) Non-polarized plugs (e.g. 2 pin with side earth contact)
The wire which is coloured GREEN AND YELLOW must be connected to the earth contact. The other two
wires should be connected to the two pins, irrespective of colour.
FUSE REPLACEMENT
If the mains lead of this washing machine is fitted with a BS 1363A 13
amp fused plug, replace the fuse only with an A.S.T.A. approved type con-
forming to BS 1362 and proceed as follows: Remove the fuse cover (A)
and the fuse (B). Fit the replacement 13 A fuse into the fuse cover. Refit
both into the plug. For all other types of plug, the supply socket should be
protected by a 16 A fuse or circuit breaker at the distribution board.
ELECTRICAL CONNECTION

EN 5
BEFORE THE FIRST WASH CYCLE
To remove any residual water used in testing by the
manufacturer, we recommend that you carry out a
short wash cycle without laundry.
1. Open the tap.
2. Close the drum flaps.
3. Add a small amount of detergent (maximum
1/3 of the quantity the detergent manufacturer
recommends for lightly soiled laundry) to the main
wash chamber of the detergent dispenser.
4. Close the lid.
5. Select and start programme “Synthetics” at 60°C
(see separate the programme chart).
PREPARATION OF THE LAUNDRY
Sort the laundry
1. Sort the laundry according to…
• Type of fabric / care label symbol
Cottons, mixed fibres, easy care/synthetics, wool,
handwash items.
• Colour
Separate whites and coloureds. Wash new
coloured items separately.
• Size
Wash items of different sizes in the same load to
improve washing efficiency and distribution in the
drum.
• Fabric delicacy
Wash delicate articles separately: use a special
programme for Pure New Wool , curtains and
other delicates. Always remove curtain glides or
wash curtains with the glides inside a cotton bag.
Use the special programme for handwash fabrics.
Wash stockings, belts and other small items or
articles with hooks (e.g. bras) in special cotton
bags for washing machines or in zipped pillow
cases.
2. Empty pockets
Coins, safety pins and similar items can damage
your laundry as well as the washing machine’s
drum and tub.
3. Fasteners
Close zips and fasten buttons or hooks; loose belts
or ribbons should be tied together.
Stain remwoval
• Blood, milk, egg and other organic substances are
generally removed by the enzyme phase of the
programme.
• To remove red wine, coffee, tea, grass and
fruitstains etc. add a stain remover to the main
wash chamber of the detergent dispenser.
• Particularly stubborn stains should be treated
before the wash.
Dyeing and bleaching
• Only use dyes and bleaches that are suitable
forwashing machines.
• Follow the manufacturer’s instructions.
• Plastic and rubber parts of the machine may be
stained by dyes or bleaches.
Loading the laundry
1. Open the machine lid by pulling it upwards.
2. Open the drum
—by pushing the drum flap release (picture 10,11);
models as shown on picture 10 have a fixed
drum flap release which will not compress when
pushed.
—by holding the rear drum flap, sliding back the
slider into arrow direction and pushing the front
flap towards the inside of the drum until the
closing mechanism releases (picture 12).
3. Place the items of laundry into the drum one by
one. Do not exceed the maximum load of the
programmes indicated in the separate programme
chart.
—Overloading the machine will result in
unsatisfactory washing results and creased
laundry.
—Take care that the laundry does not overhang the
drum; if this is the case, push the laundry down
into the drum so that there is enough free space
to close the drum flaps properly.
—Do not use the flaps to push the laundry into the
drum.
4. To close the drum, hold both flaps in the middle
again (picture 13), the rear flap over the front flap.
ATTENTION: make sure that the drum flaps are
properly locked — depending on the model:
—all metal hooks must be properly hooked inside
the rear door flap — see picture 14.
—all metal hooks must be properly hooked inside
the rear door flap, and the button must overlap
the edge of the rear door flap see picture 15.
—the slider of the front flap must slightly overlap
the rear flap — see picture 16.
Check that no laundry gets stuck between the flaps,
or between flaps and drum.

EN 6
DETERGENTS AND ADDITIVES
Keep detergents and additives in a safe, dry
place out of the reach of children.
Do not use any solvents (e.g. turpentine,
benzene); do not machine wash fabrics that
have been treated with solvents or flammable
liquids.
Only use detergents and/or additives that are
specifically produced for domestic washing
machines. Observe the recommendations on the
care labels of your laundry.
The choice of detergent depends on:
• Type of fabric
• Colour
• Recommended wash temperature
• Degree and type of soiling
Laundry type Kind of detergent
White robust laundry
(cold-95°C):
heavy duty detergents with
bleach
White delicate laundry
(cold-40°C):
mild detergents with bleach
and/or optical brighteners
Light /pastel- shaded
colours (cold-60°C):
detergents with bleach and/
or optical brighteners
Intensive colours
(cold-60°C):
colour detergents without
bleach/optical brighteners
Black/dark
colours(cold-60°C):
special detergents for black/
dark laundry
For laundry requiring special treatment (e.g. wool
or microfibers), we recommend to use specialized
detergents, additives or pre-treatment available on the
market. Refer to internet link www.cleanright.eu for
more detailed information.
Do not use liquid detergent for the main wash
when having activated the “Prewash” option.
Do not use liquid detergent when selecting a
later cycle start / cycle end (depending on the
model).
Dosage
Follow the dosage recommendations on the detergent
pack. They depend on:
• degree and type of soiling
• size of wash
—full load: follow the detergent manufacturer’s
instructions;
—half load: 3/4 the amount used for a full load;
—minimum load (about 1 kg): half the amount used
for a full load
If there is no reference to a certain wash load on
the detergent pack: the detergent manufacturers
usually refer their dosing recommendations to 4.5
kg laundry for heavy duty detergent and 2.5 kg
laundry for delicate detergent.
• water hardness in your area (ask for information
from your water company). Soft water requires less
detergent than hard water.
Please note:
Too much detergent can result in excess foam
formation, which reduces washing efficiency. If the
washing machine detects too much foam, it may
prevent spinning, or prolong the programme duration
and increase the water consumption (see also
remarks on foam formation in the “Troubleshooting
Guide”). Insufficient detergent may result in grey
laundry and also calcifies the heating system, drum
and hoses.
Where to put detergents and additives
(picture 17)
Prewash chamber
• Detergent for the prewash phase (only if you
have activated “prewash” option)
Main wash chamber
• Detergent for the main wash phase (must be
added for all wash programmes)
• Additive for stain removal (optional)
• Water softener (optional; recommendable for
water hardness class 4 or more)
Softener chamber
• Fabric softener (optional)
• Starch dissolved in water (optional)
Do not exceed the “MAX” level mark when filling in
detergent, additives or softener.
For more information regarding the application of
detergent and fabric softener in the programmes,
have a look at the separate program chart.
Using chlorine bleach
• Wash your laundry in the desired programme
(Cotton, Synthetics), adding an appropriate amount
of chlorine bleach to the SOFTENER chamber
(close the lid carefully).
• Immediately after end of programme, start the
“Rinse and Spin” programme to eliminate any
residual bleach smell; if you want, you can add
softener.
• Never put both chlorine bleach and softener into
the softener chamber at the same time.
Using starch powder
• Wash your laundry in the desired wash
programme.
• Prepare the starch solution according to the starch
manufacturer’s instructions.
• Fill the prepared starch solution (maximum 100
ml) into the softener chamber of the detergent
dispenser.
• Close the lid and start programme “Rinse and
Spin”.

EN 7
CLEANING THE FILTER/ DRAINING RESIDUAL WATER
The washing machine is provided with a self-cleaning
pump. The filter keeps objects like buttons, coins,
safetypins etc. which have been left in the laundry.
We recommend to check and clean the filter regularly,
at least two or three times a year.
Especially:
• if the appliance is not draining properly or if it fails
to perform spin cycles.
• if the “Pump” indication lights up.
IMPORTANT: make sure the water has cooled
before draining the appliance.
Residual water must be drained also before transport-
ing the machine.
1. Unplug the washing machine.
2. Open the filter cover with a coin (picture 18).
3. Place a bowl beneath it.
4. Turn the filter slowly anti-clockwise until some
water starts to flow out; do not remove it as yet.
5. Wait until all the water has drained.
6. Now unscrew the filter completely and extract it
(picture 19).
7. Clean the filter and the filter chamber.
8. Make sure the pump impeller (in the housing
behind the filter) is not obstructed.
9. Insert the filter again and screw it in
completely in clockwise direction. Make
sure the filter is screwed in properly, as far
as it will go.
10. Pour approximately one litre of water into the
washing machine via the drum and check that
water does not leak from the filter.
11. Close the filter cover.
12. Reconnect the washing machine.
CARE AND MAINTENANCE
Always unplug the washing machine before doing any maintenance.
Detergent dispenser
Clean the detergent dispenser regularly, at least
three or four times a year, to prevent detergent
build-up:
1. Press the button to release the detergent dispenser
and remove it (picture 20). A small quantity of
water can remain in the dispenser, thus you should
carry it in an upright position.
2. Wash the dispenser using running water. You can
also remove the siphon cap on the back of the
dispenser for cleaning (picture 21).
3. Replace the siphon cap in the dispenser (if
removed)
4. Reinstall the dispenser by locating the dispenser’s
bottom tabs into the appropriate openings on the
lid, and by pushing the dispenser against the lid
until it locks into place.
Make sure that the detergent dispenser is
correctly reinstalled.
Water inlet hose filter
Check and clean regularly (at least two or three
times a year).
1. Unplug the washing machine.
2. Turn off the tap.
3. Unscrew the hose from the tap.
4. Carefully clean the filter located at the end of hose,
without disassembling it, for example with a tooth-
brush.
Note: Do not submerge the hose in water.
5. Screw the flexible hose back onto the tap by hand.
Do not use pliers (risk of squashing the joint).
6. Turn on the tap and check that the connections
are water-tight.
7. Plug the washing machine back in.
Water inlet hose
(picture 22, 23 or 24, depending on model)
Check the inlet hose regularly for brittleness and
cracks and replace it if necessary using a new hose of
the same type.
The inlet hose as shown on picture 22 has a safety
valve to prevent the appliance against uncontrolled
water inlet; if the safety valve inspection window (A) is
red, the safety valve has been activated and the hose
must be exchanged. Contact out After-Sales Service
or your specialist dealer to obtain a new inlet hose.
For unscrewing the inlet hose as shown on picture 22,
you must push down the release lever (B) (if available)
while unscrewing it.
If your inlet hose has a transparent hose coating
(picture 23), periodically check the colour of the
transparent coating. If the transparent hose shows a
local dark colour change, this is an indication that the
hose may have a leak and should be replaced.
Contact our After-Sales Service team or specialist
dealer to obtain a replacement hose.
Appliance exterior and control panel
• Clean with a soft damp cloth.
• If necessary, use some soapy water or a mild
neutral detergent (do not use detergents containing
solvents, abrasive detergents, window or general-
purpose cleaners — they may harm the surfaces).
Appliance interior
• After each washing, leave the lid open for some-
time to allow the inside of the appliance to dry.
• If you never or seldom wash your laundry at
95°C, we recommend to occasionally run a 95°C
programme without laundry, adding a small amount
of detergent, to keep the interior of the appliance
clean.
Lid seal
• Check the condition of the lid seal periodically and
clean it from time to time with a damp cloth.
EN 8
Water inlet hose(s)
• Check the hose regularly for brittleness and cracks.
Replace if necessary.
Filter
• Check and clean the filter regularly, at least 3 or
4 times a year (see “Cleaning the Filter/ Draining
Residual Water”).
Do not use flammable fluids for cleaning the
appliance.
Recovering an object that falls between
the drumand the tub
If an object accidentally falls between the drum and
the tub, you can recover it thanks to one of the remov-
able drum blades:
1. Unplug the washing machine.
2. Remove the laundry from the drum.
3. Close the drum flaps and turn the drum a
half-turn (picture 25).
4. Using a screw-driver, press on the plastic end while
sliding the blade from left to right (picture 26, 27).
5. It will fall into the drum.
6. Open the drum: you can recover the object
through the hole in the drum.
7. Refit the blade from inside the drum: Position the
plastic tip above the hole on the right side of the
drum (picture 28).
8. Then slide the plastic blade from right to left until
it clips.
9. Close the drum flaps again, turn the drum through
half a turn and check the positioning of the blade at
all its anchorage points.
10. Plug the washing machine in again.
REMAINING MOISTURE CONTENT OF THE LAUNDRY
AFTER SPINNING
The degree of moisture remaining in the laundry
after spinning mainly depends on the fabric type, the
selected programme and spin speed.
The lowest remaining moisture content can be
achieved using the wash programme referred to by
the Energy Label, with maximum spin speed. This
programme is marked in the separate programme
chart as “Reference programme for the Energy Label”.
Below a survey of the remaining moisture content
(in %) related to the various spin-drying efficiency
classes:
TRANSPORT AND HANDLING (picture 29)
1. Unplug the washing machine.
2. Turn off the tap.
3. Remove the water supply and drain hose.
4. Eliminate all water from the hoses and the washing
machine (see “Cleaning the Filter/ Draining
Residual Water”). Wait for the water to cool so as to
avoid any accidents.
5. To facilitate moving the machine, pull the handle
situated at the bottom front (if available on your
model) out a little by hand and pull it out to the stop
with the foot. Afterwards push the handle back into
the original stable position.
6. Fix the transport bracket again for transportation.
7. Transport the washing machine upright.
IMPORTANT: Do not use the washing machine while
the handle is pulled out.
AFTER-SALES SERVICE
Before contacting After-Sales Service:
1. Try to remedy the problem yourself (see
“Troubleshooting Guide”).
2. Restart the programme to check whether the
problem has solved itself.
3. If the washing machine continues to function
incorrectly, call After-Sales Service.
Specify:
• The nature of the problem.
• The exact model of the washing machine.
• The service code (number after the word
SERVICE).
The After-Sales Service sticker is situated
behind the filter cover or on the rear of the
machine.
• Your full address.
• Your telephone number and area code. As a
priority, you should contact the After-Sales Service
of the retailer who supplied you with the washing
machine.
Manufacturer:
Whirlpool Europe s.r.l.
Viale Guido Borghi 27
21025 Comerio (VA)
Italy
Spin-drying efficiency
class
Remaining moisture
content in %
A (= most efficient) less than 45
B45 or more, but less than 54
C54 or more, but less than 63
D63 or more, but less than 72
E72 or more, but less than 81
EN 9
TROUBLESHOOTING GUIDE
Your washing machine is equipped with automatic safety functions which detect and diagnose faults at an early
stage and allow you to react appropriately. These faults are frequently so minor that they can be removed within
a few minutes.
Problem Causes — Solutions — Tips
Appliance does not start,
no indicator lamps are on
• Plug is not properly inserted in socket.
• Socket or fuse does not function correctly (use a table lamp or similar
appliance to test it).
• The washing machine switched off automatically to save energy, before
programme start or after programme end. To switch on the washing
machine, turn the programme selector first to “Off/O” and then to the
desired programme again.
Appliance does not start
although “Start(Pause)”
has been pressed
• Lid is not properly closed.
• The “Child lock” function has been activated (if available on your
model). To unlock the buttons, push temperature and spin speed button
simultaneously and hold them at least for 3 seconds. The key symbol on
the display disappears and the programme can be started.
Appliance stops during the
programme, and the
“Start(Pause)” light blinks
• “Rinse hold” option is activated (if available on your model) — terminate
“Rinse hold” by pressing “Start(Pause)” or by choosing and starting
“Drain”.
• Programme has been changed — reselect desired programme and press
Start(Pause)”.
• Programme has been interrupted and eventually lid has been opened —
close lid and restart programme by pressing “Start(Pause)”.
• The appliance’s safety system has been activated (see “Description of
failure indicators”).
• Water tap is not opened or water inlet hose is kinked (“Water tap closed”
indicator lights up).
Detergent dispenser
contains residues from
detergent/additives at end
of wash
• Detergent dispenser is not properly installed, or detergent dispenser is
blocked (see “Care and Maintenance”).
• Filter in the water inlet hose is blocked (see “Care and Maintenance”).
Appliance vibrates during
spin cycle
• Washing machine is not level; the feet are not properly adjusted (see
“Installation”).
• The transport bracket has not been removed; before using the washing
machine, the transport bracket must be removed.
Final spin results are poor • Unbalance during spinning prevented spin phase to protect the washing
machine (see “Unbalance during spinning”).
• Excessive foam formation prevented spinning; select and start “Rinse &
Spin” programme. Avoid excessive detergent dosing (see “Detergents
And Additives”).
• “Spin” button has been set to a low spin speed.
“Unbalance during spinning”
The “Spin/Drain” indicator
in the programme flow bar
blinks, or the spin speed on
the display blinks, or the spin
speed indicator blinks after
the end of the programme
(depending on the model).
The laundry is still very wet.
Unbalance of the laundry load during spinning prevented the spin phase
to avoid damages on the washing machine. This is why the laundry is still
very wet.
Reason for unbalance can be: small laundry loads (consisting of only few
quite big or absorbent items, e.g. towels), or big/heavy laundry items.
• If possible avoid small laundry loads.
• It is highly recommended that you add other laundry items of different
sizes when washing a big or heavy piece of laundry.
If you want to spin the wet laundry, add more laundry items of different
sizes, and subsequently select and start the “Rinse & Spin” programme.
Programme duration is
considerably longer or
shorter as indicated in the
“programme chart” or on
the display (if available)
Normal function of the washing machine to adapt to factors that can have
an effect on the programme duration, like excessive foam formation, load
unbalance due to heavy laundry items, prolonged heating time resulting
from low inlet water temperature etc.. Moreover, the sensing system of the
washing machine adapts the programme duration to the size of the wash
load.
Depending on these factors, the duration is recalculated during the
programme and updated if necessary; during such periods, an animation
appears on the display (if available). For small loads, the programme
time indicated in the “programme chart” may be reduced by up to 50%.
EN 10
Failure indicator
lights up
Indication on display
(if available)
Description — Causes — Solutions
“Service”
“bdd”
(in case your washing
machine has no display:
all lamps of the
programme flow bar light
up)
Appliance stops during the programme. “Drum flaps
open” (the drum flaps have not been closed properly).
Push the “Reset” button for at least 3 seconds and wait
until the “Door open” lights up. Open lid and close
drum flaps, then select and start desired programme
again. If fault persists, notify our After-Sales Service.
from “F02” to “F35”
(except “F09”)
“Electrical module fault”.
Select and start “Drain” programme or push “Reset”
button for at least 3 seconds.
“F09”
“Water level too high” (after programme cancellation or
false operating). Switch off appliance and then switch it
on again, select programme “Drain” and start within 15
sec.
“FA”
“Waterstop fault”
Switch off appliance, pull out mains plug and turn water
tap off. Tilt appliance forward carefully to allow collected
water to flow out from the bottom. Then:
• Plug in the appliance again.
• Turn the water tap on (if water immediately flows into
the appliance without the appliance being started,
there is a failure; turn off the tap and notify After-Sales
Service).
• Select and start the desired programme again.
“Fod”
“Overfoaming”
Too much foam interrupted the wash programme.
• Select and start “Rinse & Spin” programme.
• Afterwards select and start desired programme again,
using less detergent.
If faults persist, unplug the appliance, turn off the water
tap and contact our After-Sales Service
“Water tap
closed” −
Appliance has no or insufficient water supply. The “Start
(Pause)” light blinks. Check whether:
• Water tap is fully open and water supply pressure is
sufficient.
• Kinks are present in water inlet hose.
• Mesh filter of water supply hose is blocked (see “Care
and Maintenance”).
• Water hose is frozen up.
• Safety valve inspection window of your water supply
hose is red (provided your appliance has a water
supply hose as shown on picture 22 — see previous
chapter “Care and Maintenance”); replace the hose by
a new one available through our After-Sales Service or
your specialist dealer.
After problem has been removed, restart programme
by pressing “Start (Pause)”. If the fault occurs again,
contact our After-Sales Service.
“Clean pump” −
Waste water is not pumped out. The appliance stops in
the corresponding programme step; unplug it and check
whether:
• Kinks are present in the drain hose.
• Filter or pump is blocked (see chapter “Cleaning the
Filter/ Draining Residual Water”; make sure the water
has cooled before draining the appliance).
• The drain hose is frozen up.
After problem has been removed, select and start “Drain”
programme or push “Reset” button for at least 3 seconds;
afterwards restart desired programme. If the fault occurs
again, contact our After-Sales-Service.
Description of failure indicators
If your washing machine has no display, check which of the previously described situations could be
the origin of the fault and follow the corresponding instructions.
F — 11/2014


A
B
( )
19
20
21
22
23
25
26
27
28
17
18
29
24

W10748684 EN 11/2014
Whirlpool® Registered trademark/TM Trademark of Whirlpool group of companies — © Copyright Whirlpool Europe s.r.l. 2014. All rights reserved — http://www.whirlpool.eu
Need a manual for your Whirlpool TDLR 60210 Washing Machine? Below you can view and download the PDF manual for free. There are also frequently asked questions, a product rating and feedback from users to enable you to optimally use your product. If this is not the manual you want, please contact us.
Is your product defective and the manual offers no solution? Go to a Repair Café for free repair services.
Frequently Asked Questions
Our support team searches for useful product information and answers to frequently asked questions. If you find an inaccuracy in our frequently asked questions, please let us know by using our contact form.
My washing machine won’t start when I press the start-button, what can I do? Verified
In many cases the door of the washing machine hasn’t closed properly. Open and close the door and try again.
This was helpful (22200)
My washing machine won’t drain, what can I do? Verified
The main reason a washing machine won’t drain is because of blockage in either the pump or the drain hose. If your washing machine has access to these parts, try to remove any blockage. If this does not solve the problem or if you don’t have access to these parts you should contact a mechanic or the manufacturer.
This was helpful (21771)
There is no water coming into my washing machine, what can I do? Verified
Check if the water inlet is open and if there aren’t any kinks in the hose of the water inlet. If this doesn’t solve the problem you should contact the manufacturer.
This was helpful (8487)
The door of my washing machine won’t open, what can I do? Verified
There can be several causes. The most common cause is the filter being clogged. Unplug the appliance and check the filter. Remove any blockage if necessary. The location of the filter is different depening on the model. It is also possible that there is a special lever to open the door. If these options don’t help, the last option is unplug the appliance for a period of 30-60 minutes and try to open the door after that. If this doesn’t work, contact the manufacturer or a mechanic.
This was helpful (6979)
My washing machine makes a lot of noice and/or vibrates loudly, what can I do about that? Verified
It’s possible that the washing machine has not been leveled. You can do this by adjusting the feet to make it perfectly level. The problem can also be caused by inserting to much clothes in the machine. If these are not the cause of your problem you should contact the manufacturer.
This was helpful (6144)
In which compartment should the detergent go? Verified
Most washing machines have 3 compartments for detergent. These compartments are often marked with I, II and * to show where the detergent goes. Compartment I is used for a pre-wash cycle, II is for the main wash cycle and * is for fabric softener. Compartment II is used most often.
This was helpful (4132)
My washing machine smells, what can I do about it? Verified
There are washing machines with self-cleaning features. If these features are not available it’s possible to add 100ml of white vinegar or 100gr of soda crystals and have the washing machine run a 90 ℃ program.
This was helpful (3342)
Can I connect my washing machine to a warm water outlet? Verified
Although washing machines can probably handle water intake up to 65°C, this is not recommended by most manufacturers. There are wash cycles that specifically make use of cold water. In those cases warm water can harm the results of your wash cycle. Also, many washing machines are designed to be connected to a cold water outlet.
This was helpful (2760)
What should I pay attention to when moving a washing machine? Verified
When moving a washing machine, you should secure the drum. You can use the transit bolt which come with every washing machine and will prevent the drum from moving around inside the machine. You also need to drain all the water.
This was helpful (1312)
Can I stack my dryer and washing machine? Verified
In general it is possible to directly stack a dryer and washing machine directly on top of each other. This only works with front loading models. However, it is advisable to use a fitting accessory to do so. This will prevent the machines from vibrating and falling off and also prevents damage to the bottom machine.
This was helpful (1032)
What is the difference in usage between a washer-dryer and a separate washing machine and dryer? Verified
The biggest advantage of a washer-dryer is that it takes less space. However, a separate dryer will be able to dry more than a washer-dryer. A washer-dryer also uses relatively more energy and requires more time.
This was helpful (1027)
Can I connect a washing machine to an extension cord? Verified
Appliances that require large amounts of power, like a washing machine, can not be connected to all extension cords. See what the power usage of the washing machine is, which is indicated in Watt, and check if the extension cord can handle this. There are extension cords with thicker cables that are made to handle larger appliances.
This was helpful (1026)
What does ‘6th Sense’ mean? Verified
Whirlpool appliances that are equipped with 6th Sense technology have sensors that ensure optimal operation of the machine. For example in dryers, these sensors measure the moisture left in the wash and stops the machine when everything is completely dry.
This was helpful (698)
инструкцияWhirlpool TDLR 60210

Gebrauchsanweisung
Instructions for use
Mode d’emploi
Gebruiksaanwijzing
Istruzioni per l’uso
Brugsanvisning
Bruksanvisning
Käyttöohje
Manual de utilização
Instrucciones para el uso
Instrukcje użytkowania
Használati utasítás
ИнструкциЯ за употреба
Návod k použití
Návod na použitie
Instruc∑iuni de utilizare
Инструкции по эксплуатации
Қолдану бойынша нұсқаулық
Інструкція з експлуатації
Посмотреть инструкция для Whirlpool TDLR 60210 бесплатно. Руководство относится к категории стиральные машины, 35 человек(а) дали ему среднюю оценку 8.4. Руководство доступно на следующих языках: английский. У вас есть вопрос о Whirlpool TDLR 60210 или вам нужна помощь? Задайте свой вопрос здесь
Стиральная машина Whirlpool TDLR 60210 — самостоятельно стоящее устройство с встроенным LED-дисплеем и подсветкой. Длина шнура составляет 1,5 метра, дверь поворачивается вверх. Система балансировки нагрузки отсутствует, а барабан изготовлен из нержавеющей стали и имеет объем 42 литра. Управление осуществляется при помощи кнопок и поворотного переключателя. Расчетная емкость — 6 кг.
Эта стиральная машина Whirlpool способна прекрасно справляться с множеством загрязнений благодаря своей надежности и прочности. Она имеет оптимальное расположение для каждой модели автомобиля, и ее конструкция выполнена из премиум-материалов. Характеристики продукта гарантируют удобство и надежность в использовании, а также расширенную функциональность. Она будет идеальным выбором для каждого, кто ищет надежную стиральную машину с нормальной емкостью загрузки. Конструкция позволяет использовать ее длительное время, обеспечивая при этом эффективную работу и продолжительный срок службы.
Главная
| Whirlpool | |
| TDLR 60210 | TDLR60210 | |
| стиральная машина | |
| 8003437727672, 8003437727214, 8003437727276 | |
| английский | |
| Руководство пользователя (PDF) |
Дизайн
| Размещение бытового устройства | Отдельно стоящий |
| Тип загрузки | Вертикальная загрузка |
| Цвет товара | Белый |
| Встроенный экран | Да |
| Тип дисплея | LED |
| Подсветка дисплея | Да |
| Цвет освещения | Зеленый |
| Длина шнура | 1.5 m |
| Дверная петля | Вверх |
| Материал барабана | Нержавеющая сталь |
| Объем барабана | 42 L |
| Цвет двери | Белый |
| Тип управления | Buttons, Rotary |
Производительность
| Система выравнивания нагрузки | Нет |
| Номинальная емкость | 6 kg |
| Максимальная скорость вращения | 1000 RPM |
| Класс отжима | B |
| Количество программ стирки | — |
| Таймер | Да |
| Уровень шума (стирка) | 59 dB |
| Продолжительность цикла (макс.) | 210 min |
| Таймер отложенного старта | — |
| Уровень шума (отжим) | 76 dB |
| Половинная загрузка | Да |
| Остаточная влага | 53 % |
| Hygiene/anti-allergy, Black |
Прочие свойства
| Класс стирки | A |
| Годовое потребление энергии при стирке | 153 кВт·ч |
| Годовой расход воды при стирке | 8500 L |
Эргономика
| Регулируемые по высоте ножки | Да |
Энергопитание
| Класс энергоэффективности (старый) | A+++ |
| Потребление энергии при стирке | 0.78 кВт·ч |
| Потребляемая мощность (в обычном режиме) | 2100 W |
| Сила тока | 10 A |
| Входящее напряжение сети | 220 — 230 V |
| Частота входящего переменного тока | 50 Hz |
Вес и размеры
| Ширина | 400 mm |
| Глубина | 600 mm |
| Высота | 900 mm |
| Вес | 62000 g |
Данные об упаковке
| Глубина упаковки | 700 mm |
| Высота упаковки | 940 mm |
| Ширина упаковки | 450 mm |
| Масса брутто | 64000 g |
показать больше
Не можете найти ответ на свой вопрос в руководстве? Вы можете найти ответ на свой вопрос ниже, в разделе часто задаваемых вопросов о Whirlpool TDLR 60210.
При какой температуре следует стирать одежду?
Рекомендуемая температура стирки указывается на этикетке.
Стоит ли использовать средство для удаления накипи при стирке в стиральной машине?
Необходимость использования средства для удаления накипи отсутствует. Предотвратить появление накипи можно уменьшив количество стирок при высокой температуре и благодаря использованию рекомендуемого количества моющего средства при стирке.
Как предотвратить появление неприятного запаха в стиральной машине?
Возникновения неприятных запахов можно избежать периодической стиркой при 60 градусах и благодаря использованию рекомендуемого количества моющего средства.
Какой вес Whirlpool TDLR 60210?
Whirlpool TDLR 60210 имеет вес 62000 g.
Какая высота Whirlpool TDLR 60210?
Whirlpool TDLR 60210 имеет высоту 900 mm.
Какая ширина Whirlpool TDLR 60210?
Whirlpool TDLR 60210 имеет ширину 400 mm.
Какая толщина Whirlpool TDLR 60210?
Whirlpool TDLR 60210 имеет толщину 600 mm.
Инструкция Whirlpool TDLR 60210 доступно в русский?
К сожалению, у нас нет руководства для Whirlpool TDLR 60210, доступного в русский. Это руководство доступно в английский.
Не нашли свой вопрос? Задайте свой вопрос здесь