Electrolux EWT 9120 W — Washing Machine Manual
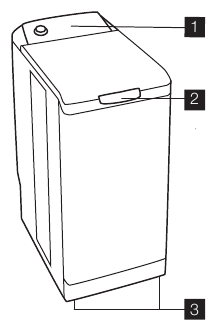
Description
- The control panel
- Lid handle
- Adjustable levelling feet
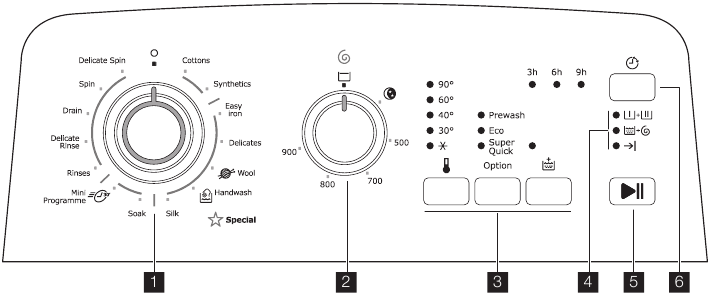
Control panel
- Pushbuttons and their functions
- Lights of cycle progress
- «Start/Pause» pushbutton
- «Delay start» pushbutton
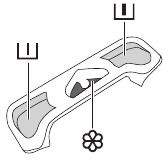
Dispenser box


Safety Information
Please read these points carefully before installing and using your appliance. Keep this user manual with your appliance.
General safety
- Do not modify or attempt to modify this appli-ance. This would put yourself in danger.
- Ensure that all coins, safety pins, brooches, screws etc have been removed before starting a washing programme. If left in washing, they can seriously damage the appliance.
- Use the recommended quantity of detergent.
- Put small items together (socks, belts etc.) in asmall linen bag or pillow case.
- Unplug and close inlet hose tap after using ap-pliance.
- Always disconnect the power supply from theappliance before cleaning or maintenance.
- Do not machine wash clothes with ribbing, un-finished or torn material.
Installation
- Unpack or ask for the appliance to be unpackedimmediately upon delivery. Check the outside of the appliance is not damaged in any way. Report all transit damage to your retailer.
- Remove all transit bolts and packaging beforeinstalling the appliance.
- Connection to the water supply must be carriedout by a qualified plumber.
- If your domestic electrical circuit needs adaptingto allow the appliance to be plugged in, use a qualified electrician.
- Ensure that, after installation, the power cable isnot trapped under the appliance.
- If the appliance is installed on carpeted floor, ensure that the carpet does not obstruct any ventilation ducts located at the base of the appliance.
- The appliance must be equipped with an earth-ed power plug which conforms to regulations.
- Before connecting your appliance to the powersupply, carefully read the instructions in the chapter entitled «Electrical connection».
- Replacing the power cable should only be car-ried out by an authorised service engineer.
- The manufacturer cannot be held responsiblefor any damage resulting from incorrect installation.
Precautions to be taken against frost
If your appliance is exposed to temperatures below 0°C, the following precautions must be taken:
- Close the tap and disconnect the inlet hose.
- Place the end of this hose and the drain hose in a basin on the floor.
- Select the Drain programme let it run until theend of the cycle.
- Disconnect the appliance from the power supplyby turning the programme selector to «Stop»
.
- Unplug the appliance.
- Replace the inlet hose and drain hose.
This way, the water remaining in the hoses will be drained away, avoiding any ice formation which would damage your appliance. Before turning your appliance on again, ensure that it is installed in an area where the temperature will not fall below freezing.
Use
- Your appliance is intended for normal domesticuse. Do not use the appliance for commercial or industrial purposes or for any other purpose.
- Refer to the instructions on the label of each itembefore washing.
- Do not put items into the washing machine which have had stains removed with petrol, alcohol, trichlorethylen etc. If such stain removers have been used, wait until the product has evaporated before putting these items into the drum.
- This appliance is not intended for use by per-sons (including children) with reduced physical, sensory or mental capabilities, or lack of experience and knowledge, unless they have been given supervision or instruction concerning use of the appliance by a person responsible for their safety.
Children should be supervised to ensure that they do not play with the appliance.
How to run a wash cycle
Using for the first time
Ensure the electrical and water connec-tions comply with the installation instructions.
- Remove the polystyrene insert and all otheritems inside the drum.
- Run an initial wash cycle at 90°C, without any washing but with detergent to clean the water tank.
Daily use
Loading washing
- Open the lid of the appliance.
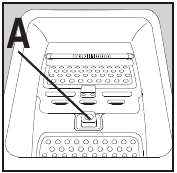
- Open the drum bydepressing the locking button A:
The two shutters unlock automatically. - Load the washing, close the drum and the lid of your washing machine.
Before closing the lid of your appliance, ensure that the drum is properly closed:
- When the two shutters are closed,
- locking button A released.
Proportioning of detergents
Pour the amount of washing powder into the washing and prewash


Selection of desired programme
Turn the programme selector to the required programme. The «Start/Pause» pushbutton flashes green.
If you turn the programme selector to another programme while a cycle is in progress, the appliance will ignore the new selected programme. The «Start/Pause» pushbutton flashes red for a few seconds.
Selecting the temperature
Press the «Temperature» 

Selecting the spin speed
Turn the spin speed selector on the desired position.
The maximum spin speeds are:
for Cottons, Synthetics, Easy iron, Wool, Handwash: 900 rpm, for Delicates, Silk, Mini programme: 700 rpm.
At the end of the programme, if you have selected «Rinse hold» or «Night silence plus»
, you then need to select a «Spin» or «Drain» programme to finish the cycle and empty the water.
Selecting options
You must select the different options after selecting the programme and before pressing the «Start/ Pause» pushbutton (see «Programmes table»). Press the desired button(s): the corresponding lights come on. If pressed again, the lights go out. If one of the options is not compatible with the selected programme, the «Start/Pause» pushbutton flashes red.
Prewash option
The appliance runs a prewash at 30°C max.
Eco option
This option allows you to choose a lower temperature programme which is as effective as a higher temperature wash programme.
Super quick option
The washing time will be reduced depending on the programme selected.
Rinse plus option
The washing machine will add one or more rinses during the cycle. This option is recommended for people with sensitive skin and in soft water areas.
Temporary: Press the «Rinse plus» pushbutton. The option is only active for the selected programme.
Permanent: Hold down the «Temperature» and «Options» pushbuttons for a few seconds. The option is permanently activated, even if the appliance is switched off. To deactivate it, repeat the process.
Delay start
This option allows you to delay the start of a wash programme by 3, 6 or 9 hours by pressing the «Delay start» pushbutton.
You can change or cancel the delayed start time at any time before you press the «Start/Pause» pushbutton by pressing the «Delay start» pushbutton again (when all indicators are off, the wash programme will start immediately).
If you have already pressed the «Start/Pause» pushbutton and you want to change or cancel the delayed start, proceed as follows:
- To cancel the delay start and start the cycle im-mediately, press «Start/Pause» and then «Delay start». Press «Start/Pause» to start the cycle.
- To change the timer delay period, you must go through the «Stop» position
and reprogramme your cycle.
The lid will be locked during the delayed start time. If you need to open it, you must first pause the appliance by pressing the «Start/Pause» pushbutton. After closing the lid again, press the «Start/Pause» pushbutton.
Start of the programme
Press the «Start/Pause» pushbutton to start the cycle. The corresponding light will come on green. It is normal for the programme selector to remain stationary during the cycle. The light corresponding to the current cycle is illuminated.


Interrupting a programme
Adding washing during the first 10 minutes
Press the «Start/Pause» pushbutton: the corresponding light will flash green while the appliance is paused. The lid can only be opened around 2 minutes after the washing machine has come to a stop. Press the «Start/Pause» pushbutton again to continue the programme.
Modifying the programme in progress
Before making any changes to the current programme, you need to pause the washing machine by pressing the «Start/Pause» pushbutton. If the modification is not possible, the «Start/Pause» pushbutton flashes red for a few seconds. If you still decide to change the programme, you must cancel the current programme (see below).
Cancelling the programme
If you want to cancel the programme, turn the programme selector to the «Stop» position.
End of the programme
The washing machine stops automatically, the «Start/Pause» pushbutton goes out and the light «End of cycle» 
. Remove washing. Unplug and close water inlet tap.
Standby mode
If the appliance is on but no commands are selected for 10 min before or after a cycle, it goes into standby mode. All the lights go out and «Start/ Pause» flashes slowly.
To exit standby mode, simply press any pushbutton or turn the programme selector.
Programmes table
| Programme / Type of washing | Load/Time | Possible options |
| Cottons1) (cold — 90°): White or colour, e.g. normally soiled work clothes, bed linen, table linen, body linen, towels. | 5,5 kg 140-150 min |
Night silence plus, Rinse hold, Prewash, Eco2), Super quick, Rinse plus, Delay start |
| Synthetics (cold — 60°): Synthetic fabrics, body linen, fab, coloured farics, non-iron shirts, blouses. | 2,5 kg 90-100 min |
Night silence plus, Rinse hold, Prewash, Eco2), Super quick, Rinse plus, Delay start |
| Easy iron (cold — 60°): Reduces creasing and makes ironing easier. | 1,0 kg 100-110 min |
Rinse hold, Prewash, Rinse plus, Delay start |
| Delicates (cold — 40°): For all delicate materials, for example curtains. | 2,5 kg 60-70 min |
Night silence plus, Rinse hold, Prewash, Super quick, Rinse plus, Delay start |
 Wool (cold — 40°): Very delicate items carrying the «wash by hand» label. Wool (cold — 40°): Very delicate items carrying the «wash by hand» label. |
1,0 kg 55-65 min |
Night silence plus, Rinse hold, Delay start |
 Handwash (cold — 40°): Very delicate items carrying the «wash by hand» label. Handwash (cold — 40°): Very delicate items carrying the «wash by hand» label. |
1,0 kg 55-65 min |
Night silence plus, Rinse hold, Delay start |
| Silk (30°): Fabric machine washable at 30°C. | 1,0 kg 25-35 min |
Night silence plus, Rinse hold, Delay start |
| Soak (30°): Soaking for very dirty washing. The drum stops full of water. | 5,5 kg 15-25 min |
Delay start |
 Mini programme (30°): For lightly soiled fabrics except for wool. Mini programme (30°): For lightly soiled fabrics except for wool. |
2,5 kg 25-35 min |
Delay start |
| Rinses: Hand washed items can be rinsed in this programme. | 5,5 kg 50-60 min |
Night silence plus, Rinse hold, Rinse plus, Delay start |
| Delicate rinse: Hand washed items can be rinsed in this programme. | 2,5 kg 35-45 min |
Night silence plus, Rinse hold, Rinse plus, Delay start |
| Drain: Runs an empty cycle after a Rinse hold (or Night silence plus). | 5,5 kg 0-10 min |
|
| Spin: A spin cycle from 500 to 900 rpm after a Rinse hold (or Night silence plus). | 5,5 kg 10-20 min |
Delay start |
| Delicate spin: A delicate spin cycle after a Rinse hold (or Night silence plus). | 2,5 kg 5-15 min |
Delay start |
1) Reference programme for test confirming to CEI 456 standard (Cottons 60° programme, Eco option): 49 L / 1,04 kWh / 170 min
2) Available with programmes with wash temperatures of 40°C and above.
Care and cleaning
Unplug the appliance before cleaning.
Descaling the appliance
To descale the appliance, use an appropriate noncorrosive product designed for washing machines. Read product label for recommended amounts and how often descaling should be carried out.
The exterior
Use warm soapy water to clean the exterior of the appliance. Never use alcohol, solvents or similar products.
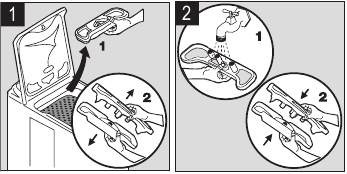
Dispenser box
To clean, proceed as follows:
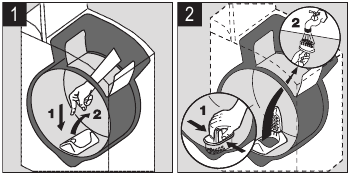
Object trap
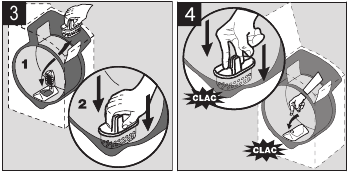
Regularly clean out the object trap which is located at the bottom of the drum:
Check if the filter being coupled well before closing the trap to pull up and down the central wall.
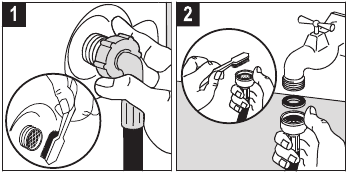
Water inlet filters
To clean, proceed as follows:
Operating Problems
Numerous checks were carried out on your appli- notice a malfunction, please refer to the sections ance before it left the factory. However, should you below before contacting the after-sales service.
| Problems | Causes |
| The washing machine doesn’t start or doesn’t fill: |
|
| The appliance fills but empties straight away: |
|
| The washing machine doesn’t rinse or doesn’t empty: |
|
| You have found water around the washing machine: |
|
| Wash is unsatisfactory: |
|
| The appliance vibrates, is noisy: |
|
| The wash cycle is much too long: |
|
| The washing machine stops during a wash cycle: |
|
| The lid doesn’t open at the end of the cycle: |
|
| Softener runs directly into the drum when filling the dispenser box: |
|
| The «Start/Pause» pushbutton 1) flashes red 2): |
|
1) On some models, the auditable signals can sound
2) After solving any problems, press «Start/Pause» pushbutton to restart the interrupted programme.
Detergents and Additives
Only use detergents and additives designed for use in a washing machine. We do not recommend mixing different types of detergents. This may spoil the washing. There are no restrictions on the use of powder detergents. Liquid detergents must not be used when a prewash has been selected. For cycles without prewash, they must be added via means of a dosing ball. Detergent tablets or doses must be placed in the detergent compartment of your appliance’s dispenser box.
Technical Specifications
| DIMENSIONS | Height | 850 mm |
| Width | 400 mm | |
| Depth | 600 mm | |
| LINE VOLTAGE /FREQUENCY POWER CONSUMPTION |
230 V / 50 Hz 2300 W |
|
| WATER PRESSURE | Minimum | 0,05 MPa (0,5 bar) |
| Maximum | 0,8 MPa (8 bar) | |
| Connection to water supply | Type 20/27 |
Installation
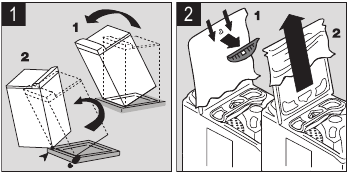
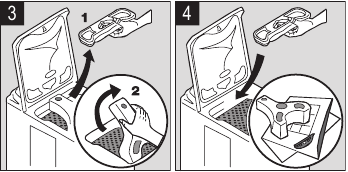
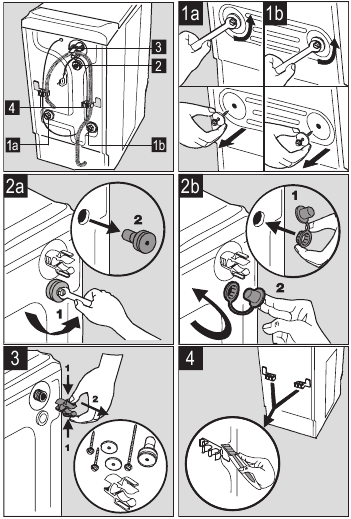
Remove all protective packaging for transit before using for the first time. Keep in case needed for future transit: Transporting a non-secured appliance may damage internal components and cause leakages and malfunctions. The appliance can also be damaged through physical contact.
Unpacking
Untying
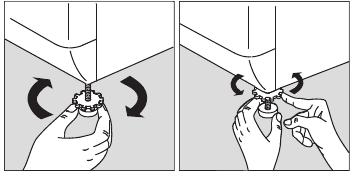
To install your washing machine at the same level as surrounding furniture, proceed as shown on picture 4.
Water supply
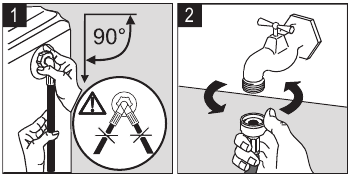
Install the supplied water inlet hose at the rear of your washing machine by proceeding as follows. Do not reuse an old hose. The water inlet hose can not be extended. If it is too short, please contact the after-sales service.
Open the water inlet tap. Check there are no leaks.
Drainage
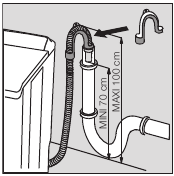
Fit the U-piece on the drainage hose. Place everything in a drainage point (or in a sink) at a height of between 70 and 100 cm. Ensure it is positioned securely. Air must be able to enter the end of the hose, to avoid any risk of siphoning.
The drain hose must never be stretched. If it is too short, contact an engineer.
Electrical connection
This washing machine must only be connected in single-phased 230 V. Check the fuse size: 13 A for 230 V. The appliance must not be connected with an extension lead or multi-plug adaptor. Ensure that the plug is earthed and that it is in accordance with current regulations.
Positioning
Position the appliance on a flat and hard surface in a ventilated location. Ensure the appliance does not come into contact with the wall or other furniture. Accurate levelling avoids vibrations, noise and prevents the appliance from moving when running.
Environment
Disposing of the appliance


The symbol 
Protecting the environment
To save water and energy and therefore help protect the environment, we recommend the following:
- Whenever possible, use the appliance at full ca-pacity and avoid partial loads.
- Only use the prewash and soak programmes forheavily soiled items.
- Use an appropriate amount of detergent for thehardness of the water, the size of the load and how soiled the washing is.
Documents / Resources
Download manual
Here you can download full pdf version of manual, it may contain additional safety instructions, warranty information, FCC rules, etc.
Download Electrolux EWT 9120 W — Washing Machine Manual
Требуется руководство для вашей Electrolux EWT9120W Стиральная машина? Ниже вы можете просмотреть и загрузить бесплатно руководство в формате PDF. Кроме того, приведены часто задаваемые вопросы, рейтинг изделия и отзывы пользователей, что позволит оптимально использовать ваше изделие. Если это не то руководство, которое вы искали, – свяжитесь с нами.
Ваше устройство неисправно, и в руководстве отсутствует решение? Перейдите в Repair Café для получения бесплатных ремонтных услуг.
Руководство

Рейтинг
Сообщите нам, что вы думаете о Electrolux EWT9120W Стиральная машина, оставив оценку продукта. Хотите поделиться вашими впечатлениями от данного изделия или задать вопрос? Вы можете оставить комментарий в нижней части страницы.
Довольны ли вы данным изделием Electrolux?
Да Нет
1 проголосовать
Часто задаваемые вопросы
Наша служба поддержки выполняет поиск полезной информации по изделиям и отвечает на часто задаваемые вопросы. Если вы заметили неточность в наших часто задаваемых вопросах, сообщите нам об этом с помощью нашей контактной формы.
Стиральная машина не реагирует, когда я нажимаю кнопку включения. Что мне делать? Проверенный
Это обычно означает, что дверца стиральной машины недостаточно плотно закрыта. Откройте и закройте дверцу и попробуйте снова.
Это было полезно (22211)
Моя стиральная машина не запускает слив. Что делать? Проверенный
Основной причиной того, что стиральная машина не запускает слив, может быть засор в шланге подачи или слива воды. Если у вас есть доступ к этим шлангам, постарайтесь удалить засорение. Если проблема не решается, или у вас нету доступа к шлангам, обратитесь к специалисту по ремонту машин или к производителю.
Это было полезно (21776)
В стиральную машину не поступает вода, что мне делать? Проверенный
Проверьте, открыт ли входной патрубок для воды и нет ли перегибов в шланге подачи воды. Если это не решит проблему, обратитесь к производителю.
Это было полезно (8490)
Дверца стиральной машины не открывается, что мне делать? Проверенный
Причин может быть несколько. Наиболее частая причина — засорение фильтра. Отключите прибор от сети и проверьте фильтр. При необходимости удалите все засорения. Расположение фильтра зависит от модели. Также возможно наличие специального рычага для открытия двери. Если эти варианты не помогают, последний вариант — отключить прибор от сети на 30-60 минут и после этого попытаться открыть дверцу. Если это не сработает, обратитесь к производителю или механику.
Это было полезно (6985)
Моя стиральная машина громко шумит и/или вибрирует. Что делать? Проверенный
Возможно, вы не выровняли стиральную машину. Это можно сделать, отрегулировав ножки машины. Также причина проблемы может крыться в избыточной загрузке машины. Если причина шума и вибрации не в этом, обратитесь к производителю.
Это было полезно (6145)
В какое отделение должно быть моющее средство? Проверенный
У большинства стиральных машин есть 3 отделения для моющего средства. Эти отделения часто имеют маркировку I, II и *, чтобы показать, куда идет моющее средство. Ячейка I используется для предварительной стирки, II — для основной стирки, а * — для кондиционера. Чаще всего используется второй отсек.
Это было полезно (4133)
Моя стиральная машина пахнет, что мне делать? Проверенный
Есть стиральные машины с функцией самоочистки. Если эти функции недоступны, можно добавить 100 мл белого уксуса или 100 г кристаллов соды и запустить стиральную машину по программе 90 ℃.
Это было полезно (3349)
Могу ли я подключить стиральную машину к розетке с теплой водой? Проверенный
Хотя стиральные машины, вероятно, могут подавать воду до 65 ° C, большинство производителей не рекомендуют это делать. Существуют циклы стирки, в которых используется только холодная вода. В таких случаях теплая вода может повредить результат вашей стирки. Также многие стиральные машины рассчитаны на подключение к розетке холодной воды.
Это было полезно (2760)
На что следует обратить внимание при транспортировке стиральной машины? Проверенный
При транспортировке стиральной машины следует зафиксировать положение барабана. Можно использовать транспортировочный болт, который поставляется в комплекте со стиральной машиной. Он не даст барабану вращаться внтури машины. Также необходимо слить всю воду.
Это было полезно (1312)
Можно ли ставить сушильную и стиральную машину одну на другую? Проверенный
В целом сушильную и стиральную машину возможно поставить прямо одну на другую. Это относится только к моделям с фронтальной загрузкой. Тем не менее для этого рекомендуется использовать крепежные элементы. Это позволит избежать вибрации и падения верхней машины и повреждения нижней машины.
Это было полезно (1032)
В чем разница в использовании стиральной машины с сушилкой и отдельной стиральной машины и сушилки? Проверенный
Самым большим преимуществом стирально-сушильной машины является то, что она занимает меньше места. Однако отдельная сушилка сможет сушить больше, чем стирально-сушильная машина. Стирально-сушильная машина также потребляет относительно больше энергии и требует больше времени.
Это было полезно (1029)
Можно ли подключить стиральную машину к удлинителю? Проверенный
Технику, требующую большого количества энергии, например стиральную машину, нельзя подключать ко всем удлинителям. Посмотрите, какова потребляемая мощность стиральной машины, которая указывается в ваттах, и проверьте, может ли удлинитель с этим справиться. Существуют удлинители с более толстыми кабелями, предназначенные для работы с более крупными приборами.
Это было полезно (1026)
Я хочу знать возраст моего прибора Electrolux. Как мне это сделать? Проверенный
Вы можете определить возраст вашего продукта по серийному номеру. Это можно найти на вашем устройстве. Первый символ серийного номера указывает год (например: 1 = 2001), а два символа после этого указывают неделю производства (например: 35 = 35 неделя этого года). Таким образом, серийный номер 13500016 указывает на то, что машина начиная с 35 недели 2001 года.
Это было полезно (802)
Габаритные размеры
| Габаритные размеры (В*Ш*Г) | 85*40*60 см |
Загрузка
| Максимальная загрузка | 5.5 кг |
Отжим
| Макс. скорость отжима | 900 об/мин |
Класс энергопотребления и стирки
| Класс энергоэффективности | A |
| Энергопотребление за цикл | 1.04 кВтч |
| Класс стирки | A |
| Класс отжима | C |
| Расход воды за цикл | 49 л |
Уровень шума
| Уровень шума при стирке | 57 дБ |
| Уровень шума при отжиме | 69 дБ |
Управление
| Тип управления | электронный |
Индикация
| Индикация этапов программы | Да |
Функции
| Разрых. белья после отжима | Да |
| Дополнительное полоскание | Да |
| Отложенный старт | 2/ 4/ 6 ч |
| Авт. парковка барабана | Да |
Системы безопасности
| Защита от протечек | доп. опция |
| Наим. защиты от протечек | Menalux |
Тип загрузки
| Тип загрузки | вертикальная |
Подключение
| Потребляемая мощность | 2300 Вт |
Цвет и вес
Основные характеристики
| Краткое описание | 85*40*60 см;5.5кг;900об/мин;вертик. |
| Гарантия | 1 год |
| Страна | Польша |
| Высота | 85 см |
| Ширина | 40 см |
| Глубина | 60 см |
Служебная информация
| Language | Type | Pages | |
|---|---|---|---|
| German | User Manual | 40 | > Go to the manual |
| Dutch | User Manual | 42 | Go to the manual |
465055
1
-
Electrolux Washer Intuition 6kg Eco Valve does not open after wash program. There is no water in the machine.
Submitted on 1-10-2018 at 20:15Reply Report abuse
Report abuse
Libble takes abuse of its services very seriously. We’re committed to dealing with such abuse according to the laws in your country of residence. When you submit a report, we’ll investigate it and take the appropriate action. We’ll get back to you only if we require additional details or have more information to share.
Product: Electrolux ewf 14070w intuition eco valve 6 kg
Forumrules
To achieve meaningful questions, we apply the following rules:
- First, read the manual;
- Check if your question has been asked previously;
- Try to ask your question as clearly as possible;
- Did you already try to solve the problem? Please mention this;
- Is your problem solved by a visitor then let him/her know in this forum;
- To give a response to a question or answer, do not use this form but click on the button ‘reply to this question’;
- Your question will be posted here and emailed to our subscribers. Therefore, avoid filling in personal details.
Your question has been posted on this page
Would you like to receive an email when new answers and questions are posted? Please enter your email address.


