Search code, repositories, users, issues, pull requests…
Provide feedback
Saved searches
Use saved searches to filter your results more quickly
Sign up
Introduction
In this article, I am going to explain how to connect SQL Server from the SQL Server Management Studio. After installing SQL Server 2022 and executing a query, and talking about what’s new in SQL Server 2022, the latest version of SQL Server is SQL Server 2022.
Prerequisites
- SQL Server 2022
- SQL Server Management Studio (SSMS). If you want to learn more about how to install SSMS, please refer to this article How To Install SQL Server Management Studio 2022.
What are the new features in SQL Server 2022?
- Analytics
- Availability
- Security
- Performance
- Query Store and intelligent query processing
- Management
- Platform
- Language
- Tools
- SQL Machine Learning Services
- Query Store improvements
- SQL Server Service is set to Automatic(Delayed Start) start mode
- SQL Server Analysis Services
- SQL Server Reporting Services
To get more details about what’s new in SQL Server 2022 Click here.
Connect To SQL Server Using SQL Server Management Studio 2022 (SSMS)
To connect to SQL Server 2022 using the Microsoft SQL Server Management Studio 2022, use the below steps.
Step 1. First, install SQL Server 2022 in your system. To understand the installation process for SQL Server 2022, refer to the instructions provided in this article How To Install SQL Server 2022.
Step 2. Go to all programs in your systems, we can see two folders, one is Microsoft SQL Server 2022 and another one is Microsoft SQL Server Tool 2019. Under Microsoft SQL Server Tools 19 you can see the Microsoft SQL Server Management Studio 19.

Step 3. Double-click on SQL Server Management Studio 19 and it will open looks like the below screenshot. The first opening will take a few minutes.

After opening SQL Server Management Studio 2019, we can see it looks like the below screenshot.

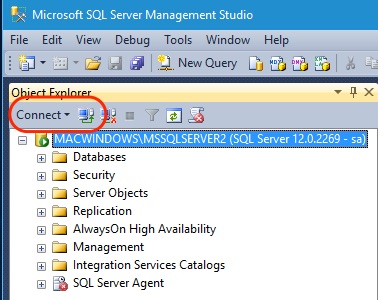
Step 4. Now connect to the server and use the SQL Server Management Studio 2019. Click the Connect button to connect the SQL Server.

Step 5. If the connection is established successfully, then you will see the Object Explorer panel,

Execute a query
Now click on New Query, to open your new query window.

New query window.

Now, first, we will create a Database and a table.
Creating Database and One Table
Step 1. Create a Database
Open your SQL Server and use the following script to create the “Chittadb” Database.
CREATE DATABASE Chittadb;
Now, select the script query then press F5 or click on Execute button to execute the above script.
You should see a message, “Command(s) completed successfully.” This means your new database is created.

We can check now if the database is created or not. Refresh the database and check.

Our database is created.
Step 2. Create a table
Open your SQL Server and use the following script to create table “tbl_Employees”.
CREATE TABLE tbl_Employees
(
    Id INT PRIMARY KEY NOT NULL IDENTITY(1,1),
    FirstName VARCHAR(50),
    LastName VARCHAR(20),
    Location VARCHAR(20),
    Gender VARCHAR(50),
    Salary INT
)
Execute the above query to create “tbl_Employees “.
You should see a message, “Command(s) completed successfully” with completion time.

Now, data is inserted into the table.
INSERT INTO tbl_Employees VALUES ('Chittaranjan', 'Swain', 'Odisha', 'Male', 80000);
INSERT INTO tbl_Employees VALUES ('Chandin', 'Swain', 'Pune', 'Female', 76000);
INSERT INTO tbl_Employees VALUES ('Mitu', 'Pradhan', 'Delhi', 'Male', 55000);
INSERT INTO tbl_Employees VALUES ('Jeni', 'Swain', 'Chennai', 'Female', 76000);
INSERT INTO tbl_Employees VALUES ('Adyashree', 'Swain', 'UK', 'Female', 49000);
INSERT INTO tbl_Employees VALUES ('Ram', 'Kumar', 'US', 'Male', 39000);
INSERT INTO tbl_Employees VALUES ('Jitendra', 'Gouad', 'Hyderabad', 'Male', 35000);
INSERT INTO tbl_Employees VALUES ('Dibas', 'Hembram', 'Bangalore', 'Male', 55000);
Execute the above query, and you should see a message, “(1 row affected)” which means data was inserted successfully.

Now retrieve all data from the “tbl_Employees” table. Execute the below query and get the data.
SELECT * FROM tbl_Employees
Output

Conclusion
In this article, we explained how to connect SQL Server and execute a query from the SQL Server Management Studio 2022 (SSMS) and how to create a database and a table.
You’re not alone if you’ve ever felt overwhelmed working with SQL Server Management Studios (SMSS). Figuring out how to use all features SMSS offers can be tricky. But take it easy. This tutorial is just what you need to get started.
In this tutorial, you’ll learn the basics of working with SSMS, like connecting to a server, running queries, and creating databases.
Read on and take your SQL server management skills to the next level!
Prerequisites
This tutorial will be a hands-on demonstration. If you’d like to follow along, be sure you have the following.
- A Windows machine – This tutorial uses Windows 10, but later versions will also work.
- MySQL Server installed on your machine – You can use Microsoft SQL Server Express, a free, lightweight version of SQL Server.
- A MySQL database server to connect to (local machine or a remote server).
Downloading and Installing SQL Server Management Studio (SSMS)
SSMS is a free integrated environment for managing any SQL infrastructure, from SQL Server to Azure SQL Database. SMSS provides a GUI to manage databases and objects on your server.
But before running queries or creating databases, you’ll first have to ensure SSMS is installed correctly. So write and test queries, and create and alter database schema on your local machine or in the cloud.
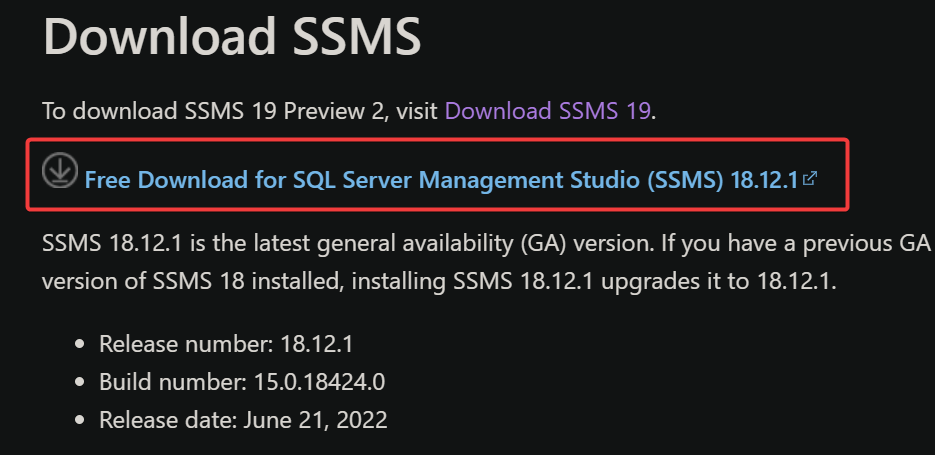
1. Open your favorite web browser, and head to SMSS’s download page.
2. Scroll down to the Download SSMS section and click the Free Download for SQL Server Management Studio (SSMS) hyperlink to start the download.
The file’s size is about 700MB, so the download process might take a few minutes to complete, depending on your internet connection.
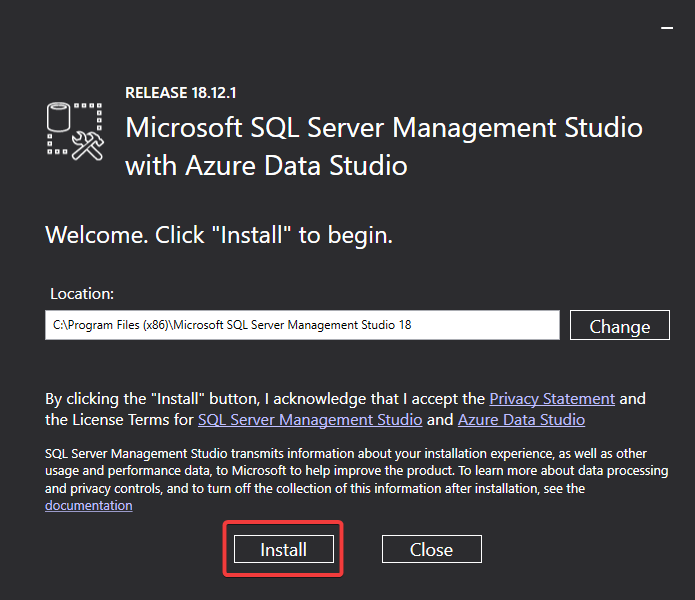
3. Double-click the downloaded file to launch the SSMS installer.
4. Finally, click Install to start the installation process.
You can change the default installation directory if you want, but the default location is fine for most users.
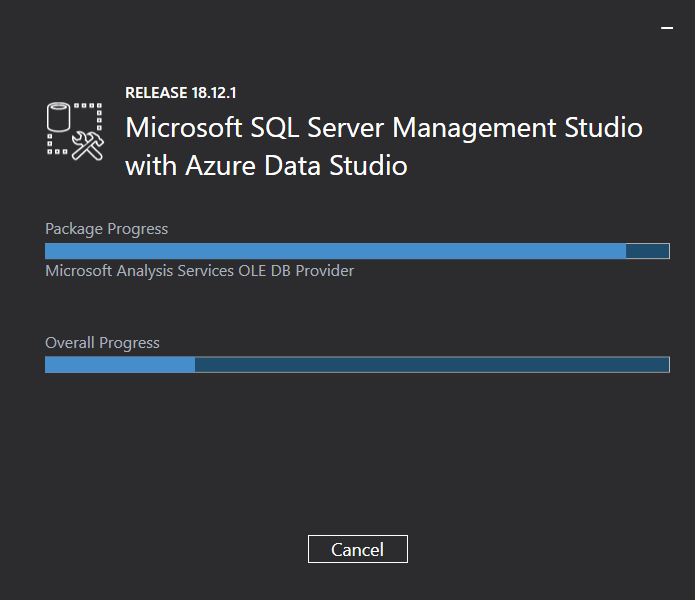
SSMS loads, extracts, and installs the required files, which may take a few minutes.
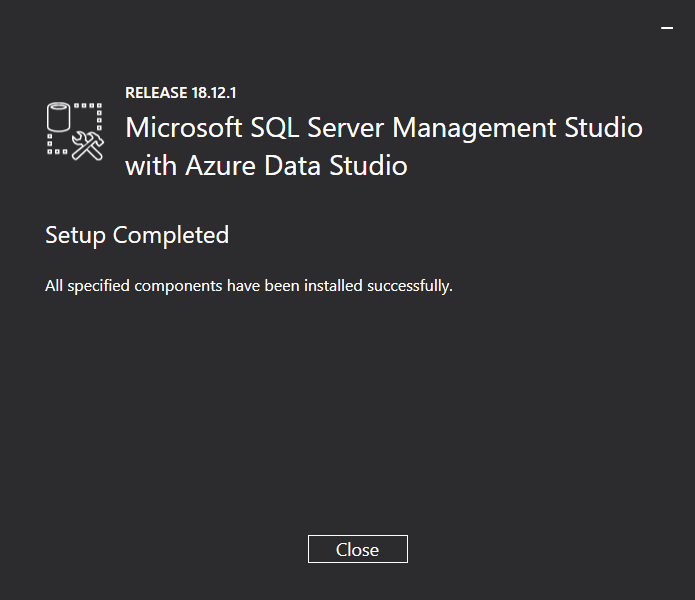
Once the installation completes, you’ll see the Setup Completed screen below.
Congratulations! You’ve successfully installed SSMS on your machine.
Verifying the MySQL Server is Running, and TCP/IP Port is Open
You’ve just installed SSMS, but you need to connect to a database server before you can do SQL server management. For this tutorial, you’ll connect to a MySQL server via SSMS.
Trying to connect to a MySQL server at the moment would be a stretch. So, first things first. Ensure your MySQL server is running and your TCP/IP port is open.
1. Open a PowerShell as administrator for elevated privileges.
2. Next, run the following ping command to verify your TCP/IP port is open. Replace your-ip with your MySQL database server’s IP address.
The ping responses in the output below indicate your MySQL database server is reachable.
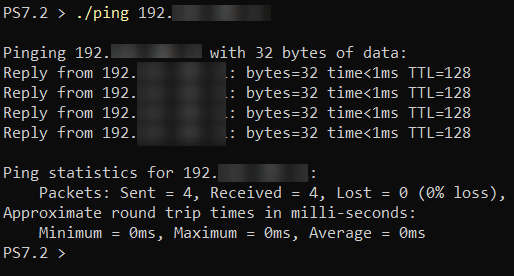
If you get a Request timed out error, like the one below, your database server is unreachable, and you need to check your network configuration.

3. Finally, run the below commands to check if the MySQL database server is running.
# Gets running services that contain the words "sql server"
Get-Service | Where {$_.status -eq 'running' -and $_.DisplayName -match "sql server*"}
# Verifies the MySQL (MSSQL15) folder exists
Get-ChildItem -Path "C:\Program Files\Microsoft SQL Server\mssql*" -Recurse -Include Errorlog |select-string "SQL Server is now ready for client connections.” 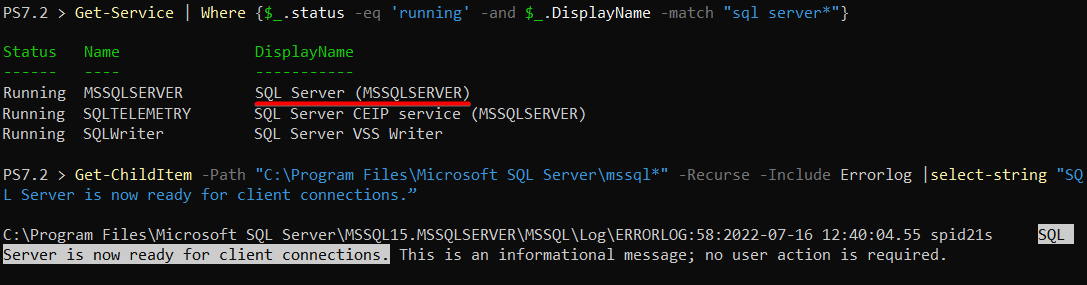
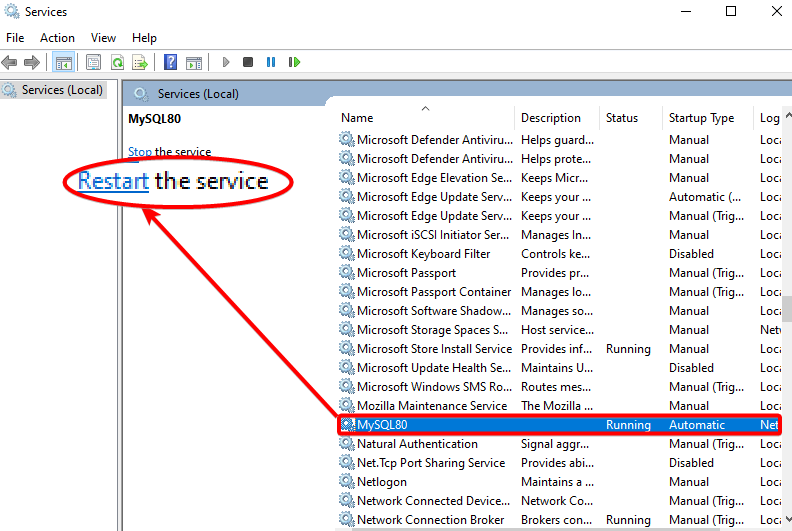
If the database engine service isn’t running, launch the Windows Services, and restart the service, as shown below.
Connecting to the MySQL Database Server
Your MySQL database server is running, and that’s a good start. But the server doesn’t do much right now. To manage SQL databases, you’ll need to connect to your database server via SSMS.
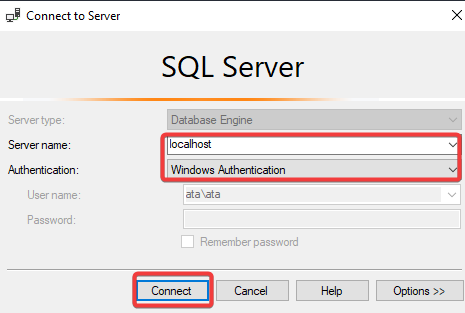
Open SSMS, and you’ll be greeted with the Connect to Server dialog box shown below the first time you launch the tool.
Connect to your MySQL database server with the following:
- Server name – Input your MySQL database server’s IP address or hostname. If you’re running SSMS on the same machine as your database server, you can put localhost as the server name instead.
- Authentication – Select Windows Authentication to connect to the database server using Windows Authentication, which is more secure.
- Click the Connect button to connect to the database server.
If you didn’t get the Connect to Server dialog box, click the Connect button (top-left) under the Object Explorer pane, and select Database Engine.
The Object Explorer is a tree view control that lets you browse objects in your database server — like File Explorer.
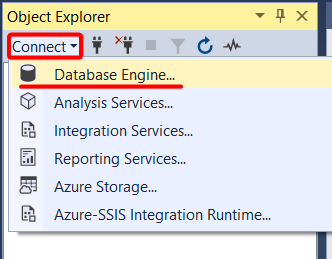
Once connected to the database server, you’ll see the Object Explorer populate with your database server and various objects within each database.

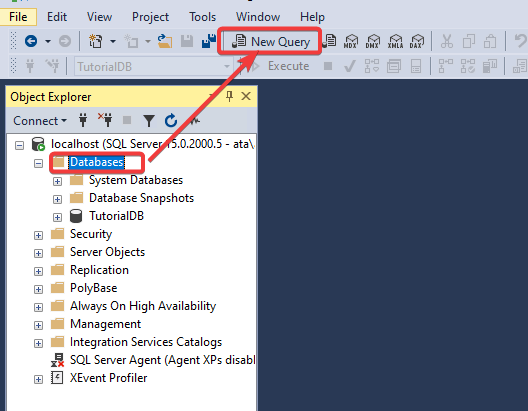
Creating a New Database
After connecting to your database server, it’s time to fill it up with databases and tables and insert data into tables. Having a central location (database) for all your data makes data fetching quicker when you need it.
To create a new database using SSMS:
1. In the Object Explorer panel, select the Databases node and click New Query at the toolbar, which opens a new query window (step two).
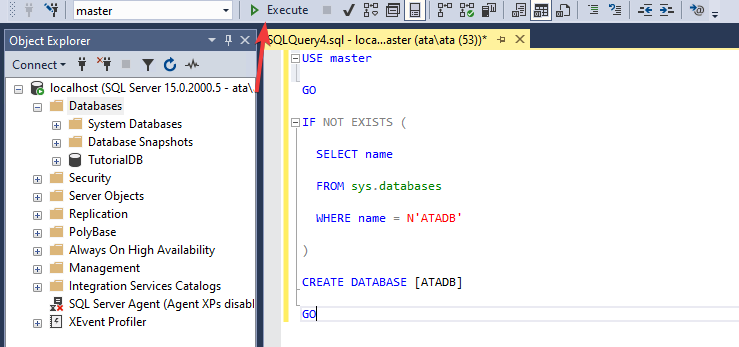
2. In the query window, enter the following T-SQL snippet, which checks if a database with the name ATADB already exists.
If the database exists, the statement does nothing. But if the database doesn’t exist, the statement creates a new database named ATADB.
-- Use the master database.
USE master

GO

-- Check if a database named ATADB exists.
IF NOT EXISTS (

  SELECT name

  FROM sys.databases

  WHERE name = N'ATADB'

  -- If the ATADB database exists, do nothing.
)

-- If the ATADB database doesn't exist, create the database.
CREATE DATABASE [ATADB]

GO
3. Press F5 or click Execute to run the query, as shown below.
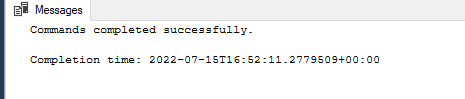
After running the query, you’ll see a message that says Command(s) completed successfully if the database is created successfully. The Completion time is the time SSMS took to execute the query and create the database.
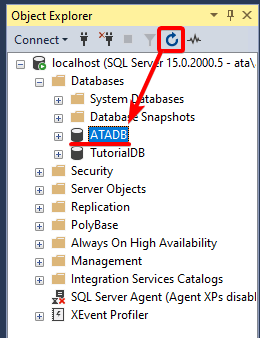
4. Finally, click on the refresh icon in the Object Explorer panel, and you’ll see the newly created database ATADB.
Creating a New Table
You’ve just created a database and know what’s next — a table. A table lets you store data, organized in columns and tables.
To create a new table in SSMS:
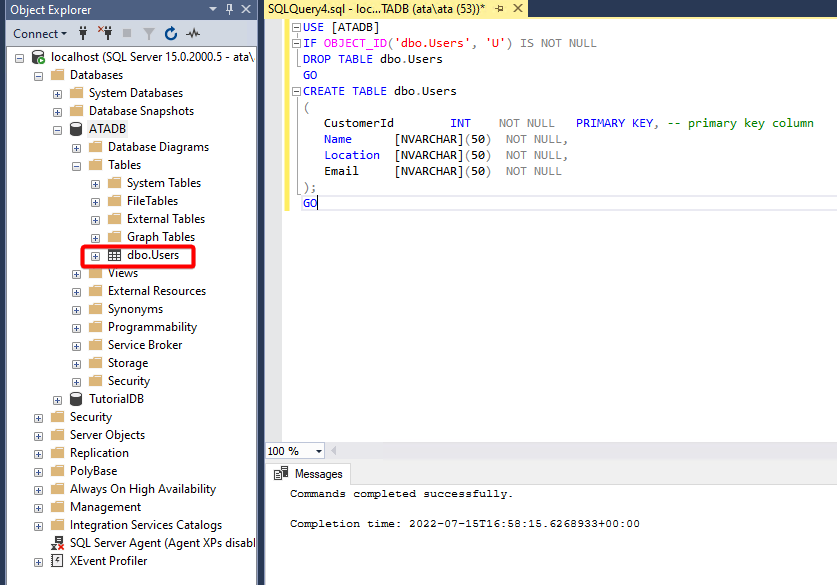
1. Copy and paste the following SQL snippet into the query window, which creates a table called Users in the ATADB database. This table will have four columns: CustomerId, Name, Location, and Email.
The first column (CustomerId) is the primary key of the table. A primary key is a column that uniquely identifies each row in the table. The other columns are just regular data columns.
Notice a data type associated with each column:
- The
CustomerIdcolumn is anINTdata type used for storing whole numbers.
- The Name, Location, and Email columns are all NVARCHAR data types that store text data.
-- Use the ATADB database
USE [ATADB]
-- Check if the Users table
IF OBJECT_ID ('dbo.Users', 'U') IS NOT NULL
-- If the Users table exists, delete the table
DROP TABLE dbo.Users

GO

-- Create the Users table if it doesn't exist
CREATE TABLE dbo.Users

(
  -- Primary key column
  CustomerId INT NOT NULL PRIMARY KEY,
  -- Regular columns
  Name [NVARCHAR](50) NOT NULL,
  Location [NVARCHAR](50) NOT NULL,
  Email [NVARCHAR](50) NOT NULL
);

GO
2. Execute the query to create the Users table if it doesn’t exist.
3. Lastly, click on the refresh icon again in the Object Explorer panel to see the newly created table (Users).
Inserting Data Into a Table
An empty table wouldn’t be useful, so why not insert data into your newly-created Users table? Inserting data into a table is just like copying and pasting text to a sheet’s cells. But with SSMS, you use the INSERT INTO query instead.
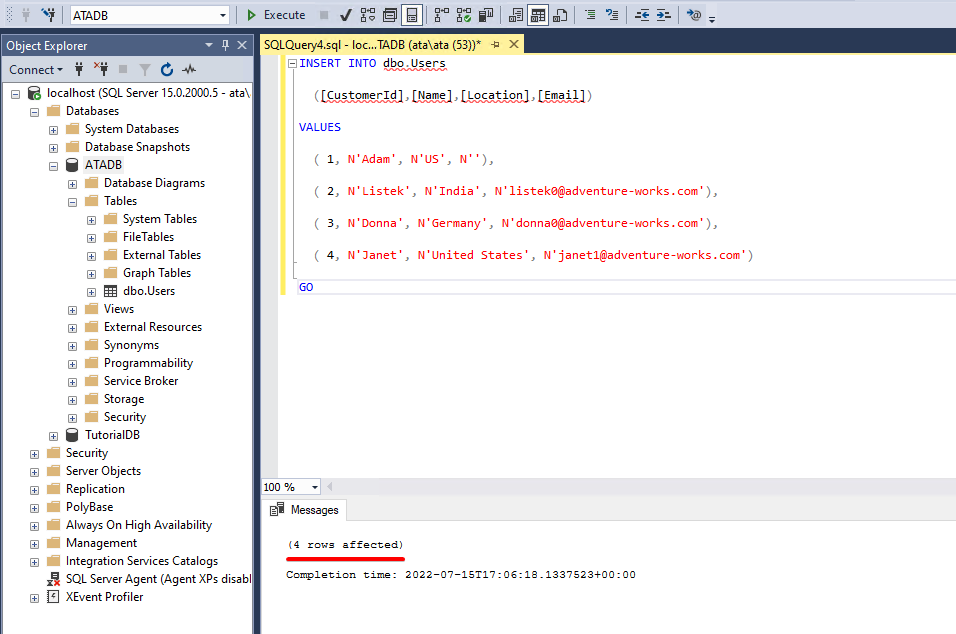
Populate the SQL snippet below to the query window to INSERT data INTO the Users table on each column respectively.
-- Insert data into the columns in the Users table
INSERT INTO dbo.Users

  ([CustomerId],[Name],[Location],[Email])

-- Set the values to add to the Users table
VALUES

  ( 1, N'Adam', N'US', N''),
  ( 2, N'Listek', N'India', N'[email protected]'),
  ( 3, N'Donna', N'Germany', N'[email protected]'),
  ( 4, N'Janet', N'United States', N'[email protected]')

GO
Execute the query and see SSMS inserts data into the Users table.
You can see below that the message says 4 rows affected. Jump to the following step to see the actual data.
Querying Data From a Table
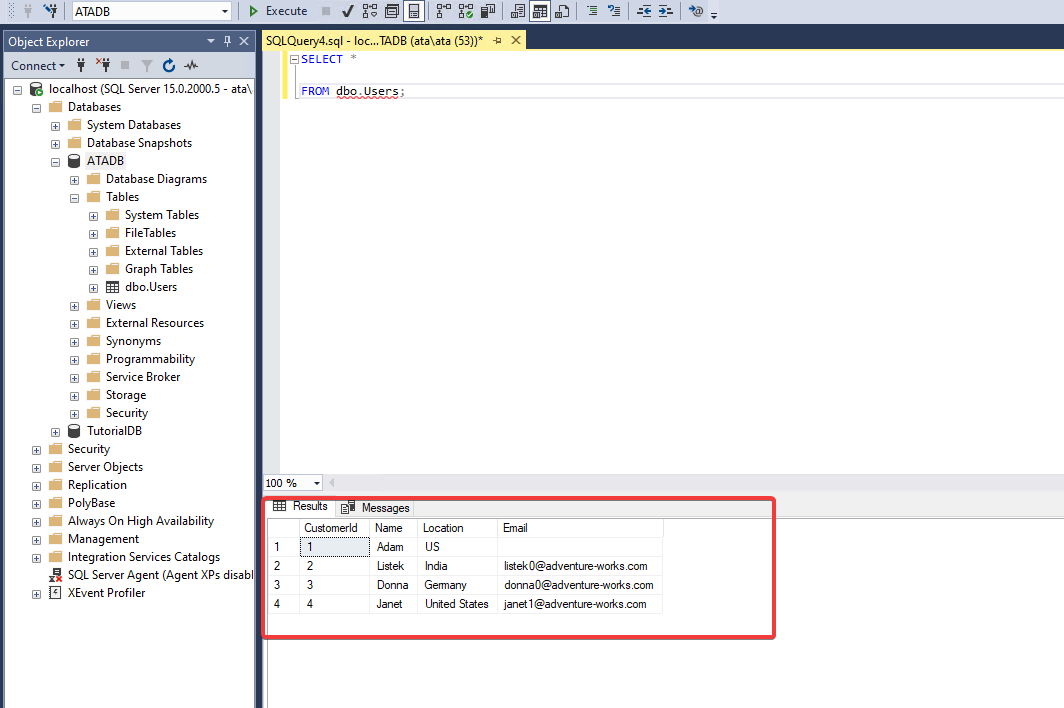
You’ve successfully inserted data to your Users table, but how do you verify that? Execute an SQL snippet to view the actual data inserted into your Users table.
Put the following SQL snippet into the query window. This query will SELECT all (*) of the columns and rows from the Users table.
Execute the query, and you’ll see the data from the Users table in the results pane, as shown below.
Conclusion
In this tutorial, you’ve learned how to install and use SQL Server Management Studio (SSMS) to create a database and table. You’ve inserted data into a table and realized how SSMS makes your life easier managing data in your database by verifying data in an actual table.
Why not use pre-built templates to quickly create databases to build on this newfound knowledge? Or perhaps create shortcut key bindings to work with SSMS easier?
In my earlier article, I’ve explained how to install SQL Server Developer Edition. In this article, I’ll walk you through Microsoft SQL Server Management Studio (SSMS) and how to connect to SQL Server Instance using management studio.
I’ve divided the management studio section into 2 parts. This is part 1. I’ll write the part 2 in the next article.
- In this first part, we will see about SSMS.
- How to login to SQL Server Management Studio.
- How to connect to SQL Server.
- About Object explorer window and how to use it.
- About Object explorer details window.
- About Properties window.
Video Walk Through On SQL Server Management Studio – Part-1
What is SSMS?
- SSMS is the short form of SQL Server Management Studio.
- Management studio is not a database. It’s just a client application or an user interface to connect to SQL Server installed in local pc or in a network on a server.
- Using SSMS we can configure, manage and administer the SQL Server components like Database, Reporting Services, Analysis Services, SQL Server agent, etc.
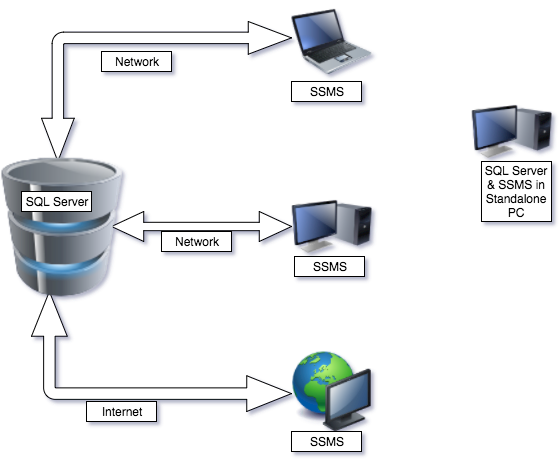
- SSMS connecting SQL Server:

- This is a diagrammatic representation of how the SSMS can connect to the SQL Server.
- In the right side of the diagram, there is a personal computer. In the computer both the SQL Server and SSMS are installed together. The SSMS in the PC can connect to the PC’s Local SQL Server. This is a straight forward way.
- This will not be the case in a big company or an organization or in a production environment.
- In companies, SQL Server is normally installed on a data server. The data server can be connected through the network.
- For example, in the left side of the diagram, the laptop and the workstations are connected to the SQL Server in the network. The laptop and workstation have SSMS installed in them.
- The developer can launch the SSMS from the laptop and connect to the SQL Server instance using the server’s IP or name.
- Management studio can also connect to SQL Server through the internet, provided the server has a static IP or registered domain name.
Starting SSMS
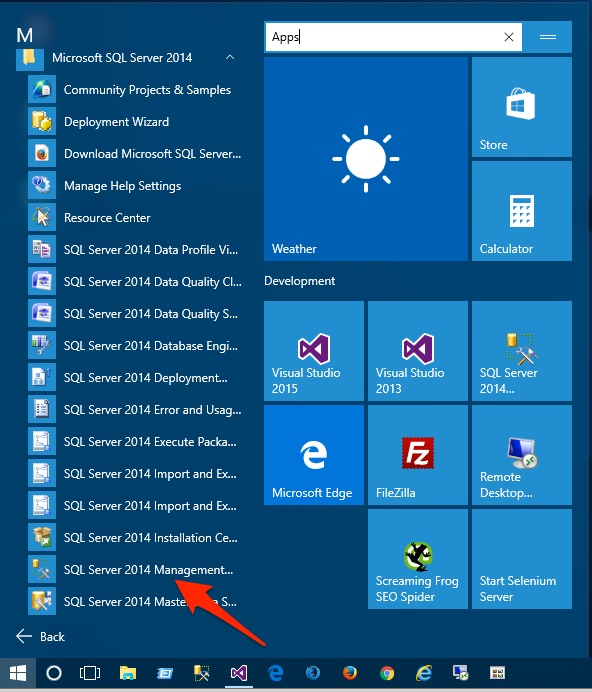
- To launch SSMS: I’m using Windows 10. In windows-10 first you have to go to start icon and then to All Apps.
- In all apps, scroll down and find Microsoft SQL Server 2014 folder.
- Under Microsoft SQL Server 2014 folder look for SQL Server 2014 Management Studio and click.

- The login screen of management screen will appear.

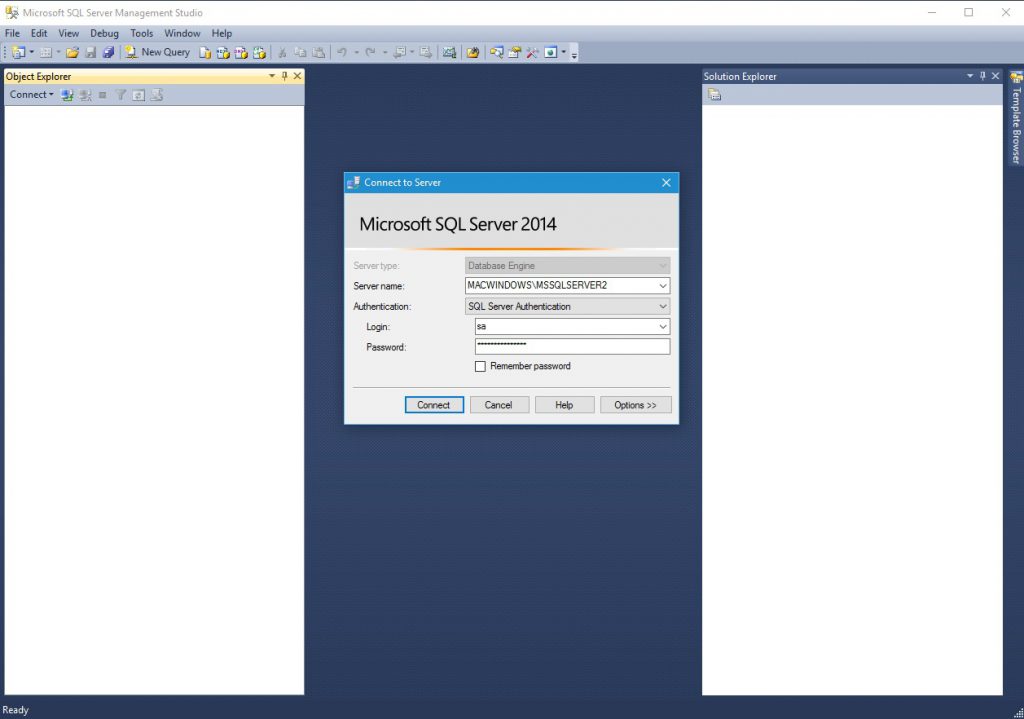
Connecting SQL Server
In the login screen there are several fields to configure the SQL Server connection details. Let’s see about the fields one by one.
Server Type
The first field in the login window is the server type. There are four server types:
- The Database Engine, which has the database and other database components.
- Analysis Services, which is used in decision support and business analysis.
- Reporting Services, which is used for generating user-friendly reports.
- Integration Services, which is used for building enterprise-level data integration and data transformations solutions.
As we are dealing with the database now, select the server type as Database Engine in Server Type Field.
Server Name
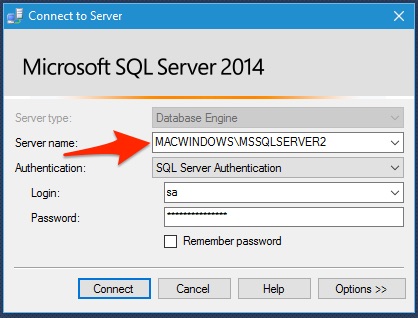
The second field is the Server Name. In the server field we have to enter the name or the IP address of the server where SQL Server database engine is installed. If there is a named instance then we have to specify the instance name after the slash.
An SQL Server Instance is a complete SQL server. You can install more than one instances, I mean more than one SQL Server on a machine or pc. Only one of them will be the default instance with just the name of the server or PC. The other instances are called as named instances. The named instances needs to be specified with the instance name along with the server or computer’s name.
Here MACWINDOWS is the server name and MSSQLSERVER2 is the instance name.
In case if the SQL Server is in the same machine along with the SSMS then you can just enter “.” to connect to the default local instance of the SQL server. Another option is to enter “local” in opening and closing brackets.
Even though my SQL server is installed in the same PC as the SSMS, I’m entering the PC’s name followed by a slash and the instance name. This is because, I have more than one instance of SQL Server in my PC.
Authentication
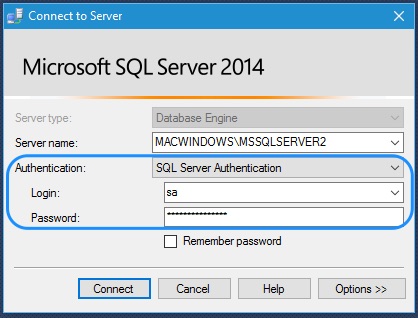
The next field is the authentication type. There are 2 types of authentication, the windows authentication and the SQL Server authentication.
- If you select windows authentication, then the login process will use the current logged in windows user credentials.
- If you select SQL Server authentication, then you have to enter the SQL server login password. If this is a fresh installation of SQL server, then login with the user name “sa” and password you have provided during the SQL Server installation.
Remember Password
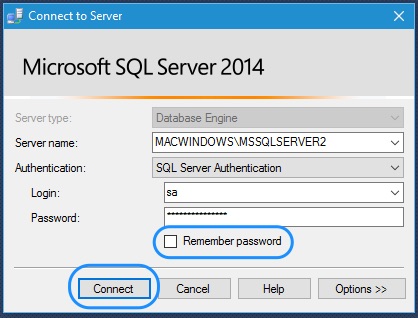
The last and the optional field is Remember password. If you have to frequently use SSMS in your secured PC or workstation, then use the remember password option.
Finally press the Connect button to connect to the SQL Server Database Engine. Now you will be logged in to the SQL Server Management Studio.
SQL Server Management Studio Components
The SQL Server Management Studio’s User Interface is divided into 2 major panels. The object explorer window and the document window.
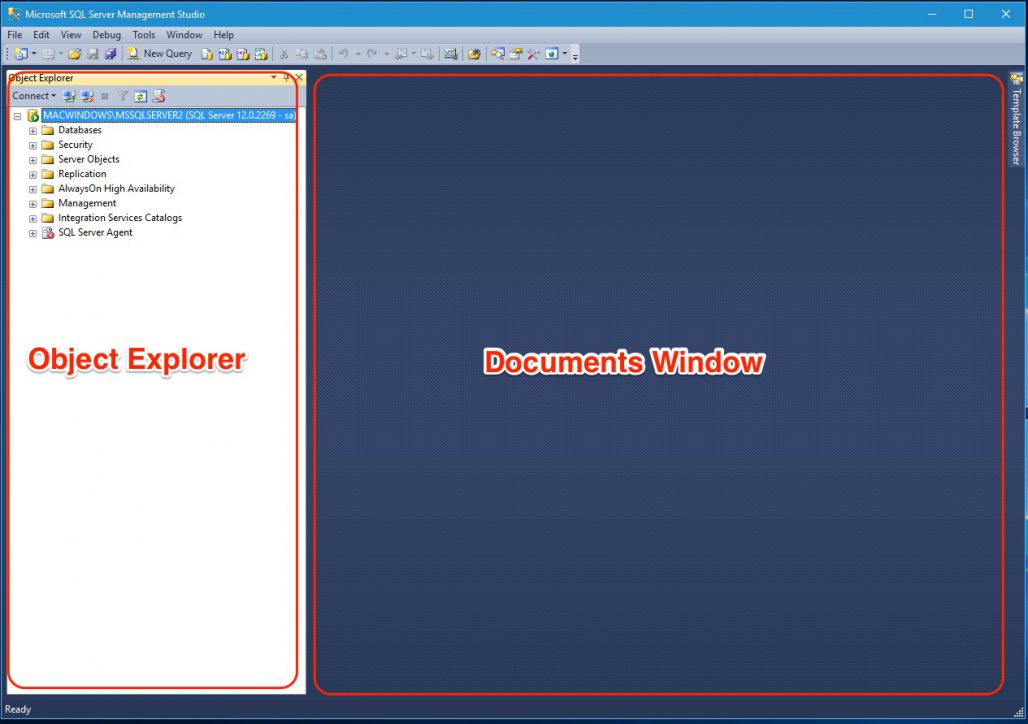
Object Explorer Window
- The panel you are seeing in the left side is the Object Explorer.
- Object Explorer lists down all the connected servers, their databases and other database objects and SQL Server Agent in tree structure.
- The objects other than database you can see in this window are security and logins, roles and credentials, etc.
- In the management section, you can see the database management objects like the maintenance plan, backup manager, SQL Server logs, etc.
- In SQL Server agent section, you can see the SQL jobs, alerts and error logs.
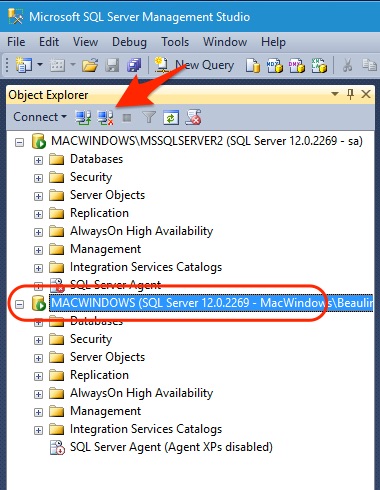
- After logging in to SSMS, if you want to connect to another server:
- Press the connect icon at the top of the Object explorer window.

- The SSMS login window will pop-up.
- In the login window, type in the other SQL Server name, enter the authentication details and press Connect.
- Now the SQL server will be connected and added to the tree view in the object explorer.
- If you want to remove the SQL server from the object explorer tree view, Select the SQL server you want to remove and press the disconnect icon, the disconnect icon is next to the connect icon. On disconnecting, the SQL server will disappear from the tree view.

- Press the connect icon at the top of the Object explorer window.
Document Window
The documents window panel is the most important part of the Management Studio, it shows the Object explorer details window, SQL query editor window, browser window, etc..
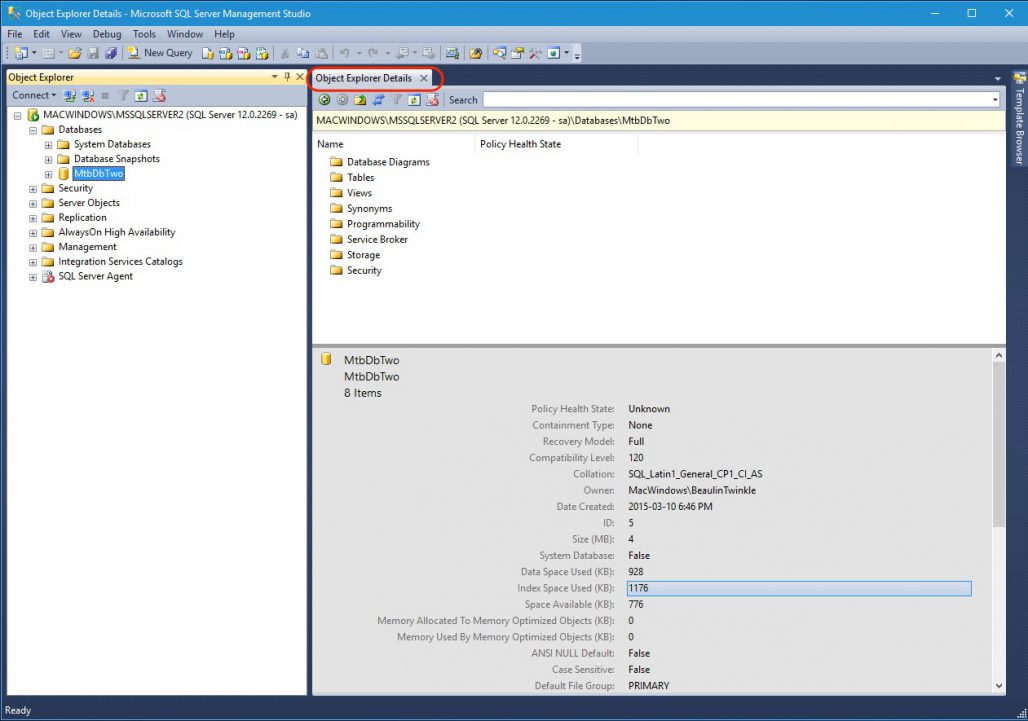
Object Explorer Details Window
The object explorer details window, as the name suggests, will show the details of the object you select in the Object explorer.
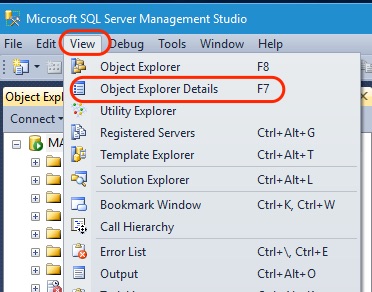
- To open object explorer detail window, go to the View menu and select Object Explorer Details.
- The details widow will open in the panel right to the object explorer.
- This window will show the details of the object you are selecting in the Object explorer.

- Most of the details displayed in the details window is also available in the properties pop-up screen.

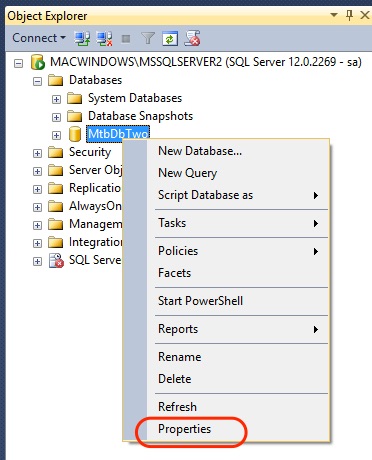
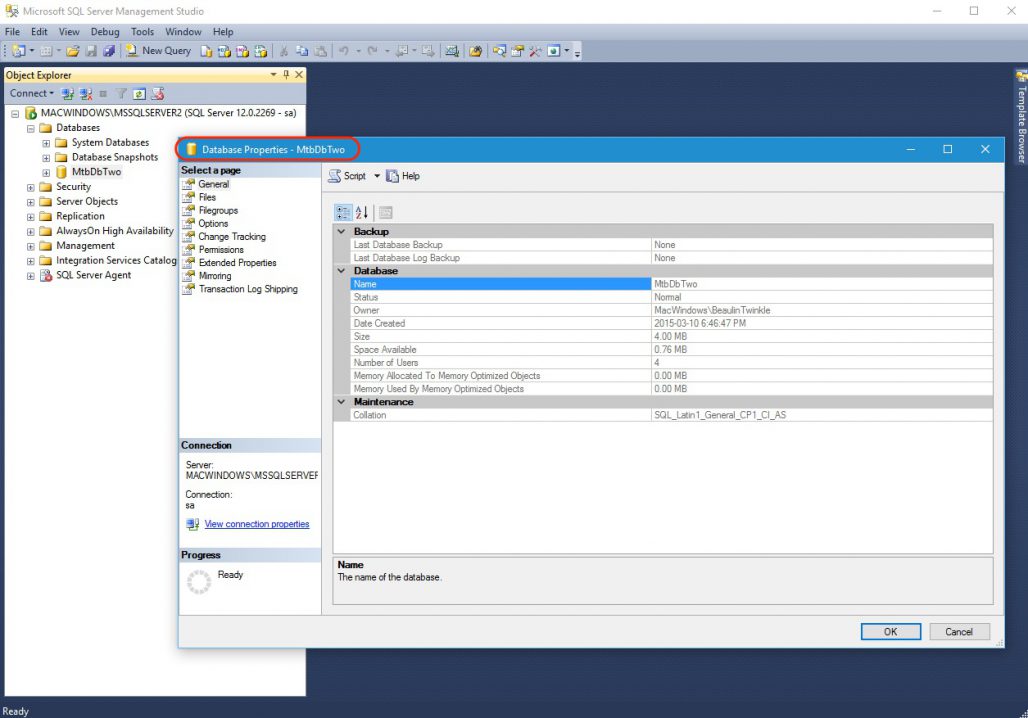
Properties Window
- To launch the properties screen, select an object, right-click. From the right-click menu select properties.

- This pop-up window show the detailed properties of the selected object.

Conclusion Of Part-1
With this I’m completing the part 1 of the SQL Server Management Studio Session. In the next session we will have the Part-2 of SQL Server Management Studio.
Contents of SQL Server Management Studio Part-2
- SQL Query editor Window.
- Changing Windows Layout.
- Some editing tools.
- Registered Servers.
- And about templates, solutions and scripting projects.
Go to Part-2 of SQL Server Management Studio Tutorial.
Reference
- SQL Server Management Studio in Microsoft Docs.
Back to: SQL Server Tutorial For Beginners and Professionals
In this article, I am going to discuss how to connect to SQL Server Database using SQL Server Management Studio (SSMS). The most important thing that you need to keep in mind is that both SQL Server and SSMS are two different things. Here SQL Server is the database and SQL Server Management Studio (SSMS) is the tool that can be used by a user to write and execute SQL queries against the SQL Server Database. As part of this article, we are going to discuss the following pointers in detail.
- How to connect to the SQL Server using SQL Server Management Studio?
- Understanding the Server Type available in SQL Server.
- Understanding the Authentication while connecting with the database.
- Windows Authentication.
- SQL Server Authentication.
How to connect to the SQL Server using SQL Server Management Studio?
You need to follow the below to connect to the SQL Server using SQL Server Management Studio
- First click on the start
- Then select all Programs
- Select the version of Microsoft SQL Server that is installed in your machine, in my case it is 2014
- Finally, click on the SQL Server Management Studio which will open the below window.
")
Let us discuss what we need to select and provide from the above image
Step1. Select Server Type
As we are going to connect with the SQL Server database, so here we need to select the Server Type as Database Engine. Along with Database Engine, the other Server Types options are available as SQL Server Analysis Services (SSAS), SQL Server Reporting Services (SSRS) and SQL Server Integration Services (SSIS). These there are called MSBI (Microsoft Business Intelligence) which we will discuss in detail in our MSBI Tutorials.
Database Engine:
- The database engine is the core service of SQL Server which will use for storing a large amount of data, accessing the data, manipulating the data and providing security to the information.
- In the database engine, the data will be stored in the form of a 2-D format (Tables).
Analysis Services (SSAS):
- The SSAS (SQL Server Analysis Service) is a tool that is used under the data warehousing/ data mining environment for storing the information in the form of a 3-D format.
Reporting Services (SSRS):
- SQL Server Reporting Service (SSRS) is a tool that is used to generate various reports such as MS-Word file format, MS-Excel format, .pdf format, XML format, .tiff file format et.
- The report is a document that is used to store some business-related information.
Integration Services (SSIS):
- The SQL Server Integration Service (SSIS) is a tool that is used to convert one database tables into another database understandable format. For example, SQL Server database Tables are converting into Oracle understandable table format.
The SSAS, SSRS, SSIS tools are coming under the MSBI (Microsoft Business Intelligence) tool.
Step2. Specify Server Name:
The server name is nothing but the name of the SQL Server or IP address of SQL Server. One more thing that you need to remember is if the SQL Server is installed on your machine then you can specify the server name as a dot (.) or 127.0.0.1 or local.
Server name = (local)
Step3. Select Authentication
In SQL Server there are two types of authentication i.e. Windows Authentication and SQL Server Authentication. But it will depend on how you installed the SQL Server. That means, at the time of installation, if you select the mixed-mode authentication then you will get both Windows and SQL Server authentication to connect with the SQL Server database or else you will only have windows authentication to connect with the database.
Windows Authentication:
- It is the default authentication mode of SQL Server.
- In Windows authentication, we will work on user admin.
- With Windows authentication mode there is no need to enter the user credentials i.e. user Id and password because User Id and Password are generated by the Operating System by default,

SQL Server Authentication:
- In SQL Server authentication we will work on the current user.
- When we will work with SQL Server authentication we should enter user Id and Password (This user Id and password are created by the user at the time of SQL Server software installation).

How you connect to the SQL Server, it is up to you.
Once you provide the necessary details and click on the Connect button, then we will be connected to the SQL Server Database. Once you connected, now, click on the New Query option. You can find the New Query option on the top left corner of SQL Server Management Studio as shown in the below image.

Once you click on the New Query option, it should open the new query editor window, where we can type SQL queries and execute which we will discuss in our next article.
The key point that you need to remember from this article is that the SSMS (SQL Server Management Studio) is not the Server, it is the client tool that can be used by a user to connect with Server. The database server (SQL Server) is generally on a dedicated machine, and the users are connecting to the server using SQL Server Management Studio from their machines as shown in the below image.

As shown in the above image, the developer machines are connecting to the database server using SQL Server Management Studio.
In the next article, I am going to discuss show how to create, alter and delete a database in SQL Server. Here, in this article, I try to explain how to use SQL Server Management Studio (SSMS) to connect with SQL Server Database step by step. I hope this article will help you with your needs.