Инструкции кондиционера Whirlpool AMD312, Размер файла: 3187 KB, Формат: pdf, Платформа: Windows/Linux, Дата: 2020-08-18
Общие сведения о кондиционере Whirlpool AMD312.
- Тип компрессора:
- Обычный
- Тип установки внутреннего блока:
- Настенный
- Тип:
- Сплит-система
Представленные на этой странице файлы инструкций и руководств кондиционера Whirlpool AMD312 содержат подробное описание функциональных характеристик устройства и доступны для скачивания абсолютно бесплатно.
Инструкции кондиционера Whirlpool не локализованы для русскоязычного населения, поэтому для ознакомления с файлами вы должны обладать минимальным владением английским языком со знанием значений специальных терминов. Расширение файлов PDF предполагает наличие установленной на вашем устройстве программы для просмотра файлов такого формата.
Предоставленные вам для скачивания файлы инструкций и руководств кондиционера Whirlpool AMD312 предназначены только для личного использования с целью изучения функциональных особенностей и технических характеристик. Распространение, тиражирование или передача файлов посторонним лицам запрещается.
Используйте информацию приведенную на нашем сайте перед покупкой кондиционера. Изучите технические данные и функционал данной модели. Ознакомьтесь с перечнем основных неисправностей кондиционера Whirlpool AMD312 и способами их устранения. Также важно знать о требованиях к сервисному обслуживанию и корректному монтажу конкретной модели.
Файлы инструкций кондиционера AMD312, представленные на сайте имеют следующие характеристики. Убедитесь в том, что ваша система поддерживает работу с ними и прочтение файлов соответствующего формата.
- Бренд:
- Whirlpool
- Модель:
- AMD312
- Тип устройства:
- кондиционер
- Файл:
- manuals_whirlpool_amd312.pdf
- Платформа:
- Windows/Linux
- Расширение:
- Объем:
- 3187 KB
- Разработан:
- 2020-08-18
- Скачано:
- 337 раз
- Цена:
- Бесплатно
Постарайтесь описать ваше мнение о кондиционере Whirlpool AMD312. Опишите как давно вы им пользуетесь и какие функции стали для вас незаменимыми, а какие нужны очень редко. С какими неисправностями вы столкнулись в процессе эксплуатации?
Ваш отзыв может быть первым
Gebrauchsanweisung
Instructions for use
Mode d’emploi
Gebruiksaanwijzing
Istruzioni per l’uso
Brugsanvisning
Bruksanvisning
Käyttöohje
Manual de utilização
Instrucciones para el uso
Instrukcje użytkowania
Használati utasítás
ИнструкциЯ за употреба
Návod k použití
Návod na použitie
Instruc∑iuni de utilizare
Инструкции по эксплуатации


3
ENGLISH Instructions for use Page 4
РУCCКИЙ
Инcтpyкции по экcплyaтaции Cтpaницa
26
УКРАЇНСЬКА
Інструкція з експлуатації Сторінка
48
AMD 310 — 311 — 312 — 313

4
BEFORE USING THE APPLIANCE
To make the most out of your new appliance,
please read the user instructions carefully and keep
them handy for future consultation.
Before using the appliance please follow and
set according to the below indications:
Remote Control (RC) presetting:
Each time the batteries are replaced in the remote
control, the RC is pre-set on Heat pump.
If the air conditioner that you purchased is a
cooling only, then the pre-set on Heat pump will
not bring any changes.
Auto-Restart presetting Function:
To set the auto-restart function, press the
Emergency button (ON/OFF) on the indoor unit
for at least 5 seconds.
A buzz sound will signal that the auto-restart
function is set and the air conditioner is in standby.
To cancel the auto-restart function, repeat the
above steps.
SAFETY PRECAUTIONS
• The Installation and service/repair must be
performed by a qualified technician, in
compliance with the producer’s instructions and
following local safety norms. Do not repair or
replace any parts of the appliance unless it is
specifically written in the user instructions.
• Do not pull the power supply cord to remove it
from the socket. Do not twist or press the
power supply cord, and make sure it is not
broken.
• Do not touch the power plug, circuit breaker
and emergency button when your hands are
wet.
• Do not insert your fingers or foreign substances
into the air inlet/outlet of indoor&outdoor unit.
• Never block the air inlet or outlet of indoor and
outdoor unit.
• Physically or mentally disabled people, children
and people without any experience with the
product are only allowed to use the appliance if
they have had specific training on how to
operate the appliance by a person responsible
for their security and well-being. The appliance
is not intended for use by disabled people and
very young children without supervision.
• Children should be supervised to ensure that
they do not play with the appliance (including
remote control).
5
• This appliance has been made of recyclable or
re-usable material. Scrapping must be carried
out in compliance with local waste disposal
regulations. Before scrapping it, make sure to
cut off the mains cord so that the appliance
cannot be re-used.
• For more detailed information on handling and
recycling of this product, contact your local
authorities who deal with the separate collection
of rubbish or the shop where you bought the
appliance.
SCRAPPING OF PACKAGING
• The packaging can be 100% recycled as
confirmed by the recycling symbol . The
various parts of the packaging must not be
dispersed in the environment, but must be
scrapped in line with local authority regulations.
SCRAPPING OF APPLIANCE
• This appliance is marked according to the
European Directive 2002/96/EC, Waste
Electrical and Electronic Equipment (WEEE).
• By ensuring that this product is disposed of
correctly, you will help to prevent potentially
negative consequences for the environment and
for human health.
• The symbol on the product or on the
documents accompanying the product indicates
that this appliance should not be treated as
household waste, but must be given to the
appropriate local gathering place where electric
and electronic appliances are stored and
recycled.
SAFEGUARDING THE ENVIRONMENT
AIR CONDITIONER PRECAUTIONS
Please strictly follow the below instructions:
• Long and direct exposure to cool air might be
harmful to health. It is advisable to set the
louvers in order to avoid direct cool air and
deflect it within the room.
• Upon malfunctioning first turn the appliance off
by pressing the ON/OFF button on the remote
control, then disconnect it from power supply.
• Do not switch the appliance on and off too often
as this can damage the appliance.
• Do not place any objects on the outdoor unit.
• Disconnect the air conditioner from the power
supply if it is to be left unused for a long period
of time or during a thunder/lightning storm.
• This product contains Fluorinated Greenhouse
Gases covered by the Kyoto Protocol, the
refrigerant gas being in a hermetically sealed
system. Refrigerant gas: R410a has a Global
Warming Potential (GWP) 1975.
6
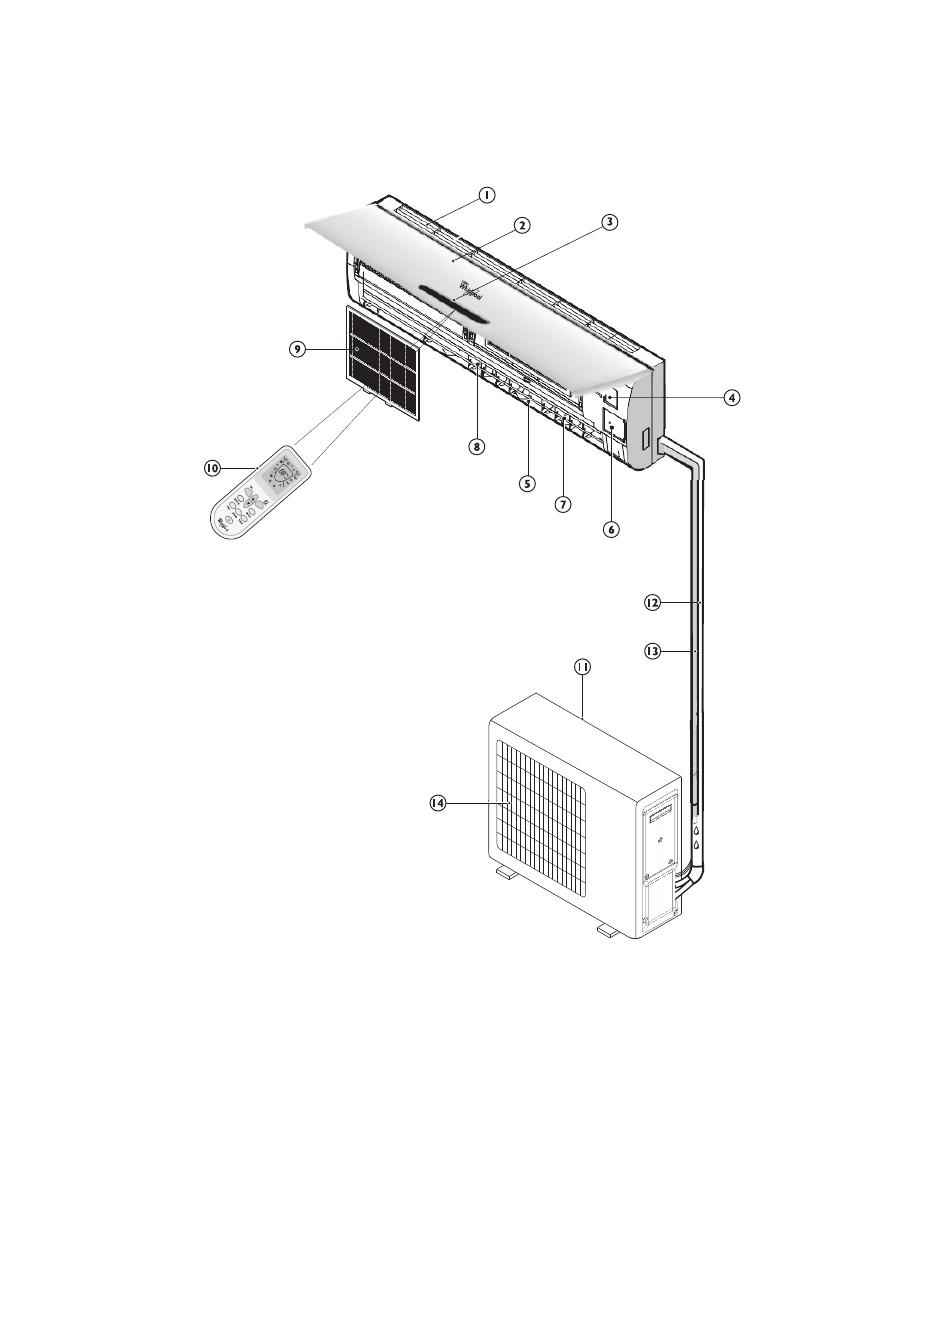
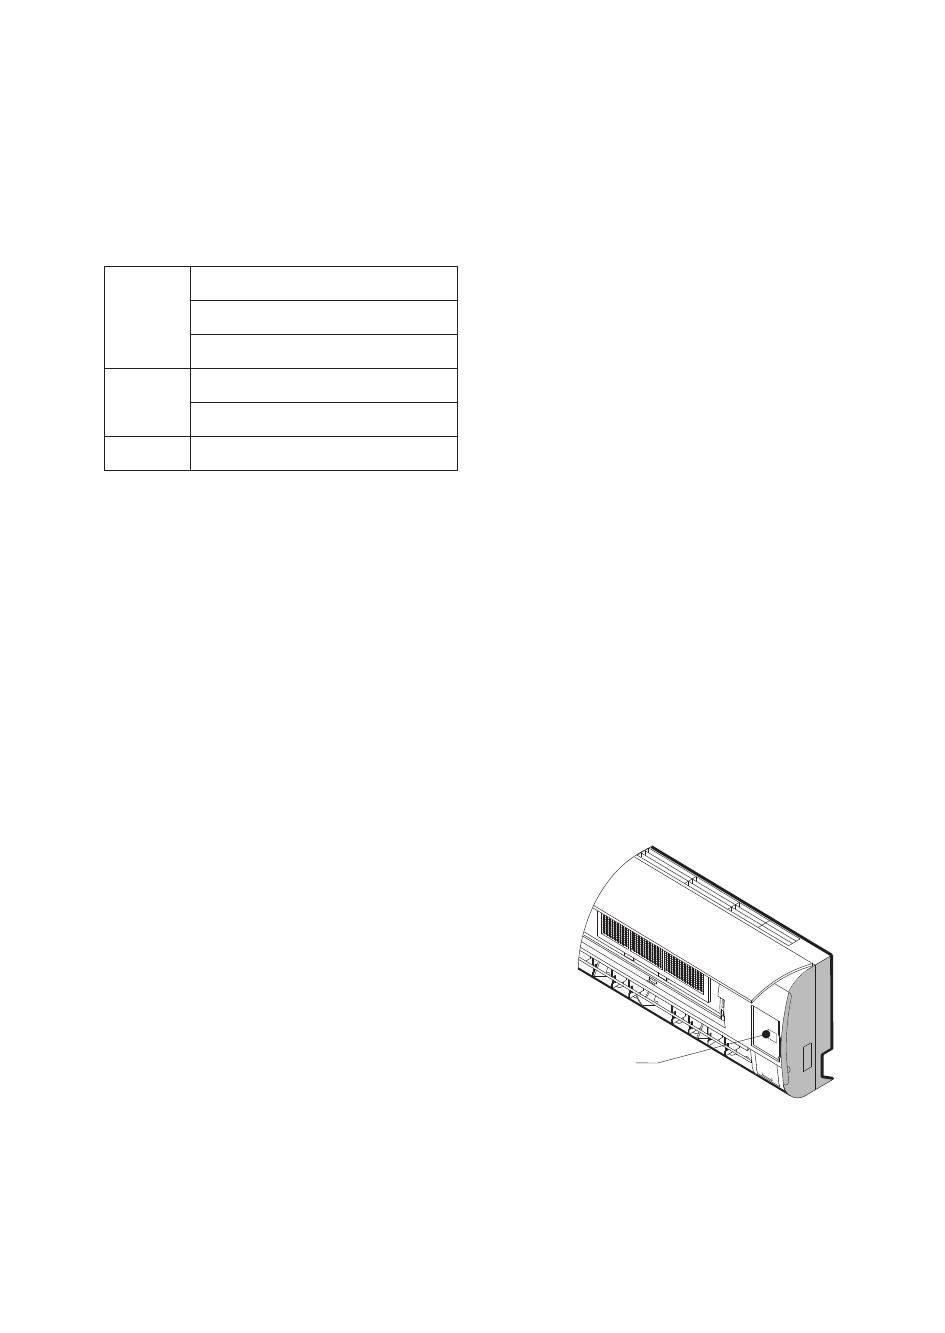
PRODUCT DESCRIPTION
Indoor unit
1. Air Intake
2. Front Panel
3. Display panel
4. Electrical box
5. Air Outlet
6. Emergency button
7. Vertical Adjustment Louver
8. Horizontal Adjustment Louver
9. Air Filter
10. Remote Control
Outdoor unit
11. Air Intake
12. Pipes and Power Connection Cord
13. Drain Hose
Note: Condensate water drains at COOLING
or DRY operation.
14. Air Outlet
Images in the user instructions are based on external views of standard models, shape and design vary
according to the model.
7
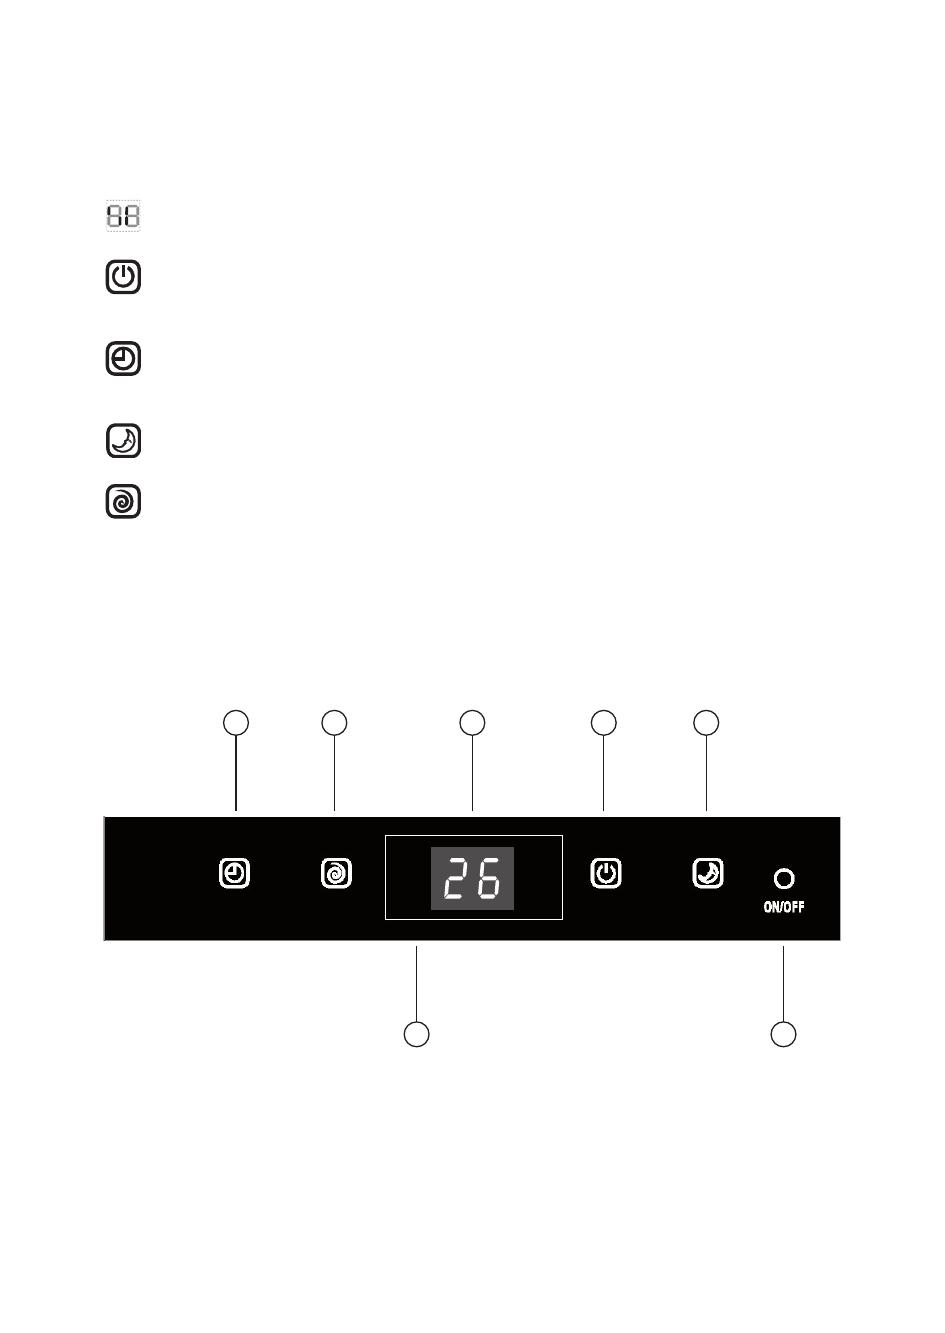
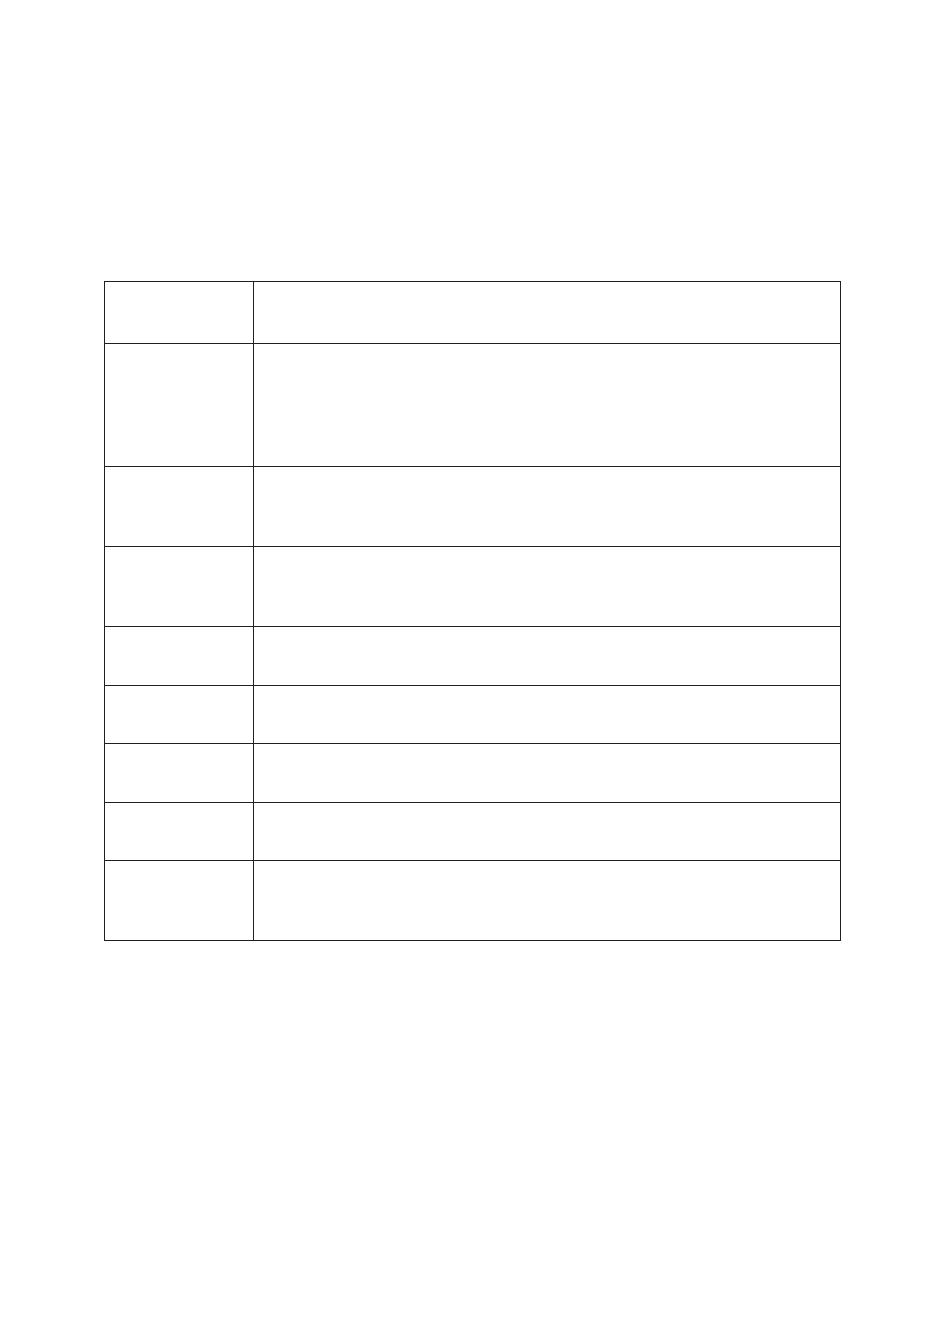
CONTROL PANEL DISPLAY INDICATORS
DESCRIPTION
Temperature indicator (1)
Displays set temperature.
Running indicator (2)
It lights up during operation.
It flashes during outside unit defrosting.
Timer indicator (3)
It lights up during the set time.
It goes off when timer operation ends.
Sleep indicator (4)
It lights up during sleep mode.
Compressor indicator (5)
It lights up when the compressor is on.
Emergency ON/OFF button (6)
Used to control the unit by pressing the button, when the RC is out of work.
Used to set or cancel auto-restart function.
Signal Receptor (7)
7 6
3 5 1 2 4
8
1. ON/OFF BUTTON
Starts and/or Stops the appliance by pressing
this button.
2. TIMER BUTTON
Sets or cancels the timer operation.
3-4. ROOM TEMPERATURE SETTING
BUTTONS
Used to select the room temperature. Used
to set time in timer mode.
5. MODE BUTTON
Used to select the operation mode.
6. BUTTON
Used to set or cancel 6th sense operation,
also during stand-by.
7. SLEEP BUTTON
Used to set or cancel Sleep Mode operation.
8. FAN BUTTON
Used to select fan speed in sequence auto,
high, medium or low.
9. SWING BUTTON
Used to stop or start vertical adjustment
louver swinging and set the desired up/down
airflow direction.
10. JET BUTTON
Used to start or stop the fast cooling.
(Fast cooling operates at high fan speed with
18°C set temp. automatically).
10
6
5
3
2
1
4
9
8
7
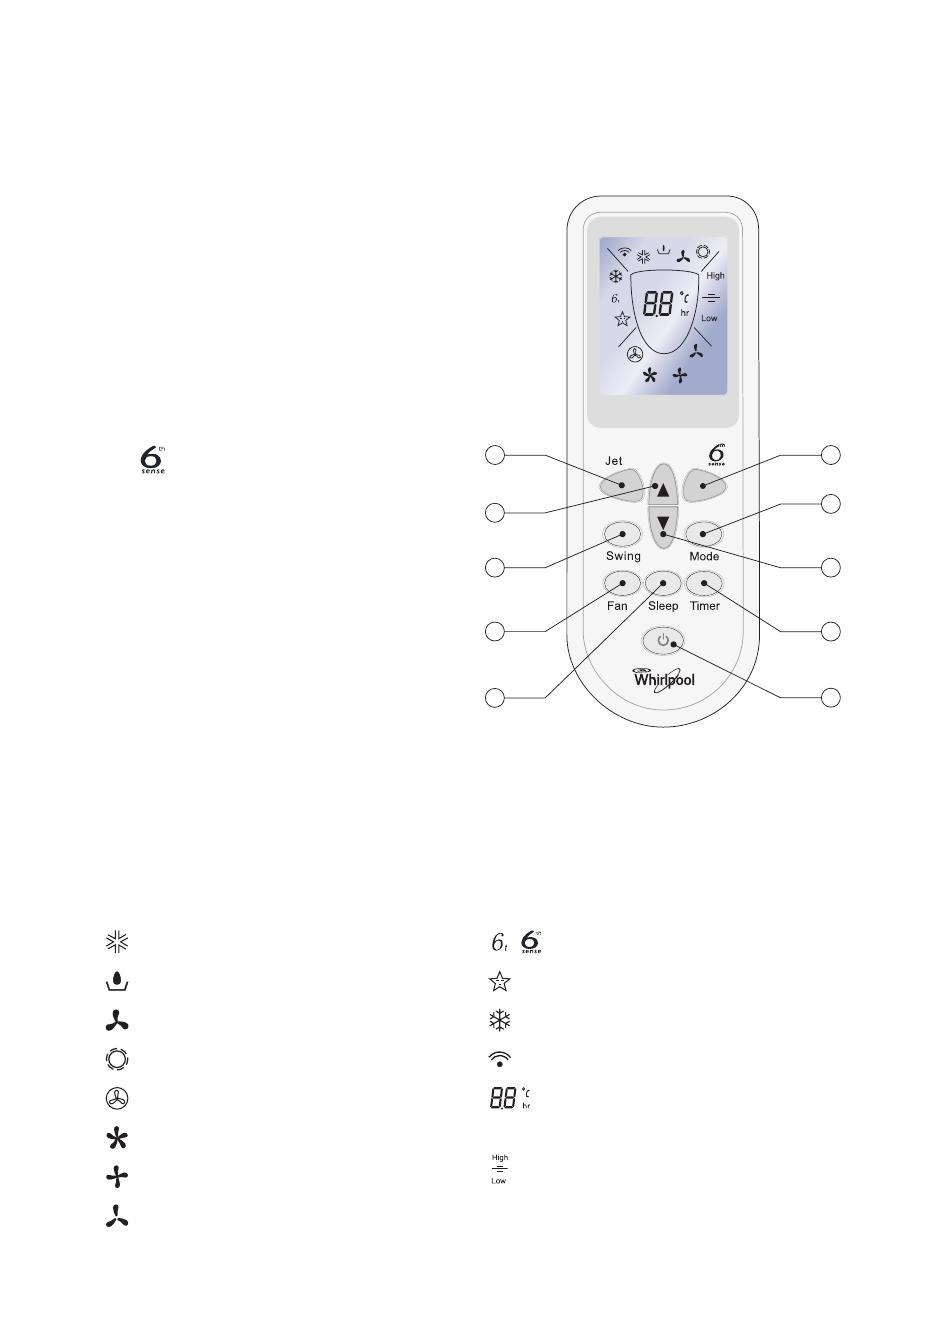
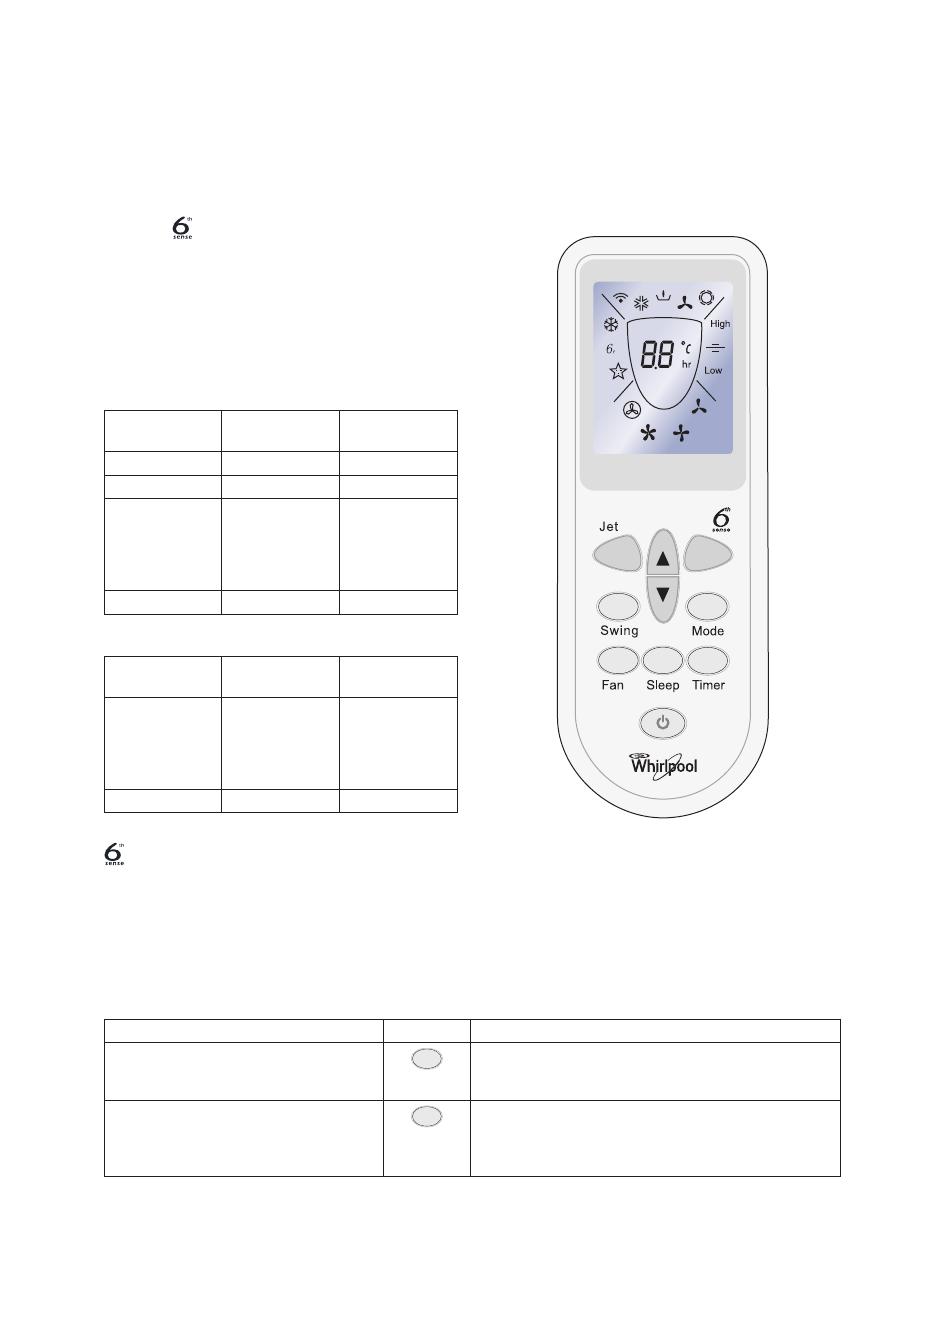
INDICATOR SYMBOLS ON RC DISPLAY
Cooling indicator
Dry indicator
Fan only indicator
Heating indicator
Auto fan speed
High fan speed
Medium fan speed
Low fan speed
indicator
Sleep indicator
Jet indicator
Signal transmission
Display set temperature
Display set timer
Adjust Temperature (±2°C) indicator in 6th
sense mode
REMOTE CONTROL FUNCTIONS
AND INDICATORS
9
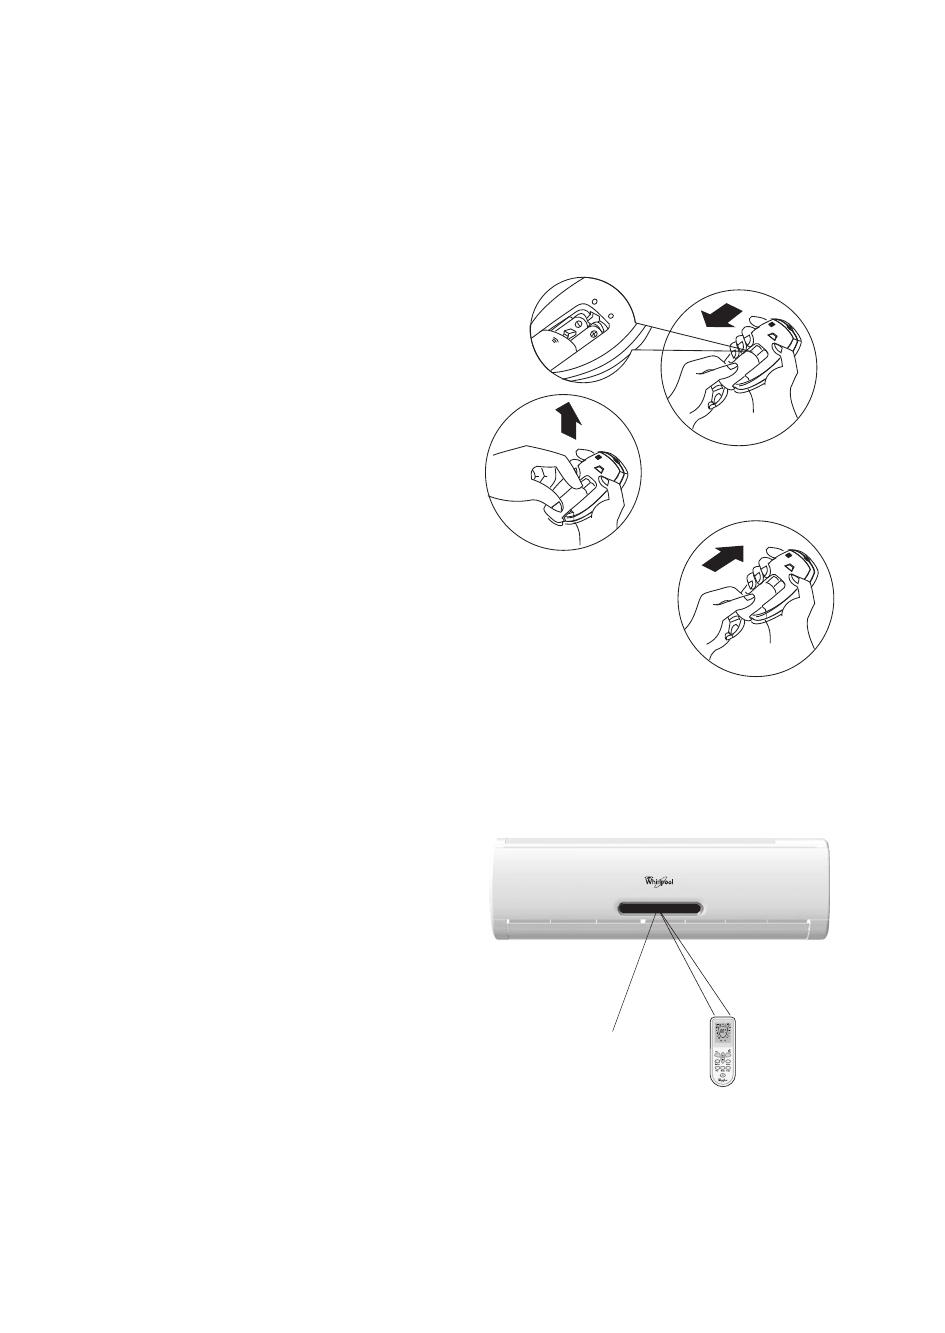
STORAGE AND TIPS FOR USING THE RC
How to insert the batteries
Remove the battery cover in the direction of the
arrow.
Insert new batteries making sure that the (+) and
(-) of battery are matched correctly.
Refit the cover by sliding it back into position.
Note:
• Use 2 LR03 AAA (1.5volt) batteries. Do not use
rechargeable batteries.
Replace batteries with new ones of the same
type when the display becomes dim.
• If the replacement is done within 1 minute, the
remote control will keep original presetting.
However, if you replace batteries taking more
than 3 minutes, all presetting will be cancelled
and timer will display Zero.
How to remove the batteries
Remove the battery cover in the direction of the
arrow.
Press the positive pole of the battery softly with
your fingers, then draw the batteries out of the
compartment.
All this should be done by adults, children are
forbidden to remove the batteries from the remote
control in order to avoid danger of swallow.
Disposal of the batteries
Please discard the batteries as sorted municipal
waste at the accessible collection point.
Precautions
• When replacing the batteries, do not use new
batteries with old batteries, or different types of
batteries as this may cause the remote control to
malfunction.
• If you do not expect to use the remote control
for some time, take the batteries out to prevent
leakage of battery acid in the remote control.
• Operate the remote control within effective
range. Keep the remote control at least 1 meter
from any TV set or HI-FI equipment.
• If the remote control does not work normally,
take the batteries out and reinstall after 30
seconds. If it still does not work install new
batteries.
• To operate the appliance by remote control,
point the remote control at the receiving device
on the indoor unit, to ensure receiving sensibility.
• The remote control will operate the air
conditioner at a distance of up to 7m.
Signal receptor
10
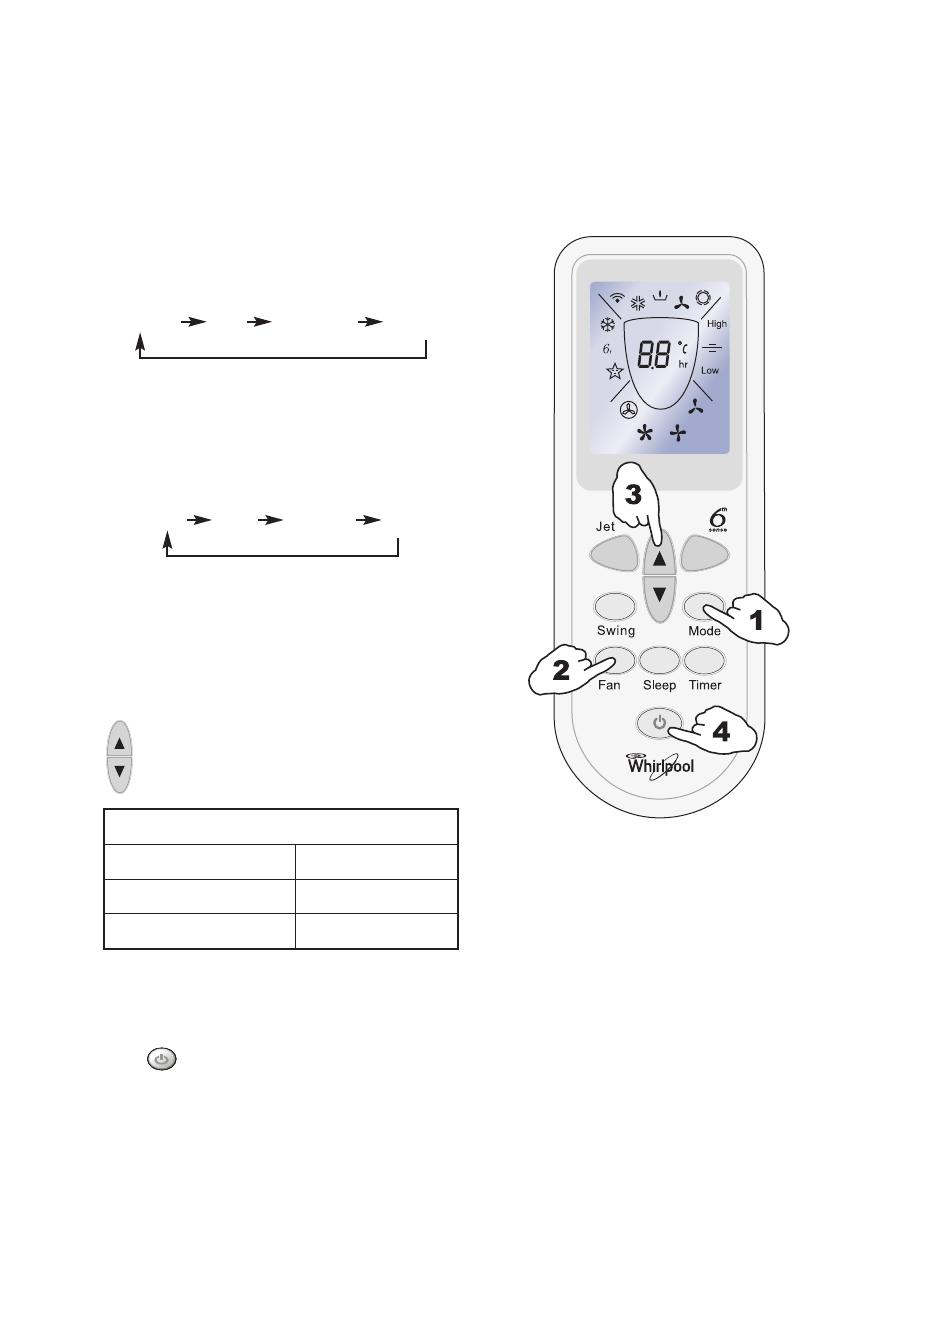
OPERATING MODE DESCRIPTION
Operation Modes:
1. Selecting mode
Each time MODE button is pressed, the operation
mode is changed in sequence:
COOLING DRY FAN ONLY HEATING
Heating mode is not available for cooling only air
conditioners.
2. FAN mode
Each time the «FAN» button is pressed, the fan
speed is changed in sequence:
Auto High Medium Low
At «FAN ONLY» mode, only «High«, «Medium«
and «Low» are available.
At «DRY» mode, Fan speed is set at «Low«
automatically, «FAN» button is ineffective in this
case.
3. Setting temperature
Press once to raise temperature setting by
1 raise °C
Press once to lower temperature setting by
1 lower °C
*Note: Heating mode is NOT available for
cooling only models.
4. Turning on
Press button, when the appliance receives
the signal, the RUNNING indicator of the indoor
unit lights up.
During mode changes wait a few seconds and
repeat the operation if the unit does not respond
at once.
When selection the heating operation, air flow will
start after 2-5 minutes.
Range of available set temperature
*HEATING, COOLING 18°C~32°C
DRY unable to set
FAN ONLY unable to set
11
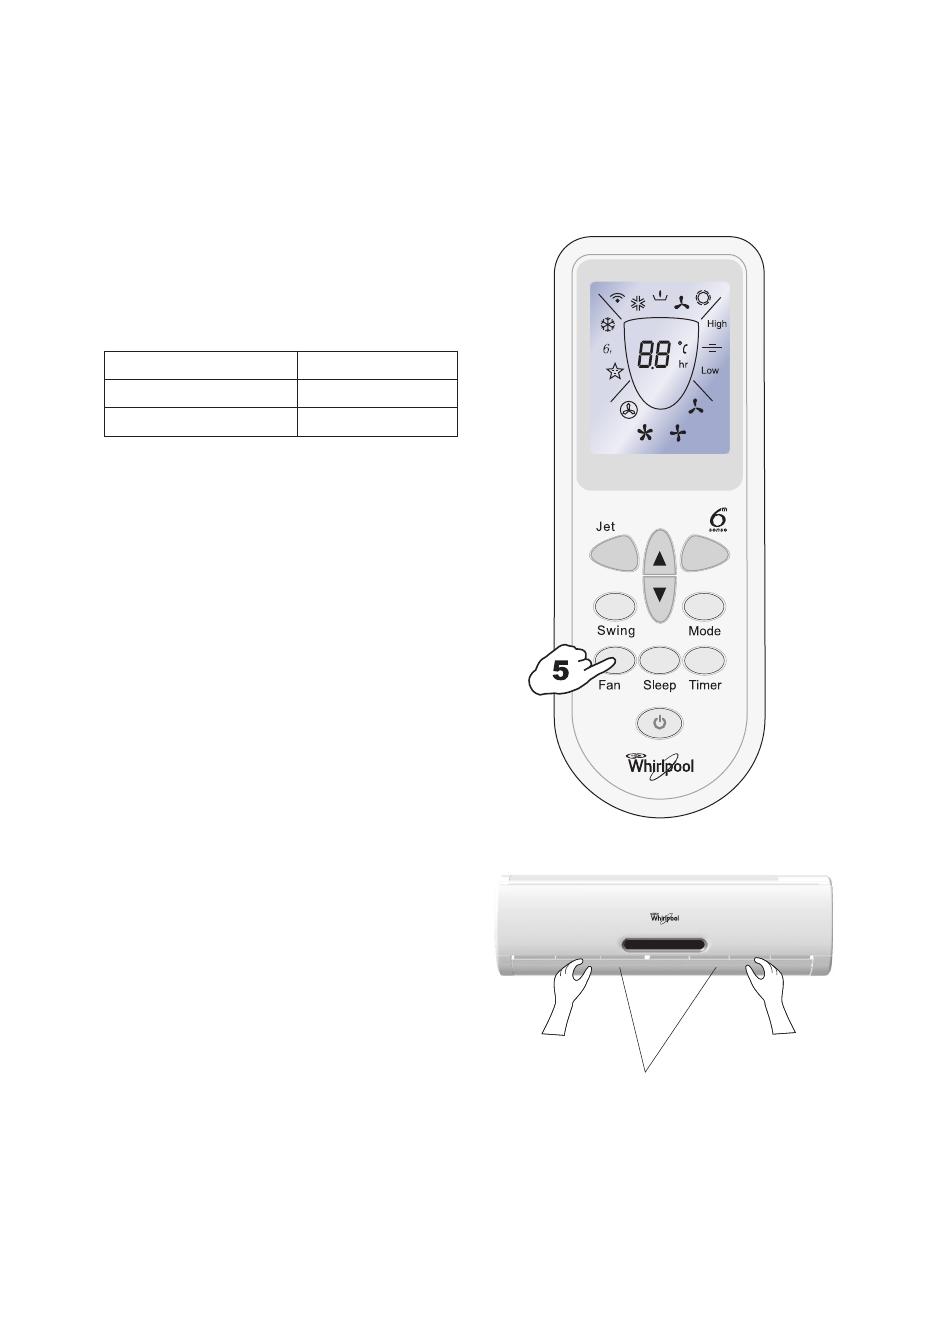
AIRFLOW DIRECTION CONTROL
5. Airflow direction control
Vertical airflow is automatically adjusted to a
certain angle in accordance with the operation
mode after turning on the unit.
The direction of airflow can be also adjusted to
your own requirement by pressing the «SWING»
button of the remote control.
*Heating mode is only available for heat pump
models.
Vertical airflow control (using the remote
control)
Use the remote control to set the flow angles.
Swinging airflow
Pressing «SWING» button once, the vertical
adjustment louver will swing up and down
automatically.
Desired direction airflow
Pressing the «SWING» button again when the
louvers swing to a suitable angle as desired.
Horizontal airflow control (with hands)
Turn the control rods of the horizontal adjustment
louvers to change horizontal air flow as shown.
Note: The shape of the unit may look different
from that of the air conditioner you have selected.
A — Do not turn the vertical adjustment louvers
manually, otherwise malfunction may occur. If
that happens, turn off the unit first and cut off
the power supply, then restore power supply
again.
B — It is better not to let the vertical adjustment
louver tilt downward for a long time at
COOLING or DRY mode to prevent
condensed water from dripping.
Operation mode Direction of airflow
COOLING, DRY horizontal
*HEATING, FAN ONLY downward
control rod of horizontal
adjustment louvers
12
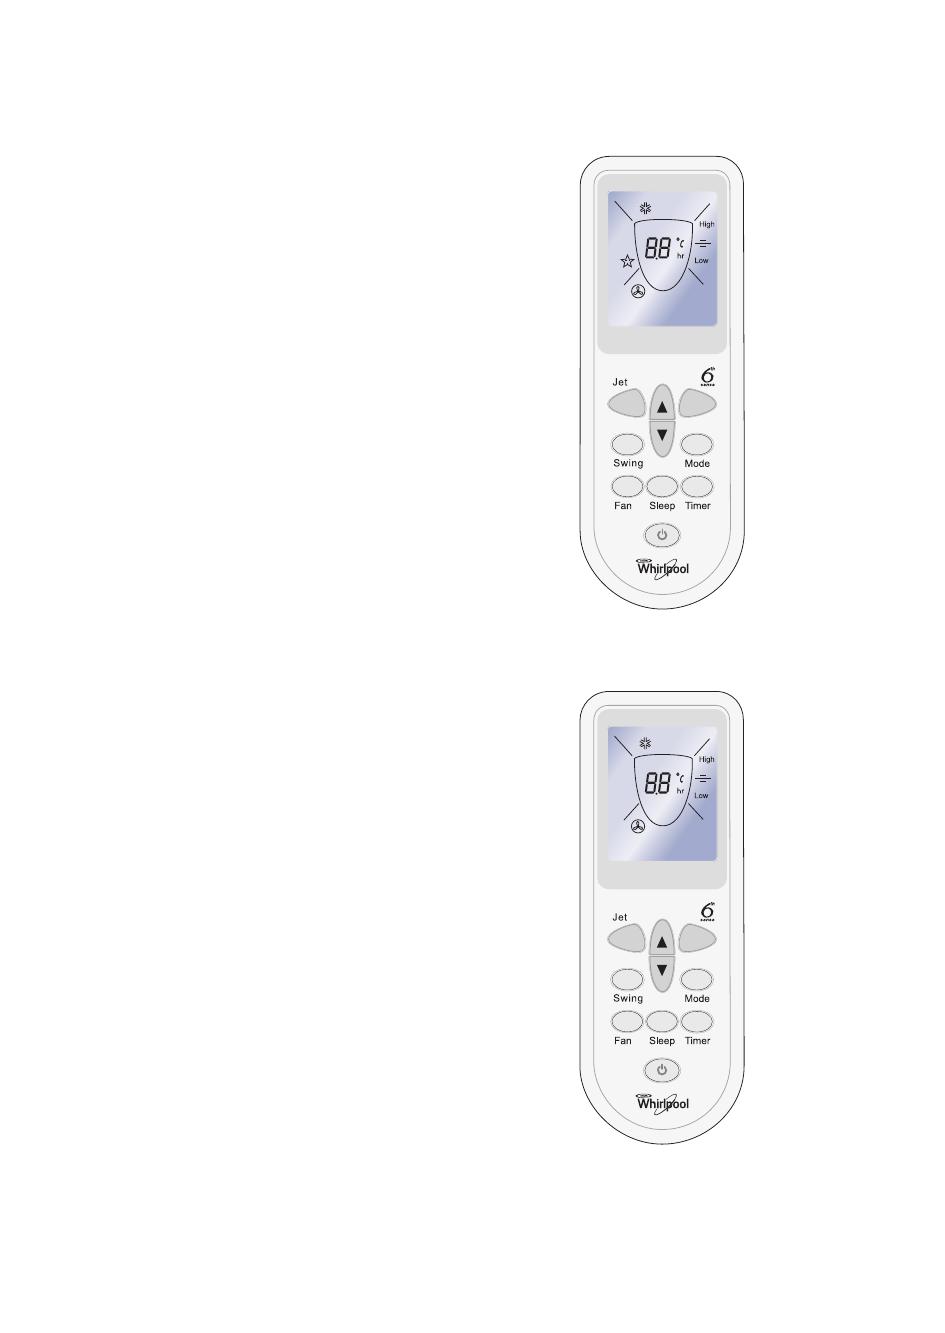
MODE AND FUNCTION DESCRIPTIONS
6th SENSE MODE
Press the button, the unit enters 6th sense
mode directly regardless of the unit is on or off.
In this mode, temperature and fan speed are
automatically set based on the actual room
temperature.
Operation mode and temperature are
determined by indoor temperature.
Heat pump models
Cooling only models
Button is ineffective in Jet mode.
Note: Temperature, airflow and direction are
controlled automatically in 6th sense mode.
However, a decrease or rise of up to 2°C can be
set with the remote control if you still feel
uncomfortable.
What you can do in 6th sense mode
Indoor
temperature
Operation
mode
Target
temperature
21°C or below HEATING 22°C
21°C-23°C FAN ONLY
23°C-26°C DRY
Room
temperature
decrease 1.5°C
after operating
for 3 minutes
Over 26°C COOLING 26°C
Indoor
temperature
Operation
mode
Target
temperature
26°C or below DRY
Room
temperature
decrease 1.5°C
after operating
for 3 minutes
Over 26°C COOLING 26°C
Your feeling button adjustment procedure
Uncomfortable because of unsuitable
air flow volume.
Fan
Indoor fan speed alternates among High, Medium
and Low each time this button is pressed.
Uncomfortable because of unsuitable
flow direction.
Swing
Press it once, the vertical adjustment louver swings
to change vertical airflow direction. Press it again,
swings stops. For horizontal airflow direction please
refer to the chapter «Airflow direction control».
13
SLEEP mode
SLEEP mode can be set in COOLING or
HEATING operation mode.
This function gives you a more comfortable
environment for sleep.
In SLEEP mode,
• The appliance will stop operation automatically
after operating for 8 hours.
• Fan speed is automatically set at low speed.
• Set temperature will rise by max 1°C if the
appliance operates in cooling mode for 2 hours.
• Set temperature will decrease by 3°C at most if
the appliance operates in heating mode for 3
hours.
*Note: In cooling mode, if room temperature is
26°C or above, set temperature will not change.
Note: Heating is NOT available for cooling only air
conditioner.
JET mode
• JET mode is used to start or stop fast cooling.
Fast cooling operates at high fan speed, changing
the set temperature automatically to 18°C.
• JET mode can be set when the appliance is in
operation.
•In JET mode, you can set airflow direction or
timer. If you want to quit from JET mode, press
any — JET, MODE, FAN, ON/OFF or
TEMPERATURE SETTING button, the display
will return to the original mode.
Note:
• SLEEP and 6th Sense buttons are not available
in JET mode.
• JET button is ineffective in HEATING mode.
• The appliance will continue working in JET
mode with set temperature of 18°C if you don’t
quit from it by pressing any of the buttons
mentioned above.
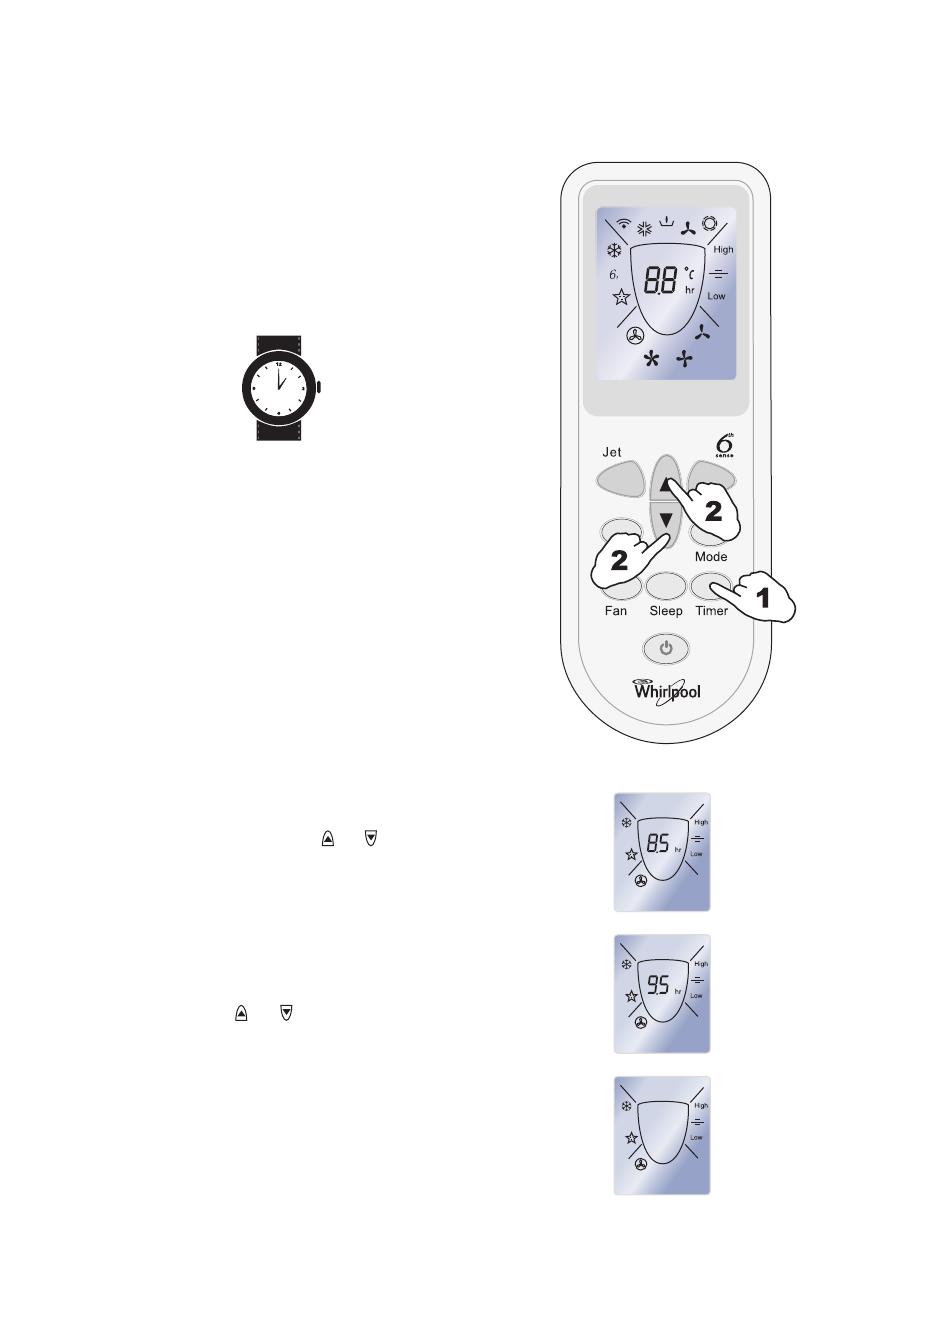
14
Timer function
It is convenient to set the timer on by pressing the
button to achieve a comfortable room temperature
at the time you get home.
You can also set timer off automatically to enjoy a
good sleep at night.
Timer-setting
Set the timer when the appliance is off.
Switch-off timer during operation.
A — As time goes by, LCD on remote control only
displays the remaining time not the set
temperature.
B — The previous set time is stored and the next
set time begins with the previous setting.
C — On- timer and Off-timer cannot be set at the
same time.
D — The room may not reach your desired
temperature within the preset time this
depends on the size of the room.
Example: setting the next operation after 9.5
hours
1. Set desired operating mode, temperature and
indoor fan speed, then press the TIMER button;
«h» flashes on display.
2. Point the remote control at the signal receptor
of the indoor unit, press the or button
when «h» flashes. Choose the time you desire,
then press the TIMER button, a «beep» can be
heard.
A — Timer indicator on the indoor unit lights up.
B — «h» stops flashing.
Press the TIMER button, «h» flashes on the
display, then you can set the time.
Each time the or button is pressed,
If the desired time is within 10 hours, the set
time increases or decreases by 0.5 hour;
If desired time is beyond 10 hours, increases or
decreases by 1 hour.
The range can be set is 0.5 hour to 24 hours.
3. To cancel the set timer: press the TIMER button
again, a «beep» can be heard and the timer
indicator on the indoor unit lights off.
15
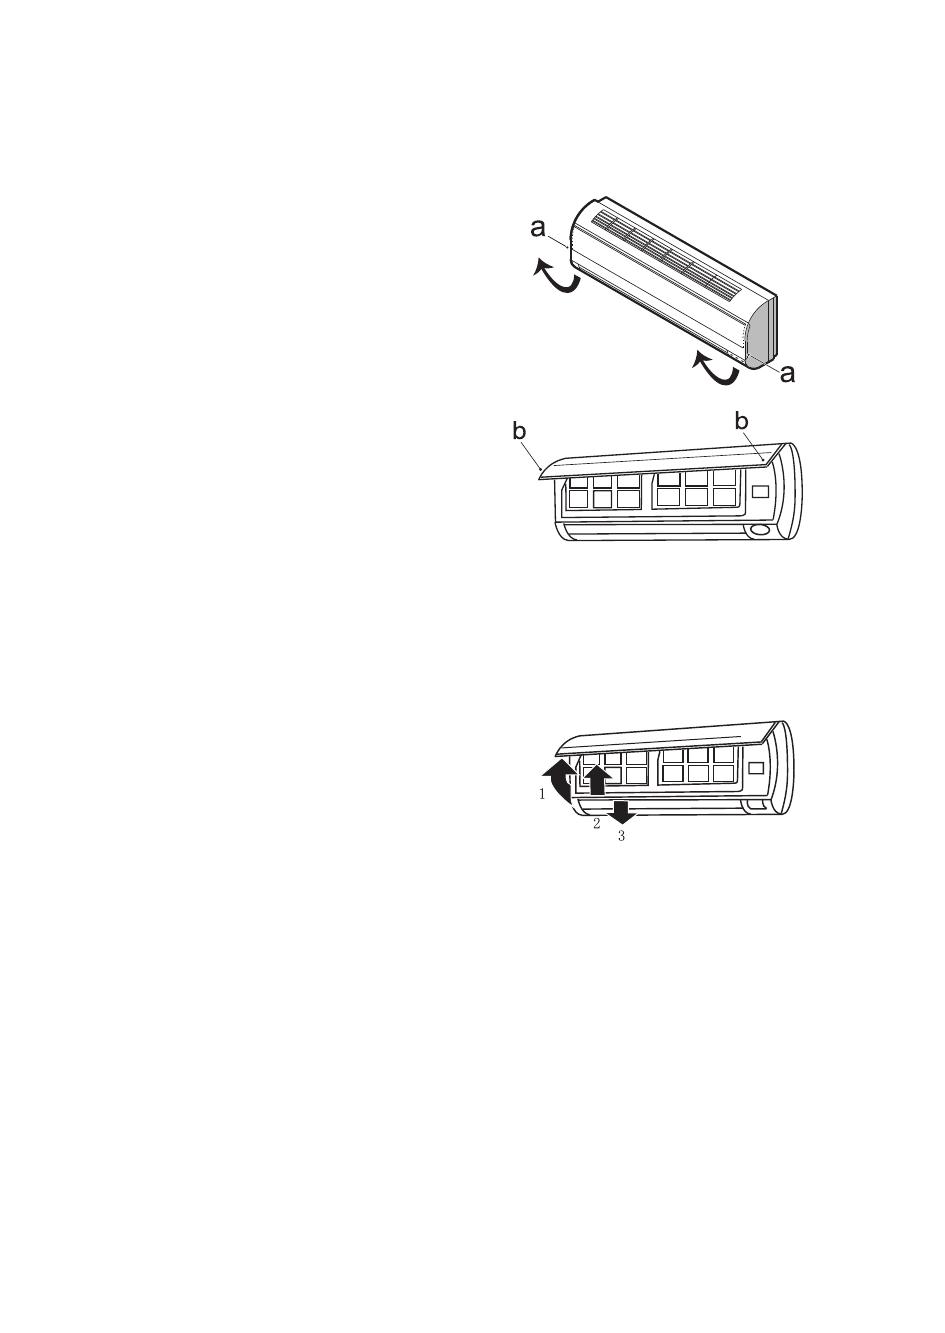
MAINTENANCE
Unit
1. Unplug from the power supply
Turn off the appliance first before disconnecting
from power supply.
2. To remove the front panel pull it outwards
(Fig. A).
3. Wipe with a soft and dry cloth.
Use lukewarm water (below 40°C) to clean if
the appliance is very dirty.
4. Refit and close the front panel (Fig. B).
Refit and close the front panel by pushing it
downward.
Note:
• Do not use substances such as gasoline or
polishing powder to clean the appliance.
• Do not sprinkle water onto the indoor unit
Dangerous! Electric shock!
Air filter
It is necessary to clean the air filter after using it
for about 100 hours.
Clean the air filter every two weeks if the air
conditioner operates in an extremely dusty
environment.
1. Unplug from the power supply
Turn off the appliance first before disconnecting
from power supply and remove the air filter.
1. Open the front panel.
2. Press the handle of the filter gently.
3. Slide out the filter.
2. Cleaning and refitting the air filter.
If the filter is very dirty, clean it with a solution
of lukewarm water and neutral detergent.
After cleaning let it dry.
3. Close the front panel.
Note:
• To avoid injury, do not touch the fins of
indoor unit with your fingers after
removing the filter.
• Do not attempt to clean the inside of the
air conditioner by yourself.
• Do not clean the filter in washing machine.
Fig. A
Fig. B
16
PROTECTION
Operating condition
The protective device maybe trip and stop the
appliance in the cases listed below.
* For Tropical (T3) Climate condition models, the
temperature point is 52°C instead of 43°C.
If the air conditioner runs in COOLING or DRY
mode with door or window opened for a long
time when relative humidity is above 80%, dew
may drip down from the outlet.
Noise pollution
• Install the air conditioner at a place that can bear
its weight in order to operate more quietly.
• Install the outdoor unit at a place where the air
discharged and the operation noise would not
annoy your neighbours.
• Do not place any obstacles in front of the air
outlet of the outdoor unit lest it increases the
noise level.
Features of protection device
1. Protection device
Wait at least 3 minutes before restarting the unit
after operation stops or changing mode during
operation.
After connecting to power supply and turning on
the appliance immediately, a delay of 20 seconds
may occur before it starts to operate.
2. If all operation has stopped, press ON/OFF
button again to restart. Timer should be set
again if it has been cancelled.
Features of HEATING mode
Preheating
2-5 minutes are necessary to preheat the indoor
unit at HEATING operation start.
Defrosting (out door unit)
In HEATING operation the appliance will defrost
(de-ice) automatically to raise efficiency.
This procedure usually lasts 2-10 minutes. During
defrosting, fan stops operation.
After defrosting completes, it returns to
HEATING mode automatically.
Note: Heating is NOT available for cooling only
air conditioner models.
HEATING
Outdoor air temperature is over 24°C
Outdoor air temperature is below -7°C
Room temperature is over 27°C
COOLING
Outdoor air temperature is over *43°C
Room temperature is below 21°C
DRY Room temperature is below 18°C
EMERGENCY OPERATION
Under emergency situation or when remote
control is missing, you can control the unit by
pressing the emergency button located on the
indoor unit.
• Turn on the appliance: when the unit is off, press
this button, it will start up.
• Turn off the appliance: when the unit is on, press
this button, the unit will stop working.
Operation problems are often due to minor causes, please check and refer to the
following chart before contacting the service. This may save time and unnecessary
expenses.
Note: If the problems still have, turn off the appliance and disconnect from power supply,
then contact the nearest Whirlpool Authorized Service Center. Do not attempt to move,
repair, disassemble, or modify the appliance by yourself.
17
TROUBLESHOOTING
Trouble Analysis
Does not run
• Is the protection device or fuse blown?
• Please wait for 3 minutes and start again, protection device may be preventing
unit to work.
• Are the RC batteries low?
• Is the plug not properly plugged?
No cooling or
heating air
• Is the air filter dirty?
• Are the intakes and outlets of the air conditioner blocked?
• Is the temperature set properly?
Ineffective control
• Has there been a strong interference (from excessive static electricity discharge,
power supply voltage abnormality)? Note that operation will be abnormal, in this
case unplug from the power supply and re-plug after 2-3 seconds.
Does not operate
immediately
• 3 minute delay will occur when changing mode during operation.
Peculiar smell
• This smell may come from another source such as furniture, cigarette etc, which
is sucked in the unit and blown out with the air.
A sound of running
water
• Normal behaviour caused by the flow of refrigerant in the air conditioner.
• Defrosting sound in heating mode.
Cracking sound
• The sound may be generated by the expansion or contraction of the front panel
due to temperature changes.
Mist sprays from
the outlet
• Mist is present in the room with low temperature? Normal behaviour due to
cool air discharged from indoor unit during COOLING or DRY operation
mode.
18
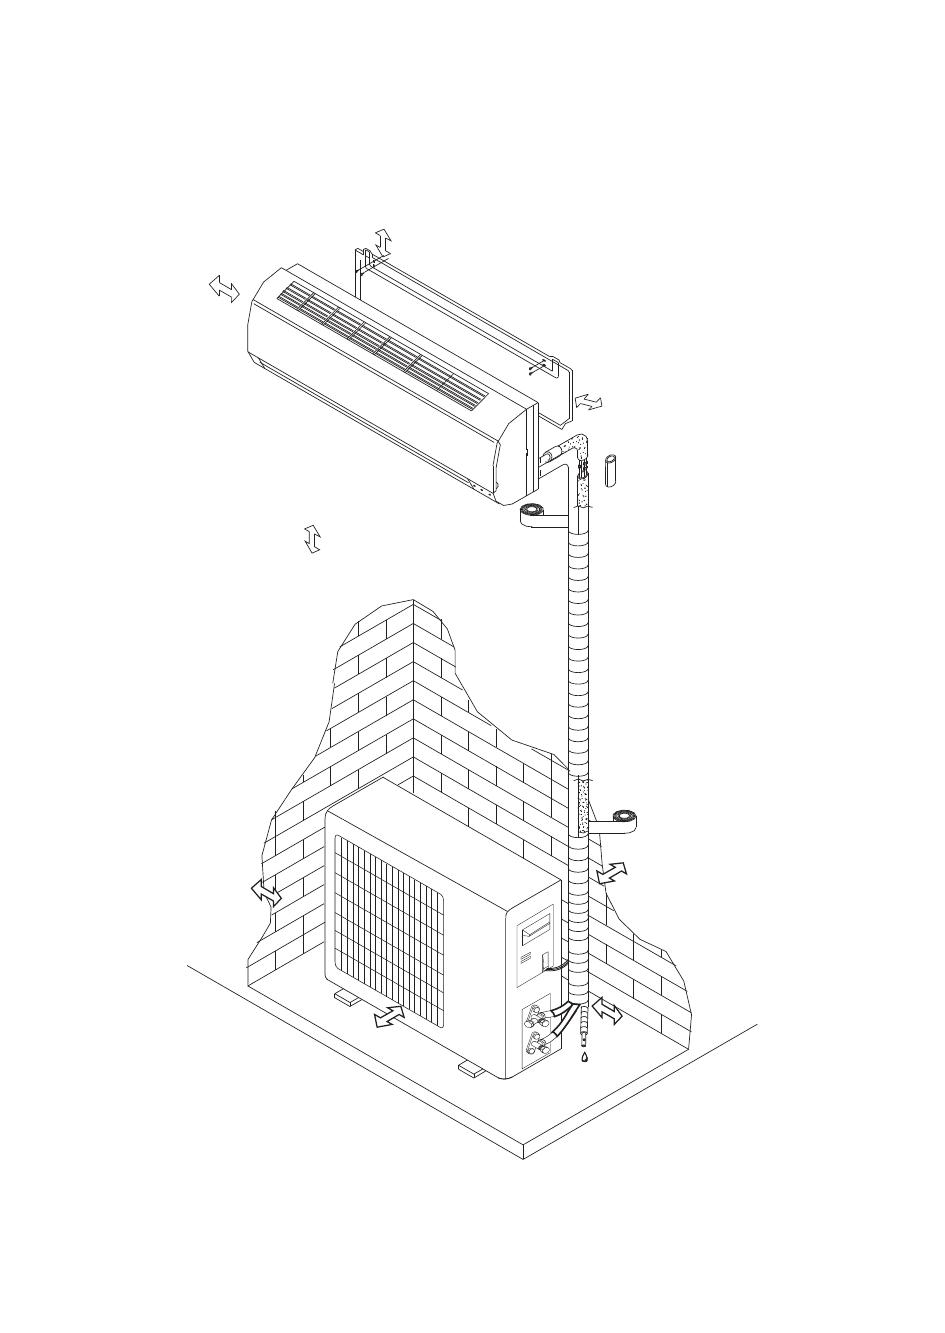
INSTALLATION INSTRUCTIONS
Installation diagram
NOTE: The figure above is only a simple presentation of the unit, it may not match the external
appearance of the product you purchased. Installation must be performed in accordance with the national
wiring standards by authorized service people only.
Distance from wall
should be over 50mm
Distance from ceiling
should be over 50mm
Distance from floor
should be over 2000mm
Distance from the wall
should be over 50mm
Air intake distance from
the wall should be over
250mm
Air intake distance from
the wall should be over
250mm
Air outlet distance from the wall
should be over 500mm
Over 250mm
19
Select the best location
Location for Installing Indoor Unit
• Where there is no obstacle near the air outlet
and air can be easily blown to every corner.
• Where piping and wall hole can be easily
arranged.
• Observe the required distance from ceiling and
wall according to the wiring diagram.
• Where the air filter can easily be removed.
• Keep the unit and remote control 1m or more
from television, radio etc.
• To prevent the effects of a fluorescent lamp,
keep the unit as far as possible from it.
• Do not put anything near the air inlet that could
obstruct it.
• In a place that can bear the weight and will not
increase operating noise and vibrations.
Location for Installing Outdoor Unit
• Install in a convenient and well-ventilated place.
• Avoid installing it where flammable gas could
leak.
• Observe the required distance from the wall.
• The distance between Indoor and outdoor unit
should be 5 meters and can go up to maximum
15 meters with additional refrigerant charge.
• Do not install the outdoor unit in a dirty or
greasy place, near a vulcanization gas exit.
• Avoid installing it at the roadside where it could
be soiled with muddy water.
• A fixed base where operating noise will not
increase.
• Where the air outlet is not obstructed.
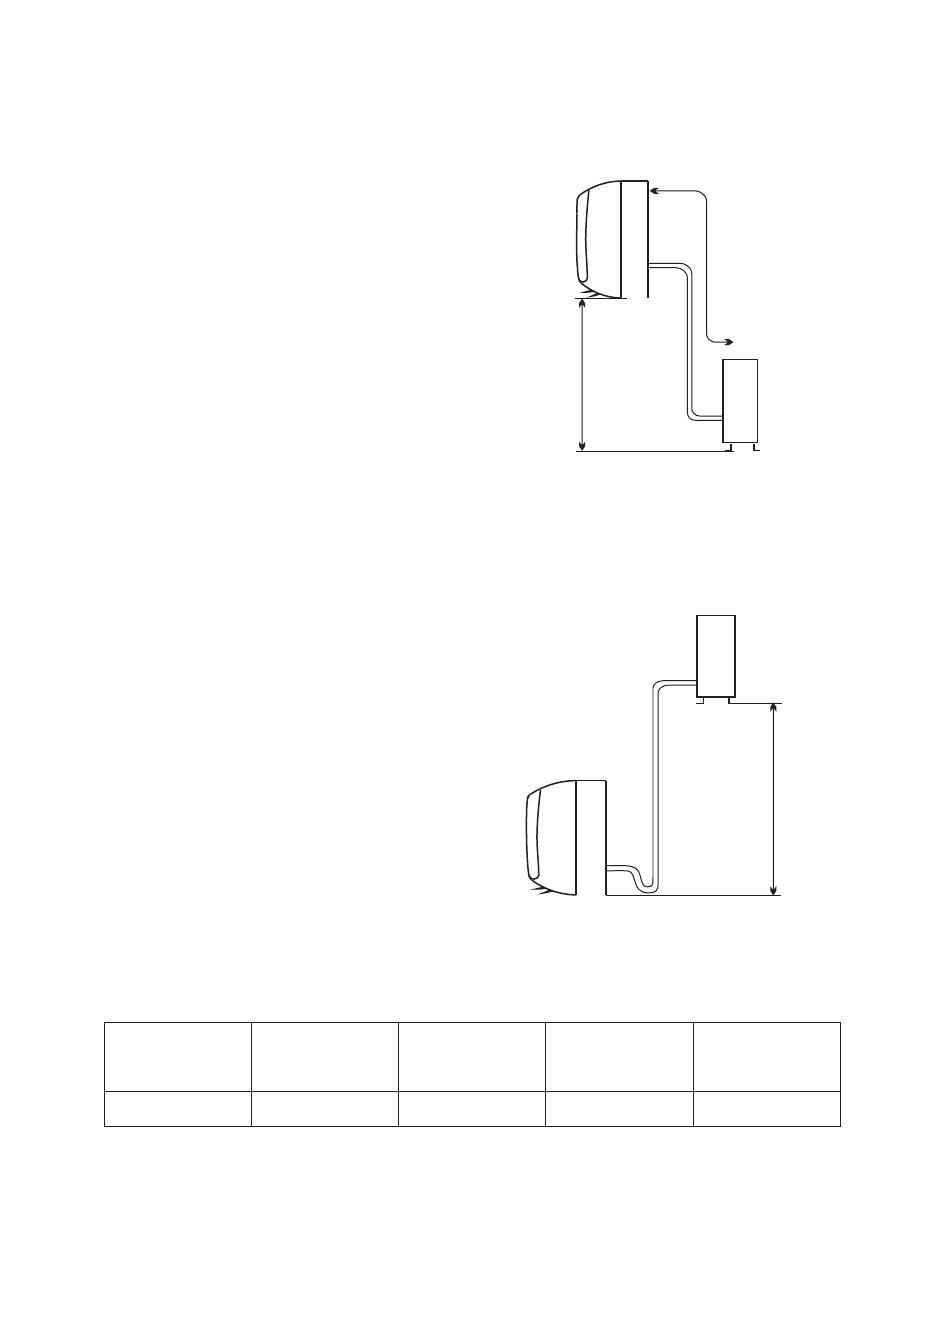
Model Max. Allowable
Tubing Length at
Shipment (m)
Limit of Tubing
Length (m)
Limit of Elevation
Difference H (m)
Required amount
of additional
refrigerant (g/m)
7K~18K 5 15 5 20
Indoor unit
Pipe length is
15 meters Max.
Outdoor unit
Height should
be less than 5m
Outdoor unit
Pipe length is
15 meters Max.
Indoor unit
Height should be less
than 5m

20
INDOOR UNIT INSTALLATION
1. Installing the Mounting Plate
• Select a location to install the mounting plate
according to the indoor unit location and piping
direction.
• Adjust the mounting plate horizontally with a
horizontal ruler or plumb line.
• Drill holes 32mm in deep on the wall to fix the
plate.
• Insert the plastic plugs in the hole, then fix the
mounting plate with tapping screws.
• Check that the mounting plate is well fixed.
Then drill a hole for piping.
NOTE: The shape of your mounting plate may be different from the one above, but installation method is
similar.
2. Drill a Hole for Piping
• Decide the position of the hole for piping
according to the location of mounting plate.
• Drill a hole on the wall. The hole should slightly
be inclined downward toward outside.
• Install a sleeve through the wall hole to keep the
wall tidy and clean.
3. Indoor Unit Piping Installation
• Fit the piping (liquid and gas pipe) and cables
through the wall hole from outside or fit them
from inside after completing indoor piping and
cables connections so as to connect to outdoor unit.
• Decide whether saw off the plastic part in accordance with the piping direction (as shown below).
NOTE:
When fixing the pipe along directions 1, 2 or 4, saw the corresponding plastic part off the indoor unit base.
• After connecting the piping as required, install the drain hose. Then connect the power cords. After
connecting, wrap the piping, cords and drain hose together with thermal insulating materials.
Wall hole sleeve
(hard polythene tube
prepared by user)
Indoor
Outdoor
5mm
(downward
inclination)
1
2
3
4
trough
Piping direction
Unloading
piece
Saw the unloading piece off
along the trough
Tapping screw
Mounting plate
/
Не Дует
Система Кондиционирования Не Работает
Не Работает Регулировка Температуры
Из Кондиционера Не Поступает Теплый Холодный Воздух
Не Работает Регулирование Воздушного Потока
Не Работает Регулирование Скорости Вращения Вентилятора.
Не Работает Пульт Дистанционного Управления.
Не Устанавливается Функция Таймера
Непрерывно Мигает Индикатор.
Во Время Работы Запахи Проникают В Комнату.
Появилась Надпись «Ошибка».
Появился Шум.
Из Внешнего Блока Идет Дым
С Соединительных Трубок Внешнего Блока Капает Вода
Ne Vklyuchaetsa
Ne Vklyuchaetsa
Ошибка E3
При Включении На Дисплее Ошибка E3
Из Внутренего Блока Капает Вода
Кондиционер Не Включается С Пульта, Пульт В Исправном Состоянии.
Включается И Выключается Только От Полозкового Переключателя
Ошибка E1
Сплит В 30 Км, Родственники Спрашивают)
Ошибка Е4
Выдает Ошибку F6
Помогите Решить В Домашних Условиях За Ранее Спосибо
Не Горят Огоньки На Панели Работающего Кондиционера
Сам Включается
При Воткнутой Вилки В Розетку , Кондиционер Сам Включается И Самостоятельно Переключаются Режимы.
F1
Блокируется И Выключается
Кондиционер Работал. Демонтировали Пролежал В Гараж Два Года Установили Выдает Ошибку
После Перестановки Показывает Ошибку Е6
При Включении Постоянно Пищит Короткий И Частый Звуковой Сигнал
Выдает Е5 На Втором Блоке
E6
Ошибка Е9
Постоянно Ее Выдает
Отключается Компрессор
Пять Минут Работает Отлично, Отключается Не Нагнав Нужную Температуру, Потом Через Пять Минут Опять Включается Компрессор
Не Изменяется Обозначение Температуры
Температура На Экране Пульта Обозначена В Фаренгейтах И Не Изменяется На Цельсия
E5
Выдаёт Ошибку F4
Сначала Кондиционер Вроде Включается Прогоняет Воздух А Потом Резко Останавливается И Выскакивает Ошибка И Все Кондиционер Больше Не Функционирует
Ksvp140Hfdn3
Не Запускается Компрессор По Индикаторам Все В Штатном Режиме
Горят Все Три Светодиода На Внутреннем Блоке
Кондиционер Работает, Но Стало Напрягать То, Что После Профилактики Стали Гореть Все Три Свето Диода На Внутреннем Блоке Не Зависимо От Того Включаю Ли Я С Пульта Функции Слип Или Таймер.
Ошибка F9
Кондиционер Не Запускается Даже Принудительно
Не Включаетса
Горит На Табло F8
Ошибка F8
Ошбка F8 Что Это?
Пишет Е14
Ошибка Е14 Не На Что Не Риагирует
Не Запускается Компрессор
При Включении Кондиционера Не Запускается Компрессор,Если При Отключенном От Сети Кондиционере Зажать Кнопку «Mode» И Вставить Вилку В Розетку,Кандиционер Включается,Компрессор Запускается,Работает,На Дисплее «Снежинка» И 18С° Но Если Поднять Температуру
Очень Медленно Крутится Вентилятор Конденсатора.
При Включении Кондиционера Компрессор Включается И Медленно Разгоняется Вентилятор.
Мигает P1Нет Охлаждения
Р2
И Ничего. Тишина
Не Запускается
Горит Ошибка Е7
J6
Отключается
Не Запускается
Через Несколько Секунд После Включения На Дисплее Загораются Все Символы И Кондиционер Отключается. Почему?
Постоянно Горит Первый Светодиод Который Слева На Право На Внутреннем Блоке
Загорелась На Дисплее Ec
Загорелась На Дисплее Ec И Кондиционер Не Работает!
Горить Жолтая Лампочка Другая З Права На Лєво
Коды На Дисплее Cf И Cl
Что Означают Коды Ошибок На Дисплее Cf И Cl?
Код Pf
На Всех Режимах Выдает Код Pf. Работает Только Вентиляция.
Обогрев
На Модели Igc Ras/Rac-07Nhg При Переключении Mode Не Предлагает Функцию Обогрев. (Символ Солнца На Пульте Не Появляется), Хотя В Модели Эта Функция Предусмотрена. Почему?
Сбой В Управлении Работой
При Включении Кондиционера Forina На Самом Табло Кондиционра Сразу Загораются И Мигают Все Значки: Слева -Зеленый Листок, Желтый И Синий; Справ — Синий И Желтый-Таймер. Посредине Горит Не Мигая Буква L C Точкой. Перенастрооки Кода Результатов Не Дают. Пр
Ошибка Е2
5Е
Ошибка С04
Молчит
H1
Включается Только «Обогрев», На Табло Нет «Температуры», Горит «Солнышко»
Включается Только «Обогрев», На Табло Нет «Температуры», Горит «Солнышко»
Наружний Блок Запускаеться И Сразу Останавливаеться
F7
Ошибка P12
Обогрев
На Обогрев Идет Холодный Воздух, Внутри Внутреннего Блока Собирается Иней , Тепла Нет
Ошибкаal
Ошибка Е7
Кондиционер Выдает Ошибку Е7
Ошибка P04
Компрессор Запускается Через. Минуту Отключается,Спустя 3 Минуты Запускается Снова И Также Отключается Ошибку Выдает, Испаритель Вроде Нагревает,Но Вентилятор На Тепло Внутреннего Блока Не Запускается,А На Холод Хорошо Работает,В Чем Может Быть Причина
P7
Горит На Табло Р7 Ни На Что Не Реагирует
F0
Не Включается
При Подключении К Сети Загорается Верхний Правый Индикатор(Красным) И Больше Никаких Признаков Жизни. Не Реагирует Ни На Пульт Ни На Кнопку Вкл/Выкл На Самом Внутреннем Блоке. Помогите Плиз
Не Запускается Наружный Блок
Kelon As-09Hr4Fl
Включаешь — 5 Раз Пищит И Тишина. Выключаешь Из Розетки, Включаешь И Все Повторяется.
Run И Пищит
При Выключении Кондиционера Индикатор Run Мигает И Пищит.
Сломан Компрессор
Подскажите Пожалйста , Где Можно Купить ?
-

- Тип
- Руководство пользователя
- Производитель
- Whirlpool
- Размер
- 7,15 MB
- Категория
- кондиционеры сплит-системы
- Страницы
- 72
- Язык
- русский, украинский
Просмотр документа
Посмотреть инструкция для Whirlpool SPIW312A2WF бесплатно. Руководство относится к категории Кондиционеры, 19 человек(а) дали ему среднюю оценку 8.4. Руководство доступно на следующих языках: русский, английский. У вас есть вопрос о Whirlpool SPIW312A2WF или вам нужна помощь? Задайте свой вопрос здесь
Не можете найти ответ на свой вопрос в руководстве? Вы можете найти ответ на свой вопрос ниже, в разделе часто задаваемых вопросов о Whirlpool SPIW312A2WF.
Как часто следует прочищать фильтры кондиционера Whirlpool?
Какую маркировку энергоэффективности Whirlpool SPIW312A2WF имеет?
Инструкция Whirlpool SPIW312A2WF доступно в русский?
Не нашли свой вопрос? Задайте свой вопрос здесь

109
ПPЕЖДЕ ЧЕМ ПОЛЬЗОВАТЬСЯ
ПPИБОPОМ
Для того, чтобы получить максимум от вашего
нового устройства, пожалуйста, читайте
внимательно инструкции пользователя и
храните их в удобном месте для консультаций в
будущем.
Перед использованием устройства,
пожалуйста следуйте ниже приведенным
указаниям и и настройте устройство в
соответствии с ними:
Предварительная настройка пульта ДУ
Каждый раз при замене батареек пульта ДУ
пульт автоматически устанавливается в режим
теплового насоса.
Если же приобретенный Вами кондиционер
работает только в режиме охлаждения,
установка пульта ДУ в режим теплового насоса
не повлечет каких-либо изменений в его работе.
Настройка функции автоматического
повторного включения:
Для включения функции автоматического
повторного включения нажмите аварийную
кнопку (ON/OFF — ВКЛ/ВЫКЛ) на внутреннем
блоке не менее чем на 5 секунд. Подача
звукового сигнала будет означать, что функция
автоматического повторного включения задана
и кондиционер находится в режиме ожидания.
Для того чтобы отменить функцию
автоматической перезагрузки, повторите
вышеупомянутые шаги.
МЕРЫ ПРЕДОСТОРОЖНОСТИ
• Не устанавливайте устройство, если оно
подключено к источнику питания.
• Установка и обслуживание / ремонт должны
выполняться квалифицированным
специалистом, в соответствии с инструкциями
производителя и следуя местным нормам
безопасности. Ремонт и замена каких-либо
частей устройства предусмотрена только в
случае, если это специально указано в
инструкции пользователя.
• Заземление этого устройства является
обязательным.
• Убедитесь, что шнур электропитания является
достаточной длинны, чтобы обеспечить
правильное подключение.
• Не используйте удлинитель для блока
питания.
• Не тяните за шнур электропитания, чтобы
выдернуть его из розетки.
• Не скручивайте и не давите на шнур
электропитания и убедитесь, что он не
сломан.
• После того как установка будет завершена,
электрические компоненты не должны быть
доступны для пользователей.
• Не прикасайтесь к операционным кнопкам
мокрыми руками, и не используйте
устройство, когда вы босиком.
• Физически или умственно неполноценным
людям, детям и людям без какого-либо опыта
работы с продуктом разрешается
использованием устройства только в том
случае, если они прошли специальную
подготовку по вопросам эксплуатации
устройства у человека, ответственного за их
безопасность и благополучие. Устройство не
предназначена для использования
инвалидами и очень маленькими детьми, без
присмотра.

Настенная сплит — система, которая предназначена для качественного и довольно быстрого кондиционирования воздуха в помещении. Кроме того, что система может работать в двух разных направлениях: на обогрев воздуха или на его охлаждение, кондиционер способен осуществить вентиляцию воздуха, не включая при этом какой – то из двух основных режимов.
Автоматический режим позволяет системе самостоятельно установить нужную температуру в помещении, без вмешательства человека. Установиться температуру, наиболее благоприятная в данное время. Управление кондиционером происходит за счет действия пульта управления и непосредственно с передней панели кондиционера. С помощью эргономичного пульта управления вы не только сможете установить нужную температуру воздуха, но и отрегулировать скорость работы вентилятора, которых у данной модели три. Стоит отметить, что, даже работая на максимальных оборотах с максимально эффективной отдачей, кондиционер издает минимальное количество шума.
Теплый поток кондиционированного воздуха направлен вниз, затем поднимается вверх, а поток холодного воздуха, наоборот, стелется по потолку, затем опускается вниз. Таким образом работа климатической системы происходит наиболее равномерно и эффективно, человек не чувствует перепада температур и нет сквозняков. Кроме угольного и антибактериального фильтров, комплекция модели Whirlpool AMD 312 предусматривает наличие деодорирующего фильтра, который очень качественно и надолго удалит все неприятные и резкие запахи из комнаты.
Стоимость такой модели Whirlpool AMD 312 – 3 – 3, 1 тысяч гривен. Приобрести новую модель кондиционера Whirlpool AMD 312 можно практически в любом крупном магазине бытовой техники.

Помогла статья?
Не тратьте время на поиск нужной запчасти, оформите заявку на заказ товара и наш менеджер свяжется с вами и согласует заказ.
Модель
Просьба указывать серийный номер техники, для ускорения
обработки заказа.
Запчасть
Если у вас есть Артикул (P/N) необходимой запчасти — укажите её.
Email используется для отправки уведомлений о ценах и наличии
Наша компания продает запчасти к бытовой технике уже много лет. Мы реализуем запчасти для кондиционеров Whirlpool в розницу и оптом в различные регионы России и Украины. С повсеместным распространением всемирной паутины все больше людей стали делать выбор в пользу интернет-магазинов, понимая, что торговля через интернет позволяет продавцу избежать затрат связанных с арендой помещения, содержания огромного штата продавцов и т.п. Поэтому, мы предлагаем покупателям запчасти для кондиционеров по более низким ценам, нежели в обычных магазинах. Мы постоянно расширяем ассортимент запчастей, заключая договора напрямую с заводами-изготовителями.
Воспользовавшись услугами наших менеджеров, можно оперативно уточнить характеристики деталей для кондиционеров Whirlpool, получить консультацию по применению, взаимозаменяемости запчасти и другую дополнительную информацию.
Для оплаты заказа предусмотрены различные возможности, удобные как частным лицам, так и организациям. Доставка возможна несколькими способами: товар может доставить наш курьер, можно воспользоваться услугами транспортных компаний, либо осуществить пересылку почтой не только в такие крупные города как Москва, Санкт-Петербург, Нижний Новгород, Екатеринбург, Казань, Самара, Новосибирск, Киев, Днепропетровск, Донецк, Харьков, Запорожье, Одесса, Львов, а и в любой уголок России и Украины.