Драйверы
Для выполнения подключения некоторых устройств к компьютеру может потребоваться драйвер. На этой вкладке вы найдете соответствующие драйверы для своего устройства или, в случае отсутствия драйверов, описание совместимости устройства с каждой операционной системой.
Полезная информация. Доступ к программному обеспечению, руководствам и другим материалам можно получить с помощью вкладок, расположенных выше.
Программное обеспечение
Программное обеспечение загружать необязательно, но оно обеспечивает дополнительные функции и позволяет максимально эффективно пользоваться возможностями устройства. На этой вкладке можно просмотреть и загрузить доступное программное обеспечение для вашего устройства.
Программное обеспечение
Программное обеспечение загружать необязательно, но оно обеспечивает дополнительные функции и позволяет максимально эффективно пользоваться возможностями устройства. На этой вкладке можно просмотреть и загрузить доступное программное обеспечение для вашего устройства.
Руководства пользователя
Руководства для вашего устройства или программного обеспечения перечислены ниже.
Приложения и функции
На этой вкладке можно посмотреть доступные приложения и функции, совместимые с вашим устройством.
Встроенное ПО
Встроенное ПО — это постоянное программное обеспечение, установленное на устройстве и обеспечивающее его корректную работу. Canon может периодически выпускать обновления для этого встроенного ПО, и если обновление доступно, его можно загрузить ниже.
FAQs
На этой вкладке вы найдете ответы на часто задаваемые вопросы и другую полезную информацию, которая поможет вам в решении вопросов и проблем.
Важная информация
На этой вкладке вы найдете подборку часто задаваемых вопросов, которые, на наш взгляд, будут вам интересны.
Коды ошибок
Код ошибки или сообщение об ошибке может появиться на устройстве по различным причинам. С помощью поля поиска можно найти полезную информацию о конкретном коде ошибки, где будут указаны причина ошибки и необходимые действия по ее устранению.
Технические характеристики
Ниже приведены все технические характеристики данного продукта.
Drivers
For certain products, a driver is necessary to enable the connection between your product and a computer. On this tab, you will find the applicable drivers for your product or in the absence of any drivers, an explanation of your product’s compatibility with each operating system.
Helpful Information
: To access software, manuals and other content please use the tabs above.
Software
Software is an optional download that enables advanced functionality and helps you to get the most out of your product. On this tab, you can view and download the available software for your product.
Software
Software is an optional download that enables advanced functionality and helps you to get the most out of your product. On this tab, you can view and download the available software for your product.
Manuals
Manuals for your product or software are listed below.
Apps & Functions
On this tab, you can view the available Apps and functions that are compatible with your product.
Firmware
Firmware is permanent software which is installed on your product and enables it to function correctly. Canon may periodically release updates to this firmware and if there is an update available, this can be downloaded below.
FAQs & Help
On this tab you can find a selection of FAQs and other helpful information that can assist you with your question or issues.
Important Information
On this tab you can find a selection of FAQs that we feel are important to bring to your attention.
Error Codes
An error code or message may appear on your product for different reasons. Using the the search box you can access helpful information regarding your specific error code that will explain the cause and provide you with the necessary steps for how to proceed.
Specifications
Below are all the technical specifications for this product.
Canon Driver Downloads is for the support of Canon Products SOLD IN AUSTRALIA AND NEW ZEALAND ONLY. It includes drivers and demonstration software for Canon brand printers, scanners, cameras and other Canon products.
DISCLAIMER: CANON AUSTRALIA PTY LTD MAKES NO GUARANTEES OF ANY KIND WITH REGARD TO ANY PROGRAMS, FILES, DRIVERS OR ANY OTHER MATERIALS CONTAINED ON OR DOWNLOADED FROM THIS, OR ANY OTHER, CANON SOFTWARE SITE. ALL SUCH PROGRAMS, FILES, DRIVERS AND OTHER MATERIALS ARE SUPPLIED «AS IS.» CANON DISCLAIMS ALL WARRANTIES, EXPRESS OR IMPLIED, INCLUDING, WITHOUT LIMITATION, IMPLIED WARRANTIES OF MERCHANTABILITY, FITNESS FOR A PARTICULAR PURPOSE AND NON-INFRINGEMENT. CANON AUSTRALIA PTY LTD SHALL NOT BE HELD LIABLE FOR ERRORS CONTAINED HEREIN, OR FOR LOST PROFITS, LOST OPPORTUNITIES, CONSEQUENTIAL OR INCIDENTAL DAMAGES INCURRED AS A RESULT OF ACTING ON INFORMATION, OR THE OPERATION OF ANY SOFTWARE, INCLUDED IN THIS SOFTWARE SITE.
Export: Some of the software is subject to export controls under the U.S. Export Administration Regulations (EAR), and anyone receiving the software cannot export the software without a license or other authorisation of the U.S. Canon will not be liable for any loss of whatsoever nature incurred as a result of this prohibition.
Applicable software includes;
— Software using OS created by US companies
— Driver software (printer driver, fax driver),
— Utility software (Network ScanGear),
— Application software (imageWARE products),
— Support tool (SST, NAVI, etc)
— Firmware of the device (main body)
and any further software that may from time to time be added to this list.
![]()
COPY
INSTRUCTION MANUAL
MODE D’EMPLOI
MANUAL DE INSTRUCCIONES
Español Français English
Thank you for purchasing a Canon product.
The Canon Speedlite 430EX II is a multi-feature flash unit for Canon EOS cameras. It works automatically with E-TTL II, E-TTL, and TTL autoflash systems. It can be used as an on-camera flash or as part of a wireless flash system.
Read this instruction manual while also referring to your camera’s instruction manual.
Before using the Speedlite, read this instruction manual and your camera’s instruction manual to familiarize yourself with the Speedlite operations.
The basic operation is the same as with normal AE shooting.
When the 430EX II is attached to an EOS camera, almost all automatic exposure control for flash photography is handled by the camera.
Although the 430EX II is an external flash unit, it works automatically and seamlessly like the camera’s built-in flash.
It becomes automatically compatible with the camera’s flash
1.E-TTL II autoflash (evaluativeCOPYflash metering with preflash reading/lens distance information)
2.E-TTL autoflash (evaluative flash metering with preflash reading)
3.TTL autoflash (off-the-film metering for real-time flash metering) controls
Regarding the camera’s available flash metering modes, refer to the “External Speedlite” specification in the “Specifications” of your camera’s instruction manual.
In the camera instruction manual, cameras having flash metering modes 1 or 2 are called Type-A cameras (compatible with E-TTL II or E-TTL). And cameras having flash metering mode 3 (compatible only with TTL) are Type-B cameras.
*This instruction manual assume that you are using the Speedlite with a Type-A camera.
For Type-B cameras, see page 37.
2
|
Contents |
|
|
1 Getting Started and Basic Operation |
…………………………… 7 |
|
2 Using Flash ……………………………………………………………… |
13 |
|
3 Wireless Flash …………………………………………………………. |
25 |
|
Reference …………………………………………………………………. |
32 |
Conventions Used in this Manual
The <COPY9> symbol in the text refers to the +/– button. The <8> symbol in the text refers to the Select/
Setting button.
The operation procedures in this instruction manual assume that both the camera and Speedlite’s power switches are ON.
Icons used in the text to indicate the respective buttons, dials, and settings match the same icons found on the camera and Speedlite.
The (4) / (0) / (3) icons indicate that the respective function remains in effect for 4 sec., 6 sec., or 16 sec. after you let go of the button.
Reference page numbers are indicated by (p.**).
This instruction manual uses the following alert symbols:  : Warning to prevent shooting problems.
 : Gives supplemental information.
3

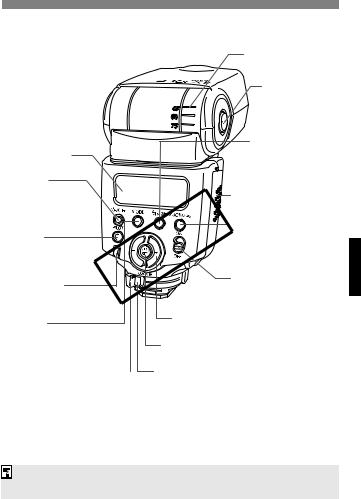
Nomenclature
 Built-in wide panel (retracted) (p.18)
Flash head 
|
Wireless sensor |
|||
|
Bracket mounting hole |
|||
|
AF-assist beam emitter |
Bracket mount |
||
|
(p.23) |
COPY |
||
|
cover |
|||
|
Mounting foot (p.9) |
|||
|
Locking pin |
Contacts |
Shoe
Mini stand pocket
4
LCD panel (p.6)
* <A>
LCD panel illumination/ Custom Function setting button (p.6/21)
Bounce angle index
<z>
Bounce lock release button (p.17)
<E> High-speed sync (FP flash)/Shutter curtain synchronization button (p.16)
Battery compartment cover (p.8)
|
COPY |
<G> |
|
|
<J> |
Zoom button/Wireless setting |
|
|
Pilot lamp/ |
button (p.18/26, 29, 30) |
|
|
Test firing button (p.10) |
||
|
Flash exposure |
Power switch (p.10) |
|
|
confirmation lamp (p.11) |
||
|
<D> |
<9> +/– button |
|
|
Flash mode/Slave setting button |
||
|
(p.11, 19/31) |
* <8> Select/Setting button |
|
Mounting foot’s lock lever |
Lock-release button (p.9) |
|
|
(p.9) |
Asterisked buttons have functions which remain active for 8 sec. after you press and let go of the button. The <B> illumination lasts for 12 sec.
5
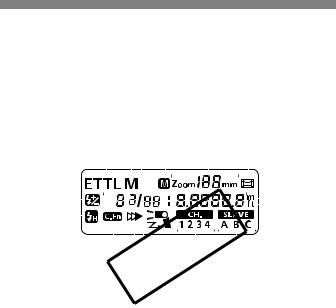
LCD Panel
|
Manual flash output level |
<d> Manual zoom |
|||||||||||||||||||||||||||||||||||||
|
Flash exposure compensation |
||||||||||||||||||||||||||||||||||||||
|
amount |
||||||||||||||||||||||||||||||||||||||
|
Max. flash range |
Zoom focal length |
|||||||||||||||||||||||||||||||||||||
|
Aperture |
||||||||||||||||||||||||||||||||||||||
|
Custom Function |
||||||||||||||||||||||||||||||||||||||
|
<q> Manual flash |
<s> Auto zoom |
|||||||||||||||||||||||||||||||||||||
|
for image sensor |
||||||||||||||||||||||||||||||||||||||
|
<a/b> |
size |
|||||||||||||||||||||||||||||||||||||
|
E-TTL (ll)/TTL autoflash |
||||||||||||||||||||||||||||||||||||||
|
<f> |
Indicator (meters) |
|||||||||||||||||||||||||||||||||||||
|
Flash exposure |
||||||||||||||||||||||||||||||||||||||
|
compensation |
Indicator (feet) |
|||||||||||||||||||||||||||||||||||||
|
<c> High-speed |
||||||||||||||||||||||||||||||||||||||
|
sync (FP flash) |
COPY |
|||||||||||||||||||||||||||||||||||||
|
<u> Custom Function |
Slave ID |
|||||||||||||||||||||||||||||||||||||
|
<r> Second-curtain sync |
Channel |
|||||||||||||||||||||||||||||||||||||
|
<X> Slave flash |
||||||||||||||||||||||||||||||||||||||
To illuminate the LCD panel, press the <B> button.
The items actually displayed depend on the current settings.
6
1
Getting Started and Basic Operation
|
COPY |
||
|
Installing the Batteries …………………………………….. |
8 |
|
|
Attaching and Detaching the Flash……………………. |
9 |
|
|
Turning on the Power Switch………………………….. |
10 |
|
|
Fully Automatic Flash Shooting……………………….. |
11 |
|
|
Using E-TTL II and E-TTL Autoflash in the |
||
|
Shooting Modes……………………………………………. |
12 |
 Cautions for firing continuous flashes
To avoid overheating and degrading the flash head, do not fire more than 20 continuous flashes. After 20 continuous flashes, allow a rest time of at least 10 min.
If you fire more than 20 continuous flashes and then fire more flashes in short intervals, the inner overheating prevention function may be activated to make the recycling time about 8 to 20 sec. If this occurs, allow a rest time of about 15 min. and the flash will then return to normal.
7
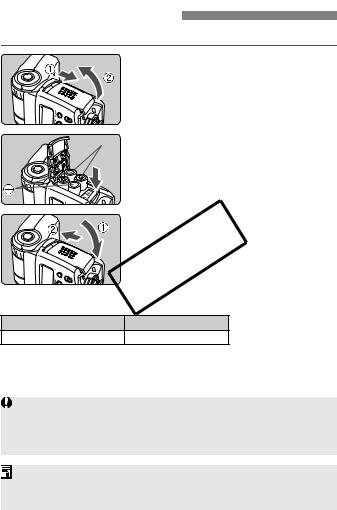
Installing the Batteries
Install four size-AA batteries.
1
 2
2
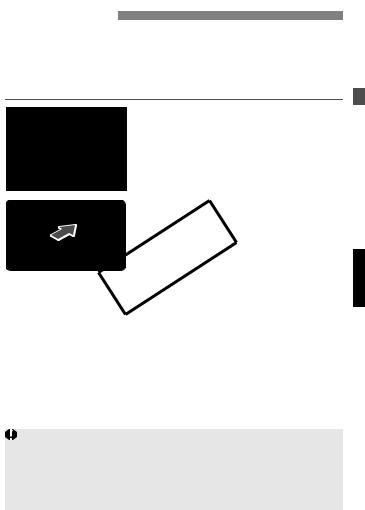
Open the cover.
Slide the battery compartment cover as shown by the arrow and open it.
Install the batteries.
Make sure the + and – battery contacts are correctly oriented as shown in the battery compartment.
|
3 Close the cover. |
|
|
Close the battery compartment cover |
|
|
and slide it as shown by the arrow. |
|
|
Recycling Time and Flash ount |
|
|
COPY |
|
|
Recycling Time (Approx.) |
Flash Count (Approx.) |
|
0.1 — 3.0 sec. |
200 — 1400 |
Based on new size-AA alkaline batteries and Canon’s testing standards.
Using size-AA batteries other than the alkaline type may cause improper battery contact due to the irregular shape of the battery contacts.
If you change the batteries after firing many flashes continuously, be aware that the batteries might be hot.
Use a new set of four batteries of the same brand. When replacing the batteries, replace all four at one time.
Size-AA Ni-MH or lithium batteries can also be used.
8
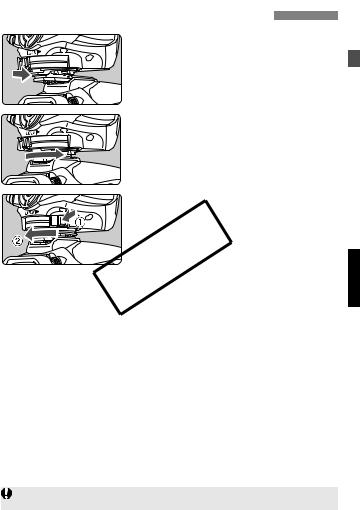
Attaching and Detaching the Flash
|
1 |
Attach the Speedlite. |
|
Slip the Speedlite’s mounting foot into |
|
|
the camera’s hot shoe all the way. |
|
|
(The mounting foot will protrude |
|
|
slightly from the hot shoe.) |
|
|
2 Secure the Speedlite. |
|
|
On the mounting foot, slide the lock |
|
|
lever to the right. |
|
|
X When the lock lever clicks in place, it |
|
|
will be locked. |
|
|
3 Detach the Speedlite. |
|
|
While pressing the lock-release |
|
|
button, slide the lock lever to the left |
|
|
COPY |
|
|
and detach the Speedlite. |
Before attaching or detaching the Speedlite, be sure to turn off the Speedlite.
9
![]()
Turning on the Power Switch
Set the power switch to <K>.
X The flash recycling starts.
Check that the flash is ready.
When the pilot lamp lights in red, the flash is ready to fire (fully charged). To fire a test flash, press the <J> button.
About Auto Power Off
To save battery power, the power will turn off automatically after a certain period (approx. 1.5COPYmin. to 15 min.) of idle use. To turn on the Speedlite again, press the camera’s shutter button halfway. Or press the Speedlite’s <J> button.
A test firing cannot be fired while the camera’s operation timer 4or 0 is active.
The Speedlite’s settings will be retained in memory even after the power is turned off. To retain the Speedlite’s settings after you replace the batteries, turn off the power and replace the batteries within 1 minute.
10
Fully Automatic Flash Shooting 
When you set the camera’s shooting mode to <V> (Program AE) or <U> (Full Auto), E-TTL II/E-TTL fully automatic flash will make it as easy as normal AE shooting in the <V> and <U> modes.
 1
1
Maximum effective range
Set the Speedlite to <a>.
Press the <D> button so that <a> is displayed.
When you press the shutter button halfway, the maximum effective range (distance) of the flash will be displayed.
2 Focus the subject.
Press the shutter button halfway to focus.
X The shutter speed and aperture will
COPYbe set as displayed in the viewfinder.
Check that the <Q> icon is lit in the viewfinder.
3 Take the picture.
X When you press the shutter button completely, the flash will fire and the
picture will be taken.
XIf a standard flash exposure was obtained, the flash exposure confirmation lamp (green) will light for about 3 sec.
If the lens focal length blinks on the LCD panel, the periphery of the flash picture may turn out dark. Use the built-in wide panel (p.18).
<a> will be displayed on the LCD panel even if the camera is compatible with E-TTL II.
If the flash exposure confirmation lamp does not light, move closer to the subject and take the picture again. With a digital camera, you can also increase the camera’s ISO speed.
11
Using E-TTL II and E-TTL Autoflash in the Shooting Modes 
Just set the camera’s shooting mode to <X> (shutter-priority AE), <W> (aperture-priority AE), or <q> (manual) and you can use E-TTL II/E-TTL autoflash.
Select this mode when you want to set the shutter speed manually.
The camera will then automatically set the aperture matching the shutter speed to obtain a standard exposure.
XIf the aperture display blinks, it means that the background exposure will be underexposed or overexposed. Adjust the shutter speed until the aperture display stops blinking.
Select this mode when you want to set the aperture manually.
The camera will then automatically set the shutter speed matching the aperture to obtain a standard exposure.
If the background is dark like a night scene, a slow sync speed will be used to obtain a standard exposure of both the main subject and background. Standard exposure of the main subject is obtained with the flash, while a
W standard exposure of the background is obtained with a slow shutter speed.
qStandard exposure of theCOPYmain subject is obtained with the flash. The
exposure of the background is obtained with the shutter speed and aperture combination you set.Since a slow shutter speed will be used for low-light scenes, using a
If you use the <Z> or <Y> shooting mode, the result will be the same as using the <V> (Program AE) mode.
Flash Sync Speeds and Apertures Used
|
Shutter Speed Setting |
Aperture Setting |
|
|
V |
Set automatically (1/X sec. — 1/60 sec.) |
Automatic |
|
X |
Set manually (1/X sec. — 30 sec.) |
Automatic |
|
W |
Set automatically (1/X sec. — 30 sec.) |
Manual |
|
q |
Set manually (1/X sec. — 30 sec., Bulb) |
Manual |
1/X sec. is the camera’s maximum flash sync speed.
12
|
2 |
||
|
Using Flash |
||
|
fFlash Exposure Compensation (M) …………….. |
14 |
|
|
7: FE Lock (M) …………………………………………. |
15 |
|
|
cHigh-Speed Sync (M) ………………………………… |
16 |
|
|
rSecond-Curtain Sync (M) …………………………. |
16 |
|
|
Bounce Flash |
………………………………………………….COPY |
17 |
|
H: Setting the Flash Coverage (M) and |
||
|
Using the Wide ………………………………………Panel |
18 |
|
|
q: Manual Flash …………………………………….(M) |
19 |
|
|
C: Setting ………………..Custom Functions (M) |
21 |
|
|
Auto Zoom for …………………….Image Sensor Size |
23 |
|
|
About Color Temperature ….Information Transmission |
23 |
|
|
About the AF- ……………………………….Assist Beam |
23 |
|
|
Speedlite Control with the Camera’s Menu |
||
|
Screen (M) …………………………………………………… |
24 |
Features with a star cannot be used in Basic Zone modes.
13
fFlash Exposure Compensation
In the same way as normal exposure compensation, you can set exposure compensation for flash. The flash exposure compensation amount can be set up to ±3 stops in 1/3-stop increments. (If the camera’s exposure compensation is in 1/2-stop increments, flash exposure compensation will be in 1/2-stop increments.)
1 Press the <8> button until the <f> icon and compensation amount start blinking.
2 Set the flash exposure compensation amount.
Press the <9> button to set the amount.
COPYTo cancel the flash exposure compensation, set the amount to “+0.”
3 Press the <8> button.
X Flash exposure compensation will be set.
If flash exposure compensation has been set with both the Speedlite and camera, the Speedlite’s flash exposure compensation amount will override the camera’s.
Using <9>
This is for setting various numeric settings. Pressing the <6> (plus) button increases the number, while the <5> (minus) button decreases the number.
14
7: FE Lock
FE (flash exposure) lock locks the correct flash exposure setting for any part of the scene.
With <a> displayed on the LCD panel, you press the camera’s <7> button. If the camera does not have the <7> button, press the <P> button.
1 Focus the subject.


 2 Press the <7> button. (3)
  Aim the subject at the center of the
viewfinder and press the <7>
COPYbutton.
X The Speedlite fires a preflash, then
the required flash output is retained in memory.
X “FEL” will be displayed in the viewfinder for 0.5 sec.
Each time you press the <7> button, a preflash will be fired and a new flash exposure reading will be locked.
If the subject is too far away and underexposure will result, the <Q> icon will blink in the viewfinder. Move closer to the subject and try the FE lock again.
If <a> is not displayed on the LCD panel, FE lock cannot be set. If the target subject is too small in the viewfinder, the FE lock might not be very effective.
15
cHigh-Speed Sync
With high-speed sync (FP flash), the flash can synchronize with all shutter speeds. This is convenient when you want to use aperture priority for fill-flash portraits.
Press the <E> button so that <c> is displayed.
Check that the <F> icon is lit in the viewfinder.
If you set a shutter speed that is the same or slower than the camera’s maximum flash sync speed, <F> will not be displayed in the viewfinder. With high-speed sync, the faster the shutter speed, the shorter the effective flash range will be. Check the LCD panel for the maximum flash range for the respective shutter speed.
To return to normal flash, press the <E> button so that <c> icon turns off.
rSecond-CurtainCOPYSync
With a slow shutter speed, you can create a light trail following the subject. The flash fires right before the shutter closes.
Press the <E> button so that <r> is displayed.
Second-curtain sync works well in the camera’s “buLb” mode.
To return to normal flash, press the <E> button. The <r> icon will disappear.
With E-TTL II/E-TTL, when you press the shutter button completely, a preflash will be fired. Then right before the shutter closes, the main flash is fired.
16
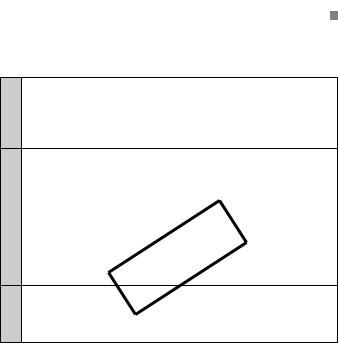
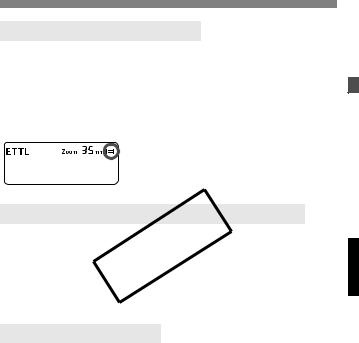
Bounce Flash
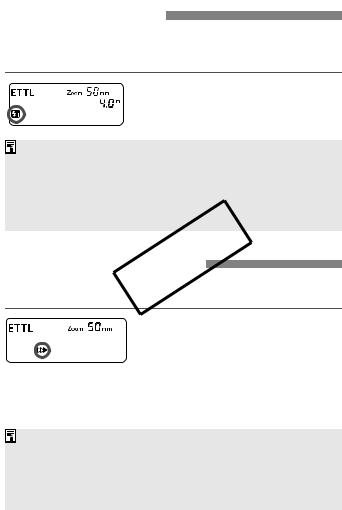
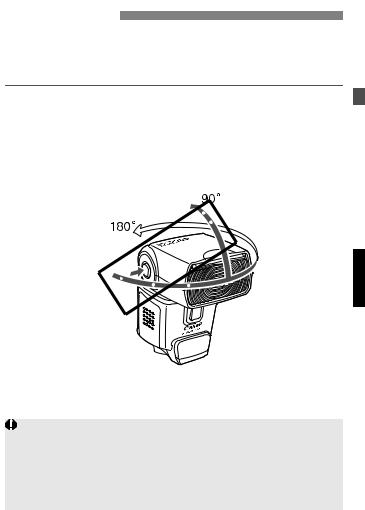
By pointing the flash head toward a wall or ceiling, the flash will bounce off the surface before illuminating the subject. This can soften shadows behind the subject for a more natural-looking shot. This is called bounce flash.
Set the Bounce Direction
Hold down the <z> button and turn the flash head.
If the flash coverage is set automatically, the flash coverage will be fixed to 50mm.
The LCD panel will also display <Zoom Omm>. You can also set the flash coverage manually. (p.18)

 COPY
COPY


If the wall or ceiling is too far away, the bounced flash might be too weak and result in underexposure.
The wall or ceiling should be a plain, white color for high reflectance. If the bounce surface is not white, a color cast may result in the picture. After you take the shot, if the flash exposure confirmation lamp does not light, use a larger aperture opening and try again. With a digital camera, you can also increase the ISO speed.
17

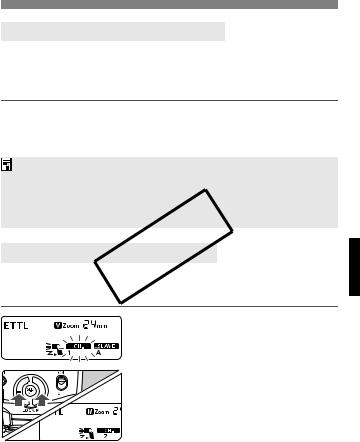
H: Setting the Flash Coverage and Using the Wide Panel 
The flash coverage can be set to match the lens focal length from 24mm to 105mm. The flash coverage can be set automatically or manually. Also, with the built-in wide panel, the flash coverage will be compatible with ultra wide-angle lenses as short as 14mm.
Press the <G> button.
Press the <9> button to change the flash coverage.
If <d> is not displayed, the flash coverage will be set automatically.
If you set the flash coverage manually, make sure it covers the lens focal length so that the picture will not have a dark periphery.
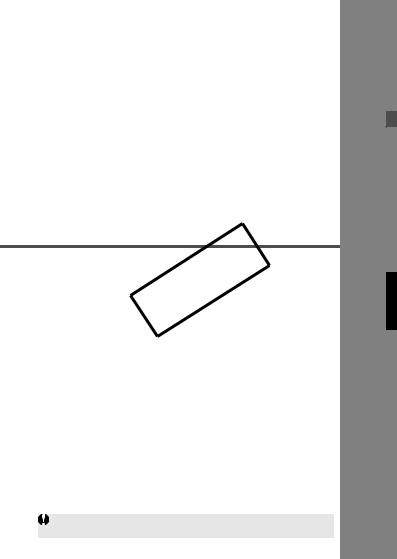
Using the Wide Panel
COPYPull out the wide panel and place it as shown.
The <G> button will not
work.
The flash coverage will not be compatible with the EF15mm f/2.8 Fisheye lens.
For the effective lens focal length (or crop factor), refer to the camera’s instruction manual.
If you use bounce flash with the wide panel in place, the entire display on the LCD panel will blink as a warning. Since the subject will be illuminated by both the bounce flash and direct flash, it will look unnatural.
Pull out the wide panel gently. Using excessive force may detach the wide panel.
18
q: Manual Flash
You can set the flash output from 1/64 power to 1/1 full power in 1/3- stop increments.
Use a hand-held flash meter to determine the required flash output to obtain a correct flash exposure. Setting the camera’s shooting mode to <W> or <q> is recommended.
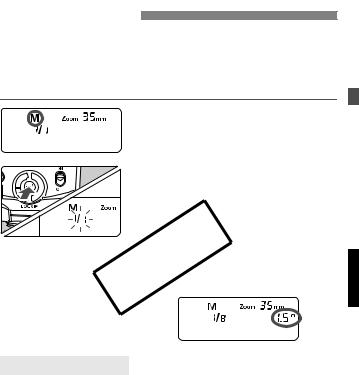
1 Press the <D> button so that <q> is displayed.
2 Set the flash output.
Press the <8> button. X The flash output blinks.
Press the <9> button to set the flash output, then press the <8>
COPYbutton.
ress the shutter button halfway to see the effective flash range displayed.
Flash Output Display
The manual flash output value will change as shown below when the flash output is decreased or increased.
|
(Example) |
Figures for decreased flash output → |
||||||||
|
1/1 |
1/1 -0.3 |
1/1 -0.7 |
1/2 |
1/2 -0.3 |
1/2 -0.7 |
1/4 |
••• |
||
|
1/2 +0.7 |
1/2 +0.3 |
1/4 +0.7 |
1/4 +0.3 |
••• |
|||||
|
← Figures for |
increased |
flash output |
19
![]()
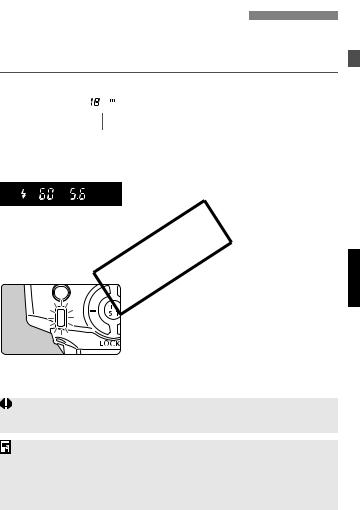
Metered Manual Flash Exposures
When the Speedlite is attached to an EOS-1D series camera, you can also set the flash exposure level manually.
1 Set the camera and Speedlite.
Setting the camera’s shooting mode to <W> or <q> is recommended.
Set the Speedlite’s flash mode to <q> (Manual flash).
Focus the subject.
Focus manually.
Set up an 18% gray card.
Place the gray card at the subject’s position.
X The Speedlite will fire a preflash and the required flash output for the subject is retained in memory.
X On the right side of the viewfinder, the exposure level indicator will show the flash exposure level for the correct flash exposure.
5 Set the flash exposure level.
Adjust the Speedlite’s manual flash level and the camera aperture so that the flash exposure level aligns with the standard exposure index.
6 Take the picture.
Remove the gray card and take the picture.
20

C: Setting Custom Functions 
You can customize Speedlite features to suit your shooting preferences. You do this with Custom Functions.
|
Custom |
Setting |
Reference |
||||
|
Function |
Function |
Settings & Description |
||||
|
No. |
page |
|||||
|
No. |
||||||
|
C.Fn-00 |
Distance indicator display |
0 |
Meters (m) |
— |
||
|
1 |
Feet (ft) |
|||||
|
C.Fn-01 |
Auto power off |
0 |
Enabled |
p.10 |
||
|
1 |
Disabled |
|||||
|
0 |
Enabled (Depth-of-field preview |
|||||
|
button) |
||||||
|
C.Fn-02 |
Modeling flash |
1 |
Enabled (Test firing button) |
p.30 |
||
|
2 |
Enabled (with both buttons) |
|||||
|
3 |
Disabled |
|||||
|
C.Fn-07 |
Test firing with autoflash |
0 |
1/32 |
— |
||
|
1 |
Full output |
|||||
|
C.Fn-08 |
AF-assist beam firing |
0 |
Enabled |
p.23 |
||
|
1 |
Disabled |
|||||
|
C.Fn-09 |
Auto zoom for sensor size |
0 |
Enabled |
p.23 |
||
|
1 |
Disabled |
|||||
|
C.Fn-10 |
Slave auto power off timer |
0 |
60 minutes |
|||
|
1 |
10 minutes |
p.28 |
||||
|
0 |
Within 8 hours |
|||||
|
C.Fn-11 |
Slave auto powerCOPYoff cancel |
|||||
|
1 |
Within 1 hour |
|||||
|
C.Fn-14 |
Flash range/aperture info. |
0 |
Maximum distance |
p.11 |
||
|
1 |
Aperture display |
|||||
C.Fn-02-1/3: Convenient when you want to use the depth-of-field preview button to check the depth of field.
C.Fn-08: If the Speedlite or camera’s AF-assist beam is disabled, the AF-assist beam will not be emitted.
C.Fn-14: You can change the information displayed on the LCD panel when the shutter button is pressed halfway. This function can be set only with Type-A cameras.
21
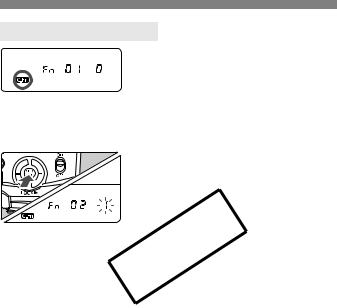
Setting Custom Functions
1 Press the <A> button for 2 sec. or more so that <u> is displayed.
2 Select the Custom Function No.
Press the <9> button to select the Custom Function number.
3 Change the setting.
Press the <8> button.
X The setting number will blink.
X Press the <9> button to set the desired number, then press the
COPY<8> button.
X After you set the Custom Function and press the <D> button, the camera will be ready to shoot.
22
Auto Zoom for Image Sensor Size
EOS DIGITAL cameras have one of three image sensor sizes. The lens’ effective focal length will differ depending on the camera’s sensor size. The Speedlite automatically recognizes the EOS DIGITAL camera’s sensor size and automatically sets the flash coverage for lens focal lengths from 24mm to 105mm.
When the Speedlite is attached to a compatible camera, <s> will appear on the Speedlite’s LCD panel.
About Color Temperature Information Transmission
When the flash fires, theCOPYcolor temperature information is transmitted to the EOS DIGITAL camera. This feature optimizes the flash picture’s white balance. When the camera’s white balance is set to <A> or <Q>, it will work automatically.
To see if this feature works with your camera, see the Specifications in your camera’s instruction manual.
About the AF-Assist Beam
Under low-light or low-contrast conditions when autofocus cannot be achieved, the built-in AF-assist beam will be emitted automatically to make it easier to autofocus. The 430EX II’s AF-assist beam is compatible with the AF points of almost all EOS cameras. The AFassist beam is compatible with 28mm and longer lenses. The effective range is shown below.
|
Position |
Effective Range (m / ft) |
|
Center |
Approx. 0.7 — 10 / 2.3 — 32.8 |
|
Periphery |
Approx. 0.7 — 5 / 2.3 — 16.4 |
23
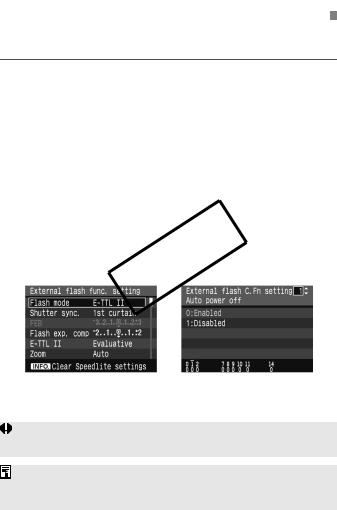
Speedlite Control with the Camera’s Menu Screen 
If the Speedlite is attached to an EOS DIGITAL camera enabling External Speedlite control, the camera can set the Speedlite settings.
Setting Speedlite functions
The settable functions will vary depending on the flash metering mode and flash mode.
·Flash mode
·Shutter sync (1st curtain, 2nd curtain, High-speed)
·Flash exposure compensation
·Flash metering mode
·Flash firing
·Zoom (Flash coverage)
·Clear Speedlite settings
Speedlite Custom Functions
|
· 9 Custom Functions |
|
|
COPY |
|
|
Clear All Speedlite Custom Functions |
|
|
Only C.Fn-00 will not be cleared. |
|
|
Flash function settings screen* |
Flash .Fn settings screen* |
* The screen may look different depending on the camera.
If flash exposure compensation has already been set with the Speedlite, flash exposure compensation cannot be set with the camera.
If any Speedlite Custom Functions and flash function settings other than flash exposure compensation have been set by both the camera and Speedlite, the latest setting will take effect.
24

|
3 |
||
|
Wireless Flash |
||
|
Wireless flash photography requires another Speedlite |
||
|
COPY |
||
|
which can serve as the master unit such as Speedlite |
||
|
580EX II. |
||
|
Wireless Flash |
……………………………………………… |
26 |
|
Setting Manual ………….Flash with the Slave Unit |
31 |
|
|
Reference |
||
|
430EX II System…………………………………………… |
32 |
|
|
Troubleshooting …………………………………..Guide |
33 |
|
|
Specifications ………………………………………………. |
35 |
|
|
Using a Type-B …………………………………Camera |
37 |
25

Wireless Flash
With multiple Canon Speedlites having the wireless flash feature, you can create various lighting effects with the same ease as using normal E-TTL II autoflash.
The settings you input with the master unit attached to the camera are also automatically transmitted to the slave units which are controlled by the master unit via wireless. Therefore, you need not operate the slave unit(s) at all during the shoot.
For details on wireless flash photography and operating the master unit, see the master unit’s instruction manual. The procedure below applies to a master unit attached to the camera and slave unit(s) controlled by wireless.
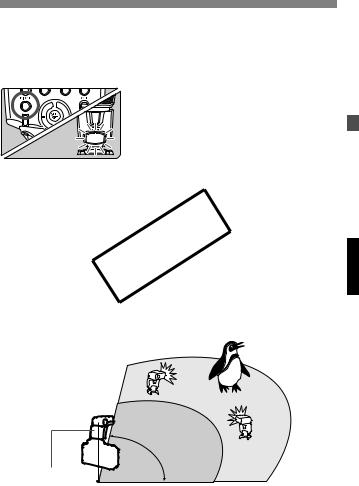
1 Set the master unit.
Attach the master unit Speedlite to the camera and set it as necessary.
2 Set the 430EX II as the slave unit.
COPYHold down the <G> button for 2 sec. or more.
3 heck the communication channel.
If the master unit and slave unit(s) are set to a different channel, set them all to the same channel (p.29).
4 Set the slave ID.
Set the slave ID when using two (A and B) or three (A, B, and C) slave groups (p.30).
5Position the camera and Speedlites.
Position the slave unit(s) within the master unit’s wireless transmission range.
26
6Set the master unit’s flash mode to <a>.
|
For shooting, <a> will also be |
|||
|
set automatically for the slave unit(s). |
|||
|
7 |
Check that the flash is ready. |
||
|
When the slave unit(s) is ready to fire |
|||
|
(fully charged), the AF-assist beam |
|||
|
will blink at 1-sec. intervals. |
|||
|
8 Check the flash operation. |
|||
|
Press the master unit’s test firing |
|||
|
button. |
|||
|
X The slave unit will fire. If the flash |
|||
|
does not fire, adjust the slave unit’s |
|||
|
angle toward the master unit and |
|||
|
distance from the master unit. |
|||
|
9 Set the camera and shoot. |
|||
|
Set the camera in the same way as |
|||
|
COPYwith normal flash shooting. |
|||
|
Sample wireless flash setup |
|||
|
Indoors |
|||
|
Outdoors |
Slave A |
||
|
(430EX II) |
|||
|
80° |
Slave B |
||
|
(430EX II) |
|||
|
Master unit such as |
|||
|
Speedlite 580EX II |
8m (26.2ft.) |
12m (39.4ft.) |
|
27
Use the mini stand (tripod socket provided) to prop up the slave unit. Use the bounce feature to swing the slave unit’s flash body so that the wireless sensor faces the master unit.
Indoors, the wireless signal can also bounce off the wall so there is more leeway in positioning the slave unit(s).
After positioning the slave unit(s), be sure to test the wireless flash operation before shooting.
Do not place any obstacles between the master unit and slave unit(s). Obstacles can block the transmission of wireless signals.
Even with multiple slave units, all of them will be controlled in the same way via wireless.
The Speedlite’s zoom setting will be set automatically to 24mm. It is possible to change the master unit’s zoom setting. However, note that the master unit transmits wireless signals to the slave unit(s) with the preflash. Therefore, the flash coverage must cover the slave unit’s position. If you changeCOPYthe master unit’s zoom setting, be sure to test the wireless flash operation before shooting.
If the slave unit’s auto power off takes effect, press the master unit’s test firing button to turn on the slave unit.
If the 430EX II is set as a slave unit and remains in auto power off mode for more than 8 hours, it will not turn on even if you try to fire a test flash with the master unit. In this case, press the slave unit’s test firing button to turn it on.
A test flash cannot be fired while the camera’s operation timer 4or 0 is active.
28
Using Fully Automatic Wireless Flash
Flash exposure compensation and other settings set with the master unit will also be automatically set in the slave units. Thus, you need not operate the slave unit(s). Wireless flash with the following settings can be done in the same way as with normal flash shooting.
|
• Flash exposure compensation |
• FEB |
|
|
• High-speed sync (FP flash) |
• Manual flash |
|
|
• FE lock |
• Stroboscopic flash |
With FE lock, if even one Speedlite will result in underexposure, the <Q> icon will blink in the viewfinder. Open the aperture more or move the slave unit closer to the subject.
With a wireless flash system, the master unit’s settings will not be displayed on the 430EX II’s LCD panel.
Setting the CommunicationCOPYChannel
If there is another Canon wireless flash system nearby, you can change the channel No. to prevent signal confusion. Both the master and slave units must be set to the same channel No.
1Press the <G> button so that <w> blinks.
2 Set the channel No.
Press the <9> button to select the channel number, then press the <8> button.
29
![]()
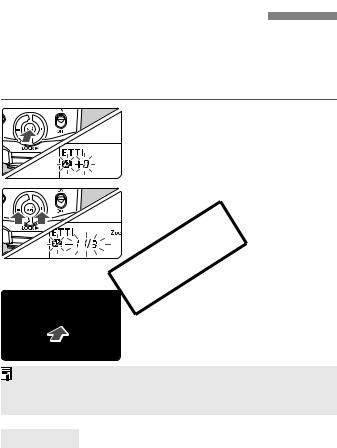
Modeling Flash
Setting the Slave ID
Set the slave ID if you use two (A and B) or three (A, B, and C) slave groups.
1 Press the <G> button so that <x> blinks.
2 Set the slave ID.
Press the <9> button to select the slave ID (A, B, or C), then press the <8> button.
If the camera has a depthCOPY-of-field preview button, pressing it will fire the flash continuously for 1 sec. This is called the modeling flash.
It enables you to see the shadow effects on the subject and the lighting balance. You can fire the modeling flash for both wireless and normal flash shooting.
Do not fire the modeling flash more than 10 consecutive times. If you fire the modeling flash 10 consecutive times, allow the Speedlite to rest for at least 10 min. to avoid overheating and deteriorating the flash head.
The modeling flash cannot be fired with the EOS REBEL 2000/300 and Type-B cameras (p.2).
30

About Slave Group Control
Slave group A
ID = A ID = A ID = A
For example, if you have the slave ID set to <1> for three slave units, all three slave units will be controlled as if they were one Speedlite in slave group A.
Setting Manual Flash with the Slave Unit 
Manual flash can be set manually with the slave unit. Do this in the following cases:
|
(1) |
When you want to set the flash output with the slave units |
|
individually for wireless or manual flash, as with studio flash units. |
|
|
(2) |
COPY |
|
When you use Speedlite Transmitter ST-E2 for wireless or manual |
flash.
2
Set the manual flash output. (p.19)
31

Reference
430EX II System
f Speedlite TransmitterCOPYST-E2
Dedicated transmitter for wireless control of 430EX II set as slave units. g Macro Ring Lite MR-14EX / h Macro Twin Lite MT-24EX
Flash for macro photography.
iOff-Camera Shoe Cord OC-E3
Enables the 430EX II to be connected to the camera up to 60 cm/2 ft away.
j Speedlite Bracket SB-E2
32

Troubleshooting Guide
If there is a problem, refer to this Troubleshooting Guide.
The Speedlite does not fire.
The batteries are installed in the wrong orientation.
XInstall the batteries in the correct orientation. (p.8)
The Speedlite’s internal batteries are exhausted.
XIf the flash recycling time takes 30 sec. or longer, replace the batteries. (p.8)
The Speedlite is not attached securely to the camera.
XAttach the Speedlite’s mounting foot securely to the camera. (p.9)
The electrical contacts of the Speedlite and camera are dirty.
XClean the contacts.
The slave unit does not fire.
XSet it to the sameCOPYchannel as the master unit. (p.29)
The slave unit(s) is not positioned properly.
XPlace the slave unit within the master unit’s transmission range. (p.26)
XPoint the slave unit(s)’s sensor toward the master unit. (p.26)The channel does not match the master unit’s channel.
The power turns off by itself.
Auto power off took effect.
XPress the shutter button halfway or press the <J> button. (p.10)
The entire LCD panel blinks.
The wide panel has been pulled out for bounce flash.
X Retract the wide panel. (p.18)
Auto zoom does not work.
The Speedlite is not attached securely to the camera.
X Attach the Speedlite’s mounting foot securely to the camera. (p.9)
33

The periphery or bottom of the picture looks dark.
When you set the flash coverage manually, the setting was a higher number than the lens focal length, resulting in a dark periphery.
XSet the flash coverage that is a lower number than the lens focal length or set it to auto zoom. (p.18)
If only the bottom of the picture looks dark, you were too close to the subject.
XKeep at least 0.7 m/2.3 ft away from the subject.
The flash exposure is underexposed or overexposed.
There was a highly reflective object (glass window, etc.) in the picture.
XUse FE lock. (p.15)
The subject looksCOPYvery dark or very bright.
XSet flash exposure compensation. For a dark subject, set a decreased flash exposure. And for a bright subject, set an increased flash exposure. (p.14)
You used high-speed sync.
XWith high-speed sync, the effective flash range will be shorter. Make sure the subject is within the effective flash range displayed. (p.16)
The picture is really blurred.
The shooting mode was set to <W>, and the scene was dark.
X Use a tripod or set the shooting mode to <V>. (p.12)
The buttons do not work.
The Mode Dial is set to a Basic Zone mode.
X Set the Mode Dial to a Creative Zone mode.
34

Specifications
• Type
|
Type: |
On-camera, E-TTL II/E-TTL/TTL autoflash Speedlite |
|
Compatible cameras: |
Type-A EOS cameras (E-TTL II/E-TTL autoflash), |
|
Type-B EOS cameras (TTL autoflash) |
|
|
Guide No.: |
43/141 (at 105mm focal length, ISO 100 in meters/feet) |
|
Flash coverage: |
24 — 105mm (14mm with wide panel) |
|
• Auto zoom (Flash coverage set automatically to match the |
|
|
lens focal length and image sensor size) |
|
|
• Manual zoom |
|
|
• Flash head swing (bounce flash) |
Color temperature
information transmission: Flash color temperature information transmitted to camera when flash is fired
• Exposure Control
Exposure control system: Effective flash range: (With EF50mm f/1.4 lens at ISO 100)
Flash exposure compensation: FE lock:
High-speed sync: Flash exposure confirmation:
E-TTL II/E-TTL/TTL autoflash, manual flash 0.7 — 24.3 m / 2.3 — 79.7 ft.
* High-speed sync: 0.7 — 12 m / 2.3 — 39.4 ft. (at 1/250 sec.)
COPY±3 stops in 1/3- or 1/2-stop increments Provided
Provided
Flash exposure confirmation lamp lights
• Flash Recycling
|
Recycling time: |
Normal flash: Approx. 3.0 sec. (with size-AA alkaline |
|
batteries) |
|
|
Flash-ready indicator: |
Red pilot lamp lights |
• Wireless Slave
|
Transmission method: |
Optical pulse |
|
Channels: |
4 |
|
Transmission range: |
Reception angle: Approx. ±40° horizontal, Approx. ±30° |
|
vertical |
|
|
Slave-ready indicator: |
AF-assist beam blinks |
|
Modeling flash: |
Fired with camera’s depth-of-field preview button |
• Custom Functions: 9 (20 settings)
35

• AF-Assist Beam
|
Linkable AF points: |
1 — 9 AF points (28mm or longer focal length) |
|
Effective range: |
At center: Approx. 0.7 — 10 m / 2.3 — 32.8 ft., |
|
Periphery: Approx. 0.7 — 5 m / 2.3 — 16.4 ft. |
• Power Source
|
Battery: |
Four size-AA alkaline batteries |
|
* Size-AA Ni-MH and lithium batteries also usable |
Battery life (flash count): Approx. 200 — 1400 flashes (with size-AA alkaline batteries)
|
Power saving: |
Power off after approx. 1.5 min. to 15 min. of idle operation |
|
(60 min. if set as slave) |
• Dimensions
|
(W x H x D): |
72 x 122 x 101 mm / 2.8 x 4.8 x 4.0 in. |
|
• Weight: |
Approx. 320 g / 11.3 oz. (Speedlite only, excluding batteries) |
All specifications above are based on Canon’s testing standards.
Product specifications and external appearance are subject to change without notice.
Manual Flash Guide No. (ISO 100, in meters/feet)
|
Flash Output |
Flash Coverage (mm) |
||||||||
|
14 |
24 |
28 |
35 |
50 |
70 |
80 |
105 |
||
|
COPY |
|||||||||
|
1/1 |
11/ |
25/ |
27/ |
31/ |
34/ |
37/ |
40/ |
43/ |
|
|
36.1 |
82 |
88.6 |
101.7 |
111.5 |
121.4 |
131.2 |
141.1 |
||
|
1/2 |
7.8/ |
17.7/ |
19.1/ |
21.9/ |
24/ |
26.2/ |
28.3/ |
30.4/ |
|
|
25.6 |
58.1 |
62.7 |
71.9 |
78.7 |
86 |
92.8 |
99.7 |
||
|
1/4 |
5.5/ |
12.5/ |
13.5/ |
15.5/ |
17/ |
18.5/ |
20/ |
21.5/ |
|
|
18 |
41 |
44.3 |
50.9 |
55.8 |
60.7 |
65.6 |
70.5 |
||
|
1/8 |
3.9/ |
8.8/ |
9.5/ |
11/ |
12/ |
13.1/ |
14.1/ |
15.2/ |
|
|
12.8 |
28.9 |
31.2 |
36.1 |
39.4 |
43 |
46.3 |
49.9 |
||
|
1/16 |
2.8/ |
6.3/ |
6.8/ |
7.8/ |
8.5/ |
9.3/ |
10/ |
10.8/ |
|
|
9.2 |
20.7 |
22.3 |
25.6 |
27.9 |
30.5 |
32.8 |
35.4 |
||
|
1/32 |
1.9/ |
4.4/ |
4.8/ |
5.5/ |
6/ |
6.5/ |
7.1/ |
7.6/ |
|
|
6.2 |
14.4 |
15.7 |
18 |
19.7 |
21.3 |
23.3 |
24.9 |
||
|
1/64 |
1.4/ |
3.1/ |
3.4/ |
3.9/ |
4.3/ |
4.6/ |
5/ |
5.4/ |
|
|
4.6 |
10.2 |
11.2 |
12.8 |
14.1 |
15.1 |
16.4 |
17.7 |
||
36
 Loading…
Drivers
For certain products, a driver is necessary to enable the connection between your product and a computer. On this tab, you will find the applicable drivers for your product or in the absence of any drivers, an explanation of your product’s compatibility with each operating system.
Helpful Information
: To access software, manuals and other content please use the tabs above.
Software
Software is an optional download that enables advanced functionality and helps you to get the most out of your product. On this tab, you can view and download the available software for your product.
Software
Software is an optional download that enables advanced functionality and helps you to get the most out of your product. On this tab, you can view and download the available software for your product.
Manuals
Manuals for your product or software are listed below.
Apps & Functions
On this tab, you can view the available Apps and functions that are compatible with your product.
Firmware
Firmware is permanent software which is installed on your product and enables it to function correctly. Canon may periodically release updates to this firmware and if there is an update available, this can be downloaded below.
FAQs & Help
On this tab you can find a selection of FAQs and other helpful information that can assist you with your question or issues.
Important Information
On this tab you can find a selection of FAQs that we feel are important to bring to your attention.
Error Codes
An error code or message may appear on your product for different reasons. Using the the search box you can access helpful information regarding your specific error code that will explain the cause and provide you with the necessary steps for how to proceed.
Specifications
Below are all the technical specifications for this product.