- Adobe Premiere Pro User Guide
- Beta releases
- Beta Program Overview
- Premiere Pro Beta Home
- Beta features
- Enhance Speech
- Enhance Speech FAQs
- Filler Words in Text-Based Editing
- Effects Manager
- Color Settings
- Audio Auto-Tagging
- Recovery Mode
- SRT Support
- Getting started
- Get started with Adobe Premiere Pro
- What’s new in Premiere Pro
- Best practices for updating Premiere Pro
- Keyboard shortcuts in Premiere Pro
- Accessibility in Premiere Pro
- Frequently asked questions
- Release notes
- Hardware and operating system requirements
- Hardware recommendations
- System requirements
- GPU and GPU Driver requirements
- GPU Accelerated Rendering & Hardware Encoding/Decoding
- Creating projects
- Start a new project
- Open projects
- Move and delete projects
- Work with multiple open projects
- Work with Project Shortcuts
- Backward compatibility of Premiere Pro projects
- Open and edit Premiere Rush projects in Premiere Pro
- Best Practices: Create your own project templates
- Workspaces and workflows
- Workspaces
- Import and export FAQs
- Working with Panels
- Windows touch and gesture controls
- Use Premiere Pro in a dual-monitor setup
- Frame.io
- Install and activate Frame.io
- Use Frame.io with Premiere Pro and After Effects
- Integrate Adobe Workfront and Frame.io
- Frequently asked questions
- Capturing and importing
- Importing
- Transfer files
- Importing still images
- Importing digital audio
- Importing from Avid or Final Cut
- Importing AAF project files from Avid Media Composer
- Importing XML project files from Final Cut Pro 7 and Final Cut Pro X
- File formats
- Supported file formats
- Support for Blackmagic RAW
- Digitizing analog video
- Working with timecode
- Importing
- Editing
- Edit video
- Sequences
- Create and change sequences
- Set In and Out points in the Source Monitor
- Add clips to sequences
- Rearrange and move clips
- Find, select, and group clips in a sequence
- Remove clips from a sequence
- Change sequence settings
- Edit from sequences loaded into the Source Monitor
- Simplify sequences
- Rendering and previewing sequences
- Working with markers
- Source patching and track targeting
- Scene edit detection
- Cut and trim clips
- Split or cut clips
- Trim clips
- Edit in Trim mode
- Perform J cuts and L cuts
- Create and play clips
- Adjust Trimming and Playback preferences
- Video
- Synchronizing audio and video with Merge Clips
- Render and replace media
- Undo, history, and events
- Freeze and hold frames
- Working with aspect ratios
- Audio
- Overview of audio in Premiere Pro
- Edit audio clips in the Source Monitor
- Audio Track Mixer
- Adjusting volume levels
- Edit, repair, and improve audio using Essential Sound panel
- Automatically duck audio
- Remix audio
- Monitor clip volume and pan using Audio Clip Mixer
- Audio balancing and panning
- Advanced Audio — Submixes, downmixing, and routing
- Audio effects and transitions
- Working with audio transitions
- Apply effects to audio
- Measure audio using the Loudness Radar effect
- Recording audio mixes
- Editing audio in the timeline
- Audio channel mapping in Premiere Pro
- Use Adobe Stock audio in Premiere Pro
- Text-Based Editing
- Text-Based Editing
- Text-Based Editing FAQs
- Advanced editing
- Multi-camera editing workflow
- Set up and use Head Mounted Display for immersive video in Premiere Pro
- Editing VR
- Best Practices
- Best Practices: Mix audio faster
- Best Practices: Editing efficiently
- Editing workflows for feature films
- Video Effects and Transitions
- Overview of video effects and transitions
- Effects
- Types of effects in Premiere Pro
- Apply and remove effects
- Effect presets
- Metadata effect in Premiere Pro
- Automatically reframe video for different social media channels
- Color correction effects
- Change duration and speed of clips
- Adjustment Layers
- Stabilize footage
- Transitions
- Applying transitions in Premiere Pro
- Modifying and customizing transitions
- Morph Cut
- Titles, Graphics, and Captions
- Overview of the Essential Graphics panel
- Titles
- Create a title
- Graphics
- Create a shape
- Draw with the Pen tool
- Align and distribute objects
- Change the appearance of text and shapes
- Apply gradients
- Add Responsive Design features to your graphics
- Install and use Motion Graphics templates
- Replace images or videos in Motion Graphics templates
- Use data-driven Motion Graphics templates
- Captions
- Speech to Text
- Download language packs for transcription
- Working with captions
- Check spelling and Find and Replace
- Export text
- Speech to Text FAQs
- Best Practices: Faster graphics workflows
- Retiring the Legacy Titler FAQs
- Upgrade Legacy titles to Source Graphics
- Animation and Keyframing
- Adding, navigating, and setting keyframes
- Animating effects
- Use Motion effect to edit and animate clips
- Optimize keyframe automation
- Moving and copying keyframes
- Viewing and adjusting effects and keyframes
- Compositing
- Compositing, alpha channels, and adjusting clip opacity
- Masking and tracking
- Blending modes
- Color Correction and Grading
- Overview: Color workflows in Premiere Pro
- Auto Color
- Get creative with color using Lumetri looks
- Adjust color using RGB and Hue Saturation Curves
- Correct and match colors between shots
- Using HSL Secondary controls in the Lumetri Color panel
- Create vignettes
- Looks and LUTs
- Lumetri scopes
- Display Color Management
- Timeline tone mapping
- HDR for broadcasters
- Enable DirectX HDR support
- Exporting media
- Export video
- Export Preset Manager
- Workflow and overview for exporting
- Quick export
- Exporting for the Web and mobile devices
- Export a still image
- Exporting projects for other applications
- Exporting OMF files for Pro Tools
- Export to Panasonic P2 format
- Export settings
- Export settings reference
- Basic Video Settings
- Encoding Settings
- Best Practices: Export faster
- Collaborative editing
- Collaboration in Premiere Pro
- Get started with collaborative video editing
- Create Team Projects
- Add and manage media in Team Projects
- Invite and manage collaborators
- Share and manage changes with collaborators
- View auto saves and versions of Team Projects
- Manage Team Projects
- Linked Team Projects
- Frequently asked questions
- Long form and Episodic workflows
- Long Form and Episodic Workflow Guide
- Using Productions
- How clips work across projects in a Production
- Best Practices: Working with Productions
- Working with other Adobe applications
- After Effects and Photoshop
- Dynamic Link
- Audition
- Prelude
- Organizing and Managing Assets
- Working in the Project panel
- Organize assets in the Project panel
- Playing assets
- Search assets
- Creative Cloud Libraries
- Sync Settings in Premiere Pro
- Consolidate, transcode, and archive projects
- Managing metadata
- Best Practices
- Best Practices: Learning from broadcast production
- Best Practices: Working with native formats
- Improving Performance and Troubleshooting
- Set preferences
- Reset and restore preferences
- Working with Proxies
- Proxy overview
- Ingest and Proxy Workflow
- Check if your system is compatible with Premiere Pro
- Premiere Pro for Apple silicon
- Eliminate flicker
- Interlacing and field order
- Smart rendering
- Control surface support
- Best Practices: Working with native formats
- Knowledge Base
- Known issues
- Fixed issues
- Fix Premiere Pro crash issues
- Unable to migrate settings after updating Premiere Pro
- Green and pink video in Premiere Pro or Premiere Rush
- How do I manage the Media Cache in Premiere Pro?
- Fix errors when rendering or exporting
- Troubleshoot issues related to playback and performance in Premiere Pro
- Extensions and plugins
- Installing plugins and extensions in Premiere Pro
- Latest plugins from third-party developers
- Video and audio streaming
- Secure Reliable Transport (SRT)
- Monitoring Assets and Offline Media
- Monitoring assets
- Using the Source Monitor and Program Monitor
- Using the Reference Monitor
- Offline media
- Working with offline clips
- Creating clips for offline editing
- Relinking offline media
- Monitoring assets
Source patching and track targeting are great editing techniques to speed up your editing process and reduce errors.
Source patching is a method to specify exactly where you want your asset (image, video, or audio) to appear in the timeline when placing the asset. Use this process as you build your sequence in the timeline.
Once you have your sequence on the timeline, use track targeting when copying and pasting on the timeline to ensure that your edits are on the specific track you want to work on.
Before you start
- Switch to the Editing workspace (Window > Workspaces > Editing).
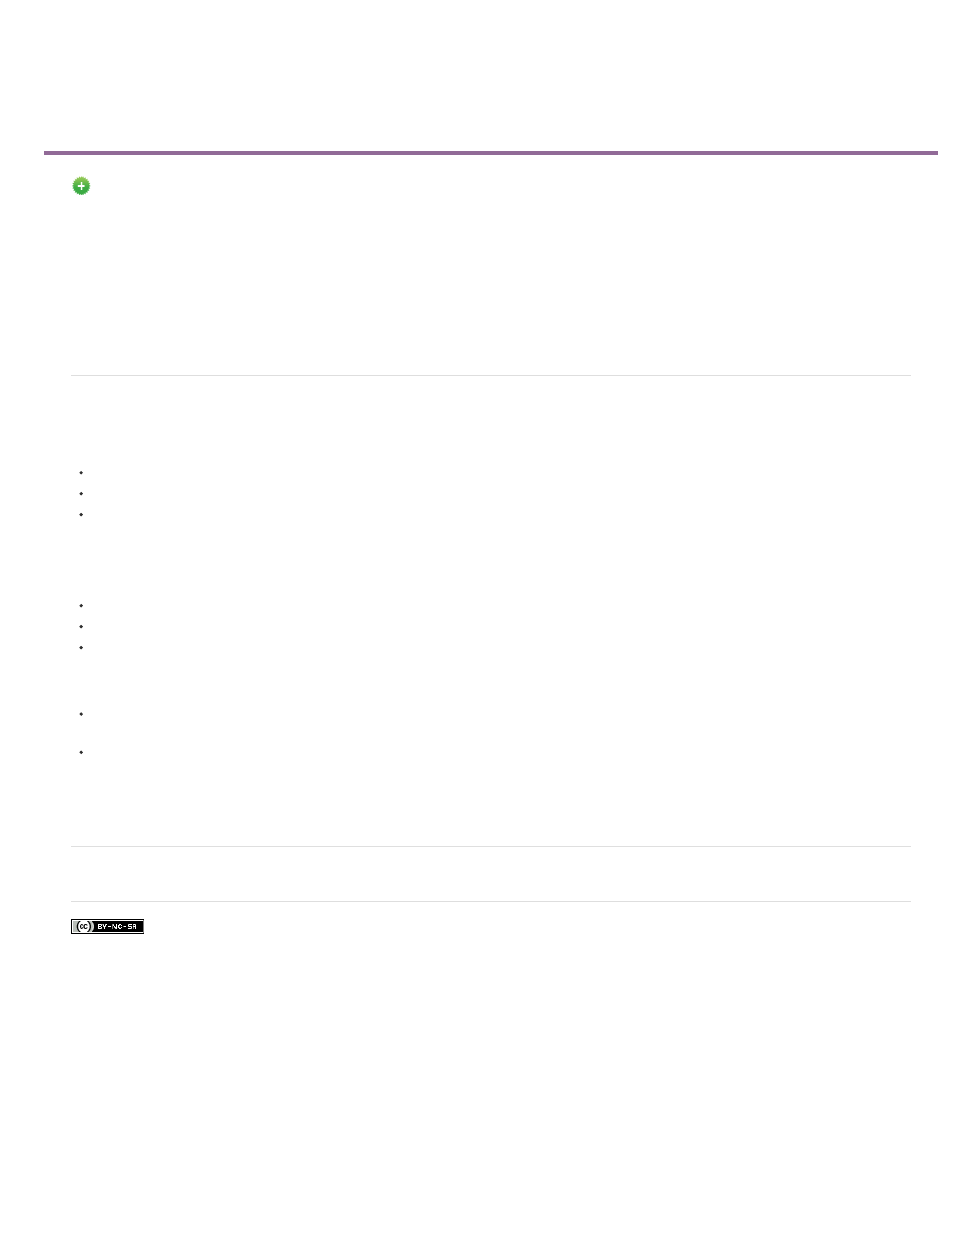
- Review this image to understand all the source patching and track targeting controls you need.
A. Source Monitor controls B. Program Monitor C. Source patching panel D. Track targeting panel
-
Select the Mark In and Mark Out points in the Source Monitor to select the clip you want to source patch. You can also use the I and O keyboard shortcuts.
-
To insert the clip, do one of the following:
- Drag the clip from the Source Monitor to the Program Monitor (as shown in the video) and select Insert in the Program Monitor.
- Select Insert from the Source Monitor and select the desired track to insert the source clip.
- Select the clip and use the comma (,) keyboard shortcut to insert a clip.
When you add a clip to the sequence using an Insert edit, the clips later in time shift ahead to accommodate the new clip. You can also Press Ctrl (Win) or Command (macOS) to enter Insert mode while dragging a clip.
-
Select Overwrite from the Source Monitor and select the desired track to overwrite the clip. You can also use a period (.) to overwrite a clip.
An Overwrite edit adds a clip by replacing existing frames in a sequence that extends from the edit point for the clip’s duration. When adding clips to sequences or rearranging clips inside sequences, the Overwrite approach is the default.
Source patchers and Source track indicators
Source patchers have three states: On, Off, and Black/Silent. One patch is displayed for each video and audio track for the item in the Source Monitor.
The associated track is part of an edit action while an item is in the On state.
When the track is in the Off state, edit changes are not reflected in the track.
A gap rather than the source panel is shown on the track while in the Black/Silent mode.
Track targeting
The timeline in Premiere Pro is organized in a hierarchy. This may impact how items are pasted when using specific keyboard shortcuts and how items are chosen. Track Targeting helps in Navigation, Copy/paste, and Match framing.
-
Select the track you want to target and choose Edit > Paste Insert.
-
To select and target multiple sources or target tracks press Cmd or Ctrl as you drag and drop the cursor across multiple track buttons on the timeline.
To invert the selection, press Cmd plus Shift or Ctrl plus Shift while dragging.
Benefits of track targeting
Track targeting can be powerful when copying and pasting items on the timeline, matching frames, or navigating the timeline.
Copy/Paste
Track targeting gives you additional control over clips on the timeline when doing copy-and-paste operations. When you copy and paste an item on the timeline, it is pasted on the lowest track targeted based on the layer order. For example, if you have V1 and V4 targeted, your content will paste to track one.
Match Frame
Match framing allows you to find the source frame of any frame in a sequence clip on the timeline and brings it up in the source monitor. Premiere Pro will only match the frame of the clip when a track is targeted and will always match the frame in the highest targeted track. For example, if you have clips on video tracks V1, V2, and V4, and only V2 is targeted, Premiere Pro will match the frame of the clip on track two.
Navigation
Track targeting helps you navigate quickly through the timeline. Use the up and down arrow keys to snap your playhead to In and Out points of clips on targeted tracks. You can have multiple tracks targeted at any given time, allowing you to navigate any clip’s In and Out points on the timeline.
Additional track targeting functions
Toggle Track Output
To disable a track, select the Toggle Track Output button in the track header. It disappears from the Program Monitor.
Toggle Sync Lock
Sync locks will allow you to lock certain tracks together to keep them in sync.
Toggle Track Lock
Allows you to completely lock the track. You can no longer make any edits to this track.
Toggle Track Targeting
Helps in managing the clips that are accessible in the video and audio tracks. Each track on the timeline has a unique number. Select a track number to choose it.
Set and use keyboard shortcuts
There are various keyboard shortcuts that can be used to speed up your workflow. You can also set keyboard shortcuts for actions, such as Paste to Same Track, Paste Insert to Same Track, Paste to Target Track, and Paste Insert to Target Track.
-
On Windows: Edit > Keyboard Shortcuts. On macOS: Adobe Premiere Pro > Keyboard Shortcuts.
-
In the Commands drop-down list, go to Timeline Panel.
-
In the Paste to Same Track section, delete the shortcut assigned.
-
Reassign the shortcut to Paste To Target Track.
-
Select OK and close the dialog box
Learn more
Watch these videos for more source patching and track targeting techniques.
How to add video and audio to the timeline in Premiere Pro.
Viewing time: 54 seconds
Shortcuts for the timeline in Premiere Pro – track targeting
Viewing time: 1 min
Related resources
Talk to us

If you have questions about source patching or track targeting, reach out to us in our Premiere Pro community. We would love to help.
- Adobe Premiere Pro User Guide
- Beta releases
- Beta Program Overview
- Premiere Pro Beta Home
- Beta features
- Text-Based Editing
- Text-Based Editing | FAQ
- Color Manager
- Recovery Mode
- Getting started
- Get started with Adobe Premiere Pro
- What’s new in Premiere Pro
- Best practices for updating Premiere Pro
- Keyboard shortcuts in Premiere Pro
- Accessibility in Premiere Pro
- Frequently asked questions
- Release Notes | Premiere Pro
- Hardware and operating system requirements
- Hardware recommendations
- System requirements
- GPU and GPU Driver requirements
- GPU Accelerated Rendering & Hardware Encoding/Decoding
- Creating projects
- Start a new project
- Open projects
- Move and delete projects
- Work with multiple open projects
- Work with Project Shortcuts
- Backward compatibility of Premiere Pro projects
- Open and edit Premiere Rush projects in Premiere Pro
- Best Practices: Create your own project templates
- Workspaces and workflows
- Workspaces
- FAQ | Import and export in Premiere Pro
- Working with Panels
- Windows touch and gesture controls
- Use Premiere Pro in a dual-monitor setup
- Frame.io
- Install and activate Frame.io
- Use Frame.io with Premiere Pro and After Effects
- Integrate Adobe Workfront and Frame.io
- Frequently asked questions
- Capturing and importing
- Capturing
- Capturing and digitizing footage
- Capturing HD, DV, or HDV video
- Batch capturing and recapturing
- Setting up your system for HD, DV, or HDV capture
- Importing
- Transfer files
- Importing still images
- Importing digital audio
- Importing from Avid or Final Cut
- Importing AAF project files from Avid Media Composer
- Importing XML project files from Final Cut Pro 7 and Final Cut Pro X
- File formats
- Supported file formats
- Support for Blackmagic RAW
- Digitizing analog video
- Working with timecode
- Capturing
- Editing
- Edit video
- Sequences
- Create and change sequences
- Change sequence settings
- Add clips to sequences
- Rearrange clips in a sequence
- Find, select, and group clips in a sequence
- Edit from sequences loaded into the Source Monitor
- Simplify sequences
- Rendering and previewing sequences
- Working with markers
- Source patching and track targeting
- Scene edit detection
- Video
- Create and play clips
- Trimming clips
- Synchronizing audio and video with Merge Clips
- Render and replace media
- Undo, history, and events
- Freeze and hold frames
- Working with aspect ratios
- Audio
- Overview of audio in Premiere Pro
- Audio Track Mixer
- Adjusting volume levels
- Edit, repair, and improve audio using Essential Sound panel
- Automatically duck audio
- Remix audio
- Monitor clip volume and pan using Audio Clip Mixer
- Audio balancing and panning
- Advanced Audio — Submixes, downmixing, and routing
- Audio effects and transitions
- Working with audio transitions
- Apply effects to audio
- Measure audio using the Loudness Radar effect
- Recording audio mixes
- Editing audio in the timeline
- Audio channel mapping in Premiere Pro
- Use Adobe Stock audio in Premiere Pro
- Advanced editing
- Multi-camera editing workflow
- Set up and use Head Mounted Display for immersive video in Premiere Pro
- Editing VR
- Best Practices
- Best Practices: Mix audio faster
- Best Practices: Editing efficiently
- Editing workflows for feature films
- Video Effects and Transitions
- Overview of video effects and transitions
- Effects
- Types of effects in Premiere Pro
- Apply and remove effects
- Effect presets
- Automatically reframe video for different social media channels
- Color correction effects
- Change duration and speed of clips
- Adjustment Layers
- Stabilize footage
- Transitions
- Applying transitions in Premiere Pro
- Modifying and customizing transitions
- Morph Cut
- Titles, Graphics, and Captions
- Overview of the Essential Graphics panel
- Titles
- Create a title
- Graphics
- Create a shape
- Draw with the Pen tool
- Align and distribute objects
- Change the appearance of text and shapes
- Apply gradients
- Add Responsive Design features to your graphics
- Install and use Motion Graphics templates
- Replace images or videos in Motion Graphics templates
- Use data-driven Motion Graphics templates
- Captions
- Speech to Text
- Download language packs for transcription
- Working with captions
- Check spelling and Find and Replace
- Export text
- Speech to Text in Premiere Pro | FAQ
- Best Practices: Faster graphics workflows
- Retiring the Legacy Titler in Premiere Pro | FAQ
- Upgrade Legacy titles to Source Graphics
- Animation and Keyframing
- Adding, navigating, and setting keyframes
- Animating effects
- Use Motion effect to edit and animate clips
- Optimize keyframe automation
- Moving and copying keyframes
- Viewing and adjusting effects and keyframes
- Compositing
- Compositing, alpha channels, and adjusting clip opacity
- Masking and tracking
- Blending modes
- Color Correction and Grading
- Overview: Color workflows in Premiere Pro
- Auto Color
- Get creative with color using Lumetri looks
- Adjust color using RGB and Hue Saturation Curves
- Correct and match colors between shots
- Using HSL Secondary controls in the Lumetri Color panel
- Create vignettes
- Looks and LUTs
- Lumetri scopes
- Display Color Management
- Timeline tone mapping
- HDR for broadcasters
- Enable DirectX HDR support
- Exporting media
- Export video
- Export Preset Manager
- Workflow and overview for exporting
- Quick export
- Exporting for the Web and mobile devices
- Export a still image
- Exporting projects for other applications
- Exporting OMF files for Pro Tools
- Export to Panasonic P2 format
- Export settings
- Export settings reference
- Basic Video Settings
- Encoding Settings
- Best Practices: Export faster
- Collaborative editing
- Get started with collaborative video editing
- Create Team Projects
- Add and manage media in Team Projects
- Invite and manage collaborators
- Share and manage changes with collaborators
- View auto-saves and versions of Team Projects
- Manage Team Projects
- Linked Team Projects
- Frequently asked questions
- Collaboration in Premiere Pro
- Long form and Episodic workflows
- Long Form and Episodic Workflow Guide
- Using Productions
- How clips work across projects in a Production
- Best Practices: Working with Productions
- Working with other Adobe applications
- After Effects and Photoshop
- Dynamic Link
- Audition
- Prelude
- Organizing and Managing Assets
- Working in the Project panel
- Organize assets in the Project panel
- Playing assets
- Search assets
- Creative Cloud Libraries
- Sync Settings in Premiere Pro
- Consolidate, transcode, and archive projects
- Managing metadata
- Best Practices
- Best Practices: Learning from broadcast production
- Best Practices: Working with native formats
- Improving Performance and Troubleshooting
- Set preferences
- Reset and restore preferences
- Working with Proxies
- Proxy overview
- Ingest and Proxy Workflow
- Check if your system is compatible with Premiere Pro
- Premiere Pro for Apple silicon
- Eliminate flicker
- Interlacing and field order
- Smart rendering
- Control surface support
- Best Practices: Working with native formats
- Knowledge Base
- Known issues
- Fixed issues
- Fix Premiere Pro crash issues
- Unable to migrate settings after updating Premiere Pro
- Green and pink video in Premiere Pro or Premiere Rush
- How do I manage the Media Cache in Premiere Pro?
- Fix errors when rendering or exporting
- Troubleshoot issues related to playback and performance in Premiere Pro
- Extensions and plugins
- Installing plugins and extensions in Premiere Pro
- Latest plugins from third-party developers
- Monitoring Assets and Offline Media
- Monitoring assets
- Using the Source Monitor and Program Monitor
- Using the Reference Monitor
- Offline media
- Working with offline clips
- Creating clips for offline editing
- Relinking offline medInstia
- Monitoring assets
Source patching and track targeting are great editing techniques to speed up your editing process and reduce errors.
Source patching is a method to specify exactly where you want your asset (image, video, or audio) to appear in the timeline when placing the asset. Use this process as you build your sequence in the timeline.
Once you have your sequence on the timeline, use track targeting when copying and pasting on the timeline to ensure that your edits are on the specific track you want to work on.
Before you start
- Switch to the Editing workspace (Window > Workspaces > Editing).
- Review this image to understand all the source patching and track targeting controls you need.
A. Source Monitor controls B. Program Monitor C. Source patching panel D. Track targeting panel
-
Select the Mark In and Mark Out points in the Source Monitor to select the clip you want to source patch. You can also use the I and O keyboard shortcuts.
-
To insert the clip, do one of the following:
- Drag the clip from the Source Monitor to the Program Monitor (as shown in the video) and select Insert in the Program Monitor.
- Select Insert from the Source Monitor and select the desired track to insert the source clip.
- Select the clip and use the comma (,) keyboard shortcut to insert a clip.
When you add a clip to the sequence using an Insert edit, the clips later in time shift ahead to accommodate the new clip. You can also Press Ctrl (Win) or Command (macOS) to enter Insert mode while dragging a clip.
-
Select Overwrite from the Source Monitor and select the desired track to overwrite the clip. You can also use a period (.) to overwrite a clip.
An Overwrite edit adds a clip by replacing existing frames in a sequence that extends from the edit point for the clip’s duration. When adding clips to sequences or rearranging clips inside sequences, the Overwrite approach is the default.
Source patchers and Source track indicators
Source patchers have three states: On, Off, and Black/Silent. One patch is displayed for each video and audio track for the item in the Source Monitor.
The associated track is part of an edit action while an item is in the On state.
When the track is in the Off state, edit changes are not reflected in the track.
A gap rather than the source panel is shown on the track while in the Black/Silent mode.
Track targeting
The timeline in Premiere Pro is organized in a hierarchy. This may impact how items are pasted when using specific keyboard shortcuts and how items are chosen. Track Targeting helps in Navigation, Copy/paste, and Match framing.
-
Select the track you want to target and choose Edit > Paste Insert.
-
To select and target multiple sources or target tracks press Cmd or Ctrl as you drag and drop the cursor across multiple track buttons on the timeline.
To invert the selection, press Cmd plus Shift or Ctrl plus Shift while dragging.
Benefits of track targeting
Track targeting can be powerful when copying and pasting items on the timeline, matching frames, or navigating the timeline.
Copy/Paste
Track targeting gives you additional control over clips on the timeline when doing copy-and-paste operations. When you copy and paste an item on the timeline, it is pasted on the lowest track targeted based on the layer order. For example, if you have V1 and V4 targeted, your content will paste to track one.
Match Frame
Match framing allows you to find the source frame of any frame in a sequence clip on the timeline and brings it up in the source monitor. Premiere Pro will only match the frame of the clip when a track is targeted and will always match the frame in the highest targeted track. For example, if you have clips on video tracks V1, V2, and V4, and only V2 is targeted, Premiere Pro will match the frame of the clip on track two.
Navigation
Track targeting helps you navigate quickly through the timeline. Use the up and down arrow keys to snap your playhead to In and Out points of clips on targeted tracks. You can have multiple tracks targeted at any given time, allowing you to navigate any clip’s In and Out points on the timeline.
Additional track targeting functions
Toggle Track Output
To disable a track, select the Toggle Track Output button in the track header. It disappears from the Program Monitor.
Toggle Sync Lock
Sync locks will allow you to lock certain tracks together to keep them in sync.
Toggle Track Lock
Allows you to completely lock the track. You can no longer make any edits to this track.
Toggle Track Targeting
Helps in managing the clips that are accessible in the video and audio tracks. Each track on the timeline has a unique number. Select a track number to choose it.
Set and use keyboard shortcuts
There are various keyboard shortcuts that can be used to speed up your workflow. You can also set keyboard shortcuts for actions, such as Paste to Same Track, Paste Insert to Same Track, Paste to Target Track, and Paste Insert to Target Track.
-
On Windows: Edit > Keyboard Shortcuts. On macOS: Adobe Premiere Pro > Keyboard Shortcuts.
-
In the Commands drop-down list, go to Timeline Panel.
-
In the Paste to Same Track section, delete the shortcut assigned.
-
Reassign the shortcut to Paste To Target Track.
-
Select OK and close the dialog box
Learn more
Watch these videos for more source patching and track targeting techniques.
How to add video and audio to the timeline in Premiere Pro.
Viewing time: 54 seconds
Shortcuts for the timeline in Premiere Pro – track targeting
Viewing time: 1 min
Related resources
Talk to us
If you have questions about source patching or track targeting, reach out to us in our Premiere Pro community. We would love to help.
When using Premiere Pro to edit your latest videos, one of the most common features you’ll come across is Source Patching. Source patching in Premiere Pro is a great way to improve versatility and efficiency when editing.
The source material is in the Project panel; you can drag this onto the timeline or use some slick Adobe Premiere Pro custom shortcuts.
However, sometimes it doesn’t work, so we’ve created this little guide to further delve into Source Patching and fix common Source Patching issues.
In today’s article, we take a deeper look into the following Source Patching key questions and answers to enable you to master the art of Source Patching (Or solve those pesky issues!):
- What is source patching in Premiere Pro?
- How to turn on Source Patching in Premiere Pro
- Why is source patching not working in Premiere Pro?
- I can’t turn on Source Patching in Premiere Pro – SOLVED
Source Patching is simply instructing Premiere Pro where to patch the source. This means it will control the file’s location (Track) and allow the Insert and Overwrite edits within the timeline.
There is a source patch button for each of the tracks, one video and one audio. These only become active when you have selected the appropriate source.
This can be one of two clips selected in the Source Monitor and the other in the Project Panel.

You can find the source buttons to the left of the Track Targeting buttons (See above). These sit to the left of the Timeline panel. You can switch these buttons on or off with one simple click. We explain more down below on how to turn on Source Patching in Premiere Pro.
You may also be interested in How to Import MKV Files in Adobe Premiere Pro [SOLUTION]
How to turn on Source Patching in Premiere Pro
To turn on Source Patching in Premiere Pro is relatively simple. First of all, make sure you have the clip you are looking to edit dragged into your Project Panel or Source Monitor.
One this is in the Source Monitor, simply go to the left of Premiere Pro’s Timeline, and click the two buttons on, see below:

Ensure “V1” and “A1” are highlighted; Source Patching is now enabled. This will allow you to drag and drop both the video and audio tracks onto your timeline easily.
Here are a couple of tips to remember when using Source Patching in Premiere Pro:
- The Source Patchers have three different modes: On, Off and Silent Mode.
- On: Source clips will now be sent here.
- Off: Edits will now be ignored.
- Silent: Gaps are placed within your Timeline.
- Works on both the video and audio tracks.
- It also controls the track location of Insert and Overwrite edits within the Timeline in Premiere Pro.
You may also be interested in: How to convert an MKV file to an MP4 File
Why is source patching not working in Premiere Pro?
“I can’t turn on Source Patching in Premiere Pro?” – This is a question we’re asked regularly. There are a couple of reasons that Source Patching isn’t working in Premiere Pro. Here are a couple of the reasons why this may not be working and how to solve them.
Updates – Make sure to update Premiere Pro
Annoyingly, it can be as simple as that. Sometimes standard functionality can fail in Adobe Premiere Pro if you haven’t updated the program or your computer. Always keep the version updated where possible.
This should be the first port of call, then restart Premiere Pro, and it should then be selectable.
Open up a clip in the Source Monitor.
Sometimes you won’t be able to select the Source Patchers in Premiere Pro, which is due to the clip being unavailable in the Source Monitor.
To solve this issue, simply grab the clip you are looking to edit in the Timeline and add it to the Source Monitor. Once you’ve added it to the Source Monitor, you can then use the Source Patching. Allowing you to switch it on and off as you please!
Source Patching is Off.
Sometimes it’s just switched off, see below:

Your Source Patching toggles need to be switched on. Simply head to the left of the Timeline and switch both columns on; this will enable your Source Patching and allow you to drag your clip onto the Timeline.
Thank you for reading our article on “Source patching in Premiere Pro – Everything you NEED to know”. We hope it was of use to you – scroll below to view our latest Premiere Pro articles and resources. Happy filmmaking!
Subscribe to our Exclusive Newsletter and Become a Part of our Passionate Filmmaking Family
- Insider secrets from industry professionals
- Exclusive interviews with filmmakers and creators
- Updates on film festivals, contests, and events
- Free VIP Access to our Filmmakers resource library
Jay Neill
Jay Neill is the founder, owner, and managing editor of iFilmThings and believes everyone should have access to the film resources they need to plan their filmmaking project, which is why he’s dedicated iFilmThings to helping all filmmakers.
Take your video editing skills to the next level by working with source patching in the timeline panel in Adobe Premiere Pro.
Whether you’re new to Premiere Pro or simply switching over from another NLE, the timeline panel can be a bit intimidating. One of the first things you’ll want to learn is source patching. While you can easily get by without knowing how to patch a source, figuring out how to use this feature will streamline your workflow and help cut through the confusion.
Let’s have a closer look at how it works.
The Journey of a Premiere Pro Clip
First, let’s talk about how a file makes its way around Adobe Premiere Pro.
When editing video, I’m essentially taking my source material from the project panel and moving it into the timeline where I’ll craft my edit. Now, there are a number of different ways to do this.
One method is to simply drag assets from the project panel and drop them straight into the timeline. With this method, I can place the assets wherever I want. I can use keyboard shortcuts to specify if I want to perform an insert, overwrite, overlay, or replace edit. This particular method is good if I’m in a hurry and want to quickly slam a cut together, but it lacks a lot of options.

For more versatility, I’ll use the source monitor. To open up assets in the source monitor, I’ll simply double-click. As with the project panel, I can drag clips directly from the source monitor to the timeline. This panel allows me to view my clips, add in and out points, view the audio waveform, place markers, and separate the audio from the video.

If you’re a beginner, you can always drag content directly over the program monitor, which will give you a quick preview of various edits you can perform.

Patching a Source
While I can use the source monitor to specify how I want to send the file to the timeline, I can also customize how I want the timeline to receive the file via source patching. With source patching, I specify which tracks on the timeline will receive the assets, whether they are video, audio, or both.

Source patching won’t even be available unless you have a source selected. Once again, you can select sources in either the project panel or the source monitor. With an audio clip selected, you’ll only have patching available for audio tracks. The same goes for video clips without audio.
To activate a track, I’ll toggle the button just to the left of the lock symbol. This is located in the track header of the timeline. The buttons are labeled V1 and V2, respectively. Don’t mix them up with the track targeting buttons, which are an entirely different animal.

There are three different modes for a source patch:
- On — Source clips will be sent here.
- Off — Edits are ignored.
- Black/Silent — Gaps are placed in the timeline.
If I’m juggling a number of complex projects, I can create source patch presets. For this, I’ll simply right-click over the source patch buttons.
And voilá! With my sources patched, I’m ready to cut effectively and efficiently.
Interested in the track we used to make this video?
- “Lifelike” by Magnetize Music
Want more tips on editing with Premiere Pro? Check these out.
- Quick and Easy Compositing Tips for Adobe Premiere Pro
- Pro Tip: Exporting a Finished Video from Premiere Pro
- 15 FREE Camera Shake Presets for After Effects and Premiere Pro
- NLE Showdown: DaVinci Resolve vs. Adobe Premiere Pro — Text Effects
- NLE Showdown: DaVinci Resolve vs. Adobe Premiere Pro — The Cost
Source patching and track targeting
Keywords: Video patching, track targeting, targeting tracks, video editing, source patching, source sequences
Twitter™ and Facebook posts are not covered under the terms of Creative Commons.
Legal Notices
|
Online Privacy Policy
To the top
New in Premiere Pro CC
Adobe® Premiere® Pro lets you use source patcher presets to control insert and overwrite operations on your clips. This feature simplifies the edit
workflow, without taking away your ability to overwrite an empty gap.
Premiere Pro decouples source indicators from target tracks. Premiere Pro uses Source track indicators for the Insert and Overwrite operations. It
uses track targets for Paste, Match Frame, Go To Next/Previous Edit, and other edit operations.
Using source patchers and source track indicators
Source patchers have three states: On, Off, Black/Silent. One patch is displayed for each video and audio track for the item in the Source monitor.
When an item is in the On state, the corresponding track is included in an edit operation.
When the track is in the Off state, edit changes are not reflected in the track.
When the track is in the Black/Silent state, a gap appears on the track instead of placing the source material.
Single-click a source indicator to toggle between the On and Off states. Press the Alt key to toggle to the Black/Silent state. Press Alt + Shift to
apply the operation to all source indicators of the same media type.
You can drag an assigned source track indicator and assign it to another track:
If the source track indicator is disabled, dragging it enables the indicator.
If the source track indicator is enabled already, dragging the indicator doesn’t change its state.
If the destination track has another source track indicator, the two indicators swap tracks.
You can drag source indicators of the same type (audio or video) simultaneously while maintaining the relative vertical spacing between the two.
Press Shift while you click and then drag an assigned source track indicator.
If you click an empty source track indicator, the closest indicator above moves down to the track. If there is no indicator above, the closest
indicator below moves up to the track.
If you press Alt/Opt while clicking an empty source track indicator, the closest indicator below moves up to the track. If there is no indicator
below, the closest indicator above moves down to the track.
When there aren’t enough tracks to display the source tracks, the last clip track contains a + icon in the source indicator column. If you click the
icon, new tracks are added to match the source.
267
When editing video in Premiere Pro, many people confuse Source Patching with Track Targeting. While both are located in the same location of the Timeline and look very similar, the two are, in fact, quite different. Each performs its own distinct function, and trying to understand what exactly that is can prove to be daunting for new users of Premiere. Even after playing around with the program for several years, I still didn’t fully understand the ins and out of these two important features of the Timeline panel. Let’s have a closer look and learn the specific differences between Source Patching and Track Targeting.
As the name implies, Source Patching instructs Premiere where to «patch» your source. They control the track location of Insert and Overwrite edits on the Timeline. There is one Source Patch button for the video track and one for the audio track. The buttons become active only when you have a source selected. This can be a clip selected in the project panel or a clip loaded in the Source Monitor. Source buttons are located just to the left of the Track Targeting buttons in the Timeline panel. This is most likely where all of the confusion ensues, since both buttons look very similar, with the ability to turn on and off with a click. However, the Source Patch indicators have three different modes; on, off, and silent.
Track Targeting
Track Targeting controls several things, including Copy/Paste, Match Frame, and Navigation commands. When you copy an asset on the Timeline and then decide to paste, your content will paste on the lowest track targeted based on layer order. For example, if you have video tracks two and four targeted, your content will paste to track two. For the Match Frame command (keyboard shortcut F), Premiere will match the frame of the clip on the highest track targeted. Again, this is based on layer order. So if you have clips on video tracks one, two, and four, and only track two is targeted, Premiere will Match Frame the clip on track two. Last but not least, you can use navigation shortcut keys with targeted tracks. The Up and Down arrow keys will quickly jump your playhead to head and tail edits of clips in targeted tracks.
Check out the tutorial for more details.

Boone’s short-form documentary work has been featured on National Geographic, Yahoo!, Bing, Fuel, and Current TV. While he’s not busy creating tutorials on Adobe Premiere Pro and After Effects, he vlogs about living as an American expat in Paris.
Source patching and track targeting
Keywords: Video patching, track targeting, targeting tracks, video editing, source patching, source sequences
Twitter™ and Facebook posts are not covered under the terms of Creative Commons.
Legal Notices
|
Online Privacy Policy
To the top
New in Premiere Pro CC
Adobe® Premiere® Pro lets you use source patcher presets to control insert and overwrite operations on your clips. This feature simplifies the edit
workflow, without taking away your ability to overwrite an empty gap.
Premiere Pro decouples source indicators from target tracks. Premiere Pro uses Source track indicators for the Insert and Overwrite operations. It
uses track targets for Paste, Match Frame, Go To Next/Previous Edit, and other edit operations.
Using source patchers and source track indicators
Source patchers have three states: On, Off, Black/Silent. One patch is displayed for each video and audio track for the item in the Source monitor.
When an item is in the On state, the corresponding track is included in an edit operation.
When the track is in the Off state, edit changes are not reflected in the track.
When the track is in the Black/Silent state, a gap appears on the track instead of placing the source material.
Single-click a source indicator to toggle between the On and Off states. Press the Alt key to toggle to the Black/Silent state. Press Alt + Shift to
apply the operation to all source indicators of the same media type.
You can drag an assigned source track indicator and assign it to another track:
If the source track indicator is disabled, dragging it enables the indicator.
If the source track indicator is enabled already, dragging the indicator doesn’t change its state.
If the destination track has another source track indicator, the two indicators swap tracks.
You can drag source indicators of the same type (audio or video) simultaneously while maintaining the relative vertical spacing between the two.
Press Shift while you click and then drag an assigned source track indicator.
If you click an empty source track indicator, the closest indicator above moves down to the track. If there is no indicator above, the closest
indicator below moves up to the track.
If you press Alt/Opt while clicking an empty source track indicator, the closest indicator below moves up to the track. If there is no indicator
below, the closest indicator above moves down to the track.
When there aren’t enough tracks to display the source tracks, the last clip track contains a + icon in the source indicator column. If you click the
icon, new tracks are added to match the source.
267
Take your video editing skills to the next level by working with source patching in the timeline panel in Adobe Premiere Pro.
Whether you’re new to Premiere Pro or simply switching over from another NLE, the timeline panel can be a bit intimidating. One of the first things you’ll want to learn is source patching. While you can easily get by without knowing how to patch a source, figuring out how to use this feature will streamline your workflow and help cut through the confusion.
Let’s have a closer look at how it works.
The Journey of a Premiere Pro Clip
First, let’s talk about how a file makes its way around Adobe Premiere Pro.
When editing video, I’m essentially taking my source material from the project panel and moving it into the timeline where I’ll craft my edit. Now, there are a number of different ways to do this.
One method is to simply drag assets from the project panel and drop them straight into the timeline. With this method, I can place the assets wherever I want. I can use keyboard shortcuts to specify if I want to perform an insert, overwrite, overlay, or replace edit. This particular method is good if I’m in a hurry and want to quickly slam a cut together, but it lacks a lot of options.
For more versatility, I’ll use the source monitor. To open up assets in the source monitor, I’ll simply double-click. As with the project panel, I can drag clips directly from the source monitor to the timeline. This panel allows me to view my clips, add in and out points, view the audio waveform, place markers, and separate the audio from the video.
If you’re a beginner, you can always drag content directly over the program monitor, which will give you a quick preview of various edits you can perform.
Patching a Source
While I can use the source monitor to specify how I want to send the file to the timeline, I can also customize how I want the timeline to receive the file via source patching. With source patching, I specify which tracks on the timeline will receive the assets, whether they are video, audio, or both.
Source patching won’t even be available unless you have a source selected. Once again, you can select sources in either the project panel or the source monitor. With an audio clip selected, you’ll only have patching available for audio tracks. The same goes for video clips without audio.
To activate a track, I’ll toggle the button just to the left of the lock symbol. This is located in the track header of the timeline. The buttons are labeled V1 and V2, respectively. Don’t mix them up with the track targeting buttons, which are an entirely different animal.
There are three different modes for a source patch:
- On — Source clips will be sent here.
- Off — Edits are ignored.
- Black/Silent — Gaps are placed in the timeline.
If I’m juggling a number of complex projects, I can create source patch presets. For this, I’ll simply right-click over the source patch buttons.
And voilá! With my sources patched, I’m ready to cut effectively and efficiently.
Interested in the track we used to make this video?
- “Lifelike” by Magnetize Music
Want more tips on editing with Premiere Pro? Check these out.
- Quick and Easy Compositing Tips for Adobe Premiere Pro
- Pro Tip: Exporting a Finished Video from Premiere Pro
- 15 FREE Camera Shake Presets for After Effects and Premiere Pro
- NLE Showdown: DaVinci Resolve vs. Adobe Premiere Pro — Text Effects
- NLE Showdown: DaVinci Resolve vs. Adobe Premiere Pro — The Cost
Source patching is one common way of working in Premiere Pro. Instead of messing around with dragging and dropping clips manually, you’re able to show the program exactly where you want each piece of footage to go.
But how do you do this? This is one question that plagues beginners everywhere. We need some way of communicating what we want Premiere to do on the fly. Source patching, and, by extension, track targeting, are our ways of doing that.
What Is Source Patching?
When most of us first start using Premiere Pro, our approach tends to be a bit primitive. We see it, we want it, we grab it, and dump it right in with the rest. When editing projects for fun, or working on something small, most competent editors will be able to get the job done in this way, with no problem at all.
When orchestrating something more complicated, though, the ability to work quickly and neatly is indispensable. In a nutshell, source patching is your way of telling Premiere which tracks should be populated when you use any of the transitive controls associated with the Source Monitor, such as when overwriting or inserting.
Without this system in place, we would have no way of specifying what goes where when using these tools. They allow us to work in layers, which can be useful if your project will be built from the bottom up.
Documentary work is one good example of why this is useful; you lay the foundation of the sound bed and then add B-Roll on top, each category of material confined to one or several dedicated tracks.
The anatomy of video projects will vary, but the logic of source patching can be applied to pretty much anything that you need to build as an editor. This includes projects that feature many composited elements, as well as pieces that are set to music and have no other soundtrack at all.
How Does Source Patching Work?
You may have noticed that you have the ability to enable or disable tracks as you work. By doing so selectively, you signify your desired destination for every clip that you choose to incorporate into the sequence when you use an Insert or Overwrite, or when you copy and paste something.
In the below screenshot, however, you’ll notice that there are actually two columns of highlighted track selections in blue.
The second column includes the names of each track, V1, V2, V3, A1, A2, and A3. The first, however, only includes two: V1 and A1.
You can see, however, that when we select V2 and A2 in the first column, the label does not change. They are still denoted as V1 and A1, despite the fact that the tracks that these monikers actually apply to are still below and above, respectively.
What’s the Difference?
This first column will be your go-to for hard source patching, which will apply while working hands-free as you insert and overwrite from the Source Monitor. You can choose only one audio and one video track at a time, and you may also choose to disable one or both entirely.
The second column simply toggles tracks on and off. These toggles are used to target tracks, covering any type of automated media movement that does not involve the Source Monitor at all. Anything that you have copied to your clipboard, for example, will be sent to the tracks that you have selected here.
When dragging and dropping, it doesn’t really matter which tracks you have selected in the source patching column—all that matters is that you have both your audio and video source patch enabled if you would like both audio and video to be included.
Track targeting will be even more irrelevant if you’re one to hunt and peck manually; if you literally do nothing but drag and drop, with no copying or pasting at all, they may as well not even be there.
For the sake of the future of your career (and your sanity), we definitely recommend taking some time to at least internalize how both of these tools work.
How to Use Source Patching in Premiere Pro
Source patching is likely something that you already do. Any time you have Ins and Outs in both your Source Monitor and your timeline, source patching will be what bridges the gap between both sides.
We’ve got an In and an Out in the Source Monitor, and an In point in the timeline. Our source patching indicates that we would like our footage to end up in tracks V1 and A1. V3, however, is the only track that is targeted.
To insert your selection from the Source Monitor, press the on-screen button or hit the comma (,) key.
As you can see, the fact that we only had V3 selected has not influenced our net result in any way. When source patching, only the first column of toggles matters. In fact, when source patching exclusively, you don’t even need to have any tracks targeted at all.
If we were to do the same thing with V1 disabled in our source patching, however, only the portion of audio selected in the Source Monitor would be brought into the timeline. The video portion would be left behind.
The same goes for the opposite. If you’re editing dialogue only or building a visual montage, this is one efficient way of only grabbing what you need.
How to Target Tracks in Premiere Pro
In this example, we have three clips stacked on top of one another, already in the timeline. We’ve got an In and an Out in place and tracks V1, V2, and V3 targeted. Hit the Lift button, or use the default shortcut, the semi-colon key (;), to continue.
That section will vanish without a trace, along with both our In and Out points.
Drop a new In or Out elsewhere. We’re going to perform an approximation of a traditional three-point edit, sending this wedge of media to tracks V3, V4, and V5, instead of the three tracks that we found it in originally. Toggle tracks V1 and V2 off, and enable V4 and V5.
Pressing Ctrl + V will paste exactly what we just Lifted behind or in front of our new In or Out points on the tracks that we have targeted.
If we walk back a couple of steps and instead target only V3, Premiere will use this single targeted track as the base level track that the whole stack will be re-added to.
Now, let’s try targeting only the top track and the bottom track included in our selected stack.
Despite the fact that the track in between has not been enabled, the entire wedge has been copied over regardless.
This illustrates one important thing to remember about track targeting: you really cannot modify the chunks of material that you Lift, Extract, or copy. Track targeting is used to move things around without changing what was picked up initially.
If you wanted to, for instance, Lift the pieces of footage on tracks V1 and V3 only, you should first disable track V2 before Lifting at all.
This way, no matter what you have targeted as your destination, only what you need has been Lifted. Therefore, only what you need will be carried through.
Again, Premiere does not require you to select only the two tracks that these two clips occupy together, accounting for the gap track in between. You only need to select the bottom-most track; the Lifted or Extracted section will be copied over in all of its original glory, as long as there are enough tracks above the one that you selected to accommodate all of them.
Level Up Your Premiere Pro Workflow
Before you know what you’re getting into, track targeting and source patching can be a frustrating game to play. If you’ve ever spent the afternoon unable to get your footage to cooperate, just know that a viable solution is never far out of reach.