инструкцияSony XR-CA440X

GB
RU
Operating Instructions
Инструкция по эксплуатации
XR-CA440X
For installation and connections, see the supplied installation/connections manual.
Перед установкой и подсоединениями прочитайте прилагаемую инструкцию по
установке и подсоединению.
3-238-898-11 (2)
© 2002 Sony Corporation
FM/AM
Cassette Car Stereo
Посмотреть инструкция для Sony XR-CA440X бесплатно. Руководство относится к категории автомагнитолы, 1 человек(а) дали ему среднюю оценку 6.7. Руководство доступно на следующих языках: русский, английский. У вас есть вопрос о Sony XR-CA440X или вам нужна помощь? Задайте свой вопрос здесь
- GB
- RU
Главная
| Sony | |
| XR-CA440X | |
| автомагнитола | |
| русский, английский | |
| Руководство пользователя (PDF), Инструкция по установке (PDF) |
Не можете найти ответ на свой вопрос в руководстве? Вы можете найти ответ на свой вопрос ниже, в разделе часто задаваемых вопросов о Sony XR-CA440X.
В чем разница между FM и AM?
FM означает «частотная модуляция», AM — «амплитудная модуляция». Основная разница между FM- и AM-радиостанциями состоит в качестве звука.
Когда звук считается слишком громким?
Уровень звука выше 80 децибел может нанести вред слуху. Уровень звука выше 120 децибел может нанести прямое повреждение слуху. Вероятность повреждения слуха зависит от частоты и продолжительности прослушивания.
Автомобильный радиоприемник не включается, что делать?
Если автомобильный радиоприемник не включен, на него не будет подаваться питание. Убедитесь, что красный провод подключен к контактному источнику питания, а желтый провод — к источнику питания постоянной мощности.
Как лучше всего выполнять чистку автомагнитола?
Для удаления отпечатков пальцев лучше всего использовать слегка влажную салфетку для уборки или мягкую чистую ткань. Пыль в труднодоступных местах лучше всего удаляется потоком сжатого воздуха.
Что такое Bluetooth?
Bluetooth — это способ обмена данными по беспроводной сети между электронными устройствами с помощью радиоволн. Расстояние между двумя устройствами обменивающимися данными в большинстве случаев составляет не более десяти метров.
Инструкция Sony XR-CA440X доступно в русский?
Да, руководствоSony XR-CA440X доступно врусский .
Не нашли свой вопрос? Задайте свой вопрос здесь

GB
RU
Operating Instructions
Инструкция по эксплуатации
XR-CA440X
For installation and connections, see the supplied installation/connections manual.
Перед установкой и подсоединениями прочитайте прилагаемую инструкцию по
установке и подсоединению.
3-238-898-11 (2)
© 2002 Sony Corporation
FM/AM
Cassette Car Stereo
FM/MW/SW
Cassette
Car Stereo
Installation/Connections
Instalación/ Conexiones
安裝 線路連接
XR-CA440X
XR-CA440
Sony Corporation © 2002
1
1
4
5
× 4
× 2
Equipment used in illustrations (not supplied)
Equipo utilizado en las ilustraciones (no suministrado)
插圖中的裝置(非附送)
Front speaker
Altavoces delanteros
前揚聲器
Rear speaker
Altavoces traseros
後揚聲器
3-238-178-21 (2)
Printed in Thailand
2
3
6
7
Power amplifier
Amplificador de potencia
功率放大器
CD/MD changer
Cambiador de CD/MD
CD/MD換碟機
2
A
AUDIO OUT REAR
B
BUS AUDIO IN
BUS CONTROL IN
*
Source selector
Selector de fuente
音源選擇器
BUS CONTROL IN
Parts Iist (1)
The numbers in the list are keyed to those in the
instructions.
Caution
Handle the bracket 1 carefully to avoid injuring
your fingers.
1
Cautions
• This unit is designed for negative earth 12 V
DC operation only.
• Do not get the wires under a screw, or caught
in moving parts (e.g. seat railing).
• Before making connections, turn the car
ignition off to avoid short circuits.
• Connect the yellow and red power input leads
only after all other leads have been connected.
• Run all earth wires to a common earth
point.
• Be sure to insulate any loose unconnected
wires with electrical tape for safety.
Notes on the power supply cord (yellow)
• When connecting this unit in combination with
other stereo components, the connected car
circuit’s rating must be higher than the sum of
each component’s fuse.
• When no car circuits are rated high enough,
connect the unit directly to the battery.
Connection example (2)
Notes (2-A)
• Be sure to connect the earth cord before
connecting the amplifier.
• If you connect an optional power amplifier and do
not use the built-in amplifier, the beep sound will
be deactivated.
Tip (2-B-
)
For connecting two or more CD/MD changers, the
source selector XA-C30 (optional) is necessary.
BUS AUDIO IN
* not supplied
no suministrado
非附送
Connection diagram (3)
1
To a metal surface of the car
First connect the black earth lead, then connect
the yellow and red power input leads.
2
To the power aerial control lead or power
supply lead of aerial booster amplifier
Notes
• It is not necessary to connect this lead if there
is no power aerial or aerial booster, or with a
manually-operated telescopic aerial.
• When your car has a built-in FM/MW/SW aerial
in the rear/side glass, see «Notes on the control
and power supply leads.»
3
To AMP REMOTE IN of an optional power
amplifier
This connection is only for amplifiers. Connecting
any other system may damage the unit.
4
To the +12 V power terminal which is energised
in the accessory position of the ignition key
switch
Notes
• If there is no accessory position, connect to the
+12 V power (battery) terminal which is
energised at all times.
Be sure to connect the black earth lead to it
first.
• When your car has a built-in FM/MW/SW aerial
in the rear/side glass, see «Notes on the control
and power supply leads.»
5
To the +12 V power terminal which is energised
at all times
Be sure to connect the black earth lead to it first.
Notes on the control and power supply leads
• The power aerial control lead (blue) supplies +12 V
DC when you turn on the tuner.
• When your car has built-in FM/MW/SW aerial in
the rear/side glass, connect the power aerial
control lead (blue) or the accessory power input
lead (red) to the power terminal of the existing
aerial booster. For details, consult your dealer.
• A power aerial without relay box cannot be used
with this unit.
Memory hold connection
When the yellow power input lead is connected,
power will always be supplied to the memory circuit
even when the ignition key is turned off.
Notes on speaker connection
• Before connecting the speakers, turn the unit off.
• Use speakers with an impedance of 4 to 8 ohms, and
with adequate power handling capacities to avoid its
damage.
• Do not connect the speaker terminals to the car
chassis, or connect the terminals of the right speakers
with those of the left speaker.
• Do not connect the earth lead of this unit to the
negative (–) terminal of the speaker.
• Do not attempt to connect the speakers in parallel.
• Connect only passive speakers. Connecting active
speakers (with built-in amplifiers) to the speaker
terminals may damage the unit.
• To avoid a malfunction, do not use the built-in speaker
wires installed in your car if the unit shares a common
negative (–) lead for the right and left speakers.
• Do not connect the unit’s speaker cords to each other.
Инструкция к Автомагнитоле Sony XR-CA440X
3-238-898-11 (2)
FM/AM
Cassette Car Stereo
GB
Operating Instructions
RU
Инструкция по эксплуатации
For installation and connections, see the supplied installation/connections manual.
Перед установкой и подсоединениями прочитайте прилагаемую инструкцию по
установке и подсоединению.
XR-CA440X
© 2002 Sony Corporation

Welcome !
Thank you for purchasing this Sony Cassette
Player. You can enjoy its various features even
more with:
• Optional CD/MD units (both changers and
1
players)*
.
• CD TEXT information (displayed when a CD
2
TEXT disc*
is played on a connected optional
CD unit with the CD TEXT function).
*1 This unit works with Sony products only.
*2 A CD TEXT disc is an audio CD that includes
information such as the disc name, artist name,
and track names. This information is recorded on
the disc.
2

Table of Contents
Location of controls . . . . . . . . . . . . . . . . . . . 4
CD/MD Unit (optional)
Precautions . . . . . . . . . . . . . . . . . . . . . . . . . . 5
Playing a CD or MD. . . . . . . . . . . . . . . . . . 13
Notes on Cassettes. . . . . . . . . . . . . . . . . . . . . 5
Display items . . . . . . . . . . . . . . . . . . . . . . . 13
Playing tracks repeatedly
Getting Started
— Repeat Play . . . . . . . . . . . . . . . . . . . . 14
Resetting the unit. . . . . . . . . . . . . . . . . . . . . . 6
Playing tracks in random order
Detaching the front panel . . . . . . . . . . . . . . . 6
— Shuffle Play. . . . . . . . . . . . . . . . . . . . 14
Setting the clock . . . . . . . . . . . . . . . . . . . . . . 7
MP3 playable CD Unit (optional)
Cassette Player
Listening to an MP3 file . . . . . . . . . . . . . . . 15
Listening to a tape . . . . . . . . . . . . . . . . . . . . . 8
Display items . . . . . . . . . . . . . . . . . . . . . . . 15
Playing a tape in various functions . . . . . . . . 9
Playing tracks repeatedly
— Repeat Play . . . . . . . . . . . . . . . . . . . . 16
Radio
Playing tracks in random order
Storing stations automatically
— Shuffle Play. . . . . . . . . . . . . . . . . . . . 16
— Best Tuning Memory (BTM). . . . . . . . 9
Storing only the desired stations . . . . . . . . . 10
Additional Information
Receiving the stored stations. . . . . . . . . . . . 10
Maintenance . . . . . . . . . . . . . . . . . . . . . . . . 17
Removing the unit. . . . . . . . . . . . . . . . . . . . 17
Other Functions
Specifications . . . . . . . . . . . . . . . . . . . . . . . 18
Adjusting the sound characteristics. . . . . . . 11
Troubleshooting . . . . . . . . . . . . . . . . . . . . . 19
Quickly attenuating the sound. . . . . . . . . . . 11
Error displays . . . . . . . . . . . . . . . . . . . . . . . 20
Changing the sound and display settings
— Menu . . . . . . . . . . . . . . . . . . . . . . . . . 11
Selecting the sound position
— My Best sound Position (MBP). . . . . 12
Boosting the bass sound
— D-bass . . . . . . . . . . . . . . . . . . . . . . . . 12
3

Location of controls
Refer to the pages listed for details.
ATT
SEEK
SOURCE
VOL
D-BASS
AMS
MODE
MBP
RELEASE
DISC
REP
SHUF BL
SKIP/ ALBM
—
+
/ATA
MTL
SEL
SENS
123456
BTM
OFFDSPL
XR-CA440X
a SOURCE (Power on/Tape/Radio/CD/
n Number buttons
MD) select button
Tape:
b MODE (o) button
(3): REP (Repeat)
Selecting the source.
(5): BL SKIP (Blank Skip)
c VOL +/– button
(6): ATA (Automatic Tuner Activation)
d ATT (attenuate) button
Radio:
e Display window
Storing the desired station on each number
f Z (eject) button 8
button.
g SEEK/AMS button
CD (MP3 files)/MD:
Tape:
(1): DISC –
Fast-forwarding, reversing a tape.
(2): DISC +
Radio:
(3): REP (Repeat)
Tuning in stations automatically.
(4): SHUF (Shuffle)
Finding a station manually.
MP3 files:
CD (MP3 files)/MD:
(5): ALBM –
Skipping tracks.
(6): ALBM +
h MBP (My Best sound Position) button
o BTM/MTL (Best Tuning Memory/Metal)
12
button 9
i D-BASS button 12
p DSPL (display mode change) button
j RELEASE (front panel release) button
q OFF (Stop/Power off) button*
k SEL (select) button
Selecting items.
* Warning when installing in a car without
an ACC (accessory) position on the
l RESET button (located on the front side of
ignition switch
the unit, behind the front panel) 6
After turning off the ignition, be sure to press
m SENS button
(OFF) on the unit for 2 seconds to turn off
Storing the stations with the strongest
the clock display.
signals.
Otherwise, the clock display does not turn off
and this causes battery drain.
4
Precautions
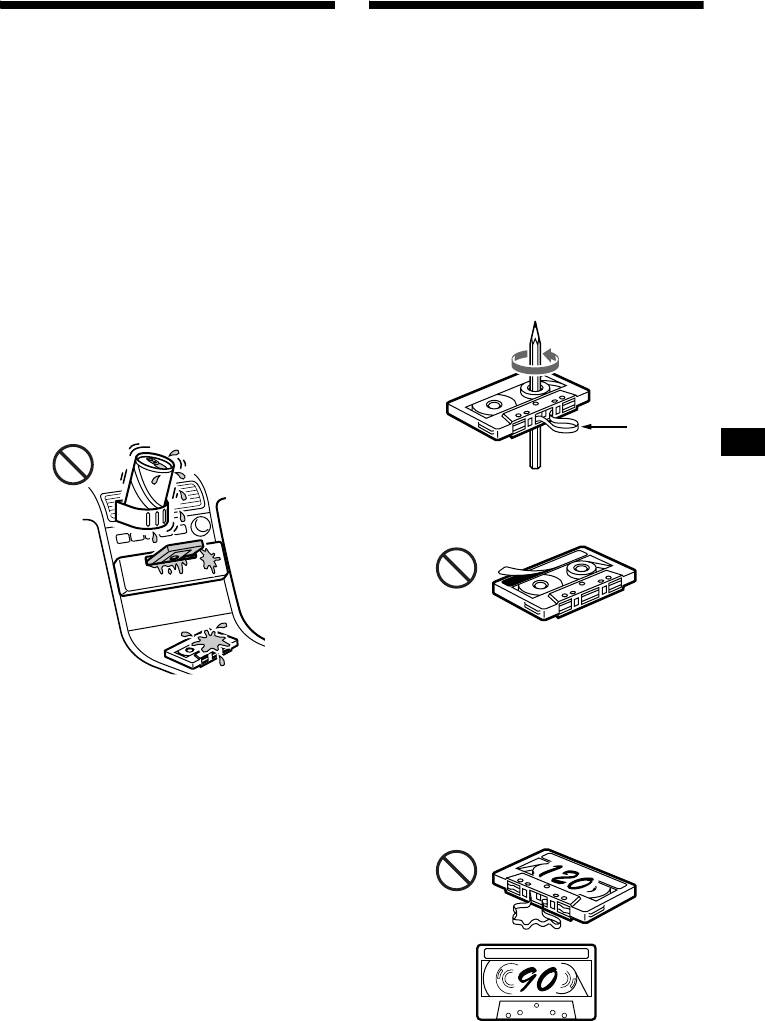
Notes on Cassettes
• If your car was parked in direct sunlight, allow
Cassette care
the unit to cool off before operating it.
• Do not touch the tape surface of a cassette, as
• If no power is being supplied to the unit, check
any dirt or dust will contaminate the heads.
the connections first. If everything is in order,
• Keep cassettes away from equipment with
check the fuse.
built-in magnets such as speakers and
• If no sound comes from the speakers of a two—
amplifiers, as erasure or distortion on the
speaker system, set the fader control to the
recorded tape could occur.
centre position.
• Do not expose cassettes to direct sunlight,
• When a tape is played back for a long period,
extremely cold temperatures, or moisture.
the cassette may become warm because of the
• Slack in the tape may cause the tape to be
built-in power amplifier. However, this is not a
caught in the machine. Before you insert the
sign of malfunction.
tape, use a pencil or similar object to turn the
reel and take up any slack.
If you have any questions or problems
concerning your unit that are not covered in this
manual, please consult your nearest Sony dealer.
To maintain high quality sound
Be careful not to splash juice or other soft drinks
onto the unit or tapes.
Slack
• Distorted cassettes and loose labels can cause
problems when inserting or ejecting tapes.
Remove or replace loose labels.
• The sound may become distorted while playing
the cassette. The cassette player head should be
cleaned after each 50 hours of use.
The use of cassettes longer than 90 minutes
is not recommended except for long
continuous play
The tape used for these cassettes is very thin and
tends to stretch easily.
Frequent playing and stopping of these tapes
may cause them to become entangled in the
cassette deck mechanism.
5
Detaching the front panel
Getting Started
You can detach the front panel of this unit to
protect the unit from being stolen.
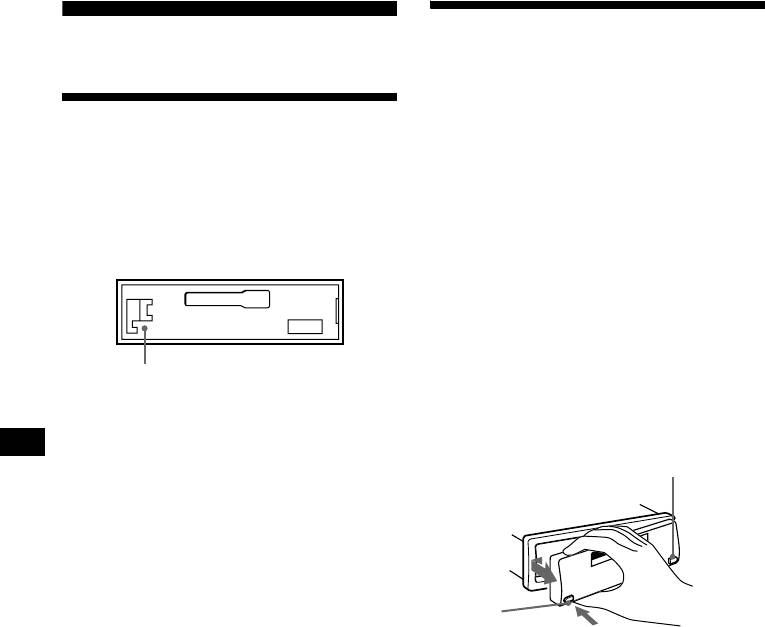
Resetting the unit
Caution alarm
If you turn the ignition switch to the OFF
Before operating the unit for the first time or
position without removing the front panel, the
after replacing the car battery, you must reset the
caution alarm will beep for a few seconds.
unit.
If you connect an optional amplifier and do not
Remove the front panel and press the RESET
use the built-in amplifier, the beep sound will be
button with a pointed object, such as a ballpoint
deactivated.
pen.
1 Press (OFF)*.
Tape playback or radio reception stops (the
key illumination and display remain on).
* If your car has no ACC position on the ignition
switch, be sure to turn the unit off by pressing
(OFF) for 2 seconds to avoid car battery drain.
RESET button
2 Press (RELEASE), then slide the front
Note
panel a little to the left, and pull it off
Pressing the RESET button will erase the clock setting
towards you.
and some stored contents.
(OFF)
(RELEASE)
Notes
• Be sure not to drop the panel when detaching it from
the unit.
• If you detach the panel while the unit is still turned
on, the power will turn off automatically to prevent
the speakers from being damaged.
• When carrying the front panel with you, use the
supplied front panel case.
6
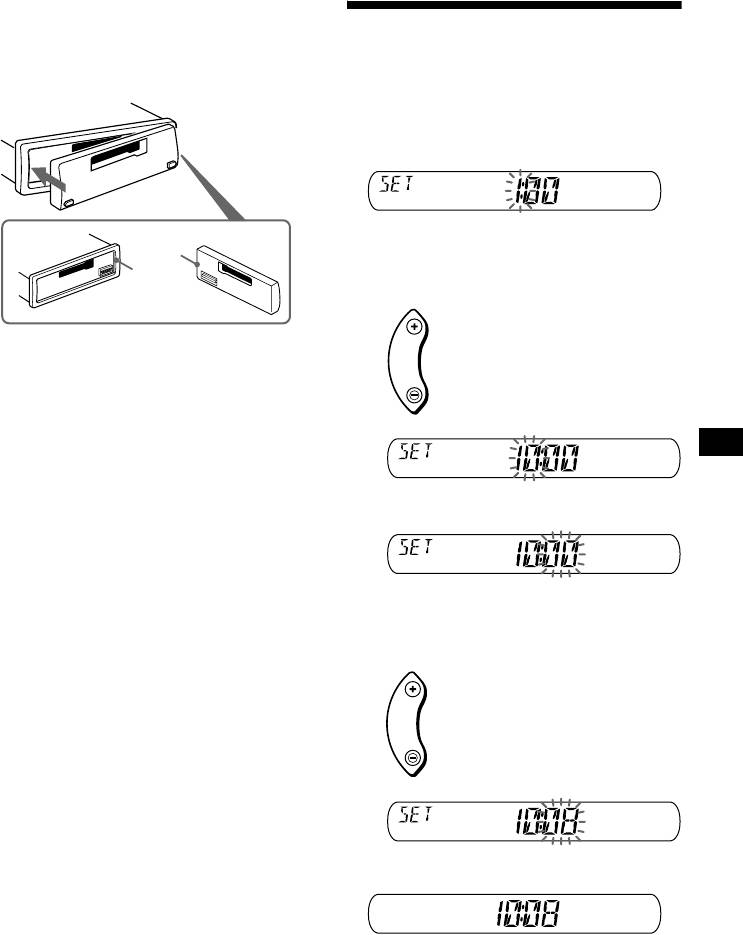
Attaching the front panel
Attach part A of the front panel to part B of the
Setting the clock
unit as illustrated and push the left side into
position until it clicks.
The clock uses a 12-hour digital indication.
Example: To set the clock to 10:08
1 Press (DSPL) for 2 seconds.
The hour indication flashes.
A
1 Press either side of (VOL) to set the
B
hour.
to go forward
VOL
Notes
• Be sure not to attach the front panel upside down.
to go back
• Do not press the front panel too hard against the unit
when attaching it.
• Do not press too hard or put excessive pressure on
the display window of the front panel.
• Do not expose the front panel to direct sunlight or
heat sources such as hot air ducts, and do not leave
it in a humid place. Never leave it on the dashboard
of a car parked in direct sunlight or where there may
2 Press (SEL).
be a considerable rise in temperature.
The minute indication flashes.
3 Press either side of (VOL) to set the
minute.
to go forward
VOL
to go back
2 Press (DSPL).
The clock starts.
After the clock setting is completed, the
display returns to normal play mode.
7
Оглавление
Аннотации для Автомагнитолы Sony XR-CA440X в формате PDF
Топ 10 инструкций
Другие инструкции
Перейти к контенту
Автомагнитолы Sony

- Размер инструкции: 650.23 kB
- Формат файла: pdf
Если вы потеряли инструкцию от автомагнитолы Sony XR-CA440X, можете скачать файл для просмотра на компьютере или печати.
Инструкция для автомагнитолы Sony XR-CA440X на русском языке. В руководстве описаны возможности и полезные функции, а также правила эксплуатации. Перед использованием внимательно ознакомьтесь с инструкцией.
Чтобы не читать всю инструкцию вы можете выполнить поиск по содержимому внутри инструкции и быстро найти необходимую информацию. Рекомендации по использованию помогут увеличить срок службы автомагнитолы Sony XR-CA440X. Если у вас появилась проблема, то найдите раздел с описанием неисправностей и способами их решения. В нем указаны типичные поломки и способы их решения.