- Manuals
- Brands
- Bizerba Manuals
- Kitchen Appliances
- A400
- Operating manual
-
Contents
-
Table of Contents
-
Bookmarks
Quick Links
Slicers A400 / A400FB
Operating Manual
6.054.98.5.10.04
A400FB
A400
Related Manuals for Bizerba A400
Summary of Contents for Bizerba A400
-
Page 1
Slicers A400 / A400FB Operating Manual 6.054.98.5.10.04 A400FB A400… -
Page 2
All rights reserved Tous droits réservés Reservados todos los derechos Tutti i diritti riservati E 12 / 2007 Bizerba GmbH & Co. KG, 72336 Balingen Postfach 10 01 64 72301 Balingen/Germany, Tel. (+49 7433) 12—0, Fax (+49 7433) 12—2696 e—mail: marketing@bizerba.com… -
Page 3: Table Of Contents
Operating Manual A400 / A400FB Contents Contents Page General ……….
-
Page 4
Operating Manual A400 / A400FB Contents Page Cleaning ………. -
Page 5: General
Good accessibility and technical operating aspects must be taken into account. — The initial installation and commissioning as well as instruction in the operation, cleaning, care and maintenance will be carried out by the responsible BIZERBA Customer Service Agent or the BIZERBA specialist adviser.
-
Page 6: Safety Information
— If the mains cable should become damaged, have a new cable fitted immediately by a skilled electrician or by the responsible BIZERBA Customer Service Agent. — Keep the workplace clean and dry so that you have a non—slip area to stand on.
-
Page 7: Overview/Identification Of Components
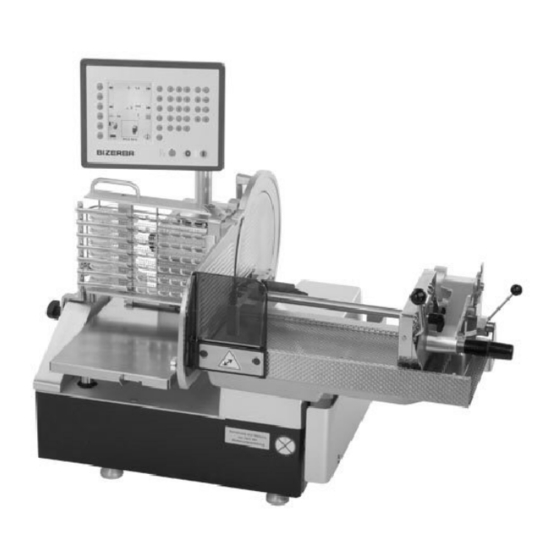
Operating Manual A400 / A400FB General Overview/Identification of components A400 1 Blade guard ring 11 Rating plate 2 Blade 12 Receiving table 3 Blade cover 13 Rear wall 4 Sliced products support 14 Gauge plate 5 Sliced product holder cpl. with…
-
Page 8
Operating Manual A400 / A400FB General A400FB 1 Blade guard ring 11 Bench, mobile 2 Blade 12 Lock on belt support 3 Blade cover 13 Conveyor belt 4 Sliced products support 14 Light barrier 5 Sliced product holder cpl with… -
Page 9: Technical Data
Operating Manual A400 / A400FB General Technical data The most important technical data: A402 A404 A406 Outside measurements = 850 x 800 mm = 1050 x 800 mm = 1255 x 800 mm Work surface = 1010 x 850 mm…
-
Page 10
Operating Manual A400 / A400FB General The most important technical data: A402FB A404FB A406FB Outside measurements = 850 x 1710 mm = 1050 x 1710 mm = 1255 x 1710 mm Height = 1370 mm / 1535 mm Conveyor belt, applicable length… -
Page 11: Device Description, A400/A400Fb Slicer
A406FB = Conveyor belt design with 600 mm carriage All versions are available with a mobile bench. The A400 / A400FB is a slicer that automatically feeds, slices and deposits according to the respective program that is set. This slicer is equipped with a power—driven carriage with automatic sliced product feed and depositing system.
-
Page 12
Operating Manual A400 / A400FB General The following are termed as protective and safety facilities: — — Blade guard ring, fixed, not removable — — Blade cover, fixed, removable — — Gauge plate, to cover stroke — — Rear wall, not removable — — Protective cover for carriage guide, to cover stroke — — Autom. -
Page 13: Sliced Product, Application Area, Ambient Influences
Operating Manual A400 / A400FB General Sliced product, application area, ambient influences The following are approved sliced products that comply with the permissible dimensions: — Sausage of all kinds — Ham/Bacon — Smoked meats with/without rind — Roast meats/Roast beef…
-
Page 14: Device Installation
Follow the instructions on how to unpack 6.054.49.106.00. Assembling the work table Assembly, start—up and instruction is carried out for the first time by the responsible BIZERBA customer services office or the BIZERBA trade consultant. Please take not of operating criteria.
-
Page 15: Electric Connections
Operating Manual A400 / A400FB Device installation Electric connections compare existing mains voltage with the information on the rating plate if this does not correspond, under no circumstances connect the slicer to the socket but inform BIZERBA Customer Service! — The socket must comply with the national country regulations (e.g.
-
Page 16: Shaving Option
Operating Manual A400 / A400FB Device installation Shaving option In order to mount the shaving attachment to the chain frame first of all the depositing arm has to be disassembled. (see p. 5—2) The shaving attachment is secured to the chain frame by means of a triangular screw at the distance indicated in the picture.
-
Page 17: Device And Operating Controls
Operating Manual A400 / A400FB Device and operating controls Device and operating controls Main switch By pressing the green switch on the operating and display panel, the machine is switched The signal lamp lights up, the display is activated, the carriage, receiving table and depositing arm move into their basic setting.
-
Page 18: Keyboard
Operating Manual A400 / A400FB Device and operating controls Keyboard Function <Start/Stop slicing> ON: The machine starts to move, the set program is worked through, the LED is lit. OFF: The machine remains in its basic setting, the set program is interrupted.
-
Page 19
Operating Manual A400 / A400FB Device and operating controls Depositing program <Stack> (PLU1) The sliced product is deposited in a stack. Desk—top machine max. 90 mm, conveyor belt machine max. 60 mm. Depositing program <Shingle> (PLU3) The sliced product is deposited in a shingle. -
Page 20
Operating Manual A400 / A400FB Device and operating controls Program — -Keys <Open>—key Request PLU from memory. The PLU station appears in the display. <Save>—key Save new PLU to memory or overwrite or delete existing PLU. The PLU station appears in the display. -
Page 21: Display Icons
Operating Manual A400 / A400FB Device and operating controls Display icons Slicing thickness Shingling distance lengthwise or crosswise Number of slices Number of carriage strokes Number of portions at depositing station at measuring station/sliced product length Light barrier (only on conveyor belt machine)
-
Page 22
Operating Manual A400 / A400FB Device and operating controls Single stack Double stack Shingle lengthwise Shingle crosswise Shingling lengthwise, several layers (only receiving table machines) Shingling crosswise, several layers (only receiving table machines) Shaving (special attachment required) Equal distribution of sliced product on receiving table… -
Page 23: Displays, Stations
Operating Manual A400 / A400FB Device and operating controls Displays, stations Workstation This display appears after the machine has been switched on indicating the settings that were active before the machine was switched off. All numeric input can be entered via the numeric keyboard and adopted when <Enter> is pressed.
-
Page 24
Operating Manual A400 / A400FB Device and operating controls Depositing station This is where depositing positions are determined on the table or conveyor belt. The selected depositing position appears in the middle of the display: in the example ”Shingling, lengthwise, three—rows”. -
Page 25
Operating Manual A400 / A400FB Device and operating controls Measuring station This is where the dimensions for the sliced product are entered. In addition select one of the predefined values for sliced product length, height, width via the function keys. -
Page 26
Operating Manual A400 / A400FB Device and operating controls Information station The password is activated by entering a three—digit number, and is deactivated by entering the same number again. Display contrast <F1> <F7> Display contrast Set daily counter to zero <F2>… -
Page 27
Operating Manual A400 / A400FB Device and operating controls Open PLU station This display appears after activating the <Open> key. (Example for the receiving table machine, with PLU 1 to PLU 4) By directly selecting a PLU via the function keys or entering the PLU number and <Enter>, the data is transferred to the work station. -
Page 28
Operating Manual A400 / A400FB Device and operating controls Save PLU station This display appears after activating the <Save> key; the password is required when activated. (Example for the receiving table machine, with PLU 5 to PLU Enter new PLU number, confirm with <Enter>, or select existing PLU via function keys;…
 -
Page 29
Operating Manual A400 / A400FB Device and operating controls Sharpening station This display appears after activating the <Sharpening> key. Comment: Exit the sharpening station by pressing the <Cleaning> key. Mount sharpener. <F7>Blade on <F9> Blade off _______________________________________________________________________ CAUTION Open blade! Cut- -injuries Wear cut—resistant gloves. -
Page 30
Operating Manual A400 / A400FB Device and operating controls Cleaning station This display appears after activating the <Cleaning> key. Comment: Do not switch off machine yet. Table, product feed, slicing thickness and depositing arm run in the cleaning setting. Do not tilt out carriage until you hear a clear ”Clack” sound. -
Page 31: Paper Holder
Operating Manual A400 / A400FB Device and operating controls Paper holder The paper holder is used when the sliced product has to be deposited straight on to paper or foil. Inserting several sheets of paper or foil: Press the lever with your thumb to the right against the spring until it clicks into place.
-
Page 32: Device Operation/Slicing
Operating Manual A400 / A400FB Device operating/slicing Device operation/slicing Insert long sliced product The machine is switched on, all functioning parts are in or move into their basic setting. 4.1.1 Carriage 200/400 mm with sliced product holder, feed carriage and clamping facility Hold on to the handle of the sliced product holder.
-
Page 33: Carriage 600 Mm
Operating Manual A400 / A400FB Device operating/slicing 4.1.2 Carriage 600 mm with sliced product holder: Position the sliced product with the left hand against the rear wall of the carriage and press against the holder and downwards towards the hooks.
-
Page 34: Slicing
Operating Manual A400 / A400FB Device operating/slicing Slicing The machine may not be operated without a table or conveyor belt. Select and enter the required functions and delivery programs via the foil keyboard of the operation and display panel. Start the machine drive, press <start/stop slicing>.
-
Page 35: Cleaning
Operating Manual A400 / A400FB Cleaning Cleaning Clean thoroughly: Before putting into operation, according to application and use, several times a day if heavily contaminated, after sharpening and after long down—times. Do not clean the machine with a steam jet or similar device! Cleaning preparation Press the <Cleaning>…
-
Page 36: Cleaning 5
Operating Manual A400 / A400FB Cleaning Remove components as follows: Receiving table (only for receiving table machines) Use both hands on the operator side to lift it up a little and pull towards you. Conveyor belt (only conveyor belt machines) Pull the light barrier upwards out of the holder and hang in to the holder of the machine.
-
Page 37
Operating Manual A400 / A400FB Cleaning Use both hands to hold on to the sides of the center of the conveyor belt and tilt it towards you and then lift it up. Place the belt carefully on to an even surface. -
Page 38
Operating Manual A400 / A400FB Cleaning Chain frame _______________________________________________________________________ CAUTION Risk of injury at chain points! Wear cut—resistant gloves. _______________________________________________________________________ Move the feed roller with the right hand to the left first of all and then hold it. Lift the connected chain frame out of the bearing with the left hand. -
Page 39
Operating Manual A400 / A400FB Cleaning Sliced product holder (200/400 mm carriage) Loosen star grip screw and pull up holder housing. Feed carriage (200/400 mm carriage) Hold on to the handle of the sliced product holder. Loosen lock lever and move upwards until it locks into place. -
Page 40
Operating Manual A400 / A400FB Cleaning Blade cover Place widely—spanned right hand on the cover. Use the left hand to unscrew the attachment bolts on the triangular handle and push out of center by applying pressure to the bolts. Tilt out the cover on to the span of your hand, and remove upwards. -
Page 41
Operating Manual A400 / A400FB Cleaning Cleaning Clean removable and non- -removable parts according to the cleaning plan. _______________________________________________________________________ CAUTION Risk of injury at chain- -, driver- -, and grip hooks! Wear cut—resistant gloves. _______________________________________________________________________ Blade Press a wet disposable cleaning cloth against the blade surface and slowly wipe away from the center. -
Page 44: Preparing The Machine For Operation
Operating Manual A400 / A400FB Cleaning Preparing the machine for operation (attach the parts that have been removed and cleaned) Assembly of the machine takes place in the reverse order in which parts were removed to prepare for cleaning. (See Chapter 5.1) To avoid annoyance and injuries, assembly must be carried out carefully and conscientiously.
-
Page 45
Operating Manual A400 / A400FB Cleaning Carriage Move the carriage and screw tight to the carriage base with the star grip screw. Sliced product holder (600 mm carriage) Insert the holder housing into the channel along the sliced product holder guide and screw tight with the star grip screw. -
Page 46
Operating Manual A400 / A400FB Cleaning Guide cog _______________________________________________________________________ CAUTION Risk of injury at chain points! Wear cut—resistant gloves. _______________________________________________________________________ Insert between the transport chain and screw tight via the handle. By turning the fee roller check that the chains are mounted correctly. -
Page 47
Operating Manual A400 / A400FB Cleaning Depositing arm _______________________________________________________________________ CAUTION Risk of injury at chain points! Wear cut—resistant gloves. _______________________________________________________________________ Push on to the driver shaft and turn until the boss catches the channel. Screw tight with the star grip screw. -
Page 48
Operating Manual A400 / A400FB Cleaning Push the belt as far as it will go towards the connection, if necessary turn the drive shaft until it connects with the connection bolts. Secure the conveyor belt by setting the lock at the belt support. -
Page 49: Sharpening The Knife
Clean before sharpening with a brush and cleaning agent. In the event that the grinding bead has been worn down from use, the stones have to be replaced. Replacement delivery available by the BIZERBA customer services. Do not muddle the stones when replacing them. Preparing the sharpening process Press the <Cleaning>…
-
Page 50: Sharpening 6
Sharpening the knife Operating Manual A400 / A400FB Swing the deflector into a horizontal position (ca. 90_). Switch on machine. Press the <Sharpening> key. The slicing thickness opens up completely and the following picture appears in the display: <F7> Blade on <F9>…
-
Page 51: Sharpening
Sharpening the knife Operating Manual A400 / A400FB Hold on to the device in this position and use the star grip screw to clamp it to the stop plate. Sharpening Start the blade motor with the <F7> key. Set the manual wheel marking to ”1”.
-
Page 52: Remove Sharpening Device
Sharpening the knife Operating Manual A400 / A400FB _______________________________________________________________________ Remove sharpener immediately. _______________________________________________________________________ Remove sharpening device. Loosen the clamp connection via the star grip screw, Move the device upwards and hang it out of the holes Exit the sharpening program Press the <Cleaning>…
-
Page 53
Sharpening the knife Operating Manual A400 / A400FB Blade guard ring Thread a dry disposable cleaning cloth into the front between the blade and the guard ring. Use your hands to turn the blade and the disposable cleaning cloth; while you are doing so, press the cloth lightly against the inside of the guard ring. -
Page 54: Servicing/ Maintenance
Operating Manual A400 / A400FB Servicing/Maintenance Servicing/ Maintenance Resharpen blade if necessary. When necessary, clean or exchange the grinding stones. Caution! Left- -handed thread! _______________________________________________________________________ At an annular gap of > 6mm between the blade and the guard ring, the grinding device no longer has a grinding effect and the blade has to be replaced.
-
Page 55: Special Accessories
Operating Manual A400 / A400FB Servicing/Maintenance Special accessories Order number Bench 60542420000 Cheese blade 60530105300 7 — 2 6.054.98.5.10.04…
-
Page 56: Operating Conditions
Operating Manual A400 / A400FB Operating conditions Operating conditions 10.1 EC Directives/Norms and Recommendations Depending on the country, the machines fulfil the following requirements: machine directive 98/37/EC EMC Directive 89/336/EEC Low Voltage Directive 73/23/EEC Norms: DIN EN 55011, DIN EN 60204—1…
-
Page 57: Air Convection
Operating Manual A400 / A400FB Operating conditions Technical data for the mains power supply Mains connection Single—phase alternating current or three—phase current, see rating plate. Permissible mains voltage tolerance (steady- -state) normal: At 100 to 400 V+6% to —10% of nominal value…
-
Page 58: Annex
Operating Manual A400 / A400FB Annex Annex Set programs Declaration of conformity A400 Declaration of conformity A400FB 6.054.98.5.10.04 9 — 1…
-
Page 59
Operating Manual A400 / A400FB Annex 9 — 2 6.054.98.5.10.04… -
Page 60
Set programs Slicer A400 (Receiving table) Slicer A400FB (Conveyor belt) 6.054.98.5.10.04… -
Page 61
DIN EN 1974 The declaration of type conformity is based on contractual documents (Bizerba order documents). Any modification made to the above device type without the prior permission of Bizerba or by Bizerba staff will render thisdeclaration invalid. Date: 04.07.2006 Manufacturer Signature: ppa. -
Page 62
DIN EN 1974 The declaration of type conformity is based on contractual documents (Bizerba order documents). Any modification made to the above device type without the prior permission of Bizerba or by Bizerba staff will render thisdeclaration invalid. Date: 04.07.2006 Manufacturer Signature: ppa.
 Enter new PLU number, confirm with <Enter>, or select existing PLU via function keys;…
 This manual is also suitable for:
A400fb
Войти или зарегистрироваться
-
Файл недоступен
Получить доступ4 МБ .pdf
![]()
Слайсер Bizerba A 404 FB 2020-07-13
Инструкция
- Обзoр
- Обновления (2)
- История версий
-

Инструкция на русском.
Cepeja нравится это.

Последние обнoвления
- Деталировка 14 июл 2020
- Электрическая схема 14 июл 2020
- Войти через Facebook
- Войти через Twitter
- Войти через Google
- Ваше имя или e-mail:
- У Вас уже есть учётная запись?
-
- Нет, зарегистрироваться сейчас.
- Да, мой пароль:
-
Забыли пароль?
-
Запомнить меня
Поиск
-
- Искать только в заголовках
- Сообщения пользователя:
-
Имена участников (разделяйте запятой).
- Новее чем:
-
-
Искать только в этой категории
- Искать только в описаниях ресурсов
-
Искать только в этой категории
-
Быстрый поиск
- Последние сообщения
Больше…
-
Этот сайт использует файлы cookie. Продолжая пользоваться данным сайтом, Вы соглашаетесь на использование нами Ваших файлов cookie.Accept
Узнать больше.Скрыть объявление
-
Page 1
Slicer A400 / A400FB Instruction manual 6.054.98.5.10.06 en… -
Page 2
All rights reserved Tous droits réservés Reservados todos los derechos Tutti i diritti riservati © 05/2014 Bizerba GmbH & Co. KG, 72336 Balingen P.O. Box 10 01 64 72301 Balingen, Germany Telephone (+49 7433) 12-0, Fax (+49 7433) 12-2696 Email: marketing@bizerba.com… -
Page 3
Chapter index About these instructions About this machine Safety instructions Installation Machine and operating elements Operation Troubleshooting Maintenance Technical data Appendix 6.054.98.5.10.06 en… -
Page 4
6.054.98.5.10.06 en… -
Page 5: Table Of Contents
Machine description ……… . 2 — 2.2.1 Descriptions of components A400 ……2.2.2 Descriptions of components A400FB .
-
Page 6
Contents Instruction manual A400 / A400FB Option A400FB openWorld ……..4 — 4.5.1… -
Page 7
Instruction manual A400 / A400FB Contents Blade sharpening ………. -
Page 8
Contents Instruction manual A400 / A400FB 0 — 4 6.054.98.5.10.06 en… -
Page 9: About These Instructions
The machine may only be operated by trained personnel over the age of 14. This means that the operator has to be familiar with the contents of these operating instructions. Installation, maintenance and repair must be performed by Bizerba authorized specialists only.
-
Page 10: Warnings
About these instructions Instruction manual A400 / A400FB Warnings Warnings are divided into danger levels by the signal word above the warning symbol. Structure of warnings and meaning of signal words are described in these instructions as follows. DANGER Source of danger with high risk of imminent danger to persons!
-
Page 11: About This Machine
This Bizerba slicer is technical work equipment intended for commercial use only. It may only be operated by instructed personnel over the age of 14. The A400 / A400FB is a slicer that automatically feeds, slices and delivers according to the respective program that is set.
-
Page 12: Machine Description
About this machine Instruction manual A400 / A400FB Machine description Type designations or versions A402 = Depositing table version with 200 mm carriage A404 = Depositing table version with 400 mm carriage A406 = Depositing table version with 600 mm carriage…
-
Page 13: Descriptions Of Components A400
The total vibration of the items, which get into contact with hand and arm is below 2.5 m/s and therefore below the required limited value. 2.2.1 Descriptions of components A400 Fig. 1: Descriptions of components A400 The machine is available in different versions. The figure shows an example: Blade guard ring Blade…
-
Page 14
About this machine Instruction manual A400 / A400FB Drive housing Rating plate Depositing table Gauge plate Rear wall Depositing arm Feed roller with cam Chain frame Main switch Operating and display panel on motor tower (optional on drive housing) 2 — 4… -
Page 15: Descriptions Of Components A400Fb
Instruction manual A400 / A400FB About this machine 2.2.2 Descriptions of components A400FB Fig. 2: Descriptions of components A400FB The machine is available in different versions. The figure shows an example: Blade guard ring Blade Blade cover product support Product holder complete with remnant holder…
-
Page 16: Accessories
Feed roller with cam Chain frame Main switch Operating and display panel on motor tower (optional on drive housing) 2.2.3 Accessories Only use the original Bizerba spare parts and accessories in order to ensure safe and trouble-free operations. standard – Instruction manual –…
-
Page 17: Disposal Of The Machine / Environmental Protection
To ensure that the machine is recycled environmentally friendly, return the machine to the manufacturer or the dealer after intended use has expired. Naturally, Bizerba and its dealers will take back free of charge old machines no longer in operation.
-
Page 18
About this machine Instruction manual A400 / A400FB 2 — 8 6.054.98.5.10.06 en… -
Page 19: Safety Instructions
Protective devices may not be removed, modified or bypassed. DANGER Open the electrical installation area! Risk of life from electric current. – The electrical installation area may only be opened by Bizerba Service. – Pull power plug before moving the machine. WARNING Unauthorized persons! Serious injuries to fingers and hands and damage to health.
-
Page 20: Safety Instructions For Transport And Installation
Safety instructions Instruction manual A400 / A400FB Safety instructions for transport and installation CAUTION Carriage might move due to its unladen weight. Risk of hand injuries due to crushing! – Be careful when unpacking. Safety instructions during operation, slicing WARNING Rotating blade! Cut-injuries.
-
Page 21: Protective And Safety Equipment
Check if the machine is complete before it is re-started. – Check if components are positioned correctly and firmly. – Only use original Bizerba spare parts and accessories. Protective and safety equipment – Blade guard ring, stationary, cannot be removed –…
-
Page 22: Plates On Machine
Safety instructions Instruction manual A400 / A400FB Plates on machine Beware of hazardous electric charge Fig. 3: Warning sign: Flash sign Beware of magnetic field Fig. 4: Warning sign: Magnetic field Only use and service after the instruc- tion manual has been read Fig.
-
Page 23: Installation
Installation and assembly Installation, start-up, as well as instructions on how to operate, clean, maintain and service the device are provided for the first time by the relevant Bizerba customer services or the Bizerba trade consultant. Only lift the machine at the lifting straps. The drawing «Packing/unpacking the machine» is included.
-
Page 24: Electrical Connection
Installation Instruction manual A400 / A400FB The installation surface needs to: – provide sufficient space, Dimensions, see chapter 9.1 – be horizontal and flat – be slip-proof and tilt-proof – be stable and rigid, Machine weight, see chapter 9.1 The recommended table height is approx. 800 mm.
-
Page 25: Start-Up
Bizerba machines Start-up Initial start-up as well as instructions on how to operate, clean, maintain and service the machine are initially provided by the responsible Bizerba service department or by a Bizer- ba specialist. 4.3.1 Switching the slicer on Press the green key <I>.
-
Page 26: Option A400Fb Openworld
Installation Instruction manual A400 / A400FB Option A400FB openWorld Option openWorld allows easy connection of A400FB slicers to automatic packaging ma- chines, film or tray dispensers via configurable communication interfaces. You may choose from the following conveyor belts: 2-lane conveyor belt, 2 x 115 mm Fig.
-
Page 27: Installation Of Conveying Belts And Light Sensor
Instruction manual A400 / A400FB Installation Selectable are: – Light sensor – Insertion plate set and remnant holder – External switch off option 4.5.1 Installation of conveying belts and light sensor For a detailed description, please see chapter 8.5 Use both hands to hold the conveyor belt on its sides.
-
Page 28
Installation Instruction manual A400 / A400FB Adjustment of conveyor belt to the packages running in parallel Turn stop latches at side of conveyor belt. A bracing of max. 35 mm with 2-track conveyor belt and 2x 25°mm with 3-track conveyor belt in total are possible to ad- just the tracks to the packages running in parallel. -
Page 29: Installation Of Insertion Plate Set And Remnant Holder
Instruction manual A400 / A400FB Installation 4.5.2 Installation of insertion plate set and remnant holder Insertion plate set The plates are variable in their use and can be adjusted to different product and packaging sizes. Place the insertion plate with the threa- ded bolt into the required aperture of the basset.
-
Page 30: Switch Off Optional, External
Check if the machine is complete before it is re-started. – Check if components are positioned correctly and firmly. – Only use original Bizerba spare parts and accessories. 4.5.3 Switch off optional, external This option allows disconnecting specified slicer drives from the drive electronics by means of a contactor.
-
Page 31: I/O Interface
Instruction manual A400 / A400FB Installation 4.5.4 I/O interface Connect the slicer to a packaging machine, foil or tray dispenser: Remove the catch of the interface on the left side of the slicer. Insert synchronization plug into inter- face. Fig. 19: Communication interface…
-
Page 32
Installation Instruction manual A400 / A400FB The signal deriving from the light barrier or sensor will be transmitted to the synchroniza- tion plug. 4 — 10 6.054.98.5.10.06 en… -
Page 33: Machine And Operating Elements
Instruction manual A400 / A400FB Machine and operating elements Machine and operating elements Operating and display panel Operating of machine is done via function keys. Fig. 20: Operating and display panel Function keys <ON switch> (green) Lamp lights (white) when the machine is switched on <OFF switch>…
-
Page 34
Machine and operating elements Instruction manual A400 / A400FB <Clean> key The slice thickness is automatically set to smaller -1 mm. The cleaning station appears in the display, The carriage can only be tilted in this setting <Grind> key The slice thickness is automatically set to higher +15 mm. -
Page 35: Icons On Display
Instruction manual A400 / A400FB Machine and operating elements Program key <Save> Save new PLU to memory or overwrite or delete existing PLU. The PLU station appears in the display. Icons on display Slice thickness Fanning space lengthwise or crossways…
-
Page 36: Workstation
Machine and operating elements Instruction manual A400 / A400FB Fan longitudinally Fan transversely Fan lengthwise multi-layer (only for table- mounted machines) Fan transversely multi-layer (only for table-mounted machines) Shaving (special depositing arm is required) Equal distribution of sliced product on delivery device…
-
Page 37: Depositing Station
Instruction manual A400 / A400FB Machine and operating elements Fig. 21: Workstation <F1> Reduce slice thickness <F2> Reduce fanning space <F3> Reduce number of slices <F4> Number of carriage strokes <F5> To depositing station <F6> To measuring station <F7> Increase slice thickness <F8>…
-
Page 38: Measuring Station
Machine and operating elements Instruction manual A400 / A400FB Fig. 22: Depositing station <F1> Stacking <F2> Fan longitudinally <F3> Fan lengthwise multi-layer <F4> Shaving <F5> Reduce distance between rows <F6> Distributed depositing <F7> Double stacking <F8> Fan transversely <F9> Fan transversely, multi-layer <F11>…
-
Page 39: Plu Station
Instruction manual A400 / A400FB Machine and operating elements Fig. 23: Measuring station <F1> Product length <F2> Product height <F3> Product width <F7> Product length <F8> Product height <F9> Product width <F10> Reset to standard values <F11> In-between sizes <F12> Back to workstation…
-
Page 40: Information Station
Machine and operating elements Instruction manual A400 / A400FB Fig. 24: PLU station <F1> Page backward <F2> PLU5 <F3> PLU6 <F4> PLU7 <F5> PLU8 <F6> Page forward <F8> PLU5 <F9> PLU6 <F10> PLU7 <F11> PLU8 <F12> Back to workstation Data records PLU 1 to PLU 8 are predefined programs to ensure that they cannot be overwritten.
-
Page 41: Grinding Station
Instruction manual A400 / A400FB Machine and operating elements Fig. 25: Information station <F1> Contrast of display <F2> Set day counter to zero <F4> Activate / deactivate password <F5> To service station <F7> Contrast of display <F12> Back to workstation…
-
Page 42: Cleaning Station
Machine and operating elements Instruction manual A400 / A400FB Fig. 26: Grinding station <F7> Blade on <F9> Blade off Comment: Exit the grinding station by pushing on <Clean>. 5.10 Cleaning station This display appears after pushing on <Clean>. Comment: Do not switch off machine yet. Table, sliced product feed, slice thickness and depositing arm run in the cleaning setting.
-
Page 43: Paper Holder
Instruction manual A400 / A400FB Machine and operating elements Fig. 27: Cleaning station 5.11 Paper holder The paper holder is used when the sliced product has to be delivered straight on to paper or foil. Positioning of several sheets of paper or film:…
-
Page 44: Product Support
Machine and operating elements Instruction manual A400 / A400FB 5.12 Product support The correctly positioned product support prevents unstable or short product from deflecting or tipping over during slicing. Position the support; the sliced product is in the feed carriage: Loosen the handle on the carriage.
-
Page 45: Operation
Instruction manual A400 / A400FB Operation Operation Inserting and slicing product The machine may not be operated without a table or conveyor belt. The machine is switched on, all functioning parts are in or move into their basic setting. Carriage 200/400 mm with product holder, product feeding carriage and product clamp Move carriage towards operator.
-
Page 46
Operation Instruction manual A400 / A400FB Pull the lever towards the operator while at the same time pushing the guide manually up to the stop plate. Position the Sliced products support Fig. 33: Unlocking product feed Carriage 600 mm with Sliced product holder:… -
Page 47
Instruction manual A400 / A400FB Operation To safely slice leftover pieces the end of the sliced product has to be cut off. 6.054.98.5.10.06 en 6 — 3… -
Page 48
Operation Instruction manual A400 / A400FB 6 — 4 6.054.98.5.10.06 en… -
Page 49: Troubleshooting
Switch off machine immediately if untypical noises are heard or if there is a suspected risk of injury. Call the responsible Customer Service if you are unable to rectify the fault yourself. Please provide your Bizerba customer service point with the following details: – Machine type (see rating plate), –…
-
Page 50
Troubleshooting Instruction manual A400 / A400FB 7 — 2 6.054.98.5.10.06 en… -
Page 51: Maintenance
Instruction manual A400 / A400FB Maintenance Maintenance Preparation for cleaning Clean thoroughly: – before putting into operation – depending on use and application frequency – if extremely soiled, several times a day – after sharpening – after a longer down time…
-
Page 52: Removing Components
Maintenance Instruction manual A400 / A400FB Removing components CAUTION Chain, driver and gripper hooks, scraper edge! Stab and cut wounds. Twisted guide cogs or chain hooks can cause malfunctions. – Always wear cut-proof gloves when cleaning. – Avoid touching the chain hooks.
-
Page 53
Instruction manual A400 / A400FB Maintenance Conveyor belt A400FB Pull the light barrier upwards out of the holder and hang in to the holder of the machine. Fig. 37: Light sensor Tilt the lock on the belt support back- wards in the direction of the arrow. -
Page 54
Maintenance Instruction manual A400 / A400FB Use both hands to hold on to the sides of the center of the conveyor belt and tilt it towards you and then lift it up. Place the belt carefully on to an even surface. -
Page 55
Instruction manual A400 / A400FB Maintenance Guide cam Loosen the clamp handle on the frame and remove guide cam from between the transport chains. Fig. 43: Guide cam Product holder 200/400 mm carriage Loosen star knob. Lift out the holder casing in upwards di- rection. -
Page 56
Maintenance Instruction manual A400 / A400FB Product holder 600 mm carriage Loosen the star-grip handle on the car- riage. Lift out the holder casing in upwards di- rection. Fig. 46: Product holder product support Loosen star knob on guide element. -
Page 57: Cleaning
Instruction manual A400 / A400FB Maintenance Deflector Loosen deflector from magnet lock and move upwards. Fig. 49: Deflector Now the machine is ready for cleaning. Cleaning CAUTION Splash water! If water gets into the machine it can damage electric components.
-
Page 58
Maintenance Instruction manual A400 / A400FB Blade cleaning Press a wet disposable cleaning cloth against the blade surface and slowly wipe away from the center. Clean the back of the blade in the same manner. After this process, repeat using a dry disposable cleaning cloth. -
Page 59
Instruction manual A400 / A400FB Maintenance Wipe gauge plate away from blade. Never wipe towards the blade. Fig. 54: Gauge plate Wipe carriage. Leave surfaces dry in the air. Fig. 55: Carriage 6.054.98.5.10.06 en 8 — 9… -
Page 60: Cleaning Plan For Slicing Machines
Maintenance Instruction manual A400 / A400FB Cleaning plan for slicing machines Work steps Recommen- Procedure Cleaning devices Notes ded cleaning agents Preparatory Close slice thick- measures ness, switch off machine, pull out power plug Disassemble in accordance all removable with instruction…
-
Page 61
Instruction manual A400 / A400FB Maintenance Work steps Recommen- Procedure Cleaning devices Notes ded cleaning agents Rinse Drinking water Max. 50°C tem- Disposable other machine perature depend. cleaning cloth on when grease Water pipe removed parts can be easily re-… -
Page 62: Preparing The Machine For Operation
Maintenance Instruction manual A400 / A400FB The cleaning agent can be acquired from the BIZERBA customer services: Description Order No. Packaging unit P3-steril 50003250000 5 liters P3-riksan 50003270000 5 liters P3-alcodes 50003260000 5 liters Clean Station 50003280000 H1-Service-Oil 94008900022 400 ml…
-
Page 63
Instruction manual A400 / A400FB Maintenance Carriage Tilt the carriage in the direction of the ar- row. Using the handle screw into place on the carriage foot. Fig. 58: Tilting carriage Feeding carriage 200/400 mm carriage Insert the carriage plate into the channel along the sliced product holder guide and screw tight with the star grip screw. -
Page 64
Maintenance Instruction manual A400 / A400FB Product holder 600 mm carriage Insert the holder casing into the groove. Screw tight with the star grip screw. Fig. 61: Product holder product support Push product support onto guide ele- ment, tighten star knob. -
Page 65
Instruction manual A400 / A400FB Maintenance Chain frame Install chain frame with swiveled in feed roller from the top in the holding fixtures and drive shaft. Fig. 64: Chain frame Depositing arm Push depositing arm onto carriage shaft and turn until the hub catches the groove. -
Page 66
Maintenance Instruction manual A400 / A400FB Conveyor belt A400FB Use both hands to hold the conveyor belt on its sides. Put the belt bearing down onto the take- up pin, keeping it in a slight tilted posi- tion. Fig. 67: Insert conveyor belt… -
Page 67: Blade Sharpening
– Check if components are positioned correctly and firmly. – Only use original Bizerba spare parts and accessories. Blade sharpening Re-sharpening is necessary if the slicing result is unsatisfactory. The time intervals are dependent on the wear and tear of the blade and/or its operating usage as also the properties and conditions of the product.
-
Page 68: Preparation For Sharpening
Maintenance Instruction manual A400 / A400FB If sharpening stones are worn, replace stones. Replacement parts are supplied by Bizerba customer services. When replacing, do not confuse sharpening and honing stones. 8.6.2 Preparation for sharpening On the operating panel press <Clean> , see chapter 5.10.
-
Page 69: Sharpening
Instruction manual A400 / A400FB Maintenance Hold on to the sharpener in this position and use the star grip screw to clamp it to the gauge plate. Fig. 72: Clamping the sharpener 8.6.3 Sharpening Wear eye protection! Hearing protection is recommended.
-
Page 70: Honing
Maintenance Instruction manual A400 / A400FB 8.6.4 Honing Start the blade motor with the key <F7>. Set handwheel marking to «2». The honing stone is engaged. Hone until right-hand blade edge shows a honing bevel of approx. 0.5 — 1 mm which is (after approx.
-
Page 71: Removing Sharpening Dust
Instruction manual A400 / A400FB Maintenance 8.6.6 Removing sharpening dust – Slice thickness to «0» – Power plug is pulled – Wear cut-resistant gloves – Blade cover removed Press dry disposable cleaning towel to blade surface and slowly clean from center to outside.
-
Page 72: Care Of Machine, Servicing, Maintenance
Check if the machine is complete before it is re-started. – Check if components are positioned correctly and firmly. – Only use original Bizerba spare parts and accessories. Care of machine, servicing, maintenance The entire machine must be thoroughly cleaned based on usage, but at least twice a day.
-
Page 73
WARNING Changing the blade! Severe injuries and damage to property. – For safety reasons, the blade may only be changed by Bizerba customer service. – Wear cut-proof gloves and shoes with toe caps. 6.054.98.5.10.06 en 8 — 23… -
Page 74
Maintenance Instruction manual A400 / A400FB 8 — 24 6.054.98.5.10.06 en… -
Page 75: Technical Data
Instruction manual A400 / A400FB Technical data Technical data Dimensions A402 A404 A406 Outer dimensions 850 x 800 mm 1050 x 800 mm = 41.4″ x 1255 x 800 mm 31.5″ Work area 1010 x 850 mm 1210 x 850 mm = 47.7″ x 1280 x 850 mm 33.5″…
-
Page 76: Voltage Supply
Technical data Instruction manual A400 / A400FB A402FB A404FB A406FB Outer dimensions 850 x 1,710 mm 1050 x 1,710 mm = 1255 x 1,710 mm = 41.4″ x 67.4″ 49.4″ x 67.4″ Height on stand (dis- 1,535 mm 1,535 mm = 60.5″…
-
Page 77: Ambient Conditions
Instruction manual A400 / A400FB Technical data Ambient conditions – Surrounding temperature for operation and storage: -10 to +40°C (+14 to +104 degF) – Humidity Protection type IP 33. High air humidity and condensation can result in damage to the machine.
-
Page 78
Technical data Instruction manual A400 / A400FB 9 — 4 6.054.98.5.10.06 en… -
Page 79: Set Programs
Instruction manual A400 / A400FB Appendix Appendix Set programs Declaration of conformity Declaration of conformity for plastic materials with direct food contact 6.054.98.5.10.06 en…
-
Page 80
Appendix Instruction manual A400 / A400FB Set programs Slicer A400 (table depositing) Slicer A400FB (depositing on conveyor belt) 6.054.98.5.10.06 en… -
Page 81
The basis for the declaration of conformity is the contract documents (Bizerba pur- chase order documents). In the event of a modification to a machine of the above description that is not coor- dinated with Bizerba or not carried out by Bizerba, this declaration looses its validi- Date: 4/22/2014 Signature of manufacturer: i. -
Page 82
Functional barriers made of plastic are not used in the specified machine. Information on suppliers or preliminary suppliers can be provided on request. Date: 22 Jul 2013 Signature of manufacturer: i. V. Title of signatory: Ralf Steinhilber Director Food Processing Technology (FPT) Bizerba GmbH & Co. KG 6.054.98.5.10.06 en…
Доставляем ушедшие из РФ бренды напрямую из США и Европы. Есть вопросы? Напишите нам в WhatsApp!
×
Сейчас вы находитесь в городе Москва
Выберите город, в который Вы хотите осуществить доставку
Доставка в
город Москва
: 25 октября
Основные характеристики
Товар из США
Доставим в Ваш город
Артикул:325409874968
Продавец:
spons_mik
(598)
Местонахождение:Mechanicsburg, Pennsylvania, US
Доставка до склада США
59427 ₽ ($499)

Товары из магазинов
США и Европы
без наценок!
Отправили
67 000 посылок
с 2008 года!
Знаменитый
каталог eBay
на русском языке!
Доставка курьером
до двери
Почтой или в удобный пункт выдачи!
Наши видеообзоры
Bizerba A 404 FB Fully Automatic Slicer Stacker Bacon Meat w/ Conveyor Working!
Bizerba A 404 FB Fully Automatic Slicer Stacker Bacon Meat w/ Conveyor Working! – можно купить на shopozz.ru с доставкой
из Mechanicsburg, Pennsylvania, US. Все товары из
категории «Мясорезки и слайсеры» быстро и вовремя доставляются в Россию и страны СНГ.
Полную информацию о доставке можно посмотреть в разделе «Доставка».
На товары категории «Мясорезки и слайсеры» действует доступная цена,
поэтому Bizerba A 404 FB Fully Automatic Slicer Stacker Bacon Meat w/ Conveyor Working! можно
приобрести всего за
2250670 руб.
Не можете сделать выбор? Посмотрите другие товары продавца
spons_mik
(598)
–
«Смотреть все товары».
Возникли вопросы о товаре, условиях оплаты либо доставки?
Закажи обратный
звонок!
Другие бренды категории
Покупки в США и Европе — это просто
Вы делаете заказ — мы выкупаем товары и доставляем вам
Склад

$46
Косметика M.A.C.maccosmetics.com

$46
Часы Timexamazon.com

$15
Джинсы levi’sebay.com
К вам домойОтправляем в Россию и
во все страны СНГ
Начать выгодные покупки в зарубежных интернет-магазинах
Устройства и системы
Слайсеры

Вручную, полу- или полностью автоматические, отдельно стоящие или объединённые в сеть, — в широком наборе техники для нарезки от Bizerba найдётся подходящий продукт для любой задачи — как в промышленности, так и в торговле. Узнайте о том как получить безупречную нарезку в комплексе с простой чисткой, великолепной эргономией и многолетней надёжностю.
-
Домой
-
Продукты
-
Оборудование
-
Слайсеры

Вопросы?
Пожалуйста, свяжитесь с нашими специалистами в любое время
Фамилия *
Мы сожалеем, но содержание неправильно отформатировано
Компания *
Мы сожалеем, но содержание неправильно отформатировано
E-mail *
Мы сожалеем, но содержание неправильно отформатировано
Телефон *
Мы сожалеем, но содержание неправильно отформатировано
Улица *
Мы сожалеем, но содержание неправильно отформатировано
Почтовый индекс *
Мы сожалеем, но содержание неправильно отформатировано
Город *
Мы сожалеем, но содержание неправильно отформатировано
Ваше сообщение для нас *
Мы сожалеем, но содержание неправильно отформатировано
Отправить
Ваше сообщение уже в пути
Форма была успешно отправлена
Упс! Что-то пошло не так
При отправке формы произошла ошибка. Пожалуйста, попробуйте еще раз