Перейти к контенту
-
AIWA
-
AKAI
-
BANG & OLUFSEN
-
Denon
-
Dual
-
Fisher
-
Grundig
-
Kenwood
-
Luxman
-
Marantz
-
Mitsubishi
-
NAD
-
Nakamichi
-
Nikko
-
Onkyo
-
Pioneer
-
Realistic
-
ReVox
-
SABA
-
Sansui
-
SONY
-
Teac
-
Technics
-
The Fisher
-
Toshiba
-
Yamaha
DriverHub
Не тратьте время на поиск драйверов — DriverHub автоматически найдет и установит их.
Скачать

-
Contents
-
Table of Contents
-
Troubleshooting
-
Bookmarks
Quick Links
POWER
1
2
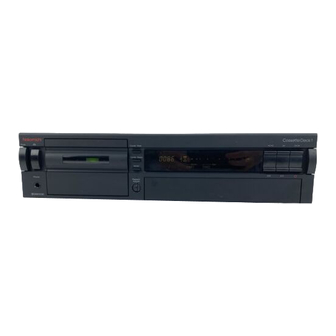
D U E T — I I
Digital Key Control CD/CDG Dual Cassette Karaoke System
Related Manuals for VocoPro Cassette Deck
Summary of Contents for VocoPro Cassette Deck
-
Page 1
POWER D U E T — I I Digital Key Control CD/CDG Dual Cassette Karaoke System… -
Page 2: Table Of Contents
Cassette Deck Operations ……..
-
Page 3: Cautions And Warnings
Safety Instructions CAUTION RISK OF SHOCK CAUTION: To reduce the risk of electric shock, do not remove cover (or back). No user- serviceable parts inside. Only refer servicing to qualified service personnel. Explanation of Graphical Symbols The lightning flash & arrowhead symbol, within an equilateral triangle, is intended to alert you to the presence of danger.
-
Page 4
CAUTION: Read this before operating your unit The apparatus is not disconnected from the AC power source so long as it is connected to the wall outlet, even if the apparatus itself is turned off. To fully insure that the apparatus is indeed fully void if residual power, leave unit disconnected from the AC outlet for at least fifteen seconds. -
Page 5: Welcome
Club VocoPro for Karaoke news and events, chat rooms, club directories and even a Service directory! We look forward to hearing you sound like a PRO, with VocoPro, your ultimate choice in Karaoke entertainment. Please record the model number and serial number below, for easy reference, in case of loss or theft. These numbers are located on the rear panel of the unit.
-
Page 6: Listening For A Lifetime
Now it’s time to consider how you can maximize the fun and excitement your equipment offers. VocoPro and the Electronic Industries Association’s Consumer Electronics Group want you to get the most out of your equipment by playing it at a safe level.
-
Page 7: Before Getting Started
Before Getting Started: It is very important to read the following instructions prior to starting any installation procedures. Doing so will ensure a correct installation and may save you some time as well. Protect Against Power Surges • Connect all external components before you plug any of their power cords into the wall outlet.
-
Page 8: Features And Specifications
DUET-II Features • 40W + 40W Maximum Power Output • Top Loading Digital Shock Resistant CD/CDG Player • Dual Cassette Decks to Play and Record Live Performance Mixes from CD or Cassette • AM/FM Stereo Tuner • 12-Step Digital Key Controller (half-steps) •…
-
Page 9: Front Panel Descriptions
Front Panel Descriptions 1. POWER — Press to turn the system ON, press again and release to turn the system OFF. 2. CASSETTE CONTROLS. RECORD — Press to RECORD. Refer to «Recording Cassettes». Play – Press to PLAY tape. Refer to «Playing Cassettes».
-
Page 10: Front Panel Descriptions
Front Panel Descriptions 14. STOP – To stop playing the CD, press the STOP button once. The LCD will display total number of tracks and playing time of the CD 15. F.F.___- To advance the CD to the beginning of the next track, press and release this button.
-
Page 11: Rear/Top Panel Descriptions
Rear / Top Panel Descriptions 21. OPEN/CLOSE – Press the OPEN/CLOSE point to open the CD compartment. Close CD compartment by pressing this button again. 22. FM ANT TERMINAL – Connect the FM ANTENNA wire for optimal reception. 23. VIDEO OUTPUT – Connect jack to VIDEO IN of TV (See Figure 1).
-
Page 12: Cd Player Operations
CD Player Operations NOTES: • Do not touch the disc tray while player is operating. • Never place anything except a compact disc in the disc tray. Foreign objects can damage the unit. • Do not apply excessive force to the disc tray. •…
-
Page 13: Getting Connected
Getting Connected Connecting Audio and Video to External Devices: (see figure below) 1. Connect yellow plug from the included A/V cable to the VIDEO OUTPUT jack on the back of your Duet-II karaoke system. 2. Connect the other yellow plug of the A/V cable to the VIDEO OUTPUT jack on your television. 3.
-
Page 14: Audio Controls
Audio Controls Graphic EQ Settings After choosing the program source you want; adjust the GRAPHIC EQUALIZER controls as follows: 1. Adjust the VOLUME control for the desired listening level. 2. Set the GRAPHIC EQUALIZER controls to match the sound characteristics of your listening room. With each of the five controls of the GRAPHIC EQUALIZER, it is possible to control a narrow, distinct section of the audio band by up to +/-10dB.
-
Page 15: Cassette Deck Operations
Cassette Deck Operation Follow the steps bellow for any tape deck operations: 1. Press the POWER switch ON. 2. Slide the FUNCTION SELECTOR to TAPE. 3. Press the STOP/EJECT button, the cassette door will open. 4. Put the cassette into the holder, open end down, and gently close the cassette door.
-
Page 16: Cassette Tape/Deck Maintenance
Cassette Tape / Deck Maintenance Erase Protection Every cassette can be protected against accidental erasing of pre-recorded material. On the back of a cassette are two breakout tabs. These must be in place before the RECORD button will depress. If these tabs have been removed, such as on pre-recorded cassette you buy, the RECORD button will not depress.
-
Page 17: Troubleshooting
Troubleshooting If your stereo system fails to operate, carefully read these instructions. Many problem situations are caused by improper use. Listed below are the most common ones. PROBLEMS Power switched on, but no sound and no light on the POWER LED. The POWER LED system is on but no sound Poor FM reception…
-
Page 18
Recommended VocoPro Gear VP-600X 2 Space 600W Professional Power Amplifier • 300W + 300W RMS • 600W + 600W Max • THD: 0.05% • Frequency Response: 20HZ-20KHZ Signal to Noise • 1/4″ or XLR Inputs • Input Ratio: Less than 100DB •… -
Page 19
Recommended VocoPro Gear LCD-V5 5″ TFT LCD Color Monitor • TFT LCD Color Monitor • Audio/Video Input • 3 Watts Stereo Speakers • Headphone Output With Volume Control • Color/Brightness Adjustment • Reversible Screen Control For Both Table Top Or Auto Roof Mounting •… -
Page 20
Recommended VocoPro Gear SV-420 Professional 8″ 3 Way Vocal Speakers • 3 Way 8″ Karaoke Vocal Speakers (Sold in Pair) • Designed for Karaoke Studio and Singer Monitor applications • Power Rating: 180 Watts Peak / 90 Watts RMS • Metal Grill •…
This manual is also suitable for:
Duet-ii
BK Precision
715
User Manual

Lenovo
ThinkCentre 6010
Service Manual

Siemens
WR Send 20 M-03
Datasheet

IBM
ThinkPad i Series 1200
Service Manual

Telecommunications Techniques Corporation
Fireberd 4000
User Manual

IBM
ThinkPad S30
Service Manual

Tektronix
067-0523-00
Service and User Manual

Bose
Lifestyle Music Center
User Manual

Tektronix
P68XX Series
Service and User Manual

Philips
VR550 58
Service Manual

Philips
MX3800D
Service Manual Supplement

Wavetek
132
Service and User Manual

-
Contents
-
Table of Contents
-
Troubleshooting
-
Bookmarks
Quick Links
Related Manuals for Nakamichi Cassette Deck 1


 Русская версия ниже
The cassette decks assembled here are presented as some kind of benchmark, both in terms of engineering and sound quality. For objectivity, key models from different generations were selected. At one time, it was they who determined the boundaries of the development of this equipment. Of course, other interesting devices were created, but most of them were already secondary or simplified versions of the models listed below.
Thus, the main task of the Service Manuals is to demonstrate the most advanced technical solutions used in this field of technology. Here you can learn about the proper adjustment and repair of the specified equipment. In addition, the Owner’s Manuals allow familiarizing yourself with the functional equipment and features of operation of the best models of cassette decks.
This page can be called the hall of fame of magnetic sound recording. And if you plan to buy a cassette deck, then any of the following models can be a worthy choice. Of course, you must understand that all these devices are 30-40 years old. And even if they were never used and kept all this time in a box, for their normal operation will be required a serious restoration from a competent specialist.
![]()
![]()
| Model | Year | Owner’s Manual | Service Manual |
|---|---|---|---|
| AD-6900mkII / AD-F90m | 1979 | Coming Soon | Coming Soon |
| XK-S9000 | 1992 | Coming Soon | Coming Soon |
![]()
![]()
| Model | Year | Owner’s Manual | Service Manual |
|---|---|---|---|
| GX-F91 | 1982 | Coming Soon | Coming Soon |
| GX-95mkII / GX-Z9100EV | 1990 | Coming Soon | Wanted |
![]()
![]()
| Model | Year | Owner’s Manual | Service Manual |
|---|---|---|---|
| K-05 / AL-90 | 1983 | Coming Soon | Coming Soon |

| Model | Year | Owner’s Manual | Service Manual |
|---|---|---|---|
| 1000ZXL | 1980 | Coming Soon | Coming Soon |
| Dragon | 1982 | Coming Soon | Coming Soon |
| CR-7 / CR-70 | 1985 | Coming Soon | Coming Soon |
![]()
| Model | Year | Owner’s Manual | Service Manual |
|---|---|---|---|
| CT-F1250 | 1979 | Coming Soon | Coming Soon |
| CT-A9 | 1983 | Coming Soon | Coming Soon |
| CT-95 / T-1100S | 1993 | Coming Soon | Coming Soon |
![]()
| Model | Year | Owner’s Manual | Service Manual |
|---|---|---|---|
| TC-K88 | 1978 | Coming Soon | Coming Soon |
| TC-K777ES | 1983 | Wanted | Coming Soon |
| TC-KA7ES | 1994 | Coming Soon | Coming Soon |
![]()
![]()
| Model | Year | Owner’s Manual | Service Manual |
|---|---|---|---|
| A710 / B710 | 1981 | Coming Soon | Coming Soon |
| A721 / B215 | 1985 | Coming Soon | Coming Soon |
![]()
| Model | Year | Owner’s Manual | Service Manual |
|---|---|---|---|
| TCD3014A / TCD910 | 1983 | Coming Soon | Coming Soon |
![]()
| Model | Year | Owner’s Manual | Service Manual |
|---|---|---|---|
| 122mkIII | 1993 | Coming Soon | Coming Soon |
![]()
| Model | Year | Owner’s Manual | Service Manual |
|---|---|---|---|
| C-1mkII | 1979 | Coming Soon | Coming Soon |
| Z-7000 | 1983 | Coming Soon | Coming Soon |
| V-8000S | 1991 | Coming Soon | Wanted |
![]()
![]()
| Model | Year | Owner’s Manual | Service Manual |
|---|---|---|---|
| RS-M95 | 1979 | Coming Soon | Coming Soon |
| RS-B965 / RS-B900 | 1990 | Coming Soon | Coming Soon |
![]()
| Model | Year | Owner’s Manual | Service Manual |
|---|---|---|---|
| TD-V931 | 1989 | Coming Soon | Wanted |
Note:
- The missing files is marked by yellow color. If you have these documents or see some of those for sale, please contact me.
- This scanning has been made for scientific and educational purposes only not for profitable distribution.
![]() A.Vostokov, 2002-2022. E-mail: avostokov@yandex.com
A.Vostokov, 2002-2022. E-mail: avostokov@yandex.com
 English version above
Инструкции для кассетных дек
Собранные здесь кассетные деки представлены в качестве некоего эталона, как с инженерной точки зрения, так и по качеству звучания. Для объективности были выбраны ключевые модели из разных поколений. В свое время именно они определяли границы развития данной аппаратуры. Конечно, было много других моделей, но большинство из них являлись уже вторичными, либо упрощенными версиями перечисленных ниже.
Основная задача представленных сервисных мануалов состоит в демонстрации наиболее совершенных технических решений, применявшихся в области магнитной записи звука. Здесь же можно узнать о правильном обслуживании и ремонте указанной аппаратуры. Пользовательские инструкции, в свою очередь, позволяют ознакомиться с функциональным оснащением и особенностями эксплуатации лучших моделей кассетных дек.
Данный список можно назвать выставкой достижений магнитной записи. И если вы планируете покупку кассетной деки, то любая из перечисленных здесь моделей будет достойным выбором. Конечно, надо понимать, что сегодня всем этим аппаратам уже по 30-40 лет. И даже если они никогда не использовались и все это время хранились в коробке, для их нормальной эксплуатации потребуется серьезное восстановление у грамотного специалиста.
![]()
![]()
| Модель | Год | Инструкция по эксплуатации | Сервисная инструкция |
|---|---|---|---|
| AD-6900mkII / AD-F90m | 1979 | Скоро | Скоро |
| XK-S9000 | 1992 | Скоро | Скоро |
![]()
![]()
| Модель | Год | Инструкция по эксплуатации | Сервисная инструкция |
|---|---|---|---|
| GX-F91 | 1982 | Скоро | Скоро |
| GX-Z9100EV | 1990 | Скоро | Розыск |
![]()
![]()
| Модель | Год | Инструкция по эксплуатации | Сервисная инструкция |
|---|---|---|---|
| K-05 / AL-90 | 1983 | Скоро | Скоро |
| Модель | Год | Инструкция по эксплуатации | Сервисная инструкция |
|---|---|---|---|
| 1000ZXL | 1980 | Скоро | Скоро |
| Dragon | 1982 | Скоро | Скоро |
| CR-7 / CR-70 | 1985 | Скоро | Скоро |
![]()
| Модель | Год | Инструкция по эксплуатации | Сервисная инструкция |
|---|---|---|---|
| CT-F1250 | 1979 | Скоро | Скоро |
| CT-A9 | 1983 | Скоро | Скоро |
| CT-95 / T-1100S | 1993 | Скоро | Скоро |
![]()
| Модель | Год | Инструкция по эксплуатации | Сервисная инструкция |
|---|---|---|---|
| TC-K88 | 1978 | Скоро | Скоро |
| TC-K777ES | 1983 | Розыск | Скоро |
| TC-KA7ES | 1994 | Скоро | Скоро |
![]()
![]()
| Модель | Год | Инструкция по эксплуатации | Сервисная инструкция |
|---|---|---|---|
| A710 / B710 | 1981 | Скоро | Скоро |
| A721 / B215 | 1985 | Скоро | Скоро |
![]()
| Модель | Год | Инструкция по эксплуатации | Сервисная инструкция |
|---|---|---|---|
| TCD3014A / TCD910 | 1983 | Скоро | Скоро |
![]()
| Модель | Год | Инструкция по эксплуатации | Сервисная инструкция |
|---|---|---|---|
| 122mkIII | 1993 | Скоро | Скоро |
![]()
| Модель | Год | Инструкция по эксплуатации | Сервисная инструкция |
|---|---|---|---|
| C-1mkII | 1979 | Скоро | Скоро |
| Z-7000 | 1983 | Скоро | Скоро |
| V-8000S | 1991 | Скоро | Розыск |
![]()
![]()
| Модель | Год | Инструкция по эксплуатации | Сервисная инструкция |
|---|---|---|---|
| RS-M95 | 1979 | Скоро | Скоро |
| RS-B965 / RS-B900 | 1990 | Скоро | Скоро |
![]()
| Модель | Год | Инструкция по эксплуатации | Сервисная инструкция |
|---|---|---|---|
| TD-V931 | 1989 | Скоро | Розыск |
Примечание:
- Отсутствующие файлы выделены желтым цветом. Если вы имеете указанные документы или увидите их в продаже, пожалуйста, свяжитесь со мной.
- Сканирование произведено в научных и просветительских целях, без извлечения прибыли.
![]() А.Востоков, 2002-2022. E-mail: avostokov@yandex.com
А.Востоков, 2002-2022. E-mail: avostokov@yandex.com

Teclmics
Stereo-Cassettendeck
RS-AZ7/RS-AZ6
Bedienungsanleitung
Istruzioni per l’uso
Mode d’emploi
Инструкция по эксплуатации
‘ ‘ ■
^
•… •,,.
7′-.v ‘•
i Î . ‘ » ‘ i . • ‘
‘
‘hfé’
Dieso Afjhndeng /oi.;jl e,ìs ¡Hf’Oon i-S-
i > . i ‘
’
^ Ф и ■ •• •
Bitte lesen Sie diese В о d i о n u n g sa n ! C‘ i t u
g ve- aoìn Лп->-
Inbetriebnehmen oder Einsteiion dieses Gerätes vülisîanr.ü
* ;v;,^ . . .
‘•1Ш
а
| Найти файл |  |
| Сейчас на сайте | |
|
Онлайн всего: 128 Гостей: 110 Пользователей: 18 ZimA, tomacgocha, XliveJam, enotnotnot, Serge94, sokolychok2017, Babasan, sti21, bratsk08, joka008, aramilpc, vzor, behap63852, puma-968, TebajKuj, Rema, VITAL66 |
|
| Приветствую Вас, Гость · RSS | 25.04.2023, 03:09:23 |
|
AIWA [1893] |
|
AKAI [253] |
|
AKIRA [14] |
|
ALTO [126] |
|
BBK [163] |
|
BEHRINGER [108] |
|
BRITANIA [41] |
|
CARVIN [21] |
|
CCE [123] |
|
DAEWOO [49] |
|
DENON [529] |
|
Edifier [43] |
|
FISHER [162] |
|
GRUNDIG [79] |
|
Harman Kardon [279] |
|
HITACHI [202] |
|
HYUNDAI [98] |
|
JBL [181] |
|
JVC [816] |
|
KENWOOD [337] |
|
LG [476] |
|
LUXMAN [45] |
|
MAGNAT [17] |
|
MARANTZ [669] |
|
Microlab [102] |
|
NAD [243] |
|
NAKAMICHI [101] |
|
ONKYO [594] |
|
PANASONIC [939] |
|
PHILIPS [968] |
|
PIONEER [1393] |
|
ROTEL [138] |
|
SANSUI [96] |
|
SANYO [195] |
|
SVEN [76] |
|
SONY [3841] |
|
SHARP [255] |
|
SHERWOOD [72] |
|
TASCAM [83] |
|
TEAC [294] |
|
Technics [1065] |
|
TOSHIBA [109] |
|
Vitek [77] |
|
YAMAHA [827] |
|
прочие AUDIO [1779] |
Сортировать файлы в разделе Audio по
Дате ·
Названию ·
Рейтингу ·
Комментариям ·
Загрузкам ·
Просмотрам
Страницы: « 1 2 … 46 47 48 49 50 … 399 400 »
Service Manual Cassette Deck TECHNICS RS-B13

Категория: Audio / Technics |
Просмотров: 555 |
Добавил: Andriiko | Дата: 29.12.2017 в 13:44:12 |
Могут скачать:
Все Участники
Service Manual Cassette Deck TECHNICS RS-B105

Категория: Audio / Technics |
Просмотров: 545 |
Добавил: Andriiko | Дата: 29.12.2017 в 13:57:31 |
Могут скачать:
Все Участники
Service Manual Cassette Deck TECHNICS RS-B100

Категория: Audio / Technics |
Просмотров: 642 |
Добавил: SErArt | Дата: 09.07.2017 в 22:47:29 |
Могут скачать:
Все Участники
Service Manual Cassette Deck TECHNICS RS-B10

Категория: Audio / Technics |
Просмотров: 417 |
Добавил: Andriiko | Дата: 29.12.2017 в 13:41:49 |
Могут скачать:
Все Участники
Service Manual Cassette Deck TECHNICS RS-AZ7
Категория: Audio / Technics |
Просмотров: 1142 |
Добавил: Diman770 | Дата: 30.09.2016 в 21:28:20 |
Могут скачать:
Все Участники
Service Manual кассетной деки Technics RS-AZ6
Категория: Audio / Technics |
Просмотров: 810 |
Добавил: Diman770 | Дата: 09.09.2016 в 17:22:24 |
Могут скачать:
Все Участники
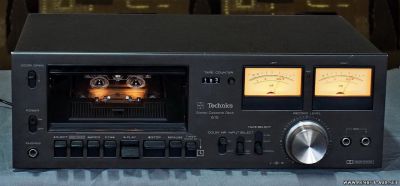
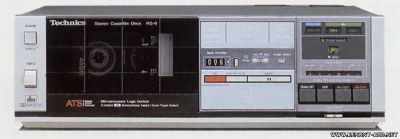
Service Manual Cassette Deck TECHNICS RS-8R
Категория: Audio / Technics |
Просмотров: 567 |
Добавил: Andriiko | Дата: 10.12.2019 в 17:21:04 |
Могут скачать:
Все Участники
Service Manual кассетной деки TECHNICS RS-7500US
Категория: Audio / Technics |
Просмотров: 1770 |
Добавил: jrpirola | Дата: 29.12.2009 в 19:22:04 |
Могут скачать:
Все Участники
Service Manual Stereo Tape Deck TECHNICS RS-715U (NATIONAL)
Категория: Audio / Technics |
Просмотров: 485 |
Добавил: ws545bfs | Дата: 16.01.2023 в 16:19:01 |
Могут скачать:
Все Участники
Parts List Stereo Tape Deck TECHNICS RS-715U (NATIONAL)
Replacement parts list

Категория: Audio / Technics |
Просмотров: 453 |
Добавил: ws545bfs | Дата: 16.01.2023 в 16:35:26 |
Могут скачать:
Все Участники
Service Manual Cassette Deck TECHNICS RS-676US

Категория: Audio / Technics |
Просмотров: 550 |
Добавил: Andriiko | Дата: 25.12.2017 в 01:15:32 |
Могут скачать:
Все Участники
Service Manual Cassette Deck TECHNICS RS-671US

Категория: Audio / Technics |
Просмотров: 254 |
Добавил: Andriiko | Дата: 28.05.2020 в 15:16:29 |
Могут скачать:
Все Участники
Service Manual Stereo Cassette Deck TECHNICS RS-646DS
Категория: Audio / Technics |
Просмотров: 250 |
Добавил: Andriiko | Дата: 28.05.2020 в 15:16:29 |
Могут скачать:
Все Участники
Service Manual Cassette Deck TECHNICS RS-641

Категория: Audio / Technics |
Просмотров: 598 |
Добавил: Andriiko | Дата: 25.12.2017 в 01:13:27 |
Могут скачать:
Все Участники
Service Manual Cassette Deck TECHNICS RS-631

Категория: Audio / Technics |
Просмотров: 494 |
Добавил: Andriiko | Дата: 25.12.2017 в 01:11:03 |
Могут скачать:
Все Участники
Service Manual Cassette Deck Technics RS-616
Категория: Audio / Technics |
Просмотров: 506 |
Добавил: 2350 | Дата: 23.12.2016 в 04:52:51 |
Могут скачать:
Все Участники
Service Manual Cassette Deck TECHNICS RS-615US
Категория: Audio / Technics |
Просмотров: 582 |
Добавил: Andriiko | Дата: 28.05.2020 в 15:16:29 |
Могут скачать:
Все Участники
Service Manual Cassette Deck TECHNICS RS-6
Категория: Audio / Technics |
Просмотров: 455 |
Добавил: Andriiko | Дата: 17.05.2019 в 00:13:36 |
Могут скачать:
Все Участники
Service Manual Cassette Deck TECHNICS RS-5
Категория: Audio / Technics |
Просмотров: 507 |
Добавил: Andriiko | Дата: 13.12.2015 в 02:24:28 |
Могут скачать:
Все Участники
Service Manual Double Cassette Deck TECHNICS RS-1W
Категория: Audio / Technics |
Просмотров: 1035 |
Добавил: Andriiko | Дата: 13.12.2015 в 01:18:43 |
Могут скачать:
Все Участники
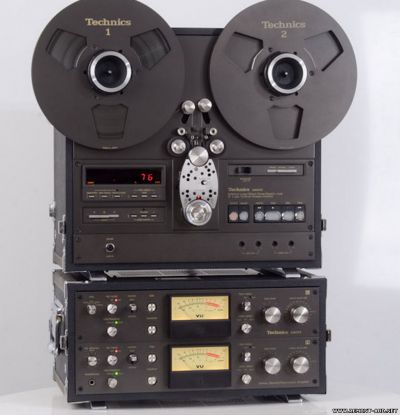
Service Manual Tape Deck TECHNICS RS-1800
Категория: Audio / Technics |
Просмотров: 1602 |
Добавил: Andriiko | Дата: 31.01.2021 в 00:28:21 |
Могут скачать:
Все Участники
Service Manual Tape Deck TECHNICS RS-1700 vol.1

Категория: Audio / Technics |
Просмотров: 946 |
Добавил: Andriiko | Дата: 29.05.2016 в 00:40:07 |
Могут скачать:
Все Участники
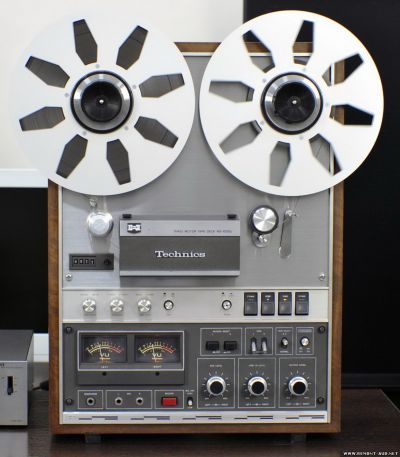
Service Manual Direct-Drive Open-Reel Tape Deck TECHNICS RS-1520

Категория: Audio / Technics |
Просмотров: 809 |
Добавил: Andriiko | Дата: 03.12.2018 в 00:04:15 |
Могут скачать:
Все Участники
Service Manual Stereo Tape Deck TECHNICS RS-1030US
Категория: Audio / Technics |
Просмотров: 616 |
Добавил: Andriiko | Дата: 17.05.2019 в 00:23:19 |
Могут скачать:
Все Участники
Service Manual Noise Reduction Unit TECHNICS RP-9024

Категория: Audio / Technics |
Просмотров: 614 |
Добавил: Andriiko | Дата: 01.04.2017 в 01:30:05 |
Могут скачать:
Все Участники
Service Manual Master Cassette Deck TEAC Z-7000
Категория: Audio / TEAC |
Просмотров: 981 |
Добавил: Andriiko | Дата: 25.11.2016 в 01:21:56 |
Могут скачать:
Все Участники
Service Manual Master Cassette Deck TEAC Z-6000
Категория: Audio / TEAC |
Просмотров: 716 |
Добавил: Andriiko | Дата: 25.11.2016 в 01:21:01 |
Могут скачать:
Все Участники
Service Manual Master Cassette Deck TEAC Z-5000
Категория: Audio / TEAC |
Просмотров: 890 |
Добавил: Andriiko | Дата: 25.11.2016 в 01:19:57 |
Могут скачать:
Все Участники
Service Manual Open Tape Deck Recorder TEAC X-7R, X-7
Категория: Audio / TEAC |
Просмотров: 718 |
Добавил: Andriiko | Дата: 25.11.2016 в 01:12:39 |
Могут скачать:
Все Участники
Service Manual катушечного магнитофона TEAC X-700R
Категория: Audio / TEAC |
Просмотров: 1835 |
Добавил: mik-gray | Дата: 30.04.2013 в 22:55:44 |
Могут скачать:
Все Участники
Service Manual Open Tape Deck Recorder TEAC X-3R
Категория: Audio / TEAC |
Просмотров: 495 |
Добавил: Andriiko | Дата: 25.11.2016 в 00:35:54 |
Могут скачать:
Все Участники
Service Manual катушечного магнитофона TEAC X-300R

Категория: Audio / TEAC |
Просмотров: 1178 |
Добавил: mik-gray | Дата: 30.04.2013 в 22:34:29 |
Могут скачать:
Все Участники
Service Manual Open Tape Deck Recorder TEAC X-3
Категория: Audio / TEAC |
Просмотров: 562 |
Добавил: Andriiko | Дата: 25.11.2016 в 00:34:50 |
Могут скачать:
Все Участники
Service Manual Open Tape Deck Recorder TEAC X-20R
Категория: Audio / TEAC |
Просмотров: 630 |
Добавил: Andriiko | Дата: 25.11.2016 в 01:14:58 |
Могут скачать:
Все Участники
Service Manual
Reel To Reel Tape Deck Teac X-2000R

Категория: Audio / TEAC |
Просмотров: 2287 |
Добавил: stokom | Дата: 24.09.2013 в 14:27:24 |
Могут скачать:
Все Участники
Schematic Diagrams
Электрическая схема катушечного магнитофона Teac X-2000R
Категория: Audio / TEAC |
Просмотров: 1527 |
Добавил: stokom | Дата: 25.09.2013 в 09:29:59 |
Могут скачать:
Все Участники
Service Manual Open Tape Deck Recorder TEAC X-10R, X-10
Категория: Audio / TEAC |
Просмотров: 1355 |
Добавил: Andriiko | Дата: 25.11.2016 в 01:13:49 |
Могут скачать:
Все Участники
Service Manual Open Tape Deck Recorder TEAC X-1000R
Категория: Audio / TEAC |
Просмотров: 1409 |
Добавил: Andriiko | Дата: 25.11.2016 в 01:17:52 |
Могут скачать:
Все Участники
Страницы: « 1 2 … 46 47 48 49 50 … 399 400 »
-
Contents
-
Table of Contents
-
Troubleshooting
-
Bookmarks
Quick Links
3D0798550A
Z
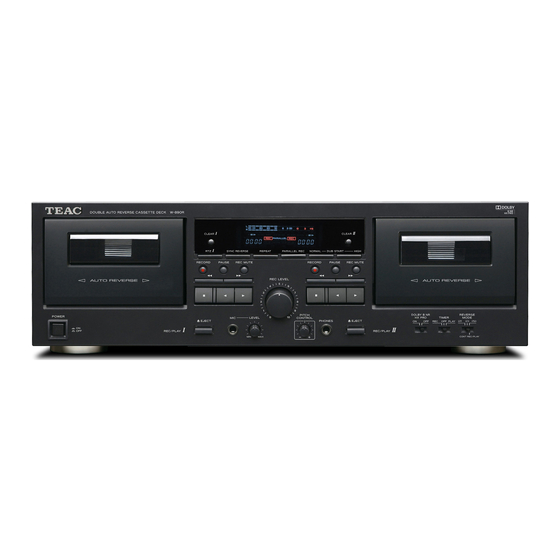
W-890R
Double Auto Reverse Cassette Deck
OWNER’S MANUAL
MODE D’EMPLOI
MANUAL DEL USUARIO
Related Manuals for Teac W-890R
Summary of Contents for Teac W-890R
-
Page 1
3D0798550A W-890R Double Auto Reverse Cassette Deck OWNER’S MANUAL MODE D’EMPLOI MANUAL DEL USUARIO… -
Page 2
IMPORTANT SAFETY INSTRUCTIONS 1) Read these instructions. 2) Keep these instructions. 3) Heed all warnings. 4) Follow all instructions. CAUTION: TO REDUCE THE RISK OF ELECTRIC SHOCK, DO NOT 5) Do not use this apparatus near water. REMOVE COVER (OR BACK). NO USER-SERVICEABLE PARTS INSIDE. 6) Clean only with dry cloth. -
Page 3
< DO NOT REMOVE THE EXTERNAL CASES OR CABINETS TO EXPOSE THE ELECTRONICS. NO USER SERVICEABLE PARTS ARE WITHIN. < IF YOU ARE EXPERIENCING PROBLEMS WITH THIS PRODUCT, CONTACT TEAC FOR A SERVICE REFERRAL. DO NOT USE THE PRODUCT UNTIL IT HAS BEEN REPAIRED. Manufactured under license from Dolby Laboratories. -
Page 4: Table Of Contents
Features of the W-890R ……..
-
Page 5: Introduction
< The voltage selector on the rear panel is only available on units up and connect the W-890R, as well as the operation of its many useful and convenient functions. After you have finished reading this for the North American market.
-
Page 6: Automatic Tape Type Detection Function
Introduction Maintenance Automatic tape type detection function This cassette deck can detect what type of tape is being used based If the surface of the deck becomes soiled, wipe it clean with a dry, on the detection holes in the cassette shell. Be sure to use cassettes soft cloth.
-
Page 7: Connections
Connections PLAY TAPE AC power cord CAUTION Plug this AC power cord into an AC wall socket. < Plug the power cord into an AC outlet only after having made all NOTE other connections. < Read the instructions of each component you intend to use with <…
-
Page 8: Features Of The W-890R
Features of the W-890R Front panel POWER switch Reverse mode switch (REV MODE) This switches the unit power between off and on. This switch is used to switch between reverse modes. TIMER switch NOTE This switch is provided for use with a commercially available The apparatus draws nominal non-operating power from the AC audio timer, to allow timer controlled recording or playback.
-
Page 9: Remote Control Unit
Remote Control Unit Using the Remote Control Unit Cautions when using the remote control unit < Point the remote control unit at the remote sensor of the cassette deck and operate the remote control unit at a distance of no more than 5 meters.
-
Page 10: Display
Features of the W-890R Display Peak level meter Dubbing indicator NORMAL DUB HIGH DUB This shows recording and playback levels. lights during normal speed dubbing, and lights during high speed dubbing. SYNC REV This indicator lights when the synchro reverse dubbing function is Play indicator This indicator lights when the TAPE II deck is in play mode.
-
Page 11: Playback
Playback Set the DOLBY NR switch. Playback I (either TAPE I or TAPE II) Set the switch to the ON position when playing back tapes recorded with Dolby NR. To play tapes recorded without Dolby NR, set the switch to the OFF position.
-
Page 12: Playback Ii (Either Tape I Or Tape Ii)
Playback Pitch control (TAPE I deck only) Playback II (either TAPE I or TAPE II) This control varies the pitch of the music during playback (This control does not work during recording or dubbing). Turning the PITCH CONTROL knob clockwise increases the playback speed and raises the pitch up to +10%.
-
Page 13: Continuous Playback
RTZ I (TAPE I only) Continuous playback When you press the RTZI key, the TAPE I deck fast-forwards or rewinds Continuous playback can be performed between TAPE I and TAPE II. the tape until the counter reads , and then stops. When one tape is played back to the end, the other tape automatically starts playback, in a relay fashion.
-
Page 14: Recording
Recording Press the RECORD (K) key. Recording (either TAPE I or TAPE II) The deck enters the record-pause mode. J and will light on the display. NOTE < If you want to record using the remote control unit, press the two RECORD keys on the remote control unit at the same time.
-
Page 15: To Erase Recordings
When everything is ready, start recording by pressing the Recording silence PAUSE key or the PLAY key whose arrow points in the When you press the REC MUTE key during recording, the unit records same direction as the indicator. no signal for about 4 seconds and then enters the record-pause mode.
-
Page 16: Mic Mixing Recording
Recording Mic mixing recording Adjusting mix recording level This function allows you to record your voice and another audio To record a mix of voice and another audio source, you need to adjust source together on a cassette tape. the mic input level and then fine tune the overall recording level. The mic sound is fed into both the Left and Right channels so it is located in the center of the stereo image.
-
Page 17: Continuous Recording
Continuous recording NOTE Be careful not to press the PLAY (h or y) key whose arrow points in the same direction as the indicator. Doing so will start recording. Recording is done in this order: TAPE I Side “A” Side “B” TAPE II Side “A”…
-
Page 18: Parallel Recording
Recording Dubbing (from TAPE I to TAPE II) Parallel recording This function allows you to record the same material simultaneously Insert a cassette tape for playback into the TAPE I on both TAPE I and TAPE II. compartment and a cassette tape for recording into the Load tapes into both decks and press the PARALLEL REC key to start TAPE II compartment.
-
Page 19: Editing During Dubbing (Only At Normal Speed)
NOTE Editing during dubbing (only at normal speed) High-speed dubbing makes a copy at approximately two times the normal speed. We recommend normal speed dubbing for best audio quality. NORM DUB HIGH DUB During dubbing, either the indicator lights steadily on the display. During normal speed dubbing, only the following keys work: TAEP I deck : STOP (H) TAPE II deck : PAUSE, REC MUTE, STOP (H)
-
Page 20: Synchro Reverse Dubbing (From Tape I To Tape Ii)
Recording Check the recording direction of both decks. Synchro reverse dubbing (from TAPE I to TAPE II) If the reverse direction indicator (h) lights on the display, press the PAUSE key followed by the forward PLAY (y) key. Then, be sure to press the STOP (H) key to get out of the pause mode.
-
Page 21: Timer-Controlled Playback And Recording
Timer-Controlled Playback and Recording Timer-controlled recording (Example: Recording a broadcast program) Connect this unit and stereo system to a commercially available audio timer. Set the power switch of all components to ON. Load a recordable cassette tape(s) in TAPE I or II (or both decks for continuous recording).
-
Page 22: Troubleshooting
If the problem cannot be solved with any of the following checks, contact your nearest TEAC authorized service center or your dealer for Refer to the illustration below, and connect your audio components. help. Cannot switch on the power e Check the connection to the AC power supply.
-
Page 23: Specifications
Specifications Track System ……4-track, 2-channel stereo NOTE Heads Construction ..Record/playback head x 1 (each deck) This cassette deck operates on a delicate microcomputer and Erase head x 1 (each deck) there may be occasions when the deck does not function as…
-
Page 24
Description de la W-890R …….. -
Page 25: Introduction
Pour cette raison, nous vous recommandons fortement de conserver tous les éléments d’emballage livrés avec la W-890R, au cas où vous devriez la transporter dans le futur. Accessoires fournis De plus, quand vous transportez l’unité, vous devez bloquer le compartiment cassette en position fermée par de l’adhésif, en…
-
Page 26: Fonction De Détection Automatique De Type De Bande
Introduction Entretien Fonction de détection automatique de type de bande Cette platine cassette peut détecter le type de bande utilisé en se Si la surface de la platine est sale, nettoyez-la avec un chiffon sec référant aux orifices de détection de la cassette. Veuillez utiliser des et doux.
-
Page 27: Connexions
Introduction Connexions Vers une prise d’alimentation standard PLAY Amplificateur TAPE Cordon d’alimentation secteur PRÉCAUTIONS Branchez ce cordon d’alimentation à une prise secteur. < Branchez le cordon d’alimentation dans une prise secteur NOTE seulement après avoir fait toutes les autres connexions. <…
-
Page 28: Description De La W-890R
Description de la W-890R Face avant Commutateur POWER Sélecteur TIMER Ce commutateur fait alterner l’alimentation de l’unité entre veille et Ce sélecteur sert à l’emploi avec une minuterie audio du mise en service. commerce, pour permettre l’enregistrement ou la lecture pilotés par minuterie.
-
Page 29: Télécommande
Télécommande Instructions pour l’utilisation de la télécommande Emploi de la télécommande < Dirigez la télécommande directement vers le détecteur infrarouge du magnétocassette et manipulez la télécommande à une distance inférieure à 5 m. Veillez à ce qu’il n’y ait pas d’obstacles entre la télécommande et le détecteur infrarouge.
-
Page 30: Écran
Description de la W-890R Écran Crête-mètre Témoin de copie NORMAL DUB HIGH DUB Affiche les niveaux d’enregistrement et de lecture. s’allume durant la copie à vitesse normale, et s’allume durant la copie à haute vitesse. SYNC REV Ce témoin s’allume quand la fonction de copie avec retournement Témoin de lecture…
-
Page 31: Lecture
Lecture Sélectionnez le réglage de mode de retournement Lecture 1 (avec TAPE I ou TAPE II) (Reverse) avec le sélecteur REV MODE. Vous avez un choix de trois réglages : 7: Mode unidirectionnel Réglez ainsi le sélecteur pour ne lire qu’un seul côté. j: Mode bidirectionnel Enclenchez le commutateur POWER.
-
Page 32: Lecture 2 (Avec Tape I Ou Tape Ii)
Lecture Compteur de bande Lecture 2 (avec TAPE I ou TAPE II) Appuyez sur la touche COUNTER RESET pour ramener le compteur de bande à . Vous pouvez utiliser cette fonction pour repérer rapidement n’importe quel point sur la bande. Pour stopper la lecture, appuyez sur la touche STOP (H).
-
Page 33: Lecture Continue (Enchaînée)
RTZ I (TAPE I uniquement) Lecture continue (enchaînée) Quand vous appuyez sur la touche RTZ I, la cassette de la platine La lecture continue peut s’accomplir par l’enchaînement des platines TAPE I passe en avance ou retour rapide jusqu’à ce que le compteur TAPE I et TAPE II.
-
Page 34: Enregistrement
Enregistrement Réglez le sélecteur DOLBY NR. Enregistrement (avec TAPE I ou TAPE II) Réglez le sélecteur en position ON pour enregistrer avec le réducteur de bruit Dolby. Réglez-le sur OFF pour enregistrer sans le réducteur de bruit Dolby. Appuyez sur la touche RECORD (K). Mettez sous tension.
-
Page 35: Pour Effacer Les Enregistrements
Lancement rapide de l’enregistrement NOTE Assurez-vous que la flèche de la touche (h / y) sur laquelle Appuyez sur la touche RECORD (K) et appuyez sur la touche PLAY vous allez appuyer pointe bien dans la direction opposée à celle (h ou y) correspondant à…
-
Page 36: Enregistrement Avec Mixage Du Micro
Enregistrement Enregistrement avec mixage du micro Réglage du niveau d’enregistrement de mixage Cette fonction vous permet d’enregistrer votre voix et une autre Pour enregistrer un mixage de voix et d’une autre source audio, source audio sur une même cassette. vous devez régler le niveau d’entrée du micro, puis affiner le niveau Le son du micro est envoyé…
-
Page 37: Enregistrement Continu (Enchaîné)
Enregistrement continu (enchaîné) NOTE Veillez à ne pas appuyer sur la touche PLAY (h ou y) dont la flèche pointe dans la même direction que le témoin affiché. Cela lancerait l’enregistrement. L’enregistrement se fait dans cet ordre : TAPE I Face “A” Face “B”…
-
Page 38: Enregistrement En Parallèle
Enregistrement Réglez la direction de défilement de la cassette sur les Enregistrement en parallèle deux platines. Si le témoin de direction de lecture/enregistrement (h / y) pointe à l’écran dans la direction opposée de celle désirée, appuyez sur la touche PAUSE puis sur la touche PLAY (h ou y) correspondante à…
-
Page 39: Montage Durant La Copie (Seulement À Vitesse Normale)
Copie avec retournement synchronisé (de NOTE TAPE I à TAPE II) < Durant la copie, la commande de hauteur (Pitch control) ne fonctionne pas. < Le réglage du niveau d’enregistrement n’est pas nécessaire pour la copie car le niveau d’enregistrement est fixé sur celui de la bande pré-enregistrée.
-
Page 40
Enregistrement Vérifiez le sens d’enregistrement des 2 platines. NOTE < Durant la copie, la commande de hauteur (Pitch control) ne fonctionne pas. < Le réglage du niveau d’enregistrement n’est pas nécessaire pour la copie car le niveau d’enregistrement est fixé sur celui de la bande pré-enregistrée. -
Page 41: Lecture Avec Minuteur (Timer)
Lecture avec minuteur (Timer) Enregistrement piloté par minuterie (Exemple: Enregistrement d’un programme diffusé) Reliez cet appareil et le système stéréo à une minuterie audio du commerce. Réglez l’interrupteur POWER de tous les éléments sur ON. Chargez une cassette enregistrable dans TAPE I ou II (ou dans les deux platines pour un enregistrement en continu).
-
Page 42: Guide De Dépannage
Lecture avec minuteur (Timer) Guide de dépannage Si vous pensez que quelque chose ne fonctionne pas dans la platine PRÉCAUTIONS cassette, vérifiez les points suivants avant de contacter le service Si vous connectez directement le cordon d’alimentation après-vente. Dans certains cas, le problème peut être dû à un autre secteur de la platine à…
-
Page 43: Caractéristiques
Caractéristiques Système de pistes ….. . 4 pistes, 2 canaux stéréo NOTE Structure des têtes Cette platine cassette fonctionne à partir d’un micro-ordinateur Tête d’enregistrement/lecture x 1 (chaque platine) délicat et il peut se produire qu’elle ne fonctionne pas comme Tête d’effacement x 1 (chaque platine)
-
Page 44: Indice
Características del W-890R ……..48 <…
-
Page 45: Introducción
Durante la reproducción, asegúrese de ajustar el interruptor DOLBY NR a la misma posición que usó durante la Conserve el embalaje original que viene con el W-890R por si en el grabación. futuro tiene que transportar esta unidad. Además, cuando vaya a transportar esta unidad coloque una cinta de celo (u otro producto que no dañe el acabado) sobre las puertas de las pletinas para…
-
Page 46: Función De Detección Automática De Tipo De Cinta
Introducción Mantenimiento Función de detección automática de tipo de cinta Esta unidad puede detectar el tipo de cinta que está siendo usada en Si la superficie de la unidad está sucia, límpiela con un trapo suave y base a los agujeros de detección de la carcasa de la cinta. Asegúrese seco.
-
Page 47: Conexiones
Conexiones A salida de corriente alterna standard PLAY Amplificador TAPE Cable de alimentación AC CUIDADO Conéctelo en una salida de corriente alterna. < Conecte el cable de alimentación a una salida de corriente alterna NOTA solo después de que haya hecho todas las conexiones. <…
-
Page 48: Características Del W-890R
Características del W-890R Panel frontal Interruptor POWER Interruptor de modo reverse (REV MODE) Hace que esta unidad cambie entre los estados de standby y Se utiliza para cambiar entre los distintos modos del sistema encendido. reverse. Interruptor TIMER NOTA Se incluye para permitir el uso de un temporizador audio standard Este aparato recibe corriente nominal no operativa de la salida de para la ejecución de una grabación o reproducción controlada por…
-
Page 49: Control Remoto
Control Remoto Usando la Unidad de Control Remoto Precauciones durante el uso de la unidad de control remoto < Apunte la unidad de control remoto al sensor de la casetera y opere la unidad del control remoto a una distancia de no más de 5 metros.
-
Page 50: Display
Características del W-890R Display Medidor de nivel de picos Indicador de duplicación NORMAL DUB Le indica los niveles de grabación y reproducción. Se encenderá la indicación cuando la duplicación tenga lugar a velocidad normal, mientras que cuando se realice a…
-
Page 51: Reproducción
Reproducción Seleccione un ajuste para el modo reverse utilizando el Reproducción 1 (tanto en TAPE I como en TAPE II) interruptor REV MODE. Puede elegir entre tres ajustes: u : odo unidireccional Coloque el interruptor en esta posición para que se reproduzca solo una cara.
-
Page 52: Reproducción 2 (Tanto En Tape I Como Tape Ii)
Reproducción Control de tono (solo pletina TAPE I) Reproducción 2 (tanto en TAPE I como TAPE II) Este control modificar el tono de la música durante la reproducción. (No funciona durante la grabación ni en la duplicación). Gire el mando PITCH CONTROL hacia la derecha para aumentar la velocidad de reproducción y hacer que el tono aumente en hasta un +10%.
-
Page 53: Reproducción Continua
RTZ I (Solo TAPE I) Reproducción continua Cuando pulse la tecla RTZI, la pletina TAPE I realizará un avance Puede realizar un proceso de reproducción continua entre las pletinas rápido o rebobinado de la cinta hasta que el contador llegue a TAPE I y TAPE II.
-
Page 54: Grabación (Tanto En Tape I Como En Tape Ii)
Grabación Ajuste el interruptor DOLBY NR. Grabación (tanto en TAPE I como en TAPE II) Coloque este interruptor en ON para grabar con la reducción de ruidos Dolby, o ajústelo a OFF si no quiere usar este sistema de reducción de ruidos. NOTA <…
-
Page 55: Para Borrar Las Grabaciones
Cuando todo esté listo, inicie la grabación pulsando la Inicio rápido de grabación tecla PAUSE o la tecla de reproducción cuya flecha apunte Pulse la tecla RECORD (K) y la tecla PLAY (h or y) correspondiente en el mismo sentido que el indicador. al sentido en el que quiera que sea grabada la cinta.
-
Page 56: Grabación Con Mezcla De Micro
Grabación Grabación con mezcla de micro Ajuste del nivel de mezcla de grabación Esta función le permite grabar su voz y otra fuente audio a la vez en Para grabar una mezcla entre el sonido de su voz y el de otra fuente una cinta de cassette.
-
Page 57: Grabación Continua
Grabación continua NOTA Tenga cuidado de no pulsar la tecla PLAY (h o y) cuya flecha apunte en el mismo sentido que el indicador. El hacerlo iniciaría la grabación. La grabación se realizará en este orden: TAPE I Cara “A” Cara “B”…
-
Page 58: Grabación En Paralelo
Grabación Si el indicador de dirección de reproducción / grabación de la Grabación en paralelo pantalla (h/y) apunta en el sentido opuesto al que quiera, pulse la tecla PAUSE seguida por la tecla PLAY (h o y) correspondiente al sentido que quiera. Una vez que haya cambiado el sentido de la marcha, asegúrese de pulsar la tecla STOP (H) para salir del modo de pausa.
-
Page 59: Edición Durante La Duplicación (Solo A Velocidad Normal)
Duplicación reverse sincronizada (de TAPE I a NOTA TAPE II) < Durante el doblaje, el control de tono no funciona. < El ajuste de nivel de grabación no es necesario para el doblaje, dado que ese nivel es ajustado al nivel de la cinta pregrabada. El uso del control INPUT, antes o después de iniciar el doblaje, no produce ningún efecto.
-
Page 60
Grabación Compruebe el sentido de grabación de las pletinas. NOTA < Durante el doblaje, el control de tono no funciona. < El ajuste de nivel de grabación no es necesario para el doblaje, dado que ese nivel es ajustado al nivel de la cinta pregrabada. El uso del control REC LEVEL, antes o después de iniciar el doblaje, no produce ningún efecto. -
Page 61: Reproducción Con Temporizador
Reproducción con temporizador Grabación con temporizador (Ejemplo: grabación de una emisión) Conecte esta unidad y el resto de su equipo audio a un temporizador standard. Ajuste el interruptor POWER de todas las unidades del sistema a ON. Introduzca una cinta grabable en TAPE I o II (o en ambas para una grabación continua).
-
Page 62: Conexiones Con Un Temporizador
Si después de comprobar estos puntos no puede resolver el problema, póngase en contacto con el servicio técnico TEAC más cercano o con Basándose en la siguiente ilustración, conecte los distintos el distribuidor para que le digan qué hacer.
-
Page 63: Especificaciones Técnicas
Especificaciones técnicas Sistema de pistas ….. . .4 pistas, 2 canales stereo NOTA Distribución de cabezales Esta pletina funciona con un microprocesador muy delicado y Cabezal grabación/reproducción x 1 (cada pletina) puede que haya ocasiones en las que la unidad no funcione de Cabezal de borrado x 1 (cada pletina)
-
Page 64
7733 Telegraph Road, Montebello, California 90640 U.S.A. Phone: (323) 726-0303 TEAC CANADA LTD. 5939 Wallace Street, Mississauga, Ontario L4Z 1Z8, Canada Phone: (905) 890-8008 TEAC MEXICO, S.A. DE C.V. Río Churubusco 364, Colonia Del Carmen, Delegación Coyoacàn, CP 04100, México DF, México Phone: (5255)5010-6000 TEAC UK LTD.
| Анекдот |
|
В аптеке: — Мне, пожалуйста, коробку презервативов, как обычно. Только вытащите, пожалуйста, оттуда, 3 пачки. Нет, лучше 4: я собираюсь постепенно бросить. |
![]()
| Анекдот |
|
Учительница спрашивает детей, кем они хотят быть. Ну все говорят, врачом, космонавтом, артистом… А Вовочка: — Дедом Морозом. Учительница: — Но почему? Вовочка: — А потому! Классная профессия: недельку посуетился — и год свободен! |
| Анекдот |
|
Ездил я в Москву на машине и на обратном пути заехал в McDonalds, который в городе N. Ну заказал там, что надо, расплатился сижу жду, когда принесут. Кто в McDonalds не был — у них в прайсе последней строчкой написано «Улыбка-бесплатно». Приносит девушка заказ и спрашивает: — Ещё что-нибудь? — Улыбку. — А я уже у кассы улыбнулась. |
Cassette deck Manuals
| Model | Manufacturer | Date | Description |
|---|
All categories
Some other manuals
Dual
810
Catalog

Moog Music
Polypedal 285
Service Manual

Fluke
83
Service Manual

Fostex
VR800Z
Service Manual

Mitsubishi
CT — 25M5EN
Cirquit Diagram

Kenwood
ELEVEN III
Service Manual

Mirage Communication Equipment
KP-2 / 10 Meter:
User Manual

Sony
NW-E503
Service Manual

Sony
CCD-TRV53
Service Manual
