-
Contents
-
Table of Contents
-
Troubleshooting
-
Bookmarks
Quick Links
You can expect updates to this manual over the next few months
Do NOT read this entire manual… unless you want to.
•
At the start of Chapters 1 — 4 are short sections with references to find what you need plus some important
reminders. PLEASE read these short sections at the very least and refer back to them, when needed.
•
Chapters 1 and 2 are very important in terms of correctly setting up your Skycut to work with SignCut Pro2
and learning the ins and outs of cutting.
•
Chapter 3 is for those owners wanting to perform print and cut applications.
•
Chapter 4 covers using Skycut accessory tools and dual head applications.
•
Chapter 5 covers several SignCut Pro2 functions of interest: creating contour cuts and engraving fills.
It’s not practical to print this entire manual because:
•
It’s a waste of paper and ink if you only ever need certain sections.
•
The live links to videos and web sites in the manual will not work.
•
This manual will be updated from time to time.
•
You cannot search on individual words.
Also:
•
Videos of interest can be found at the following link:
________________________________________________________________
© 2018-2020
Sandy McCauley All Rights Reserved
Skycut Series D with SignCut Pro2
July 3, 2020
Skycut Support Videos
1
Summary of Contents for Skycut D Series
В ГРАФИЧЕСКОМ РЕДАКТОРЕ CorelDraw:
1. Создайте макет в графическом редакторе
2. Зайдите в приложения и нажмите SEND TO SIGNCUT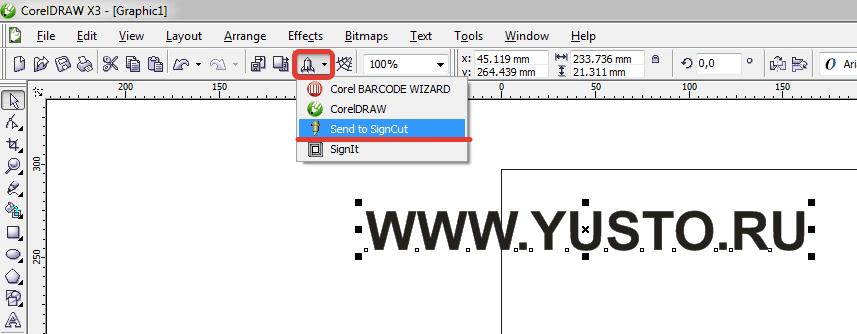
3. Откроется интерфейс программы SIGNCUT
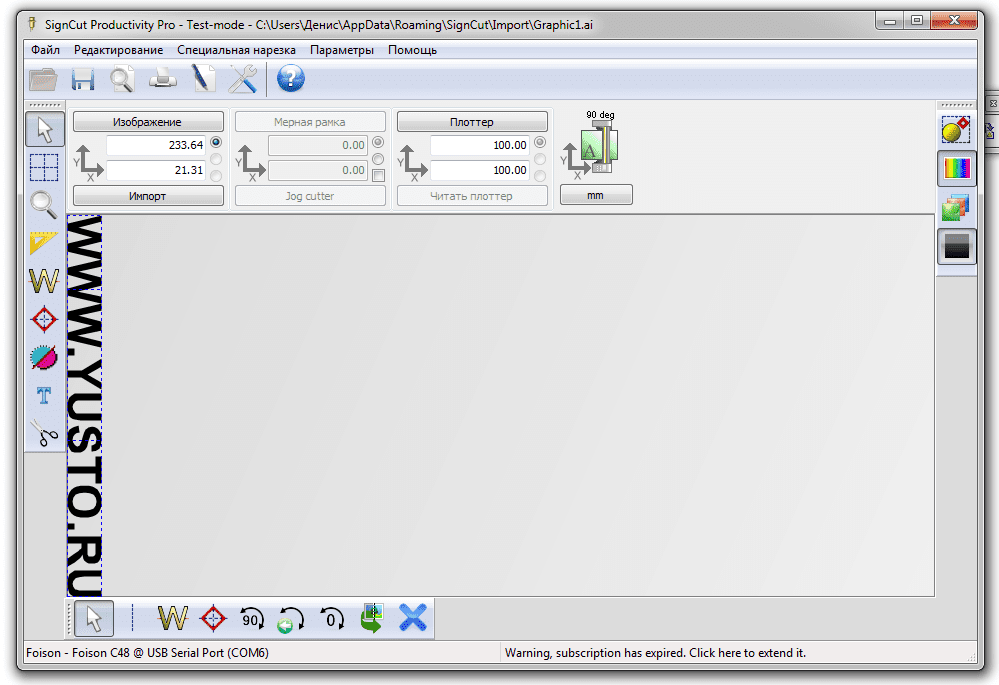
4. Выровняйте изображение по листу кнопкой 
5. Отправьте на резку макет, нажав кнопку 

Фрезерный станок ЧПУ VENO K45MT2040
Рабочее поле: 2000х4000 мм. Мощность шпинделя: 4,5 кВт. Цанговый патрон: ER-32. Высота портала:…
1 099 000
Перейти вкорзинуПерейти вкарточку товара
Лазерный станок CO2 по металлу KAMACH 1390 ZET
Рабочее поле, мм: 1300х900. Мощность излучателя, Вт: 130-160 RECI w6. Система управления RuiDa…
899 900
Перейти вкорзинуПерейти вкарточку товара
Лазерный станок по металлу VENO 1530 GE II 1000
Мощность лазера: 1000 Вт. Рабочее поле: 3000х1500 мм. Источник: Maxphotonics. Опция: RayCus, IPG….
2 790 000
Перейти вкорзинуПерейти вкарточку товара
Товар добавлен в корзину
6. В появившемся меню нажмите кнопку ВЫРЕЗАТЬ.
Чтобы убрать рамку снимите галочку (выделено звездочкой) в строке USE WEEDING FRAME
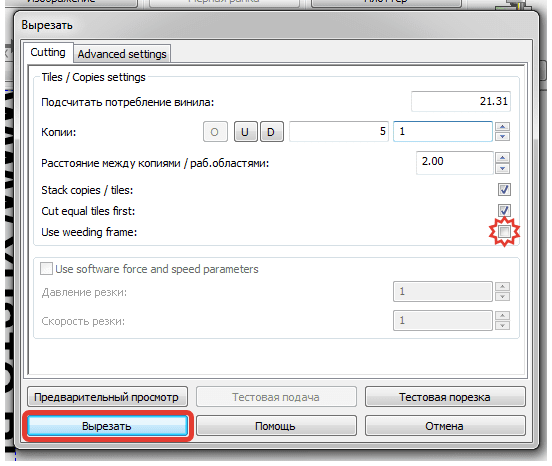
7. Плоттер сразу начнет резать после отправки файла.
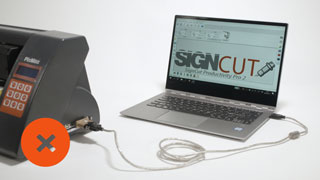
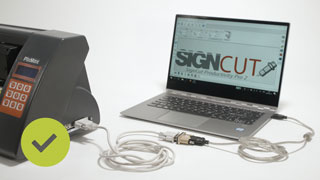
USB Connection
A communication driver must be installed unless the cutting plotter is plug-and-play compatible.

Plug-and-Play
The cutter’s name will show up automatically in the output list in SignCut as a printer, normally, with the name of the manufacturer or model.
Correct way to install the USB-driver
- Install the USB-driver for the cutter. You can find the proper driver on the manufacturer’s or reseller’s website.
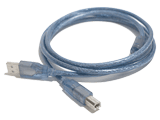
- Once installed, connect the USB-cable as shown in the illustration on the right.
- Power on the cutting plotter and it will show up in the SignCut output list.
Ethernet or TCP/IP Connection
The process to set up the cutting plotter varies. Check the manual for instructions.
Once you have the IP address of the cutter, enter it in SignCut and continue to the next step.
This video shows how to enter the IP address in SignCut. Click to start and watch the video in fullscreen.
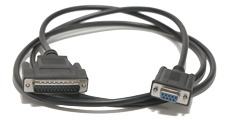
Serial to USB Connection
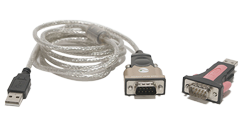
Serial communication is the most stable communication method. If your computer does not have a serial port, you are able to by-pass this through a Serial to USB adapter.
Notice: When using a Serial to USB Adapter, a communication driver must be installed for the computer to recognise it.
Correct way to connect the adapter and serial cable.
- Install the driver that you received with the adapter. If no driver was included, it could usually be found on the manufacturer’s website.
- Connect the adapter and the serial cable between the cutter and computer. See the images below for how to make the correct connection.
- Power on the cutter and it will now show up in the SignCut device list.

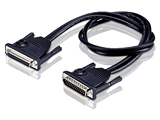
Serial Connection
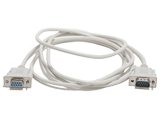
Serial communication is the most stable communication method. If you have both a cutter and a computer with a serial port, use a serial cable to connect the cutter to the computer. When direct serial communication is used, you do not need to install a driver. The option is shown in the SignCut device list as COM1 or COM2.
Follow these steps to connect the cutting machine to the computer.
- Connect the serial cable to the cutter.
- Connect the other end to the computer.
- Power on the cutter.
- Select the
COM portfrom the SignCut device list.
If the cutter has a serial port, but the computer doesn’t, you can use a Serial to USB converter. Click on Serial to USB tab for setup instructions.
Parallel to USB Connection
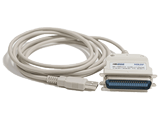
Parallel connection is considered outdated because most modern computers do not have parallel ports. For cutters which only have a parallel port, there are Parallel to USB adapters available which means that the cutter can be used with any Windows operating systems.
Note: This does not work with Mac operating systems.
We recommend adapters with FTDI-chip as it is the only type of adapter we support.
Follow these steps to connect the cutter to the computer.
- Install the driver for the adapter.
- Connect the parallel end of the adapter to the cutter.
- Connect the USB end of the adapter to the computer.
- Power on the cutter and it will now show up in the SignCut device list.
- Click OK to close the dialogue.
Parallel Connection
When direct parallel communication is used, you do not need to install a driver.
Follow these steps to connect the cutter to the computer.
- Connect the parallel cable to the cutter.
- Connect the other end to the computer.
- Power on the cutter and it will show up in the SignCut device list.
If no LTP is shown, follow the instructions below.
-
Open the
Control Paneland clickDevice and Printers. -
Click
Add a Printer. -
Click
The printer that I want isn't listed. -
Click
Add a local printerthen click Next. -
Click
Use an existing portandselect LPT1 in the list. Click Next. -
As for the manufacturer, select
Generic, and for the printer, chooseGeneric/text only. Click Next. -
Name the cutter and click Next to install the driver.
-
Choose if you want to share the cutter onto the network and click Next.
Note:We recommend that you do not do this if you are only going to use it on one computer. -
Do not click
Print out a test pageas the cutter can not print. Click Finish instead.
If the cutter has a parallel port, but the computer does not, you can use a Parallel to USB Converter. Click on the Parallel to USB tab for setup instructions.
Click «Next» to continue to the next section.
Последние добавленные макеты

Резной наличник
Меч «Оскверненный испепелитель»
Клинок «Ледяная скорбь»
Набор из 100 вариантов топперов на все случаи жизни
Копилка — джойстик
Макет ключницы с дверью под 4 мм
Смотреть все
-
vla2661
Помогите мне тоже с Signcut. vla2661@mail.ru
melkij60 писал(а): (→)что то много писем по этой теме
короче1- ставите пробную с официального сайта
2 -заменяете все на мои файлы
3- удаляете в програм файл/ синкат/ файлик склаушер(что то такое точно не помню, с дома пишу я в отпуске) выглядит как основной файл синката
4 -либо делаете новый файл ярлык на прогу и пихаете его на раб.стол либо ,на раб столе редактируете основной ярлык. там в пути надо этот склаушер заменить на синкат
будет работать по пол дня, если повторять все операции опять будет работать пол дня
5- блокируем прогу брендмауэром как? смотрите в яндексе (или антивирусом )на все исходящее и исходящее
будет работать не по пол дня
вот тогда радуемсяверсия с сайта пробная нужна для роботы с последними коралами
у меня работает даже с интернетом
если не понятно сниму видео после отпуска
Добавлено спустя 1 минуту 33 секунды:
Помогите с Signcut. ооооЧЕНЬ надо а ни чего рабочего найти не могу…
-
Baska
Сообщение Baska » 12 мар 2015 19:28
Приветствую!
Такая же ситуация. Кончилась лицензия на SignCut
Поставщики плоттера вообще не предупредили о такой ситуации.
Для оперативности пришлось продлить на неделю за 8$ а с нынешним курсом это 500р!)))
Друзья, если есть возможность, выложите ссылку на фалы актуальные или пришлите на
Basnev.Dima@gmail.com
буду крайне признателен! Заранее СПАСИБО!!!!
-
itemno
Сообщение itemno » 13 апр 2015 16:58
Уважаемый автор темы,
не могли бы поделиться патчем для SignCut.
Буду очень благодарен. ![]()
itemno@gmail.com
-
melkij60
Сообщение melkij60 » 14 апр 2015 12:22
подменить все файлы
блокирнуть все влезания в инет сингада
инет подключить после
а так все на форуме описано, если нечего не поменяли
ключ fo2035327422014341412-52485
download51.files.attachmail.ru/06FA487B6B374D319980954B9B34EBE2/4ccb11d6bcf8b80eca339ba1304407e6/SignCut.rar
-
itemno
Сообщение itemno » 17 апр 2015 13:12
melkij60 писал(а): (→)подменить все файлы….r
поправьте, пожалуйста, ссылку — ошибку 404 выдает
-
melkij60
Сообщение melkij60 » 17 апр 2015 14:44
-
kot1988
Сообщение kot1988 » 19 апр 2015 17:41
melkij60 писал(а): (→)https://cloud.mail.ru/public/3jUv9K2RBNK3/SignCut.rar
![]() Большое человеческое спасибо
Большое человеческое спасибо
-
itemno
Сообщение itemno » 20 апр 2015 10:20
melkij60 писал(а): (→)https://cloud.mail.ru/public/3jUv9K2RBNK3/SignCut.rar
спасибо!!!
-
itemno
Сообщение itemno » 27 апр 2015 11:08
внесу свои 5 копеек..
После того как переписали папки, выложенные уважаемым melkij60 программу нужно обновить (установить последний апдейт). Иначе не видит плоттер (у меня подключен по USB). В этот момент скорее всего слетит лицензия. Не нужно удалять и переустанавливать по новой всю программу — снесите папку C:\Users\….\AppData\Roaming\SignCut
и все.. правда в этот момент слетают все настройки программы, но их проще восстановить чем переписывать программу.
Что сделать чтобы лицензия больше не слетала:
1. Править хост-файл — в 7-й винде лежит в папочке C:\Windows\System32\drivers\etc…
копируем на рабочий стол, открываем в блокноте и добавляем строчки
127.0.0.1 crl.globalsign.net
127.0.0.1 signcutpro.com
127.0.0.1 globalsign.net
сохраняем и переписываем в исходную папку
2. Блокируем в брэндмауэр виндовс все входящие и исходящие подключения для SignCut
у меня больше недели уже полет нормальный
![]()
-
Tujh
- Постоянный участник

- Сообщения: 115
- Зарегистрирован: 12 апр 2012 09:22
- Последний визит: 25 мар 2023 21:01
- Изменить репутацию:
Репутация:
Голосов: 1 - Откуда: Санкт Петербург

Сообщение Tujh » 04 май 2015 14:47
ПРИВЕТСТВУЮ всех форумчан! Сделал как написано-поменял файлы. Сначала резал но уменьшал размер в разы при резке, потом поменял галочку где размер макета вместо изображение постафит знак, пустил на резку все ок, повторно пустил и все 10*10 только. Есть ли еще какой нибудь способ запустить ?
-

i1
- Новичок
- Сообщения: 21
- Зарегистрирован: 18 мар 2015 14:11
- Последний визит: 08 янв 2018 10:24
- Изменить репутацию:
Репутация: нет - Откуда: Moscow


Сообщение i1 » 05 май 2015 14:38
Tujh писал(а): (→) и все 10*10 только.
100х100 мм триал-моде без всяких шаманств позволяет резать.
-
Tujh
- Постоянный участник
- Сообщения: 115
- Зарегистрирован: 12 апр 2012 09:22
- Последний визит: 25 мар 2023 21:01
- Изменить репутацию:
Репутация:
Голосов: 1 - Откуда: Санкт Петербург
Сообщение Tujh » 05 май 2015 17:59
i1 писал(а): (→)
Tujh писал(а): (→) и все 10*10 только.
100х100 мм триал-моде без всяких шаманств позволяет резать.
В смысле без всяких шаманств, он не даёт резать больше 10*10 см
-
Tujh
- Постоянный участник
- Сообщения: 115
- Зарегистрирован: 12 апр 2012 09:22
- Последний визит: 25 мар 2023 21:01
- Изменить репутацию:
Репутация:
Голосов: 1 - Откуда: Санкт Петербург
Сообщение Tujh » 05 май 2015 20:43
переустановил, повторил операцию с заменой, ввел серийный номер выше предоставленый по теме, пару раз вырезал ок — и на этом счастье закончилось. ![]() что делать незнаю
что делать незнаю
Вернуться в «Программные вопросы плоттерной резки»
Кто сейчас на конференции
Сейчас этот форум просматривают: нет зарегистрированных пользователей и 0 гостей