Singer 4423 Sewing Machine Manual
ATTENTION
Be sure to observe the following, as they may well become causes for fire, electric-shock, injuries, and damage to parts.
- Be sure to unplug power source before engaged in disassembly, installation, adjustment.
- In case of installing please pay special care to clamp electrical cords, etc., scars to sheath, mis-circuit, etc.
- Be sure to use regular standard part in replacing.
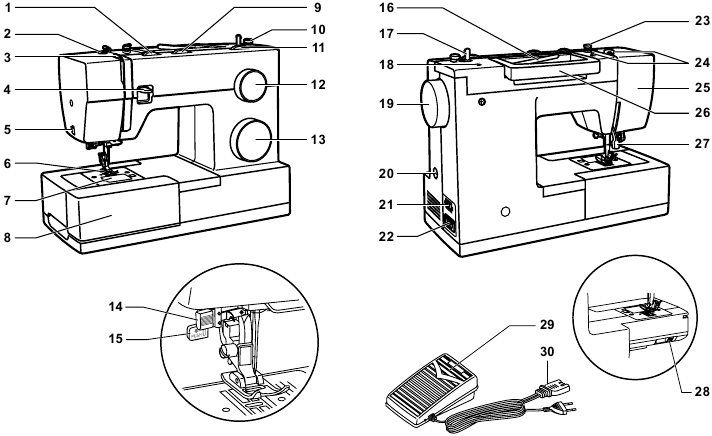
Names of principal parts
- Thread tension dial
- Presser foot pressure adjustment
- Thread take-up lever
- Reverse sewing lever
- Thread cutter
- Presser foot
- Needle plate cover
- Removable extension table/ accessory storage
- Three needle position dial
- Bobbin stopper
- Stitch width dial
- Stitch length dial
- Pattern selector dial
- Automatic threader (not on all model)
- One step buttonhole lever (not on all model)
- Horizontal spool pin
- Bobbin winding spindle
- Hole for second spool pin
- Handwheel
- Buttonhole stitch balance adjustment slot
- Power and light switch
- Main plug socket
- Bobbin thread guide
- Upper thread guide
- Face plate
- Handle
- Presser foot lifter
- Drop feed control
- Foot speed control
- Power cord
Removing methods of external parts
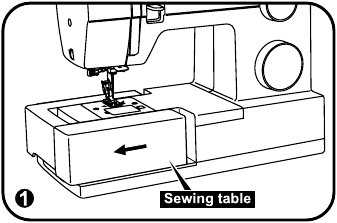
Sewing table
Keep the snap-in sewing table horizontal, and pull it in the direction of the arrow. (1)
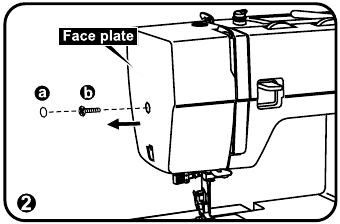
Face plate
- Remove the operation cover (a).
- Loosen the screw (b) and remove the face plate. (2)
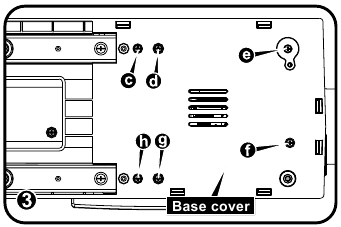
Base cover
- Lay down machine.
- Remove the screws (c, d, e, f, g, h). (3)
- Remove the base cover.
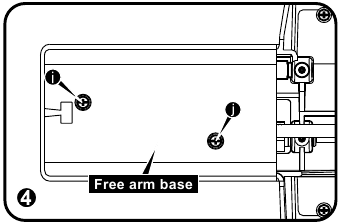
Free arm base
Remove the screws (i, j) and remove the free arm base. (4)
Free arm slab
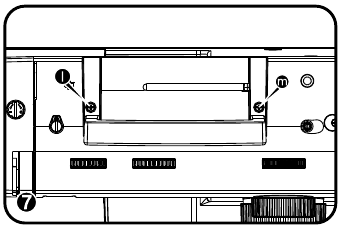
Arm top cover
Remove the screws (l, m) and remove the arm top cover. (7)
Back cover
Front cover
Adjusting methods of each part
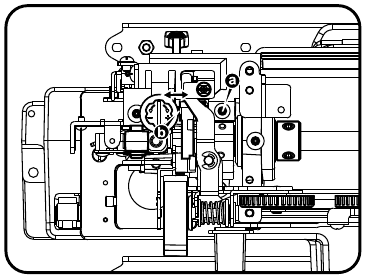
Play of arm shaft
Noisy — take up lever adjustment
- Remove the face plate and front cover.
- Turn around hand wheel, check noisy and movement.
- Remove the screw (a), push take up lever support (b) right to proper location, tight the screw (a). (1)
- If adjustment is too tight, it will be difficult to move during turn around hand wheel.
- If adjustment is too loose, it will be made noisy during turn around hand wheel.
Needle drop position adjustment
Height of presser foot
Needle flow at maximum zigzag width
Needle center position adjustment
Needle position on zigzag
Automatic needle threader adjustment
Adjustment of feed rock shaft and feed lifting rock cam
- Remove the cord reel cover and free arm cover.
- Turn the hand wheel to make the needle at its lowest point.
- Check if the feed lifting rock cam (a) and the screw (b) of feed rock cam (c) are parallel.
- If the screw of feed rock cam are not parallel: Loosen the screw (b) of feed rock cam (c) adjust the screw and front gauge correction to the middle.
Height of needle bar
Timing of needle and hook
Distance-needle-hook
Play between shuttle driver shaft gear and lower shaft gear
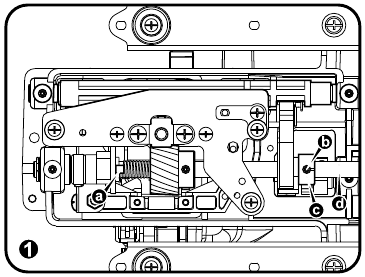
Play of shuttle driver shaft
- Remove the needle plate.
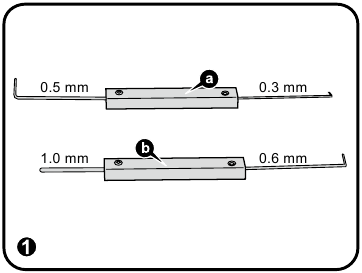
- There are 2 gauges (a, b) for testing the play of shuttle driver shaft. (1)
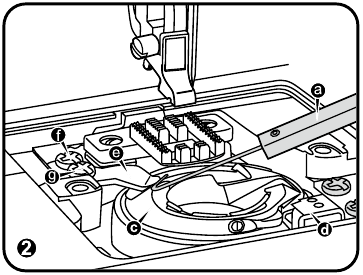
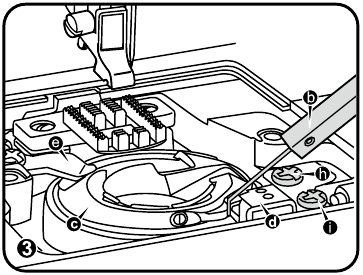
- When you turn the hand wheel counterclockwise, the shuttle hook (c) will move to rotary hook plate (d), and generate the play between the shuttle hook and the rotary hook plate (e).
Using the gauge (a) to test the play, and the standard is 0.3 mm to 0.5 mm.
If the play is incorrect, loosen screws (f, g) of rotary hook plate (e) and adjust the plate to the proper position. Finally, re-tighten the screws. (2) - When you turn the hand wheel clockwise, the shuttle hook (c) will move to rotary hook plate (e), and generate the play between the shuttle hook and the rotary hook plate (d).
Using the gauge (b) to test the play, and the standard is 0.6 mm to 1.0 mm.
If the play is incorrect, loosen screws (h, i) of rotary hook plate (d) and adjust the plate to the proper position. Finally, re-tighten the screws. (3)
Feed-dog height
When the feed dog is in it’s highest position it should be 0.9 to 1.05 mm above the surface of the needle plate.
Position of feed-dog in relation to the needle plate (left to right)
Upper thread tension adjustment
Shuttle hook tension adjustment
Motor belt tension
Drop point of needle
Forward and reverse stitching in buttonhole sewing (feeding pitch of reverse and forward stitching is not even)
Buttonhole upper and lower stitching problem
Bobbin winding problem
® A registered trademark of The Singer Company Ltd. or its affiliates.
Videos
Singer Heavy Duty 4423 Threading & Winding a Bobbin Video
Documents / Resources
Download manual
Here you can download full pdf version of manual, it may contain additional safety instructions, warranty information, FCC rules, etc.
Download Singer 4423 Sewing Machine Manual
Перейти к контенту
Русские электронные инструкции по эксплуатации
Постоянно обновляемый большой каталог документации по эксплуатации и использованию современных устройств и оборудования на русском языке. Бесплатное скачивание файлов.
Поиск:
Главная
♥ В закладки
Просмотр инструкции в pdf
Инструкция по эксплуатации швейной машины Singer Heavy Duty 4423.
Скачать инструкцию к швейной машине Singer Heavy Duty 4423 (1 006,51 КБ)
Инструкции по эксплуатации швейных машин Singer
« Инструкция к швейной машине Jaguar 143
» Инструкция к швейной машине Comfort 210
Вам также может быть интересно
Инструкция к швейной машине Singer Starlet 6660
Инструкция к швейной машине Singer Brilliance 6180
Инструкция к швейной машине Singer Starlet 6680
Инструкция к швейной машине Singer Tradition 2259
Инструкция к швейной машине Singer M3205
Инструкция к швейной машине Singer 7640
Инструкция к швейной машине Singer M2405
Инструкция к швейной машине Singer Talent 3321
Добавить комментарий
Имя *
Email *
Сайт
Комментарий


Сохранить моё имя, email и адрес сайта в этом браузере для последующих моих комментариев.
- Добавить инструкцию
- Заказать инструкцию
- Политика конфиденциальности

Швейная машина Singer Heavy Duty 4432. Обзор от Папа Швей

Singer 4423 Heavy Duty | Unboxing +Test

Singer Heavy Duty 4423 4 Threading & Winding a Bobbin

Model 4411 4423 Heavy Duty Instructional DVD

SINGER Heavy Duty series — ознакомительное видео

Singer HD 4423 — скорость работы

SINGER Heavy Duty 4423 — Erklärung und Test

Обзор: швейная машина Singer Heavy Duty 4423
4423 Instruction Manual
Danger save these instructions, Warning, Important safety instructions
Страница 2
- Изображение
- Текст
When using an electrical appliance, basic safety should always be
followed, including the following:
Read all instructions before using this sewing machine.
1. An appliance should never be left unattended when plugged in.
2. Always unplug this appliance from the electric outlet immediately
after using and before cleaning.
3.
. Replace bulb with
same type rated 15 watts
1. Do not allow to be used as a toy. Close attention is necessary
when this appliance is used by or near children.
2. Use this appliance only for its intended use as described in this
manual. Use only attachments recommended by the
manufacturer as contained in this manual.
3. Never operate this appliance if it has a damaged cord or plug, if
it is not working properly, if it has been dropped or damaged, or
dropped into water. Return the appliance to the nearest
authorized dealer or service center for examination, repair,
electrical or mechanical adjustment.
4. Never operate the appliance with any air openings blocked. Keep
ventilation openings of the sewing machine and foot controller
free from accumulation of lint, dust, and loose cloth.
5. Keep fingers away from all moving parts. Special care is required
around the sewing machine needle.
6. Always use the proper needle plate. The wrong plate can cause
the needle to break.
7. Do not use bent needles.
8. Do not pull or push fabric while stitching. It may deflect the
needle causing it to break.
9. Switch the sewing machine off («O») when making any adjustments
in the needle area, such as threading needle, changing needle,
threading bobbin, or changing presser foot, and the like.
10. Always unplug sewing machine from the electrical outlet when
removing covers, lubricating, or when making any other user
servicing adjustments mentioned in the instruction manual.
11. Never drop or insert any object into any opening.
12. Do not use outdoors.
13. Do not operate where aerosol spray products are being used or
where oxygen is being administered.
14. To disconnect, turn all controls to the off («O») position, then
remove plug from outlet.
15. Do not unplug by pulling on cord. To unplug, grasp the plug, not
the cord.
This sewing machine is intended for household use only.
DANGER
SAVE THESE INSTRUCTIONS
—
To reduce the risk of electric shock:
(110-120V area / 220-240V area).
Please turn off the machine or unplug when the machine is not
operating properly.
18. Never place anything on the foot controller.
19. If the supply cord that is fixed with foot controller is damaged, it
must be replaced by the manufacturer or its service agent or a
similar qualified person in order to avoid a hazard.
20. This appliance is not intended for use by persons (including
children) with reduced physical, sensory or mental capabilities, or
lack of experience and knowledge, unless they have been given
supervision or instruction concerning use of the appliance by a
person responsible for their safety.
21. Children should be supervised to ensure that they do not play
with the appliance.
WARNING
—
To reduce the risk of burns, fire,
electric shock, or injury to persons:
Always unplug before changing the light bulb
16. The sound pressure level under normal operating conditions is
75dB(A).
17.
IMPORTANT SAFETY INSTRUCTIONS
As the owner of a new Singer sewing machine, you are about t…
Страница 3
- Изображение
- Текст
As the owner of a new Singer sewing machine, you are about to begin an exciting adventure in
creativity. From the moment you first use your machine, you will know you are sewing on one
of the easiest to use sewing machines ever made.
May we recommend that, before you start to use your sewing machine, you discover the many
features and the ease of operation by going through this instruction book, step by step, seated
at your machine.
To ensure that you are always provided with the most modern sewing capabilities, the
manufacturer reserves the right to change the appearance, design or accessories of this
sewing machine when considered necessary.
SINGER is a registered trademark of The Singer Company Limited or its affiliates.
© 2010 The Singer Company Limited or its affiliates. All rights reserved.
Congratulations
List of Contents
Machine Basics
Sewing
General Information
Maintenance and Troubleshooting
Principle Parts of the Machine ………………………………………………………………………………………………………………………………….2/3
Connecting Machine to Power Source………………………………………………………………………………………………………………………….4
Two Step Presser Foot Lifter/
………………………………………………………………………………………..5
Accessories………………………………………………………………………………………………………………………………………………………………6
Winding the Bobbin ……………………………………………………………………………………………………………………………………………………7
Inserting the Bobbin …………………………………………………………………………………………………………………………………………………..8
Threading the Upper Thread ……………………………………………………………………………………………………………………………………….9
Raising the Bobbin Thread ………………………………………………………………………………………………………………………………………..11
How to Choose Your Pattern……………………………………………………………………………………………………………………………………..13
Sewing Straight Stitch ………………………………………………………………………………………………………………………………………………16
Reverse Sewing/
………………………………………………………………………………………………17
Choosing Stretch Stitch Patterns ……………………………………………………………………………………………………………………………….18
Blind Hem……………………………………………………………………………………………………………………………………………………………….19
……………………………………………………………………………………………………………………………………………20
Sewing on Buttons …………………………………………………………………………………………………………………………………………………..22
Installing the Removable Extension Table …………………………………………………………………………………………………………………..23
Attaching the Presser Foot Shank ……………………………………………………………………………………………………………………………..24
Needle/Fabric/Thread Chart………………………………………………………………………………………………………………………………………25
…………………………………………………………………………………………………………………………………………….26
Inserting & Changing Needle …………………………………………………………………………………………………………………………………….27
Changing the Bulb……………………………………………………………………………………………………………………………………………………28
Troubleshooting Guide ……………………………………………………………………………………………………………………………………………..29
Adjusting Presser Foot Pressure
Automatic Needle Threader ………………………………………………………………………………………………………………………………………10
Thread Tension ……………………………………………………………………………………………………………………………………………………….12
Stitch Width Dial & Stitch Length Dial …………………………………………………………………………………………………………………………15
Removing the Work/Cutting the Thread
Sew 1-step Buttonholes
Threading the Machine
Three Needle Position Dial ……………………………………………………………………………………………………………………………………….14
Left and Right Side Balance for Buttonhole …………………………………………………………………………………………………………………21
How To Drop Feed Dog
2
1. Thread tension dial
2. Presser foot pressure adjustment
3. Thread take-up lever
4. Reverse sewing lever
5. Thread cutter
6. Presser foot
7. Needle plate cover
8. Removable extension table/ accessory storage
9. Three needle position dial
10. Bobbin stopper
11. Stitch width dial
12. Stitch length dial
13. Pattern selector dial
14. Automatic threader
15. One step buttonhole lever
14
15
1
2
3
5
6
8
7
13
11
12
10
4
9
Principal Parts of the Machine
3
16. Horizontal spool pin
17. Bobbin winding spindle
18. Hole for second spool pin
19. Handwheel
20. Buttonhole stitch balance adjustment slot
21. Power and light switch
22. Main plug socket
23. Bobbin thread guide
24. Upper thread guide
25. Face plate
26. Handle
27. Presser foot lifter
28.
29. Foot speed control
30. Power cord
Drop feed control
29
30
25
26
28
23
24
27
20
21
22
16
17
19
18
Principal Parts of the Machine
Connect the machine to a power source as illustrated. (1)
This appliance is equipped with a polarized plug which must be
used with the appropriate polarized outlet. (2)
Unplug power cord when machine is not in use.
The foot control pedal regulates the sewing speed. (3)
Consult a qualified electrician if in doubt of how to connect
machine to power source.
Unplug power cord when machine is not in use.
The foot control must be used with the appliance by KD-
1902 (110-120V area)/ KD-2902 (220-240V area)
manufactured by ZHEJIANG FOUNDER MOTOR
CORPORATION LTD. (China)
4C-316B (110-120V area)/ 4C-326G (230V area)
manufactured by Wakaho Electric Ind. Co., Ltd. (Vietnam)
Press main switch (A) to » l » for power and light.
For appliance with a polarized plug (one blade is wider than
the other). To reduce the risk of electric shock, this plug is
intended to fit in a polarized outlet only one way. If it does not
fit fully in the outlet, reverse the plug. If it still does not fit,
contact a qualified electrician to install the proper outlet. Do
not modify the plug in any way.
Attention:
Foot control
Attention:
Sewing light
IMPORTANT NOTICE
a. Polarized attachment plug
b. Conductor intended to be grounded
2
3
4
1
A
a
b
Connecting Machine to Power Source
When sewing several layers or thick fabrics, the presser fo…
Страница 8
- Изображение
- Текст
5
When sewing several layers or thick fabrics, the presser foot
can be raised
for easy positioning of the
work. (A)
to a higher position
A
The presser foot pressure of the machine has been pre-set
and requires no particular readjustment according to the type
of fabric (light-or-heavy weight).
However, if you need to adjust the presser foot pressure,
turn the presser adjusting screw with a coin.
For sewing very thin fabric, loosen the pressure by turning
the screw counter clockwise, and for heavy fabric, tighten by
turning it clockwise.
Two Step Presser Foot Lifter
Adjusting Presser Foot Pressure
1 Standard accessories
2 Optional accessories
Standard accessories (1)
Optional accessories (2)
a. All purpose foot
b. Zipper foot
c. Buttonhole foot
d. Button sewing foot
e. Seam ripper/ brush
f. Edge/ quilting guide
g. Pack of needles
h. Spool holders
i. Bobbin (3x)
j. L-screwdriver
k. Auxiliary Spool Pin
l. Spool pin felt
m. Soft cover
(These 10 accessories are not supplied with this machine;
they are, however, available for purchase from your authorized
retailer.)
n. Satin stitch foot
o. Overcasting foot
p. Hemmer foot
q. Cording foot
r. Blind hem foot
s. Quilting/ straight stitch foot
t. Gathering foot
u. Darning/ embroidery foot
v. Even Feed foot
w. Twin needle
o
n
p
q
r
s
t
u
v
w
006916008
006016008
006917008
0061850081
006904008
006172008
006907008
006900008
006813008
m
h
g
e
f
i
j
l
k
a
b
c
d
006806008
006905008
006914008
006Q6A0150
Accessories
6
1
2
4
7
8
9
5
6
3
10
—
corresponding
. (1/2)
— Snap thread into thread guide. (3)
— Wind thread clockwise around bobbin winder tension discs. (4)
— Thread bobbin as illustrated and place on spindle. (5)
— Push bobbin spindle to right. (6)
— Hold thread end. (7)
— Step on foot control pedal. (8)
— Cut thread. (9)
— Push bobbin spindle to left (10) and remove.
When the bobbin winder spindle is in «bobbin winding»
position, the machine will not sew and the
.
To start sewing, push the bobbin winder spindle to the left
(sewing position).
Please Note:
Place thread and
spool holder on to spool
pin
handwheel turn
Winding the Bobbin
7
Комментарии
Singer 4423 Sewing Machine Manual
ATTENTION
Be sure to observe the following, as they may well become causes for fire, electric-shock, injuries, and damage to parts.
- Be sure to unplug power source before engaged in disassembly, installation, adjustment.
- In case of installing please pay special care to clamp electrical cords, etc., scars to sheath, mis-circuit, etc.
- Be sure to use regular standard part in replacing.
Names of principal parts
- Thread tension dial
- Presser foot pressure adjustment
- Thread take-up lever
- Reverse sewing lever
- Thread cutter
- Presser foot
- Needle plate cover
- Removable extension table/ accessory storage
- Three needle position dial
- Bobbin stopper
- Stitch width dial
- Stitch length dial
- Pattern selector dial
- Automatic threader (not on all model)
- One step buttonhole lever (not on all model)
- Horizontal spool pin
- Bobbin winding spindle
- Hole for second spool pin
- Handwheel
- Buttonhole stitch balance adjustment slot
- Power and light switch
- Main plug socket
- Bobbin thread guide
- Upper thread guide
- Face plate
- Handle
- Presser foot lifter
- Drop feed control
- Foot speed control
- Power cord
Removing methods of external parts
Sewing table
Keep the snap-in sewing table horizontal, and pull it in the direction of the arrow. (1)
Face plate
- Remove the operation cover (a).
- Loosen the screw (b) and remove the face plate. (2)
Base cover
- Lay down machine.
- Remove the screws (c, d, e, f, g, h). (3)
- Remove the base cover.
Free arm base
Remove the screws (i, j) and remove the free arm base. (4)
Free arm slab
Arm top cover
Remove the screws (l, m) and remove the arm top cover. (7)
Back cover
Front cover
Adjusting methods of each part
Play of arm shaft
Noisy — take up lever adjustment
- Remove the face plate and front cover.
- Turn around hand wheel, check noisy and movement.
- Remove the screw (a), push take up lever support (b) right to proper location, tight the screw (a). (1)
- If adjustment is too tight, it will be difficult to move during turn around hand wheel.
- If adjustment is too loose, it will be made noisy during turn around hand wheel.
Needle drop position adjustment
Height of presser foot
Needle flow at maximum zigzag width
Needle center position adjustment
Needle position on zigzag
Automatic needle threader adjustment
Adjustment of feed rock shaft and feed lifting rock cam
- Remove the cord reel cover and free arm cover.
- Turn the hand wheel to make the needle at its lowest point.
- Check if the feed lifting rock cam (a) and the screw (b) of feed rock cam (c) are parallel.
- If the screw of feed rock cam are not parallel: Loosen the screw (b) of feed rock cam (c) adjust the screw and front gauge correction to the middle.
Height of needle bar
Timing of needle and hook
Distance-needle-hook
Play between shuttle driver shaft gear and lower shaft gear
Play of shuttle driver shaft
- Remove the needle plate.
- There are 2 gauges (a, b) for testing the play of shuttle driver shaft. (1)
- When you turn the hand wheel counterclockwise, the shuttle hook (c) will move to rotary hook plate (d), and generate the play between the shuttle hook and the rotary hook plate (e).
Using the gauge (a) to test the play, and the standard is 0.3 mm to 0.5 mm.
If the play is incorrect, loosen screws (f, g) of rotary hook plate (e) and adjust the plate to the proper position. Finally, re-tighten the screws. (2) - When you turn the hand wheel clockwise, the shuttle hook (c) will move to rotary hook plate (e), and generate the play between the shuttle hook and the rotary hook plate (d).
Using the gauge (b) to test the play, and the standard is 0.6 mm to 1.0 mm.
If the play is incorrect, loosen screws (h, i) of rotary hook plate (d) and adjust the plate to the proper position. Finally, re-tighten the screws. (3)
Feed-dog height
When the feed dog is in it’s highest position it should be 0.9 to 1.05 mm above the surface of the needle plate.
Position of feed-dog in relation to the needle plate (left to right)
Upper thread tension adjustment
Shuttle hook tension adjustment
Motor belt tension
Drop point of needle
Forward and reverse stitching in buttonhole sewing (feeding pitch of reverse and forward stitching is not even)
Buttonhole upper and lower stitching problem
Bobbin winding problem
® A registered trademark of The Singer Company Ltd. or its affiliates.
Documents / Resources
Download manual
Here you can download full pdf version of manual, it may contain additional safety instructions, warranty information, FCC rules, etc.
Download Singer 4423 Sewing Machine Manual
4423 Instruction Manual
IMPORTANT SAFETY INSTRUCTIONS When using an electrical appliance, basic safety should always be followed, including the following: Read all instructions before using this sewing machine. DANGER — To reduce the risk of electric shock: 1. An appliance should never be left unattended when plugged in.
Congratulations As the owner of a new Singer sewing machine, you are about to begin an exciting adventure in creativity. From the moment you first use your machine, you will know you are sewing on one of the easiest to use sewing machines ever made. May we recommend that, before you start to use
List of Contents Machine Basics Principle Parts of the Machine ………………………………………………………………………………………………………………………………….2/3 Connecting Machine to Power
Principal Parts of the Machine 1. Thread tension dial 2. Presser foot pressure adjustment 3. Thread take-up lever 4. Reverse sewing lever 1 9 2 10 11 3 5. Thread cutter 6. Presser foot 12 4 7. Needle plate cover 5 8. Removable extension table/ accessory storage 9. Three needle position dial 13 6
Principal Parts of the Machine 16. Horizontal spool pin 17. Bobbin winding spindle 16 23 18. Hole for second spool pin 17 19. Handwheel 24 18 20. Buttonhole stitch balance adjustment slot 25 21. Power and light switch 19 22. Main plug socket 26 23. Bobbin thread guide 27 24. Upper thread guide 25.
Connecting Machine to Power Source Connect the machine to a power source as illustrated. (1) This appliance is equipped with a polarized plug which must be used with the appropriate polarized outlet. (2) Attention: Unplug power cord when machine is not in use. A Foot control The foot control pedal
Two Step Presser Foot Lifter When sewing several layers or thick fabrics, the presser foot can be raised to a higher position for easy positioning of the work. (A) A Adjusting Presser Foot Pressure The presser foot pressure of the machine has been pre-set and requires no particular readjustment
Accessories 1 Standard accessories Standard accessories (1) a. All purpose foot b. Zipper foot c. Buttonhole foot d. Button sewing foot e. Seam ripper/ brush f. Edge/ quilting guide g. Pack of needles h. Spool holders i. Bobbin (3x) j. L-screwdriver k. Auxiliary Spool Pin l. Spool pin felt m. Soft
Winding the Bobbin — Place thread and corresponding spool holder on to spool pin. (1/2) — Snap thread into thread guide. (3) — Wind thread clockwise around bobbin winder tension discs. (4) — Thread bobbin as illustrated and place on spindle. (5) — Push bobbin spindle to right. (6) — Hold thread
Inserting the Bobbin When inserting or removing the bobbin, the needle must be fully raised. 1. Insert the bobbin in the bobbin case with the thread running counterclockwise direction (arrow). 2. Pull the thread through the slit (A). 3. Draw the thread clockwise until it slips into the notch (B).
Threading the Upper Thread This is a simple operation but it is important to carry out correctly as by not doing so several sewing problems could result. — Start by raising the needle to its highest point (1), and continue turning the handwheel counterclockwise until the needle just slightly begins
Automatic Needle Threader — Raise the needle to its highest position. — Press lever (A) down as far as it will go. — The threader automatically swings to the threading position (B). — Pass thread around thread guide (C). A — Pass the thread in front of the needle around the hook (D) from bottom to
Raising the Bobbin Thread Hold the upper thread with the left hand. Turn the handwheel (1) towards you (counterclockwise) lowering, then raising needle. Note: If it is difficult to raise the bobbin thread, check to make sure the thread is not trapped by the hinged cover or the Removable Extension
Thread Tension Upper thread tension Basic thread tension setting: «4». (1) To increase the tension, turn the dial to the next number up. To reduce the tension, turn the dial to the next number down. A. Normal thread tension for straight stitch sewing. B. Thread tension too loose for straight stitch
How to Choose Your Pattern The diagram on this page display the stitch patterns available on the machine. a b c Stitches in the top of the diagram are indicated on the Pattern Selector Dial in gray. To select the patterns indicated with the gray color, turn the Pattern Selector Dial. (e) Use the
Three Needle Position Dial The needle position can be altered with the «Three needle position dial». For normal work, the needle position is middle. For edge stitching or sewing parallel lines of top stitch, select needle position left or right. For twin needle stitching, needle position is middle.
Stitch Width Dial & Stitch Length Dial Function of stitch width dial The maximum zigzag stitch width for zigzag stitching is 5mm; however, the width can be reduced on any patterns. The width increases as you move zigzag dial from «0» — «6». (1) The Stitch Width Dial is also the control for the
Sewing Straight Stitch To begin sewing, set the machine for straight stitch. (1) Place the fabric under the presser foot with the fabric edge lined up with the desired seam guide line on the needle plate. (2) Lower the presser foot lifter, and then step on the foot controller to start sewing. (3) 1
Reverse Sewing To secure the beginning and the end of a seam, press down the reverse sewing lever (A). Sew a few reverse stitches. Release the lever and the machine will sew forward again. (1) A Removing the Work Turn the handwheel toward you (counterclockwise) to bring the thread take up lever to
Choosing Stretch Stitch Patterns The Stretch Stitch Patterns are indicated with a blue color on the Pattern Selector Dial. To select these stitches, turn the Pattern Selector Dial to the desired pattern. Then, turn the Stitch Length Dial to the indicator marked «S1». Though there are several
Blind Hem For hems on curtains, trousers, skirts, etc. Blind hem for stretch fabrics. Blind hem for firm fabrics. M Set the Stitch Length Dial with the range shown on the diagram at the right. Blind hems, however, are normally sewn with a longer stitch length setting. Set the Stitch Width Dial at a
Sew 1-step Buttonholes Buttonhole sewing is a simple process that provides reliable results. However, it is strongly suggested to always make a practice buttonhole on a sample of your fabric and stabilizer. M Making a Buttonhole 1. Using tailor’s chalk, mark the position of the buttonhole on the
Left and Right Side Balance for Buttonhole Stitch density on right and left sides of buttonhole can be adjusted by buttonhole balance control dial. This dial should usually be in a neutral position (between «+» and «–») If the stitches on the left side of buttonhole are too close together, turn the
Sewing on Buttons Move the drop feed control to right side to lower the feed dogs. (1) L Change the all purpose foot to the button sewing foot. (2) Set the stitch length to «0». Place the button and fabric under the Button Sewing foot, as illustrated in (3). Set the machine for zig-zag stitch, then
Installing the Removable Extension Table Hold the removable extension table horizontally, and push it in the direction of the arrow. (1) To remove the extension table, pull it toward the left. 1 The inside of the removable extension table can be utilized as an accessory box. To open, flip cover
Attaching the Presser Foot Shank Raise the presser bar (a) with the presser foot lifter. Attach the presser foot shank (b) as illustrated. (1) a a Attaching the presser foot Lower the presser foot shank (b) using the presser foot lifter, until the cut-out (c) is directly above the pin (d). (2) The
Needle/ Fabric/ Thread Chart NEEDLE, FABRIC, THREAD SELECTION GUIDE NEEDLE SIZE FABRICS Lightweight fabrics-thin cottons, voile, silk, muslin, 9-11 (70-80) interlocks, cotton knits, tricots, jerseys, crepes, woven polyester, shirt & blouse fabrics. 11-14 (80-90) 14 (90) 16 (100) 18 (110) Medium
How To Drop Feed Dog For ordinary sewing, keep the feed dog up, for freehand embroidery, sewing on buttons and darning, drop the feed dog. To raise (a) and lower (b) feed dog. (2) 1 a b 2 26 a b
Inserting & Changing Needles Change the needle regularly, especially if it is showing signs of wear and causing problems. For best sewing results ® always use SINGER Brand Needles. D A Insert the needle as illustrated as follows: A. Loosen the needle clamp screw and tighten again after inserting
Changing the Bulb Disconnect the machine from the power supply by removing the plug from the main socket! Replace bulb with same type rated 15 watts (110-120V area / 220-240V area). — Loosen screw (A) as illustrated. (1) Remove the face plate (B). Unscrew the bulb and install a new one (C). (2)
Troubleshooting Guide Problem Cause Correction Upper thread breaks 1. The machine is not threaded correctly. 2. The thread tension is too tight. 3. The thread is too thick for the needle. 4. The needle is not inserted correctly. 5. The thread is wound around the spool holder pin. 6. The needle is
Please note that on disposal, this product must be safely recycled in accordance with relevant National legislation relating to electrical/electronic products. If in doubt please contact your retailer for guidance.
Ïðè ïîäêëþ÷åíèè ýòîãî ïðîäóêòà íåîáõîäèìî âíèìàòåëüíî îçíàêîìèòüñÿ ñ ïðàâèëàìè ïî òåõíèêå áåçîïàñíîñòè, â ñîîòâåòñòâèè ñ äåéñòâóþùèì çàêîíîäàòåëüñòâîì â âàøåé ñòðàíå. Ïîæàëóéñòà, ó÷òèòå, ÷òî ïî îêîí÷àíèè ñðîêà ñëóæáû ýòîò ïðîäóêò äîëæåí áûòü óòèëèçèðîâàí â ñîîòâåòñòâèè ñ äåéñòâóþùèì Íàöèîíàëüíûì
Íåïîëàäêè è èõ óñòðàíåíèå Çàïóòûâàíèå íèòè â ÷åëíîêå Òÿæåëûé õîä ìàøèíû 1.  ÷åëíî÷íîì ìåõàíèçìå ñêîïèëîñü ìíîãî âîðñà è ïûëè 2. Ïîâðåæäåíà èãëà Ìàøèíà øóìíî ðàáîòàåò 1. Ïëîõîå êà÷åñòâî íèòîê 2. Íåïðàâèëüíî çàïðàâëåíà íèæíÿÿ íèòü 3. Òÿíåòå òêàíü âî âðåìÿ øèòüÿ Íåðîâíûå ñòåæêè, íåðàâíîìåðíîå
Çàìåíà ëàìïî÷êè Îòêëþ÷èòå ìàøèíó îò ñåòè ýëåêòðîïèòàíèÿ, âûíóâ ñåòåâîé øíóð èç ðîçåòêè! Èñïîëüçóéòå ëàìïî÷êè òàêîãî æå òèïà 10W (110-120V) èëè 15W (220-240V). — Âûêðóòèòå âèíò (À) êàê ïîêàçàíî íà ðèñóíêå (1). B — Ñíèìèòå êðûøêó êîðïóñà (Â). — Âûêðóòèòå ëàìïî÷êó è âñòàâüòå íîâóþ (Ñ). (2) A —
Óñòàíîâêà è ñìåíà èãëû Ìåíÿéòå èãëû ðåãóëÿðíî ïîñëå øèòüÿ êàæäîãî ïðîåêòà èëè ïðè âîçíèêíîâåíèè êàêèõ-ëèáî ïðîáëåì. ® Èñïîëüçóéòå èãëû SINGER äëÿ ëó÷øåãî êà÷åñòâà øèòüÿ. Âñòàâüòå èãëó, êàê ïîêàçàíî íà ðèñóíêå. D A A. Îñëàáüòå âèíò èãëû è çàòåì çàòÿíèòå åãî ñíîâà, ïîñëå òîãî, êàê âñòàâèòå íîâóþ èãëó
Êàê îïóñòèòü çóáöû òðàíñïîðòåðà Äëÿ øèòüÿ â îáû÷íîì ðåæèìå, íóæíî, ÷òîáû çóáöû òðàíñïîðòåðà áûëè ïîäíÿòû. Äëÿ âûøèâàíèÿ â òåõíèêå «ñâîáîäíîãî ïåðåäâèæåíèÿ», ïðèøèâàíèÿ ïóãîâèö èëè øòîïêè îïóñòèòå çóáöû. 1 ×òîáû ïîäíÿòü (à) è îïóñòèòü (b) çóáöû òðàíñïîðòåðà. (2) a b a b 2 26
Òàáëèöà ñîîòâåòñòâèÿ òèïîâ Èãëû/Òêàíè/Íèòåé Ðóêîâîäñòâî ïî âûáîðó òêàíè, íèòåé, èãë Ðàçìåð èãëû 9-11 (70-80) 11-14 (80-90) Òîíêàÿ íèòü — õëîïêîâàÿ, íåéëîíîâàÿ, ïîëèýñòðîâàÿ èëè àðìèðîâàííûé õëîïêîì ïîëèýñòð. Áîëüøèíñòâî ïðîäàâàåìûõ òèïîâ íèòåé ïðèìåíèìû äëÿ ýòèõ âèäîâ òêàíåé è èãë. Èñïîëüçóéòå
Óñòàíîâêà äåðæàòåëÿ ëàïêè Ïîäíèìèòå äåðæàòåëü ëàïêè (à). Íàäåíüòå äåðæàòåëü ïðèæèìíîé ëàïêè (b), êàê ïîêàçàíî íà ðèñóíêå (1). a a Óñòàíîâêà ïðèæèìíîé ëàïêè Îïóñòèòå äåðæàòåëü ïðèæèìíîé ëàïêè (b), ïîêà âûåìêà (ñ) íå ñîâïàäåò ñ îñüþ (d). (2) Îïóñòèòå äåðæàòåëü ïðèæèìíîé ëàïêè è ëàïêà (f)
Óñòàíîâêà ñúåìíîé ðàáî÷åé ïîâåðõíîñòè Äåðæèòå ñúåìíóþ ðàáî÷óþ ïîâåðõíîñòü ãîðèçîíòàëüíî è çàäâèíüòå åå ïî íàïðàâëåíèþ ñòðåëîê (1). 1 Âíóòðåííÿÿ ÷àñòü ñúåìíîé ðàáî÷åé ïîâåðõíîñòè ìîæåò èñïîëüçîâàòüñÿ äëÿ õðàíåíèÿ àêñåññóàðîâ. Îòêðîéòå êðûøêó ñúåìíîãî îòñåêà êàê ïîêàçàíî íà ðèñóíêå (2). 2 23
Ïðèøèâàíèå ïóãîâèöû Ïåðåâåäèòå ðû÷àã, ðåãóëèðóþùèé ïîëîæåíèå çóáöîâ òðàíñïîðòåðà, âïðàâî, ÷òîáû îïóñòèòü çóáöû. (1) Ñìåíèòå óíèâåðñàëüíóþ ëàïêó íà ëàïêó äëÿ ïðèøèâàíèÿ ïóãîâèöû (2). Óñòàíîâèòå äëèíó ñòåæêà «0». L R Ðàñïîëîæèòå ïóãîâèöó è òêàíü ïîä ëàïêîé äëÿ ïðèøèâàíèÿ ïóãîâèö êàê ïîêàçàíî íà
Áàëàíñ ïðàâîé è ëåâîé ñòîðîí ïåòëè Âû ìîæåòå ñáàëàíñèðîâàòü ïëîòíîñòü çàñòèëà ïðàâîé è ëåâîé ñòîðîí ïåòëè ñ ïîìîùüþ Ðåãóëÿòîðà áàëàíñà ïåòëè. Îáû÷íî ðåãóëÿòîð äîëæåí íàõîäèòüñÿ â íåéòðàëüíîì ïîëîæåíèè (ìåæäó «+» è «-«). Åñëè ñòåæêè ëåâîé ñòîðîíû ïåòëè íàëîæåíû ñëèøêîì ïëîòíî, ïîâåðíèòå ðåãóëÿòîð
Âûìåòûâàíèå àâòîìàòè÷åñêîé ïåòëè Ñ ïîìîùüþ ôóíêöèè âûìåòûâàíèÿ îäíîøàãîâîé ïåòëè âû äîáüåòåñü ïðåêðàñíûõ ðåçóëüòàòîâ. Ðåêîìåíäóåòñÿ ïîòðåíèðîâàòüñÿ íà îòäåëüíîì îòðåçêå òêàíè, óêðåïëåííîé ñòàáèëèçàòîðîì. Âûìåòûâàíèå ïåòëè 1. Ñ ïîìîùüþ ìåëêà îòìåòüòå ïîëîæåíèå áóäóùåé ïåòëè íà òêàíè. 2. Ïðèñîåäèíèòå
Ïîòàéíàÿ ïîäðóáî÷íàÿ ñòðî÷êà Ïîòàéíàÿ ïîäðóáî÷íàÿ ñòðî÷êà èäåàëüíî ïîäõîäèò äëÿ îáðàáîòêè êðàÿ íà øòîðàõ, áðþêàõ, þáêàõ è ò.ä. Ïîòàéíàÿ ïîäðóáî÷íàÿ ñòðî÷êà äëÿ ñòàíäàðòíûõ òêàíåé M Ïîòàéíàÿ ïîäðóáî÷íàÿ ñòðî÷êà äëÿ ýëàñòè÷íûõ òêàíåé Ïîâåðíèòå Ðåãóëÿòîð äëèíû ñòåæêà âïðàâî. Äëÿ òàêîãî âèäà ñòðî÷åê
Ýëàñòè÷íûå ñòðî÷êè Ýëàñòè÷íûå ñòðî÷êè èçîáðàæåíû ñèíèì öâåòîì íà ðåãóëÿòîðå âûáîðà ñòðî÷åê. ×òîáû âûáðàòü îäíó èç ýëàñòè÷íûõ ñòðî÷åê, ïåðåâåäèòå ðåãóëÿòîð ê èçîáðàæåíèþ âûáðàííîé ñòðî÷êè. Çàòåì ïåðåâåäèòå ðåãóëÿòîð äëèíû ñòåæêà ê èçîáðàæåíèþ «S1». Íèæå îïèñàíû íåñêîëüêî âèäîâ ýëàñòè÷íûõ ñòðî÷åê:
Ðåæèì øèòüÿ â îáðàòíîì íàïðàâëåíèè Äëÿ çàêðåïëåíèÿ øâà â íà÷àëå è êîíöå ñòðî÷êè, íàæèìàéòå íà ðû÷àã øèòüÿ â îáðàòíîì íàïðàâëåíèè (À). Ñäåëàéòå íåñêîëüêî ñòåæêîâ â îáðàòíîì íàïðàâëåíèè. Îòïóñòèòå ðû÷àã, è ìàøèíà ñíîâà áóäåò øèòü âïåðåä (1). A Îêîí÷àíèå øèòüÿ Ïîâåðíèòå ìàõîâîå êîëåñî ïðîòèâ ÷àñîâîé
Ïðÿìàÿ ñòðî÷êà Äëÿ íà÷àëà, óñòàíîâèòå Ðåãóëÿòîð âûáîðà ñòðî÷åê íà ïðÿìóþ ñòðî÷êó (1). Ðàçìåñòèòå òêàíü ïîä ïðèæèìíîé ëàïêîé òàê, ÷òîáû êðàé òêàíè ñîâïàäàë ñ îäíîé èç âûáðàííûõ îòìåòîê íà èãîëüíîé ïëàñòèíå (2). Îïóñòèòå ïðèæèìíóþ ëàïêó, íàæìèòå íà ïåäàëü óïðàâëåíèÿ, ÷òîáû íà÷àòü øèòü (3). 1 2 3 16
Ðåãóëÿòîð øèðèíû ñòåæêà è Ðåãóëÿòîð äëèíû ñòåæêà Èñïîëüçîâàíèå ðåãóëÿòîðà øèðèíû ñòåæêà Ìàêñèìàëüíàÿ øèðèíà ñòåæêà äëÿ ñòðî÷êè çèã-çàã 6ìì; äëÿ ìíîãèõ ñòðî÷åê øèðèíà ñòåæêà ìîæåò áûòü óìåíüøåíà. Øèðèíà ñòåæêà óâåëè÷èâàåòñÿ, êîãäà âû ïîâîðà÷èâàåòå ðåãóëÿòîð îò «0» äî «6» (1). Ñ ïîìîùüþ ðåãóëÿòîðà
Òðè ïîëîæåíèÿ èãëû Âû ìîæåòå óñòàíàâëèâàòü èãëó â íóæíîå ïîëîæåíèå ñ ïîìîùüþ ðåãóëÿòîðà «Òðè ïîëîæåíèÿ èãëû». Äëÿ îáû÷íûõ âèäîâ ðàáîò èñïîëüçóéòå öåíòðàëüíîå ïîëîæåíèå èãëû. Äëÿ îáðàáîòêè êðàÿ èëè äëÿ ñîçäàíèÿ ïàðàëëåëüíûõ ñòðî÷åê äëÿ îòñòðî÷êè èçäåëèÿ, óñòàíàâëèâàéòå ïðàâîå èëè ëåâîå ïîëîæåíèå
Âûáîð ñòðî÷êè Íà ðèñóíêå âû óâèäèòå èçîáðàæåíèÿ âñåõ âèäîâ ñòðî÷åê, êîòîðûå äîñòóïíû íà âàøåé ìàøèíå. a b c Ñòðî÷êè, èçîáðàæåííûå â âåðõíåì ðÿäó íà ðèñóíêå, íà ðåãóëÿòîðå âûáîðà ñòðî÷åê èçîáðàæåíû ñåðûì öâåòîì. Âðàùàÿ ðåãóëÿòîð, âû ìîæåòå âûáðàòü îäíó èç ñòðî÷åê, èçîáðàæåííûõ â ñåðîì öâåòå. Ñ
Íàòÿæåíèå íèòè Íàòÿæåíèå âåðõíåé íèòè Ñòàíäàðòíîå íàòÿæåíèå íèòè — ïîëîæåíèå: «4». (1) Äëÿ óâåëè÷åíèÿ íàòÿæåíèÿ íèòè ïîâåðíèòå ðåãóëÿòîð íà áîëüøåå çíà÷åíèå. Äëÿ óìåíüøåíèÿ íàòÿæåíèÿ ïåðåâåäèòå ðåãóëÿòîð íà ìåíüøåå çíà÷åíèå. À. Íîðìàëüíîå íàòÿæåíèå íèòè äëÿ ïðÿìîé ñòðî÷êè. Â. Íåäîñòàòî÷íîå
Ïîäúåì íèæíåé íèòè Ïðèäåðæèâàéòå âåðõíþþ íèòü ëåâîé ðóêîé. Ïîâåðíèòå ìàõîâîå êîëåñî (1) íà ñåáÿ (ïðîòèâ ÷àñîâîé ñòðåëêè), îïóñòèòå è çàòåì ïîäíèìèòå èãëó. Âàæíî: Åñëè âîçíèêëè ñëîæíîñòè ñ ïîäíÿòèåì íèæíåé íèòè, ïðîâåðüòå, âîçìîæíî, îíà çàñòðÿëà â ñúåìíîé ðàáî÷åé ïîâåðõíîñòè. 1 Ìÿãêî ïîòÿíèòå çà
Àâòîìàòè÷åñêèé íèòåâäåâàòåëü — Ïîäíèìèòå èãëó â íàèâûñøåå ïîëîæåíèå. — Îïóñòèòå ðû÷àã (À) âíèç äî êîíöà. — Àâòîìàòè÷åñêèé íèòåâäåâàòåëü âñòàíåò â ïîëîæåíèå (Â). — Çàöåïèòå íèòü çà êðþ÷îê (Ñ). A — Ïðîâåäèòå íèòü ïåðåä èãëîé âîêðóã êðþ÷êà (D) ñíèçó ââåðõ. B — Îòïóñòèòå ðû÷àã (À). D C — Ïðîòÿíèòå íèòü
Çàïðàâêà âåðõíåé íèòè Ýòî ïðîñòàÿ îïåðàöèÿ, íî î÷åíü âàæíî âûïîëíèòü åå ïðàâèëüíî, ÷òîáû èçáåæàòü ïîÿâëåíèÿ ïðîáëåì ïðè øèòüå. — Ïîäíèìèòå èãëó â íàèâûñøåå ïîëîæåíèåì (1) è ïðîäîëæàéòå ïîâîðà÷èâàòü ìàõîâîå êîëåñî íà ñåáÿ, ïðîòèâ ÷àñîâîé ñòðåëêè, ïîêà èãëà ñëåãêà íå îïóñòèòñÿ. Ïîäíèìèòå ïðèæèìíóþ
Óñòàíîâêà øïóëüêè Ïðè óñòàíîâêå èëè èçúÿòèè øïóëüêè èãëà äîëæíà íàõîäèòüñÿ â íàèâûñøåì ïîëîæåíèè. 1. Óñòàíîâèòå øïóëüêó â øïóëüíîå ãíåçäî, òàê ÷òîáû íèòü ðàçìàòûâàëàñü ïðîòèâ ÷àñîâîé ñòðåëêè. 2. Ïðîòÿíèòå íèòü ÷åðåç ïðîðåçü (À). 3. Ïîòÿíèòå íèòü â íàïðàâëåíèè ïî õîäó ÷àñîâîé ñòðåëêè ïîêà îíà íå
Íàìîòêà íèòè íà øïóëüêó — Íàäåíüòå êàòóøêó íà ãîðèçîíòàëüíûé äåðæàòåëü è çàêðåïèòå ïðè ïîìîùè áîëüøîé èëè ìàëîé êàòóøå÷íîé ïëàñòèíû (1/2). — Ïðîâåäèòå íèòü â íèòåíàïðàâèòåëü (3). — Îáâåäèòå íèòü âîêðóã äèñêà ðåãóëèðóþùåãî íàòÿæåíèå íèòè ïî ÷àñîâîé ñòðåëêå (4). — Çàïðàâüòå íèòü â øïóëüêó è
Àêñåññóàðû Ñòàíäàðòíûå àêñåññóàðû (1) a. Óíèâåðñàëüíàÿ ëàïêà b. Ëàïêà äëÿ âøèâàíèÿ ìîëíèè c. Ëàïêà äëÿ âûìåòûâàíèÿ ïåòëè d. Ëàïêà äëÿ ïðèøèâàíèÿ ïóãîâèö e. Ðàñïàðûâàòåëü/êèñòî÷êà f. Íàïðàâëÿþùàÿ ëèíåéêà äëÿ êðàåîáìåòî÷íîãî/ñòåãàëüíîãî øâà Íàáîð èãë Êàòóøå÷íûå ïëàñòèíû Øïóëüêè (3øò.) Îòâåðòêà
Äâóõ-øàãîâûé ïîäúåì ëàïêè Ïðè øèòüå ìíîãîñëîéíûõ èëè îáúåìíûõ òêàíåé ïðèæèìíàÿ ëàïêà äîëæíà áûòü ïîäíÿòà â ñàìîå âåðõíåå ïîëîæåíèå äëÿ îáëåã÷åíèÿ ïðîõîæäåíèÿ òêàíè ïîä ïðèæèìíîé ëàïêîé (À). A Ðåãóëèðîâàíèå äàâëåíèÿ ïðèæèìíîé ëàïêè Äàâëåíèå ïðèæèìíîé ëàïêè áûëî îòðåãóëèðîâàíî ïðè ñáîðêå ìàøèíû è íå
Ïîäêëþ÷åíèå ìàøèíû ê ýëåêòðîñåòè Ïîäêëþ÷èòå ìàøèíó ê ýëåêòðîñåòè, êàê ïîêàçàíî íà ðèñóíêå (1). Âñòàâüòå âèëêó â ðîçåòêó (2). Âíèìàíèå: Îòêëþ÷àéòå ìàøèíó îò ñåòè, åñëè íå èñïîëüçóåòå åå äëèòåëüíîå âðåìÿ. A Ïåäàëü óïðàâëåíèÿ Ïðè ïîìîùè íîæíîé ïåäàëè âû ðåãóëèðóåòå ñêîðîñòü ìàøèíû (3). Âíèìàíèå:
Îñíîâíûå ÷àñòè ìàøèíû 16. Ãîðèçîíòàëüíûé äåðæàòåëü äëÿ êàòóøêè 17. Ðû÷àã íàìîòêè øïóëüíîé íèòè 18. Îòâåðñòèå äëÿ âòîðîãî äåðæàòåëÿ êàòóøêè 16 23 17 19. Ìàõîâîå êîëåñî 20. Ðåãóëèðîâêà áàëàíñà ïåòëè 21. Âêëþ÷åíèå ìàøèíû è îñâåùåíèÿ 22. Ãëàâíûé ðàçúåì äëÿ øíóðà 18 24 25 19 23. Íèòåíàïðàâèòåëü øïóëüíîé
Îñíîâíûå ÷àñòè ìàøèíû Òðè ïîëîæåíèÿ èãëû 9. Ñúåìíûé îòñåê äëÿ õðàíåíèÿ àêñåññóàðîâ 8. Çàäâèæíàÿ êðûøêà øïóëüíîãî îòñåêà 7. Ïðèæèìíàÿ ëàïêà 6. Íîæ äëÿ îáðåçàíèÿ íèòè 5. Ðû÷àã øèòüÿ â îáðàòíîì íàïðàâëåíèè 4. Ðû÷àã-íèòåïðèòÿãèâàòåëü 3. Ðåãóëèðîâàíèå äàâëåíèÿ ïðèæèìíîé ëàïêè 2. Ðåãóëÿòîð íàòÿæåíèÿ
Îãëàâëåíèå ÇÍÀÊÎÌÑÒÂÎ Ñ ÌÀØÈÍÎÉ Îñíîâíûå ÷àñòè ìàøèíû …………………………………………………………………………………………………………………………………2/3 Ïîäêëþ÷åíèå ìàøèíû ê
Ïîçäðàâëÿåì Âû ñòàëè îáëàäàòåëåì íîâîé øâåéíîé ìàøèíû è òåïåðü ìîæåòå íà÷àòü îòêðûâàòü íîâûå ïóòè â òâîð÷åñòâå. Ñ ýòîãî ìîìåíòà âû óçíàåòå íàñêîëüêî ëåãêî è óäîáíî ìîæíî øèòü íà ñîâðåìåííîé øâåéíîé ìàøèíå. Ïîæàëóéñòà, âíèìàòåëüíî ïðî÷èòàéòå èíñòðóêöèþ ïî ýêñïëóàòàöèè ìàøèíû — ýòî ñàìûé ëåãêèé ïóòü
Ïðàâèëà òåõíèêè áåçîïàñíîñòè Ïðåæäå ÷åì âêëþ÷èòü øâåéíóþ ìàøèíó, âíèìàòåëüíî ïðî÷èòàéòå ñëåäóþùèå ðåêîìåíäàöèè: ÎÏÀÑÍÎ — âî èçáåæàíèå ýëåêòðè÷åñêîãî øîêà: 1. Íåëüçÿ îñòàâëÿòü âêëþ÷åííóþ ìàøèíó áåç ïðèñìîòðà. 2. Íåîáõîäèìî îòêëþ÷àòü ìàøèíó îò ýëåêòðîñåòè, åñëè ñîáèðàåòåñü åå ÷èñòèòü. 3. Âñåãäà
4423 Èíñòðóêöèÿ ïî ýêñïëóàòàöèè 021Q5D0103( ) May/10 SINGER 4423(Q50DST)
-
Страница 1
4423 Manuel d’Instruction Instruction Manual Manual de Instrucciones[…]
-
Страница 2
IMPORT ANT SAFETY INSTRUCTIONS EN When using an electrical appliance, basic safety should always be followed, including the following: Read all instructions before using this sewing machine. 1. An appliance should never be left unattended when plugged in. 2. Always unplug this appliance from the electric outlet immediately after using and before cl[…]
-
Страница 3
E IMPORT ANTES INSTRUCCIONES DE SEGURIDAD Cuando se utiliza un dispositivo eléctrico, debe seguirse siempre de seguridad básica, incluyendo las siguientes: Leer las instrucciones antes de utilizar está máquina de coser . 1. Un dispositivo eléctrico nunca debe dejarse desatendido cuando está conectado. 2. Desenchufar siempre la máquina de la […]
-
Страница 4
INSTRUCTIONS IMPORT ANTES DE SÉCURITÉ F Lors de l’utilisation d’un appareil électrique, il est important de toujours suivre certaines précautions de sécurité dont certaines sont les suivantes : Lire toutes les instructions avant d’utiliser votre machine à coudre : 1. Lorsque la machine est branchée, ne jamais la laisser sans […]
-
Страница 5
E F Como propietario/ a de una nueva máquina de coser Singer , usted acaba de iniciar una gran oportunidad para plasmar su creatividad. Desde el momento en que utilice por primera vez su máquina, se dará cuenta de que está cosiendo con una de las máquinas más fáciles de utilizar . Le recomendamos encarecidamente que, antes de comenzar a util[…]
-
Страница 6
List of contents EN Machine Basics Sewing General Information Maintenance and T roubleshooting Principle Parts of the Machine ………………………………………………………………………………………………………………………………………2/4 Connecting Machine to Power Source……………………………[…]
-
Страница 7
Indice E Partes de la máquina Enhebrado de la máquina Cosiendo Información general Mantenimiento y solución de problemas …………………………………………………………………………………………………………………………………………………..3/5 ………………………………………………[…]
-
Страница 8
T able des matières F L’essentiel de la machine Les composantes principales de la machine à coudre Levier du Installer ……………………………………………………………………………………………………..3/5 Branchement de la machine à une source d’alimentation ……………………………………..[…]
-
Страница 9
2 Principal Parts of the Machine EN 1. Thread tension dial 2. Presser foot pressure adjustment 3. Thread take-up lever 4. Reverse sewing lever 5. Thread cutter 6. Presser foot 7. Needle plate cover 8. Removable extension table/ accessory storage 9. Three needle position dial 10. Bobbin stopper 1 1. Stitch width dial 12. Stitch length dial 13. Patte[…]
-
Страница 10
E F 1. Disco de tensión 2. Ajuste del prensatelas de presión 3. T irahilos 4. Palanca para coser hacia átras 5. Cortahilos 6. Prensatelas 7. Placa de cubierta de canilla 8. Mesa de coser convertible/ caja de accesorios 9. Guía de cambio de posición de la aguja 10. T ope del devanador 1 1. Disco selector de ancho de puntada 12. Disco selector d[…]
-
Страница 11
4 Principal Parts of the Machine EN 16. Horizontal spool pin 17. Bobbin winding spindle 18. Hole for second spool pin 19. Handwheel 20. Buttonhole stitch balance adjustment slot 21. Power and light switch 22. Main plug socket 23. Bobbin thread guide 24. Upper thread guide 25. Face plate 26. Handle 27. Presser foot lifter 28. 29. Foot speed control […]
-
Страница 12
E F 5 Partes de la máquina Les composantes principales de la machine à coudre 16. Porte bobine horizontal 17. Axe du bobineur 18. T rou pour insérer un deuxième axe de bobine 19. V olant 20. Fente de réglage du point utilisé pour les boutonnières 21. Interrupteur d’alimentation et d’éclairage 22. Prise de branchement du fil d&apos[…]
-
Страница 13
Connect the machine to a power source as illustrated. (1) This appliance is equipped with a polarized plug which must be used with the appropriate polarized outlet. (2) Unplug power cord when machine is not in use. The foot control pedal regulates the sewing speed. (3) Consult a qualified electrician if in doubt of how to connect machine to power s[…]
-
Страница 14
Conecte la máquina a una fuente de alimentación según se ilustra. (1) Esta máquina está provista de un conector polarizado, que debe utilizarse con una toma de corriente polarizada adecuada. (2) Desenchufe el cable de alimentación cuando la máquina no esté en uso. El pedal de control regula la velocidad de la máquina. (3) Consulte a un ele[…]
-
Страница 15
8 When sewing several layers or thick fabrics, the presser foot can be raised for easy positioning of the work. (A) to a higher position T wo Step Presser Foot Lifter EN A The presser foot pressure of the machine has been pre-set and requires no particular readjustment according to the type of fabric (light-or-heavy weight). However , if you need t[…]
-
Страница 16
E F Elevador del prensatelas de dos tiempos Levier du pied presseur à deux niveaux Cuando se cose varias capas de tela gruesa, el prensatelas puede elevarse a una posición alta para facilitar la colocación de (A). la tela La presión del prensatelas de la máquina ha sido prefijada y no requiere ningún reajuste particular de acuerdo con el tipo[…]
-
Страница 17
1 Standard accessories 2 Optional accessories Standard accessories (1) Optional accessories (2) a. All purpose foot b. Zipper foot c. Buttonhole foot d. Button sewing foot e. Seam ripper/ brush f. Edge/ quilting guide g. Pack of needles h. Spool holders i. Bobbin (3x) j. L-screwdriver k. Auxiliary Spool Pin l. Spool pin felt m. Soft cover (These 10[…]
-
Страница 18
E F Accesorios Accessoires 11 Accesorios incluidos (1) Accesorios opcionales (2) a. Prensatelas universal b. Prensatelas para cremalleras c. Prensatelas para ojales d. Prensatelas para coser botones e. Brocha descosedor f. Guía para coser bordes/ edredones g. Paquete de agujas h. Portacarrete i. j. Destornillador plano k. Portacarrete Auxiliar l. […]
-
Страница 19
1 2 4 7 8 9 5 6 3 10 Winding the Bobbin EN 12 — corresponding . (1/2) — Snap thread into thread guide. (3) — Wind thread clockwise around bobbin winder tension discs. (4) — Thread bobbin as illustrated and place on spindle. (5) — Push bobbin spindle to right. (6) — Hold thread end. (7) — Step on foot control pedal. (8) — Cut thread. (9) — Push bobb[…]
-
Страница 20
E F Devanado de la bobina Remplissage de la canette 13 — (1/2) — el hilo del carrete a través de la guía del hilo superior . (3) — — (5) — Empuje la a la derecha. (6) — Sujete el extremo del hilo. (7) — Pise el (8) — Corte el hilo. (9) — (10) y extráigala. de la canilla está en la posición de «devanado», la máquina no coserá y el v[…]
-
Страница 21
When inserting or removing the bobbin, the needle must be fully raised. Attention: 1. Insert the bobbin in the bobbin case with the thread running counterclockwise direction (arrow). 2. Pull the thread through the slit (A). 3. Draw the thread clockwise until it slips into the notch (B). 4. Pull out about 15 cm (6 inches) of thread and attach the bo[…]
-
Страница 22
E F Colocación de la bobina Lorsque vous insérez ou retirez une canette, assurez- vous que l’aiguille est complètement relevée. le couvercle d’enlever 1. Insérer la canette dans son logement, le fil étant orienté dans le sens anti-horaire (flèche). 2. T irer le fil en le faisant passer dans la fente (A). 3. T irer le fil dans le s[…]
-
Страница 23
2 1 6 8 7 5 This is a simple operation but it is important to carry out correctly as by not doing so . — Start by raising the needle to its highest point (1), and continue turning the handwheel counterclockwise until the needle just slightly begins to descend. Raise the presser foot to release the tension discs. For safety , it is strongly suggeste[…]
-
Страница 24
E F Enhebrado del hilo superior Enfilage supérieur 17 Se trata de una operación sencilla pero es importante realizarla correctamente pues de no hacerlo podría surgir varios problemas en la costura. — Comience elevando la aguja a su posición más alta (1) y también eleve el prensatelas para liberar los discos de tensión. Para seguridad, se rec[…]
-
Страница 25
Automatic Needle Threader — Raise the needle to its highest position. — Press lever (A) down as far as it will go. — The threader automatically swings to the threading position (B). — Pass thread around thread guide (C). — Pass the thread in front of the needle around the hook (D) from bottom to top. — Release lever (A). — Pull the thread through t[…]
-
Страница 26
— Relever l’aiguille à sa position la plus haute. — le levier (A) le plus possible. — L’enfileur se met automatiquement en position d’enfilage (B). — Faire passer le fil autour du guide-fil (C). — Faire passer le fil devant l’aiguille autour du crochet (D) depuis le bas vers le haut. — Relâcher le levier (A). — Tirer le fil à[…]
-
Страница 27
1 2 3 Hold the upper thread with the left hand. T urn the handwheel (1) towards you (counterclockwise) lowering, then raising needle. If it is difficult to raise the bobbin thread, check to make sure the thread is not trapped by the hinged cover or the Removable Extension T able. Gently pull on the upper thread to bring the bobbin thread up through[…]
-
Страница 28
E F Elevación del hilo de la bobina Pour remonter le fil de canette T enir le fil supérieur avec la main gauche. T ourner le volant (1) vers vous (sens anti-horaire) pour abaisser et lever l’aiguille. vérifier que le fil n’est pas pris dans le couvercle du boîtier ou dans la fermeture du bras amovible. pour faire passer le fil de la c[…]
-
Страница 29
22 B A C D 1 Upper thread tension Lower thread tension Please note: Basic thread tension setting: «4». (1) T o increase the tension, turn the dial to the next number up. T o reduce the tension, turn the dial to the next number down. A. Normal thread tension for straight stitch sewing. B. Thread tension too loose for straight stitch sewing[…]
-
Страница 30
E F T ensión del hilo superior T ensión del hilo inferior No olvide que: Ajuste de la tensión del hilo básica: «4». (1) Para aumentar la tensión, girar el disco al siguiente número más alto. Para reducir la tensión, girar el disco al siguiente número más bajo. A. T ensión normal del hilo para cosido de puntos rectos. B. T ensi?[…]
-
Страница 31
24 How to Choose Y our Pattern EN B AI K D C J EG FH S 1 B AI K D C J EG FH c e d a b The diagram on this page display the stitch patterns available on the machine. Stitches in the top of the diagram are indicated on the Pattern Selector Dial in gray . T o select the patterns indicated with the gray color , turn the Pattern Selector Dial. (e) Use t[…]
-
Страница 32
El diagrama en esta página muestra los diseños de las puntadas disponibles en la máquina. Las puntadas en la parte superior del diagrama están señaladas con gris en el Selector de Puntada. Para elegir los patrones indicados en color gris gire el selector de puntada. (e) Utilice el selector del largo de puntada (d) para ajustar la longitud de l[…]
-
Страница 33
26 The needle position can be altered with the «Three needle position dial». For normal work, the needle position is middle. For edge stitching or sewing parallel lines of top stitch, select needle position left or right. For twin needle stitching, needle position is middle. a. Straight b. Zig-zag L. Left Needle Position M. Middle Needle […]
-
Страница 34
La posición de la aguja puede ser cambiada utilizando el Guía de Cambio de Posición de la Aguja. Para trabajo normal, la posición de la aguja es en el centro. Para puntadas al borde de la tela o para costuras de líneas paralelas, seleccione la posición izquierda o derecha. Para puntadas con la doble aguja, la posición es en el centro. a. Rec[…]
-
Страница 35
28 1 2 4 3 2 1 0.5 Function of stitch width dial Function of stitch length dial while zig-zag stitching Function of stitch length dial for when straight stitching The maximum zigzag stitch width for zigzag stitching is 5mm; however , the width can be reduced on any patterns. The width increases as you move zigzag dial from «0» — «6&q[…]
-
Страница 36
E F Selector de ancho de puntada y Selector de largo de puntada Cadran de largeur de point et cadran de longueur de point 29 Función del selector de ancho de puntada Función de largo de puntada mientras se realiza el zigzag Función de largo de puntada para costura recta El ancho máximo del zigzag es de 6mm. Sin embargo, el ancho se puede modifi[…]
-
Страница 37
30 T o begin sewing, set the machine for straight stitch. (1) Place the fabric under the presser foot with the fabric edge lined up with the desired seam guide line on the needle plate. (2) Lower the presser foot lifter , and then step on the foot controller to start sewing. (3) 1 2 3 Sewing Straight Stitch EN[…]
-
Страница 38
E F Puntada recta Para comenzar a coser , gire el selector de puntadas en la puntada recta, puede seleccionar la posición de la aguja en centr ooal a derecha. (1) Coloque la tela bajo prensatelas con el borde de la tela alineado con la línea de guía deseada de la costura en la placa aguja. (2) Baje el prensatelas, y después presione con el pie […]
-
Страница 39
32 T urn the handwheel toward you (counterclockwise) to bring the thread take up lever to its highest position, raise the presser foot and remove work behind (2) the needle and presser foot. Pull the threads under and behind the presser foot. Guide the threads to the side of the face plate and into thread cutter (B). Pull threads down to cut. (3) T[…]
-
Страница 40
E F Para fijar el comienzo y el final de la costura, presione la palanca de retroceso. Haga unas pocas puntadas hacia atrás. Suelte la palanca y la máquina coserá de nuevo hacia delante (A). (1) Gire el volante hacia usted para llevar la palanca tira-hilo a su posición más alta, eleve el prensatelas y retire su trabajo hacia atrás. (2) Jale l[…]
-
Страница 41
34 Choosing Stretch Stitch Patterns 1 2 The Stretch Stitch Patterns are indicated with a blue color on the Stitch Length Dial to the indicator marked «S1». Though there are several stretch patterns, here are two examples: The machine sews two stitches forward and one stitch backwards. Adjust the Stitch Width Dial to between «3» […]
-
Страница 42
Les motifs de point extensible sont indiqués en bleu sur le cadran de sélection de motifs. Pour sélectionner ces points, tourner le cadran de sélection de motifs sur le motif souhaité. Puis, tourner le cadran de longueur de point sur l’indicateur marqué par «S1». Il existe plusieurs motifs extensibles et en voici deux exemples […]
-
Страница 43
36 2 1 For hems on curtains, trousers, skirts, etc. Blind hem for stretch fabrics. Blind hem for firm fabrics. Set the Stitch Width Dial at a setting appropriate for the weight/type of fabric being sewn, within the range shown in the diagram on the right of the page. Generally , a narrower stitch is used for lighter weight fabrics, and a wider stit[…]
-
Страница 44
Pour les ourlets sur les rideaux, pantalons, jupes, etc. Ourlet invisible pour tissus extensibles. Ourlet invisible pour tissus solides. Régler le cadran de longueur de point dans la sur le diagramme à droite. T outefois, les ourlets invisibles sont normalement cousus avec un réglage de longueur de point plus long. Régler le cadran de largeur d[…]
-
Страница 45
EN 38 Sew 1-step Buttonholes 2 1 4 3 A D a b E B C Buttonhole sewing is a simple process that provides reliable results. However , it is strongly suggested to always make a practice buttonhole on a sample of your fabric and stabilizer . Making a Buttonhole Making a Buttonhole on Stretch Fabrics (E) 1. Using tailor’s chalk, mark the position of[…]
-
Страница 46
E Ojal de un sólo paso Confeccionar ojales es un proceso sencillo que proporciona resultados confiables. Marque la posición del ojal en la tela con la tiza de sastre, ponga el prensatelas para ojales y coloque el disco selector del dibujo en » «. Ponga el selctor de largo de puntada en » «. insértelo en las ranuras Sin embarg[…]
-
Страница 47
40 Left and Right Side Balance for Buttonhole Stitch density on right and left sides of buttonhole can be adjusted by buttonhole balance control dial. This dial should usually be in a neutral position (between «+» and » «) If the stitches on the left side of buttonhole are too close together , turn the dial to the left (+). * T […]
-
Страница 48
41 La densidad de la puntada en los lados derecho e izquierdo del ojal puede ajustarse por el mando de control del balance del ojal. Este selector debe estar normalmente en una posición neutral. (entre «+» y » «) Si las puntadas en la lado izquierdo del ojal están demasiado próximas, gire el disco a la izquierda (+). * El gir[…]
-
Страница 49
42 4 3 1 2 Move the drop feed control to right side to lower the feed dogs. (1) Change the all purpose foot to the button sewing foot. (2) Set the stitch length to «0». Set the machine for zig-zag stitch, then set the width to number «3» — «6». T urn the handwheel to check that the needle goes cleanly into the left and[…]
-
Страница 50
Mueva el control del alimentador hacia la derecha para bajar los dientes de alimentación. (1) Cambie el prensatelas especial para coser botones.(2) Ajuste el largo de puntada en «0». Coloque el botón y tela debajo del Pie de Prensatelas para Botón, como se muestra en (3). Coloque el selector de puntadas en la puntada de Zigzag, y ajust[…]
-
Страница 51
1 2 44 Hold the removable extension table horizontally , and push it in the direction of the arrow . (1) T o remove the extension table, pull it toward the left. The inside of the removable extension table can be utilized as an accessory box. T o open, flip cover down as shown. (2) Installing the Removable Extension T able EN[…]
-
Страница 52
E F 45 Instalación de la cubierta removible Installation du bras amovible Coloque la máquina en una superficie estable, empuje la cubierta removible como indica la flecha, y luego jale hacia afuera. (1) El interior de la cubierta removible, se puede utilizar para guardar los accesorios de la máquina. Para abrirla, bájela siguiendo la dirección[…]
-
Страница 53
12 3 4 a c d e f b b a e g 46 Raise the presser bar dge/ quilting dge/ quilting (a) with the presser foot lifter . Attach the presser foot shank (b) as illustrated. (1) Lower the presser foot shank (b) using the presser foot lifter , until the cut-out (c) is directly above the pin (d). (2) The presser foot (f) will engage automatically . Raise the […]
-
Страница 54
E F 47 Colocación del portaprensatelas Installer le support du pied presseur Relever la barre du pied (a) avec le releveur de pied presseur . Attacher le support du pied presseur (b) comme illustré. (1) Abaisser le support du pied presseur (b) à l’aide du releveur de pied presseur , jusqu’à ce que la découpe (c) se trouve directement[…]
-
Страница 55
48 Heavy woolen, overcoat fabrics, upholstery fabrics, some leathers and vinyls. EXPLANA TION Standard sharp needles. Sizes range thin to large. 9 (70) to 18 (1 10). Semi-ball point needle, scarfed. 9 (70) to 18 (1 10). Leather needles. 12 (80) to 18 (1 10). SINGER ® 2020 SINGER ® 2045 SINGER ® 2032 9-1 1 (70-80) 1 1-14 (80-90) 14 (90) 16 (100) […]
-
Страница 56
GUÍA DE SELECCIÓN DE AGUJAS/ TELAS/ HILOS CALIBRE DE LA AGUJA TELA HILO 9-1 1 (70-80) 1 1-14 (80-90) T elas de poco peso — algodones delgados, V oile, sarga, seda, muselina, interlocks (puntadas entrelazadas), tejidos de algodón, tricots, jerseys, crepés, poliester tejido, telas para camisas y blusas. T elas de peso medio, raso, lona, tela de v[…]
-
Страница 57
T able de correspondance de l’aiguille, du tissu et du fil GUIDE DE SÉLECTION DE L’AIGUILLE, DU TISSU ET DU FIL 9-1 1 (70-80) 1 1-14 (80-90) 14 (90) 16 (100) 18 (1 10) T issus légers, cotons légers, voile, serge, soie, mousseline, Qiana, tissu interlock, tricots de coton, tricots, jerseys, crêpes, polyester tissé, tissus pour chemise[…]
-
Страница 58
51 For ordinary sewing, keep the feed dog up, for freehand embroidery , sewing on buttons and darning, drop the feed dog. T o raise (a) and lower (b) feed dog. (2) How T o Drop Feed Dog 1 2 a b EN a b[…]
-
Страница 59
E 52 Ocultacion del transportador Comment abaisser les griffes d’entraînement Les griffes d’entraînement reste en position haute pour les travaux de couture ordinalre. Pour le reprisage, broderie à main levée, et coudre les boutons. Il faut abaisser les griffes d’entraînement. Pousser le levier (b) vers la droite (2). Los diente[…]
-
Страница 60
53 A C B A B C D 1 2 Change the needle regularly , especially if it is showing signs of wear and causing problems. For best sewing results always use SINGER Brand Needles. Insert the needle A. Loosen the needle clamp screw and tighten again after inserting the new needle. (1) B. The flat side of the shaft should be towards the back. C/D.Insert the […]
-
Страница 61
Cambie la aguja periódicamente, sobre todo si muestra signos de desgaste y origina problemas. la la aguja Apague el buenas condiciones. Para mejores resultados de la costura, utilice siempre agujas originales de SINGER . Inserta la aguja como se ilustra: A. Afloje el tornillo de abrazadera de la aguja y vuélvalo a apretar después de insertar la […]
-
Страница 62
1 2 55 A B Changing the Bulb EN Disconnect the machine from the power supply by removing the plug from the main socket! Replace bulb with same type rated 15 watts (1 10-120V area / 220-240V area). — Loosen screw (A) as illustrated. (1) — Remove the face plate (B). — Unscrew the bulb and install a new one (C). (2) — Replace the face plate and tighte[…]
-
Страница 63
E F Cambio de la bombilla Changement de l’ampoule 56 Débrancher la machine de l’alimentation électrique en retirant la prise! Remplacer l’ampoule par une ampoule du même type de 15 W atts (pour 1 10-120V / 220-240V). — Desserrer la vis (A) comme indiqué. (1) — Enlever la plaque frontale (B). — Dévisser l’ampoule et installe[…]
-
Страница 64
Problem Cause Correction Upper thread breaks Lower thread breaks Skipped stitches Needle breaks Loose stitches Seams gather or pucker Uneven stitches, uneven feed The machine is noisy The machine jams 1. The machine is not threaded correctly . 2. The thread tension is too tight. 3. The thread is too thick for the needle. 4. The needle is not insert[…]
-
Страница 65
Problema El hilo superior se rompe La aguja se rompe La costura se encoge, la tela se frunce Puntadas no uniforme La máquina hace ruido Máquina obstruida Salto de puntadas Puntadas sueltas desiguales, arrastre Causa 1. La máquina está mal enhebrada. 2. La tensión del hilo es demasiado fuerte. 3. El hilo es demasiado grueso para la aguja. 4. La[…]
-
Страница 66
Problème Cause Solution Le fil supérieur casse Le fil inférieur casse Points manqués L’aiguille casse Points lâches Entraînement irrégulier La machine se Bloque enfilée. du porte bobine. 1. Le boîtier n’est pas bien inséré. 2. Le boîtier n’est pas bien enfilé. 3. La tension inférieure est trop élevée. Le mauvais pied […]
-
Страница 67
021Q5D0101 ( ) /10 SINGER 4423(Q50DST) (A) Jun[…]


