
При подключении этого продукта необходимо внимательно ознакомиться с правилами по технике безопасности, в
соответствии с действующим законодательством в вашей стране. Пожалуйста, учтите, что по окончании срока
службы этот продукт должен быть утилизирован в соответствии с действующим Национальным законодательством,
установленным для электрических приборов.
- Manuals
- Brands
- Singer Manuals
- Sewing Machine
- 1507
- Instruction manual
-
Contents
-
Table of Contents
-
Bookmarks
Quick Links
Related Manuals for Singer 1507
Summary of Contents for Singer 1507
-
Page 1
Instruction Manual… -
Page 2
IMPORTANT SAFETY INSTRUCTIONS When using an electrical appliance, basic safety should always 6. Always use the proper needle plate, The wrong plate can be followed, including the following: cause the needle to break. Read all instructions before using this sewing machine. 7. -
Page 3
Congratulations As the owner of a new Singer sewing machine, you are about to begin an exciting adventure in creativity. From the moment you first use your machine, you will know you are sewing on one of the easiest to use sewing machines ever made. -
Page 4: Table Of Contents
List of contents Principal parts of the machine ……….2/3 Zig-zag stitching …………….21 Accessories ……………..4 Blind hem/ Lingerie stitch …………22 Installing the snap-in sewing table ……….5 Sewing on buttons…………..23 Connecting machine to power source ………6 Sew 4-step buttonholes………….24 Changing the bulb ……………7 Zippers and piping…………..25 Two-step presser foot lifter…………8 Mutlti-stitch zig-zag/ Bar tack …………26…
-
Page 5: Principal Parts Of The Machine
Principal parts of the machine 1. Thread tension dial 2. Presser foot pressure adjustment 3. Thread take-up lever 4. Thread cutter 5. Presser foot 6. Needle plate 7. Removable sewing table/ accessory storage 8. Reverse sewing lever 9. Bobbin stopper 10.
-
Page 6
Principal parts of the machine 13. Horizontal spool pin 14. Bobbin winder 15. Handwheel 16. Power and light switch 17. Main plug socket 18. Bobbin thread guide 19. Upper thread guide 20. Face plate 21. Handle 22. Presser foot lever 23. -
Page 7: Standard/Optional Accessories
Accessories Standard accessories (1) a. All purpose foot b. Zipper foot c. Buttonhole foot d. Button sewing foot 006806008 006905008 006909008 006914008 e. L-screwdriver f. Seam ripper/ brush g. Oil bottle h. Pack of needles I. Bobbin (3x) j. Seam guide k.
-
Page 8: Installing The Snap-In Sewing Table
Installing the snap-in sewing table Keep the snap-in sewing table horizontal, and push it in the direction of the arrow. (1) The inside of the snap-in sewing table can be utilized as an accessory box. To open, lift up at the point of the arrow. (2)
-
Page 9: Connecting Machine To Power Source
Connecting machine to power source Connect the machine to a power source as illustrated. (1) This appliance is equipped with a polarized plug which must be used with the appropriate polarized outlet. (2) Attention: Unplug power cord when machine is not in use. Foot control The foot control pedal regulates the sewing speed.
-
Page 10: Changing The Bulb
Changing the bulb Disconnect the machine from the power supply by removing the plug from the main socket! Replace bulb with same type rated 10 watts (110-120V area) or 15 watts (220-240V area). — Loosen screw (A) as illustrated. (1) — Remove the face plate (B).
-
Page 11: Two-Step Presser Foot Lifter
Two-step presser foot lifter When sewing several layers or thick fabrics, the presser foot can be raised to a high rise position for easy positioning of the work. (A) Adjusting presser foot pressure The presser foot pressure of the machine has been pre-set and requires no particular readjustment according to the type of fabric (light-or-heavy weight).
-
Page 12: Attaching The Presser Foot Holder
Attaching the presser foot holder Raise the presser bar (a). Attach the presser foot shank (b) as illustrated. (1) Attaching the presser foot Lower the presser foot shank (b) until the cut-out (c) is directly above the pin (d). (2) Raise the lever (e).
-
Page 13: Winding The Bobbin
Winding the bobbin — Place thread and spool holder onto spool pin (1). — For smaller spools of thread place spool holder with small side next to spool (2). — Wind thread anticlockwise around bobbin winder tension discs (3). — Thread bobbin as illustrated and place on spindle (4). — Push bobbin to right (5).
-
Page 14: Inserting The Bobbin
Inserting the bobbin When inserting or removing the bobbin, the needle must be fully raised. — Open the hinged cover (1). — Hold the bobbin case with one hand. Insert the bobbin so that the thread runs in a clockwise direction (arrow) (2). — Pull the thread through the slit and under the finger (3).
-
Page 15: Inserting And Changing Needles
Inserting and changing needles Change the needle regularly, especially if it is showing signs of wear and causing problems. For best sewing results always use SINGER Brand Needles. Insert the needle as illustrated as follows: A. Loosen the needle clamp screw and tighten again after inserting the new needle.
-
Page 16: Threading The Upper Thread
Threading the upper thread This is a simple operation but it is important to carry out correctly as by not doing so several sewing problems could result. — Start by raising the needle to its highest point (1), and also raise the presser foot to release the tension discs.
-
Page 17: Automatic Needle Threader (Optional)
Automatic needle threader (optional) * The automatic needle threader is a factory installed option. If your machine has this option use the following instructions: — Raise the needle to its highest position. — Press lever (A) down as far as it will go. — The threader automatically swings to the threading position (B).
-
Page 18: Thread Tension
Thread tension Upper thread tension Basic thread tension setting: «4» To increase the tension, turn the dial to the next number up. To reduce the tension, turn the dial to the next number down. A. Normal thread tension for straight stitch sewing. B.
-
Page 19: Raising The Bobbin Thread
Raising the bobbin thread Hold the upper thread with the left hand. Turn the handwheel (1) towards you (counterclockwise) lowering, then raising needle. Gently pull on the upper thread to bring the bobbin thread up through the needle plate hole (2). Lay both threads to the back under the presser foot.
-
Page 20: Reverse Sewing/ Removing The Work/ Cutting The Thread
Reverse sewing To secure the beginning and the end of a seam, press down the reverse sewing lever (A). Sew a few reverse stitches. Release the lever and the machine will sew forwards again. (1) Removing the work Turn the handwheel counterclockwise to bring the thread take up lever to its highest position, raise the presser foot and remove work behind the needle and presser foot.
-
Page 21: Matching Needle/ Fabric/ Thread
2. When sewing with twin needles, the stitch width dial should be set at less than «3». 3. For best sewing results always use genuine SINGER needles. 4. Replace needle often (approximately every other garment ) and/ or at first thread breakage or skipped stitches.
-
Page 22: How To Choose Your Pattern
How to choose your pattern For center needle straight stitch select pattern » » with pattern selector dial. Adjust the stitch length with the stitch length dial. You may choose left needle position, by selecting pattern » «. For zigzag stitch, select pattern » «…
-
Page 23: Straight Stitch And Needle Position
Straight stitching and needle position Turn the stitch selection dial so that the pointer is set to the straight stitch position. Choose your needle position, from center needle position or right needle position. Generally speaking, the thicker the fabric, thread and needle, the longer the stitch should be.
-
Page 24: Zig-Zag Stitching
Zig-zag stitching Turn the pattern selector dial to » «. (1) Function of stitch length dial while zigzaging The density of zigzag stitches increase as the setting of stitch length dial approaches «0». Neat zigzag stitches are usually achieved at «2.5» or below. Dense zigzag stitches (close together) are referred to as a satin stitch.
-
Page 25: Blind Hem/ Lingerie Stitch
Blind hem/ Lingerie stitch For hems, curtains, trousers, skirts, etc. Blind hem for stretch fabrics. Blind hem/ lingerie for firm fabrics. Reverse blind hem/ lingerie for firm fabrics. Note: It takes practice to sew blind hems. Always make a sewing test first.
-
Page 26: Sewing On Buttons
Sewing on buttons Install the darning plate. (1) Change presser foot to button sewing foot (2). Position the work under the foot. Place the button in the desired position and lower the foot. Set the pattern selector knob on » «…
-
Page 27: Sew 4-Step Buttonholes
Sew 4-step buttonholes Prepare 1. Take off the all purpose foot and attach the buttonhole foot. 2. Measure diameter and thickness of button and add 0.3 cm (1/8″) for bar tacks; mark buttonhole size on fabric. 3. Place fabric under the foot, so that marking on the buttonhole foot aligns with starting marking on fabric.
-
Page 28: Zippers And Piping
Zippers and piping Set the machine as illustrated. Dial selector on » «. Change to zipper foot. Set stitch length control between «1» — «4» (according to thickness of fabric). The zipper foot can be attached right or left, depending on which side of the foot you are going to sew.
-
Page 29: Mutlti-Stitch Zig-Zag/ Bar Tack
Multi-stitch zig-zag Sewing on lace and elastic, darning, mending, reinforcing edges. Set the stitch pattern dial to » «. Place patch in position. The stitch length can be shortened to produce very close stitches. (1) When mending tears, it is advisable to use a piece of backing fabric to reinforce.
-
Page 30: Free Motion Darning, Stippling
Free motion darning, stippling * The darning foot is an optional accessory not included with your machine. (1) Set the machine as illustrated. Install the darning plate. (2) Remove the presser foot clamp. (3) Attach the darning foot to the presser foot holder. The lever (a) should be behind the needle clamp screw (b).
-
Page 31: Practical Stitches
Practical stitches Set the machine as illustrated. Turn the stitch length dial to suit the fabric and application. Shell stitch (A) For decorative edges. Suitable for edges on sheer, fine and stretch fabrics. The larger stitch should go just over the edge of the fabric to create the shell effect.
-
Page 32: Applique And Blindstitch Applique
Applique and blindstitch applique Position applique piece on background fabric. Align needle so that it pierces background fabric along the outside edge if the applique. Lower presser foot. If using a blindhem foot, align the lip of the blindhem foot guide so that it sits directly under the edge of the applique.
-
Page 33: Quilting Functions
Quilting functions Stippling is free motion quilting where you hoop the fabric and guide it by hand, allowing you to stitch in any direction. For template quilting transfer a design from a template (plastic stencil) to your fabric and then stitch following the outline. Do not forget to lower the presser bar if you are sewing without a foot.
-
Page 34: Mending
Mending Machine Preparation: — Pattern: Multi — stitch Zigzag — Stitch width: Largest 4.5mm — Stitch length: Fine (0.5 — 1.0) Sewing Instructions: Position a piece of fabric directly beneath the tear in your fabric. Align the center of the foot with the center of the tear. Stitchacross, backstitching at the start and at the end of the seam.
-
Page 35: Stay-Stitching
Stay-stitching Machine Preparation: — Pattern: Straight Stitch — Stitch Width: Straight — Stitch length: 1.5mm (fine) Sewing Instructions: Stay-stitching is used to reinforce curves such as armholes, seams in stretch fabrics and other areas to prevent stretching. Stay stitch along the edge of the area 1/4 of an inch from the edge of the seam.
-
Page 36: Blindstitch Applique
Blindstitch applique Machine Preparation: — Pattern: Blindhem — Stitch Length: 2 — 3 — Foot: Standard Zigzag or optional Blindhem foot Sewing Instructions: Position applique piece on background fabric and secure it in place using fabric glue. Align needle so that it pierces background fabric along the outside edge of the applique.
-
Page 37: Traditional Pintucks
Traditional pintucks Machine Preparation: — Pattern: Straight — Stitch Width: Straight — Stitch Length: 2 — 3 Sewing Instructions: To mark pintucks in your fabric, either pull a thread to mark the fold or mark with chalk or marking pencil. Fold and press wrong sides together on pulled thread line or marked lines.
-
Page 38: Gathering
Gathering Machine Preparation: — Pattern: Straight Stitch — Stitch Width: Straight — Stitch Length: Longest Sewing Instructons: Use this technique for gathering waistbands, sleeve caps etc. At 1/4 of an inch from the edge of the seam, begin by backstitching and then continue to sew the length required.
-
Page 39: Couching
Couching Machine Preparation: — Pattern: Zigzag — Stitch width: Variable (Set according to width of cord) — Stitch length: Variable — Foot: Zigzag or optional Satin foot Sewing Instructions: Couching is simply the technique of zigzagging over a fine cord. Use as a decorative touch on jackets and other sewing projects.
-
Page 40: Trim Attachment Stitch Function
Trim attachment stitch function — Set the stitch pattern dial to zigzag. — Set the stitch length to «0». — Sew 6 to 8 stitches to secure the trim in place. — Then set needle to right needle position and then to sew the length of the trim.
-
Page 41: Maintenance
Maintenance Attention: Disconnect the machine from the electrical supply by removing the plug from the main socket. When cleaning the machine, it must always be disconnected from the electrical supply. Remove the needle plate: Turn the handwheel until the needle is fully raised. Open the hinged front cover and unscrew the needle plate screws with the screw driver (1).
-
Page 42: Trouble Shooting Guide
Trouble shooting guide Problem Cause Correction Upper thread breaks 1.The machine is not threaded correctly. 1.Rethread the machine. 2.The thread tension is too tight. 2.Reduce the thread tension. (lower number) 3.The thread is too thick for the needle. 3.Select a larger needle. 4.The needle is not inserted correctly.
-
Page 43
021V880105( ) Dec/05 SINGER 1507(8280C)
Перейти к контенту
![]()
Русские электронные инструкции по эксплуатации
Постоянно обновляемый большой каталог документации по эксплуатации и использованию современных устройств и оборудования на русском языке. Бесплатное скачивание файлов.
Поиск:
Главная
♥ В закладки
Просмотр инструкции в pdf


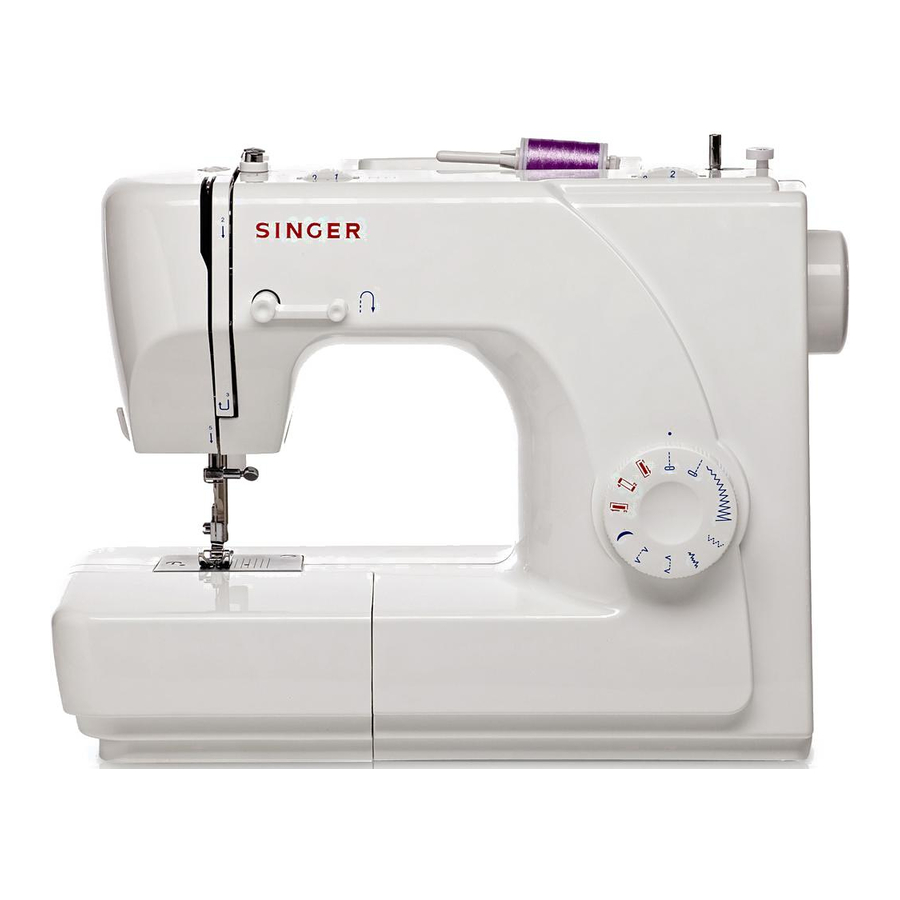
Инструкция по эксплуатации швейной машины Singer 1507.
Скачать инструкцию к швейной машине Singer 1507 (743,66 КБ)

Инструкции по эксплуатации швейных машин Singer
« Инструкция к автомобильному радар-детектору Whistler WH-338ST
» Инструкция к тепловой пушке Otgon КЭВ-3
Вам также может быть интересно

Инструкция к швейной машине Singer Simple 3210

Инструкция к швейной машине Singer Promise 1408

Инструкция к швейной машине Singer Simple 3229

Инструкция к швейной машине Singer Starlet 6660

Инструкция к швейной машине Singer 2273

Инструкция к швейной машине Singer Brilliance 6180

Инструкция к швейной машине Singer 7640

Инструкция к швейной машине Singer Talent 3321
Добавить комментарий
Имя *
Email *
Сайт
Комментарий


![]()


Сохранить моё имя, email и адрес сайта в этом браузере для последующих моих комментариев.
- Добавить инструкцию
- Заказать инструкцию
- Политика конфиденциальности
Перед вами файл pdf, где представлена инструкция (руководство) на русском для SINGER 1507. Вы можете скачать ее либо изучить в онлайн режиме.
Подробные сведения об инструкции:
Устройство из раздела: швейная машина
Бренд-производитель: SINGER
Наименование модели: SINGER 1507
Язык: Руководство на русском языке
Файл: pdf
Размер файла: 1,49 MB

Скачать инструкцию к HARPER HDT2-1110
ЗАГРУЗИТЬ
Просмотр инструкции онлайн
-
Page 1
Instruction Manual… -
Page 2
IMPORTANT SAFETY INSTRUCTIONS When using an electrical appliance, basic safety should always 6. Always use the proper needle plate, The wrong plate can be followed, including the following: cause the needle to break. Read all instructions before using this sewing machine. 7. -
Page 3
Congratulations As the owner of a new Singer sewing machine, you are about to begin an exciting adventure in creativity. From the moment you first use your machine, you will know you are sewing on one of the easiest to use sewing machines ever made. -
Page 4: Table Of Contents
List of contents Principal parts of the machine ……….2/3 Zig-zag stitching …………….21 Accessories ……………..4 Blind hem/ Lingerie stitch …………22 Installing the snap-in sewing table ……….5 Sewing on buttons…………..23 Connecting machine to power source ………6 Sew 4-step buttonholes………….24 Changing the bulb ……………7 Zippers and piping…………..25 Two-step presser foot lifter…………8 Mutlti-stitch zig-zag/ Bar tack …………26…
-
Page 5: Principal Parts Of The Machine
Principal parts of the machine 1. Thread tension dial 2. Presser foot pressure adjustment 3. Thread take-up lever 4. Thread cutter 5. Presser foot 6. Needle plate 7. Removable sewing table/ accessory storage 8. Reverse sewing lever 9. Bobbin stopper 10.
-
Page 6
Principal parts of the machine 13. Horizontal spool pin 14. Bobbin winder 15. Handwheel 16. Power and light switch 17. Main plug socket 18. Bobbin thread guide 19. Upper thread guide 20. Face plate 21. Handle 22. Presser foot lever 23. -
Page 7: Standard/Optional Accessories
Accessories Standard accessories (1) a. All purpose foot b. Zipper foot c. Buttonhole foot d. Button sewing foot 006806008 006905008 006909008 006914008 e. L-screwdriver f. Seam ripper/ brush g. Oil bottle h. Pack of needles I. Bobbin (3x) j. Seam guide k.
-
Page 8: Installing The Snap-In Sewing Table
Installing the snap-in sewing table Keep the snap-in sewing table horizontal, and push it in the direction of the arrow. (1) The inside of the snap-in sewing table can be utilized as an accessory box. To open, lift up at the point of the arrow. (2)
-
Page 9: Connecting Machine To Power Source
Connecting machine to power source Connect the machine to a power source as illustrated. (1) This appliance is equipped with a polarized plug which must be used with the appropriate polarized outlet. (2) Attention: Unplug power cord when machine is not in use. Foot control The foot control pedal regulates the sewing speed.
-
Page 10: Changing The Bulb
Changing the bulb Disconnect the machine from the power supply by removing the plug from the main socket! Replace bulb with same type rated 10 watts (110-120V area) or 15 watts (220-240V area). — Loosen screw (A) as illustrated. (1) — Remove the face plate (B).
-
Page 11: Two-Step Presser Foot Lifter
Two-step presser foot lifter When sewing several layers or thick fabrics, the presser foot can be raised to a high rise position for easy positioning of the work. (A) Adjusting presser foot pressure The presser foot pressure of the machine has been pre-set and requires no particular readjustment according to the type of fabric (light-or-heavy weight).
-
Page 12: Attaching The Presser Foot Holder
Attaching the presser foot holder Raise the presser bar (a). Attach the presser foot shank (b) as illustrated. (1) Attaching the presser foot Lower the presser foot shank (b) until the cut-out (c) is directly above the pin (d). (2) Raise the lever (e).
-
Page 13: Winding The Bobbin
Winding the bobbin — Place thread and spool holder onto spool pin (1). — For smaller spools of thread place spool holder with small side next to spool (2). — Wind thread anticlockwise around bobbin winder tension discs (3). — Thread bobbin as illustrated and place on spindle (4). — Push bobbin to right (5).
-
Page 14: Inserting The Bobbin
Inserting the bobbin When inserting or removing the bobbin, the needle must be fully raised. — Open the hinged cover (1). — Hold the bobbin case with one hand. Insert the bobbin so that the thread runs in a clockwise direction (arrow) (2). — Pull the thread through the slit and under the finger (3).
-
Page 15: Inserting And Changing Needles
Inserting and changing needles Change the needle regularly, especially if it is showing signs of wear and causing problems. For best sewing results always use SINGER Brand Needles. Insert the needle as illustrated as follows: A. Loosen the needle clamp screw and tighten again after inserting the new needle.
-
Page 16: Threading The Upper Thread
Threading the upper thread This is a simple operation but it is important to carry out correctly as by not doing so several sewing problems could result. — Start by raising the needle to its highest point (1), and also raise the presser foot to release the tension discs.
-
Page 17: Automatic Needle Threader (Optional)
Automatic needle threader (optional) * The automatic needle threader is a factory installed option. If your machine has this option use the following instructions: — Raise the needle to its highest position. — Press lever (A) down as far as it will go. — The threader automatically swings to the threading position (B).
-
Page 18: Thread Tension
Thread tension Upper thread tension Basic thread tension setting: «4» To increase the tension, turn the dial to the next number up. To reduce the tension, turn the dial to the next number down. A. Normal thread tension for straight stitch sewing. B.
-
Page 19: Raising The Bobbin Thread
Raising the bobbin thread Hold the upper thread with the left hand. Turn the handwheel (1) towards you (counterclockwise) lowering, then raising needle. Gently pull on the upper thread to bring the bobbin thread up through the needle plate hole (2). Lay both threads to the back under the presser foot.
-
Page 20: Reverse Sewing/ Removing The Work/ Cutting The Thread
Reverse sewing To secure the beginning and the end of a seam, press down the reverse sewing lever (A). Sew a few reverse stitches. Release the lever and the machine will sew forwards again. (1) Removing the work Turn the handwheel counterclockwise to bring the thread take up lever to its highest position, raise the presser foot and remove work behind the needle and presser foot.
-
Page 21: Matching Needle/ Fabric/ Thread
2. When sewing with twin needles, the stitch width dial should be set at less than «3». 3. For best sewing results always use genuine SINGER needles. 4. Replace needle often (approximately every other garment ) and/ or at first thread breakage or skipped stitches.
-
Page 22: How To Choose Your Pattern
How to choose your pattern For center needle straight stitch select pattern » » with pattern selector dial. Adjust the stitch length with the stitch length dial. You may choose left needle position, by selecting pattern » «. For zigzag stitch, select pattern » «…
-
Page 23: Straight Stitch And Needle Position
Straight stitching and needle position Turn the stitch selection dial so that the pointer is set to the straight stitch position. Choose your needle position, from center needle position or right needle position. Generally speaking, the thicker the fabric, thread and needle, the longer the stitch should be.
-
Page 24: Zig-Zag Stitching
Zig-zag stitching Turn the pattern selector dial to » «. (1) Function of stitch length dial while zigzaging The density of zigzag stitches increase as the setting of stitch length dial approaches «0». Neat zigzag stitches are usually achieved at «2.5» or below. Dense zigzag stitches (close together) are referred to as a satin stitch.
-
Page 25: Blind Hem/ Lingerie Stitch
Blind hem/ Lingerie stitch For hems, curtains, trousers, skirts, etc. Blind hem for stretch fabrics. Blind hem/ lingerie for firm fabrics. Reverse blind hem/ lingerie for firm fabrics. Note: It takes practice to sew blind hems. Always make a sewing test first.
-
Page 26: Sewing On Buttons
Sewing on buttons Install the darning plate. (1) Change presser foot to button sewing foot (2). Position the work under the foot. Place the button in the desired position and lower the foot. Set the pattern selector knob on » «…
-
Page 27: Sew 4-Step Buttonholes
Sew 4-step buttonholes Prepare 1. Take off the all purpose foot and attach the buttonhole foot. 2. Measure diameter and thickness of button and add 0.3 cm (1/8″) for bar tacks; mark buttonhole size on fabric. 3. Place fabric under the foot, so that marking on the buttonhole foot aligns with starting marking on fabric.
-
Page 28: Zippers And Piping
Zippers and piping Set the machine as illustrated. Dial selector on » «. Change to zipper foot. Set stitch length control between «1» — «4» (according to thickness of fabric). The zipper foot can be attached right or left, depending on which side of the foot you are going to sew.
-
Page 29: Mutlti-Stitch Zig-Zag/ Bar Tack
Multi-stitch zig-zag Sewing on lace and elastic, darning, mending, reinforcing edges. Set the stitch pattern dial to » «. Place patch in position. The stitch length can be shortened to produce very close stitches. (1) When mending tears, it is advisable to use a piece of backing fabric to reinforce.
-
Page 30: Free Motion Darning, Stippling
Free motion darning, stippling * The darning foot is an optional accessory not included with your machine. (1) Set the machine as illustrated. Install the darning plate. (2) Remove the presser foot clamp. (3) Attach the darning foot to the presser foot holder. The lever (a) should be behind the needle clamp screw (b).
-
Page 31: Practical Stitches
Practical stitches Set the machine as illustrated. Turn the stitch length dial to suit the fabric and application. Shell stitch (A) For decorative edges. Suitable for edges on sheer, fine and stretch fabrics. The larger stitch should go just over the edge of the fabric to create the shell effect.
-
Page 32: Applique And Blindstitch Applique
Applique and blindstitch applique Position applique piece on background fabric. Align needle so that it pierces background fabric along the outside edge if the applique. Lower presser foot. If using a blindhem foot, align the lip of the blindhem foot guide so that it sits directly under the edge of the applique.
-
Page 33: Quilting Functions
Quilting functions Stippling is free motion quilting where you hoop the fabric and guide it by hand, allowing you to stitch in any direction. For template quilting transfer a design from a template (plastic stencil) to your fabric and then stitch following the outline. Do not forget to lower the presser bar if you are sewing without a foot.
-
Page 34: Mending
Mending Machine Preparation: — Pattern: Multi — stitch Zigzag — Stitch width: Largest 4.5mm — Stitch length: Fine (0.5 — 1.0) Sewing Instructions: Position a piece of fabric directly beneath the tear in your fabric. Align the center of the foot with the center of the tear. Stitchacross, backstitching at the start and at the end of the seam.
-
Page 35: Stay-Stitching
Stay-stitching Machine Preparation: — Pattern: Straight Stitch — Stitch Width: Straight — Stitch length: 1.5mm (fine) Sewing Instructions: Stay-stitching is used to reinforce curves such as armholes, seams in stretch fabrics and other areas to prevent stretching. Stay stitch along the edge of the area 1/4 of an inch from the edge of the seam.
-
Page 36: Blindstitch Applique
Blindstitch applique Machine Preparation: — Pattern: Blindhem — Stitch Length: 2 — 3 — Foot: Standard Zigzag or optional Blindhem foot Sewing Instructions: Position applique piece on background fabric and secure it in place using fabric glue. Align needle so that it pierces background fabric along the outside edge of the applique.
-
Page 37: Traditional Pintucks
Traditional pintucks Machine Preparation: — Pattern: Straight — Stitch Width: Straight — Stitch Length: 2 — 3 Sewing Instructions: To mark pintucks in your fabric, either pull a thread to mark the fold or mark with chalk or marking pencil. Fold and press wrong sides together on pulled thread line or marked lines.
-
Page 38: Gathering
Gathering Machine Preparation: — Pattern: Straight Stitch — Stitch Width: Straight — Stitch Length: Longest Sewing Instructons: Use this technique for gathering waistbands, sleeve caps etc. At 1/4 of an inch from the edge of the seam, begin by backstitching and then continue to sew the length required.
-
Page 39: Couching
Couching Machine Preparation: — Pattern: Zigzag — Stitch width: Variable (Set according to width of cord) — Stitch length: Variable — Foot: Zigzag or optional Satin foot Sewing Instructions: Couching is simply the technique of zigzagging over a fine cord. Use as a decorative touch on jackets and other sewing projects.
-
Page 40: Trim Attachment Stitch Function
Trim attachment stitch function — Set the stitch pattern dial to zigzag. — Set the stitch length to «0». — Sew 6 to 8 stitches to secure the trim in place. — Then set needle to right needle position and then to sew the length of the trim.
-
Page 41: Maintenance
Maintenance Attention: Disconnect the machine from the electrical supply by removing the plug from the main socket. When cleaning the machine, it must always be disconnected from the electrical supply. Remove the needle plate: Turn the handwheel until the needle is fully raised. Open the hinged front cover and unscrew the needle plate screws with the screw driver (1).
-
Page 42: Trouble Shooting Guide
Trouble shooting guide Problem Cause Correction Upper thread breaks 1.The machine is not threaded correctly. 1.Rethread the machine. 2.The thread tension is too tight. 2.Reduce the thread tension. (lower number) 3.The thread is too thick for the needle. 3.Select a larger needle. 4.The needle is not inserted correctly.
-
Page 43
021V880105( ) Dec/05 SINGER 1507(8280C)