-
Главная страница
Brother -
Поддержка
- Устранение распространенных проблем в швейной машине
Инструкции
Познакомьтесь с полным списком инструкций к швейным/вышивальным машинам и плоттерам ScanNCut, которые помогут вам настроить и лучше узнать особенности вашей машины Brother.
Посмотреть инструкции Brother
Приложение Brother SupportCenter
В компании Brother мы всегда «at your side»* (*»на вашей стороне») и будем с вами на каждом шагу вашего творческого путешествия.
Наше мобильное приложение находятся в одном клике от вас и доступно для скачивания.
Что вы найдете в мобильном приложении BrotherSupport:
• Инструкцию пользователя в PDF формате
• Рекомендации по сочетанию тканей, игл и ниток
• Инструкции по использованию стандартных и дополнительных аксессуаров
• Информацию о встроенных строчках
• Короткие видеоинструкции о том, как работать на машине, и простые мастер-классы для начинающих
Скачать для iOS Скачать для Android
В вашей швейной машине Brother используется шпулька, специально разработанная для обеспечения наилучшего качества строчки. Важно использовать только оригинальные шпульки Brother, подходящего размера именно для вашей машины. Использование шпулек сторонних производителей может привести к ухудшению качества строчки или даже к повреждению вашей машины.
Во всех современных швейных машинах Brother с горизонтальным челноком используются шпульки высотой 11,5 мм, в то время как в некоторых старых моделях — высотой 9,2 мм. Проверьте правильность размера, опираясь на руководство пользователя, прилагаемое к вашей машине.
Никогда не используйте металлические шпульки в швейной машине Brother, оснащенной горизонтальным челноком.
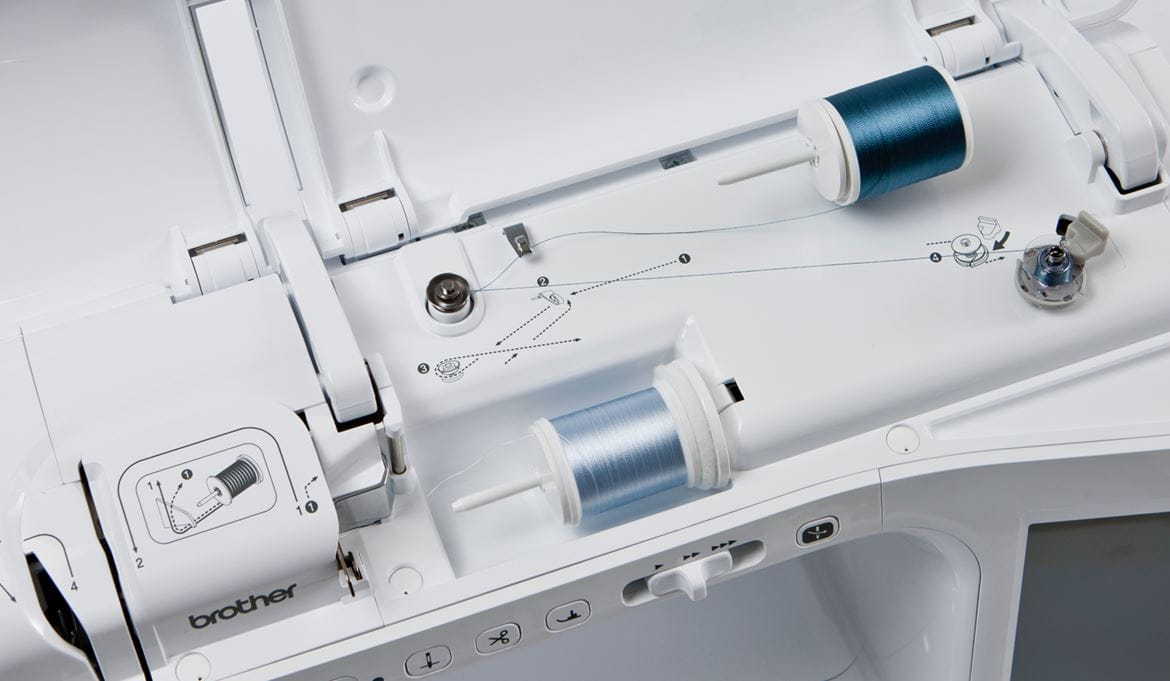
Убедитесь, что нить намотана на шпульку равномерно. При намотке нити на шпульку нить должна обязательно проходить через натяжные диски, расположенные на верхней части корпуса машины. Следуйте направляющим рисункам на корпусе машины или опирайтесь на руководство пользователя.
Правильно установите шпульку в машину. Для шпулек с горизонтальным челноком нить должна проходить вокруг шпульки против часовой стрелки. Следуйте направляющим рисункам на корпусе машины или опирайтесь на руководство пользователя.
Первым делом обратитесь к руководству пользователя для общей настройки вашей машины.
Некоторые общие быстрые исправления:
— Убедитесь, что вал намоточного устройства шпульки не сдвинут вправо; если это так, то переместите его влево.
— Проверьте, чтобы машина была заправлена правильно, убедившись, что метка на маховике находится в верхнем положении (это устанавливает иглу в правильное положение для заправки). Убедитесь, что прижимная лапка поднята, прежде чем заправлять машину. Правильно установите шпульку в машину. Для горизонтальных челноков нить на шпульке должна проходить вокруг шпульки против часовой стрелки. Используйте направляющие, изображенные на вашей машине, или обратитесь к инструкции пользователя. Если у вас механическая машина, убедитесь, что лапка опущена перед началом шитья. Компьютеризованные машины напомнят вам об этом сами, если вы забудете.
Попробуйте заново заправить верхнюю нить, убедившись, что индикатор на маховике расположен сверху (это помещает рычаг нитенаправителя в точку 3, правильное положение для заправки).
Используйте нить хорошего качества — для недорогих ниток или ниток, предназначенных для ручного шитья, характерной является проблема с натяжением, когда в целом с машиной все в порядке. Использование нити, которая не протягивается плавно, может привести к обрыву нити, плохому сшиванию или повреждению вашей машины. Для достижения наилучших результатов, вы должны использовать качественную фирменную нить.
Чтобы проверить, подходит ли нить для использования на швейной машине, заправляйте машину с поднятой лапкой. Нить должна протягиваться через машину свободно без усилий.
Попробуйте:
— повторно заправить верхнюю нить, обеспечивая позиционирование метки на маховике в верхнем положении (это устанавливает рычаг нитенаправителя в положение 3 — правильное положение для заправки), убедившись, что вы не пропустили зацеп за рычаг (это приводит к тому, что нить собирается под материалом);
— повторно заправить верхнюю нить с поднятой лапкой (заправка вашей машины с опущенной лапкой приводит к отсутствию должного натяжения верхней нити из-за того, что диски натяжения в этот момент закрыты), проверить положение шпульки, установить ее согласно инструкции, а также проверить настройки натяжения — если настройка слишком низкая, сбросьте натяжение до значения 4.
-
Contents
-
Table of Contents
-
Troubleshooting
-
Bookmarks
Quick Links
GETTING READY
SEWING BASICS
UTILITY STITCHES
APPENDIX
Operation Manual
Computerized Sewing Machine
Related Manuals for Brother Sewing Machines
Summary of Contents for Brother Sewing Machines
-
Page 1
GETTING READY SEWING BASICS UTILITY STITCHES APPENDIX Operation Manual Computerized Sewing Machine… -
Page 2: Important Safety Instructions
When transporting the sewing machine, be sure to carry it by its handle. Lifting the sewing machine by any other part may damage the machine or result in the machine falling, which could cause injuries.
-
Page 3
• Your close attention is necessary when the machine is used by or near children. • The plastic bag that this sewing machine was supplied in should be kept out of the reach of children or disposed of. Never allow children to play with the bag due to the danger of suffocation. -
Page 4
Use accessories recommended by the manufacturer as contained in this manual. Save these instructions. The contents of this manual and specifications of this product are subject to change without notice. For additional product information, visit our web site at www.brother.com… -
Page 5
FOR USERS IN AUSTRALIA AND NEW ZEALAND This sewing machine is not intended to be used by young children, and assistance may be required if used by a person with a disability. -
Page 6: Table Of Contents
— — — — — — — — — — — — — — — — — — — — — — — — — — — — — — — — — — — — — — — — — — — — — — — — — — — — Contents Important Safety Instructions …1 Introduction …8 Sewing Machine Features …8 Accessories…9 Included accessories … 9 Optional accessories … 10 Names of Machine Parts and Their Functions …11…
-
Page 7
— — — — — — — — — — — — — — — — — — — — — — — — — — — — — — — — — — — — — — — — — — — — — — — — — — — Adjusting the Thread Tension …57 Changing the tension of the upper thread … -
Page 8
— — — — — — — — — — — — — — — — — — — — — — — — — — — — — — — — — — — — — — — — — — — — — — — — — — — — Combining patterns … -
Page 9: Introduction
Sewing Machine Features a Easy upper threading Since the spool can be installed at the front of the sewing machine, the upper thread can easily be threaded. In addition, the needle can be threaded with a simple operation (page 28).
-
Page 10: Accessories
— — — — — — — — — — — — — — — — — — — — — — — — — — — — — — — — — — — — — — — — — — — — — — — — — — — — Accessories After opening the box, check that the following accessories are included.
-
Page 11: Optional Accessories
To obtain optional accessories or parts, contact the nearest authorized dealership. All specifications are correct at the time of printing. The part codes are subject to change without notice. Visit your Brother dealer for a complete listing of optional accessories available for your machine. Part Code Part Name…
-
Page 12: Names Of Machine Parts And Their Functions
Names of Machine Parts and Their Functions The names of the various parts of the sewing machine and their functions are described below. Before using the sewing machine, carefully read these descriptions to learn the names of the machine parts.
-
Page 13: Needle And Presser Foot Section
Presser foot holder The presser foot is attached to the presser foot holder. Operation buttons The operation buttons help you to easily perform various basic sewing machine operations. a Start/stop button Press the start/stop button to start or stop sewing. The machine sews at a low speed at the beginning of sewing while the button is continuously pressed.
-
Page 14: Operation Panel
— — — — — — — — — — — — — — — — — — — — — — — — — — — — — — — — — — — — — — — — — — — — — — — — — — — — Operation panel The operation panel, located on the front at the right of the sewing machine, consists of the LCD (liquid crystal display) and keys for specifying various sewing settings.
-
Page 15
— — — — — — — — — — — — — — — — — — — — — — — — — — — — — — — — — — — — — — — — — — — — — — — — — — —… -
Page 16: Getting Ready
GETTING READY The various preparations required before starting to sew are described in this chapter. Turning the Machine On/Off …16 Power supply precautions …16 Turning on the machine …17 Turning off the machine …17 Understanding the LCD Screens…18 Changing the Machine Settings …19 Changing the settings …19 Adjusting the brightness of the LCD …21 Winding/Installing the Bobbin…22…
-
Page 17: Turning The Machine On/Off
— — — — — — — — — — — — — — — — — — — — — — — — — — — — — — — — — — — — — — — — — — — — GETTING READY Turning the Machine On/Off This section explains how to turn the sewing machine on and off. Power supply precautions Be sure to observe the following precautions concerning the power supply.
-
Page 18: Turning On The Machine
— — — — — — — — — — — — — — — — — — — — — — — — — — — — — — — — — — — — — — — — — — — — — — — — — — — — Turning on the machine Prepare the included power cord. Make sure that the sewing machine is turned off (the main power switch is set to “ then plug the power cord into the power supply jack on the right side of the machine.
-
Page 19: Understanding The Lcd Screens
GETTING READY Understanding the LCD Screens The LCD screen, located on the front at the right of the sewing machine, displays the settings for the selected stitch and error messages if operations are performed incorrectly. The LCD displays the following information.
-
Page 20: Changing The Machine Settings
— — — — — — — — — — — — — — — — — — — — — — — — — — — — — — — — — — — — — — — — — — — — — — — — — — — — Changing the Machine Settings Various sewing machine operations and sewing settings can be changed. Changing the settings The general procedure for changing machine settings is described below.
-
Page 21
— — — — — — — — — — — — — — — — — — — — — — — — — — — — — — — — — — — — — — — — — — — — GETTING READY ■… -
Page 22: Adjusting The Brightness Of The Lcd
— — — — — — — — — — — — — — — — — — — — — — — — — — — — — — — — — — — — — — — — — — — — — — — — — — — — Adjusting the brightness of the LCD The brightness of the LCD can be adjusted.
-
Page 23: Winding/Installing The Bobbin
● Only use the bobbin (part code: SA156, SFB(XA5539-151)) designed specifically for this sewing machine. Use of any other bobbin may result in injuries or damage to the machine. ● The included bobbin was designed specifically for this sewing machine. If bobbins from other models are used, the machine will not operate correctly.
-
Page 24
— — — — — — — — — — — — — — — — — — — — — — — — — — — — — — — — — — — — — — — — — — — — — — — — — — — — Turn on the sewing machine. -
Page 25
— — — — — — — — — — — — — — — — — — — — — — — — — — — — — — — — — — — — — — — — — — — — GETTING READY Memo When sewing with fine, cross-wound thread,… -
Page 26
Slide the sewing speed controller back to its original position. Memo When the sewing machine is started or the handwheel is turned after winding the bobbin, the machine will make a clicking sound; this is not a malfunction. -
Page 27: Installing The Bobbin
● The bobbin was designed specifically for this sewing machine. If bobbins from other models are used, the machine will not operate correctly. Use only the included bobbin or bobbins of the same type (part code: SA156, SFB(XA5539-151)).
-
Page 28
— — — — — — — — — — — — — — — — — — — — — — — — — — — — — — — — — — — — — — — — — — — — — — — — — — — — Insert the bobbin with your right hand so that the thread unwinds to the left side, and then pull the thread firmly under the tab with your… -
Page 29: Upper Threading
(page 33). Memo The order that the machine should be threaded is indicated by a solid line on the sewing machine. Be sure to thread the machine as indicated. a Spool pin b Mark on handwheel Threading the upper thread Set the spool of thread on the spool pin, and then thread the machine.
-
Page 30
— — — — — — — — — — — — — — — — — — — — — — — — — — — — — — — — — — — — — — — — — — — — — — — — — — — — Press (needle position button) once or twice to raise the needle. -
Page 31
— — — — — — — — — — — — — — — — — — — — — — — — — — — — — — — — — — — — — — — — — — — — GETTING READY While holding the spool with your right hand, pull the thread with your left hand, and then… -
Page 32: Threading The Needle
Threading the needle This section describes how to thread the needle. Memo The needle threader can be used with sewing machine needles 75/11 through 100/16. Thread with a thickness of 130/20 or thicker cannot be used with the needle threader.
-
Page 33
— — — — — — — — — — — — — — — — — — — — — — — — — — — — — — — — — — — — — — — — — — — — GETTING READY Lower the needle threader lever on the left side of the machine, and then slowly return the… -
Page 34: Threading The Needle Manually (Without Using The Needle Threader)
— — — — — — — — — — — — — — — — — — — — — — — — — — — — — — — — — — — — — — — — — — — — — — — — — — — — Threading the needle manually (without using the needle threader) When using special thread, thread with a thickness of…
-
Page 35
“Replacing the presser foot” (page 41). CAUTION ● When using the twin needle, be sure to attach zigzag foot “J”, otherwise the needle may break or the machine may be damaged. Turn on the sewing machine. The LCD comes on. through… -
Page 36
• To return to single needle sewing, press (Needle mode selection key) until the icon switches to • Even after the sewing machine is turned off, the twin needle setting is not cancelled. CAUTION ● When using the twin needle, be sure to… -
Page 37: Pulling Up The Bobbin Thread
— — — — — — — — — — — — — — — — — — — — — — — — — — — — — — — — — — — — — — — — — — — — GETTING READY Pulling up the bobbin thread When making gathers or before free-motion quilting,…
-
Page 38: Replacing The Needle
CAUTION ● Only use home sewing machine needles. Use of any other needle may bend the needle or damage the machine. ● Never use bent needles. Bent needles can easily break, possibly resulting in injuries.
-
Page 39: Needle Types And Their Uses
Needle types and their uses The sewing machine needle that should be used depends on the fabric and thread thickness. Refer to the following table when choosing the thread and needle appropriate for the fabric that you wish to sew.
-
Page 40: Checking The Needle
(needle position button) once or twice to raise the needle. a Needle position button Turn off the sewing machine. CAUTION turn off the sewing machine, otherwise injuries may occur if (start/stop button) is accidentally pressed and the machine starts sewing.
-
Page 41
— — — — — — — — — — — — — — — — — — — — — — — — — — — — — — — — — — — — — — — — — — — — GETTING READY Hold the needle with your left hand, and then use a screwdriver to turn the needle clamp… -
Page 42: Replacing The Presser Foot
● Only use presser feet designed specifically for this sewing machine. Use of any other presser foot may result in injuries or damage to the machine.
-
Page 43
Check that the correct presser foot is attached before starting to sew. If the wrong presser foot is installed, turn off the sewing machine, attach the correct presser foot, and then select the desired stitch again. Buttonhole foot “A”… -
Page 44: Removing The Presser Foot Holder
Removing the presser foot holder Remove the presser foot holder when cleaning the sewing machine or when installing a presser foot that does not use the presser foot holder, such as the quilting foot. Use the screwdriver to remove the presser foot holder.
-
Page 45: Using The Optional Walking Foot
■ Removing the walking foot Press twice to raise the needle. a Needle position button The needle is raised. Turn off the sewing machine. Raise the presser foot lever. a Presser foot lever The presser foot is raised. (needle position button) once or…
-
Page 46
Only the straight stitch (with reinforcement stitching) and the zigzag stitch can be used with the walking foot. For details on the stitches, refer to “Stitch Settings” (page 120). The optional walking foot is available through your Brother dealer. Replacing the Presser Foot 45… -
Page 47: Sewing Cylindrical Or Large Pieces
— — — — — — — — — — — — — — — — — — — — — — — — — — — — — — — — — — — — — — — — — — — — GETTING READY Sewing Cylindrical or Large Pieces When sewing cylindrical or large pieces of fabric, remove the flat bed attachment.
-
Page 48
Sewing machine bed Note The optional wide table is available through your Brother dealer. Turn the screw at the bottom of each leg to adjust their height so the wide table will be level with the sewing machine bed. -
Page 49
— — — — — — — — — — — — — — — — — — — — — — — — — — — — — — — — — — — — — — — — — — — — GETTING READY… -
Page 50: Sewing Basics
SEWING BASICS The necessary preparations for sewing are described in this chapter. Sewing…50 General sewing procedure …50 Positioning the fabric …51 Starting to sew …52 Securing the stitching…54 Cutting the thread …56 Adjusting the Thread Tension …57 Changing the tension of the upper thread …57 Adjusting the Stitch Width and Length …58 Adjusting the stitch width …58 Adjusting the stitch length…59…
-
Page 51: Sewing
● When sewing, make sure that the needle does not strike basting pins, otherwise the needle may break or bend. ● Before replacing the presser foot, be sure to turn off the sewing machine, otherwise injuries may occur if the start/stop button is accidentally pressed and the machine starts sewing.
-
Page 52: Positioning The Fabric
Be sure that the fabric pieces are sewn in the correct order and that the right and wrong sides of the fabric are aligned correctly. Turn on the sewing machine. The straight stitch (left needle position) is automatically selected. Press (needle position button) once or twice to raise the needle.
-
Page 53: Starting To Sew
Sewing can be started and stopped using the foot controller. Turn off the sewing machine. When connecting the foot controller, be sure to turn off the sewing machine in order to prevent the machine from accidentally being started. (start/stop button)
-
Page 54
— — — — — — — — — — — — — — — — — — — — — — — — — — — — — — — — — — — — — — — — — — — — — — — — — — — — Insert the foot controller plug into its jack on the side of the sewing machine. a Foot controller jack Note (For U.S.A. -
Page 55: Securing The Stitching
— — — — — — — — — — — — — — — — — — — — — — — — — — — — — — — — — — — — — — — — — — — — SEWING BASICS When you are finished sewing, raise the needle, and then cut the threads.
-
Page 56
The machine starts sewing in the normal sewing direction. After sewing to the end of the stitching, the sewing machine stops. Press (start/stop button) or release foot controller. a Beginning of stitching… -
Page 57: Cutting The Thread
When you have finished sewing, cut the threads with the thread cutter on the side of the machine. When you wish to finish the stitching and the sewing machine is stopped, if the needle is not raised, press (needle position button) once to raise the needle.
-
Page 58: Adjusting The Thread Tension
— — — — — — — — — — — — — — — — — — — — — — — — — — — — — — — — — — — — — — — — — — — — — — — — — — — — Adjusting the Thread Tension The tensions of the upper thread and of the bobbin thread (thread tension) should be adjusted so that they are equal.
-
Page 59: Adjusting The Stitch Width And Length
Increasing the width moves the needle to the right; reducing the width moves the needle to the left. The sewing machine can be set so that the stitch width can easily be changed with the sewing speed controller. For details, refer to “Satin stitching using the sewing speed…
-
Page 60: Adjusting The Stitch Length
— — — — — — — — — — — — — — — — — — — — — — — — — — — — — — — — — — — — — — — — — — — — — — — — — — — — Adjusting the stitch length The stitch length can be adjusted to make the stitch longer or shorter. Turn on the sewing machine. The LCD comes on. Select a stitch. A screen containing settings for the selected stitch appears.
-
Page 61: Useful Functions
Functions useful in improving sewing efficiency are described below. Changing the needle stop position When the sewing machine is purchased, it is set to leave the needle lowered in the fabric when sewing is stopped. However, the machine can be set to instead leave the needle raised when sewing is stopped.
-
Page 62
• To turn automatic reverse/reinforcement stitching off, press reinforcement stitch key) until the icon disappears. • When the sewing machine is turned off, the automatic reverse/reinforcement stitching setting is cancelled. Position the fabric under the presser foot, and then press (start/stop button) once. -
Page 63: Useful Sewing Tips
Changing the sewing direction When the stitching reaches a corner, stop the sewing machine. Leave the needle lowered (in the fabric). If the needle remained up when the machine stopped sewing, press (needle position button) to lower the needle.
-
Page 64: Sewing Thin Fabrics
— — — — — — — — — — — — — — — — — — — — — — — — — — — — — — — — — — — — — — — — — — — — — — — — — — — — ■…
-
Page 65: Sewing An Even Seam Allowance
— — — — — — — — — — — — — — — — — — — — — — — — — — — — — — — — — — — — — — — — — — — — SEWING BASICS Sewing an even seam allowance…
-
Page 66: Utility Stitches
UTILITY STITCHES The various stitches and their applications are described in this chapter. Selecting Stitching … 66 Selecting stitch types and patterns… 66 Selecting stitching … 67 Overcasting Stitches… 71 Sewing overcasting stitches using overcasting foot “G” … 71 Sewing overcasting stitches using zigzag foot “J”…
-
Page 67: Selecting Stitching
— — — — — — — — — — — — — — — — — — — — — — — — — — — — — — — — — — — — — — — — — — — UTILITY STITCHES Selecting Stitching You can select any of the various types of stitching available.
-
Page 68: Selecting Stitching
• For details on the stitches that can be sewn Attach the presser foot. • For details, refer to “Replacing the presser Turn on the sewing machine. After selecting the stitch mode, select the stitch pattern. to the stitch pattern plate and “Stitch Settings”…
-
Page 69
— — — — — — — — — — — — — — — — — — — — — — — — — — — — — — — — — — — — — — — — — — — UTILITY STITCHES ■… -
Page 70
Check that the correct presser foot is attached before starting to sew. If the wrong presser foot is installed, turn off the sewing machine, attach the correct presser foot, and then select the desired stitch again. Memo For details on adjusting the stitch width and length, refer to “Adjusting the Stitch Width… -
Page 71
— — — — — — — — — — — — — — — — — — — — — — — — — — — — — — — — — — — — — — — — — — — UTILITY STITCHES To select a stitch in a different mode as the current one… -
Page 72: Overcasting Stitches
Three stitches can be used to sew overcasting with overcasting foot “G”. Pattern Numeric Stitch Name Overcasting stitch Turn on the sewing machine. Select a stitch. • For details, refer to “Selecting stitching” (page 67). Attach overcasting foot “G”. • For details, refer to “Replacing the presser foot”…
-
Page 73: Sewing Overcasting Stitches Using Zigzag Foot «J
3-point zigzag stitch – Overcasting – stitch – Turn on the sewing machine. Select a stitch. • For details, refer to “Selecting stitching” (page 67). Attach zigzag foot “J”. • For details, refer to “Replacing the presser foot” (page 41).
-
Page 74: Sewing Overcasting Stitches Using The Optional Side Cutter
Lower the presser foot lever, and then manually thread the needle. • The needle threader cannot be used. If the needle threader is used with the side cutter, the sewing machine may be damaged. Raise the presser foot lever. Application Auto…
-
Page 75
If the side cutter can no longer cut fabric, use a rag to apply a small amount of oil to the cutting edge of the cutter. The optional side cutter is available through your Brother dealer. -
Page 76: Basic Stitching
Triple stretch stitch Basic stitching Baste or pin together the fabric pieces. Turn on the sewing machine. Select a stitch. • For details, refer to “Selecting stitching” (page 67). Attach zigzag foot “J”. • For details, refer to “Replacing the presser foot”…
-
Page 77
— — — — — — — — — — — — — — — — — — — — — — — — — — — — — — — — — — — — — — — — — — — UTILITY STITCHES ■… -
Page 78: Blind Hem Stitching
Fold back the fabric along the basting, and then position the fabric with the wrong side facing up. a Wrong side of fabric b Basting Turn on the sewing machine. Select a stitch. • For details, refer to “Selecting stitching” (page 67). Application…
-
Page 79
— — — — — — — — — — — — — — — — — — — — — — — — — — — — — — — — — — — — — — — — — — — UTILITY STITCHES Adjust the stitch width until the needle slightly catches the fold of the hem. -
Page 80: Buttonhole Stitching/Button Sewing
— — — — — — — — — — — — — — — — — — — — — — — — — — — — — — — — — — — — — — — — — — — — — — — — — — — — Buttonhole Stitching/Button Sewing Buttonholes can be sewn and buttons can be sewn on.
-
Page 81: Buttonhole Sewing
— — — — — — — — — — — — — — — — — — — — — — — — — — — — — — — — — — — — — — — — — — — UTILITY STITCHES Buttonhole sewing The maximum buttonhole length is about 28 mm (1-1/8 inches) (diameter + thickness of the button).
-
Page 82
— — — — — — — — — — — — — — — — — — — — — — — — — — — — — — — — — — — — — — — — — — — — — — — — — — — — ■… -
Page 83
— — — — — — — — — — — — — — — — — — — — — — — — — — — — — — — — — — — — — — — — — — — UTILITY STITCHES Gently hold the end of the upper thread in your left hand, and then start sewing. -
Page 84
Hook the gimp thread onto the part of buttonhole foot “A” shown in the illustration so that it fits into the grooves, and then loosely tie it. Turn on the sewing machine. Select stitch Attach buttonhole foot “A”. • For details, refer to “Replacing the presser foot”… -
Page 85: Button Sewing
— — — — — — — — — — — — — — — — — — — — — — — — — — — — — — — — — — — — — — — — — — — UTILITY STITCHES Button sewing Buttons can be sewn on with the sewing machine. Buttons with 2 or with 4 holes can be attached. Measure the distance between the holes in the button to be attached.
-
Page 86
Start sewing. Set the sewing speed controller to the left (so that the speed will be slow). The sewing machine automatically stops after sewing reinforcement stitches. • If additional strength is needed to secure the button, perform the button-sewing operation twice. -
Page 87: Zipper Insertion
Right side of fabric b Stitching c End of zipper opening Turn on the sewing machine. Attach zigzag foot “J” and sew straight stitches up to the zipper opening. With the right sides of the fabric facing each other, sew reverse stitches after reaching the zipper opening.
-
Page 88
— — — — — — — — — — — — — — — — — — — — — — — — — — — — — — — — — — — — — — — — — — — — — — — — — — — — Select stitch •… -
Page 89: Inserting A Side Zipper
End of zipper opening The following procedure will describe how to stitch on the left side, as shown in the illustration. Turn on the sewing machine. Baste the two pieces up to the edge of the fabric. a Basting stitching…
-
Page 90
When you are about 5 cm (2 inches) from the end of the zipper, stop the sewing machine with the needle lowered (in the fabric), raise the presser foot lever, and then open the zipper and continue sewing. -
Page 91
— — — — — — — — — — — — — — — — — — — — — — — — — — — — — — — — — — — — — — — — — — — UTILITY STITCHES When you are about 5 cm (2 inches) from the end of the zipper, stop the sewing machine with the needle lowered (in the fabric), raise the presser foot lever, and then open the zipper and continue sewing. -
Page 92: Sewing Stretch Fabrics And Elastic Tape
Elastic- attaching stitch Observe the corresponding precautions when performing each of the following stitching operations. Stretch stitching Turn on the sewing machine. Select stitch • For details, refer to “Selecting stitching” (page 67). Attach zigzag foot “J”. • For details, refer to “Replacing the presser foot”…
-
Page 93
— — — — — — — — — — — — — — — — — — — — — — — — — — — — — — — — — — — — — — — — — — — UTILITY STITCHES Attach zigzag foot “J”. -
Page 94: Appliqué, Patchwork And Quilt Stitching
— — — — — — — — — — — — — — — — — — — — — — — — — — — — — — — — — — — — — — — — — — — — — — — — — — — — Appliqué, Patchwork and Quilt Stitching The stitches that can be used for sewing appliqués, patchwork and quilts are described below.
-
Page 95: Appliqué Stitching
Turn the fabric over, and then baste or pin it onto the fabric that it will be attached to. a Basting stitching Turn on the sewing machine. Select a stitch. • For details, refer to “Selecting stitching” (page 67).
-
Page 96: Patchwork (Crazy Quilt) Stitching
Baste or pin along the seam allowance of the fabric that you wish to piece together. Turn on the sewing machine. Select stitch • For details, refer to “Selecting stitching” (page 67).
-
Page 97: Quilting
“quilting”. Quilts can easily be sewn using the optional walking foot and the optional quilting guide. Baste the fabric to be quilted. Turn on the sewing machine. Select a stitch. • For details, refer to “Selecting Stitching” (page 66).
-
Page 98: Free-Motion Quilting
Note The optional quilting guide is available through your Brother dealer. Free-motion quilting With free-motion quilting, lower the feed dogs (using the drop feed lever) so that the fabric can be moved freely in any direction.
-
Page 99: Satin Stitching Using The Sewing Speed Controller
A decorative stitch can be sewn by changing the stitch width of a satin stitch. If the sewing machine is set so that the stitch width can be adjusted using the sewing speed controller, the stitch width can quickly and easily be adjusted.
-
Page 100
— — — — — — — — — — — — — — — — — — — — — — — — — — — — — — — — — — — — — — — — — — — — — — — — — — — — Press (Stitch width keys) to select To return to… -
Page 101: Reinforcement Stitching
– stitch Triple stretch stitching Use triple stretch stitching to reinforce sleeve holes and inseams. Turn on the sewing machine. Select stitch • For details, refer to “Selecting stitching” (page 67). Attach zigzag foot “J”. • For details, refer to “Replacing the presser foot”…
-
Page 102
— — — — — — — — — — — — — — — — — — — — — — — — — — — — — — — — — — — — — — — — — — — — — — — — — — — — Select stitch •… -
Page 103: Eyelet Stitching
(1/4, 15/64 and 3/16 inch). Pattern Stitch Name Sewing eyelets, for example, on Eyelet stitch belts Turn on the sewing machine. Select stitch • For details, refer to “Selecting stitching” (page 67). Attach monogramming foot “N”. • For details, refer to “Replacing the presser foot”…
-
Page 104: Decorative Stitching
— — — — — — — — — — — — — — — — — — — — — — — — — — — — — — — — — — — — — — — — — — — — — — — — — — — — Decorative Stitching Various decorative stitches can be sewn with this sewing machine. Pattern…
-
Page 105: Fagoting
Thin paper or water soluble stabilizer b Basting stitching c 4 mm (3/16 inch) Turn on the sewing machine. Select stitch • For details, refer to “Selecting stitching” (page 67). Stitch Width…
-
Page 106: Scallop Stitching
The wave-shaped repeating pattern that looks like shells is called “scalloping”. It is used on the collars of blouses and to decorate the edges of handkerchiefs. Turn on the sewing machine. Select stitch • For details, refer to “Selecting stitching” (page 67).
-
Page 107: Shell Tuck Stitching
The gathers that look like shells are called “shell tucks”. They are used to decorate trims, the front of blouses or cuffs made of thin fabrics. Fold the fabric along the bias. Turn on the sewing machine. Select stitch , and then increase the thread tension.
-
Page 108: Joining
Decorative bridging stitches can be sewn over the seam allowance of joined fabrics. This is used when making a crazy quilt. Turn on the sewing machine. Sew together the right sides of the two pieces of fabric, and then open up the seam allowances.
-
Page 109
Two ways to create drawnwork are described below. ■ Drawnwork (Example 1) Pull out several threads from the fabric. Turn on the sewing machine. Select stitch • For details, refer to “Selecting stitching” (page 67). Attach monogramming foot “N”. -
Page 110
Pull out several threads from two sections of the fabric, separated by an unfrayed section of about 4 mm (3/16 inch). a 4 mm (3/16 inch) Turn on the sewing machine. Select stitch • For details, refer to “Selecting stitching” (page 67). -
Page 111: Sewing The Various Built-In Decorative Patterns
■ Needles and threads When sewing thin, medium weight or stretch fabrics, use the ball point needle. When sewing thick fabrics, use a 90/14 home sewing machine needle. In addition, #50-#60 thread should be used. ■ Trial sewing…
-
Page 112: Combining Patterns
Memo Up to 35 patterns can be combined. If multiple patterns have been combined, the sewing machine stops once all the selected patterns displayed in the LCD have been sewn. To repeatedly sew the combined pattern, refer to “Repeat sewing patterns”.
-
Page 113: Repeat Sewing Patterns
Note If repeated sewing is set, the pattern is repeatedly sewn until the sewing machine is stopped. If the sewing machine is turned off, the repeated/single sewing setting returns to its default setting. Checking the selected pattern Up to 35 patterns can be combined. If all of the…
-
Page 114: Mirror Imaging The Pattern
— — — — — — — — — — — — — — — — — — — — — — — — — — — — — — — — — — — — — — — — — — — — — — — — — — — — Press (Stitch length keys) until is displayed.
-
Page 115: Saving Patterns
Saving patterns Combined patterns can be saved for later use. Since saved patterns are not lost after the sewing machine is turned off, they can be retrieved at any time. This is convenient for patterns, such as names, that will be used often.
-
Page 116: Retrieving A Pattern
After the pattern is saved, a beep is sounded, and the initial stitch screen appears again. Note Do not turn off the sewing machine while a pattern is being saved, otherwise the pattern data may be lost. Memo…
-
Page 117: Realigning The Pattern
(page 41). Start sewing. The pattern for making the adjustment is sewn. The sewing machine stops after it has finished sewing the pattern. Check the sewn pattern. If the part of the pattern indicated in the illustration is sewn uniformly, the pattern is correctly aligned.
-
Page 118
— — — — — — — — — — — — — — — — — — — — — — — — — — — — — — — — — — — — — — — — — — — — — — — — — — — — Press (Stitch width keys). -
Page 119
— — — — — — — — — — — — — — — — — — — — — — — — — — — — — — — — — — — — — — — — — — — UTILITY STITCHES… -
Page 120: Appendix
APPENDIX The various maintenance and troubleshooting procedures are described in this chapter. Stitch Settings…120 Utility stitches …120 Other stitches…124 Care and Maintenance …126 Cleaning the machine surface…126 Cleaning the race …126 Troubleshooting …128 Error messages …132 Nothing appears in the LCD…134 Operation beep …134 Cancelling the operation beep…134 Index …136…
-
Page 121: Stitch Settings
— — — — — — — — — — — — — — — — — — — — — — — — — — — — — — — — — — — — — — — — — — — — — — APPENDIX Stitch Settings Applications, stitch lengths and widths and whether the twin needle can be used are listed for utility…
-
Page 122
— — — — — — — — — — — — — — — — — — — — — — — — — — — — — — — — — — — — — — — — — — — — — — — — — — — — Stitch Name Appliqué… -
Page 123
— — — — — — — — — — — — — — — — — — — — — — — — — — — — — — — — — — — — — — — — — — — — — — APPENDIX Stitch Name Application… -
Page 124
— — — — — — — — — — — — — — — — — — — — — — — — — — — — — — — — — — — — — — — — — — — — — — — — — — — — Stitch Name Bar tack stitch… -
Page 125: Other Stitches
— — — — — — — — — — — — — — — — — — — — — — — — — — — — — — — — — — — — — — — — — — — — — — APPENDIX Stitch Name Application…
-
Page 126
— — — — — — — — — — — — — — — — — — — — — — — — — — — — — — — — — — — — — — — — — — — — — — — — — — — — Stitch Type Utility decorative stitches… -
Page 127: Care And Maintenance
Turn off the sewing machine. Unplug the power cord from the power supply jack on the right side of the sewing machine. CAUTION ● Unplug the power cord before cleaning the machine, otherwise injuries or an electric shock may occur.
-
Page 128: Removing The Needle Plate
— — — — — — — — — — — — — — — — — — — — — — — — — — — — — — — — — — — — — — — — — — — — — — — — — — — — Insert the bobbin case so that the projection on the bobbin case aligns with the spring.
-
Page 129: Troubleshooting
— — — — — — — — — — — — — — — — — — — — — — — — — — — — — — — — — — — — — — — — — — — — — — APPENDIX Troubleshooting If the machine stops operating correctly, check the following possible problems before requesting service.
-
Page 130
— — — — — — — — — — — — — — — — — — — — — — — — — — — — — — — — — — — — — — — — — — — — — — — — — — — — Symptom The upper thread was not threaded correctly (for example, the spool is… -
Page 131
— — — — — — — — — — — — — — — — — — — — — — — — — — — — — — — — — — — — — — — — — — — — — — APPENDIX Symptom Probable Cause… -
Page 132
— — — — — — — — — — — — — — — — — — — — — — — — — — — — — — — — — — — — — — — — — — — — — — — — — — — — Symptom Dust has accumulated in the feed dogs or in the bobbin case. -
Page 133: Error Messages
APPENDIX Error messages (start/stop button) is pressed before the sewing machine is correctly set up or if an operation is performed incorrectly, an icon indicating the error appears in the LCD. Follow the instructions that appear. The icon will disappear if…
-
Page 134
— — — — — — — — — — — — — — — — — — — — — — — — — — — — — — — — — — — — — — — — — — — — — — — — — — — — Error Error Message Code No. -
Page 135: Nothing Appears In The Lcd
Be sure to check for the cause of the error, and correct it before continuing to sew. Cancelling the operation beep When the sewing machine is purchased, it is set to beep each time an operation panel key is pressed. This setting can be changed so that the machine does not beep.
-
Page 136
— — — — — — — — — — — — — — — — — — — — — — — — — — — — — — — — — — — — — — — — — — — — — — — — — — — — Press (Stitch width keys) to select To return to… -
Page 137: Index
— — — — — — — — — — — — — — — — — — — — — — — — — — — — — — — — — — — — — — — — — — — — — — APPENDIX Index Numerics…
-
Page 138
…114 scallop stitching …105 screwdriver … 9 seam ripper … 9 selecting stitching …67 settings key … 13 sewing machine needles …37 sewing speed …52 sewing speed controller … 12 shell tuck stitch …106 side cutter … 10 sleeves …100 smocking …105… -
Page 139
— — — — — — — — — — — — — — — — — — — — — — — — — — — — — — — — — — — — — — — — — — — — — — APPENDIX upper thread …28 upper thread tension …57… -
Page 140
English 885-V14 XE2408-001 2 Printed in China…
Главная >
Brother
Brother: инструкции для 392 моделей
-
 Brother 1034D
Швейная Машина
-
Brother 22 N
Швейная Машина
-
Brother 2340CV
Швейная Машина
-
Brother 270
Факсимильный Аппарат (Факс)
-
Brother 3034D
Швейная Машина
-
Brother 370
Факсимильный Аппарат (Факс)
-
Brother 4234D
Швейная Машина
-
Brother 515
Факсимильный Аппарат (Факс)
-
Brother 825
Факсимильный Аппарат (Факс)
-
Brother 950
Факсимильный Аппарат (Факс)
-
Brother Artwork 10
Швейная Машина
-
Brother Artwork 19
Швейная Машина
-
Brother Artwork 20
Швейная Машина
-
Brother Artwork 22
Швейная Машина
-
Brother ARTWORK 31
Швейная Машинка
-
Brother Artwork 33A
Швейная Машина
-
Brother Artwork 37 A
Швейная Машина
-
Brother ARTWORK 37A
Швейная Машинка
-
Brother BC-2100
Швейная Машина
-
Brother BC-2300
Швейная Машина
-
Brother Boutique 27
Швейная Машина
-
Brother Boutique 37
Швейная Машина
-
Brother CLASSIC 20
Швейная Машинка
-
Brother Classic 20 белый
Швейная Машина
-
Brother CLASSIC 30
Швейная Машина
-
Brother Classic 30 белый
Швейная Машина
-
Brother Classic 40
Швейная Машина
-
Brother Classic 40 белый
Швейная Машина
-
Brother Comfort 10
Швейная Машина
-
Brother COMFORT 12
Швейная Машина
-
Brother Comfort 15
Швейная Машина
-
Brother Comfort 25
Швейная Машина
-
Brother Comfort 25A
Швейная Машина
-
Brother Comfort 35A
Швейная Машина
-
Brother Comfort 40E
Швейная Машина
-
Brother Comfort 60E
Швейная Машина
-
Brother CS-8060
Швейная Машина
-
Brother CS-8120
Швейная Машина
-
Brother CX 5
Швейная Машинка
-
Brother DCP-110C
Мфу
-
Brother DCP-115C
Мфу
-
Brother DCP-120C
Мфу
-
Brother DCP-130C
Мфу
-
Brother DCP-135C
Мфу
-
Brother DCP-145C
Мфу
-
Brother DCP-150C
Мфу
-
Brother DCP-1510R
Мфу
-
Brother dcp-1512r
Лазерное МФУ
-
Brother DCP-153C
Мфу
-
Brother DCP-157C
Мфу
-
Brother DCP-1602R
Лазерное МФУ
-
Brother DCP-1610WR
Лазерное МФУ
-
Brother dcp-1612wr
Лазерное МФУ
-
Brother DCP-163C
Мфу
-
Brother DCP-165C
Мфу
-
Brother DCP-167C
Мфу
-
Brother DCP-185C
Мфу
-
Brother DCP-193C
Мфу
-
Brother DCP-195C
Струйное Многофункциональное Устройство
-
Brother DCP-197C
Мфу
-
Brother DCP-310CN
Мфу
-
Brother DCP-330C
Мфу
-
Brother DCP-350C
Мфу
-
Brother DCP-353C
Мфу
-
Brother DCP-357C
Мфу
-
Brother DCP-373CW
Мфу
-
Brother DCP-375CW
Мфу
-
Brother DCP-377CW
Мфу
-
Brother DCP-385C
Струйное Многофункциональное Устройство
-
Brother DCP-540CN
Мфу
-
Brother DCP-560CN
Мфу
-
Brother DCP-6690CW
Мфу
-
Brother DCP-7030R
Лазерное Многофункциональное Устройство
-
Brother DCP-8020
Мфу
-
Brother DCP-8025D
Мфу
-
Brother DCP-8040
Мфу
-
Brother DCP-8045D
Многофункциональное Устройство (Мфу)
-
Brother DCP-8060
Мфу
-
Brother DCP-8065DN
Мфу
-
Brother DCP-8070D
Мфу
-
Brother DCP-8085DN
Мфу
-
Brother DCP-8110D
Многофункциональное Устройство (Мфу)
-
Brother DCP-8110DN
Многофункциональное Устройство (Мфу)
-
Brother DCP-8250DN
Многофункциональное Устройство (Мфу)
-
Brother DCP-9010CN
Мфу
-
Brother DCP-9020CDW
Мфу
-
Brother DCP-9040CN
Мфу
-
Brother DCP-9042CDN
Мфу
-
Brother DCP-J100
МФУ струйное
-
Brother DCP-J125
Мфу
-
Brother DCP-J315W
Мфу
-
Brother DCP-J515W
Мфу
-
Brother DCP-J525W
Мфу
-
Brother DCP-J715W
Мфу
-
Brother DCP-J725DW
Мфу
-
Brother DCP-L2 DCP-L2540DNR Черный
Лазерное МФУ
-
Brother DCP-L2500DR
Лазерное МФУ
-
Brother DCP-L2520DWR
Лазерное МФУ
-
Brother DCP-L2540DNR
Лазерное МФУ
-
Brother DCP-L2560DWR
Лазерное МФУ
-
Brother DCP-L5500DN
Мфу
-
Brother DCP-L6600DW
Мфу
-
Brother DS-120
Швейная Машина
-
Brother DS-140
Швейная Машина
-
Brother DS-160
Швейная Машинка
-
Brother ELITE 45
Швейная Машинка
-
Brother ELITE 55
Швейная Машинка
-
Brother ELITE 95E
Швейная Машинка
-
Brother ES-2020
Швейная Машина
-
Brother ES-2220
Швейная Машина
-
Brother ES-2420
Швейная Машина
-
Brother F 480
Швейная Машина
-
Brother FAX 1170
Факсимильный Аппарат (Факс)
-
Brother FAX 1570MC
Факсимильный Аппарат (Факс)
-
Brother Fax-2820
Факс
-
Brother FS-20
Швейная Машина
-
Brother FS-40
Швейная Машина
-
Brother G 20
Швейная Машинка
-
Brother HANAMI 17
Швейная Машинка
-
Brother HANAMI 25
Швейная Машинка
-
Brother HANAMI 27S
Швейная Машинка
-
Brother HANAMI 37S
Швейная Машинка
-
Brother HL-2030R
Принтер
-
Brother HL-2035R
Лазерный Принтер
-
Brother HL-2130R
Принтер
-
Brother HL-3040CN
Принтер
-
Brother HL-3140CW
Принтер
-
Brother HL-3170CDW
Лазерный Принтер
-
Brother HL-4140CN
Принтер
-
Brother HL-4570CDW
Принтер
-
Brother HQ 17
Швейная Машина
-
Brother HQ 27
Швейная Машина
-
Brother HQ 33
Швейная Машина
-
Brother HQ-18
Швейная Машинка
-
Brother INNOV-IS 10
Швейная Машина
-
Brother INNOV-IS 10 A
Компьютеризированая Швейная Машина
-
Brother Innov-is 1250
Швейная Машина
-
Brother Innov-is 150
Швейная Машина
-
Brother Innov-is 1500
Швейная Машина
-
Brother Innov-is 20
Швейная Машина
-
Brother INNOV-IS 20 LE
Компьютеризированая Швейная Машина
-
Brother Innov-is 200
Швейная Машина
-
Brother Innov-is 2200
Швейная Машина
-
Brother Innov-is 250
Швейная Машина
-
Brother Innov-is 30
Швейная Машина
-
Brother INNOV-IS 300
Компьютеризированая Швейная Машина
-
Brother Innov-is 350SE
Швейная Машина
-
Brother Innov-is 400
Швейная Машина
-
Brother INNOV-IS 4000
Швейная Машина
-
Brother Innov-is 4000D
Швейная Машина
-
Brother Innov-is 450
Швейная Машина
-
Brother Innov-is 50
Швейная Машина
-
Brother Innov-is 500
Швейная Машина
-
Brother Innov-is 5000
Швейная Машина
-
Brother Innov-is 500D
Швейная Машина
-
Brother Innov-is 550
Швейная Машина
-
Brother Innov-is 550SE
Швейная Машина
-
Brother Innov-is 600
Швейная Машина
-
Brother Innov-is 650
Швейная Машина
-
Brother INNOV-IS 670
Компьютеризированая Швейная Машина
-
Brother Innov-is 700E
Швейная Машина
-
Brother Innov-is 700EII
Швейная Машина
-
Brother Innov-is 750E
Швейная Машина
-
Brother Innov-is 900
Швейная Машина
-
Brother Innov-is 90E
Швейная Машина
-
Brother Innov-is I
Швейная Машина
-
Brother JS 20
Швейная Машина
-
Brother JS 23
Швейная Машина
-
Brother JS 40E
Швейная Машина
-
Brother JS 50CE
Швейная Машина
-
Brother JS 50E
Швейная Машина
-
Brother JS 60E
Швейная Машина
-
Brother JS 70E
Швейная Машина
-
Brother JSL 15
Швейная Машинка
-
Brother JSL 18
Швейная Машинка
-
Brother JSL 30
Швейная Машина
-
Brother L 15
Швейная Машина
-
Brother L 25
Швейная Машина
-
Brother L 30
Швейная Машина
-
Brother L 40
Швейная Машина
-
Brother L-35
Швейная Машина
-
Brother LS 1520
Швейная Машина
-
Brother LS 200
Швейная Машинка
-
Brother LS 2125
Швейная Машина
-
Brother LS 2150
Швейная Машина
-
Brother LS 300
Швейная Машинка
-
Brother LS 300 белый
Швейная Машина
-
Brother LS 300S
Швейная Машинка
-
Brother LS 3125
Швейная Машина
-
Brother LS 5555
Швейная Машинка
-
Brother LS-2225
Швейная Машинка
-
Brother LS-3125 S
Швейная Машинка
-
Brother LX 1400 белый
Швейная Машина
-
Brother LX-1400
Швейная Машинка
-
Brother LX-1700
Швейная Машинка
-
Brother lx-3500
Швейная Машина
-
Brother M 14
Швейная Машинка
-
Brother MFC-1815R
Мфу
-
Brother MFC-1912WR
Мфу
-
Brother MFC-210C
Мфу
 Brother 1034D
 Brother 22 N
 Brother 2340CV
 Brother 270
 Brother 3034D
 Brother 4234D
 Brother 515
 Brother 825
 Brother 950
 Brother Artwork 10
 Brother Artwork 19
 Brother Artwork 20
 Brother Artwork 22
 Brother ARTWORK 31
 Brother Artwork 33A
 Brother Artwork 37 A
 Brother ARTWORK 37A
 Brother BC-2100
 Brother BC-2300
 Brother Boutique 27
 Brother Boutique 37
 Brother CLASSIC 20
 Brother CLASSIC 30
 Brother Classic 40
 Brother Comfort 10
 Brother COMFORT 12
 Brother Comfort 15
 Brother Comfort 25
 Brother Comfort 25A
 Brother Comfort 35A
 Brother Comfort 40E
 Brother Comfort 60E
 Brother CS-8060
 Brother CS-8120
 Brother CX 5
 Brother DCP-110C
 Brother DCP-115C
 Brother DCP-120C
 Brother DCP-130C
 Brother DCP-135C
 Brother DCP-145C
 Brother DCP-150C
 Brother DCP-1510R
 Brother dcp-1512r
 Brother DCP-153C
 Brother DCP-157C
 Brother DCP-1602R
 Brother DCP-1610WR
 Brother dcp-1612wr
 Brother DCP-163C
 Brother DCP-165C
 Brother DCP-167C
 Brother DCP-185C
 Brother DCP-193C
 Brother DCP-195C
 Brother DCP-197C
 Brother DCP-310CN
 Brother DCP-330C
 Brother DCP-350C
 Brother DCP-353C
 Brother DCP-357C
 Brother DCP-373CW
 Brother DCP-375CW
 Brother DCP-377CW
 Brother DCP-385C
 Brother DCP-540CN
 Brother DCP-560CN
 Brother DCP-6690CW
 Brother DCP-7030R
 Brother DCP-8020
 Brother DCP-8025D
 Brother DCP-8040
 Brother DCP-8045D
 Brother DCP-8060
 Brother DCP-8065DN
 Brother DCP-8070D
 Brother DCP-8085DN
 Brother DCP-8110D
 Brother DCP-8110DN
 Brother DCP-8250DN
 Brother DCP-9010CN
 Brother DCP-9020CDW
 Brother DCP-9040CN
 Brother DCP-9042CDN
 Brother DCP-J100
 Brother DCP-J125
 Brother DCP-J315W
 Brother DCP-J515W
 Brother DCP-J525W
 Brother DCP-J715W
 Brother DCP-J725DW
 Brother DCP-L2500DR
 Brother DCP-L2520DWR
 Brother DCP-L2540DNR
 Brother DCP-L2560DWR
 Brother DCP-L5500DN
 Brother DCP-L6600DW
 Brother DS-120
 Brother DS-140
 Brother DS-160
 Brother ELITE 45
 Brother ELITE 55
 Brother ELITE 95E
 Brother ES-2020
 Brother ES-2220
 Brother ES-2420
 Brother F 480
 Brother FAX 1170
 Brother FAX 1570MC
 Brother Fax-2820
 Brother FS-20
 Brother FS-40
 Brother G 20
 Brother HANAMI 17
 Brother HANAMI 25
 Brother HANAMI 27S
 Brother HANAMI 37S
 Brother HL-2030R
 Brother HL-2035R
 Brother HL-2130R
 Brother HL-3040CN
 Brother HL-3140CW
 Brother HL-4140CN
 Brother HL-4570CDW
 Brother HQ 17
 Brother HQ 27
 Brother HQ 33
 Brother HQ-18
 Brother INNOV-IS 10
 Brother INNOV-IS 10 A
 Brother Innov-is 1250
 Brother Innov-is 150
 Brother Innov-is 1500
 Brother Innov-is 20
 Brother INNOV-IS 20 LE
 Brother Innov-is 200
 Brother Innov-is 2200
 Brother Innov-is 250
 Brother Innov-is 30
 Brother INNOV-IS 300
 Brother Innov-is 350SE
 Brother Innov-is 400
 Brother INNOV-IS 4000
 Brother Innov-is 4000D
 Brother Innov-is 450
 Brother Innov-is 50
 Brother Innov-is 500
 Brother Innov-is 5000
 Brother Innov-is 500D
 Brother Innov-is 550
 Brother Innov-is 550SE
 Brother Innov-is 600
 Brother Innov-is 650
 Brother INNOV-IS 670
 Brother Innov-is 700E
 Brother Innov-is 700EII
 Brother Innov-is 750E
 Brother Innov-is 900
 Brother Innov-is 90E
 Brother Innov-is I
 Brother JS 20
 Brother JS 23
 Brother JS 40E
 Brother JS 50CE
 Brother JS 50E
 Brother JS 60E
 Brother JS 70E
 Brother JSL 15
 Brother JSL 18
 Brother JSL 30
 Brother L 15
 Brother L 25
 Brother L 30
 Brother L 40
 Brother L-35
 Brother LS 1520
 Brother LS 200
 Brother LS 2125
 Brother LS 300
 Brother LS 300S
 Brother LS 3125
 Brother LS 5555
 Brother LS-3125 S
 Brother LX-1400
 Brother LX-1700
 Brother lx-3500
 Brother M 14
 Brother MFC-1815R
 Brother MFC-1912WR
 Brother MFC-210C
- 1
- 2
Топ 10 инструкций
100.00
Gefest 6100-03
99.98
Alcatel 9008D A3 XL 16Gb White Blue
99.85
Gefest 6100-04 0001
99.85
Alcatel Pixi 4
99.75
Casio EX-H20G Silver
99.72
Tp-Link TL-WA5210G
99.72
Gefest 3102
99.67
Casio CTK-4000
99.64
Gefest 6100-02
99.63
Casio EX-Z1050 Silver
К рейтингу инструкций и мануалов →
Интересные инструкции

Gefest 6100-03

Alcatel 9008D A3 XL 16Gb White Blue

Gefest 6100-04 0001
Alcatel Pixi 4

Casio EX-H20G Silver

Tp-Link TL-WA5210G
Новые ответы на вопросы
Такой инструкции не будет. Смотрите разбор стиральной машины, а подшипники меняются примерно одинаково на всех, ни чего сложного.
Ремонт машинки
10 месяцев 2 недели назад
Гость
Проблема со сливом или не видит тен
Посудомойка индезит dif16 перед сушкой загораются 4 индикатора первых из 6
1 год 5 месяцев назад
manualsman
Проверьте провод питания. Если провод исправен, но так и не включается — несите в сервис!
Што может быть не включаеца
1 год 6 месяцев назад
manualsbot
болты сзади выкрутить. См инструкцию, траница 12
Убрать подставку
1 год 6 месяцев назад
manualsbot