-
Contents
-
Table of Contents
-
Bookmarks
Quick Links
Related Manuals for Sharp GF-800Z
Summary of Contents for Sharp GF-800Z
-
Page 2
Please refer to relevant law in your by law. SHARP is not in a position to authorise the copying country. or broadcasting of copyright materials and nothing in this OPERATION MANUAL should be implied as giving that authority. -
Page 3
NAMES OF CONTROLS Tweeter FM/SW1/SW2 Telescopic Rod Antenna Band Selector: BAND Woofer Fine Tuning Control: FINE TUNING FM Stereo Indicator: FM STEREO Tuning Control: TUNING FM Mode Switch: FM MODE Level Meter: LEVEL’ METER Automatic-off Timer Switch (Sleep Timer): SLEEP ON/OFF Power Indicator: Automatic-on Timer Switch Function Selector… -
Page 4
DECK 2 OPERATION Tape Counter and Reset Button Record Indicator: RECORD Fast Forward/Cue Button: FF Stop/Eject Button: STOP/EJECT Pause Button: PAUSE Rewind/Review Button: REW -Play Button: PLAY -Record Button: RECORD -Tape Selector: TAPE [2] Dubbing Start Button: DUBBING START Dubbing Speed Button: DUBBING SPEED Playback Mode Selector: CONT PLAY Headphones Socket: PHONES Flight Microphone Socket: R/EXTMIC… -
Page 5: Clock Setting
BUILT-IN CLOCK/TIMER TIMER BATTERY • Set a timer battery before placing the main batteries. • Replace the battery once a year. Lay the unit face down on a soft cloth so as not to damage the unit. Then, remove the battery compart- Set a new battery —…
-
Page 6: Battery Operation
POWER SOURCE BATTERY OPERATION Placing Batteries • Set the POWER switch to the OFF position. Remove the battery compartment cover as described on page 4. Place ten new batteries (1.5V cell x 10) — UM/SUM-1 or R20 type — into the compartment. Set this battery Replace the battery compartment cover.
-
Page 7
AC OPERATION AC SUPPLY VOLTAGE SELECTOR Check the setting of the voltage selector before connecting the AC supply plug to an AC outlet. If necessary, change the setting as follows: Loosen the screw of the supply voltage selector. Slide the panel right or left, until the correct voltage reading is seen on either side. -
Page 8
SPEAKER BOX •Set the POWER switch to the O F F position before connecting speakers. HOW TO INSTALL SPEAKERS TO THE HOW TO USE SPEAKERS SEPARATELY UNIT 1 Align the grooves of the speaker box to the protruding 1 Disconnect the plugs from the EXT SP sockets at the rear portion of the main body. -
Page 9
COMMON FUNCTIONS •POWER SWITCH Before starting any function such as decks and radio, set the POWER switch to the ON position. If the deck is in operation, turn the POWER switch off after stopping tape transport by pressing the «± STOP/EJECT button. The deck is not turned off even after turning the POWER switch off while the sleep timer or automatic ON timer is in operation. -
Page 10
•VOLUME CONTROLS To control output sound level, use the LEFT VOLUME control for left channel level and RIGHT VOLUME control for right channel level. LOUDNESS CIRCUIT When listening to the radio or a tape at low volume settings, the built-in loudness circuit is automatically activated to compensate for tone deficiencies. -
Page 11
RADIO OPERATION Refer to the instructions on page 8. Press the RADIO button of the FUNCTION selector. Slide the BAND selector to the FM, AM, SW1 or SW2 posi- tion. Rotate the TUNING control until the desired broadcast is received. The FINE TUNING control functions only for SW1 and SW2 bands. -
Page 12
• Normal and low-noise tapes ..Sharp SD, Maxell UD • Metal tape ..Sharp MX, Maxell MX Cassette Tape Selection • Use only well-known brands of tape. • Stretched tapes will run at uneven speed and will distort anything recorded on them. -
Page 13
CASSETTE PLAYBACK • Since treble is emphasised on tapes recorded with Dolby NR • When playing a tape with Deck 1, set the DUBBING SPEED system, for playback of such tapes with this unit, lowering selector switch to the NORMAL position. At the HIGH posi- treble slightly with the GRAPHIC EQUALIZER controls tion, the equalizer circuit for high speed operation is activated makes for easier listening. -
Page 14
APLD (Auto Program Locate Device) and APPS (Auto Program Pause System) SHARP has solved one of the main drawbacks of cassette play in comparison with record play: That of finding the beginning or end of a selection. To eliminate the need for trial, error and delay, APLD was developed to automatically scan a tape for the blank space between recording, and to either start playback from the beginning of the recording following the space. -
Page 15
v Notes For both APLD and APPS For APLD • If the APLD/APPS function is activated near the end of a • When the APLD is functioning (searching for a programmed selection, one programme may be skipped. Check by watching item forward or reverse), the speakers may emit a light high- the APLD/APPS indicator as it is displayed. -
Page 16
RECORDING • Record ing is possible only Deck 2. RECORDING FROM THE BUILT-IN RADIO • When recording important selections, be sure to make a pre- • The ALC (Automatic Record Level Control) circuit auto- liminary test to ensure that the desired material is being matically controls the level of input signal strength used for properly recorded. -
Page 17
ERASING RECORDED TAPES | Load a tape to be erased into the cassette compartment of Previously recorded materials will be erased automatically whenever new materials are re-recorded onto the tape. If it Deck 2. is desired to erase a previously recorded tape without record- ing over it, follow the instructions below. -
Page 18
HOW TO USE BUILT-IN TIMER To listen to the built-in radio by turning it on, to record radio programmes or to playback a cassette tape at desired time. In order to record or playback a tape, load the tape into the compartment. -
Page 19
To turn the unit off at desired time within 64 minutes • The radio can be turned off automatically, or cassette deck can be stopped and then the unit can be turned off automatically after recording or reproducing. • The timer can be set either the unit is in operation or it is out of operation. -
Page 20
USE WITH MICROPHONES (not supplied) • Set the DUBBING SPEED switch to the NORMAL position • Microphones have to be 400 ohms to 3 kilo ohms impedance before using the microphone. When setting the switch to the and equipped with a 6.3 mm diameter plug. HIGH position, no sound can be introduced from the micro- phone. -
Page 21
USE WITH EXTERNAL UNITS • Before connecting any lead or operating the selector switch, turn off the power of all units. To TAPE PB or TAPE IN terminal Record by connecting to the amplifier. To TAPE REC or TAPE OUT terminal RECORD PLAYER 1 Connect the output leads of the record player using 3 Press the… -
Page 22
MAINTENANCE CLEANING THE TAPE HEADS AND MECHANICAL PARTS Dirt on the heads will impair the sound qualify of both recording and play back. Capstan Record/playback Capstan head Dust or magnetised particles attached to the capstan or pinch roller are the direct cause of uneven tape speed during recording and playback.
Я уже многократно писал о Sharp GF-800Z, в принципе можно было бы и не повторяться. Но так получилось, что в моей коллекции около года его не было, вакантную дырку надо было бы заполнить, но ничего путевого мне не попадалось, то цена была стратосферная, то состояние неудовлетворительное. И вот на нашем Поле Чудес увидел этот аппарат, естественно, продавал его господин «Канабис», кто же еще. Я не стал его спрашивать, что да почем, решил навести резкость на обстоятельства появления магнитолы у перекупщика. Базар — это квинтэссенция информации, все про все знают, потому входную цену я определил быстро, осталось узнать нынешнюю продажную. Она оказалась ровно в два раза выше закупочной, значит было некоторое поле для торговли. Я накинул к закупочной цене одну треть, полагая, что 33% за пару часов — это хороший доход, но перекупщик не согласился. Ну не очень то и хотелось, решил я и ушел.
Следующий день был самый что ни на есть базарный, суббота. И на удивление с утра ко мне сразу обратился владелец Sharp GF-800Z, прося напомнить, сколько же я ему предлагал вчера? Я озвучил желаемую сумму и он тут же согласился, породив во мне ворох всяческих подозрений. Пришлось спросить, не произошло ли ничего такого с аппаратом за ночь, но он сказал, что и текущих недостатков хватало, а именно: радио работало еле-еле, его можно было чуть услышать только на полной громкости; левая дека молчала вообще; в правой через пару секунд срабатывал автостоп. Покрутив в руках магнитолу, я еще раз убедился, что косметика весьма неплоха, в общем кости есть, а мясо мы нарастим, благо доноров у меня хватает.
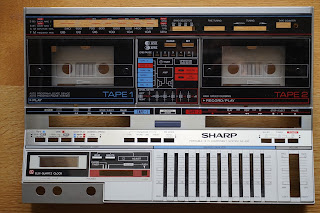
Вот я решил его починить и некоторые особенности, не вошедшие в прежний обзор, осветить более подробно.
Итак, разобрав, решил проверить левую деку. Питание к ней не приходило, решил проверить предохранители. Эту миссию выполняют резисторы R593 и R594. Один из них был мертвым, я припаял к нему в параллель сопротивление 5 ом. Дека ожила. Я специально обвел эти резисторы на плате красным фломастером.

Проблема правой деки заключалась в том, что на подмоточном ролике (idler) порвалась резинка и он не мог выполнять свою функцию.
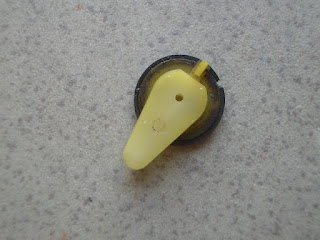
Я снял эту резинку с донора и поставил на ролик.

Что бы снять этот ролик, нет нужды разбирать половину протяжки, достаточно открутить направляющий винт каретки блока головок, отсоединить пружину, подтягивающую подмоточный ролик вверх, с помощью плоской отвертки приподнять каретку вверху на 2-3 мм и вытащить ролик. Главное, вывести его из зацепления с рычагом паузы, остальное трудностей не представляет. Рекомендую резину ролика зачистить мелкой шкуркой или наждачной бумагой, эта простая операция сильно помогает для лучшего сцепления ролика с приемным подкассетником.

Главная проблема состояла в том, что надеть на ролик вместо разорванной резинки. Ранее я экспериментировал с разного рода сантехническими прокладкам, они круглые в своем сечении, а нам нужен квадратный профиль, в общем ничего путного у меня не вышло.
В порядке эксперимента отрезал кусок от прижимного ролика диаметром 13 мм, но он мало того, что сделан из жесткой резины, так в случае, если и удастся натянуть его на ролик, то внешний диаметр получится явно больше необходимых 13 мм. Такой ролик будет цеплять за другие детали, в общем он не годится. Именно это кольцо я не натягивал, мне достаточно было использовать подобное колечко серого цвета от валика факса или принтера, оно сделано из несравненно более мягкой резины. Вот установка серого кольца и показала, что такой формат не подходит. Напротив, когда я надел, вернее, натянул белое колечко от другого валика диаметром 10 мм, оно стало на ролике идеально, но как долго оно бы работало, не знаю.

Резина мягкая, тянется неплохо, но как на него будет влиять время, пока не ясно.Я оставил белое колечко на доноре, попробую понаблюдать за ним хотя бы год.

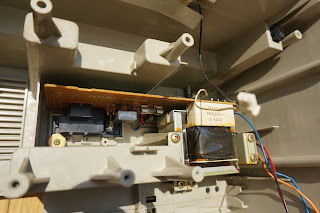
Тюнер. Он работал чуть слышно, при этом два зеленых светодиода, индицирующие включение аппарата в сеть, не горели. Рабочая идея была в отсутствии питания, приходящего на этот тюнер. Я измерил, так и есть, вместо полноценного напряжения на тюнере было всего 2,6 вольта. Отсоединил шлейф тюнера и светодиоды загорелись, что навело меня на мысль, что именно тюнер подсаживает напряжение. Я начал проверять электролиты питания тюнера на короткое замыкание или утечку, но с ними было все хорошо. И вообще тюнер был исправен, я измерил сопротивление между его полюсами питания, утечки не было. В общем был выбран изначально wrong way.
Самое смешное, что месяца три назад мне присылали Sharp GF-800Z примерно такой же проблемой и я тоже искал неисправность на тюнере, пока не догадался померить напряжение идущее непосредственно на сам тюнер. Оно было 5,5 вольт вместо положенных 7 вольт.
За три месяца просто забылось, что проблему я нашел на основной плате, в общем мне пришлось наступить на грабли во второй раз. Мне надо тренировать память, а пока приходится полагаться на внешнюю в виде этих записок. Естественно, фирма Sharp подстраховалась и в цепи питания силовых транзисторов поставила предохранители, сопротивления R541 и R545. В моем случае мертвым было 545-е, я поставил вместо него сопротивление на 5 ом и все заработало. Я их тоже красным обвел для пытливых умов.

Для проверки гипотезы я закоротил R545 пинцетом и нечаянно коснулся пинцетом радиатора, общий предохранитель на 3,15 ампера этого не вынес и его пришлось поменять. Это я к тому, что и старуху подстарегает проруха. И вообще правильно работать в резиновых перчатках, стоя на резиновом коврике в резиновых сапогах, предварительно повесив на дверь табличку «Не влезай, убьет!». Шутки шутками, но пару-тройку раз меня крепко тряхануло, бывало и такое в моей жизни. Один мой знакомый говорил, что по жизни он не боится ничего, кроме женщин, собак и электричества и я его понимаю. Но вообще, если вы не суетесь непосредственно в блок питания, то все остальное не так и страшно.
Про то, как правильно снимать шлейф с тюнера, я наверное писал, но нелишним будет повторить, что для этого надо нажать на белую колодку разъема и шлейф выйдет из него легко. Чтобы соединить шлейф с тюнером, достаточно его просто всунуть с небольшим усилием в разъем.

Можете пропаять выводы катушек FM диапазона, это две красные катушки перед конденсатором переменной емкости, лишней процедура не будет.

В общем, мораль моего сегодняшнего нравоучения в том, что если есть какие проблемы с аппаратом Sharp GF-800Z, нелишне сразу проверить все предохранители в правой части платы, вы можете сэкономить себе кучу времени.

Я подумал и решил проиллюстрировать процесс разборки видеороликом, наверное, для кого-то он будет полезен.
И еще. Тут меня почитывает народ из за рубежа, так вот Google иногда переводит технические термины от вольной масти. Потому придется сделать маленький глоссарий, чтобы движок магнитолы не переводился как engine, а как motor. My English is not perfect, потому кто может, помогите, чтобы наиболее точно перевести некоторые термины. С учетом замечаний я буду дополнять и поправлять наш словарик.
Итак:
Пасик — Belt
Тонвал — Capstan
Прижимной ролик — Pinch Roller
Подмоточный ролик — Idler
Движок — Motor
Протяжка — Mechanism
УНЧ (усилитель низкой частоты) — Amplifier or Amp
ПЧ (промежуточная частота) — IF
Гетеродин -Oscilator
Динамик — Loudspeaker или Speaker
Пыльник — Dust Cap
Ручка — Knob
Кнопка — Button
Ползунок — Slider
Ручка движка — Slider Knob
Нажимная кнопка — Push button Knob
Верньерное устройство — Dial Thread
Микросхема -Chip или IC (Integral Circuit)
Предохранитель — Fuse
Если кто еще вспомнит из дежурных терминов, буду признателен.
Апдейт. Столкнулся с тем, что при регулировке скорости диапазона подстроечников не хватает. Ну у меня скорость нормальная выставилась на самом краешке регулировки, но у других людей бывают ситуации, когда требуется перейти этот край. Так вот, подстроечники стоят последовательно с постоянными резисторами, смотрите схемы Sharp GF-800Z и Sharp GF-800H, они несколько разные по номиналам (не критично) и по обозначению самих резисторов.
Подстроечники R502, R504 и соответственно для другой деки R501, R503
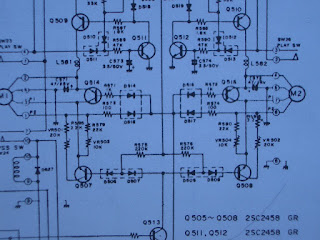
Нижняя схема от «Ашки», верхняя от «Зетки». Все то же самое, только цифровые индексы другие.
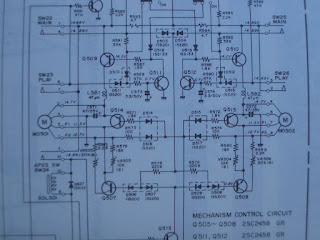
Если сопротивления не хватает, добавляем последовательно, если много, заменяем на меньшее или в параллель вешаем другое сопротивление. Так победим.
(Ocr-Read Summary of Contents of some pages of the Sharp GF-800Z Document (Main Content), UPD: 30 August 2023)
-
2, Sharp GF-800Z ENGLISH TABLE OF CONTENTS PRECAUTIONS 1 NAMES OF CONTROLS 2 BUILT-IN CLOCK/TIMER 4 POWER SOURCE ………………………………………. 5 SPEAKER BOX 7 COMMON FUNCTIONS 8 RADIO OPERATION 10 LOADING CASSETTE TAPES ….. …..11 CASSETTE PLAYBACK 12 RECORDING 15 HOW TO USE BUILT-IN TIMER 17 USE WITH MICROPHONES (not supplied) 19 USE WITH EXTERNAL UNITS 20 MAINTENANCE 21 SPECIFICATIONS 21 Note for users in Australia: For other countries: Copyright may.exist in materi…
-
22, Sharp GF-800Z 14 MAINTENANCE CLEANING THE TAPE HEADS AND MECHANICAL PARTS Dirt on the heads will impair the sound qualify of both recording and play back. Dust or magnetised particles attached to the capstan or pinch roller are the direct cause of uneven tape speed during recording and playback. This is the cause of «wow» and «flutter», namely tape speed variations below and above normal speed, respectively. Clean the heads and mechanical parts frequentl…
-
9, 6 COMMON FUNCTIONS •POWER SWITCH Before starting any function such as decks and radio, set the POWER switch to the ON position. If the deck is in operation, turn the POWER switch off after stopping tape transport by pressing the «± STOP/EJECT button. The deck is not turned off even after turning the POWER switch off while the sleep timer or automatic ON timer is in operation. • DUBBING SPEED SWITCH Set this switch to the NORMAL position, except when u…
-
15, v Notes For APLD • When the APLD is functioning (searching for a programmed item forward or reverse), the speakers may emit a light high- pitched sound. This is not due to any malfunction of the unit. For APPS • Do not allow the APPS function to remain engaged for ex- tended period as it may damage the tape or pinch roller. When playback shall not be continued, press the button, and also press the CLEAR button. • At times of simultaneous playback, or dubbing from Deck 1 to …
-
8, 5 SPEAKER BOX •Set the POWER switch to the OFF position before connecting speakers. HOW TO INSTALL SPEAKERS TO THE UNIT HOW TO USE SPEAKERS SEPARATELY 1 Align the grooves of the speaker box to the protruding portion of the main body. 2 Lower the speaker box until it becomes the same height to the main body. 1 Disconnect the plugs from the EXT SP sockets at the rear of the unit. 2 То unlock the speaker, slide the …
-
4, REAR PANEL External DC Power Supply Socket: DC 15V AC Power Supply Socket: AC INPUT External Speaker Sockets: EXT SP Beat Cancel Switch: BEAT CANCEL Battery Compartment Earth Terminal: GND (PHONO) Phono/Line Input Sockets: INPUT R/L Input Selector: LINE IN/PHONO INPUT Line Output Sockets: LINE OUT Speaker Release Knob Speaker Lead Holder DECK 2 OPERATION Tape Counter and Reset Button Record Indicator: RECORD Fast Forwar…
-
7, AC OPERATION AC SUPPLY VOLTAGE SELECTOR Check the setting of the voltage selector before connecting the AC supply plug to an AC outlet. If necessary, change the setting as follows: WARNING When this unit is not in use, also before attempting any internal examination, pull the mains plug out of the wall socket. Loosen the screw of the supply voltage selector. Slide the panel right or left, until the c…
-
13, 9 CASSETTE PLAYBACK • Since treble is emphasised on tapes recorded with Dolby NR system, for playback of such tapes with this unit, lowering treble slightly with the GRAPHIC EQUALIZER controls makes for easier listening. • When playing a tape with Deck 1, set the DUBBING SPEED selector switch to the NORMAL position. At the HIGH posi- tion, the equalizer circuit for high speed operation is activated and the high range will be lowered. Load a pr…
-
5, HOUR button: Hour digits advance one at a time if the button is pressed. If the button is pressed for more than two seconds, hour digits advance continuous- ly. MINUTE button: Minute digits advance one at a time if the button is pressed. If the button is pressed for more than two seconds, minute digits advance continuously with five minutes increment. Press the ADJUST button with a pencil or ball-point pen at the moment another time piece s…
-
6, 4 POWER SOURCE BATTERY OPERATION Placing Batteries • Set the POWER switch to the OFF position. Remove the battery compartment cover as described on page 4. Place ten new batteries (1.5V cell x 10) — UM/SUM-1 or R20 type — into the compartment. Replace the battery compartment cover. Battery Operation The unit is automatically changed to battery operation if the AC power supply lead or car battery adaptor is disconnected from the unit. Se…
-
12, 8 LOADING CASSETTE TAPES TAPE SLACK Tighten any loose tape with a pencil or ball-point pen before inserting the cassette into the unit, as shown at the left figure. LOADING 1 Press the STOP/EJECT button of Deck 1 or Deck 2 respectively. 2 Load a cassette tape into the compartment so that the title of the tape to be used is facing outwards. Close the compartment lid. SETTING OF TAPE SELECTORS The unit is furnished with independent tape selector switches for Deck respectively. According to the de…
-
21, 13 USE WITH EXTERNAL UNITS • Before connecting any lead or operating the selector switch, turn off the power of all units. RECORD PLAYER 1 Connect the output leads of the record player using magnetic cartridge (optional) to the PHONO/LINE INPUT of the unit. Players with ceramic or crystal cartridges are not suitable for use with the unit. If the record player is equipped with an earth lead (or terminal), connect it to the GND terminal of the unit. 2 Set …
-
11, 7 RADIO OPERATION Refer to the instructions on page 8. Press the RADIO button of the FUNCTION selector. Slide the BAND selector to the FM, AM, SW1 or SW2 posi- tion. Rotate the TUNING control until the desired broadcast is received. The FINE TUNING control functions only for SW1 and SW2 bands. With the BAND selector in the FM position, set the FM MODE switch to the STEREO position. Even with the FM MODE swit…
-
20, 12 USE WITH MICROPHONES (not supplied) • Microphones have to be 400 ohms to 3 kilo ohms impedance and equipped with a 6.3 mm diameter plug. • Howl may occur when increasing the volume too much. In such a case, decrease the volume or place the microphones as far as possible from the speakers. If howl occurs, the ALC circuit operates and the sound of a microphone becomes small for a while. • Set the DUBBING SPEED switch to the NOR…
-
18, 11 HOW TO USE BUILT-IN TIMER To listen to the built-in radio by turning it on, to record radio programmes or to playback a cassette tape at desired time. In order to record or playback a tape, load the tape into the compartment. And in order to listen to the radio, set the POWER switch to the ON position and tune in to the desired radio station. Set the TIMER/CLOCK/SLEEP selector to the TIMER position. Lower dot of the colon…
-
19, Sharp GF-800Z To turn the unit off at desired time within 64 minutes • The radio can be turned off automatically, or cassette deck can be stopped and then the unit can be turned off automatically after recording or reproducing. • The timer can be set either the unit is in operation or it is out of operation. Set the TIMER/CLOCK/SLEEP selector to the SLEEP position. Upper dot of the colon between hour and minute …
-
Philips AZ1330D
1 Choosing Power Supplya Connect the AC power cord to theAC~ Mains inlet and the wall socket.-OR-b Open the battery door and insert 6x D batteries (not included).Quick UseGuideQuick UseGuide6 x R20 • UM-1 • D-CELLS1a1b3d2a3a2b2c3b3e2 Listening to Radio aPress SOURCE repeatedly to selectthe tuner source.bPress PROGR …
AZ1330D Docking Station, 2
-
Sony ZS-S3IPBLACKN
Enjoy the ultimate in full-function portable audio with the ZS-S3iP, an iPod®/iPhone® compatible1 boombox with CD-R/RW playback capability2 and a digital AM/FM tuner. An easy to use exible dock connector not only charges your iPod or iPhone, but also accommodates the protective case.Portable sound Stereo speakers …
ZS-S3IPBLACKN Portable Stereo System, 2
-
Sony MDR-EX300 — Earbud Style Heaphones
Sony Electronics Inc. • 16530 Via Esprillo • San Diego, CA 92127 • 1.800.222.7669 • www.sony.com MDR-EX300/BLKEarbud Style heaphones © 2009 Sony Electronics Inc. All rights reserved. Production prohibited without written permission from Sony. Last Updated: 09/09/2009 Closed design rests comfortably insi …
MDR-EX300 — Earbud Style Heaphones Headphone, 1
-
Sony MDR-EX76 — Ear Headphone
Sony Electronics Inc. • 16530 Via Esprillo • San Diego, CA 92127 • 1.800.222.7669 • www.sony.com MDR-EX76/BLKEX Earbuds ©2008 Sony Electronics Inc. All rights reserved.Sony is a trademark of Sony. All other trademarks are property of their respective owners.Features and specifications are subject to cha …
MDR-EX76 — Ear Headphone Headphone, 1
-
SOUNDMASTER SCD1990SW
DEUTSCH NEDERLANDS ENGLISH ITALIANO FRANÇAIS ESPANOL SCD1990SW Hersteller Wörlein GmbH Tel.: +49 9103/71670 Gewerbestrasse 12 Fax.: +49 9103/716712 D 90556 Cadolzburg Email. [email protected] GERMANY Web: www.woerlein.com …
SCD1990SW Micro Music System, 61
-
Philips AZ102C
PhilipsCD Soundmachine with Dynamic Bass BoostCDAZ102CProgramme your favourite musicYou take pleasure in the simple things in life and delight in convenience. The sleek and portable design lets you indulge in the pleasures of enjoying your favourite music with the help of easy-to-use functions.Easy to use• CD shuffle …
AZ102C Portable Stereo System, 2
-
Philips AZ1550
CD radio cassette recorderCD Sound machine• Digital 3 band equalizerAllows you to set your personal listening preferences for bass,mid-range and treble frequencies without the restriction of factorypre-sets• Two-way speaker systemProvides higher musical clarity and enhanced stereo sound quality.• Bass reflex spea …
AZ1550 Portable Stereo System, 2
-
Philips AZ1020
CD sound machineAZ1020CD sound machine• Bass Reflex speaker systemAcoustic system that enhances the upper bass tones to provide awarmer, punchier bass sound.• Dynamic Bass BoostEnhances bass tone frequencies to give deep, rich sounds.• Digital tuner with 29 presetsProvides fast, accurate tuning to your favourite …
AZ1020 Other, 2
Руководства Sharp GF800 Размер файлов: 8618 KB, Язык: English, Формат: pdf, Платформа: Windows/Linux, Дата: 2016-01-14
На данной странице вы можете скачать руководства Sharp GF800. Мы предлагаем вам ознакомиться с руководством пользователя, инструкцией по сервисному обслуживанию и ремонту.
Также здесь вы найдете список заказных номеров на комплектующие Sharp GF800.
Все файлы предоставляются исключительно в ознакомительных целях. И не являютя руководством по ремонту, а направлены лишь на то чтобы помочь вам более детально ознакомиться с принципом построения устройства.
Содержимое представленных здесь руководств требуют от вас знания технического английского языка.
Если вы собираетесь скачать руководство по сервисному обслуживанию Sharp GF800, иными словами сервис мануал, вы дожны обладать хотя бы минимальными познаниями в области электроники и пониманием базовых принципов работы электромеханических устройств.
Для просмотра руководств вам понадобится Adobe Acrobat Reader версии 9 и выше либо другая программа для просмотра pdf файлов.
В связи с популярностью информации представленной на сайте и ее бесплатного предоставления конечному пользователю, убедительная просьба использовать специальные программные продукты для многопотокового скачивания файлов.
Руководства для Sharp GF800
- Руководство пользователя (User manual)
- Руководство по сервисному обслуживанию (Service manual)
- Руководство по ремонту (Repair manual)
- Перечень комплектующих (PartList)