-
Contents
-
Table of Contents
-
Troubleshooting
-
Bookmarks
Quick Links
Instruction Manual
Step counter
HJ-203
Model
Related Manuals for Omron HJ-203
Summary of Contents for Omron HJ-203
-
Page 1
Instruction Manual Step counter HJ-203 Model… -
Page 3: Table Of Contents
Before Using the Unit TABLE OF CONTENTS Before Using the Unit Introduction ……2 Notes on Safety ……3 Operating Instructions Know Your Unit ……. 4 Settings ……..6 Attaching the Unit ….8 Using the Unit ……9 Activity Mode……10 Checking the Display …..
-
Page 4: Introduction
INTRODUCTION Thank you for purchasing this high-quality OMRON step counter. The new walking style will measure your physical activity keenly and helps you in your dieting regime and motivates you to reach your daily walking target. This pedometer can count the number of…
-
Page 5: Notes On Safety
Operating Instructions NOTES ON SAFETY Warning: • Contact your doctor or healthcare provider before beginning a weight reduction or exercise program. • Keep the unit out of the reach of young children. • If young children swallow any small piece, immediately consult a doctor. •…
-
Page 6: Know Your Unit
NOTES ON SAFETY General Advice: • Replace a worn battery with a new one immediately. • Remove the battery from this unit when you are not going to use it for a long period of time (approximately 3 months or more).
-
Page 7
Clip Instruction Manual Battery * The battery is already installed in the unit. ASSEMBLE THE OMRON WALKING STYLE 1. Attach the strap to the unit. 2. Attach the clip to the strap. 3. Open and close the clip. NOTE: Press the clip open to remove the unit. -
Page 8: Settings
SETTINGS SETTING THE TIME, WEIGHT, HEIGHT AND STRIDE LENGTH When you use the unit for the first time, follow the steps below. 1. Press the SET button on the back of the unit with a thin, sturdy, stick that will not break easily. NOTE: Do not press the button with a sharp point.
-
Page 9
SETTINGS 4. Repeat steps (1) to (2) to set the weight. 5. Repeat steps (1) to (2) to set the height. 6. Repeat steps (1) to (2) to set the stride length. NOTES: • The initial stride length value that blinks on the display is an estimated stride length calculated from your height setting. -
Page 10: Attaching The Unit
ATTACHING THE UNIT We recommend putting the unit in your pocket, your bag or hanging it from your neck. To prevent accidentally dropping of the unit, and make it more noticeable when adding clothes to the washing, we recommend using the strap and clip provided.
-
Page 11: Using The Unit
USING THE UNIT 1. Start walking. NOTE: In order to avoid counting steps that are not part of a walk, the unit does not display the step count for the first 4 seconds of walking. If you continue walking for more than 4 seconds, it displays the step count for the first 4 seconds and then continues to count.
-
Page 12: Activity Mode
ACTIVITY MODE The activity mode stores the measurement values for a specified walking period or session. NOTE: You cannot check the current display or memory function when using the activity mode. 1. Press for two seconds from any of the displays. rotates when using the activity mode.
-
Page 13: Checking The Display
CHECKING THE DISPLAY CHECKING THE CURRENT DISPLAY Press to change the display. Step taken during a day Displays the symbol when you reach 10,000 steps or more for a day. Distance walked during a day Calories display Additional energy burned during a day (Resting metabolism + additional energy burned = total…
-
Page 14
CHECKING THE DISPLAY CHECKING THE DISPLAY DURING THE ACTIVITY MODE Press to change the display. Step taken during the self defined walking event Distance walked during the self defined walking event Calories display Additional energy burned during the self defined walking event (Resting metabolism + additional energy burned = total… -
Page 15
CHECKING THE DISPLAY ABOUT THE ENERGY SAVING FUNCTION In order to save energy, the display of the unit will be turned off after “SLEEP” is displayed if no buttons are pressed for more than 5 minutes. However, the unit will continue to monitor your step count. -
Page 16
CHECKING THE DISPLAY Irregular movement • When the unit is placed in a bag that moves irregularly because it hits your foot or clothes. • When the unit hangs from your waist or a bag. Inconsistent walking pace • When you shuffle or wear sandals etc. •… -
Page 17: Using The Memory Function
USING THE MEMORY FUNCTION The measurements for each day (steps, distance walked, calories burned and fat burned) are automatically stored in memory and reset to 0 at midnight (0:00) each day. RECALL DATA 1. Press to select the type of display you want to see.
-
Page 18: Battery Life And Replacement
USING THE MEMORY FUNCTION NOTES: • You cannot use the memory function when using the activity mode (refer to “ACTIVITY MODE” on page 10). • If no buttons are pressed for more than 1 minute, the display returns to the current display.
-
Page 19: Care And Maintenance
Care and Maintenance BATTERY LIFE AND REPLACEMENT REPLACING THE BATTERY 1. Loosen the screw of the battery cover on the back of the unit, and remove the battery cover by pulling it off in the direction of the arrow. Use a small screwdriver to loosen the screw on the battery cover.
-
Page 20: Maintenance And Storage
Please observe the following storage conditions. • Do not disassemble or modify the unit. Changes or modifications not approved by OMRON HEALTHCARE will void the user warranty. • Do not subject the unit to strong shocks or vibrations, drop it, step on it, or leave it at an angle.
-
Page 21: Troubleshooting
TROUBLESHOOTING Phenomenon Cause Rectification Insert a new 3V lithium battery type Battery CR2032 (refer to Blinks or weak or “REPLACING THE appears exhausted. BATTERY” on continuously. page 17). Polarities of Insert battery in battery (+ correct alignment and -) (refer to aligned in “REPLACING THE wrong…
-
Page 22
TROUBLESHOOTING Phenomenon Cause Rectification Follow instructions The unit is (refer to attached “ATTACHING incorrectly. THE UNIT” on page 8). Refer to “CASES WHERE THE UNIT You are MAY NOT BE walking at Displayed ABLE TO COUNT inconsistent values are STEPS pace. -
Page 23: Specifications
35.5(W) × 68.5(H) × 11.0(D) mm External dimensions Weight Approx. 19 g (including battery) Contents Step counter, Strap, Clip, 3V Lithium battery type CR2032 and Instruction manual These specifications are subject to change without notice. * New battery life based on OMRON testing.
-
Page 24
Correct Disposal of This Product (Waste Electrical & Electronic Equipment) This marking shown on the product or its literature, indicates that it should not be disposed of, with other household wastes at the end of its working life. To prevent possible harm to the environment or human health from uncontrolled waste disposal, please separate this from other types of wastes…
(скачивание инструкции бесплатно)
Формат файла: PDF
Доступность: Бесплатно как и все руководства на сайте. Без регистрации и SMS.
Дополнительно: Чтение инструкции онлайн
Step counter
Walking style
• Manual de instrucciones
1
• Gebruiksaanwijzing
17
•
РУКОВОДСТВО
ПО
ЭКСПЛУАТАЦИИ
33
IM-HJ-203-E-01-05/2010
9062599-8A
ES
NL
RU
AR
HJ-203-E_A_M.book Page 1 Tuesday, February 16, 2010 1:49 PM
Страница:
(1 из 66)
навигация

1

2

3

4

5

6

7

8

9

10

11

12

13

14

15

16

17

18

19

20

21

22

23

24

25

26

27

28

29

30

31

32

33

34

35

36

37

38

39

40

41

42

43

44

45

46

47

48

49

50

51

52

53

54

55

56

57

58

59

60

61

62

63

64

65

66
Оглавление инструкции
- Страница 1 из 67
HJ-203-E_A_M.book Page 1 Tuesday, February 16, 2010 1:49 PM Step counter Walking style • Manual de instrucciones 1 ES • Gebruiksaanwijzing 17 NL • РУКОВОДСТВО ПО ЭКСПЛУАТАЦИИ 33 RU AR IM-HJ-203-E-01-05/2010 9062599-8A - Страница 2 из 67
HJ-203-E_A_M.book Page 2 Tuesday, February 16, 2010 1:49 PM - Страница 3 из 67
HJ-203-E_A_M.book Page 1 Tuesday, February 16, 2010 1:49 PM 1 Introducción Estimado cliente: Gracias por la compra de este podómetro OMRON de alta calidad. El nuevo modelo Walking Style III mide su actividad física con gran precisión y le ayuda a complementar su dieta o a motivarle para que alcance - Страница 4 из 67
HJ-203-E_A_M.book Page 2 Tuesday, February 16, 2010 1:49 PM 2 Uso del podómetro OMRON Walking style III 2.1 Precauciones • Póngase en contacto con su médico antes de comenzar un programa de ejercicio o de reducción de peso. • Mantenga el dispositivo fuera del alcance de los niños. • En caso de que - Страница 5 из 67
HJ-203-E_A_M.book Page 3 Tuesday, February 16, 2010 1:49 PM 4 Conozca su unidad a fondo ■ Unidad principal Pantalla Indicador de pila baja botón botón botón 5 Configuración 5.1 Ajustes de la hora, el peso, la estatura y la longitud de los pasos ES Cuando utilice la unidad por primera vez, siga los - Страница 6 из 67
HJ-203-E_A_M.book Page 4 Tuesday, February 16, 2010 1:49 PM 2 Ajuste de la hora. (1) Pulse o para seleccionar el valor deseado del ajuste. • Pulse ( ) para avanzar (retroceder) una vez. • Mantenga pulsado ( ) para avanzar (retroceder) más rápidamente. 3 4 5 6 (2) Pulse para confirmar el ajuste. - Страница 7 из 67
HJ-203-E_A_M.book Page 5 Tuesday, February 16, 2010 1:49 PM 6 Cómo usar el OMRON Walking style III 6.1 Preparación del OMRON Walking style III 1 Coloque la cinta en la uni1 2 dad. 2 Sujete el clip a la cinta. 3 Abra y cierre el clip. 3 Nota: Presione la apertura del clip para retirar la unidad. - Страница 8 из 67
HJ-203-E_A_M.book Page 6 Tuesday, February 16, 2010 1:49 PM 6.3 Uso efectivo del OMRON Walking style III 1 Empiece a caminar. Nota: Para evitar que se cuenten pasos que no formen parte de un paseo, la unidad no muestra el recuento de pasos durante los primeros 4 segundos del paseo. Si sigue - Страница 9 из 67
HJ-203-E_A_M.book Page 7 Tuesday, February 16, 2010 1:49 PM 7 Comprobación de la pantalla 7.1 Comprobación de la pantalla actual Pulse para cambiar la pantalla. Pasos dados en un día Muestra el símbolo cuando se llega a los 10.000 pasos en un día. Distancia recorrida en un día Visualización de las - Страница 10 из 67
HJ-203-E_A_M.book Page 8 Tuesday, February 16, 2010 1:49 PM 7.2 Comprobación de la pantalla en el modo actividad Pulse para cambiar de pantalla. Pasos durante un periodo definido Distancia recorrida en un periodo definido Energía adicional consumida durante una caminata definida (Metabolismo Basal - Страница 11 из 67
HJ-203-E_A_M.book Page 9 Tuesday, February 16, 2010 1:49 PM ■ Función de ahorro de energía Con el fin de ahorrar energía, la pantalla de la unidad se apagará tras aparecer la palabra “SLEEP” si no se pulsa ningún botón en un periodo de 5 minutos. Sin embargo, la unidad seguirá el control de los - Страница 12 из 67
HJ-203-E_A_M.book Page 10 Tuesday, February 16, 2010 1:49 PM 8 Función de memoria Las mediciones de cada día (pasos, distancia recorrida, calorías consumidas y grasa quemada) se guardan automáticamente en la memoria y se ponen a 0 a medianoche (0:00) todos los días. 8.1 Restablecimiento de datos 1 - Страница 13 из 67
HJ-203-E_A_M.book Page 11 Tuesday, February 16, 2010 1:49 PM 9 Duración y recambio de la pila Si el símbolo parpadea o aparece en pantalla, cambie la pila por una pila nueva (CR2032). Si se saca la pila, se perderán todos los ajustes y mediciones.Vuelva a realizar los ajustes iniciales (consulte el - Страница 14 из 67
HJ-203-E_A_M.book Page 12 Tuesday, February 16, 2010 1:49 PM 10 Mantenimiento y conservación 10.1 Mantenimiento Mantenga siempre la unidad limpia. Limpie la unidad con un paño seco y suave. Para eliminar las manchas difíciles, limpie la unidad con un paño humedecido con agua o con detergente suave. - Страница 15 из 67
HJ-203-E_A_M.book Page 13 Tuesday, February 16, 2010 1:49 PM 11 Resolución de problemas Problema Causa Solución Introduzca una nueva pila de litio de 3V del tipo Parpadea o apa- Pila con poca carga o gastada. CR2032 (consulte el capírece continuatulo 9.1). mente. No hay nada en pantalla. Los - Страница 16 из 67
HJ-203-E_A_M.book Page 14 Tuesday, February 16, 2010 1:49 PM 12 Datos técnicos Nombre del producto Modelo Fuente de alimentación Duración de la pila Walking style III HJ-203-ED/HJ-203-EG/HJ-203-EK/HJ-203-EV Pila de litio de 3 V tipo CR2032 Aprox. 1,5 años* (cuando se utiliza 4 horas al día). Nota: - Страница 17 из 67
HJ-203-E_A_M.book Page 15 Tuesday, February 16, 2010 1:49 PM Eliminación correcta de este producto (material eléctrico y electrónico de desecho) La presencia de esta marca en el producto o en el material informativo que lo acompaña, indica que al finalizar su vida útil no deberá eliminarse junto - Страница 18 из 67
HJ-203-E_A_M.book Page 16 Tuesday, February 16, 2010 1:49 PM 16 - Страница 19 из 67
HJ-203-E_A_M.book Page 17 Tuesday, February 16, 2010 1:49 PM 1 Inleiding Geachte klant, Hartelijk dank voor de aanschaf van deze hoogwaardige stappenteller van OMRON. De nieuwe Walking style III meet nauwkeurig uw fysieke activiteit en ondersteunt u bij uw dieet of motiveert u bij het bereiken van - Страница 20 из 67
HJ-203-E_A_M.book Page 18 Tuesday, February 16, 2010 1:49 PM 2 De OMRON Walking style III gebruiken 2.1 Voorzorgsmaatregelen • Raadpleeg een arts of zorgaanbieder voordat u begint aan een afslank- of trainingsprogramma. • Houd het apparaat buiten het bereik van kleine kinderen. • Raadpleeg - Страница 21 из 67
HJ-203-E_A_M.book Page 19 Tuesday, February 16, 2010 1:49 PM 4 Onderdelen van het apparaat ■ Stappenteller Display Indicator batterij bijna leeg Knop Knop Knop 5 Instellingen 5.1 Tijd, gewicht, lengte en paslengte instellen Wanneer u het apparaat voor het eerst gebruikt, volgt u de onderstaande - Страница 22 из 67
HJ-203-E_A_M.book Page 20 Tuesday, February 16, 2010 1:49 PM 2 Stel de uren in. (1) Druk op of om de gewenste waarde voor een instelling te selecteren. • Druk op ( ) om de waarde met één te verhogen (verlagen). • Houd ( ) ingedrukt om de waarde snel te verhogen (verlagen). 3 4 5 6 (2) Druk op om de - Страница 23 из 67
HJ-203-E_A_M.book Page 21 Tuesday, February 16, 2010 1:49 PM 6 De OMRON Walking style III gebruiken 6.1 De OMRON Walking style III in elkaar zetten 1 Maak het koord vast aan de 1 2 3 stappenteller. 2 Maak de clip vast aan het koord. 3 Open en sluit de clip. Opmerking: Druk de clip open om de - Страница 24 из 67
HJ-203-E_A_M.book Page 22 Tuesday, February 16, 2010 1:49 PM 6.3 Gebruik van de OMRON Walking style III 1 Begin te lopen. Opmerking: Om te voorkomen dat er stappen worden geteld die niet echt worden gezet, geeft de stappenteller de eerste 4 seconden dat u loopt geen aantal stappen weer. Als u - Страница 25 из 67
HJ-203-E_A_M.book Page 23 Tuesday, February 16, 2010 1:49 PM 7 Het display bekijken 7.1 Huidige weergave bekijken Druk op om de weergave te wijzigen. Stappen op een dag Het symbool wordt weergegeven als u 10.000 stappen op een dag bereikt. Gelopen afstand op een dag Calorieweergave Extra verbrande - Страница 26 из 67
HJ-203-E_A_M.book Page 24 Tuesday, February 16, 2010 1:49 PM 7.2 Het display bekijken tijdens de activiteitsmodus Druk op om de weergave te wijzigen. Stappen tijdens een sessie Gelopen afstand tijdens een sessie Extra verbrande energie tijdens een sessie (ruststofwisseling + extra verbrande energie - Страница 27 из 67
HJ-203-E_A_M.book Page 25 Tuesday, February 16, 2010 1:49 PM ■ Stroombesparingsfunctie Als langer dan 5 minuten geen knop wordt ingedrukt, wordt het display van het apparaat uitgeschakeld nadat “SLEEP” wordt weergegeven. Het apparaat blijft echter wel het aantal stappen bijhouden. Druk op , - Страница 28 из 67
HJ-203-E_A_M.book Page 26 Tuesday, February 16, 2010 1:49 PM 8 Geheugenfunctie De metingen voor elke dag (stappen, gelopen afstand, verbrande calorieën en verbrand vet) worden automatisch opgeslagen in het geheugen en elke dag om middernacht (0:00) teruggezet op 0. 8.1 Gegevens bekijken 1 Druk op - Страница 29 из 67
HJ-203-E_A_M.book Page 27 Tuesday, February 16, 2010 1:49 PM 9 Levensduur en vervangen van batterij Als het symbool knippert of wordt weergegeven op het display, moet u de batterij vervangen door een nieuwe batterij (CR2032). Als de batterij uit het apparaat wordt genomen, worden de instellingen en - Страница 30 из 67
HJ-203-E_A_M.book Page 28 Tuesday, February 16, 2010 1:49 PM 10 Onderhoud en opslag 10.1 Onderhoud Houd het apparaat altijd schoon. Reinig de stappenteller met een zachte, droge doek. Hardnekkige vlekken kunt u verwijderen met een doek die is bevochtigd met water of een mild reinigingsmiddel. Veeg - Страница 31 из 67
HJ-203-E_A_M.book Page 29 Tuesday, February 16, 2010 1:49 PM 11 Problemen oplossen Verschijnsel Oorzaak Knippert of wordt Batterij is (bijna) continu weergegeven. Er wordt niets weergegeven. Weergegeven waarden zijn onjuist. leeg. Oplossing Plaats een nieuwe 3V-lithiumbatterij, type CR2032 - Страница 32 из 67
HJ-203-E_A_M.book Page 30 Tuesday, February 16, 2010 1:49 PM 12 Technische gegevens Productnaam Type Voeding Levensduur batterij Walking style III HJ-203-ED/HJ-203-EG/HJ-203-EK/HJ-203-EV 3V-lithiumbatterij, type CR2032 Ongeveer 1,5 jaar* (bij een gebruik van 4 uur per dag). Opmerking: De - Страница 33 из 67
HJ-203-E_A_M.book Page 31 Tuesday, February 16, 2010 1:49 PM Correcte verwijdering van dit product (elektrische & elektronische afvalapparatuur) Dit merkteken op het product of het bijbehorende informatiemateriaal duidt erop dat het niet met ander huishoudelijk afval verwijderd moet worden aan het - Страница 34 из 67
HJ-203-E_A_M.book Page 32 Tuesday, February 16, 2010 1:49 PM 32 - Страница 35 из 67
HJ-203-E_A_M.book Page 33 Tuesday, February 16, 2010 1:49 PM 1 Введение Уважаемый покупатель! Благодарим за приобретение нашего высококачественного шагомера OMRON. Новый шагомер Walking style III позволяет точно измерить уровень физической активности, позволяя корректировать диету и мотивируя на - Страница 36 из 67
HJ-203-E_A_M.book Page 34 Tuesday, February 16, 2010 1:49 PM 2 Рекомендации по использованию шагомера OMRON Walking style III 2.1 Меры предосторожности • До начала программы снижения веса или тренировок проконсультируйтесь со своим врачом или иным медицинским работником. • Храните прибор в - Страница 37 из 67
HJ-203-E_A_M.book Page 35 Tuesday, February 16, 2010 1:49 PM 4 Знакомство с прибором ■ Основной блок Дисплей Кнопка Индикатор низкой зарядки батареи Кнопка Кнопка 5 Настройки 5.1 Настройка времени, веса, роста и длины шага При первом использовании прибора выполните следующие действия. 1 Тонкой, - Страница 38 из 67
HJ-203-E_A_M.book Page 36 Tuesday, February 16, 2010 1:49 PM 2 Настройка часа. (1) Нажимайте или для выбора нужного значения. • Нажмите ( ) для перехода к следующему (возврата к предыдущему). • Удерживайте ( ) для быстрого перехода вперед (назад). 3 4 5 6 (2) Нажмите для подтверждения настройки. - Страница 39 из 67
HJ-203-E_A_M.book Page 37 Tuesday, February 16, 2010 1:49 PM 3 Откройте и закройте зажим. Примечание. Откройте зажим, чтобы снять прибор. Если неаккуратно прикреплять зажим на одежду или снимать с нее, то в зависимости от материала зажим может повредить ткань или оставить на ней следы. 6.2 - Страница 40 из 67
HJ-203-E_A_M.book Page 38 Tuesday, February 16, 2010 1:49 PM 2 После завершения ходьбы нажмите , чтобы просмотреть данные (см. главу 7 «Считывание данных с дисплея»). Примечание. Каждый день в полночь (0:00) значение прибора сбрасывается до «0». Для точного подсчета шагов до начала использования - Страница 41 из 67
HJ-203-E_A_M.book Page 39 Tuesday, February 16, 2010 1:49 PM 7 Считывание данных с дисплея 7.1 Считывание данных с текущего дисплея Нажимайте для переключения дисплея. Количество шагов за день При достижении 10 000 шагов в день отображается символ . Расстояние, пройденное за день Дисплей калорий - Страница 42 из 67
HJ-203-E_A_M.book Page 40 Tuesday, February 16, 2010 1:49 PM 7.2 Считывание данных с дисплея в режиме активности Нажимайте для переключения дисплея. Количество шагов в течение определенного сеанса ходьбы Расстояние, пройденное в течение сеанса ходьбы Дополнительно затраченная энергия в течение - Страница 43 из 67
HJ-203-E_A_M.book Page 41 Tuesday, February 16, 2010 1:49 PM ■ Сведения о функции энергосбережения Если в течение 5 минут ни одна кнопка не нажимается, то на экране отображается сообщение «SLEEP», после чего экран отключается для экономии электроэнергии. Однако прибор продолжает вести подсчет - Страница 44 из 67
HJ-203-E_A_M.book Page 42 Tuesday, February 16, 2010 1:49 PM 8 Функция памяти Измерения за каждый день (число шагов, пройденное расстояние, сожженные калории и сожженный жир) автоматически сохраняются в памяти и сбрасываются до 0 каждый день в полночь (0:00). 8.1 Просмотр сохраненных данных 1 - Страница 45 из 67
HJ-203-E_A_M.book Page 43 Tuesday, February 16, 2010 1:49 PM 9 Срок службы батареи и ее замена Если на экране мигает или постоянно горит символ , замените батарею на новую (CR2032). При извлечении батареи все настройки и значения измерений удаляются. Выполните повторную настройку (см. главу 5.1). - Страница 46 из 67
HJ-203-E_A_M.book Page 44 Tuesday, February 16, 2010 1:49 PM 10 Техническое обслуживание и хранение 10.1 Техническое обслуживание Всегда держите прибор в чистоте. Протирайте прибор мягкой сухой тканью. Для удаления пятен протрите прибор тканью, смоченной водой или мягким моющим средством. Затем - Страница 47 из 67
HJ-203-E_A_M.book Page 45 Tuesday, February 16, 2010 1:49 PM 11 Устранение неисправностей Неисправн ость Причина разряжена. Установите новую литиевую батарею типа CR2032 напряжением 3 В (см. главу 9.1). Не соблюдена полярность при установке батареи (+ и -). Установите батарею с соблюдением - Страница 48 из 67
HJ-203-E_A_M.book Page 46 Tuesday, February 16, 2010 1:49 PM 12 Технические данные Название Walking style III изделия Тип HJ-203-ED/HJ-203-EG/HJ-203-EK/HJ-203-EV Электропитание Литиевая батарея типа CR2032 напряжением 3 В Срок службы Прибл. 1,5 года* (при использовании в батареи течение 4 часов в - Страница 49 из 67
HJ-203-E_A_M.book Page 47 Tuesday, February 16, 2010 1:49 PM Надлежащая утилизация продукта (использованное электрическое и электронное оборудование) Этот символ на продукте или описании к нему указывает, что данный продукт не подлежит утилизации вместе с другими домашними отходами по окончании - Страница 50 из 67
HJ-203-E_A_M.book Page 48 Tuesday, February 16, 2010 1:49 PM 48 - Страница 51 из 67
AR ١٦ HJ-203-E_A_M08.indd 16 16/02/2010 13:44:53 - Страница 52 из 67
ﺍﻟﺘﺨﻠﺺ ﺍﻟﺴﻠﻴﻢ ﻣﻦ ﻫﺬﺍ ﺍﻟﻤﻨﺘﺞ )ﻣﻌﺪﺍﺕ ﻛﻬﺮﺑﺎﺋﻴﺔ ﻭﺇﻟﻜﺘﺮﻭﻧﻴﺔ ﻣﺴﺘﻬﻠﻜﺔ( ﺗﺸﻴﺮ ﻫﺬﻩ ﺍﻟﻌﻼﻣﺔ ﺍﻟﻤﻮﺟﻮﺩﺓ ﻋﻠﻰ ﺍﻟﻤﻨﺘﺞ ﺃﻭ ﺍﻟﻤﻄﺒﻮﻋﺎﺕ ﺍﻟﺨﺎﺻﺔ ﺑﻪ ﺇﻟﻰ ﺣﺘﻤﻴﺔ ﻋﺪﻡ ﺍﻟﺘﺨﻠﺺ ﻣﻨﻪ ﻣﻊ ﺍﻟﻤﺨﻠﻔﺎﺕ ﺍﻟﻤﻨﺰﻟﻴﺔ ﺍﻷﺧﺮﻯ ﻋﻨﺪﻣﺎ ﻳﺼﺒﺢ ﻏﻴﺮ ﺻﺎﻟﺢ ﻟﻼﺳﺘﺨﺪﺍﻡ .ﻟﻠﺤﻴﻠﻮﻟﺔ ﺩﻭﻥ ﺗﻌﺮﺽ ﺍﻟﺒﻴﺌﺔ ﺃﻭ ﺍﻟﺼﺤﺔ ﺍﻟﺒﺸﺮﻳﺔ ﻷﻱ ﺃﺫﻯ ﻳﻨﺠﻢ ﻋﻦ ﺍﻟﺘﺨﻠﺺ ﻏﻴﺮ ﺍﻟﻤﻮﺟﻪ ﻣﻦ - Страница 53 из 67
١٢ﺍﻟﺒﻴﺎﻧﺎﺕ ﺍﻟﺘﻘﻨﻴﺔ ﺍﺳﻢ ﺍﻟﻤﻨﺘﺞ Walking style III ﺍﻟﻨﻮﻉ HJ-203-ED/HJ-203-EG/HJ-203-EK/HJ-203-EV ﻣﺼﺪﺭ ﺍﻟﻄﺎﻗﺔ ﺑﻄﺎﺭﻳﺔ ﻟﻴﺜﻴﻮﻡ ٣ﻓﻮﻟﺖ ﻣﻦ ﺍﻟﻨﻮﻉ CR2032 ﻋﻤﺮ ﺍﻟﺒﻄﺎﺭﻳﺔ ﺣﻮﺍﻟﻲ ١٫٥ﻋﺎﻡ* )ﻋﻨﺪ ﺍﺳﺘﺨﺪﺍﻣﻬﺎ ٤ﺳﺎﻋﺎﺕ ﻳﻮﻣﻴًﺎ(. ﻣﻼﺣﻈﺔ :ﺍﻟﺒﻄﺎﺭﻳﺔ ﺍﻟﻤﻘ ّﺪﻣﺔ ﻟﻼﺳﺘﺨﺪﺍﻡ ﺍﻟﺘﺠﺮﻳﺒﻲ .ﻗﺪ ﻳﻨﻘﻀﻲ - Страница 54 из 67
١١ﺍﺳﺘﻜﺸﺎﻑ ﺍﻷﺧﻄﺎء ﻭﺇﺻﻼﺣﻬﺎ ﺍﻟﻈﺎﻫﺮﺓ ﻳﻮﻣﺾ ﺃﻭ ﻳﻈﻬﺮ ﺑﺎﺳﺘﻤﺮﺍﺭ. ﻻ ﻳﻮﺟﺪ ﺷﻲء ﻣﻌﺮﻭﺽ. ﺍﻟﻘﻴﻢ ﺍﻟﻤﻌﺮﻭﺿﺔ ﻏﻴﺮ ﺻﺤﻴﺤﺔ. ﺍﻟﺴﺒﺐ ﺍﻹﺻﻼﺡ ﺿﻌﻒ ﺍﻟﺒﻄﺎﺭﻳﺔ ﺃﻭ ﻧﻔﺎﺩ ﻃﺎﻗﺘﻬﺎ. ّ ﺭﻛﺐ ﺑﻄﺎﺭﻳﺔ ﻟﻴﺜﻴﻮﻡ ﻗﻮﺗﻬﺎ ٣ﻓﻮﻟﺖ ﻣﻦ ﺍﻟﻨﻮﻉ CR2032ﺟﺪﻳﺪﺓ )ﺭﺍﺟﻊ ﺍﻟﻔﺼﻞ .(١-٩ ﺃﻗﻄﺎﺏ ﺍﻟﺒﻄﺎﺭﻳﺔ ) +ﻭ (-ﻣﺤﺎﺫﻳﺔ - Страница 55 из 67
١٠ﺍﻟﺼﻴﺎﻧﺔ ﻭﺍﻟﺘﺨﺰﻳﻦ ١-١٠ﺍﻟﺼﻴﺎﻧﺔ ﺣﺎﻓﻆ ﺩﻭﻣًﺎ ﻋﻠﻰ ﻧﻈﺎﻓﺔ ﺍﻟﺠﻬﺎﺯ. ﻳﺠﺐ ﺗﻨﻈﻴﻒ ﺍﻟﺠﻬﺎﺯ ﺑﺎﺳﺘﺨﺪﺍﻡ ﻗﻄﻌﺔ ﻗﻤﺎﺵ ﻧﺎﻋﻤﺔ ﻭﺟﺎﻓﺔ. ﻹﺯﺍﻟﺔ ﺍﻟﺒﻘﻊ ﺍﻟﺼﻌﺒﺔ ،ﺍﻣﺴﺢ ﺍﻟﺠﻬﺎﺯ ﺑﻘﻄﻌﺔ ﻗﻤﺎﺵ ﺭﻃﺒﺔ ﻣﺒﻠﻠﺔ ﺑﺎﻟﻤﺎء ﺃﻭ ﻣﻨﻈﻒ ﻣﺘﻌﺎﺩﻝ. ﺛﻢ ﺍﻣﺴﺤﻪ ﻟﻴﺠﻒ. ﺍﺣﺘﻴﺎﻃﺎﺕ ﺍﻟﺼﻴﺎﻧﺔ ﻭﺍﻟﺘﺨﺰﻳﻦ ّ ﺍﻟﻤﺮﻗﻖ ﻟﺘﻨﻈﻴﻒ ﺍﻟﺠﻬﺎﺯ. ﺗﺠﻨﺐ - Страница 56 из 67
٩ﻋﻤﺮ ﺍﻟﺒﻄﺎﺭﻳﺔ ﻭﺍﺳﺘﺒﺪﺍﻟﻬﺎ ً ﻭﻣﻴﻀﺎ ﺃﻭ ﻳﻈﻬﺮ ﻋﻠﻰ ﺷﺎﺷﺔ ﺍﻟﻌﺮﺽ ،ﻓﻘﻢ ﺑﺎﺳﺘﺒﺪﺍﻝ ﻳُﺼ ِﺪﺭ ﺇﺫﺍ ﻛﺎﻥ ﺍﻟﺮﻣﺰ ﺍﻟﺒﻄﺎﺭﻳﺔ ﺑﺒﻄﺎﺭﻳﺔ ) (CR2032ﺟﺪﻳﺪﺓ. ﻓﻲ ﺣﺎﻟﺔ ﺇﺯﺍﻟﺔ ﺍﻟﺒﻄﺎﺭﻳﺔ ،ﺳﻴﺘﻢ ﺣﺬﻑ ﺍﻹﻋﺪﺍﺩﺍﺕ ﻭﻛﺎﻓﺔ ﻗﻴﻢ ﺍﻟﻘﻴﺎﺳﺎﺕ .ﺍﻟﺮﺟﺎء ﺇﻋﺎﺩﺓ ﺗﻌﻴﻴﻦ ﺍﻹﻋﺪﺍﺩﺍﺕ )ﺭﺍﺟﻊ ﺍﻟﻔﺼﻞ .(١-٥ ﻣﻼﺣﻈﺎﺕ: • ﺇﺫﺍ ﺃﺭﺩﺕ ﺍﻻﺣﺘﻔﺎﻅ ﺑﺄﻱ - Страница 57 из 67
٨ﻭﻇﻴﻔﺔ ﺍﻟﺬﺍﻛﺮﺓ ﻳﺘﻢ ﺗﺨﺰﻳﻦ ﺍﻟﻘﻴﺎﺳﺎﺕ ﺍﻟﺨﺎﺻﺔ ﺑﻜﻞ ﻳﻮﻡ )ﺍﻟﺨﻄﻮﺍﺕ ،ﻭﺍﻟﻤﺴﺎﻓﺔ ﺍﻟﺘﻲ ﺗﻤﺸﻴﻬﺎ ،ﻭﺍﻟﺴﻌﺮﺍﺕ ﺍﻟﻤﺤﺮﻭﻗﺔ ﻭﺍﻟﺪﻫﻮﻥ ﺍﻟﻤﺤﺮﻭﻗﺔ( ﺗﻠﻘﺎﺋﻴًﺎ ﻓﻲ ﺍﻟﺬﺍﻛﺮﺓ ﻭﻳﺘﻢ ﺇﻋﺎﺩﺓ ﺗﻌﻴﻴﻨﻬﺎ ﻋﻠﻰ ٠ﻓﻲ ﻣﻨﺘﺼﻒ ﺍﻟﻠﻴﻞ ) (٠:٠٠ﻳﻮﻣﻴًﺎ. ١-٨ﺍﺳﺘﺪﻋﺎء ﺍﻟﺒﻴﺎﻧﺎﺕ ﻟﺘﺤﺪﻳﺪ ﻧﻮﻉ ﺷﺎﺷﺔ ﺍﻟﻌﺮﺽ ﺍﻟﺘﻲ ﺗﺮﻳﺪ ﻣﺸﺎﻫﺪﺗﻬﺎ. ١ﺍﺿﻐﻂ ﻋﻠﻰ - Страница 58 из 67
■ ﺣﻮﻝ ﻭﻇﻴﻔﺔ ﺗﻮﻓﻴﺮ ﺍﻟﻄﺎﻗﺔ ﻟﺘﻮﻓﻴﺮ ﺍﻟﻄﺎﻗﺔ ،ﺳﻴﺘﻢ ﺇﻃﻔﺎء ﺷﺎﺷﺔ ﻋﺮﺽ ﺍﻟﺠﻬﺎﺯ ﺑﻌﺪ ﻋﺮﺽ «) «SLEEPﺳﻜﻮﻥ( ﻓﻲ ﺣﺎﻟﺔ ﻋﺪﻡ ﺍﻟﻀﻐﻂ ﻋﻠﻰ ﺃﻱ ﺯﺭ ﻟﻤﺪﺓ ﺗﺰﻳﺪ ﻋﻦ ٥ﺩﻗﺎﺋﻖ .ﻟﻜﻦ ﺳﻴﺴﺘﻤﺮ ﺍﻟﺠﻬﺎﺯ ﻓﻲ ﻣﺮﺍﻗﺒﺔ ﻋﺪﺩ ﺍﻟﺨﻄﻮﺍﺕ. ﺍﺿﻐﻂ ﻋﻠﻰ ﺃﻭ ﺃﻭ ﻹﻋﺎﺩﺓ ﺗﺸﻐﻴﻞ ﺷﺎﺷﺔ ﺍﻟﻌﺮﺽ. ■ ﺣﺎﻻﺕ ﻗﺪ ﻻ ﻳﺴﺘﻄﻴﻊ ﺍﻟﺠﻬﺎﺯ ﺧﻼﻟﻬﺎ ﻋ ّﺪ ﺍﻟﺨﻄﻮﺍﺕ ﺑﺪﻗﺔ - Страница 59 из 67
٢-٧ﺍﻟﺘﺤﻘﻖ ﻣﻦ ﺷﺎﺷﺔ ﺍﻟﻌﺮﺽ ﺧﻼﻝ ﻭﺿﻊ ﺍﻟﻨﺸﺎﻁ ﺍﺿﻐﻂ ﻋﻠﻰ ﻟﺘﻐﻴﻴﺮ ﺷﺎﺷﺔ ﺍﻟﻌﺮﺽ. ﺍﻟﺨﻄﻮﺍﺕ ﺍﻟﻤﺤﺘﺴﺒﺔ ﺍﺛﻨﺎء ﺍﻟﻤﺸﻲ ﺍﻟﻤﺤﺪﺩ ﺫﺍﺗﻴﺎ ﺍﻟﻤﺴﺎﻓﺔ ﺍﻟﻤﺤﺘﺴﺒﺔ ﺍﺛﻨﺎء ﺍﻟﻤﺸﻲ ﺍﻟﻤﺤﺪﺩ ﺫﺍﺗﻴﺎ ﺷﺎﺷﺔ ﻋﺮﺽ ﺍﻟﺴﻌﺮﺍﺕ ﺍﻟﻄﺎﻗﺔ ﺍﻹﺿﺎﻓﻴﺔ ﺍﻟﻤﺤﺮﻭﻗﺔ ﺧﻼﻝ ﺍﻟﻤﺸﻲ ﺍﻟﻤﺤﺪﺩ ﺫﺍﺗﻴﺎ)ﺍﻷﻳﺾ ﻓﻲ ﻓﺘﺮﺓ ﺍﻟﺮﺍﺣﺔ + ﺍﻟﻄﺎﻗﺔ ﺍﻹﺿﺎﻓﻴﺔ ﺍﻟﻤﺤﺮﻭﻗﺔ = ﺍﺟﻤﺎﻟﻲ - Страница 60 из 67
٧ﺍﻟﺘﺤﻘﻖ ﻣﻦ ﺷﺎﺷﺔ ﺍﻟﻌﺮﺽ ١-٧ﺍﻟﺘﺤﻘﻖ ﻣﻦ ﺷﺎﺷﺔ ﺍﻟﻌﺮﺽ ﺍﻟﺤﺎﻟﻴﺔ ﺍﺿﻐﻂ ﻋﻠﻰ ﻟﺘﻐﻴﻴﺮ ﺷﺎﺷﺔ ﺍﻟﻌﺮﺽ. ﺍﻟﺨﻄﻮﺍﺕ ﺍﻟﺘﻲ ﻣﺸﻴﺘﻬﺎ ﺧﻼﻝ ﻳﻮﻡ ﺗﻌﺮﺽ ﺍﻟﺮﻣﺰ ﻋﻨﺪ ﺍﻟﻮﺻﻮﻝ ﺇﻟﻰ ١٠٠٠٠ﺧﻄﻮﺓ ﻓﻲ ﺍﻟﻴﻮﻡ. ﺍﻟﻤﺴﺎﻓﺔ ﺍﻟﺘﻲ ﻣﺸﻴﺘﻬﺎ ﺧﻼﻝ ﻳﻮﻡ ﺷﺎﺷﺔ ﻋﺮﺽ ﺍﻟﺴﻌﺮﺍﺕ ﺍﻟﻄﺎﻗﺔ ﺍﻹﺿﺎﻓﻴﺔ ﺍﻟﻤﺤﺮﻭﻗﺔ ﺧﻼﻝ ﻳﻮﻡ )ﺍﻷﻳﺾ ﻓﻲ ﻓﺘﺮﺓ ﺍﻟﺮﺍﺣﺔ + - Страница 61 из 67
٤-٦ﻭﺿﻊ ﺍﻟﻨﺸﺎﻁ ّ ﻳﺨﺰﻥ ﻭﺿﻊ ﺍﻟﻨﺸﺎﻁ ﻗﻴﻢ ﺍﻟﻘﻴﺎﺳﺎﺕ ﺍﻟﺨﺎﺻﺔ ﺑﻔﺘﺮﺓ ﻣﺸﻲ ﺃﻭ ﺟﻠﺴﺔ ﻣﺤﺪﺩﺓ. ﻣﻼﺣﻈﺔ :ﻻ ﻳﻤﻜﻨﻚ ﺍﻟﺘﺤﻘﻖ ﻣﻦ ﻭﻇﻴﻔﺔ ﺍﻟﺬﺍﻛﺮﺓ ﺃﻭ ﺷﺎﺷﺔ ﺍﻟﻌﺮﺽ ﺍﻟﺤﺎﻟﻴﺔ ﻋﻨﺪ ﺍﺳﺘﺨﺪﺍﻡ ﻭﺿﻊ ﺍﻟﻨﺸﺎﻁ. ١ﺍﺿﻐﻂ ﻋﻠﻰ ﻳﺪﻭﺭ ﻟﻤﺪﺓ ﺛﺎﻧﻴﺘﻴﻦ ﻣﻦ ﺃﻱ ﺷﺎﺷﺔ ﻋﺮﺽ. ﻋﻨﺪ ﺍﺳﺘﺨﺪﺍﻡ ﻭﺿﻊ ﺍﻟﻨﺸﺎﻁ. ٢ﺍﺑﺪﺃ ﺍﻟﻤﺸﻲ. ﻟﺘﻌﺮﺽ ﻋﺪﺩ - Страница 62 из 67
٢-٦ﻛﻴﻔﻴﺔ ﺗﻮﺻﻴﻞ ﻋﺪّﺍﺩ Walking style IIIﻣﻦ OMRON ﻧﻮﺻﻲ ﺑﻮﺿﻊ ﺍﻟﺠﻬﺎﺯ ﻓﻲ ﺟﻴﺒﻚ ﺃﻭ ﺣﻘﻴﺒﺘﻚ ﺃﻭ ﺗﻌﻠﻴﻘﻪ ﻓﻲ ﺍﻟﺮﻗﺒﺔ. ﻇﻬﻮﺭﺍ ﻋﻨﺪ ﻭﺿﻊ ﺍﻟﻤﻼﺑﺲ ﻓﻲ ﺍﻟﻐﺴﻴﻞ، ﻟﻤﻨﻊ ﺍﻟﺴﻘﻮﻁ ﻏﻴﺮ ﺍﻟﻤﺘﻌﻤﺪ ﻟﻠﺠﻬﺎﺯ ﻭﺟﻌﻠﻪ ﺃﻛﺜﺮ ً ﻧﻮﺻﻲ ﺑﺎﺳﺘﺨﺪﺍﻡ ﺷﺮﻳﻂ ﺍﻟﺮﺑﻂ ﻭﺍﻟﻤﺸﺒﻚ ﺍﻟﻤﻘ ّﺪﻡ ﻣﻌﻪ. ﺍﻟﺠﻴﺐ ١ﺿﻊ ﺍﻟﺠﻬﺎﺯ ﻓﻲ ﺍﻟﺠﻴﺐ ﺍﻟﻌﻠﻮﻱ ﺍﻷﻣﺎﻣﻲ - Страница 63 из 67
٢ﺇﻋﺪﺍﺩ ﺍﻟﺴﺎﻋﺔ. ) (١ﺍﺿﻐﻂ ﻋﻠﻰ ﻟﻺﻋﺪﺍﺩ. ﺃﻭ ) • ﺍﺿﻐﻂ ﻋﻠﻰ ﺑﻤﻘﺪﺍﺭ ﺧﻄﻮﺓ ﻭﺍﺣﺪﺓ. • ﺍﺿﻐﻂ ﺑﺎﺳﺘﻤﺮﺍﺭ ﻋﻠﻰ ﻟﻠﺨﻠﻒ( ﺑﺴﺮﻋﺔ. ٣ ٤ ٥ ٦ ﻟﺘﺤﺪﻳﺪ ﺍﻟﻘﻴﻤﺔ ﺍﻟﻤﻄﻠﻮﺑﺔ ( ﻟﻠﺘﻘﺪﻳﻢ )ﻟﻠﺮﺟﻮﻉ ﻟﻠﺨﻠﻒ( ) ( ﻟﻠﺘﻘﺪﻳﻢ )ﻟﻠﺮﺟﻮﻉ ﻟﺘﺄﻛﻴﺪ ﺍﻹﻋﺪﺍﺩ. ) (٢ﺍﺿﻐﻂ ﻋﻠﻰ ﻛﺮﺭ ﺍﻟﺨﻄﻮﺍﺕ ﻣﻦ ) (١ﺇﻟﻰ - Страница 64 из 67
٤ﺗﻌﺮّﻑ ﻋﻠﻰ ﺍﻟﺠﻬﺎﺯ ■ ﺍﻟﺠﻬﺎﺯ ﺍﻷﺳﺎﺳﻲ ﺷﺎﺷﺔ ﺍﻟﻌﺮﺽ ﻣﺆﺷﺮ ﺍﻧﺨﻔﺎﺽ ﻃﺎﻗﺔ ﺍﻟﺒﻄﺎﺭﻳﺔ ﺍﻟﺰﺭ ﺍﻟﺰﺭ ﺍﻟﺰﺭ ٥ﺍﻹﻋﺪﺍﺩﺍﺕ ١-٥ﺇﻋﺪﺍﺩ ﺍﻟﻮﻗﺖ ﻭﺍﻟﻮﺯﻥ ﻭﺍﻻﺭﺗﻔﺎﻉ ﻭﻃﻮﻝ ﺍﻟﺨﻄﻮﺓ ﻋﻨﺪ ﺍﺳﺘﺨﺪﺍﻡ ﺍﻟﺠﻬﺎﺯ ﻷﻭﻝ ﻣﺮﺓ ،ﺍﺗﺒﻊ ﺍﻟﺨﻄﻮﺍﺕ ﺍﻟﺘﺎﻟﻴﺔ. ١ﺍﺿﻐﻂ ﻋﻠﻰ ﺍﻟﺰﺭ ) SETﺗﻌﻴﻴﻦ( ﻋﻠﻰ ﻇﻬﺮ ﺍﻟﺠﻬﺎﺯ ﺑﺎﺳﺘﺨﺪﺍﻡ ﻋﺼﺎ ﺭﻓﻴﻌﺔ ﻗﻮﻳﺔ ﻻ - Страница 65 из 67
٢ﺍﺳﺘﺨﺪﺍﻡ ﻋ ّﺪﺍﺩ Walking style IIIﻣﻦ OMRON ١-٢ﺗﻨﺒﻴﻬﺎﺕ • ﺍﺗﺼﻞ ﺑﺎﻟﻄﺒﻴﺐ ﺃﻭ ﻣﻮﻓﺮ ﺍﻟﺮﻋﺎﻳﺔ ﺍﻟﺼﺤﻴﺔ ﻗﺒﻞ ﺍﻟﺒﺪء ﻓﻲ ﺑﺮﻧﺎﻣﺞ ﻹﻧﻘﺎﺹ ﺍﻟﻮﺯﻥ ﺃﻭ ﺑﺮﻧﺎﻣﺞ ﺗﺪﺭﻳﺒﺎﺕ. • ﺍﺣﻔﻆ ﺍﻟﺠﻬﺎﺯ ﺑﻌﻴ ًﺪﺍ ﻋﻦ ﻣﺘﻨﺎﻭﻝ ﺍﻷﻃﻔﺎﻝ. • ﻓﻲ ﺣﺎﻟﺔ ﺍﺑﺘﻼﻉ ﺍﻷﻃﻔﺎﻝ ﻟﻠﺒﻄﺎﺭﻳﺔ ﺃﻭ ﻏﻄﺎء ﺍﻟﺒﻄﺎﺭﻳﺔ ﺃﻭ ﺍﻟﺒﺮﻏﻲ ،ﺍﺳﺘﺸﺮ ﺍﻟﻄﺒﻴﺐ ﻓﻲ ﺍﻟﺤﺎﻝ. - Страница 66 из 67
١ﻣﻘﺪﻣﺔ ﻋﺰﻳﺰﻱ ﺍﻟﻌﻤﻴﻞ، ﺷﻜﺮﺍ ﻟﺸﺮﺍﺋﻚ ﻋ ّﺪﺍﺩ ﺍﻟﺨﻄﻮﺍﺕ ﻋﺎﻟﻲ ﺍﻟﺠﻮﺩﺓ ﻣﻦ .OMRONﻳﻘﻴﺲ ﻋ ّﺪﺍﺩ walking ً ّ style IIIﺍﻟﺠﺪﻳﺪ ﻧﺸﺎﻃﻚ ﺍﻟﺒﺪﻧﻲ ﺑﺪﻗﺔ ﻭﻳﺴﺎﻋﺪﻙ ﻓﻲ ﺩﻋﻢ ﺍﻟﻨﻈﺎﻡ ﺍﻟﻐﺬﺍﺋﻲ ﺃﻭ ﻳﺤﻔﺰﻙ ﻋﻠﻰ ﺗﺤﻘﻴﻖ ﻫﺪﻓﻚ ﺍﻟﻴﻮﻣﻲ ﺍﻟﻤﺮﺗﺒﻂ ﺑﺎﻟﻤﺸﻲ. ﻳﺴﺘﻄﻴﻊ ﻋ ّﺪﺍﺩ ﺍﻟﺨﻄﻮﺍﺕ ﻫﺬﺍ ﻋ ّﺪ ﺍﻟﺨﻄﻮﺍﺕ ﺃﺛﻨﺎء ﻭﺟﻮﺩﻩ ﻓﻲ ﺣﻘﻴﺒﺔ ﺃﻭ ﻓﻲ - Страница 67 из 67
Просмотр
Доступно к просмотру 66 страниц. Рекомендуем вам скачать файл инструкции, поскольку онлайн просмотр документа может сильно отличаться от оригинала.
-
HJ-203-E_A_M.book Page 1 Tuesday, February 16, 2010 1:49 PM Step counter Walking style • Manual de instrucciones 1 ES • Gebruiksaanwijzing 17 NL • РУКОВОДСТВО ПО ЭКСПЛУАТАЦИИ 33 RU AR IM-HJ-203-E-01-05/2010 9062599-8A
-
HJ-203-E_A_M.book Page 2 Tuesday, February 16, 2010 1:49 PM
-
HJ-203-E_A_M.book  Page 1  Tuesday, February 16, 2010  1:49 PM
1 Introduccion
Estimado cliente:
Gracias por la compra de este podometro OMRON de alta
calidad. El nuevo modelo Walking Style III mide su actividad
fisica con gran precision y le ayuda a complementar su dieta
o a motivarle para que alcance el numero de pasos diarios
que tiene como objetivo.
Este podometro puede contar el numero de pasos aunque se
encuentre en el interior de un bolso o en el bolsillo e incluso si
lo lleva alrededor del cuello, lo cual le proporciona una varie-
dad de opciones a la hora de llevarlo consigo. Utilicelo diaria-
mente para controlar su salud de forma sencilla.
¦ OMRON Walking style III - Caracteristicas
Calorias consumidas/Grasa quemada
Mide la intensidad del paseo y calcula la cantidad de calo-
rias consumidas y de grasa quemada.
Modo actividad
Guarda las mediciones* correspondientes a un periodo o
sesion especificos. Estas mediciones son distintas de las
mediciones guardadas cada dia.
* Pasos contados/Distancia/Calorias consumidas/Grasa que-
mada
simbolo a los 10.000 pasos
El simbolo    se muestra en pantalla cuando se alcanzan
10.000 pasos en un solo dia. (No aparecera en la pantalla
del modo actividad o en la pantalla de memoria del modo
actividad).                        ES
1
- 1
- 2
- 3
- 4
- 66
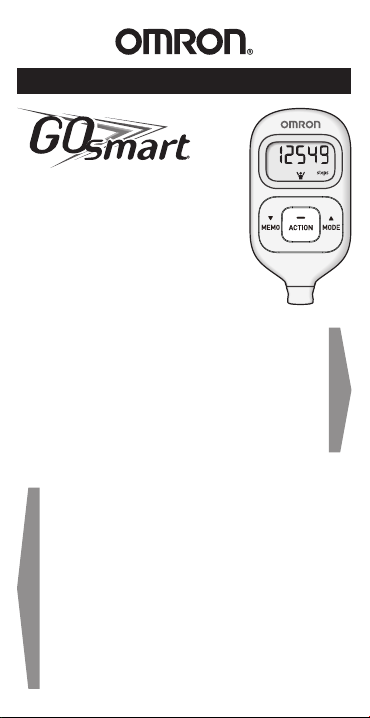
INSTRUCTION MANUAL
Pocket Pedometer with
ACTIVITY TRACKER
Model HJ-203
Before Using the Unit
Introduction……………………………………………. 1
Special Features ……………………………………… 2
Important Safety Information …………………..3
Know Your Unit …………………………………….. 5
Settings …………………………………………………. 6
Battery Life …………………………………………. 10
Battery Replacement …………………………….. 11
Operating Instructions
Attaching the Unit ………………………………… 13
Reading the Current Display ………………….. 15
Activity Tracker ……………………………………. 16
Reading the Activity Tracker Display………. 17
Memory Function …………………………………. 18
Procedures for the Memory Function ………. 19
Care and Maintenance
Care and Maintenance ………………………….. 22
Troubleshooting Tips ……………………………. 23
Specications ………………………………………. 24
FCC Statement …………………………………….. 25
Limited Warranty ………………………………….. 26
21
Thank you for purchasing the HJ-203 OMRON
GOsmart Pocket Pedometer with Activity Tracker.
This Pocket Pedometer with Activity Tracker
features advanced 2D Smart Sensor technology —
so it knows exactly when you’re taking a step. It’s
more accurate than other pedometers which use the
simple pendulum design. Use this in your pocket,
back or hip for added convenience. The seven-day
memory helps you keep track of your daily activity
to help you reach your tness goals. Plus, this unit
features Activity Tracker so you can separately
track your exercise output. Use this unit everyday to
monitor your tness achievements!
Your Pocket Pedometer with Activity Tracker
comes with the following components:
Pedometer
Strap
Clip
Battery (CR2032 installed)
Screwdriver
Instruction Manual
INTRODUCTION
SAVE THESE INSTRUCTIONS
Fill-in for future reference:
DATE PURCHASED:
Before Using the Unit
• Staple your purchase receipt here
• Register your product on-line at
www.register-omron.com
SPECIAL FEATURES
Activity Tracker (Activity measurement mode)
This unique setting separately tracks and stores
steps/distance/calories burned/fat burned during
your Activity or Exercise time.
This stores the measurement values for a specied
period or session. These measurement values are
separate from the measurement values stored for
each day. Refer to page 16 for more information.
symbol at 10,000 steps
Congratulations! The unit displays the symbol
when you reach 10,000 steps for that day.
Based on that day’s data only. Not displayed in the
activity measurement mode.
Automatic stride length
Your stride length will be automatically
recommended after you input your height. You
can accept or override the original number. You
can manually adjust based on your walking stride
lengths.
43
IMPORTANT SAFETY
INFORMATION
To assure the correct use of the product, basic safety
measures should always be followed including the
warnings and cautions listed in this instruction manual.
SAFETY SYMBOLS USED IN THIS
INSTRUCTION MANUAL
WARNING
Indicates a potentially hazardous
situation which, if not avoided, could
result in death or serious injury.
CAUTION
Indicates a potentially hazardous
situation which, if not avoided, may
result in minor or moderate injury to
the user or patient or damage to the
equipment or other property.
OPERATING THE DEVICE
Please use care in checking pedometer readings and
do not check readings while walking in any situation
which presents hazards, such as on roads, sidewalks
or trails which have vehicles, congestion, obstacles,
uneven terrain or other hazards.
Contact your physician or healthcare provider before
beginning a weight reduction or exercise program.
Keep the unit out of the reach of young children. The
unit contains small pieces that may be swallowed.
Immediately contact your physician if any piece is
swallowed.
If used hanging around neck, the string can cause
strangulation. Do not place the unit with string around
a child’s neck.
If battery uid gets in your eyes, immediately rinse
with plenty of clean water. Contact a physician
immediately.
Read all information in the instruction manual and
any other literature included in the box before using
the unit.
IMPORTANT SAFETY
INFORMATION
Operate the unit only as intended. Do not use for any
other purpose.
Do not swing the unit by the strap. Swinging the unit
while holding the strap may cause an injury.
Do not put the unit in the back pocket of your shorts
or trousers. It could be damaged if you sit down while
the unit is still in your pocket.
If battery uid gets on your skin or clothing,
immediately rinse with plenty of clean water.
Do not insert the battery with the polarities in the
wrong direction.
Replace a worn battery with a new one immediately.
Remove the battery from this unit when you
are not going to use it for a long period of time
(approximately three months or longer).
Do not throw the battery into re. The battery may
explode.
Dispose of the device, battery, and components
according to applicable local regulations. Unlawful
disposal may cause environmental pollution.
CARE AND MAINTENANCE
Do not disassemble or modify the unit. Changes or
modications not approved by Omron Healthcare will
void the user warranty.
Do not subject the unit to strong shocks, such as
dropping the unit on the oor.
Do not submerge the unit or any of the components in
water.
Do not press the SET button with a sharp point. This
could cause damage.
65
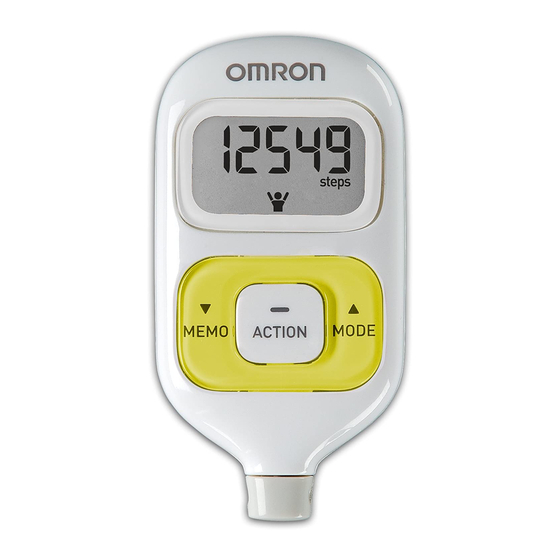
KNOW YOUR UNIT
Front of unit
Back of unit
Components
NOTE:
Clothing may be damaged if you pull the unit off
without opening the clip.
Display
Low battery
indicator
How to
connect the
strap and
the clip
How to release
and fasten with a
clip
How to
attach the
strap to the
main unit
▲/MODE button
/ACTION button
▼/MEMO (memory)
button
Battery cover
Battery cover
screw
Strap attachment
SET button
Strap
Clip
To release
To fasten
Create a
loop to
attach
the strap
The unit comes with the battery installed. When you
use the unit for the rst time or you want to change
settings, follow the steps below. For setting range
details refer to “Specications” on page 24.
1. Press the SET button on the
back of the unit with a thin,
sturdy, stick that will not
break easily.
Do not press the SET button
with a sharp point. This could cause damage.
The following display (HELLO) will appear.
NOTE:
The display will turn off if no buttons are
pressed after 5 minutes while setting the unit
for the rst time or after resetting the unit.
When resetting the unit, the display will show
the current step count.
2. Setting the hour.
• Press
( ) to advance (go back) one.
SETTINGS
Press or to select the
desired value for a setting.
Press to conrm the setting.
87
SETTINGS
3. Setting the minute.
• Press
( ) to advance (go back) one.
• Press and hold ( ) to advance or go back
in increments of 10.
4. Setting the weight.
• Press
( ) to advance (go back) one.
• Press and hold ( ) to advance or go back
in increments of 10.
5. Setting the height.
• Press
( ) to advance (go back) one.
• Press and hold ( ) to advance or go back
in increments of 4.
Press or to select the
desired value for a setting.
Press to conrm the setting.
Press or to select the
desired value for a setting.
Press to conrm the setting.
Press or to select the
desired value for a setting.
Press to conrm the setting.
SETTINGS
6. Setting the stride length.
The initial stride length value that blinks on the display
is anestimated stride length calculated from your
height setting.
• Press ( ) to advance (go back) one.
• Press and hold ( ) to advance or go back
in increments of 4.
NOTE:
To get a more accurate stride length, walk about 10
steps, then measure the length for one step (from the
tip of one foot to the tip of the other). Refer to “Stride
length measurement” on page 9.
All the settings are completed.
Adjust the Settings
1 Press the SET button on the
back of the unit with a thin,
sturdy, stick that will not
break easily.
The hour ashes on the display.
2 Follow the procedure from
step 2 on page 6 “Settings”.
NOTES:
•
This does not delete measurement values stored on
the unit, including any stored today.
•
If no settings are made for more than 5 minutes, the
display will revert to the current step count display.
Press or to select the
desired value for a setting.
Press to conrm the setting.
 Loading…