Перейти к контенту
![]()
Русские электронные инструкции по эксплуатации
Постоянно обновляемый большой каталог документации по эксплуатации и использованию современных устройств и оборудования на русском языке. Бесплатное скачивание файлов.
Поиск:
Главная
♥ В закладки
Просмотр инструкции в pdf


Инструкция по эксплуатации наручных часов Casio HS-80TW-1E.
Скачать инструкцию к наручным часам Casio HS-80TW-1E (827,34 КБ)

Инструкции наручных часов Casio
« Инструкция к наручным часам Casio Edifice EFR-552GL-2A
» Инструкция к наручным часам Casio LTP-2069D-7A2
Вам также может быть интересно

Инструкция к наручным часам Casio F-200W-1A

Инструкция к наручным часам Casio A-158WEA-1E

Инструкция к наручным часам Casio Edifice EFA-120L-1A1

Инструкция к наручным часам Casio BEM-111D-1A

Инструкция к наручным часам Casio MTP-1183PA-1A

Инструкция к наручным часам Casio A-159WGEA-1E

Инструкция к наручным часам Casio W-800H-1A

Инструкция к наручным часам Casio G-SHOCK GA-700-7A
Добавить комментарий
Имя *
Email *
Сайт
Комментарий


![]()


Сохранить моё имя, email и адрес сайта в этом браузере для последующих моих комментариев.
- Добавить инструкцию
- Заказать инструкцию
- Политика конфиденциальности
MA0809-EA
HS-80TW
ENGLISH
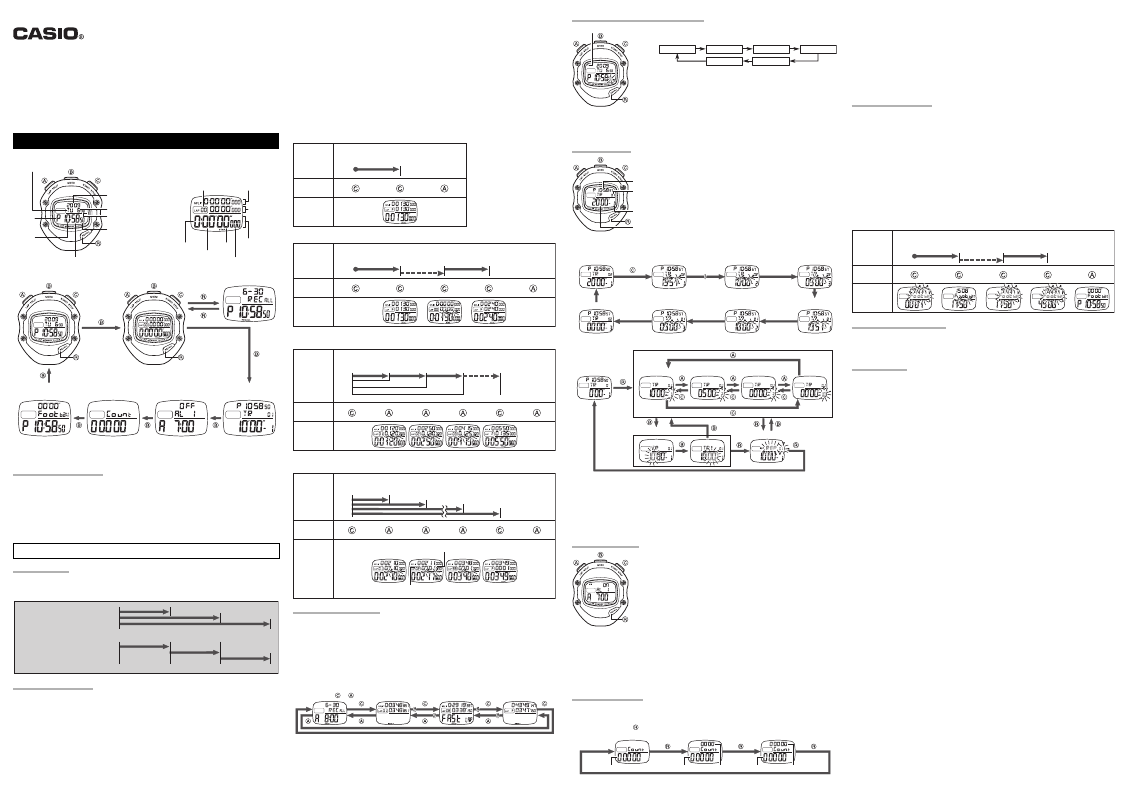
Time Display
Stopwatch Display
Day of the week
Lap counter
Year
Month
Day
PM
Second
Hour
Hours
Seconds
Minutes
Minute
1/1000th of a second
Timekeeping Mode
Stopwatch Mode
Football Stopwatch
Counter Mode
Alarm Mode
Mode
• A sticker is affixed to the glass of this stopwatch when you purchase it. Be sure to remove the sticker before using
the stopwatch.
• Depending on its model, the configuration of your stopwatch may differ somewhat from that shown in the
illustration.
OPERATING PRECAUTIONS
• A battery is installed at the factory. Have it replaced by a CASIO distributor at the first sign of low power (dim
display).
• Do not use or store this stopwatch in areas exposed to temperature extremes, strong magnetism, strong
vibration, or strong impact.
• Heat can shorten battery life and cause malfunction. Keep the stopwatch away from heaters and direct sunlight
when using it.
• Never try to take the stopwatch apart. Doing so can cause malfunction.
• To clean the stopwatch, use a soft, dry cloth or a cloth moistened in a solution of water and a mild neutral
detergent. Wring out all excess moisture from the cloth. Never use thinner, benzene, alcohol or other similar
agents.
• Be sure to keep all user documentation handy for future reference.
CASIO COMPUTER CO., LTD. assumes no responsibility for any loss, or any claims by third parties that may
arise through the use of this stopwatch.
GENERAL GUIDE
C button …. Starts and stops timing.
B button …. Cycles between: Stopwatch, Timer, Alarm, Counter, Football Stopwatch, and Timekeeping Modes.
A button ….. Performs lap/split and reset operation (stopwatch beeps).
R button ….. Recalls lap/split time records and total elapsed time.
SPLIT TIME AND LAP TIME
1ST SPLIT
2ND SPLIT
Split time (SPLIT) is the time
elapsed from the start to a
specific point.
START
1ST LAP
Lap time (LAP) is the time
2ND LAP
elapsed from one point to another
or for one lap around a track.
START
USING THE STOPWATCH
The stopwatch beeps to signal C and A button operations.
Working range
The total elapsed time and split time display is limited to 9 hours 59 minutes 59.999 seconds. Lap time display is
limited to 59 minutes 59.999 seconds.
Thereafter it will be reset and started again. The lap counter starts from 1 to 99 and repeats from 0.
While the stopwatch is reset to all zeros, holding down the A button will toggle the lower display area between
display of lap time and split time.
• 100 (indicating the number of laps) will flash on the display when memory is full (100 lap times in the current
group).
NORMAL TIME
START
STOP
RESET
0
(a)
CHART
a
BUTTON
Split time
OPERATION
Lap time
DISPLAY
NET TIME
Total
elapsed time
START
STOP
START
0
(a)
(a)
CHART
a
(Stoppage time)
Recall Mode
BUTTON
OPERATION
DISPLAY
After stopping a net time operation by pressing C, you can resume it by pressing C again.
LAP/SPLIT TIMES
START
1ST LAP
2ND LAP
3RD LAP
0
(a)
(a + b)
c (a + b + c)
a
b
CHART
1ST SPLIT (a)
Timer Mode
2ND SPLIT (a+b)
3RD SPLIT (a+b+c)
BUTTON
OPERATION
DISPLAY
MULTIPLE FINISHING TIMES
Example : To record the times of 100 different runners.
START
1ST
2ND
RUNNER
RUNNER
FINISHES
FINISHES
CHART
BUTTON
OPERATION
Difference between current finisher
and previous finisher
DISPLAY
Finishing position
USING THE RECALL MODE
You can use the recall mode to view data in stopwatch memory.
3RD SPLIT
• There is enough memory to store a total of up to 200 records, divided between two record groups of 100 each. If
you record 100 times, the 100th time will not be stored in memory until you reset the stopwatch to all zeros.
• Starting a new stopwatch elapsed time operation will cause the older of the two record groups to be deleted
automatically in order to make room for a new group of records.
• There is also a FAST LAP record that displays the fastest lap from among all of the lap times currently in memory.
• Record 1 (the newest record) will always be displayed first whenever you press the R button to switch from the
3RD LAP
Stopwatch Mode to the Recall Mode.
• In the Recall Mode, each press of the B button will toggle the display between record group 1 and record group
2.
• Lap time records in memory can be recalled while an elapsed time operation is in progress or stopped.
• Memory records are cleared whenever a new Stopwatch Mode elapsed time operation is stared by pressing the
C button after pressing the A button to reset the stopwatch to all zeros.
Holding down the
or
button scrolls at high speed.
SETTING THE CURRENT TIME AND DATE
1. In the Timekeeping Mode, hold down R for about two seconds.
MUTE
2. Press C on a time signal to correct the seconds.
3. Flashing setting can be changed. Press B to move the flashing.
4. Use C (+) and A (–) to change the flashing setting.
• Holding down the C or A button scrolls at high speed.
5. Press R to exit the setting mode.
* Year digits can be set up to the year 2099.
12/24-hour Timekeeping
In the Timekeeping Mode, press C to toggle between 12-hour and 24-hour
timekeeping.
Beeper On/Off
In the Timekeeping Mode, hold down the A button for about two seconds to toggle the beeper on or off.
Auto Return
The stopwatch returns to the Timekeeping Mode if left unused for a few minutes.
USING THE TIMER
Current time
Number of
repeats
Timer number
Timer start time
Example:
Timer 1 20’00»
STOP
RESET
Timer 2 10’00»
Timer 3 05’00
Timer 1,
(a + b)
Repeat 2
Repeat 1 start
b
Timer 2 end,
Timer 3 end
Timer 3 start
To set an interval start time
STOP
RESET
(t)
Reset
Timer Selection
Timer Interval Setting
1. In the Timer Mode, hold down the R button for about 2 seconds until the displayed interval time starts to flash.
99TH
100TH
RESET
2. Use the C and A buttons to scroll through the 10 interval times until the one you want to change is displayed.
RUNNER
RUNNER
• Interval timers count down in sequence from Timer 1 to Timer 10. Any timer with a starting time of 00’00» is
FINISHES
FINISHES
skipped.
3. Use the B button to move the flashing between the minute and second digits.
• You can specify a start time within the range of 0 to 59 minutes 59 seconds.
• You can repeat steps 2 and 3 to set other interval timer start times, if you want.
4. Press the R button to move the flashing to the number of repeats settings, and then use the C (+) and A (–)
buttons to change the setting to a value from 1 to 100.
5. After the number of repeats setting is the way you want, press the R button to exit the setting screen.
• Holding down C or A in steps 2, 3, or 4 of the above procedure will change the setting at high speed.
USING THE ALARMS
You can set up to 12 alarm times. The stopwatch beeps for 10 seconds when
an alarm time is reached.
• Press any button to stop the beeper after it starts to sound.
To turn a specific alarm on or off
1. In the Alarm Mode, use the C button to display the alarm (AL 1 to AL 12)
you want.
2. Press the A button to toggle the alarm on or off.
To turn all alarms off
In the Alarm Mode, hold down the A button until «ALL OFF» appears on the
display. This turns off all 12 alarms.
To test the alarm
Hold down the C button to sound the alarm.
To set the alarm time
1. In the Alarm Mode, use the C button to scroll through the alarm screen
(1 through 12), until the one you want to set is displayed.
2. Hold down the R button for about 2 seconds until the hour digits of the alarm time start to flash.
3. Use the B button to move the flashing between the hour and minute digits. Use the C (+) and A (–) buttons to
change the currently flashing digits.
4. After the setting is the way you want, press the R button to exit the setting screen.
• The alarm will not sound if the time on a flashing setting screen arrives.
• The stopwatch will exit the setting screen automatically if you do not perform any operation for two or three minutes.
• Displaying the setting screen for an alarm will cause that alarm to turn on.
USING THE COUNTER
• The stopwatch is equipped with three types of counters, which can be used to maintain a count from 0 to 99,999.
• Each press of the R button cycles through the three counter types described below. Note that you can switch
between counter types only when the current counter is reset to zero.
Hold down the
button for about two seconds to reset the count to zero.
Standard Counter
Counter
Standard Counter
C button ………… counter (+)
A button …………. counter (–)
R button hold ….. counter reset
Stopwatch Counter
Stopwatch: 00’00» to 59’59»
SECONDS
HOUR
MINUTES
YEAR
C button ………… counter (+)
A button …………. stopwatch start/stop
DAY
MONTH
R button hold ….. counter reset, stopwatch reset
Dual Counter
C button ………… counter 1 (+)
A button …………. counter 2 (+)
R button hold ….. counter 1 reset, counter 2 reset
FOOTBALL STOPWATCH
This stopwatch can be used to time a football match, and even allows for stoppage time.
To set the match time
1. In the Football Stopwatch Mode, hold down the R button for about two seconds until the minute digits of the
match time start to flash. This is the setting screen.
2. Use the C (+) button and A (–) button to change the match time setting in one-minute increments.
• You can set a match time of 1 to 99 minutes. There is also a «– –» setting which means that the match time is
unlimited.
• Holding down the C or A button scrolls at high speed.
You can set start times for up to 10 intervals, which are counted
3. After the time setting is the way you want, press the R button to exit the setting screen.
down in sequence one after the other. You can configure the timer
To time a match
interval sequence to repeat up to 100 times.
• Press the C button to start timing of the match in the upper and lower display areas («Football» flashes on the
• When the timer sequence reaches the end of the final interval, it
restarts from the beginning of the first interval.
display).
• Press the C button again to stop match timing in the upper display area («Football» stops flashing). The match
timing in the lower display area continues at this time. Pressing C again will resume timing in the upper display
area.
• The stopwatch will beep for 10 seconds when the preset match time is reached in the lower display area. The
lower display area will start measuring elapsed time from zero and the upper display area will continue measuring
time. The end of stoppage time is reached when the upper display area indicates the preset match time.
• To stop match timing, make sure that match timing is stopped («Football» not flashing), and then hold down the A
button until the watch beeps and the current time appears in the lower display area.
CHART
Timer 1 end,
Timer 2 end,
Timer 2 start
Timer 3 start
BUTTON
OPERATION
DISPLAY
Timer 1 end,
Timer 3 end,
Timer 2 start
Timer 1 start
CARE OF YOUR STOPWATCH
• This stopwatch is water resistant up to five bars (atmospheres), which means you can use it in the rain or in
areas where splashing water is present.
Never, however, operate the buttons of the stopwatch while it is immersed in water.
• You should have the rubber seal that keeps out water and dust replaced every 2 to 3 years.
• Should moisture appear inside the stopwatch, have it checked immediately by your dealer or a CASIO distributor.
SPECIFICATIONS
Accuracy at a normal temperature (TIME): ±30 seconds per month
Display capacity:
• Time Display: Hour, minutes, seconds, am/pm, year, month, day and day of the week
Calendar system: Pre-programmed until the year 2099
• Stopwatch Display:
Measuring capacity: (Total elapsed time display) 9 hours 59 minutes 59.999 seconds
Measuring unit: 1/1000 second
Measuring modes: Net time, lap time, split time, 1st-100th place time, lap counter (up to 99)
Repeat Setting
Memory capacity: 2 sets of 100 records each
Timer
10 intervals
Measuring capacity: 59 minutes 59 seconds
Measuring unit: 1 second
Number of repeats: 100
Beeper duration: 10 seconds
Alarm
Number of alarms: 12
Beeper duration: 10 seconds
Setting unit: 1 minute
Counter
Standard Counter: 0 to 99999
Stopwatch Counter: 0 to 99999
Measuring capacity: 59 minutes 59 seconds
Dual Counter: 0 to 99999
Football Stopwatch
Measuring capacity: 59 minutes 59 seconds
Measuring unit: 1 second
Beeper duration: 10 seconds
Battery: One lithium battery (type: CR2032)
Approx. 5 years continuous operation on type CR2032
(includes an average of 30 presses of button per day.)
Operating Temperature: 0°C to 40°C (32°F to 104°F)
Stopwatch Counter
Dual Counter
Counter
Stopwatch
Counter 1
Counter 2
START
STOP
START
STOP
RESET
0
(a)
(a)
(a + b)
a
b
(Stoppage time)
(STOPWATCH): 99.9988%
(Lap time display) 59 minutes 59.999 seconds
(Split time display) 9 hours 59 minutes 59.999 seconds
MA0809-EA
HS-80TW
ENGLISH
|
Time Display |
Stopwatch Display |
Day of the week
|
Lap counter |
Split time |
|||
|
Year |
||||
|
Month |
Lap time |
|||
|
PM |
Day |
|||
|
Second |
||||
|
Hour |
Total |
|||
|
Hours |
Seconds |
|||
|
elapsed time |
||||
|
Minutes |
||||
|
Minute |
1/1000th of a second |
|||
|
Timekeeping Mode |
Stopwatch Mode |
Recall Mode |
|
Football Stopwatch |
Counter Mode |
Alarm Mode |
Timer Mode |
|||||
|
Mode |
||||||||
•A sticker is affixed to the glass of this stopwatch when you purchase it. Be sure to remove the sticker before using the stopwatch.
•Depending on its model, the configuration of your stopwatch may differ somewhat from that shown in the illustration.
OPERATING PRECAUTIONS
•A battery is installed at the factory. Have it replaced by a CASIO distributor at the first sign of low power (dim display).
•Do not use or store this stopwatch in areas exposed to temperature extremes, strong magnetism, strong vibration, or strong impact.
•Heat can shorten battery life and cause malfunction. Keep the stopwatch away from heaters and direct sunlight when using it.
•Never try to take the stopwatch apart. Doing so can cause malfunction.
•To clean the stopwatch, use a soft, dry cloth or a cloth moistened in a solution of water and a mild neutral detergent. Wring out all excess moisture from the cloth. Never use thinner, benzene, alcohol or other similar agents.
•Be sure to keep all user documentation handy for future reference.
CASIO COMPUTER CO., LTD. assumes no responsibility for any loss, or any claims by third parties that may arise through the use of this stopwatch.
GENERAL GUIDE
Cbutton …. Starts and stops timing.
Bbutton …. Cycles between: Stopwatch, Timer, Alarm, Counter, Football Stopwatch, and Timekeeping Modes. Abutton ….. Performs lap/split and reset operation (stopwatch beeps).
Rbutton ….. Recalls lap/split time records and total elapsed time.
|
SPLIT TIME AND LAP TIME |
1ST SPLIT |
2ND SPLIT |
|||||||
|
Split time (SPLIT) is the time |
|||||||||
|
elapsed from the start to a |
3RD SPLIT |
||||||||
|
specific point. |
|||||||||
|
START |
|||||||||
|
Lap time (LAP) is the time |
1ST LAP |
2ND LAP |
|||||||
|
elapsed from one point to another |
|||||||||
|
or for one lap around a track. |
3RD LAP |
||||||||
|
START |
|||||||||
USING THE STOPWATCH
The stopwatch beeps to signal C and Abutton operations.
Working range
The total elapsed time and split time display is limited to 9 hours 59 minutes 59.999 seconds. Lap time display is limited to 59 minutes 59.999 seconds.
Thereafter it will be reset and started again. The lap counter starts from 1 to 99 and repeats from 0.
While the stopwatch is reset to all zeros, holding down the A button will toggle the lower display area between display of lap time and split time.
•100 (indicating the number of laps) will flash on the display when memory is full (100 lap times in the current group).
NORMAL TIME
|
START |
STOP |
RESET |
||
|
CHART |
0 |
(a) |
||
|
a |
||||
BUTTON
OPERATION
DISPLAY
NET TIME
|
START |
STOP |
START |
STOP |
RESET |
||||
|
CHART |
0 |
(a) |
(a) |
(a + b) |
||||
|
a |
(Stoppage time) |
b |
||||||
|
BUTTON |
||||||||
|
OPERATION |
DISPLAY
After stopping a net time operation by pressing C, you can resume it by pressing C again.
LAP/SPLIT TIMES
|
START |
STOP |
RESET |
||||||
|
1ST LAP |
2ND LAP |
3RD LAP |
||||||
|
0 |
a |
(a) |
b |
(a + b) |
c |
(a + b + c) |
(t) |
|
|
CHART |
1ST SPLIT (a) |
|||||||
|
2ND SPLIT (a+b) |
||||||||
|
3RD SPLIT (a+b+c) |
BUTTON
OPERATION
DISPLAY
MULTIPLE FINISHING TIMES
Example : To record the times of 100 different runners.
|
START |
1ST |
2ND |
99TH |
100TH |
RESET |
|
RUNNER |
RUNNER |
RUNNER |
RUNNER |
||
|
FINISHES |
FINISHES |
FINISHES |
FINISHES |
CHART
BUTTON
OPERATION
Difference between current finisher and previous finisher
DISPLAY
Finishing position
USING THE RECALL MODE
You can use the recall mode to view data in stopwatch memory.
•There is enough memory to store a total of up to 200 records, divided between two record groups of 100 each. If you record 100 times, the 100th time will not be stored in memory until you reset the stopwatch to all zeros.
•Starting a new stopwatch elapsed time operation will cause the older of the two record groups to be deleted automatically in order to make room for a new group of records.
•There is also a FAST LAP record that displays the fastest lap from among all of the lap times currently in memory.
•Record 1 (the newest record) will always be displayed first whenever you press the Rbutton to switch from the Stopwatch Mode to the Recall Mode.
•In the Recall Mode, each press of the B button will toggle the display between record group 1 and record group 2.
•Lap time records in memory can be recalled while an elapsed time operation is in progress or stopped.
•Memory records are cleared whenever a new Stopwatch Mode elapsed time operation is stared by pressing the C button after pressing the A button to reset the stopwatch to all zeros.
Holding down the  or
or  button scrolls at high speed.
SETTING THE CURRENT TIME AND DATE
1.In the Timekeeping Mode, hold down Rfor about two seconds.
2.Press Con a time signal to correct the seconds.
3.Flashing setting can be changed. Press Bto move the flashing.
|
SECONDS |
HOUR |
MINUTES |
YEAR |
|||||||
|
DAY |
MONTH |
4.Use C(+) and A (–) to change the flashing setting.
• Holding down the C or Abutton scrolls at high speed.
5.Press Rto exit the setting mode.
* Year digits can be set up to the year 2099.
12/24-hour Timekeeping
In the Timekeeping Mode, press Cto toggle between 12-hour and 24-hour timekeeping.
In the Timekeeping Mode, hold down the Abutton for about two seconds to toggle the beeper on or off.
Auto Return
The stopwatch returns to the Timekeeping Mode if left unused for a few minutes.
USING THE TIMER
Current time


 Number of repeats


 Timer number
 Timer start time
You can set start times for up to 10 intervals, which are counted down in sequence one after the other. You can configure the timer interval sequence to repeat up to 100 times.
•When the timer sequence reaches the end of the final interval, it restarts from the beginning of the first interval.
|
Example: |
||||
|
Timer 1 |
20’00» |
|||
|
Timer 2 |
10’00» |
|||
|
Timer 3 05’00 |
Timer 1, |
Timer 1 end, |
Timer 2 end, |
|
|
Repeat 2 |
Repeat 1 start |
Timer 2 start |
Timer 3 start |
|
|
Timer 2 end, |
Timer 1 end, |
Timer 3 end, |
||
|
Timer 3 end |
Timer 3 start |
Timer 2 start |
Timer 1 start |
|
To set an interval start time |
|
|
Reset |
Timer Selection |
|
Timer Interval Setting |
|
|
Repeat Setting |
1.In the Timer Mode, hold down the Rbutton for about 2 seconds until the displayed interval time starts to flash.
2.Use the C and Abuttons to scroll through the 10 interval times until the one you want to change is displayed.
•Interval timers count down in sequence from Timer 1 to Timer 10. Any timer with a starting time of 00’00» is skipped.
3.Use the B button to move the flashing between the minute and second digits.
•You can specify a start time within the range of 0 to 59 minutes 59 seconds.
•You can repeat steps 2 and 3 to set other interval timer start times, if you want.
4.Press the Rbutton to move the flashing to the number of repeats settings, and then use the C (+) and A(–) buttons to change the setting to a value from 1 to 100.
5.After the number of repeats setting is the way you want, press the R button to exit the setting screen.
•Holding down C or A in steps 2, 3, or 4 of the above procedure will change the setting at high speed.
USING THE ALARMS
You can set up to 12 alarm times. The stopwatch beeps for 10 seconds when an alarm time is reached.
• Press any button to stop the beeper after it starts to sound.
To turn a specific alarm on or off
1. In the Alarm Mode, use the Cbutton to display the alarm (AL 1 to AL 12) you want.
2. Press the Abutton to toggle the alarm on or off.
To turn all alarms off
In the Alarm Mode, hold down the Abutton until “ALL OFF” appears on the display. This turns off all 12 alarms.
To test the alarm
Hold down the C button to sound the alarm.
To set the alarm time
1.In the Alarm Mode, use the Cbutton to scroll through the alarm screen (1 through 12), until the one you want to set is displayed.
2.Hold down the Rbutton for about 2 seconds until the hour digits of the alarm time start to flash.
3.Use the Bbutton to move the flashing between the hour and minute digits. Use the C(+) and A (–) buttons to change the currently flashing digits.
4.After the setting is the way you want, press the Rbutton to exit the setting screen.
•The alarm will not sound if the time on a flashing setting screen arrives.
•The stopwatch will exit the setting screen automatically if you do not perform any operation for two or three minutes.
•Displaying the setting screen for an alarm will cause that alarm to turn on.
USING THE COUNTER
•The stopwatch is equipped with three types of counters, which can be used to maintain a count from 0 to 99,999.
•Each press of the R button cycles through the three counter types described below. Note that you can switch between counter types only when the current counter is reset to zero.
Hold down the  button for about two seconds to reset the count to zero.
|
Standard Counter |
Stopwatch Counter |
Dual Counter |
|||||||||||||
Standard Counter
|
C button ………… |
counter (+) |
|
Abutton …………. |
counter (–) |
|
R button hold ….. |
counter reset |
Stopwatch Counter
Stopwatch: 00’00» to 59’59»
|
C button ………… |
counter (+) |
|
Abutton …………. |
stopwatch start/stop |
|
R button hold ….. |
counter reset, stopwatch reset |
|
Dual Counter |
|
|
C button ………… |
counter 1 (+) |
|
Abutton …………. |
counter 2 (+) |
|
R button hold ….. |
counter 1 reset, counter 2 reset |
FOOTBALL STOPWATCH
This stopwatch can be used to time a football match, and even allows for stoppage time.
To set the match time
1.In the Football Stopwatch Mode, hold down the R button for about two seconds until the minute digits of the match time start to flash. This is the setting screen.
2.Use the C(+) button and A(–) button to change the match time setting in one-minute increments.
•You can set a match time of 1 to 99 minutes. There is also a “– –” setting which means that the match time is unlimited.
•Holding down the Cor Abutton scrolls at high speed.
3.After the time setting is the way you want, press the Rbutton to exit the setting screen.
To time a match
•Press the C button to start timing of the match in the upper and lower display areas (“Football” flashes on the display).
•Press the C button again to stop match timing in the upper display area (“Football” stops flashing). The match timing in the lower display area continues at this time. Pressing C again will resume timing in the upper display area.
•The stopwatch will beep for 10 seconds when the preset match time is reached in the lower display area. The lower display area will start measuring elapsed time from zero and the upper display area will continue measuring time. The end of stoppage time is reached when the upper display area indicates the preset match time.
•To stop match timing, make sure that match timing is stopped (“Football” not flashing), and then hold down the A button until the watch beeps and the current time appears in the lower display area.
|
START |
STOP |
START |
STOP |
RESET |
|
|
CHART |
0 |
(a) |
(a) |
(a + b) |
|
|
a |
(Stoppage time) |
b |
|||
|
BUTTON |
|||||
|
OPERATION |
|||||
|
DISPLAY |
CARE OF YOUR STOPWATCH
•This stopwatch is water resistant up to five bars (atmospheres), which means you can use it in the rain or in areas where splashing water is present.
Never, however, operate the buttons of the stopwatch while it is immersed in water.
•You should have the rubber seal that keeps out water and dust replaced every 2 to 3 years.
•Should moisture appear inside the stopwatch, have it checked immediately by your dealer or a CASIO distributor.
SPECIFICATIONS
Accuracy at a normal temperature (TIME): ±30 seconds per month (STOPWATCH): 99.9988%
Display capacity:
•Time Display: Hour, minutes, seconds, am/pm, year, month, day and day of the week Calendar system: Pre-programmed until the year 2099
•Stopwatch Display:
Measuring capacity: (Total elapsed time display) 9 hours 59 minutes 59.999 seconds (Lap time display) 59 minutes 59.999 seconds
(Split time display) 9 hours 59 minutes 59.999 seconds
Measuring unit: 1/1000 second
Measuring modes: Net time, lap time, split time, 1st-100th place time, lap counter (up to 99) Memory capacity: 2 sets of 100 records each
Timer
10 intervals
Measuring capacity: 59 minutes 59 seconds Measuring unit: 1 second
Number of repeats: 100 Beeper duration: 10 seconds
Alarm
Number of alarms: 12 Beeper duration: 10 seconds Setting unit: 1 minute
Counter
Standard Counter: 0 to 99999 Stopwatch Counter: 0 to 99999
Measuring capacity: 59 minutes 59 seconds
Dual Counter: 0 to 99999
Football Stopwatch
Measuring capacity: 59 minutes 59 seconds Measuring unit: 1 second
Beeper duration: 10 seconds
Battery: One lithium battery (type: CR2032)
Approx. 5 years continuous operation on type CR2032 (includes an average of 30 presses of button per day.)
Operating Temperature: 0°C to 40°C (32°F to 104°F)
ENGLISH
Stopwatch Mode
Recall Mode
Alarm Mode
Counter Mode
Football Stopwatch
Mode
Timekeeping Mode
Timer Mode
Year
Month
Day
Second
Seconds
Minute
Time Display
Stopwatch Display
Minutes
Hour
Hours
Day of the week
PM
Lap counter
Split time
Lap time
1/1000th of a second
Total
elapsed time
•
A sticker is affixed to the glass of this stopwatch when you purchase it. Be sure to remove the sticker before using
the stopwatch.
•
Depending on its model, the configuration of your stopwatch may differ somewhat from that shown in the
illustration.
OPERATING PRECAUTIONS
•
A battery is installed at the factory. Have it replaced by a CASIO distributor at the first sign of low power (dim
display).
•
Do not use or store this stopwatch in areas exposed to temperature extremes, strong magnetism, strong
vibration, or strong impact.
•
Heat can shorten battery life and cause malfunction. Keep the stopwatch away from heaters and direct sunlight
when using it.
•
Never try to take the stopwatch apart. Doing so can cause malfunction.
•
To clean the stopwatch, use a soft, dry cloth or a cloth moistened in a solution of water and a mild neutral
detergent. Wring out all excess moisture from the cloth. Never use thinner, benzene, alcohol or other similar
agents.
•
Be sure to keep all user documentation handy for future reference.
CASIO COMPUTER CO., LTD. assumes no responsibility for any loss, or any claims by third parties that may
arise through the use of this stopwatch.
GENERAL GUIDE
C
button …. Starts and stops timing.
B
button …. Cycles between: Stopwatch, Timer, Alarm, Counter, Football Stopwatch, and Timekeeping Modes.
A
button ….. Performs lap/split and reset operation (stopwatch beeps).
R
button ….. Recalls lap/split time records and total elapsed time.
SPLIT TIME AND LAP TIME
Split time (SPLIT) is the time
elapsed from the start to a
specific point.
Lap time (LAP) is the time
elapsed from one point to another
or for one lap around a track.
START
1ST SPLIT
2ND SPLIT
3RD SPLIT
START
1ST LAP
2ND LAP
3RD LAP
USING THE STOPWATCH
The stopwatch beeps to signal
C
and
A
button operations.
Working range
The total elapsed time and split time display is limited to 9 hours 59 minutes 59.999 seconds. Lap time display is
limited to 59 minutes 59.999 seconds.
Thereafter it will be reset and started again. The lap counter starts from 1 to 99 and repeats from 0.
While the stopwatch is reset to all zeros, holding down the
A
button will toggle the lower display area between
display of lap time and split time.
•
100 (indicating the number of laps) will flash on the display when memory is full (100 lap times in the current
group).
SETTING THE CURRENT TIME AND DATE
MUTE
1. In the Timekeeping Mode, hold down
R
for about two seconds.
2. Press
C
on a time signal to correct the seconds.
3. Flashing setting can be changed. Press
B
to move the flashing.
SECONDS
HOUR
MINUTES
YEAR
MONTH
DAY
4. Use
C
(+) and
A
(–) to change the flashing setting.
•
Holding down the
C
or
A
button scrolls at high speed.
5. Press
R
to exit the setting mode.
*
Year digits can be set up to the year 2099.
12/24-hour Timekeeping
In the Timekeeping Mode, press
C
to toggle between 12-hour and 24-hour
timekeeping.
Beeper On/Off
In the Timekeeping Mode, hold down the
A
button for about two seconds to toggle the beeper on or off.
Auto Return
The stopwatch returns to the Timekeeping Mode if left unused for a few minutes.
USING THE TIMER
Current time
Number of
repeats
Timer number
Timer start time
You can set start times for up to 10 intervals, which are counted
down in sequence one after the other. You can configure the timer
interval sequence to repeat up to 100 times.
•
When the timer sequence reaches the end of the final interval, it
restarts from the beginning of the first interval.
Timer 1,
Repeat 1 start
Example:
Timer 1 20’00»
Timer 2 10’00»
Timer 3 05’00
Repeat 2
Timer 1 end,
Timer 2 start
Timer 2 end,
Timer 3 start
Timer 2 end,
Timer 3 start
Timer 3 end
Timer 1 end,
Timer 2 start
Timer 3 end,
Timer 1 start
To set an interval start time
Reset
Timer Selection
Timer Interval Setting
Repeat Setting
1. In the Timer Mode, hold down the
R
button for about 2 seconds until the displayed interval time starts to flash.
2. Use the
C
and
A
buttons to scroll through the 10 interval times until the one you want to change is displayed.
•
Interval timers count down in sequence from Timer 1 to Timer 10. Any timer with a starting time of 00’00» is
skipped.
3. Use the
B
button to move the flashing between the minute and second digits.
•
You can specify a start time within the range of 0 to 59 minutes 59 seconds.
•
You can repeat steps 2 and 3 to set other interval timer start times, if you want.
4. Press the
R
button to move the flashing to the number of repeats settings, and then use the
C
(+) and
A
(–)
buttons to change the setting to a value from 1 to 100.
5. After the number of repeats setting is the way you want, press the
R
button to exit the setting screen.
•
Holding down
C
or
A
in steps 2, 3, or 4 of the above procedure will change the setting at high speed.
USING THE ALARMS
You can set up to 12 alarm times. The stopwatch beeps for 10 seconds when
an alarm time is reached.
•
Press any button to stop the beeper after it starts to sound.
To turn a specific alarm on or off
1. In the Alarm Mode, use the
C
button to display the alarm (AL 1 to AL 12)
you want.
2. Press the
A
button to toggle the alarm on or off.
To turn all alarms off
In the Alarm Mode, hold down the
A
button until “ALL OFF” appears on the
display. This turns off all 12 alarms.
To test the alarm
Hold down the
C
button to sound the alarm.
To set the alarm time
1. In the Alarm Mode, use the
C
button to scroll through the alarm screen
(1 through 12), until the one you want to set is displayed.
2. Hold down the
R
button for about 2 seconds until the hour digits of the alarm time start to flash.
3. Use the
B
button to move the flashing between the hour and minute digits. Use the
C
(+) and
A
(–) buttons to
change the currently flashing digits.
4. After the setting is the way you want, press the
R
button to exit the setting screen.
•
The alarm will not sound if the time on a flashing setting screen arrives.
•
The stopwatch will exit the setting screen automatically if you do not perform any operation for two or three minutes.
•
Displaying the setting screen for an alarm will cause that alarm to turn on.
USING THE COUNTER
•
The stopwatch is equipped with three types of counters, which can be used to maintain a count from 0 to 99,999.
•
Each press of the
R
button cycles through the three counter types described below. Note that you can switch
between counter types only when the current counter is reset to zero.
Hold down the button for about two seconds to reset the count to zero.
Standard Counter
Stopwatch Counter
Dual Counter
Counter
Counter
Stopwatch
Counter 1
Counter 2
NORMAL TIME
START
STOP
RESET
CHART
BUTTON
OPERATION
DISPLAY
0
a
(a)
NET TIME
0
a
b
(a)
(a)
(a + b)
START
STOP
START
STOP
RESET
CHART
BUTTON
OPERATION
DISPLAY
(Stoppage time)
After stopping a net time operation by pressing
C
, you can resume it by pressing
C
again.
LAP/SPLIT TIMES
0
a
(a)
b
(a + b)
c (a + b + c)
(t)
START
STOP
RESET
CHART
BUTTON
OPERATION
DISPLAY
1ST LAP
2ND LAP
3RD LAP
1ST SPLIT (a)
2ND SPLIT (a+b)
3RD SPLIT (a+b+c)
MULTIPLE FINISHING TIMES
Example : To record the times of 100 different runners.
CHART
BUTTON
OPERATION
DISPLAY
Difference between current finisher
and previous finisher
Finishing position
START
1ST
RUNNER
FINISHES
2ND
RUNNER
FINISHES
99TH
RUNNER
FINISHES
100TH
RUNNER
FINISHES
RESET
USING THE RECALL MODE
You can use the recall mode to view data in stopwatch memory.
•
There is enough memory to store a total of up to 200 records, divided between two record groups of 100 each. If
you record 100 times, the 100th time will not be stored in memory until you reset the stopwatch to all zeros.
•
Starting a new stopwatch elapsed time operation will cause the older of the two record groups to be deleted
automatically in order to make room for a new group of records.
•
There is also a FAST LAP record that displays the fastest lap from among all of the lap times currently in memory.
•
Record 1 (the newest record) will always be displayed first whenever you press the
R
button to switch from the
Stopwatch Mode to the Recall Mode.
•
In the Recall Mode, each press of the
B
button will toggle the display between record group 1 and record group
2.
•
Lap time records in memory can be recalled while an elapsed time operation is in progress or stopped.
•
Memory records are cleared whenever a new Stopwatch Mode elapsed time operation is stared by pressing the
C
button after pressing the
A
button to reset the stopwatch to all zeros.
Holding down the or button scrolls at high speed.
Standard Counter
C
button ………… counter (+)
A
button …………. counter (–)
R
button hold ….. counter reset
Stopwatch Counter
Stopwatch: 00’00» to 59’59»
C
button ………… counter (+)
A
button …………. stopwatch start/stop
R
button hold ….. counter reset, stopwatch reset
Dual Counter
C
button ………… counter 1 (+)
A
button …………. counter 2 (+)
R
button hold ….. counter 1 reset, counter 2 reset
FOOTBALL STOPWATCH
This stopwatch can be used to time a football match, and even allows for stoppage time.
To set the match time
1. In the Football Stopwatch Mode, hold down the
R
button for about two seconds until the minute digits of the
match time start to flash. This is the setting screen.
2. Use the
C
(+) button and
A
(–) button to change the match time setting in one-minute increments.
•
You can set a match time of 1 to 99 minutes. There is also a “– –” setting which means that the match time is
unlimited.
•
Holding down the
C
or
A
button scrolls at high speed.
3. After the time setting is the way you want, press the
R
button to exit the setting screen.
To time a match
•
Press the
C
button to start timing of the match in the upper and lower display areas (“Football” flashes on the
display).
•
Press the
C
button again to stop match timing in the upper display area (“Football” stops flashing). The match
timing in the lower display area continues at this time. Pressing
C
again will resume timing in the upper display
area.
•
The stopwatch will beep for 10 seconds when the preset match time is reached in the lower display area. The
lower display area will start measuring elapsed time from zero and the upper display area will continue measuring
time. The end of stoppage time is reached when the upper display area indicates the preset match time.
•
To stop match timing, make sure that match timing is stopped (“Football” not flashing), and then hold down the
A
button until the watch beeps and the current time appears in the lower display area.
0
a
b
(a)
(a)
(a + b)
START
STOP
START
STOP
RESET
CHART
BUTTON
OPERATION
DISPLAY
(Stoppage time)
CARE OF YOUR STOPWATCH
•
This stopwatch is water resistant up to five bars (atmospheres), which means you can use it in the rain or in
areas where splashing water is present.
Never, however, operate the buttons of the stopwatch while it is immersed in water.
•
You should have the rubber seal that keeps out water and dust replaced every 2 to 3 years.
•
Should moisture appear inside the stopwatch, have it checked immediately by your dealer or a CASIO distributor.
SPECIFICATIONS
Accuracy at a normal temperature (TIME):
±
30 seconds per month
(STOPWATCH):
99.9988%
Display capacity:
•
Time Display:
Hour, minutes, seconds, am/pm, year, month, day and day of the week
Calendar system:
Pre-programmed until the year 2099
•
Stopwatch Display:
Measuring capacity:
(Total elapsed time display) 9 hours 59 minutes 59.999 seconds
(Lap time display) 59 minutes 59.999 seconds
(Split time display) 9 hours 59 minutes 59.999 seconds
Measuring unit:
1/1000 second
Measuring modes:
Net time, lap time, split time, 1st-100th place time, lap counter (up to 99)
Memory capacity:
2 sets of 100 records each
Timer
10 intervals
Measuring capacity:
59 minutes 59 seconds
Measuring unit:
1 second
Number of repeats:
100
Beeper duration:
10 seconds
Alarm
Number of alarms:
12
Beeper duration:
10 seconds
Setting unit:
1 minute
Counter
Standard Counter:
0 to 99999
Stopwatch Counter:
0 to 99999
Measuring capacity: 59 minutes 59 seconds
Dual Counter:
0 to 99999
Football Stopwatch
Measuring capacity:
59 minutes 59 seconds
Measuring unit:
1 second
Beeper duration:
10 seconds
Battery:
One lithium battery (type: CR2032)
Approx. 5 years continuous operation on type CR2032
(includes an average of 30 presses of button per day.)
Operating Temperature:
0
°
C to 40
°
C (32
°
F to 104
°
F)
MA0809-EA
HS-80TW