
Всем привет! На связи Александр Белый, автор блога radiohooligan.ru! )
Сегодня я расскажу о то, как пользоваться самой известной программой, которая используется для работы приемника RTL-SDR, которая называется SDRSharp. О том, что такое SDR приемник я рассказывал в одной из прошлых статей https://radiohooligan.ru/sdr-priemnik/
Устанавливать SDRSharp будем на лицензионную WINDOWS 10, на которой уже изначально должен быть установлен свежий Microsoft Net (программа работает с Net 4.6 или более поздней версией). Последнюю версию Microsoft Net можно скачать с сайта https://www.microsoft.com/en-us/download/details.aspx?id=55167.
Также может потребоваться установка среды Visual C++, устанавливаем вот отсюда https://visualstudio.microsoft.com/ru/thank-you-downloading-visual-studio/?sku=Community&rel=16#install
Оба сайта официальные от Microsoft. Можно смело открывать и скачивать.
Внимание: программа SDRSharp не будет работать на WINDOWS XP.
Для того чтобы скачать программу SDRSharp переходим на официальный сайт разработчика https://airspy.com/download/

Далее нажимаем кнопочку скачать, в папку загрузки скачается архив под названием sdrsharp-x86.zip.
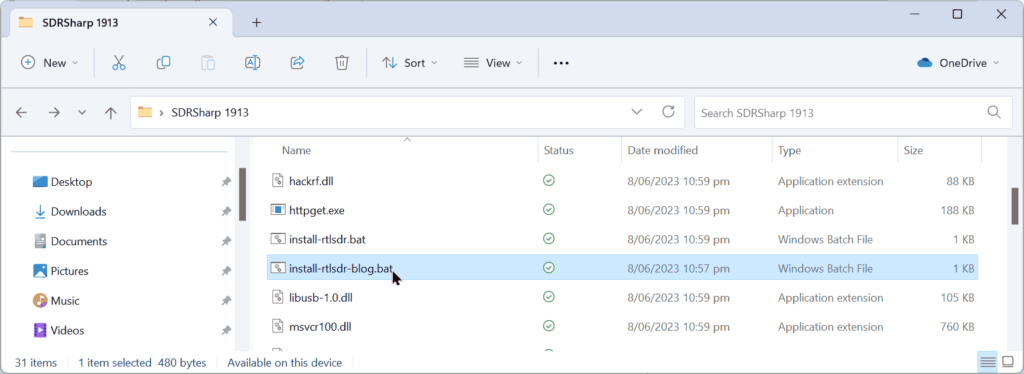
Далее создаем папку с названием sdrsharp на диске(C) и распакуем туда файл sdrsharp-x86.zip (не создавайте папку в Program Files — будут проблемы с запуском). В распакованной папке находим файл install-rtlsdr.bat

Дважды щелкаем по нему левой кнопкой мыши: на экране запустится командная строка и закроется автоматически в течении нескольких секунд.
В папку с распакованной программой появятся файлы rtlsdr.dll и zadig.exe


В случае если эти файлы не появились — попробуйте отключить антивирус на время установки или вы разместили папку с распакованной программой в директории Program Files.
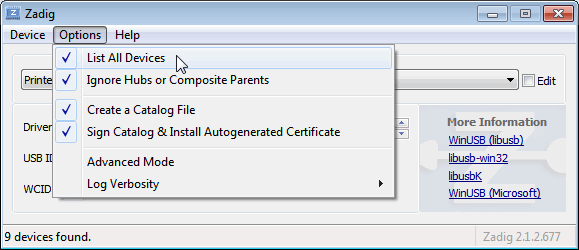
Далее вставляем SDR приемник в USB разъем — у меня работает в 3.0 и запускаем файл Zadig.exe через правую кнопку мыши от имени администратора. Нажимаем Options, устанавливаем галочку в строке List All Devices

Далее в строке Device выбираем Bulk-In, Interface (Interface 0), (могут выпадать и другие устройства такие как RTL2832U или RTL2832UHIDIR их тоже можно выбирать), в строке Driver после зеленой стрелки должно стоять WinUSB, в строке USB ID должно стоять 0BDA 2838 00

Нажимаем кнопку Replace Driver, можем получить сообщение от системы , что издатель неизвестен и файл может, что то повредить :), игнорируем сообщение жмем «установить».

В папке с распакованной программой SDRSharp находим файл SDRSharp.exe и двойным щелчком левой кнопки мыши запускаем его:

Программа запустится и вы увидите примерно вот такое:

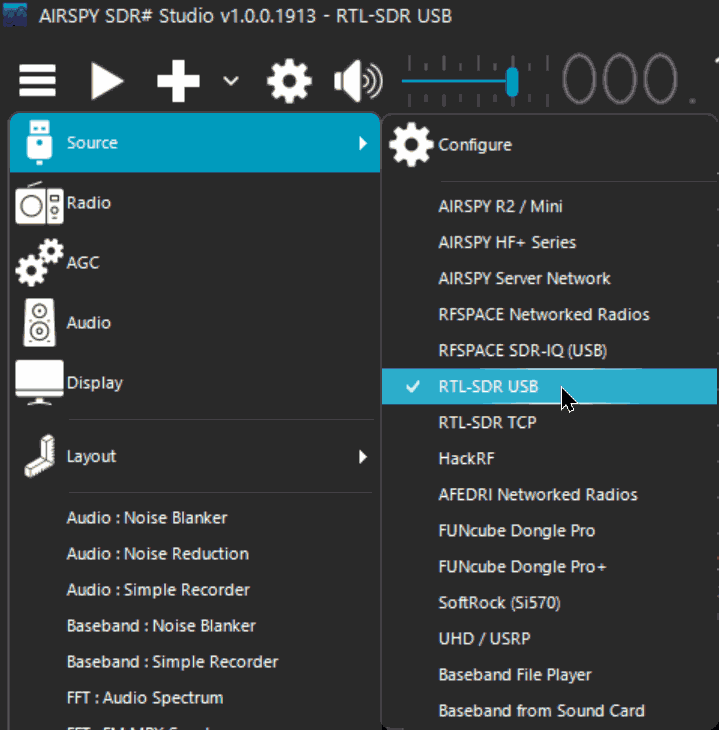
Под строкой Source нажимаем маленький треугольник выбора устройств и выбираем наше устройство RTL-SDR(USB).
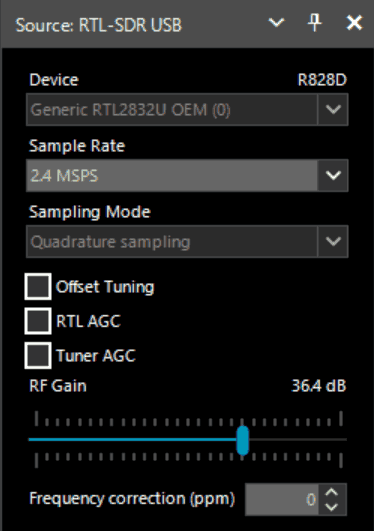
Устройство выбрано — теперь нажимаем зубастое 🙂 колесико вверху слева: выходит окошко RTL-SDR Controller — настраиваем как на картинке:

Все ) Остальные функции программы более подробно рассмотрим в следующей статье.
Нажимаем кнопку треугольник слева вверху и запускаем программу:

На этом у меня все! Спасибо за просмотр. Всем хорошего настроения, здоровья близким! До скорых интересных, следующих встреч:)!
Пока пока!
Здесь приведен перевод руководства по запуску недорогого приемника Software-Defined Radio, RTL-SDR (RTL2832U), перевод [1]. Проще всего установить и запустить этот приемник на Windows. Если у Вас встретились какие-то проблемы в инсталляции всех системы, пожалуйста см. ниже раздел «Решение проблем». Также кратко будут рассмотрены вопросы быстрого старта под операционными системами Linux и OSX.
Вот так выглядит плата приемника внутри:

Имейте в виду, что RTL-SDR не является устройством типа «подключи и работай» (plug and play). Поэтому Вам потребуется достаточная квалификация для выполнения базовых операций на PC для распаковки архивов, инсталляции программного обеспечения, перемещения и копирования файлов. Кроме того, для новичка управляющая программа будет поначалу выглядеть довольно сложной, так что требуется некая мотивация к изучению нового программного обеспечения.
Система состоит из программы, работающей на компьютере (в этой статье описана установка SDRsharp под Windows 7 и более свежей системы), и аппаратного модуля, подключаемого через USB. На aliexpress.com можно купить наборы для его сборки, а также можно купить готовые модули. Также описана установка других программ, которые могут работать под устаревшей уже системой Windows XP.
Здесь приведены строки для поиска в google.
DIY KIT rtl2832 SDR receiver site:aliexpress.com
В ответ на этот запрос получите ссылки на наборы для сборки недорого приемника. Цены начинаются с $25.
100KHz-1.7GHz all band radio RTL-SDR receiver RTL2832+R820T RTL-SDR site:aliexpress.com
В ответ на этот запрос получите ссылки на готовое устройство. Цены начинаются с $37.
HackRF One RTL SDR Software Defined Radio site:aliexpress.com
В ответ на этот запрос будут появляться ссылки на более дорогие устройства, по цене от $192 и выше.
Для ссылок на донглы, которые можно применить в качестве приемника SDR, а также антенны и дополнительное оборудование, см. [2, 3, 4, 6]. Обзор параметров различных приемников SDR см. в статье [8].
Обычно двухядерные процессоры PC позволяют комфортно работать с программным обеспечением SDR. Некоторые утилиты командной строки и декодеры ADS-B могут работать на менее мощной аппаратуре.
Чтобы получить удовлетворительный прием, понадобится достойная антенна (см. [2]). Неплохо для быстрого старта работает вариант из 2 телескопических антенн (рожки). Простая антенна фиксированной длины с центральной удлинительной катушкой в виде спирали (обычно идет в комплекте с недорогими устройствами) позволит принимать только близко расположенные радиостанции. Большие широкополосные внешние антенны наподобие [3, 4] позволяют значительно повысить качество приема.
Для пользователей устройств RTL-SDR Blog V3: см. [5] для получения указаний по запуску, настройке функциям разъема расширения.
[Установка программы SDR# (SDRSharp)]
SDRSharp наиболее часто используемая SDR-программа под Windows. Её работа проверялась под Windows 10, Windows 8, Windows 7 версий 32/64 бита. Есть старые версии SDRSharp, работающие под Windows XP.
Я пробовал установку SDRSharp под Windows 7 версии 64 бита вместе с приемником [6], который купил на aliexpress.com. Ниже приведены основные шаги по установке.
1. Оригинальное руководство [1] говорит, что для работы SDRSharp на Windows требуется наличие библиотек .NET 4.6 (пакет .NET 4.6 redistributable), и рекомендуется пройти по этой ссылке и установить пакет. Однако я на Windows 7 обошелся без этого шага; возможно, что причина в том, что ранее была установлена программа, которая уже подтянула эту библиотеку. Большинство PC с Windows 10 уже имеют установленный этот пакет, но более старые системы могут все-таки потребовать установку .NET 4.6 redistributable.
Внимание для пользователей Windows XP, если таковые еще остались: библиотека .NET 4.6 не совместима с Windows XP, поэтому свежая версия SDRSharp на Windows XP работать не будет. Если у Вас XP, то прокрутите вниз эту страничку, и найдите руководство по установке HDSDR или SDR-Console. Также имейте в виду, что некоторые компьютеры могут потребовать установки библиотеки Visual C++ Runtime, если она еще не установлена (мне на Windows 7 это не понадобилось).
2. Зайдите на сайт www.airspy.com, и кликните на кнопку downloads в верхнем меню сайта. Найдите заголовок «SDR Software Package», и кликните на кнопку для загрузки sdrsharp-x86.zip.
3. В архиве нет инсталлятора программы, поэтому распакуйте загруженный архив в папку на диске, где должна работать программа. Я создал папку SDRSharp на диске D: (D:\SDRSharp), и распаковал туда содержимое архива.
Многие пользователи на этом шаге допускают ошибку, запуская файлы прямо изнутри архива. Другая распространенная ошибка — попытка создать папку для программы внутри папки %ProgramFiles%, когда недостаточно административных прав. В этом случае Windows может не позволить этого сделать (с ограничением прав доступа NTFS эта папка доступна только для чтения). Поэтому, если Вы не уверены в своих действиях, создайте лучше папку в корне диска, или на диске с файловой системой FAT32.
4. Запустите командный файл install-rtlsdr.bat в папке, куда Вы распаковали архив.

В консоли запустится процесс, который загрузит все драйверы, требуемые для работы SDRSharp с RTL-SDR. Через несколько секунд после окончания загрузки окно консоли закроется. Командный файл install-rtlsdr.bat загрузит файлы rtlsdr.dll и zadig.exe, которые окажутся в той же папке где находится сам командный файл. Если файлы не загрузились, то на Вашем PC есть проблема либо с подключением к Интернет, либо с антивирусным ПО, либо проблема с запуском командных файлов. Проверьте, не установлены ли на Вашей папке ограничения «только чтение», особенно если она находится в папке %ProgramFiles%. Если загрузка не получилась, выполните инсталляцию драйвера вручную (врезка ниже).
Здесь кратко описан способ обхода проблемы, когда запуск install-rtlsdr.bat в окне консоли CMD не запускается, и файлы не закачиваются.
1) Скачайте драйверы RTL-SDR, и распакуйте их файлы из папки x32 в папку с программой SDRSharp, заменяя любые файлы, если они уже существуют:
http://sdr.osmocom.org/trac/raw-attachment/wiki/rtl-sdr/RelWithDebInfo.zip
2) Загрузите установщик драйвера zadig, и поместите его в ту же папку с программой SDRSharp:
http://zadig.akeo.ie/downloads/zadig.exe
5. Подключите кабелем USB приемник RTL-SDR к компьютеру с Windows. Система обнаружит новое устройство, подождите несколько секунд, убедившись, что попытка автоматической установки драйвера закончилась неудачно (система не смогла установить драйверы Windows DVB-T). В этом можно убедиться, просматривая список устройств в Менеджере Устройств — приемник RTL-SDR должен отображаться как устройство «Другие устройства -> Bulk-In, Interface» с вопросительными знаками, сигнализирующими об отсутствии драйвера, это нормально:

Если Вы ранее уже устанавливали драйверы DVB-T, которые ранее поставлялись на CD вместе с некоторыми устройствами, то перед выполнением шага 5 сначала удалите эти драйверы.
6. Запустите утилиту zadig.exe с правами администратора (она находится в той же папке с программой SDRSharp). Для этого сделайте правый клик на этом файле и выберите в контекстном меню «Run as administrator»:

Еще одно замечание для любителей Windows XP: свежая версия zadig не поддерживает XP, однако на сайте zadig.akeo.ie есть возможность скачать старые версии (см. ссылку «Other versions»).
7. В меню Options выберите «List All Devices», и убедитесь, что на этом пункте меню стоит галочка.

8. Из выпадающего списка выберите вариант «Bulk-In, Interface (Interface 0)». Убедитесь, что выбран драйвер WinUSB в боксе напротив метки Driver. На некоторых PC можно увидеть что-то наподобие RTL2832UHIDIR или RTL2832U вместо bulk in interface. Это также допустимый выбор. Однако не выбирайте вариант «USB Receiver (Interface 0)». Также убедитесь, что драйвер справа от зеленой стрелки выбран как WinUSB.
9. Кликните Replace Driver.

На некоторых PC может появиться предупреждение о том, что поставщик драйвера не может быть проверен (publisher cannot be verified), но просто согласитесь с установкой, выбрав вариант «Install this driver software anyway» (все равно установить этот драйвер).


Эта операция установит драйверы, необходимые для запуска приемника SDR вместе с программой SDRSharp. Имейте в виду, что Вам может потребоваться повторный запуск zadig.exe, если Вы переключили приемник на другой порт USB, или если Вы хотите использовать совместно два или большее количество приемников.
10. Запустите SDRSharp.exe. Если появится предупреждение, говорящее о том, что Windows защищает Ваш PC, то это ложная тревога. Просто кликните на «more info» (дополнительно) и затем «run anyway (все равно запустить). В выпадающем списке программы Source выберите вариант приемника «RTL-SDR (USB)».

12. Для запуска приема кликните на кнопку Play (треугольничек). Ваш приемник SDR настроен и готов к работе! Вы можете настраивать его на разные частоты приема.
Важное замечание: не забывайте о возможности настроек усиления радио (RF gain settings), которые доступны кликом на кнопке Configure (выглядит как шестеренка) справа от кнопки Play. По умолчанию усиление (RF gain) установлено в 0. Нулевое усиление позволит принимать только самые мощные сигналы, так что подстраивайте усиление до нужного уровня, пока не сможете увидеть другие, более слабые сигналы.

[Дополнительные шаги]
После того, как Вы вдоволь наиграетесь с RTL-SDR и SDRSharp, рекомендуем:
1. Ознакомиться со статьями, посвященными теме SDR: http://www.rtl-sdr.com/category/article/.
2. Попробуйте улучшить антенну. Для самого лучшего приема используйте внешнюю антенну, расположенную на крыше. Оптимальная антенна (разновидность антенны, размеры и форма) всегда привязана к выбранному диапазону принимаемых частот. Однако хорошим выбором для КВ и УКВ будет антенна Discone [4], или для более высоких частот планарная дисковая антенна [7] (PlanarDiskAntennas.pdf).
3. Если Вы используете приемник RTL-SDR для диапазона HF (КВ) с повышающим конвертером частот, таким как SpyVerter, то рекомендуется использовать SDRSharp вместе со специальными драйверами децимации. Это позволит Вам делать зум сигналов в узком диапазоне частот, которые используются в диапазоне HF, без потери разрешающей способности в перестройке по частоте.
4. Ознакомьтесь с возможностью применения различных акcессуаров радио, таких как фильтры, малошумящие усилители (LNA) и антенны.
[Решение проблем]

Убедитесь, что запустили install-rtlsdr.bat, и был успешно загружен файл rtlsdr.dll (он должен находиться в той же самой папке, где находится SDRSharp.exe). Если этот файл не был загружен, проверьте, не настроен ли доступ к этой папке как «read only» (только чтение). Это иногда может произойти, если Вы установили SDRSharp в каталоге, находящемся в папке Program Files — если Вы не обладаете достаточной квалификацией, чтобы настроить права доступа, не устанавливайте программу в этой папке.
Другой причиной этой проблемы может быть случайная установка драйверов WinUSB для Bulk Interface 1 вместо Bulk Interface 0, когда выполнялась установка драйверов начиная с шага 6 (запуск Zadig). Если ошибочно выбрать Bulk Interface 1, то SDRSharp не распознает приемник. Чтобы исправить это запустите Менеджер Устройств (Device Manager) или Устройства и принтеры (Devices and Printers), и удалите драйвер для Bulk Interface 1. После этого повторно выполните установку драйверов, начиная с шага 6.
Примечание переводчика: тоже по непонятной причине столкнулся с ошибкой «No Device Selected», хотя я все делал правильно. Помогли удаление драйвера и повторная его установка.
Длинные, некачественные кабели USB иногда приводят к подобной ошибке. Некоторые порты USB 3.0 также могут быть несовместимы с приемником и давать такую ошибку. Один пользователь столкнулся с такой ошибкой, когда он установил драйвера с помощью утилиты zadig в безопасном режиме Windows (safe mode). И наконец, есть некий малый шанс, что приемник неисправен. Если попытка запуска приемника на нескольких компьютерах приводит к той же ошибке, то следует его заменить или вернуть продавцу.
Ошибка «найдено 1 совместимое устройство, но оно все время занято». Чтобы исправить это, может потребоваться переустановить драйверы с помощью программы zadig, и попробовать сделать установку на каждом порте PC. Вы можете попробовать отключить все другие устройства USB, подключенные к PC. Также некоторые порты USB 3.0 работают некорректно, переключите приемник к порту USB 2.0. У некоторых пользователей получилась установка программного обеспечения в безопасном режиме Windows (safe mode). Убедитесь, что Вы не выбрали «USB Receiver (Interface 0)», когда устанавливали драйвер в программе zadig. Иногда подходящий Bulk in interface может называться наподобие RTL2838UHIDIR или иметь другое название с префиксом RTL. Если Вы не видите подходящего интерфейса Bulk Interface 0, убедитесь, что стоит галочка на пункте меню Options -> List All Devices, и снята галочка с пункта Ignore Hubs or Composite Parents.
В установке драйвера может помочь отключение функции автоматической установки драйверов Windows (automatic driver installation). Инструкции, как запретить эту функцию, можно получить в статье [10]. Эта ошибка может иногда появиться, когда работа компьютера приостанавливалась (переход в режим сна, suspended) – чтобы исправить проблему, отключите и снова подключите приемник.
Обычно эту проблему решит установка библиотеки Visual C++ Runtime (https://www.microsoft.com/en-us/download/details.aspx?id=8328). На большинстве Windows PC это уже установлено, но если у Вас свежая установка Windows, то возможно, что Visual C++ Runtime еще не установлена.
Это нормальный сторонний эффект в дизайне многих донглов приемников RTL-SDR. Эффект можно устранить алгоритмически, если в программном обеспечении SDRSharp поставить галочку в чекбоксе «Correct IQ».
Возможно, что zadig не был запущен с правами администратора. Убедитесь, что Вы запустили zadig с помощью правого клика на файле zadig.exe, и выбора в контекстном меню «Run as Administrator» (запустить с правами учетной записи администратора).
Убедитесь, что стоит галочка в пункте меню «Options -> List All Devices», и также иногда может понадобиться снятие галочки «Ignore Hubs or Composite Parents». Некоторые пользователи сообщают, что они видят какое-то другое название вместо bulk in interface. Название может выглядеть как бренд (марка производителя) Вашего приемника, или иметь префикс RTL. Эта опция также должна работать. В редких случаях может быть, что Вы получили неисправный приемник, который не сможет увидеть Zadig даже при попытках подключения приемника к разным портам USB или даже при попытках установить драйвер на других компьютерах. В таком случае приемник нужно заменить или вернуть продавцу.
Возможно, что Вы загрузили старую версию SDRSharp, в которой нет поддержки rtl-sdr. Проверьте, что загрузили официальную версию с сайта airspy.com.
К сожалению, во многих контроллерах USB 3.0 есть баг, и они не работают с некоторыми устройствами. Обычно порты USB 3.0 работают корректно с RTL-SDR, но есть некоторые контроллеры, которые просто не распознают приемник RTL-SDR. В этом случае используйте для подключения порт USB 2.0.
Возможно так происходит потому, что Вы не распаковали содержимое архива, как это было указано на шаге 3, и запускаете install-rtlsdr.bat прямо из zip-файла. Помните, что сначала нужно распаковать архив, и только потом запускать файлы из той папки, куда они были распакованы.
Так выглядит баг или ошибка в конфигурации некоторых версий Windows, когда невозможно запускать командные файлы. Один из способов обойти проблему — ручная установка драйверов RTL-SDR. Инструкции по такой установке можно найти по ссылке http://www.rtl-sdr.com/manual-installation-of-sdr/, также см. врезку «Ручная установка драйверов RTL-SDR для SDRSharp». Некоторые антивирусные программы также создают проблемы с запуском .bat файлов. В таком случае нужно либо временно запретить работу антивируса, либо сменить его, или выполнить установку драйвера вручную.
Проверьте, увеличили ли вы усиление слайдером RF gain, который доступен, если кликнуть на кнопку Configure (шестеренка). Также для хорошего приема стоковой штыревой антенны может быть недостаточно. Сначала проверьте, как будет работать наружная, высоко размещенная антенна. В некоторых случаях стоковая антенна оказывается отключенной (из-за проблем в кабеле антенны или коннекторах), что придет к очень плохому приему. В редких случаях, если Вы все еще не можете принимать мощный сигнал, который гарантированно принимают другие приемники, то возможно Ваш донгл приемника неисправен, и требует замены или возврата продавцу.
Имейте в виду, что дешевые SDR-приемники имеют очень низкую чувствительность, особенно по входу HF (порядка нескольких единиц или даже десятков милливольт), поэтому прием на ДВ, СВ и КВ диапазонах доступен только на очень качественную (рассчитанную по полосе пропускания на нужный диапазон) антенну. Улучшить чувствительность по диапазону HF для таких приемников можно также с помощью повышающего конвертера (upconverter), выход которого подключен ко входу UV.
См. также вопрос «Не работает антенный вход HF (100 кГц — 30 МГц)».
Это может означать, что у Вас нет корректно установленной библиотеки .NET Framework.
Это может означать, что на Вашем PC нет корректно установленного аудиодрайвера, или у Вас нет любого разрешенного звукового устройства. Если устройство имеется, но запрещено, то разрешите его работу в свойствах звука Панели Управления (раздел Sound Playback, воспроизведение звука).
Проверьте сначала качество кабеля, которым подключен приемник USB, или подключите донгл приемника напрямую в гнездо порта USB, если это возможно. Попробуйте подключение к другому порту. Если проблема остается, то причина в неисправности приемника.
Этот приемник неисправен и требует замены или возврата.
Для качественной работы графического интерфейса (GUI) программного обеспечения SDR наподобие SDRSharp, рекомендуется иметь как минимум двухядерный процессор. Если у Вас современный процессор последней модели, но все еще имеет место высокая загрузка процессора, попробуйте снизить скорость оцифровки (sample rate) до 1 MSPS или меньше, снижая разрешающую способность экрана FFT (или совсем выключите его), выключите Correct IQ и уменьшите порядок фильтра.
Причина в том, сто Вы кликнули в Zadig на кнопке Install после неправильного выбора драйвера из выпадающего списка. Сначала убедитесь, что выбрано корректное устройство RTL-SDR (Bulk-In Interface, Interface 0). Перезаписывает предыдущие драйверы. Чтобы получить старые драйверы обратно, Вы должны это сделать в Менеджере Устройств Windows с помощью функции обновления драйверов (update driver software).
R820T2 и R820T идентичны с точки зрения электроники, за исключением некоторых незначительных изменений в в максимальной ширине фильтра IF (интермодуляционный фильтр?). Различие в фильтрах может быть причиной лучшей производительности R820T2. Таким образом, R820T2 будет выглядеть как R820T на PC, поскольку в цифровой части схемы отличий нет. Вы можете убедиться, что у Вас именно R820T2 по маркировке на чипе.
Это скорее всего почти на 100% неправда. SDRSharp обновляется часто, так что иногда новый zip-файл релиза выпускается ежедневно. Плохо разработанный антивирус иногда ошибочно считает, что любой загруженный файл является вирусом. SDRSharp обновляется так часто, что у разработчиков не хватает возможности оповестить антивирусные компании о том, что вышедшая новая версия программы не является вирусом.
Некоторые пользователи встречаются с этим багом, который вызван выбором «custom scaling level» или «custom sizing options» в Windows. Сброс этой опции обратно в состояние по умолчанию в настройках экрана Windows исправляет этот баг.
Когда SDRSharp закрывается, может появиться ошибка наподобие «An error occurred loading a configuration file: Access to the path ‘C:\Program Files\SDR\s14i12qq.tmp’ is denied. (C:\Program Files\SDR\SDRSharp.exe.Config) —> System.UnauthorizedAccessException: Access to the path ‘C:\Program Files\SDR\s14i12qq.tmp’ is denied.»
Причина этой ошибки обычно в том, что Вы записали файлы SDRSharp в папку, у которой настроены права доступа для текущего пользователя «только чтение» (read only). Для папок Windows, находящихся в «C:\Program Files», это как раз справедливо для обычных пользователей, не обладающих правами администратора. Чтобы исправить ошибку, настройте права на папку, где находятся файлы SDRSharp, либо перенесите файлы в папку, находящуюся в корне диска, например в папку «C:\SDR».
Некоторые продавцы как опцию добавляют к приемнику пульт управления, используемый для переключения каналов TV. Это может быть полезно только если приемник используется по своему оригинальному назначению — как приемник DVB-T HDTV. Этот пульт не нужен, когда донгл приемника используется как SDR.
Усиление может быть настроено в SDRSharp кликом на кнопке Configure, которая выглядит как шестеренка. Когда Вы настраиваете усиление на радиочастоте (RF gain), то старайтесь получить сигнал как можно более мощный, однако при этом старайтесь, чтобы уровень шума был как можно меньше. Начните настройку усиления с малого установленного уровня RF gain, и понемногу увеличивайте его с помощью слайдера gain. Проверьте спектр частоты, чтобы уровень сигнала увеличился, но в то же время уровень шума был достаточно низким. Если шум слишком большой, прекратите увеличивать усиление.
Уровень шума являются частью частотного спектра, где нет полезных сигналов.
Официальный список плагинов SDRSharp можно найти на сайте http://airspy.com/, и неофициальный список можно найти здесь: http://www.rtl-sdr.com/sdrsharp-plugins/.
Попробуйте переключить флешку в другой порт USB, который принадлежит другому контроллеру USB.
У большинства недорогих приемников на чипе RTL2832 есть 2 антенных входа — HF и UV. Первый предназначен для приема в диапазоне относительно низких частот (100 кГц — 30 МГц), и второй на высоких (25 МГц — 1.7 ГГц). Эти 2 входа работают по-разному: HF подает сигнал напрямую на чип RTL2832, при этом перед запуском приема должен быть выбран режим прямой оцифровки (Direct sampling), а вход UV пропускает сигнал через квадратурный модулятор (Quadrature sampling).
Поэтому если вход HF не работает, то скорее всего неправильно выбран режим оцифровки (настройка Sampling Mode). Для изменения режима оцифровки откройте окно диалога RTL-SDR Controller (в программе SDRSharp для этого служит кнопка с шестеренкой «Configure Source»). Когда прием остановлен, в выпадающем меню Sampling Mode доступен выбор режима оцифровки:

Выберите правильный режим оцифровки Sampling Mode. Для антенного входа UV должен быть выбран режим «Quadrature sampling». Для HF должен быть выбран режим или «Direct sampling (I branch)», или «Direct sampling (Q branch)», в зависимости от схемы приемника.
Если у Вас все еще есть проблемы при работе с приемниками SDR, то не стесняйтесь и ищите помощь на форуме rtl-sdr.com (http://www.rtl-sdr.com/forum/).
[Другое программное обеспечение SDR]
Ниже описана установка других программ для SDR, которые будут работать на Windows XP и более новых системах Windows.
1. Купите донгл RTL-SDR. Самые дешевые и лучшие приложения SDR работают на основе донглов R820T/R820T2. По ссылкам [2, 3, 4, 6] можно найти ссылки для покупки донглов и дополнительного оборудования.
2. Подключите Ваш донгл, и не устанавливайте никакое программное обеспечение, поставляемое к ним, но убедитесь, что завершилась процедура plug and play, которая пыталась установить драйверы для устройства. Если Вы уже установили раньше программные драйверы, то сначала их удалите.
3. Перейдите по ссылке http://zadig.akeo.ie/ и загрузите Zadig.
4. В Zadig зайдите в меню Options -> List All Devices и убедитесь, что на этом пункте стоит галочка.
5. Из выпадающего списка выберите «Bulk-In, Interface (Interface 0)». Убедитесь, что в правом боксе выбран драйвер WinUSB. Имейте в виду, что на некоторых PC можно увидеть что-то наподобие RTL2832UHIDIR или RTL2832U вместо интерфейса bulk in. Это также допустимый выбор. Но не выбирайте «USB Receiver (Interface 0)».
6. Кликните на большой кнопке Install Driver (или Replace Driver).
Может появиться предупреждение, что поставщик драйвера не может быть проверен, но все равно подтвердите установку драйвера (Install this driver software anyway). Эта процедура установит драйверы, которые необходимы для работы SDR. Имейте в виду, что может понадобиться повторный запуск zadig.exe, если Вы перенесли подключение приемника на другой порт USB, или если хотите совместно использовать два или большее количество приемников.
7. Загрузите HDSDR с сайта http://hdsdr.de/ (с помощью кнопки download в нижней части страницы сайта).
8. Для установки HDSDR используйте загруженный инсталлер.
9. Загрузите ExtIO_RTL2832U.dll по ссылке https://app.box.com/s/7tpiy8r6qo2bbhdxtt4k (зеркало).
10. Скопируйте файл ExtIO_RTL2832U.dll в папку, куда была установлена программа HDSDR. По умолчанию это папка C:\Program Files (x86)\HDSDR.
11. Запустите программу HDSDR. Может появиться запрос выбрать файл *.dll. Выберите файл ExtIO_RTL2832U.dll, который был скопирован на шаге 10, и кликните Open.

12. Выберите Вашу звуковую карту для вывода кликом на кнопку Soundcard в левом нижнем углу окна программы, или альтернативно нажатием клавиши F5. Здесь важно только установить «RX Output (to Speaker)», когда должны установить вывод звука на динамики, или на канал программного обеспечения вывода звука.

13. Кликните кнопку Bandwidth или альтернативно нажмите F6. Выберите скорость вывода звука (Sampling Rate) 48000 Гц для обычного использования.

14. Нажмите Start или альтернативно нажмите F2. Это запустит прием SDR.
15. Для установки скорости оцифровки RTL-SDR (sample rate), усиления (gain) и коррекции частоты (frequency correction) кликните кнопку ExtIO.

16. Чтобы настроиться на станцию, поменяйте частоту локального генератора (Local Oscillator frequency) на частоту, близкую к интересующей частоте. Затем выполните настройку на нужную частоту кликом на спектре RF, или используя цифры установленной частоты (Tune).

17. Вы можете менять зум в сторону расширения или сжатия спектра с помощью слайдера Zoom, находящийся слева от слова «zoom».

18. Режим можно изменить кликом на кнопках mode.

19. После клика на кнопку режима FM полоса пропускания FM может быть изменена вручную слайдером FM-BW.

20. Чтобы прослушать обычную вещательную станцию FM в хорошем качестве, то нужно поменять скорость выборок звука на 192000 Гц. Выполните это кликом на кнопку Bandwidth, или альтернативно нажмите F6 и затем выберите скорость вывода звука 192000 Гц.
To install SDR-RADIO for the RTL-SDR follow the steps below.
1. Купите донгл RTL-SDR. Самые дешевые и лучшие приложения SDR работают на основе донглов R820T/R820T2. По ссылкам [2, 3, 4, 6] можно найти ссылки для покупки донглов и дополнительного оборудования.
2. Подключите Ваш донгл, и не устанавливайте никакое программное обеспечение, поставляемое к ним, но убедитесь, что завершилась процедура plug and play, которая пыталась установить драйверы для устройства. Если Вы уже установили раньше программные драйверы, то сначала их удалите.
3. Перейдите по ссылке http://zadig.akeo.ie/ и загрузите Zadig.
4. В Zadig зайдите в меню Options -> List All Devices и убедитесь, что на этом пункте стоит галочка.
5. Из выпадающего списка выберите «Bulk-In, Interface (Interface 0)». Убедитесь, что в правом боксе выбран драйвер WinUSB. Имейте в виду, что на некоторых PC можно увидеть что-то наподобие RTL2832UHIDIR или RTL2832U вместо интерфейса bulk in. Это также допустимый выбор. Но не выбирайте «USB Receiver (Interface 0)».
6. Кликните на большой кнопке Install Driver.
Может появиться предупреждение, что поставщик драйвера не может быть проверен, но все равно подтвердите установку драйвера (Install this driver software anyway). Эта процедура установит драйверы, которые необходимы для работы SDR. Имейте в виду, что может понадобиться повторный запуск zadig.exe, если Вы перенесли подключение приемника на другой порт USB, или если хотите совместно использовать два или большее количество приемников.
7. Загрузите установщик программы SDR-RADIO по ссылке http://v2.sdr-radio.com/Software/Download1.
8. Используйте загруженный инсталлятор для установки SDR-RADIO.
9. Загрузите пакет поддержки RTL-SDR по ссылке http://m3ghe.blogspot.com.au/p/adding-support-for-rtl-sdr-usb-dongles.html (зеркало).
10. Распакуйте файлы SDRSourceRTL2832U.dll, rtlsdr.dll и libusb-1.0.dll из папки x64 в папку C:\Program Files\SDR-RADIO-PRO.com. Или если у Вас 32-битный PC, то распакуйте эти файлы из папки x32 в папку C:\Program Files (x86)\SDR-RADIO-PRO.com.
11. Запустите программу SDR-RADIO. Вы увидите приветственное окно «Select Radio» и приглашение «List is empty – add radio definition now?» (список пуст — добавить определение радио) — кликните Yes. Если это приглашение не появилось, то кликните на кнопку +Definitions.
12. В новом окне откройте выпадающее меню Search, и выберите RTL SDR (USB). После этого кликните на RTL-SDR, чтобы добавить его в список определений радиоприемников (Radio Definitions). Кликните OK.
13. Кликните на RTL-SDR, чтобы выбрать его, выберите желаемую скорость выборки и затем кликните Start.

14. Кликните на кнопку Span, и настройте диапазон для полосы пропускания частоты выборки, как это было выбрано на последнем шаге. Это позволит Вам увидеть весь спектр.

15. Чтобы поменять режим приема, используйте левое меню по закладкой frequency (частота). Вы также можете поменять здесь полосу пропускания сигнала. Сигналы NFM обычно шириной 12 кГц, и для вещания FM обычно полоса 192 кГц.

16. Чтобы настроить частоту, используйте бокс настройки VFO в правой части окна. Если Вы не видите это, можно кликнуть на закладку VFO tuning. Также если экран слишком мал, можно увеличить его размер, чтобы были показаны нужные элементы управления. Вы также можете кликнуть на область «водопада» спектра для немедленной настройки на ту частоту, на которую пришелся клик курсора мыши.

17. Убедитесь в правильной настройке усиления с помощью кнопки RF gain в верхней части окна под закладкой Home. По умолчанию задана автоматическая настройка усиления (automatic).

18. Настройте на закладке Display цвета «водопада» спектра, чтобы лучше видеть сигналы и кликните на кнопку Automatic Calibration (автоматическая калибровка) справа вверху.

Предупреждение: программа CubicSDR находится в альфа-версии разработки. Однако сейчас она относительно стабильна в работе и проста в установке.
1. Купите донгл RTL-SDR. Самые дешевые и лучшие приложения SDR работают на основе донглов R820T/R820T2. По ссылкам [2, 3, 4, 6] можно найти ссылки для покупки донглов и дополнительного оборудования.
2. Подключите Ваш донгл, и не устанавливайте никакое программное обеспечение, поставляемое к ним, но убедитесь, что завершилась процедура plug and play, которая пыталась установить драйверы для устройства. Если Вы уже установили раньше программные драйверы, то сначала их удалите.
3. Перейдите по ссылке http://zadig.akeo.ie/ и загрузите Zadig.
4. В Zadig зайдите в меню Options -> List All Devices и убедитесь, что на этом пункте стоит галочка.
5. Из выпадающего списка выберите «Bulk-In, Interface (Interface 0)». Убедитесь, что в правом боксе выбран драйвер WinUSB. Имейте в виду, что на некоторых PC можно увидеть что-то наподобие RTL2832UHIDIR или RTL2832U вместо интерфейса bulk in. Это также допустимый выбор. Но не выбирайте «USB Receiver (Interface 0)».
6. Кликните на большой кнопке Install Driver.
Может появиться предупреждение, что поставщик драйвера не может быть проверен, но все равно подтвердите установку драйвера (Install this driver software anyway). Эта процедура установит драйверы, которые необходимы для работы SDR. Имейте в виду, что может понадобиться повторный запуск zadig.exe, если Вы перенесли подключение приемника на другой порт USB, или если хотите совместно использовать два или большее количество приемников.
7. Зайдите на сайт cubicsdr.com и откройте страницу загрузок (downloads). Найдите ссылку загрузки последней версии. Загрузите ту версию, которая подходит для Вашей операционной системы Windows.
8. Запустите инсталлер программы CubicSDR.
9. Подключите Ваш приемник и запустите программу CubicSDR.
10. Появится приветственное окно для выбора устройств — SDR Devices. Выберите Ваш RTL-SDR и кликните кнопку «Use Selected».
11. Автоматически запустится программа CubicSDR.
12. Кликните в любом месте «водопада» для начала прослушивания.
Большой список другого программного обеспечения SDR для Windows, совместимого с RTL-SDR, см. по этой ссылке http://www.rtl-sdr.com/big-list-rtl-sdr-supported-software/.
[Запуск RTL-SDR под Linux]
Инструкции для установки библиотек RTL-SDR под Linux можно найти по ссылке http://sdr.osmocom.org/trac/wiki/rtl-sdr.
После установки библиотек Вам вероятно потребуется выгрузить драйверы DVB-T, которые по умолчанию использует Linux. Для выгрузки их временно введите в терминале команду «sudo rmmod dvb_usb_rtl28xxu». Это решение только временное — до того момента, пока Вы не переподключите донгл приемника или перезагрузите PC, в этот момент драйверы DVB-T будут загружены заново. Для постоянной выгрузки создайте текстовый файл «rtlsdr.conf» в папке /etc/modprobe.d и добавьте в него строку «blacklist dvb_usb_rtl28xxu».
После установки библиотек и запрета драйверов DVB-T рекомендуем начать знакомство с SDR в программе GQRX, которая по функционалу похожа на SDRSharp. Программу GQRX можно загрузить с помощью менеджера пакетов Вашего дистрибутива Linux, или по ссылке http://gqrx.dk/download. Мы также можем теперь рекомендовать мультиплатформенную программу CubicSDR, которую можно загрузить с сайта http://www.cubicsdr.com/.
Если Вы хотите установить GNU Radio, мы рекомендуем использовать скрипт за авторством Marcus Leech, вводом в терминале следующей команды. Это установит также и драйверы RTL-SDR:
wget http://www.sbrac.org/files/build-gnuradio && chmod a+x ./build-gnuradio && ./build-gnuradio
Обратите внимание, что если Вы хотите запустить Linux на виртуальной машине, то производительность работы RTL-SDR в VirtualBox будет плохой из-за медленного соединения USB. VMWare Player, с другой стороны, даст хорошую производительность — просто помните, что нужно установить контроллер USB на использование протокола USB 2.0, поскольку по умолчанию установлен протокол USB 1.1.
[Запуск RTL-SDR под OSX]
Из-за того, что по OSX мало программ для SDR, мы рекомендуем использовать либо Linux, либо Windows. Однако GQRX является программой SDR, которая хорошо работает на OSX. Инструкции по установке этой программы на Mac можно найти в посте http://www.smittix.co.uk/rtlsdr-up-and-running-in-mac-osx-yosemite-with-gqrx-gnuradio.
Также рекомендуем кроссплатформенную программу CubicSDR, которую можно загрузить с сайта http://www.cubicsdr.com/.
[Ссылки]
1. RTL-SDR QUICK START GUIDE site:rtl-sdr.com.
2. BUY RTL-SDR DONGLES (RTL2832U) site:rtl-sdr.com.
3. SCANNER ANT-BASE 30-1300MHZ 50’RG6 15ELM site:amazon.com.
4. Centerfire Antenna Deluxe Discone site:amazon.com.
5. RTL-SDR BLOG V.3. DONGLES USER GUIDE site:rtl-sdr.com.
6. 100KHz-1.7GHz all band radio RTL-SDR receiver RTL2832+R820T RTL-SDR site:aliexpress.com.
7. Planar Disk Antennas site:www.wa5vjb.com.
8. ROUNDUP OF SOFTWARE DEFINED RADIOS site:rtl-sdr.com.
9. 161218RTL-SDR.zip — документация, драйверы, программы для RTL-SDR.
10. Отключение автоматической установки драйверов Windows 7.
Introduction – what is SDR?
SDR stands for software defined radio. It is a term used to describe devices that can receive radio frequency signals over a wide range of frequencies. These devices most commonly interface with USB drives of computers / Raspberry Pi / similar. There are standalone-devices but they often cost quite a bit more than the USB devices. The best part about the base-level SDRs? They’re less than $50. I have a couple that I paid $18 for.
Video link to follow along – https://youtu.be/HUkaIJhoYUs
So you’re here on the “Getting Started with SDR” post. In this SDR tutorial post we’ll get a SDR plugged into your Windows computer, install drivers, and start sniffing for signals. We’ll try FM radio first since they have very powerful transmitters and there is almost certainly one you can receive at your hose, followed by checking for those wireless temperature sensors, and then some aircraft position signals.
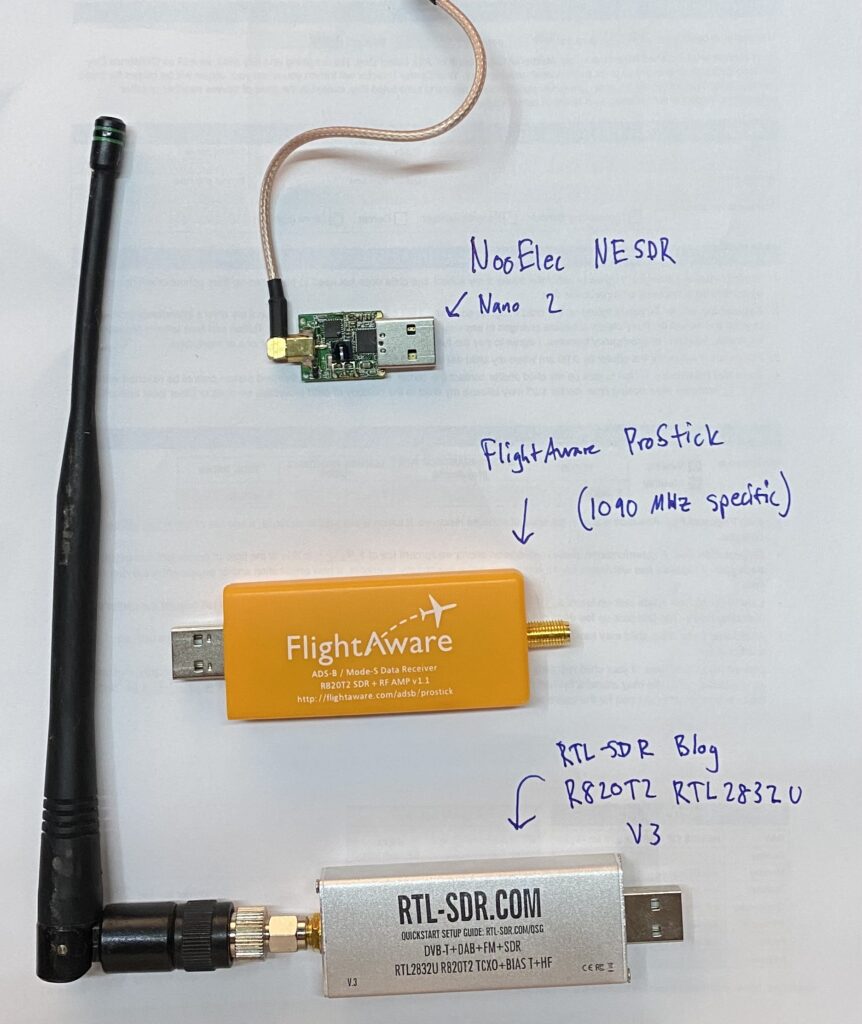
What does a SDR look like? Below is a image with 3 I have around the house that I snagged for a picture (USB plug for size reference). Below the picture is the table of contents for the post.
SDR Tutorial Contents
- Purchasing a suitable SDR
- Plugging it into a Windows computer and installing drivers
- Installing SDR# (a program to monitor any and all frequencies)
- Listening to a FM radio station
- Installing rtl_433 and listening for wireless temperature sensors
- Installing dump1090 and listening for aircraft position signals
1 – Purchasing a suitable SDR
To get started, you’ll obviously need a RTL-SDR. I recommend the NooElec devices, specifically the NooElec NESDR Smart v5 bundle. NooElec devices have lasted the longest out of the 8 SDRs I’ve purchased and have been very useful for me. It includes 3 different antenna (433 MHz for sensors, 1090 MHz for ADS-B aircraft signals, and an adjustable antenna) which are useful for the rest of the tutorial:
With a SDR in hand, let’s get started!
2 – Installing drivers and plugging in the RTL-SDR
I use Windows 10 for this SDR tutorial, but I use Linux for the long-term monitoring I have in place around the house. Linux doesn’t ever automatically reboot for updates, and is generally much more stable (and doesn’t need a license). Windows is easy to get started so we’ll use it.
The instructions for installation are a bit long so I’ll just leave a link to the official source where they will always have the most up to date drivers and such – https://www.rtl-sdr.com/rtl-sdr-quick-start-guide/. I will re-write these at some point (and also make a video) but I’ll just leave the link for now.
3 – SDRSharp installation
If you followed the instructions in the link above, you should have a file called SDRSharp.exe in the folder you used:
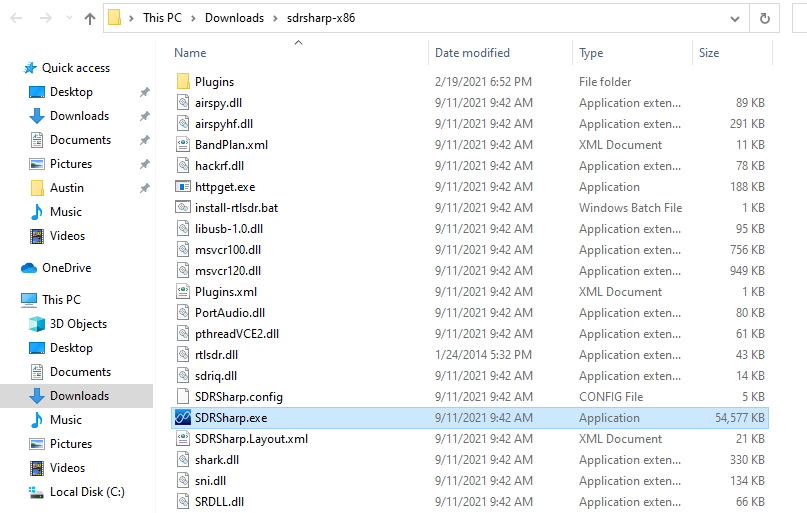
This means it is already “installed” since it is just a simple executable file. No need to click next, next, next finish to install.
4 – Listening to a FM radio station with your RTL-SDR
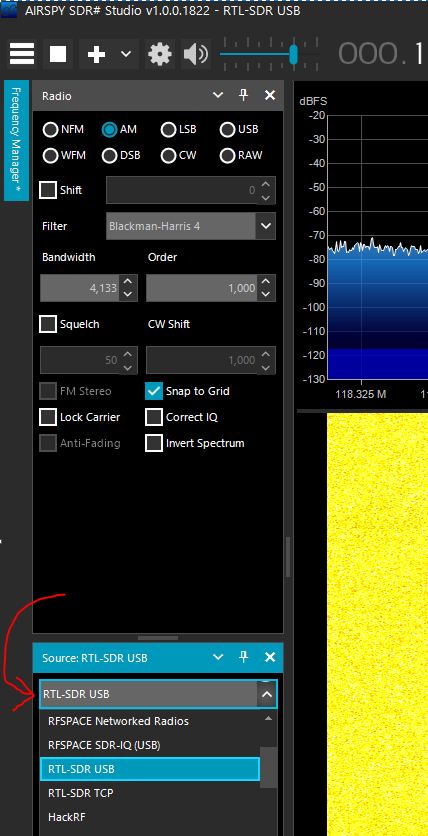
Go ahead and double-click on SDRSharp.exe and launch it! First thing you need to do is select the RTL-SDR USB option from the sources drop down menu:
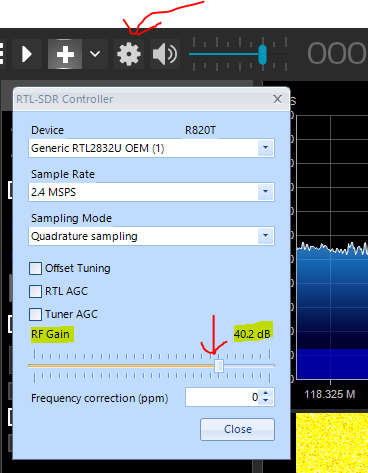
Next up, we need to crank the gain to get useful signal out of the SDR. Click the gear icon, make sure the RTL2832U device is selected, then set the RF gain slider to around 40dB, then click close:
Now we are ready to listen to FM radio!
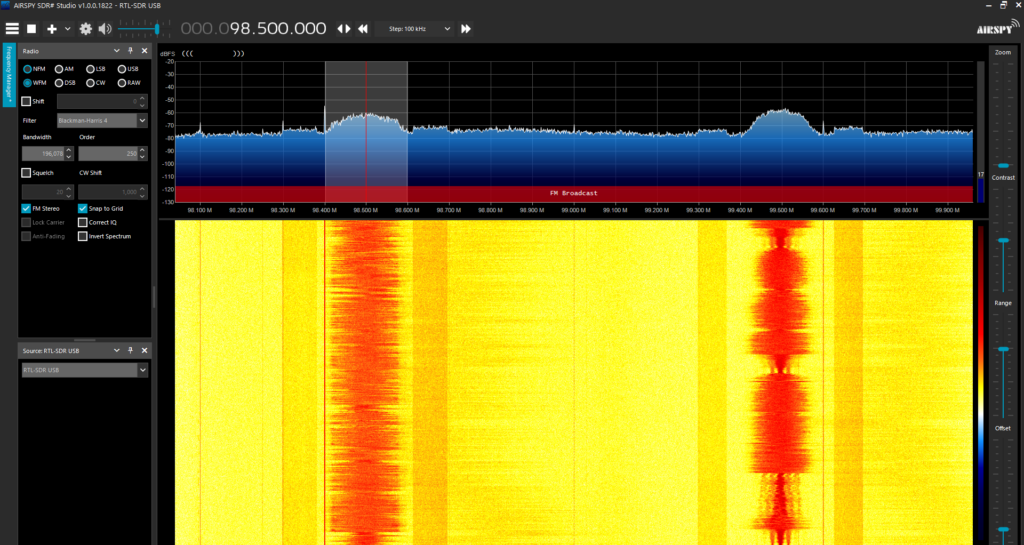
Ensure the WFM radio button is selected in the signal type, set the zoom slider all the way down, set the step to 100 kHz, then click the frequency numbers up/down to pick a known FM station. This should get everything ready to go:

With all that setup out of the way, click the play button and watch the signals start streaming in! Assuming your speakers are set to a decent volume, you’ll hear the radio from your computer! From my 2nd story bedroom near Broomfield, CO, I can easily get 98.5 MHz and 99.5 MHz (and many others). You can also check the “FM Stereo” checkbox on the left side if you know you’ll be receiving FM stereo. Make sure you uncheck it if you start looking at other things:
Here is a picture showing my setup for writing this blog – a simple NooElec Nano SDR I bought in 2016, a little bit of cable, and a 1090 MHz antenna (which is clearly not ideal for FM radio frequencies, but radio is so powerful it doesn’t really matter). Also say hi to Fluffy the cat:

5 – Installing rtl_433 and listening for wireless temperature/humidity sensors
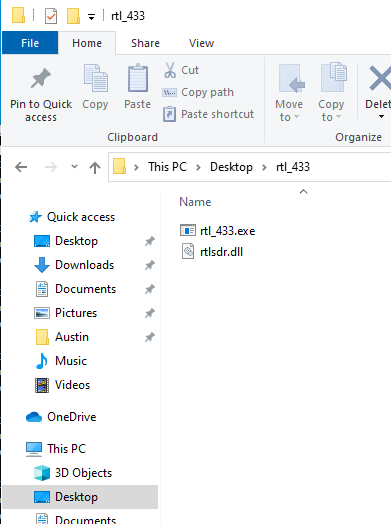
Ok so now that we know radio works, let’s see what other radio frequency signals are traveling through the air. We will start by downloading the rtl_433 Windows release from GitHub. The latest version as of this post is here (https://github.com/winterrace/rtl_433_win/releases/download/v19.8.19/rtl_433_win_2019-08-19.zip). Unzip the .zip file. There should be two files inside, rtl_433.exe and rtlsdr.dll. I put these files on my desktop in a folder called rtl_433:
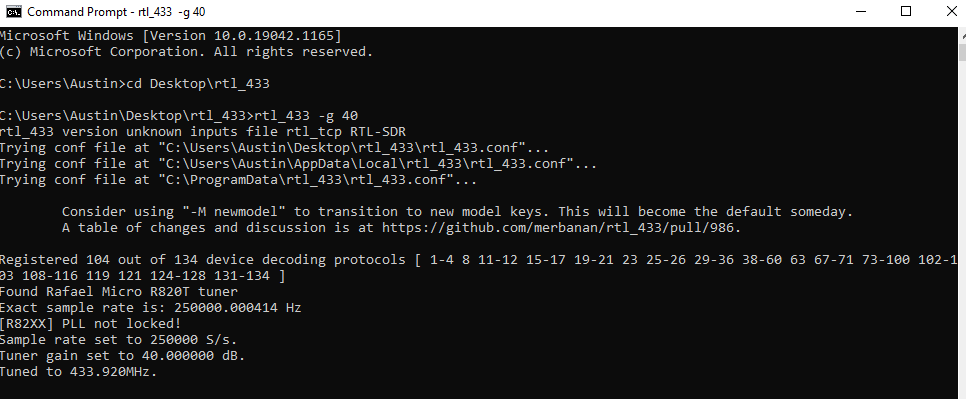
Now open a command window, and change directory (cd) to Desktop/rtl_433.
C:\Users\Austin>cd Desktop\rtl_433

C:\Users\Austin\Desktop\rtl_433>
Ok now we’re in the rtl_433 directory so we can run commands now. The most basic command for this program is to run it and only specify the gain. We used 40 dB for the FM radio so let’s use 40 again by specifying it with the -g option (you can view all commands by running rtl_433 -h):
rtl_433 -g 40
The output will show the following (ending in “Tuned to 433.92 MHz”) if all went well:
Let it run for a couple minutes. You might see some thermometers and other such devices! Here is what my output looks like after about 60 seconds:
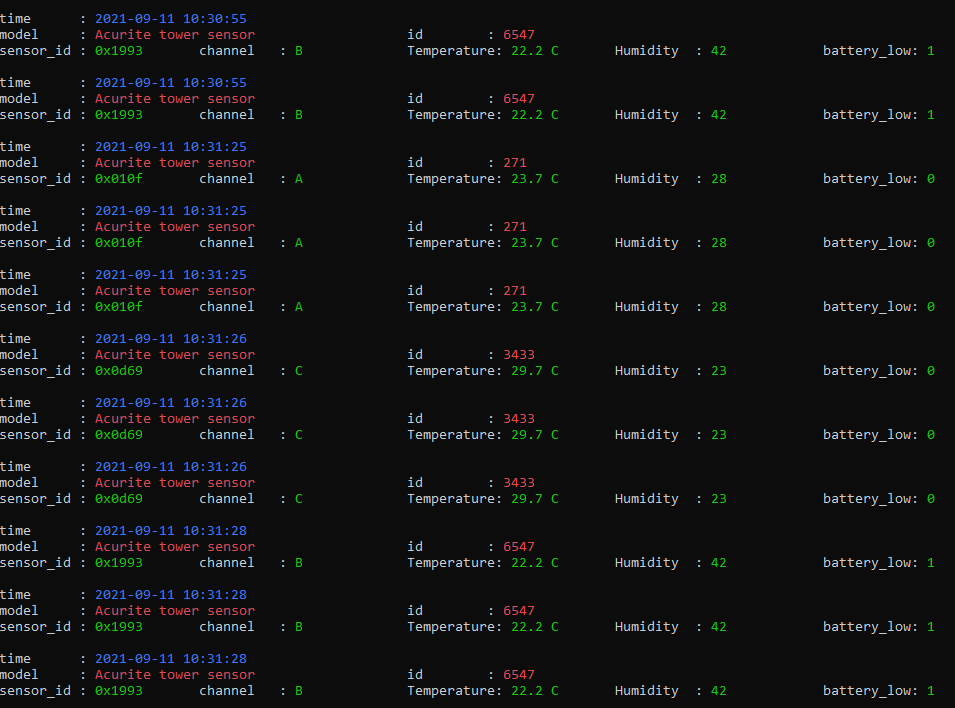
If you look closely, you can see there are three separate devices broadcasting on 433 MHz that I can pick up with my (still not desirable) 1090 MHz antenna! One is sitting in my garage, another is next to me in the bedroom, and I don’t actually know where the 3rd is or who owns it.
With the same, tiny USB RTL-SDR, we have picked up FM radio as well as temperature/humidity readings from three separate sensors!
6 – Installing dump1090 and listening for aircraft position (ADS-B) signals
Last up for this RTL-SDR tutorial is installing dump1090 and checking to see if we can pick up any aircraft signals.
Dump1090 is a utility written many years ago that decodes aircraft ADS-B position signals. Some brave souls ported it for use in Windows a while ago. Using the directions and links from https://sonicgoose.com/using-dump1090-in-windows/ I have distilled it down for you. Download the dump1090 windows package that I’ve rehosted here –
And then extract it to your desktop in a folder called dump1090.
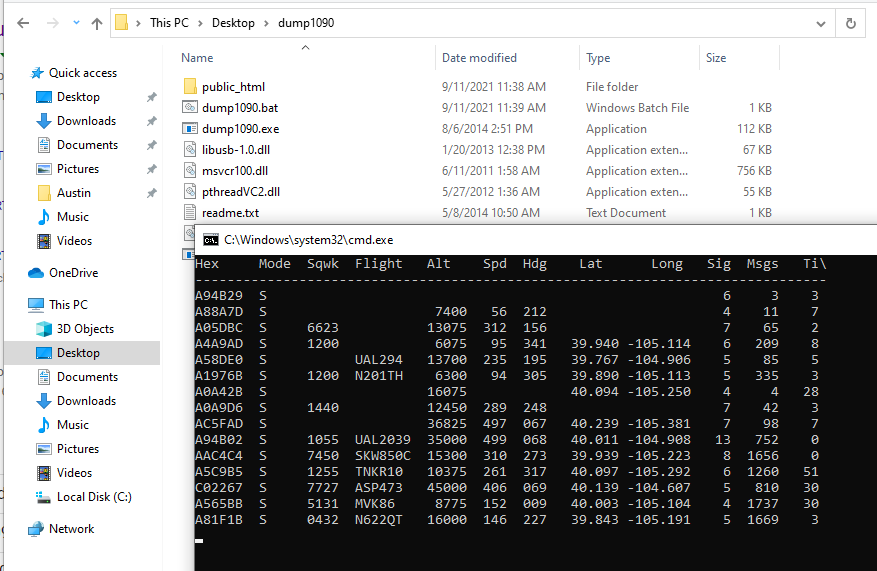
There is a .bat file (batch file) in the folder, double-click it to run it:
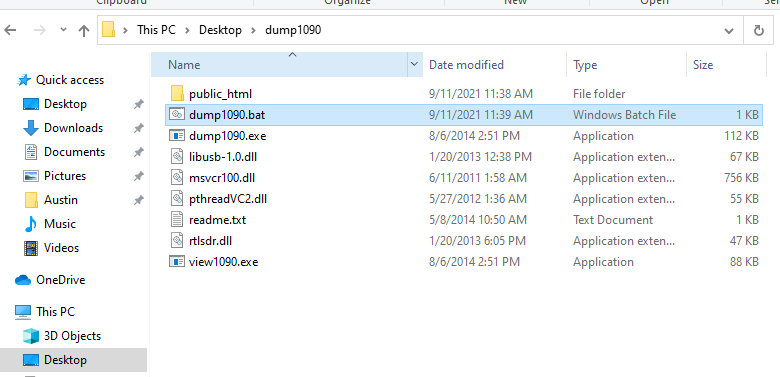
You will be presented with a screen that updates in realtime as signals come in. You are now receiving ADS-B signals with the same device that could listen to FM radio, and also temperature/humidity sensors around the house!
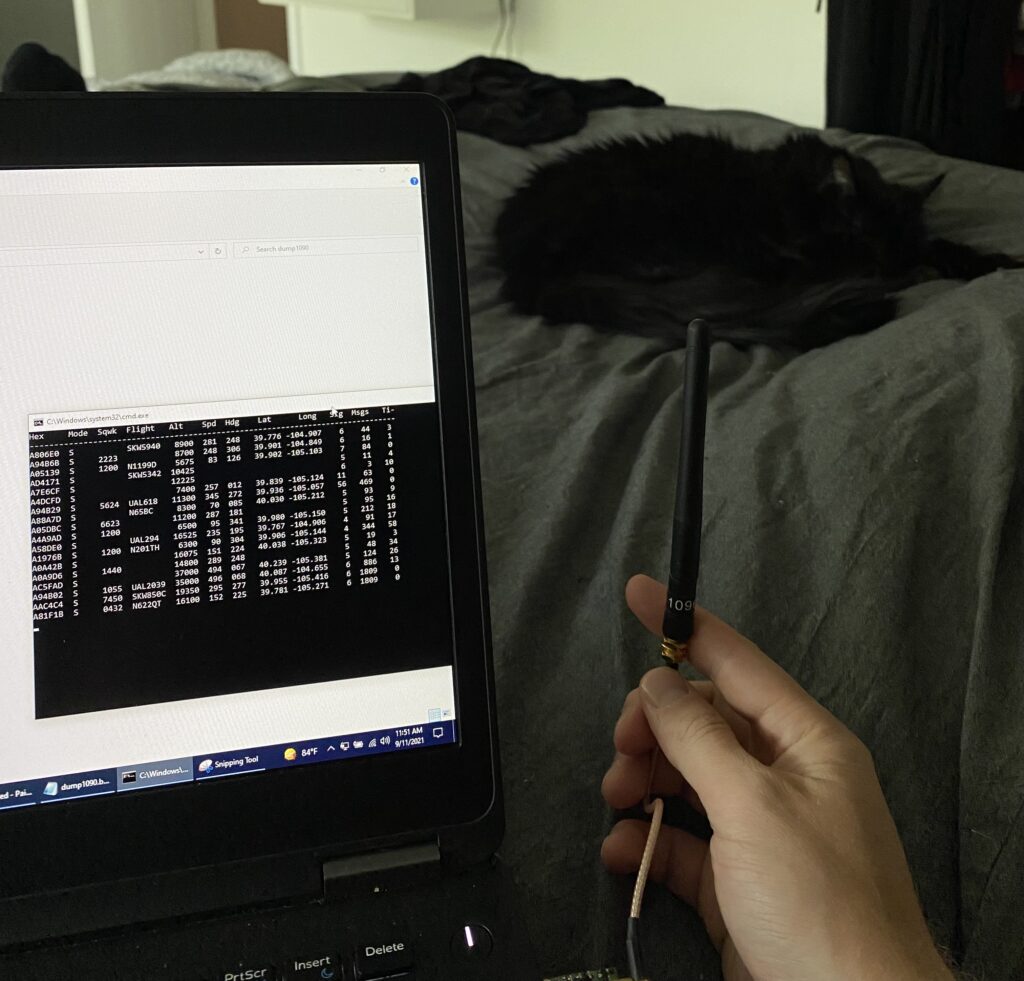
All this from a 1090 MHz antenna (which is actually finally the right frequency for the application at hand). Fluffy is still supervising:
Conclusion
In this SDR tutorial, we have purchased a RTL-SDR, installed the drivers, plugged it in, listened to FM radio, checked for wireless temperature/humidity sensors and found 3, and listened for aircraft ADS-B signals (and found 15 aircraft broadcasting in the last screenshot). This is an addictive hobby. With the right antenna, you can hear people speaking and morse code coding from across the world. In my next post I’ll show how to implement some of these into automated programs to take the data and input it into Home Assistant and other databases.
One last thing – receiving RF signals is 98% about the antenna and 2% about what you’re receiving the signals with! The base antennas that come with RTL-SDRs are good for the basics but if you really want to get into receiving interesting/distant signals, be prepared to spend 2-3x the cost of a SDR on a single antenna.
Hope you learned something and enjoyed this tutorial!
Post Views: 16,359
Время на прочтение
10 мин
Количество просмотров 38K
Привет, Хабр.
В третьей части было рассказано, как получить доступ к SDR-приемнику посредством языка Python. Сейчас мы познакомимся с программой GNU Radio — системой, позволяющей создать достаточно сложную конфигурацию радиоустройства, не написав ни единой строчки кода.
Для примера рассмотрим задачу параллельного приема нескольких FM-станций на один приемник. В качестве приемника будем использовать все тот же RTL SDR V3.
Продолжение под катом.
Установка
Для начала работы GNU Radio необходимо установить, дистрибутив для Windows можно скачать здесь. Система эта кроссплатформенная, версии есть также под Linux и под OSX (вроде бы GNU Radio успешно запускали и на Raspberry Pi, но 100% гарантии дать не могу).
По сути, GNU Radio это целый фреймворк для цифровой обработки сигналов, в котором программа «собирается» из отдельных модулей. Есть большое количество уже готовых блоков, при желании также можно создавать свои собственные. Сами модули написаны на С++, а для взаимодействия блоков друг с другом используется Python. Желающие могут посмотреть на API более подробно, но на практике это, скорее всего, не пригодится — все действия можно делать визуально в программе GNU Radio Companion.
Система ориентирована на обработку потоков данных, так что каждый блок обычно имеет вход и выход. Далее, соединяя блоки в редакторе, мы получаем готовую систему. Сам интерфейс GNU Radio довольно простой, сложность состоит в понимании того, что делает тот или иной блок. Как говорилось ранее, низкоуровневая работа с SDR имеет высокий порог входа и требует некоторого знания в DSP и математике. Но мы рассмотрим простую задачу, для которой никаких специальных знаний не потребуется. Итак, приступим.
Начало работы
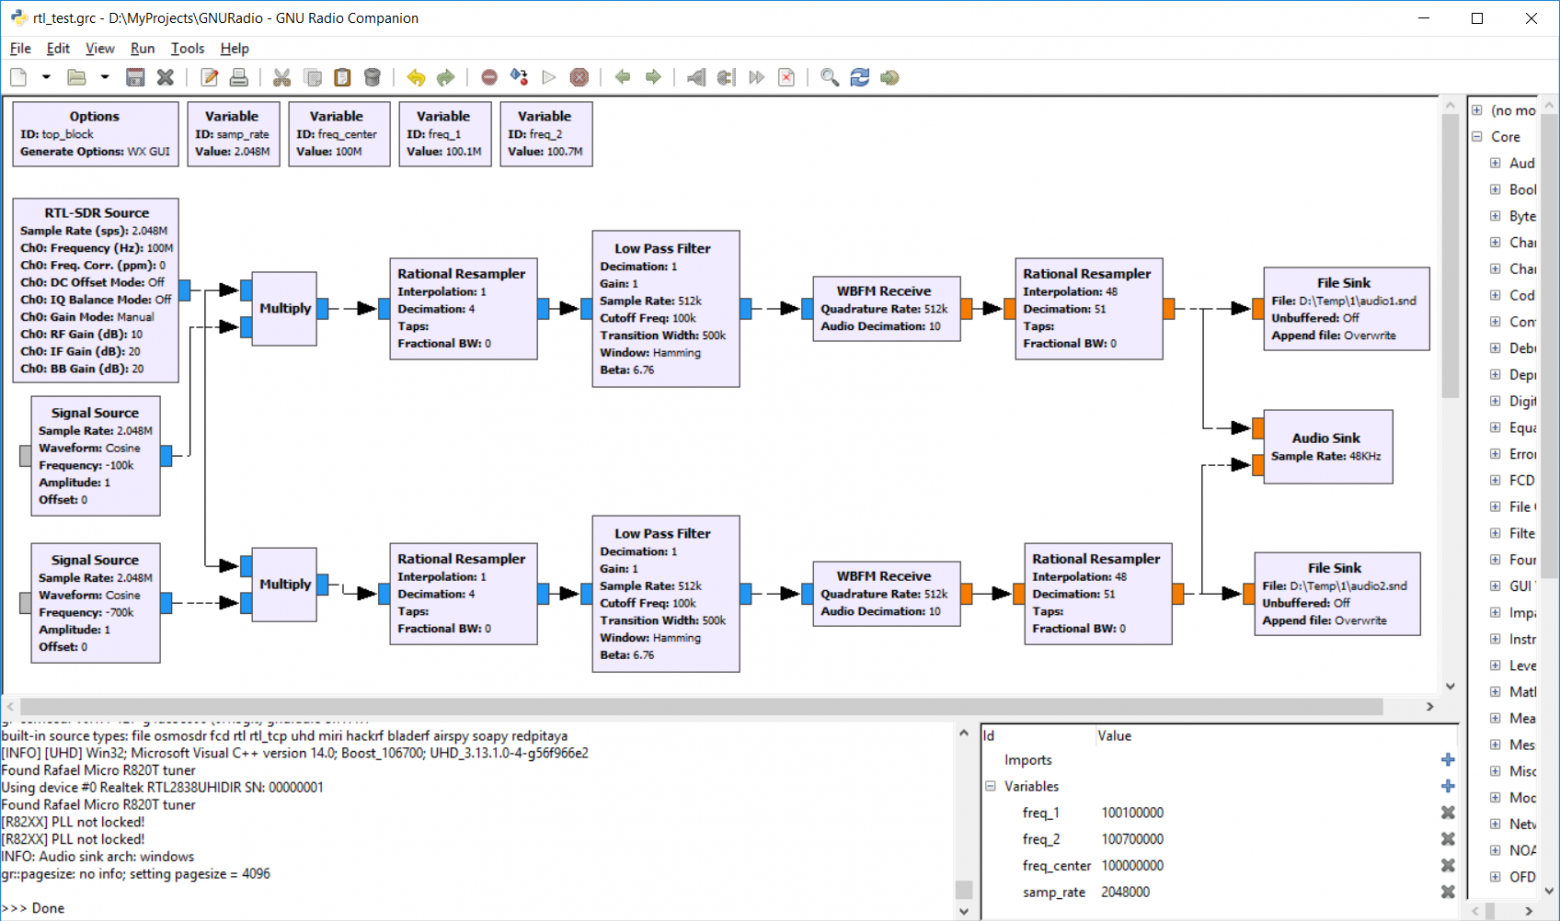
Запускаем GNU Radio Companion, создаем новый проект, тип проекта выбираем WX GUI, добавляем на экран и соединяем два блока, как показано на скриншоте.
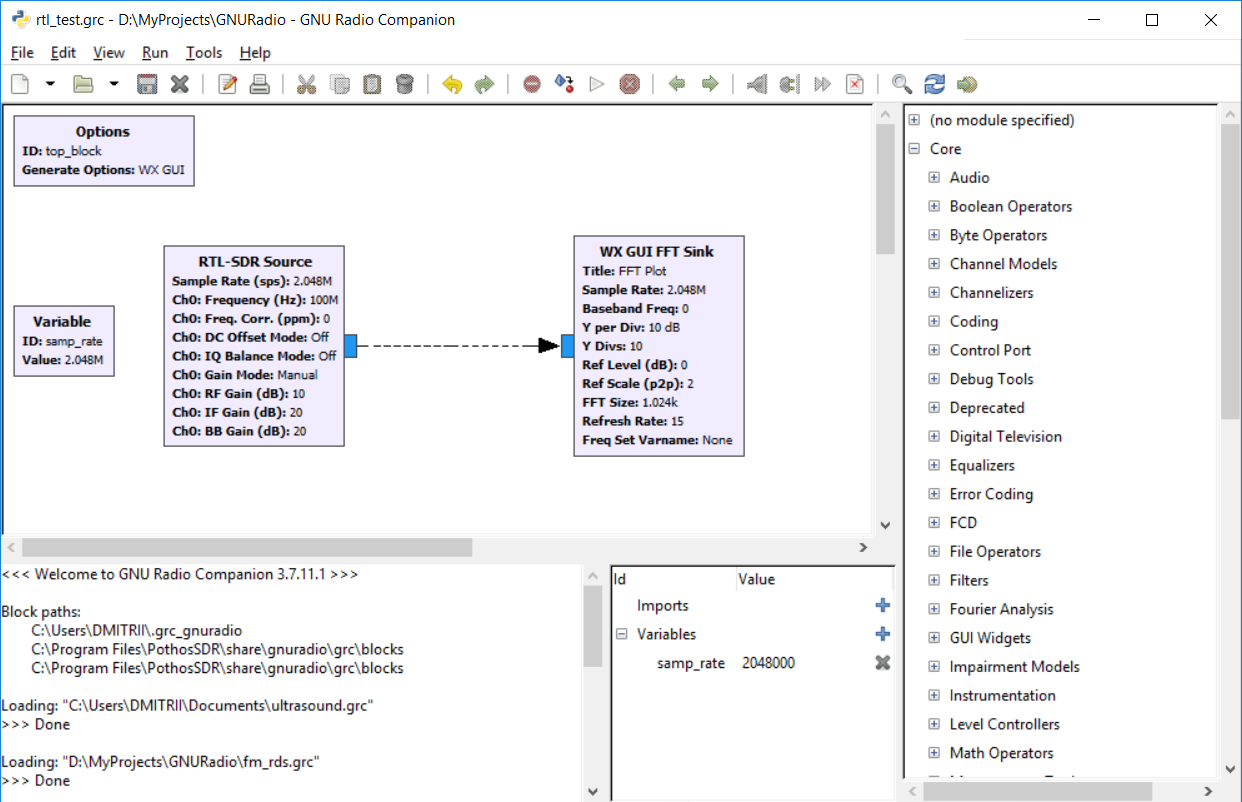
Мы видим два типа блоков — Source (источник) и Sink (выход, «слив»). RTL-SDR — это наш приемник, FFT GUI — это виртуальный спектроанализатор.
Переменную Sample Rate устанавливаем в 2048000, это частота дискретизации нашего приемника. Частоту RTL-SDR оставляем по умолчанию равной 100МГц.
Запускаем проект — все работает, мы видим спектр FM-станций. Первая программа для GNU Radio готова!

Если мы посмотрим лог, то увидим такие строки.
Generating: ‘D:\\MyProjects\\GNURadio\\top_block.py’
Executing: C:\Python27\python.exe -u D:\MyProjects\GNURadio\top_block.py
Да, мы можем посмотреть файл top_block.py, который сгенерил нам GNU Radio Companion. Истинные джедаи могут писать непосредственно в Python, но требуемый код, как мы видим, довольно большой. Мы же создали его за 1 минуту.
top_blocks.py
#!/usr/bin/env python2
# -*- coding: utf-8 -*-
##################################################
# GNU Radio Python Flow Graph
# Title: Top Block
# Generated: Wed May 22 22:05:14 2019
##################################################

if __name__ == '__main__':
    import ctypes
    import sys
    if sys.platform.startswith('linux'):
        try:
            x11 = ctypes.cdll.LoadLibrary('libX11.so')
            x11.XInitThreads()
        except:
            print "Warning: failed to XInitThreads()"

from gnuradio import eng_notation
from gnuradio import gr
from gnuradio import wxgui
from gnuradio.eng_option import eng_option
from gnuradio.fft import window
from gnuradio.filter import firdes
from gnuradio.wxgui import fftsink2
from grc_gnuradio import wxgui as grc_wxgui
from optparse import OptionParser
import osmosdr
import time
import wx


class top_block(grc_wxgui.top_block_gui):

    def __init__(self):
        grc_wxgui.top_block_gui.__init__(self, title="Top Block")

        ##################################################
        # Variables
        ##################################################
        self.samp_rate = samp_rate = 2048000

        ##################################################
        # Blocks
        ##################################################
        self.wxgui_fftsink2_0 = fftsink2.fft_sink_c(
        	self.GetWin(),
        	baseband_freq=0,
        	y_per_div=10,
        	y_divs=10,
        	ref_level=0,
        	ref_scale=2.0,
        	sample_rate=samp_rate,
        	fft_size=1024,
        	fft_rate=15,
        	average=False,
        	avg_alpha=None,
        	title='FFT Plot',
        	peak_hold=False,
        )
        self.Add(self.wxgui_fftsink2_0.win)
        self.rtlsdr_source_0 = osmosdr.source( args="numchan=" + str(1) + " " + '' )
        self.rtlsdr_source_0.set_sample_rate(samp_rate)
        self.rtlsdr_source_0.set_center_freq(100e6, 0)
        self.rtlsdr_source_0.set_freq_corr(0, 0)
        self.rtlsdr_source_0.set_dc_offset_mode(0, 0)
        self.rtlsdr_source_0.set_iq_balance_mode(0, 0)
        self.rtlsdr_source_0.set_gain_mode(False, 0)
        self.rtlsdr_source_0.set_gain(10, 0)
        self.rtlsdr_source_0.set_if_gain(20, 0)
        self.rtlsdr_source_0.set_bb_gain(20, 0)
        self.rtlsdr_source_0.set_antenna('', 0)
        self.rtlsdr_source_0.set_bandwidth(0, 0)


        ##################################################
        # Connections
        ##################################################
        self.connect((self.rtlsdr_source_0, 0), (self.wxgui_fftsink2_0, 0))

    def get_samp_rate(self):
        return self.samp_rate

    def set_samp_rate(self, samp_rate):
        self.samp_rate = samp_rate
        self.wxgui_fftsink2_0.set_sample_rate(self.samp_rate)
        self.rtlsdr_source_0.set_sample_rate(self.samp_rate)


def main(top_block_cls=top_block, options=None):

    tb = top_block_cls()
    tb.Start(True)
    tb.Wait()


if __name__ == '__main__':
    main()
Впрочем, если убрать громоздкую инициализацию, то мы увидим, что ключевых строк кода не так уж много.
from gnuradio import gr
from gnuradio.wxgui import fftsink2
import osmosdr

class top_block(grc_wxgui.top_block_gui):

    def __init__(self):
        grc_wxgui.top_block_gui.__init__(self, title="Top Block")
        self.samp_rate = samp_rate = 2048000
        self.wxgui_fftsink2_0 = fftsink2.fft_sink_c(...)
        self.Add(self.wxgui_fftsink2_0.win)
        self.rtlsdr_source_0 = osmosdr.source(args="numchan=" + str(1) + " " + '' )
        self.connect((self.rtlsdr_source_0, 0), (self.wxgui_fftsink2_0, 0))

def main(top_block_cls=top_block, options=None):
    tb = top_block_cls()
    tb.Start(True)
    tb.Wait()
Так что в принципе, это можно написать вручную. Но мышью оно все-таки быстрее. Хотя возможность поменять код иногда может пригодиться, если захочется добавить какую-то нестандартную логику.
Принимаем FM-радио
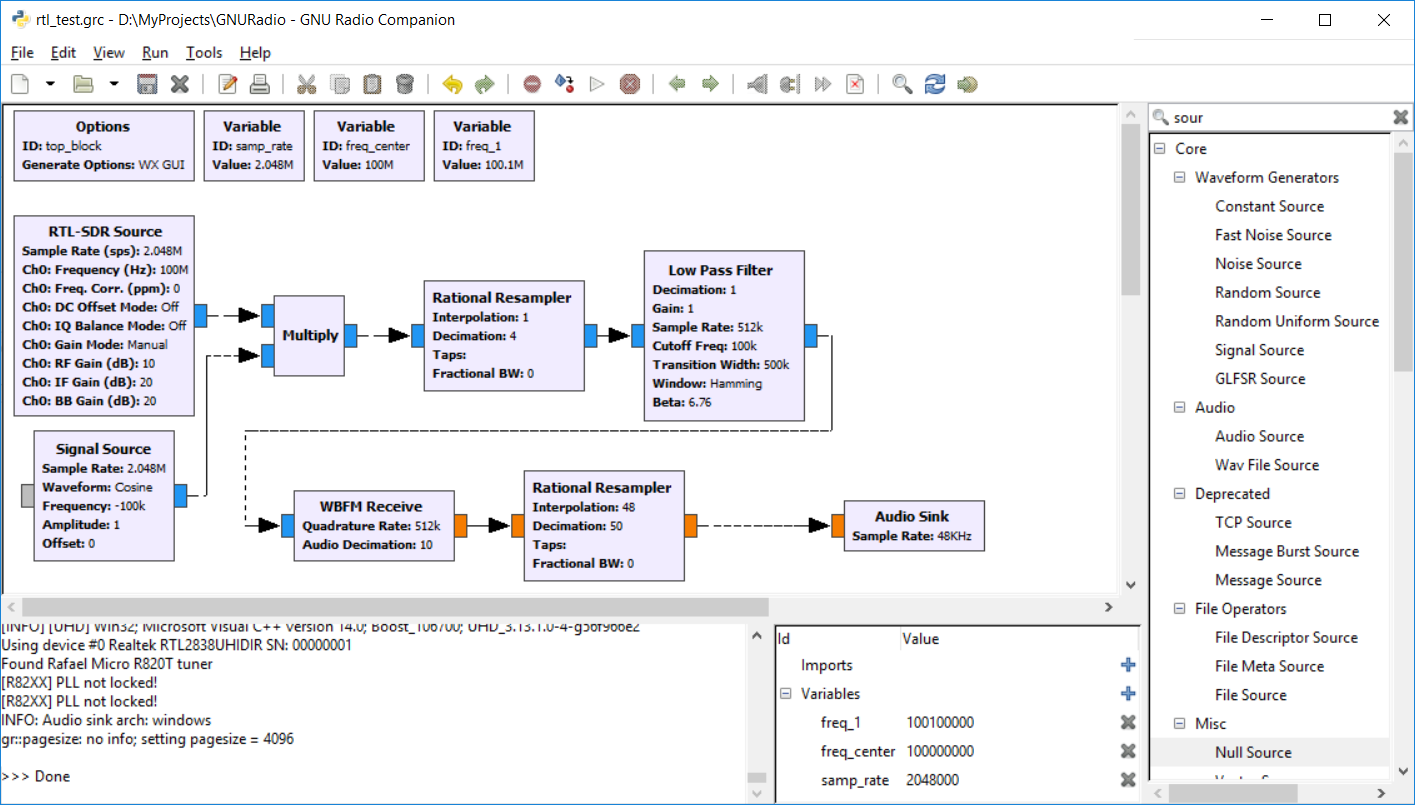
Теперь попробуем принять одну из станций. Как было видно из скриншотов, центральная частота приемника 100МГц и ширина полосы пропускания около 2МГц. На спектре мы видим две станции, на 100.1МГц и 100.7МГц соответственно.
Первым шагом необходимо перенести спектр станции в центр, сейчас он отстоит вправо на 100КГц. Для этого вспоминаем школьную формулу умножения косинусов — в результате будет две частоты, сумма и разность — нужная станция сдвинется в центр, что нам и нужно (а лишнее мы потом отфильтруем).
Создаем две переменные для хранения частоты freq_center=100000000 и freq_1=100100000, также добавляем генератор сигналов с частотой freq_center — freq_1.
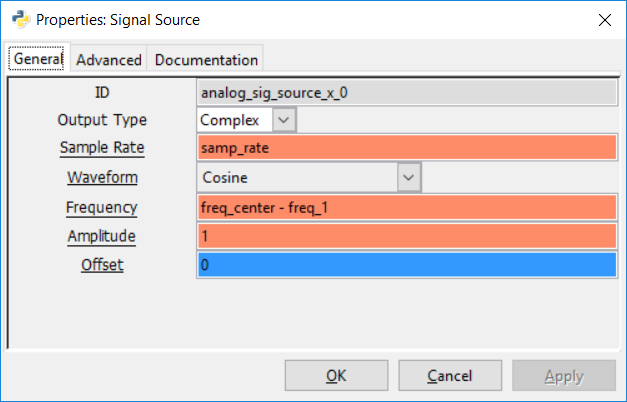
Т.к. система построена на базе Python, то в полях ввода параметров мы можем использовать выражения, что достаточно удобно.
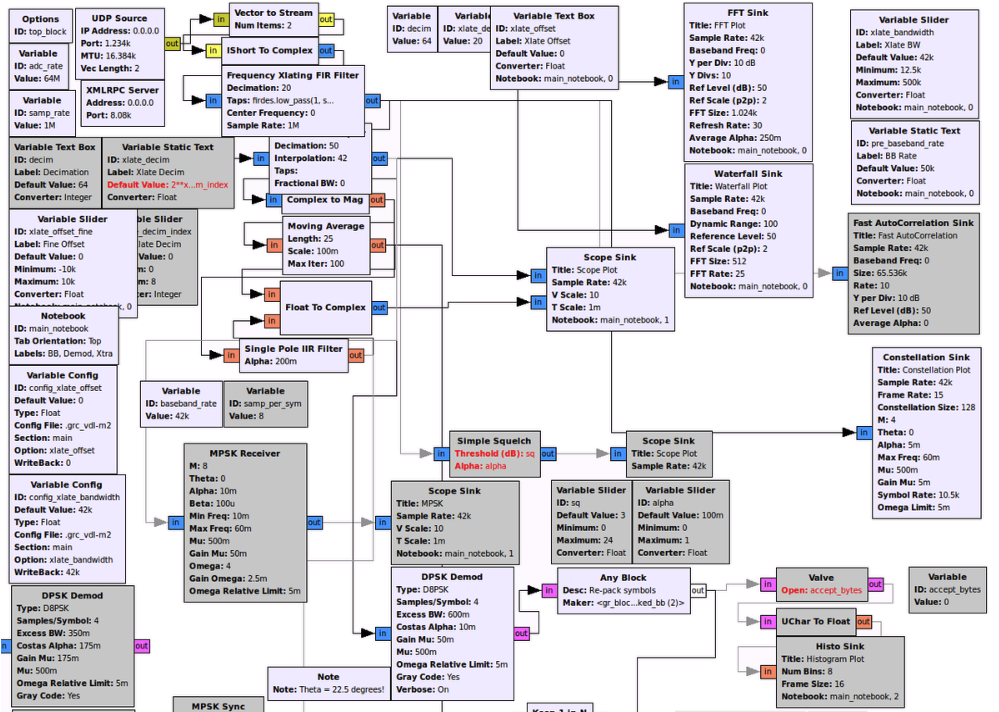
Схема в итоге должна выглядеть так:
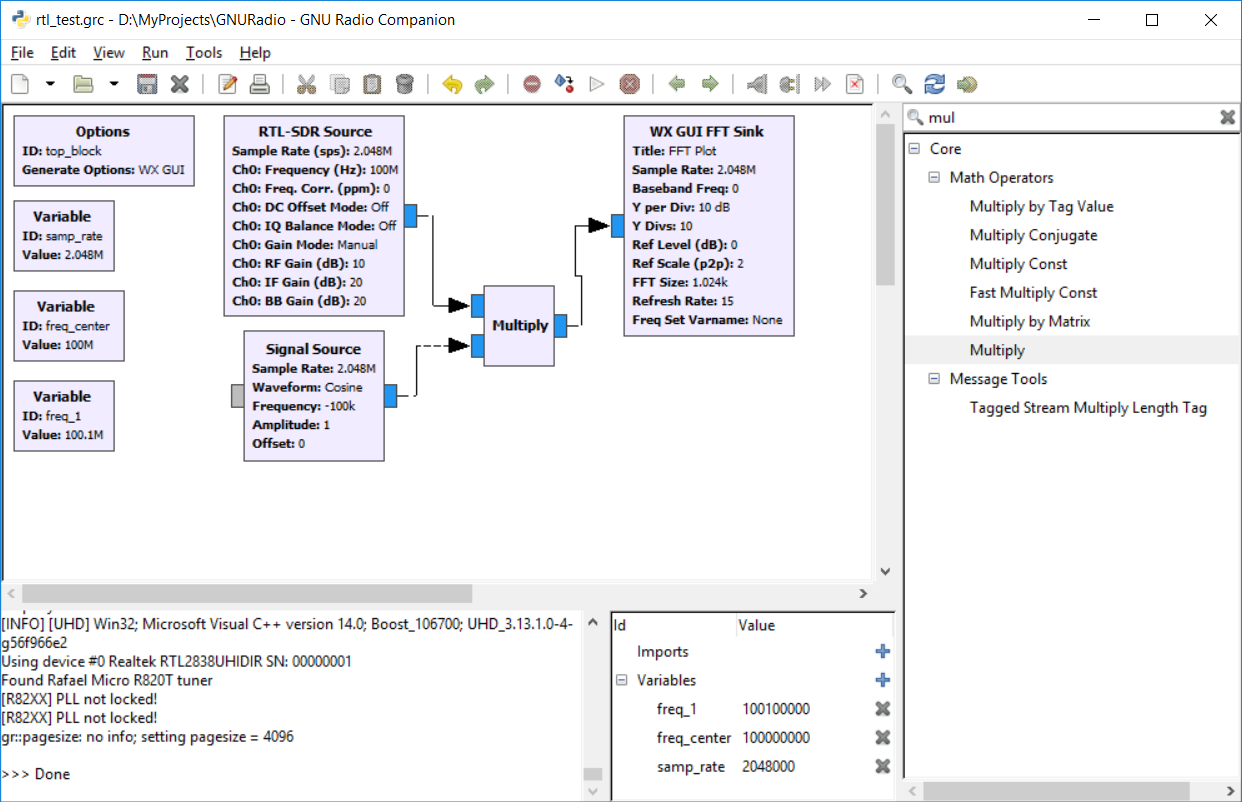
Теперь необходимо добавить сразу несколько блоков — уменьшить тактовую частоту входного сигнала (она равна 2048КГц), отфильтровать сигнал, подать его на FM-декодер, затем еще раз уменьшить тактовую частоту до 48КГц.
Результат показан на картинке:
Считаем внимательно. Мы делим тактовую частоту 2048КГц в 4 раза блоком Rational Resampler (получаем 512КГц), затем после Low Pass фильтра стоит WBFM-декодер с децимацией 10 (получаем 51.2КГц). В принципе, этот сигнал уже можно подать на звуковую карту, но высота тона будет чуть отличаться. Еще раз меняем тактовую частоту в 48/51, в результате будет тактовая частота 48.2КГц, разницей уже можно пренебречь.
Второй важный момент — тип входов. С приемника поступает комплексный IQ-сигнал (входы-выходы синего цвета), с FM-декодера выходит вещественный сигнал — входы и выходы желтого цвета. Если перепутать, ничего не заработает. Подробнее уже было на Хабре, нам достаточно понять общий принцип.
В общем, запускаем, убеждаемся что все работает. Можно запустить программу и слушать радио. Мы пойдем дальше — у нас же все-таки Software Defined радио — добавим одновременный прием второй станции.
Многоканальный прием
Второй приемник добавляется любимым программистским методом — Ctrl+C/Ctrl+V. Добавляем переменную freq_2, копируем блоки и соединяем их точно также.

Результат вполне сюрреалистичный — две FM-станции можно слушать одновременно. Тем же самым методом (Ctrl+V) можно добавить и третью станцию.
Запись
Слушать две станции оригинально, но на практике мало полезно. Сделаем что-то более нужное, например добавим запись звука в отдельные файлы. Это может быть достаточно удобно — с одного физического приемника можно параллельно записывать несколько каналов.
Добавим к каждому выходу компонент File Sink, как показано на скриншоте.
Windows-версия почему-то требует абсолютные пути файлов, иначе запись не работает. Запускаем, убеждаемся что все нормально. Размер сохраняемых файлов довольно большой, т.к. по умолчанию записывается формат float. Запись в формате int оставлю читателям в качестве домашнего задания.
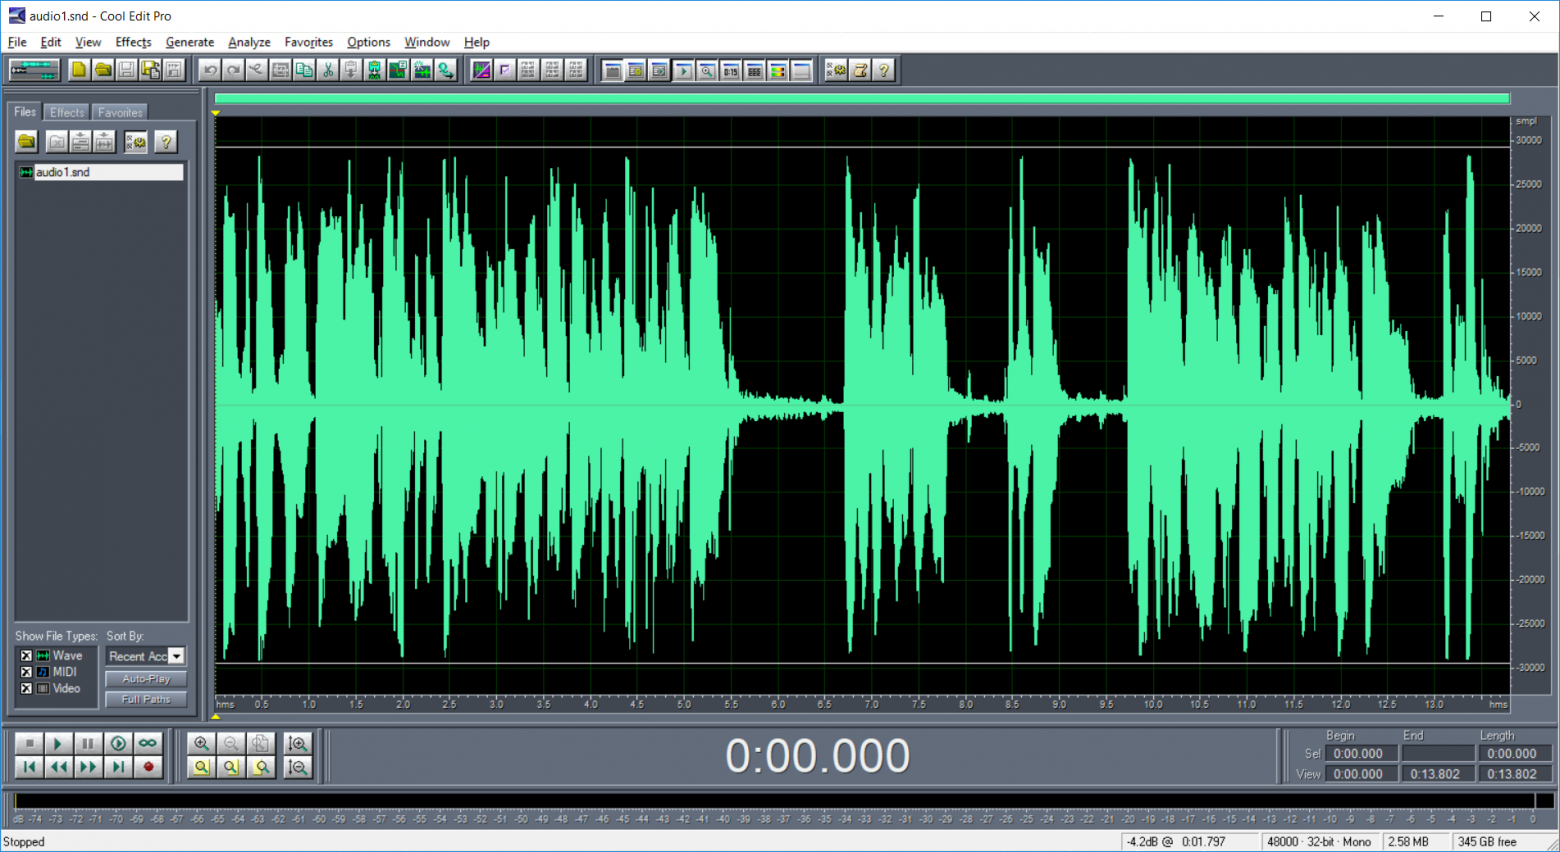
Получившиеся файлы можно открыть в Cool Edit и убедиться, что звук записался нормально.

Разумеется, число записываемых каналов можно увеличить, оно ограничено только полосой пропускания приемника и мощностью компьютера. Кроме File Sink можно использовать и UDP Sink, так что программу можно использовать для трансляции по сети.
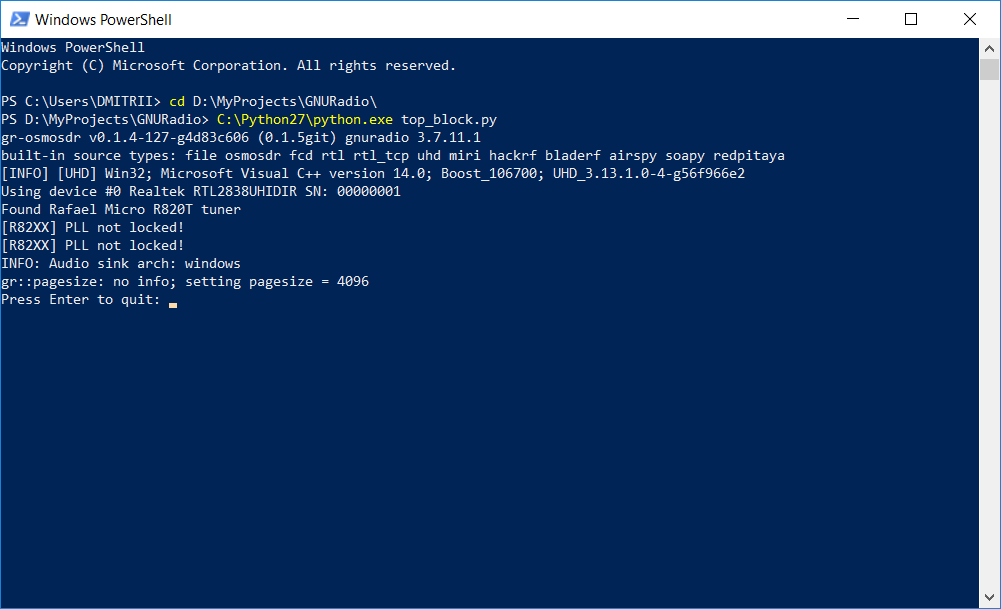
Запуск из командной строки
И последнее. Если использовать программу автономно, например для многоканальной записи, то UI в принципе и не нужен. В верхнем левом блоке Options меняем параметр Run Options на No UI. Запускаем программу еще раз, убеждаемся что все работает. Теперь сохраняем сгенерированный файл top_block.py — мы можем просто запускать его из командной строки, например из bat-файла или из консоли.
Если кому интересно, сгенерированный файл сохранен под спойлером.
recorder.py
#!/usr/bin/env python2
# -*- coding: utf-8 -*-
##################################################
# GNU Radio Python Flow Graph
# Title: Top Block
# Generated: Fri May 24 21:47:03 2019
##################################################

from gnuradio import analog
from gnuradio import audio
from gnuradio import blocks
from gnuradio import eng_notation
from gnuradio import filter
from gnuradio import gr
from gnuradio.eng_option import eng_option
from gnuradio.filter import firdes
from optparse import OptionParser
import osmosdr
import time


class top_block(gr.top_block):

    def __init__(self):
        gr.top_block.__init__(self, "Top Block")

        ##################################################
        # Variables
        ##################################################
        self.samp_rate = samp_rate = 2048000
        self.freq_center = freq_center = 100000000
        self.freq_2 = freq_2 = 100700000
        self.freq_1 = freq_1 = 100100000

        ##################################################
        # Blocks
        ##################################################
        self.rtlsdr_source_0 = osmosdr.source( args="numchan=" + str(1) + " " + '' )
        self.rtlsdr_source_0.set_sample_rate(samp_rate)
        self.rtlsdr_source_0.set_center_freq(freq_center, 0)
        self.rtlsdr_source_0.set_freq_corr(0, 0)
        self.rtlsdr_source_0.set_dc_offset_mode(0, 0)
        self.rtlsdr_source_0.set_iq_balance_mode(0, 0)
        self.rtlsdr_source_0.set_gain_mode(False, 0)
        self.rtlsdr_source_0.set_gain(10, 0)
        self.rtlsdr_source_0.set_if_gain(20, 0)
        self.rtlsdr_source_0.set_bb_gain(20, 0)
        self.rtlsdr_source_0.set_antenna('', 0)
        self.rtlsdr_source_0.set_bandwidth(0, 0)

        self.rational_resampler_xxx_1_0 = filter.rational_resampler_fff(
                interpolation=48,
                decimation=51,
                taps=None,
                fractional_bw=None,
        )
        self.rational_resampler_xxx_1 = filter.rational_resampler_fff(
                interpolation=48,
                decimation=51,
                taps=None,
                fractional_bw=None,
        )
        self.rational_resampler_xxx_0_0 = filter.rational_resampler_ccc(
                interpolation=1,
                decimation=4,
                taps=None,
                fractional_bw=None,
        )
        self.rational_resampler_xxx_0 = filter.rational_resampler_ccc(
                interpolation=1,
                decimation=4,
                taps=None,
                fractional_bw=None,
        )
        self.low_pass_filter_0_0 = filter.fir_filter_ccf(1, firdes.low_pass(
        	1, samp_rate/4, 100000, 500000, firdes.WIN_HAMMING, 6.76))
        self.low_pass_filter_0 = filter.fir_filter_ccf(1, firdes.low_pass(
        	1, samp_rate/4, 100000, 500000, firdes.WIN_HAMMING, 6.76))
        self.blocks_multiply_xx_0_0 = blocks.multiply_vcc(1)
        self.blocks_multiply_xx_0 = blocks.multiply_vcc(1)
        self.blocks_file_sink_0_0 = blocks.file_sink(gr.sizeof_float*1, 'D:\\Temp\\1\\audio2.snd', False)
        self.blocks_file_sink_0_0.set_unbuffered(False)
        self.blocks_file_sink_0 = blocks.file_sink(gr.sizeof_float*1, 'D:\\Temp\\1\\audio1.snd', False)
        self.blocks_file_sink_0.set_unbuffered(False)
        self.audio_sink_0 = audio.sink(48000, '', True)
        self.analog_wfm_rcv_0_0 = analog.wfm_rcv(
        	quad_rate=samp_rate/4,
        	audio_decimation=10,
        )
        self.analog_wfm_rcv_0 = analog.wfm_rcv(
        	quad_rate=samp_rate/4,
        	audio_decimation=10,
        )
        self.analog_sig_source_x_0_0 = analog.sig_source_c(samp_rate, analog.GR_COS_WAVE, freq_center - freq_2, 1, 0)
        self.analog_sig_source_x_0 = analog.sig_source_c(samp_rate, analog.GR_COS_WAVE, freq_center - freq_1, 1, 0)

        ##################################################
        # Connections
        ##################################################
        self.connect((self.analog_sig_source_x_0, 0), (self.blocks_multiply_xx_0, 1))
        self.connect((self.analog_sig_source_x_0_0, 0), (self.blocks_multiply_xx_0_0, 1))
        self.connect((self.analog_wfm_rcv_0, 0), (self.rational_resampler_xxx_1, 0))
        self.connect((self.analog_wfm_rcv_0_0, 0), (self.rational_resampler_xxx_1_0, 0))
        self.connect((self.blocks_multiply_xx_0, 0), (self.rational_resampler_xxx_0, 0))
        self.connect((self.blocks_multiply_xx_0_0, 0), (self.rational_resampler_xxx_0_0, 0))
        self.connect((self.low_pass_filter_0, 0), (self.analog_wfm_rcv_0, 0))
        self.connect((self.low_pass_filter_0_0, 0), (self.analog_wfm_rcv_0_0, 0))
        self.connect((self.rational_resampler_xxx_0, 0), (self.low_pass_filter_0, 0))
        self.connect((self.rational_resampler_xxx_0_0, 0), (self.low_pass_filter_0_0, 0))
        self.connect((self.rational_resampler_xxx_1, 0), (self.audio_sink_0, 0))
        self.connect((self.rational_resampler_xxx_1, 0), (self.blocks_file_sink_0, 0))
        self.connect((self.rational_resampler_xxx_1_0, 0), (self.audio_sink_0, 1))
        self.connect((self.rational_resampler_xxx_1_0, 0), (self.blocks_file_sink_0_0, 0))
        self.connect((self.rtlsdr_source_0, 0), (self.blocks_multiply_xx_0, 0))
        self.connect((self.rtlsdr_source_0, 0), (self.blocks_multiply_xx_0_0, 0))

    def get_samp_rate(self):
        return self.samp_rate

    def set_samp_rate(self, samp_rate):
        self.samp_rate = samp_rate
        self.rtlsdr_source_0.set_sample_rate(self.samp_rate)
        self.low_pass_filter_0_0.set_taps(firdes.low_pass(1, self.samp_rate/4, 100000, 500000, firdes.WIN_HAMMING, 6.76))
        self.low_pass_filter_0.set_taps(firdes.low_pass(1, self.samp_rate/4, 100000, 500000, firdes.WIN_HAMMING, 6.76))
        self.analog_sig_source_x_0_0.set_sampling_freq(self.samp_rate)
        self.analog_sig_source_x_0.set_sampling_freq(self.samp_rate)

    def get_freq_center(self):
        return self.freq_center

    def set_freq_center(self, freq_center):
        self.freq_center = freq_center
        self.rtlsdr_source_0.set_center_freq(self.freq_center, 0)
        self.analog_sig_source_x_0_0.set_frequency(self.freq_center - self.freq_2)
        self.analog_sig_source_x_0.set_frequency(self.freq_center - self.freq_1)

    def get_freq_2(self):
        return self.freq_2

    def set_freq_2(self, freq_2):
        self.freq_2 = freq_2
        self.analog_sig_source_x_0_0.set_frequency(self.freq_center - self.freq_2)

    def get_freq_1(self):
        return self.freq_1

    def set_freq_1(self, freq_1):
        self.freq_1 = freq_1
        self.analog_sig_source_x_0.set_frequency(self.freq_center - self.freq_1)


def main(top_block_cls=top_block, options=None):

    tb = top_block_cls()
    tb.start()
    try:
        raw_input('Press Enter to quit: ')
    except EOFError:
        pass
    tb.stop()
    tb.wait()


if __name__ == '__main__':
    main()
Удобно и то, что система является кросс-платформенной, и получившаяся программа может работать на Linux, Windows и OSX.
Заключение
Можно сказать, что GNU Radio достаточно сложная система, не в плане рисования блоков конечно, а в плане понимания того, как все это работает. Но какие-то несложные вещи сделать вполне посильно и интересно. GNU Radio также удобно использовать как «виртуальную лабораторию» для обучения — к любой части схемы можно подключить виртуальный осциллограф или спектроанализатор и посмотреть, как выглядит сигнал.
Если не будет каких-то отдельных пожеланий, тему SDR-приема наверно можно закрыть — все основные моменты уже рассмотрены, да и количество просмотров от первой к третьей части падает почти по экспоненте (хотя еще можно написать про передачу, но оно требует более дорогого «железа» для тестов чем RTL SDR). Надеюсь все же, что некоторое понимание того как это работает, у читателей осталось. Ну и всем удачных экспериментов.
This page is a guide aimed at helping anyone set up a cheap radio scanner based on the RTL-SDR software defined radio as fast as possible on a Windows system. If you have any trouble during the installation, please see the troubleshooting guide further down the page. We also have brief instructions for getting started on Linux and OSX at the end of this page.
Please note that the RTL-SDR is not a plug and play device. You will need to have sufficient skills to perform basic PC operations such as unzipping files, installing software, moving and copying files and have the motivation to learn new software.
******* RTL-SDR Blog V3/V4 Users *******
New RTL-SDR Blog V4 USERS: Please remember that you need to install our custom drivers in order to make the V4 work. The quickstart guides below show how to install them on common software. For other software we have generic instructions here rtl-sdr.com/V4.
We suggest the following reading order:
- Quickstart Guide: rtl-sdr.com/QSG — Current page. Helps you install the software and set up your dongle.
- V3 Features Guide: rtl-sdr.com/V3 — Learn how to use special V3 features like the direct sampling HF mode and bias tee.
V4 Features Guide: rtl-sdr.com/V4 — Learn how to use special V4 features and how to install the required drivers for V4 models. - SDR# Users Guide: rtl-sdr.com/SDRSHARP — Learn about the setting in SDR#.
- Dipole Antenna Guide: rtl-sdr.com/DIPOLE — Learn how to use your RTL-SDR Blog multipurpose dipole antenna (if purchased in set)
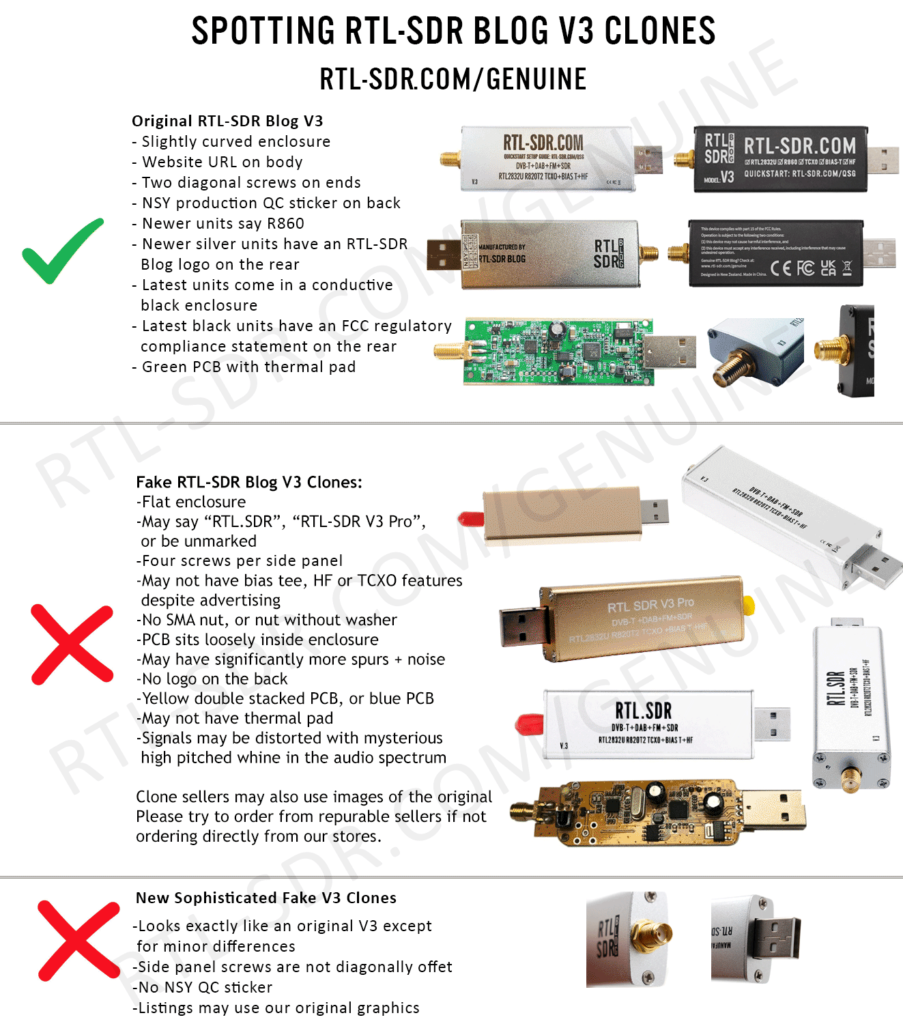
RTL-SDR BLOG V3/V4 BUYERS: PLEASE BE WARY OF COUNTERFEITERS. Opportunistic sellers are advertising all sorts of dongles under our brand «RTL-SDR Blog«. The dongles with blue or green cases or square rectangular silver cases with four screws per panel (eight total), or those advertised as «Pro» are not ours. Those dongles use poorer quality components, are designed cheaply, and may not have all the V3 features. We cannot provide support for counterfeits and these do not help support the running of the blog and the design of new products. The best place to purchase RTL-SDR V3 dongles is directly from our store at www.rtl-sdr.com/store.
***************************************
Equipment Guide
We recommend purchasing one of our RTL-SDR Blog V3 or V4 dongles. See the Buy RTL-SDR dongles page for more information on purchasing.
Generally at least a dual core processor will be required to run most SDR software smoothly. Some command line software and ADS-B decoders may work on less powerful hardware.
To get the most enjoyment out of RTL-SDR you will need a decent antenna. Our packages that come with the dipole antenna set are a great start. Be sure to get them up high and outside (during good weather only) for best results. Units not sold by us may come with a smaller fixed length whip antenna with a magnetic mount base that is okay for testing, but overall is not that great. The recommended outdoor antenna for general scanning is a discone due to their wide band receiving properties. You can also cheaply build a wideband planar disk antenna (pdf warning) out of some metal pizza pans.
SDR# (SDRSharp) Set Up Guide (Tested on Windows 11/10/8/7) (XP/Vista Incompatible) (Works with RTL-SDR Blog V4/V3)
SDR# is the most commonly used SDR program on Windows. We recommend it as one of the easiest to setup and use with the RTL-SDR.
- Purchase an RTL-SDR dongle. We recommend purchasing one of our RTL-SDR Blog V3 or V4 dongles. Information on purchasing one can be found here.
- You must have the Microsoft .NET 7.0 x86 Desktop Runtime installed to use SDRSharp. Most modern PCs will have automatically updated to this already, unless you have specifically blocked these updates on your PC.
- You will also need the Microsoft Visual C++ redistributable installed. Most PCs will have this already installed, but just in case download the x86 version from here.
- Go to www.airspy.com and find the downloads button on the top menu. Next to the «Software Defined Radio Package» heading click on the download button to download sdrsharp-x86.zip. Do not download the community managed edition, as this is often broken.

- Extract (unzip) sdrsharp-x86.zip to a folder on your PC. (Important! Many people who have issues forget this step! DO NOT run the files from within the zip file or the following steps will fail). (Also, do not extract into a folder within the Program Files directory, or installation may fail as these folders are often automatically made read only by Windows).
- Double click on install-rtlsdr.bat from within the extracted folder. On some versions of Windows you may get a SmartScreen warning. Click on More Info, then Run Anyway. This will start a command prompt that will download all the drivers required to make SDRSharp work with RTL-SDR. Once completed, press any key to close the command prompt.
If the batch file ran successfully the files rtlsdr.dll and zadig.exe will be downloaded into the SDR# directory. If they were not downloaded then your PC or anti virus solution may be misconfigured and may have trouble running batch files (Check that the folder is not read only, and not located in the Program Files directory).
If install-rtlsdr.bat fails to download the dll or zadig, do a manual driver installation. If Zadig is smaller than 5000kB (5MB), the download has failed and you should download Zadig manually.
- Plug in your dongle. Do not install any of the software that it came with (if any), and ensure that you wait a few seconds for plug and play to finish attempting to install the dongle (it will either fail or install Windows DVB-T TV drivers). If you’ve already installed the DVB-T drivers that came on the CD bundled with some dongles, uninstall them first.
- In the folder where you extracted the sdrsharp files find the file called zadig.exe. Right click this file and select «Run as administrator».
- In Zadig, go to «Options->List All Devices» and make sure this option is checked. If you are using Windows 10 or 11, in some cases you may need to also uncheck «Ignore Hubs or Composite Parents».

- Select «Bulk-In, Interface (Interface 0)» from the drop down list. Make sure it is Interface 0 (ZERO), and not «1». Note on some PCs you may see something like RTL2832UHIDIR or RTL2832U or Blog V4 instead of the bulk in interface. This is also a valid selection. Double check that USB ID shows «0BDA 2838 00» as this indicates that the dongle is selected.
WARNING: DO NOT select anything else or you will overwrite that device’s driver! DO NOT click around randomly in Zadig. If you do you are likely to overwrite your mouse, keyboard, printer, soundcard etc drivers. Many bad reviews we get are due to people clicking around randomly in Zadig, so PLEASE check what you are doing first.
- Make sure the box to the right of the arrow shows WinUSB. The box to the left of the green arrow is not important, and it may show (NONE) or (RTL…). This left hand box indicates the currently installed driver, and the box to the right the driver that will be installed after clicking Replace/Install Driver.
- Click Replace Driver. On some PC’s you might get a warning that the publisher cannot be verified, but just accept it by clicking on «Install this driver software anyway». This will install the drivers necessary to run the dongle as a software defined radio.

- Open SDRSharp.exe and set the «Source» to ‘RTL-SDR USB‘. The source menu is in the top left Hamburger Menu (the three horizontal lines).

- Press the Play button
 (the right facing triangle in the top left of the program). Your RTL-SDR software radio should now be set up and ready to use! If everything has worked you should be able to start tuning to frequencies.
 - Important! Don’t forget to also adjust the RF gain settings by adjusting it in the Source window, in the lower left of SDR#. By default the RF gain is set at zero. A gain of zero will probably receive nothing but very strong broadcast FM — increase the gain until you start seeing other signals.
To receive HF signals below 24 MHz with an RTL-SDR Blog V3, please see our V3 users guide.

What’s Next?
After getting your RTL-SDR set up with SDR# we recommend investigating the following:
- If you are using a RTL-SDR.com V3 dongle, view our V3 users guide to learn how to use the special features like HF direct sampling and the bias tee. If it is a newer V4 dongle, visit our V4 users guide.
- Read our SDR# Users Guide to learn what each setting in SDR# does. You may also want to check out the more up to date and comprehensive «SDR# Big Book» which is available on the Airspy downloads page.
- Check out all our featured articles on this blog for various RTL-SDR related projects and tutorials.
- Upgrade from the stock antenna. For optimal reception you should use an outdoor roof mounted antenna. The optimal antenna will depend on the frequency and project you are interested in, but for a general all purpose antenna we recommend a Discone or planar disk antenna (pdf).
- If you are using your RTL-SDR for HF with direct sampling mode or an upconverter then we recommended using SDR# with the special decimation drivers. This will allow you to zoom in on the small bandwidth signals used on HF without loosing resolution.
- Check out our store for various RF accessories such as filters, LNA’s and antennas.
- Also check out the official list of SDRSharp plugins which can be found here and also our unofficial list of plugins which can be found here.
Troubleshooting (Click to Expand)
- I am using a V4 dongle but it receives nothing, or signals appear to be at the wrong frequency.
This will happen if you are not using our RTL-SDR Blog drivers. V4 units require our custom drivers to work. Please follow the instructions carefully. - I received a black colored dongle instead of a silver one. What is the difference?
In early 2023 we are transitioning from silver colored enclosures to black colored dongles. The reasons are to try and seperate our brand from the clones that are copying us, and also as we need to add clearer FCC regulation text on the product to be compliant with regulations. There are no functional differences between silver and black RTL-SDR Blog units, the changes are purely cosmetic. - My dongle has an R860 tuner. Most posts talk about the R820T/2. Is the R860 a legitimate tuner?
Yes, the R860 is the new batch of tuners, identical to the R820T/2. You might find them on new dongles purchased from 2021 onwards. The name appears to have been changed by the manufacturer simply for accounting and tracking purposes, since the R820T2 line for TV dongle usage has been officially discontinued, and the R860 is only sold specifically for SDR usage now.
- I get the error «No Device Selected» when trying to start the dongle in SDR#.
Make sure you have run the install-rtlsdr.bat file, and that it has successfully downloaded the rtlsdr.dll file into the SDR# folder. If it is not downloaded, check that your folder is not set to «read only» (this sometimes happens automatically if you install into Program Files, so do not install into that folder). Another source of problems is if you have accidentally installed the WinUSB drivers to Bulk Interface 1 instead of 0 with Zadig. If you have done this, then SDR# will not recognize your dongle. To fix it go into device manager or Devices and Printers and uninstall the driver for Bulk Interface 1.
- I’m seeing weird wavy lines in the spectrum wherever I tune, and no signals.
This is most likely due to your USB port underpowering the RTL-SDR. This can easily happen with long USB cables, or unpowered hubs. Please try connecting the RTL-SDR directly to the PC to confirm.
- I get the error «No compatible devices found» when trying to start the dongle in SDR#
Long low quality USB extension cables can sometimes cause this error. Some USB 3.0 ports are also incompatible with the dongle and cause this error. One user has had luck with this error by installing zadig from safe mode. Finally, there is a small chance that the dongle is actually faulty. If the dongle produces the same error on multiple computers the dongle is probably faulty and should be refunded or replaced.
- Zadig just hangs when I try to install the driver
One user has reported that this can happen when a Windows Update has failed, and is continuously running in the background without your knowledge. Another solution that people usually have success with is using an alternative Zadig tool available at visualgdb.com/UsbDriverTool. Use the tool to install the WinUSB driver.
- Zadig shows NONE in the driver install screen.
Some users have reported this as an issue, but this is normal. The box on the left indicates the CURRENTLY installed driver. The box on the right indicates the driver THAT WILL BE installed after clicking on the install button.
- When trying to run Zadig I get an error «This app can’t run on your PC», or «The version of this file is not compatible with the version of Windows you’re running». I have a 64-bit PC.
This is due to some sort of problem with your PC’s configuration, although exactly what is unknown. Users have found that downloading the file manually with Chrome also produces the error, but downloading it with Edge browser results in a file that works. So try downloading from the Zadig website in Edge, or using the alternative tool at visualgdb.com/UsbDriverTool.
- My dongle was working before but today it no longer works and displays an error when I click on Play.
99% of the time this is because Windows automatic driver updates has automatically removed the SDR drivers and installed DVB-T drivers in its place. Make sure Windows automatic driver updates are turned off, and rerun zadig to reinstall the WinUSB driver.
- Windows updates broke my dongle!
Windows updates sometimes overwrite the SDR drivers with broken Windows ones. Simply run zadig again and install the drivers again to fix it.
- My dongle gets extremely hot and stops working, or doesn’t work at all. USB current measures well above 0.3A.
It is normal for the dongle to be hot or warm during operation. But there is a small number of RTL8232U chips that come from the factory faulty (we measure this at less than 0.3%). They draw very high current, cause excessive heat and eventually fail. Some units will work for a few minutes to hours before exhibiting issues, and others will fail instantly. If you have a USB current meter you can check and see if the current draw is above 0.3A. If higher then something is wrong with the RTL2832U. If you suspect a fault like this contact the manufacturer of your dongle and ask for a refund or replacement.NOTE: This higher than normal current draw issue does not exist in batches of the RTL-SDR Blog V3 from 2019 onwards, but it may exist on other brands as we have not yet seen any copy our fixes for this problem.
- I get the error «1 compatible devices have been found but are all busy» or «libusb Open error -12»
First check that another program is not using the RTL-SDR. Also some USB 3.0 ports are buggy, switch to a USB 2.0 port. Some users have also had success with installing everything from Windows safe mode.
Make sure you are not selecting the «USB Receiver (Interface 0)» in zadig, and instead are selecting the Bulk in interface, or one that may say RTL2838UHIDIR or something else prefixed with RTL.
If you don’t see the correct Bulk in Interface make sure that «Options->List All Devices» is checked and that «Ignore Hubs or Composite Parents» is unchecked. Then you might see an entry like «RTLSDR (Composite)» which is what you should select with Zadig. READ this forum post especially if you are on Windows 10.
Another thing to try may be to disable Windows automatic driver installation. Instructions for disabling this can be found here. This error also sometimes occurs after the computer has been suspended — to fix it simply disconnect and reconnect the dongle.
- In SDR# get the error «Unable to load DLL ‘rtlsdr’: the specified module could not be found. (Exception from HRESULT: 0x8007007E)»
Usually installing the Visual C++ Runtime solves this problem. Most PCs have this installed already, but if you are on a freshly installed version of Windows it may not have been installed yet.
- With SDR# I get the error «The application has failed to start because its side-by-side configuration is incorrect».
If you are using the x64 version try the x86 version. This can also indicate a corrupted .NET install on your PC. Attempt a .NET repair or reinstall.
- There is a constant spike in the middle of the spectrum that won’t go away.
This is normal and is a side effect of the design of most RTL-SDR dongles. It can be removed algorithmically in the SDR# software by checking the «Correct IQ» box. If you are using an E4000 dongle select offset tuning instead.
- I don’t see Bulk-In, Interface (Interface 0)
Ensure «Options->List All Devices» is checked. Sometimes you may also need to uncheck «Ignore Hubs or Composite Parents». Some people report seeing something else other than the bulk in interface. It may also show up as the brand of your dongle or something prefixed with «RTL», e.g. RTL2832U or RTL2832UHIDR. Any of those options should work too. In rare cases you may receive a faulty dongle that will not show up in Zadig no matter what USB port or computer you try it on. You should ask for a replacement in this case.
- USB 3.0 ports don’t work
Unfortunately some cheap USB 3.0 controllers are buggy and don’t work with some USB 2.0 devices. Generally, USB 3.0 works fine with the RTL-SDR, but there are some controllers that will just not recognize the dongle. In this case use a USB 2.0 port instead.
- When running install-rtlsdr.bat I get errors on the command line like “The system cannot find the file specified” and the sdrsharp folder is not downloaded
This is because you did not unzip the files and you are trying to run install-rtlsdr.bat from within the zip file. Remember to extract the files first, before running them.
- When I run install-rtlsdr.bat a CMD/DOS window flashes on the screen briefly then disappears. Nothing is installed.
There seems to be a bug or misconfiguration with some versions of Windows where batch files cannot be run. One way around this is to install the RTL-SDR drivers manually. We have instructions for this here: rtl-sdr.com/manual-installation-of-sdr. Some antivirus solutions are also overly restrictive and do not allow .bat files to be run. In this case either disable or install a better antivirus, or perform a manual driver install.
- Reception in SDR# seems very poor/receiver is insensitive
Make sure you have increased the RF gain slider which can be accessed by clicking on the configure button. Also, in poor reception areas using the stock antenna indoors may not be sufficient. First test with the antenna placed up high outside. In some cases with the stock antenna the connection to the antenna can become disconnected in the antenna base causing unexpectedly poor reception. In rare cases if you still cannot receive any strong signals and another radio can, then you may have received a broken dongle and should ask for a replacement.
- SDR# gives error «Application failed to initialize properly (0xc0000135). Click OK to terminate.»
This might mean that you do not have the correct .NET Framework installed.
- SDR# gives error «Object reference not set to an instance of an object»
This may mean that you do not have an audio driver properly installed on your PC, or that you do not have any output audio devices enabled. Enable them in the windows Sound Playback properties.
- The dongle constantly disconnects from the USB port
First test to make sure that it is not the fault of a bad USB extension cable by plugging the dongle directly into the PC. Try other USB cables if possible. If the USB connector is loose, gently pressing on the top of the USB connector on the RTL-SDR and making a small indentation can help tighten the connection. If it still disconnects often the dongle may be faulty and you should ask for a replacement.
- SDR# freezes when my display goes to sleep
This appears to be a bug with SDR# or Windows. The solution right now is to simply turn display sleep off.
- The dongle won’t connect and the LED does not illuminate on models with an LED
The dongle is faulty and should be refunded or replaced.
- It seems that my PC is not powerful enough to run SDR# as it uses near 100% CPU
For graphical GUI SDR software like SDR#, at least a dual core processor is recommended. If you have a borderline decent CPU and still experience high CPU usage, try reducing the sample rate to 1 MSPS or less, reducing the FFT display resolution (or turning it off), turning off Correct IQ and reducing the filter order.
- I used zadig but it broke my keyboard/mouse/other USB device somehow
This is because you would have clicked the install button in Zadig after selecting the wrong device in the drop down menu. Please don’t randomly click things in Zadig and be sure to read step 9 very carefully. Make sure you select the correct RTL-SDR device, (Bulk-In Interface, Interface 0) first. Zadig overwrites previous drivers.
To get the old drivers back you should be able to do so in Windows device manager, right click device -> Properties -> Driver Tab -> Update Driver -> Browse my computer for driver software -> Let me pick from a list of available drivers on my computer -> Pick the old driver and then click next and follow the instructions.
- My R860 or R820T2 RTL-SDR shows up as an R820T when I run the diagnostic tool rtl_test
The R860, R820T2 and R820T are identical electronically except for some minor changes in the maximum IF filter widths that occurred by accident from using higher quality silicon in the R820T2. The accidentally different filters and higher quality silicon may be the reason the R820T2 has generally better performance and less manufacturing variability. Thus a R820T2 will show up as an R820T on the PC, since there is no distinction between them in the digital part of the circuit. You can confirm that you have a R820T2 by checking the markings on the chip.
- My antivirus shows SDR# as a virus.
This is almost 100% a false positive. SDR# is updated often and thus a new .zip file is sometimes released almost daily. Poorly designed antivirus programs will sometimes assume that any file that is not downloaded often is a virus. With SDR# being updated so often it takes a while for many people to download the new version and build up trust with the antivirus company.
- The Mode selection buttons in SDR# are graphically glitching and I cannot click on them.
Some users have found that this bug is caused due to selection of a «custom scaling level» or «custom sizing options» in Windows. Reset this option back to default in Windows display settings to fix the bug.
- When closing SDR# I get an error like «An error occurred loading a configuration file: Access to the path ‘C:\Program Files\SDR\s14i12qq.tmp’ is denied. (C:\Program Files\SDR\SDRSharp.exe.Config) —> System.UnauthorizedAccessException: Access to the path ‘C:\Program Files\SDR\s14i12qq.tmp’ is denied.»
This is usually because you have copied the SDR# files into a folder that is read only. In Windows folders located in «C:\Program Files» are usually automatically read only. To fix, install SDR# into a non read only folder that is not located in Program Files, for example «C:\SDR».
- My dongle came with a remote control. What is it for?
Some sellers opt to include the remote control that is used for changing TV channels. It is only useful for when the dongle is used for its original purpose — as a DVB-T HDTV receiver. The remote control has no purpose when the dongle is used as an SDR.
- I want to watch DVB-T with my dongle, how do I do it?
The original purpose of the dongle was for DVB-T TV, and it can still do this. But please note that the DVB-T drivers and the SDR drivers are different, and they cannot both be installed at the same time. You can download the DVB-T drivers here. We recommend using Prog-DVB as the TV software.
- I have a RTL-SDR V3 and can’t get the HF signals to work
You must turn on the direct sampling mode for HF reception. Please see the V3 users guide for information on how to activate the direct sampling mode.
- I get the error «rtlsdr_demod_write_reg failed with -9» on command line based software like rtl_fm, rtl_test, the bias tee software etc.
This usually means that there is some issue with the USB port on your PC not working correctly. Try other USB ports on your PC, and confirm that the dongle operates on another PC.
- I have a modern Ryzen based motherboard with USB 3.0/3.1 and no software can detect and run my RTL-SDR.
There appears to be a LibUSB bug/incompatibility with modern motherboards like this. We have published a version of our «rtl-sdr-blog» drivers that should have a fix for this here. Replace the rtlsdr.dll file in the SDR# folder with the librtlsdr.dll file from the zip, and rename it to rtlsdr.dll. Someone else has has also published a fixed DLL here which works for some people. Modern firmware updates to Ryzen should eliminate this problem.
- I get decoding, audio and/or visual spectrum glitches when I set the PPM offset to a non-zero value.
This can happen if you have set the sampling rate to the maximum stable rate at 2.56 MSPS. Adjusting the PPM value actually slightly modifies the sampling rate, so you may be pushing it over the stable limit. To solve this you will need to go down to a sampling rate of 2.4 MSPS.
If you continue to have issues please feel free to post in the troubleshooting section of our Forums.
Alternative Software
Below are various alternatives to SDR# that we also highly recommend. The first step to all installations is installing the drivers with Zadig. Follow the Zadig guide below when setting up a new dongle if you have not already done so during the SDR# installation.
Before following the next steps, please make sure you have installed the Microsoft Visual C++ x64 redistributable. Most PCs will have this already installed, but on some fresh installs this may not be the case.
Installing Zadig drivers
- Purchase an RTL-SDR dongle. The cheapest and best for most applications is the R820T/R820T2/R860 dongle. Information on purchasing one can be found here.
- Plug in your dongle and do not install any of the software that it came with, but ensure you let plug and play finish trying to install it. If you’ve already installed the software drivers it came with previously, uninstall them first.
- Go to zadig.akeo.ie and download Zadig.
- In Zadig, go to Options->List All Devices and make sure this option is checked.
- Select «Bulk-In, Interface (Interface 0)» from the drop down list. Note on some PCs you may see something like RTL2832UHIDIR or RTL2832U or Blog V4 instead of the bulk in interface. This is also a valid selection. Double check that USB ID shows «0BDA 2838 00» as this indicates that the dongle is selected.
WARNING: Do not select anything else or you will overwrite that device’s driver! DO NOT click around randomly on Zadig. If you do you are likely to overwrite your mouse, keyboard, printer, soundcard etc drivers.

- Make sure the box to the right of the arrow shows WinUSB. You might get a warning that the publisher cannot be verified, but just accept it by clicking on Install this driver software anyway. This will install the drivers necessary to run the dongle as a software defined radio. Note that you may need to run zadig.exe again if you move the dongle to another USB port, or want to use two or more dongles together.
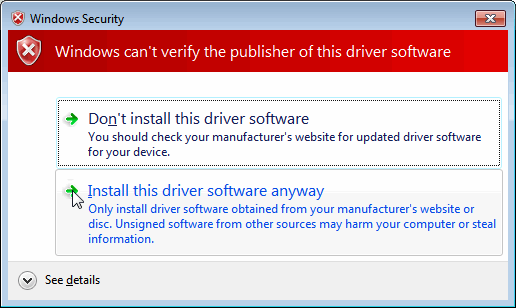
SDR++ Setup Guide (Tested on Windows 7, 10, 11) (Works with RTL-SDR Blog V4/V3)
If you experience problems with SDR#, SDR++ is our second choice software that we also highly recommend.
- Follow the Zadig guide above to install the RTL-SDR drivers via Zadig.
- Head to www.sdrpp.org and click on the button to Download the latest release.
- In the «Assets» list click on «sdrpp_windows_x64.zip«

- Extract the zip file onto a folder on your PC.
- (V4 USERS — V3 OPTIONAL) — Download the latest RTL-SDR Blog drivers from the GitHub releases page. Open the x64 folder in Releases.zip and copy the rtlsdr.dll file into the SDR++ folder, replacing the old one.
- In the extracted folder, double click on «sdrpp.exe» to start the software.

- In the top left find the «Source» menu, and select «RTL-SDR» from the drop down menu.

- Click on the Play button in the top bar.
- You should begin to see the spectrum and waterfall. You can tune to a new frequency with the frequency tuner in the top bar, and within the active bandwidth by clicking on the spectrum.

- Remember to set the Gain using the slider under the Source menu on the side.

- And remember to select the correct demodulation mode for the signal you are tuned to via the «Radio» menu on the left.

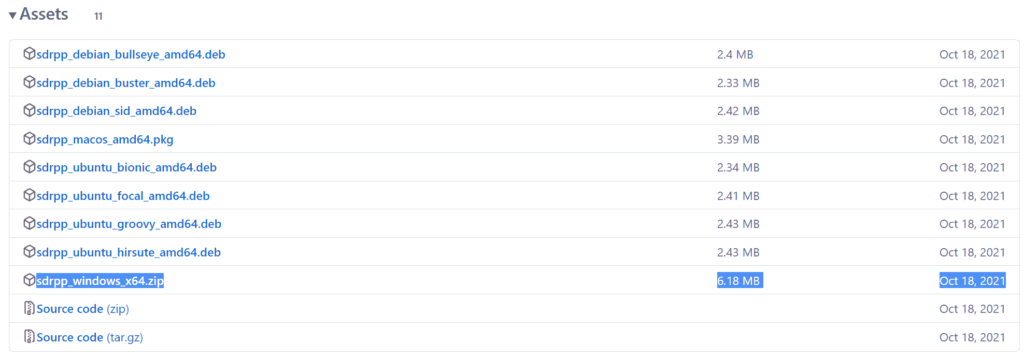

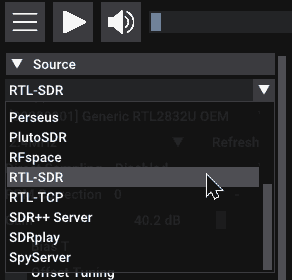
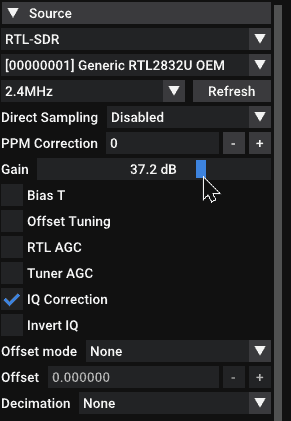
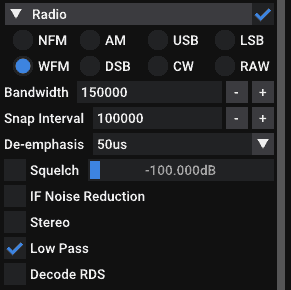
HDSDR Setup Guide (Tested on Win XP and above) (Works with RTL-SDR Blog V4/V3)
- Follow the Zadig guide above to install the RTL-SDR drivers via Zadig.
- Download HDSDR from http://hdsdr.de/, using the download button at the bottom of the page.
- Use the installer you just downloaded to install HDSDR.
- Go to https://github.com/hayguen/ExtIO_RTL/releases and download the latest 2023 version of the ExtIO zip file. Open the Zip File.
- Copy the ExtIO_RTL.dll file into the HDSDR install folder which is by default set to C:\Program Files (x86)\HDSDR.
- Open HDSDR. You might be asked to select a .dll file. If it asks choose the ExtIO_RTLU.dll file you just copied over and then click Open. It is okay if you do not see this screen as long as you have copied the ExtIO_RTL.dll file over properly in the last step.
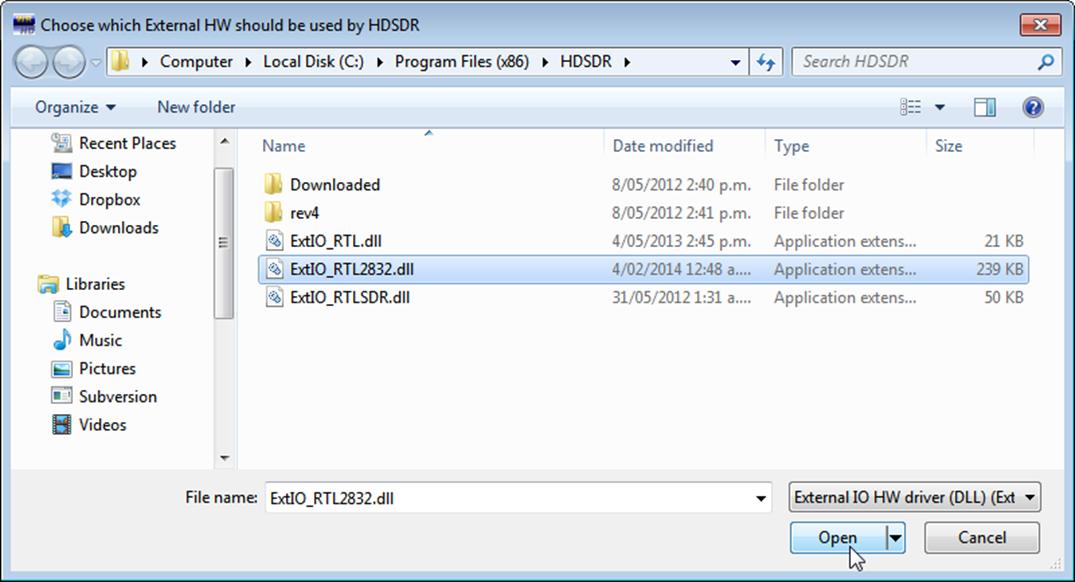
- Choose your output sound card by clicking on the Soundcard button in the bottom left corner, or alternatively by pressing F5. The only important setting here is the “RX Output (to Speaker)” setting which you should set to your speakers, or desired audio piping software.
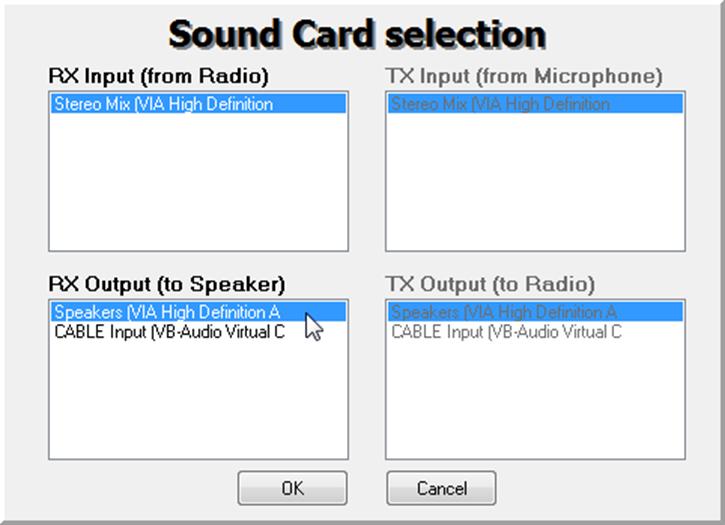
- Click on the Bandwidth button or alternatively press F6. Choose an output Sampling Rate of 48000 Hz for general NFM signals, or choose 192000 for wideband FM signals, like broadcast FM.
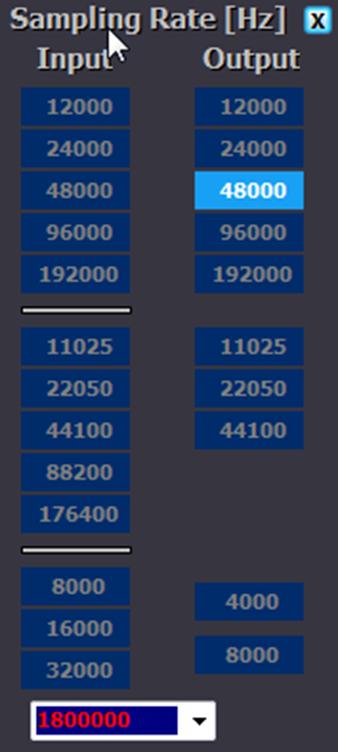
- Press Start or alternatively press F2. This will start the SDR.
- To set the RTL-SDR sample rate, gain and frequency correction click on the green «SDR-Device» button.

- For the V4 make sure that «IF AGC» is NOT selected otherwise you may experience problems.
- To tune to a station, change the Local Oscillator frequency to a frequency near the frequency you are interested in. Then tune to the desired frequency either by clicking in the RF spectrum, or using the Tune numbers.
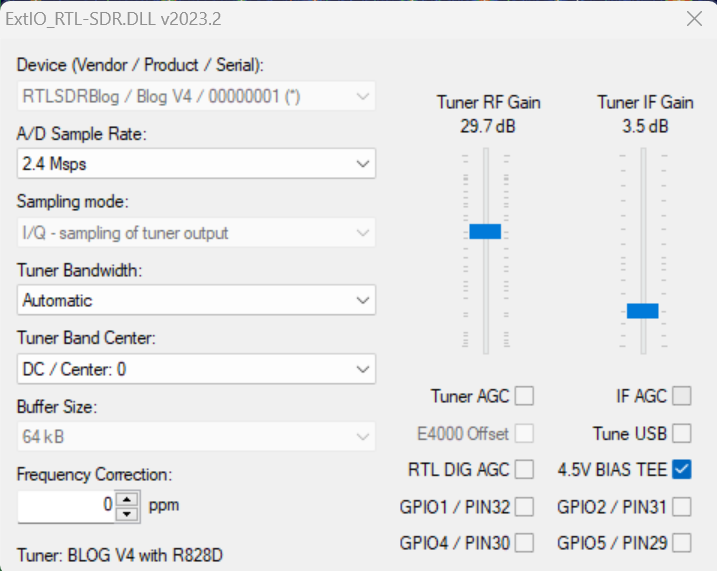
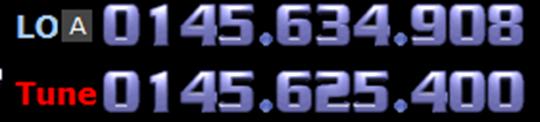
- You can zoom in and out of the spectrum by using the Zoom slider which is to the left of the word zoom.
![]()
- The mode can be altered by clicking on the mode buttons.
![]()
- After clicking on the FM mode button, the FM bandwidth can be manually modified with the FM-BW slider.
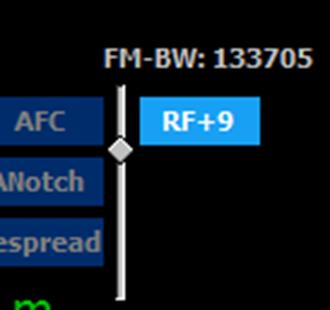
- To listen to a typical wideband broadcast FM station, you will need to change the audio sampling rate to 192000 Hz. Do this by clicking on the Bandwidth button or alternatively by pressing F6 and then selecting the output sampling rate as 192000 Hz.
Alternatively for HDSDR you can also use extio_rtl_tcp which will allow you to connect to an rtl_tcp server.
CubicSDR Set Up Guide (Tested on XP and above) (Works with RTL-SDR Blog V4/V3)
- Follow the Zadig guide above to install the RTL-SDR drivers via Zadig
- Go to cubicsdr.com and go to the downloads page. Find the download link for the latest version. Download the version suitable for your particular version of Windows.
- Run the CubicSDR installer.
- (V4 USERS — V3 OPTIONAL) — Download the latest RTL-SDR Blog drivers from the GitHub releases page. Open the x64 folder in Releases.zip and copy the rtlsdr.dll file into the Program Files\CubicSDR folder, replacing the old one.
- Plug in your dongle and run CubicSDR from your start menu.
- You will be greeted with a SDR Devices menu. Choose your RTL-SDR from the menu and click on the «Use Selected» button.
- CubicSDR will automatically start.
- Click anywhere on the waterfall to start listening.
Other SDR Windows Software Compatible with RTL-SDR
See the Software Guide for a big list of other compatible RTL-SDR software.
Getting Started on Linux
These are the instructions for installing our RTL-SDR Blog drivers. Type them into the Linux terminal one by one.
First, if you already have some other drivers installed, please purge them from your system using the following commands:
sudo apt purge ^librtlsdr
sudo rm -rvf /usr/lib/librtlsdr* /usr/include/rtl-sdr* /usr/local/lib/librtlsdr* /usr/local/include/rtl-sdr* /usr/local/include/rtl_* /usr/local/bin/rtl_*
Next you can install the RTL-SDR Blog drivers using the following.
sudo apt-get install libusb-1.0-0-dev git cmake
git clone https://github.com/rtlsdrblog/rtl-sdr-blog
cd rtl-sdr/
mkdir build
cd build
cmake ../ -DINSTALL_UDEV_RULES=ON
make
sudo make install
sudo cp ../rtl-sdr.rules /etc/udev/rules.d/
sudo ldconfig
After installing the libraries you will likely need to unload the DVB-T drivers, which Linux uses by default. To unload them temporarily type «sudo rmmod dvb_usb_rtl28xxu» into terminal. This solution is only temporary as when you replug the dongle or restart the PC, the DVB-T drivers will be reloaded. For a permanent solution, create a text file «rtlsdr.conf» in /etc/modprobe.d and add the line «blacklist dvb_usb_rtl28xxu». You can use the one line command shown below to automatically write and create this file.
echo 'blacklist dvb_usb_rtl28xxu' | sudo tee --append /etc/modprobe.d/blacklist-dvb_usb_rtl28xxu.conf
Now you can restart your device. After it boots up again run «rtl_test» at the terminal with the RTL-SDR plugged in. It should start running.
NOTE: Some devices like the Orange Pi zero have a bug in their current mainline OSes. Instead of blacklisting «dvb_usb_rtl28xxu», you will need to blacklist «dvb_usb_rtl2832u». If you installed rtl-sdr by «apt-get», you will need to update the black list file at /etc/modprobe.d/rtl-sdr-blacklist.conf manually too.
After installing the libraries and black listing the DVB-T drivers we recommend starting off with SDR++ or GQRX. Instructions for installing SDR++ are on their GitHub, and for GQRX it can be downloaded via the package manager in your Linux distribution or from http://gqrx.dk/download. We can also recommend the multi-platform CubicSDR which can be downloaded from http://www.cubicsdr.com.
Getting Started on OSX
SDR++ is highly recommended for us on OSX. Instruction on their GitHub.
GQRX is also an excellent SDR program that works well on OSX.
We can also recommend CubicSDR which can be downloaded from cubicsdr.com.