-
Contents
-
Table of Contents
-
Troubleshooting
-
Bookmarks
Quick Links
P3PC-4422-01ENZ2
Basic Operation Guide
Related Manuals for Fujitsu ScanSnap SV600
Summary of Contents for Fujitsu ScanSnap SV600
-
Page 1
P3PC-4422-01ENZ2 Basic Operation Guide… -
Page 2: Table Of Contents
Contents About This Manual ……………………. 5 Safety Information……………………..6 Manuals ………………………….7 Trademarks……………………….10 Manufacturer……………………….11 Symbols Used in This Manual…………………… 12 Arrow Symbols in This Manual………………….. 13 Screen Examples in This Manual ………………….14 For Windows 8 Users ……………………… 15 Abbreviations Used in This Manual ………………….16 What You Can Do with the ScanSnap ……………..
-
Page 3
Purchasing and Cleaning the Background Pad ………………154 Specification ……………………….. 155 Documents That Can Be Scanned with the ScanSnap and How to Load Them (Models Other than SV600) ………………….. 156 Documents for Scanning (For iX500/S1500/S1500M/S510) …………..157 Conditions for Documents to Scan (For iX500/S1500/S1500M/S510) ……….158 Conditions for Using the Carrier Sheet (For iX500/S1500/S1500M/S510) ……….. -
Page 4
How to Load Documents (For S1100) ………………..177 About Customer Support and Maintenance …………… 179… -
Page 5: About This Manual
About This Manual About This Manual «Safety Information» (page 6) «Manuals» (page 7) «Trademarks» (page 10) «Manufacturer» (page 11) «Symbols Used in This Manual» (page 12) «Arrow Symbols in This Manual» (page 13) «Screen Examples in This Manual» (page 14) «For Windows 8 Users»…
-
Page 6: Safety Information
Safety Information Safety Information The attached «Safety Precautions» manual contains important information about the safe and correct use of the ScanSnap. Make sure that you read and understand it before using the ScanSnap.
-
Page 7: Manuals
→ [Safety Precautions] under [ScanSnap Manager]). When Setting Up the ScanSnap Manual Description and Location ScanSnap SV600 Getting This manual explains the setup procedure from the moment you open the package to Started testing the operations.
-
Page 8
Manuals When Saving Scanned Images to a Mobile Device Manual Description and Location ScanSnap Connect This manual describes operations to be performed on an iOS-based mobile device Application User’s Guide when you save scanned images to the mobile device. (iOS) This manual can be accessed by the following method: 1. -
Page 9
Manuals When Using Bundled Applications Manual Description and Location ScanSnap Organizer Help This Help file describes the operations, windows, and messages of ScanSnap Organizer. This Help file can be accessed by one of the following methods: l Select [Start] menu → [All Programs] → [ScanSnap Organizer] → [Help] (for Windows 8, right-click the Start screen, and select [All apps] on the app bar →… -
Page 10: Trademarks
Trademarks Trademarks Microsoft, Windows, Windows Vista, Excel, PowerPoint, Outlook, SharePoint, Windows Live, Internet Explorer, and Entourage are either registered trademarks or trademarks of Microsoft Corporation in the United States and/or other countries. Word is the product of Microsoft Corporation in the United States. Adobe, the Adobe logo, Acrobat, and Reader are either registered trademarks or trade names of Adobe Systems Incorporated in the United States and/or other countries.
-
Page 11: Manufacturer
Manufacturer Manufacturer PFU LIMITED International Sales Dept., Imaging Business Division, Products Group Solid Square East Tower 580 Horikawa-cho, Saiwai-ku, Kawasaki-shi, Kanagawa 212-8563, Japan Phone: (81-44)-540-4538 ©PFU LIMITED 2013…
-
Page 12: Symbols Used In This Manual
Symbols Used in This Manual Symbols Used in This Manual The following indications are used in this manual to obviate any chance of accident or damage to you and people near you, and your property. Warning labels indicate the warning level and statements.
-
Page 13: Arrow Symbols In This Manual
Arrow Symbols in This Manual Arrow Symbols in This Manual Right-arrow symbols (→) are used to connect icons or menu options you should select in succession. Example: Select [Start] menu → [Computer].
-
Page 14: Screen Examples In This Manual
Screen Examples in This Manual Screen Examples in This Manual Microsoft product screenshots are reprinted with permission from Microsoft Corporation. The screenshots used in this manual are of Windows 7. The actual windows and operations may differ depending on the operating system. Icon in the Notification Area The ScanSnap Manager icon is displayed in the menu which appears when you click…
-
Page 15: For Windows 8 Users
For Windows 8 Users For Windows 8 Users To start ScanSnap applications or display Control Panel, use the All apps screen. The All apps screen is displayed by following the procedure below. Right-click the Start screen. Click [All apps] on the app bar.
-
Page 16: Abbreviations Used In This Manual
Abbreviations Used in This Manual Abbreviations Used in This Manual When a ScanSnap model is referred to in this manual, «Color Image Scanner ScanSnap» is omitted. Also, the following abbreviations are used in this manual. Abbreviation Used Designation Windows 8 ®…
-
Page 17
Abbreviations Used in This Manual Abbreviation Used Designation ABBYY FineReader for ™ ABBYY FineReader for ScanSnap ScanSnap All the descriptions in this manual assume the usage of ABBYY FineReader for ScanSnap bundled with the ScanSnap. Unless otherwise specified, the term ABBYY FineReader for ScanSnap refers to the ABBYY FineReader for ScanSnap bundled with the ScanSnap. -
Page 18: What You Can Do With The Scansnap
What You Can Do with the ScanSnap What You Can Do with the ScanSnap The ScanSnap model that performs overhead scanning has a scanning unit that does not touch documents. The following scanning operations can be performed with this model: l A book or booklet that is up to A3 in size can be scanned without cutting pages out.
-
Page 19
What You Can Do with the ScanSnap This is useful also for scanning multiple documents (of any type) consecutively. There are two types of settings for timed mode: l Setting the time period before the ScanSnap starts scanning a document after the [Scan] button is pressed l Setting the time period for the ScanSnap to start the next scan when a document is scanned continuously… -
Page 20
«Deleting Unnecessary Scanned Images» (page 99) Scanning Documents with Two ScanSnaps Connected to a Computer You can use SV600 and another ScanSnap connected to a computer. For details, refer to «Scanning Documents with Two ScanSnaps Connected to a Computer» (page… -
Page 21: Scanning A Document
Scanning a Document Scanning a Document Press the [Scan] or [Stop] button on the ScanSnap to turn the power on. [Stop] Button [Scan] Button a The power LED lights up in blue. In addition, the ScanSnap Manager icon in the notification area changes from Place the Background Pad on the front side of the ScanSnap.
-
Page 22
Scanning a Document White Sheets ATTENTION l Do not perform the following operations during scanning. Doing so will stop scanning. Connect or disconnect the ScanSnap and other USB devices. Switch users. Allow the computer to enter sleep mode. l Do not cover the white sheet with an object or hand during scanning. The color reproduction of the scanned image will be affected. -
Page 23
Scanning a Document a When scanning is complete, the [ScanSnap Manager — Image scanning and file saving] window displays a scanning standby status. HINT To continue scanning, place down the next document to be scanned, and then perform one of the following operations. -
Page 24
Scanning a Document Select [Crop and save flat document images as-is], and then click the [Save this image] button. a The Quick Menu appears. In the Quick Menu, click the icon of the application to link with ScanSnap Manager. When you select , you can manage scanned images by folder in a file management application. -
Page 25
Scanning a Document a The selected application starts up. For details, refer to the Advanced Operation Guide. ATTENTION l You cannot start scanning when the Quick Menu is displayed. Either select an icon from the Quick Menu and finish the process, or close the Quick Menu before you perform the next scan. -
Page 26: Scanning A Book
Scanning a Book Scanning a Book Press the [Scan] or [Stop] button on the ScanSnap to turn the power on. [Stop] Button [Scan] Button a The power LED lights up in blue. In addition, the ScanSnap Manager icon in the notification area changes from Place the Background Pad on the front side of the ScanSnap.
-
Page 27
Scanning a Book White Sheets ATTENTION l Do not perform the following operations during scanning. Doing so will stop scanning. Connect or disconnect the ScanSnap and other USB devices. Switch users. Allow the computer to enter sleep mode. l Do not cover the white sheet with an object or hand during scanning. The color reproducibility of the scanned image will be affected. -
Page 28
Scanning a Book a When scanning the book is complete, the [ScanSnap Manager — Image scanning and file saving] window displays a scanning standby status. HINT To continue scanning the book, open the next page to be scanned, and then perform one of the following operations: Continuous scanning of the book starts. -
Page 29
Scanning a Book Select [Correct and save double-page spread document images (book/ magazine)], and then click the [Save this image] button. HINT Click the [Check/Correct] button in the [ScanSnap Manager — Image scanning and file saving] window to correct the scanned image. The following functions are available: «Correcting Distorted Book Images»… -
Page 30
Scanning a Book a The selected application starts up. For details, refer to the Advanced Operation Guide. ATTENTION l You cannot start scanning when the Quick Menu is displayed. Either select an icon from the Quick Menu and finish the process, or close the Quick Menu before you perform the next scan. -
Page 31: Scanning Multiple Documents At Once
Scanning Multiple Documents at Once Scanning Multiple Documents at Once Press the [Scan] or [Stop] button on the ScanSnap to turn the power on. [Stop] Button [Scan] Button a The power LED lights up in blue. In addition, the ScanSnap Manager icon in the notification area changes from Place the Background Pad on the front side of the ScanSnap.
-
Page 32
Scanning Multiple Documents at Once White Sheets ATTENTION l Do not perform the following operations during scanning. Doing so will stop scanning. Connect or disconnect the ScanSnap and other USB devices. Switch users. Allow the computer to enter sleep mode. l Do not cover the white sheet with an object or hand during scanning. -
Page 33
Scanning Multiple Documents at Once a When scanning is complete, the [ScanSnap Manager — Image scanning and file saving] window displays a scanning standby status. HINT To continue scanning, place down the next document to be scanned, and then perform one of the following operations. -
Page 34
Scanning Multiple Documents at Once Select [Crop and save flat document images as-is], and then click the [Save this image] button. HINT Click the [Check/Correct] button in the [ScanSnap Manager — Image scanning and file saving] window to correct the scanned image. The following functions are available: «Correcting the Scanned Image Orientation»… -
Page 35
Scanning Multiple Documents at Once a The selected application starts up. For details, refer to the Advanced Operation Guide. ATTENTION l You cannot start scanning when the Quick Menu is displayed. Either select an icon from the Quick Menu and finish the process, or close the Quick Menu before you perform the next scan. -
Page 36: Scansnap Overview
ScanSnap Overview ScanSnap Overview This section provides an overview that you should be aware of before operating ScanSnap. «Parts and Functions» (page 37) «ScanSnap Manager Icon» (page 40) «Right-Click Menu» (page 41) «ScanSnap Setup Dialog Box» (page 43) «Turning the ScanSnap On/Off» (page 45) «Documents to Scan»…
-
Page 37: Parts And Functions
Parts and Functions Parts and Functions This section explains the names and functions of the ScanSnap parts. Front Name Description Head - Neck - [Scan] button (*1) l Turns on the ScanSnap. l Starts scanning. [Stop] button (*1) l Turns the ScanSnap on or off. l Stops scanning.
-
Page 38
Parts and Functions ATTENTION When carrying the ScanSnap, hold its base and neck. Do not carry the scanner by the head. Back Name Description Security cable slot Used to connect an anti-theft security cable (commercially available). USB connector Used to connect a USB cable. Power connector Used to connect the AC cable. -
Page 39
Parts and Functions Name Description Camera Detects page turning and glossy papers. Infrared LED Irradiates the scan area with infrared to detect page turning and glossy papers. Glass Protects the lens used to scan a document. Lamp Illuminates the document to be scanned. -
Page 40: Scansnap Manager Icon
ScanSnap Manager Icon ScanSnap Manager Icon When ScanSnap Manager is running, the ScanSnap Manager icon is displayed in the notification area. The notification area is located at the far right of the taskbar. The ScanSnap Manager icon indicates whether or not ScanSnap Manager is successfully communicating with the ScanSnap.
-
Page 41: Right-Click Menu
Right-Click Menu Right-Click Menu This menu appears when you right-click the ScanSnap Manager icon Item Function Scan Scans the document placed in the scan area of the ScanSnap. Follows the settings configured in [Scan Button Settings]. Scan Button Settings Displays the «ScanSnap Setup Dialog Box»…
-
Page 42
Exit Exits ScanSnap Manager. HINT When SV600 and one of iX500, S1500, S1500M, S1300i, S1300, S1100, S510, and S300 are connected to a computer, the Right-Click Menu displays items relevant to each of the connected ScanSnap models. For details, refer to the ScanSnap Manager Help. -
Page 43: Scansnap Setup Dialog Box
Detail Setting Tabs HINT When SV600 and one of iX500, S1500, S1500M, S1300i, S1300, S1100, S510, and S300 are connected to a computer, you can change the scan settings for each of the connected ScanSnap models by selecting the model name from [Scanner] on the ScanSnap setup dialog box.
-
Page 44
ScanSnap Setup Dialog Box… -
Page 45: Turning The Scansnap On/Off
Turning the ScanSnap On/Off Turning the ScanSnap On/Off This section explains how to turn the ScanSnap on or off. «Turning the ScanSnap On» (page 46) «Turning the ScanSnap Off» (page 48) «Sleep Mode» (page 49) «Automatic Power OFF» (page 50)
-
Page 46: Turning The Scansnap On
Turning the ScanSnap On/Off Turning the ScanSnap On Turn on the computer. a Windows starts up and the ScanSnap Manager icon appears in the notification area. HINT l If the ScanSnap Manager icon is not displayed in the notification area, select [Start] menu →…
-
Page 47
Turning the ScanSnap On/Off HINT l It may take more time for the ScanSnap Manager icon in the notification area to change to depending on computer performance, operating environment, or loading, for example, when many software programs are running at the same time. l When the ScanSnap is turned on, a pop-up balloon notifies you of the ScanSnap’s communication status. -
Page 48: Turning The Scansnap Off
Turning the ScanSnap On/Off Turning the ScanSnap Off Press the [Stop] button on the ScanSnap for three seconds or longer. a The power LED turns off. In addition, the ScanSnap Manager icon in the notification area changes from ATTENTION If moving the ScanSnap, first turn the power off and remove all cables. HINT l When the ScanSnap is turned off, a pop-up balloon notifies you of the ScanSnap’s communication status.
-
Page 49: Sleep Mode
Turning the ScanSnap On/Off Sleep Mode When the ScanSnap is on and has not been used for 15 minutes, it enters sleep (power saving) mode.
-
Page 50: Automatic Power Off
Turning the ScanSnap On/Off Automatic Power OFF When the ScanSnap is turned on and left unused for the specified time (default is «4 hours»), it will turn itself off automatically. To turn the ScanSnap back on, perform one of the following operations: l Press the [Scan] button on the ScanSnap (this will not start scanning) l Press the [Stop] button on the ScanSnap HINT…
-
Page 51: Documents To Scan
Documents to Scan Documents to Scan The following documents can be scanned because the scanning unit does not touch the documents. l Thick documents, such as books l Documents that you want to keep intact, such as photographs and handwritten illustrations Conditions for Documents to Scan Document type Flat documents, such as standard office paper,…
-
Page 52: How To Place Documents
How to Place Documents How to Place Documents When you place down documents, use the Background Pad. If you scan documents without using the Background Pad, the document edges may not be detected correctly and the created scanned image may be different from the document. For details about documents that can be scanned with the ScanSnap, refer to «Documents to Scan»…
-
Page 53
When you select an option other than [Automatic detection] for [Paper size] on the [Paper] tab in the «ScanSnap Setup Dialog Box» (page 43), align the center of the document with the centering mark on the ScanSnap. SV600 When Placing a Book Place a book as follows: l Open a book horizontally. -
Page 54
How to Place Documents l The number of documents placed must not exceed 10. SV600 15 mm (0.59 in.) or More 15 mm (0.59 in.) or More… -
Page 55: Using The Scansnap According To Your Needs
Using the ScanSnap According to Your Needs Using the ScanSnap According to Your Needs This section explains how to scan a document and link with a bundled application according to your needs when using the ScanSnap. «Managing Business Forms in ScanSnap Organizer» (page 56) «Saving Business Cards in CardMinder»…
-
Page 56: Managing Business Forms In Scansnap Organizer
Managing Business Forms in ScanSnap Organizer Managing Business Forms in ScanSnap Organizer This section explains how to digitize business forms such as quotation sheets and manage the data for each customer company in a file management application. In the following, ScanSnap Organizer is used as the file management application. Scan a quotation sheet with the ScanSnap.
-
Page 57
Managing Business Forms in ScanSnap Organizer Click on the [Home] tab. a A new cabinet is created in the folder list. Rename the created cabinet to the customer company name. HINT To create multiple cabinets for each customer company, repeat steps 3 to 4. Select the scanned image of the quotation sheet from the file list, and drag and drop it to the cabinet for the customer company. -
Page 58
Managing Business Forms in ScanSnap Organizer a The scanned image of the quotation sheet is moved to the cabinet for the customer company. HINT ScanSnap Organizer has various functions for using saved files. For details, refer to the ScanSnap Organizer Help. -
Page 59: Saving Business Cards In Cardminder
Saving Business Cards in CardMinder Saving Business Cards in CardMinder This section explains how to digitize business cards and save the card data in a business card application. In the following, CardMinder is used as the business card application. ATTENTION If you do not log on as a user with Administrator privileges, you may not be able to link the ScanSnap with another application properly.
-
Page 60
Saving Business Cards in CardMinder Check the card data. Make sure that the text on the card images are displayed correctly in the Edit Data pane. If the card data must be corrected, click the text to be corrected and then directly edit it. Card Image Pane Edit Data Pane… -
Page 61
Saving Business Cards in CardMinder HINT When you scan double-sided business cards, you must scan one side of each card and edit the card data in CardMinder. For details, refer to the CardMinder Help. -
Page 62: Reproducing A Book In Rack2-Filer Smart
Reproducing a Book in Rack2-Filer Smart Reproducing a Book in Rack2-Filer Smart This section explains how to digitize a book, and reproduce and manage the digitized book in Rack2-Filer Smart. You can scan the front cover, pages, back cover, and spine of a book, and import the scanned images to Rack2-Filer Smart.
-
Page 63
Reproducing a Book in Rack2-Filer Smart For details about scanning a book, refer to «Scanning a Book» (page 26). a The Quick Menu appears. Click the [Scan to Rack2-Filer Smart] icon in the Quick Menu. a A binder selection dialog box appears. Click the [New Binder] button. -
Page 64
Reproducing a Book in Rack2-Filer Smart a The [Import Settings] dialog box appears. Select the book opening direction and click the [OK] button. a The scanned images of the book are added in the Rack2-Bookshelf window. -
Page 65
Reproducing a Book in Rack2-Filer Smart XXXX Also, the Viewer Window opens and displays the scanned images. Importing of scanned images from a book is now complete. Setting the spine of a book The spine of the scanned book can be specified for the created binder. The spine for the binder can be set on the [Binder Settings] dialog box in Rack2-Filer Smart. -
Page 66
Reproducing a Book in Rack2-Filer Smart Also, you can change the setting so that the scanned image of the spine of the book can be imported immediately after the scanned images of the covers and pages of the book are imported. -
Page 67: Useful Usages
Useful Usages Useful Usages This section explains how to start continuous scanning automatically and how to carry out scanning with two ScanSnap scanners simultaneously connected to a computer. «Scanning Documents Using Page Turning Detection» (page 68) «Scanning Documents Using Timed Mode» (page 72) «Scanning Documents with Two ScanSnaps Connected to a Computer»…
-
Page 68: Scanning Documents Using Page Turning Detection
Scanning Documents Using Page Turning Detection Scanning Documents Using Page Turning Detection This section explains how to detect page turning to start scanning automatically. ATTENTION When the installation environment of the ScanSnap or the specification of the book to be scanned encounters any of the following, use timed mode to scan a document.
-
Page 69
Scanning Documents Using Page Turning Detection a The [Scanning mode option] dialog box appears. Select the [Configure settings for starting the next scan.] check box and then [Page turning detection mode]. Click the [OK] button to close all the dialog boxes. Open the page of a book you want to scan and place the book in the scan area of the ScanSnap. -
Page 70
Scanning Documents Using Page Turning Detection For details, refer to «How to Place Documents» (page 52). Press the [Scan] button on the ScanSnap to start scanning the book. a The [ScanSnap Manager — Image scanning and file saving] window appears. a Once the scanning of the book page is complete, [Turn the page.] appears on the [ScanSnap Manager — Image scanning and file saving] window. -
Page 71
Scanning Documents Using Page Turning Detection a The page turning is detected and continuous scanning starts. ATTENTION l While the [Turn the page.] message appears on the [ScanSnap Manager — Image scanning and file saving] window, if you hold or move your hand over the Background Pad, such motion may be incorrectly detected as page turning. -
Page 72: Scanning Documents Using Timed Mode
Scanning Documents Using Timed Mode Scanning Documents Using Timed Mode This section explains how to automatically start scanning by setting the time period for the document scanning to start. Right-click the ScanSnap Manager icon in the notification area, and select [Scan Button Settings] from the «Right-Click Menu»…
-
Page 73
Scanning Documents Using Timed Mode l To set the time period for the ScanSnap to start the next scan when a document is scanned continuously: 1. Select the [Configure settings for starting the next scan.] check box, and then select [Timed interval (Timed mode)]. -
Page 74
Scanning Documents Using Timed Mode Click the [OK] button to close all open dialog boxes. Place a document with the scanned side face-up in the scan area of the ScanSnap. For details, refer to «How to Place Documents» (page 52). Press the [Scan] button on the ScanSnap. -
Page 75
Scanning Documents Using Timed Mode To finish scanning, click the [Finish Scanning] button or press the [Stop] button on the ScanSnap. -
Page 76: Scanning Documents With Two Scansnaps Connected To A Computer
Scanning Documents with Two ScanSnaps Connected to a Computer You can use SV600 and another ScanSnap connected to a computer. When both of the ScanSnap models are connected and turned on, you can use one of them at a time.
-
Page 77: Correcting The Scanned Images
Correcting the Scanned Images Correcting the Scanned Images The scanned images can be corrected before ScanSnap Manager is linked with an application. The scanned images can be corrected in the following cases: «Scanning Books» (page 78) «Scanning Multiple Documents at Once» (page 91)
-
Page 78: Scanning Books
Scanning Books Scanning Books The book image correction allows you to correct scanned images. The book image correction refers to making the following corrections to the images scanned from books with the ScanSnap: «Correcting Distorted Book Images» (page 79) «Splitting a Double-Page Spread Image into Two Page Images» (page 84) «Filling in Fingers Captured in a Scanned Image»…
-
Page 79: Correcting Distorted Book Images
Scanning Books Correcting Distorted Book Images To correct the distortion of a scanned image from a book, follow the procedure below. ATTENTION l To correct the distortion of a scanned image, the shape of the book needs to be detected. If a book is scanned as follows, the shape of the book may not be detected correctly.
-
Page 80
Scanning Books 2. Edit in point retouch mode ( Filling in the captured fingers in image If you edit in the book image correction mode after editing in the point retouch mode, the edited results in point retouch mode are overridden. On the window that appears after a book is scanned, select [Correct and save double-page spread document images (book/magazine)] and click the [Check/Correct] button. -
Page 81
Scanning Books HINT For the output format selection button, select On the page, drag the corner points to move the corners of the book and both ends of the gutter to any location. On the front and back cover of the book, make the middle outline for the gutter parallel to the right and left outlines. -
Page 82
Scanning Books Follow the procedure below to modify the corner points and the outline. 1. Modify the corner points. The corner points can be modified by either of the following: l Drag the corner points to move them to the corners of the book and both ends of the gutter. -
Page 83
Scanning Books HINT To correct another distorted page, select the page for which the distortion is to be corrected in [Final image], and repeat steps 2 to 6. -
Page 84: Splitting A Double-Page Spread Image Into Two Page Images
Scanning Books Splitting a Double-Page Spread Image into Two Page Images The double-page spread image can be split into the right and left pages. When a JPEG file is split, the file is divided into two files. ATTENTION Follow the procedure below to perform multiple book image correction for one page. 1.
-
Page 85
Scanning Books a The [ScanSnap Manager — Book Image Viewer] dialog box appears. Select the page to be split in [Final image]. Click , and then click a The split line is indicated with a green dashed line. -
Page 86
Scanning Books If the split line is not aligned correctly, drag the corner points to move them to both ends of the gutter. Click the [Apply] button. a A message for confirming the split target appears. Click the [Selected Pages] button. a The page is split. -
Page 87: Filling In Fingers Captured In A Scanned Image
Scanning Books Filling in Fingers Captured in a Scanned Image Fingers that are captured when a book is scanned can be filled in. ATTENTION l To fill in fingers captured in the scanned image, the fingers need to be detected. If a book is scanned in the following ways, captured fingers may not be detected correctly.
-
Page 88
Scanning Books If you edit in the book image correction mode after editing in the point retouch mode, the edited results in point retouch mode are overridden. HINT Up to five fingers on each side (right/left) can be filled in. On the window that appears after a book is scanned, select [Correct and save double-page spread document images (book/magazine)] and click the [Check/Correct] button. -
Page 89
Scanning Books HINT When a finger captured in a scanned image is not detected, a default outline is displayed around the finger. In that case, drag the white dot on the outline to align the outline with the shape of the finger. Click the [Apply] button. -
Page 90
Scanning Books When you have completed filling in the captured finger, click the [Save and Exit] button. -
Page 91: Scanning Multiple Documents At Once
Scanning Multiple Documents at Once Scanning Multiple Documents at Once When multiple documents are scanned at once with the ScanSnap, the following corrections can be made on the scanned images: «Correcting the Scanned Image Orientation» (page 92) «Modifying the Crop Area» (page 95) «Adding the Necessary Scanned Images»…
-
Page 92: Correcting The Scanned Image Orientation
Scanning Multiple Documents at Once Correcting the Scanned Image Orientation The orientation of scanned images that are skewed or upside-down can be corrected. On the window that appears after multiple documents are scanned at once, select [Crop and save flat document images as-is] and click the [Check/ Correct] button.
-
Page 93
Scanning Multiple Documents at Once Click a The scanned image is rotated by 90 degrees. -
Page 94
Scanning Multiple Documents at Once When you have completed correcting the orientation, click the [Save and Exit] button. HINT To fine-tune the orientation of the crop frame, select which scanned image you want to rotate and then perform one of the following operations: l Drag the green operating point that appears at the top of the crop frame by as little or as much as you want. -
Page 95: Modifying The Crop Area
Scanning Multiple Documents at Once Modifying the Crop Area The size of the crop frame that is used to crop the scanned image can be modified. On the window that appears after multiple documents are scanned at once, select [Crop and save flat document images as-is] and click the [Check/ Correct] button.
-
Page 96
Scanning Multiple Documents at Once Click any position on the dialog box. a The crop area is fixed. When you have completed changing the crop area, click the [Save and Exit] button. HINT To move a crop frame, place the mouse inside the crop frame and drag it when all the operating points have turned red. -
Page 97: Adding The Necessary Scanned Images
Scanning Multiple Documents at Once Adding the Necessary Scanned Images If the necessary scanned images do not become the targets to be cropped, you can manually add them to the targets. Up to 20 crop frames can be added for one scanned image. On the window that appears after multiple documents are scanned at once, select [Crop and save flat document images as-is] and click the [Check/ Correct] button.
-
Page 98
Scanning Multiple Documents at Once a A crop frame is added to the scanned image that is automatically recognized, and the scanned image that was cropped by dragging the mouse is added to the end of [Cropped image]. After you have added a crop frame, click the [Save and Exit] button. -
Page 99: Deleting Unnecessary Scanned Images
Scanning Multiple Documents at Once Deleting Unnecessary Scanned Images When there are multiple scanned images, unnecessary crop frames can be deleted. Scanned images without crop frames are not output and cannot be linked with an application. On the window that appears after multiple documents are scanned at once, select [Crop and save flat document images as-is] and click the [Check/ Correct] button.
-
Page 100
Scanning Multiple Documents at Once Click a A confirmation message appears. Click the [Yes] button. a The crop frame is removed from the selected scanned image, and the scanned image disappears from [Cropped image]. -
Page 101
Scanning Multiple Documents at Once After you have removed the crop frame from the unnecessary scanned image, click the [Save and Exit] button. -
Page 102: Troubleshooting
To display this section, right-click the ScanSnap Manager icon in the notification area, and select [Help] → [Troubleshooting] from the «Right-Click Menu» (page 41). If you cannot solve the problem after referring to the above section, contact your FUJITSU scanner dealer or an authorized FUJITSU scanner service provider.
-
Page 103: How To Find Your Resolution
How to Find Your Resolution How to Find Your Resolution When software installation fails, or the ScanSnap does not operate normally after installation is complete, refer to the flow chart below for troubleshooting. Have you installed the software before? Is the installation complete? Does the ScanSnap Manager icon…
-
Page 104: If Your First Attempt To Install Failed
This section explains how to troubleshoot when the first attempt to install the bundled software failed. If any software bundled with the ScanSnap (including models other than SV600) has been installed before, refer to «If You Have Installed the Software Before» (page 105).
-
Page 105: If You Have Installed The Software Before
If You Have Installed the Software Before This section explains how to troubleshoot if your attempt to reinstall the software bundled with the ScanSnap (including models other than SV600) failed. «Uninstalling the Software» (page 106) «Removing the Installation Information» (page 107) «Installing the Software from the [ScanSnap Setup] Dialog Box»…
-
Page 106: Uninstalling The Software
If You Have Installed the Software Before Uninstalling the Software Uninstall the software that is already installed. The uninstallation procedure is as follows. If the ScanSnap is connected to the computer, unplug the USB cable from the computer. Log on as a user with Administrator privileges. If anti-virus software is running, disable the software temporarily.
-
Page 107: Removing The Installation Information
Remove the installation information in the following procedure. ATTENTION If you cannot successfully remove the installation information, contact your FUJITSU scanner dealer or an authorized FUJITSU scanner service provider. Log on as a user with Administrator privileges.
-
Page 108
If You Have Installed the Software Before a A confirmation message appears. 2. Click the [Yes] button. a A message appears to check whether or not to remove the profile information. 3. Click the [Yes] button to remove and the [No] button to keep the profile information. -
Page 109
If You Have Installed the Software Before ATTENTION If the problem persists when you kept the profile information then reinstalled the software, try again after removing the profile information. a The installation information is removed, and the following message appears. 4. -
Page 110
If You Have Installed the Software Before a A confirmation message appears. 2. Click the [Yes] button. a The installation information is removed, and the following message appears. -
Page 111
If You Have Installed the Software Before 3. Click the [OK] button to close the [Remove Installation Information] dialog box. By repeating step 5, remove the installation information of all the software listed in the [Remove Installation Information] dialog box. Click the [Close] button to close the [Remove Installation Information] dialog box. -
Page 112: Installing The Software From The [Scansnap Setup] Dialog Box
If You Have Installed the Software Before Installing the Software from the [ScanSnap Setup] Dialog Box Once the software is uninstalled or the installation information is removed, install the software from the [ScanSnap Setup] dialog box. Install the software in the following procedure. Restart the computer.
-
Page 113: Installing One Software At A Time
If You Have Installed the Software Before Installing One Software at a Time Install the software one by one in the following procedure. Restart the computer. Log on as a user with Administrator privileges. If anti-virus software is running, disable the software temporarily. ATTENTION If you cannot disable the anti-virus software, check if the software is set to lock the application.
-
Page 114: When The Scansnap Manager Icon Does Not Appear
When the ScanSnap Manager Icon Does Not Appear When the ScanSnap Manager Icon Does Not Appear This section explains how to troubleshoot when the ScanSnap Manager icon does not appear in the notification area even though the software is installed and the ScanSnap is connected to the computer.
-
Page 115: Displaying The Scansnap Manager Icon
When the ScanSnap Manager Icon Does Not Appear Displaying the ScanSnap Manager Icon Start up ScanSnap Manager by selecting [Start] menu → [All Programs] → [ScanSnap Manager] → [ScanSnap Manager] (for Windows 8, start up ScanSnap Manager by right-clicking the Start screen, and selecting [All apps] on the app bar →…
-
Page 116: When Scansnap Manager Does Not Operate Normally
When ScanSnap Manager Does Not Operate Normally When ScanSnap Manager Does Not Operate Normally If the ScanSnap Manager icon in the notification area is displayed as even though the software is installed and the ScanSnap is connected to the computer, perform the following procedures. «Removing Unnecessary Icons from the Notification Area»…
-
Page 117: Removing Unnecessary Icons From The Notification Area
When ScanSnap Manager Does Not Operate Normally Removing Unnecessary Icons from the Notification Area Check the software icons in the notification area, and exit the software that you are not using. a The icon is removed from the notification area. Right-click the ScanSnap Manager icon in the notification area and select [Exit] from the…
-
Page 118: Checking The Connection Between The Scansnap And The Computer
When ScanSnap Manager Does Not Operate Normally Checking the Connection between the ScanSnap and the Computer Unplug the USB cable from the computer and the ScanSnap, then plug it back in. Make sure to leave at least 5 seconds between unplugging and plugging the cable. If you are using a USB hub, connect the USB cable to the computer directly.
-
Page 119: Checking If Scansnap Manager Is Operating Normally
When ScanSnap Manager Does Not Operate Normally Checking If ScanSnap Manager Is Operating Normally Turn off the ScanSnap and then turn it on again. Make sure to leave at least 5 seconds between turning off and on the ScanSnap. If the problem persists, proceed to step 2. If you are using a USB hub, connect the ScanSnap to the computer directly with a USB cable.
-
Page 120
When ScanSnap Manager Does Not Operate Normally a If the message «The recommended privileges have been applied.» appears, turn off the ScanSnap and then turn it on again. Make sure to leave at least 5 seconds between turning off and on the ScanSnap. If the message «Failed to change the privileges. -
Page 121
When ScanSnap Manager Does Not Operate Normally Turn off the ScanSnap and restart the computer. If the problem persists, refer to «Removing the ScanSnap’s Connection Information» (page 122). -
Page 122: Removing The Scansnap’s Connection Information
Select [start] menu → [Control Panel] → [Performance and Maintenance] → [System] → [Hardware] tab → [Device Manager] button. Select [Imaging devices] and right-click on [ScanSnap SV600] (or [Other devices] → [ScanSnap SV600]), and then select [Uninstall] from the displayed menu.
-
Page 123
If the above procedures do not solve the problem, please attach the data of your system information to an email and send it to your FUJITSU scanner dealer or an authorized FUJITSU scanner service provider. For details about how to collect system information, refer to «Troubleshooting» in the ScanSnap Manager Help. -
Page 124: When You Cannot Uninstall The Software
When You Cannot Uninstall the Software When You Cannot Uninstall the Software This section explains how to troubleshoot when you cannot uninstall ScanSnap Manager, ScanSnap Organizer, or CardMinder. Restart the computer and log on as a user with Administrator privileges. Remove the installation information.
-
Page 125: Installing And Uninstalling
Installing and Uninstalling Installing and Uninstalling This section explains how to install and uninstall the software bundled with the ScanSnap. «Installing the Software» (page 126) «Uninstalling the Software» (page 148)
-
Page 126: Installing The Software
Installing the Software Installing the Software This section explains the software bundled with the ScanSnap and how to install them. «Bundled Software Overview» (page 127) «System Requirements» (page 129) «How to Install the Software» (page 131) «Standard Installation» (page 133) «Installation of Each Application»…
-
Page 127: Bundled Software Overview
Installing the Software Bundled Software Overview This section gives an overview of each bundled software and their functions. You can edit, manage, and arrange the scanned image by using the following software: Software That Can Be Installed from the Setup DVD-ROM ScanSnap Manager This scanner driver is required to scan documents with the ScanSnap.
-
Page 128
Installing the Software Software That Can Be Installed from the Adobe Acrobat DVD-ROM Adobe Acrobat XI Standard This is a global standard application for creating, editing, managing, and utilizing PDF format electronic documents. Software That Can Be Downloaded and Installed The Setup DVD-ROM contains links to the download web pages of the following software programs. -
Page 129: System Requirements
CardMinder: 660 MB l ABBYY FineReader for ScanSnap: 620 MB l ScanSnap Online Update: 10 MB l Evernote for Windows: 150 MB l ScanSnap SV600 Basic Operation Guide: 200 MB l Adobe Acrobat XI Standard: 1.5 GB USB port USB3.0(*6)/USB2.0/USB1.1 *1: The software bundled with the ScanSnap operates as a desktop application.
-
Page 130
Installing the Software l The actual disk space used for the installation of the software and the disk space required for the installation may be different because of the disk management in your Windows system. l To scan a document, a disk space that is approximately three times larger than the size of the file to be saved is required. -
Page 131: How To Install The Software
Installing the Software How to Install the Software When you insert the Setup DVD-ROM into the DVD-ROM drive on your computer, the [ScanSnap Setup] dialog box appears. The functions of each button in the [ScanSnap Setup] dialog box are as follows. Button Function Readme…
-
Page 132
Installing the Software Button Function Install Products Displays the [Install Products] dialog box. l [ScanSnap] button Installs the following software: — ScanSnap Manager — ScanSnap Organizer — CardMinder — ABBYY FineReader for ScanSnap — ScanSnap Online Update l [Dropbox] button Opens the Dropbox for Windows download web page. -
Page 133: Standard Installation
Installing the Software Standard Installation HINT When the installation is complete, a pop-up balloon which indicates that the latest updates are available on the download server may appear. For details, refer to the ScanSnap Online Update Help. Install the following software: l ScanSnap Manager l ScanSnap Organizer l CardMinder…
-
Page 134
Installing the Software a The [Install Products] dialog box appears. Click the [ScanSnap] button. -
Page 135
Installing the Software a The [ScanSnap] dialog box appears, displaying the [Welcome to the InstallShield Wizard for ScanSnap] screen. Click the [Next] button. a The [ScanSnap Setup] appears. Read the message about anti-virus software, and click the [OK] button. a [Setup Type] appears. Click the [Next] button. -
Page 136
Installing the Software a A confirmation about accepting the license agreement appears. Read the «END-USER LICENSE AGREEMENT», select [I accept the terms of the license agreement], and then click the [Next] button. a The [Start Copying Files] screen appears. Confirm the settings, and then click the [Next] button. a Installation starts. -
Page 137
Installing the Software a The [Install Complete] screen appears. Click the [Complete] button. a When you installed ScanSnap Manager, the [ScanSnap — Connecting ScanSnap] dialog box appears. When you do not have ScanSnap Manager installed, proceed to step 13. -
Page 138
Installing the Software Follow the instructions on the screen to check the connection between the ScanSnap and the computer. Remove the Setup DVD-ROM from the DVD-ROM drive. ATTENTION If the installation is not successfully completed, refer to «Troubleshooting» (page 102). -
Page 139: Installation Of Each Application
Installing the Software Installation of Each Application Install Evernote for Windows. The procedure is as follows. Turn on the computer and log on as a user with Administrator privileges. Insert the Setup DVD-ROM into the DVD-ROM drive. a The [ScanSnap Setup] dialog box appears. HINT If the [ScanSnap Setup] dialog box does not appear, double-click «ScanSnap.exe»…
-
Page 140
Installing the Software a The [Evernote] dialog box appears. Click the [Install Product] button. -
Page 141
Installing the Software HINT If you require the latest version of Evernote for Windows, click the [Download latest version] button. A web browser starts up and the Evernote for Windows download web page opens. Download and install Evernote for Windows. a Installation starts. -
Page 142: Installing From The Download Web Page
Installing the Software Installing from the Download Web Page ATTENTION To install from the download web page, an Internet connection is required. Install the following software: l Dropbox for Windows l SugarSync Manager for Windows l Scan to Microsoft SharePoint The procedure is as follows.
-
Page 143
Installing the Software a The [Install Products] dialog box appears. Click the button of the application you want to install. -
Page 144
Installing the Software a A web browser starts up and the download web page of the selected application opens. Download and install the application. When the installation is complete, remove the Setup DVD-ROM from the DVD-ROM drive. -
Page 145: Installing From Rack2-Filer Smart With Magic Desktop
Installing the Software Installing from Rack2-Filer Smart with Magic Desktop The following applications can be installed by selecting Rack2-Filer Smart with Magic Desktop. l Rack2-Filer Smart l Magic Desktop For details, refer to the Readme document bundled with Rack2-Filer Smart with Magic Desktop.
-
Page 146: Installing Adobe Acrobat
Installing the Software Installing Adobe Acrobat The procedure is as follows. ATTENTION Adobe Acrobat can be used in the following operating systems: l Windows 8 l Windows 7 l Windows XP (Service Pack 3 or later required) Additional requirements are as follows: l Internet Explorer 7.0 or later/Firefox (ESR)/Google Chrome l A display resolution of 1024 ×…
-
Page 147
Installing the Software Follow the instructions on the screen to complete the installation. HINT l For details about the installation of Adobe Acrobat, refer to «Readme» included on the Adobe Acrobat DVD-ROM. To open Readme, open the file below via Windows Explorer. DVD-ROM drive: \ ReadMeJ.htm l For details about how to use Adobe Acrobat, refer to the Adobe Acrobat Help. -
Page 148: Uninstalling The Software
Uninstalling the Software Uninstalling the Software This section explains how to uninstall the following software programs: l ScanSnap Manager l ScanSnap Organizer l CardMinder l ABBYY FineReader for ScanSnap l Evernote for Windows HINT If all of the following software programs are uninstalled, ScanSnap Online Update is also uninstalled at the same time: l ScanSnap Manager l ScanSnap Organizer…
-
Page 149
Uninstalling the Software ATTENTION l Screen displays may vary slightly depending on the operating system that you are using. In that case, follow the instructions by the operating system. Example: [Programs and Features] In Windows XP: [Add or Remove Programs] The [Uninstall] button In Windows XP: [Remove] button l If you cannot successfully uninstall the following software programs, refer to… -
Page 150: Cleaning
Cleaning Cleaning This section explains about the cleaning materials and how to clean the ScanSnap. «Cleaning Materials» (page 151) «Cleaning the ScanSnap» (page 152)
-
Page 151: Cleaning Materials
F1. *3: Any lint-free cloth can be used. Contact your FUJITSU scanner dealer or an authorized FUJITSU scanner service provider for details about purchasing the cleaning materials. For details, refer to the following web page:…
-
Page 152: Cleaning The Scansnap
Cleaning the ScanSnap Cleaning the ScanSnap This section explains how to clean the outside of the ScanSnap. If the white sheet, glass, camera, lamp, or infrared LED is dirty, errors may appear in the scanned images. Whenever an error appears in a scanned image, clean the ScanSnap. Unplug the cables from the ScanSnap.
-
Page 153: Appendix
Appendix Appendix «Purchasing and Cleaning the Background Pad» (page 154) «Specification» (page 155)
-
Page 154: Purchasing And Cleaning The Background Pad
Product Name Qty. Part No. Background Pad 1 sheet PA03641-0052 Contact your FUJITSU scanner dealer or an authorized FUJITSU scanner service provider for details about purchasing the Background Pad. For details, refer to the following web page: http://scansnap.fujitsu.com/ Cleaning As you keep using the Background Pad, dirt and dust will accumulate on the surface.
-
Page 155: Specification
Specification Specification The following table summarizes the specifications of the ScanSnap. Item Specification Product name/part no. ScanSnap SV600/FI-SV600 Scanning method Overhead scanning Scanning color mode Color/gray/black and white/auto (automatic color, gray, and B&W detection) Optical system/image sensor Lens reduction optics/color CCD × 1 Light source (White LED + lens illumination) ×…
-
Page 156: Documents For Scanning (For Ix500/S1500/S1500M/S510)
Documents That Can Be Scanned with the ScanSnap and How to Load Them (Models Other than SV600) Documents That Can Be Scanned with the ScanSnap and How to Load Them (Models Other than SV600) This section describes the documents that can be scanned with the following ScanSnap models and explains how to load the documents.
-
Page 157: Documents For Scanning (For Ix500/S1500/S1500M/S510)
Documents for Scanning (For iX500/S1500/S1500M/S510) Documents for Scanning (For iX500/S1500/S1500M/ S510) This section explains about the documents that can be scanned with the ScanSnap and the conditions for using the Carrier Sheet. «Conditions for Documents to Scan (For iX500/S1500/S1500M/S510)» (page 158) «Conditions for Using the Carrier Sheet (For iX500/S1500/S1500M/S510)»…
-
Page 158: Conditions For Documents To Scan (For Ix500/S1500/S1500M/S510)
Documents for Scanning (For iX500/S1500/S1500M/S510) Conditions for Documents to Scan (For iX500/S1500/S1500M/ S510) iX500 S1500/S1500M S510 Document type Standard office paper, Standard office paper, postcards, business cards postcards, business cards, Plastic cards conforming to the ISO781A ID-1 type (54 × 86 mm/2.1 ×…
-
Page 159
Documents for Scanning (For iX500/S1500/S1500M/S510) When you scan plastic cards with strong luster, some parts of the image may appear lighter or darker than the original. Example: gold colored credit card When you scan embossed cards, put the embossed side down, and insert the card in landscape orientation. -
Page 160: Conditions For Using The Carrier Sheet (For Ix500/S1500/S1500M/S510)
Documents for Scanning (For iX500/S1500/S1500M/S510) Conditions for Using the Carrier Sheet (For iX500/S1500/ S1500M/S510) The bundled Carrier Sheet is a sheet designed to transport documents through the ScanSnap. You can scan documents that are larger than A4/Letter size, photographs and clippings. Conditions for documents that can be scanned using the Carrier Sheet are as follows: AUTION l Do not use a damaged Carrier Sheet.
-
Page 161
Documents for Scanning (For iX500/S1500/S1500M/S510) Clean the rollers occasionally when you scan such documents directly without using a Carrier Sheet because dirt accumulating on the rollers may cause feeding errors. For details about how to perform cleaning, refer to «Troubleshooting» in the ScanSnap Manager Help. -
Page 162
Documents for Scanning (For iX500/S1500/S1500M/S510) To avoid deformation, do not use or leave the Carrier Sheet in high temperature places such as under direct sunlight or near a heating apparatus for a long time. To avoid deformation, store the Carrier Sheet on a flat surface without any weight on it. -
Page 163: How To Load Documents (For Ix500/S1500/S1500M/S510)
How to Load Documents (For iX500/S1500/S1500M/S510) How to Load Documents (For iX500/S1500/S1500M/ S510) Load documents in the ScanSnap in the following procedure. For details about documents that can be loaded, refer to «Documents for Scanning (For iX500/ S1500/S1500M/S510)» (page 157). If you are loading multiple sheets, check the number of sheets.
-
Page 164
How to Load Documents (For iX500/S1500/S1500M/S510) At an Angle Feed Direction ATTENTION Paper jams or damage to documents may occur if you scan the documents without aligning the edges first. Open the ADF paper chute (cover) of the ScanSnap. ADF Paper Chute (Cover) Pull the stacker towards you. -
Page 165
How to Load Documents (For iX500/S1500/S1500M/S510) Extension Stacker Load the documents in the ADF paper chute (cover). Load the documents face-down and top-first with their back facing you. Use the reference marks within the side guides to adjust the number of the documents to be loaded. Side Guide ATTENTION l Do not accumulate more than 50 sheets (with paper weight of 80 g/m… -
Page 166
How to Load Documents (For iX500/S1500/S1500M/S510) Adjust the side guides to the width of the documents. Hold each side guide in the middle to adjust them. Otherwise, the documents may be fed skewed. Documents… -
Page 167: Documents For Scanning (For S1300I/S1300/S300)
Documents for Scanning (For S1300i/S1300/S300) Documents for Scanning (For S1300i/S1300/S300) Standard Office Paper, Postcards, Business Cards S1300i S1300 S300 Document type Standard office paper, postcards, business cards Paper weight 64 to 104.7 g/m (17 to 20 lb) Paper size Width: 50.8 to 216 mm (2 to 8.5 in.) Width: 50.8 to 216 mm (2 to 8.5 in.) Length: 50.8 to 360 mm (2 to 14.17 in.)
-
Page 168: Picture Postcards
Documents for Scanning (For S1300i/S1300/S300) Folded or torn documents Tracing paper Coated paper Photographs (photographic paper) Perforated or punched documents Documents that are not rectangular or square Carbon paper or thermal paper Documents with memo papers or sticky notes attached Picture Postcards Picture postcards can be scanned when a power cable connection is used.
-
Page 169: How To Load Documents (For S1300I/S1300/S300)
How to Load Documents (For S1300i/S1300/S300) How to Load Documents (For S1300i/S1300/S300) Load documents in the ScanSnap in the following procedure. For details about documents that can be loaded, refer to «Documents for Scanning (For S1300i/ S1300/S300)» (page 167). If you are loading multiple sheets, check the number of sheets. The maximum number of sheets in the ScanSnap is as follows: For A4 or smaller sizes: Up to 10 sheets can be loaded (with paper weight of 80 g/m [20 lb]…
-
Page 170
How to Load Documents (For S1300i/S1300/S300) ATTENTION Paper jams or damage to documents may occur if you scan the documents without aligning the edges first. Open the ADF paper chute (cover) of the ScanSnap. ADF Paper Chute (Cover) Pull out the extension. Extension Load the documents in the ADF paper chute (cover). -
Page 171
How to Load Documents (For S1300i/S1300/S300) Side Guide ATTENTION In the «ScanSnap Setup Dialog Box» (page 43), select the [Scanning] tab, and click the the [Option] to show the [Scanning mode option] dialog box. If the [Place document face up] check box is selected in the [Scanning mode option] dialog box, load the documents face-up with the bottom part of the documents first. -
Page 172: Documents For Scanning (For S1100)
Documents for Scanning (For S1100) Documents for Scanning (For S1100) This section explains about the documents that can be scanned with the ScanSnap and the conditions for using the Carrier Sheet. «Conditions for Documents to Scan (For S1100)» (page 173) «Conditions for Using the Carrier Sheet (For S1100)»…
-
Page 173: Conditions For Documents To Scan (For S1100)
Documents for Scanning (For S1100) Conditions for Documents to Scan (For S1100) S1100 Eject method With the output guide closed With the output guide open Document type Standard office paper, postcards, business cards, Standard office paper Plastic cards conforming to the ISO7810 ID-1 type (54 × 86 mm) Paper weight 52.3 to 209.3 g/m…
-
Page 174
Documents for Scanning (For S1100) 2. Select the [Increase text contrast] check box. -
Page 175: Conditions For Using The Carrier Sheet (For S1100)
Documents for Scanning (For S1100) Conditions for Using the Carrier Sheet (For S1100) The Carrier Sheet (sold separately) is a sheet designed to transport documents through the ScanSnap. You can scan documents that are larger than A4/Letter size, photographs and clippings. Conditions for documents that can be scanned using the Carrier Sheet are as follows: AUTION l Do not use a damaged Carrier Sheet.
-
Page 176
Documents for Scanning (For S1100) l Carbonless paper Because carbonless paper may contain chemicals that can harm the ScanSnap internal rollers, it is recommended that you use the Carrier Sheet to scan such documents. Make sure to clean the rollers occasionally to maintain the scanner performance when scanning carbonless paper directly without using the Carrier Sheet. -
Page 177
How to Load Documents (For S1100) How to Load Documents (For S1100) Load documents in the ScanSnap in the following procedure. For details about documents that can be loaded, refer to «Documents for Scanning (For S1100)» (page 172). ATTENTION You can only load one document at a time in the ScanSnap. Open the feed guide of the ScanSnap. -
Page 178
How to Load Documents (For S1100) a The document is pulled in until it is set inside the ScanSnap. ATTENTION l When you select an option other than [Automatic detection] for [Paper size] on the [Paper] tab in the «ScanSnap Setup Dialog Box» (page 43), insert the document by aligning it with the left edge of the feeding section. -
Page 179: About Customer Support And Maintenance
For other inquiries on the ScanSnap, refer to the following web page: http://scansnap.fujitsu.com/g-support/en/ If your problem cannot be solved after referring to the above web pages, visit the following web page to check the contact information of a suitable Fujitsu office and contact the Fujitsu office. http://imagescanner.fujitsu.com/warranty.html Suppliers of Consumables/Options http://scansnap.fujitsu.com/…
-
Page 180
About Customer Support and Maintenance ATTENTION For safety reasons, never attempt repairs by yourself.
![]()
P3PC-4422-16RUZ2
Руководство по основным операциям
(Windows)
|
Содержание |
|
|
О данном руководстве …………………………………………………………………………………………… |
5 |
|
Меры предосторожности ………………………………………………………………………………………………………. |
6 |
|
Руководства ……………………………………………………………………………………………………………………….. |
7 |
|
Товарные знаки…………………………………………………………………………………………………………………. |
10 |
|
Производитель………………………………………………………………………………………………………………….. |
11 |
|
Символы, используемые в данном руководстве……………………………………………………………………….. |
12 |
|
Символы стрелок в данном руководстве ………………………………………………………………………………… |
13 |
|
Примеры экранов в данном руководстве ………………………………………………………………………………… |
14 |
|
Сокращения, используемые в данном руководстве …………………………………………………………………… |
15 |
|
Что можно сделать при помощи ScanSnap……………………………………………………………. |
17 |
|
Сканирование документа……………………………………………………………………………………… |
21 |
|
Сканирование книги …………………………………………………………………………………………….. |
26 |
|
Сканирование несколько документов за один раз …………………………………………………. |
31 |
|
Краткий обзор ScanSnap………………………………………………………………………………………. |
36 |
|
Части и Функции………………………………………………………………………………………………………………… |
37 |
|
Системные требования ………………………………………………………………………………………………………. |
40 |
|
Краткий обзор программного обеспечения, связанного с ScanSnap ……………………………………………… |
42 |
|
Как установить программное обеспечение………………………………………………………………………………. |
43 |
|
Значок ScanSnap Manager …………………………………………………………………………………………………… |
44 |
|
Меню правого клика …………………………………………………………………………………………………………… |
45 |
|
Окно настроек ScanSnap …………………………………………………………………………………………………….. |
48 |
|
Включение / Выключение ScanSnap ………………………………………………………………………………………. |
50 |
|
Включение ScanSnap……………………………………………………………………………………………………. |
51 |
|
Выключение ScanSnap …………………………………………………………………………………………………. |
53 |
|
Спящий режим ……………………………………………………………………………………………………………. |
54 |
|
Автоматическое выключение питания ……………………………………………………………………………… |
55 |
|
Документы для сканирования ………………………………………………………………………………………………. |
56 |
|
Как поместить документы ……………………………………………………………………………………………………. |
57 |
|
Что можно сделать при помощи связанного программного обеспечения………………… |
60 |
|
Что можно сделать при помощи ScanSnap Organizer…………………………………………………………………. |
61 |
|
Процедура основной операции в ScanSnap Organizer …………………………………………………………. |
62 |
|
Управление файлами …………………………………………………………………………………………………… |
64 |
|
Редактирование файлов……………………………………………………………………………………………….. |
67 |
|
Использование файлов ………………………………………………………………………………………………… |
68 |
|
Что можно сделать при помощи CardMinder…………………………………………………………………………….. |
70 |
|
Процедура основной операции в CardMinder …………………………………………………………………….. |
71 |
|
Связь данных карточки с другими приложениями……………………………………………………………….. |
74 |
|
Поиск данных карточки при помощи панели инструментов основного поиска …………………………… |
75 |
|
Поиск данных карточки при помощи CardMinder Viewer ……………………………………………………….. |
76 |
|
Вложение файла в данные карточки ……………………………………………………………………………….. |
77 |
|
Полезные использования …………………………………………………………………………………….. |
78 |
|
Управление бумажными документами при помощи папок в компьютере………………………………………… |
79 |
|
Сохранение визитных карточек в компьютер……………………………………………………………………………. |
82 |
2
|
Сканирование документов, используя обнаружения переворачивания страницы…………………………….. |
85 |
|
Сканирование документов, используя временный режим …………………………………………………………… |
89 |
|
Сканирование документов с двумя ScanSnap, соединенными к компьютеру…………………………………… |
92 |
|
Корректировка сканированных изображений…………………………………………………………. |
93 |
|
Сканирование документа …………………………………………………………………………………………………….. |
94 |
|
Заполнение пальцев, захваченных в сканированном изображении (Когда документ сканирован) …. |
95 |
|
Сканирование книг …………………………………………………………………………………………………………….. |
99 |
|
Корректировка искаженных изображений книги………………………………………………………………… |
100 |
|
Разделение изображения двухсторонней развернутой страницы на изображения двух страниц…. |
105 |
|
Заполнение пальцев, захваченных в сканированном изображении (Когда книга сканирована) …… |
108 |
|
Сканирование несколько документов за один раз …………………………………………………………………… |
112 |
|
Корректировка ориентации сканированного изображения…………………………………………………… |
113 |
|
Изменение области обрезки ………………………………………………………………………………………… |
116 |
|
Добавление нужных сканированных изображений…………………………………………………………….. |
118 |
|
Удаление ненужных сканированных изображений…………………………………………………………….. |
120 |
|
Устранение неполадок……………………………………………………………………………………….. |
123 |
|
Как найти решение …………………………………………………………………………………………………………… |
124 |
|
Если первая попытка установить не удалась …………………………………………………………………………. |
125 |
|
Если программное обеспечение было установлено ранее………………………………………………………… |
126 |
|
Удаление программного обеспечения ……………………………………………………………………………. |
127 |
|
Удаление информации установки …………………………………………………………………………………. |
128 |
|
Установка программного обеспечения из окна [ScanSnap Setup]………………………………………….. |
133 |
|
Установка одного программного обеспечения за один раз………………………………………………….. |
134 |
|
Когда значок ScanSnap Manager не отображен ………………………………………………………………………. |
136 |
|
Отображение значка ScanSnap Manager…………………………………………………………………………. |
137 |
|
Когда ScanSnap Manager не работает правильно……………………………………………………………………. |
138 |
|
Удаление ненужных значков из области уведомлений ………………………………………………………. |
139 |
|
Проверка соединения между ScanSnap и компьютером …………………………………………………….. |
140 |
|
Проверка правильности работы ScanSnap Manager ………………………………………………………….. |
141 |
|
Удаление информации соединения ScanSnap …………………………………………………………………. |
144 |
|
Когда невозможно установить программное обеспечение ………………………………………………………… |
146 |
|
Чистка……………………………………………………………………………………………………………….. |
147 |
|
Материалы для чистки………………………………………………………………………………………………………. |
148 |
|
Чистка ScanSnap ……………………………………………………………………………………………………………… |
149 |
|
Приложение ………………………………………………………………………………………………………. |
150 |
|
Подготовка для использования Nuance Power PDF Standard …………………………………………………….. |
151 |
|
Обновление программного обеспечения ………………………………………………………………………………. |
152 |
|
Удаление программного обеспечения ………………………………………………………………………………….. |
153 |
|
Спецификации фоновой подкладки ……………………………………………………………………………………… |
155 |
|
Характеристики ScanSnap …………………………………………………………………………………………………. |
156 |
|
Документы, которые могут быть сканированы при помощи ScanSnap и как загрузить |
|
|
их (iX500, S1500, S1500M, S1300i, S1300 или S1100) ……………………………………… |
158 |
|
Документы для сканирования (Для iX500, S1500 или S1500M) …………………………………………………… |
159 |
|
Условия сканирования документов (Для iX500, S1500 или S1500M) ……………………………………… |
160 |
|
Условия использования Несущего Листа (Для iX500, S1500 или S1500M) ……………………………… |
162 |
|
Как загрузить документы (Для iX500, S1500 или S1500M) …………………………………………………………. |
165 |
|
Документы для сканирования (Для S1300i или S1300)……………………………………………………………… |
169 |
3
|
Как загрузить документы (Для S1300i или S1300)……………………………………………………………………. |
171 |
|
Документы для сканирования (Для S1100)…………………………………………………………………………….. |
174 |
|
Условия сканирования документов (Для S1100) ……………………………………………………………….. |
175 |
|
Условия использования Несущего Листа (Для S1100) ……………………………………………………….. |
177 |
|
Как загрузить документы (Для S1100) …………………………………………………………………………………… |
180 |
|
О технической поддержке и обслуживании …………………………………………………………. |
183 |
4

О данном руководстве
О данном руководстве
•«Меры предосторожности» (страница 6)
•«Руководства» (страница 7)
•«Товарные знаки» (страница 10)
•«Производитель» (страница 11)
•«Символы, используемые в данном руководстве» (страница 12)
•«Символы стрелок в данном руководстве» (страница 13)
•«Примеры экранов в данном руководстве» (страница 14)
•«Сокращения, используемые в данном руководстве» (страница 15)
5

Меры предосторожности
Меры предосторожности
Вложенное руководство «Меры предосторожности» содержит важную информацию о безопасном и правильном использовании ScanSnap. Удостоверьтесь, что данное прочитано и понято перед использованием ScanSnap.
6

Руководства
Руководства
Читайте следующие руководства соответственно требования при использовании ScanSnap.
Перед использованием ScanSnap
|
Руководство |
Описание и расположение |
|
Меры предосторожности |
Данное руководство содержит важную информацию о безопасном |
|
использовании ScanSnap. |
|
|
Удостоверьтесь прочитать данное руководство перед использованием |
|
|
ScanSnap. |
|
|
Данное руководство включено в упаковку. |
В дополнение после установки программного обеспечения можно просмотреть данное руководство в следующей процедурой:
•Windows 10
Выберите меню [Пуск] → [Руководства ScanSnap] → [SV600 Меры предосторожности].
•Windows 8.1
Выберите  в нижней левой части экрана Пуска, и выберите [SV600 Меры предосторожности] под [Руководства ScanSnap] в экране Все приложения.
•Windows 7
Выберите меню [Пуск] → [Все программы] → [Руководства ScanSnap] → [SV600 Меры предосторожности].
При настройке ScanSnap
|
Руководство |
Описание и расположение |
|
Руководство по началу |
Данное руководство дает объяснение о процедуре настройки с момента |
|
работы ScanSnap SV600 |
открытия упаковки и до пробной операции. |
|
Руководство по началу работы включено в упаковке. |
В дополнение после установки программного обеспечения можно просмотреть данное руководство в следующей процедурой:
•Windows 10
Выберите меню [Пуск] → [Руководства ScanSnap] → [SV600 Руководство по началу работы].
•Windows 8.1
Выберите  в нижней левой части экрана Пуска, и выберите [SV600 Руководство по началу работы] под [Руководства ScanSnap] в экране Все приложения.
•Windows 7
Выберите меню [Пуск] → [Все программы] → [Руководства ScanSnap] → [SV600 Руководство по началу работы].
При работе с ScanSnap
|
Руководство |
Описание и расположение |
|
Основное Руководство по |
Данное руководство объясняет основные операции и процедуру чистки для |
|
эксплуатации ScanSnap |
ScanSnap. |
|
SV600 (данное |
|
|
руководство) |
|
7

|
Руководства |
||||
|
Руководство |
Описание и расположение |
|||
|
Дополнительное |
Данное руководство объясняет операции, включая различные методы |
|||
|
Руководство по |
сканирования, и полезного использования ScanSnap. |
|||
|
эксплуатации ScanSnap |
Можно просмотреть данное руководство в следующей веб странице. |
|||
|
http://www.pfu.fujitsu.com/imaging/downloads/manual/advanced/v62/ru/common/ |
||||
|
index.html |
||||
|
Справка ScanSnap |
Данный файл справки описывает окна, операционные неполадки и решения, а |
|||
|
Manager |
также сообщения ScanSnap Manager. |
|||
|
Данное руководство может быть доступно одним из следующих методов: |
||||
|
• Нажмите правой кнопкой мыши по значку ScanSnap Manager |
в области |
|||
|
уведомлений, расположенной в правой части панели задач и выберите |
||||
|
[Справка] → [Справка] в «Меню правого клика» (страница 45). |
||||
|
• Нажмите кнопку [Справка] ( |
) для ScanSnap Manager. |
|||
|
• Откройте необходимое окно и нажмите клавишу [F1] на клавиатуре. |
||||
|
• Нажмите кнопку [Справка] в любом окне. |
||||
При сохранении сканированных изображений в мобильное устройство
|
Руководство |
Описание и расположение |
|||
|
Основное Руководство по |
Данное руководство дает объяснение операциям для выполнения в мобильном |
|||
|
эксплуатации ScanSnap |
устройстве, основанном на iOS, при сохранении сканированных изображений в |
|||
|
(Мобильное соединение |
мобильное устройство. |
|||
|
для iOS) |
В данное руководство можно получить доступ следующих методом: |
|||
|
1. |
Запустите ScanSnap Connect Application в мобильном устройстве. |
|||
|
a Отобразится экран [Список файлов]. |
||||
|
2. |
Нажмите |
. |
||
|
a Отобразится экран [Информация]. |
||||
|
3. |
Нажмите кнопку [Справка]. |
|||
|
Основное Руководство по |
Данное руководство дает объяснение операциям для выполнения в мобильном |
|||
|
эксплуатации ScanSnap |
устройстве, основанном на Android, при сохранении сканированных изображений |
|||
|
(Мобильное соединение |
в мобильное устройство. |
|||
|
для Android) |
В данное руководство можно получить доступ следующих методом: |
|||
|
1. |
Запустите ScanSnap Connect Application в мобильном устройстве. |
|||
|
a Отобразится экран [Список файлов]. |
||||
|
2. |
Нажмите . |
|||
|
a Отобразится меню. |
||||
|
3. |
Нажмите [Справка]. |
|||
|
Справка Scan to Mobile |
В данном файле Справки дается объяснение операций, окон и сообщений Scan |
|||
|
to Mobile. |
||||
|
Данный файл Справки может быть доступен одним из следующих методов: |
||||
|
• Значок [Сканировать в мобильное устройство] отобразится в меню, которое |
||||
|
появляется при нажатии |
в области уведомлений в правой части панели |
|||
|
задач. Нажмите правую кнопку мыши по значку [Scan to Mobile], и выберите |
||||
|
[Справка] из меню, которое отобразится. |
||||
|
• Откройте необходимое окно и нажмите клавишу [F1] на клавиатуре. |
||||
|
• Нажмите кнопку [Справка] в любом окне. |
||||
8

Руководства
При обновлении ScanSnap
|
Руководство |
Описание и расположение |
|
Справка ScanSnap Online |
В данном файле Справки дается объяснение операций, окон и сообщений |
|
Update |
ScanSnap Online Update. |
|
Данный файл Справки может быть доступен одним из следующих методов: |
|
|
• Откройте необходимое окно и нажмите клавишу [F1] на клавиатуре. |
|
|
• Нажмите кнопку справка в любом окне. |
|
При использовании связанных приложений
|
Руководство |
Описание и расположение |
|
|
Справка ScanSnap |
В данном файле Справки дается объяснение операций, окон и сообщений |
|
|
Organizer |
ScanSnap Organizer. |
|
|
Данный файл Справки может быть доступен одним из следующих методов: |
||
|
• Нажмите кнопку Справка ( |
) для ScanSnap Organizer. |
|
|
• Откройте необходимое окно и нажмите клавишу [F1] на клавиатуре. |
||
|
• Нажмите кнопку [Справка] в любом окне. |
||
|
Справка CardMinder |
В данном файле Справки дается объяснение операций, окон и сообщений |
|
|
CardMinder. |
||
|
Данный файл Справки может быть доступен одним из следующих методов: |
||
|
• Нажмите кнопку Справка ( |
) следующей за панелью инструментов |
|
|
основного поиска. |
||
|
• Откройте необходимое окно и нажмите клавишу [F1] на клавиатуре. |
||
|
• Нажмите кнопку [Справка] в любом окне. |
||
|
Руководство |
В данном руководстве дается объяснение краткого обзора и операций ABBYY |
|
|
пользователя ABBYY |
FineReader for ScanSnap. |
|
|
FineReader for ScanSnap |
Данный файл справки может быть доступен одним из следующих методов: |
|
|
• Откройте необходимое окно и нажмите клавишу [F1] на клавиатуре. |
||
|
• Нажмите кнопку [Справка] в любом окне. |
||
|
Справка Nuance Power |
Данный файл справки может быть доступен выбором значений [Справка в |
|
|
|
Интернете] или [Справка в автономном режиме] в меню, которое отображается |
|
|
нажатием значения [Справка] в панели меню → [Справка Power PDF] в Nuance |
||
|
Power PDF. |
||
9

Товарные знаки
Товарные знаки
Microsoft, Windows, Windows Vista, Excel, PowerPoint, Outlook, SharePoint, Windows Live, Internet Explorer и OneDrive являются зарегистрированными товарными знаками или товарными знаками компании Microsoft Corporation в США и / или других странах.
Word является продуктом корпорации Microsoft Corporation в США.
Nuance, логотип Nuance и Dragon являются товарными знаками и/или зарегистрированными товарными знаками компании Nuance Communications, Inc. и/или ее дочерних компаний в США и/или других странах.
Adobe, Acrobat и Reader являются зарегистрированными товарными знаками или товарными именами компании Adobe Systems Incorporated в США и / или других странах.
Intel и Intel Core являются зарегистрированными товарными знаками или товарными знаками компании Intel Corporation в США и в других странах.
ABBYY™ FineReader™ Engine © ABBYY. OCR by ABBYY
ABBYY и FineReader являются товарными знаками компании ABBYY Software, Ltd., которая может быть зарегистрирована в некоторых юрисдикциях.
Evernote является зарегистрированным товарным знаком или товарным знаком компании
Evernote Corporation.
Google, Android, Google Play и Google Диск являются зарегистрированными товарными знаками или товарными знаками компании Google Inc. Использование этих зарегистрированных товарных знаков или товарных знаков допускается только с разрешения
Google.
Salesforce, логотип Salesforce, и Salesforce CRM являются зарегистрированными товарными знаками или товарными знаками компании salesforce.com, inc. в США и / или других странах.
Wi-Fi, Wi-Fi Protected Setup и логотип Wi-Fi Protected Setup являются товарными знаками компании Wi-Fi Alliance.
ScanSnap, логотип ScanSnap, ScanSnap Manager, ScanSnap Organizer, CardMinder и Rack2Filer являются зарегистрированными товарными знаками или товарными знаками компании
PFU Limited в Японии.
Другие названия компаний и названия продуктов являются зарегистрированными товарными знаками или товарными знаками соответствующих компаний.
10
![]()
Производитель
Производитель
PFU Limited
YOKOHAMA i-MARK PLACE, 4-4-5 Minatomirai, Nishi-ku, Yokohama, Kanagawa, 220-8567, Japan
© PFU Limited 2013-2017
11

Символы, используемые в данном руководстве
Символы, используемые в данном руководстве
Следующие обозначения используются в данном руководстве, чтобы устранить любые несчастные случаи или повреждения пользователя и окружающих его людей, и собственность. Предупреждающие наклейки указывают на состояние и описание предупреждения. Символы, указывающие на степень предупреждения и их значения следующие.
Данный указатель предупреждает пользователей об операциях, которые в
ОСТОРОЖНО случае нестрого соблюдения инструкций, могут привести к опасности для безопасности персонала или повреждению продукта.
12

Символы стрелок в данном руководстве
Символы стрелок в данном руководстве
Символы правой стрелки (→) используются для соединения знаков или параметров меню, которые следует выбирать последовательно.
Пример: Выберите меню [Пуск] → [Компьютер].
13
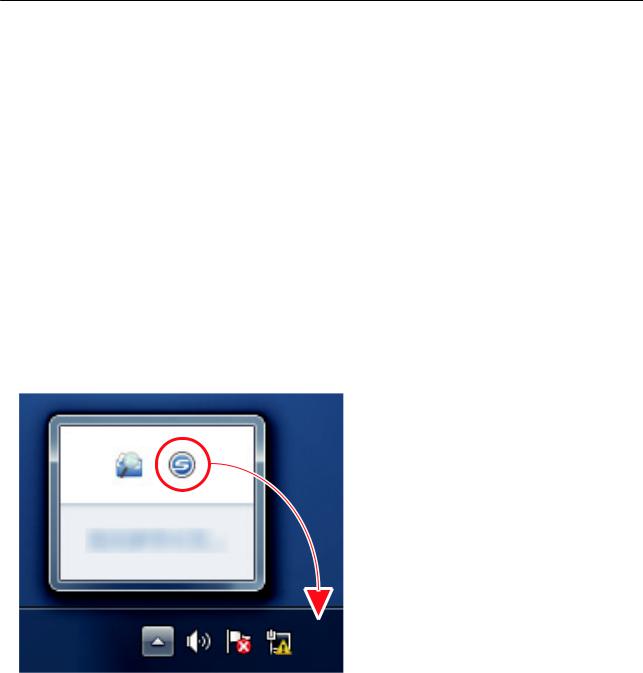
Примеры экранов в данном руководстве
Примеры экранов в данном руководстве
Снимки экранов продукта Microsoft переизданы при помощи разрешения от корпорации
Microsoft Corporation.
Экраны, используемые в данном руководстве, относятся к Windows 7.
Фактические окна и операции могут отличаться в зависимости от операционной системы.
Значок в области уведомлений
Значок ScanSnap Manager  отобразится в меню, которое появляется при нажатии
  в области уведомлений.
Чтобы значок ScanSnap Manager  всегда отображался в области уведомлений,
перетащите значок  и вставьте его в область уведомлений. Область уведомлений расположена в правой части панели задач.
Описания в данном руководстве использует случаи, в которых значок ScanSnap Manager  , всегда отображается в области уведомлений.
14

Сокращения, используемые в данном руководстве
Сокращения, используемые в данном руководстве
Когда модель ScanSnap упоминается в данном руководстве, «Сканер цветного изображение
ScanSnap» опущено.
Также следующие сокращения используются в данном руководстве.
|
Используемые |
Обозначение |
|
сокращения |
|
|
Windows 10 |
Операционная система Windows® 10 Домашняя, Русская версия |
|
Операционная система Windows® 10 Pro, Русская версия |
|
|
Операционная система Windows® 10 Корпоративная, Русская версия |
|
|
Операционная система Windows® 10 для образовательных учреждений, Русская |
|
|
версия |
|
|
Windows 8.1 |
Операционная система Windows® 8.1, Русская версия |
|
Операционная система Windows® 8.1 Профессиональная, Русская версия |
|
|
Операционная система Windows® 8.1 Корпоративная, Русская версия |
|
|
Windows 7 |
Операционная система Windows® 7 Начальная, Русская версия |
|
Операционная система Windows® 7 Домашняя расширенная, Русская версия |
|
|
Операционная система Windows® 7 Профессиональная, Русская версия |
|
|
Операционная система Windows® 7 Максимальная, Русская версия |
|
|
Windows |
Операционная система Windows 10, Windows 8.1 или Windows 7 |
|
Microsoft Office |
Microsoft® Office |
|
Word |
Microsoft® Word |
|
Microsoft® Office Word |
|
|
Excel |
Microsoft® Excel® |
|
Microsoft® Office Excel® |
|
|
PowerPoint |
Microsoft® PowerPoint® |
|
Microsoft® Office PowerPoint® |
|
|
SharePoint |
Microsoft® SharePoint™ Server |
|
Microsoft® SharePoint™ Foundation |
|
|
Microsoft® SharePoint™ Online |
|
|
Internet Explorer |
Windows® Internet Explorer™ |
|
Microsoft® Internet Explorer™ |
|
|
Microsoft Edge |
Microsoft® Edge |
|
Outlook |
Microsoft® Outlook® |
|
Microsoft® Office Outlook® |
|
|
.NET Framework |
Microsoft® .NET Framework |
|
Nuance |
Nuance® |
|
Adobe Acrobat |
Adobe®Acrobat® |
15
|
Сокращения, используемые в данном руководстве |
||
|
Используемые |
Обозначение |
|
|
сокращения |
||
|
ABBYY FineReader for |
ABBYY FineReader for ScanSnap™ |
|
|
ScanSnap |
Все описания в данном руководстве предполагают использование ABBYY |
|
|
FineReader for ScanSnap, прилагаемое в комплекте с ScanSnap. При отсутствии |
||
|
иных указаний, термин ABBYY FineReader for ScanSnap относится к ABBYY |
||
|
FineReader for ScanSnap, прилагаемое в комплекте с ScanSnap. |
||
|
Обратите внимание, что ABBYY FineReader for ScanSnap может быть |
||
|
усовершенствован без предупреждения. Если описания в данном руководстве |
||
|
отличаются от фактических отображаемых экранов, смотрите руководство |
||
|
пользователя ABBYY FineReader for ScanSnap. |
||
|
Google Диск |
Google Диск™ |
|
|
Android |
Android™ |
|
|
ScanSnap |
Сканер цветного изображения серии ScanSnap (*1) |
|
|
Несущий Лист |
Несущий Лист ScanSnap |
|
*1: ScanSnap серии N1800 не включен.
16
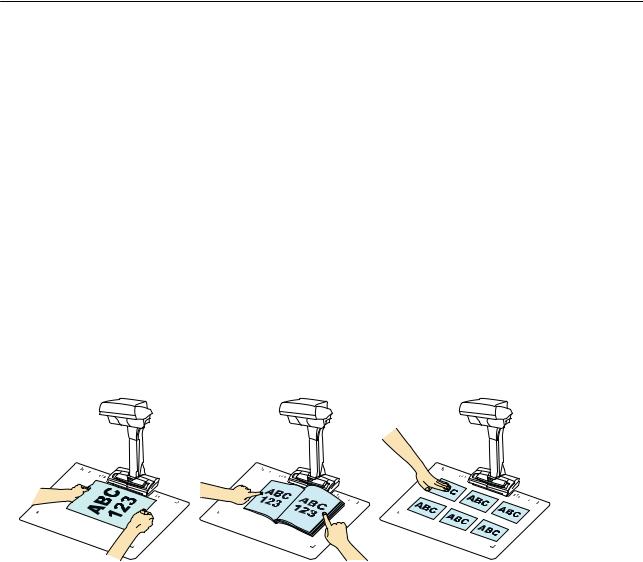
Что можно сделать при помощи ScanSnap
Что можно сделать при помощи ScanSnap
Модель ScanSnap, которая выполняет подвесное сканирование имеют модуль сканирования, который не прикасается к документам. Следующие операции сканирования могут быть выполнены с данной моделью:
•Книга или буклеты, которые имеют размер до размера A3, могут быть сканированы без обрезания страниц.
•Несколько документов, таких как визитные карточки или другие типы карточки могут быть сканированы за один раз.
Сканированные изображения, созданные сканированием документов, корректируются автоматически.
•Когда буклеты как документа сканируются Искажение страницы корректируется автоматически.
•Когда несколько документов сканируются за один раз
Сканированные изображения обрежутся на раздельные изображения для соответствующих документов.
В дополнение, продолжительное сканирование может быть запущено автоматически и сканированные изображения могут быть корректированы после сканирования документов.
Обнаружение переворачивания страниц
Когда страница переворачивается, ScanSnap автоматически запускает продолжительное сканирование.
Данное подходит для сканирования нескольких страниц книги или буклетов как документ.
Для получения подробной информации, смотрите «Сканирование документов, используя обнаружения переворачивания страницы» (страница 85).
17
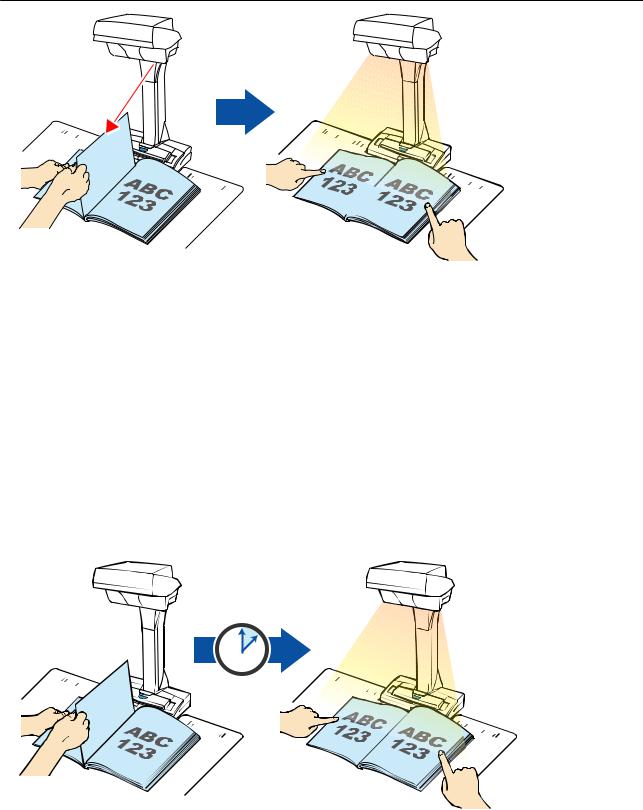
Что можно сделать при помощи ScanSnap
Временный режим
ScanSnap автоматически запустит сканирование после истечения заданного периода времени.
Данное является пригодной для сканирования нескольких документов (любых типов) продолжительно.
Существует два типа настроек для временного режима:
•Настройки периода времени ScanSnap перед запуском сканирования документа после нажатие кнопки [Scan].
•Настройки периода времени ScanSnap для запуска следующего сканирования, когда документы сканируются продолжительно.
Для получения подробной информации, смотрите «Сканирование документов, используя временный режим» (страница 89).
Корректировка сканированных изображений
После сканирования документов при помощи ScanSnap, сканированные изображения могут быть корректированы.
Следующие функции доступны:
18
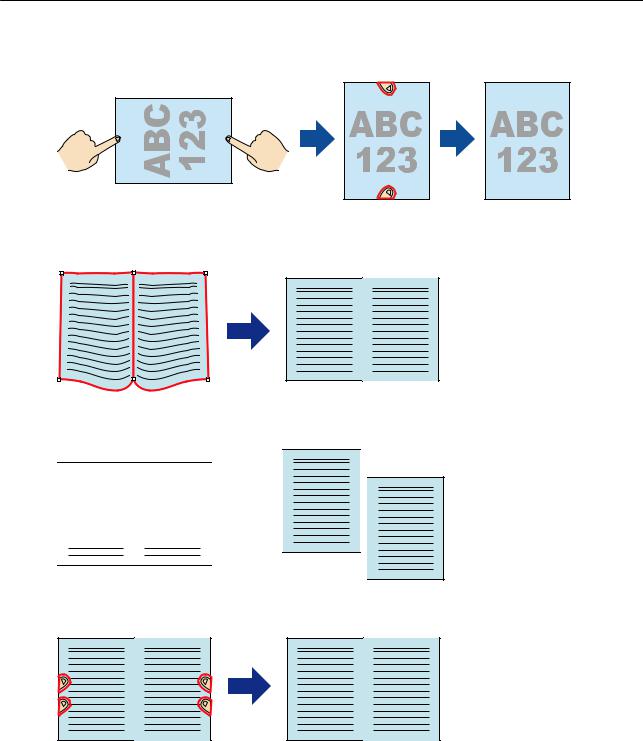
Что можно сделать при помощи ScanSnap
Когда документ сканирован
•«Заполнение пальцев, захваченных в сканированном изображении (Когда документ сканирован)» (страница 95)
Когда книга сканируется
• «Корректировка искаженных изображений книги» (страница 100)
•«Разделение изображения двухсторонней развернутой страницы на изображения двух страниц» (страница 105)


 1
1 
 2
2
•«Заполнение пальцев, захваченных в сканированном изображении (Когда книга сканирована)» (страница 108)
Когда несколько документов сканируются за один раз
•«Корректировка ориентации сканированного изображения» (страница 113)
•«Изменение области обрезки» (страница 116)
•«Добавление нужных сканированных изображений» (страница 118)
•«Удаление ненужных сканированных изображений» (страница 120)
Сканирование документов с двумя ScanSnap, соединенными к компьютеру
Можно использовать SV600 и другой ScanSnap, соединенный к компьютеру.
19
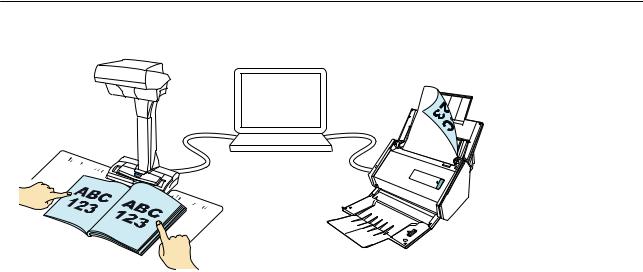
Что можно сделать при помощи ScanSnap
Для получения подробной информации, смотрите «Сканирование документов с двумя ScanSnap, соединенными к компьютеру» (страница 92).
20
![]()
Сканирование документа
Сканирование документа
1.Нажмите кнопку [Scan] или кнопку [Stop] на ScanSnap для включения питания.
Кнопка [Stop]  Кнопка [Scan]
a Светодиод питания светится синим.
В дополнение, значок ScanSnap Manager в области уведомления изменится с  на
на
 .
.
2.Поместите фоновую подкладку в передней стороне ScanSnap.
Поместите фоновую подкладку так, чтобы она плотно прилегала к ScanSnap.
3.Расположите документ в область сканирования ScanSnap и нажмите кнопку [Scan].
Для получения подробной информации, смотрите «Как поместить документы» (страница
57).
21
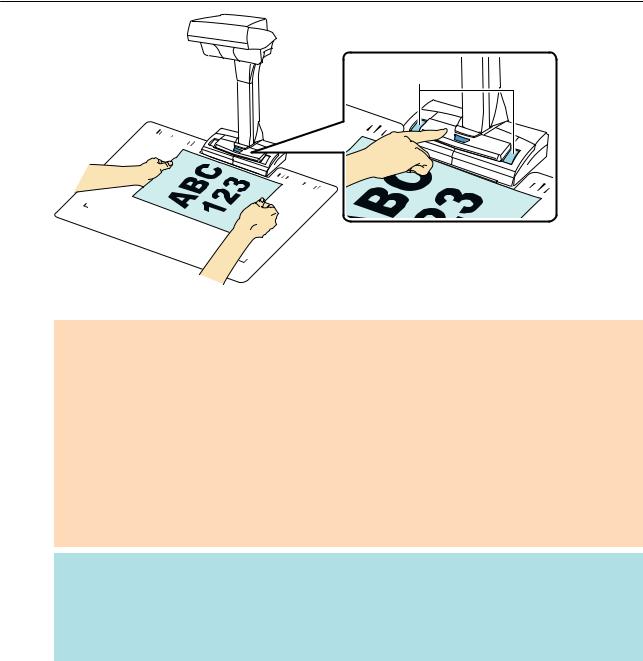
Сканирование документа
белый лист
a Начнется сканирование.
ВНИМАНИЕ
•Не выполняйте следующие операции во время сканирования. Выполнение данного остановит сканирование.
—Соедините или отсоедините ScanSnap и другие устройства USB.
—Переключите пользователя.
—Позвольте компьютеру войти в спящий режим.
•Не перекрывайте белый лист объектом или рукой во время сканирования. Это может привести к некорректной цветопередаче сканированного изображения.
•Не трясите стол или письменный стол, когда ScanSnap используется, или перемещайте документы во время их сканирования. Выполнение данного может исказить сканированное изображение или размыть цвет.
СОВЕТ
Можно также запустить сканирование документа, нажатием правой кнопки мыши по значку
ScanSnap Manager  в области уведомлений, а затем выбором [Сканирование] из «Меню правого клика» (страница 45).
aСветодиод питания на ScanSnap мигает синим, во время выполнения сканирования документов.
Отображается окно [ScanSnap Manager — Сканирование изображения и сохранение файла].
22
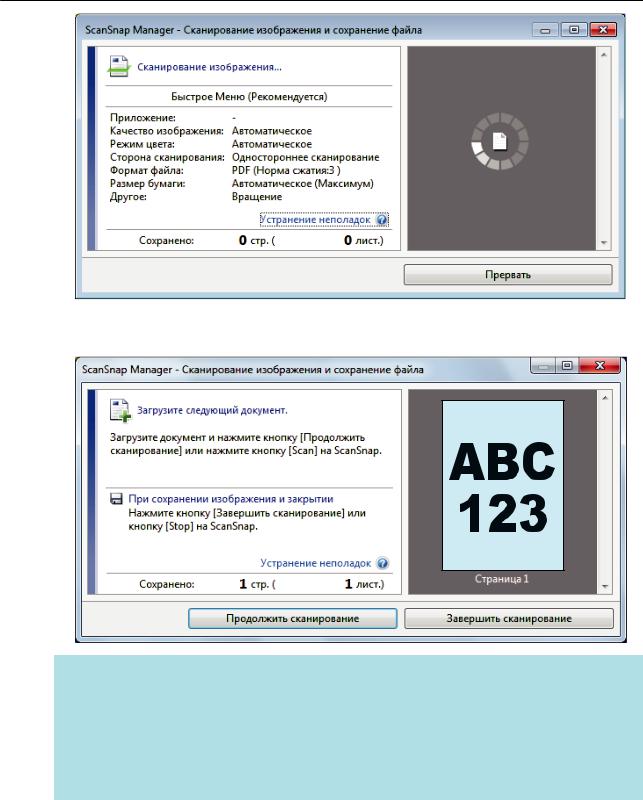
Сканирование документа
aКогда сканирование завершено, окно [ScanSnap Manager — Сканирование изображения и сохранения файла] отобразит состояние ожидания сканирования.
СОВЕТ
Для продолжения сканирования, поместите следующий документ для сканирования, а затем выполните одну из следующих операций. Продолжительное сканирование запустится.
•Нажатие кнопки [Продолжить сканирование] в окне [ScanSnap Manager — Сканирование изображения и сохранение файла]
•Нажатие кнопки [Scan] на ScanSnap
4.Для завершения сканирования, нажмите кнопку [Завершить сканирование] или нажмите кнопку [Stop] на ScanSnap.
a Окно отобразится для выбора как сохранить сканированные изображения.
В области просмотра сканированные изображения обрезаются и отображаются.
5.Выберите [Обработайте и сохраните изображения обычного документа как есть], а затем нажмите кнопку [Сохранить данное изображение].
23
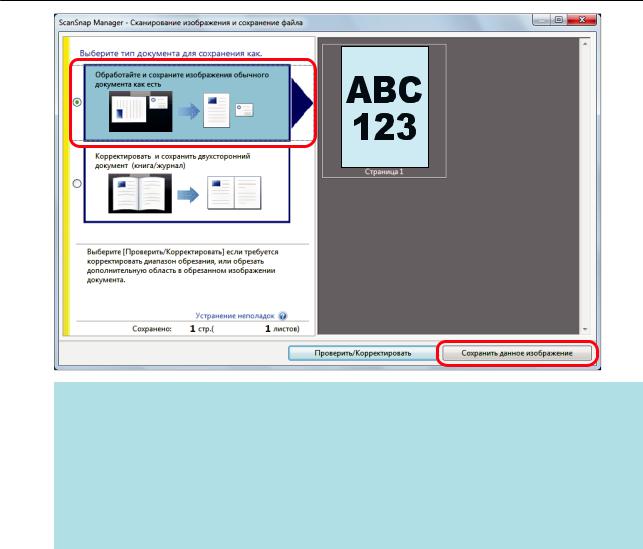
Сканирование документа
СОВЕТ
Нажмите кнопку [Проверить/Корректировать] в окне [ScanSnap Manager — Сканирование изображения и сохранение файла] для корректировки сканированного изображения. Следующие функции доступны:
•«Заполнение пальцев, захваченных в сканированном изображении (Когда документ сканирован)» (страница 95)
•«Корректировка ориентации сканированного изображения» (страница 113)
•«Изменение области обрезки» (страница 116)
a Отобразится Быстрое Меню.
6.В Быстром Меню, нажмите значок приложения для связи со ScanSnap Manager.
При выборе  , можно управлять сканированными изображениями в каждой отдельной папке с помощью ScanSnap Organizer.
Для получения подробной информации, смотрите «Управление бумажными документами при помощи папок в компьютере» (страница 79).
24
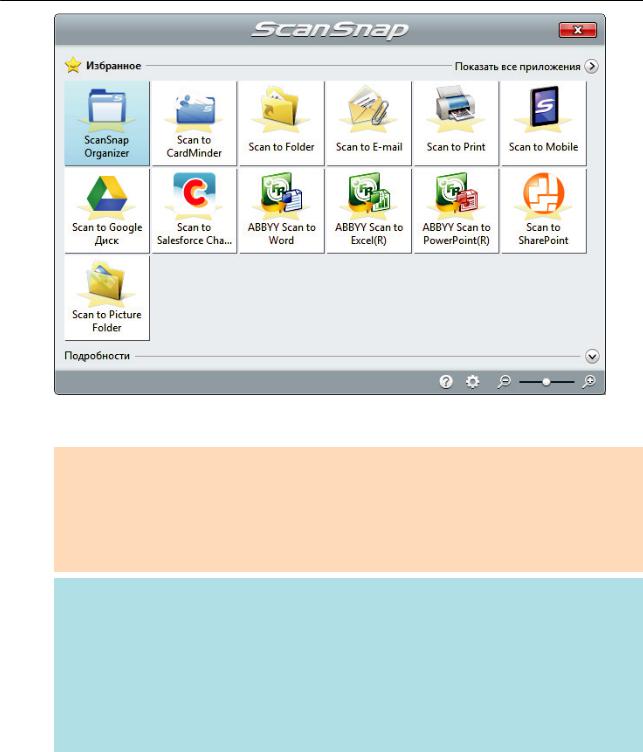
Сканирование документа
aВыбранное приложение будет запущено. Для получения подробной информации, смотрите дополнительное руководство по эксплуатации.
ВНИМАНИЕ
•Невозможно запустить сканирование, когда Быстрое Меню отображено. Либо выберите элемент из Быстрого Меню и завершите процесс, либо закройте Быстрое Меню до выполнения следующего сканирования.
•Не перемещайте, не удаляйте или не переименовывайте сканированные изображения используя другие приложения, когда Быстрое Меню отображено.
СОВЕТ
•Нажатие  отобразит описание приложения. Расположение курсора мыши над значком другого приложения отобразит описание приложения.
•Выполнение сканирования, во время активирования приложение, которое может быть автоматически связано, автоматически запускает связь между ScanSnap Manager и приложения.
Для получения подробной информации, смотрите дополнительное руководство по эксплуатации.
25
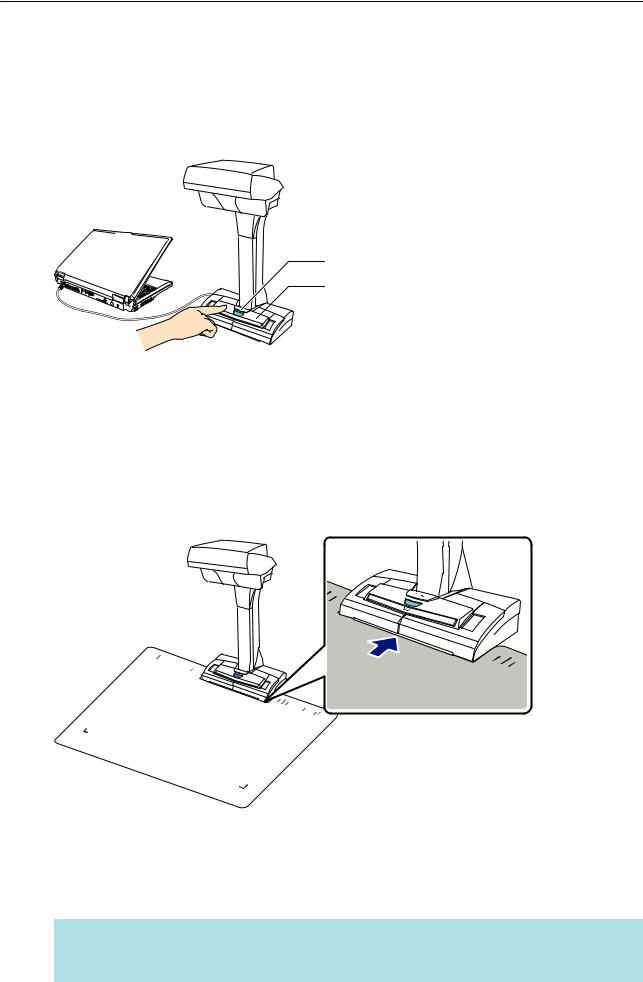
Сканирование книги
Сканирование книги
1.Нажмите кнопку [Scan] или кнопку [Stop] на ScanSnap для включения питания.
Кнопка [Stop]  Кнопка [Scan]
a Светодиод питания светится синим.
В дополнение, значок ScanSnap Manager в области уведомления изменится с  на
на
 .
.
2.Поместите фоновую подкладку в передней стороне ScanSnap.
Поместите фоновую подкладку так, чтобы она плотно прилегала к ScanSnap.
3.Расположите книгу в область сканирования ScanSnap и нажмите кнопку
[Scan].
Для получения подробной информации, смотрите «Как поместить документы» (страница
57).
СОВЕТ
Можно также включить обнаружение переворачивания страницы, удерживая нажатой кнопку [Scan] на ScanSnap в течение 2 секунд или более. Когда обнаружение
26
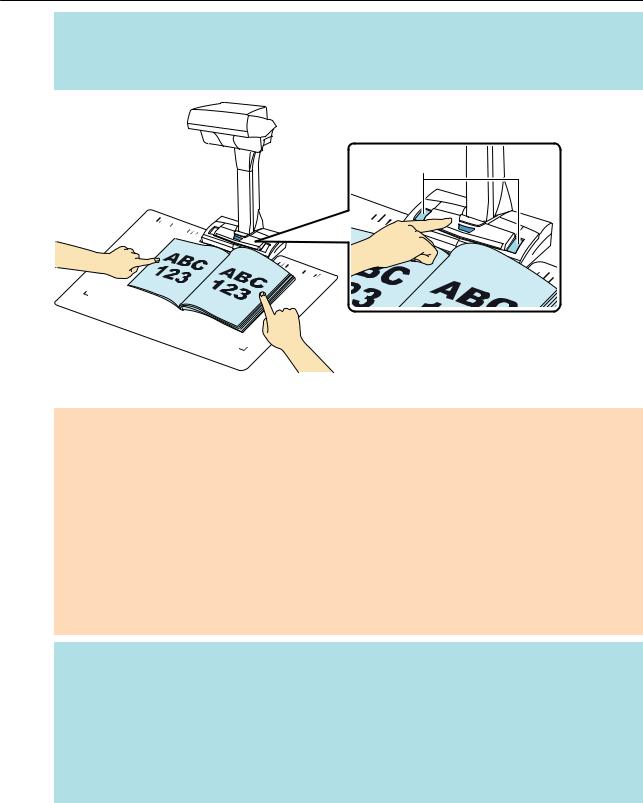
Сканирование книги
переворачивания страницы используется, перелистывание страницы книги автоматически запустит сканирование.
Для получения подробной информации, смотрите «Сканирование документов, используя обнаружения переворачивания страницы» (страница 85).
белый лист
a Сканирование книги начнется.
ВНИМАНИЕ
•Не выполняйте следующие операции во время сканирования. Выполнение данного остановит сканирование.
—Соедините или отсоедините ScanSnap и другие устройства USB.
—Переключите пользователя.
—Позвольте компьютеру войти в спящий режим.
•Не перекрывайте белый лист объектом или рукой во время сканирования. Воспроизводство цвета сканированного изображения будет затронута.
•Не трясите стол или письменный стол, когда ScanSnap используется, или перемещайте документы во время их сканирования. Выполнение данного может исказить сканированное изображение или размыть цвет.
СОВЕТ
•Можно также запустить сканирование книги нажатием правой кнопки мыши по значку
ScanSnap Manager  в области уведомлений, и выбором [Сканирование] из «Меню правого клика» (страница 45).
•Когда временный режим используется, после задания времени, ScanSnap автоматически запустит сканирование. Для получения подробной информации, смотрите «Сканирование документов, используя временный режим» (страница 89).
aСветодиод питания на ScanSnap мигает синим, во время выполнения сканирования книги.
Отображается окно [ScanSnap Manager — Сканирование изображения и сохранение файла].
27

Сканирование книги
aКогда сканирование книги завершено, окно [ScanSnap Manager — Сканирование изображения и сохранения файла] отобразится состояние ожидания сканирования.
СОВЕТ
Для продолжения сканирования книги, откройте следующую страницу для сканирования, а затем выполните одну из следующих операций: Продолжительное сканирование книги запустится.
•Нажатие кнопки [Продолжить сканирование] в окне [ScanSnap Manager — Сканирование изображения и сохранение файла]
•Нажмите кнопку [Scan] на ScanSnap.
4.Для завершения сканирования книги, нажмите кнопку [Завершить сканирование] или нажмите кнопку [Stop] на ScanSnap.
a Окно отобразится для выбора как сохранить сканированные изображения.
В области предварительного просмотра обрезаются и показываются изображения, сканированные из книги.
5.Выберите [Корректировать и сохранить двухсторонний документ (книга/ журнал)], а затем нажмите кнопку [Сохранить данное изображение].
28
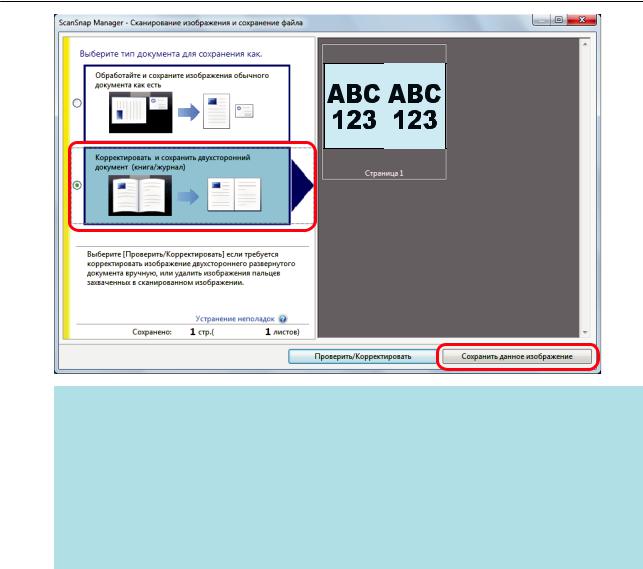
Сканирование книги
СОВЕТ
Нажмите кнопку [Проверить/Корректировать] в окне [ScanSnap Manager — Сканирование изображения и сохранение файла] для корректировки сканированного изображения. Следующие функции доступны:
•«Корректировка искаженных изображений книги» (страница 100)
•«Разделение изображения двухсторонней развернутой страницы на изображения двух страниц» (страница 105)
•«Заполнение пальцев, захваченных в сканированном изображении (Когда книга сканирована)» (страница 108)
a Отобразится Быстрое Меню.
6.В Быстром Меню, нажмите значок приложения для связи со ScanSnap Manager.
При выборе  , можно управлять сканированными изображениями в каждой отдельной папке с помощью ScanSnap Organizer.
Для получения подробной информации, смотрите «Управление бумажными документами при помощи папок в компьютере» (страница 79).
29
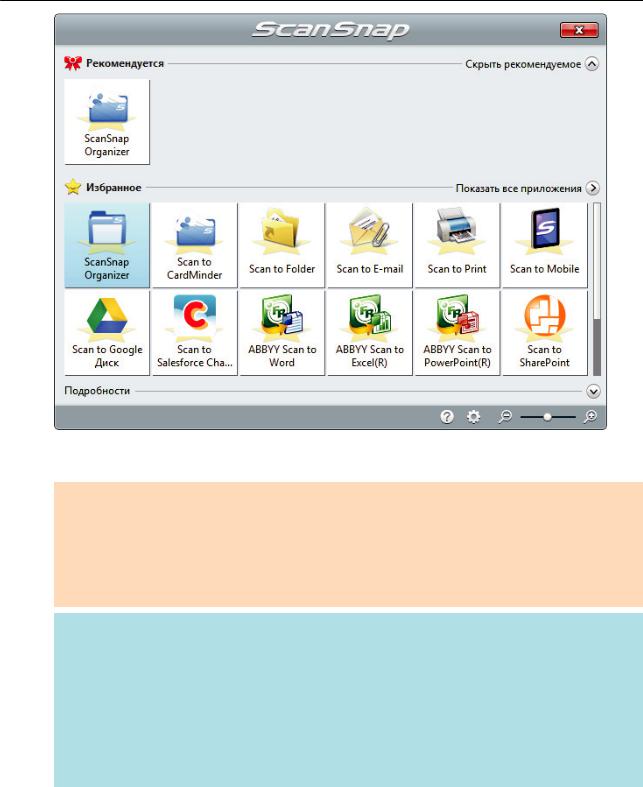
Сканирование книги
aВыбранное приложение будет запущено. Для получения подробной информации, смотрите дополнительное руководство по эксплуатации.
ВНИМАНИЕ
•Невозможно запустить сканирование, когда Быстрое Меню отображено. Либо выберите элемент из Быстрого Меню и завершите процесс, либо закройте Быстрое Меню до выполнения следующего сканирования.
•Не перемещайте, не удаляйте или не переименовывайте сканированные изображения используя другие приложения, когда Быстрое Меню отображено.
СОВЕТ
•Нажатие  отобразит описание приложения. Расположение курсора мыши над значком другого приложения отобразит описание приложения.
•Выполнение сканирования, во время активирования приложение, которое может быть автоматически связано, автоматически запускает связь между ScanSnap Manager и приложения.
Для получения подробной информации, смотрите дополнительное руководство по эксплуатации.
30
![]()
Сканирование несколько документов за один раз
Сканирование несколько документов за один раз
1.Нажмите кнопку [Scan] или кнопку [Stop] на ScanSnap для включения питания.
Кнопка [Stop]  Кнопка [Scan]
a Светодиод питания светится синим.
В дополнение, значок ScanSnap Manager в области уведомления изменится с  на
на
 .
.
2.Поместите фоновую подкладку в передней стороне ScanSnap.
Поместите фоновую подкладку так, чтобы она плотно прилегала к ScanSnap.
3.Расположите документ в область сканирования ScanSnap и нажмите кнопку [Scan].
Для получения подробной информации, смотрите «Как поместить документы» (страница
57).
31

Сканирование несколько документов за один раз
белый лист
a Начнется сканирование.
ВНИМАНИЕ
•Не выполняйте следующие операции во время сканирования. Выполнение данного остановит сканирование.
—Соедините или отсоедините ScanSnap и другие устройства USB.
—Переключите пользователя.
—Позвольте компьютеру войти в спящий режим.
•Не перекрывайте белый лист объектом или рукой во время сканирования. Воспроизводство цвета сканированного изображения будет затронута.
•Не трясите стол или письменный стол, когда ScanSnap используется, или перемещайте документы во время их сканирования. Выполнение данного может исказить сканированное изображение или размыть цвет.
СОВЕТ
Можно также запустить сканирование документов, нажатием правой кнопки мыши по
значку ScanSnap Manager  в области уведомлений, и выбором [Сканирование] из «Меню правого клика» (страница 45).
aСветодиод питания на ScanSnap мигает синим, во время выполнения сканирования документов.
Отображается окно [ScanSnap Manager — Сканирование изображения и сохранение файла].
32

Сканирование несколько документов за один раз
aКогда сканирование завершено, окно [ScanSnap Manager — Сканирование изображения и сохранения файла] отобразит состояние ожидания сканирования.
СОВЕТ
Для продолжения сканирования, поместите следующий документ для сканирования, а затем выполните одну из следующих операций. Продолжительное сканирование запустится.
•Нажатие кнопки [Продолжить сканирование] в окне [ScanSnap Manager — Сканирование изображения и сохранение файла]
•Нажмите кнопку [Scan] на ScanSnap.
4.Для завершения сканирования, нажмите кнопку [Завершить сканирование] или нажмите кнопку [Stop] на ScanSnap.
a Окно отобразится для выбора как сохранить сканированные изображения.
В области просмотра сканированные изображения будут обрезаны, и каждое из них отобразится как отдельный документ.
5.Выберите [Обработайте и сохраните изображения обычного документа как есть], а затем нажмите кнопку [Сохранить данное изображение].
33

Сканирование несколько документов за один раз
СОВЕТ
Нажмите кнопку [Проверить/Корректировать] в окне [ScanSnap Manager — Сканирование изображения и сохранение файла] для корректировки сканированного изображения. Следующие функции доступны:
•«Корректировка ориентации сканированного изображения» (страница 113)
•«Изменение области обрезки» (страница 116)
•«Добавление нужных сканированных изображений» (страница 118)
•«Удаление ненужных сканированных изображений» (страница 120)
a Отобразится Быстрое Меню.
6.В Быстром Меню, нажмите значок приложения для связи со ScanSnap Manager.
При выборе пункта  можно сохранить данные визитной карточки в приложении
CardMinder.
Для получения подробной информации, смотрите «Сохранение визитных карточек в компьютер» (страница 82).
34

Сканирование несколько документов за один раз
aВыбранное приложение будет запущено. Для получения подробной информации, смотрите дополнительное руководство по эксплуатации.
ВНИМАНИЕ
•Невозможно запустить сканирование, когда Быстрое Меню отображено. Либо выберите элемент из Быстрого Меню и завершите процесс, либо закройте Быстрое Меню до выполнения следующего сканирования.
•Не перемещайте, не удаляйте или не переименовывайте сканированные изображения используя другие приложения, когда Быстрое Меню отображено.
СОВЕТ
•Нажатие  отобразит описание приложения. Расположение курсора мыши над значком другого приложения отобразит описание приложения.
•Выполнение сканирования, во время активирования приложение, которое может быть автоматически связано, автоматически запускает связь между ScanSnap Manager и приложения.
Для получения подробной информации, смотрите дополнительное руководство по эксплуатации.
35

Краткий обзор ScanSnap
Краткий обзор ScanSnap
В данном разделе дается краткий обзор, который необходимо знать перед работой со
ScanSnap.
•«Части и Функции» (страница 37)
•«Системные требования» (страница 40)
•«Краткий обзор программного обеспечения, связанного с ScanSnap» (страница 42)
•«Как установить программное обеспечение» (страница 43)
•«Значок ScanSnap Manager» (страница 44)
•«Меню правого клика» (страница 45)
•«Окно настроек ScanSnap» (страница 48)
•«Включение / Выключение ScanSnap» (страница 50)
•«Документы для сканирования» (страница 56)
•«Как поместить документы» (страница 57)
36

Части и Функции
Части и Функции
В данном разделе дается объяснение названиям и функциям частей ScanSnap.
Передняя часть
1
|
2 |
||
|
3 |
||
|
4 |
||
|
5 |
||
|
6 |
||
|
7 |
||
|
8 |
||
|
Номер |
Название |
Описание |
|
1 |
Головка |
— |
|
2 |
Стойка |
— |
|
3 |
Кнопка [Scan] (*1) |
• Включает ScanSnap. |
|
• Запускает сканирование. |
||
|
4 |
Кнопка [Stop] (*1) |
• Включает или выключает ScanSnap. |
|
• Останавливает сканирование. |
||
|
5 |
Основа |
— |
|
6 |
Светодиод питания |
Указывает состояние ScanSnap следующим образом: |
|
Синий (светится): Готово |
||
|
Синий (мигает): Сканирование |
||
|
Оранжевый (мигает): Ошибка |
||
|
7 |
Белый лист |
Используется для определения начального положения для |
|
сканирования документов, а также эталон стандартных цветов |
||
|
для цветов документов, когда документы сканируются. |
||
|
8 |
Метка центрирования |
При расположении книги или документа стандартного размера, |
|
отрегулируйте центр документа с меткой центрирования. |
*1: Если ScanSnap был выключен автоматически, по причине функции автоматического выключения питания, нажмите кнопку [Scan] или [Stop] для включения ScanSnap снова. (Нажатие кнопки [Scan] не запустит сканирование.)
37

Части и Функции
Для получения подробной информации, смотрите «Автоматическое выключение питания» (страница 55).
ВНИМАНИЕ
При переносе ScanSnap, возьмитесь за основу и стойку. Не переносите сканер, держа его за головку.
Задняя часть
|
9 |
||
|
10 |
||
|
11 |
||
|
Номер |
Название |
Описание |
|
9 |
Слот кабеля безопасности |
Используется для соединения кабеля безопасности против |
|
кражи (коммерчески доступен). |
||
|
10 |
Разъем USB |
Используется для соединения кабеля USB. |
|
11 |
Разъем питания |
Используется для соединения кабеля переменного тока. |
Модуль сканирования
Работает, когда документы сканируются.
38

Части и Функции
12
13
14
|
15 |
|||||
|
Номер |
Название |
Описание |
|||
|
12 |
Камера |
Обнаруживает переворачивание страницы и глянцевую бумагу. |
|||
|
13 |
Инфракрасный светодиод |
Облучает область сканирования инфракрасными лучами для |
|||
|
обнаружения переворачивания страницы и глянцевой бумаги. |
|||||
|
14 |
Стекло |
Защищает линзы, используемые для сканирования документа. |
|||
|
15 |
Лампа |
Освещает документ для сканирования. |
|||
39

Системные требования
Системные требования
ScanSnap имеет следующие системные требования.
Для получения последней информации о требованиях, посетите сайт поддержки ScanSnap: http://scansnap.fujitsu.com/g-support/ru/
|
Операционная система |
Windows 10 (32-бита / 64-бита) (*1) |
|
Windows 8.1 (32-бита / 64-бита) (*2) |
|
|
Windows 7 (32-бита / 64-бита) |
|
|
ЦПУ |
Intel®Core™ i5 2,5 Ггц или выше |
|
Память |
4 ГБ или больше |
|
Разрешение экрана (*3) |
Windows 10 / Windows 8.1: 1024 × 768 пиксель или выше |
|
Windows 7: 800 × 600 пиксель или выше |
|
|
Пространство диска |
Свободное пространство, требуемое для установки программного |
|
обеспечения, связанное с ScanSnap следующее: (*4) |
|
|
• ScanSnap Manager: 700 MБ |
|
|
• ScanSnap Organizer: 290 МБ |
|
|
• CardMinder: 730 MБ |
|
|
• ABBYY FineReader for ScanSnap: 710 МБ |
|
|
• ScanSnap Online Update: 50 MБ |
|
|
• Scan to Microsoft SharePoint: 40 МБ |
|
|
• Пакет OCR (*5) |
|
|
• Основное Руководство по эксплуатации ScanSnap SV600: 10 MБ |
|
|
• Nuance Power PDF Standard: 700 MБ |
|
|
Порт USB |
USB 3.0(*6)/USB 2.0/USB 1.1 |
*1: Программное обеспечение, прилагаемое в комплекте со ScanSnap, работает режиме рабочего стола.
*2: Программное обеспечение, прилагаемое в комплекте со ScanSnap, работает как приложение рабочего стола.
*3: Когда размер шрифта является большим, некоторые экраны могут быть отображены не правильно.
В подобном случае, используйте меньший размер шрифта.
*4: Для сохранения сканированных изображений, требуется больше свободного пространства.
Для получения подробной информации о приблизительных данных размера изображения,
смотрите Справку ScanSnap Manager.
*5: При установке пакета OCR вы можете добавить дополнительные языки для распознания текста.
Свободное пространство, требуемое для установки пакета OCR, для справки смотрите следующее:
http://www.fujitsu.com/global/support/products/computing/peripheral/scanners/scansnap/ software/ocrpack-setup.html
*6: Даже если соединение ScanSnap выполнено через порты соответствующий USB 3.0, сканер работает как устройство USB 2.0.
ВНИМАНИЕ
•Если системные требования, изложенные выше не удовлетворены, ScanSnap может не работать.
40
![]()
Системные требования
•Если используется порт USB на клавиатуре или мониторе, ScanSnap может не работать.
•При использовании коммерчески доступного USB-концентратор, используйте тип, который подпитывается от источника электрического питания (и прилагается вместе с адаптером).
•Скорость сканирования замедлится в следующих случаях:
—ЦПУ или память не отвечает рекомендованным спецификациям.
—Версия порта USB или USB-концентратора является USB 1.1.
•Фактическое пространство диска, использованное для установки программного обеспечения и пространства диска требуемое для установки может отличаться, по причине управления диском в использованной системе Windows.
•Для сканирования документов, требуется пространство диска, которое примерно в три раза больше размера файла для сохранения.
•Если символы не отобразятся правильно при использовании следующих функций, установите универсальный шрифт (Arial Unicode MS) с установочного диска Microsoft Office версии 2007 или более поздней версии:
—CardMinder
—Scan to Mobile
—Scan to Salesforce Chatter
—Scan to Dropbox
СОВЕТ
•Для Windows 7, когда следующие программные обеспечения установлены, .NET Framework 4 или или версия обновления на месте для .NET Framework 4 (которая требует 2 ГБ свободного пространства диска) может быть установлено:
—ScanSnap Manager
—ScanSnap Organizer
После установки .NET Framework, примените обновление в центре обновления Windows.
•Для Windows 10 или Windows 8.1 при установке следующих программ может также устанавливаться .NET Framework 3.5 SP1 (для этого требуется максимум 500 МБ свободного дискового пространства):
—ScanSnap Manager
—ScanSnap Organizer
—CardMinder
41

Краткий обзор программного обеспечения, связанного с ScanSnap
Краткий обзор программного обеспечения, связанного с ScanSnap
В данном разделе дается обзор каждого прилагаемого в комплекте программного обеспечения и функций. Можно редактировать, управлять и упорядочивать сканированные изображения, используя следующее программное обеспечение:
ScanSnap Manager
Данное программное обеспечение необходимо для сканирования документов при помощи ScanSnap. Сканированные изображения могут быть сохранено как файл PDF или JPEG в компьютер.
Необходимо иметь ScanSnap Connect Application, установленный в мобильное устройства, для сохранения файлов PDF или JPEG в мобильное устройство.
Можно загрузить ScanSnap Connect Application для мобильного устройства в магазине приложений.
ScanSnap Organizer
Можно использовать данное приложение для отображения данных изображения (файлы PDF или JPEG) без их открытия, создать папки и упорядочить файлы по желанию.
CardMinder
Можно использовать данное приложение для эффективной оцифровки большого числа визитных карточек.
Распознавание текста может быть выполнено на визитных карточках и можно создать базу данных для содействия управлению и поиску данных карточки. Данные в базе данных могут быть напечатаны и связаны с различными приложениями.
ABBYY FineReader for ScanSnap
Это приложение может распознавать содержащийся в сканированных изображениях текст с помощью OCR (оптического распознавания символов) и затем преобразовывать изображения в редактируемые файлы Word, Excel или PowerPoint.
ScanSnap Online Update
Данное приложение проверяет доступны ли последние обновления или программные обеспечения в сервере загрузки. Когда последние обновления или программные обеспечения доступны, можно автоматически применить обновления, или загрузить и установить программные обеспечения автоматически.
Scan to Microsoft SharePoint
Можно легко сохранить файлы в SharePoint используя ScanSnap.
Evernote для Windows
При помощи ScanSnap можно легко сохранить файлы в Evernote.
Dropbox для Windows
Можно без затруднений сохранить файлы в используемую папку Dropbox при помощи
ScanSnap.
Nuance Power PDF Standard
Данное является приложением для создания, редактирования, управления, и использования электронных документов формата PDF.
42

Как установить программное обеспечение
Как установить программное обеспечение
При вставлении установочного диска Setup DVD-ROM в дисковод DVD-ROM компьютера,
отобразится окно [ScanSnap Setup].
ВНИМАНИЕ
•Соединен ли ScanSnap к компьютеру перед установкой программного обеспечения. Данное может стать причиной того, что ScanSnap не будет распознан компьютером. В подобном случае, установите программное обеспечение, а затем повторно соедините ScanSnap к компьютеру.
•Если дисковод DVD-ROM не доступен, программа установки программных обеспечений может быть загружен со следующей веб-страницы.
http://scansnap.fujitsu.com/g-support/ru/
Кнопки, представленные в окне [ScanSnap Setup], обладают следующими функциями.
|
Кнопка |
Функция |
|
Сведения |
Отображение окна [Readme]. Можно просмотреть файл Сведения каждого |
|
программного обеспечения в данном окне. |
|
|
Установить продукт |
Отображение окна [Install Products]. Можно начать установку программного |
|
обеспечения. |
|
|
Руководства |
Отображение окна [Manuals]. В этом окне можно просмотреть руководства «Меры |
|
предосторожности», «Руководство по началу работы», «Основное Руководство по |
|
|
эксплуатации» (данное руководство), а также руководство по каждой программе. |
|
|
Обзор содержания DVD |
Открывает Проводник для отображения файлов установочного DVD-ROM. |
|
Поддержка |
Отобразит контактную информацию для поддержки клиентов. |
43

Значок ScanSnap Manager
Значок ScanSnap Manager
Когда ScanSnap Manager запущен, значок ScanSnap Manager отобразится в области уведомлений. Область уведомлений расположена в правой части панели задач.
Значок ScanSnap Manager указывает успешно ли выполнено соединение ScanSnap Manager со ScanSnap. Отображение значка меняется соответственно состоянию соединения, как показано ниже.
|
Состояние соединения |
Значок ScanSnap Manager |
Соединение
Нет соединения
СОВЕТ
Включите ScanSnap в начале связи между ScanSnap Manager и ScanSnap. Для получения подробной информации о том, как включить ScanSnap, смотрите «Включение ScanSnap» (страница 51).
Можно отобразить меню для сканирования документов и настройки ScanSnap Manager из значка ScanSnap Manager.
•Нажатие правой кнопкой мыши Отобразит «Меню правого клика» (страница 45).
•Нажатие левой кнопки мыши Отображает Меню Левого клика.
Для получения подробной информации, смотрите дополнительное руководство по эксплуатации.
44

Меню правого клика
Меню правого клика
Это меню появляется когда вы щелкаете правой кнопкой мыши на значке ScanSnap Manager
 в области уведомлений, расположенной правой части панели задач.
|
Элемент |
Функция |
|
Сканирование |
Сканирует документ помещенный в область сканирования ScanSnap. Следуйте |
|
настройкам конфигурированным в [Настройка кнопки Scan]. |
|
|
Настройка кнопки Scan |
Отобразит «Окно настроек ScanSnap» (страница 48). Можно конфигурировать |
|
настройки сканирования в данном окне. |
|
|
Управление профилями |
Отобразит окно [ScanSnap Manager — Управление профилями]. |
|
Невозможно выбрать [Управление профилями], когда значение [Использовать |
|
|
Быстрое Меню] выбрано, в окне настроек ScanSnap. |
|
|
Для получения подробной информации, смотрите дополнительное руководство |
|
|
по эксплуатации. |
|
|
Соединить при помощи |
Отображает окна [ScanSnap Manager — Соединить при помощи Wi-Fi]. |
|
Wi-Fi |
Доступно для моделей iX500 и iX100. |
|
Настройка ScanSnap |
Отобразит окно настроек ScanSnap. Можно конфигурировать настройки |
|
Folder |
сканирования для использования ScanSnap Folder в данном окне. |
|
Для получения подробной информации, смотрите дополнительное руководство |
|
|
по эксплуатации. |
|
45

|
Меню правого клика |
||
|
Элемент |
Функция |
|
|
Показать результаты |
После завершения сканирования, отобразится сообщение для уведомления |
|
|
сканирования |
следует ли вращать изображение. |
|
Предпочтения |
Отобразит окно [ScanSnap Manager — Предпочтения]. |
|
Справка |
Отобразит следующее меню: |
|
• Справка |
|
|
Открывает Справку ScanSnap Manager. |
|
|
• Устранение неполадок |
|
|
Отобразит [Устранение неполадок] в Справке ScanSnap Manager. |
|
|
• Узел портала ScanSnap |
|
|
Открывает глобальную домашнюю страницу ScanSnap (http:// |
|
|
scansnap.fujitsu.com). |
|
|
• О ScanSnap Manager |
|
|
Отобразит окно [ScanSnap Manager — Информация о версии]. |
|
|
• Информация ScanSnap |
|
|
Отобразит окно [ScanSnap Manager — Информация о сканере и драйвере]. |
|
|
Отображается, когда ScanSnap и компьютер подключены. |
|
|
• Онлайн обновление |
|
|
Запускает ScanSnap Online Update. |
|
|
Для получения подробной информации, смотрите «Обновление программного |
|
|
обеспечения» (страница 152). |
|
|
Чтобы установить связь |
Отобразится, когда ScanSnap Manager не правильно связан с ScanSnap. |
|
Выход |
Закрывает ScanSnap Manager. |
СОВЕТ
Когда SV600 и один из iX500, iX100, S1500, S1500M, S1300i, S1300, S1100i и S1100 соединены к компьютеру, Меню правого клика отобразит элементы связанные с каждым из соединенных моделей ScanSnap.
Для получения подробной информации, смотрите Справку ScanSnap Manager.
46

Меню правого клика
Когда SV600 и iX500 соединены к компьютеру
47

Окно настроек ScanSnap
Окно настроек ScanSnap
При нажатии правой кнопкой мыши по значку ScanSnap Manager  в области уведомлений в правой части панели задач и выборе пункта [Настройка кнопки Scan] в меню «Меню правого клика» (страница 45) открывается следующее окно настроек ScanSnap.
В окне настроек ScanSnap можно использовать значение [Использовать Быстрое Меню] для задания использовать или нет Быстрое Меню. Можно также использовать кнопки профиля и вкладки подробных настроек для задания настроек сканирования соответственно требованиям сканирования.
Для получения подробной информации, смотрите Справку ScanSnap Manager.
Кнопки профиля
Вкладки подробной настройки
СОВЕТ
Когда SV600 и один из iX500, iX100, S1500, S1500M, S1300i, S1300, S1100i и S1100 подключены к компьютеру, можно изменить настройки сканирования для каждой из соединенных моделей ScanSnap, выбрав название модели в пункте [Сканер] окна настроек ScanSnap.
48

Окно настроек ScanSnap
49

Включение / Выключение ScanSnap
Включение / Выключение ScanSnap
В данном разделе дается объяснение о том, как включить или выключить ScanSnap.
•«Включение ScanSnap» (страница 51)
•«Выключение ScanSnap» (страница 53)
•«Спящий режим» (страница 54)
•«Автоматическое выключение питания» (страница 55)
50
 Loading…
Инструкцию для Fujitsu ScanSnap SV600 на русском языке, в формате pdf можно скачать с нашего сайта. Наш каталог предоставляем Вам инструкцию производителя фирмы Fujitsu, которая была взята из открытых источников. Ознакомившись с руководством по эксплуатации от Fujitsu, Вы на все 100% и правильно сможете воспользоваться всеми функциями устройства.
Для сохранения инструкции «Сканер Fujitsu ScanSnap SV600» на русском языке на вашем компьютере либо телефоне, нажмите кнопку «Скачать инструкцию». Если активна кнопка «Инструкция онлайн», то Вы можете просмотреть документ (manual), в своём браузере онлайн.
Если у Вас нет возможности скачать инструкцию по эксплуатации либо просмотреть её, Вы можете поделиться ссылкой на эту страницу в социальных сетях и при удобном моменте скачать инструкцию. Либо добавьте эту страницу в закладки Вашего браузера, нажав кнопку «Добавить страницу в закладки браузера».
-
Page 1
P3PC-4842-07ENZ2 Basic Operation Guide (Mac OS) -
Page 2: Table Of Contents
Contents About This Manual ……………………. 5 Safety Information……………………..6 Manuals ………………………….7 Trademarks……………………….9 Manufacturer……………………….10 Symbols Used in This Manual…………………… 11 Arrow Symbols in This Manual………………….. 12 Screen Examples in This Manual ………………….13 Abbreviations Used in This Manual ………………….14 What You Can Do with the ScanSnap …………….. 15 Scanning a Document………………….
-
Page 3
Scanning Documents Using Page Turning Detection …………….78 Scanning Documents Using Timed Mode………………..82 Scanning Documents with Two ScanSnaps Connected to a Computer…………85 Correcting the Scanned Images………………. 86 Scanning a Document …………………….. 87 Filling in Fingers Captured in a Scanned Image (When a Document Is Scanned) ……..88 Scanning Books……………………… -
Page 4
Conditions for Using the Carrier Sheet (For S1100) …………….. 157 How to Load Documents (For S1100) ………………..159 About Customer Support and Maintenance …………… 161… -
Page 5: About This Manual
About This Manual About This Manual «Safety Information» (page 6) «Manuals» (page 7) «Trademarks» (page 9) «Manufacturer» (page 10) «Symbols Used in This Manual» (page 11) «Arrow Symbols in This Manual» (page 12) «Screen Examples in This Manual» (page 13) «Abbreviations Used in This Manual»…
-
Page 6: Safety Information
Safety Information Safety Information The attached «Safety Precautions» manual contains important information about the safe and correct use of the ScanSnap. Make sure that you read and understand it before using the ScanSnap.
-
Page 7: Manuals
[SV600 Safety Precautions]. When Setting Up the ScanSnap Manual Description and Location ScanSnap SV600 Getting This manual explains the setup procedure from the moment you open the package to Started testing the operations. Getting Started is included in the package.
-
Page 8
Manuals When Saving Scanned Images to a Mobile Device Manual Description and Location ScanSnap Connect This manual describes operations to be performed on an iOS-based mobile device Application User’s Guide when you save scanned images to the mobile device. (iOS) This manual can be accessed by the following method: 1. -
Page 9: Trademarks
Trademarks Trademarks Microsoft, Windows, Windows Vista, Excel, PowerPoint, Outlook, SharePoint, Windows Live, Internet Explorer, and Entourage are either registered trademarks or trademarks of Microsoft Corporation in the United States and/or other countries. Word is the product of Microsoft Corporation in the United States. Apple, App Store, the Apple logo, Mac, Mac OS, OS X, iPad, iPhone, iPhoto, iPod touch, and iTunes are trademarks of Apple Inc.
-
Page 10: Manufacturer
Manufacturer Manufacturer PFU LIMITED YOKOHAMA i-MARK PLACE, 4-4-5 Minatomirai, Nishi-ku, Yokohama, Kanagawa, 220-8567, Japan © PFU LIMITED 2013-2015…
-
Page 11: Symbols Used In This Manual
Symbols Used in This Manual Symbols Used in This Manual The following indications are used in this manual to obviate any chance of accident or damage to you and people near you, and your property. Warning labels indicate the warning level and statements.
-
Page 12: Arrow Symbols In This Manual
Arrow Symbols in This Manual Arrow Symbols in This Manual Right-arrow symbols (→) are used to connect icons or menu options you should select in succession. Example: From the sidebar in Finder, select [Applications] → [ScanSnap].
-
Page 13: Screen Examples In This Manual
Screen Examples in This Manual Screen Examples in This Manual The screenshots used in this manual are of OS X v10.9. However, some screenshots are of OS X v10.10.3 or later. The actual windows and operations may differ depending on the operating system. The screen examples in this manual are subject to change without notice in the interest of product development.
-
Page 14: Abbreviations Used In This Manual
Abbreviations Used in This Manual Abbreviations Used in This Manual When a ScanSnap model is referred to in this manual, «Color Image Scanner ScanSnap» is omitted. Also, the following abbreviations are used in this manual. Abbreviation Used Designation Mac OS OS X v10.10, OS X v10.9, OS X v10.8, or Mac OS X v10.7 Word ®…
-
Page 15: What You Can Do With The Scansnap
What You Can Do with the ScanSnap What You Can Do with the ScanSnap The ScanSnap model that performs overhead scanning has a scanning unit that does not touch documents. The following scanning operations can be performed with this model: l A book or booklet that is up to A3 in size can be scanned without cutting pages out.
-
Page 16
What You Can Do with the ScanSnap This is useful also for scanning multiple documents (of any type) consecutively. There are two types of settings for timed mode: l Setting the time period before the ScanSnap starts scanning a document after the [Scan] button is pressed l Setting the time period for the ScanSnap to start the next scan when a document is scanned continuously… -
Page 17
What You Can Do with the ScanSnap «Filling in Fingers Captured in a Scanned Image (When a Book Is Scanned)» (page 100) When multiple documents are scanned at once «Correcting the Scanned Image Orientation» (page 105) «Modifying the Crop Area» (page 108) «Adding the Necessary Scanned Images»… -
Page 18: Scanning A Document
Scanning a Document Scanning a Document Press the [Scan] or [Stop] button on the ScanSnap to turn the power on. [Stop] Button [Scan] Button a The power LED lights up in blue. In addition, the ScanSnap Manager icon in the Dock changes from Place the Background Pad on the front side of the ScanSnap.
-
Page 19
Scanning a Document White Sheets a Scanning starts. ATTENTION l Do not perform the following operations during scanning. Doing so will stop scanning. Connect or disconnect the ScanSnap and other USB devices. Switch users. Allow the computer to enter sleep mode. l Do not cover the white sheet with an object or hand during scanning. -
Page 20
Scanning a Document a When scanning is complete, the [ScanSnap Manager — Image scanning and file saving] window displays a scanning standby status. HINT To continue scanning, place down the next document to be scanned, and then perform one of the following operations. -
Page 21
Scanning a Document HINT Click the [Check/Correct] button in the [ScanSnap Manager — Image scanning and file saving] window to correct the scanned image. The following functions are available: «Filling in Fingers Captured in a Scanned Image (When a Document Is Scanned)» (page «Correcting the Scanned Image Orientation»… -
Page 22
Scanning a Document HINT l Clicking displays the description of an application. Placing the mouse cursor over the icon of another application displays the description of the application. l Performing a scan while an application that can be automatically linked with is active automatically starts the linkage between ScanSnap Manager and the application. -
Page 23: Scanning A Book
Scanning a Book Scanning a Book Press the [Scan] or [Stop] button on the ScanSnap to turn the power on. [Stop] Button [Scan] Button a The power LED lights up in blue. In addition, the ScanSnap Manager icon in the Dock changes from Place the Background Pad on the front side of the ScanSnap.
-
Page 24
Scanning a Book White Sheets a Scanning of the book starts. ATTENTION l Do not perform the following operations during scanning. Doing so will stop scanning. Connect or disconnect the ScanSnap and other USB devices. Switch users. Allow the computer to enter sleep mode. l Do not cover the white sheet with an object or hand during scanning. -
Page 25
Scanning a Book a When scanning the book is complete, the [ScanSnap Manager — Image scanning and file saving] window displays a scanning standby status. HINT To continue scanning the book, open the next page to be scanned, and then perform one of the following operations: Continuous scanning of the book starts. -
Page 26
Scanning a Book HINT Click the [Check/Correct] button in the [ScanSnap Manager — Image scanning and file saving] window to correct the scanned image. The following functions are available: «Correcting Distorted Book Images» (page 93) «Splitting a Double-Page Spread Image into Two Page Images» (page 97) «Filling in Fingers Captured in a Scanned Image (When a Book Is Scanned)»… -
Page 27
Scanning a Book a The selected application starts up. For details, refer to the Advanced Operation Guide. ATTENTION l You cannot start scanning when the Quick Menu is displayed. Either select an icon from the Quick Menu and finish the process, or close the Quick Menu before you perform the next scan. -
Page 28: Scanning Multiple Documents At Once
Scanning Multiple Documents at Once Scanning Multiple Documents at Once Press the [Scan] or [Stop] button on the ScanSnap to turn the power on. [Stop] Button [Scan] Button a The power LED lights up in blue. In addition, the ScanSnap Manager icon in the Dock changes from Place the Background Pad on the front side of the ScanSnap.
-
Page 29
Scanning Multiple Documents at Once White Sheets a Scanning starts. ATTENTION l Do not perform the following operations during scanning. Doing so will stop scanning. Connect or disconnect the ScanSnap and other USB devices. Switch users. Allow the computer to enter sleep mode. l Do not cover the white sheet with an object or hand during scanning. -
Page 30
Scanning Multiple Documents at Once a When scanning is complete, the [ScanSnap Manager — Image scanning and file saving] window displays a scanning standby status. HINT To continue scanning, place down the next document to be scanned, and then perform one of the following operations. -
Page 31
Scanning Multiple Documents at Once HINT Click the [Check/Correct] button in the [ScanSnap Manager — Image scanning and file saving] window to correct the scanned image. The following functions are available: «Correcting the Scanned Image Orientation» (page 105) «Modifying the Crop Area» (page 108) «Adding the Necessary Scanned Images»… -
Page 32
Scanning Multiple Documents at Once l Performing a scan while an application that can be automatically linked with is active automatically starts the linkage between ScanSnap Manager and the application. For details, refer to the Advanced Operation Guide. -
Page 33: Scansnap Overview
ScanSnap Overview ScanSnap Overview This section provides an overview that you should be aware of before operating ScanSnap. «Parts and Functions» (page 34) «System Requirements» (page 37) «Overview of the Software Related to the ScanSnap» (page 38) «How to Install the Software» (page 39) «ScanSnap Manager Icon»…
-
Page 34: Parts And Functions
Parts and Functions Parts and Functions This section explains the names and functions of the ScanSnap parts. Front Name Description Head Neck [Scan] button (*1) l Turns on the ScanSnap. l Starts scanning. [Stop] button (*1) l Turns the ScanSnap on or off. l Stops scanning.
-
Page 35
Parts and Functions ATTENTION When carrying the ScanSnap, hold its base and neck. Do not carry the scanner by the head. Back Name Description Security cable slot Used to connect an anti-theft security cable (commercially available). USB connector Used to connect a USB cable. Power connector Used to connect the AC cable. -
Page 36
Parts and Functions Name Description Camera Detects page turning and glossy papers. Infrared LED Irradiates the scan area with infrared to detect page turning and glossy papers. Glass Protects the lens used to scan a document. Lamp Illuminates the document to be scanned. -
Page 37: System Requirements
CardMinder: 600 MB l ABBYY FineReader for ScanSnap: 590 MB l ScanSnap Online Update: 10 MB l ScanSnap SV600 Basic Operation Guide: 100 MB l Nuance PDF Converter for Mac: 110 MB USB port USB 3.0 (*3)/USB 2.0/USB 1.1 *1: Updating Mac OS to the latest version is recommended.
-
Page 38: Overview Of The Software Related To The Scansnap
Overview of the Software Related to the ScanSnap Overview of the Software Related to the ScanSnap This section gives an overview of each bundled software and their functions. You can edit, manage, and arrange the scanned image by using the following software: ScanSnap Manager This scanner driver is required to scan documents with the ScanSnap.
-
Page 39: How To Install The Software
ScanSnap to the computer. l If a DVD-ROM drive is not available, the installers for the software programs can be downloaded from the following web page. http://scansnap.fujitsu.com/g-support/en/ The functions of each button in the [ScanSnap] window are as follows. Icon…
-
Page 40: Scansnap Manager Icon
ScanSnap Manager Icon ScanSnap Manager Icon When ScanSnap Manager is running, the ScanSnap Manager icon is displayed in the Dock. The ScanSnap Manager icon indicates whether or not ScanSnap Manager is successfully communicating with the ScanSnap. The appearance of the icon changes according to the communication status as shown below.
-
Page 41: Scansnap Manager Menu
ScanSnap Manager Menu ScanSnap Manager Menu This menu appears when you click the ScanSnap Manager icon in the Dock while holding down the [control] key on the keyboard. Click While Pressing the [control] Key on the Keyboard Item Function Scan Scans the document placed in the scan area of the ScanSnap.
-
Page 42
Opens the ScanSnap Manager Help. l Troubleshooting Displays [Troubleshooting] in the ScanSnap Manager Help. l ScanSnap Portal Site Opens the ScanSnap global homepage (http://scansnap.fujitsu.com). l About ScanSnap Manager Displays the [ScanSnap Manager — Version Information] window. l ScanSnap information Displays the [ScanSnap Manager — Scanner and driver information] window. -
Page 43
ScanSnap Manager Menu When SV600 and iX500 are connected to a computer… -
Page 44: Scansnap Setup Window
ScanSnap Setup Window ScanSnap Setup Window When you click the ScanSnap Manager icon while holding down the [control] key on the keyboard, and then select [Settings] from the «ScanSnap Manager Menu» (page 41), the following ScanSnap setup window appears. In the ScanSnap setup window, you can use the [Use Quick Menu] checkbox to specify whether or not to use the Quick Menu.
-
Page 45
ScanSnap Setup Window… -
Page 46: Turning The Scansnap On Or Off
Turning the ScanSnap On or Off Turning the ScanSnap On or Off This section explains how to turn the ScanSnap on or off. «Turning the ScanSnap On» (page 47) «Turning the ScanSnap Off» (page 49) «Sleep Mode» (page 50) «Automatic Power OFF» (page 51)
-
Page 47: Turning The Scansnap On
Turning the ScanSnap On or Off Turning the ScanSnap On Turn on the computer. a The computer starts up and the ScanSnap Manager icon appears in the Dock. HINT l If the ScanSnap Manager icon is not displayed in the Dock, click [Applications] from the sidebar in Finder, click [ScanSnap], and then double-click [ScanSnap Manager].
-
Page 48
Turning the ScanSnap On or Off 1. Click the ScanSnap Manager icon in the Dock while holding down the [control] key on the keyboard, and then select [Preferences] from the «ScanSnap Manager Menu» (page 41). a The [ScanSnap Manager — Preferences] window appears. 2. -
Page 49: Turning The Scansnap Off
Turning the ScanSnap On or Off Turning the ScanSnap Off Press the [Stop] button on the ScanSnap for three seconds or longer. a The power LED turns off. In addition, the ScanSnap Manager icon in the Dock changes from ATTENTION If moving the ScanSnap, first turn the power off and remove all cables.
-
Page 50: Sleep Mode
Turning the ScanSnap On or Off Sleep Mode When the ScanSnap is on and has not been used for 15 minutes, it enters sleep (power saving) mode.
-
Page 51: Automatic Power Off
Turning the ScanSnap On or Off Automatic Power OFF When the ScanSnap is turned on and left unused for the specified time (default is «4 hours»), it will turn itself off automatically. To turn the ScanSnap back on, perform one of the following operations: l Press the [Scan] button on the ScanSnap (this will not start scanning) l Press the [Stop] button on the ScanSnap HINT…
-
Page 52: Documents To Scan
Documents to Scan Documents to Scan The following documents can be scanned because the scanning unit does not touch the documents. l Thick documents, such as books l Documents that you want to keep intact, such as photographs and handwritten illustrations Conditions for Documents to Scan Document type Flat documents, such as office paper,…
-
Page 53: How To Place Documents
How to Place Documents How to Place Documents When you place down documents, use the Background Pad. If you scan documents without using the Background Pad, the document edges may not be detected correctly and the created scanned image may be different from the document. For details about documents that can be scanned with the ScanSnap, refer to «Documents to Scan»…
-
Page 54
How to Place Documents When Placing a Standard Size Document When you select an option other than [Automatic detection] for [Paper size] on the [Paper] tab in the «ScanSnap Setup Window» (page 44), align the center of the document with the centering mark on the ScanSnap. -
Page 55
How to Place Documents l The number of documents placed must not exceed 10. SV600 15 mm (0.59 in.) or More 15 mm (0.59 in.) or More… -
Page 56: What You Can Do With Related Software
What You Can Do with Related Software What You Can Do with Related Software This section explains the basic operation procedure of software related to the ScanSnap and gives an overview of its functions. «What You Can Do with the ScanSnap Organizer» (page 57) «What You Can Do with CardMinder»…
-
Page 57: What You Can Do With The Scansnap Organizer
What You Can Do with the ScanSnap Organizer What You Can Do with the ScanSnap Organizer ScanSnap Organizer is an application used for displaying, organizing, and managing image data (PDF or JPEG files) scanned with the ScanSnap. You can use this application to create folders and arrange files for various uses. Pages of a PDF file can be opened with an associated application to check the scanned image data.
-
Page 58: Basic Operation Procedure Of Scansnap Organizer
What You Can Do with the ScanSnap Organizer Basic Operation Procedure of ScanSnap Organizer This section explains the basic operation procedure of ScanSnap Organizer. From the sidebar in Finder, select [Applications] → [ScanSnap Organizer], and then double-click [ScanSnap Organizer] to start up ScanSnap Organizer. Scan documents with the ScanSnap.
-
Page 59: Managing Files
What You Can Do with the ScanSnap Organizer Managing Files For details about operations, refer to the ScanSnap Organizer Help. Setting a Marked Character String as a Keyword Keywords can be set to a PDF file by using the keyword setting function. These keywords can be used when you search for PDF files.
-
Page 60
What You Can Do with the ScanSnap Organizer Searching Files You can search files that are managed in ScanSnap Organizer. -
Page 61: Editing Files
What You Can Do with the ScanSnap Organizer Editing Files For details about operations, refer to the ScanSnap Organizer Help. Correcting a book distortion By starting Book Image Viewer from ScanSnap Organizer, you can correct distorted images of scanned books. For details about other image correction functions, refer to the ScanSnap Organizer Help.
-
Page 62: Using Files
What You Can Do with the ScanSnap Organizer Using Files For details about operations, refer to the ScanSnap Organizer Help. Linking Files with Other Applications You can use files with a variety of applications. Sending Files by E-mail Files can be sent by e-mail.
-
Page 63: What You Can Do With Cardminder
What You Can Do with CardMinder What You Can Do with CardMinder CardMinder is an application used for displaying, organizing, and managing card image data scanned with the ScanSnap. This application digitalizes large amounts of business cards into images at a high speed and recognizes text on those cards, thus allowing you to search for your clients’ business cards from those data quickly, and create your client databases conveniently.
-
Page 64
What You Can Do with CardMinder «Searching Card Data with Keyboard Shortcuts» (page 70) «Attaching a File to Card Data» (page 71) -
Page 65: Basic Operation Procedure Of Cardminder
What You Can Do with CardMinder Basic Operation Procedure of CardMinder This section explains the basic operation procedure of CardMinder. Start CardMinder. From the sidebar in Finder, select [Applications] → [CardMinder], and then double-click [CardMinder]. Scan a card with the ScanSnap. Load a card in the ScanSnap and press the [Scan] button to start scanning the card.
-
Page 66
What You Can Do with CardMinder Card Image View Card Data Edit View If the language to be used for text recognition is different, perform text recognition again in the following procedure: 1. Select [CardMinder] menu → [Preferences]. a The [General] window appears. 2. -
Page 67
What You Can Do with CardMinder The card data can be corrected in the following ways. For details, refer to the CardMinder Help. l Redoing the recognition process on the character strings in the selected areas l Entering text directly in the Card Data Edit view l Correcting the orientation of the card image or switching the front and back images No. -
Page 68: Linking Card Data With Other Applications
What You Can Do with CardMinder Linking Card Data with Other Applications Click the following buttons on the Toolbar to use card data in a variety of applications. The following explains an example in which the Toolbar is customized to display the [Application] button.
-
Page 69: Searching Card Data With The Basic Search Toolbar
What You Can Do with CardMinder Searching Card Data with the Basic Search Toolbar This section explains how to search card data with the CardMinder Basic Search Toolbar. Find (Basic Search Toolbar) To search card data, type in a search term (such as an individual name or a company name) in the Basic Search Toolbar.
-
Page 70: Searching Card Data With Keyboard Shortcuts
What You Can Do with CardMinder Searching Card Data with Keyboard Shortcuts Even when CardMinder is not running, you can search card data by using a character string in another application (such as TextEdit) as the keyword for searching. Drag the mouse to select a character string you want to search for. Press [command ] + [shift] + [&] keys on the keyboard at the same time.
-
Page 71: Attaching A File To Card Data
What You Can Do with CardMinder Attaching a File to Card Data A file can be attached to card data easily by dragging and dropping it.
-
Page 72: Useful Usages
Useful Usages Useful Usages This section explains how to use related software for the scanned image that is created after a document is scanned with the ScanSnap and how to scan a document with a setting other than the default setting. «Managing Paper Documents by Folder on a Computer»…
-
Page 73: Managing Paper Documents By Folder On A Computer
Managing Paper Documents by Folder on a Computer Managing Paper Documents by Folder on a Computer This section explains how to digitize paper documents and manage the data by folder in ScanSnap Organizer. Scan a paper document with the ScanSnap. For details about scanning a document, refer to «Scanning a Document»…
-
Page 74
Managing Paper Documents by Folder on a Computer From the menu bar, select [File] → [New Folder]. a A new folder is created in the folder list. Rename the created folder. HINT To create multiple folders, repeat steps 3 to 4. Select the scanned image from the file list, and drag and drop it to the folder. -
Page 75
Managing Paper Documents by Folder on a Computer a The scanned image is moved to the folder. HINT For details about other functions, refer to the ScanSnap Organizer Help. -
Page 76: Saving Business Cards To A Computer
Saving Business Cards to a Computer Saving Business Cards to a Computer This section explains how to digitize business cards and save the card data in CardMinder. ATTENTION If you do not log in as a user with Administrator privileges, you may not be able to link the ScanSnap with another application properly.
-
Page 77
Saving Business Cards to a Computer Check the card data. Make sure that the text on the card images are displayed correctly in the Card Data Edit view. If the card data must be corrected, click the text to be corrected and then directly edit it. Card Image View Card Data Edit View HINT… -
Page 78: Scanning Documents Using Page Turning Detection
Scanning Documents Using Page Turning Detection Scanning Documents Using Page Turning Detection This section explains how to detect page turning to start scanning automatically. ATTENTION When the installation environment of the ScanSnap or the specification of the book to be scanned encounters any of the following, use timed mode to scan a document.
-
Page 79
Scanning Documents Using Page Turning Detection a The [Scanning mode option] window appears. Select the [Configure settings for starting the next scan.] checkbox and then [Page turning detection mode]. Click the [OK] button to close the [Scanning mode option] window. Click the [Apply] button in the ScanSnap setup window. -
Page 80
Scanning Documents Using Page Turning Detection Open the page of a book you want to scan and place the book in the scan area of the ScanSnap. For details, refer to «How to Place Documents» (page 53). Press the [Scan] button on the ScanSnap to start scanning the book. a The [ScanSnap Manager — Image scanning and file saving] window appears. -
Page 81
Scanning Documents Using Page Turning Detection a The page turning is detected and continuous scanning starts. ATTENTION l While the [Turn the page.] message appears on the [ScanSnap Manager — Image scanning and file saving] window, if you hold or move your hand over the Background Pad, such motion may be incorrectly detected as page turning. -
Page 82: Scanning Documents Using Timed Mode
Scanning Documents Using Timed Mode Scanning Documents Using Timed Mode This section explains how to automatically start scanning by setting the time period for the document scanning to start. Click the ScanSnap Manager icon in the Dock while holding down the [control] key on the keyboard, and select [Settings] from the «ScanSnap Manager Menu»…
-
Page 83
Scanning Documents Using Timed Mode l To set the time period for the ScanSnap to start the next scan when a document is scanned continuously: 1. Select the [Configure settings for starting the next scan.] checkbox, and then select [Timed interval (Timed mode)]. 2. -
Page 84
Scanning Documents Using Timed Mode Click the [ ] button at the upper left of the window to close the ScanSnap setup window. Place a document with the scanned side face-up in the scan area of the ScanSnap. For details, refer to «How to Place Documents»… -
Page 85: Scanning Documents With Two Scansnaps Connected To A Computer
Scanning Documents with Two ScanSnaps Connected to a Computer Scanning Documents with Two ScanSnaps Connected to a Computer You can use SV600 and another ScanSnap connected to a computer. When both of the ScanSnap models are connected and turned on, you can use one of them at a time. When the two ScanSnap models are turned on, the ScanSnap Manager icon in the Dock changes from Note that you cannot scan a document with two ScanSnap models simultaneously.
-
Page 86: Correcting The Scanned Images
Correcting the Scanned Images Correcting the Scanned Images The scanned images can be corrected before ScanSnap Manager is linked with an application. The scanned images can be corrected in the following cases: «Scanning a Document» (page 87) «Scanning Books» (page 92) «Scanning Multiple Documents at Once»…
-
Page 87: Scanning A Document
Scanning a Document Scanning a Document When a document is scanned with the ScanSnap, the following correction can be made on the scanned image: «Filling in Fingers Captured in a Scanned Image (When a Document Is Scanned)» (page 88)
-
Page 88: Filling In Fingers Captured In A Scanned Image (When A Document Is Scanned)
Scanning a Document Filling in Fingers Captured in a Scanned Image (When a Document Is Scanned) Fingers that are captured when a document is scanned can be filled in. ATTENTION l Do not hold the corners of the document when you scan. If you do so, the shape of the image may not be recognized correctly.
-
Page 89
Scanning a Document For details about scanning, refer to «Scanning a Document» (page 18). a The [ScanSnap Manager — View cropped images] window is displayed. Select a scanned image to fill in fingers captured in the image. Select the [Continue with Point Retouch] checkbox and click the [Next] button. -
Page 90
Scanning a Document a The [ScanSnap Manager — Book Image Viewer] window appears in the point retouch mode. Click on a finger captured in a scanned image with the mouse. a When a finger is detected, it is indicated with a red dashed outline. To change a range of the outline, drag the white dot on the outline. -
Page 91
Scanning a Document HINT When a finger captured in a scanned image is not detected, a default outline is displayed around the finger. In that case, drag the white dot on the outline to align the outline with the shape of the finger. Click the [Apply] button. -
Page 92: Scanning Books
Scanning Books Scanning Books The book image correction allows you to correct scanned images. The book image correction refers to making the following corrections to the images scanned from books with the ScanSnap: «Correcting Distorted Book Images» (page 93) «Splitting a Double-Page Spread Image into Two Page Images» (page 97) «Filling in Fingers Captured in a Scanned Image (When a Book Is Scanned)»…
-
Page 93: Correcting Distorted Book Images
Scanning Books Correcting Distorted Book Images To correct the distortion of a scanned image from a book, follow the procedure below. ATTENTION l To correct the distortion of a scanned image, the shape of the book needs to be detected. If a book is scanned as follows, the shape of the book may not be detected correctly.
-
Page 94
Scanning Books Filling in the captured fingers in image If you edit in the book image correction mode after editing in the point retouch mode, the edited results in point retouch mode are overridden. On the window that appears after a book is scanned, select [Double-page spread (Book/Magazine)] and click the [Check/Correct] button. -
Page 95
Scanning Books If the outline of the book is not aligned with the shape of the book in the scanned image, drag the upper part and lower part of the outline to correct each position. HINT If the shape of the book was not detected, the corner points and the outline are displayed on the entire window. -
Page 96
Scanning Books 1. Modify the corner points. The corner points can be modified by either of the following: l Double-click the position where you want to move the corner points. a The corner points automatically move to the double-clicked position. If the corner points cannot be modified properly, drag them to move. -
Page 97: Splitting A Double-Page Spread Image Into Two Page Images
Scanning Books Splitting a Double-Page Spread Image into Two Page Images The double-page spread image can be split into the right and left pages. When a JPEG file is split, the file is divided into two files. ATTENTION Follow the procedure below to perform multiple book image correction for one page. 1.
-
Page 98
Scanning Books a The [ScanSnap Manager — Book Image Viewer] window appears. Select the page to be split. Click , and then click a The split line is indicated with a green dashed line. If the split line is not aligned with the gutter of the book, drag the corner points to correct the position. -
Page 99
Scanning Books Click the [Apply] button. a A message for confirming the split target appears. Click the [Selected Pages] button. a The page is split. When you have completed splitting the page, click the [Save and Quit] button. -
Page 100: Filling In Fingers Captured In A Scanned Image (When A Book Is Scanned)
Scanning Books Filling in Fingers Captured in a Scanned Image (When a Book Is Scanned) Fingers that are captured when a book is scanned can be filled in. ATTENTION l To fill in fingers captured in the scanned image, the fingers need to be detected. If a book is scanned in the following ways, captured fingers may not be detected correctly.
-
Page 101
Scanning Books If you edit in the book image correction mode after editing in the point retouch mode, the edited results in point retouch mode are overridden. HINT l Up to five fingers on each side (right/left) can be filled in. l To prevent image deterioration, select and fill in as many fingers as possible in one go. -
Page 102
Scanning Books HINT When a finger captured in a scanned image is not detected, a default outline is displayed around the finger. In that case, drag the white dot on the outline to align the outline with the shape of the finger. Click the [Apply] button. -
Page 103
Scanning Books a The finger captured in a scanned image is filled in. When you have completed filling in the captured finger, click the [Save and Quit] button. -
Page 104: Scanning Multiple Documents At Once
Scanning Multiple Documents at Once Scanning Multiple Documents at Once When multiple documents are scanned at once with the ScanSnap, the following corrections can be made on the scanned images: «Correcting the Scanned Image Orientation» (page 105) «Modifying the Crop Area» (page 108) «Adding the Necessary Scanned Images»…
-
Page 105: Correcting The Scanned Image Orientation
Scanning Multiple Documents at Once Correcting the Scanned Image Orientation The orientation of scanned images that are skewed or upside-down can be corrected. On the window that appears after multiple documents are scanned at once, select [Flat document] and click the [Check/Correct] button. For details about scanning multiple documents, refer to «Scanning Multiple Documents at Once»…
-
Page 106
Scanning Multiple Documents at Once Click a The scanned image is rotated by 90 degrees. When you have completed correcting the orientation, click the [Save and Quit] button. -
Page 107
Scanning Multiple Documents at Once HINT l To fine-tune the orientation of the crop frame, select which scanned image you want to rotate and then perform one of the following operations: Drag the green operating point that appears at the top of the crop frame by as little or as much as you want. -
Page 108: Modifying The Crop Area
Scanning Multiple Documents at Once Modifying the Crop Area The size of the crop frame that is used to crop the scanned image can be modified. On the window that appears after multiple documents are scanned at once, select [Flat document] and click the [Check/Correct] button. For details about scanning multiple documents, refer to «Scanning Multiple Documents at Once»…
-
Page 109
Scanning Multiple Documents at Once Click any position on the window. a The crop area is fixed. When you have completed changing the crop area, click the [Save and Quit] button. HINT l To move a crop frame, place the mouse inside the crop frame and drag it when all the operating points have turned red. -
Page 110: Adding The Necessary Scanned Images
Scanning Multiple Documents at Once Adding the Necessary Scanned Images If the necessary scanned images do not become the targets to be cropped, you can manually add them to the targets. Up to 20 crop frames can be added for one scanned image. On the window that appears after multiple documents are scanned at once, select [Flat document] and click the [Check/Correct] button.
-
Page 111
Scanning Multiple Documents at Once a A crop frame is added to the scanned image that is automatically recognized, and the scanned image that was cropped by dragging the mouse is added to the end of [Cropped image]. After you have added a crop frame, click the [Save and Quit] button. HINT If the [Next] button is displayed, clear the [Continue with Point Retouch] checkbox. -
Page 112: Deleting Unnecessary Scanned Images
Scanning Multiple Documents at Once Deleting Unnecessary Scanned Images When there are multiple scanned images, unnecessary crop frames can be deleted. Scanned images without crop frames are not output and cannot be linked with an application. On the window that appears after multiple documents are scanned at once, select [Flat document] and click the [Check/Correct] button.
-
Page 113
Scanning Multiple Documents at Once Click a A confirmation message appears. Click the [Yes] button. a The crop frame is removed from the selected scanned image, and the scanned image disappears from [Cropped image]. -
Page 114
Scanning Multiple Documents at Once After you have removed the crop frame from the unnecessary scanned image, click the [Save and Quit] button. HINT If the [Next] button is displayed, clear the [Continue with Point Retouch] checkbox. The [Next] button changes to the [Save and Quit] button. -
Page 115: Troubleshooting
[control] key on the keyboard, and select [Help] → [Troubleshooting] from the «ScanSnap Manager Menu» (page 41). l ScanSnap Support Site (http://scansnap.fujitsu.com/g-support/en/) If you cannot solve the problem after referring to the above section, contact your FUJITSU scanner dealer or an authorized FUJITSU scanner service provider.
-
Page 116: If You Have Installed The Software Before
If You Have Installed the Software Before If You Have Installed the Software Before If your attempt to reinstall the software related to the ScanSnap (including models other than SV600) failed, uninstall the software and then reinstall it. For details, refer to the following: «Uninstalling the Software»…
-
Page 117: When The Scansnap Manager Icon Does Not Appear
When the ScanSnap Manager Icon Does Not Appear When the ScanSnap Manager Icon Does Not Appear This section explains how to troubleshoot when the ScanSnap Manager icon does not appear in the Dock even though the software is installed and the ScanSnap is connected to the computer. «Displaying the ScanSnap Manager Icon»…
-
Page 118: Displaying The Scansnap Manager Icon
When the ScanSnap Manager Icon Does Not Appear Displaying the ScanSnap Manager Icon From the sidebar in Finder, select [Applications] → [ScanSnap], and then double-click [ScanSnap Manager] to start ScanSnap Manager. HINT If the problem is solved, you can change the setting so that ScanSnap Manager will start up automatically from the next time you log in to the computer.
-
Page 119: When Scansnap Manager Does Not Operate Normally
When ScanSnap Manager Does Not Operate Normally When ScanSnap Manager Does Not Operate Normally If the ScanSnap Manager icon in the Dock is displayed as even though the software is installed and the ScanSnap is connected to the computer, perform the following procedures. «Checking the Connection between the ScanSnap and the Computer»…
-
Page 120: Checking The Connection Between The Scansnap And The Computer
When ScanSnap Manager Does Not Operate Normally Checking the Connection between the ScanSnap and the Computer Unplug the USB cable from the computer and the ScanSnap, then plug it back in. Make sure to leave at least 5 seconds between unplugging and plugging the cable. If you are using a USB hub, connect the USB cable to the computer directly.
-
Page 121: Checking If Scansnap Manager Is Operating Normally
When ScanSnap Manager Does Not Operate Normally Checking If ScanSnap Manager Is Operating Normally Turn off the ScanSnap and then turn it on again. Make sure to leave at least 5 seconds between turning off and on the ScanSnap. If the problem persists, proceed to step 2. If you are using a USB hub, connect the ScanSnap to the computer directly with a USB cable.
-
Page 122: Cleaning
Cleaning Cleaning This section explains about the cleaning materials and how to clean the ScanSnap. «Cleaning Materials» (page 123) «Cleaning the ScanSnap» (page 124)
-
Page 123: Cleaning Materials
Cleaner F1. *3: Any lint-free cloth can be used. Contact your FUJITSU scanner dealer or an authorized FUJITSU scanner service provider for details about purchasing the cleaning materials. For details, refer to the following web page:…
-
Page 124: Cleaning The Scansnap
Cleaning the ScanSnap Cleaning the ScanSnap This section explains how to clean the outside of the ScanSnap. If the white sheet, glass, camera, lamp, or infrared LED is dirty, errors may appear in the scanned images. Whenever an error appears in a scanned image, clean the ScanSnap. Unplug the cables from the ScanSnap.
-
Page 125: Appendix
Appendix Appendix «Preparations for Using Nuance PDF Converter for Mac» (page 126) «Updating the Software» (page 130) «Uninstalling the Software» (page 131) «Specifications of the Background Pad» (page 138) «Specifications of the ScanSnap» (page 139)
-
Page 126: Preparations For Using Nuance Pdf Converter For Mac
Preparations for Using Nuance PDF Converter for Mac Preparations for Using Nuance PDF Converter for This section explains how to install and activate Nuance PDF Converter for Mac. «Installing Nuance PDF Converter for Mac» (page 127) «Activating Nuance PDF Converter for Mac» (page 129)
-
Page 127: Installing Nuance Pdf Converter For Mac
Preparations for Using Nuance PDF Converter for Mac Installing Nuance PDF Converter for Mac Install Nuance PDF Converter for Mac in the following procedure. System Requirements Operating system OS X v10.10 OS X v10.9 OS X v10.8 Mac OS X v10.7 Disk space 110 MB Insert the Nuance PDF Converter for Mac DVD-ROM into the DVD-ROM drive.
-
Page 128
To complete the activation process, you need to have access to the Internet. l For details about the activation procedure, refer to «Activating Nuance PDF Converter for Mac» (page 129). For the installation procedure of the PDF editing software, refer to the following web page: http://www.pfu.fujitsu.com/imaging/downloads/manual/install/en… -
Page 129: Activating Nuance Pdf Converter For Mac
Preparations for Using Nuance PDF Converter for Mac Activating Nuance PDF Converter for Mac Activate Nuance PDF Converter for Mac in the following procedure. ATTENTION To complete the activation process, you need to have access to the Internet. Start up Nuance PDF Converter for Mac. a The [End User License Agreement] window appears.
-
Page 130: Updating The Software
It is recommended that you apply latest updates to enhance security, operability and functions. For the software programs that can be updated, refer to the following: http://www.fujitsu.com/global/support/computing/peripheral/scanners/software/online-setup-help.html ScanSnap Online Update checks the download server periodically. When the latest version of ScanSnap is available, the update list window appears.
-
Page 131: Uninstalling The Software
Uninstalling the Software Uninstalling the Software This section explains how to uninstall the following software programs: «Uninstalling ScanSnap Manager» (page 132) «Uninstalling ScanSnap Organizer» (page 134) «Uninstalling CardMinder» (page 135) «Uninstalling ABBYY FineReader for ScanSnap» (page 136) «Uninstalling ScanSnap Online Update» (page 137)
-
Page 132: Uninstalling Scansnap Manager
Uninstalling the Software Uninstalling ScanSnap Manager Uninstall ScanSnap Manager. The procedure is as follows. Turn on the computer and log in as a user with Administrator privileges. From the sidebar in Finder, select [Applications] → [ScanSnap] → [Sub], and then double-click [ScanSnap Uninstaller]. a The [ScanSnap Uninstaller] window (the [Welcome to ScanSnap Uninstaller] screen) appears.
-
Page 133
Uninstalling the Software 8. Close the [Users & Groups] window. -
Page 134: Uninstalling Scansnap Organizer
Uninstalling the Software Uninstalling ScanSnap Organizer Uninstall ScanSnap Organizer. The procedure is as follows. Turn on the computer and log in as a user with Administrator privileges. Exit ScanSnap Organizer if it is running. From the sidebar in Finder, select [Applications] → [ScanSnap Organizer], and drag the [ScanSnap Organizer] folder into the Trash.
-
Page 135: Uninstalling Cardminder
Uninstalling the Software Uninstalling CardMinder Uninstall CardMinder. The procedure is as follows. Turn on the computer and log in as a user with Administrator privileges. Exit CardMinder if it is running. From the sidebar in Finder, select [Applications] → [CardMinder], and drag the [CardMinder] folder into the Trash.
-
Page 136: Uninstalling Abbyy Finereader For Scansnap
Uninstalling the Software Uninstalling ABBYY FineReader for ScanSnap Uninstall ABBYY FineReader for ScanSnap. The procedure is as follows. Turn on the computer and log in as a user with Administrator privileges. Exit ABBYY FineReader for ScanSnap if it is running. From the sidebar in Finder, select [Applications] →…
-
Page 137: Uninstalling Scansnap Online Update
Uninstalling the Software Uninstalling ScanSnap Online Update Uninstall ScanSnap Online Update. HINT Before uninstalling ScanSnap Online Update, make sure that none of the following software is installed. l ScanSnap Manager l ScanSnap Organizer l CardMinder The procedure is as follows. Turn on the computer and log in as a user with Administrator privileges.
-
Page 138: Specifications Of The Background Pad
Qty. Part No. Background Pad 1 sheet PA03641-0052 Contact your FUJITSU scanner dealer or an authorized FUJITSU scanner service provider for details about purchasing the Background Pad. For details, refer to the following portal site: http://scansnap.fujitsu.com/ Cleaning As you keep using the Background Pad, dirt and dust will accumulate on the surface.
-
Page 139: Specifications Of The Scansnap
Specifications of the ScanSnap Specifications of the ScanSnap The following table summarizes the specifications of the ScanSnap. Item Specification Product Name ScanSnap SV600 Scanning method Overhead scanning Scanning color mode Color/gray/black and white/auto (automatic color, gray, and B&W detection) Optical system/image sensor Lens reduction optics/color CCD ×…
-
Page 140: Documents That Can Be Scanned With The Scansnap And How To Load Them (Ix500, S1500, S1500M, S1300I, S1300, Or S1100)
Documents That Can Be Scanned with the ScanSnap and How to Load Them (iX500, S1500, S1500M, S1300i, S1300, or S1100) Documents That Can Be Scanned with the ScanSnap and How to Load Them (iX500, S1500, S1500M, S1300i, S1300, or S1100) This section describes the documents that can be scanned with the following ScanSnap models and explains how to load the documents.
-
Page 141: Documents For Scanning (For Ix500, S1500 Or S1500M)
Documents for Scanning (For iX500, S1500 or S1500M) Documents for Scanning (For iX500, S1500 or S1500M) This section explains about the documents that can be scanned with the ScanSnap and the conditions for using the Carrier Sheet. «Conditions for Documents to Scan (For iX500, S1500 or S1500M)» (page 142) «Conditions for Using the Carrier Sheet (For iX500, S1500 or S1500M)»…
-
Page 142: Conditions For Documents To Scan (For Ix500, S1500 Or S1500M)
Documents for Scanning (For iX500, S1500 or S1500M) Conditions for Documents to Scan (For iX500, S1500 or S1500M) iX500 S1500/S1500M Document type Office paper, postcards, business cards Office paper, postcards, business cards Plastic cards conforming to the ISO781A ID-1 type (54 × 86 mm/2.1 × 3.4 in.) Paper weight 40 to 209 g/m (10.7 to 55.7 lb)
-
Page 143
Documents for Scanning (For iX500, S1500 or S1500M) 1. Click the [Option] button in the [Scanning] tab of the «ScanSnap Setup Window» (page 44). a The [Scanning mode option] window appears. 2. Select the [Increase text contrast] checkbox. -
Page 144: Conditions For Using The Carrier Sheet (For Ix500, S1500 Or S1500M)
Documents for Scanning (For iX500, S1500 or S1500M) Conditions for Using the Carrier Sheet (For iX500, S1500 or S1500M) The bundled Carrier Sheet is a sheet designed to transport documents through the ScanSnap. You can scan documents that are larger than A4/Letter size, photographs and clippings. Conditions for documents that can be scanned using the Carrier Sheet are as follows: AUTION l Do not use a damaged Carrier Sheet.
-
Page 145
Documents for Scanning (For iX500, S1500 or S1500M) Because carbonless paper may contain chemicals that can harm the ScanSnap internal rollers, it is recommended that you use the Carrier Sheet to scan such documents. Make sure to clean the rollers occasionally to maintain the scanner performance when scanning carbonless paper directly without using the Carrier Sheet. -
Page 146: How To Load Documents (For Ix500, S1500 Or S1500M)
How to Load Documents (For iX500, S1500 or S1500M) How to Load Documents (For iX500, S1500 or S1500M) Load documents in the ScanSnap in the following procedure. For details about documents that can be loaded, refer to «Documents for Scanning (For iX500, S1500 or S1500M)»…
-
Page 147
How to Load Documents (For iX500, S1500 or S1500M) Open the ADF paper chute (cover) of the ScanSnap. ADF Paper Chute (Cover) Pull the stacker towards you. Stacker Depending on documents to scan, pull out the extension on the ADF paper chute (cover) and open the stacker. -
Page 148
How to Load Documents (For iX500, S1500 or S1500M) Side Guide ATTENTION Do not accumulate more than 50 sheets (with paper weight of 80 g/m [20 lb]) in the stacker. Adjust the side guides to the width of the documents. Hold each side guide in the middle to adjust them. -
Page 149: Documents For Scanning (For S1300I Or S1300)
Documents for Scanning (For S1300i or S1300) Documents for Scanning (For S1300i or S1300) Office paper, postcards, business cards S1300i/S1300 Document type Office paper, postcards, business cards Paper weight 64 to 104.7 g/m (17 to 20 lb) Paper size Width: 50.8 to 216 mm (2 to 8.5 in.) Length: 50.8 to 360 mm (2 to 14.17 in.) l For long page (*1) 216 ×…
-
Page 150
Documents for Scanning (For S1300i or S1300) Coated paper Photographs (photographic paper) Perforated or punched documents Documents that are not rectangular or square Carbon paper or thermal paper Documents with memo papers or sticky notes attached Picture Postcards Picture postcards can be scanned when a power cable connection is used. S1300i/S1300 Document type Picture postcards… -
Page 151: How To Load Documents (For S1300I Or S1300)
How to Load Documents (For S1300i or S1300) How to Load Documents (For S1300i or S1300) Load documents in the ScanSnap in the following procedure. For details about documents that can be loaded, refer to «Documents for Scanning (For S1300i or S1300)»…
-
Page 152
How to Load Documents (For S1300i or S1300) ADF Paper Chute (Cover) Pull out the extension. Extension Load the documents in the ADF paper chute (cover). Load the documents face-down and top-first with their back facing you. Use the reference marks within the side guides to adjust the number of the documents to be loaded. -
Page 153
How to Load Documents (For S1300i or S1300) Documents… -
Page 154: Documents For Scanning (For S1100)
Documents for Scanning (For S1100) Documents for Scanning (For S1100) This section explains about the documents that can be scanned with the ScanSnap and the conditions for using the Carrier Sheet. «Conditions for Documents to Scan (For S1100)» (page 155) «Conditions for Using the Carrier Sheet (For S1100)»…
-
Page 155: Conditions For Documents To Scan (For S1100)
Documents for Scanning (For S1100) Conditions for Documents to Scan (For S1100) S1100 Eject method With the output guide closed With the output guide open Document type Office paper, postcards, business cards Office paper Plastic cards conforming to the ISO7810 ID-1 type (54 × 86 mm) Paper weight 52.3 to 209.3 g/m…
-
Page 156
Documents for Scanning (For S1100) 2. Select the [Increase text contrast] checkbox. -
Page 157
Documents for Scanning (For S1100) Conditions for Using the Carrier Sheet (For S1100) The optional Carrier Sheet is a sheet designed to transport documents through the ScanSnap. You can scan documents that are larger than A4/Letter size, photographs and clippings. Conditions for documents that can be scanned using the Carrier Sheet are as follows: AUTION l Do not use a damaged Carrier Sheet. -
Page 158
Documents for Scanning (For S1100) Because carbonless paper may contain chemicals that can harm the ScanSnap internal rollers, it is recommended that you use the Carrier Sheet to scan such documents. Make sure to clean the rollers occasionally to maintain the scanner performance when scanning carbonless paper directly without using the Carrier Sheet. -
Page 159
How to Load Documents (For S1100) How to Load Documents (For S1100) Load documents in the ScanSnap in the following procedure. For details about documents that can be loaded, refer to «Documents for Scanning (For S1100)» (page 154). ATTENTION You can only load one document at a time in the ScanSnap. Open the feed guide of the ScanSnap. -
Page 160
How to Load Documents (For S1100) Insert the document straight into the feeding section of the ScanSnap, with the scanning side facing up. a The document is pulled in until it is set inside the ScanSnap. ATTENTION l When you select an option other than [Automatic detection] for [Paper size] on the [Paper] tab in the «ScanSnap Setup Window»… -
Page 161: Customer Support
For other inquiries on the ScanSnap, refer to the ScanSnap Support Site. http://scansnap.fujitsu.com/g-support/en/ If your problem cannot be solved after referring to the above web pages, visit the following web page to check the contact information of a suitable Fujitsu office and contact the Fujitsu office. http://imagescanner.fujitsu.com/warranty.html Suppliers of Consumables/Optional Parts http://scansnap.fujitsu.com/…