-
Contents
-
Table of Contents
-
Troubleshooting
-
Bookmarks
Quick Links
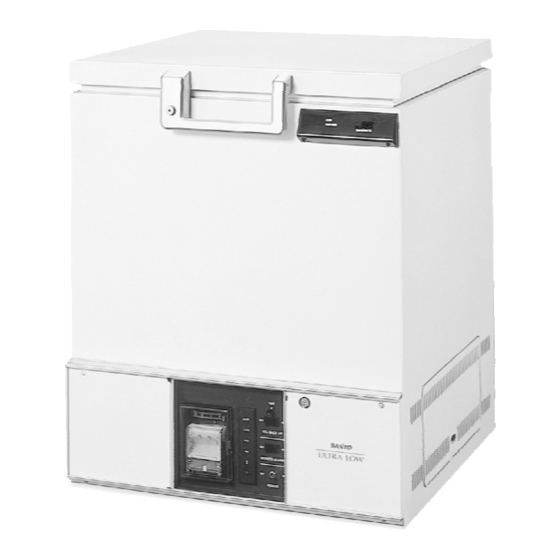
INSTRUCTION MANUAL
MDF-192
MDF-192AT
Ultra-Low Temperature Freezer
MDF-192AT
Related Manuals for Sanyo MDF-192
Summary of Contents for Sanyo MDF-192
-
Page 1
INSTRUCTION MANUAL MDF-192 MDF-192AT Ultra-Low Temperature Freezer MDF-192AT… -
Page 2: Table Of Contents
1. No part of this manual may be reproduced in any form without the expressed written permission of SANYO. 2. The contents of this manual are subject to change without notice. 3. Please contact SANYO if any point in this manual is unclear or if there are any inaccuracies. SANYO Electric Biomedical Co., Ltd.
-
Page 3: Precautions For Safe Operation
PRECAUTIONS FOR SAFE OPERATION It is imperative that the user complies with this manual as it contains important safety advice. Items and procedures are described so that you can use this unit correctly and safely. If the precautions advised are followed, this will prevent possible injury to the user and any other person.
-
Page 4
PRECAUTIONS FOR SAFE OPERATION WARNING Do not use the unit outdoors. Current leakage or electric shock may result if the unit is exposed to rain water. Only qualified engineers or service personnel should install the unit. The installation by unqualified personnel may cause electric shock or fire. Be sure to install the unit on a sturdy floor. -
Page 5
PRECAUTIONS FOR SAFE OPERATION WARNING Ensure you do not inhale or consume medication or aerosols from around the unit at the time of maintenance. These may be harmful to your health. As with any equipment that uses CO gas, there is a likelihood of oxygen depletion in the vicinity of the equipment. -
Page 6
PRECAUTIONS FOR SAFE OPERATION CAUTION Select a level and sturdy floor for installation. This precaution will prevent the unit from tipping. Improper installation may result in water spillage or injury from the unit tipping over. Connect the unit to a power source as indicated on the rating label attached to the unit. Use of any other voltage or frequency other than that on the rating label may cause fire or electric shock. -
Page 7
PRECAUTIONS FOR SAFE OPERATION CAUTION Do not touch the condenser directly when the filter is removed for cleaning. This may cause injury by hot surface. Always disconnect the power supply plug before moving the unit. Take care not to damage the power cord. -
Page 8: Cautions For Usage
CAUTIONS FOR USAGE ■ Always use a dedicated power source. The power source of this freezer is single phase and 100 V. The power source should be the dedicated circuit with a dedicated breaker. Do not connect this freezer to the branch circuit for other electric appliances. ■…
-
Page 9
CAUTIONS FOR USAGE ■ The top surface of the frame sometimes becomes hot during the initial operation or when operating in a hot environment. This is due to the hot gas circuit for preventing dew, and is not an indication of a malfunction. -
Page 10: Environmental Conditions
ENVIRONMENTAL CONDITIONS This equipment is designed to be safe at least under the following conditions (based on the IEC 1010-1): 1. Indoor use; 2. Altitude up to 2000 m; 3. Ambient temperature 5 C to 40 4. Maximum relative humidity 80% for temperature up to 31 C decreasing linearly to 50% relative humidity at 40 5.
-
Page 11: Freezer Components
FREEZER COMPONENTS MDF-192…
-
Page 12
FREEZER COMPONENTS 1. Lock 2. Door: Hinged type. The door can be opened in any angle on the way to full open. 3. Magnetic door gasket: Seals the door and prevents leakage of cold air. 4. Inner lid: Serves as a means of reducing cold air leakage when the door is open. Remove the frost before it is accumulated too much. -
Page 13: Control Panel
FREEZER COMPONENTS Control panel 1. Power switch (POWER): Switch for ON/OFF off all functions except remote alarm and back-up system (MDF-192AT only). 2. Back-up switch (CO BACK UP)(MDF-192AT only): Switch for back-up system. Refer to page 21 for details. 3. Back-up test switch (TEST): Examine the functions of the back-up system. This switch allows liquid CO to spout under any circumstances.
-
Page 14: Installation
INSTALLATION Installation site To operate this unit properly and to obtain maximum performance, install the unit in a location with the following conditions: ■ A location not subjected to direct sunlight The direct sunlight to the freezer causes too high temperature and the chamber temperature may not reach -85 ■…
-
Page 15
INSTALLATION Installation 1. Remove the packaging materials and tapes Remove all transportation packaging materials and tapes. Open the doors and ventilate the unit. If the outside panels are dirty, clean them with a diluted neutral dishwashing detergent. (Undiluted detergent can damage the plastic components. For the dilution, refer to the instruction of the detergent.) After the cleaning with the diluted detergent, always wipe it off with a wet cloth. -
Page 16: Start-Up Of Unit
START-UP OF UNIT Follow the procedures for the initial and consequent operations of the unit. 1. Make sure that all the switches on the control panel, such as the power switch, the remote alarm switch, the back-up system switch (MDF-192AT only) are off. 2.
-
Page 17: Operating Instructions
OPERATING INSTRUCTIONS Temperature setting Table 1 shows the basic operation method. Perform key operations in the sequence indicated in the table. The example in the table is based on the assumption that the temperature is -70 Note: The unit is set at the factory that the chamber temperature is -85C. Table 1.
-
Page 18: Alarm Temperature Setting
OPERATING INSTRUCTIONS Alarm temperature setting This unit is provided with the high temperature alarm. The setting of high temperature alarm is 10 C or C higher than the setting of chamber temperature. The procedure in table 2 shows the sequence to set the high temperature alarm at 15 C higher than the setting of chamber temperature.
-
Page 19: Setting Of Alarm Resume Time
OPERATING INSTRUCTIONS Setting of alarm resume time The alarm buzzer is silenced by pressing BUZZER key on the control panel during alarm condition (Initial setting 100: The remote alarm is not silenced). The buzzer will be activated again after certain suspension if the alarm condition is continued. The suspension time can be set by following the procedure shown in the Table 3 below.
-
Page 20: Remote Alarm Terminal
The recommended contact capacity is between 2 A (DC 30V) and 0.1 mA (DC 1V). Contact output: between COM. and N.O. between COM. and N.C. At normal Open Close At abnormal Close Open Contact Sanyo sales agency when the installation of remote alarm device is desired.
-
Page 21: Alarms And Safety Functions
OPERATING INSTRUCTIONS Alarms and safety functions This unit has the alarm and safety functions shown in table below, and also self diagnostic function. Alarm & safety Situation Indication Buzzer Safety operation When the chamber temp. is Intermittent High temperature Remote alarm approx.
-
Page 22
Rough scheme Liquid CO joint of the back-up system. For this setting, gas cylinder consult with a qualified gas supplier or Sanyo sales agency. 2. After setting the liquid CO gas cylinder, operate the freezer until the chamber temperature reaches the required level. -
Page 23: Temperature Recorder At Type
TEMPERATURE RECORDER [AT type] The figure below shows the description of a temperature recorder. The temperature recorder is provided with model MDF-192AT. Time Temperature Warning indicator Recording indicator Pen holder lever Door Cartridge Feeding of chart 1. Open the door and let down the lever of the penholder; the pen point is apart from the chart. (Fig. 1) 2.
-
Page 24
The battery for back-up system is discharged when the back-up switch is kept on. ■ The additional felt pen or recording paper is available from Sanyo sales agency. ■ To stop the temperature recorder, remove the cell from the recorder. -
Page 25
MAINTENANCE WARNING Always disconnect the power supply to the unit prior to any repair or maintenance of the unit in order to prevent electric shock or injury. Ensure you do not inhale or consume medication or aerosols from around the unit at the time of maintenance. -
Page 26: Routine Maintenance
ROUTINE MAINTENANCE Cleaning of condenser filter WARNING Do not touch the condenser when removing the condenser filter for cleaning. It may cause burn injury. This unit is provided with the filter check lamp. This lamp flickers and the buzzer sounds when the condenser filter is clogged.
-
Page 27: Troubleshooting
TROUBLE SHOOTING If the unit malfunctions, check out the following before calling for service, after transferring all the contents to another freezer No refrigeration ■ The voltage is too low. (In this case, call an electrician.) ■ The breaker is free. ■…
-
Page 28: Disposal Of Unit
DISPOSAL OF UNIT WARNING If the unit is to be stored unused in an unsupervised area for an extended period ensure that children do not have access and doors cannot be closed completely. The disposal of the unit should be accomplished by appropriate personnel. Always remove doors to prevent accidents such as suffocation.
-
Page 29: Recycle Of Nickel-Cadmium Battery
RECYCLE OF NICKEL-CADMIUM BATTERY The unit contains a rechargeable battery. The battery is recyclable. At the end of it’s useful life, check with you local solid officials option or proper disposal. Location of a nickel-cadmium battery This unit is provided a nickel-cadmium battery for the power failure alarm. The battery is located in the control box behind the control panel.
-
Page 30: Specifications
Note Design or specifications will be subject to change without notice. The battery for power failure alarm is an article for consumption. It is recommended that the battery will be replaced about every 3 years. Contact Sanyo sales agency at the time of replacement of the battery for recycling.
-
Page 31: Performance
PERFORMANCE Cooling performance Center point of freezing chamber; -85 C (Ambient temperature; 35 C, no load) Control range C to -85 Power source AC 110 V, AC 150 V, AC 220 V, AC 220 V, AC 230 V, AC 240 V, 60 Hz 60 Hz 50 Hz…
-
Page 32: Safety Check Sheet
Procedure to be adhered to in order to reduce safety risk indicated in b) below. Date : Signature : Address, Division : Telephone : Product name : Model : Serial number : Date of Installation : Ultra-Low Temperature MDF-192 Freezer MDF-192AT Please decontaminate the unit yourself before calling the service engineer.
-
Page 33
7FB6P10137300 SANYO Electric Biomedical Co., Ltd. (10 May 2004) 10-15, Hongo 3-Chome Recycled paper Bunkyoku, Tokyo 113-8434 Japan Printed in Japan…
ИНСТРУКЦИЯ ПО ЭКСПЛУАТАЦИИ
MDF-193(AT)
MDF-293(AT)
MDF-392(AT)
MDF-492(AT)
MDF-593(AT)
MDF-793(AT)
MDF-C8V
Низкотемпературный медицинский морозильник
MDF-192AT
wwWodia-moiTQi!
заказ on-line
Примечание:
1.Никакие части этой инструкции не могут быть репродуцированы никоим образом без письменного разрешения SANYO.
2.Гарантия относится только к самому морозильнику.
3.Содержимое этой инструкции является предметом для изменения без уведомления.
ОSanyo Electric Biomedical Co., Ltd. Все права защищены. Оригинал отпечатан в Японии.
_______________________________________ Перевод Диаэм._____________
1
Не используйте холодильник вне помеще ния. При попадании дождевой воды внутрь можно получить электрический шок или утечку электричества.
Инсталляция устройства должна произво диться только квалифицированным инже нером или сервис-персоналом.
Устройство должно располагаться только на ровной устойчивой поверхности.
Никогда не располагайте устройство во влажном месте, или вблизи брызг воды.
Никогда не располагайте устройство в по жароопасном месте.
Никогда не располагайте устройство там, где присутствуют пары кислот или другие коррозийные газы.
Убедитесь, что параметры вашей электри ческой сети соответствуют требованиям, обозначенным в табличке на устройстве.
Убедитесь, что пыль удалена с вилки устройства. Запыленная вилка может при вести к пожару или другому повреждению.
Используйте ТОЛЬКО заземленные розет ки. Если заземления нет, оно должно быть проведено квалифицированным электри ком.
Никогда не используйте трубы газа, воды и др. для заземления. Это может привести к электрическому шоку или поломке устрой ства.
Никогда не помещайте металлические предметы в вентиляционные отверстия.
Никогда не храните ЛВЖ или взрыво опасные вещества в устройстве.
Никогда не храните коррозийные веще ства в устройстве. Это может привести к повреждению внутренних компонентов или электропроводки.
Всегда выключайте устройство из эл.сети при ремонте или обслуживании.
Убедитесь, что вы не вдыхаете медицин ские препараты или аэрозоли во время ремонта или обслуживания. Это может быть опасно для вашего здоровья.
Никогда не лейте и не брызгайте воду непосредственно внутрь устройства.
Никогда не разбирайте, не ремонтируйте и не модернизируйте устройство само стоятельно. Это может привести к пожа ру, эл. шоку или поломке устройства.
При неполадках немедленно выключите устройство из эл.сети. Продолжение ра боты неисправного устройства может привести к пожару, эл. шоку или др.
Если устройство в течении долгого вре мени не работает и хранится без надзора, убедитесь, что оно не досягаемо для де тей и его двери закрыты на ключ.
Даже если вы уже не пользуетесь моро зильником, не оставляйте его без при смотра.
Неправильное подсоединение СО2 или N2 газа может привести к взврыву или по жару.
При использовании С02 не забывайте проветривать помещение. Повышенное содержание этого газа в воздухе может быть опасно для человека
Выберите для инсталляции место с устой чивым и ровным полом.
Убедитесь, что в эл. сети, куда подключено устройство, есть эл. автомат или предохра нитель. (Особенно это важно если устрой ство работает во влажном месте)
Хорошо закрепляйте полки внутри устрой ства.
Выключая вилку устройства из сети, НИ КОГДА не дергайте за провод (кабель).
Никогда не повреждайте вилку устройства и не используйте поврежденную вилку и кабель.
Никогда не трогайте эл, части (такие как вилка или переключатели мокрыми руками)
Проверьте установленную температуру по сле возобновления работы после аварии электросети. Неправильно установленная температура может повредить содержимое.
Не ставьте емкости с водой на морозиль ник, Разлившись, она может нарушить изо ляцию электропроводов.
Не залезайте сами и не ставьте никакие предметы на морозильник. Это может при чинить ущерб, если морозильник перевер нется, или эти предметы упадут.
Не храните стеклянные и жестяные банки в морозильнике. Замерзнув, они могут лоп нуть.
Одевайте сухие перчатки.
Не трогайте замерзшие предметы в мо розильнике мокрыми руками.
Открывая и закрывая дверцы, чтобы не прищемить пальцы, держитесь только за ручки.
Не хлопайте дверью, можно повредить холодильник.
Проверяйте загрязнение фильтра кон денсора и чистите его. Загрязненный фильтр может привести к росту темпе ратуры или неполадкам.
Никогда не трогайте конденсор. Вы мо жете обжечься.
Никогда не давите на стекло, его можно повредить.
Всегда выключайте устройство из сети при его перемещении. Следите, чтобы не повредить эл.кабель.
Если устройство не используется долгое время не забудьте выключить его из се ти.
Не оставляйте упаковочные материалы в доступном для детей месте.
|
1. Цифровой термометр должен высвечивать |
8. При подключении баллона с жидким СОг |
|
|
температуру в середине камеры. Иногда тер |
к моделям АТ проконсультируйтесь с вашю |
|
|
мометр может показывать температуру на 2°С |
региональным дилером или ближайшим ин |
|
|
выше реальной. |
женерным центром. |
|
|
2. После начала работы не загружайте сразу |
9. Не включайте тумблер удаленной сигна |
|
|
много теплых предметов внутрь. Делайте это |
лизации пока температура внутри не достиг |
|
|
порциями и только после того, как температура |
нет установленного значения В моделях А1 |
|
|
опустилась хотя бы до -20°С. |
не включайте также устройство аварийного |
|
|
поддержания температуры Backup. Когда |
||
|
3. Температура внутри морозильника вблизи |
температура достигнет установленной, уста |
|
|
двери (около 10см) иногда на выше чем в сере |
новите иглу температуры включения BackU] |
|
|
дине. Нижняя часть морозильника больше под |
на записывающем устройстве на 10°С выше |
|
|
ходит для длительного хранения предметов. |
требуемой и только потом включите удален |
|
|
4. Перед началом работы закройте внутреннюю |
ную сигнализацию. |
|
|
10. Некоторые модели снабжены темпера |
||
|
крышку. Это уменьшит разницу температур |
||
|
сверху и на дне. |
турной сигнализацией, которая автоматиче |
|
|
ски срабатывает (предустановленная темпе |
||
|
5. Если внутри камеры необходимо использо |
ратура на заводе 10°С) |
|
|
вать другие приборы, проденьте их кабели в |
11. Не удаляйте лед ножом или другими ост |
|
|
отверстие и уплотните пробкой. В исходном |
||
|
состоянии отверстие должно быть закрыто |
рыми предметами. Удалите лед с помощью |
|
|
черными резиновыми пробками. |
прилагаемого шпателя. Следите, чтобы не |
|
|
6. В начале работы или при высокой окружаю |
повредить трубки на стенках камеры. |
|
|
12. Не чистите устройство скребущими |
||
|
щей температуре часть морозильника вблизи |
||
|
резинового уплотнения двери может быть го |
щетками, кислотами, растворителями, абра |
|
|
рячей. Это препятствует нарастанию льда и не |
зивными пастами и кипятком. Используйте |
|
|
является поломкой. |
нейтральные детергенты и тряпку, смочен |
|
|
7. После первого включения устройства неко |
ную чистой водой. |
|
|
торые предупреждающие функции могут не ра |
||
|
ботать из-за разрядки аккумуляторов. Полная |
||
|
их зарядка требует работы морозильника в те |
||
|
чении 2 дней. |
МЕСТОРАСПОЛОЖЕНИЕ
Для нормальной работы устройства и получения максимальной производительно сти при выборе места расположения учтите следующие условия:
1. Располагаете устройство на устойчивой равной поверхности.
Установите морозильник на ровный устойчивый пол, чтобы избежать вибрации и шум.
2. Располагайте устройство вдали от источников тепла.
Избегайте установки вблизи устройств, излучающих тепло. Тепло может повлиять на материа лы и вызвать неправильное морожение.
3. Не располагайте устройство под прямыми солнечными лучами
Установка под прямыми солнечными лучами может привести к неполадкам и уменьшить срок жизни морозильника.
4. Сухое место.
Избегайте расположения морозильника вблизи влажных мест, например, раковины, слива и т.д.
5. Чистое место.
Располагайте вдали от хранения химикатов, ЛВЖ, коррозийных газов, сильного запыления.
6. Помещение должно быть хорошо вентилируемым.
Не забудьте оставить вокруг устройства 10 см свободными. Потребление мощность будет меньше, если морозильник не стоит вплотную к стене.
7. Убедитесь в заземлении.
Заземление защитит Вас от электрического удара, в случае повреждения изоляции.
^ Предостережение
Обязательно используйте вилку с заземлением, чтобы предотвратить электрический удар и утечку электричества.
Использования водопроводных труб не обеспечивает надлежащее заземление. Никогда не заземляйте морозильник через газовые трубы.
Никогда не заземляйте морозильник через телефонные линии и кабель электроосвещения._____
8. Выкрутите ножки для фиксации положения.
Две регулируемые ножки фиксируют положение рамы, вращая их влево. Поверните их вправо перед перемещением.
^Предупреждение
Когда Вы утилизировали морозильник не забудьте сломать защелку и замок устройства, чтобы избежать ситуации, что кто-то может быть захлопнут внутри. Не позволяйте детям играть вокруг морозильника,___________________________________________________________________
-
Contents
-
Table of Contents
-
Troubleshooting
-
Bookmarks
Note:
1. No part of this manual may be reproduced in any form without the expressed written
permission of SANYO.
2. The contents of this manual are subject to change without notice.
3. Please contact SANYO if any point in this manual is unclear or if there are any
inaccuracies.
SANYO Electric Biomedical Co., Ltd.
CONTENTS
All rights reserved.
1
Printed in Japan.
P. 2
P. 7
P. 9
P. 10
P. 13
P. 15
P. 16
P. 22
P. 24
P. 26
P. 27
P. 28
P. 29
P. 30
P. 31
File Specifications:706/706974-mdf192.pdf file (16 May 2023) |
Accompanying Data:
Sanyo MDF-192 Freezer PDF Instruction Manual (Updated: Tuesday 16th of May 2023 03:52:18 AM)
Rating: 4.6 (rated by 7 users)
Compatible devices: MDF-U333, MDF-5386SC, MDF-593C, mpr-214f — Commercial Solutions Refrigerator, MDF-C2156VAN, MPR-414F — Commercial Solutions Refrigerator, MDF-394, MDF-594C.
Recommended Documentation:
Instruction Manual (Text Version):
(Ocr-Read Summary of Contents of some pages of the Sanyo MDF-192 Document (Main Content), UPD: 16 May 2023)
-
28, 27 DISPOSAL OF UNIT WARNING If the unit is to be stored unused in an unsupervised area for an extended period ensure that children do not have access and doors cannot be closed completely. The disposal of the unit should be accomplished by appropriate personnel. Always remove doors to prevent accidents such as suffocation.
… -
32, 31 CAUTION Please fill in this form before servicing. Hand over this form to the service engineer to keep for his and your safety. Safety check sheet 1. Refrigerator contents : Risk of infection: Risk of toxicity: Risk from radioactive sources: (List all potentially hazardous materials that have been stored in this unit.) Notes : 2. Contamination of the unit Unit interior No contami…
-
19, 18 OPERATING INSTRUCTIONS Setting of alarm resume time The alarm buzzer is silenced by pressing BUZZER key on the control panel during alarm condition (Initial setting 100: The remote alarm is not silenced). The buzzer will be activated again after certain suspension if the alarm condition is continued. The suspension time can be set by following the procedure shown in the Table 3 below. The example in the table is based on the assumpt…
-
29, 28 RECYCLE OF NICKEL-CADMIUM BATTERY The unit contains a rechargeable battery. The battery is recyclable. At the end of it’s useful life, check with you local solid officials option or proper disposal. Location of a nickel-cadmium battery This unit is provided a nickel-cadmium battery for the power failure alarm. The battery is located in the control box behind the control panel. Removal of nickel-cadmium battery 1. Turn off the power swi…
-
17, 16 OPERATING INSTRUCTIONS Temperature setting Table 1 shows the basic operation method. Perform key operations in the sequence indicated in the table. The example in the table is based on the assumption that the temperature is -70 o C. Note: The unit is set at the factory that the chamber temperature is -85C. Table 1. Basic operation sequence (Example: Chamber temperature -70 o C) Description of operation K…
-
7, 6 PRECAUTIONS FOR SAFE OPERATION Do not touch the condenser directly when the filter is removed for cleaning. This may cause injury by hot surface. Always disconnect the power supply plug before moving the unit. Take care not to damage the power cord. A damaged cord may cause electric shock or fire. Be careful not to tip over the unit during movement to prevent damage or injury. Always disconnect the power plug when the un…
-
31, 30 PERFORMANCE Cooling performance Center point of freezing chamber; -85 o C (Ambient temperature; 35 o C, no load) Control range -20 o C to -85 o C Power source AC 110 V, 60 Hz AC 150 V, 60 Hz AC 220 V, 50 Hz AC 220 V, 60 Hz AC 230 V, 50 Hz AC 240 V, 50 Hz Rated power consumption 600 W 600 W 550 W 600 W 550 W 550 W Alarm duration 9 hours Noise level 50 dB [A] (background noise; 20 dB…
-
15, 14 INSTALLATION Installation 1. Remove the packaging materials and tapes Remove all transportation packaging materials and tapes. Open the doors and ventilate the unit. If the outside panels are dirty, clean them with a diluted neutral dishwashing detergent. (Undiluted detergent can damage the plastic components. For the dilution, refer to the instruction of the detergent.) After the cleaning with the diluted detergent, always wipe it off with a wet cloth. Then…
-
2, Sanyo MDF-192 1 Note: 1. No part of this manual may be reproduced in any form without the expressed written permission of SANYO. 2. The contents of this manual are subject to change without notice. 3. Please contact SANYO if any point in this manual is unclear or if there are any inaccuracies. SANYO Electric Biomedical Co., Ltd. All rights reserved. Printed in Japan. CONTENTS PRECAUTIONS FOR SAFE OPERATION P. 2 …
-
20, 19 OPERATING INSTRUCTIONS Remote alarm terminal The terminal of the remote alarm is installed inside the side cover at the lower left side of the unit. The alarm is outputted from this terminal. The recommended contact capacity is between 2 A (DC 30V) and 0.1 mA (DC 1V). Contact output: between COM. and N.O. between COM. and N.C. At normal Open Close At abnormal Close …
-
3, Sanyo MDF-192 2 PRECAUTIONS FOR SAFE OPERATION It is imperative that the user complies with this manual as it contains important safety advice. Items and procedures are described so that you can use this unit correctly and safely. If the precautions advised are followed, this will prevent possible injury to the user and any other person. Precautions are illustrated in the following way: WARNING Failure to obse…
-
25, 24 MAINTENANCE WARNING Always disconnect the power supply to the unit prior to any repair or maintenance of the unit in order to prevent electric shock or injury. Ensure you do not inhale or consume medication or aerosols from around the unit at the time of maintenance. These may be harmful to your health. Cleaning ■ Clean the unit once a month. Regular cleaning keeps the unit looking new. ■ Use a dry cloth to wipe off small…
-
5, Sanyo MDF-192 4 PRECAUTIONS FOR SAFE OPERATION Ensure you do not inhale or consume medication or aerosols from around the unit at the time of maintenance. These may be harmful to your health. As with any equipment that uses CO 2 gas, there is a likelihood of oxygen depletion in the vicinity of the equipment. It is important that you assess the work site to ensure there is suitable an…
-
16, 15 START-UP OF UNIT Follow the procedures for the initial and consequent operations of the unit. 1. Make sure that all the switches on the control panel, such as the power switch, the remote alarm switch, the back-up system switch (MDF-192AT only) are off. 2. Liquid CO 2 gas cylinder for MDF-192AT is set at this time. 3. Shut the door and connect the power cable to the power supply after the inner lid is installed. 4. Turn on the power supply switch and the temperature is d…
-
12, 11 FREEZER COMPONENTS 1. Lock 2. Door: Hinged type. The door can be opened in any angle on the way to full open. 3. Magnetic door gasket: Seals the door and prevents leakage of cold air. 4. Inner lid: Serves as a means of reducing cold air leakage when the door is open. Remove the frost before it is accumulated too much. 5. Access port: Serves a means of leading the measuring cable from the freezing room to the outsi…
-
Sanyo MDF-192 User Manual
-
Sanyo MDF-192 User Guide
-
Sanyo MDF-192 PDF Manual
-
Sanyo MDF-192 Owner’s Manuals
Recommended: KW-ADV793, 950-8B CEILING SPEAKER, XV-S200BK, Continental, SCP-2370TH
Links & Tools
Operating Impressions, Questions and Answers:
-
Contents
-
Table of Contents
-
Troubleshooting
-
Bookmarks
Quick Links
INSTRUCTION MANUAL
MDF-192
MDF-192AT
Ultra-Low Temperature Freezer
MDF-192AT
Related Manuals for Sanyo MDF-192
Summary of Contents for Sanyo MDF-192
-
Page 1
INSTRUCTION MANUAL MDF-192 MDF-192AT Ultra-Low Temperature Freezer MDF-192AT… -
Page 2: Table Of Contents
1. No part of this manual may be reproduced in any form without the expressed written permission of SANYO. 2. The contents of this manual are subject to change without notice. 3. Please contact SANYO if any point in this manual is unclear or if there are any inaccuracies. SANYO Electric Biomedical Co., Ltd.
-
Page 3: Precautions For Safe Operation
PRECAUTIONS FOR SAFE OPERATION It is imperative that the user complies with this manual as it contains important safety advice. Items and procedures are described so that you can use this unit correctly and safely. If the precautions advised are followed, this will prevent possible injury to the user and any other person.
-
Page 4
PRECAUTIONS FOR SAFE OPERATION WARNING Do not use the unit outdoors. Current leakage or electric shock may result if the unit is exposed to rain water. Only qualified engineers or service personnel should install the unit. The installation by unqualified personnel may cause electric shock or fire. Be sure to install the unit on a sturdy floor. -
Page 5
PRECAUTIONS FOR SAFE OPERATION WARNING Ensure you do not inhale or consume medication or aerosols from around the unit at the time of maintenance. These may be harmful to your health. As with any equipment that uses CO gas, there is a likelihood of oxygen depletion in the vicinity of the equipment. -
Page 6
PRECAUTIONS FOR SAFE OPERATION CAUTION Select a level and sturdy floor for installation. This precaution will prevent the unit from tipping. Improper installation may result in water spillage or injury from the unit tipping over. Connect the unit to a power source as indicated on the rating label attached to the unit. Use of any other voltage or frequency other than that on the rating label may cause fire or electric shock. -
Page 7
PRECAUTIONS FOR SAFE OPERATION CAUTION Do not touch the condenser directly when the filter is removed for cleaning. This may cause injury by hot surface. Always disconnect the power supply plug before moving the unit. Take care not to damage the power cord. -
Page 8: Cautions For Usage
CAUTIONS FOR USAGE ■ Always use a dedicated power source. The power source of this freezer is single phase and 100 V. The power source should be the dedicated circuit with a dedicated breaker. Do not connect this freezer to the branch circuit for other electric appliances. ■…
-
Page 9
CAUTIONS FOR USAGE ■ The top surface of the frame sometimes becomes hot during the initial operation or when operating in a hot environment. This is due to the hot gas circuit for preventing dew, and is not an indication of a malfunction. -
Page 10: Environmental Conditions
ENVIRONMENTAL CONDITIONS This equipment is designed to be safe at least under the following conditions (based on the IEC 1010-1): 1. Indoor use; 2. Altitude up to 2000 m; 3. Ambient temperature 5 C to 40 4. Maximum relative humidity 80% for temperature up to 31 C decreasing linearly to 50% relative humidity at 40 5.
-
Page 11: Freezer Components
FREEZER COMPONENTS MDF-192…
-
Page 12
FREEZER COMPONENTS 1. Lock 2. Door: Hinged type. The door can be opened in any angle on the way to full open. 3. Magnetic door gasket: Seals the door and prevents leakage of cold air. 4. Inner lid: Serves as a means of reducing cold air leakage when the door is open. Remove the frost before it is accumulated too much. -
Page 13: Control Panel
FREEZER COMPONENTS Control panel 1. Power switch (POWER): Switch for ON/OFF off all functions except remote alarm and back-up system (MDF-192AT only). 2. Back-up switch (CO BACK UP)(MDF-192AT only): Switch for back-up system. Refer to page 21 for details. 3. Back-up test switch (TEST): Examine the functions of the back-up system. This switch allows liquid CO to spout under any circumstances.
-
Page 14: Installation
INSTALLATION Installation site To operate this unit properly and to obtain maximum performance, install the unit in a location with the following conditions: ■ A location not subjected to direct sunlight The direct sunlight to the freezer causes too high temperature and the chamber temperature may not reach -85 ■…
-
Page 15
INSTALLATION Installation 1. Remove the packaging materials and tapes Remove all transportation packaging materials and tapes. Open the doors and ventilate the unit. If the outside panels are dirty, clean them with a diluted neutral dishwashing detergent. (Undiluted detergent can damage the plastic components. For the dilution, refer to the instruction of the detergent.) After the cleaning with the diluted detergent, always wipe it off with a wet cloth. -
Page 16: Start-Up Of Unit
START-UP OF UNIT Follow the procedures for the initial and consequent operations of the unit. 1. Make sure that all the switches on the control panel, such as the power switch, the remote alarm switch, the back-up system switch (MDF-192AT only) are off. 2.
-
Page 17: Operating Instructions
OPERATING INSTRUCTIONS Temperature setting Table 1 shows the basic operation method. Perform key operations in the sequence indicated in the table. The example in the table is based on the assumption that the temperature is -70 Note: The unit is set at the factory that the chamber temperature is -85C. Table 1.
-
Page 18: Alarm Temperature Setting
OPERATING INSTRUCTIONS Alarm temperature setting This unit is provided with the high temperature alarm. The setting of high temperature alarm is 10 C or C higher than the setting of chamber temperature. The procedure in table 2 shows the sequence to set the high temperature alarm at 15 C higher than the setting of chamber temperature.
-
Page 19: Setting Of Alarm Resume Time
OPERATING INSTRUCTIONS Setting of alarm resume time The alarm buzzer is silenced by pressing BUZZER key on the control panel during alarm condition (Initial setting 100: The remote alarm is not silenced). The buzzer will be activated again after certain suspension if the alarm condition is continued. The suspension time can be set by following the procedure shown in the Table 3 below.
-
Page 20: Remote Alarm Terminal
The recommended contact capacity is between 2 A (DC 30V) and 0.1 mA (DC 1V). Contact output: between COM. and N.O. between COM. and N.C. At normal Open Close At abnormal Close Open Contact Sanyo sales agency when the installation of remote alarm device is desired.
-
Page 21: Alarms And Safety Functions
OPERATING INSTRUCTIONS Alarms and safety functions This unit has the alarm and safety functions shown in table below, and also self diagnostic function. Alarm & safety Situation Indication Buzzer Safety operation When the chamber temp. is Intermittent High temperature Remote alarm approx.
-
Page 22
Rough scheme Liquid CO joint of the back-up system. For this setting, gas cylinder consult with a qualified gas supplier or Sanyo sales agency. 2. After setting the liquid CO gas cylinder, operate the freezer until the chamber temperature reaches the required level. -
Page 23: Temperature Recorder At Type
TEMPERATURE RECORDER [AT type] The figure below shows the description of a temperature recorder. The temperature recorder is provided with model MDF-192AT. Time Temperature Warning indicator Recording indicator Pen holder lever Door Cartridge Feeding of chart 1. Open the door and let down the lever of the penholder; the pen point is apart from the chart. (Fig. 1) 2.
-
Page 24
The battery for back-up system is discharged when the back-up switch is kept on. ■ The additional felt pen or recording paper is available from Sanyo sales agency. ■ To stop the temperature recorder, remove the cell from the recorder. -
Page 25
MAINTENANCE WARNING Always disconnect the power supply to the unit prior to any repair or maintenance of the unit in order to prevent electric shock or injury. Ensure you do not inhale or consume medication or aerosols from around the unit at the time of maintenance. -
Page 26: Routine Maintenance
ROUTINE MAINTENANCE Cleaning of condenser filter WARNING Do not touch the condenser when removing the condenser filter for cleaning. It may cause burn injury. This unit is provided with the filter check lamp. This lamp flickers and the buzzer sounds when the condenser filter is clogged.
-
Page 27: Troubleshooting
TROUBLE SHOOTING If the unit malfunctions, check out the following before calling for service, after transferring all the contents to another freezer No refrigeration ■ The voltage is too low. (In this case, call an electrician.) ■ The breaker is free. ■…
-
Page 28: Disposal Of Unit
DISPOSAL OF UNIT WARNING If the unit is to be stored unused in an unsupervised area for an extended period ensure that children do not have access and doors cannot be closed completely. The disposal of the unit should be accomplished by appropriate personnel. Always remove doors to prevent accidents such as suffocation.
-
Page 29: Recycle Of Nickel-Cadmium Battery
RECYCLE OF NICKEL-CADMIUM BATTERY The unit contains a rechargeable battery. The battery is recyclable. At the end of it’s useful life, check with you local solid officials option or proper disposal. Location of a nickel-cadmium battery This unit is provided a nickel-cadmium battery for the power failure alarm. The battery is located in the control box behind the control panel.
-
Page 30: Specifications
Note Design or specifications will be subject to change without notice. The battery for power failure alarm is an article for consumption. It is recommended that the battery will be replaced about every 3 years. Contact Sanyo sales agency at the time of replacement of the battery for recycling.
-
Page 31: Performance
PERFORMANCE Cooling performance Center point of freezing chamber; -85 C (Ambient temperature; 35 C, no load) Control range C to -85 Power source AC 110 V, AC 150 V, AC 220 V, AC 220 V, AC 230 V, AC 240 V, 60 Hz 60 Hz 50 Hz…
-
Page 32: Safety Check Sheet
Procedure to be adhered to in order to reduce safety risk indicated in b) below. Date : Signature : Address, Division : Telephone : Product name : Model : Serial number : Date of Installation : Ultra-Low Temperature MDF-192 Freezer MDF-192AT Please decontaminate the unit yourself before calling the service engineer.
-
Page 33
7FB6P10137300 SANYO Electric Biomedical Co., Ltd. (10 May 2004) 10-15, Hongo 3-Chome Recycled paper Bunkyoku, Tokyo 113-8434 Japan Printed in Japan…
ИНСТРУКЦИЯ ПО ЭКСПЛУАТАЦИИ
MDF-193(AT)
MDF-293(AT)
MDF-392(AT)
MDF-492(AT)
MDF-593(AT)
MDF-793(AT)
MDF-C8V
Низкотемпературный медицинский морозильник
MDF-192AT
wwWodia-moiTQi!
заказ on-line
Примечание:
1.Никакие части этой инструкции не могут быть репродуцированы никоим образом без письменного разрешения SANYO.
2.Гарантия относится только к самому морозильнику.
3.Содержимое этой инструкции является предметом для изменения без уведомления.
ОSanyo Electric Biomedical Co., Ltd. Все права защищены. Оригинал отпечатан в Японии.
_______________________________________ Перевод Диаэм._____________
1
Не используйте холодильник вне помеще ния. При попадании дождевой воды внутрь можно получить электрический шок или утечку электричества.
Инсталляция устройства должна произво диться только квалифицированным инже нером или сервис-персоналом.
Устройство должно располагаться только на ровной устойчивой поверхности.
Никогда не располагайте устройство во влажном месте, или вблизи брызг воды.
Никогда не располагайте устройство в по жароопасном месте.
Никогда не располагайте устройство там, где присутствуют пары кислот или другие коррозийные газы.
Убедитесь, что параметры вашей электри ческой сети соответствуют требованиям, обозначенным в табличке на устройстве.
Убедитесь, что пыль удалена с вилки устройства. Запыленная вилка может при вести к пожару или другому повреждению.
Используйте ТОЛЬКО заземленные розет ки. Если заземления нет, оно должно быть проведено квалифицированным электри ком.
Никогда не используйте трубы газа, воды и др. для заземления. Это может привести к электрическому шоку или поломке устрой ства.
Никогда не помещайте металлические предметы в вентиляционные отверстия.
Никогда не храните ЛВЖ или взрыво опасные вещества в устройстве.
Никогда не храните коррозийные веще ства в устройстве. Это может привести к повреждению внутренних компонентов или электропроводки.
Всегда выключайте устройство из эл.сети при ремонте или обслуживании.
Убедитесь, что вы не вдыхаете медицин ские препараты или аэрозоли во время ремонта или обслуживания. Это может быть опасно для вашего здоровья.
Никогда не лейте и не брызгайте воду непосредственно внутрь устройства.
Никогда не разбирайте, не ремонтируйте и не модернизируйте устройство само стоятельно. Это может привести к пожа ру, эл. шоку или поломке устройства.
При неполадках немедленно выключите устройство из эл.сети. Продолжение ра боты неисправного устройства может привести к пожару, эл. шоку или др.
Если устройство в течении долгого вре мени не работает и хранится без надзора, убедитесь, что оно не досягаемо для де тей и его двери закрыты на ключ.
Даже если вы уже не пользуетесь моро зильником, не оставляйте его без при смотра.
Неправильное подсоединение СО2 или N2 газа может привести к взврыву или по жару.
При использовании С02 не забывайте проветривать помещение. Повышенное содержание этого газа в воздухе может быть опасно для человека
Выберите для инсталляции место с устой чивым и ровным полом.
Убедитесь, что в эл. сети, куда подключено устройство, есть эл. автомат или предохра нитель. (Особенно это важно если устрой ство работает во влажном месте)
Хорошо закрепляйте полки внутри устрой ства.
Выключая вилку устройства из сети, НИ КОГДА не дергайте за провод (кабель).
Никогда не повреждайте вилку устройства и не используйте поврежденную вилку и кабель.
Никогда не трогайте эл, части (такие как вилка или переключатели мокрыми руками)
Проверьте установленную температуру по сле возобновления работы после аварии электросети. Неправильно установленная температура может повредить содержимое.
Не ставьте емкости с водой на морозиль ник, Разлившись, она может нарушить изо ляцию электропроводов.
Не залезайте сами и не ставьте никакие предметы на морозильник. Это может при чинить ущерб, если морозильник перевер нется, или эти предметы упадут.
Не храните стеклянные и жестяные банки в морозильнике. Замерзнув, они могут лоп нуть.
Одевайте сухие перчатки.
Не трогайте замерзшие предметы в мо розильнике мокрыми руками.
Открывая и закрывая дверцы, чтобы не прищемить пальцы, держитесь только за ручки.
Не хлопайте дверью, можно повредить холодильник.
Проверяйте загрязнение фильтра кон денсора и чистите его. Загрязненный фильтр может привести к росту темпе ратуры или неполадкам.
Никогда не трогайте конденсор. Вы мо жете обжечься.
Никогда не давите на стекло, его можно повредить.
Всегда выключайте устройство из сети при его перемещении. Следите, чтобы не повредить эл.кабель.
Если устройство не используется долгое время не забудьте выключить его из се ти.
Не оставляйте упаковочные материалы в доступном для детей месте.
|
1. Цифровой термометр должен высвечивать |
8. При подключении баллона с жидким СОг |
|
|
температуру в середине камеры. Иногда тер |
к моделям АТ проконсультируйтесь с вашю |
|
|
мометр может показывать температуру на 2°С |
региональным дилером или ближайшим ин |
|
|
выше реальной. |
женерным центром. |
|
|
2. После начала работы не загружайте сразу |
9. Не включайте тумблер удаленной сигна |
|
|
много теплых предметов внутрь. Делайте это |
лизации пока температура внутри не достиг |
|
|
порциями и только после того, как температура |
нет установленного значения В моделях А1 |
|
|
опустилась хотя бы до -20°С. |
не включайте также устройство аварийного |
|
|
поддержания температуры Backup. Когда |
||
|
3. Температура внутри морозильника вблизи |
температура достигнет установленной, уста |
|
|
двери (около 10см) иногда на выше чем в сере |
новите иглу температуры включения BackU] |
|
|
дине. Нижняя часть морозильника больше под |
на записывающем устройстве на 10°С выше |
|
|
ходит для длительного хранения предметов. |
требуемой и только потом включите удален |
|
|
4. Перед началом работы закройте внутреннюю |
ную сигнализацию. |
|
|
10. Некоторые модели снабжены темпера |
||
|
крышку. Это уменьшит разницу температур |
||
|
сверху и на дне. |
турной сигнализацией, которая автоматиче |
|
|
ски срабатывает (предустановленная темпе |
||
|
5. Если внутри камеры необходимо использо |
ратура на заводе 10°С) |
|
|
вать другие приборы, проденьте их кабели в |
11. Не удаляйте лед ножом или другими ост |
|
|
отверстие и уплотните пробкой. В исходном |
||
|
состоянии отверстие должно быть закрыто |
рыми предметами. Удалите лед с помощью |
|
|
черными резиновыми пробками. |
прилагаемого шпателя. Следите, чтобы не |
|
|
6. В начале работы или при высокой окружаю |
повредить трубки на стенках камеры. |
|
|
12. Не чистите устройство скребущими |
||
|
щей температуре часть морозильника вблизи |
||
|
резинового уплотнения двери может быть го |
щетками, кислотами, растворителями, абра |
|
|
рячей. Это препятствует нарастанию льда и не |
зивными пастами и кипятком. Используйте |
|
|
является поломкой. |
нейтральные детергенты и тряпку, смочен |
|
|
7. После первого включения устройства неко |
ную чистой водой. |
|
|
торые предупреждающие функции могут не ра |
||
|
ботать из-за разрядки аккумуляторов. Полная |
||
|
их зарядка требует работы морозильника в те |
||
|
чении 2 дней. |
МЕСТОРАСПОЛОЖЕНИЕ
Для нормальной работы устройства и получения максимальной производительно сти при выборе места расположения учтите следующие условия:
1. Располагаете устройство на устойчивой равной поверхности.
Установите морозильник на ровный устойчивый пол, чтобы избежать вибрации и шум.
2. Располагайте устройство вдали от источников тепла.
Избегайте установки вблизи устройств, излучающих тепло. Тепло может повлиять на материа лы и вызвать неправильное морожение.
3. Не располагайте устройство под прямыми солнечными лучами
Установка под прямыми солнечными лучами может привести к неполадкам и уменьшить срок жизни морозильника.
4. Сухое место.
Избегайте расположения морозильника вблизи влажных мест, например, раковины, слива и т.д.
5. Чистое место.
Располагайте вдали от хранения химикатов, ЛВЖ, коррозийных газов, сильного запыления.
6. Помещение должно быть хорошо вентилируемым.
Не забудьте оставить вокруг устройства 10 см свободными. Потребление мощность будет меньше, если морозильник не стоит вплотную к стене.
7. Убедитесь в заземлении.
Заземление защитит Вас от электрического удара, в случае повреждения изоляции.
^ Предостережение
Обязательно используйте вилку с заземлением, чтобы предотвратить электрический удар и утечку электричества.
Использования водопроводных труб не обеспечивает надлежащее заземление. Никогда не заземляйте морозильник через газовые трубы.
Никогда не заземляйте морозильник через телефонные линии и кабель электроосвещения._____
8. Выкрутите ножки для фиксации положения.
Две регулируемые ножки фиксируют положение рамы, вращая их влево. Поверните их вправо перед перемещением.
^Предупреждение
Когда Вы утилизировали морозильник не забудьте сломать защелку и замок устройства, чтобы избежать ситуации, что кто-то может быть захлопнут внутри. Не позволяйте детям играть вокруг морозильника,___________________________________________________________________
-
Contents
-
Table of Contents
-
Troubleshooting
-
Bookmarks
Note:
1. No part of this manual may be reproduced in any form without the expressed written
permission of SANYO.
2. The contents of this manual are subject to change without notice.
3. Please contact SANYO if any point in this manual is unclear or if there are any
inaccuracies.
SANYO Electric Biomedical Co., Ltd.
CONTENTS
All rights reserved.
1
Printed in Japan.
P. 2
P. 7
P. 9
P. 10
P. 13
P. 15
P. 16
P. 22
P. 24
P. 26
P. 27
P. 28
P. 29
P. 30
P. 31
В наличии документация на медицинское оборудование фирмы Sanyo (в т.ч. на русском языке):
Сервисная инструкция (Service manual) на CO2 MCO-15A, MCO-15AC [Sanyo] Инкубатор
![Сервисная инструкция Service manual на CO2 MCO-15A, MCO-15AC [Sanyo]](https://medtechnic.net.ua/img_d/1881.jpg "Сервисная инструкция Service manual на CO2 MCO-15A, MCO-15AC [Sanyo]")
Инструкция по эксплуатации (Operation (Instruction) manual) на CO2 MCO-15AC, MCO-17AC [Sanyo] Инкубатор
Сервисная инструкция (Service manual) на CO2 MCO-17A [Sanyo] Инкубатор
Сервисная инструкция (Service manual) на CO2 MCO-18AIC [Sanyo] Инкубатор
![Сервисная инструкция Service manual на CO2 MCO-18AIC [Sanyo]](https://medtechnic.net.ua/img_d/9704.jpg "Сервисная инструкция Service manual на CO2 MCO-18AIC [Sanyo]")
Сервисная инструкция (Service manual) на CO2 MCO-20AIC [Sanyo] Инкубатор
![Сервисная инструкция Service manual на CO2 MCO-20AIC [Sanyo]](https://medtechnic.net.ua/img_d/5455.jpg "Сервисная инструкция Service manual на CO2 MCO-20AIC [Sanyo]")
Сервисная инструкция (Service manual) на Автоклав MAK-1200 [Sanyo] Стерилизаторы
![Сервисная инструкция Service manual на Автоклав MAK-1200 [Sanyo]](https://medtechnic.net.ua/img_d/1860.jpg "Сервисная инструкция Service manual на Автоклав MAK-1200 [Sanyo]")
Сервисная инструкция (Service manual) на Автоклав MAK-250NEX [Sanyo] Стерилизаторы
![Сервисная инструкция Service manual на Автоклав MAK-250NEX [Sanyo]](https://medtechnic.net.ua/img_d/1856.jpg "Сервисная инструкция Service manual на Автоклав MAK-250NEX [Sanyo]")
Сервисная инструкция (Service manual) на Автоклав MAK-350P [Sanyo] Стерилизаторы
![Сервисная инструкция Service manual на Автоклав MAK-350P [Sanyo]](https://medtechnic.net.ua/img_d/1857.jpg "Сервисная инструкция Service manual на Автоклав MAK-350P [Sanyo]")
Сервисная инструкция (Service manual) на Автоклав MAK-550EX [Sanyo] Стерилизаторы
![Сервисная инструкция Service manual на Автоклав MAK-550EX [Sanyo]](https://medtechnic.net.ua/img_d/1859.jpg "Сервисная инструкция Service manual на Автоклав MAK-550EX [Sanyo]")
Сервисная инструкция (Service manual) на Автоклав MLS-3751L/3781L [Sanyo] Стерилизаторы
![Сервисная инструкция Service manual на Автоклав MLS-3751L/3781L [Sanyo]](https://medtechnic.net.ua/img_d/9151.jpg "Сервисная инструкция Service manual на Автоклав MLS-3751L/3781L [Sanyo]")
Сервисная инструкция (Service manual) на Автоматическая машина для упаковывания таблеток ATC-120,240,360,480(F,FL) [Sanyo] Разное
![Сервисная инструкция Service manual на Автоматическая машина для упаковывания таблеток ATC-120,240,360,480(F,FL) [Sanyo]](https://medtechnic.net.ua/img_d/1872.jpg "Сервисная инструкция Service manual на Автоматическая машина для упаковывания таблеток ATC-120,240,360,480(F,FL) [Sanyo]")
Сервисная инструкция (Service manual) на Автоматическая машина для упаковывания таблеток ATC-M7G [Sanyo] Разное
![Сервисная инструкция Service manual на Автоматическая машина для упаковывания таблеток ATC-M7G [Sanyo]](https://medtechnic.net.ua/img_d/1876.jpg "Сервисная инструкция Service manual на Автоматическая машина для упаковывания таблеток ATC-M7G [Sanyo]")
Сервисная инструкция (Service manual) на Антисептические столы Bio Сlean bench MCV-B91, B131, 161(T) [Sanyo] Лаборатория
![Сервисная инструкция Service manual на Антисептические столы Bio Сlean bench MCV-B91, B131, 161(T) [Sanyo]](https://medtechnic.net.ua/img_d/1939.jpg "Сервисная инструкция Service manual на Антисептические столы Bio Сlean bench MCV-B91, B131, 161(T) [Sanyo]")
Сервисная инструкция (Service manual) на Антисептические столы с вытяжкой Сlean bench MCV-91,131,161BNN,BNS,BNF [Sanyo] Лаборатория
Сервисная инструкция (Service manual) на Медицинские морозильники MDF U50V, U50VC [Sanyo] Разное
Сервисная инструкция (Service manual) на Медицинские морозильники MDF-1155 AT, ATN [Sanyo] Разное
Сервисная инструкция (Service manual) на Медицинские морозильники MDF-1156 ATN [Sanyo] Разное
Сервисная инструкция (Service manual) на Медицинские морозильники MDF-135, 235, 435 [Sanyo] Разное
![Сервисная инструкция Service manual на Медицинские морозильники MDF-135, 235, 435 [Sanyo]](https://medtechnic.net.ua/img_d/1940.jpg "Сервисная инструкция Service manual на Медицинские морозильники MDF-135, 235, 435 [Sanyo]")
Сервисная инструкция (Service manual) на Медицинские морозильники MDF-136,236,436 [Sanyo] Разное
Сервисная инструкция (Service manual) на Медицинские морозильники MDF-192 (AT) [Sanyo] Разное
![Сервисная инструкция Service manual на Медицинские морозильники MDF-192 (AT) [Sanyo]](https://medtechnic.net.ua/img_d/1946.jpg "Сервисная инструкция Service manual на Медицинские морозильники MDF-192 (AT) [Sanyo]")
Сервисная инструкция (Service manual) на Медицинские морозильники MDF-2136 AT, ATN [Sanyo] Разное
![Сервисная инструкция Service manual на Медицинские морозильники MDF-2136 AT, ATN [Sanyo]](https://medtechnic.net.ua/img_d/1970.jpg "Сервисная инструкция Service manual на Медицинские морозильники MDF-2136 AT, ATN [Sanyo]")
Сервисная инструкция (Service manual) на Медицинские морозильники MDF-292,492,592,792 (AT) [Sanyo] Разное
![Сервисная инструкция Service manual на Медицинские морозильники MDF-292,492,592,792 (AT) [Sanyo]](https://medtechnic.net.ua/img_d/1949.jpg "Сервисная инструкция Service manual на Медицинские морозильники MDF-292,492,592,792 (AT) [Sanyo]")
Сервисная инструкция (Service manual) на Медицинские морозильники MDF-U281, U2810 [Sanyo] Разное
Инструкция по применению и обслуживанию (User and Service manual) на Медицинские морозильники MDF-U3286S [Sanyo] Разное
![Инструкция по применению и обслуживанию User and Service manual на Медицинские морозильники MDF-U3286S [Sanyo]](https://medtechnic.net.ua/img_d/4767.jpg "Инструкция по применению и обслуживанию User and Service manual на Медицинские морозильники MDF-U3286S [Sanyo]")
Сервисная инструкция (Service manual) на Медицинские морозильники MDF-U331, U536 D [Sanyo] Разное
Сервисная инструкция (Service manual) на Медицинские морозильники MDF-U333, U537 D [Sanyo] Разное
![Сервисная инструкция Service manual на Медицинские морозильники MDF-U333, U537 D [Sanyo]](https://medtechnic.net.ua/img_d/1990.jpg "Сервисная инструкция Service manual на Медицинские морозильники MDF-U333, U537 D [Sanyo]")
Сервисная инструкция (Service manual) на Медицинские морозильники MDF-U441, U4410 [Sanyo] Разное
![Сервисная инструкция Service manual на Медицинские морозильники MDF-U441, U4410 [Sanyo]](https://medtechnic.net.ua/img_d/2002.jpg "Сервисная инструкция Service manual на Медицинские морозильники MDF-U441, U4410 [Sanyo]")
Сервисная инструкция (Service manual) на Медицинские морозильники MDF-U70V, VC [Sanyo] Разное
Сервисная инструкция (Service manual) на Медицинские морозильники MDF-U71V, VC [Sanyo] Разное
![Сервисная инструкция Service manual на Медицинские морозильники MDF-U71V, VC [Sanyo]](https://medtechnic.net.ua/img_d/1975.jpg "Сервисная инструкция Service manual на Медицинские морозильники MDF-U71V, VC [Sanyo]")
Руководство пользователя (Users guide) на Термостат MIR-162, MIR-262 [Sanyo] Лаборатория-Термостаты
Сервисная инструкция (Service manual) на Холодильник для хранения крови MBP-107B [Sanyo] Разное
![Сервисная инструкция Service manual на Холодильник для хранения крови MBP-107B [Sanyo]](https://medtechnic.net.ua/img_d/1873.jpg "Сервисная инструкция Service manual на Холодильник для хранения крови MBP-107B [Sanyo]")
Техническая документация (Technical Documentation/Manual) на Холодильник для хранения крови MBR-107D Wiring diagram [Sanyo] Разное
Сервисная инструкция (Service manual) на Холодильник для хранения крови MBR-304D,G,DR,GR [Sanyo] Разное
Сервисная инструкция (Service manual) на Холодильник для хранения крови MBR-506D [Sanyo] Разное
![Сервисная инструкция Service manual на Холодильник для хранения крови MBR-506D [Sanyo]](https://medtechnic.net.ua/img_d/1877.jpg "Сервисная инструкция Service manual на Холодильник для хранения крови MBR-506D [Sanyo]")
Сервисная инструкция (Service manual) на Холодильник для хранения крови MBR-704G,GR [Sanyo] Разное
")