Java programming language comes with a variety of APIs that helps the developers to code more efficiently. One of those APIs is Java IO API. Java IO API helps the users to read and write data. In simple words, we can say that the Java IO helps the users to take the input and produce output based on that input. Almost every application or code requires some input and output produced based on that input. So let’s start with Java IO Tutorial.
Java I/O (Input and Output) is used to process the input and produce the output. Java uses the concept of a stream to make I/O operations fast. The java.io package contains all the classes required for input and output operations. We can perform file handling in Java by Java I/O API.

The Java IO API is placed in the java.io package. This package comprises almost all classes that a user requires to perform input and output (I/O) in Java. The Java IO package focuses on input and output to files, network streams, etc. However, the Java IO package does not include classes to open network sockets which are essential for network communication.
The java.io package generally involves reading basic information from a source and writing it to a destination. The below figure perfectly demonstrates the principle of a program taking input data from a source and producing output based on it to some destination.

Java IO Streams
In the programming world, a stream can be described as a series of data. It is known as a stream because it is similar to a stream of water that continues to flow. Java IO streams are flows of data that a user can either read from or write to. Like an array, a stream has no concept of indexing the read or write data. A stream is attached to a data origin or a data target.

Java Streams uses two primary streams to read and write the data. These are:
1. InputStream – An input stream is used to read the data from a source in a Java application. Data can be anything, a file, an array, a peripheral device, or a socket. In Java, the class java.io.InputStream is the base class for all Java IO input streams.

Methods of Java IO InputStreams
- read() – The read() method is used to read the next byte of data from the Input Stream. The value byte is passed on a scale of 0 to 255. If no byte is free because the end of the stream has arrived, the value -1 is passed.
- mark(int arg) – The mark(int arg) method is used to mark the current position of the input stream. It sets read to limit, i.e., the maximum number of bytes that can be read before the mark position becomes invalid.
- reset() – The reset() method is invoked by mark() method. It changes the position of the input stream back to the marked position.
- close() – The close() method is used to close the input stream and releases system resources associated with this stream to Garbage Collector.
- read(byte [] arg) – The read(byte [] arg) method is used to read the number of bytes of arg.length from the input stream to the buffer array arg. The bytes read by read() method are returned as an int. If the length is zero, then no bytes are read, and 0 is returned unless there is an effort to read at least one byte.
- skip(long arg) – The skip(long arg) method is used to skip and discard arg bytes in the input stream.
- markSupported() – The markSupported() method tests if the inputStream supports the mark and reset methods. The markSupported method of Java IO InputStream yields false by default.
Example of Java IO InputStream:
Java
import java.io.*;
public class InputStreamExample
{
public static void main(String[] args) throws Exception
{
InputStream input = null;
try {
input = new FileInputStream("Text.txt");
System.out.println("Char - "+(char)input.read());
System.out.println("Char - "+(char)input.read());
input.mark(0);
input.skip(1);
System.out.println("skip() method comes to play");
System.out.println("mark() method comes to play");
System.out.println("Char - "+(char)input.read());
System.out.println("Char - "+(char)input.read());
boolean check = input.markSupported();
if (input.markSupported())
{
input.reset();
System.out.println("reset() invoked");
System.out.println("Char - "+(char)input.read());
System.out.println("Char - "+(char)input.read());
}
else
System.out.println("reset() method not supported.");
System.out.println("input.markSupported() supported"+
" reset() - "+check);
}
catch(Exception e)
{
e.printStackTrace();
}
finally
{
if (input!=null)
{
input.close();
}
}
}
}
Text.txt file used in the above code has the following content in it:
GeeksforGeeks
Output:

Note – This code won’t run on an online IDE as no such file is present there. You can run this code on your System to check it’s working.
2. OutputStream – An output stream is used to write data (a file, an array, a peripheral device, or a socket) to a destination. In Java, the class java.io.OutputStream is the base class for all Java IO output streams.

Methods of Java IO OutputStreams
- flush() – The flush() method is used for flushing the outputStream This method forces the buffered output bytes to be written out.
- close() – The close() method is used to close the outputStream and to release the system resources affiliated with the stream.
- write(int b) – The write(int b) method is used to write the specified byte to the outputStream.
- write(byte [] b) – The write(byte [] b) method is used to write bytes of length b.length from the specified byte array to the outputStream.
Java
import java.io.*;
public class OutputStreamExample {
public static void main(String args[]) throws Exception
{
OutputStream output
= new FileOutputStream("file.txt");
byte b[] = { 65, 66, 67, 68, 69, 70 };
output.write(b);
output.flush();
for (int i = 71; i < 75; i++) {
output.write(i);
}
output.flush();
output.close();
}
}
Output: When we run the program, the file.txt file is filled with the following content.
ABCDEFGHIJ
Note – This code won’t run on an online IDE as no such file is present there. You can run this code on your System to check it’s working.
Types of Streams in Java IO
The Streams in Java IO are of the following types:

1. Byte Streams – Java byte streams are the ones that are used to implement the input and output of 8-bit bytes. Several classes are affiliated with byte streams in Java. However, the most generally practiced classes are FileInputStream and FileOutputStream.
Different classes of Byte Streams
| S. No. | Stream Class | Description |
|---|---|---|
| 1 | InputStream | This is an abstract class that defines stream input. |
| 2 | FileInputStream | This is used to reads from a file. |
| 3 | DataInputStream | It contains a method for reading java standard datatypes. |
| 4 | BufferedInputStream | It is used for Buffered Input Stream. |
| 5 | PrintStream | This class comprises the commonly used print() and println() methods. |
| 6 | OutputStream | This is an abstract class that describes stream output. |
| 7 | FileOutputStream | This class is used to write to a file. |
| 8 | DataOutputStream | This contains a method for writing java standard data types. |
| 9 | BufferedOutputStream | This is used for Buffered Output Stream. |
2. Character Streams – Java Character streams are the ones that are used to implement the input and output for 16-bit Unicode. Several classes are associated with character streams in Java, but the most commonly used classes are FileReader and FileWriter. Internally, the FileReader class uses FileInputStream and the FileWriter class uses FileOutputStream. Nevertheless, the significant contrast is that FileReader and FileWriter read and write two bytes, respectively.
Different classes of Character Streams:
| S. No. | Stream Classes | Description |
|---|---|---|
| 1 | Reader | This is an abstract class that defines character stream input. |
| 2 | Writer | This is an abstract class that defines character stream output. |
| 3 | FileReader | This is an input stream that reads from the file. |
| 4 | FileWriter | This is used to the output stream that writes to the file. |
| 5 | BufferedReader | It is used to handle buffered input streams. |
| 6 | BufferedWriter | This is used to handle buffered output streams. |
| 7 | InputStreamReader | This input stream is used to translate the byte to the character. |
| 8 | OutputStreamReader | This output stream is used to translate characters to bytes. |
| 9 | PrintWriter | This contains the most used print() and println() methods. |
3. Standard Streams – All the programming languages assist standard I/O, where the user’s program can take input from a keyboard and then produce an output on the computer screen. Just like C and C++ have three standard streams, STDIN, STDOUT, and STDERR, Java also provides the following three standard streams:

- Standard Input – The Standard Input class is used to accept input data to the user’s program. Usually, a keyboard is utilized as a standard input stream and described as System.in.
- Standard Output – This class is used to output the data generated by the user’s program, and usually, a computer screen is used for standard output stream and described as System.out.
- Standard Error – The Standard error class is used to output the data having an error that is generated by the user’s program. Normally, a computer screen is utilized for standard error stream and described as System.err.
Example of Standard Streams in Java IO
Java
import java.io.*;
import java.util.*;
public class StandardStreamsExample {
public static void main(String[] args)
{
try {
Scanner s = new Scanner(System.in);
System.out.print("Enter the value of A : ");
int a = s.nextInt();
System.out.println("Value of A is : " + a);
System.out.print("Enter the value of B : ");
int b = s.nextInt();
System.out.println("Value of B is : " + b);
System.out.println(
"Result of division A/B is : " + (a / b));
}
catch (Exception ex) {
System.err.print("Exception message : "
+ ex.getMessage());
}
}
}
Output


Java IO Console
The Java.io.Console class implements programs to receive the character-based console device, if any, affiliated with the prevailing Java virtual machine. The Console class was added to the package java.io in Java Development Kit 6 (JDK 6).
The Java Console class is used to take input from the console. It presents methods to read texts and passwords. If a user reads the password using the Console class, it will not be disclosed to the user. The java.io.Console class is connected to the system console internally.

Characteristics of Java IO Console
- Java IO Console is used to read from and write to the console if one exists.
- The console is fundamentally a support class because most of its functionality is achievable through System.in and System.out. However, its effectiveness can clarify some console interactions, particularly when reading strings from the console.
- The console has no constructors. Instead, if a user wants to obtain a Console object, then it can be done by calling System.console( ).
- If a console is available, then a reference of that console is returned. Otherwise, null is returned. A console class is not feasible in all cases. Thus, in case of no console, null is returned.
Methods of Java IO Console
| S.No. | Method’s Name | Description |
|---|---|---|
| 1. | writer() | This method is used to recover the individual PrintWriter object affiliated with the console. |
| 2. | reader() | This method is used to retrieve the unique Reader object associated with the console. |
| 3. | format(String format, Object… args) | This method expresses a formatted string to the output stream of the console utilizing the designated format string and arguments. |
| 4. | printf(String format, Object… args) | This method is used to publish a formatted string to the console’s output stream utilizing the stipulated format string and arguments. |
| 5. | readLine(String format, Object… args) | This method is used to produce a formatted prompt. After that, this method reads a single line of text from the console. |
| 6. | readLine() | This method is used to recite an individual line of data from the console. |
| 7. | readPassword(String format, Object… args) | This method is used to provide a formatted prompt, then reads a password or passphrase from the console with echoing disabled. |
| 8. | readPassword() | This method is used to render a password or passphrase from the console. |
| 9. | flush() | This method is used for flushing the console. This method limits any buffered output to be written rapidly. |
Java IO Reader and Writer
Input and output streams are fundamentally byte-based. Java IO Reader and writer depends on the characters, which can have varying amplitudes depending on the character set. For instance, ASCII and ISO Latin-1 handle one-byte characters. Unicode uses two-byte characters. UTF-8 handles characters of different amplitudes (among one and three bytes). As characters are eventually comprised of bytes, readers practice their input from streams. However, they transform those bytes into characters according to a particularized encoding setup before catching them along. Furthermore, writers transform characters to bytes according to a particularized encoding before writing them onto any underlying stream.
The java.io.Reader and java.io.Writer classes are abstract superclasses. These superclasses help in reading and writing character-based data. These subclasses are important for managing the transformation among various character sets. In Java IO API, there are nine reader and eight writer classes, all in the java.io package.
Java IO Reader
A reader is used when a user wants to read character-based data from a source of the data. The Java IO Reader class is an abstract class that is used for expressing character streams. The only programs that a subclass needs to implement are read(char[], int, int) and close() methods. Many subclasses of the Reader class will override some of the methods shown below. However, most subclasses produce tremendous efficiency, additional functionality, or both.
Methods of Java IO Reader
- close() – This method is used to close the stream and release any associated system resources. Once the stream has been closed, further methods invocations like read(), mark(), or skip() will throw an IOException. In Java IO, closing an earlier-ended stream has no effect.
- mark(int readAheadLimit) – This method is utilized to check the ongoing place in the stream. The following calls to reset() method will try to change the position of the stream to this point. In Java IO Reader, all the character-input streams do not support the mark() operation.
- markSupported() – This process determines whether this stream sustains the mark() operation or not. The default implementation always returns false. All the subclasses of the Java IO Reader should call this method.
- read() – This method is used to read a single character. The read() method is obstructed till a character is feasible, an I/O error happens, or the stream is ended. All the subclasses of the Java IO Reader class that intend to sustain adequate single-character input should override this method.
- read(char[] cbuf) – This method is used to read characters into an array. This method is obstructed till some information is possible, an I/O error occurs, or the end of the stream is reached.
- read(char[] cbuf, int off, int len) – This method is used to read the characters in a part of an array. This method is obstructed till a character is feasible, an I/O error happens, or the stream is ended.
- read(CharBuffer target) – This method strives to read characters within the particularized character buffer. The buffer target is utilized like a container of characters.
- ready() – This method is used to tell whether this stream is ready to be read.
- reset() – This method is used to reset the stream. If the stream has been marked, then this method tries to reposition the stream at the mark. If the stream has not been checked, then strive to reset it in some way relevant to the appropriate stream, for example, generally used by repositioning it to its starting point. Not all character-input streams sustain the reset() process, and some help the reset() without sustaining mark().
- skip(long n) – This method is used to skip characters. This method is blocked till some information is available, an I/O error occurs, or the end of the stream is reached.
Different classes of Java IO Reader

| S. No. | Reader Classes | Description |
|---|---|---|
| 1 | BufferedReader | Java BufferedReader class is used to record the information from a character-based input stream. This method can be applied to read the data line by line with the help of the readLine() method. |
| 2 | CharArrayReader | The CharArrayReader class is used to read the character array as a reader (stream). It inherits Reader class. |
| 3 | FileReader | Java FileReader class is used to recite the information from the file. This method yields the data in a byte format, just like FileInputStream class. |
| 4 | FilterReader | Java FilterReader is used to perform filtering operations on the reader stream. FilterReader class is an abstract class for rendering filtered character streams. |
| 5 | InputStreamReader | An InputStreamReader class is a bridge from byte streams to character streams: It reads bytes and decodes them into characters using a specified charset. |
| 6 | LineNumberReader | The LineNumberReaser class keeps track of line numbers of the read characters. Line numbering begins at 0. |
| 7 | PushbackReader | Java PushbackReader class is a character stream reader. It is used to pushes back a character into the stream and overrides the FilterReader class. |
| 8 | PipedReader | The PipedReader class is utilized to read the data of a pipe in the form of a stream of characters. The PipedReader class is commonly managed to read text. |
| 9 | StringReader | Java StringReader class is a stream of characters with string as an origin. It takes an input string and changes it into a character stream. |
Example of Java IO Reader
Java
import java.io.*;
public class ReaderExample {
public static void main(String[] args) {
char[] array = new char[100];
try {
Reader input = new FileReader("file.txt");
System.out.println("Is there data in the stream? " + input.ready());
input.read(array);
System.out.println("Data in the stream -");
System.out.println(array);
input.close();
}
catch(Exception e) {
e.getStackTrace();
}
}
}
file.txt file used in the above code has the following content in it –
Hello Geeks.
Output

Note – This code won’t run on an online IDE as no such file is present there. You can run this code on your System to check it’s working.
Java IO Writer
Java IO Writer is an abstract class utilized for writing to the character streams. The only methods in Java IO Writer that a subclass must implement are write(char[], int, int), flush(), and close(). Most subclasses, however, will override several methods explained here to implement higher efficiency, additional functionality, or both.
Methods of Java IO Writer:
- append(char c) – This method is used to add the particularized character to the writer. An invocation of this process of the form out.append(c) performs the same way as the invocation – out.write(c).
- append(CharSequence csq) – This method is used to add the designated character sequence to the writer. An invocation of this process of the form out.append(csq) functions in precisely the identical style as the invocation – out.write(csq.toString()).
- append(CharSequence csq, int start, int end) – This method is used to add a subsequence of the particularized character sequence to the writer. It adds a subsequence of the detailed character sequence to the writer.
- close() – This method is used to close the stream, flushing it first. Once the stream has been stopped, further write() or flush() methods will provoke an IOException to be thrown. In Java IO Writer, closing an earlier closed stream has no effect.
- flush() – This method is used for flushing the stream. If the stream has preserved any characters from the multiple write() methods in a buffer, they should be written immediately to their proposed destination. After that, if that destination is a different character or byte stream, it should be flushed. Thus one invocation method flush() will flush all the barriers or buffers in a series of Writers and OutputStreams.
- write(char[] cbuf) – This method is used to write an array of characters.
- write(char[] cbuf, int off, int len) – This method is used to write a portion of an array of characters.
- write(int c) – This method is used to print an individual character. The character to be rewritten is displayed in the 16 low-order bits of the provided integer value. It means that the 16 high-order bits are ignored. Subclasses that intend to support efficient single-character output should override this method.
- write(String str, int off, int len) – This method is used to write a portion of a string.
Different classes of Java IO Writer
The list of different classes of Java IO Writer is given below –

| S. No. | Writer Classes | Description |
|---|---|---|
| 1 | BufferedWriter | Java BufferedWriter class is used to implement buffering for the instances of the Writer class. It makes the performance fast. It inherits the Writer class. |
| 2 | CharArrayWriter | The CharArrayWriter class can be used to write common data to multiple files. This class inherits the Writer class. |
| 3 | FileWriter | Java FileWriter class is applied to write data to a file that is character-oriented. It is a character-oriented class that is utilized for the process of file handling in java. |
| 4 | FilterWriter | Java FilterWriter class is an abstract class. It is practiced to write only the filtered character streams. The subclass of the class FilterWriter should override a few of its processes, and it should contribute additional methods and fields |
| 5 | OutputStreamWriter | OutputStreamWriter is a class used to transform the character streams to the byte stream. In this class, the characters are encoded into bytes using a designated charset. |
| 6 | PipedWriter | The PipedWriter class is used to write a stream of characters in the form of a java pipe. This class is generally used for writing text. |
| 7 | PrintWriter | Java PrintWriter class can be described as an implementation of the Writer class. This class is used to imprint the formatted description of objects to the text-output stream. |
| 8 | StringWriter | Java StringWriter class is used to collect the output from a string buffer, which can be utilized to build a string. |
Example of Java IO Writer
Java
import java.io.*;
public class WriterExample {
public static void main(String args[]) {
String data = "Hello Geeks.";
try {
Writer output = new FileWriter("file.txt");
output.write(data);
output.close();
}
catch (Exception e) {
e.getStackTrace();
}
}
}
Output
When we run the program, the file.txt file is filled with the following content.
Hello Geeks.
Note – This code won’t run on an online IDE as no such file is present there. You can run this code on your System to check it’s working.
Java IO File
The Java IO File class is Java’s description of a file or pathname of a directory. Since file and directory names have distinctive arrangements on various platforms, a naive string is not sufficient to describe them. The File class comprises various approaches for operating with the pathname, removing and renaming files, generating new directories, arranging the contents of a list, and managing numerous general properties of files and directories.
Characteristics of Java IO File
- Java IO File is an ideal illustration of files and pathnames of directories.
- A pathname, whether general or in string pattern, can be either fixed or contingent. The origin of an ideal pathname may be accomplished by invoking the getParent() process of the Java IO File class.
- First of all, a user should build an object of the File class by giving it the filename or directory name. A file method may execute limitations to specific actions on the real file-system object, such as reading and writing. These constraints are collectively identified as access permissions.
- Instances of the File class are immutable. That is, once created, the abstract pathname denoted by a File object will nevermore change.
Methods of Java IO File
- canExecute() – This method is used to examine whether the application can accomplish the file expressed by the abstract pathname.
- canWrite() – This method is used to test whether the application can transform the file expressed by the abstract pathname or not.
- canRead() – This method is used to examine whether the application can read the given file signified by the abstract pathname.
- getName() – This method is used to return the file or directory name denoted by the abstract pathname.
- getPath() – This method is used to convert the abstract pathname into a pathname string.
- getAbsolutePath() – This method is used to return the absolute pathname string of the abstract pathname.
- getParent() – This method is used to return the pathname string of the abstract pathname’s parent.
- exists() – This method is used to test whether the file or directory expressed by the abstract pathname exists or not.
- length() – This method is used to return the length of the file denoted by the abstract pathname.
- isDirectory() – This method is used to test whether the file denoted by the pathname is a directory.
Example of Java IO File
Java
import java.io.File;
public class FileExample
{
public static void main(String[] args) {
String fname =args[0];
File f = new File(fname);
System.out.println("File name - "+f.getName());
System.out.println("Path - "+f.getPath());
System.out.println("Absolute path - " +f.getAbsolutePath());
System.out.println("Parent - "+f.getParent());
System.out.println("Exists - "+f.exists());
if(f.exists())
{
System.out.println("Is writable - "+f.canWrite());
System.out.println("Is readable - "+f.canRead());
System.out.println("Is a directory - "+f.isDirectory());
System.out.println("File Size in bytes "+f.length());
}
}
}
Output

Geeks.txt file used in the above code has the following content in it –
Hello Geeks
Note – This code won’t run on an online IDE as no such file is present there. You can run this code on your System to check it’s working.
В современном мире существует большое количество способов ввода-вывода. Рассказываем о работе каждого из них и способах их применения.
Начинающему разработчику зачастую сложно разобраться в средствах ввода-вывода (I/O), поскольку присутствует небольшая путаница в определении различий этих способов. В данном материале попробуем заполнить этот пробел и разобраться в классификации основных типов ввода-вывода.
I/O в аппаратном обеспечении
В современных операционных системах средства ввода-вывода представляют собой способы взаимодействия между обработчиком информации и внешним миром. Сюда можно отнести чтение или запись файлов на жёсткий диск или SSD, отправку и получение данных по сети, отображение информации на мониторе и получение ввода с мыши и клавиатуры.
Способы взаимодействия современных ОС с периферийными устройствами зависят от типа устройства, возможностей прошивки и аппаратного обеспечения. Можно считать, что периферия может обрабатывать несколько запросов одновременно. То есть время последовательного взаимодействия прошло. В этом смысле все взаимодействия устройств ввода-вывода с процессором асинхронны и находятся на стороне аппаратного обеспечения.
Такой асинхронный механизм называется аппаратным прерыванием. В простом случае, процессор отправляет запрос к внешнему устройству и начинает бесконечный цикл, в котором он каждый раз запрашивает у периферии, готовы ли данные, которые процессор мог бы считать, и ждёт в цикле, пока периферия не выдаст ему эти данные. Этот метод ввода-вывода называется методом опроса поскольку процессор должен постоянно проверять состояние периферии.
На самом деле, на современном оборудовании процессор просит периферию выполнить действие и забывает о нём, продолжая обрабатывать другие инструкции. Как только устройство завершит свою работу, оно сообщает об этом процессору, вызывая прерывание. Это происходит на уровне аппаратного обеспечения, и при этом процессору никогда не приходится ожидать или опрашивать периферию, что освобождает его для другой работы, пока периферия сама не сообщит о своей готовности.
I/O в программном обеспечении
В среде программного обеспечения существует большое количество видов ввода и вывода: блокирующий, неблокирующий, мультиплексированный и асинхронный. Давайте рассмотрим их по очереди.
Блокирующий метод
Помните, что любая пользовательская программа запускается внутри процесса, а код выполняется в контексте потока? Предположим, вы пишете программу, которой нужно читать информацию из файла. С блокирующим вводом-выводом вы просите ОС «усыпить» ваш поток и «разбудить» его только после того, как данные из файла будут доступны для чтения.
То есть блокирующий ввод-вывод называется так, потому что поток, который его использует, блокируется и переходит в режим ожидания, пока ввод-вывод не будет завершён.
Неблокирующий метод
Проблема метода блокировки заключается в том, что поток будет спать, пока ввод-вывод не завершится. Поток не сможет выполнять никаких других задач, кроме ожидания завершения ввода-вывода. Иногда вашей программе больше и не надо ничего делать. В противном случае во время ожидания ввода-вывода было бы полезно выполнять другие задачи.
Один из способов осуществить это — использовать неблокирующий ввод-вывод. Его идея заключается в том, что когда программа делает вызов на чтение файла, ОС не будет блокировать поток, а просто вернёт ей либо готовые данные, либо информацию о том, что ввод-вывод ещё не закончен. Это не заблокирует поток, но программе придётся позже проверять, завершён ли ввод-вывод. Это означает, что ПО может по-разному реагировать в зависимости от того, завершён ли ввод-вывод и выполнять другие задачи. Когда же программе снова понадобится ввод-вывод, она сможет повторно попробовать прочесть содержимое файла, и если ввод-вывод завершён, то получит содержимое файла. В противном случае ПО снова получит сообщение о том, что операция ещё не завершена и сможет заняться другими задачами.
Мультеплексированный метод
Проблема с неблокирующим вводом-выводом в том, что с ним не удобно работать, если задачи, которые выполняет программа, ожидая ввода-вывода, сами из себя представляют другой ввод-вывод.
Хорошо, если ПО просит ОС прочитать содержимое из файла А, после чего выполняет какие-нибудь сложные вычисления. Затем проверяет, завершилось ли чтение файла А, и если да, то просто продолжает ту работу, для которой нужно было содержимое файла, а иначе снова выполняет некоторое количество сложных вычислений и так далее.
Но что, если программе не нужно выполнять сложные вычисления? Ей просто нужно прочесть файл A и одновременно файл B. Пока ПО ожидает завершения обработки файла А, оно делает неблокирующий вызов чтения содержимого файла В. Во время ожидания обработки программе больше нечего делать, потому она входит в бесконечный цикл опроса, проверяя, готово ли A и готово ли B, снова и снова. Это либо нагрузит процессор проверками состояния ваших неблокирующих вызовов, либо вам придётся вручную добавить какое-то произвольное время, которое ваш поток будет «спать», а значит, программа немного позже заметит, что ввод-вывод готов, что отрицательно скажется на пропускной способности ПО.
Во избежание этого можно использовать мультиплексированный ввод-вывод. Он тоже блокирует поток на операциях ввода-вывода, но вместо того, чтобы производить блокировку по очереди, вы можете запланировать все операции ввода-вывода, которые вам нужно сделать, и блокировать их все. Операционная система разбудит поток, когда какая-нибудь из операций завершится. В некоторых реализациях мультиплексированного ввода-вывода можно даже точно указать, что вы хотите, чтобы поток разбудили, только когда заданный набор операций ввода-вывода будет завершён, например, когда файлы A и C, или файлы B и D будут готовы.
Таким образом ПО делает неблокирующий вызов чтения файла A, потом неблокирующий вызов чтения файла B, и наконец говорит ОС: усыпи мой поток, и разбуди его, когда A и B будут оба готовы, или когда один из них будет готов.
Асинхронный метод
Проблема мультиплексированного ввода-вывода в том, что поток всё-таки спит, пока ввод-вывод не будет готов для обработки. Для многих программ это подходит, поскольку у них нет других задач, пока они ждут завершения операций ввода-вывода. Но иногда у них есть и другие задачи.
Например, ПО вычисляет цифры числа π и одновременно суммирует значения из нескольких файлов. Вам хотелось бы запланировать все операции чтения файлов, пока программа ждёт их выполнения, вычислять цифры числа π. Когда какой-нибудь из файлов будет прочитан, ПО прибавит записанное в нём значение и продолжит вычислять цифры числа π дальше, пока ещё один файл не будет прочитан.
Чтобы это работало, нужно, чтобы ваше вычисление цифр числа π могло быть прервано вводом-выводом, когда он завершается. Это можно сделать с помощью обратных вызовов, связанных с событиями. Вызов на чтение принимает функцию обратного вызова и возвращается немедленно. Когда ввод-вывод завершается, операционная система остановит ваш поток и выполнит обратный вызов. Когда обратный вызов завершится, система возобновит работу вашего потока.
Чтение по теме: Асинхронное программирование в Python
Многопоточность или однопоточность?
Вы, наверно, заметили, что все вышеописанные способы ввода-вывода работают в рамках одного потока, главного потока вашего приложения. На самом деле, для выполнения ввода-вывода не требуется отдельный поток, поскольку, как вы видели в начале статьи, вся периферия выполняет ввод-вывод асинхронно. Поэтому и возможно делать блокирующий, неблокирующий, мультиплексированный и асинхронный ввод-вывод в однопоточной модели и одновременный ввод-вывод может работать без поддержки многопоточности.
Но обработка результатов операций ввода-вывода может быть и многопоточной. Это позволяет программе делать одновременные вычисления поверх одновременного ввода-вывода. Так что, ничто не мешает вам совмещать многопоточность и эти механизмы ввода-вывода.
В самом деле, есть пятый популярный метод ввода-вывода, который требует многопоточности. Его часто путают с неблокирующим или асинхронным, поскольку он похож по интерфейсу на те два. Он работает просто: он использует блокирующий ввод-вывод, но каждый блокирующий вызов делается в отдельном потоке. В зависимости от реализации, вызов либо принимает функцию обратного вызова, либо использует модель опроса, как если он возвращает Future.
В данном учебном курсе мы будем писать программы без графического пользовательского интерфейса, то есть без кнопок, текстовых полей ввода и т. д. Программы будут принимать на вход данные от пользователя с клавиатуры (а чуть позже мы научимся работать с файловым вводом и выводом), а выводить результат будут на экран. Всё взаимодействие с программой будет происходить в командной строке, также называемой консолью или терминалом.
Во введении к курсу мы узнали, что командная строка в среде разработки Visual Studio Code находится внизу на вкладке «Терминал». Именно в ней мы будем вводить данные с клавиатуры, а программа будет выводить результаты. Как было сказано ранее, мы будем писать компьютерные программы, которые принимают на вход данные, работают с ними и выводят результат на экран.
Вспомним программу из введения:
print("Привет, мир!")
В этой программе мы вызываем встроенную функцию под названием print(). Как она устроена внутри, нам пока не столь важно. Главное — запомнить, что у неё есть имя, по которому к ней можно обратиться, плюс она принимает данные и обрабатывает их. О том, какими могут быть данные, мы тоже поговорим позже — в нашем примере мы передаём строку «Привет, мир!».
В Python строки заключены в кавычки — можно использовать одинарные, двойные и тройные (рекомендуется их составлять из трёх двойных). Внутри кавычек одного вида можно использовать другой вид кавычек как часть выводимой на экран строки.
Например:
print('Привет, мир!')print("Привет, мир!")print("""Привет, мир!""")print("Программа выводит фразу 'Привет, мир!'")
Данные в программу могут поступать различными способами. Самый простой и привычный для пользователя — это ввод с клавиатуры. Для этого в Python используется функция input(), которая возвращает в программу введённую пользователем строку. Но данные нужно куда-то сохранить, и в этом нам помогают переменные. Переменным назначаются имена, в них записываются значения, и затем они используются в программе по мере необходимости.
Напишем программу, которая получает от пользователя строку и выводит на экран:
phrase = input()
print(phrase)
После запуска программы происходит приостановка выполнения и в терминале появляется приглашение для ввода данных:
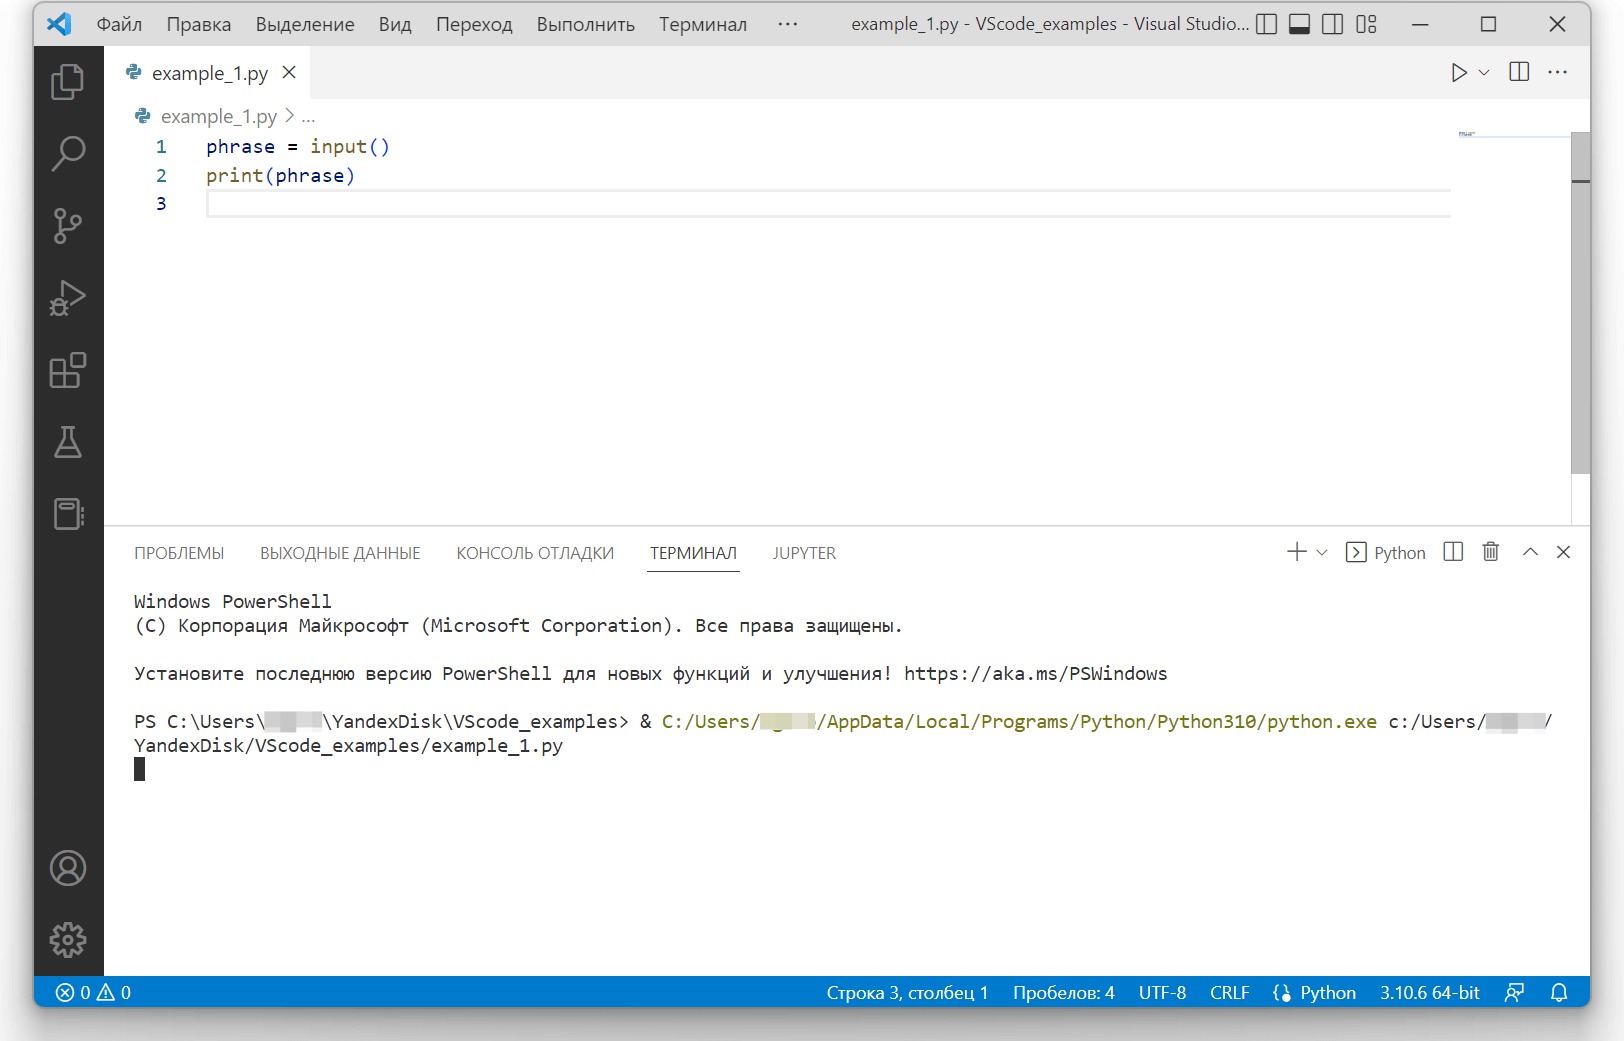
После ввода данных необходимо нажать клавишу Enter. Программа запишет введённые данные в переменную phrase и продолжит выполнение со следующей строчки. Переменная начинает существовать в программе, когда в неё записывается какое-то значение. В момент записи значения переменной назначается тип данных, определённый в соответствии со значением.
В нашем примере в переменную phrase записывается строка, введённая пользователем. Поэтому переменной phrase назначается встроенный в язык Python тип данных str. Тип данных str используется для хранения строк, а сами строки являются упорядоченной последовательностью символов.
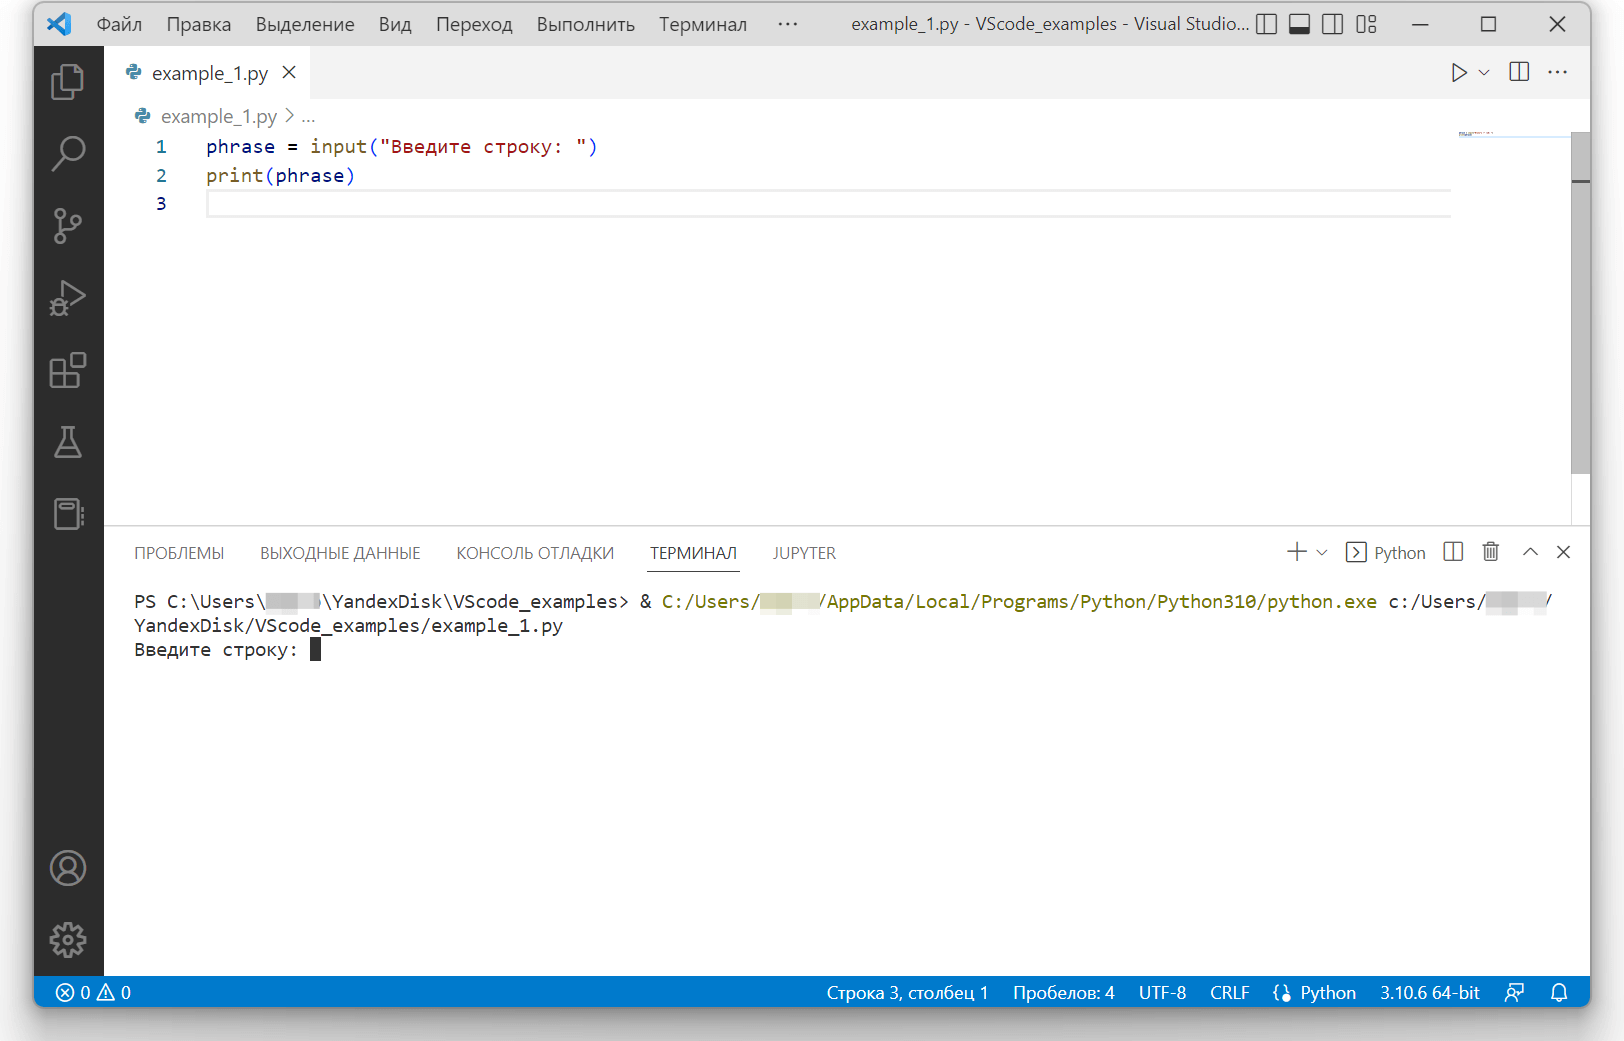
У функции input() можно задать параметр-строку перед вводом значения — и тогда указанный текст будет сопровождать приглашение к вводу данных:
phrase = input("Введите строку: ")
print(phrase)
Для именования переменных и правильного оформления кода существует стандарт PEP 8 (Python Enhancement Proposals), который следует соблюдать. Согласно стандарту PEP 8, имена переменных должны содержать маленькие буквы английского алфавита и символ «подчёркивание» для разделения слов в имени. Пример имён переменных по стандарту: value, first_value.
Нельзя использовать следующие однобуквенные имена переменных:
- I (большая английская i);
- l (маленькая английская L);
- O.
Эти однобуквенные имена усложнят читаемость кода, так как могут быть перепутаны между собой или с цифрами. Все стандарты PEP можно посмотреть на этой странице.
Но вернёмся к функции print(). С её помощью можно выводить сразу несколько значений. Для этого их нужно перечислить через запятую. Выведем, например, фразу Добрый день, %имя%.:
name = "Пользователь"
print("Добрый день,", name, ".")
В консоли отобразится:
Добрый день, Пользователь .
Как видим, результат работы программы не соответствует нашим ожиданиям, так как между словом «Пользователь» и точкой появился пробел. Данный пробел является символом, который по умолчанию ставится между выводимыми значениями. Вместо пробела можно указать любую другую строку, даже пустую. Для этого нужно передать в функцию print() именованный аргумент sep (англ. separator — «разделитель»). Обратите внимание: для именованных аргументов вокруг символа «=» не ставятся пробелы. Сделаем так, чтобы вместо пробела в качестве разделителя использовалась пустая строка:
name = "Пользователь"
print("Добрый день, ", name, ".", sep="")
В консоли отобразится:
Добрый день, Пользователь.
Но в таком случае необходимые пробелы нам придётся ставить самим, а это неудобно. К счастью, в Python существует удобный и мощный инструмент для форматирования строк — f-строки. Чтобы задать f-строку, необходимо поставить букву f перед открывающей кавычкой строки. Далее f-строка записывается как единое целое, с учётом правил её форматирования, и закрывается соответствующей кавычкой:
name = "Пользователь"
print(f"Добрый день, {name}.")
f-строки также можно использовать для выравнивания строк. Например, если требуется добавить символы «0» слева (для выравнивания по правому краю), справа (для выравнивания по левому краю) или слева и справа (для выравнивания посередине) от исходной строки до достижения длины в 9 символов:
print(f"{123:0>9}")
print(f"{123:0<9}")
print(f"{123:0^9}")
В консоли будут напечатаны следующие строки:
000000123
123000000
000123000
Внутри f-строк можно обращаться к переменным, используя фигурные скобки, как в примере выше, а также производить операции, выполнять функции и подставлять их результаты в данную строку. И это только малая часть возможностей f-строк. Более подробно про них можно почитать в данном источнике.
Использование f-строк является приоритетным способом форматирования. Наряду с f-строками существует функция format(), которая также предназначена для удобного форматирования (мы рассмотрим её чуть позже). Также форматирование строк может производиться с помощью символа %. Однако данный способ форматирования является устаревшим (здесь можно почитать про него подробнее).
В строках можно применять управляющие символы, начинающиеся с символа «бэкслеш» \. Например:
\n— переход на новую строку;\t— табуляция;\r— возврат каретки в начало строки;\b— возврат каретки на один символ.
Кроме того, с помощью бэкслеша можно экранировать символы, то есть делать их частью выводимой строки. Например, для вывода символа \ необходимо его экранировать самим собой:
print("\\")
Подробнее об экранировании можно почитать в этом источнике.
В функции print() кроме параметра sep существует параметр end, который определяет символ в конце строки. Значение по умолчанию для него — переход на новую строку, обозначаемый как \n. Если вывести строки с помощью нескольких использований функции print(), то вывод каждой из них будет осуществлён с новой строки:
print("Привет, Пользователь!")
print("Как дела?")
Привет, Пользователь!
Как дела?
Над строками можно производить следующие операции:
- сложение (конкатенация строк);
- умножение строки на целое число.
Результатом сложения строк будет новая строка, представляющая собой записанные последовательно складываемые строки (строки как бы склеиваются друг с другом, образуя новую строку).
print("Сложно" + "подчинённый")
Сложноподчинённый
При умножении строки на целое число n получается новая строка, состоящая из n дублирований исходной строки. Например, выведем 10 символов - подряд:
print("-" * 10)
В одном из следующих параграфов мы познакомимся с другими возможностями Python по работе со строками. А сейчас перейдём к работе с числами. Для создания целочисленной переменной в программе достаточно назначить ей имя и присвоить целочисленное значение. Например:
n = 10
По аналогии создаются вещественные числовые переменные, только в качестве разделителя целой и дробной частей используется десятичный разделитель «точка»:
pi = 3.14
Для преобразования строк в числа и наоборот используются следующие функции:
int()— преобразует строку (или вещественное число) в целое число. Дополнительно можно указать, в какой системе счисления было записано исходное число. По умолчанию используется десятичная система. При конвертации вещественного числа в целое отбрасывается дробная часть;float()— преобразует строку (или целое число) в вещественное число;str()— преобразует значения (в общем случае не только числовые) в строки.
Рассмотрим несколько примеров применения этих функций.
n_1 = "1"
n_2 = "2"
print(n_1 + n_2)
n_1 = int(n_1)
n_2 = int(n_2)
print(n_1 + n_2)
В результате выполнения программы получим:
12
3
Первый результат — результат сложения (конкатенации) двух строк. Второй — результат сложения целых чисел, которые были преобразованы из строк функцией int().
x = 3.89
x = int(x)
print(x)
Здесь программа выведет в консоли результат 3. Дробная часть после десятичного разделителя была отброшена при преобразовании в целое число.
width = "3.7"
height = "2.5"
s = float(width) * float(height)
print(s)
Программа выведет: 9.25.
А чтобы вводить целые или вещественные числа с клавиатуры, можно использовать уже знакомую нам функцию input() в сочетании с функциями int() и float():
int_number = int(input())
float_number = float(input())
Для работы с числовыми переменными доступны следующие математические операции:
- сложение —
x + y; - вычитание —
x - y; - умножение —
x * y; - деление —
x / y; - возведение в степень
x ** y.
Используем все эти операции в следующей программе:
n = 25
x = 0.5

print(n + x)
print(n - x)
print(n * x)
print(n / x)
print(n ** x)
Вывод программы будет таким:
25.5
24.5
12.5
50.0
5.0
Необходимо учитывать, что если выполняется операция деления или хотя бы один из операндов является вещественным числом, то результат также будет вещественным.
Например, выполнение следующего кода выведет на экран 2.0:
print(4 / 2)
Для округления вещественных чисел при выводе можно использовать уже известные нам f-строки. Например, выведем квадратный корень из 2 с точностью 2 знака после запятой:
print(f"{2 ** 0.5:.2f}")
Для целых чисел дополнительно доступны операции:
- целочисленное деление —
x // y; - остаток от деления —
x % y.
Эти операции можно использовать, например, для получения определённых цифр числа. Получим последнюю цифру числа 1234 (то есть остаток от деления на 10):
last_digit = 1234 % 10
Для получения предпоследней цифры нужно «отрезать» последнюю цифру целочисленным делением на 10, а затем у нового числа найти последнюю цифру — уже известным нам способом:
penultimate_digit = 1234 // 10 % 10
Чтобы закрепить новые знания, рекомендуем вам прорешать задачи для этого параграфа. А в следующей теме вы узнаете, как создавать программы, способные учитывать несколько вариантов развития событий.
Языки программирования:
- C
- C#
- C++
- Free Basic
- Free Pascal
- Java
- NodeJS
- Perl
- Python
- R
- Rust
C ^
Чтение из файла input.txt
#include <stdio.h>

int main() {
  int a, b;
  char p[100], q[100];
  FILE *fin = fopen("input.txt", "rt");
  fscanf(fin, "%d%d", &a, &b);
  fgets(p, 100, fin);
  fgets(q, 100, fin);
  return 0;
}
Чтение из стандартного входа
#include <stdio.h>

int main() {
  int a, b;
  char p[100], q[100];
  scanf("%d%d", &a, &b);
  fgets(p, 100, stdin);
  fgets(q, 100, stdin);
  return 0;
}
Запись в файл output.txt
#include <stdio.h>

int main() {
  int a, b;
  char p[100], q[100];
  FILE *fout = fopen("output.txt", "wt");
  fprintf(fout, "%d %d", a, b);
  fprintf(fout, "%s\n%s\n", p, q);
  return 0;
}
Запись в стандартный выход
#include <stdio.h>

int main() {
  int a, b;
  char p[100], q[100];
  printf("%d %d", a, b);
  printf("%s\n%s\n", p, q);
  return 0;
}
C# ^
Чтение из файла input.txt
using System.IO;

class Program {
    static void Main() {
        int a, b;
        string p, q;
        StreamReader reader = new StreamReader("input.txt");
        string[] tokens = reader.ReadLine().Split(' ');
        a = int.Parse(tokens[0]);
        b = int.Parse(tokens[1]);
        p = reader.ReadLine();
        q = reader.ReadLine();
    }
}
Чтение из стандартного входа
using System;

class Program {
    static void Main() {
        int a, b;
        string p, q;
        string[] tokens = Console.ReadLine().Split(' ');
        a = int.Parse(tokens[0]);
        b = int.Parse(tokens[1]);
        p = Console.ReadLine();
        q = Console.ReadLine();
    }
}
Запись в файл output.txt
using System.IO;

class Program
{
    static void Main() {
        int a = 1, b = 1;
        string p = "zzz", q = "zzz";
        StreamWriter writer = new StreamWriter("output.txt");
        writer.WriteLine("{0} {1}", a, b);
        writer.WriteLine(p);
        writer.WriteLine(q);
        writer.Flush();
    }
}
Запись в стандартный выход
using System;

class Program
{
    static void Main() {
        int a = 1, b = 1;
        string p = "zzz", q = "zzz";
        Console.WriteLine("{0} {1}", a, b);
        Console.WriteLine(p);
        Console.WriteLine(q);
    }
}
C++ ^
Чтение из файла input.txt
#include <fstream>
#include <string>
int main() {
  std::ifstream fin("input.txt");
  int a, b;
  std::string p, q;
  fin >> a >> b;
  std::getline(fin, p);
  std::getline(fin, q);
  return 0;
}
Чтение из стандартного входа
#include <iostream>
#include <string>
int main() {
  int a, b;
  std::string p, q;
  std::cin >> a >> b;
  std::getline(std::cin, p);
  std::getline(std::cin, q);
  return 0;
}
Запись в файл output.txt
#include <fstream>
#include <string>
int main() {
  std::ofstream fout("output.txt");
  int a, b;
  std::string p, q;
  fout << a << " " << b;
  fout << p << std::endl << q << std::endl;
  return 0;
}
Запись в стандартный выход
#include <iostream>
#include <string>
int main() {
  int a, b;
  std::string p, q;
  std::cout << a << " " << b;
  std::cout << p << std::endl << q << std::endl;
  return 0;
}
Чтение интерактивного запроса и запись ответа
#include <iostream>
#include <string>
int main() {
  std::string p, q;
  std::cin >> p;
  std::cout << q << "\n";
  std::cout.flush();
  return 0;
}
Free Basic ^
Чтение из файла input.txt
dim a as integer, b as integer
dim p as string, q as string
open "input.txt" for input as #1
input #1, a, b
line input #1, p
line input #1, q
Чтение из стандартного входа
dim a as integer, b as integer
dim p as string, q as string
input a, b
line input p
line input q
Запись в файл output.txt
dim a as integer, b as integer
dim p as string, q as string
open "output.txt" for output as #2
print #2, a; b
print #2, p
print #2, q
Запись в стандартный выход
dim a as integer, b as integer
dim p as string, q as string
print a; b
print p
print q
Free Pascal ^
Чтение из файла input.txt
{$mode objfpc}
var
  fin: TextFile;
  a, b: Integer;
  p, q: String;
begin
  AssignFile(fin, 'input.txt'); Reset(fin);
  Read(fin, a, b);
  Readln(fin, p);
  Readln(fin, q);
end.
Чтение из стандартного входа
{$mode objfpc}
var
  a, b: Integer;
  p, q: String;
begin
  Read(a, b);
  Readln(p);
  Readln(q);
end.
Запись в файл output.txt
var
  fout: TextFile;
  a, b: Integer;
  p, q: String;
begin
  AssignFile(fin, 'output.txt'); Rewrite(fout);
  Write(fout, a, ' ', b);
  Writeln(fout, p);
  Writeln(fout, q);
end;
Запись в стандартный выход
var
  a, b: Integer;
  p, q: String;
begin
  Write(a, ' ', b);
  Writeln(p);
  Writeln(q);
end;
Чтение интерактивного запроса и запись ответа
var
  p, q: String;
begin
  Readln(p);
  Writeln(q);
  Flush(output);
end;
Java ^
Чтение из файла input.txt
import java.io.File;
import java.io.FileNotFoundException;
import java.util.Scanner;

public class test {
  public static void main(String args[]) throws FileNotFoundException {
    int a, b;
    String p, q;
    Scanner scanner = new Scanner(new File("input.txt"));
    a = scanner.nextInt();
    b = scanner.nextInt();
    p = scanner.nextLine();
    q = scanner.nextLine();
  }
}
Чтение из стандартного входа
import java.io.FileNotFoundException;
import java.util.Scanner;

public class test {
  public static void main(String args[]) throws FileNotFoundException {
    int a, b;
    String p, q;
    Scanner scanner = new Scanner(System.in);
    a = scanner.nextInt();
    b = scanner.nextInt();
    p = scanner.nextLine();
    q = scanner.nextLine();
  }
}
Запись в файл output.txt
import java.io.FileNotFoundException;
import java.io.PrintWriter;

public class test {
  public static void main(String args[]) throws FileNotFoundException {
    int a = 1, b = 1;
    String p = "zzz", q = "zzz";
    PrintWriter writer = new PrintWriter("output.txt");
    writer.printf("%d %d", a, b);
    writer.println(p);
    writer.println(q);
    writer.flush();
  }
}
Запись в стандартный выход
public class test {
  public static void main(String args[]) {
    int a = 1, b = 1;
    String p = "zzz", q = "zzz";
    System.out.printf("%d %d", a, b);
    System.out.println(p);
    System.out.println(q);
  }
}
NodeJS ^
Чтение из файла input.txt
var file = require('fs');
var input = file.readFileSync('input.txt', 'utf8');
var ints = input.split(/\s+/).map(x => 1 * x); // numbers
var a = ints[0], b = ints[1];
var strs = input.split(/[\n\r]+/); // strings
var p = strs[0], q = strs[1]
Чтение из стандартного входа
var file = require('fs');
var input = file.readFileSync(process.stdin.fd, 'utf8');
var ints = input.split(/\s+/).map(x => 1 * x); // numbers
var a = ints[0], b = ints[1];
var strs = input.split(/[\n\r]+/); // strings
var p = strs[0], q = strs[1]
Запись в файл output.txt
var file = require('fs');
file.writeFileSync('output.txt', a + ' ' + b);
file.writeFileSync('output.txt', p + '\n' + q);
Запись в стандартный выход
console.log(a, b);
console.log(p);
console.log(q);
Perl ^
Чтение из файла input.txt
use strict;
use warnings;

open my $fin, '<input.txt';
my ($a, $b) = map 0 + $_, do { local $/ = undef; split /\s+/, <$fin>; }; # numbers
my ($p, $q) = <$fin>; # strings
Чтение из стандартного входа
use strict;
use warnings;

my ($a, $b) = map 0 + $_, do { local $/ = undef; split /\s+/, <>; }; # numbers
my ($p, $q) = <>; # strings
Запись в файл output.txt
use strict;
use warnings;

my ($a, $b) = (1, 1);
my ($p, $q) = ('zzz') x 2;
open my $fout, '>output.txt';
print $fout "$a $b";
print $fout "$p\n$q\n";
Запись в стандартный выход
use strict;
use warnings;

my ($a, $b) = (1, 1);
my ($p, $q) = ('zzz') x 2;
print "$a $b";
print "$p\n$q\n";
Python ^
Чтение из файла input.txt
with open('input.txt', 'r') as fin:
  a, b = map(int, fin.read().split()) # numbers
  p, q = fin.readlines() # strings
Чтение из стандартного входа
import sys
a, b = map(int, sys.stdin.read().split()) # numbers
p, q = sys.stdin.readlines() # strings
Запись в файл output.txt
a = b = 1
p = q = 'zzz'
with open('output.txt', 'w') as fout:
  print(a, b, file=fout)
  print(p, file=fout)
  print(q, file=fout)
Запись в стандартный выход
a = b = 1
p = q = 'zzz'
print(a, b)
print(p)
print(q)
R ^
Чтение из файла input.txt
input <- file("input.txt", "r")
ab <- scan(input, nlines=1, quiet=TRUE) # numbers
pq <- readLines(input, n=2, warn=FALSE)) # strings
Чтение из стандартного входа
input <- file("stdin", "r")
ab <- scan(input, nlines=1, quiet=TRUE) # numbers
pq <- readLines(input, n=2, warn=FALSE)) # strings
Запись в файл output.txt
a <- b <- 1
p <- q <- "zzz"
fout <- file("output.txt", "w")
cat(a, b, file=fout)
cat(p, q, file=fout, sep="\n")
Запись в стандартный выход
a <- b <- 1
p <- q <- "zzz"
cat(a, b)
cat(p, q, sep="\n")
Rust ^
Чтение из файла input.txt
use std::io::*;

fn main() -> Result<()> {
    let mut buffer = String::new();
    let f = std::fs::File::open("input.txt")?;
    BufReader::new(f).read_line(&mut buffer)?;
    let n: Vec<_> = buffer.split_whitespace().map(|x| x.parse::<i32>().unwrap()).collect();
    Ok(())
}
Чтение из стандартного входа
use std::io::*;

fn main() -> Result<()> {
    let mut buffer = String::new();
    stdin().read_line(&mut buffer)?;
    let n: Vec<_> = buffer.split_whitespace().map(|x| x.parse::<i32>().unwrap()).collect();
    Ok(())
}
Запись в файл output.txt
use std::io::*;

fn main() -> Result<()> {
    let mut f = BufWriter::new(std::fs::File::create("output.txt")?);
    let a = 1; let b = 1;
    let p = String::from("zzz");
    write!(f, "{} {}", a, b)?;
    write!(f, "{}", p)?;
    Ok(())
}
Запись в стандартный выход
fn main() -> std::io::Result<()> {
    let a = 1; let b = 1;
    let p = String::from("zzz");
    println!("{} {}", a, b);
    println!("{}", p);
    Ok(())
}