Это гайд по прохождению Steins;Gate на 100%. Здесь описано, как открыть все концовки, CG, ачивки, сцены и диалоги. Однако, в гайде не указаны CG, ачивки и прочее, открываемое при прохождении основной ветки новеллы, так как подразумевается, что вы в любом случае всё это откроете.
В Steins;Gate довольно много малозначимого опционального контента, который либо не влияет ни на что, либо на несколько строчек диалога, поэтому гайд был слегка упрощён. Не бойтесь делать собственный выбор в каких-то диалогах и решениях, не указанных в гайде.
Влиять на прохождение вы можете только через мобильный телефон, на ПК вызываемый клавишей P. Левая кнопка мыши переместит вас на шаг вперёд в меню телефона, и правая кнопка мыши — на шаг назад. ПКМ также убирает телефон в сторону, и в определённых сценах только так и можно его убрать.
Steins;Gate имеет 6 концовок. 3 из них легко получить и их получение ничему не мешает, достаточно просто сохраняться в нужные моменты перед выходом на руты. Другие 3 концовки зависят от количества полученных вами флагов истинной концовки. Если не получите ни одного, то выйдете на обычную концовку, а получив все — завершите истинную концовку, на основе которой строится сюжет аниме Steins;Gate. Если же вы соберёте не все флаги, то получите незавершённую истинную концовку. Кроме того, флаги нужно получать в определённой последовательности, и они открываются один за другим. Это значит, что не получив первый фраг, вы не откроете второй, и так далее.
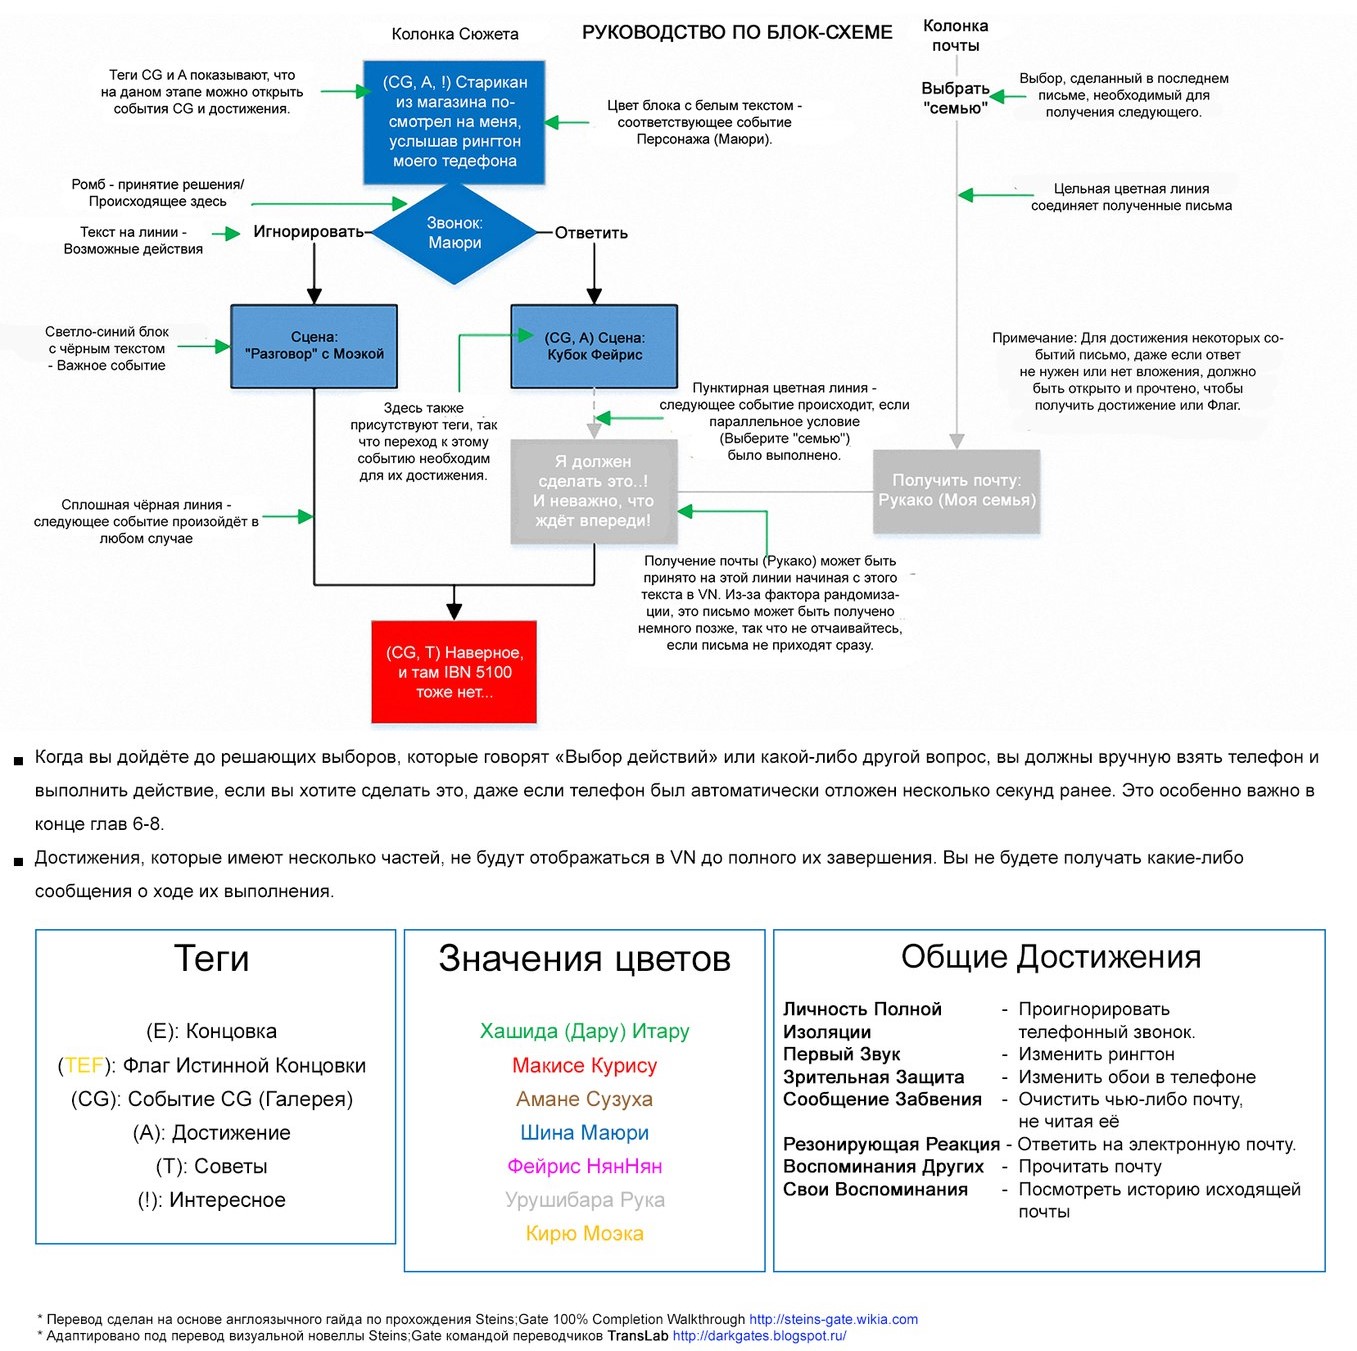
Основа схемы — левая колонка, которая продолжается от начала главы N до её конца, следуя ходу сюжета. Колонки правее поясняют выборы в сообщениях и получаемые бонусы и флаги.
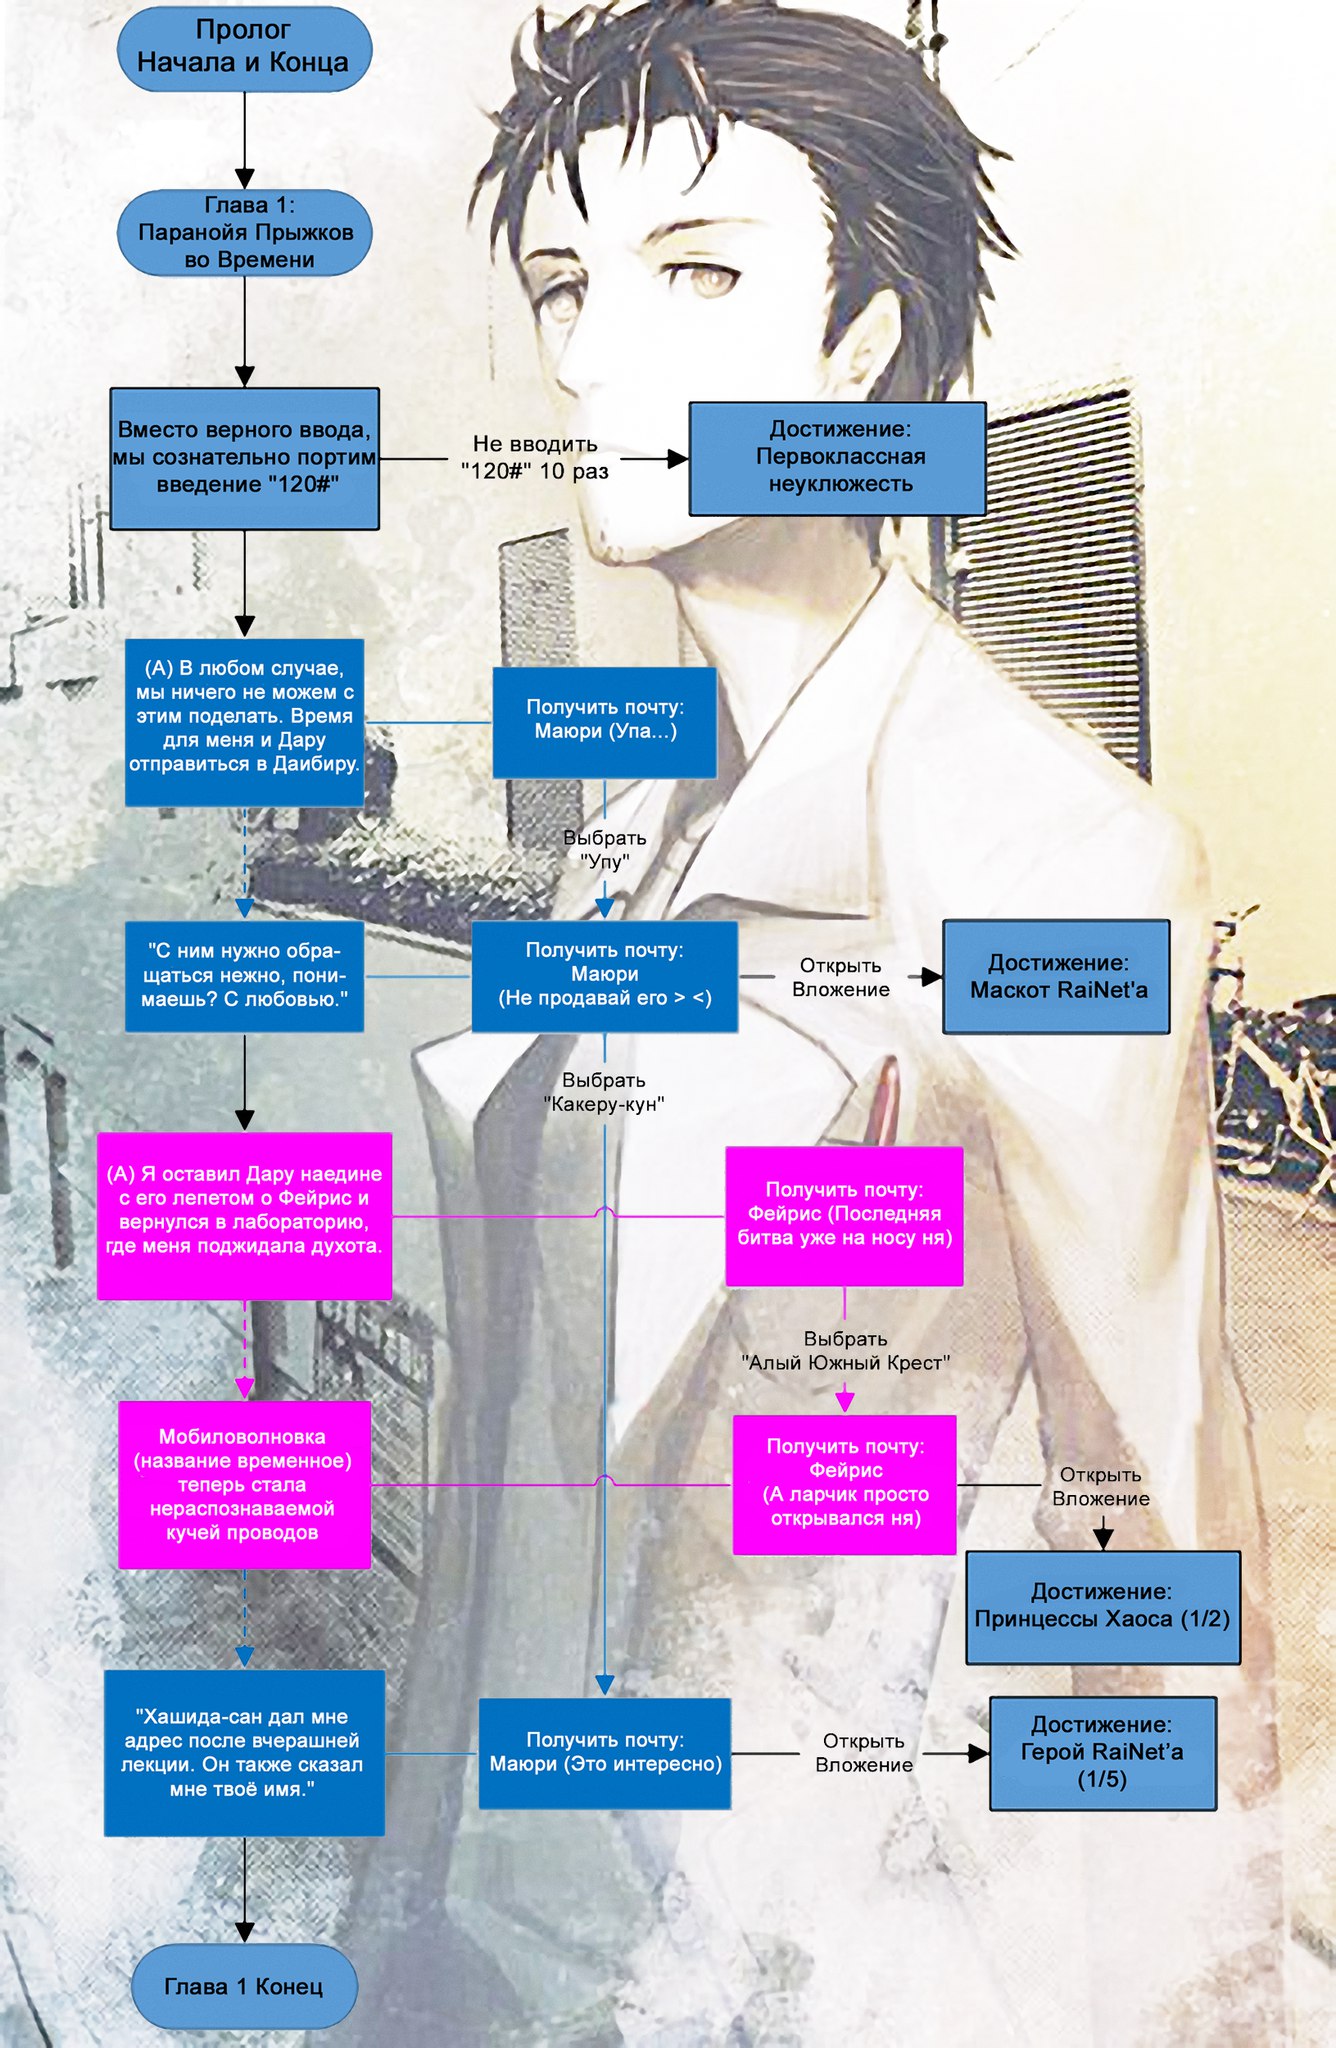
ПАРАНОЙЯ ПРЫЖКОВ ВО ВРЕМЕНИ
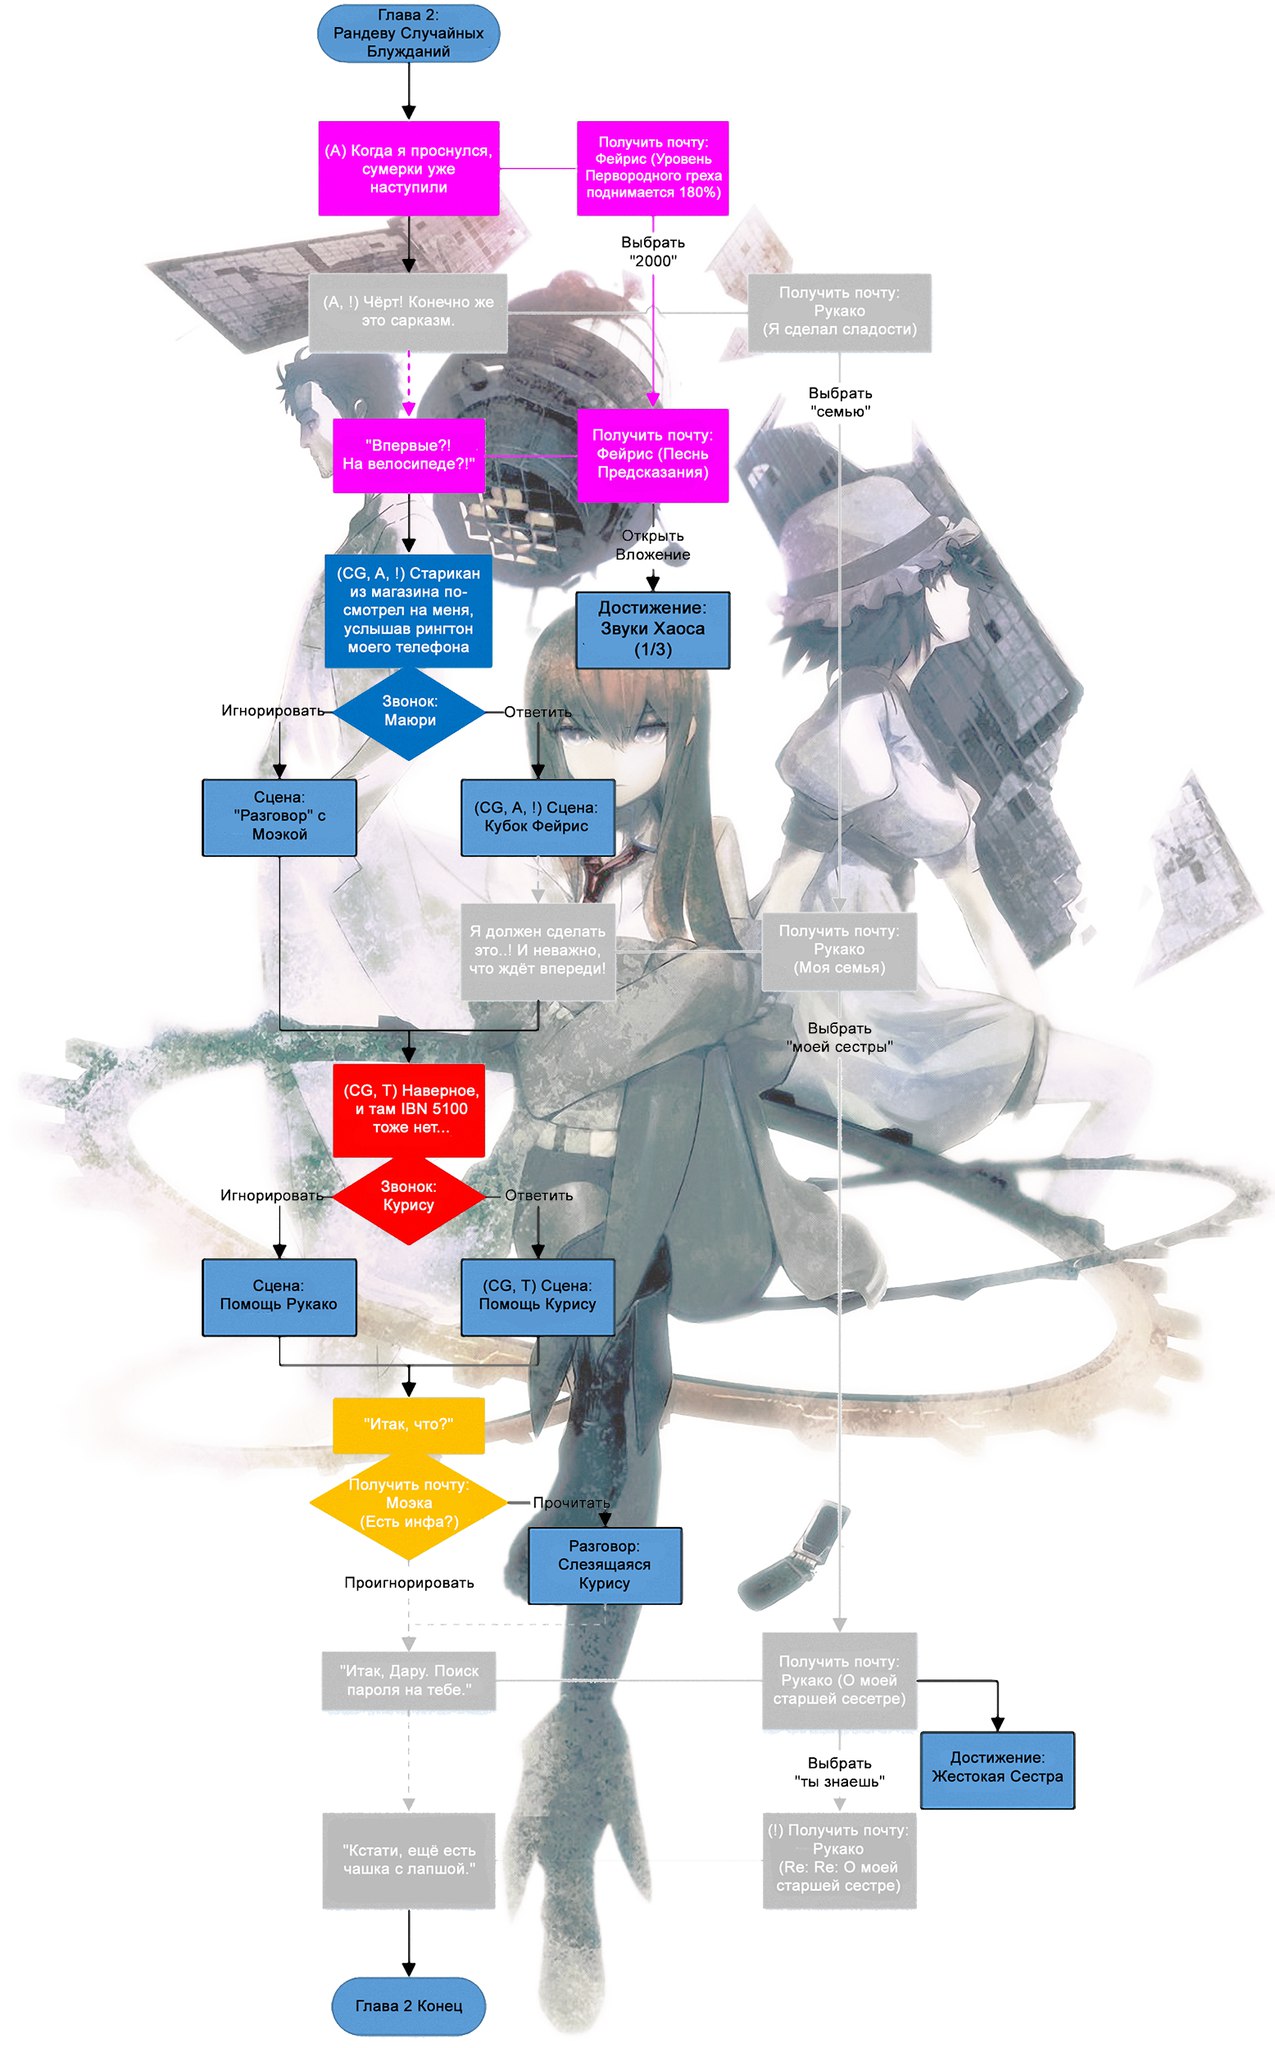
РАНДЕВУ СЛУЧАЙНЫХ БЛУЖДАНИЙ
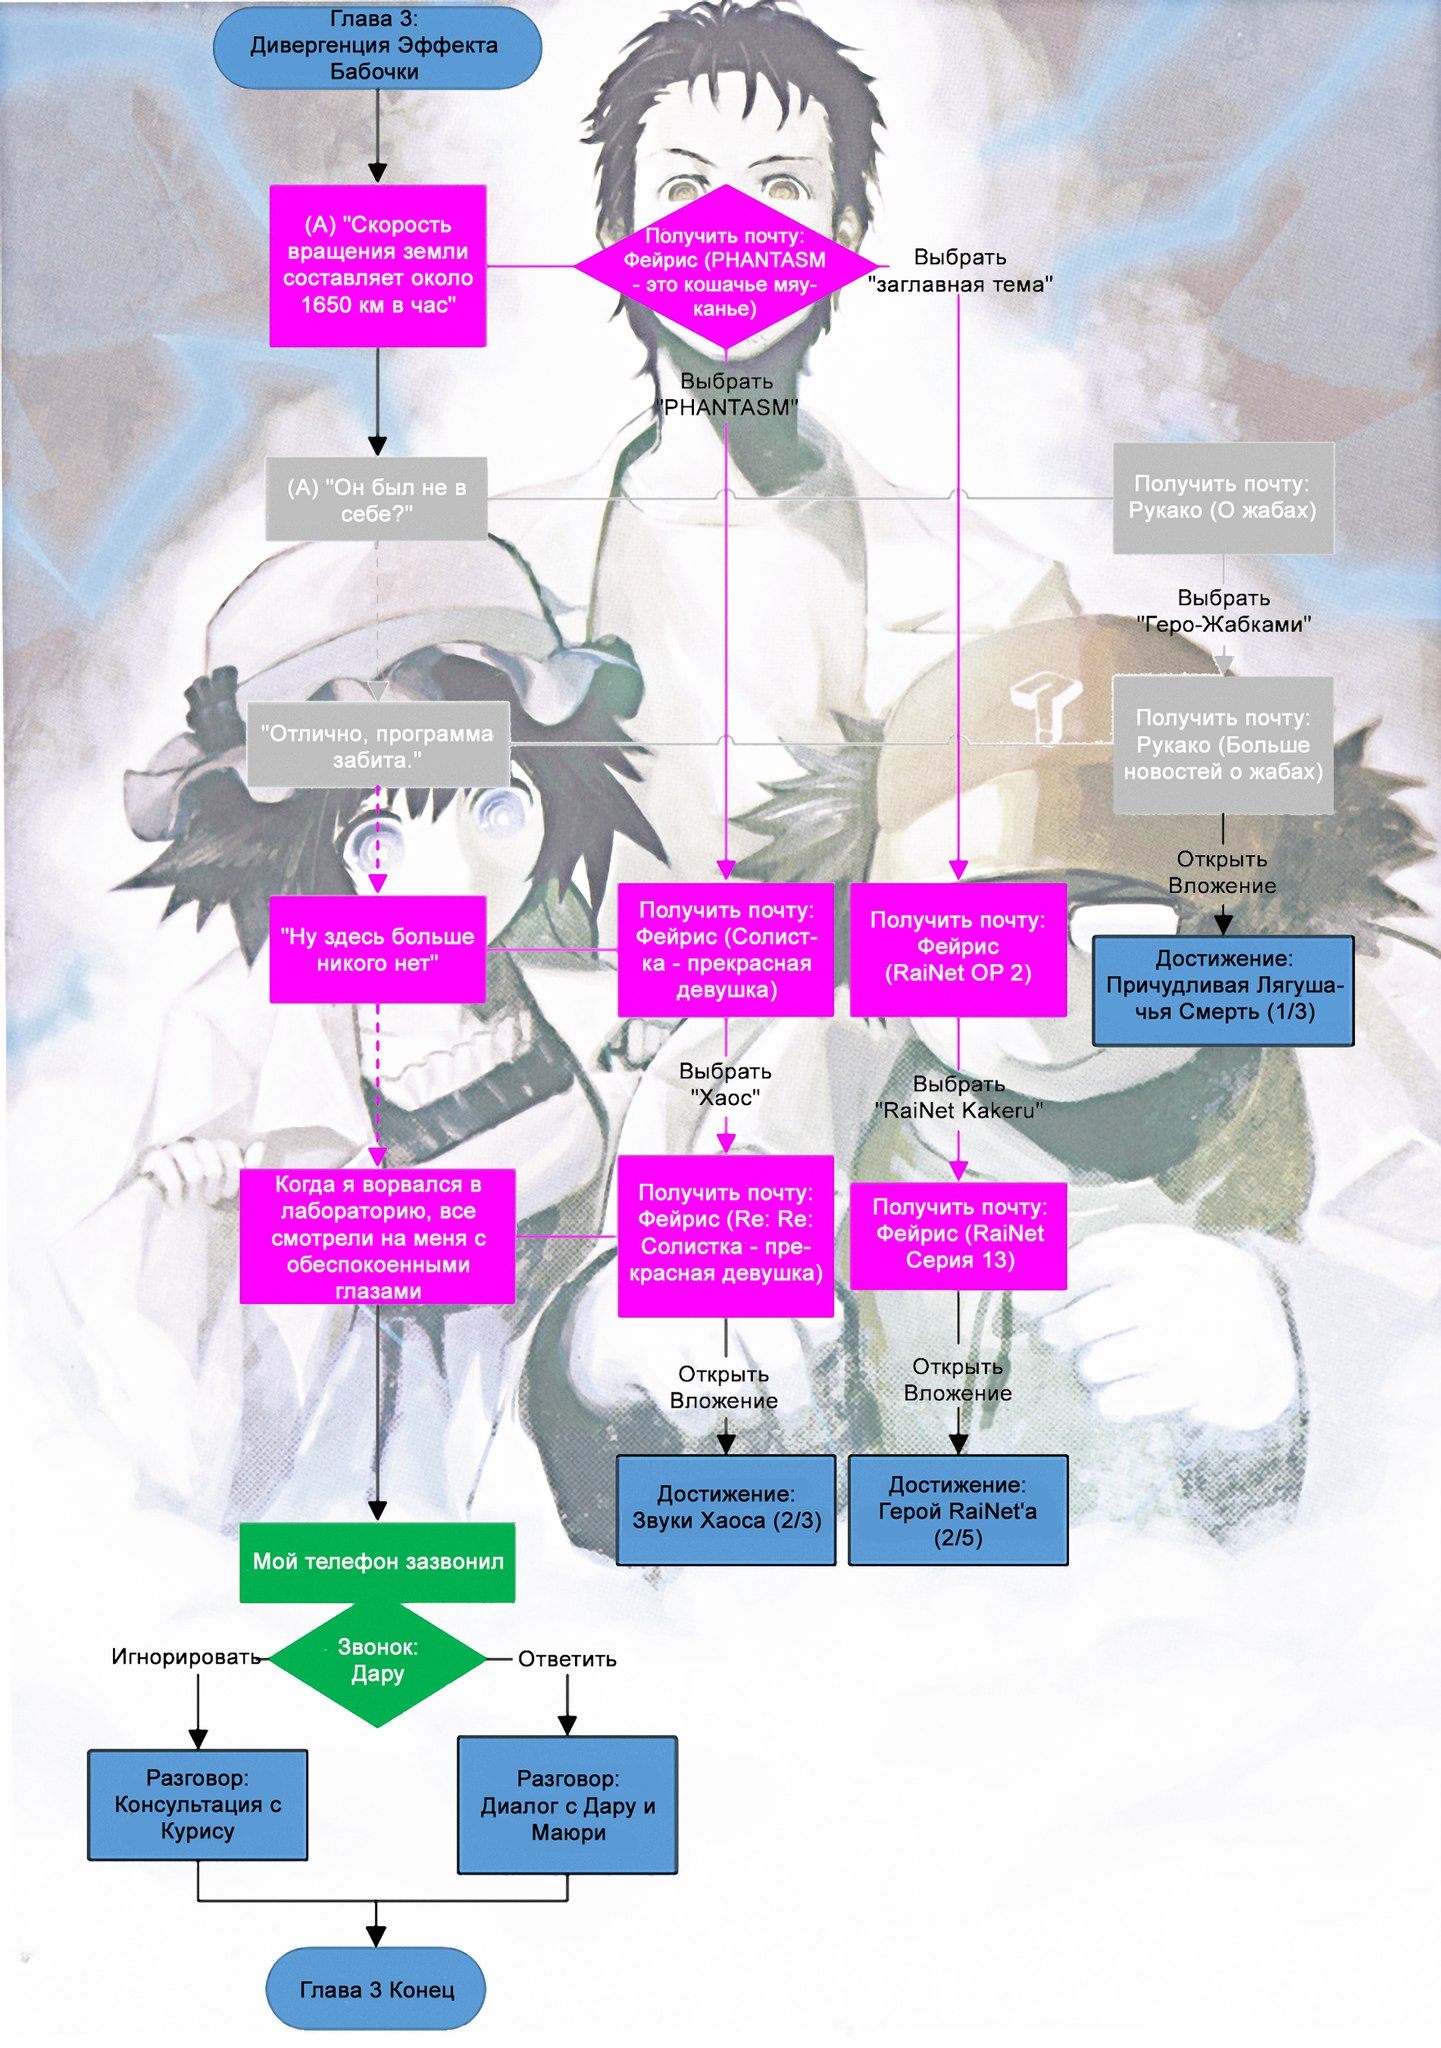
ДИВЕРГЕНЦИЯ ЭФФЕКТА БАБОЧКИ
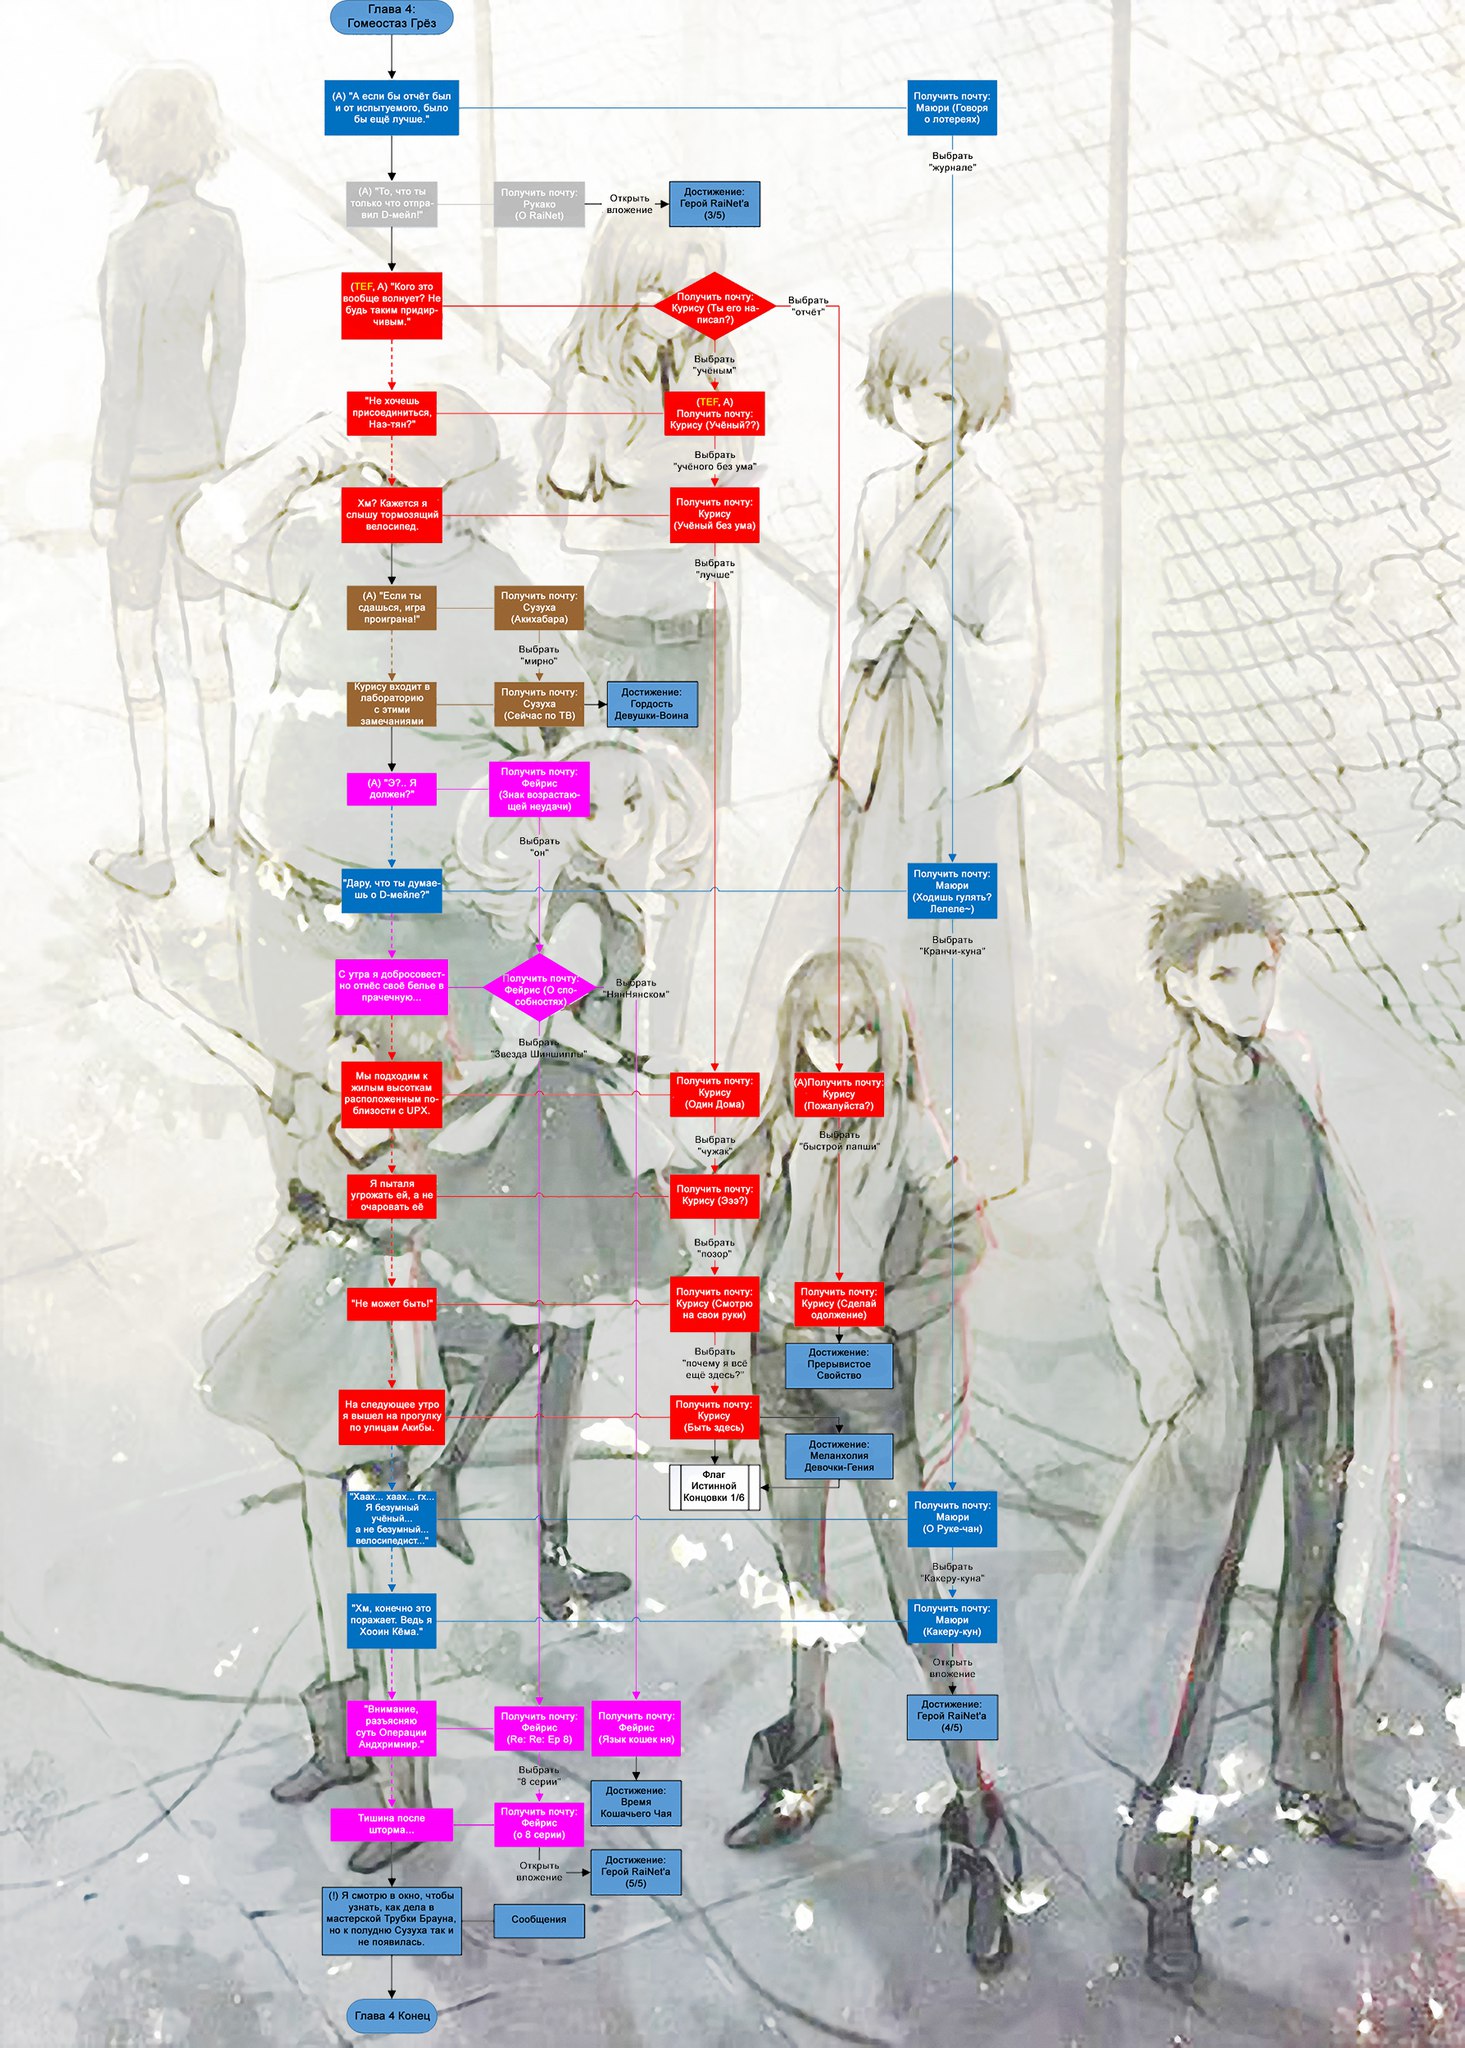
ГОМЕОСТАЗ ГРЁЗ
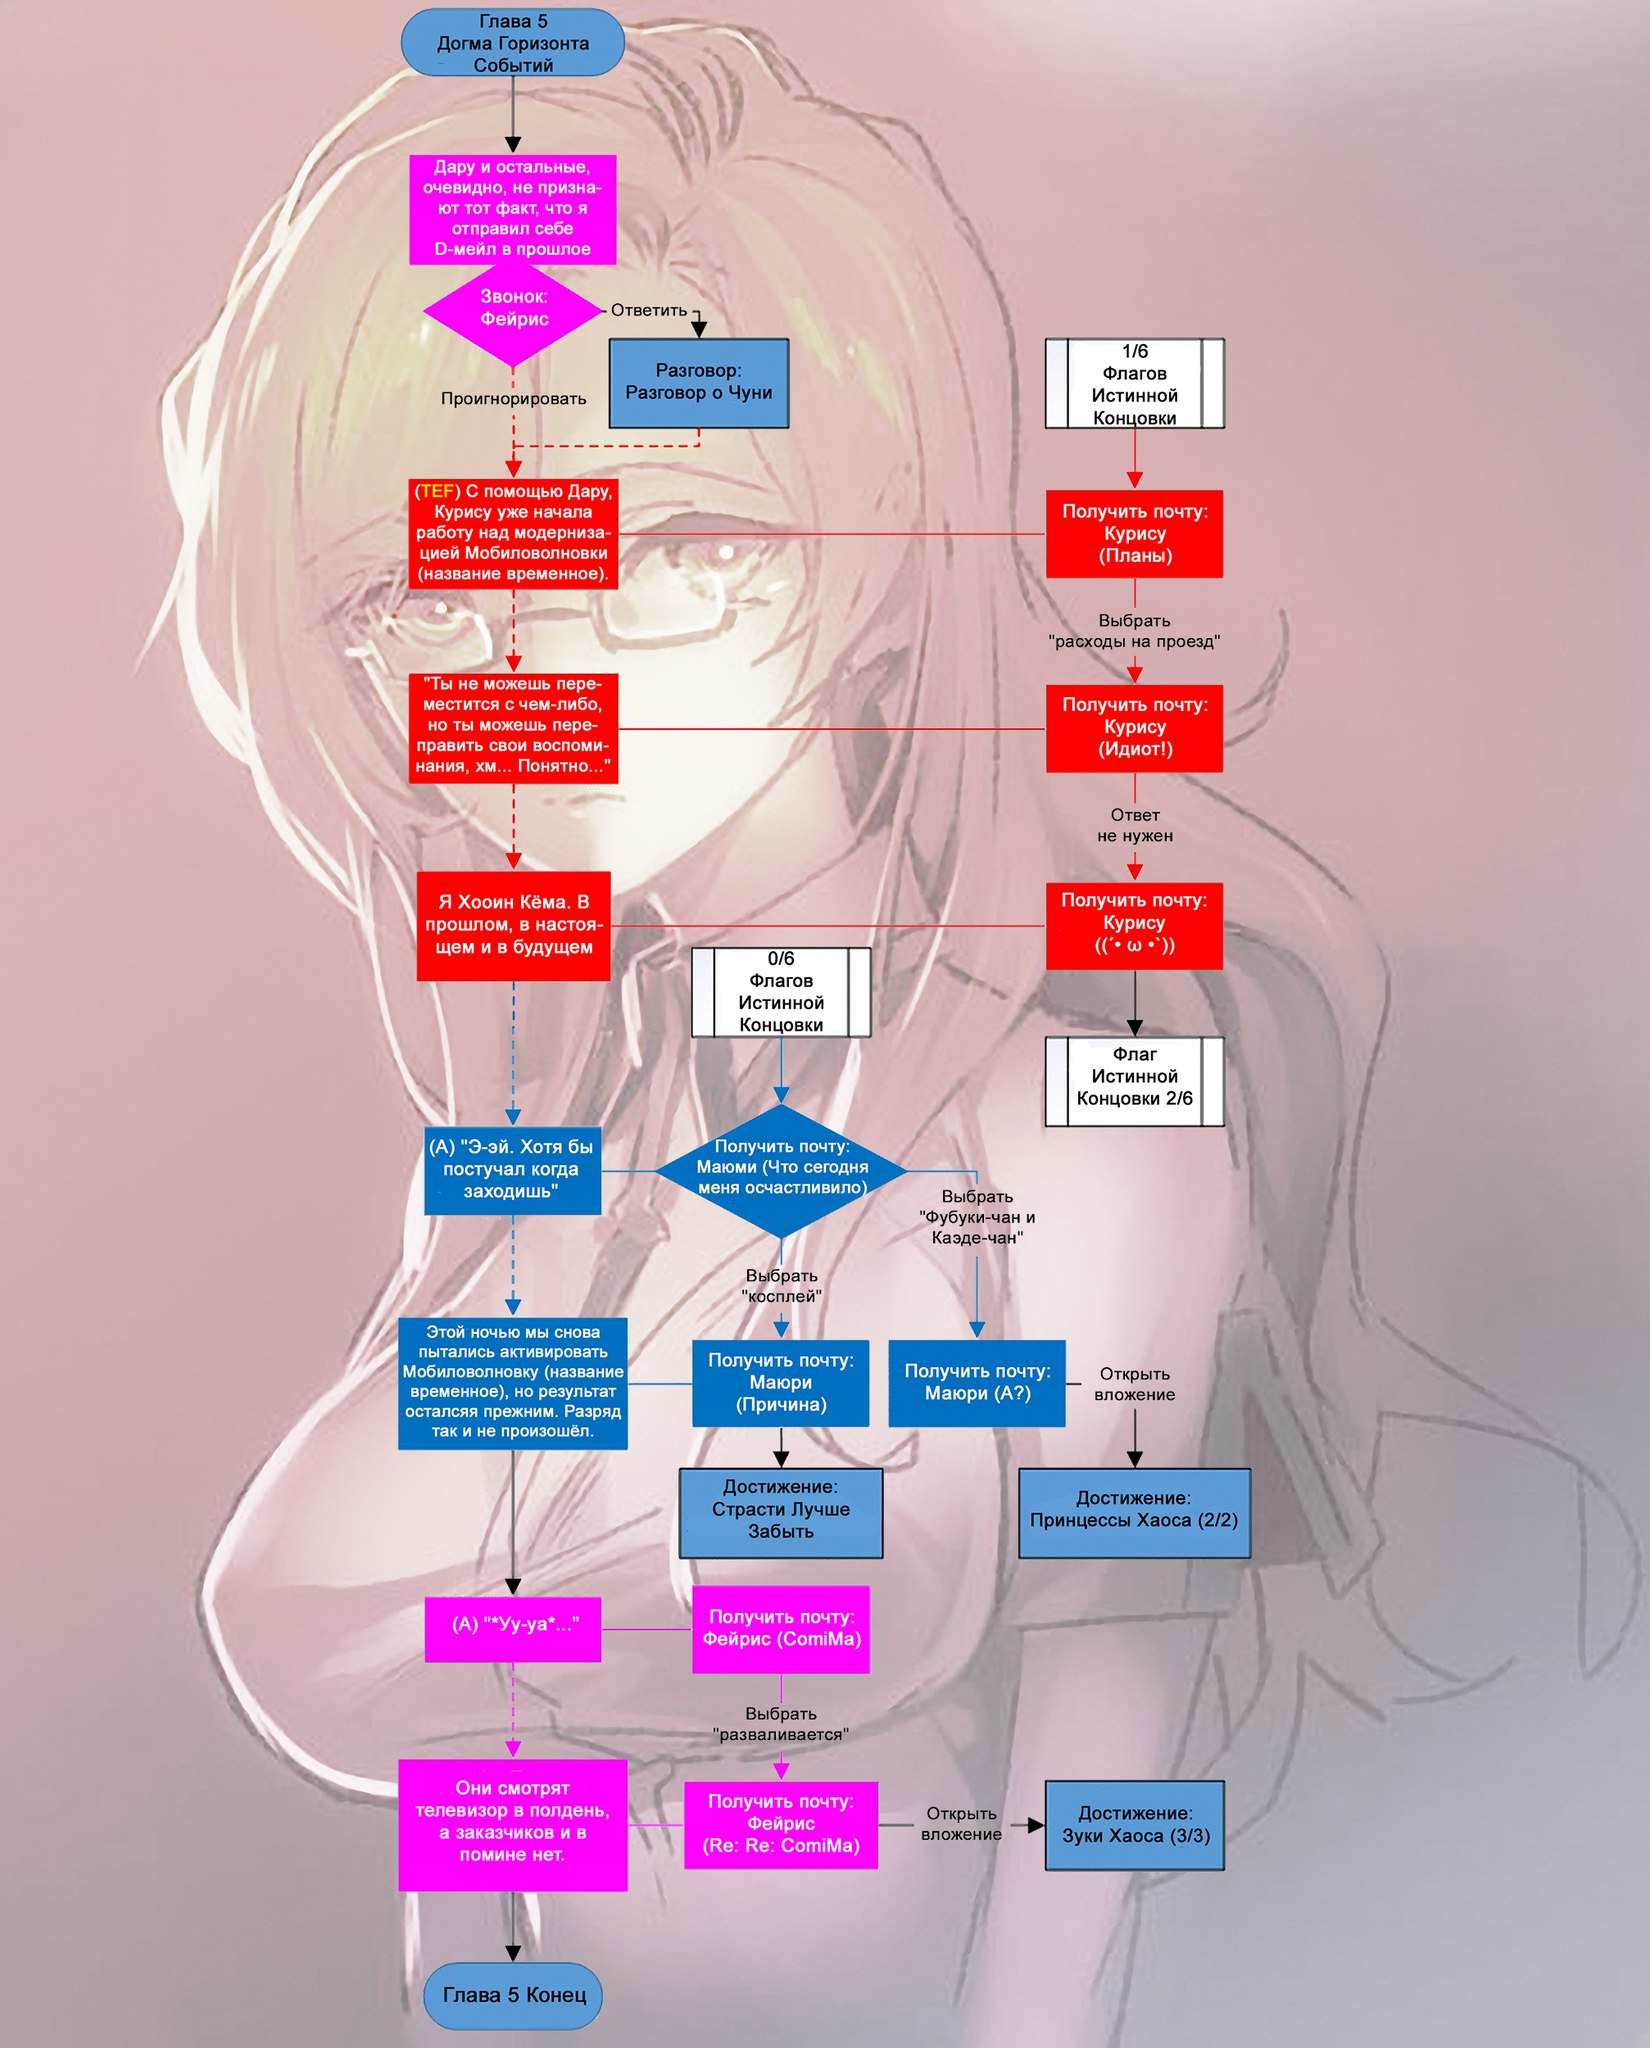
ДОГМА ГОРИЗОНТА СОБЫТИЙ
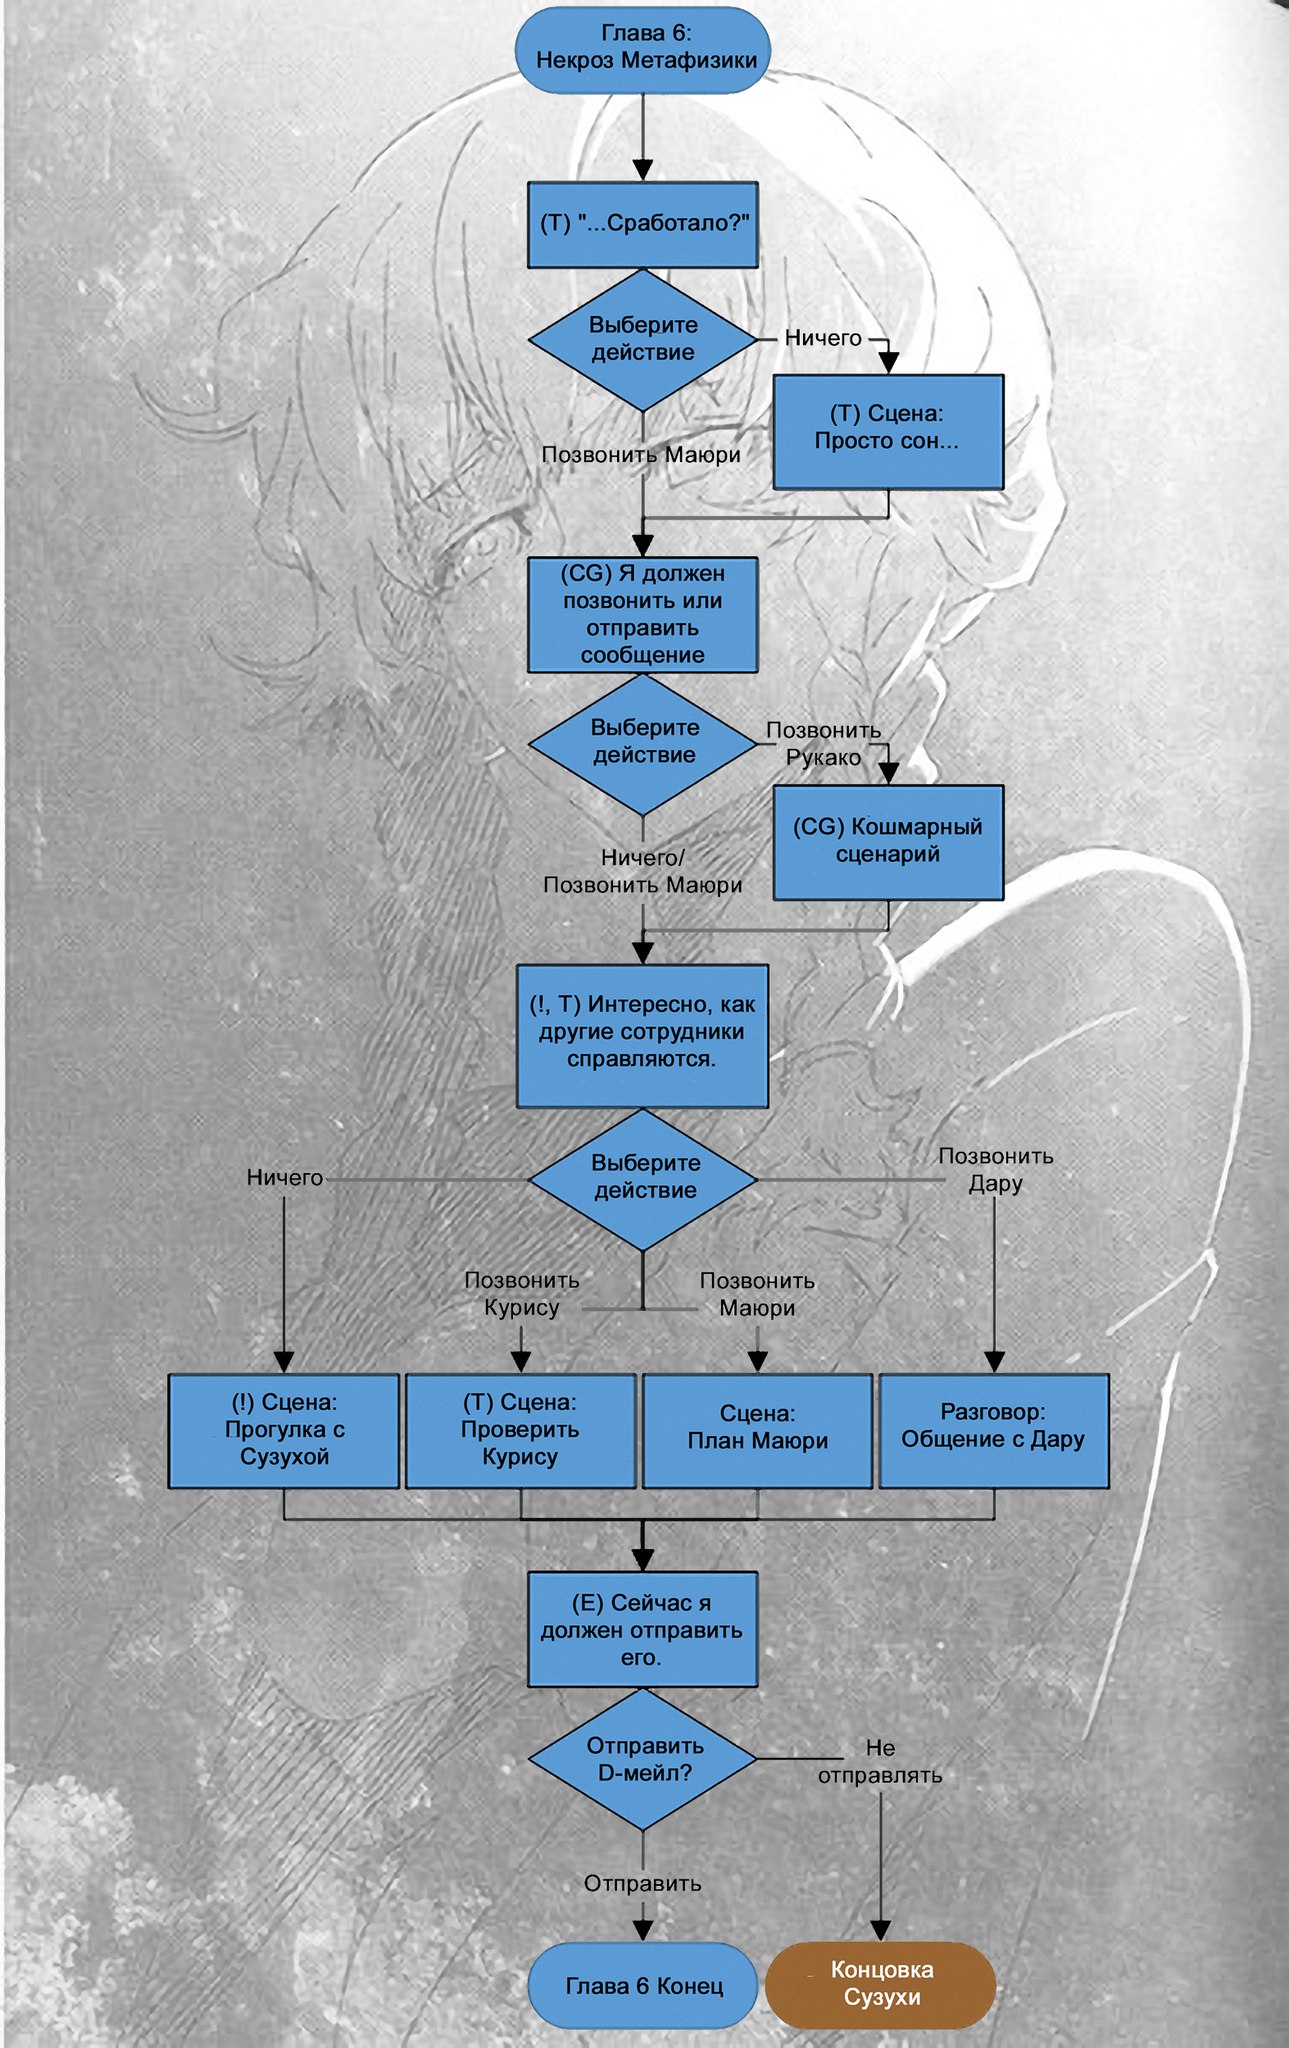
НЕКРОЗ МЕТАФИЗИКИ
КОМПЛЕКС ИСКАЖЕНИЯ МНИМОГО ИЗОБРАЖЕНИЯ

АНДРОГЕННЫЙ ФРАКТАЛ
БЕСКОНЕЧНЫЙ АПОПТОЗ

ПЛАВЛЕНИЕ ПРИНЦИПА ПРИЧИННОСТИ / ЧИСТАЯ ЗВЁЗДНАЯ ПЫЛЬ
АВТОРЫ
Гайд невозбранно взят откуда-то с просторов Steam. Слишком муторно искать автора, поэтому будем условиться на том, что это общественное достояние. Главное, что вы нашли этот гайд и смогли использовать.
- Тема: Штейнс; ворота
- Дата выпуска:
- Разработчик:
- Издатель:
Простое и понятное пошаговое руководство о том, как получить все концовки в Steins;Gate, не беспокоясь о получении 100 % достижений, компьютерной графики и советов.
Главы 1-3
Играйте в игру, как хотите, и отвечайте на любые текстовые сообщения, как хотите.
Глава 4: Гомеостаз Теории Хаоса
Когда вы получите текстовое сообщение от Курису с темой «Вы написали это?», создайте новый файл сохранения, прежде чем отвечать на него, и заблокируйте файл сохранения, чтобы не перезаписывать его позже.
После этого НЕ отвечайте на сообщение словом «ученый». Вы можете проигнорировать этот текст или отправить любой другой ответ, только не «ученый».
Глава 5: Догма в горизонте событий
Играйте в игру, как хотите, и отвечайте на любые текстовые сообщения, как хотите.
Глава 6: Некроз метафизики
Когда вам будет предложено отправить D-Mail, сохраните игру и не перезаписывайте ее.
Если вы решите не отправлять D-Mail, вы дойдете до концовки Сузухи, после чего вы сможете вернуться к сделанному вами сохранению и выбрать отправку D-Mail, что позволит вам продолжить игру.
Глава 7: Сделано комплексно
Когда вам будет предложено отправить D-Mail, сохраните игру и не перезаписывайте ее.
Если вы решите не отправлять D-Mail, вы дойдете до финала Фарис, после чего вы сможете вернуться к сделанному вами сохранению и выбрать отправку D-Mail, что позволит вам продолжить игру.
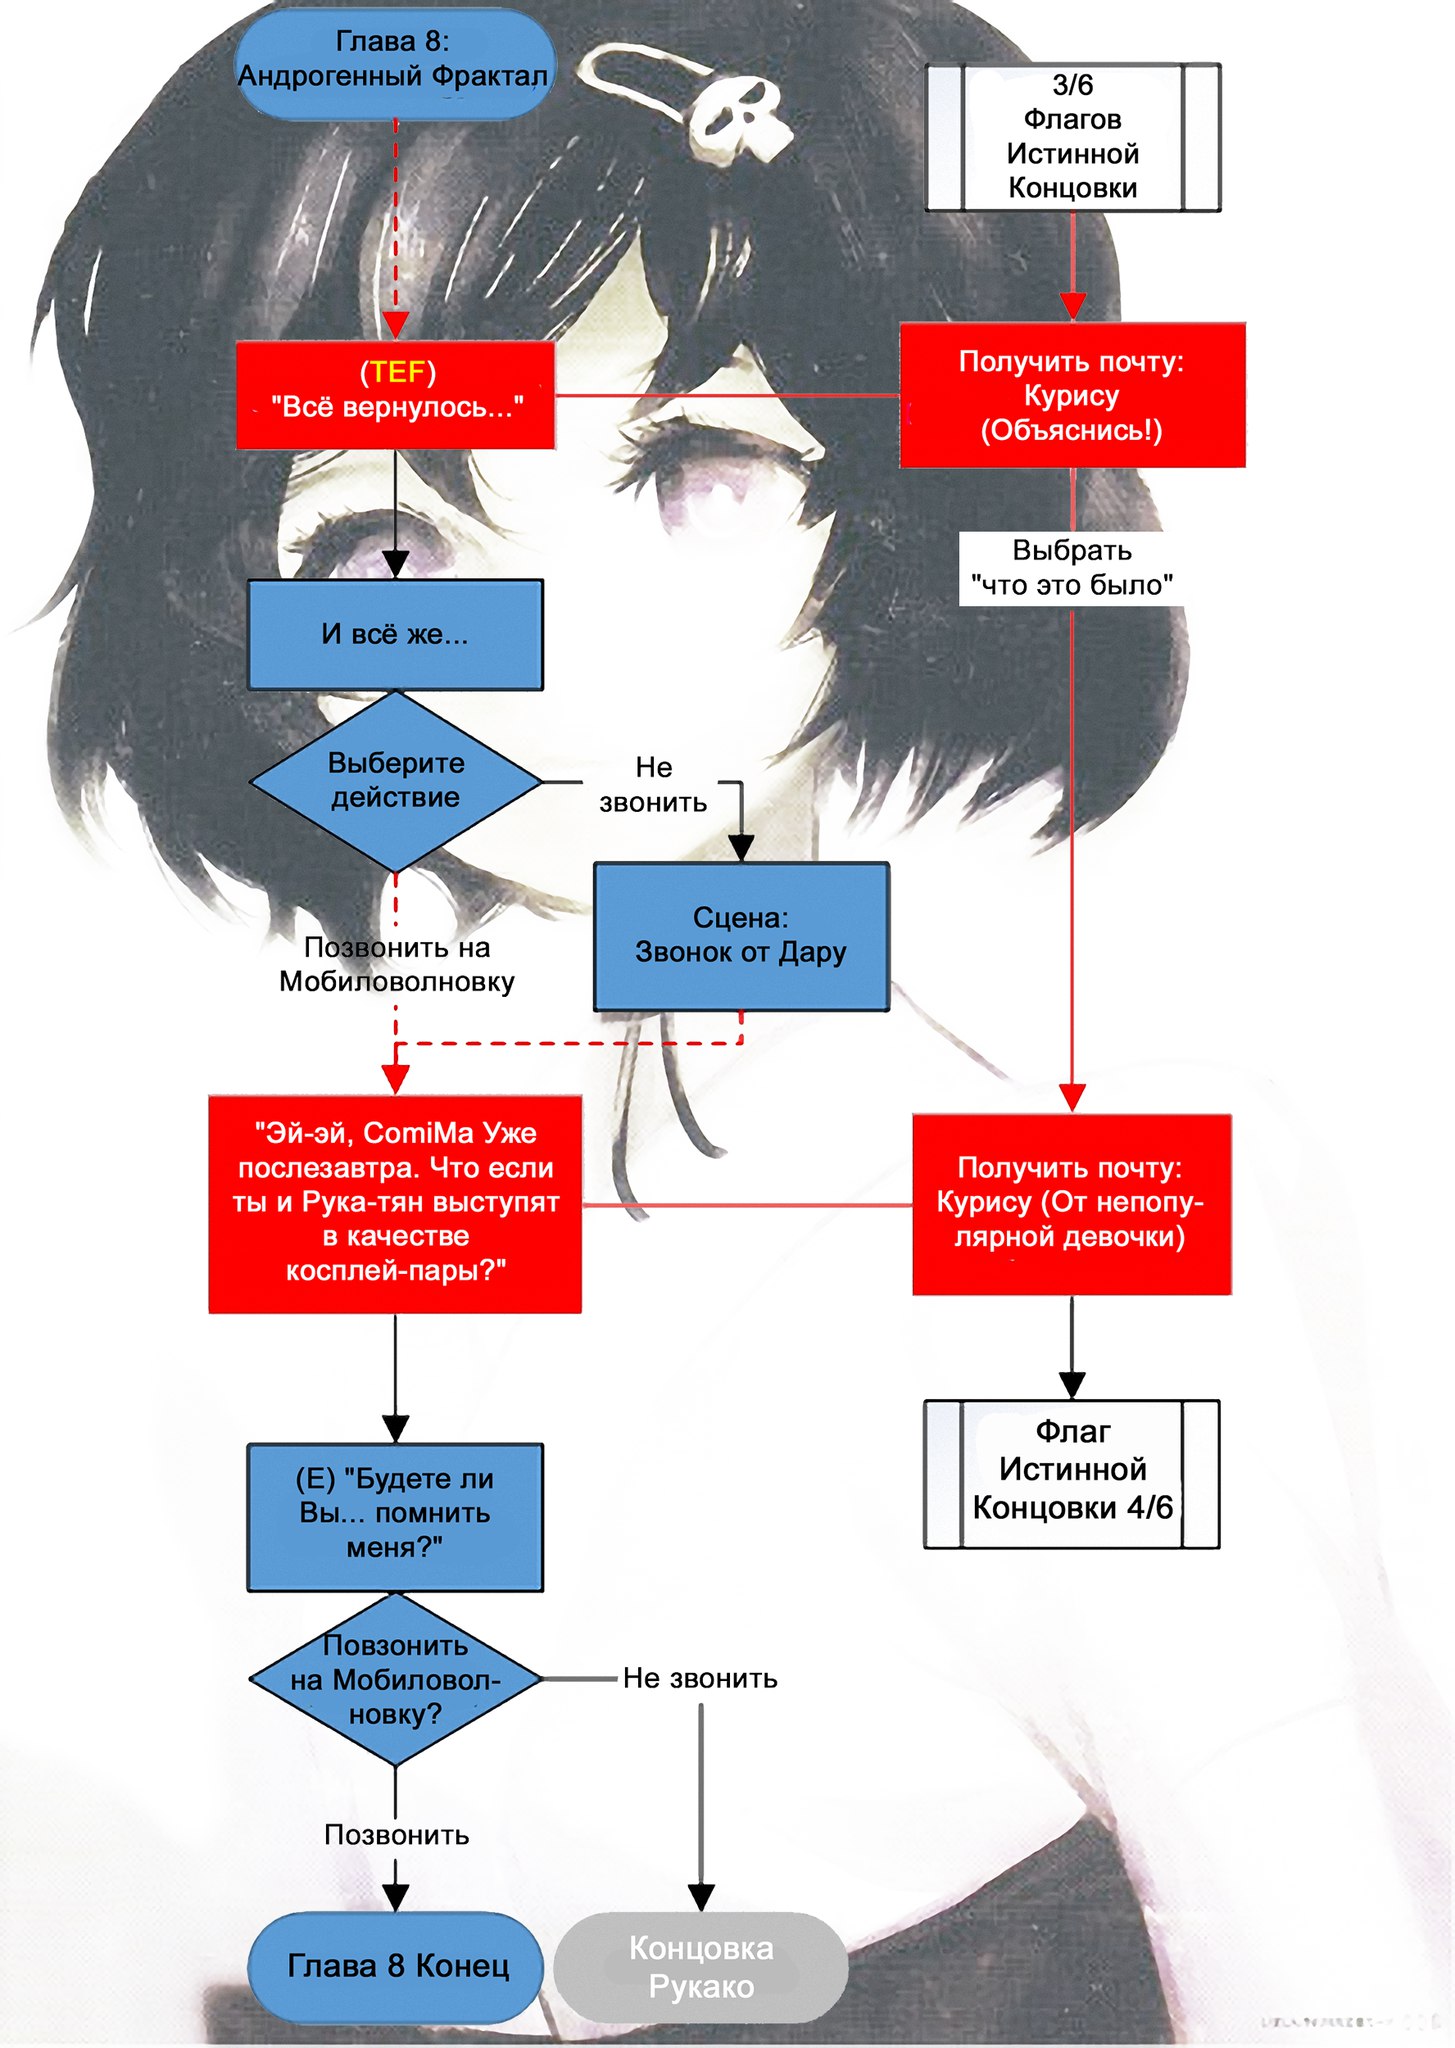
Глава 8: Фрактальный андрогин
Когда вам будет предложено позвонить в PhoneWave, сохраните игру и не перезаписывайте ее.
Если вы решите не вызывать его, вы дойдете до концовки Луки, после чего вы сможете вернуться к сделанному вами сохранению и выбрать вызов PhoneWave, что позволит вам продолжить игру.
Глава 9: Бесконечный апоптоз
Играйте в игру, как хотите, и отвечайте на любые текстовые сообщения, как хотите.
Однако, когда вам будет предложено отправить D-Mail, если вы решите не отправлять его, вы увидите дополнительную сцену, которую определенно стоит посмотреть. Вы ничего не пропустите, не отправив его, поэтому нет необходимости сохранять его перед отправкой.
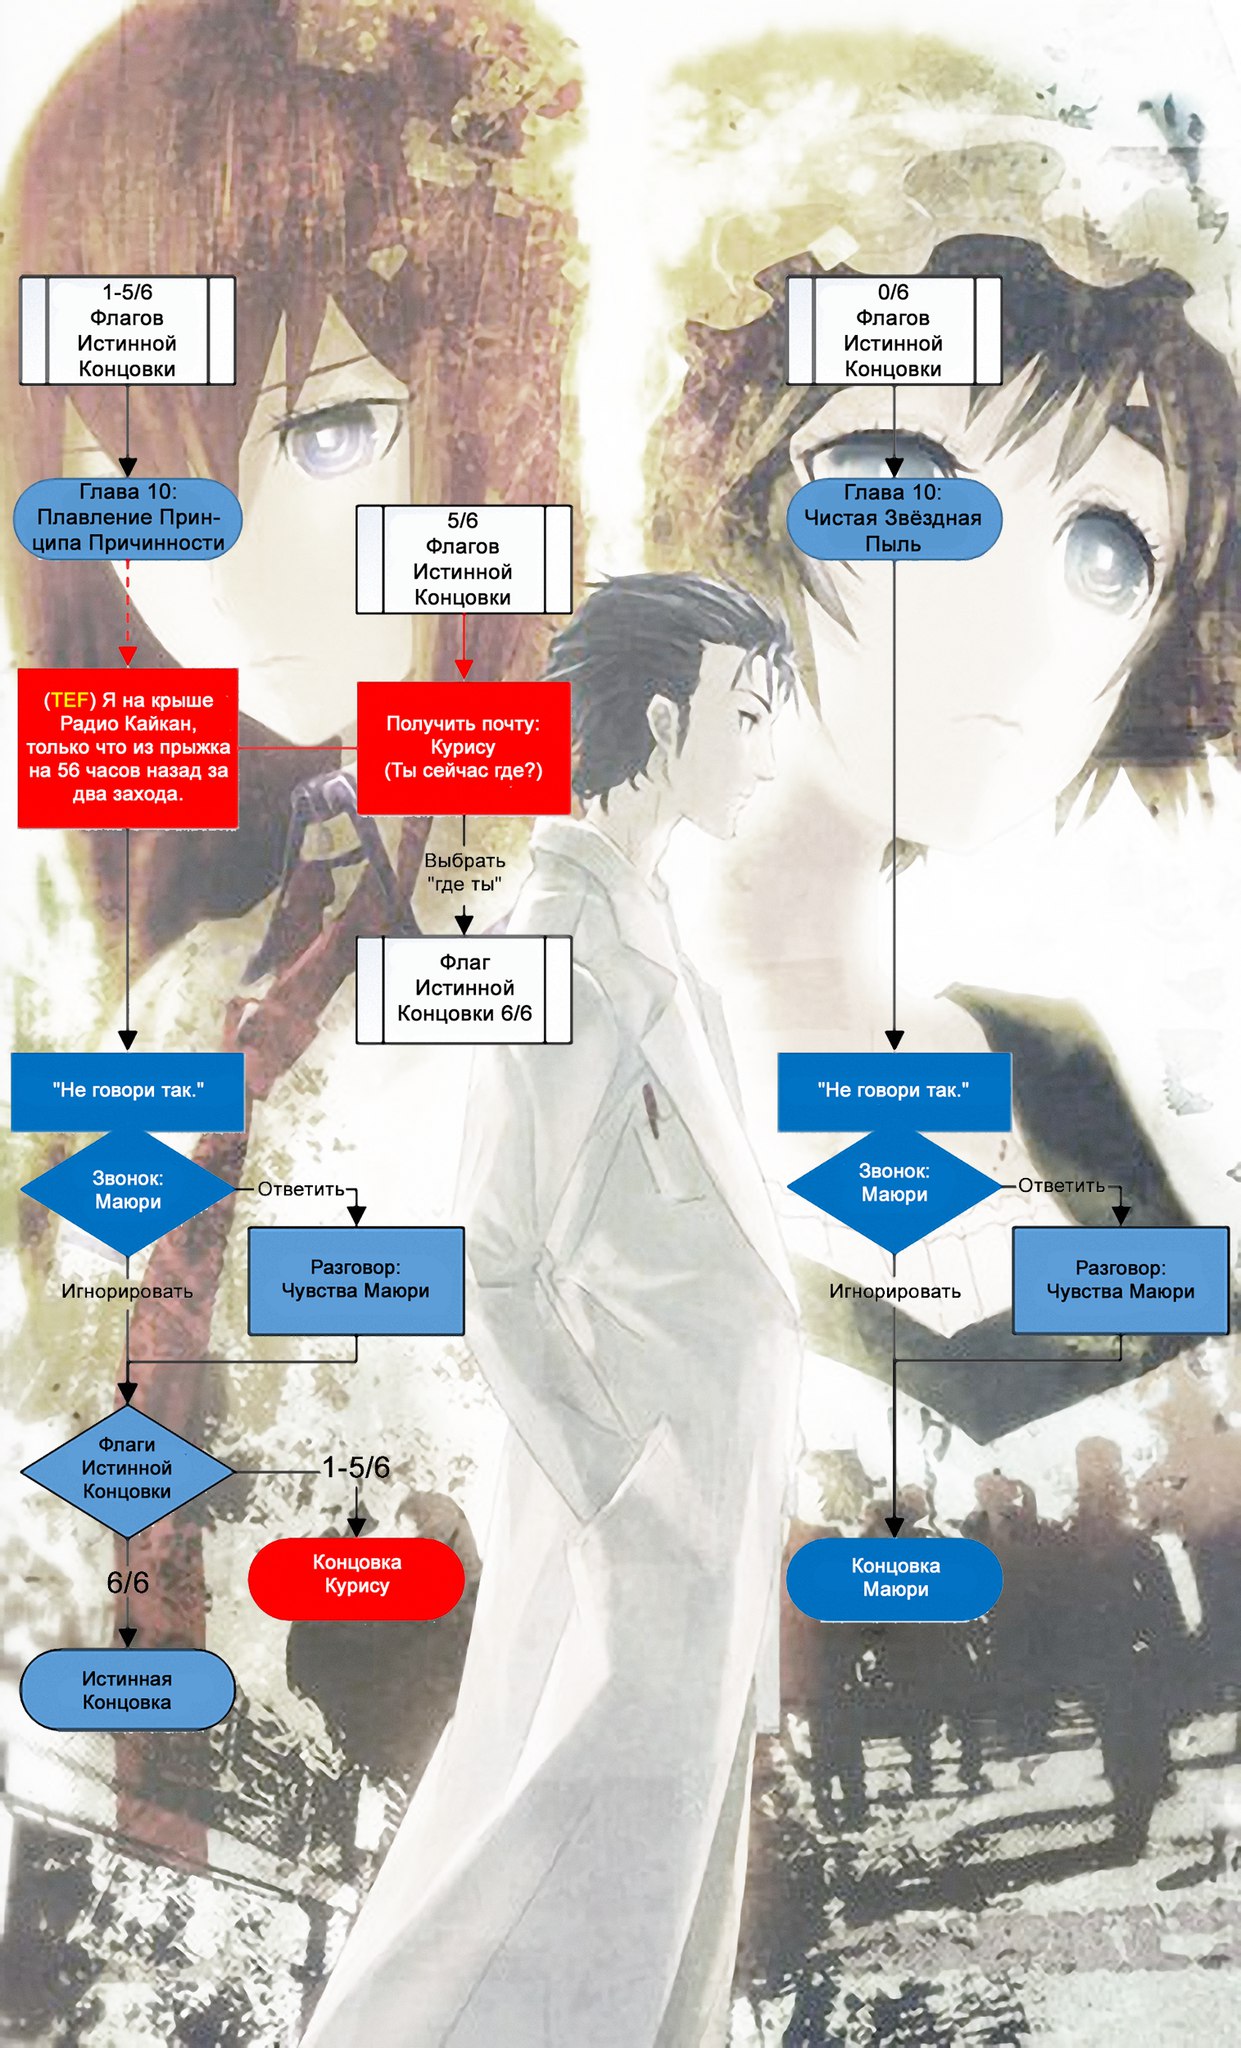
Глава 10: Небо Звездной Пыли
Вы можете сделать любой выбор, какой захотите, и в конце этой главы вы доберетесь до концовки Маюри.
После этой концовки вернитесь к сохранению, которое вы сделали в главе 4, чтобы начать второе прохождение. Во втором прохождении вы можете и должны использовать функцию пропуска игры, которая по умолчанию приостанавливается при получении текстового сообщения.
Второе прохождение
Глава 4: Гомеостаз Теории Хаоса
На этот раз, когда вы получите текстовое сообщение от Курису под названием «Вы написали это?», ответьте «ученый». Затем в последующих сообщениях с Курису сделайте следующий выбор:
Вот заголовок и ваш ответ:
- «Ученый??» > «плохой ученый»
- «Плохой ученый» > «сделай лучше»
- «Один дома» > «Посторонний»
- — Э-э? >»позор»
- «Смотрит на свою руку»> «Почему я все еще здесь?»
Когда вы получите и откроете сообщение от Курису под названием «Быть здесь», вы разблокируете первый настоящий флаг окончания. Индикатора этого нет, но если вы ответили правильно, то сработало.
Глава 5: Догма в горизонте событий
Когда вы получите сообщение от Курису под названием «Планы», ответьте «командировочные расходы». Затем просто откройте два ее последующих сообщения «Идиот!» и «[Смайлик]», которые не требуют ответа, и вы получите второй настоящий флаг окончания.
Если вы не получили сообщение с заголовком «Планы», это означает, что вы не получили предыдущий истинный флаг окончания.
Глава 6: Некроз метафизики
Сделайте любой выбор, который вам нравится в этой главе, но когда вам будет предложено отправить D-Mail, выберите отправить его, чтобы продолжить игру.
Глава 7: Сделано в комплексе
Когда вы получите сообщение от Курису под названием «Ключ [смайлик]», ответьте «У меня нет ключа», а затем отвечайте на ее последующие сообщения следующим образом:
Вот заголовок и ответ
- «[Смайлик]» > «безопасность»
- «Ты бредишь, я знаю» > «реальность»
Затем, открыв текст Курису под названием «Реальность», вы получите третий флаг истинной концовки.
Глава 8: Фрактальный андрогин
Когда вы получаете сообщение Курису под названием «Объясните себя!», для прогресса не требуется никакого ответа. Когда вы откроете ее сообщение под названием «От непопулярной девушки», вы получите четвертый флаг истинной концовки.
Когда вам будет предложено позвонить в PhoneWave, выберите его, чтобы продолжить историю.
Глава 9: Бесконечный апоптоз
Когда вы получите сообщение Курису под названием «Свяжись со мной, идиот!», ответьте «беспокоится». Затем, когда вы откроете ее сообщение под названием «Re: Re: Свяжитесь со мной, идиот!», вы получите пятый флаг истинной концовки.
Глава 10: Распад парадокса
Когда вы получите сообщение от Курису под названием «Где вы сейчас?», сохраните игру в новый слот и заблокируйте ее, чтобы не перезаписать ее. Затем НЕ отвечайте на сообщение «где вы находитесь». После этого продолжайте главу, и вы дойдете до концовки Курису.
Затем вернитесь к сохранению, которое вы сделали, и ответьте на сообщение Курису «где вы находитесь», что даст вам шестой и последний флаг истинной концовки. После этого, если вы продолжите главу, вы достигнете Истинной концовки игры.
Это все, чем мы делимся сегодня для этого Штейнс; ворота гид. Это руководство было первоначально создано и написано Атм2222. Если нам не удастся обновить это руководство, вы можете найти последнее обновление, следуя этому ссылке.
Если вы считаете, что какой-либо контент на этом сайте нарушает ваши права, включая ваши права на интеллектуальную собственность, немедленно свяжитесь с нами, используя нашу контактную форму.
Overview
Руководство по открытию всех глав в STEINS GATE My Darlings Embrace
Все руты персонажей
Точка ветвления находится в конце первой главы “История энтропического грохота”, когда Окабе предлагается отправить Д-Мэйл после того, как он попал в затруднительное положение в лаборатории. Это точка расхождения истории, где вы выбираете маршрут, который хотите пройти, поэтому сохраните его здесь (вы узнаете, когда это произойдет, просто следите за молнией Мобиловолновки (название временное) и сохраните игру, когда увидите ее).
Рут 1 – Жалкая апория (Курису)
7 августа, когда вам будет предложено, откройте свой телефон, перейдите в список контактов и выберите единственный контакт, который вам позволяет игра. После этого вообще не открывайте телефон, когда вам будет предложено, и вы перейдете на маршрут 1. Это приведет к главе Повторный резонанс.
Рут 2 – Меланхолия утраченного счастья (Моека)
7 августа, когда вам будет предложено, откройте свой телефон, перейдите в список контактов и выберите единственный контакт, который вам позволяет игра. После этого отправьте письмо как можно скорее. Это приведет к главе Коэффициент рассвета.
Рут 3 – Владения кошачьей служанки (Фейрис)
7 августа, когда вам будет предложено, откройте свой телефон, перейдите в список контактов и выберите единственный контакт, который вам позволяет игра. После этого проигнорируйте приглашение отправить письмо один раз. Это приведет к главе Небеса медного змея Нехуштана.
Рут 4 – Бродячий Архэ (Сузуха)
7 августа, когда вам будет предложено, откройте свой телефон, перейдите в список контактов и выберите единственный контакт, который вам позволяет игра. После этого отправьте письмо, проигнорировав приглашение три раза. Это приведет к главе Фуга конца разорения.
Рут 5 – Извращенная любовь анима (Лука/Рука)
7 августа, когда вам будет предложено, откройте свой телефон, перейдите в список контактов и выберите единственный контакт, который вам позволяет игра. После этого отправьте письмо после того, как не откроете свой телефон, когда его попросят два раза. Это приведет к окончанию главы Любовная синергия.
Рут 6 – Фаренгейт Кьяроскуро (Маюри)
Начните новую игру и удерживайте кнопку пропустить текст. Не отвечайте ни на одно письмо до даты и времени, указанных ниже, если только игра не заставит вас это сделать.
6 августа, в 14:10, ответьте первым вариантом. Не отвечайте ни на одно письмо, которое не от человека, отправившего вам письмо, упомянутое выше, если только руководство не говорит иначе.
6 августа, в 14:42, ответьте вторым вариантом.
6 августа, в 15:08, ответ.
6 августа, в 15:29, прочтите сообщение.
6 августа, в 21:39, ответьте вторым вариантом.
6 августа, в 21:48, ответ.
6 августа в 22:13 откройте приложение.
Если вы на правильном пути, в тексте письма упоминается определенное место… (если вы не на правильном пути, то вообще не упоминается ни одно место). Продолжайте прыгать, и… 7 августа, когда вам будет предложено, откройте свой телефон, перейдите в список контактов и выберите единственный контакт, который вам позволяет игра. После этого отправьте письмо, не открывая свой телефон, когда его попросят три раза. Это приведет к главе Дуплет звездной пыли.
This guide serves as a spoiler-free walkthrough to getting through Steins;Gate Elite in the optimal order and achieving 100% achievement/trophy completion.
Though we initially intended to release this guide last year alongside the English release of the game, various circumstances prevented us from doing so. Nevertheless, with the introduction of the Guides section on Kiri Kiri Basara, we are pleased to officially present you with the now-complete guide to Steins;Gate Elite!
Table of Contents
Introduction
Steins;Gate Elite features 6 different endings and a total of 26 achievements. Suzuha’s, Faris’s and Lukako’s endings can be reached easily, as only one decision in the game affects whether or not you get on those routes. For Kurisu’s and Mayuri’s endings, as well as the true ending, you must collect true ending flags by responding to various emails. To reach the Mayuri ending, you must collect 0 of these flags. To reach Kurisu’s ending, you must collect between 1 to 5 flags out of the 6 total in total. Getting the true ending requires you to collect all 6 total flags.
The recommended completion order for this game is:
Suzuha → Faris → Lukako → Mayuri → Kurisu → True
Please note that while this guide mentions achievements/trophies, these are only applicable on the Steam and PlayStation 4 versions of the game.
Prologue
The prologue chapter has only one achievement—”Prologue of the Beginning and the End.” To acquire it, finish the chapter.
Chapter 1
Complete this chapter for “Time Travel Paranoia” achievement.
Chapter 2
This chapter has an achievement called “Cruel Sister” which is awarded to you when you discover information about Lukako’s sister. To get this achievement, look out for an email from Lukako that allows you to reply with the phrase “family.” Choose that option, and in the subsequent email from him, choose “my sister.”
You’ll also get the “Interpreter Rendezvous” achievement for completing the chapter.
Chapter 3
Complete this chapter to get the “Butterfly Effect’s Divergence” achievement.
Chapter 4
Chapter 4 is where things start to get interesting. There are 3 possible achievements awarded for choosing right answers to various emails.
When you receive an email from Suzuha that allows you to reply with the phrase “peaceful,” choose that to get the “Warrior Girl’s Pride” achievement.
When you receive an email from Faris that allows you to reply with the phrase “He,” choose that, and in the subsequent email from her, choose “Nyannyanian” to get the “Cat’s Tea Time” achievement.
When you receive an email from Kurisu, make sure to save your game in a save slot and do not overwrite it as you continue playing. Because this email contains the first true ending flag, it will come in handy later. First, choose “report,” and in a later email, choose “cup noodles” for the “Discontinuous Qualia” achievement.
After getting the achievement, load the save file you made before you responded to Kurisu. If you want to reach the Kurisu ending or the true ending, choose “scientist,” then “bad scientist” in the subsequent email, then “do better” in the email after that. After some time, you will receive another email. Choose “Outsider,” and subsequently “disgrace.” Progress the story further until you get an email from Kurisu where you can reply with “Why am I still here,” and choose that. All of this should give you the first True Ending flag. If you are going for the Mayuri ending, ignore the instructions in the last two paragraphs and choose different options in the emails.
The “Chaos Theory Homeostasis” achievement is awarded for finishing the chapter.
Chapter 5
When you receive an email from Mayuri allowing you to reply with “cosplay,” choose it. This will net you the “Passions Best Forgotten” achievement.
If you have the first true ending flag, you’ll receive an email from Kurisu that will allow you to get the second flag by selecting “travelling expenses.”
The “Dogma in Event Horizon” achievement is awarded for finishing this chapter.
Chapter 6
Chapter 6 has two achievements. At the end of the chapter, you will be given a choice of sending a D-Mail or not. If you send the D-Mail, the chapter will end, and you will proceed with the story. You will be awarded with the “Metaphysics Necrosis” achievement.
If you don’t send the D-Mail, you will then reach Suzuha’s route, and finishing it grants you the “Irreversible Reboot” achievement.
Chapter 7
This chapter has another true ending flag. When you receive an email from Kurisu, choose “I don’t have a key,” then “security,” and then “reality”. This will grant you the third true ending flag.
Similarly to chapter 6, you are given a choice of sending a D-Mail at the end of the chapter. If you send the D-Mail, you are rewarded with the “Made in Complex” achievement, and the story continues.
If you choose to not send the D-Mail, you will reach Faris’s route, and finishing it grants you the “Isolated Jamais Vu” achievement.
Chapter 8
Another true ending flag is present in this chapter, but you won’t need to respond to the email it comes from. The flag will be granted when you receive an email from Kurisu.
Chapter 8 presents another decision at the end of the chapter. If you choose to send the D-Mail, the story proceeds and you will be awarded with the “Fractal Androgynous” achievement.
If you choose not to send the D-Mail, you will reach Lukako’s route, and finishing it will grant you the “Link of Corruption and Rebirth” achievement.
Chapter 9
Chapter 9 has the fifth true ending flag. In order to get it, when you receive an email from Kurisu with the keyword “worried,” choose it for your reply.
At the end of the chapter, you must make another decision regarding sending a D-Mail. This time however, no matter what you choose, the chapter will end and the story will continue. There is a short extra scene to view if you choose not to send the D-Mail.
You’ll get the “Endless Apoptosis” achievement for completing this chapter.
Chapter 10
If you have 5 out of 6 true ending flags, you will receive another email from Kurisu with the key phrase “where you are.” Choose it to get the last flag you need to get into the true ending if that is what you are pursuing.
If you have 0 out of 6 true ending flags, you will reach Mayuri’s ending by the end of the chapter.
If you have between 1 and 5 out of 6 true ending flags, you will reach Kurisu’s ending.
If you’ve got all 6 true ending flags, keep reading no matter what. Things may not seem all that different from Kurisu’s ending, but trust us.
Reaching the true ending is also the only way to get the “Final Gambit of the Dawn“ achievement, awarded for completing this chapter.
True ending
Completing the true ending will grant you the “Open the Steins Gate” achievement.
Other achievEments
When you finish all of the routes, you will be awarded with the “All Worldlines Complete” achievement.
Make sure to read all of the tips that you gathered throughout the game. Reading them all will grant you the “Bible of Insight” achievement.
If you have all of the achievements listed above, you will receive the “Skyclad Observer” achievement, awarded for 100% completing the game.
Steins;Gate is Visual Novel that allows you to make decisions that affect the story. Some of these decisions completely affect which ending you’ll receive while others have no effect at all and are merely character building. These choices are made through use of your phone, mainly from emails, phone calls and calling a microwave in your apartment. Before getting into the main story guide, I think it’s best we review how to interact with the game and the choices it gives you.
Controls
Being a Visual Novel, there is no control of a character but merely text to read skip through. Though unlike some games, the controls are standardised to what you would expect.
![]() — Select/Next Line
— Select/Next Line
![]() — Back
— Back
![]() — Open Phone
— Open Phone
![]() — Access TIPS (Encyclopedia)
— Access TIPS (Encyclopedia)
![]() — Auto Play On/Off
— Auto Play On/Off
![]() — Skip On/Off
— Skip On/Off
![]() — Open Save/Load menu
— Open Save/Load menu
Out of these buttons the main ones you need to use are Skip, Open Phone and Select. As the game is in Japanese the use of the TIPS is not needed and Auto Play is merely a much, much slower skip. Now, how do these controls let you affect the game?
Interactions
The only way of interacting with the story is through your phone. The two ways being emails and phone calls.
Emails
The main interaction in the game is via emails. At certain points in the game (The important ones the game auto stops for if skipping) you will receive emails from the characters. Most of these emails have the ability to be responded to by selecting on the options in the email text (Highlighted blue and underlined like hyperlinks). By selecting different options you can get other responses some with even further response options. Some of the achievements in the game are for getting to the end of these email chains successfully.
To access emails, open your phone via ![]() and select the option that appears like an envelope. The top option is your inbox and the bottom your outbox. You will get a notification when you receive a new email and can press
and select the option that appears like an envelope. The top option is your inbox and the bottom your outbox. You will get a notification when you receive a new email and can press ![]() then
then ![]() to go straight to the email.
to go straight to the email.
Some emails have attachments in the form of pictures or even music. These are also needed for achievements. To open these press ![]() on the email and select the top option (Most cases the only option) to view the picture/listen to the song and then
on the email and select the top option (Most cases the only option) to view the picture/listen to the song and then ![]() again to move to the next picture/song or back out.
again to move to the next picture/song or back out.
Just keep hitting ![]() when done to back out of an email.
when done to back out of an email.
Phone Calls
Phone calls are less frequent but do occur. To answer a call, simply open the phone (![]() ) and press
) and press ![]() . You can ignore a call by simply not opening the phone and advancing the dialogue. To make a call, on your phone menu select the person icon and scroll to the contact required.
. You can ignore a call by simply not opening the phone and advancing the dialogue. To make a call, on your phone menu select the person icon and scroll to the contact required.
Using the Guide
Pauses & Skips
This guide will focus on skipping though the game and taking action each time the game stops the skip. I will cause these ‘Pauses’. At each pause I will detail what action needs to be taken be this reviewing/replaying to an email, taking a call or making a call. To show what I mean this is an example of an instruction in the walkthrough:
P5: 06/08 11:26 — Reply — 2nd Option
In this example above this details what action is to be taken at ‘Pause 5’ (P5). The email dated 06/08, Time stamped 11:26 will need a reply (Usually the top email but make sure to check the time stamp). To reply you will need to select the 2nd option (The blue hyperlinks detailed above) and use this for a reply. Some pauses may need a few actions and these will be listed in order of action needed. If at a pause you need to take no action, I will show ‘SKIP’. This means you need to take no action at this pause and can start skipping to the next one.
In some cases, you will not be able to skip immediately and may need to manually move a few lines to be able to skip. In this case I would recommend pressing ![]() to skip to the next line and then press
to skip to the next line and then press ![]() to skip. If the skip does not start then repeat on the next line. After the first ending has been reached, you will be able to tell when these decision points require you to manually move a few lines as the icon to show the line has finished will not be the normal cog but look more like a red box with a keyhole icon. When this vanishes you will then be able to skip.
to skip. If the skip does not start then repeat on the next line. After the first ending has been reached, you will be able to tell when these decision points require you to manually move a few lines as the icon to show the line has finished will not be the normal cog but look more like a red box with a keyhole icon. When this vanishes you will then be able to skip.
There are a few moments in the game where the pauses come thick and fast with no actions to take. These portions of the game normally come when talking to a character Moeka (nicknamed Shining Finger). She only communicates via email and this causes numerous pauses but they can be skipped without worrying as either the story will force the email to open or skip past it. Follow and count the pauses and you’ll be fine. If you do mess up though…
Saving/Loading
To make the game as simple as possible and limit the number of playthroughs at certain points we will be saving the game and then reloading it after we have got to the point needed be this an achievement or a CG we need. There are two methods of saving in this game: Quick and Hard.
Quick saves are saves you can make ‘quickly’ but they don’t really differ at all for the ‘hard’ saves. The game will automatically quick save at the start of a chapter and can be a lifesaver if you miscount a pause or make the wrong decision. I will note though that quicksaves are overwritten when you get back to the same chapter on another playthrough.
Hard saves are saves you can make manually at ANY time. By pressing ![]() you can make a manual save to be loaded at any time. We will be making these saves at key point for reloading later to chase additional paths. I will state the file to make the hard save in and suggest you save in the same slots to prevent confusion. If you need to take a break from the game and need to save I suggest breaking off at a chapter start (So you can just load the quicksave) or at a hard save. If you need to save at another point, save in one of the later file slots (Anything past file 10 will be fine) to load when you return.
you can make a manual save to be loaded at any time. We will be making these saves at key point for reloading later to chase additional paths. I will state the file to make the hard save in and suggest you save in the same slots to prevent confusion. If you need to take a break from the game and need to save I suggest breaking off at a chapter start (So you can just load the quicksave) or at a hard save. If you need to save at another point, save in one of the later file slots (Anything past file 10 will be fine) to load when you return.
There is a third save type known as the system save. You can manually save this from the main menu or it will automatically ask you at the end of a path. ALWAYS save this by picking the left option (I will remind you in the walkthrough). You need this system save to access the final ending as you can only reach this path by viewing all the other ends.
DLC
There is DLC for Steins;Gate in the form of additional scenes for the game. These add extra CG’s and story lines not seen in the original release. As this game is in Japanese however the story won’t really make much sense, but each additional scene does give achievements accumulating in the ‘Platinum’ achievement for unlocking everything else.
This walkthrough will cover these additional scenes and when the achievements will unlock. I would recommend having this DLC before starting to prevent additional playthroughss needed. I built this guide while playing the Platinum Hits version of the game which comes with the DLC included (I’ll note the english version of the game has all these additional scenes included right off the bat). If you have played the game and now want the DLC achievements, load the quicksaves at the start of a chapter including them and just follow the guide.
Right, shall we begin?
Find anything you think is wrong with this walkthrough? Help us fix it by posting in its Walkthrough Thread.
This walkthrough is the property of TrueAchievements.com. This walkthrough and any content included may not be reproduced without written permission. TrueAchievements.com and its users have no affiliation with any of this game’s creators or copyright holders and any trademarks used herein belong to their respective owners.