- Manuals
- Brands
- Volkswagen Manuals
- Automobile
- Amarok 2011
- Maintenance manual
-
Contents
-
Table of Contents
-
Bookmarks
Quick Links
Service
Maintenance
Amarok 2011 ➤
Edition 01.2011
Service Department. Technical Information
Related Manuals for Volkswagen Amarok 2011
Summary of Contents for Volkswagen Amarok 2011
-
Page 1
Service Maintenance Amarok 2011 ➤ Edition 01.2011 Service Department. Technical Information… -
Page 2
In addition, the normal basic safety precautions for working on motor vehicles must, as a matter of course, be observed. All rights reserved. No reproduction without prior agreement from publisher. Copyright © 2011 Volkswagen AG, Wolfsburg D3E8027339B… -
Page 3: Table Of Contents
Amarok 2011 ➤ Maintenance — Edition 01.2011 Contents Engine list …………. .
-
Page 4
Amarok 2011 ➤ Maintenance — Edition 01.2011 4.34 Engine and components in engine compartment (from above and below): Perform visual check for leaks and damage ………. -
Page 5: Engine List
Amarok 2011 ➤ Maintenance — Edition 01.2011 Engine list Diesel engines ⇒ page 1 Petrol engines ⇒ page 1 Diesel engines Note To ease the search for an engine, the engine codes are listed in alphabetical order. Engines: ⇒ Diesel engines…
-
Page 6: Service Work
Vehicles with PR number „QG1“ With the LongLife system, a new technology was introduced by Volkswagen commercial vehicles whereby an interval service is only performed when the vehicle needs it. What is so special about it is that individual conditions of use and personal driving style are taken into consideration when deter‐…
-
Page 7
For normal operating conditions achieving these service intervals is technically assured. This means that the indicated mileage or time intervals have al‐ ready been determined and specified by Volkswagen Commer‐ cial Vehicles. Therefore the service intervals for time or distance dependent service are non-flexible. -
Page 8
♦ This means that the mileage or time values have been previ‐ ously determined and specified by Volkswagen. ♦ For normal operating conditions achieving these service in‐ tervals is technically assured. -
Page 9: Service Tables, Inland
Amarok 2011 ➤ Maintenance — Edition 01.2011 – Press button -A- in dash panel insert four times until „spanner symbol“ appears in dash panel insert -B-. ♦ On the dash panel insert display, an overdue service is indi‐ cated by a minus sign in front of the mileage or day information.
-
Page 10: Service Tables, Export
Amarok 2011 ➤ Maintenance — Edition 01.2011 Amarok Service intervals, inland 2010 ► From to Engine/ Service: Indication on SID Engine code/ Intervals (with oil change) PR No./Remarks ⇒ page 4 2010 ▶ QG0/QG2 or QG1 vehi‐ Oil change service every cles coded to fixed inter‐…
-
Page 11
Amarok 2011 ➤ Maintenance — Edition 01.2011 Amarok Service interval, export 2010 ► From to Engine/ Service: Indication on SID Engine code/ Intervals (with oil change) PR No./Remarks 2010 ▶ QG0/QG2 or QG1 vehi‐ Oil change service cles coded to fixed inter‐… -
Page 12
Amarok 2011 ➤ Maintenance — Edition 01.2011 Oil change intervals depending on sulphur content in fuel Fuel quality (EN590) ◀ 500 ppm 500-2,000 ppm 2,000-4,000 ppm ▶ 4,000 ppm Change interval 20,000 km 10,000 km 7,500 km 5,000 km Mexico… -
Page 13: Service Tables, Argentina And Brazil
Amarok 2011 ➤ Maintenance — Edition 01.2011 Oil change intervals depending on sulphur content in fuel Fuel quality (EN590) ◀ 500 ppm 500-2,000 ppm 2,000-4,000 ppm ▶ 4,000 ppm Change interval 20,000 km 10,000 km 7,500 km 5,000 km Iran…
-
Page 14: Vw Engine Oil Standards
Only for markets where diesel complies with EN 590. Only for markets with elevated sulphur content in diesel fuel. Further engine oils of other suppliers approved by Volkswagen commercial vehicles can be found in ⇒ Volkswagen Commercial Vehicles ServiceNet, Technical information, Inspections and…
-
Page 15
Amarok 2011 ➤ Maintenance — Edition 01.2011 Work to be completed Page ♦ Radio code: Request (customer should be informed of radio code IF DESIRED) ⇒ page 99 Vehicle interior ♦ All switches, electrical consumers, sockets, gauges and other control elements: Check function ♦… -
Page 16: Scopes Of Service
Amarok 2011 ➤ Maintenance — Edition 01.2011 Work to be completed Page ♦ Brake system: Perform visual check for leaks and damage ⇒ page 60 Engine compartment ♦ Engine and components in engine compartment (from above): Perform visual check for ⇒…
-
Page 17
Amarok 2011 ➤ Maintenance — Edition 01.2011 may need to be performed when services are due ⇒ page 15 ♦ It is possible to have additional work done outside the service intervals, with account being taken of the entries in the service schedule (or service sticker: „Your next service dates“). -
Page 18
Amarok 2011 ➤ Maintenance — Edition 01.2011 Int. Insp. Measure ♦ Tread depth, condition, wear pattern, age, inflation pressure (including spare tyre): Check, rectify as necessary ⇒ page 56 Vehicle from below ♦ Engine and components in engine compartment (from below): Visual check for leaks and damage ♦… -
Page 19: Time Or Distance Dependent Additional Work
Amarok 2011 ➤ Maintenance — Edition 01.2011 Int. Insp. Measure ♦ Headlights: Check adjustment ⇒ page 106 ♦ Vehicle system test: Perform ⇒ page 74 ♦ Service interval display: Reset (observe „2024733“) ⇒ page 109 ♦ „Your next service“ sticker: Enter next due date…
-
Page 20
Amarok 2011 ➤ Maintenance — Edition 01.2011 Measure: Interval ♦ Dust and pollen filter (cabin filter): Clean housing Every 60,000 km and renew filter element ⇒ page 80 ♦ Spark plugs: Renew ⇒ page 131 ♦ Air filter: Clean housing and renew filter element (reset learnt values of engine control unit -J623- ) ♦… -
Page 21: Market Specific Deviations — Scope Of Work For Argentina And Brazil
Wear on brake linings is heavily dependent on operating con‐ ditions and driving style. If urban and short-distance driving are common as well as if there is a sporty driving style, Volkswagen recommends having the thickness of the brake linings checked in the workshop more often than specified in the service schedule.
-
Page 22
Amarok 2011 ➤ Maintenance — Edition 01.2011 Deviations in scope of work relating to oil change, interval and inspection service Additional work Page ♦ Toothed belt and tensioning roller for camshaft drive: Check ⇒ page 130 • Not with oil change service ♦… -
Page 23: General
Amarok 2011 ➤ Maintenance — Edition 01.2011 General ♦ Sticker ⇒ page 20 ♦ Entries in service schedule ⇒ page 22 ♦ Severe conditions ⇒ page 20 ♦ Vehicle identification number (chassis number) ⇒ page 19 ♦ Vehicle data sticker ⇒…
-
Page 24: Severe Operating Conditions
Amarok 2011 ➤ Maintenance — Edition 01.2011 The sticker shows the following vehicle data. 1 — Vehicle identification number (chassis number) 2 — Vehicle type, engine output, gearbox 3 — Engine and gearbox code letters, paint number, interior equip‐ ment…
-
Page 25
Amarok 2011 ➤ Maintenance — Edition 01.2011 – Enter next service due: Enter a cross according to „service interval display“ and enter date and odometer reading. – Apply service sticker on driver side door pillar (B-pillar). 3.5.2 Attaching „vehicle data sticker“ into cus‐… -
Page 26: Entries In Service Schedule
Note RME fuel may only be used in vehicles which have been ap‐ ♦ proved by Volkswagen for this purpose with RME fuel — either in the standard version or in vehicles with optional equipment (PR number »2G0«). The production control number »2G0« on the vehicle data ♦…
-
Page 27
Amarok 2011 ➤ Maintenance — Edition 01.2011 Note The RME compatibility of the vehicle is indicated by the pro‐ ♦ duction control number »2G0« on the vehicle data sticker. If the vehicle is not designed to run on biodiesel, the production control number »2G2«… -
Page 28: Descriptions Of Work
Amarok 2011 ➤ Maintenance — Edition 01.2011 Descriptions of work ♦ Swivel joints: Visual check ⇒ page 44 ♦ Four-wheel drive: Insert fuse ⇒ page 77 ♦ Lifting vehicle ⇒ page 25 ♦ Reading ash mass (saturation level) of diesel particulate filter ⇒…
-
Page 29: Lifting Vehicle
Amarok 2011 ➤ Maintenance — Edition 01.2011 ♦ Engine oil: Drain or extract; renew oil filter and replenish en‐ gine oil ⇒ page 91 ♦ Oil level: Check ⇒ page 91 ♦ Check breakdown set ⇒ page 96 ♦ Performing road test ⇒…
-
Page 30
Amarok 2011 ➤ Maintenance — Edition 01.2011 4.1.1 Raising vehicle with wheel lifts as main support WARNING ♦ Before driving onto a lifting platform, ensure that there is sufficient clearance between low-lying vehicle compo‐ nents and lifting platform. ♦ Before driving a vehicle onto a lifting platform it must be ensured that the vehicle weight does not exceed the per‐… -
Page 31
Amarok 2011 ➤ Maintenance — Edition 01.2011 – Vehicle can now be raised and lowered to required working height. 4. Descriptions of work… -
Page 32
Amarok 2011 ➤ Maintenance — Edition 01.2011 4. Descriptions of work… -
Page 33
Amarok 2011 ➤ Maintenance — Edition 01.2011 4.1.2 Raising vehicle under rear axle tube WARNING ♦ Before driving onto a lifting platform, ensure that there is sufficient clearance between low-lying vehicle compo‐ nents and lifting platform. ♦ Before driving a vehicle onto a lifting platform it must be ensured that the vehicle weight does not exceed the per‐… -
Page 34
Amarok 2011 ➤ Maintenance — Edition 01.2011 Note When assembly work is performed on running gear (front axle and rear axle) then raising vehicle under rear ♦ axle should only be used as an alternative to main support ⇒ page 26 The vehicle may only be lifted at points indicated in order to avoid damaging vehicle and to prevent vehicle ♦… -
Page 35
Amarok 2011 ➤ Maintenance — Edition 01.2011 – Vehicle can now be raised and lowered to required working height. 4. Descriptions of work… -
Page 36
Amarok 2011 ➤ Maintenance — Edition 01.2011 4. Descriptions of work… -
Page 37
Amarok 2011 ➤ Maintenance — Edition 01.2011 4.1.3 Raising vehicle before rear axle tube WARNING ♦ Before driving onto a lifting platform, ensure that there is sufficient clearance between low-lying vehicle compo‐ nents and lifting platform. ♦ Before driving a vehicle onto a lifting platform it must be ensured that the vehicle weight does not exceed the per‐… -
Page 38
Amarok 2011 ➤ Maintenance — Edition 01.2011 Perform the following jobs: – Front support arms of lifting platform with rubber plate sup‐ ports are positioned in area of front bolted gearbox cross member. – Rear support arms of lifting platform with rubber plate supports -1- are positioned in front of front leaf spring supports -2- under vehicle frame. -
Page 39
Amarok 2011 ➤ Maintenance — Edition 01.2011 4. Descriptions of work… -
Page 40
Amarok 2011 ➤ Maintenance — Edition 01.2011 4.1.4 Alternative lift for front of vehicle WARNING ♦ Before driving onto a lifting platform, ensure that there is sufficient clearance between low-lying vehicle compo‐ nents and lifting platform. ♦ Before driving a vehicle onto a lifting platform it must be ensured that the vehicle weight does not exceed the per‐… -
Page 41
Amarok 2011 ➤ Maintenance — Edition 01.2011 Perform the following jobs: – Front support arms -1- of lifting platform with rubber plate sup‐ ports are positioned in area of front bolted gearbox cross member. – Additionally secure vehicles with tensioning straps -T10038- -2- directly on frame of front and rear support arms of lifting platform. -
Page 42
Amarok 2011 ➤ Maintenance — Edition 01.2011 4. Descriptions of work… -
Page 43
Amarok 2011 ➤ Maintenance — Edition 01.2011 4.1.5 Alternative lift for rear of vehicle WARNING ♦ Before driving onto a lifting platform, ensure that there is sufficient clearance between low-lying vehicle compo‐ nents and lifting platform. ♦ Before driving a vehicle onto a lifting platform it must be ensured that the vehicle weight does not exceed the per‐… -
Page 44
Amarok 2011 ➤ Maintenance — Edition 01.2011 Note For assembly work on vehicle, e.g. removal of front axle and rear axle, vehicle can be raised before rear ♦ axle tube as an alternative ⇒ page 33 The vehicle may only be lifted at points indicated in order to avoid damaging vehicle and to prevent vehicle ♦… -
Page 45
Amarok 2011 ➤ Maintenance — Edition 01.2011 – Vehicle can now be raised and lowered to required working height. 4. Descriptions of work… -
Page 46
Amarok 2011 ➤ Maintenance — Edition 01.2011 4.1.6 Additional support of vehicle Note Depending on assembly condition of vehicle, it can be secured ♦ using height-adjustable stands -2- in addition to lashing it to support arms of lifting platform with tensioning straps — T10038- . -
Page 47
Amarok 2011 ➤ Maintenance — Edition 01.2011 – Alternatively, height-adjustable stands -2- can be positioned under rear leaf spring bracket -1- on rear axle tube. 4. Descriptions of work… -
Page 48: Swivel Joints: Visual Check
Amarok 2011 ➤ Maintenance — Edition 01.2011 Swivel joints: Visual check Perform the following jobs: 4. Descriptions of work…
-
Page 49: Reading Ash Mass (Saturation Level) Of Diesel Particulate Filter
Amarok 2011 ➤ Maintenance — Edition 01.2011 – Check boots -arrow- of lower swivel joints for leaks and dam‐ age. – Check boots -arrow- of upper swivel joints for leaks and dam‐ age. Reading ash mass (saturation level) of diesel particulate filter…
-
Page 50
Amarok 2011 ➤ Maintenance — Edition 01.2011 ♦ Vehicle diagnostic and service information system -VAS 5052 ♦ Diagnosis cable, 2 m -VAS 5052/3 A- ♦ Diagnosis cable, 5 m -VAS 5052/3 A-1- Perform the following jobs: – Pull on handbrake. -
Page 51: Battery: Check Battery Terminal Clamps For Secure Seating
Amarok 2011 ➤ Maintenance — Edition 01.2011 – Select „Measured value block 68 — ash mass DPF“ -arrow- on screen and confirm with button. Done – Follow instructions of vehicle diagnostic, testing and informa‐ tion system -VAS 5051B- or vehicle diagnostic and service information system -VAS 5052 A- .
-
Page 52
Amarok 2011 ➤ Maintenance — Edition 01.2011 Note The battery terminal clamps must only be connected by hand ♦ without using force, to ensure the battery housing is not dam‐ aged. Battery terminals must not be greased. ♦ Always adhere to the sequence of work steps. -
Page 53
Amarok 2011 ➤ Maintenance — Edition 01.2011 – Check whether battery clamps are secure on battery terminals by moving battery negative cable -1- and battery positive cable -2- back and forth. WARNING If the battery terminal clamp is not seated securely on the pos‐… -
Page 54
Amarok 2011 ➤ Maintenance — Edition 01.2011 4.4.2 Battery terminal connections Caution To prevent damage to the battery terminal clamps and the bat‐ tery terminals, observe the following: ♦ The battery terminal clamps must only be connected by hand (without using force). -
Page 55: Battery: Perform Visual Check And Check Magic Eye
Amarok 2011 ➤ Maintenance — Edition 01.2011 Battery: Perform visual check and check magic eye Perform the following jobs: – Visual inspection of battery as well as a battery check using „magic eye“ ♦ Battery: Perform visual check ⇒ Electrical system; Rep. gr.
-
Page 56
Amarok 2011 ➤ Maintenance — Edition 01.2011 – Disconnect battery terminal clamp -1- on battery negative ter‐ minal first. – Separate connector -1- between vehicle side cable and wiring harness to battery cut-off relay. – Separate connector -2- of wiring harness for battery cut-off relay from brake fluid reservoir. -
Page 57
Amarok 2011 ➤ Maintenance — Edition 01.2011 – Loosen hexagon flange nut (10 mm) -1- from battery cut-off relay and remove cable to main fuse box -2- from connection. Procedure for RHD vehicles On RHD vehicles an additional adapter cable is installed to extend the wiring harness of the battery cut-off relay to connect the brake fluid reservoir in right engine compartment. -
Page 58
Amarok 2011 ➤ Maintenance — Edition 01.2011 – Remove red terminal cap -1- from ashtray and insert it into thread of jump start point -2-. – Reconnect battery terminal clamp to battery negative terminal. – Tighten securing bolt of terminal clamp to specified torque ⇒… -
Page 59: Front Passenger Front Airbag: Check Key Switch And „On/Off Function
Amarok 2011 ➤ Maintenance — Edition 01.2011 Front passenger front airbag: Check key switch and „On/Off function“ Note If the airbag is deactivated, the front airbag, side airbag and cur‐ tain airbag are deactivated on the front passenger side. All other airbags in the vehicle remain functional.
-
Page 60: Checking Tyres: Condition, Wear Pattern, Tyre Pressure, Tread Depth
Amarok 2011 ➤ Maintenance — Edition 01.2011 Checking tyres: Condition, wear pattern, tyre pressure, tread depth Note The following descriptions of work also apply to the spare ♦ wheel, if a spare wheel with standard tyres is fitted. For safety reasons, only tyres of same type and tread pattern ♦…
-
Page 61
Amarok 2011 ➤ Maintenance — Edition 01.2011 Note If damage is determined, always check to see if a new tyre should be fitted. Tests at interval service Perform the following jobs: – Check following areas of tyre for damage: ♦ »Tyre treads«… -
Page 62
Amarok 2011 ➤ Maintenance — Edition 01.2011 Note This value may vary according to different legislation in indi‐ ♦ vidual countries. The minimum tread depth is reached when the tyres have ♦ worn down level with the 1.6 mm high tread wear indicators -arrows- positioned at intervals around the tyre. -
Page 63
Amarok 2011 ➤ Maintenance — Edition 01.2011 ♦ V: up to 240 km/h Tyre pressure table: Applies to all factory-fitted tyre sizes. Permitted axle load Type of tyre Half payload Full payload Full load: FA / RA (kg) front rear… -
Page 64: Brake System: Perform Visual Check For Leaks And Damage
Amarok 2011 ➤ Maintenance — Edition 01.2011 Permitted axle load Type of tyre Half payload Full payload Full load: FA / RA (kg) 1420 / 1860 ♦ 205 R16 C 110/108 T • Summer tyres • M&S (winter tyres) •…
-
Page 65: Front Brake Pads/Linings: Check Thickness
Amarok 2011 ➤ Maintenance — Edition 01.2011 – Check brake connections and fastenings for correct seating, leaks and corrosion. WARNING Faults found must always be rectified (repair measure). 4.10 Front brake pads/linings: Check thick‐ ness Special tools and workshop equipment required ♦…
-
Page 66
Amarok 2011 ➤ Maintenance — Edition 01.2011 ♦ Adapter set for tamper-proof wheel bolts -T10190- ♦ Electric hand torch and mirror 4.10.1 Front brake pads Check thickness using test pin -T40139- Note The wheel rim geometry of some vehicles may make it im‐… -
Page 67
Amarok 2011 ➤ Maintenance — Edition 01.2011 Wear limit: 9 mm WARNING The brake pads have reached their wear limit at a brake pad thickness of 9 mm (value shown on test pin) (including back‐ plate) and must be renewed. Inform customer! -
Page 68: Rear Drum Brake Linings: Check Thickness
Amarok 2011 ➤ Maintenance — Edition 01.2011 – Assess or measure inner and outer pad thickness. a — Pad thickness „without“ backplate Wear limit: 2 mm WARNING The brake pads have reached their wear limit at a brake pad thickness of 2 mm (without backplate) and must be renewed (repair measure).
-
Page 69: Brake System And Shock Absorbers: Perform Visual Check For Leaks And Damage
Amarok 2011 ➤ Maintenance — Edition 01.2011 4.12 Brake system and shock absorbers: Perform visual check for leaks and dam‐ Check following components for leaks and damage: ♦ Brake master cylinder ♦ Hydraulic unit ♦ Brake calipers ♦ Shock absorber ♦…
-
Page 70
Amarok 2011 ➤ Maintenance — Edition 01.2011 ♦ Brake filling and bleeding equipment -VAS 5234- ♦ Brake pedal actuator -V.A.G 1869/2- ♦ Upgrade kit and extraction unit -V.A.G 1869/4- Perform the following procedure: – Unscrew sealing cover -1- from brake fluid reservoir -2-. -
Page 71
Amarok 2011 ➤ Maintenance — Edition 01.2011 – Extract as much brake fluid as possible using suction hose from brake filling and bleeding equipment -VAS 5234- . WARNING Do not reuse extracted (used) brake fluid! – Screw adapter -1- onto brake fluid reservoir -2-. -
Page 72
Amarok 2011 ➤ Maintenance — Edition 01.2011 – Push collector bottle bleed hose -1- onto rear right bleed valve. – Open bleeder valve and let appropriate quantity of brake fluid run out (see table). – Close bleeder valve again. Repeat procedure on rear left of vehicle. -
Page 73: Brake Fluid Level: Check
⇒ Electronic parts catalogue „ETKA“ . Permissible brake fluid specifications ♦ Volkswagen recommends using new brake fluid acc. to VW Standard 501 14 for optimum function of brake system. ♦ Alternatively, a brake fluid acc. to requirements of US standard FMVSS 116 DOT4 or DIN ISO 4925 Class 4 can be used.
-
Page 74: Climatronic: Set Temperature To 22 °C
Amarok 2011 ➤ Maintenance — Edition 01.2011 4.14.1 Checking brake fluid level at delivery in‐ spection At delivery inspection the fluid level must be at MAX. marking -1-. Note In order that brake fluid does not overflow the reservoir, MAX marking -1- must not be exceeded.
-
Page 75: Window Regulators: Check Positioning (Open And Close Functions)
Amarok 2011 ➤ Maintenance — Edition 01.2011 – Press -1- The „AUTO High“ function (high blower output) AUTO has been activated. The right-hand warning lamp in the button lights up. – Press -1- again. The „AUTO Low “ function (low blower AUTO output) has been activated.
-
Page 76
Amarok 2011 ➤ Maintenance — Edition 01.2011 4.17.1 Connect vehicle diagnostic, testing and information system -VAS 5051B- or ve‐ hicle diagnostic and service information system -VAS 5052 A- and select func‐ tions Special tools and workshop equipment required ♦ Vehicle diagnostic, testing and information system -VAS 5051B- or subsequent units ♦… -
Page 77
Amarok 2011 ➤ Maintenance — Edition 01.2011 ♦ Vehicle diagnostic and service information system -VAS 5052 ♦ Diagnosis cable, 2 m -VAS 5052/3 A- ♦ Diagnosis cable, 5 m -VAS 5052/3 A-1- Note Observe current operating instructions for vehicle diagnostic, ♦… -
Page 78: Performing Vehicle System Test
Amarok 2011 ➤ Maintenance — Edition 01.2011 – Connect diagnosis cable connector to diagnosis connection with ignition switched off. – Switch on tester. – Switch on ignition. – Touch the field on the screen for Guided fault finding Guided functions –…
-
Page 79
Amarok 2011 ➤ Maintenance — Edition 01.2011 Note If faults are stored, the respective event memory must not be cleared. Reason: If the subsequent fault finding (repair measure) is performed using vehicle diagnosis, testing and information system -VAS 5051B- or vehicle diagnosis and service information system -VAS 5052… -
Page 80
Amarok 2011 ➤ Maintenance — Edition 01.2011 Indicated on display: – Select function -arrow- on display of Vehicle system test vehicle diagnostic, testing and information system -VAS 5051B- or vehicle diagnostic and service information system -VAS 5052 A- . – Start system test by selecting function Start system test on display of vehicle diagnostic, testing and information sys‐… -
Page 81: Four-Wheel Drive: Insert Fuse
Amarok 2011 ➤ Maintenance — Edition 01.2011 There are two ways to clear the event memory: ♦ Clearing event memory by selecting individual control units: Perform the following jobs: – Select control unit in question individually in overview, select and then press…
-
Page 82
Amarok 2011 ➤ Maintenance — Edition 01.2011 – Release fuse holder C -SC- -1- -arrows- and fold down fuse holder C -SC- . – Remove „SC fuse / 25 A“ -arrow-, which is attached to dash panel insert -K- . -
Page 83
Amarok 2011 ➤ Maintenance — Edition 01.2011 – Connect vehicle diagnostic, testing and information system — VAS 5051B- or vehicle diagnostic and service information system -VAS 5052 A- ⇒ page 71 Note ♦ Observe current operating instructions for vehicle diagnostic, testing and information system -VAS 5051B- or vehicle diag‐… -
Page 84: Protective Bellows: Visual Check
Amarok 2011 ➤ Maintenance — Edition 01.2011 4.20 Protective bellows: Visual check Perform the following jobs: – Check outer and inner CV joint boots -arrows- for leaks and damage. 4.21 Dust and pollen filter: Clean housing and renew filter element…
-
Page 85: Poly V-Belt: Check Condition
Amarok 2011 ➤ Maintenance — Edition 01.2011 Observe installation position of filter element -arrows-. – Insert new filter -1-. – Close cover -2- and bolt on with bolts -1-. 4.22 Poly V-belt: Check condition Perform the following jobs: – Use a socket spanner to turn the engine at the vibration damp‐…
-
Page 86: High Pressure Pump: Check
Amarok 2011 ➤ Maintenance — Edition 01.2011 – Check poly V-belt -1- for: ♦ Substructure cracks (cracks, core ruptures, cross sectional breaks) ♦ Layer separation (top layer, cord strands) ♦ Base break-up ♦ Fraying of cord strands ♦ Flank wear (material wear, frayed flanks, brittle flanks -glassy flanks-, surface cracks) ♦…
-
Page 87: Fuel System: Bleed (Diesel Engine)
Amarok 2011 ➤ Maintenance — Edition 01.2011 – To pull off lines -1- press release buttons on connecting pieces of fuel filter -2-. – To remove fuel filter -1-, press fuel filter from below -movement arrow- upwards out of holder -2- and remove it downwards.
-
Page 88: Fuel Filter: Drain Water (Diesel Engine)
Amarok 2011 ➤ Maintenance — Edition 01.2011 Perform the following jobs: – Connect vehicle diagnostic, testing and information system — VAS 5051B- or vehicle diagnostic and service information system -VAS 5052 A- with ignition switched off ⇒ page 71 – Switch on ignition.
-
Page 89
Amarok 2011 ➤ Maintenance — Edition 01.2011 Note From model year 2008 all engines are filled with coolant ad‐ ♦ ditive G 12 Plus Plus (purple). G 12 Plus Plus can be mixed with coolant additives G 11 (green), G 12 (red) and G 12 Plus (purple)! But because of its positive characteristics, ensure that only G 12 Plus is used when replenishing. -
Page 90
Amarok 2011 ➤ Maintenance — Edition 01.2011 The scale -1- of the refractometer is calibrated for coolant addi‐ tives G 11, G 12; G 12 Plus and G 12 Plus Plus. The scale -2- is only calibrated for coolant additive G 13 (initially L80). -
Page 91
Amarok 2011 ➤ Maintenance — Edition 01.2011 Initial filling / standard filling Can be G12+ G12++ mixed from 1994 from 1996 from 2000 from 2005 with … G12+ G12++ ♦ „X“ May be mixed ♦ „0“ May NOT be mixed ♦… -
Page 92: Air Filter: Clean Housing And Renew Filter Element
Amarok 2011 ➤ Maintenance — Edition 01.2011 Note Coolant additive G 12 Plus Plus prevents frost and corrosion ♦ damage, scaling and also raises boiling point of coolant. For these reasons, the cooling system must be filled all-year- round with a coolant and corrosion protection additives.
-
Page 93
Amarok 2011 ➤ Maintenance — Edition 01.2011 Perform the following jobs: Removing – Before changing air filter, clean outside of components with compressed air. – Seal all openings of components using caps or hood covers immediately after removal. – Pull connector -1- off intake air temperature sender -G42- and connector -2- from air mass meter -G70- . -
Page 94: Air Filter With Saturation Indicator In Dash Panel Insert
Amarok 2011 ➤ Maintenance — Edition 01.2011 – Then push connector -1- onto intake air temperature sender — G42- and connector -2- onto air mass meter -G70- . 4.30 Air filter with saturation indicator in dash panel insert: Note When rectifying a saturated filter as a separate job, clean air filter housing and renew filter element.
-
Page 95: Engine Oil Level: Check
Amarok 2011 ➤ Maintenance — Edition 01.2011 4.32 Engine oil level: Check Note In engines with engine codes CFPA, CDBA and CDCA, it is only possible to assess and check oil level when engine is at operating temperature. Perform the following jobs: –…
-
Page 96
Amarok 2011 ➤ Maintenance — Edition 01.2011 4.33.1 Draining or extracting engine oil Note For engines with standing oil filter the oil filter must be renewed before changing the engine oil. When removing the filter element a valve is opened, the oil in the filter housing automatically flows into crankcase. -
Page 97
Amarok 2011 ➤ Maintenance — Edition 01.2011 ♦ Renewing oil filter, engine with engine code CFPA ⇒ page 94 4.33.3 Renewing oil filter, engine with engine codes CDBA, CDCA Special tools and workshop equipment required ♦ Torque wrench -V.A.G 1331-… -
Page 98
Amarok 2011 ➤ Maintenance — Edition 01.2011 4.33.4 Renewing oil filter, engine with engine code CFPA Note Observe disposal regulations! Special tools and workshop equipment required ♦ Torque wrench -V.A.G 1331- ♦ Oil filter tool -VAS 3417- ♦ Oil filter with tensioning strap Hazet — 2171-1 ♦… -
Page 99: Engine And Components In Engine Compartment (From Above And Below): Perform Visual
Amarok 2011 ➤ Maintenance — Edition 01.2011 4.33.5 Replenishing engine oil VW engine oil standards ⇒ page 10 Engine oil capacities see ⇒ Engine lubrication; Rep. gr. 17 General notes Perform the following jobs: – After replenishing with oil, wait at least 3 minutes and then check oil level.
-
Page 100: Bonnet Catch: Clean, Ensure Attachment Is Secure And Lubricate
Amarok 2011 ➤ Maintenance — Edition 01.2011 4.35 Bonnet catch: Clean, ensure attach‐ ment is secure and lubricate Special tools and workshop equipment required ♦ Universal cloth -VAS 6385- Perform the following jobs: – Clean bonnet catch -arrow- with cleaning solution -D 009 401 04- and, for example, a universal cloth -VAS 6385- .
-
Page 101: Performing Road Test
Amarok 2011 ➤ Maintenance — Edition 01.2011 Note If the breakdown set is not found at the fitting location described, this can be found in ⇒ vehicle wallet . 4.36.2 Check minimum use-by date The breakdown set consists of the compressor and a tyre filler bottle with sealant .
-
Page 102: Wheel Securing Bolts: Tighten To Specified Torque
Amarok 2011 ➤ Maintenance — Edition 01.2011 – Steering: Function, steering free clearance, steering wheel centred when vehicle is travelling straight ahead – Radio/radio navigation system: Function, reception, GALA, in‐ terference noise – Multi-function indicator (MFI): Functions – Air conditioning system: Function –…
-
Page 103: Reading Radio Code
Amarok 2011 ➤ Maintenance — Edition 01.2011 – Hook puller hook into one drilling of wheel hub trim and pull off in -direction of arrow-. Pulling off wheel bolt caps. Note Before removing wheel bolts, remove the cover caps. The puller hook to remove the cover caps is located with the ve‐…
-
Page 104
Amarok 2011 ➤ Maintenance — Edition 01.2011 • Available access for the user of the system „GeKo“ (secrecy and component protection) Note The radio codes are read in the central database (Carport, ♦ Fazit) and are indicated on display of vehicle diagnostic, test‐… -
Page 105: Radio / Radio Navigation System: Enter Anti-Theft Coding Pin
Amarok 2011 ➤ Maintenance — Edition 01.2011 Note Inform the customer about the radio code. Reading radio code using „ElsaWin“ (Electronic Service Informa‐ tion System) and Vehicle Individual Service Notes „FISH“ Reading the radio code was integrated with „ElsaWin“ (Electronic Service Information System) version 3.0 into Vehicle Individual…
-
Page 106: Radio Navigation System: Insert Navigation Cd/Dvd And Perform Update
Amarok 2011 ➤ Maintenance — Edition 01.2011 curity codes. Security code means that each unit with an anti-theft coding is programmed with its own code number. This security code is not active when leaving the factory. The security code is found on the unit card, if fitted.
-
Page 107
Amarok 2011 ➤ Maintenance — Edition 01.2011 ♦ Refractometer -T10007- Read precise value for the following tests at bright/dark boundary. Using a pipette, place a drop of water on the glass to improve the readability of the bright/dark boundary. The bright/dark boundary can be clearly recognised on the „WATERLINE“. -
Page 108
Windscreen Clear with antifreeze G 052 164. The scale -2- is designed for commercially available windscreen cleanser as well as a mixture of commercially available wind‐ screen cleanser and genuine Volkswagen Windscreen Clear with antifreeze G 052 164. Mixture ratio… -
Page 109: Windscreen Wiper Blades: Check Park Position
Amarok 2011 ➤ Maintenance — Edition 01.2011 Windscreen spray jet settings: The washer jets are preset. However, small height differences can be compensated for. Perform the following jobs: – If spray field is not at correct height, adjust spray direction up‐…
-
Page 110: Headlight Adjustment: Check, If Necessary Adjust
Amarok 2011 ➤ Maintenance — Edition 01.2011 Wiper blade tips should be located at marked position -arrow- on windscreen. – Adjust park position by moving wiper arm if necessary. – Switch windscreen wiper on and off and let it move into park position.
-
Page 111
Amarok 2011 ➤ Maintenance — Edition 01.2011 Perform the following jobs: – Read fuel level in fuel tank on fuel gauge. Determine additional weight from following table and place weight in luggage com‐ partment. Fuel gauge table Fuel level of… -
Page 112
Amarok 2011 ➤ Maintenance — Edition 01.2011 The bright core of the light beam must be to the right of the vertical line. Note To simplify determination of the breaking point -2-, cover and ♦ uncover left (from driver perspective) half of the headlight a few times. -
Page 113: Service Interval Display: Reset
Amarok 2011 ➤ Maintenance — Edition 01.2011 ♦ Height adjustment bolt -1- ♦ Height/lateral adjustment bolt -2- – For height adjustment, turn adjustment screws -1- and -2- with same number of turns. – For lateral adjustment, only turn adjuster screw -2-.
-
Page 114
Amarok 2011 ➤ Maintenance — Edition 01.2011 Note Observe current operating instructions for vehicle diagnostic, testing and information system -VAS 5051B- or vehicle diagnostic and service information system -VAS 5052 A- , which are shown on display after selecting the functions… -
Page 115: Service Interval Display: Recode (Adapt)
Amarok 2011 ➤ Maintenance — Edition 01.2011 Indicated on display: – Select function -arrow- on display. GoTo Indicated on display: – Touch function -arrow- on display. – Select function in „End menu“. – Switch off ignition and separate diagnosis connections.
-
Page 116: Service Interval: Adjusting (Inland)
Amarok 2011 ➤ Maintenance — Edition 01.2011 – Select one after another: ♦ „Dash panel insert“ -arrow- ♦ „Adapting service interval extension“. – Perform adaptation according to the information of „Guided functions“. Ending adaptation. Indicated on display: – Select function -arrow- on display.
-
Page 117
Amarok 2011 ➤ Maintenance — Edition 01.2011 ♦ Diagnosis cable -VAS 5051/5A- ♦ Vehicle diagnostic and service information system -VAS 5052 ♦ Diagnosis cable, 2 m -VAS 5052/3 A- ♦ Diagnosis cable, 5 m -VAS 5052/3 A-1- ♦ Battery charger -VAS 5903-… -
Page 118
Amarok 2011 ➤ Maintenance — Edition 01.2011 ♦ Battery charger, 60A -VAS 5904- Perform the following jobs: – Connect vehicle diagnostic, testing and information system — VAS 5051B- or vehicle diagnostic and service information system -VAS 5052 A- ⇒ page 71… -
Page 119
Amarok 2011 ➤ Maintenance — Edition 01.2011 – Select „17 — Adapt service interval“ -arrow- Note With this function, the service interval display is adapted for ♦ vehicles without LongLife service (production control number „QG0/G1“. If this function is performed on vehicles with LongLife service, ♦… -
Page 120
Amarok 2011 ➤ Maintenance — Edition 01.2011 – Confirm vehicle market query with „Yes“ or „No“ -arrow-. Note Keep confirming the vehicle market query with „Yes“ or „No“ until the desired country appears on the display. – Confirm end of „Adapt interval“ routine with „Done“ button -arrow-. -
Page 121: Service Interval: Adjusting (Export)
Amarok 2011 ➤ Maintenance — Edition 01.2011 – Confirm end of „Adapt interval“ routine with „Done“ button -arrow-. – Exit „Guided functions“. – Switch off ignition. – Remove vehicle diagnosis, testing and information system — VAS 5051B- or vehicle diagnosis and service information system -VAS 5052 A- from vehicle.
-
Page 122
Amarok 2011 ➤ Maintenance — Edition 01.2011 ♦ Diagnosis cable, 5 m -VAS 5052/3 A-1- ♦ Battery charger -VAS 5903- ♦ Battery charger, 60A -VAS 5904- Perform the following jobs: – Connect vehicle diagnostic, testing and information system — VAS 5051B- or vehicle diagnostic and service information system -VAS 5052 A- ⇒… -
Page 123
Amarok 2011 ➤ Maintenance — Edition 01.2011 – Select „17 — Dash panel insert“ -arrow- – Select „17 — Adapt service interval“ -arrow- Note With this function, the service interval display is adapted for ♦ vehicles without LongLife service (production control number „QG0/G1“. -
Page 124
Amarok 2011 ➤ Maintenance — Edition 01.2011 – Select service with „1 — Delivery inspection“ ⇒ page 120 -arrow- or „2 — Other service work“ ⇒ page 120 button. „1“ Delivery inspection – Confirm vehicle market query with „Yes“ or „No“ -arrow-. -
Page 125: Service Interval: Adjusting (Argentina And Brazil)
Amarok 2011 ➤ Maintenance — Edition 01.2011 – The service selection window is activated again by pressing the -No- button -arrow-. – Confirm end of „Adapt interval“ routine with „Done“ button -arrow-. – Exit „Guided functions“. – Switch off ignition.
-
Page 126
Amarok 2011 ➤ Maintenance — Edition 01.2011 ♦ Vehicle diagnostic and service information system -VAS 5052 ♦ Diagnosis cable, 2 m -VAS 5052/3 A- ♦ Diagnosis cable, 5 m -VAS 5052/3 A-1- ♦ Battery charger -VAS 5903- 4. Descriptions of work… -
Page 127
Amarok 2011 ➤ Maintenance — Edition 01.2011 ♦ Battery charger, 60A -VAS 5904- Perform the following jobs: – Connect vehicle diagnostic, testing and information system — VAS 5051B- or vehicle diagnostic and service information system -VAS 5052 A- ⇒ page 71… -
Page 128
Amarok 2011 ➤ Maintenance — Edition 01.2011 – Select „17 — Adapt service interval“ -arrow- Note With this function, the service interval display is adapted for ♦ vehicles without LongLife service (production control number „QG0/G1“. If this function is performed on vehicles with LongLife service, ♦… -
Page 129
Amarok 2011 ➤ Maintenance — Edition 01.2011 – Confirm vehicle market query with „Yes“ or „No“ -arrow-. Note Keep confirming the vehicle market query with „Yes“ or „No“ until the desired country appears on the display. – Confirm end of „Adapt interval“ routine with „Done“ button -arrow-. -
Page 130: Track Rod Ends: Check Clearance, Security And Boots
Amarok 2011 ➤ Maintenance — Edition 01.2011 – Confirm end of „Adapt interval“ routine with „Done“ button -arrow-. – Exit „Guided functions“. – Switch off ignition. – Remove vehicle diagnosis, testing and information system — VAS 5051B- or vehicle diagnosis and service information system -VAS 5052 A- from vehicle.
-
Page 131
Amarok 2011 ➤ Maintenance — Edition 01.2011 Perform the following jobs: – Unscrew sealing cover -arrow- with built-in dipstick from tank. – Wipe off dipstick using a clean cloth. – Screw sealing cover on until finger tight and then unscrew again. -
Page 132: Doors: Grease Door Arrester
Amarok 2011 ➤ Maintenance — Edition 01.2011 4.53 Doors: Grease door arrester Perform the following jobs: – Lubricate door arrester at positions marked -arrows-. – Use lubricating paste -G 000 150- or lock cylinder lubricating spray -G 052 778 A2- .
-
Page 133: Underbody Protection: Perform Visual Check For Damage
Amarok 2011 ➤ Maintenance — Edition 01.2011 4.56 Underbody protection: Perform visual check for damage During visual check, also check floor pan, wheel housings and sills. Note Faults found must always be rectified (repair measure). This in‐ hibits corrosion and rusting through.
-
Page 134: Camshaft Drive Toothed Belt And Toothed Belt Tensioning Roller: Renew
Amarok 2011 ➤ Maintenance — Edition 01.2011 – Press button -A- again to mark the minute display. – Briefly pressing -A- changes time by one minute 0.0 / SET for every press. – Pressing -A- for longer changes minute value 0.0 / SET…
-
Page 135: Coolant Pump Toothed Belt Sprocket And Toothed Belt: Renew
Amarok 2011 ➤ Maintenance — Edition 01.2011 – Check toothed belt condition, looking for: ♦ -A- Cracks, cross-sectional breaks, cracks (coating) ♦ -B- Side contact ♦ -C- Fraying of cord strands ♦ -D- Cracks (in teeth base) ♦ Layer separation (toothed belt body, draw strands) ♦…
-
Page 136
Amarok 2011 ➤ Maintenance — Edition 01.2011 ♦ Puller -T40039- Removing Perform the following jobs: – Pull out all ignition coils with final output stage from cylinder head approx. 30 mm using puller -T40039- . – Release connector -arrows- and simultaneously pull all con‐… -
Page 137: Removing And Installing Skid Plate
Amarok 2011 ➤ Maintenance — Edition 01.2011 4.62 Removing and installing skid plate Torque wrench -V.A.G 1331- (6-50 Nm) Note Get a second mechanic to help you to remove and install skid plate. Perform the following jobs: – Unscrew bolts -2-, -3- and -4- one after another.
-
Page 138: Exhaust Emissions Test
Amarok 2011 ➤ Maintenance — Edition 01.2011 Exhaust emissions test Note The following exhaust emissions test description is applicable only in countries where no specific exhaust emission regulations have to be adhered to. Exhaust emissions test intervals in Germany: Vehicles with regulated catalytic converter or vehicles with diesel engine: ♦…
-
Page 139: Exhaust Emissions Test For Petrol Engines With Engine Code Cfpa
Amarok 2011 ➤ Maintenance — Edition 01.2011 Exhaust emissions test for petrol en‐ gines with engine code CFPA Note The following description refers to vehicles fitted with „On‐ ♦ board diagnosis“ (OBD) and regulated catalytic converter. The OBD monitors all components and part systems influenc‐…
-
Page 140
Amarok 2011 ➤ Maintenance — Edition 01.2011 Initial screen – Select -arrow- button. Exhaust emissions test An overview is displayed to select the respective EET type. – Select -arrow-. EET petrol The display for warm-up phase appears. – Continue exhaust emission test according to instructions on display. -
Page 141
♦ For vehicle identification number (chassis number) -E- – Enter items -1…7- of vehicle data from vehicle registration certificate. ♦ -1- Vehicle manufacturer: „e.g. VOLKSWAGEN — VW“ ♦ -2- Vehicle type: „e.g. 2H“ ♦ -3- Key number to 2 (old) or 2.1 (new): „e.g. 0603“… -
Page 142
Amarok 2011 ➤ Maintenance — Edition 01.2011 – Enter displayed values on EET data sheet under „Test values for exhaust emissions test“ on display in following sequence: Test speed (idling speed) Warm-up phase for catalytic converter Engine temperature Increased idling speed… -
Page 143
Amarok 2011 ➤ Maintenance — Edition 01.2011 – Connect diagnosis line connector to EOBD connection. – Switch on ignition. – Perform visual check of „MI lamp“. – If lamp lights up, press button -arrow C-. Lamp On – Follow instructions on display, see -arrow C- and -arrow A-. -
Page 144
Amarok 2011 ➤ Maintenance — Edition 01.2011 – Follow instructions on display. Measurement starts when the engine speed has reached the re‐ quired level. – Keep engine speed within required rpm range. The remaining time to perform the warm-up phase is displayed — arrow A -. -
Page 145
Amarok 2011 ➤ Maintenance — Edition 01.2011 Measuring idling speed and CO content It is automatically switched to display for measuring the idling speed and CO content. Measurement starts when the engine speed has reached the re‐ quired level. The remaining time to perform measurement is displayed -arrow A-. -
Page 146: Exhaust Emissions Test For Diesel Engines With Engine Codes Cdba, Cdca
Amarok 2011 ➤ Maintenance — Edition 01.2011 Exhaust emissions test for diesel en‐ gines with engine codes CDBA, CDCA Special tools and workshop equipment required ♦ Diesel tester -V.A.G 1743- ♦ Engine speed adapter -VAS 6296- ♦ Data sheets for exhaust emissions test…
-
Page 147
Amarok 2011 ➤ Maintenance — Edition 01.2011 Note Faults found are to be rectified. With ignition switched off, connect testers as follows: – Pull on handbrake. – Manual gearbox: Gear lever in neutral – Connect diesel tester -V.A.G 1743- according to ⇒ operating instructions with ignition switched off. -
Page 148: Exhaust Emissions Test With Obd
Amarok 2011 ➤ Maintenance — Edition 01.2011 WARNING If the governed speed (maximum speed) is exceeded, lift off accelerator pedal immediately and perform repair measures. – If the values are not within specified range, a repair measure must be made.
-
Page 149
Amarok 2011 ➤ Maintenance — Edition 01.2011 Special tools and workshop equipment required ♦ Vehicle diagnostic, testing and information system -VAS 5051B- ♦ Diagnosis cable 5m -VAS 5051B/1- ♦ Vehicle diagnostic and service information system -VAS 5052 ♦ Diagnosis cable -VAS 5052/3- Carry out the following procedure: –… -
Page 150
Amarok 2011 ➤ Maintenance — Edition 01.2011 Note Faults found are to be rectified. – Pull on handbrake. – Manual gearbox: Gear lever in neutral. – Connect diagnosis cable connector to diagnosis connection with ignition switched off. – Connect vehicle diagnostic, testing and information system -… -
Page 151
Amarok 2011 ➤ Maintenance — Edition 01.2011 – Select „Generate readiness code“ -arrow-. – Follow instructions of vehicle diagnostic, testing and informa‐ tion system -VAS 5051B- or vehicle diagnostic and service information system -VAS 5052- . Evaluation: After running through readiness code, result appears on screen. -
Page 152: Glossary
Amarok 2011 ➤ Maintenance — Edition 01.2011 Glossary These explanations only apply to „Maintenance Manual“. They are not necessarily generally valid! Letter „A“ ⇒ page 148 Letter „B“ ⇒ page 148 Letter „C“ ⇒ page 148 Letter „D“ ⇒ page 149 Letter „E“…
-
Page 153
Amarok 2011 ➤ Maintenance — Edition 01.2011 Term Explanation Measurement unit for ignition quality of diesel fuel (Cetane number) Letter „D“ Term Explanation The diesel particulate filter is installed behind the catalytic converter and filters soot (Diesel particulate particles from emissions. -
Page 154
Amarok 2011 ➤ Maintenance — Edition 01.2011 Letter „P“ Term Explanation PR number Abbreviation for production control number, it identifies among other things optional equipment, country-specific deviations etc. Letter „Q“ Term Explanation Vehicles are „not“ fitted at the factory with components for LongLife service. For main‐… -
Page 155
Amarok 2011 ➤ Maintenance — Edition 01.2011 Letter „X“ Term Explanation „Extra Load“, reinforced tyre, additional designation for tyres with increased load ca‐ pacity 6. Glossary…
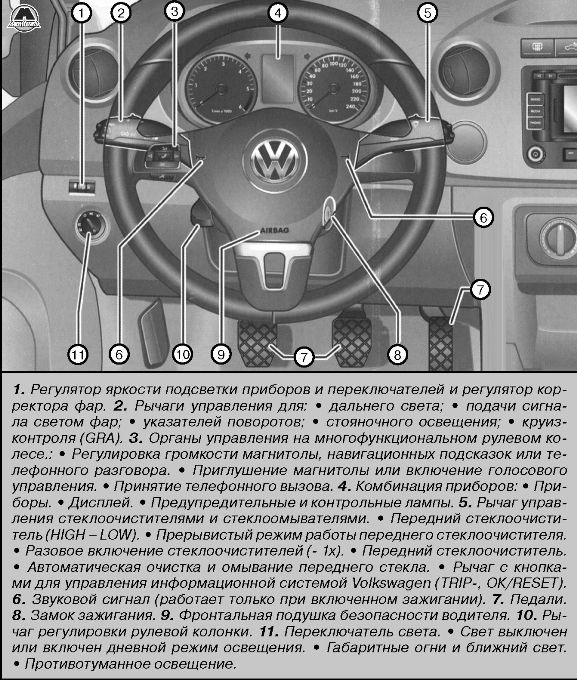
Обзор салона со стороны водителя
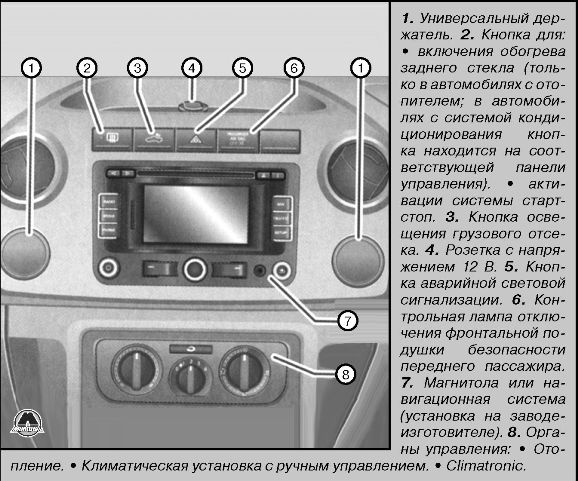
Верхняя центральная часть консоли
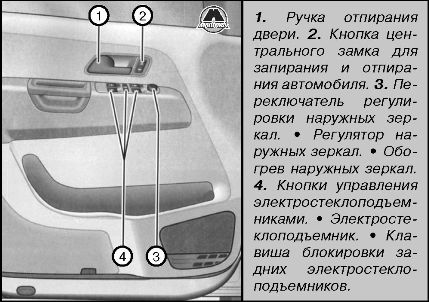
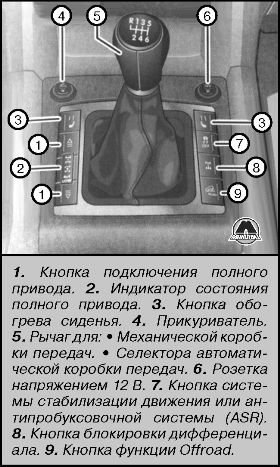
Нижняя часть центральной консоли
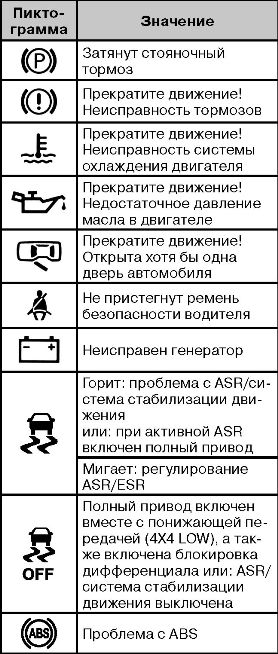
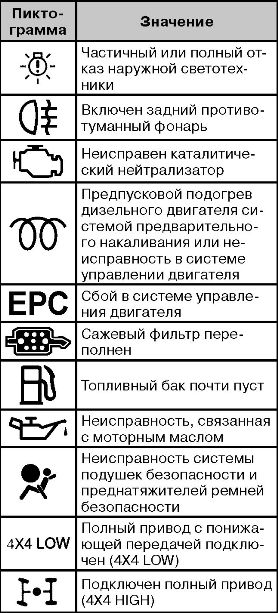
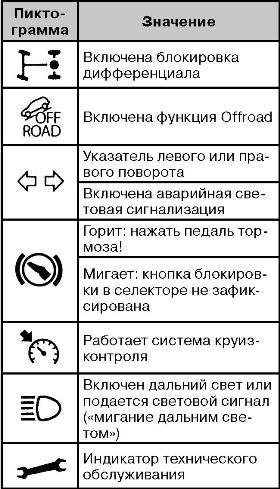
Сигнальные и контрольные лампы
ВНИМАНИЕ
Игнорирование предупредительных сигналов ламп и текстовых сообщений может привести к отказу автомобиля во время движения в транспортном потоке, к аварии и тяжелым травмам.
• Поэтому сигналы ламп и текстовые сообщения никогда нельзя оставлять без внимания.
• Остановите автомобиль сразу же, как только это можно будет безопасно сделать.
• Автомобиль необходимо поставить на безопасном удалении от транспортного потока, так, чтобы детали выпускного тракта не соприкасались с легковоспламеняющимися материалами под днищем автомобиля (например, с сухой травой, разлитым топливом).
• Неподвижный автомобиль подвергается большому риску и представляет опасность для других участников дорожного движения. При необходимости следует включить аварийную световую сигнализацию и установить знак аварийной остановки для предупреждения других участников дорожного движения.
• Перед открыванием капота моторного отсека выключите двигатель и дайте ему достаточно остыть.
• Моторный отсек любого автомобиля представляет собой зону повышенной опасности и может стать причиной тяжелых травм.
Обзор контрольных приборов
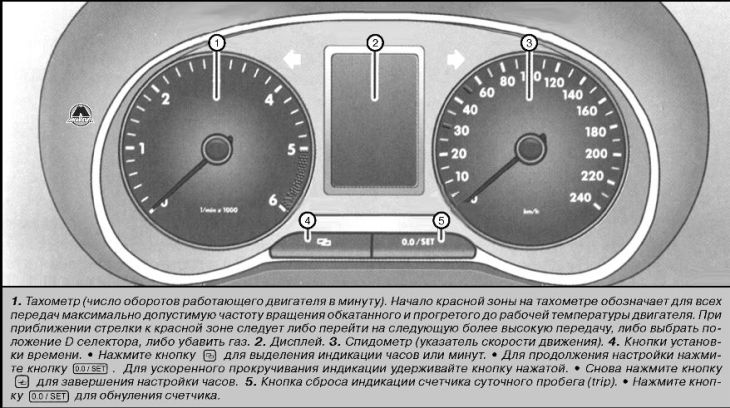
Счетчик общего пробега регистрирует суммарный пробег автомобиля за все время.
Счетчик суточного пробега (trip — поездка) показывает пробег автомобиля с момента последнего сброса в ноль. Последний разряд счетчика отсчитывает сотни метров.
Указатель наружной температуры
При наружной температуре ниже +4 °С (+39,2 °F) на указателе температуры дополнительно появляется символ «снежинки» (предупреждение о гололедице). Эта пиктограмма сначала мигает, затем горит непрерывно, пока наружная температура не поднимется выше +6 °С (+42.8 °F).
При неподвижном автомобиле и работающем автономном отопителе или при движении на очень малой скорости отображаемое значение наружной температуры может несколько превышать истинное значение изза влияния теплового излучения двигателя.
Диапазон измерения составляет от -50 °С (-58 °F) до +76 °С (+168 °F).
Положение селектора отображается как сбоку от селектора, так и на дисплее комбинации приборов. В положениях D и S, а также в режиме Tiptronic, на дисплее отображается включенная передача.
Отображение статуса системы старт-стоп
Fla дисплее в комбинации приборов отображается информация о текущем состоянии.
ВНИМАНИЕ
Игнорирование предупредительных сигналов ламп и текстовых сообщений может привести к отказу автомобиля во время движения в транспортном потоке, к аварии и тяжелым травмам.
• Поэтому сигналы ламп и текстовые сообщения никогда нельзя оставлять без внимания.
• Необходимо незамедлительно остановить автомобиль на безопасном удалении от транспортного потока так, чтобы детали выпускного тракта не соприкасались с легковоспламеняющимися материалами под днищем автомобиля, например, с сухой травой.
• Выполните указанные в сообщении действия.
ВНИМАНИЕ
Даже когда отсутствует индикация символа «снежинки», наличие гололедицы не исключено. Поэтому никогда нельзя полагаться только на это показание!
Чтобы не повредить автомобиль, всегда следует принимать во внимание сигналы контрольных ламп и соответствующие текстовые сообщения и указания.
Существуют различные варианты комбинации приборов, поэтому исполнение дисплея и вид представляемой информации могут варьироваться.
Если имеется несколько предупреждающих сообщений, соответствующие пиктограммы появляются одна за другой с интервалом в несколько секунд. Эти пиктограммы будут появляться до тех пор, пока не будут устранены причины их появления.
Сначала обязательно прочтите и примите к сведению вводную информацию и указания по технике безопасности.
Информация о предстоящем техническом обслуживании отображается на дисплее в комбинации приборов.
Сроки проведения технического обслуживания автомобилей Volkswagen различны для обслуживания с заменой моторного масла (например, сервис через определенные интервалы) и без замены моторного масла (например, инспекционный сервис). Индикатор технического обслуживания сообщает только о сроке проведения обслуживания с заменой моторного масла. Информация по срокам других видов ТО, например, по сроку следующего инспекционного сервиса или по сроку замены тормозной жидкости указывается в наклейке на стойке автомобиля или в сервисной книжке.
Указатель межсервисного обслуживания
Сроки проведения технического обслуживания автомобилей Volkswagen различаются обслуживанием с заменой моторного масла (например, сервис через определенные интервалы) и обслуживанием без замены моторного масла (например, инспекционный сервис). Указатель межсервисного интервала дает информацию только о сроке проведения обслуживания с заменой моторного масла. Все другие сроки проведения обслуживания, например, очередного инспекционного сервиса или замены тормозной жидкости приведены на наклейке на поперечине двери автомобиля или в сервисной книжке.
Для автомобилей с техобслуживанием по времени или по пробегу межсервисные интервалы постоянны.
Для автомобилей с обслуживанием по системе сервиса LongLife межсервисные интервалы определяются в индивидуальном порядке. Внедрение технических достижений позволяет существенно уменьшить потребность автомобиля в техническом обслуживании. С системой LongLife для коммерческих автомобилей Volkswagen вводится такая технология, при которой требуется проводить обслуживание (интервальный сервис) только тогда, когда это необходимо для автомобиля. При этом при определении межсервисных интервалов (максимально раз в два года) принимаются вовнимание также условия эксплуатации конкретного автомобиля и индивидуальный стиль управления им. Напоминание о предстоящем техобслуживании первый раз появляется за двадцать дней до расчетной даты обязательного техобслуживания. Остаточный пробег округляется до 100 км, а время — до целого дня. Ответ на запрос о предстоящем техобслуживании появляется лишь после пробега в 500 км с момента предыдущего техобслуживания. До этого на указателе появляются только штрихи.
Напоминание о предстоящем техническом обслуживании
Если приближается срок проведения технического обслуживания, при включении зажигания на экран выводится напоминание о предстоящем техобслуживании.
Нa автомобилях без возможности выдачи текстовых сообщений на дисплее комбинации приборов появляется символ с изображением гаечного ключа и величина пробега в км. Указанная величина соответствует пробегу в километрах, который можно проехать до момента предстоящего технического обслуживания. Через несколько секунд изображение меняется. Появляется значок часов и количество дней, оставшихся до очередного срока обращения на сервис.
Нa автомобилях с возможностью выдачи текстовых сообщений на дисплее комбинации приборов появляется сообщение: «Сервис через —км или —дней».
Указание на необходимость прохождения техобслуживания
При наступлении срока прохождения техобслуживания при включении зажигания раздается звуковой сигнал и на несколько секунд высвечивается мигающий символ гаечного ключа. Нa автомобилях с возможностью выдачи текстовых сообщений на дисплее комбинации приборов появляется указание: «Требуется немедленное проведение техобслуживания».
Запрос интервала до следующего ТО
При включенном зажигании, неработающем двигателе и неподвижном автомобиле можно запросить сообщение о сроках проведения ТО:
• Нажимайте на кнопку в комбинации приборов, пока не появится символ гаечного ключа.
• Выберите меню «Настройки».
• В подменю «Сервис» выберите пункт меню «Информация».
Просроченное техническое обслуживание
Отображается со знаком минус перед значением километров или дней. Нa автомобилях с возможностью выдачи текстовых сообщений на дисплее комбинации приборов появляется сообщение: «ТО просрочено —км, или —дней».
Обнуление счетчика межсервисных интервалов
Если техническое обслуживание было проведено не на сервисном предприятии партнера Volkswagen Nutzfahrzeuge, то сброс индикатора межсервисных интервалов можно выполнить следующим образом:
• Следует выбрать меню «Настройки». В подменю «Сервис» нужно выбрать пункт меню «Сброс».
• Требование нужно подтвердить нажатием на кнопку автомобилей с иной комплектацией:
• Следует выключить зажигание.
• Следует нажать кнопку и удерживать ее нажатой.
• Снова включить зажигание.
• Следует отпустить кнопку и в течение примерно 20 секунд нажимать на кнопку
-
Уважаемый Гость, добро пожаловать на Амарокфорум — площадку для общения сообщества амароководов!
Мы надеемся, что вам здесь понравится, вы к нам присоединитесь и поможете сделать форум ещё интереснее.
Инструкции, руководства, мануалы
Категории
-
Фотографии
1 -
Инструкции, руководства, мануалы
7 -
Материалы сайта Volkswagen Technical Site
2 -
Описания, чертежи, схемы самоделок
1 -
Маршруты, карты, треки
1 -
Графика
29 -
Прочее
0
- Также показаны ресурсы из всех подкатегорий.
Volkswagen Amarok 2011 Automobile PDF User Guides and Manuals for Free Download: Found (4) Manuals for Volkswagen Amarok 2011 Device Model (Workshop Manual, Service & Maintenance)
More Automobile Device Models:
-
Lexus
GS350 2015
GS350_QG_OM30F71U_(U)1The Quick Guide is not intended as a substitute for your Owner’sManual. We strongly encourage you to review the Owner’sManual and supplementary manuals so you will have a betterunderstanding of your vehicle’s capabilities and limitations.12.3-inch Display ……………………………… …
GS350 2015 Automobile, 94
-
Ford
2006 Escape
Introduction 4Instrument Cluster 10Warning and control lights 10Gauges 15Entertainment Systems 17AM/FM stereo with in-dash six CD 17AM/FM stereo with CD/MP3 26AM/FM stereo cassette with CD 31Climate Controls 38Heater only 38Manual heating and air conditioning 39Rear window defroster 40Lights 41Headlamps 41Turn signal c …
2006 Escape Automobile, 296
-
Volkswagen
Jetta 2000
Instrument panel, On Board Diagnostic (OBD) (through MY 1999) Clock, correcting Code Control Module Consumption indicator, matching Display group overview Distance impulse number (K number), reading Distance travelled (odometer) display, adapting Fuel gauge (adaptation), checking Language alternatives for drive …
Jetta 2000 Automobile, 225
-
Lincoln
Nautilus 2019
Quick Reference Guide2019 NautilusJuly 2018 First PrintingLitho in USA KA1J 19G217 AAWARNINGDriving while distracted can result in loss of vehicle control, crash and injury. We strongly recommend that you use extreme caution when using any device that may take your focus o the road. Your primary responsibility is th …
Nautilus 2019 Automobile, 10
Recommended Documentation: